rvchima
-
Posts
712 -
Joined
-
Last visited
Content Type
Profiles
Forums
Gallery
Events
Everything posted by rvchima
-
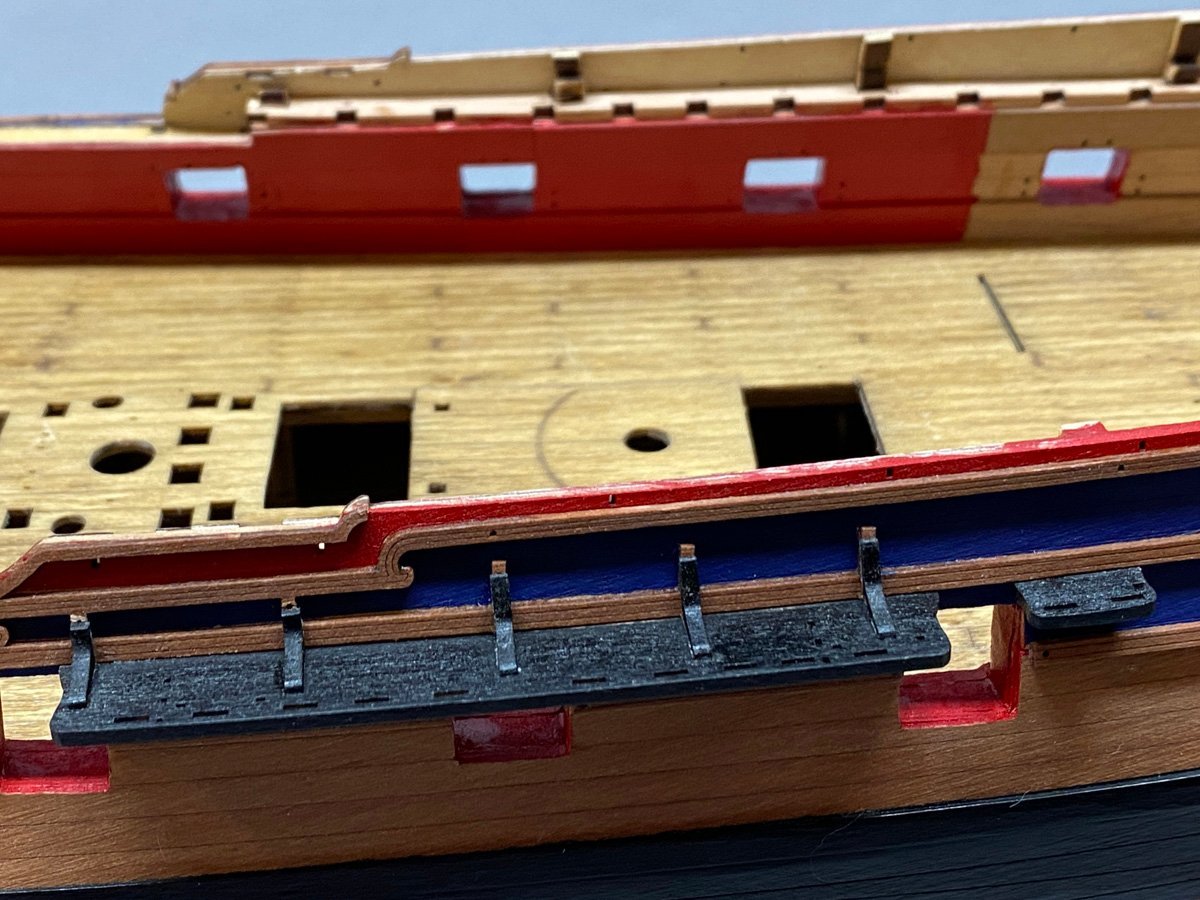
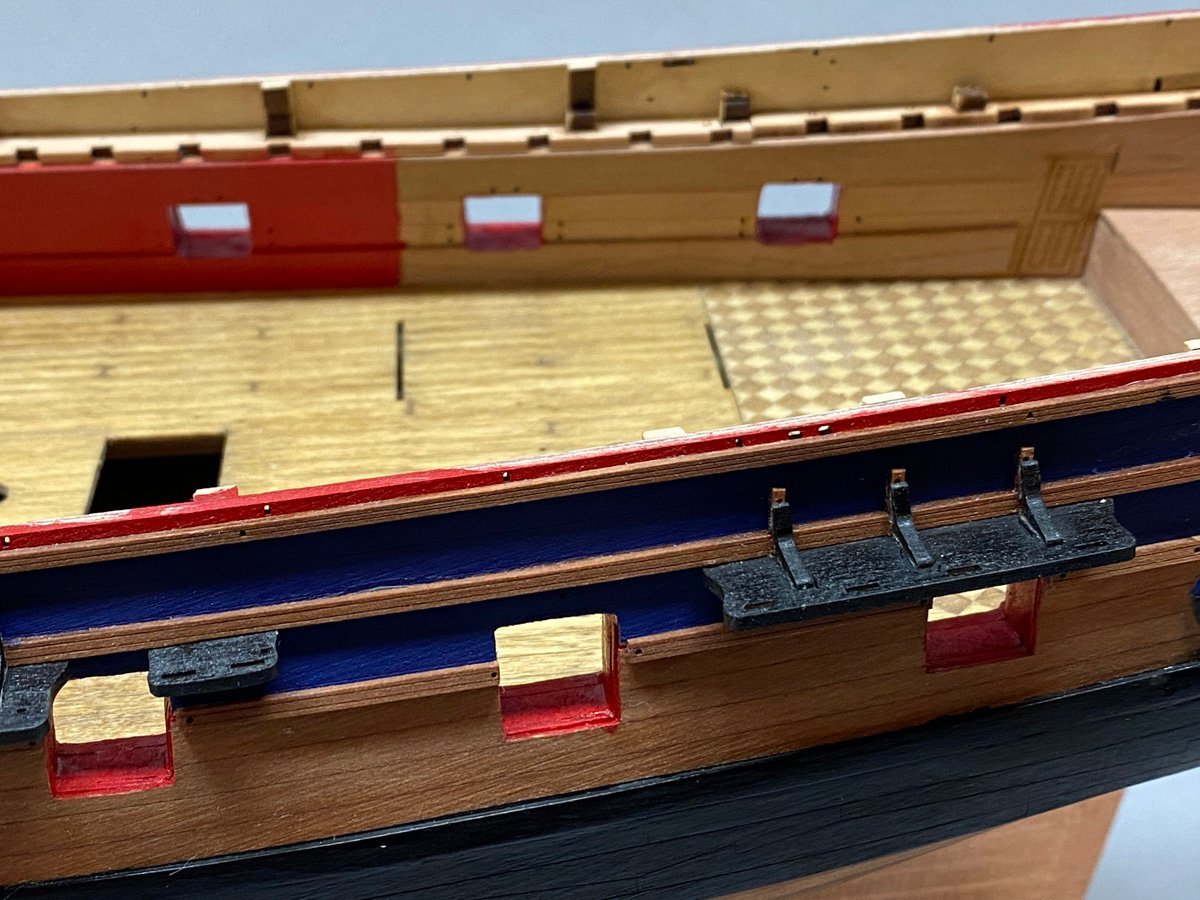
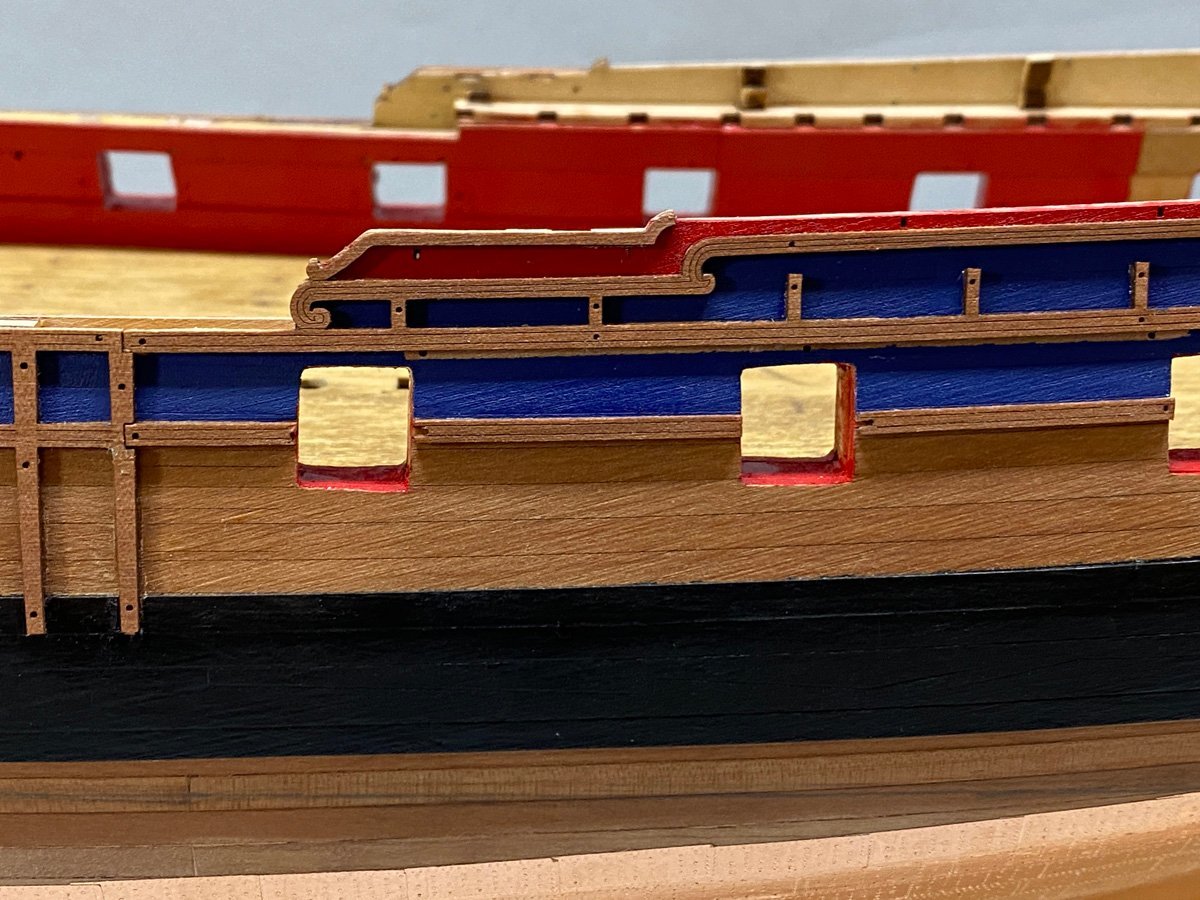
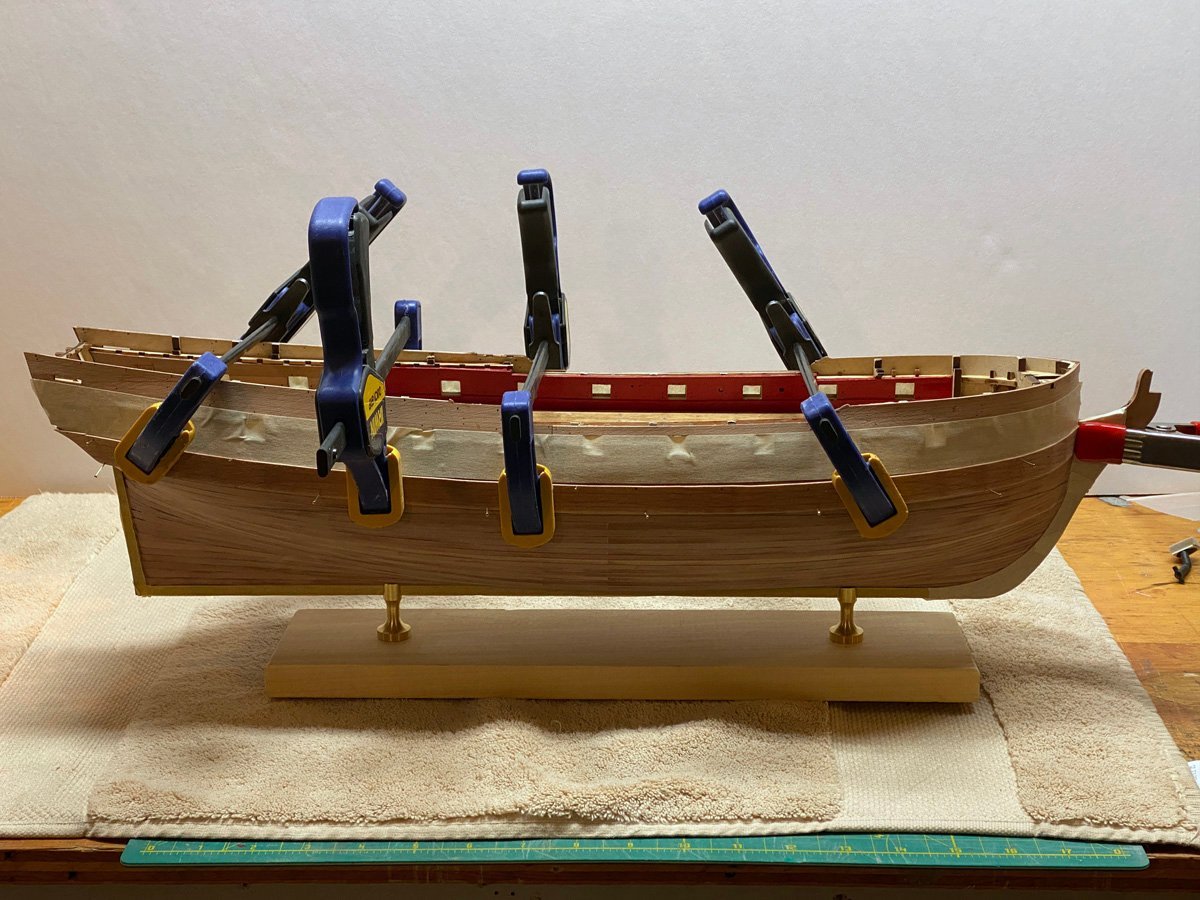
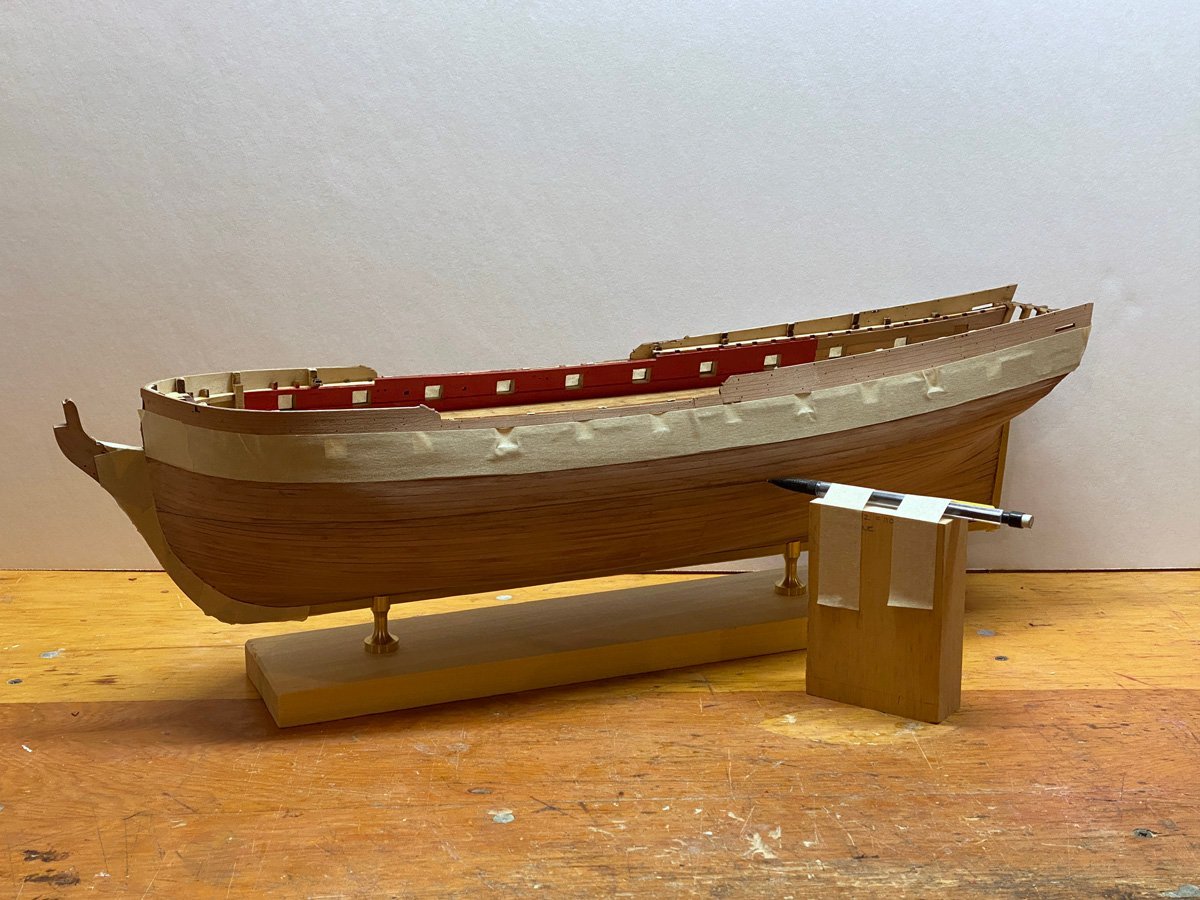
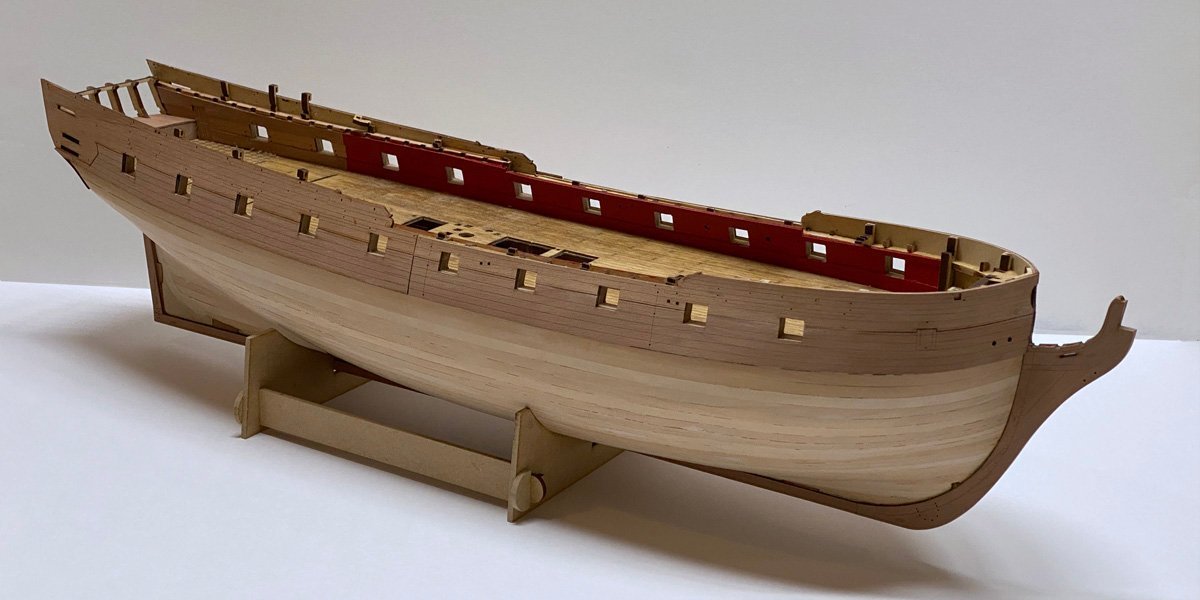
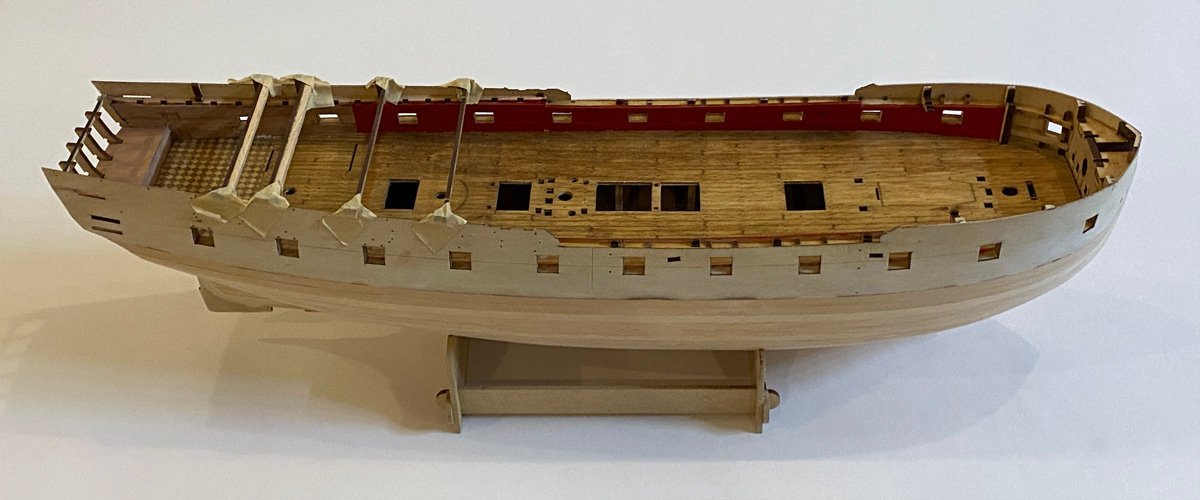
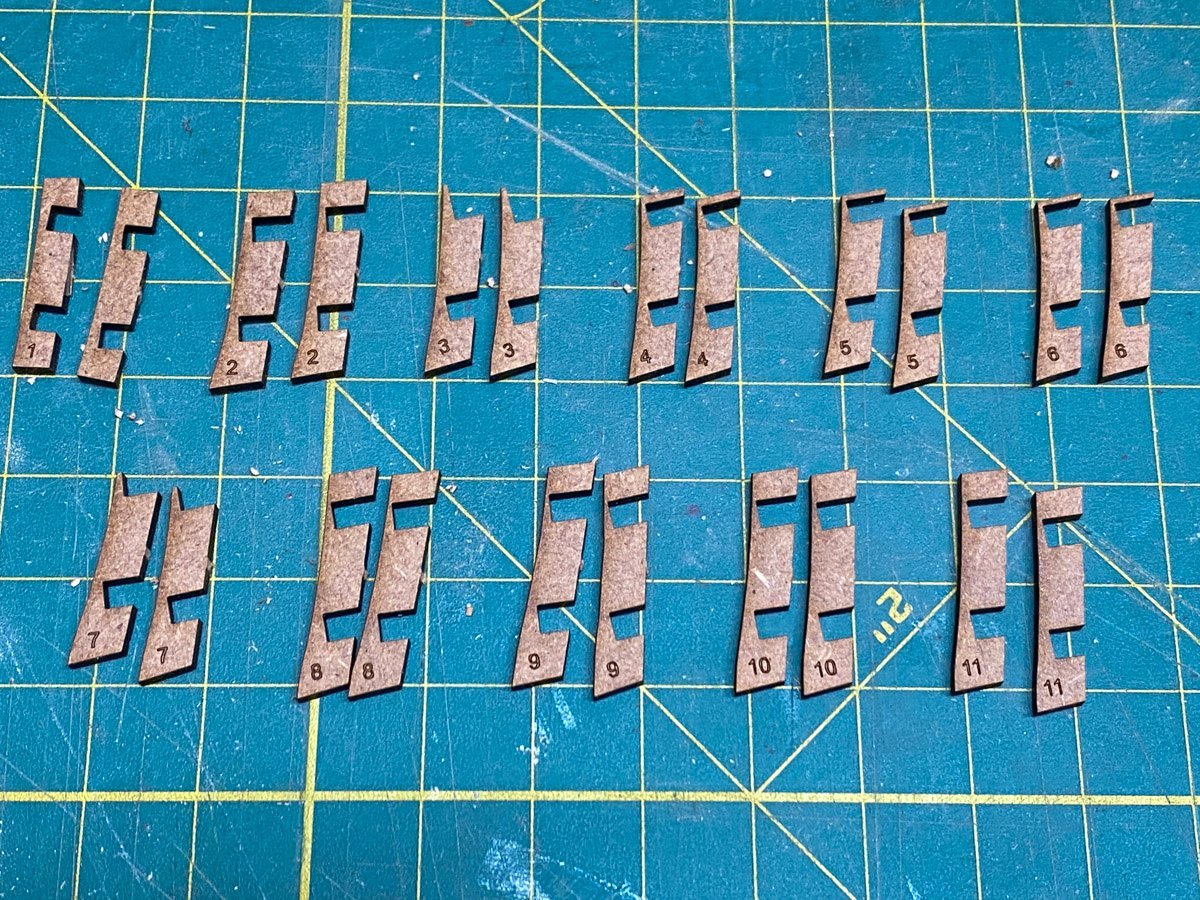
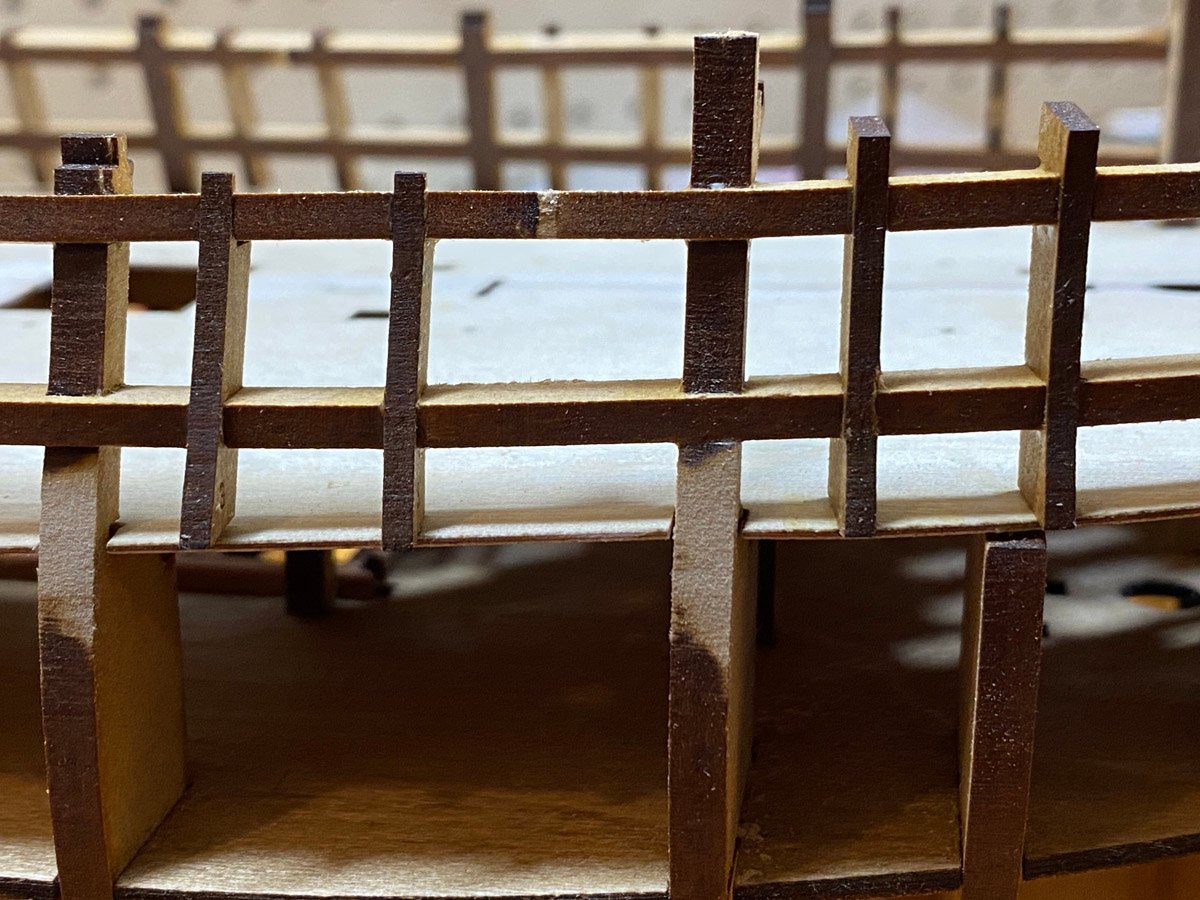
 Channels, Knees, and Bow Trim The channels are all attached with multiple brass pins. The laser markings show exactly where to put those pins. There are 26 knees to cut, sand, and paint, so it all took awhile. Fore channels. The stove is temporary for now. Main channels Mizzen channels I put some blue on the bow and added the bow grating and some trim. I have a little more work to do up front, then on to the stern.
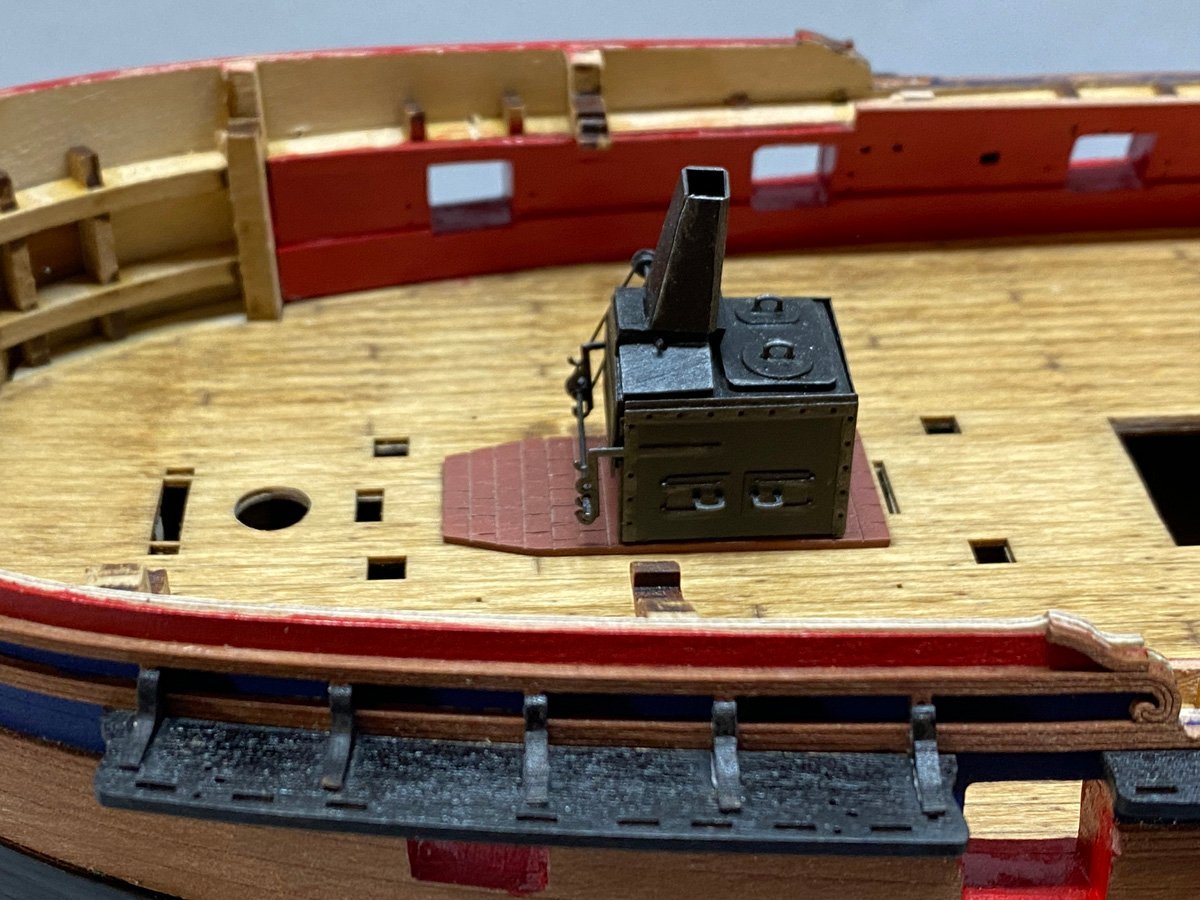
- 96 replies
-
- 11
-

-
- Sphinx
- Vanguard Models
- (and 2 more)
-
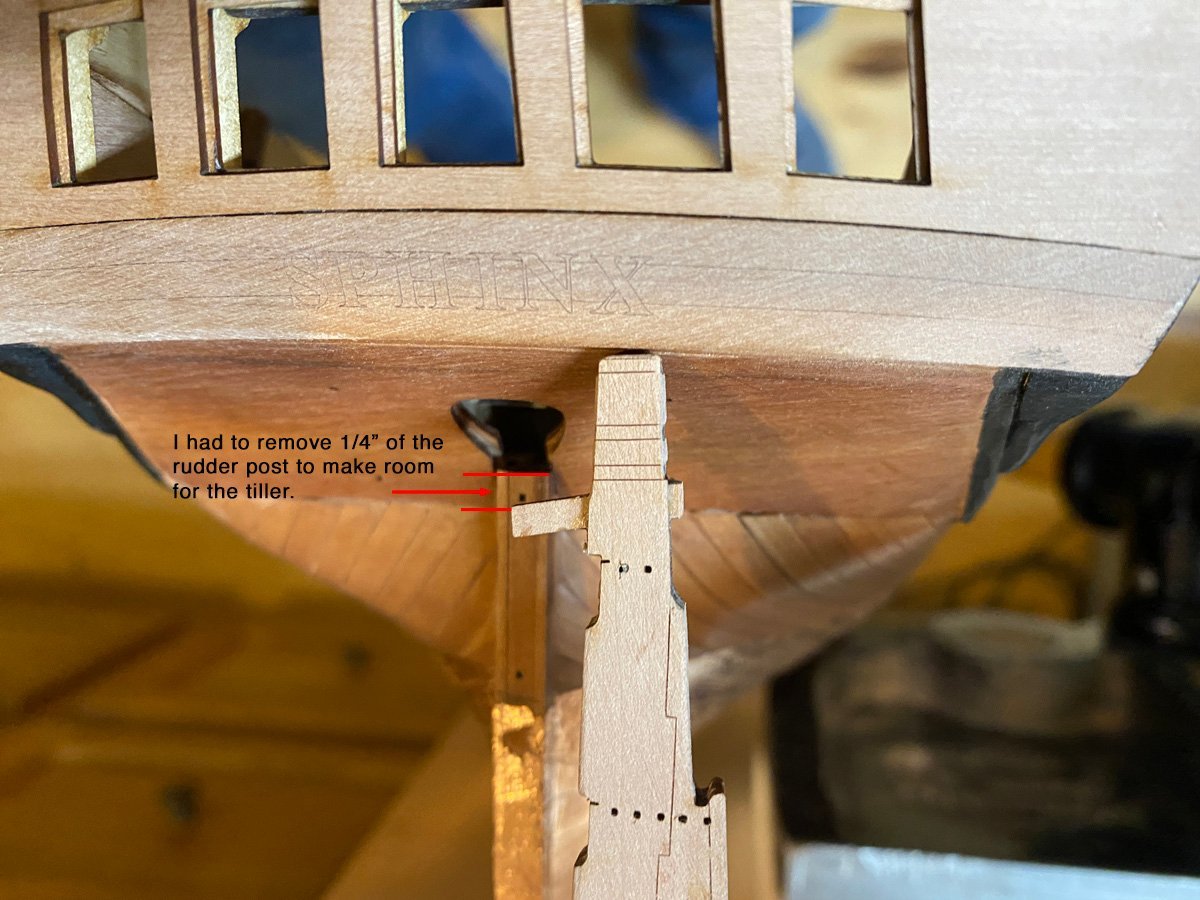
Minor Problem with the Rudder After assembling the rudder I realized that the top with the tiller would not fit into the hole in the hull. The manual shows the top of the rudder post ending a bit lower, at the juncture between the planking and stern piece, so I cut about 1/4" off of the rudder post and everything fits now. I don't know why the rudder post was too high - everything else fit together perfectly. I ran out of copper foil and had to order more from China, so it will be 3 weeks before I can complete the rudder.
- 96 replies
-
- 6
-
-
- Sphinx
- Vanguard Models
- (and 2 more)
-
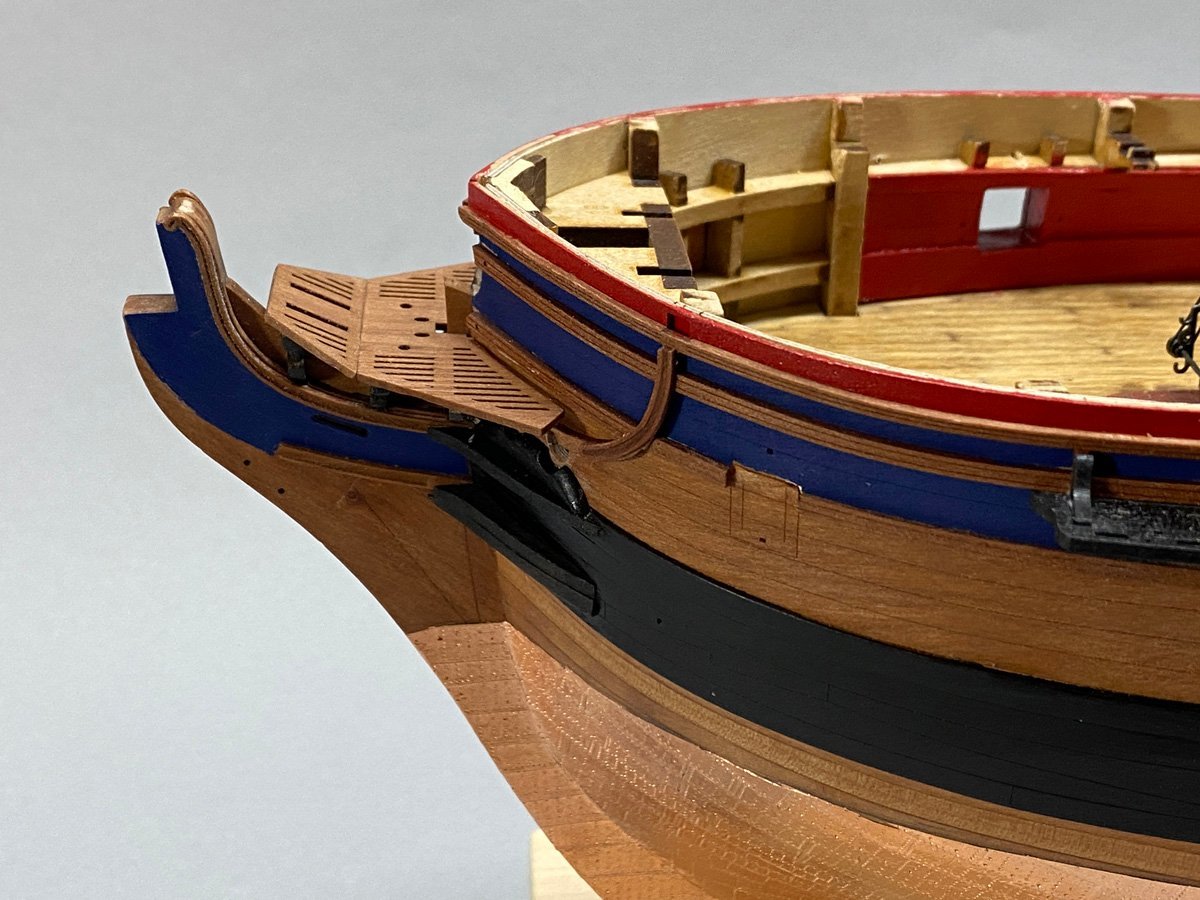
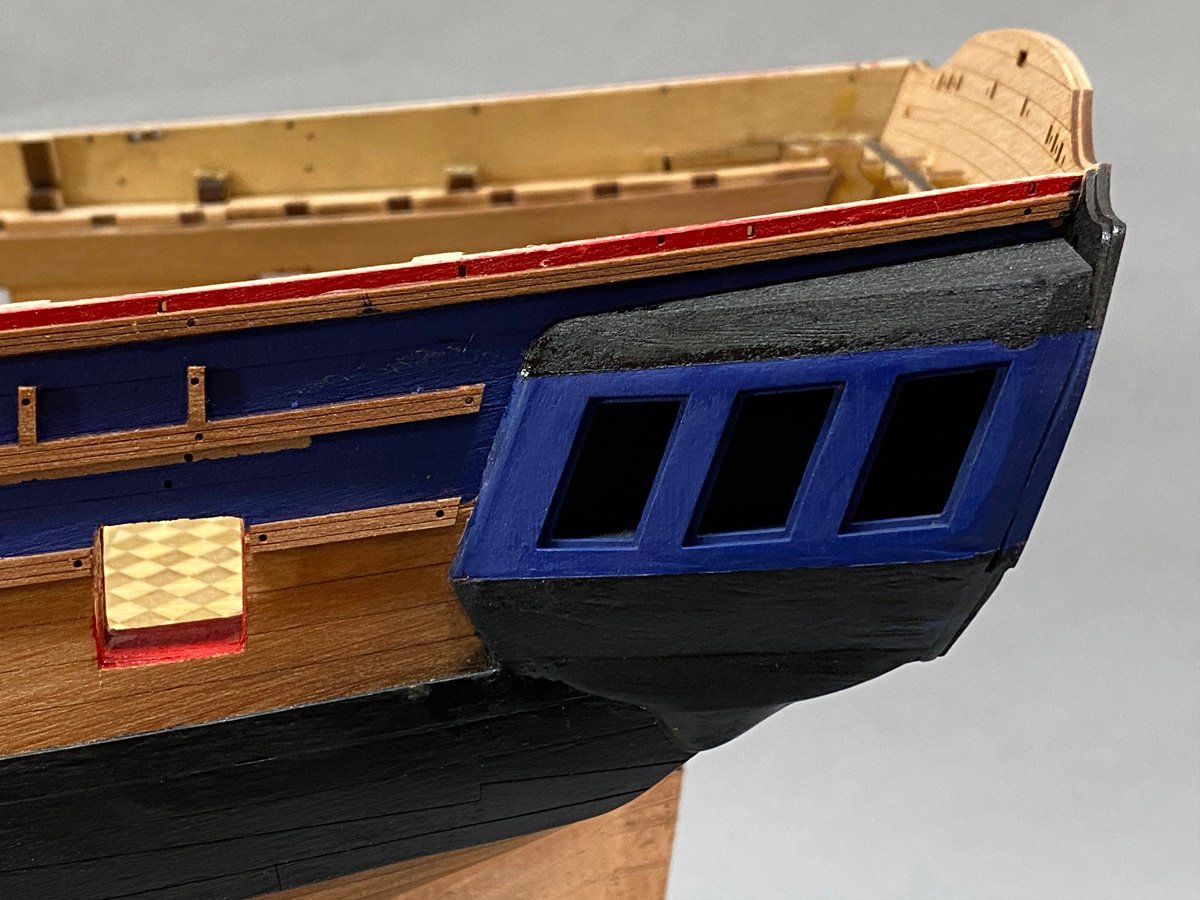
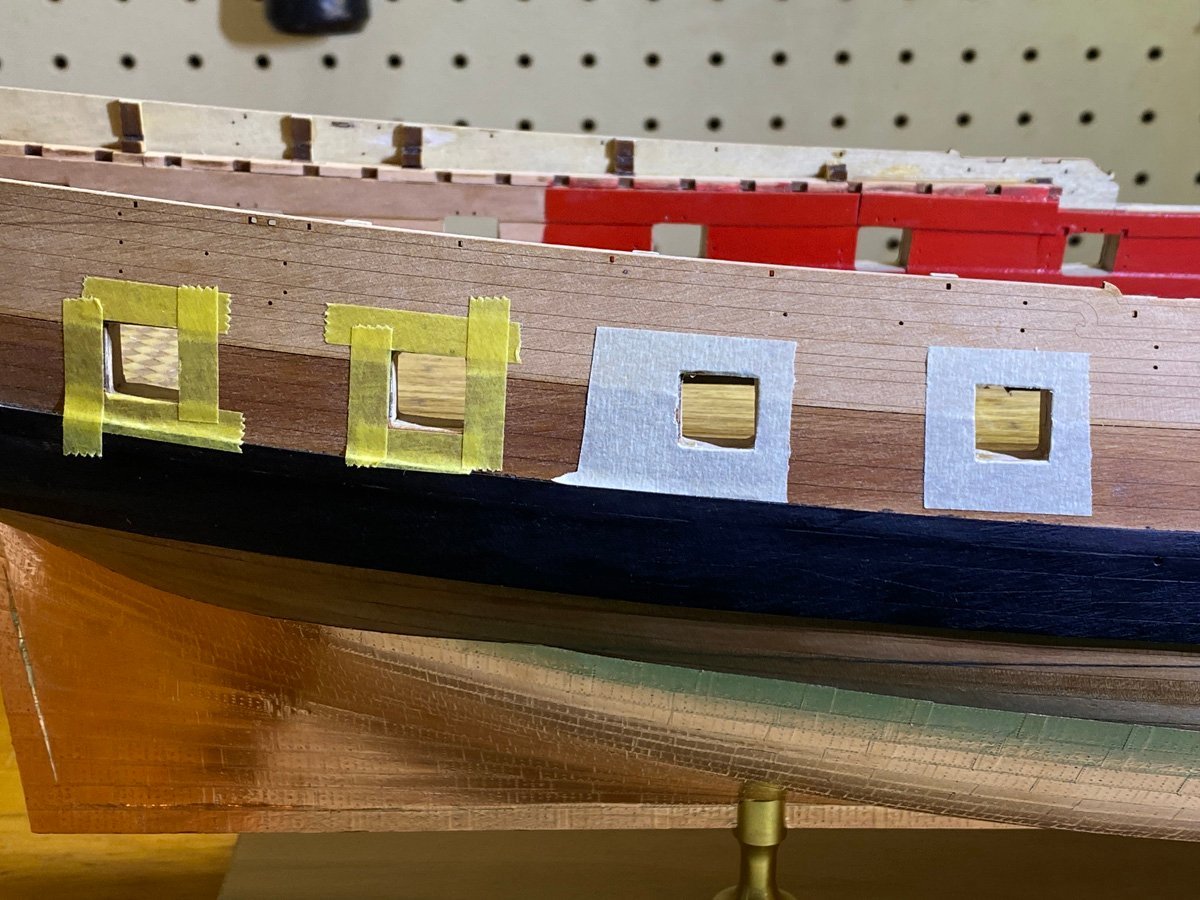
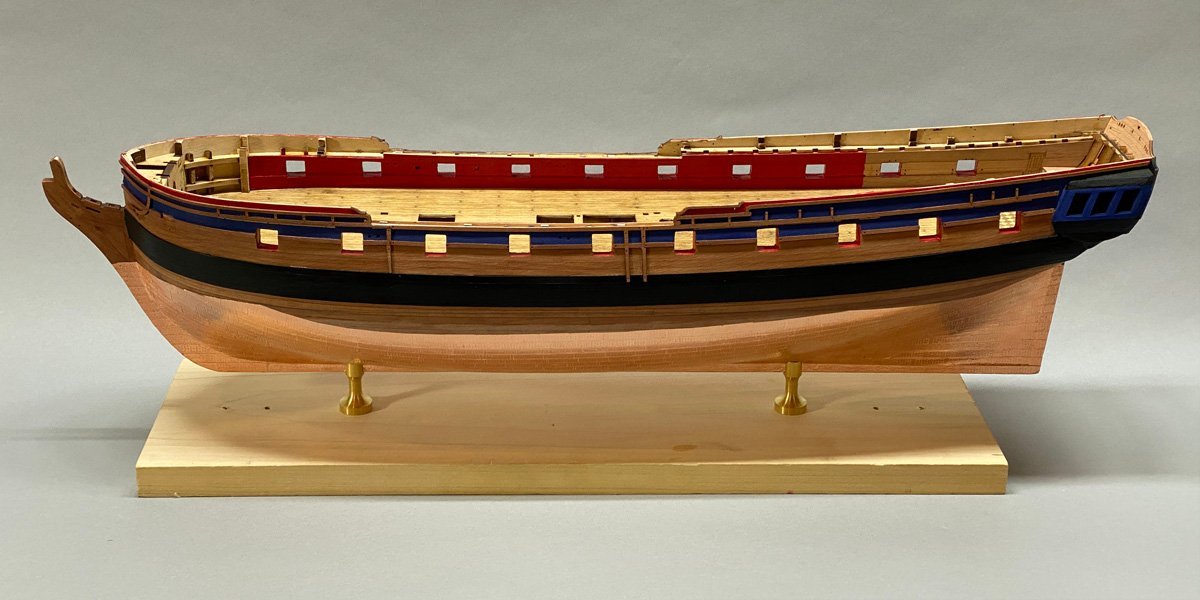
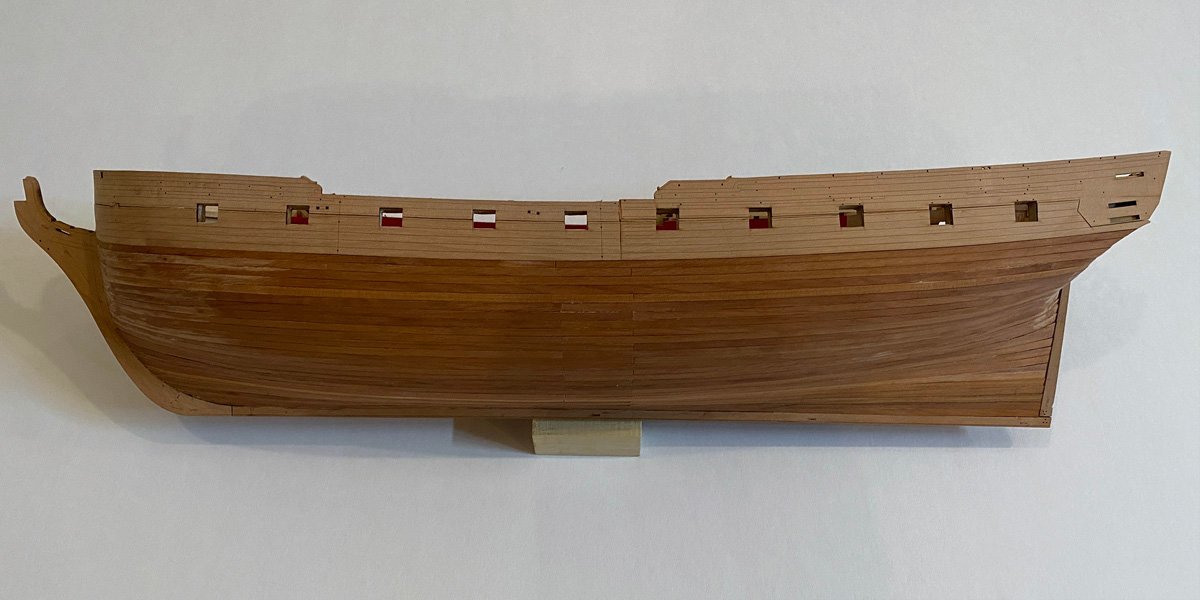
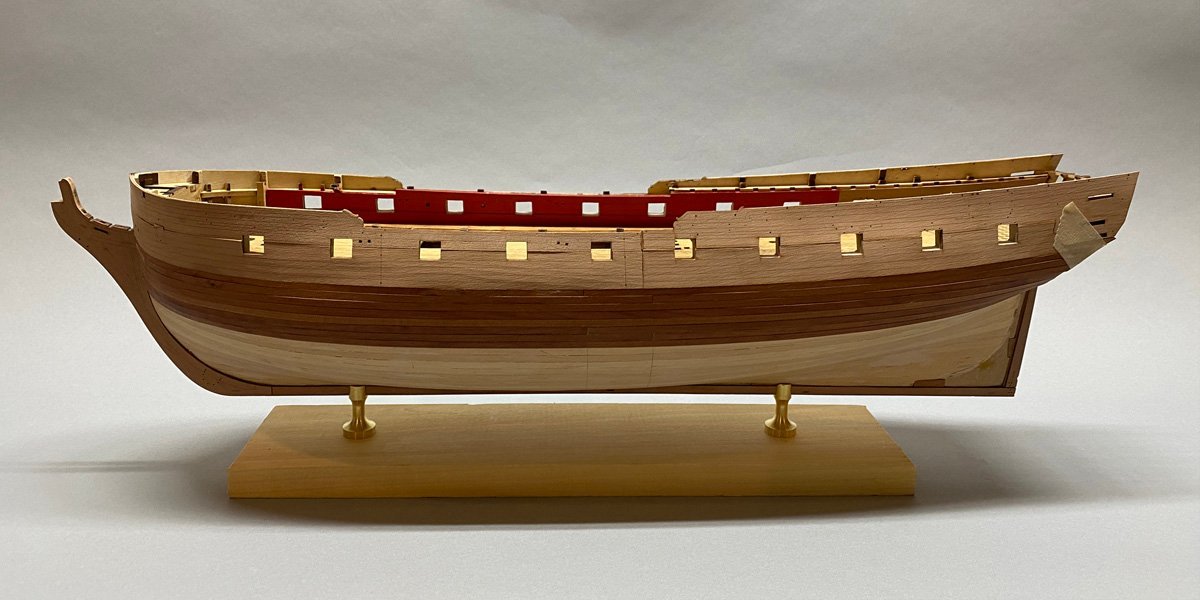
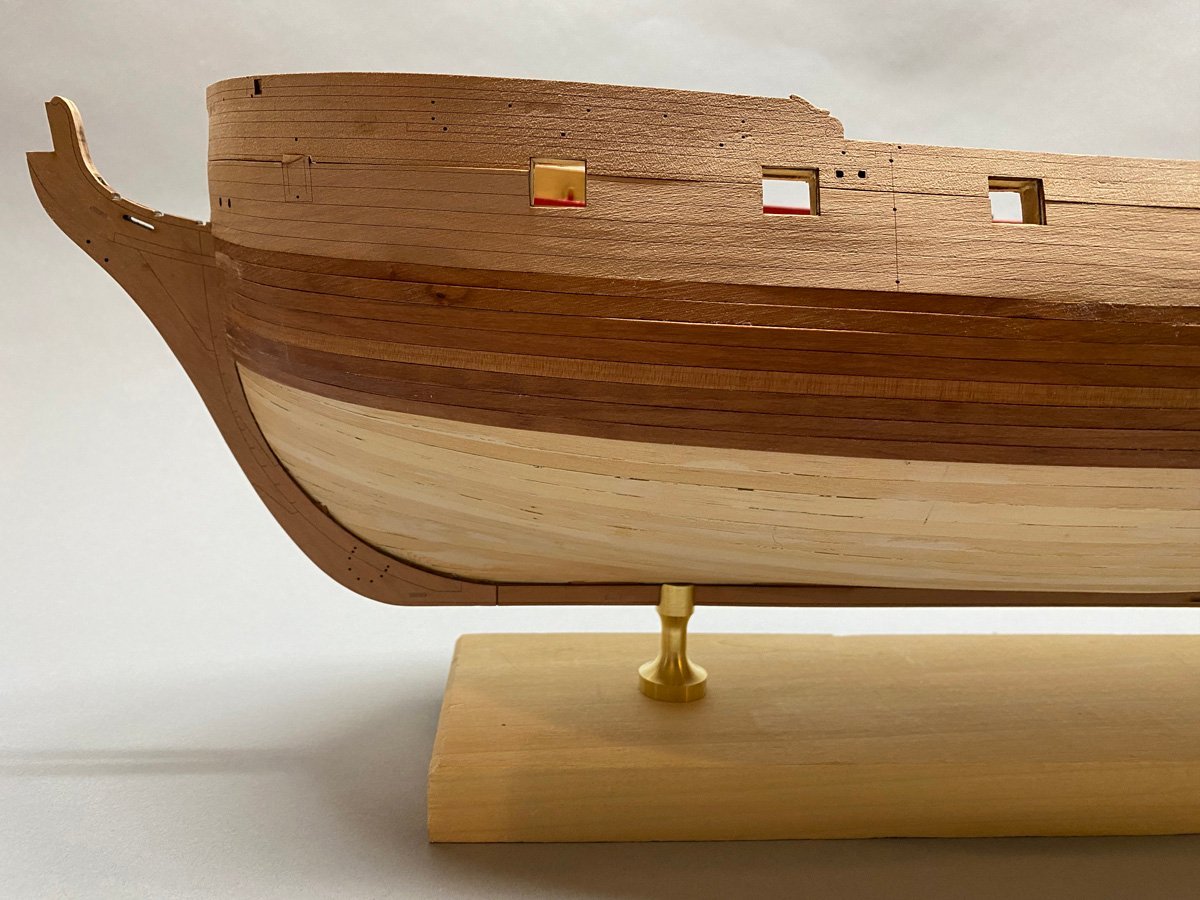
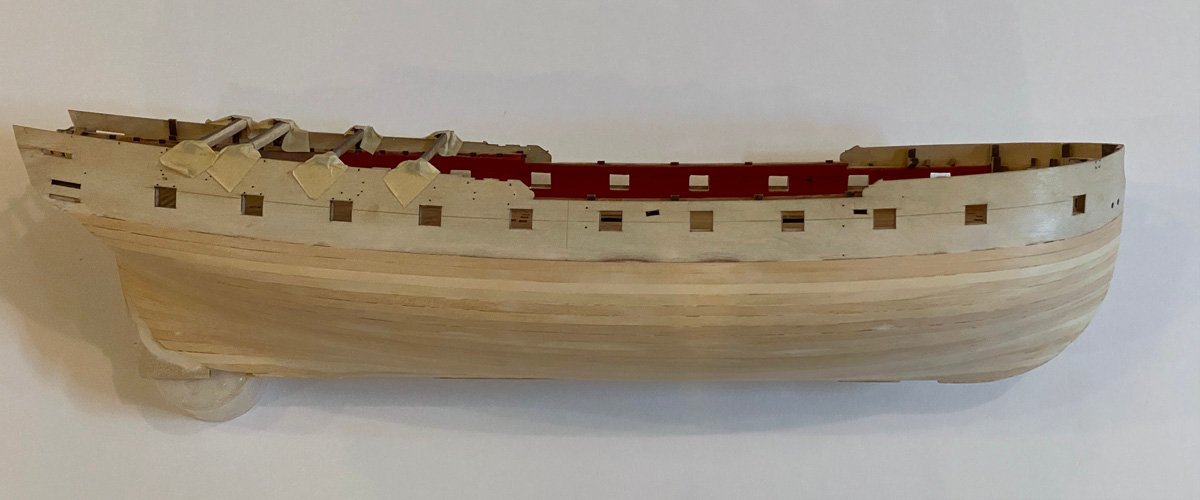
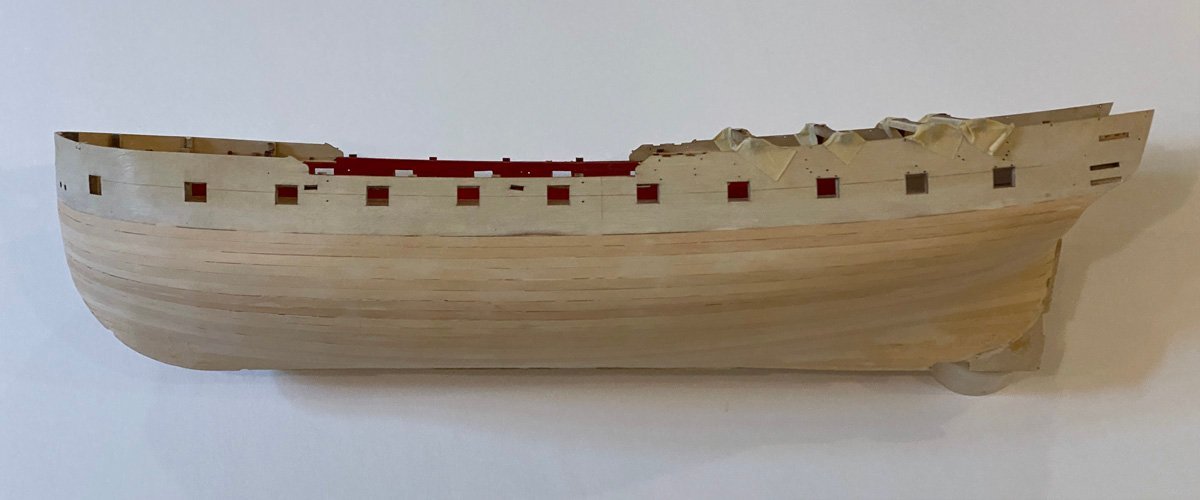
Side Trim Completed The upper sides of the hull are mostly blue with splashes of red. The gun ports are red inside. This all required a lot of masking. I started to mask off each gun port with 4 strips of tape but realized that I could put a large piece over each port and cut out the centers. After painting, a number of extremely delicate trim strips were attached. I stained them all with Watco natural oil stain on the top only. The bow pieces were soaked in water and pre-bent. The manual says to glue them with PVA and lots of clamps. I did exactly that, but as soon as I removed the clamps half of the pieces fell right off. It's tempting to blame the oil stain, but I was very careful to leave the wood bare on both sides of the joint. Maybe the PVA is soaking in and drying too quickly? Anyway, I cleaned off the dried PVA and reglued everything with CA. It's not going anywhere now. Did I mention that I finished the quarter galleries a few days ago? There are a lot of pieces in there that required a lot of trial and error fitting. Just checking that everything fits.


- 96 replies
-
- 10
-
-
- Sphinx
- Vanguard Models
- (and 2 more)
-
Yes, those are the gaps. Big mistake leaving them there. I cut them out further up the hull.
- 96 replies
-
- 1
-
-
- Sphinx
- Vanguard Models
- (and 2 more)
-
Thank you for all the clarifications, and especially for the link to the RMG collections site. I have browsed RMG many times and never stumbled on the best part! And now I'll have to buy several of Brian Lavery's books, even if it's too late for the Sphinx.
- 96 replies
-
- 2
-
-
- Sphinx
- Vanguard Models
- (and 2 more)
-
I will admit to complete ignorance on this. Who is Lavery? If I search for Sphinx on https://www.rmg.co.uk there are zero results. Is there a separate site for research?
- 96 replies
-
- 3
-
-
- Sphinx
- Vanguard Models
- (and 2 more)
-
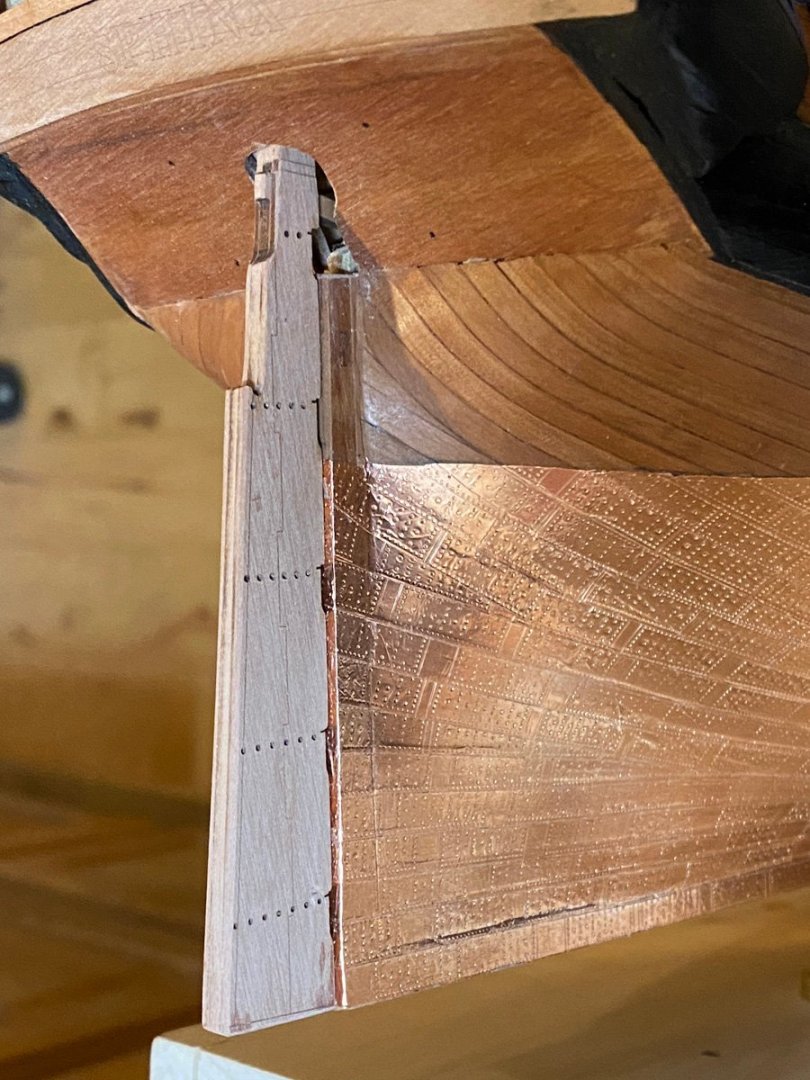
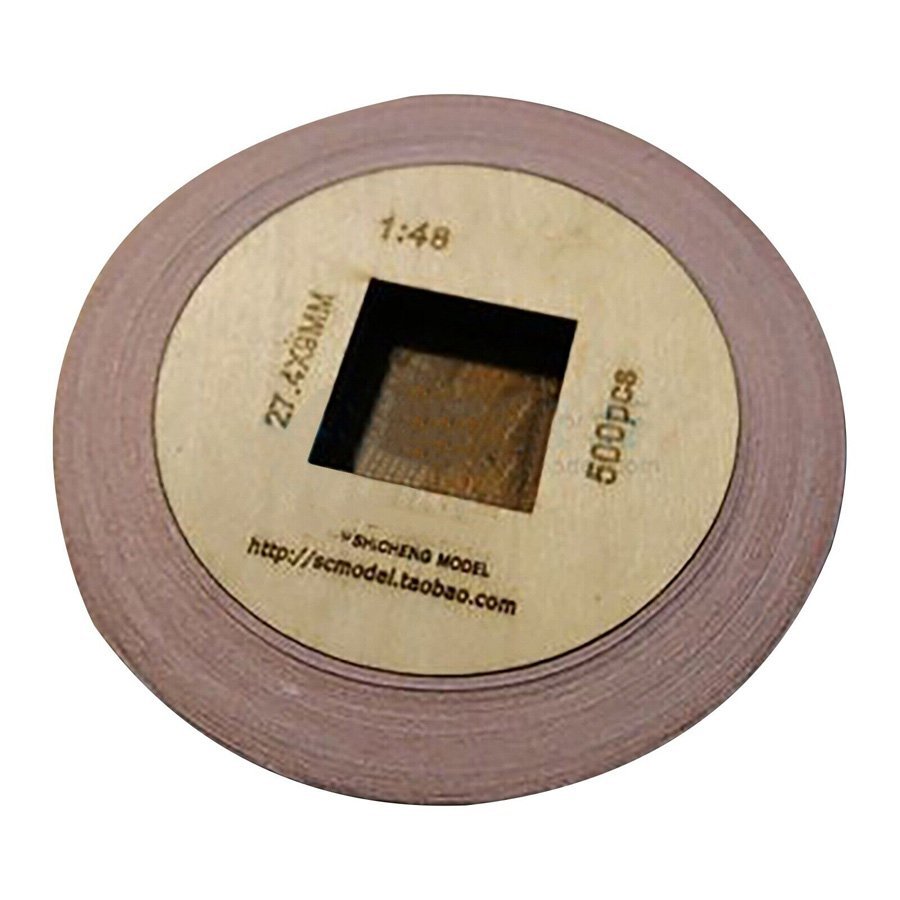
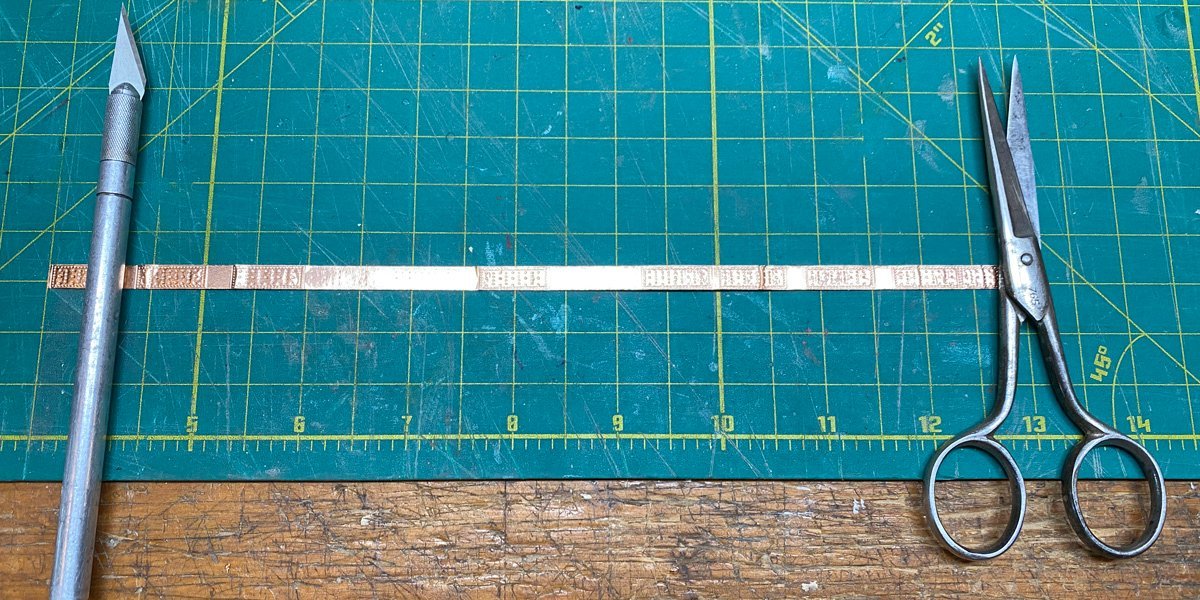
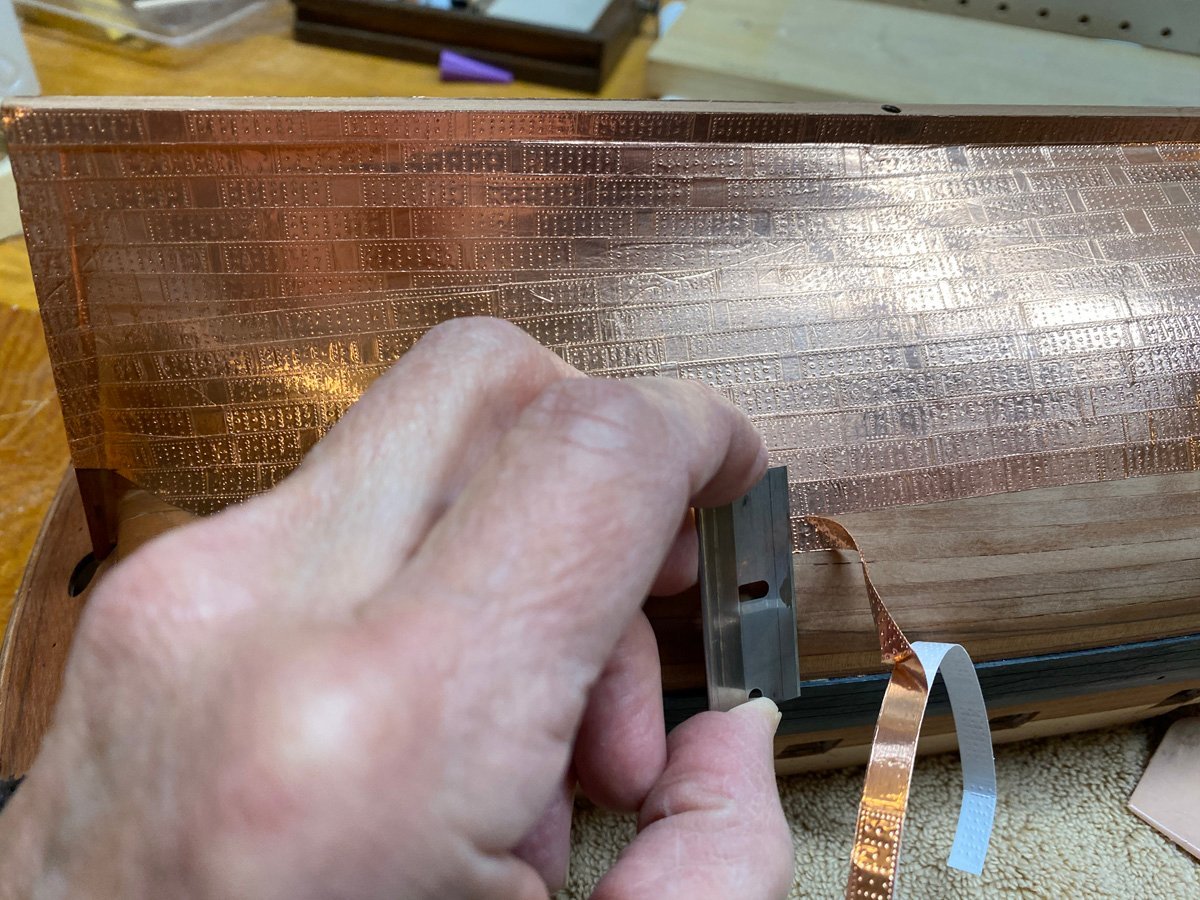
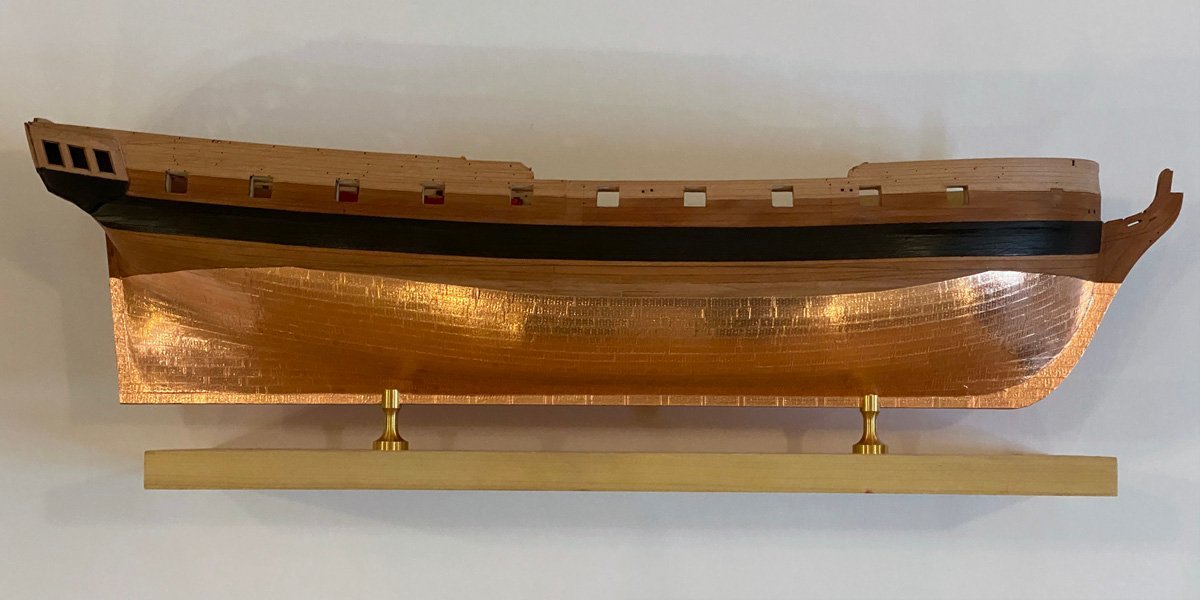
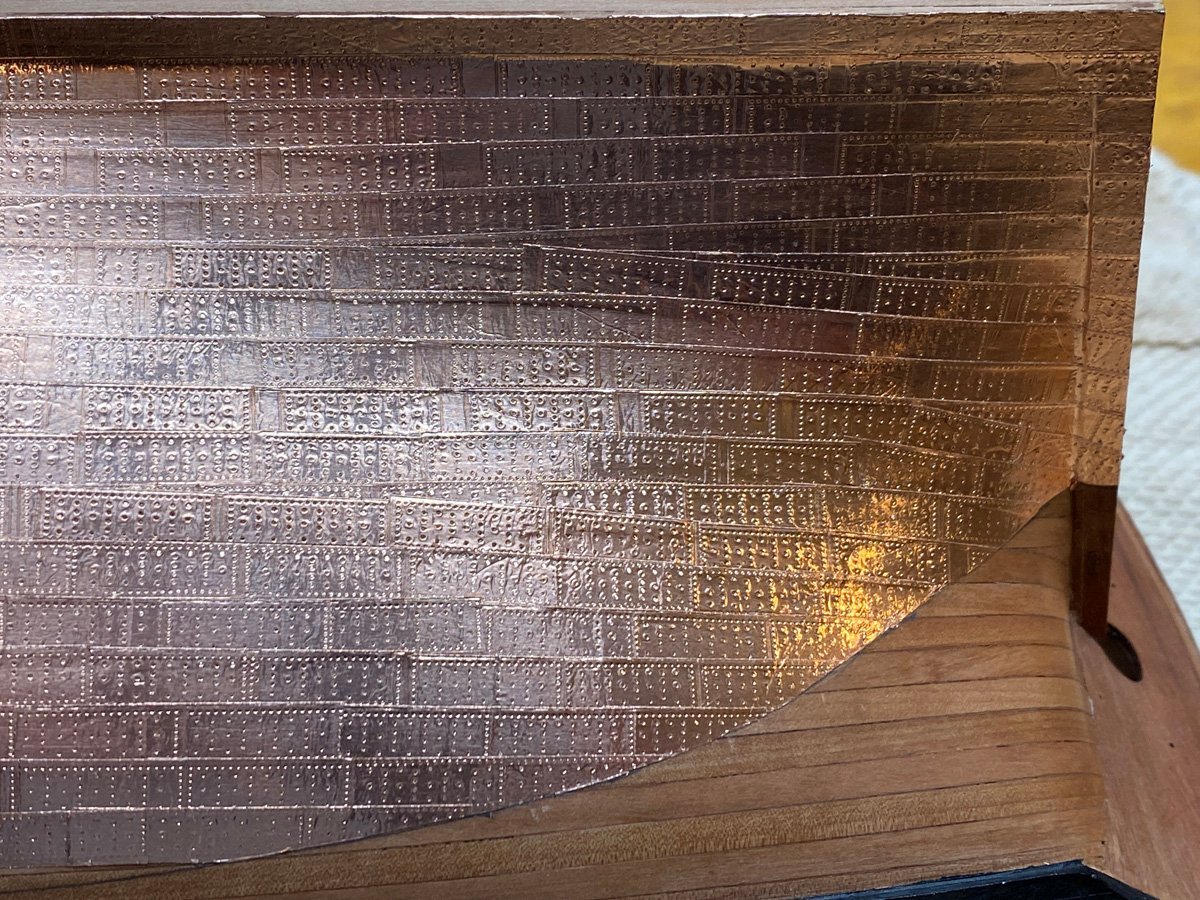
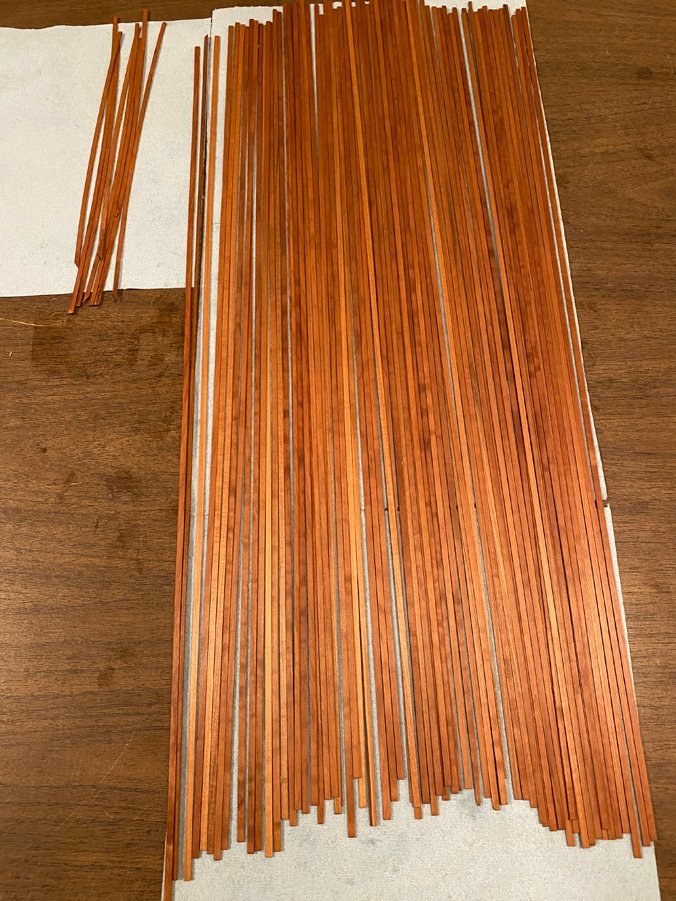
An Almost Brilliant Method for Coppering In the last few months since I ordered my model this product has popped up on eBay. It is standard copper foil for stained glass with plate patterns for model ships stamped on it. It is available in 1:48, 1:75, and 1:96 scale, 500 pieces to a roll. There are now over 30 vendors, all in China, selling what appears to be identical products. I ordered two rolls at 1:75 scale at the end of November. They were delivered about three weeks later. I just used them up on the Sphinx, ran a bit short, and just ordered another roll. I also ordered a second roll at 1:48 scale to cap the keel and rudder post. The plates were nicely spaced for the first few feet, and I thought I could cover entire rows without cutting the strips. Then the spacing became irregular, with small gaps between the plates. I decided that I could live with that. Then very long gaps started to appear in the roll, and I had to cut individual plates. It's easy to cut the foil with scissors but tedious to remove the plastic backing. A much easier technique is to cut a length of foil about 18" long, attach the end to the hull, and tear the foil against a razor blade held after the next plate. Then repeat. I coppered the rest of the hull in this manner, basically with individual plates. I wondered if I had been cheated of plates, so when I opened the second roll I measured the length and counted the plates - 32 feet, 509 plates as advertised. The 1:75 plates are 18 mm x 6 mm, almost exactly 1 cm^2. They stick very well and look good. I do regret leaving the blank gaps near the keel. Live and learn. The product would be perfect if the plates were spaced without gaps so that you could lay down entire rows without cutting (at least until the curvature got too great.) It would be nice if some US vendors carried it. I have about an inch left to cover on each side, plus the keel, the rudder, and a band around the water line. I will weather the copper with vinegar and salt when it is all applied.
- 96 replies
-
- 7
-
-
- Sphinx
- Vanguard Models
- (and 2 more)
-
Just to make sure that I understand, around 1782 Sphinx had 6 12-pounder carronades added to her quarterdeck, and possibly 2 more to the forecastle, in addition to the 20 9-pounder carriage guns on the gun deck. Is that correct?
- 96 replies
-
- 2
-
-
- Sphinx
- Vanguard Models
- (and 2 more)
-
That's what I will do. I wondered about having iron and copper in contact, but ship builders didn't understand Galvanic corrosion at the time. 😬 Yikes! I was afraid that other changes would show up in six years. Since the coppered hull is much more obvious than gun barrels to the casual observer (like me), I think I will copper the hull and ignore a few years of historical inaccuracy. But thank you kindly for the information.
- 96 replies
-
- 2
-
-
- Sphinx
- Vanguard Models
- (and 2 more)
-
Spoiler Alert - I am about to copper the hull. The Sphinx was coppered in 1781. Would the copper go under, over, or around the iron reinforcement plates? Same question for the rudder hinges.
- 96 replies
-
- 2
-
-
- Sphinx
- Vanguard Models
- (and 2 more)
-
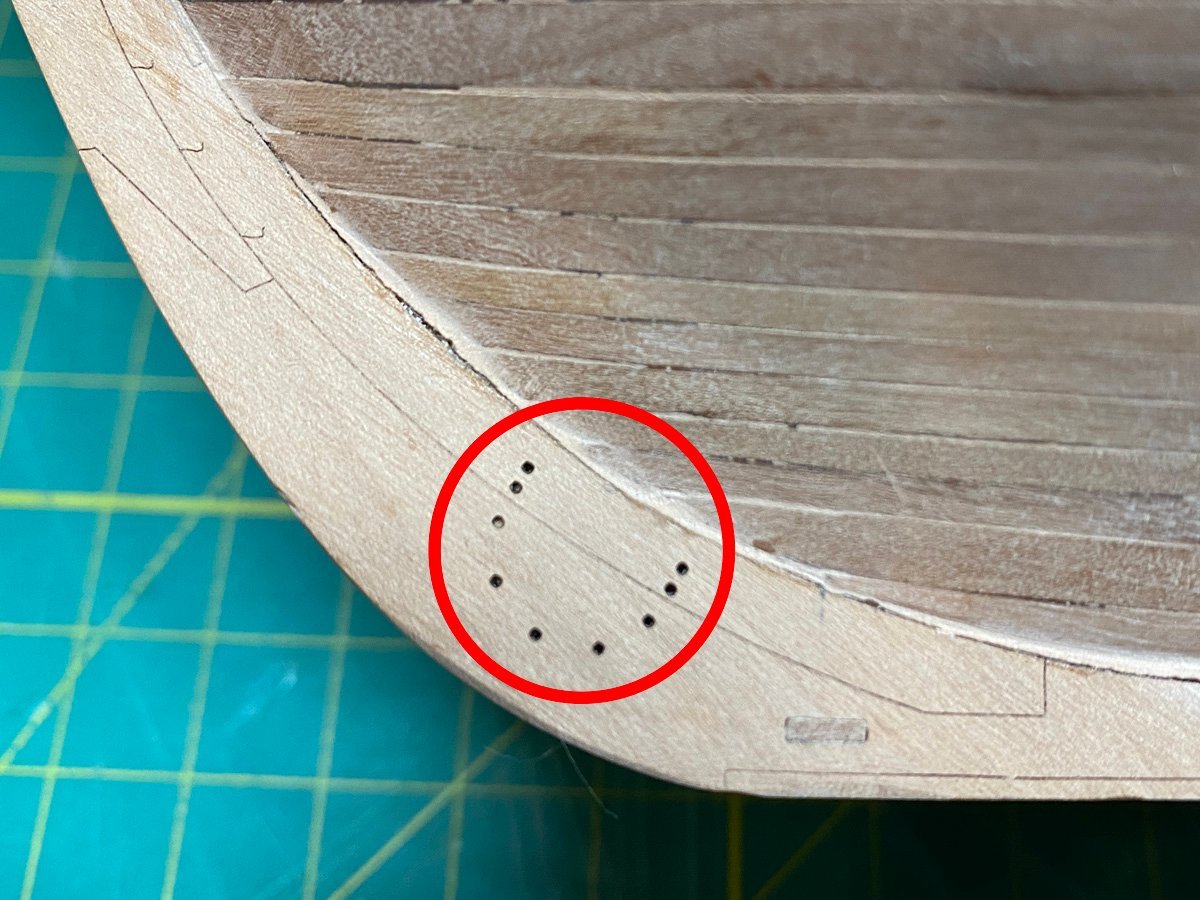
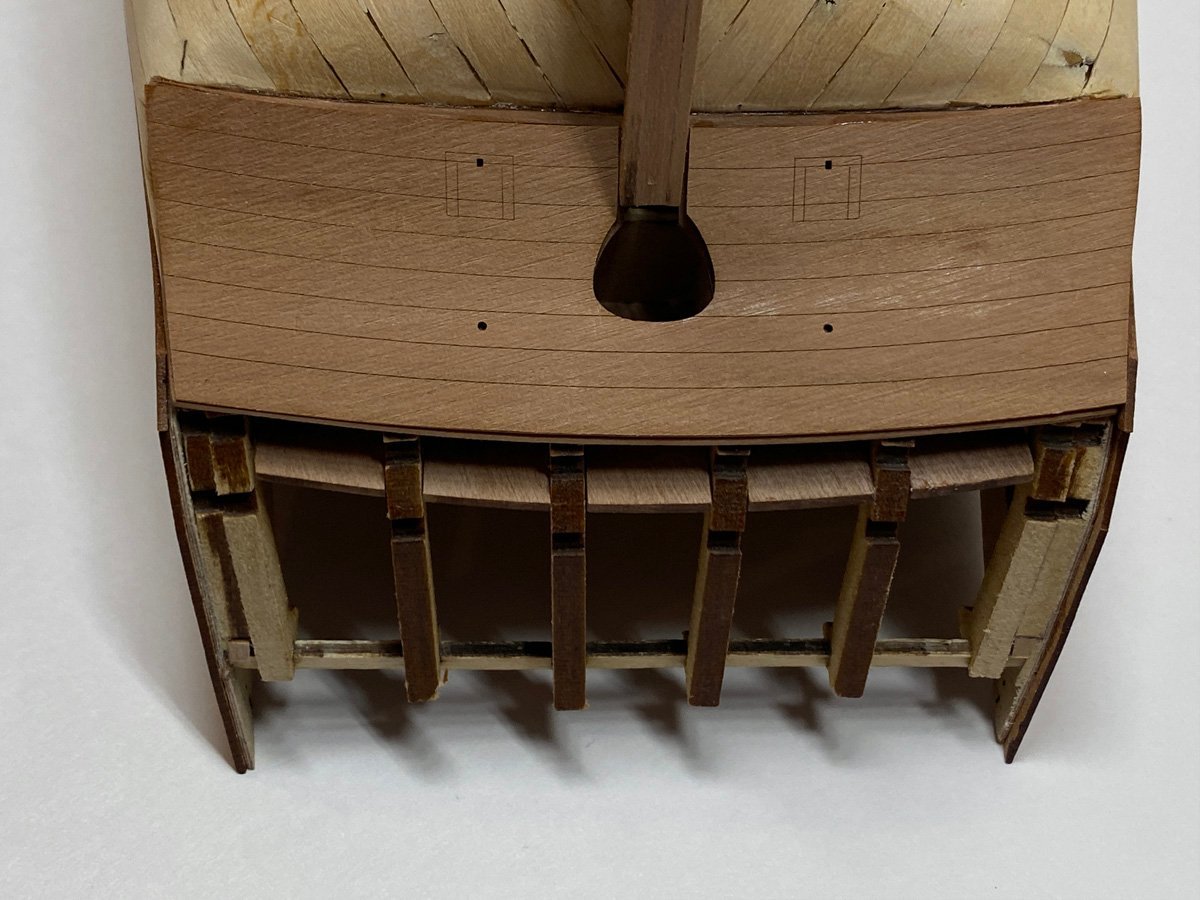
Nautical Question At the bow the keel has a ring of holes shaped like a U. What is this?
- 96 replies
-
- 8
-
-
- Sphinx
- Vanguard Models
- (and 2 more)
-
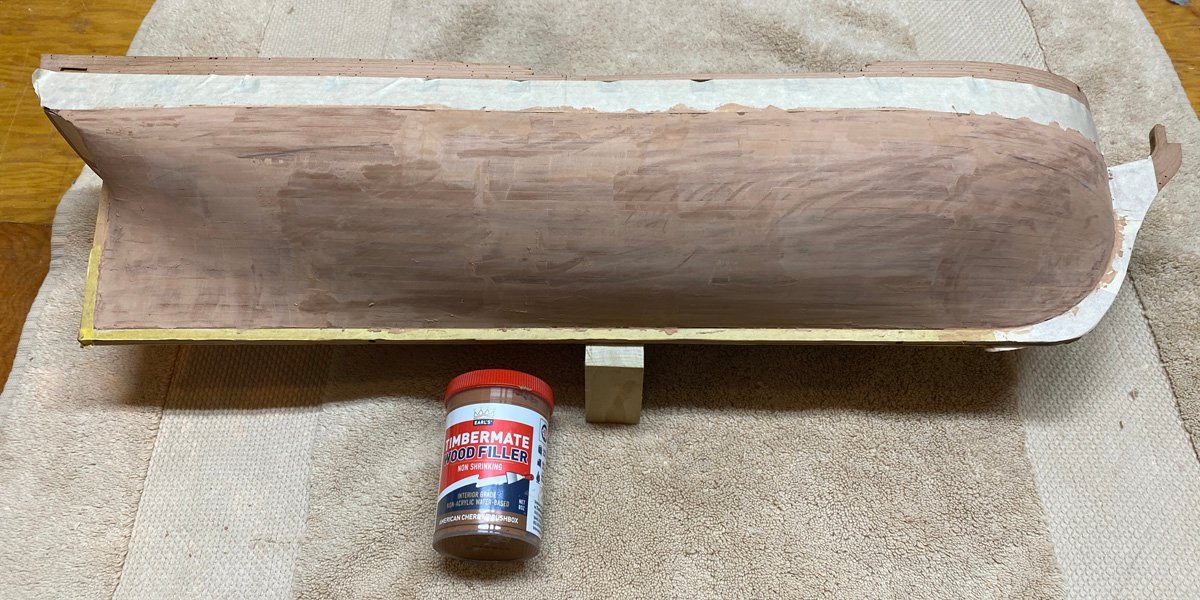
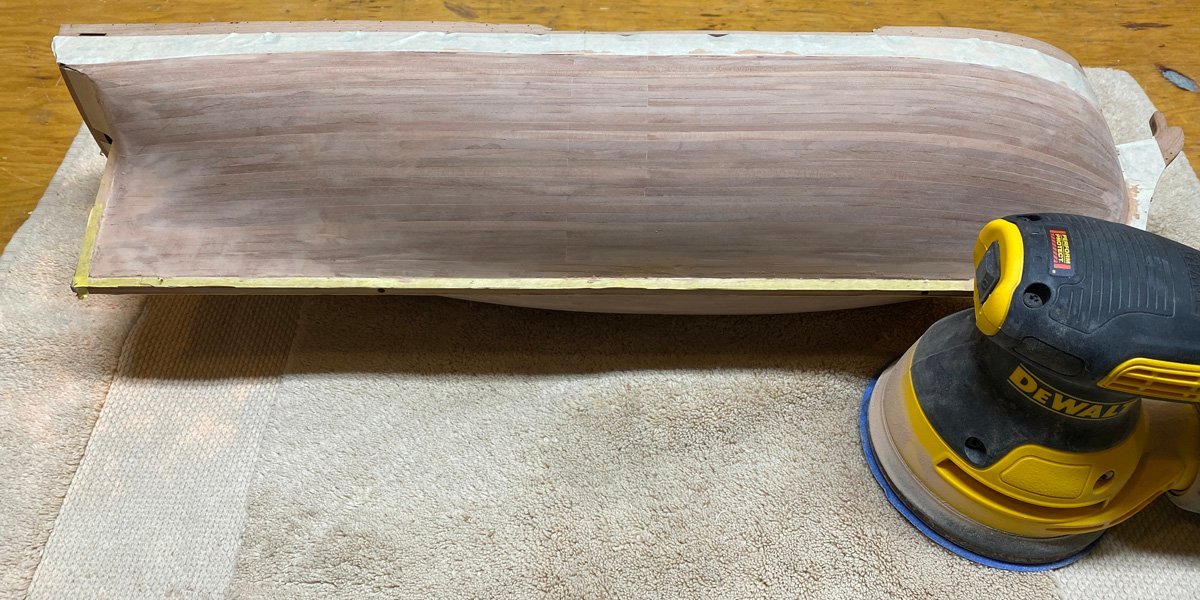
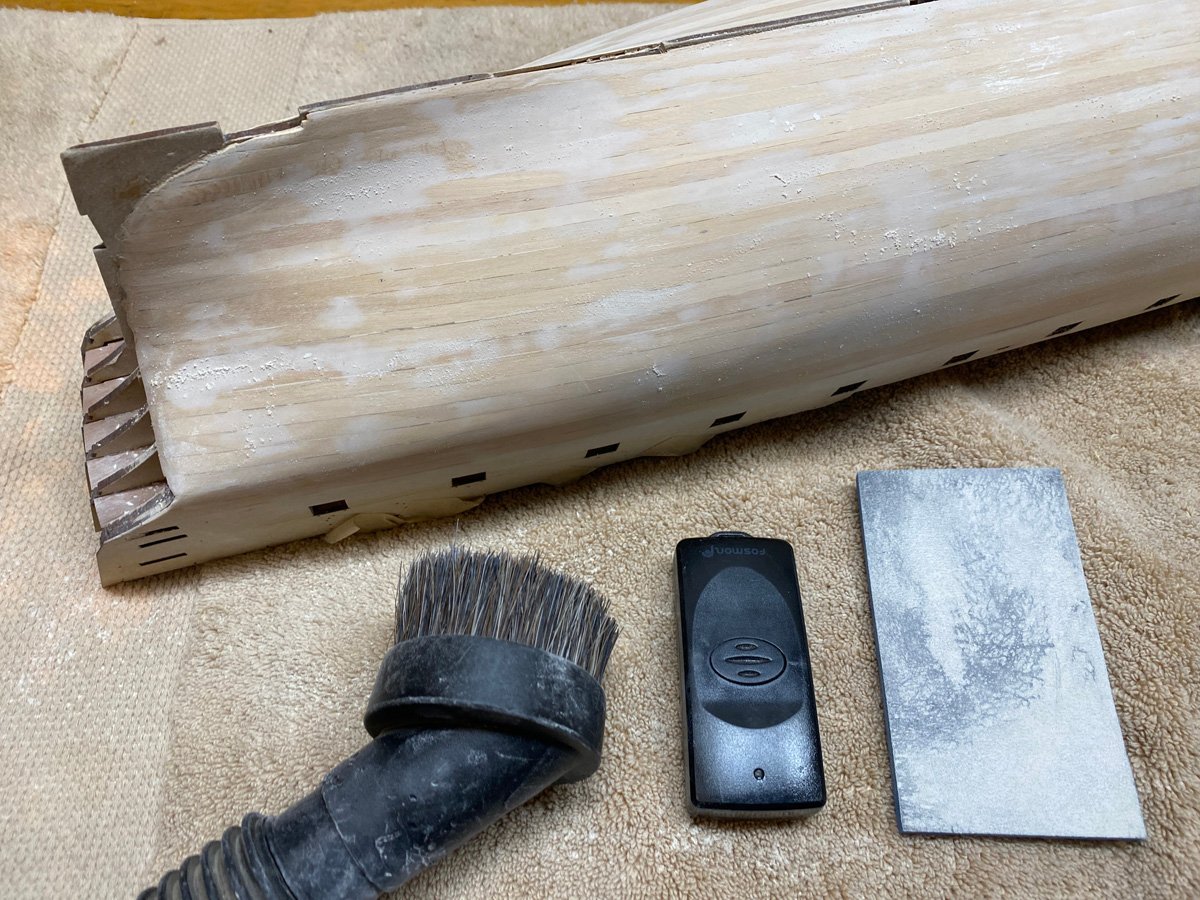
Filler 2 hours with Timbermate wood filler. It looks like my hull is made out of clay. 5 minutes with a random orbit sander - nearly smooth. 20 minutes with a sanding pad and Proxxon sander - ready to paint.
- 96 replies
-
- 10
-
-
- Sphinx
- Vanguard Models
- (and 2 more)
-
Sanding Done, Filler Needed I did maybe 80% of my sanding with a random orbit sander, and much of the rest with a Proxxon pencil sander. It's mostly done but I had to order some new wood filler to match the color of the pear. It should come tomorrow. In the meantime I marked the waterline with a high-tech marking tool, and wet-bent the main wales to shape.
- 96 replies
-
- 11
-
-
- Sphinx
- Vanguard Models
- (and 2 more)
-
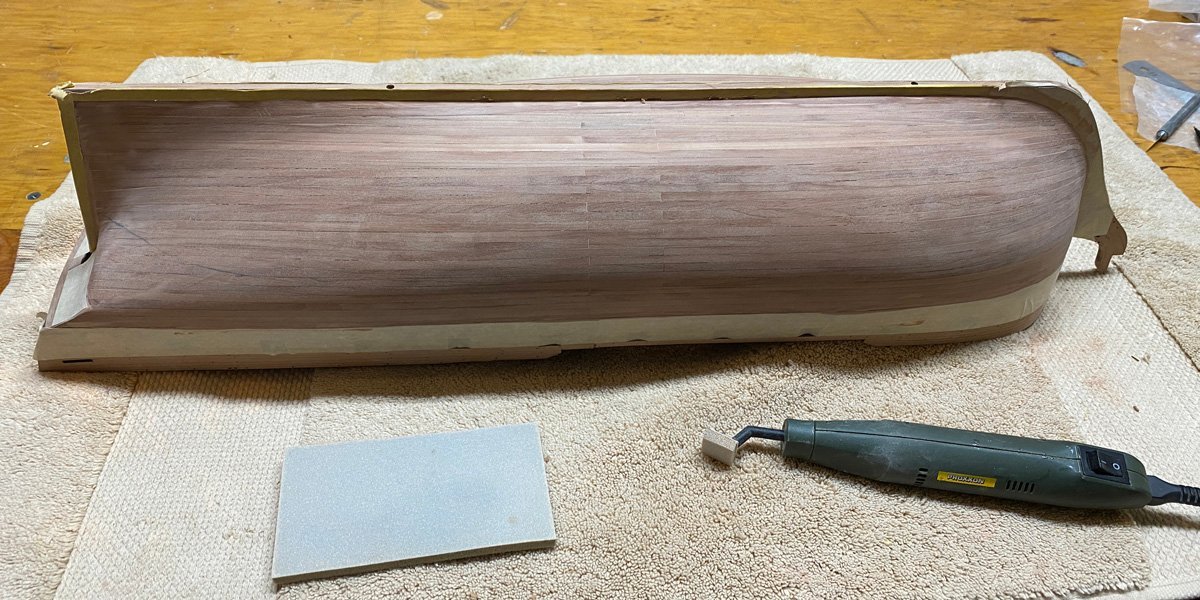
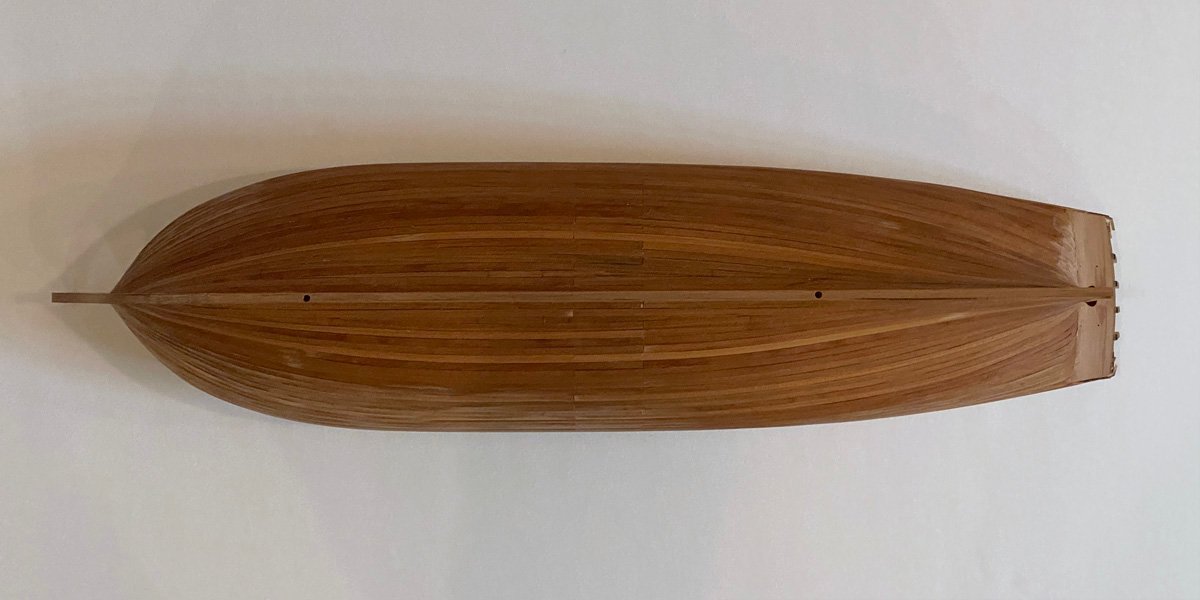
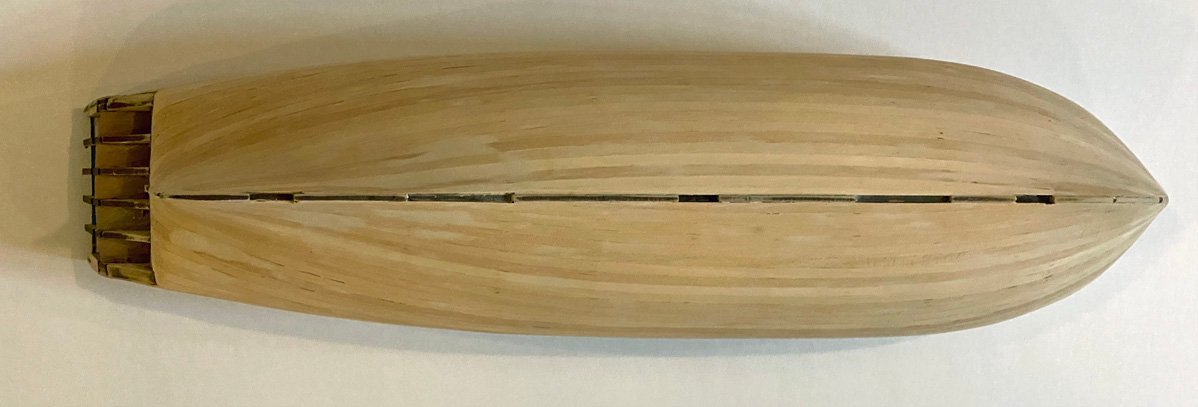
Second Planking Complete I put in a marathon build yesterday and completed the second layer of planking. "Completed" as in "all the planks are glued down." I've done a little sanding but still have a lot of sanding and filling to do. The second layer of planks took about 28 hours for 29 planks on each side. So roughly 1/2 hour per plank.
- 96 replies
-
- 10
-
-
- Sphinx
- Vanguard Models
- (and 2 more)
-
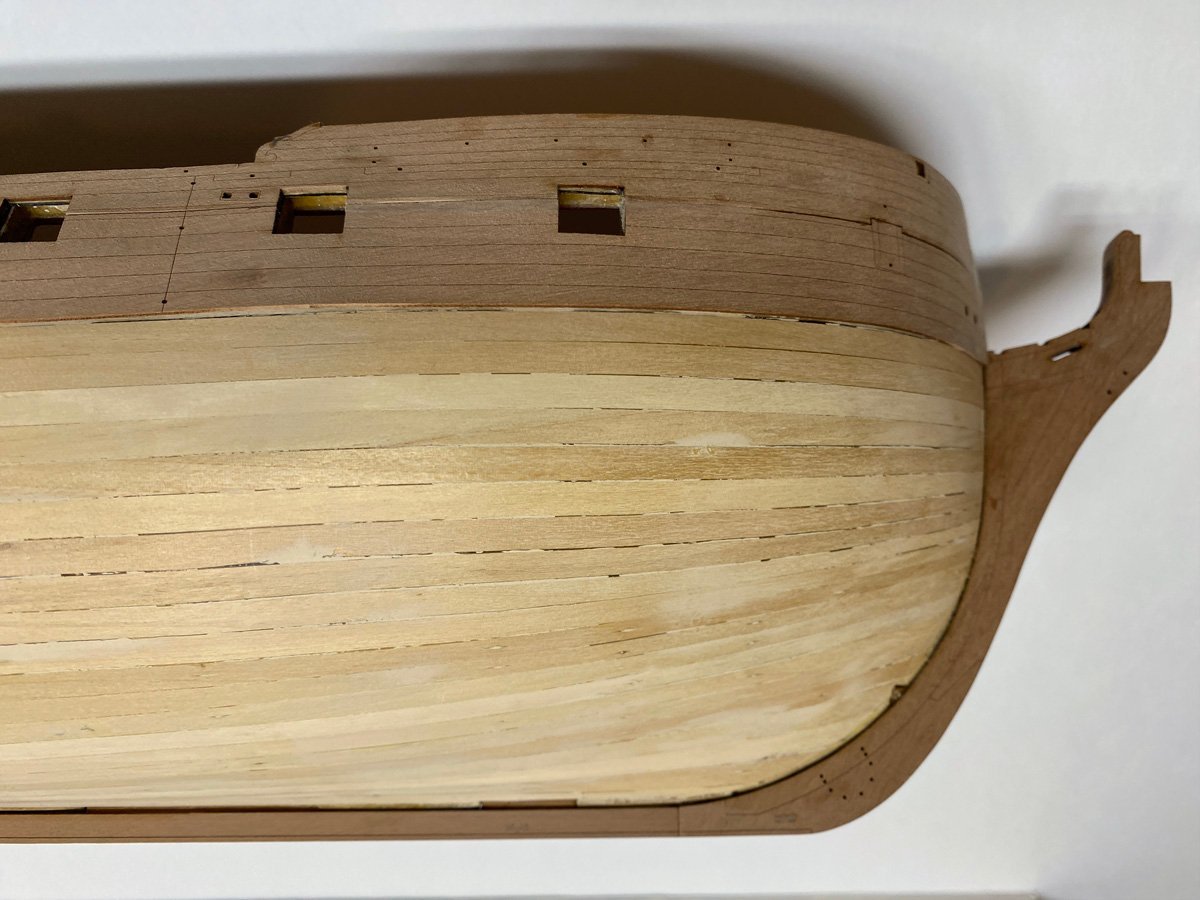
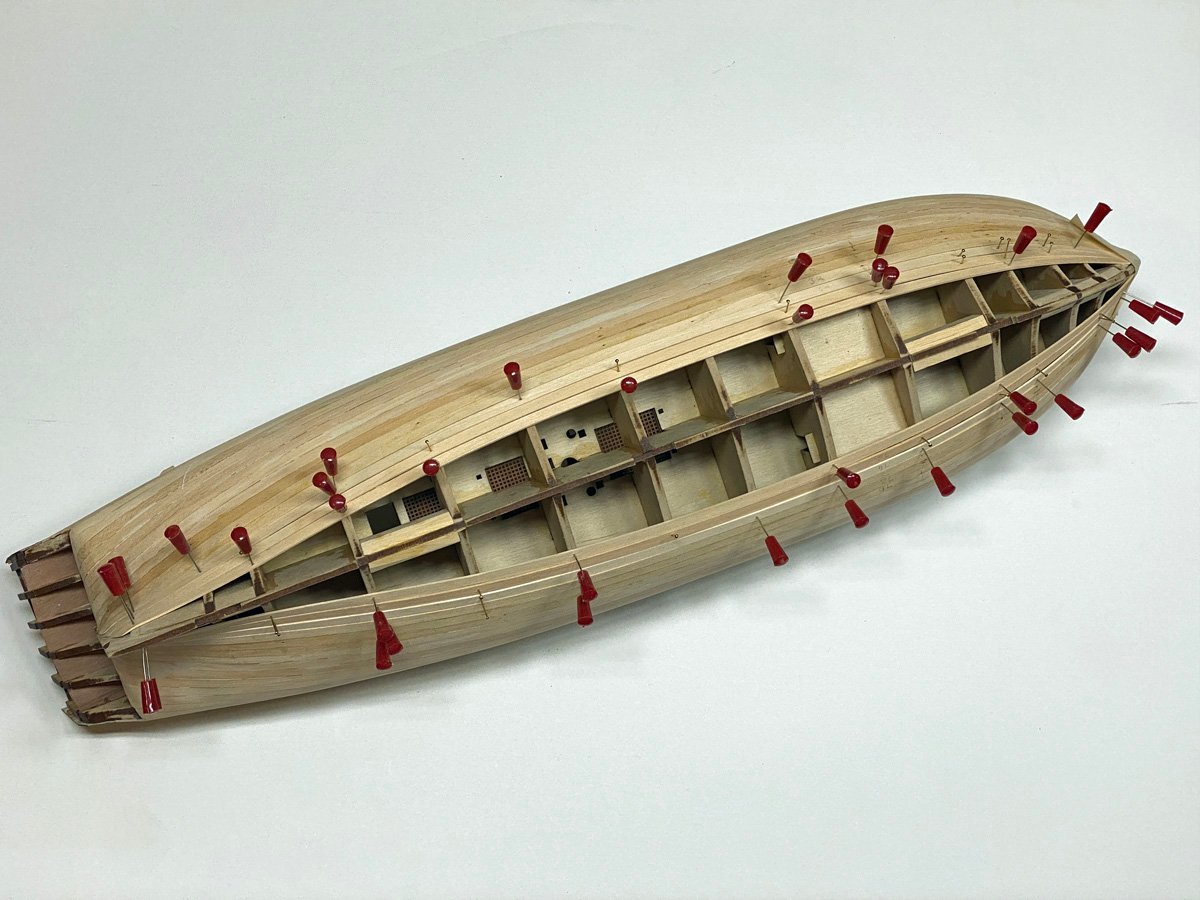
Outer Bulwarks, Keel, Bow, Rudder Post, & Stern The outer bulwarks are covered with 8 pieces of 0.8 mm pear with details burned in by the laser. The pieces fit almost perfectly but were tricky to attach. The manual says to coat the hull with dilute PVA and hold the pieces with a zillion clamps. The clamps just didn't fit very well, so when I unclamped the first piece there were several gaps along the bottom that had to be fixed carefully with CA. I attached the remaining 7 pieces by coating the hull with PVA over the center of each piece, and putting a bead of CA around the perimeter. Then I aligned the piece and held it in place for 20 seconds. No clamps necessary. The keel, bow, and rudder post start as 3 mm MDF. After the first layer of planking they are covered with a 0.8 mm veneer of pear. This brilliant scheme leaves a perfect rabbet for the second layer of planking. The lower stern counter also gets a layer of veneer. Second Layer of Planking Before applying the second layer of planking I oiled the planks with Watco natural oil. That way if when I get CA on the planks they will already be oiled. That pear takes the stain beautifully. My pedestals arrived so I attached a temporary stand. The second layer of planking takes a while to apply, but it is relatively easy with a solid hull underneath. The manual recommends splitting the planks so the front and rear joints can be fit easily. There are some edges standing proud that will be sanded down later. The trim pieces on the bulwarks have some fuzzy grain on them , but the laser detail is too fine to sand. Don't know what I'll do about that.

- 96 replies
-
- 12
-
-
- Sphinx
- Vanguard Models
- (and 2 more)
-
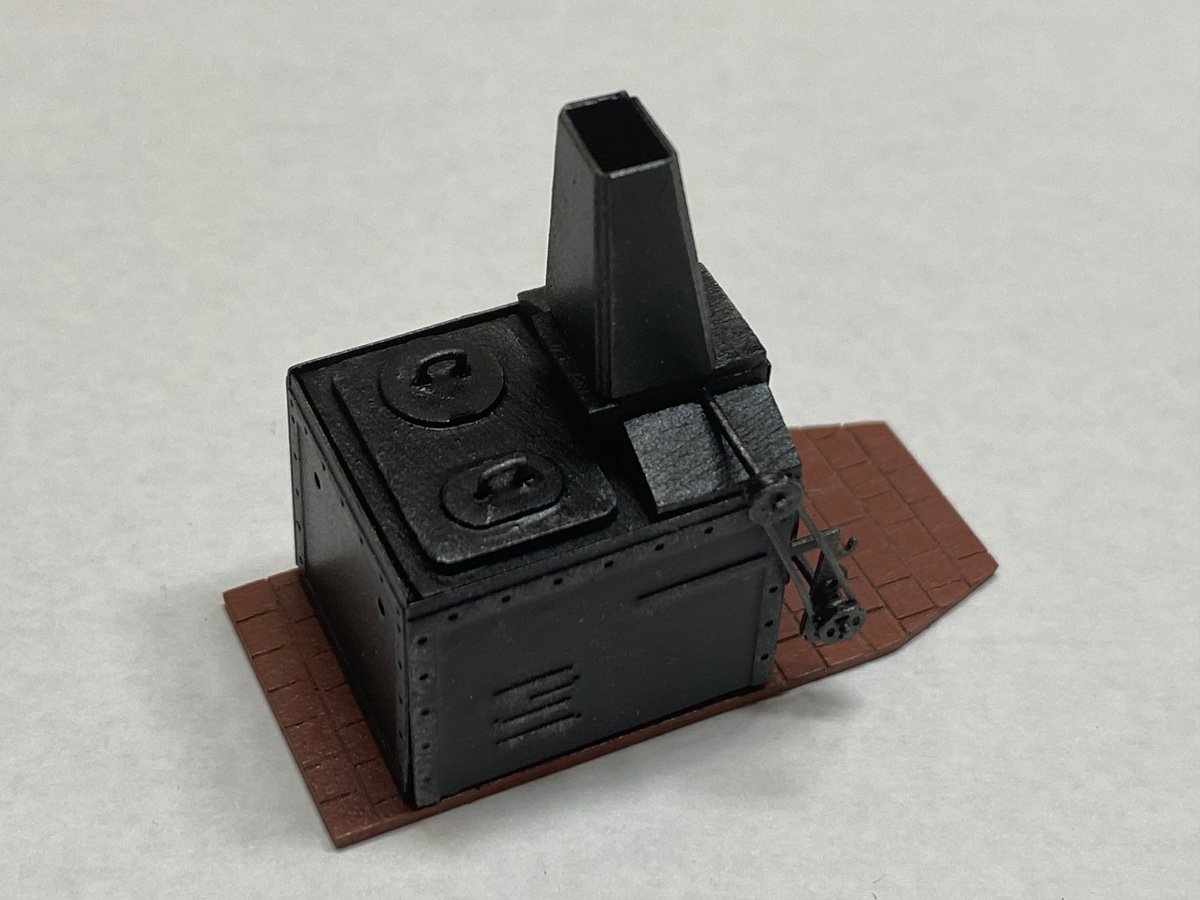
Allan, Interesting question about the stove. I certainly don't know the answer - I usually build to the plan and discover historically inaccuracies later. Perhaps someone else will know. Rod
- 96 replies
-
- 1
-
-
- Sphinx
- Vanguard Models
- (and 2 more)
-
First Layer of Planking Complete - 72 Hours, 50 days A little bit of caulk and a little bit of paint, Make a carpenter what he ain't. At least that's what a painter told me, and it sure is true of the first layer of planking. I filled all the gaps with Famowood filler and did a lot of sanding. Foam sanding pads work beautifully. One thing that came in very handy was a remote controlled extension cord for my shop vacuum. As soon as the dust began to build I grabbed the hose, pressed the button, and had the dust cleaned up in no time. Here are several photos of the first layer of planking. The kit includes several braces to maintain the width of the hull during planking. Trouble is they are made of MDF, and I broke them off so many times that I had to reinforce them and tape them in place. But they did their job.
- 96 replies
-
- 11
-
-
- Sphinx
- Vanguard Models
- (and 2 more)
-
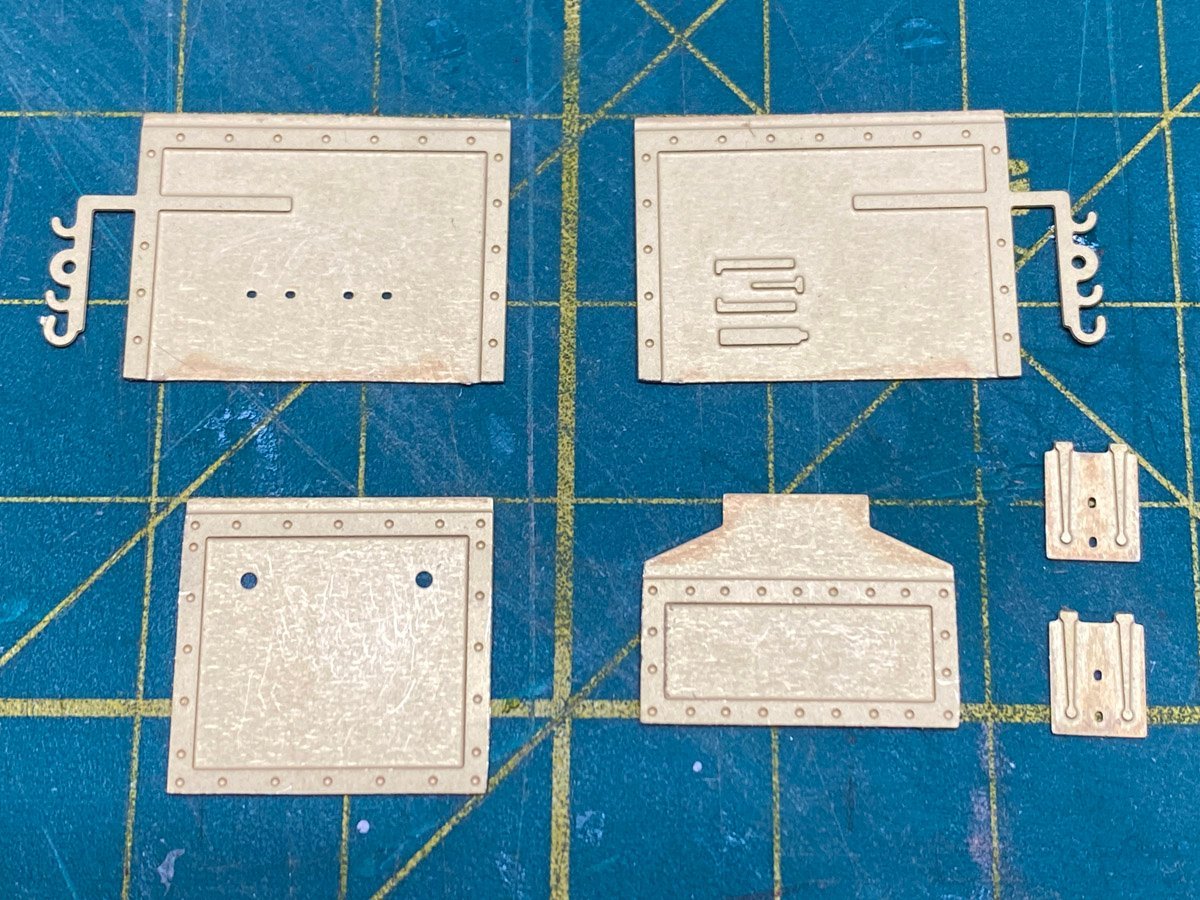
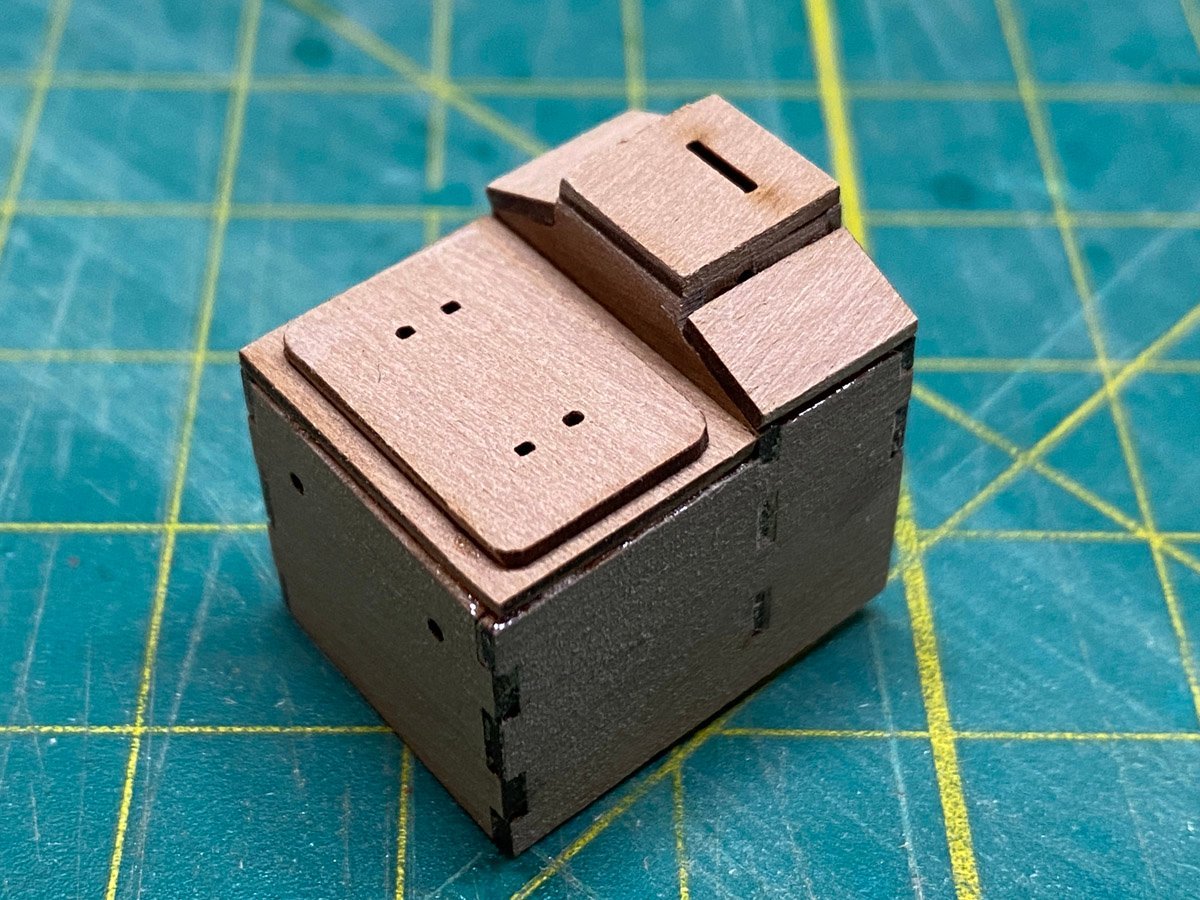
No, I Haven't Given Up Actually I just returned from an 11 day trip to Maui with my wife, two sons, and their wives. Before I left I made an embarrassing mistake. Despite several warnings in the manual I started planking the hull with wet wood. When I got home there were some serious gaps between the planks. I've planked several hulls in my life and totally know better. I spent a couple of days filling and sanding, and it shouldn't cause a problem on the first layer of planking. I am now pinning wet strips to dry overnight, then gluing them the next day with PVA on the long edges and CA on the bulkheads. The photo shows the hull about half planked with wet planks and gaps, 3 rows with dry planks attached, and 3 more rows of wet planks pinned to dry overnight. This is all working out much better. I prefer to mount my models on brass pedestals rather than using cradles. It makes them much easier to handle during construction and to move when finished. I just ordered two pedestals, and added some reinforcements along the keel to attach them to. While waiting for planks to dry I built the stove. It comprises a surprising number of wood and photo etched brass parts.

- 96 replies
-
- 13
-
-
- Sphinx
- Vanguard Models
- (and 2 more)
-
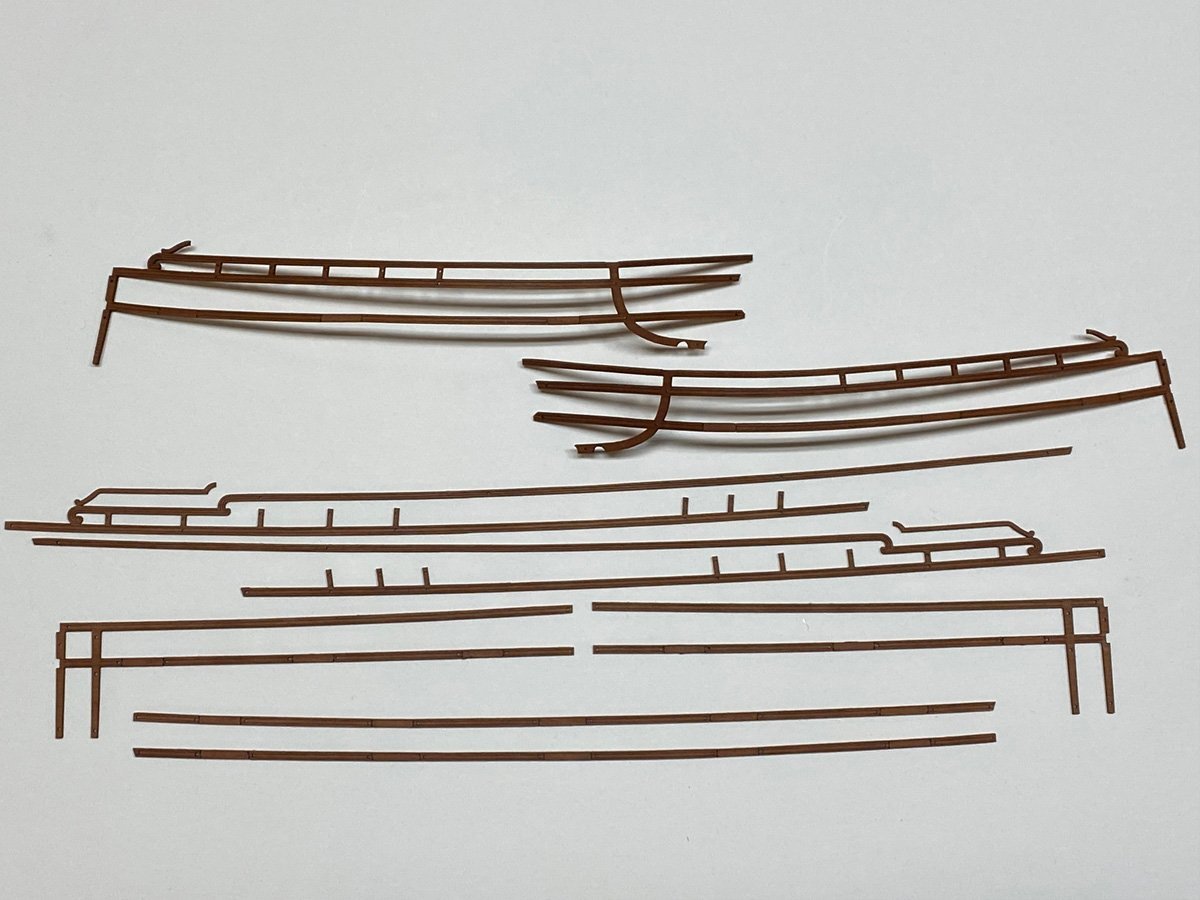
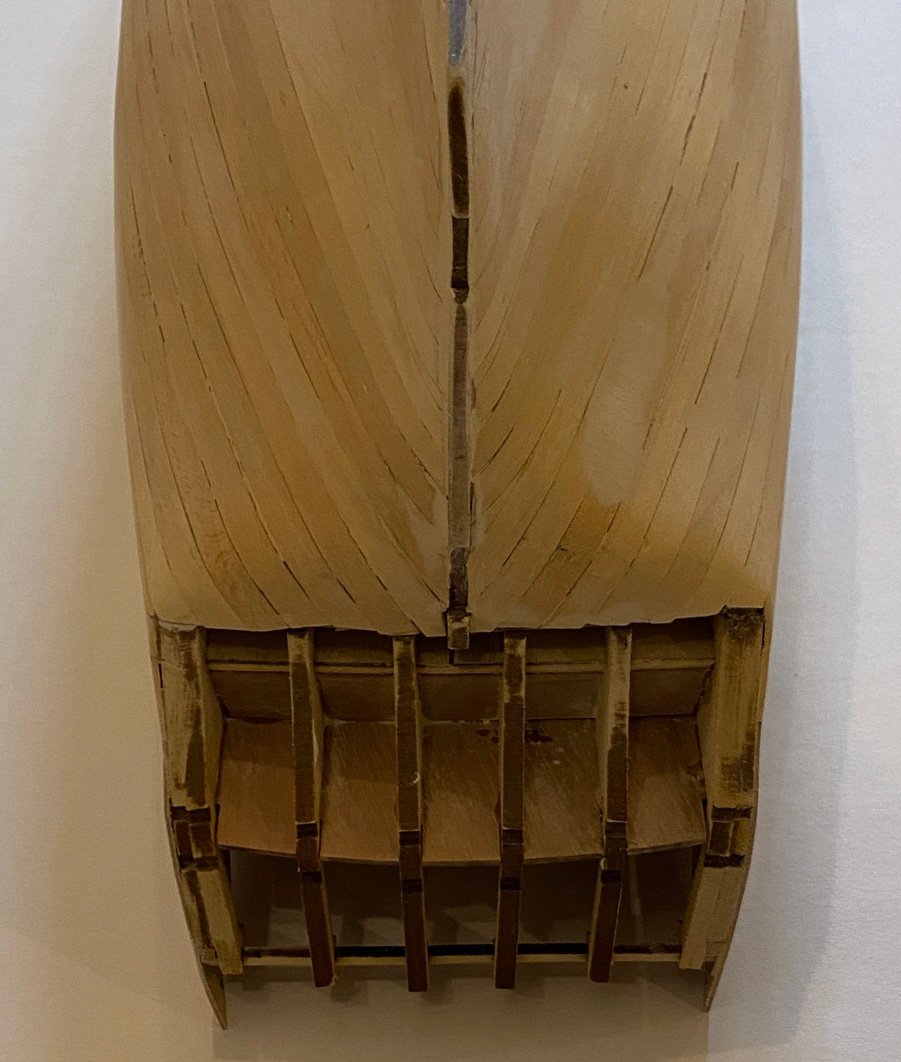
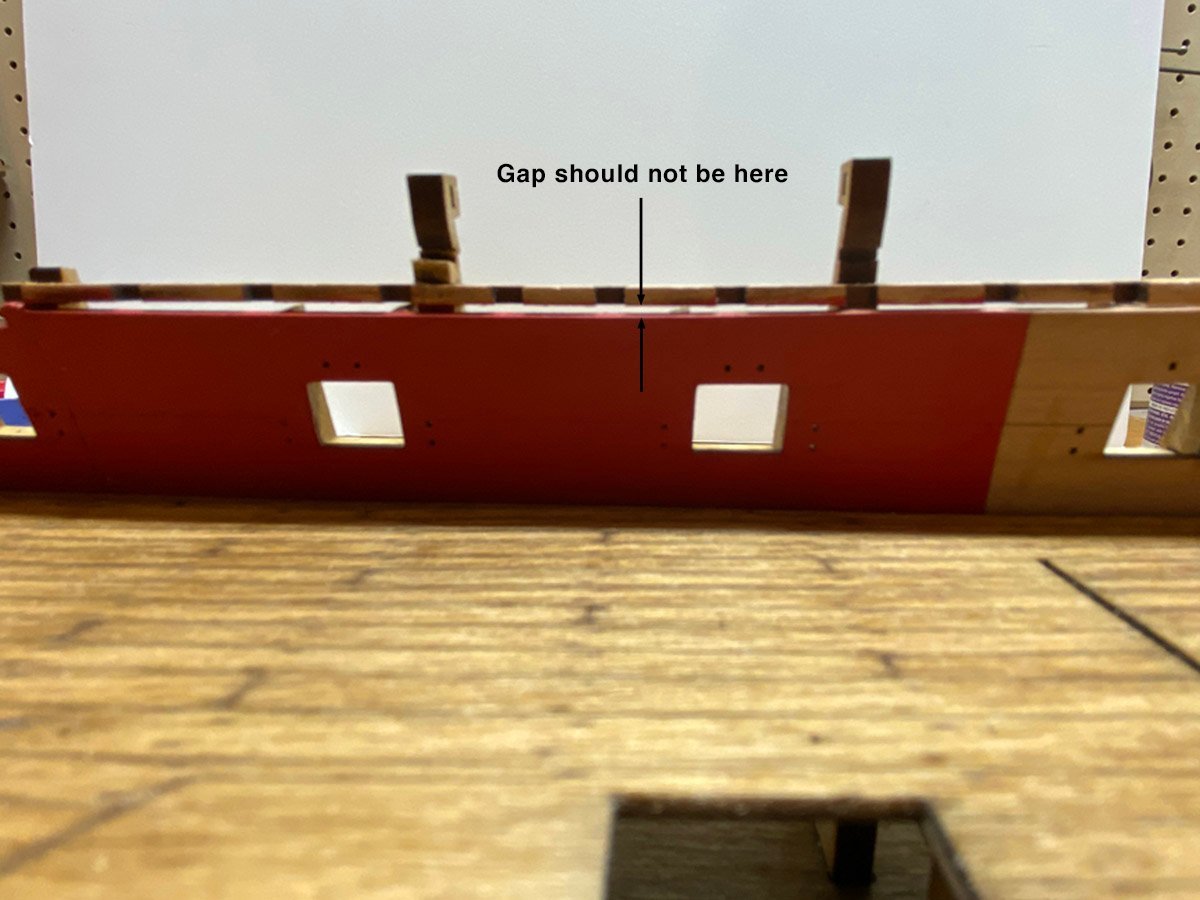
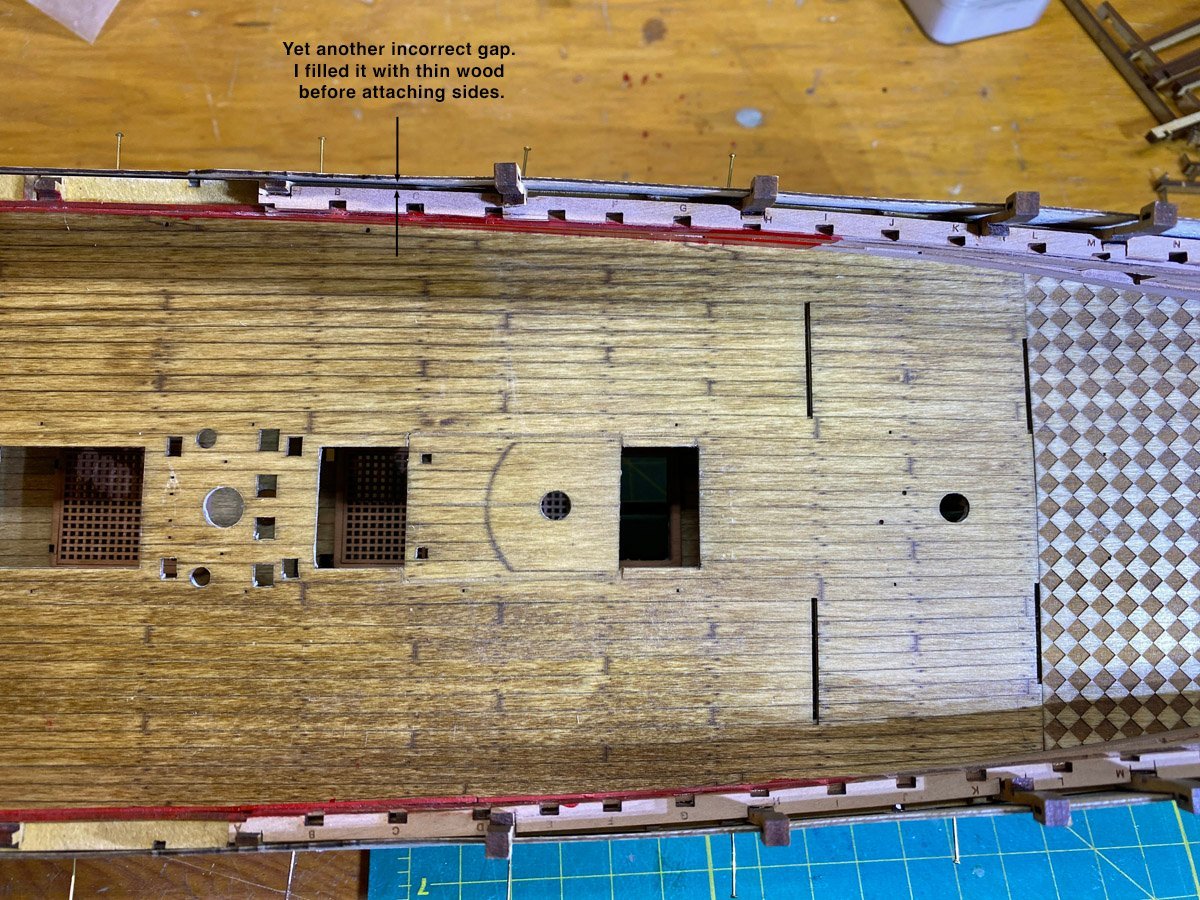
Gun Ports, And A Piece That Just Didn't Fit Right These little pieces get glued vertically to define the sides of the gun ports, like this. Then thin plywood strips get painted red and glued to the insides of the gunwales. (Test fit before painting shown.) The fit was perfect, but after I had attached everything I discovered a gap between the gunwales and the horizontal notched strip. And so, deconstruction. I removed the notched strip and found that the gunwale pieces matched the notches in the MDF frames perfectly. I have no idea how the notched strip ended up so high, and on both sides. But I glued it back in the correct position. I also stained and attached the second deck with laser-marked planking. The next step is to pre-soak thin ply panels for the outer gunwales. Before I glued these I discovered another gap between them and that same notched strip. There wasn't enough material on the MDF frames to fair the hull any more, so I filled the gaps with 1/16" square strips. It looks like this will all be covered with another deck and rails later. So future Sphinx builders, keep an eye on that notched strip. Consider attaching the inner gunwale pieces first to make sure that strip sits right on top.
- 96 replies
-
- 11
-
-
- Sphinx
- Vanguard Models
- (and 2 more)
-
Hi Mugje, I just looked at your log. If you can do beautiful planking like that you can certainly do the rigging. I really enjoy building the masts and yards, and doing all the rigging. But I have four fully-rigged ships in my house, 3 in cases that I built from scratch, plus three modern warships in another very large case, plus two large tugs and several smaller ships. I just don't have room for another large ship. But who knows, I may just break down and rig this one too 😀
- 96 replies
-
- 4
-
-
- Sphinx
- Vanguard Models
- (and 2 more)
-
For the Beginner Modeler
rvchima replied to kgstakes's topic in Modeling tools and Workshop Equipment
I use my Proxxon oscillating sander constantly. It's perfect for removing laser char, and attachment nubs from photo-etched brass. The sandpaper pads that come with it are terrible but I make my own with double-sided tape and my favorite sandpaper. I even use foam sanding pads to make tiny pads that will follow contours.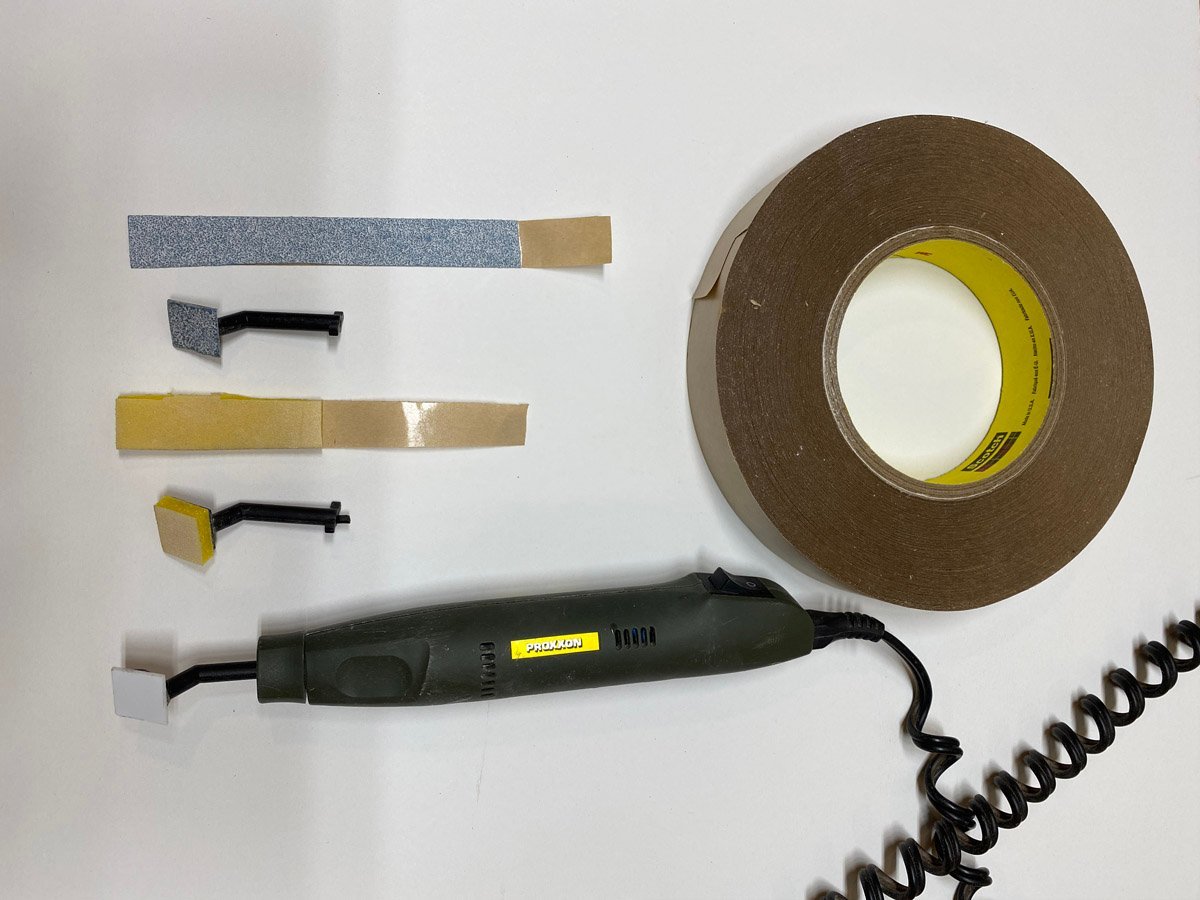
-
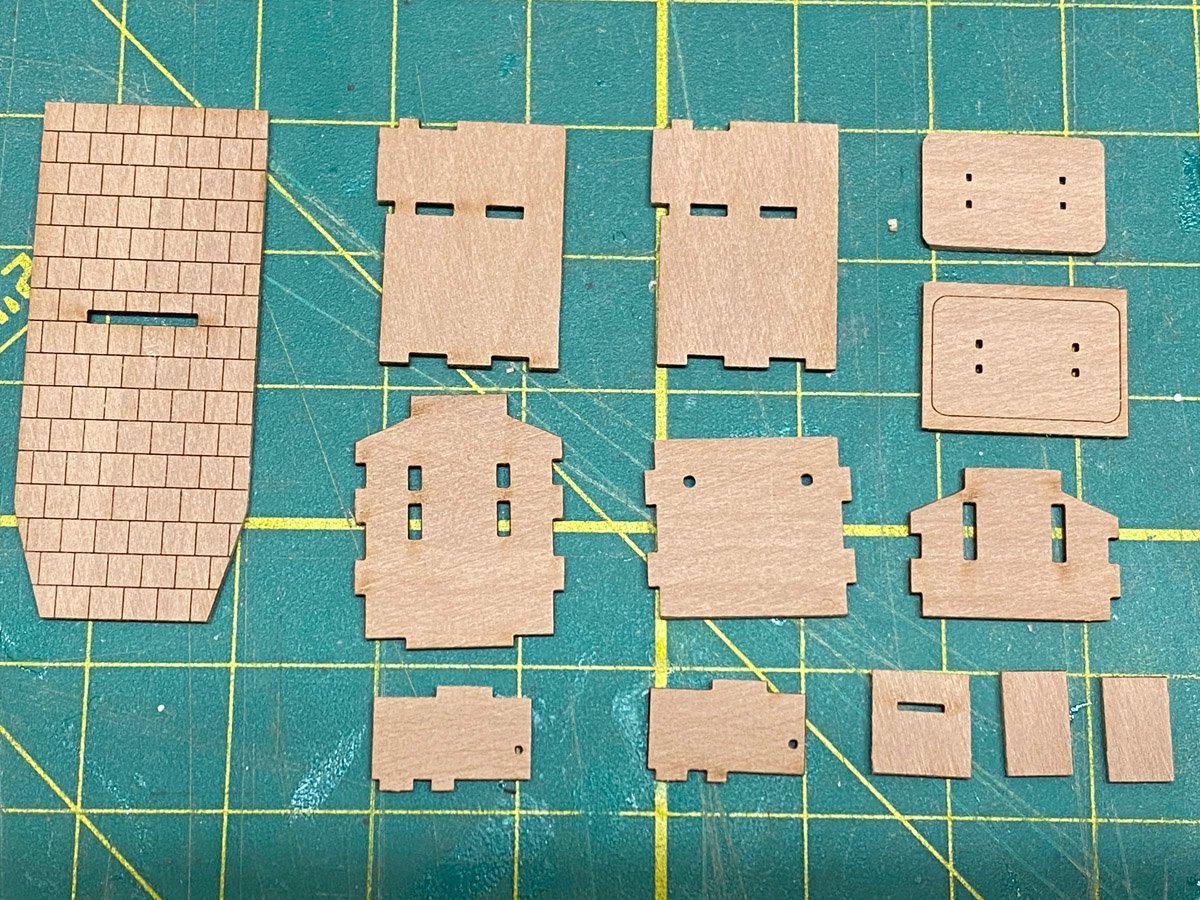
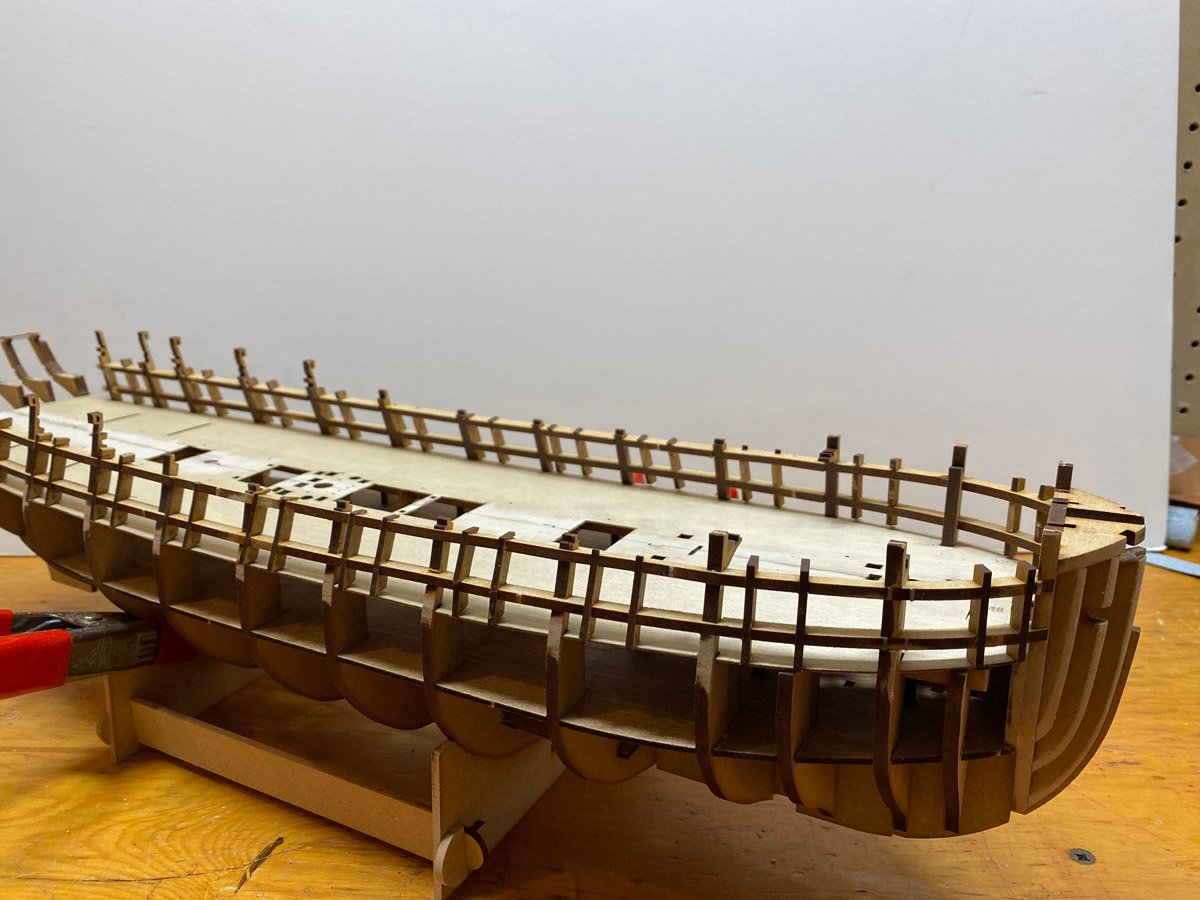
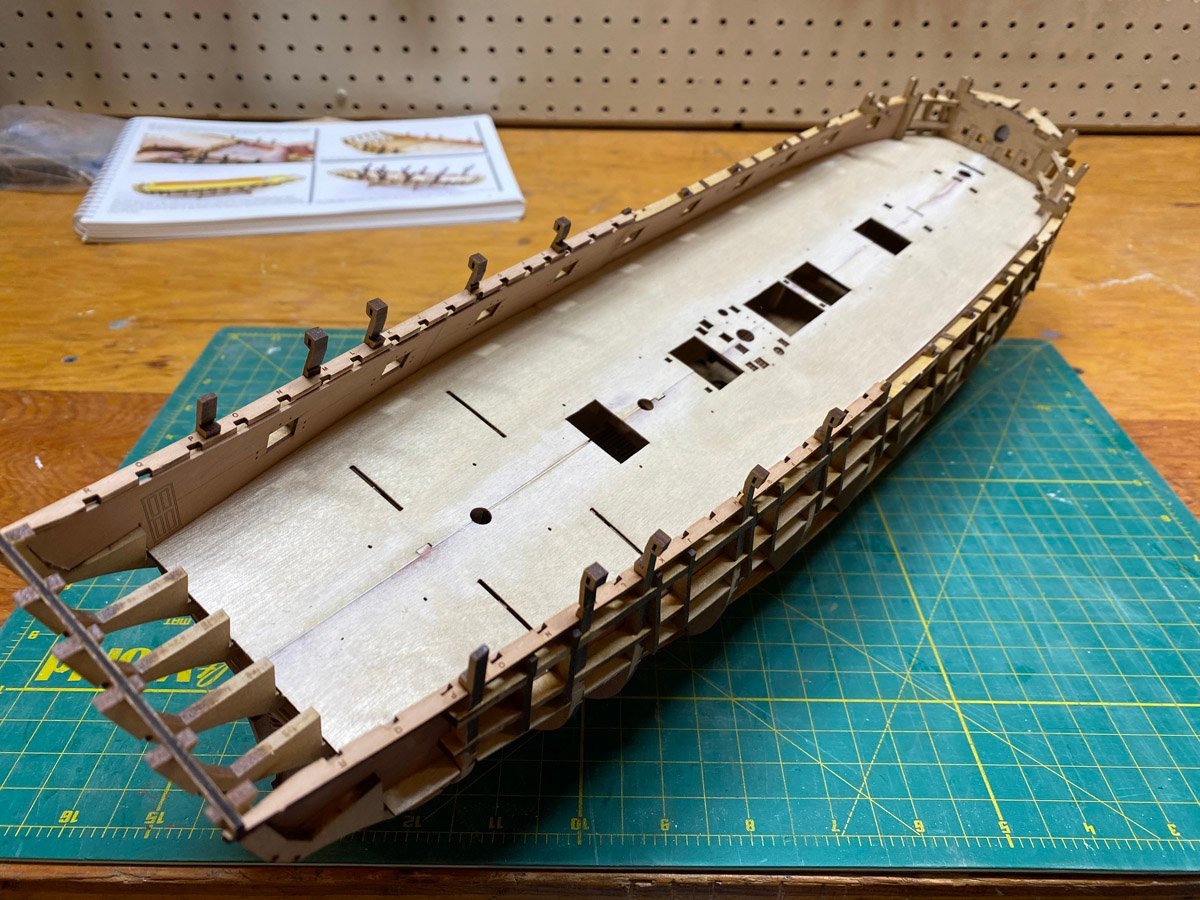
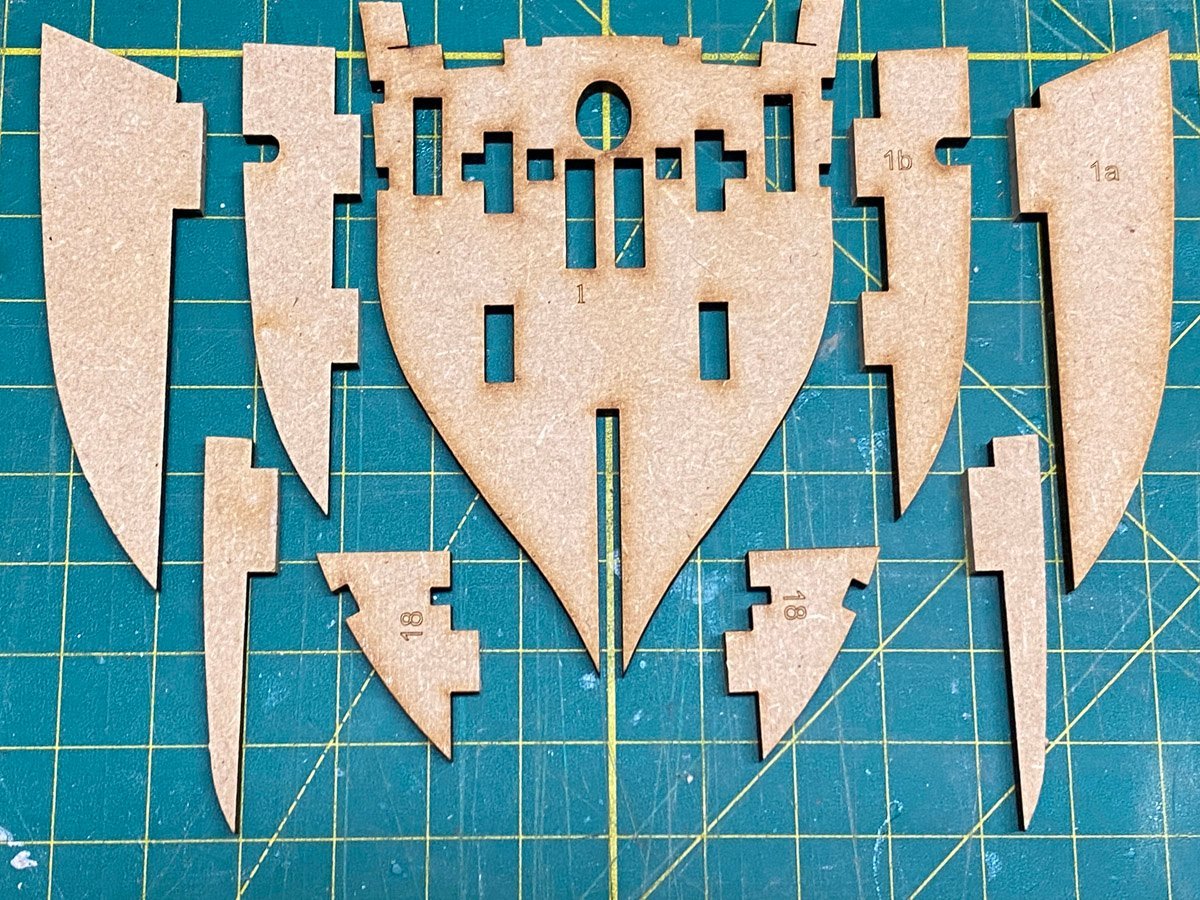
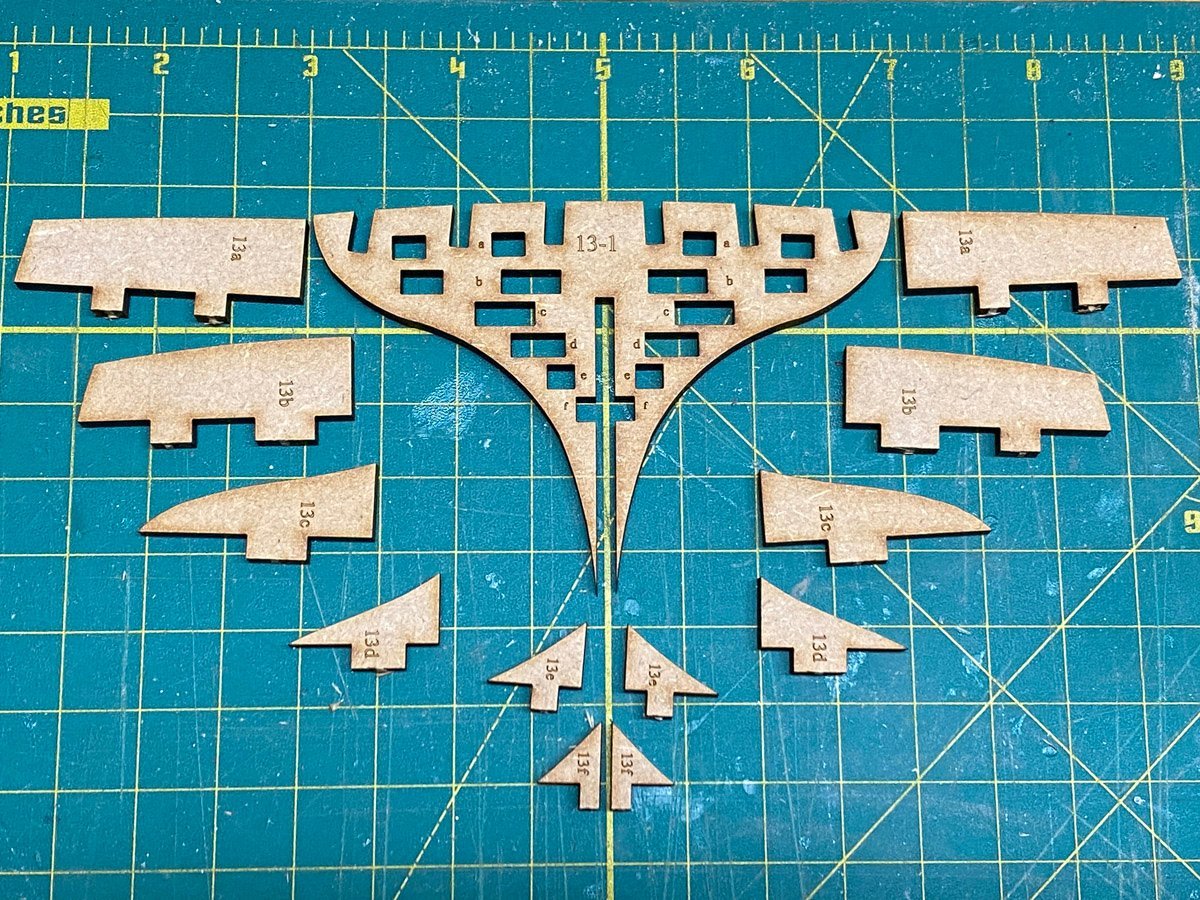
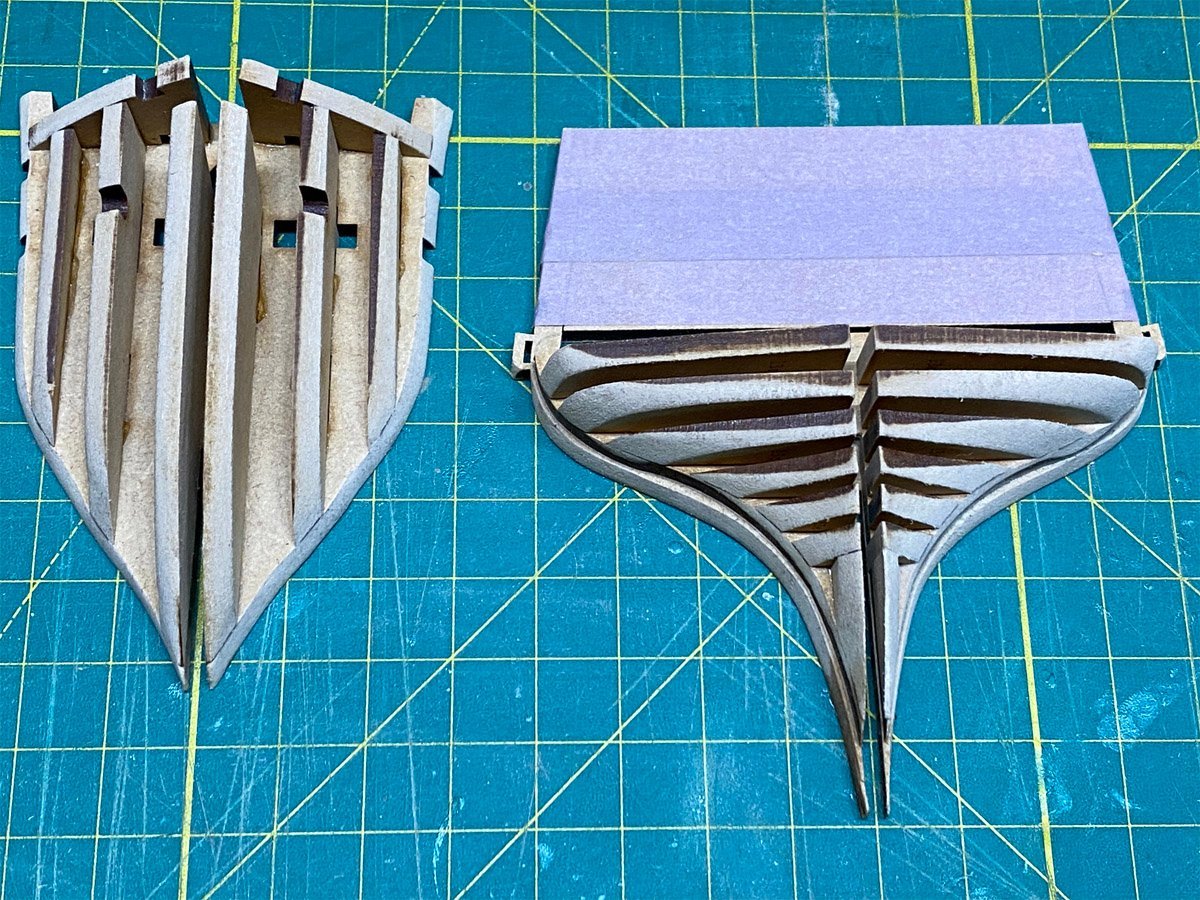
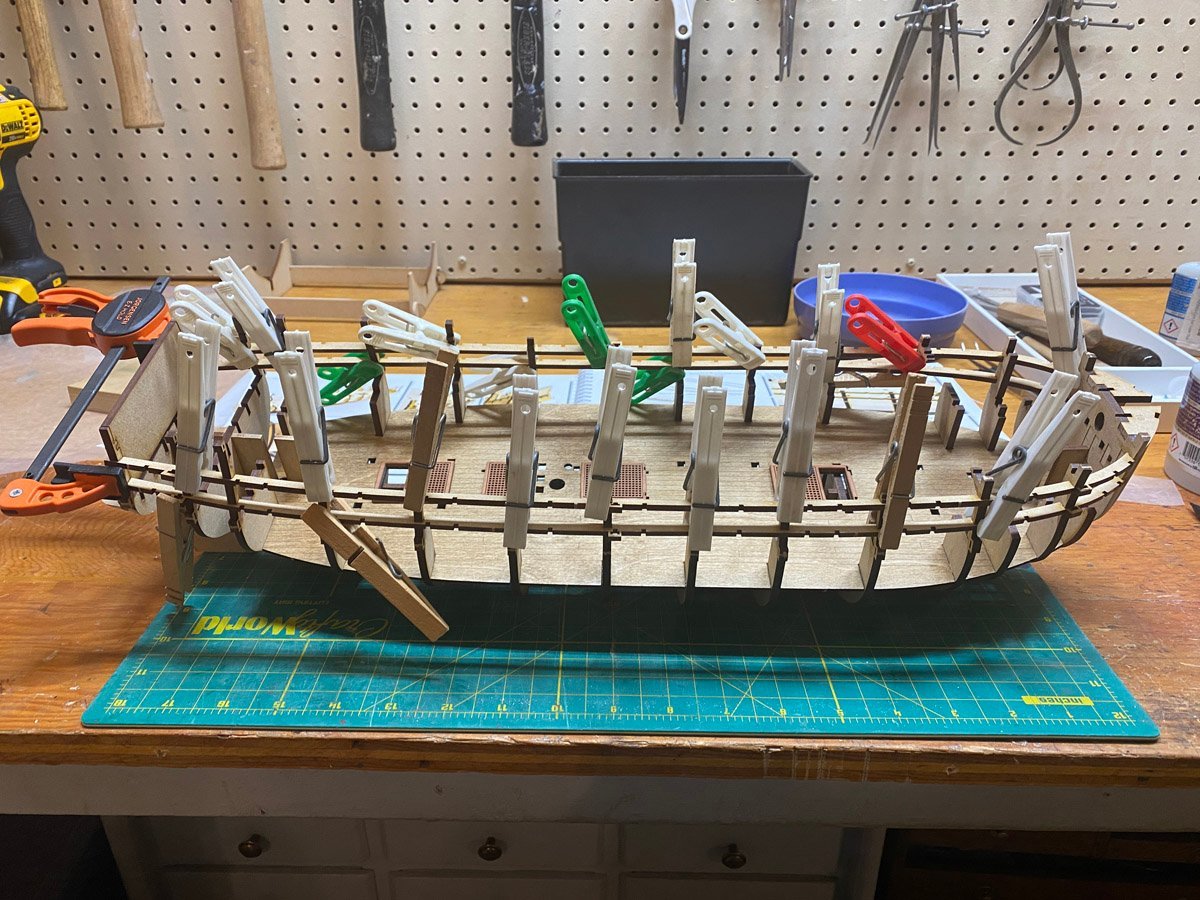
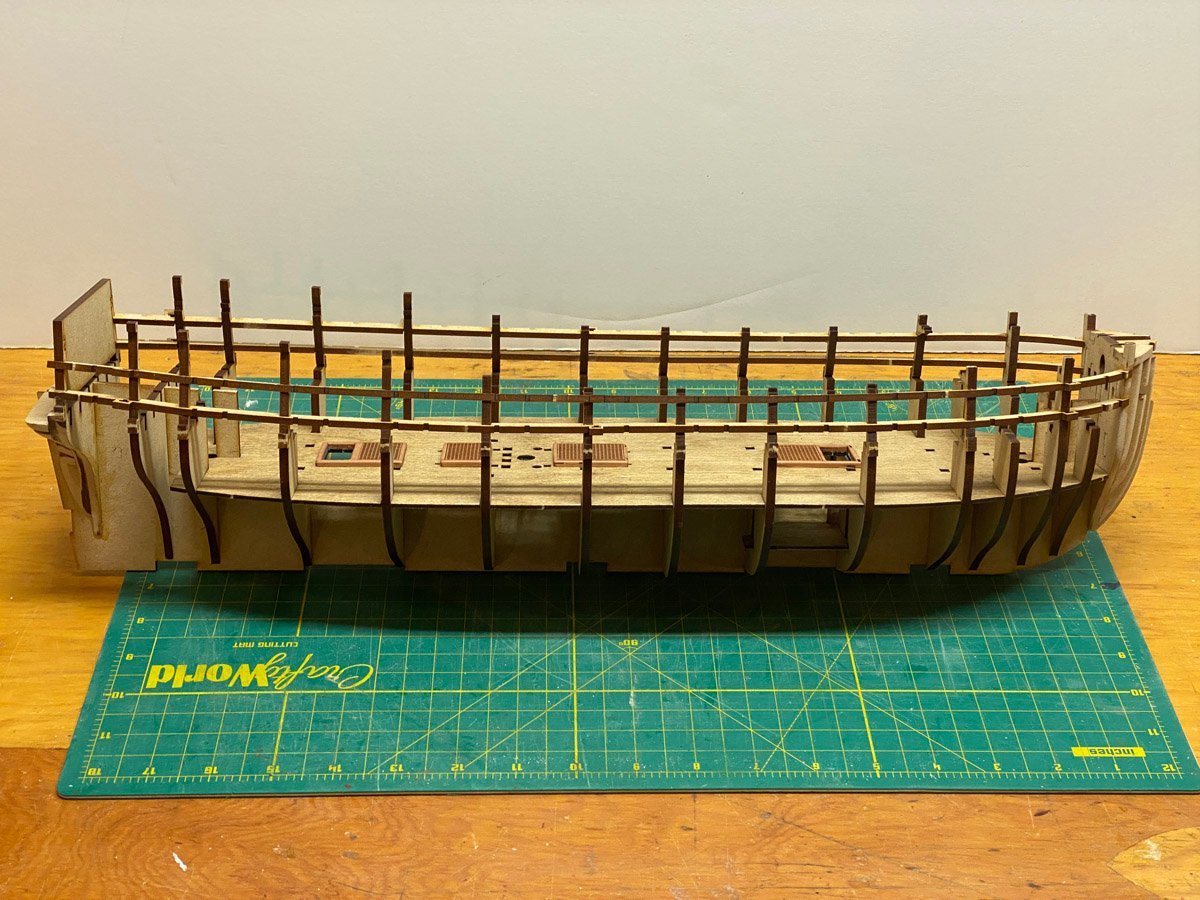
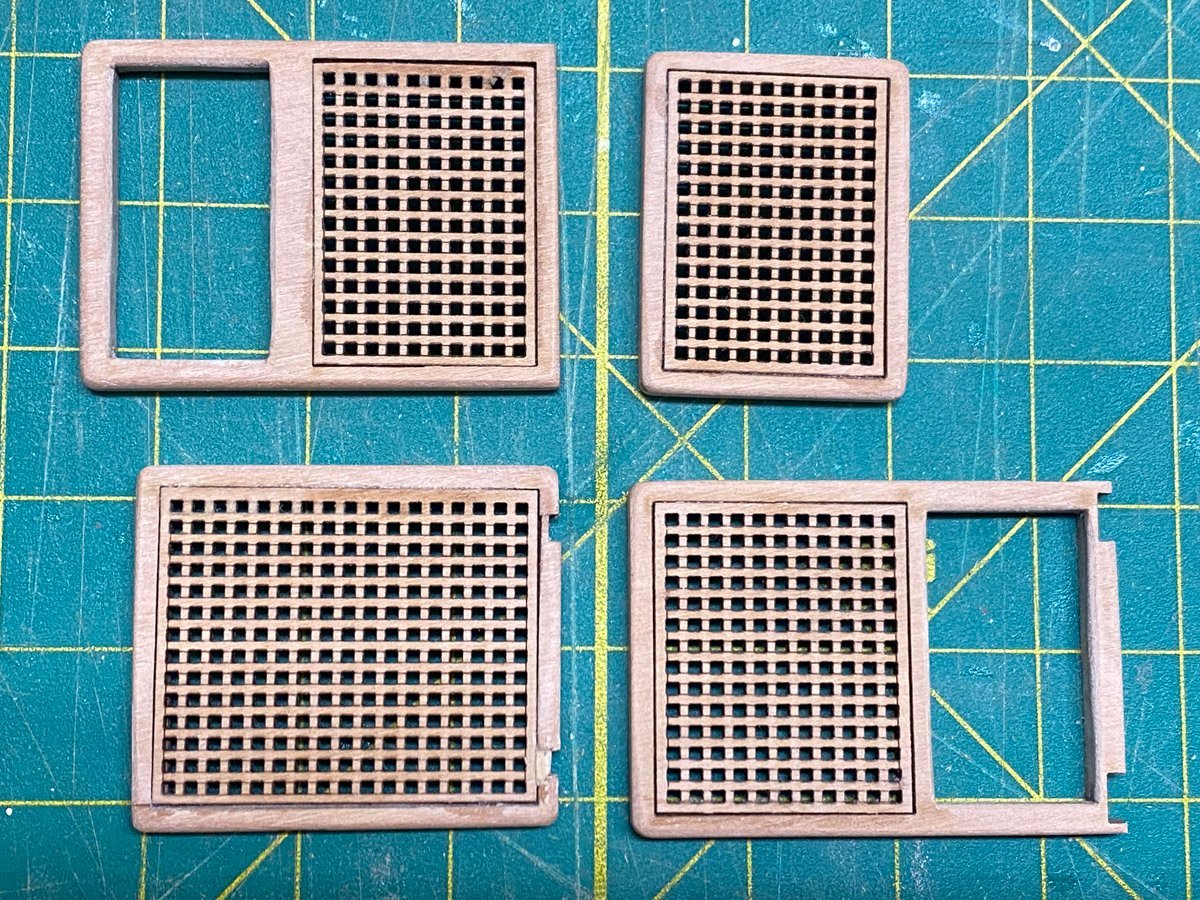
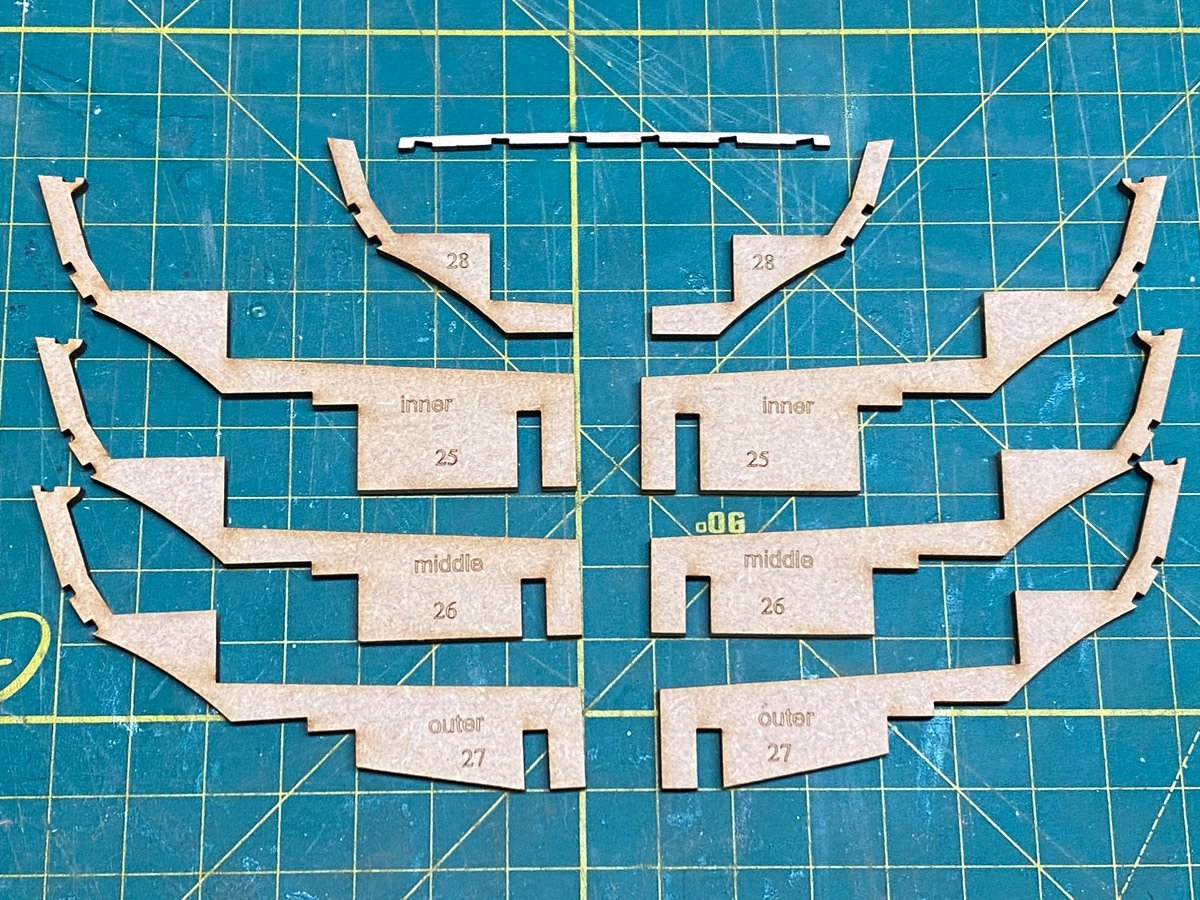
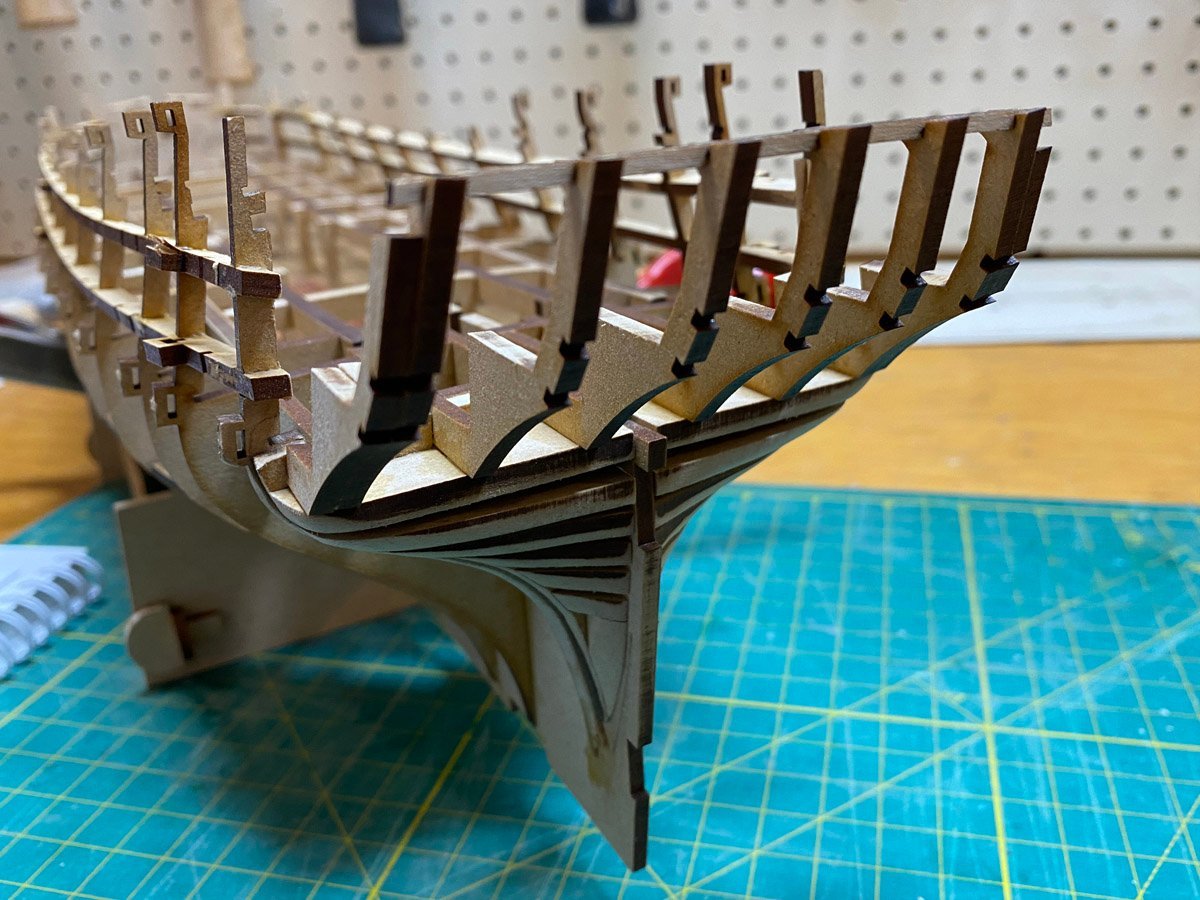
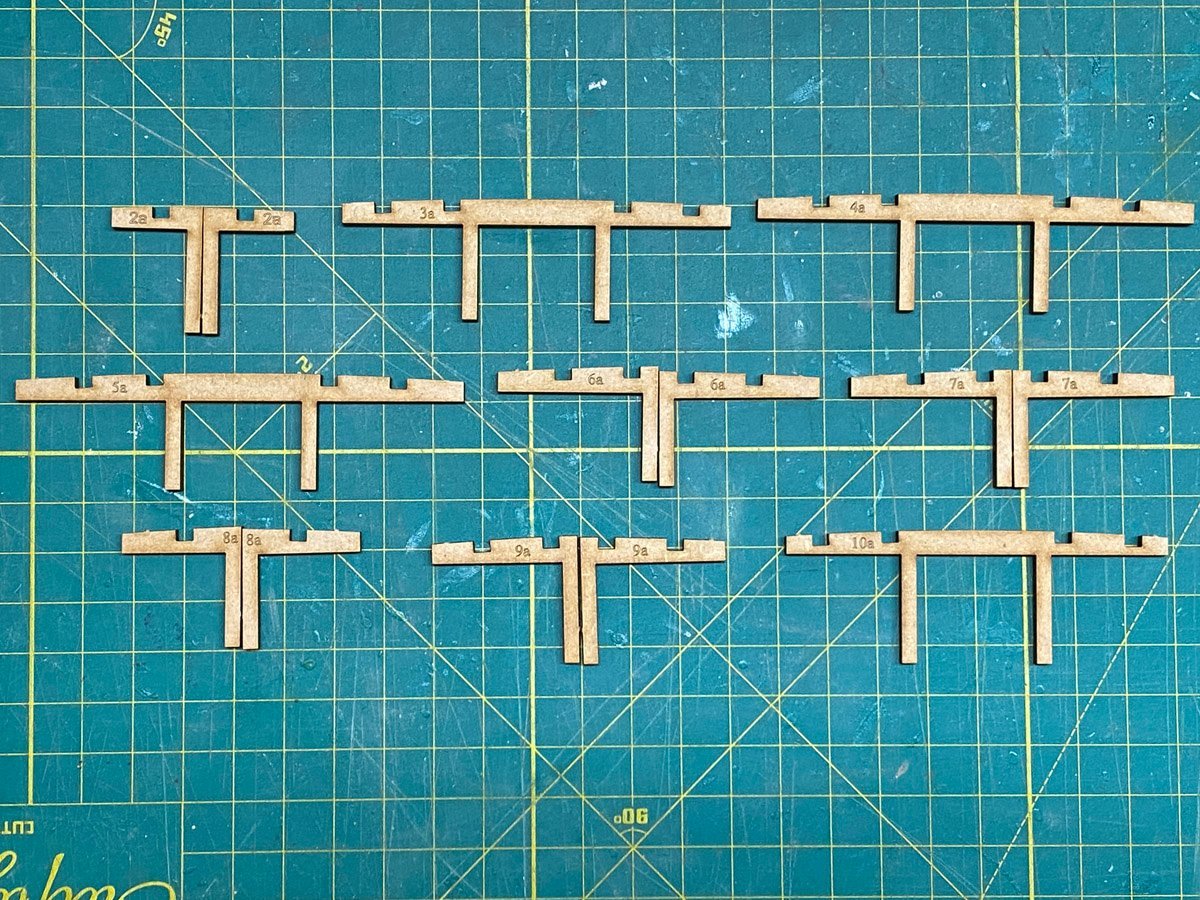
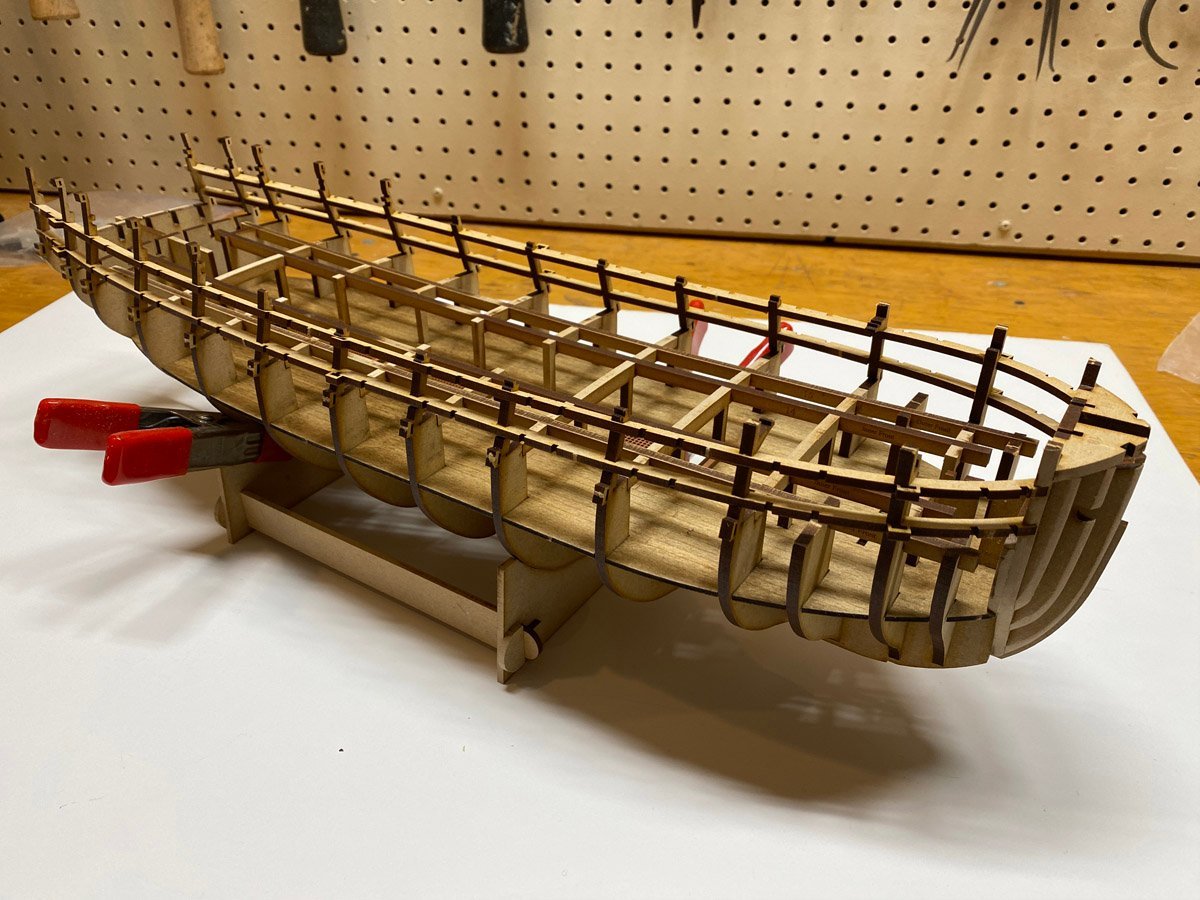
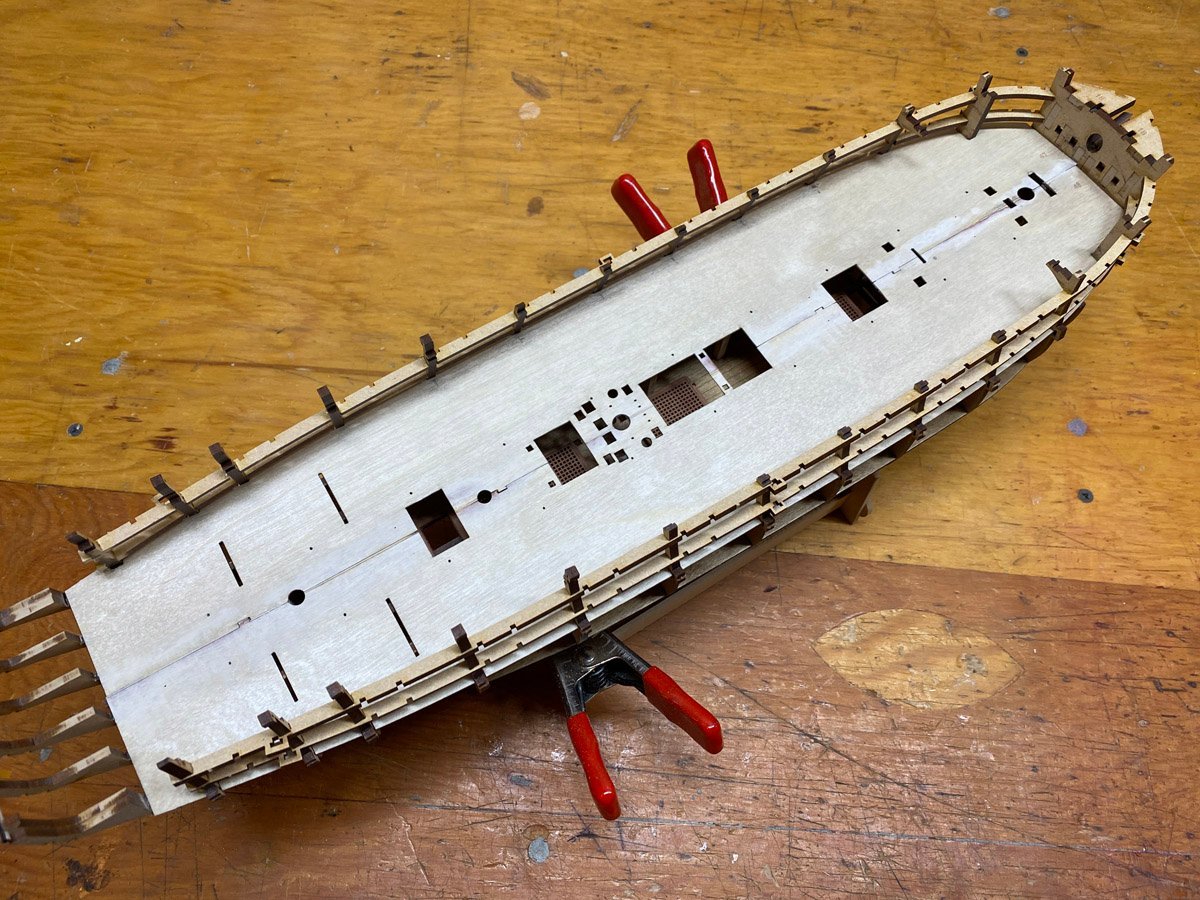
I started the model a week before Christmas and have managed to make a little progress. Bow & Stern Filler Bow and Stern Filler pieces are made from a number of small MDF parts attached to a backing plate and sanded to shape with a rotary tool. Sanding was a little bit intimidating but came out just fine. The purple take in the third photo holds a temporary piece in place to protect two delicate vertical frame pieces. Keel & Frames I forgot to take a photo of the basic keel with frames attached, so I'll jump ahead a little here. The keel is a single piece of MDF, and the frames drop perfectly into slots. Nothing is glued at first. The manual says to place the lower deck with laser-burned planking lines on the frames. Neither the manual nor most of the build logs say anything about finishing the sub deck, but I went ahead and used a coat of Minwax Golden Oak oil stain and three coats of satin Polycrylic spray. Now I realize that you can't see that deck on the finished model, but hey, I know it's there. Longitudinal gun port frames are attached to the top of the frames, then everything is glued with diluted PVA glue painted on from below. In this way the lower deck and longitudinal frames keep everything in alignment as the glue drys. You know the laser-cut wooden toys/puzzles that are so common now? Names like ROKR, UGEARS, and RoWood? So far this model reminded me of those - no skill necessary. I think that planking the hull will be a different story. Four lower coamings with gratings made of pear wood are assembled and attached to the lower deck. Note to Self: These precisely thin laser-cut pieces can be extremely delicate! Don't ask me how I know. The stern counter is made up of nine frames. Horizontal supports for the gun deck are attached next, and then longitudinal supports are attached on top of them. The kit includes a cradle to hold the model during construction. It matches two frames exactly, but until the hull is planked I am using two spring clamps to keep the hull from slipping off. Next the gun sub-deck is attached in two pieces. Remember what I said about "no skill necessary?" I take that back. The gun deck was very hard to fit. The notches were all a little tight, and the two pieces wouldn't quite match up along the center line. I placed, removed, sanded, and replaced the two pieces for hours, and still ended up with gaps between them. Eventually a nicer deck will go over top so it won't matter.
- 96 replies
-
- 14
-
-
- Sphinx
- Vanguard Models
- (and 2 more)
-
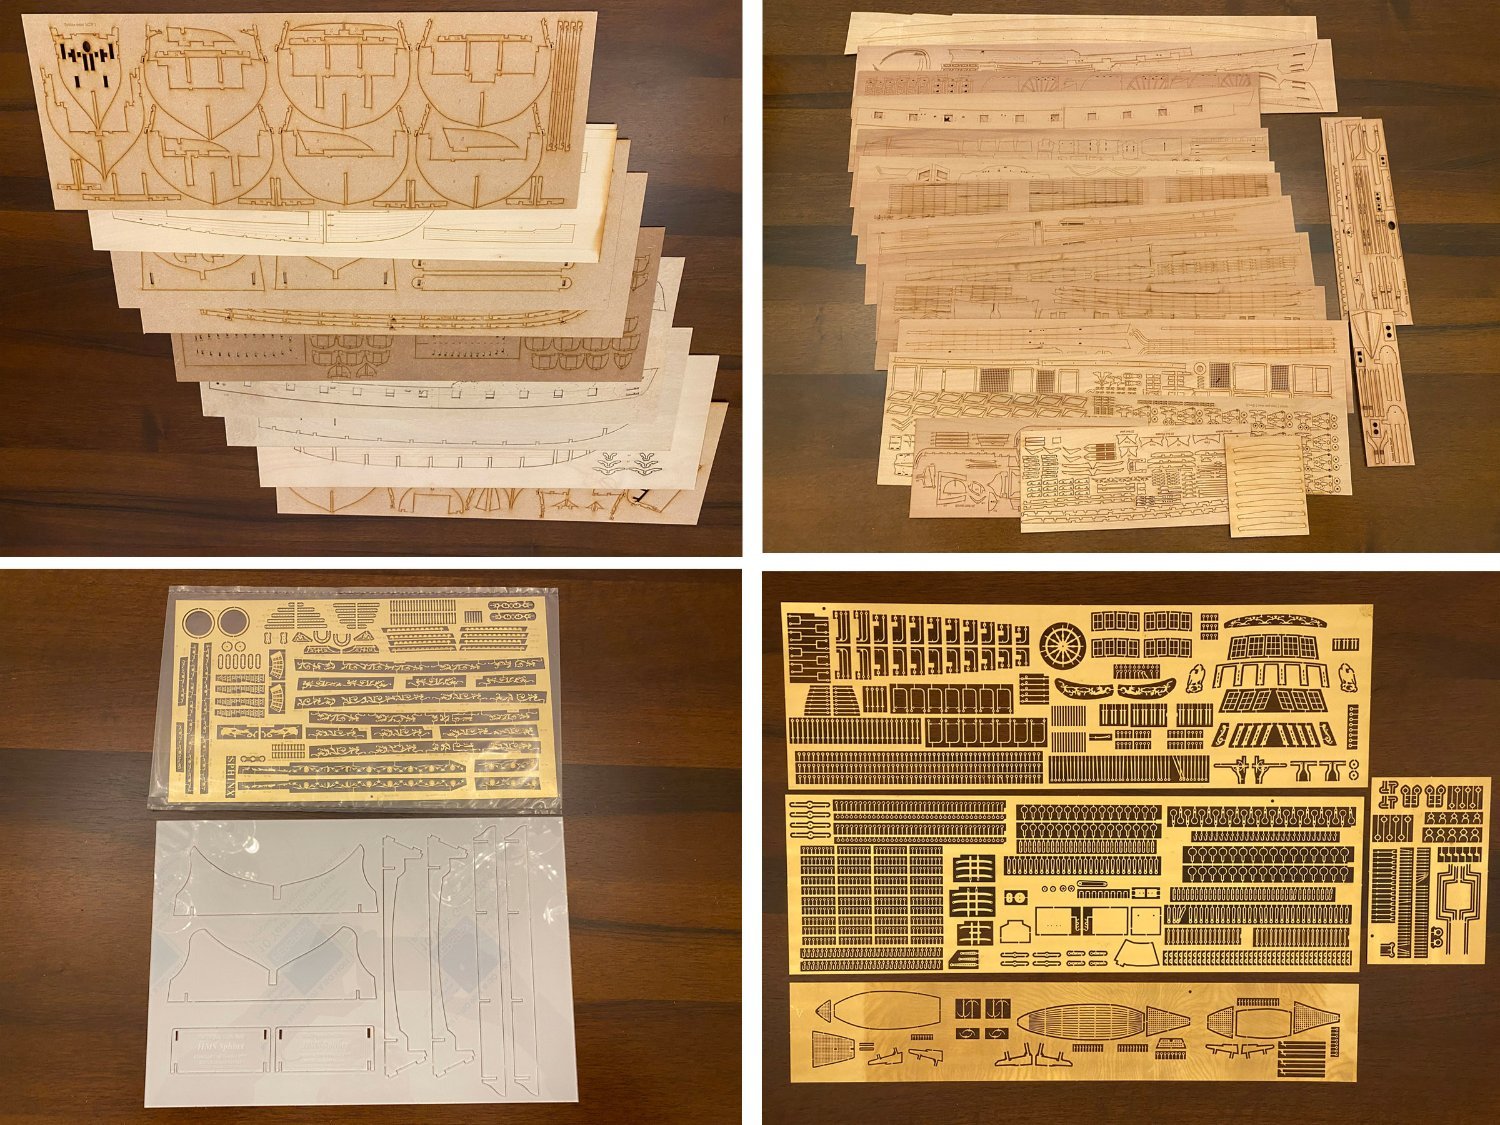
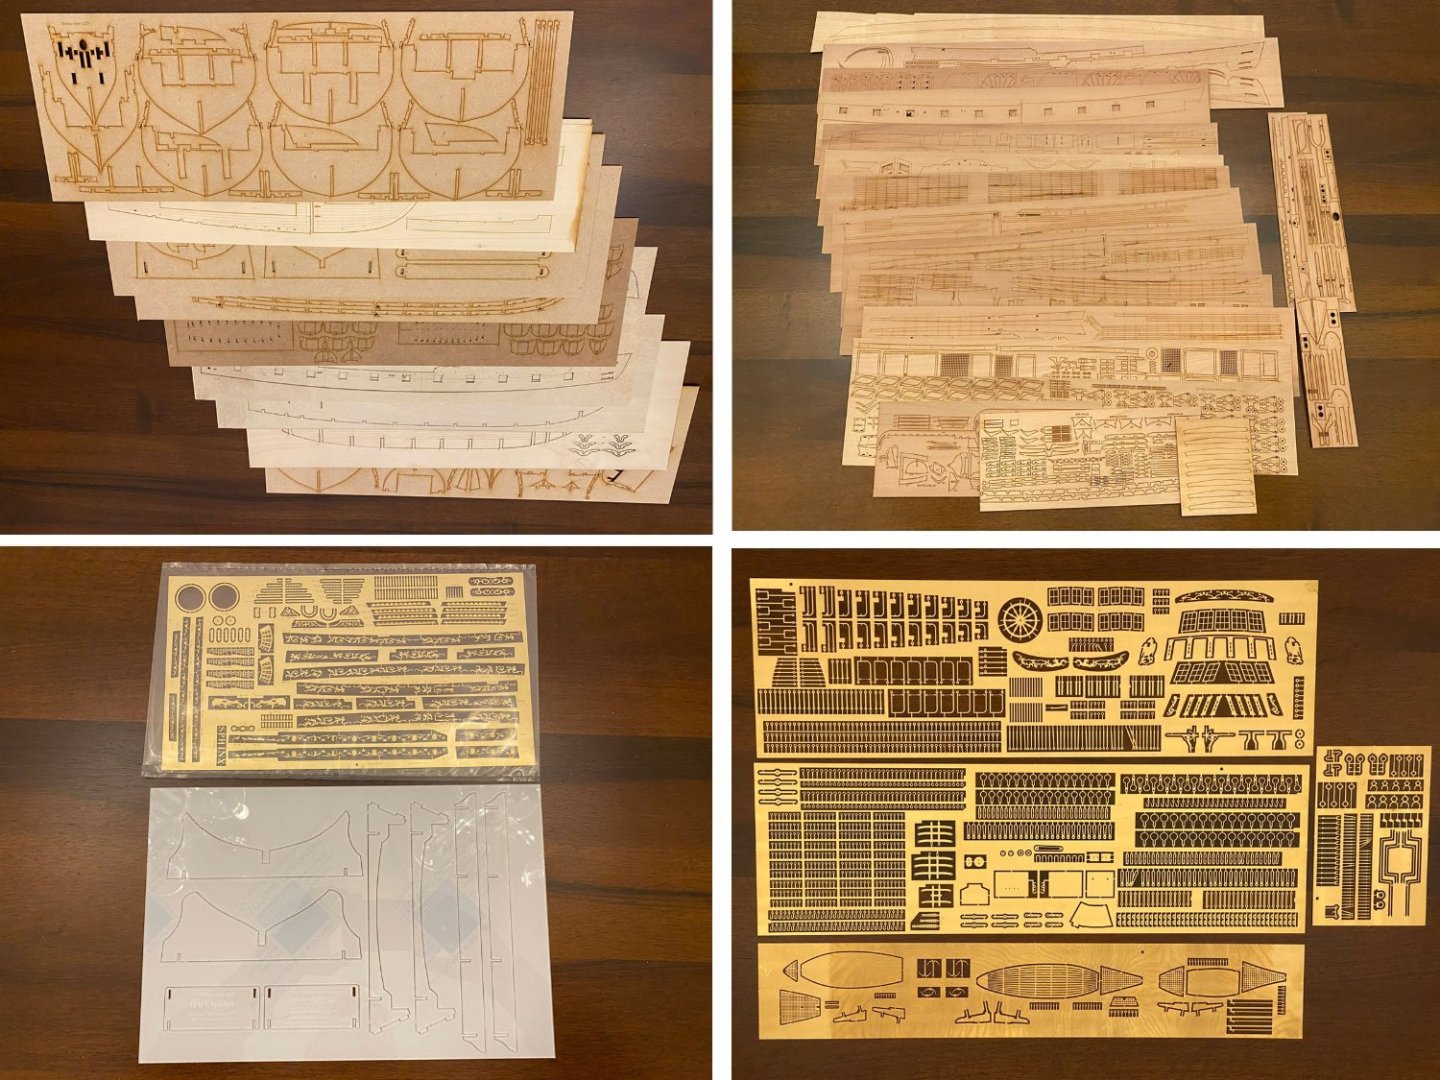
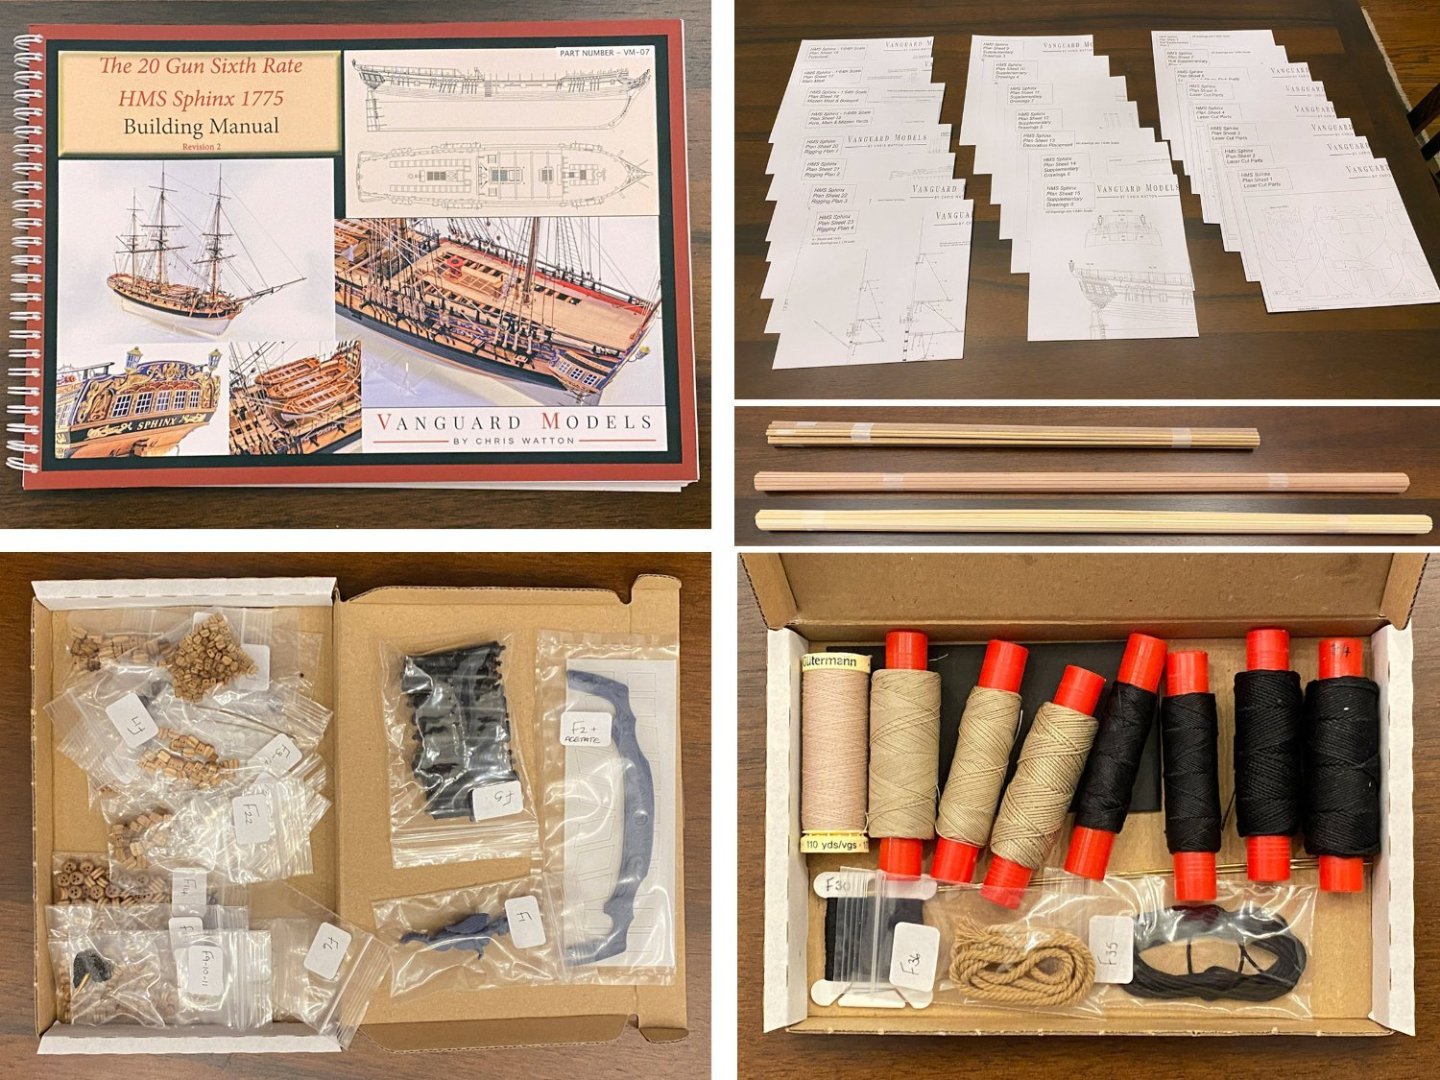
What's in the Box A photo of the box is at the top of my first post. The box weighs a hefty 13.5 pounds (6.1 kg). Here are a couple of composite photos of box contents. A lot of the weight is paper - a beautiful 152-page manual and 23 sheets of plans. The cannons, figurehead, and stern decoration are 3-D printed. The hull is double planked with lime wood and pear wood. The masts and yards are walnut. Most of the blocks and rigging material will go into my leftover box if I stop with a hull-only model. The kit includes 33 sheets of laser-cut MDF for the frames and pear wood for most everything else, 1 sheet of laser cut acetate for a stand, and 5 sheets of photo-etched parts.
- 96 replies
-
- 11
-
-
- Sphinx
- Vanguard Models
- (and 2 more)