


Beef Wellington
-
Posts
2,245 -
Joined
-
Last visited
Reputation Activity
-

 Beef Wellington got a reaction from BenD in HMS Jason by Beef Wellington - Caldercraft - 1:64 - Artois-class frigate modified from HMS Diana 1794
Not much progress, but I want to ask a question, so felt obliged to post a few photos
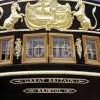
Progress made on the upper and lower counter rail. These need to follow quite a curve, more so than they appear, and were pre-bent to shape using a failed counter template I had kept. Seems very important visually to get a smooth curve. The ends of these rails will need to butt up against the side gallery rails and so were angled to approximately 45% in preparation. Using a single pin amidships proved to be the ticket here ensuring that the rail could be consistently placed while the ends were fine tuned - the small hole should be pretty easy to mask afterwards with filler. The top rail is not glued in place yet, but its possible to get a feel for the run of these rails. Overall, I'm rather relieved and pleased with how this turned out with the name placement.
So, to my question. The Diana kit provides two 'ladies' at either side of the stern fascia which are pretty good castings (represent the goddesses Hera and Athena from Jason's story) which I'd like to use. The tafferal is quite thick, and when compared to the AOTS diagram, the female figures appear to have some depth. I thought that by this time, complex carvings in the round would not be in vogue for economic reasons, so I'm wondering if what is illustrated is a simpler relief carving on an angled corner. If so, then the approach could be to simply angle the corner. The hesitation here is that after so much work on the stern, I'm wary of making a mistake...but I do like the more 'fitted' look in the AOTS picture as it seems to gradually transition the thickness of the tafferal in a visually pleasing way. Angling the corner would be easier with the upper counter rail off, but until that's decided its a roadblock to moving forward with the rest.
Opinions, thoughts and recommendations sought...
-
 Beef Wellington got a reaction from mobbsie in HMS Jason by Beef Wellington - Caldercraft - 1:64 - Artois-class frigate modified from HMS Diana 1794
So will be off on the family holiday for a few weeks this weekend so needing to step away. Here's where things stand, not wanting to jump into anything else as I know I'll be rushing, so "down tools" it is. The quarter gallery berthings are both now glued and the edge with the upper counter tidied up, everything else is dry fitted. The lower finishing proved to be quite the interesting pieces to make. The profile is very clear from the stern and side elevation, so combining that with the curve of the quarter gallery berthing and the straddle over the wale edge meant plenty of shaping, and checking to see things looked OK from all angles which was more of a challenge than I would have expected. Decided to dispense with the kit supplied metal molding for the drop as this didn't seem to match, and anyway seemed easier to take my own approach than fight with that. Drops still to be made.
The provides a PE "X" for each side, which I think is an approximation for some decoration looking at some of the Diana models. I'm leaning toward painting my own decorations here but will think a bit.
Hopefully pictures speak for themselves from the various angles...the macro gods are surely against me as the finish looks more acceptable in person
-
Beef Wellington got a reaction from mobbsie in HMS Jason by Beef Wellington - Caldercraft - 1:64 - Artois-class frigate modified from HMS Diana 1794
Thanks for the comments and likes everyone.
I did step away from the paintbrush. Lot of work and a little progress. The upper counter has been glued in place and trim added to the bottom of the lower counter. These were once again pre-shaped and as it was can be a handful. They highlight a few errors in the hull shape but shouldn't be noticeable to most (I hope). Now the work on the side galleries can continues in earnest. The main pieces had already been made up and just required a little fettling for now. The lights are all in temporarily as I find they do alter the perception of the surfaces.
Following a similar approach to that laid out in the instructions, the lower counters were made up from laminating some spare 3mm pear, there's nothing wrong with the kit supplied mahogany parts its just that I messed up the first time and there wasn't enough spare, something for others to consider. None of these items are glued in position yet.
The lower gallery piece was made up first, these were given a slight concave curve to avoid them appearing to sag, may need to do a little more here but I'm leaving alone for now. The drop is proving the most challenging because its so fiddly and needs to follow the lines of the lower counter - this is still work in progress and have a few mistakes already behind me. The upper finishing was cut from a 5mm pear which matched the ATOS profile dimensions best (the kit calls for 2x3mm laminated pieces) - this piece was a practice to get a sense for the suggested shape and will need more work.
Overall, everything seems to be fitting together as planned - although looking at the close up photos the camera is definitely not being my friend. The bottom of the gallery should be parallel to the wale, also match the angle of the stern fascia...which needs to match the angle of the rearmost false light.
So now things are now being positioned, the first non-fixable alignment issue becomes apparent! Looking at the AOTS profile, the bottom of the lower gallery should meet the top of the wale. The bottom of the trim will sit at the top of the lower gallery - so this is out by 3mm. Not much, it just means that the top of the drop will straddle the wale, and I'm not overly concerned as it seems looking at many other profiles that this positioning can be above or below the wale. As for the reason for those also building the kit, there are probably many contributing factors - and I'm sure its a cumulative effect from positioning of the stern fascia where I estimated it needed to go, the wale could also be slightly out of position, the kit sheer of the deck could be different and the bottom of the counter way back when framing could also have been out. Interestingly, had I used the 3mm strip above the wale for the black strake, and had this been painted black, this would have met exactly - but that I suspect would have been a lucky coincidence.
Bottom line, could be a lot worse, and I'm happy for now Onwards!
-
 Beef Wellington got a reaction from CiscoH in HMS Jason by Beef Wellington - Caldercraft - 1:64 - Artois-class frigate modified from HMS Diana 1794
So here's where I landed with the lettering. First the letters were painted in a darker brown and then overpainted with yellow ochre and few highlights. The goal here was not perfection as I new that was not going to remotely close, hopefully "impressionistic" describes it. Was very happy with the outcome, may touchup a little more but I'm forcing myself to stay away for now. The placement may look a little odd, but I had to estimate where the decorative rails will be so it should be correctly aligned when those are in place...something to potentially still go awry. I'm following the guidance that the letters should fill the upper counter leaving a little space between the rails. The photos are a little unkind and to my eye looks better in person.
First picture is the obvious comparison to the kit supplied PE letters, and you can see the perspective narrowing of the font. I placed the lights in the stern while fine tuning the angle as it seemed that these need be complimentary somehow, although the angle varies from every viewing angle.
-
Beef Wellington got a reaction from CiscoH in HMS Jason by Beef Wellington - Caldercraft - 1:64 - Artois-class frigate modified from HMS Diana 1794
Wow..Christian, Doug, Pat, Harvey, Carl, Tom, Wayne, VACorsair, Eamonn, and the likes, thanks guys for interest and the overly kind words. Narrative below will explain more, but think I've irrevocably stepped off the 'being happy with kit parts' ledge...this can only mean even slower progress...but perhaps more fun
I know I'm bouncing around a bit so apologies for that, but continuing foundational aspects which seem easier with the ship careened over on a towel.
Challenging Cheeks:
The kit supplied cheeks are hair rail are not that great. The cheeks themselves come nowhere near to fitting the hull, and I'm pretty sure the hull form is correct. The only option was to scratch my own cheeks. Aside from the fit, they are also seem rather undersized.
The next consideration was the hair rail and lower cheek, and decided to go whole hog and redo these as well. Given that there needs to be two of everything, I cheated and sparingly glued with PVA glue some 3mm sheet together and then cut to shape. The pieces were then separated using rubbing alcohol, and voila, 2 matching parts with the work of 1! These parts are still very slighty oversized to allow them to be fine tuned once other parts are made - necessary given I don't have any true plans to work from and that these pieces form quite a complex shape.
Photos below show hair rail prior to separation. The difference in dimensions is quite evident to that appearing in AOTS which I used as a guide for the scratch piece.
As a side note, the quality of the walnut parts are just not good, the main/false rail would need a lot a work to get presentable so suspect these will also be remade at some point.
The cheeks themselves took a long time (days) to get right due to the angled concave curve and lack of plans. Pretty happy with the results, though the parts still need some fine tuning as the rails are a little thick still I think. I'm hoping to use a scraper to give a profile to the edges, and a quick test shows that this should work OK even for a quick test. This also commits me to what will probably be my first simple carvings on the scrolls, but that's for another day.
Side by side comparison of scratch vs kit supplied pieces..
-
 Beef Wellington got a reaction from KARAVOKIRIS in HMS Jason by Beef Wellington - Caldercraft - 1:64 - Artois-class frigate modified from HMS Diana 1794
BE, Pat, Joe, Michael, Nils, Wayne, JPAM and the likes - thanks so much.
Ron - I'm hoping to make it, would love to see your fantastic Diana in person, my challenge is always football/soccer as I coach my sons team and that takes a big bite out of weekends at this time of year. If I could just arrange a game in New London then I'd be set!
Small update, I've been missing making posts but I have a little to share and hope pictures make up for it. Continuing to work on the more foundational aspects as I can. Paint has been applied to the upper hull - I used Tamiya matt XF-18 medium blue. I applied many layers of watered down paint and corrected larger imperfections, but left the slight imperfections from planking visible. I'm no painter and have limited experience with modern acrylics! Watering down the paint gives a nice smooth finish, but at the expense of surface uniformity - this should disappear completely once a clear sealer is applied so not concerned. I found that using a brush the undiluted paint dries so quickly that brush mark are inevitable. Lots of touchup to do which should be pretty easy, but I want to get a protective coat of poly onto the boxwood to reduce the risk of mishaps.
The waist rail has been applied on one side and the side steps added. I left gaps for the fenders, after having already cut these roughly to shape - using boxwood of course adds the number of pieces that need to be fabricated to keep consistent. I wont attach these until later. Steps were made using 2x2mm boxwood strip and a different profile scraper to the side molding and then cut length and shaping the ends. These hopefully give more of an impression of the fine molding as keeping that to scale was just too much for me. The upper and lower 2 steps are not glued yet. I think they pass the scale test with the assistance of Able Seaman Lewis.
I've also made up the anchor lining bolsters, not identified in the kit plans but approximated from AOTS and TFFM.
And the usual 'all over' shot of where things stand..
-
Beef Wellington got a reaction from CiscoH in HMS Jason by Beef Wellington - Caldercraft - 1:64 - Artois-class frigate modified from HMS Diana 1794
Thanks all for the "likes" and looking in. Think a point has been reached where all of the known big challenges have been addressed, or at least an approach developed, so I can start to have a bit of fun tackling some of the other odd pieces on the deck.
I am starting to seriously consider not rigging this model... the reason being that I certainly still have plenty ahead of me (and I still haven't even finished rigging 'Snake' yet) even without rigging, also the size of the hull is already quite large and adding the masts and spars will increase the needed space significantly. Curious on other's thoughts on this, hopefully it is not anathema. The other consideration is that I would like to move onto another build sooner than I realistically would if I were to fully rig. What this means is that I may spend a little extra time adding some details that I otherwise wouldn't, as I'm also wanting to leave my options open to possibly leave open some of the upper deck planking/scuttles.
4 additional standards have been added, 2 fore and 2 aft (still in process on larboard side) as these will be visible when the upper deck is in place. You can see the kit supplied riding bitts in place.
The scale of these bitts is actually pretty accurate, but I didn't like the shape so decided to make up my own...and while I was at it also made up some fore riding bitts following guidance from TFFM as the AOTS book is a little sparse on detail. These were fun little projects. I believe the forward elm battens were nailed on for easy replacement but I haven't tried to simulate that, not sure how this would be done however, or whether this is a "less is more" situation.
Previous mods allowed the bowsprit to be secured within the hull on a bowsprit step so this was also constructed. Going a little crazy some manger boards were also made up, these will not be readily (understatement) viewable but I think could add to the sense of depth when undergoing close inspection through a gun port , and help mask the obvious edge of the bulkhead against the deck. The dimensions of the bowsprit step are a little ambiguous, in retrospect I would have made it 2-3mm narrower, but given the likely visibility, this will not be redone.
The placement of the bowsprit step is a little dependent on some of the foremost beam, to be obsessive this should be a little further forward, but think it will be just fine where it is. The foremost deck beams required modification to work around some of the other alterations made up to this point but this was simple enough.
And with everything in place a couple of deck shots to get a feel for things...
-
Beef Wellington got a reaction from CiscoH in HMS Jason by Beef Wellington - Caldercraft - 1:64 - Artois-class frigate modified from HMS Diana 1794
Cheers gents.
Christian - I'm being consistent in using the Admiralty paints yellow ochre which I quite like. Constant handling of these parts seems to be no match for any paint and paint rubs off the high spots despite an undercoat. Should not be a problem to get looking OK when the time comes.
Cannon Conundrums (or "Armament Angst")
I felt I needed a bit of a change of pace while continuing to work slowly on the stern, and decided to get a head start on the cannons as I foresee these being a rather repetitive activity. Psychologically, it feels like I'm getting a head start on things a little by commencing work on these now rather than waiting until I have to do them.
The first decision was to finally decide on which barrels to go with. Photos below show 3 options, specifically left to right, Chuck's Syren offering, RB Models and the kit supplied barrels. I know I posted these pics in Andy's Diana log, but can't remember if I did here so pls forgive any repetition!
Kit provide barrels - Painful as it is, the kit provided ones just don't cut the mustard with the bore being too large, the muzzle not being the right shape and the pommel just way too big. Chuck's barrels are very nice indeed, while the length certainly works, the bore seems a little small and for a 1:64 18lb'er and overall the barrel is a little dainty to my eye RBs Models (44mm) are also very nicely shaped and to my eye seem to fit the needed proportions best. Each barrel is also supplied with a scale precut trunnion of high quality, so some labour would be saved there.
Next up, carriages. I had ordered a set of Chucks Syren carriages a while ago and finally got round to building one up in addition to a kit carriage for comparison. Pictures are self explanatory and show the kit carriage with kit barrel (left) with Syren carriage and RB models barrel (right). Making these up allowed all the possible permutations to be tried, but these are best comparison. Note - these were built over a number of very brief 10 minute sessions when I could escape to the boat yard, i.e. very quick and dirty, with quick paint job and no fittings.
Couple of things are apparent:
The kit walnut is not great, being very splintery with pronounced grain, and would require a lot of work to get an acceptable finish. The carriage is noticeably a little more squat, and the 2mm thickness of the ply looks less substantial, and the trucks a little on the small side. Similar level of finish work on the Syren laser cut parts gives a much better result. Dimensions all around look a little more pleasing to my eye.
The width of the Syren carriage were made slightly wider than the plans indicate to try and better scale to the RB barrel.
Final comparison was to place in situ. The RB/Syren combination seemed to sit nicely mid port. Placement of a quoin will need to be thought about as the barrel is probably already at approximately the right elevation. Feel the RB/Syren combo is clear winner, despite the additional investment that will be needed my view is that this will ultimately provide a more enjoyable building experience, especially as 28 of these puppies will need to be made up...
-
 Beef Wellington got a reaction from coxswain in HMS Jason by Beef Wellington - Caldercraft - 1:64 - Artois-class frigate modified from HMS Diana 1794
Not much progress, but I want to ask a question, so felt obliged to post a few photos
Progress made on the upper and lower counter rail. These need to follow quite a curve, more so than they appear, and were pre-bent to shape using a failed counter template I had kept. Seems very important visually to get a smooth curve. The ends of these rails will need to butt up against the side gallery rails and so were angled to approximately 45% in preparation. Using a single pin amidships proved to be the ticket here ensuring that the rail could be consistently placed while the ends were fine tuned - the small hole should be pretty easy to mask afterwards with filler. The top rail is not glued in place yet, but its possible to get a feel for the run of these rails. Overall, I'm rather relieved and pleased with how this turned out with the name placement.
So, to my question. The Diana kit provides two 'ladies' at either side of the stern fascia which are pretty good castings (represent the goddesses Hera and Athena from Jason's story) which I'd like to use. The tafferal is quite thick, and when compared to the AOTS diagram, the female figures appear to have some depth. I thought that by this time, complex carvings in the round would not be in vogue for economic reasons, so I'm wondering if what is illustrated is a simpler relief carving on an angled corner. If so, then the approach could be to simply angle the corner. The hesitation here is that after so much work on the stern, I'm wary of making a mistake...but I do like the more 'fitted' look in the AOTS picture as it seems to gradually transition the thickness of the tafferal in a visually pleasing way. Angling the corner would be easier with the upper counter rail off, but until that's decided its a roadblock to moving forward with the rest.
Opinions, thoughts and recommendations sought...
-
Beef Wellington got a reaction from coxswain in HMS Jason by Beef Wellington - Caldercraft - 1:64 - Artois-class frigate modified from HMS Diana 1794
Thanks all for the "likes" and looking in. Think a point has been reached where all of the known big challenges have been addressed, or at least an approach developed, so I can start to have a bit of fun tackling some of the other odd pieces on the deck.
I am starting to seriously consider not rigging this model... the reason being that I certainly still have plenty ahead of me (and I still haven't even finished rigging 'Snake' yet) even without rigging, also the size of the hull is already quite large and adding the masts and spars will increase the needed space significantly. Curious on other's thoughts on this, hopefully it is not anathema. The other consideration is that I would like to move onto another build sooner than I realistically would if I were to fully rig. What this means is that I may spend a little extra time adding some details that I otherwise wouldn't, as I'm also wanting to leave my options open to possibly leave open some of the upper deck planking/scuttles.
4 additional standards have been added, 2 fore and 2 aft (still in process on larboard side) as these will be visible when the upper deck is in place. You can see the kit supplied riding bitts in place.
The scale of these bitts is actually pretty accurate, but I didn't like the shape so decided to make up my own...and while I was at it also made up some fore riding bitts following guidance from TFFM as the AOTS book is a little sparse on detail. These were fun little projects. I believe the forward elm battens were nailed on for easy replacement but I haven't tried to simulate that, not sure how this would be done however, or whether this is a "less is more" situation.
Previous mods allowed the bowsprit to be secured within the hull on a bowsprit step so this was also constructed. Going a little crazy some manger boards were also made up, these will not be readily (understatement) viewable but I think could add to the sense of depth when undergoing close inspection through a gun port , and help mask the obvious edge of the bulkhead against the deck. The dimensions of the bowsprit step are a little ambiguous, in retrospect I would have made it 2-3mm narrower, but given the likely visibility, this will not be redone.
The placement of the bowsprit step is a little dependent on some of the foremost beam, to be obsessive this should be a little further forward, but think it will be just fine where it is. The foremost deck beams required modification to work around some of the other alterations made up to this point but this was simple enough.
And with everything in place a couple of deck shots to get a feel for things...
-
Beef Wellington got a reaction from mobbsie in HMS Jason by Beef Wellington - Caldercraft - 1:64 - Artois-class frigate modified from HMS Diana 1794
Thanks all for the "likes" and looking in. Think a point has been reached where all of the known big challenges have been addressed, or at least an approach developed, so I can start to have a bit of fun tackling some of the other odd pieces on the deck.
I am starting to seriously consider not rigging this model... the reason being that I certainly still have plenty ahead of me (and I still haven't even finished rigging 'Snake' yet) even without rigging, also the size of the hull is already quite large and adding the masts and spars will increase the needed space significantly. Curious on other's thoughts on this, hopefully it is not anathema. The other consideration is that I would like to move onto another build sooner than I realistically would if I were to fully rig. What this means is that I may spend a little extra time adding some details that I otherwise wouldn't, as I'm also wanting to leave my options open to possibly leave open some of the upper deck planking/scuttles.
4 additional standards have been added, 2 fore and 2 aft (still in process on larboard side) as these will be visible when the upper deck is in place. You can see the kit supplied riding bitts in place.
The scale of these bitts is actually pretty accurate, but I didn't like the shape so decided to make up my own...and while I was at it also made up some fore riding bitts following guidance from TFFM as the AOTS book is a little sparse on detail. These were fun little projects. I believe the forward elm battens were nailed on for easy replacement but I haven't tried to simulate that, not sure how this would be done however, or whether this is a "less is more" situation.
Previous mods allowed the bowsprit to be secured within the hull on a bowsprit step so this was also constructed. Going a little crazy some manger boards were also made up, these will not be readily (understatement) viewable but I think could add to the sense of depth when undergoing close inspection through a gun port , and help mask the obvious edge of the bulkhead against the deck. The dimensions of the bowsprit step are a little ambiguous, in retrospect I would have made it 2-3mm narrower, but given the likely visibility, this will not be redone.
The placement of the bowsprit step is a little dependent on some of the foremost beam, to be obsessive this should be a little further forward, but think it will be just fine where it is. The foremost deck beams required modification to work around some of the other alterations made up to this point but this was simple enough.
And with everything in place a couple of deck shots to get a feel for things...
-
 Beef Wellington got a reaction from Sjors in HMS Jason by Beef Wellington - Caldercraft - 1:64 - Artois-class frigate modified from HMS Diana 1794
Thanks all for the "likes" and looking in. Think a point has been reached where all of the known big challenges have been addressed, or at least an approach developed, so I can start to have a bit of fun tackling some of the other odd pieces on the deck.
I am starting to seriously consider not rigging this model... the reason being that I certainly still have plenty ahead of me (and I still haven't even finished rigging 'Snake' yet) even without rigging, also the size of the hull is already quite large and adding the masts and spars will increase the needed space significantly. Curious on other's thoughts on this, hopefully it is not anathema. The other consideration is that I would like to move onto another build sooner than I realistically would if I were to fully rig. What this means is that I may spend a little extra time adding some details that I otherwise wouldn't, as I'm also wanting to leave my options open to possibly leave open some of the upper deck planking/scuttles.
4 additional standards have been added, 2 fore and 2 aft (still in process on larboard side) as these will be visible when the upper deck is in place. You can see the kit supplied riding bitts in place.
The scale of these bitts is actually pretty accurate, but I didn't like the shape so decided to make up my own...and while I was at it also made up some fore riding bitts following guidance from TFFM as the AOTS book is a little sparse on detail. These were fun little projects. I believe the forward elm battens were nailed on for easy replacement but I haven't tried to simulate that, not sure how this would be done however, or whether this is a "less is more" situation.
Previous mods allowed the bowsprit to be secured within the hull on a bowsprit step so this was also constructed. Going a little crazy some manger boards were also made up, these will not be readily (understatement) viewable but I think could add to the sense of depth when undergoing close inspection through a gun port , and help mask the obvious edge of the bulkhead against the deck. The dimensions of the bowsprit step are a little ambiguous, in retrospect I would have made it 2-3mm narrower, but given the likely visibility, this will not be redone.
The placement of the bowsprit step is a little dependent on some of the foremost beam, to be obsessive this should be a little further forward, but think it will be just fine where it is. The foremost deck beams required modification to work around some of the other alterations made up to this point but this was simple enough.
And with everything in place a couple of deck shots to get a feel for things...
-
 Beef Wellington got a reaction from egkb in HMS Jason by Beef Wellington - Caldercraft - 1:64 - Artois-class frigate modified from HMS Diana 1794
Thanks all for the "likes" and looking in. Think a point has been reached where all of the known big challenges have been addressed, or at least an approach developed, so I can start to have a bit of fun tackling some of the other odd pieces on the deck.
I am starting to seriously consider not rigging this model... the reason being that I certainly still have plenty ahead of me (and I still haven't even finished rigging 'Snake' yet) even without rigging, also the size of the hull is already quite large and adding the masts and spars will increase the needed space significantly. Curious on other's thoughts on this, hopefully it is not anathema. The other consideration is that I would like to move onto another build sooner than I realistically would if I were to fully rig. What this means is that I may spend a little extra time adding some details that I otherwise wouldn't, as I'm also wanting to leave my options open to possibly leave open some of the upper deck planking/scuttles.
4 additional standards have been added, 2 fore and 2 aft (still in process on larboard side) as these will be visible when the upper deck is in place. You can see the kit supplied riding bitts in place.
The scale of these bitts is actually pretty accurate, but I didn't like the shape so decided to make up my own...and while I was at it also made up some fore riding bitts following guidance from TFFM as the AOTS book is a little sparse on detail. These were fun little projects. I believe the forward elm battens were nailed on for easy replacement but I haven't tried to simulate that, not sure how this would be done however, or whether this is a "less is more" situation.
Previous mods allowed the bowsprit to be secured within the hull on a bowsprit step so this was also constructed. Going a little crazy some manger boards were also made up, these will not be readily (understatement) viewable but I think could add to the sense of depth when undergoing close inspection through a gun port , and help mask the obvious edge of the bulkhead against the deck. The dimensions of the bowsprit step are a little ambiguous, in retrospect I would have made it 2-3mm narrower, but given the likely visibility, this will not be redone.
The placement of the bowsprit step is a little dependent on some of the foremost beam, to be obsessive this should be a little further forward, but think it will be just fine where it is. The foremost deck beams required modification to work around some of the other alterations made up to this point but this was simple enough.
And with everything in place a couple of deck shots to get a feel for things...
-
 Beef Wellington got a reaction from md1400cs in HMS Jason by Beef Wellington - Caldercraft - 1:64 - Artois-class frigate modified from HMS Diana 1794
Thanks all for the "likes" and looking in. Think a point has been reached where all of the known big challenges have been addressed, or at least an approach developed, so I can start to have a bit of fun tackling some of the other odd pieces on the deck.
I am starting to seriously consider not rigging this model... the reason being that I certainly still have plenty ahead of me (and I still haven't even finished rigging 'Snake' yet) even without rigging, also the size of the hull is already quite large and adding the masts and spars will increase the needed space significantly. Curious on other's thoughts on this, hopefully it is not anathema. The other consideration is that I would like to move onto another build sooner than I realistically would if I were to fully rig. What this means is that I may spend a little extra time adding some details that I otherwise wouldn't, as I'm also wanting to leave my options open to possibly leave open some of the upper deck planking/scuttles.
4 additional standards have been added, 2 fore and 2 aft (still in process on larboard side) as these will be visible when the upper deck is in place. You can see the kit supplied riding bitts in place.
The scale of these bitts is actually pretty accurate, but I didn't like the shape so decided to make up my own...and while I was at it also made up some fore riding bitts following guidance from TFFM as the AOTS book is a little sparse on detail. These were fun little projects. I believe the forward elm battens were nailed on for easy replacement but I haven't tried to simulate that, not sure how this would be done however, or whether this is a "less is more" situation.
Previous mods allowed the bowsprit to be secured within the hull on a bowsprit step so this was also constructed. Going a little crazy some manger boards were also made up, these will not be readily (understatement) viewable but I think could add to the sense of depth when undergoing close inspection through a gun port , and help mask the obvious edge of the bulkhead against the deck. The dimensions of the bowsprit step are a little ambiguous, in retrospect I would have made it 2-3mm narrower, but given the likely visibility, this will not be redone.
The placement of the bowsprit step is a little dependent on some of the foremost beam, to be obsessive this should be a little further forward, but think it will be just fine where it is. The foremost deck beams required modification to work around some of the other alterations made up to this point but this was simple enough.
And with everything in place a couple of deck shots to get a feel for things...
-
Beef Wellington got a reaction from coxswain in HMS Jason by Beef Wellington - Caldercraft - 1:64 - Artois-class frigate modified from HMS Diana 1794
Cheers gents.
Christian - I'm being consistent in using the Admiralty paints yellow ochre which I quite like. Constant handling of these parts seems to be no match for any paint and paint rubs off the high spots despite an undercoat. Should not be a problem to get looking OK when the time comes.
Cannon Conundrums (or "Armament Angst")
I felt I needed a bit of a change of pace while continuing to work slowly on the stern, and decided to get a head start on the cannons as I foresee these being a rather repetitive activity. Psychologically, it feels like I'm getting a head start on things a little by commencing work on these now rather than waiting until I have to do them.
The first decision was to finally decide on which barrels to go with. Photos below show 3 options, specifically left to right, Chuck's Syren offering, RB Models and the kit supplied barrels. I know I posted these pics in Andy's Diana log, but can't remember if I did here so pls forgive any repetition!
Kit provide barrels - Painful as it is, the kit provided ones just don't cut the mustard with the bore being too large, the muzzle not being the right shape and the pommel just way too big. Chuck's barrels are very nice indeed, while the length certainly works, the bore seems a little small and for a 1:64 18lb'er and overall the barrel is a little dainty to my eye RBs Models (44mm) are also very nicely shaped and to my eye seem to fit the needed proportions best. Each barrel is also supplied with a scale precut trunnion of high quality, so some labour would be saved there.
Next up, carriages. I had ordered a set of Chucks Syren carriages a while ago and finally got round to building one up in addition to a kit carriage for comparison. Pictures are self explanatory and show the kit carriage with kit barrel (left) with Syren carriage and RB models barrel (right). Making these up allowed all the possible permutations to be tried, but these are best comparison. Note - these were built over a number of very brief 10 minute sessions when I could escape to the boat yard, i.e. very quick and dirty, with quick paint job and no fittings.
Couple of things are apparent:
The kit walnut is not great, being very splintery with pronounced grain, and would require a lot of work to get an acceptable finish. The carriage is noticeably a little more squat, and the 2mm thickness of the ply looks less substantial, and the trucks a little on the small side. Similar level of finish work on the Syren laser cut parts gives a much better result. Dimensions all around look a little more pleasing to my eye.
The width of the Syren carriage were made slightly wider than the plans indicate to try and better scale to the RB barrel.
Final comparison was to place in situ. The RB/Syren combination seemed to sit nicely mid port. Placement of a quoin will need to be thought about as the barrel is probably already at approximately the right elevation. Feel the RB/Syren combo is clear winner, despite the additional investment that will be needed my view is that this will ultimately provide a more enjoyable building experience, especially as 28 of these puppies will need to be made up...
-
 Beef Wellington got a reaction from KenW in HMS Jason by Beef Wellington - Caldercraft - 1:64 - Artois-class frigate modified from HMS Diana 1794
Thanks all for the "likes" and looking in. Think a point has been reached where all of the known big challenges have been addressed, or at least an approach developed, so I can start to have a bit of fun tackling some of the other odd pieces on the deck.
I am starting to seriously consider not rigging this model... the reason being that I certainly still have plenty ahead of me (and I still haven't even finished rigging 'Snake' yet) even without rigging, also the size of the hull is already quite large and adding the masts and spars will increase the needed space significantly. Curious on other's thoughts on this, hopefully it is not anathema. The other consideration is that I would like to move onto another build sooner than I realistically would if I were to fully rig. What this means is that I may spend a little extra time adding some details that I otherwise wouldn't, as I'm also wanting to leave my options open to possibly leave open some of the upper deck planking/scuttles.
4 additional standards have been added, 2 fore and 2 aft (still in process on larboard side) as these will be visible when the upper deck is in place. You can see the kit supplied riding bitts in place.
The scale of these bitts is actually pretty accurate, but I didn't like the shape so decided to make up my own...and while I was at it also made up some fore riding bitts following guidance from TFFM as the AOTS book is a little sparse on detail. These were fun little projects. I believe the forward elm battens were nailed on for easy replacement but I haven't tried to simulate that, not sure how this would be done however, or whether this is a "less is more" situation.
Previous mods allowed the bowsprit to be secured within the hull on a bowsprit step so this was also constructed. Going a little crazy some manger boards were also made up, these will not be readily (understatement) viewable but I think could add to the sense of depth when undergoing close inspection through a gun port , and help mask the obvious edge of the bulkhead against the deck. The dimensions of the bowsprit step are a little ambiguous, in retrospect I would have made it 2-3mm narrower, but given the likely visibility, this will not be redone.
The placement of the bowsprit step is a little dependent on some of the foremost beam, to be obsessive this should be a little further forward, but think it will be just fine where it is. The foremost deck beams required modification to work around some of the other alterations made up to this point but this was simple enough.
And with everything in place a couple of deck shots to get a feel for things...
-
 Beef Wellington got a reaction from hamilton in HMS Jason by Beef Wellington - Caldercraft - 1:64 - Artois-class frigate modified from HMS Diana 1794
Thanks all for the "likes" and looking in. Think a point has been reached where all of the known big challenges have been addressed, or at least an approach developed, so I can start to have a bit of fun tackling some of the other odd pieces on the deck.
I am starting to seriously consider not rigging this model... the reason being that I certainly still have plenty ahead of me (and I still haven't even finished rigging 'Snake' yet) even without rigging, also the size of the hull is already quite large and adding the masts and spars will increase the needed space significantly. Curious on other's thoughts on this, hopefully it is not anathema. The other consideration is that I would like to move onto another build sooner than I realistically would if I were to fully rig. What this means is that I may spend a little extra time adding some details that I otherwise wouldn't, as I'm also wanting to leave my options open to possibly leave open some of the upper deck planking/scuttles.
4 additional standards have been added, 2 fore and 2 aft (still in process on larboard side) as these will be visible when the upper deck is in place. You can see the kit supplied riding bitts in place.
The scale of these bitts is actually pretty accurate, but I didn't like the shape so decided to make up my own...and while I was at it also made up some fore riding bitts following guidance from TFFM as the AOTS book is a little sparse on detail. These were fun little projects. I believe the forward elm battens were nailed on for easy replacement but I haven't tried to simulate that, not sure how this would be done however, or whether this is a "less is more" situation.
Previous mods allowed the bowsprit to be secured within the hull on a bowsprit step so this was also constructed. Going a little crazy some manger boards were also made up, these will not be readily (understatement) viewable but I think could add to the sense of depth when undergoing close inspection through a gun port , and help mask the obvious edge of the bulkhead against the deck. The dimensions of the bowsprit step are a little ambiguous, in retrospect I would have made it 2-3mm narrower, but given the likely visibility, this will not be redone.
The placement of the bowsprit step is a little dependent on some of the foremost beam, to be obsessive this should be a little further forward, but think it will be just fine where it is. The foremost deck beams required modification to work around some of the other alterations made up to this point but this was simple enough.
And with everything in place a couple of deck shots to get a feel for things...
-
 Beef Wellington got a reaction from marktiedens in HMS Jason by Beef Wellington - Caldercraft - 1:64 - Artois-class frigate modified from HMS Diana 1794
Thanks all for the "likes" and looking in. Think a point has been reached where all of the known big challenges have been addressed, or at least an approach developed, so I can start to have a bit of fun tackling some of the other odd pieces on the deck.
I am starting to seriously consider not rigging this model... the reason being that I certainly still have plenty ahead of me (and I still haven't even finished rigging 'Snake' yet) even without rigging, also the size of the hull is already quite large and adding the masts and spars will increase the needed space significantly. Curious on other's thoughts on this, hopefully it is not anathema. The other consideration is that I would like to move onto another build sooner than I realistically would if I were to fully rig. What this means is that I may spend a little extra time adding some details that I otherwise wouldn't, as I'm also wanting to leave my options open to possibly leave open some of the upper deck planking/scuttles.
4 additional standards have been added, 2 fore and 2 aft (still in process on larboard side) as these will be visible when the upper deck is in place. You can see the kit supplied riding bitts in place.
The scale of these bitts is actually pretty accurate, but I didn't like the shape so decided to make up my own...and while I was at it also made up some fore riding bitts following guidance from TFFM as the AOTS book is a little sparse on detail. These were fun little projects. I believe the forward elm battens were nailed on for easy replacement but I haven't tried to simulate that, not sure how this would be done however, or whether this is a "less is more" situation.
Previous mods allowed the bowsprit to be secured within the hull on a bowsprit step so this was also constructed. Going a little crazy some manger boards were also made up, these will not be readily (understatement) viewable but I think could add to the sense of depth when undergoing close inspection through a gun port , and help mask the obvious edge of the bulkhead against the deck. The dimensions of the bowsprit step are a little ambiguous, in retrospect I would have made it 2-3mm narrower, but given the likely visibility, this will not be redone.
The placement of the bowsprit step is a little dependent on some of the foremost beam, to be obsessive this should be a little further forward, but think it will be just fine where it is. The foremost deck beams required modification to work around some of the other alterations made up to this point but this was simple enough.
And with everything in place a couple of deck shots to get a feel for things...
-
 Beef Wellington got a reaction from Gahm in HMS Jason by Beef Wellington - Caldercraft - 1:64 - Artois-class frigate modified from HMS Diana 1794
Thanks all for the "likes" and looking in. Think a point has been reached where all of the known big challenges have been addressed, or at least an approach developed, so I can start to have a bit of fun tackling some of the other odd pieces on the deck.
I am starting to seriously consider not rigging this model... the reason being that I certainly still have plenty ahead of me (and I still haven't even finished rigging 'Snake' yet) even without rigging, also the size of the hull is already quite large and adding the masts and spars will increase the needed space significantly. Curious on other's thoughts on this, hopefully it is not anathema. The other consideration is that I would like to move onto another build sooner than I realistically would if I were to fully rig. What this means is that I may spend a little extra time adding some details that I otherwise wouldn't, as I'm also wanting to leave my options open to possibly leave open some of the upper deck planking/scuttles.
4 additional standards have been added, 2 fore and 2 aft (still in process on larboard side) as these will be visible when the upper deck is in place. You can see the kit supplied riding bitts in place.
The scale of these bitts is actually pretty accurate, but I didn't like the shape so decided to make up my own...and while I was at it also made up some fore riding bitts following guidance from TFFM as the AOTS book is a little sparse on detail. These were fun little projects. I believe the forward elm battens were nailed on for easy replacement but I haven't tried to simulate that, not sure how this would be done however, or whether this is a "less is more" situation.
Previous mods allowed the bowsprit to be secured within the hull on a bowsprit step so this was also constructed. Going a little crazy some manger boards were also made up, these will not be readily (understatement) viewable but I think could add to the sense of depth when undergoing close inspection through a gun port , and help mask the obvious edge of the bulkhead against the deck. The dimensions of the bowsprit step are a little ambiguous, in retrospect I would have made it 2-3mm narrower, but given the likely visibility, this will not be redone.
The placement of the bowsprit step is a little dependent on some of the foremost beam, to be obsessive this should be a little further forward, but think it will be just fine where it is. The foremost deck beams required modification to work around some of the other alterations made up to this point but this was simple enough.
And with everything in place a couple of deck shots to get a feel for things...
-
 Beef Wellington reacted to BANYAN in Asphalt/bitumen for staining wood?
Hi Neil, very early in my Endeavour build i followed a recommendation to paint the bottom of my hull with bitumen. I acquired a small can of the bitumen based undercar preserving compound and applied it as was. It looked great and really simulated the 'brown stuff' used on the hulls before white stuff really well. It dried reasonably well but as Druxey states not completely.
Then along came summer and you can guess what happened, it MELTED and went all over the base etc. Lesson learned, I scraped it off then tried to remove the residue with turps etc but the liquid part of the solution had really penetrated the wood. the end result was an unexpected really pleasing outcome as it applied a very nice patina to the walnut planks. You can see the difference in the following photo.
1. Don't apply as bitumen!
2. Look for smaller quantities in the under car body/chassis preservation compounds .
cheers
Pat
-
 Beef Wellington got a reaction from Dubz in HMS Jason by Beef Wellington - Caldercraft - 1:64 - Artois-class frigate modified from HMS Diana 1794
Thanks all for the "likes" and looking in. Think a point has been reached where all of the known big challenges have been addressed, or at least an approach developed, so I can start to have a bit of fun tackling some of the other odd pieces on the deck.
I am starting to seriously consider not rigging this model... the reason being that I certainly still have plenty ahead of me (and I still haven't even finished rigging 'Snake' yet) even without rigging, also the size of the hull is already quite large and adding the masts and spars will increase the needed space significantly. Curious on other's thoughts on this, hopefully it is not anathema. The other consideration is that I would like to move onto another build sooner than I realistically would if I were to fully rig. What this means is that I may spend a little extra time adding some details that I otherwise wouldn't, as I'm also wanting to leave my options open to possibly leave open some of the upper deck planking/scuttles.
4 additional standards have been added, 2 fore and 2 aft (still in process on larboard side) as these will be visible when the upper deck is in place. You can see the kit supplied riding bitts in place.
The scale of these bitts is actually pretty accurate, but I didn't like the shape so decided to make up my own...and while I was at it also made up some fore riding bitts following guidance from TFFM as the AOTS book is a little sparse on detail. These were fun little projects. I believe the forward elm battens were nailed on for easy replacement but I haven't tried to simulate that, not sure how this would be done however, or whether this is a "less is more" situation.
Previous mods allowed the bowsprit to be secured within the hull on a bowsprit step so this was also constructed. Going a little crazy some manger boards were also made up, these will not be readily (understatement) viewable but I think could add to the sense of depth when undergoing close inspection through a gun port , and help mask the obvious edge of the bulkhead against the deck. The dimensions of the bowsprit step are a little ambiguous, in retrospect I would have made it 2-3mm narrower, but given the likely visibility, this will not be redone.
The placement of the bowsprit step is a little dependent on some of the foremost beam, to be obsessive this should be a little further forward, but think it will be just fine where it is. The foremost deck beams required modification to work around some of the other alterations made up to this point but this was simple enough.
And with everything in place a couple of deck shots to get a feel for things...
-
 Beef Wellington got a reaction from rusty b in HMS Jason by Beef Wellington - Caldercraft - 1:64 - Artois-class frigate modified from HMS Diana 1794
Thanks all for the "likes" and looking in. Think a point has been reached where all of the known big challenges have been addressed, or at least an approach developed, so I can start to have a bit of fun tackling some of the other odd pieces on the deck.
I am starting to seriously consider not rigging this model... the reason being that I certainly still have plenty ahead of me (and I still haven't even finished rigging 'Snake' yet) even without rigging, also the size of the hull is already quite large and adding the masts and spars will increase the needed space significantly. Curious on other's thoughts on this, hopefully it is not anathema. The other consideration is that I would like to move onto another build sooner than I realistically would if I were to fully rig. What this means is that I may spend a little extra time adding some details that I otherwise wouldn't, as I'm also wanting to leave my options open to possibly leave open some of the upper deck planking/scuttles.
4 additional standards have been added, 2 fore and 2 aft (still in process on larboard side) as these will be visible when the upper deck is in place. You can see the kit supplied riding bitts in place.
The scale of these bitts is actually pretty accurate, but I didn't like the shape so decided to make up my own...and while I was at it also made up some fore riding bitts following guidance from TFFM as the AOTS book is a little sparse on detail. These were fun little projects. I believe the forward elm battens were nailed on for easy replacement but I haven't tried to simulate that, not sure how this would be done however, or whether this is a "less is more" situation.
Previous mods allowed the bowsprit to be secured within the hull on a bowsprit step so this was also constructed. Going a little crazy some manger boards were also made up, these will not be readily (understatement) viewable but I think could add to the sense of depth when undergoing close inspection through a gun port , and help mask the obvious edge of the bulkhead against the deck. The dimensions of the bowsprit step are a little ambiguous, in retrospect I would have made it 2-3mm narrower, but given the likely visibility, this will not be redone.
The placement of the bowsprit step is a little dependent on some of the foremost beam, to be obsessive this should be a little further forward, but think it will be just fine where it is. The foremost deck beams required modification to work around some of the other alterations made up to this point but this was simple enough.
And with everything in place a couple of deck shots to get a feel for things...
-
 Beef Wellington got a reaction from Dfell in HMS Jason by Beef Wellington - Caldercraft - 1:64 - Artois-class frigate modified from HMS Diana 1794
Thanks all for the "likes" and looking in. Think a point has been reached where all of the known big challenges have been addressed, or at least an approach developed, so I can start to have a bit of fun tackling some of the other odd pieces on the deck.
I am starting to seriously consider not rigging this model... the reason being that I certainly still have plenty ahead of me (and I still haven't even finished rigging 'Snake' yet) even without rigging, also the size of the hull is already quite large and adding the masts and spars will increase the needed space significantly. Curious on other's thoughts on this, hopefully it is not anathema. The other consideration is that I would like to move onto another build sooner than I realistically would if I were to fully rig. What this means is that I may spend a little extra time adding some details that I otherwise wouldn't, as I'm also wanting to leave my options open to possibly leave open some of the upper deck planking/scuttles.
4 additional standards have been added, 2 fore and 2 aft (still in process on larboard side) as these will be visible when the upper deck is in place. You can see the kit supplied riding bitts in place.
The scale of these bitts is actually pretty accurate, but I didn't like the shape so decided to make up my own...and while I was at it also made up some fore riding bitts following guidance from TFFM as the AOTS book is a little sparse on detail. These were fun little projects. I believe the forward elm battens were nailed on for easy replacement but I haven't tried to simulate that, not sure how this would be done however, or whether this is a "less is more" situation.
Previous mods allowed the bowsprit to be secured within the hull on a bowsprit step so this was also constructed. Going a little crazy some manger boards were also made up, these will not be readily (understatement) viewable but I think could add to the sense of depth when undergoing close inspection through a gun port , and help mask the obvious edge of the bulkhead against the deck. The dimensions of the bowsprit step are a little ambiguous, in retrospect I would have made it 2-3mm narrower, but given the likely visibility, this will not be redone.
The placement of the bowsprit step is a little dependent on some of the foremost beam, to be obsessive this should be a little further forward, but think it will be just fine where it is. The foremost deck beams required modification to work around some of the other alterations made up to this point but this was simple enough.
And with everything in place a couple of deck shots to get a feel for things...
-
 Beef Wellington got a reaction from Landlubber Mike in HMS Jason by Beef Wellington - Caldercraft - 1:64 - Artois-class frigate modified from HMS Diana 1794
Thanks all for the "likes" and looking in. Think a point has been reached where all of the known big challenges have been addressed, or at least an approach developed, so I can start to have a bit of fun tackling some of the other odd pieces on the deck.
I am starting to seriously consider not rigging this model... the reason being that I certainly still have plenty ahead of me (and I still haven't even finished rigging 'Snake' yet) even without rigging, also the size of the hull is already quite large and adding the masts and spars will increase the needed space significantly. Curious on other's thoughts on this, hopefully it is not anathema. The other consideration is that I would like to move onto another build sooner than I realistically would if I were to fully rig. What this means is that I may spend a little extra time adding some details that I otherwise wouldn't, as I'm also wanting to leave my options open to possibly leave open some of the upper deck planking/scuttles.
4 additional standards have been added, 2 fore and 2 aft (still in process on larboard side) as these will be visible when the upper deck is in place. You can see the kit supplied riding bitts in place.
The scale of these bitts is actually pretty accurate, but I didn't like the shape so decided to make up my own...and while I was at it also made up some fore riding bitts following guidance from TFFM as the AOTS book is a little sparse on detail. These were fun little projects. I believe the forward elm battens were nailed on for easy replacement but I haven't tried to simulate that, not sure how this would be done however, or whether this is a "less is more" situation.
Previous mods allowed the bowsprit to be secured within the hull on a bowsprit step so this was also constructed. Going a little crazy some manger boards were also made up, these will not be readily (understatement) viewable but I think could add to the sense of depth when undergoing close inspection through a gun port , and help mask the obvious edge of the bulkhead against the deck. The dimensions of the bowsprit step are a little ambiguous, in retrospect I would have made it 2-3mm narrower, but given the likely visibility, this will not be redone.
The placement of the bowsprit step is a little dependent on some of the foremost beam, to be obsessive this should be a little further forward, but think it will be just fine where it is. The foremost deck beams required modification to work around some of the other alterations made up to this point but this was simple enough.
And with everything in place a couple of deck shots to get a feel for things...
-
 Beef Wellington got a reaction from Blue Ensign in HMS Jason by Beef Wellington - Caldercraft - 1:64 - Artois-class frigate modified from HMS Diana 1794
Thanks all for the "likes" and looking in. Think a point has been reached where all of the known big challenges have been addressed, or at least an approach developed, so I can start to have a bit of fun tackling some of the other odd pieces on the deck.
I am starting to seriously consider not rigging this model... the reason being that I certainly still have plenty ahead of me (and I still haven't even finished rigging 'Snake' yet) even without rigging, also the size of the hull is already quite large and adding the masts and spars will increase the needed space significantly. Curious on other's thoughts on this, hopefully it is not anathema. The other consideration is that I would like to move onto another build sooner than I realistically would if I were to fully rig. What this means is that I may spend a little extra time adding some details that I otherwise wouldn't, as I'm also wanting to leave my options open to possibly leave open some of the upper deck planking/scuttles.
4 additional standards have been added, 2 fore and 2 aft (still in process on larboard side) as these will be visible when the upper deck is in place. You can see the kit supplied riding bitts in place.
The scale of these bitts is actually pretty accurate, but I didn't like the shape so decided to make up my own...and while I was at it also made up some fore riding bitts following guidance from TFFM as the AOTS book is a little sparse on detail. These were fun little projects. I believe the forward elm battens were nailed on for easy replacement but I haven't tried to simulate that, not sure how this would be done however, or whether this is a "less is more" situation.
Previous mods allowed the bowsprit to be secured within the hull on a bowsprit step so this was also constructed. Going a little crazy some manger boards were also made up, these will not be readily (understatement) viewable but I think could add to the sense of depth when undergoing close inspection through a gun port , and help mask the obvious edge of the bulkhead against the deck. The dimensions of the bowsprit step are a little ambiguous, in retrospect I would have made it 2-3mm narrower, but given the likely visibility, this will not be redone.
The placement of the bowsprit step is a little dependent on some of the foremost beam, to be obsessive this should be a little further forward, but think it will be just fine where it is. The foremost deck beams required modification to work around some of the other alterations made up to this point but this was simple enough.
And with everything in place a couple of deck shots to get a feel for things...