
Supplies of the Ship Modeler's Handbook are running out. Get your copy NOW before they are gone! Click on photo to order.
×


Beef Wellington
-
Posts
2,247 -
Joined
-
Last visited
Reputation Activity
-

 Beef Wellington got a reaction from maddog33 in HMS Snake by Beef Wellington - FINISHED - Caldercraft - Scale 1: 64 - First wooden ship build
Ferit, Eamon, B.E., Timmo - cheers guys!
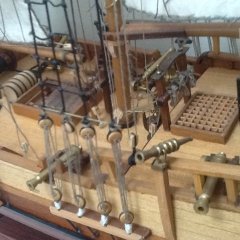
Still proceeding at a snails pace. Following picture for the benefit of other Snake builders. The block on the foremast for the maintopmast preventer stay could very easily interfere with catharpins on foremast shrouds, felt a bit lucky that I didn't run afoul of this, the positioning of the futtock stave is important as the block couldn't move any higher because of the mast cheeks. One more catharpin to go on foremast (which I'm remaking again because it didn't fit....)
-
 Beef Wellington got a reaction from janet bode in HMS Snake by Beef Wellington - FINISHED - Caldercraft - Scale 1: 64 - First wooden ship build
Jim, Smitty - thanks, I have your Pickle on my 'to read' list which I promise I'll get to soon.
Definitely agree BE, unfortunately the Snake kit doesn't even come with the photo etch letters as an option which I've seen in some of the other builds, so its this or nothing it seems.
-
 Beef Wellington reacted to jim_smits in HMS Snake by jim_smits - Caldercraft - First Build
Hi,
The fore and main mast stays have now been fully refitted and lanyards added and frapped. Glad I made the decision to go back and redo all of these. The tension in the stays is far better and the frapped lanyards look much nicer than my original attempt.
Now working on the backstays for the foremast.....
-
 Beef Wellington got a reaction from egkb in Name the Ship Game
You should also wait for confirmation that it is also the correct ship from the person who posted...
-
Beef Wellington reacted to freewheelinguy in HMS Bellerophon by freewheelinguy - FINISHED - Victory Models - Semi-scratchbuilt
Last Update:
I have made an executive decision and am nixing the rigging this build with option to at a later date. This month marks the beginning of my fourth year on this build and I just need to start something new. I have added stubs for the masts and bow (not glued in).
Since my previous update, I have added the stunsail booms to the channels, repainted and mounted the figurehead, bumpkins and safety rails, assembled and mounted the three stern lanterns.
The figurehead I have deviated from the plan suggested colors and tried to duplicate the colors of an actual Bellerophon figurehead from a web site that shows the head.
The stern lanterns needed an addition modification. The cast cap was too small to cover the five sides therefore I added 1/32" piece of wood and trimmed. The bottom cast piece was ok. I also cut clear plastic windows on each side.
There's a few additional details I wanted to add, but not at this time.
It's been a long mostly enjoyable ride and not sure I could ever attempt such a long build again.
Thanks for all those who looked in and will in the future. Hopefully, something useful was picked up positive or negative on how to. Will probably post additional pix in the gallery.
Mark this project as complete.
Take care and happy modeling,
Len
-
 Beef Wellington got a reaction from drtrap in HM Schooner Ballahoo by egkb - FINISHED - Caldercraft - 1:64 Scale - First Proper Wood Build
Interesting comment on the deck material Eammon, I thought Caldercraft supplied Tanganyika for all of their ships decks. Lime wouldn't be my choice for the decks.
-
Beef Wellington reacted to Panagiotis in Kilkis ex Mississippi (BB-23) by Panagiotis - FINISHED - scale 1:100 - Greek Battle Ship
Hi all and thank you for your kind words.
I was dealing with the ship’s windlasses all this time…
She had two main for the anchors and four smaller ones for ropes.
I started constructing the main ones using pieces of plastic in proper shapes.
Every anchor windlass is consisted from 25 pieces...
............
The windlasses for ropes was another story...
They seemed to be much complex and I had no any good view of them in some photo. To be honest, I tried to find something ready from the market, thinking to modify it but eventually and haven't found something close to them, I constructed them also from scratch.
Finally, I placed them all on the deck.
Thank you.
.....................
-
Beef Wellington reacted to AlexBaranov in HMS Cumberland 1774 by AlexBaranov - FINISHED - 1:36
Now the ship is on its "legs"
-
Beef Wellington got a reaction from egkb in HM Schooner Ballahoo by egkb - FINISHED - Caldercraft - 1:64 Scale - First Proper Wood Build
Interesting comment on the deck material Eammon, I thought Caldercraft supplied Tanganyika for all of their ships decks. Lime wouldn't be my choice for the decks.
-
Beef Wellington got a reaction from maddog33 in HMS Snake by Beef Wellington - FINISHED - Caldercraft - Scale 1: 64 - First wooden ship build
Hamilton - Cheers mate. I don't have Lees, Lever indicates that when used, the cross catharpins would be installed in addition to the catharpins going athwartship, basically forming an 'X' so that the starboard foremost shroud is catharpined to the aftmost larboard shroud and vice versa. If I ever build HMS Surprise, she will have to have cross-catharpins . I'm growing to love the Lever's Young Sea Officers sheet anchor and am following the order outlined there so far.
On your second question, I'm probably going to go with the wire and use epoxy again to secure them, but as usual will reserve final judgement until necessary.
Quick additional update on progress...main mast catharpins are all on. Pederson has a nice picture showing that these would have been lashed to the futtock stave with thinner line. Its not really practical at this scale, so I sort of got thesame result by threading the eye with two pieces of thread to try and keep the catharpin in line with the shroud. Pretty happy with the way things turned out (and not a pin or rubber band in sight).
-
Beef Wellington reacted to Timmo in HM Bomb Vessel Granado 1756 by Timmo - FINISHED - Caldercraft - Scale 1:64
The head rails had a centre section carved out to created raise prfofiles on either side. It's a little rough thanks to the file slipping and he grain on the walnut but it'll do. The centres were painted up to match the rest
Two part epoxy was used to attach the head rails. It claimed a setting time of 4 minutes but was more like an hour resulting in a lot of smearing to remove and paint over later.
While the epoxy was out the remaining stern figures were added. The castings are not quite symmetrical so bit of gentle pressure bent them on the right angle to have their heads resting against the taffrail. The bases they rest on had the edge facing the hull shaped to fit neatly.
The wee dolphin carvings were set further back towards the stern than the kit instructions show. According to AOTS Granado they are almost a continuation of the stern carvings.
His majesty's bomb vessel Granado as she now stands
-
Beef Wellington reacted to Sjors in HMS Agamemnon by Sjors - FINISHED - Caldercraft/Jotika - 1:64
Update time.....
I have now make 2 planks with the strange bend......
I think that this is the meaning.
If not, please tell me !
I have also go from the keel upwards....
Still a few more planks to go !
-
Beef Wellington reacted to drtrap in HMS Snake by drtrap - Caldercraft
Jason, Jim, thank you so much.
It was time today to fix in place all the deck blocks and the respective sliding decks, using cyano gel.
The conscecutive steps in photos just for the beginners....
-
Beef Wellington got a reaction from drtrap in HMS Snake by drtrap - Caldercraft
I used PVA wherever possible on untreated wood, but in a number of spots CA is necessary because the surfaces were sealed (either paint or varnish). I used CA for the ladders, but had finished them with matt varnish beforehand, otherwise I've noticed that that CA glue can seep into the wood grain and it leaves unfixable dark patches. Thick CA is my preference as it tends to take the longest to set so maybe gives you a few more micro-seconds to adjust things
-
Beef Wellington reacted to PMG in HMS AGAMEMNON by PMG - Caldercraft
Finally back after a long absence.
The quarter galleries appeared to be more complicated than expected.
An extreme accuracy is absolutely necessary if you want to avoid an extensive use of filler. That's my case.
After a first attempt I decided to remove all parts and to restart completely.
Angles and parallelism are extremely important and a mistake ca definitively spoil your model.
I finally discovered that pinning was much more efficient for the temporary fixing than rubber bands.
Here is the present status of my quarter galleries.
And now a view of my Aggie as she is today.
You will notice that I temporarly fixed the lower pattern (34) and the finishing casting.
These parts will be removed before starting the second planking. They are just there to see how it looks, and they still need some further adjustment. But forming the patterns necessitated the use of my Dremel machine, it means a lot of dust, and I was obliged (by the Admiral, of course) to wait for better weather to do it outside..
Best greetings to all of you,
Pierre.
-
Beef Wellington reacted to Timmo in HM Bomb Vessel Granado 1756 by Timmo - FINISHED - Caldercraft - Scale 1:64
Autumn is in the air for today's spell in the garage shipyard.
The dregs of cyclone Lusi pass overhead bringing a gusty wind and spot of rain from the dark sky. A porter ale in hand to match the mood and On to the port headrail/ cathead knee.
Symmetry is the issue here. A trace of the one already completed onto paper and a fold to invert the image to proved a template to help with the other side piece.
The same method of Dremel, bench sander, file and sandpaper was used to and shape the piece.
Plenty of test fitting is the order of the day.
The largely finished piece, right, compared to the other. None fixed as yet. I was a bit too vigorous on it and snapped it. Easily glued back together but that spells the end of progress today while the glue sets.
-
 Beef Wellington got a reaction from Mirabell61 in HMS Snake by Beef Wellington - FINISHED - Caldercraft - Scale 1: 64 - First wooden ship build
Hamilton - Cheers mate. I don't have Lees, Lever indicates that when used, the cross catharpins would be installed in addition to the catharpins going athwartship, basically forming an 'X' so that the starboard foremost shroud is catharpined to the aftmost larboard shroud and vice versa. If I ever build HMS Surprise, she will have to have cross-catharpins . I'm growing to love the Lever's Young Sea Officers sheet anchor and am following the order outlined there so far.
On your second question, I'm probably going to go with the wire and use epoxy again to secure them, but as usual will reserve final judgement until necessary.
Quick additional update on progress...main mast catharpins are all on. Pederson has a nice picture showing that these would have been lashed to the futtock stave with thinner line. Its not really practical at this scale, so I sort of got thesame result by threading the eye with two pieces of thread to try and keep the catharpin in line with the shroud. Pretty happy with the way things turned out (and not a pin or rubber band in sight).
-
 Beef Wellington got a reaction from JesseLee in HMS Snake by Beef Wellington - FINISHED - Caldercraft - Scale 1: 64 - First wooden ship build
Hamilton - Cheers mate. I don't have Lees, Lever indicates that when used, the cross catharpins would be installed in addition to the catharpins going athwartship, basically forming an 'X' so that the starboard foremost shroud is catharpined to the aftmost larboard shroud and vice versa. If I ever build HMS Surprise, she will have to have cross-catharpins . I'm growing to love the Lever's Young Sea Officers sheet anchor and am following the order outlined there so far.
On your second question, I'm probably going to go with the wire and use epoxy again to secure them, but as usual will reserve final judgement until necessary.
Quick additional update on progress...main mast catharpins are all on. Pederson has a nice picture showing that these would have been lashed to the futtock stave with thinner line. Its not really practical at this scale, so I sort of got thesame result by threading the eye with two pieces of thread to try and keep the catharpin in line with the shroud. Pretty happy with the way things turned out (and not a pin or rubber band in sight).
-
Beef Wellington reacted to drtrap in HMS Snake by drtrap - Caldercraft
I'm pretty happy with the installation of the most aft pair of the carronades.
Now I can deal with the placing of the ladders of the rear platforms...
-
.thumb.jpg.62d1d69fed1f32364417cb1f9cdeb009.jpg) Beef Wellington got a reaction from WalrusGuy in HMS Snake by Beef Wellington - FINISHED - Caldercraft - Scale 1: 64 - First wooden ship build
Beef Wellington got a reaction from WalrusGuy in HMS Snake by Beef Wellington - FINISHED - Caldercraft - Scale 1: 64 - First wooden ship build
Promised no more updates until I was done with carronade rigging, still not done so this is a 'notation to self for the future' rather than an 'update'. One lesson I'm learning is that I'm going through a lot of rigging line, and each spool seems different to the last. The stuff supplied in the box was very nice to work with, new line bought separately, though allegedly the same is much springier and surface seems much rougher and prone to snagging so harder to work with. Not sure why there is a difference, whether I was lucky with the kit supplied stuff, or unlucky with the replacement line.
These are far from consistent with the outcome, so I'm moving around the deck randomly to mix earlier and later efforts so I don't have a gradual transition from 'bad' to 'better' along one side.
Apologies for the photos not quite being in focus, I didn't notice when I took them...
Step 1: Simply rigged using the blocks prepared earlier....
Step 2: Rig as taught as possible and thread through the eyes of the hooks, aft first and then the bulwark hook...
Step 3: Thread line around the line near where it is tied to the single block, care needs to be taken not to foul with any of the other lines. Simple overhand knot and piece of wire to help position the knot and keep everything taught seems to work best. Purpose of this is just to secure the line to allow the frapping to be positioned
Step 4: Wrap around the tackle 4 times and secure the end through the last loop. Once complete, soak in dilute PVA to ensure everything stays positioned
-
Beef Wellington reacted to Dan Vadas in HMS Vulture 1776 by Dan Vadas - FINISHED - 1:48 scale - 16-gun Swan-class sloop from TFFM plans
Hi all,
I've managed to get a little bit done - the following would normally have taken me about half a day, instead I've spent nearly three days on these pieces. At least I can still do SOMETHING .
Fore Jeer Bitts
The Fore Jeer Bitts on Vulture are similar to the Fore Topsail Sheet Bitts, except they don't continue down to the upper deck. There is no room for Standards on them either as the hatch behind them is wider than most other Swan Class ships :
I've also made and fitted 22 Eyebolts - 10 around the Foremast, 8 in the bulwarks adjacent to the mast, and 4 in the Breast Beam :
Danny
-
Beef Wellington reacted to drtrap in HMS Snake by drtrap - Caldercraft
I start to prepare the tackling.
It;s my first time but it seems a painfull story, I'm not sure.... should I assemble it on the deck or not ?....
But above all, the real head-ache is doing the "frapping"...
I think that I need at least a length of 15 cm for the running rigging and a knot as a final starter to turn the edge of the line 4-5 times around the tackling...
-
Beef Wellington reacted to jim_smits in HMS Snake by jim_smits - Caldercraft - First Build
Been a little while since the last update.
Busy with all sorts (including Ballahoo!) but I have my partner moving in currently so the house is a huge state of flux at the moment.
Finally got round to removing the main and fore stays for refitting. Used the serving machine in anger for the first time, and after a little playing around got the technique sorted in my head. Made an estimate of 15cm of line to be served to give the loop around the mast, the mouse and a little further down the stay. Made the mouse in the end by simply serving back and forth over a 1cm length of line favouring one end to give the correct shape. A couple of dabs of GS Hypo to secure and sorted.
Added the heart blocks to end of the stay, and many thanks to Gil Middletons build, with a false splice. The technique takes a little while but gives a really good tidy result. Almost want to redo all my shrouds, almost.....!
Added the lanyards between the two heart blocks and frapped. This looks far better than my old lanyards.
Only three more to go....
The last photo shows the improved splice for the upper heart block and the old method for the lower. Should have replaced the lower before frapping but I think I can replace in situ.
-
 Beef Wellington got a reaction from mobbsie in HMS Snake by Beef Wellington - FINISHED - Caldercraft - Scale 1: 64 - First wooden ship build
Hamilton - Cheers mate. I don't have Lees, Lever indicates that when used, the cross catharpins would be installed in addition to the catharpins going athwartship, basically forming an 'X' so that the starboard foremost shroud is catharpined to the aftmost larboard shroud and vice versa. If I ever build HMS Surprise, she will have to have cross-catharpins . I'm growing to love the Lever's Young Sea Officers sheet anchor and am following the order outlined there so far.
On your second question, I'm probably going to go with the wire and use epoxy again to secure them, but as usual will reserve final judgement until necessary.
Quick additional update on progress...main mast catharpins are all on. Pederson has a nice picture showing that these would have been lashed to the futtock stave with thinner line. Its not really practical at this scale, so I sort of got thesame result by threading the eye with two pieces of thread to try and keep the catharpin in line with the shroud. Pretty happy with the way things turned out (and not a pin or rubber band in sight).
-
 Beef Wellington got a reaction from texxn5 in HMS Snake by Beef Wellington - FINISHED - Caldercraft - Scale 1: 64 - First wooden ship build
Hamilton - Cheers mate. I don't have Lees, Lever indicates that when used, the cross catharpins would be installed in addition to the catharpins going athwartship, basically forming an 'X' so that the starboard foremost shroud is catharpined to the aftmost larboard shroud and vice versa. If I ever build HMS Surprise, she will have to have cross-catharpins . I'm growing to love the Lever's Young Sea Officers sheet anchor and am following the order outlined there so far.
On your second question, I'm probably going to go with the wire and use epoxy again to secure them, but as usual will reserve final judgement until necessary.
Quick additional update on progress...main mast catharpins are all on. Pederson has a nice picture showing that these would have been lashed to the futtock stave with thinner line. Its not really practical at this scale, so I sort of got thesame result by threading the eye with two pieces of thread to try and keep the catharpin in line with the shroud. Pretty happy with the way things turned out (and not a pin or rubber band in sight).