
HOLIDAY DONATION DRIVE - SUPPORT MSW - DO YOUR PART TO KEEP THIS GREAT FORUM GOING!
×


KenW
-
Posts
1,231 -
Joined
-
Last visited
Content Type
Profiles
Forums
Gallery
Events
Everything posted by KenW
-
 I began to work on the inside of the boat. The first thing was to apply Wipe-On Poly. Then the floor boards and platforms. No real problems. Just to boring task of doing simulated nails. And after all that you can hardly see them in the photos.
 -
For this model I’ve decided to make the sails out of Silkspan. My club recently had a tech session on making sails from Silkspan, so I’ll be using the method put forth by our former president, Tom Ruggiero. The sail is made from the thinnest pieces of Silkspan. Three pieces of Silkspan are cut to shape; the middle has the cloth joins drawn in pencil. The lamination is done with white glue diluted at a ratio of 1 to 7, or even 1 to 10. One of the outside pieces is cut larger so it can be folded over lines that will surround the sail and include the loops or cringles. My sails will be furled, so I don’t need to add reefs, etc. I bend the sail to the yard using line to simulate robands and earings. Then a wet brush is used to pull up the clue and form the sail into a proper looking furl. Again, line simulates the gaskets. I also added foot ropes or horses. I made the fore topsail first since I think it’d be better to start with a square sail. Then I will move on to the fore gaff.
- 122 replies
-
- 10
-

-
- independence
- privateer
- (and 1 more)
-
Congrats on a great build. Hope you visit us again. Cheers.
- 152 replies
-
- 1
-
-
- medway longboat
- Syren Ship Model Company
- (and 1 more)
-
I’ve finished the third chapter of the Medway Longboat instructions. I drilled all the holes for the ‘nails’ and stuffed the holes with the monofilament. I must say that I should have simulated the nails in each plank as they were installed. It’s much easier to drill the holes INTO the frames. I can see several pieces of filament sticking through the inside of the boat. But after I cut them off and put in the floorboards, I’m sure they won’t be seen. I glued the freezes and the molding that I scraped into shape. I used a scraper that I got from Artesania Latina. The web site I used is: https://www.artesanialatina.net/en/162-micro-tools-for-modeling The model number of the scraper is 27300.
-
I sanded down the cap rail to Chuck’s specifications. No problems; just a lot of elbow grease and time. I used 220 and 320 grit sandpaper. I added the inboard sheer strake and sanded it down so the sheer top meets the cap rail. I also added the knee and sanded to insure that the seam is perfectly smooth. I finished it all off with 400 grit to get it even more smooth. And then I painted the rail red. A little sand paper removed any red paint that ended up where it wasn’t supposed to be. Overall, it looks pretty good.
-
Thanks Russ. And there is a saddle there; I guess it can't be seen in the photo. Cheers.
- 122 replies
-
- 3
-
-
- independence
- privateer
- (and 1 more)
-
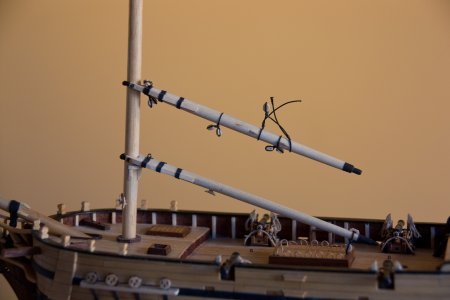
I made the lower fore mast and the fore mast boom and gaff. Nothing has been glued yet. The fore cross trees have also been made, and I still have to decide what blocks should be attached to it and where they should go. The cross trees have had their dead eyes attached. The fore mast has some cleats that I’m sure I’ll need. I need to make the cross jack yard since that must also go onto the fore mast before the cross trees are glued. In the first photo you can see the fore topmast which has also been made. The loose threads (lines) are for a block that is part of the peak halliard rigging. I want to be able to adjust these lines so insure they look good. The other blocks are for the brails.
- 122 replies
-
- 8
-
-
- independence
- privateer
- (and 1 more)
-
Hey Rusty - Your workmanship is excellent! It was great to meet you and see your work in person today. Hope you got home safe and stop by often. Cheers.
- 152 replies
-
- 1
-
-
- medway longboat
- Syren Ship Model Company
- (and 1 more)
-
Thanks Russ and Dave for the replies and encouragement. I have Harold Hahn's Halifax and Hannah plans. I'm also looking at the books, "The History of American Sailing Ships", and, "The American Sailing Navy", by Howard Chapelle. In addition, Harold Hahn has a good drawing of the US privateer Chaleur in his book, "The Colonial Schooner". While the Halifax and Chaleur have square sails on both masts, the Hannah has a gaff topsail on the main mast like the AL Independence kit. So I'm leaning that way. Anyway, I'm still researching, but I don't want to take too long.
- 122 replies
-
- 3
-
-
- independence
- privateer
- (and 1 more)
-
Bad kit or not; that is still an excellent, high class build. You should be proud. I hope your health improves and continue to build models. Cheers.
- 359 replies
-
- 4
-
-
- prince de neufchatel
- model shipways
- (and 1 more)
-
I made the two channels for the foremast including their deadeyes. I’m doing one mast at a time, so next will be the lower foremast. But first, I have to decide on what other blocks and eyebolts must be added to the mast and its crosstrees. (I still believe in doing a much as I can “off the boat”.) So now, I have to figure out my rigging scheme. I’m not totally happy with the rigging plan that came with the AL kit. I’m considering rigging the model based on Harold Hahn’s plans for for the ship, Hannah. And, the sails will be furled, which will involve some lines not on either the kit’s or Hahn’s plans. I welcome any comments or opinions.
- 122 replies
-
- 8
-
-
- independence
- privateer
- (and 1 more)
-
Thanks Jim for your comments.
-
Thanks Jim. After my panic a couple of days ago, I was able to carve/sand an acceptable bolster for the port side of the model. Again, I followed the method in Chuck’s instructions. Both bolsters are glued in place and and sanded. They look OK. The space for the roller was no problem. The next step is to sand down the cap rail.
-
Looking real good, Mike. Can't wait to see it.
- 607 replies
-
- 3
-
-
- winchelsea
- Syren Ship Model Company
- (and 1 more)
-
The dreaded bolsters are giving me lots of trouble. The kit is supposed to have eight blanks, but I only find six. I started with the starboard side and messed up 4 before I finally got a satisfactory bolster. That leaves only one blank left. I reread the instructions and stopped using my x-acto knife. I also tried to draw a line where I think the shape should be, as per the instructions. And I was very careful when making that curved bevel; checking the fit often. That bolster turned out surprisingly good. But now I’m really worried that I’ll mess up the last blank when making the port side bolster.
-
Congratulations on a very fine model! Also, I commend you on a well written and informative log. I now have a good source for my build. You should come down to Jersey for one of our meetings. Cheers.
- 152 replies
-
- 2
-
-
- medway longboat
- Syren Ship Model Company
- (and 1 more)
-
I removed the frame centers and what remains actually looks like a boat. In fact, that all went so well that I glued on the cap rail. No problems there, or so I thought. Looking at the photos, and later at the model, I see a ‘swerve’ in the middle of the boat. I think I must have had a fairing issue that went undetected until now. I’m hopeful that when I fail the inside of the hull and cap rail that I can ‘cover up the problem’. But fairing the inside of the hull comes later, for now it is on to the dreaded bolster.
-
I’ve been working on my club’s group build of the Medway Longboat, but I did take time out to complete the bow sprint and its standing rigging. All the lines and their collars were served. Getting the lengths of the bobstay collar and bow sprint shroud collars correct proved to be a challenge. It took a few tries before I was pleased. I used dead eyes since I thought that closed hearts looked too big.
- 122 replies
-
- 11
-
-
- independence
- privateer
- (and 1 more)
-
Hey Chuck. Thanks for the info. Of course, when I saw the Constitution in Boston, I hadn't begun modeling so I had no idea what I was looking at. I should go back. So what is your opinion on tree nails on the hull?
-
Thanks Rusty and Chuck. I'll bring the model to the meeting on the 22nd.
-
Just got home from a New Year’s Day party that marks the end of the holiday season. I even got a little time to spend in the shipyard these last few days. As a result, I’ve completed the planking of the Medway longboat. I still may do some more sanding and a few more coats of oil based Wipe-on Poly, but all the planks have been installed. One thing I forgot to mention on my last post is that Chuck told me to make very sure as each plank is installed that it is glued to each frame. So I need to try to move each frame just above a plank after it's put on the boat to insure it's properly glued.. I'm going to spend some time on my Independence build over the next few days.