
HOLIDAY DONATION DRIVE - SUPPORT MSW - DO YOUR PART TO KEEP THIS GREAT FORUM GOING!
×


KenW
-
Posts
1,231 -
Joined
-
Last visited
Content Type
Profiles
Forums
Gallery
Events
Everything posted by KenW
-
 Congrats on a fine model. I was impressed with the variety of colors. Excellent work.
- 75 replies
-
- 1
-

-
- constitution
- mamoli
- (and 2 more)
-
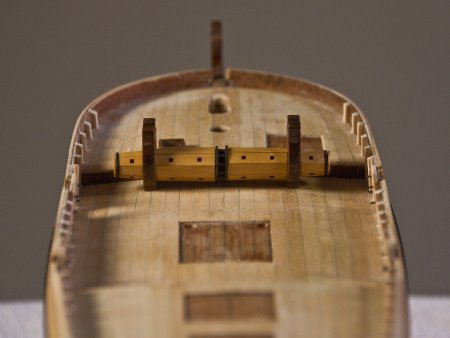
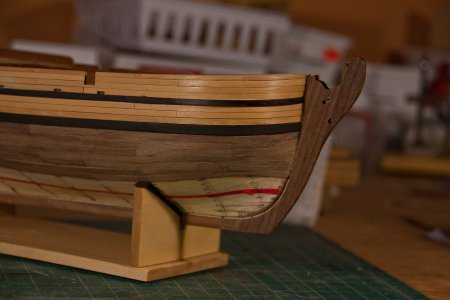
I haven’t made an entry in quite awhile due to a family issue. But I’m back in the shipyard and can report on some progress. First, I noticed that even though I used satin polyurethane, there is quite a shine on the lower planking. So I sanded it with 400 grade sandpaper and wiped it down with a tack cloth. I did not add another coat of urethane. It looks much better. Next I added vertical supports along the bulwarks which I assume were added during the conversion from a merchant/fishing boat to an armed privateer. I used wider supports where the gun ports are. I will probably replace the supports on the quarterdeck where those guns will be mounted. I stopped in the bow area so I can coordinate the supports with the location of the catheads and anchor hawse holes. I also made the windlass. I ‘bastardized’ the windlass from Syren’s Cheerful model kit. I had to make changes since this model is narrower that the Cheerful model. I reduced the section with three holes down to two and got Chuck to let me have another section so both sides of the windlass are the same. I think it came out rather well. Of course, I changed the ‘supports’ from boxwood to walnut. Note: It isn’t glued yet.
- 122 replies
-
- 13
-
-
- independence
- privateer
- (and 1 more)
-
Right Chuck! I forgot that the scale of this model is bigger. On my model, I was planning to use 1/16 for the cap rail and now I realize I need to use thinner wood. But your comments about being aware of scale and how that would translate to real life size is really valid and important. Cheers.
- 421 replies
-
- 7
-
-
- medway longboat
- Syren Ship Model Company
- (and 1 more)
-
I concur with all the comments on your workmanship. Of course I’m used to that now. Chuck is a hard act to follow at our club’s show-and-tell. Am I right that your cap rail is made from a 1/16” thick sheet? That would be a 3” cap rail in real life. Or do you sand/file that down to about 1/32”? Why not start with a 1/32” sheet? Love your workmanship.
- 421 replies
-
- 3
-
-
- medway longboat
- Syren Ship Model Company
- (and 1 more)
-
Hey Chuck - I like the look of this project. I get that the plans you show are from the book you mentioned. But where does "Senior Ole Salt" get his plans? I'll be following along with interest. Cheers.
-
Thanks Russ. And thanks to all the 'likes'.
-
Thanks for the comment Al. And thanks to the 'likes'. I didn't edge bend the boxwood between the wales. I was able to bend the 1/32 plank and it fit fine. The lower wale was thicker and I felt needed the edge bend. I should point out that most all of the planks at the bow were spilled. Good luck on your build. Cheers.
- 122 replies
-
- 2
-
-
- independence
- privateer
- (and 1 more)
-
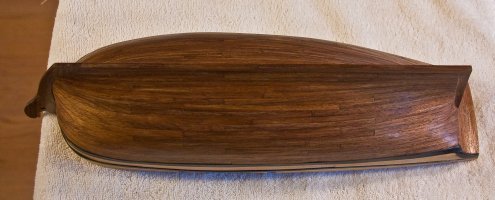
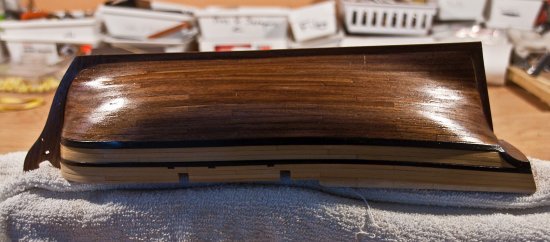
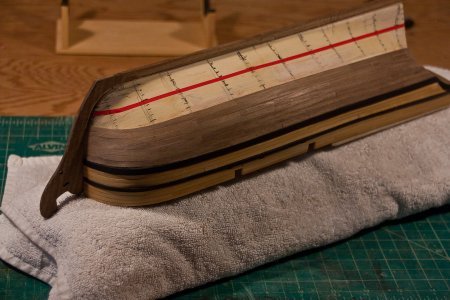
The lower planking is complete. The port side looks pretty much like the starboard, which is good. I sanded both sides and applied clear stain to the walnut. Then a coat of polyurethane to give it a finished look. I’m pleased with the walnut’s color. I also added the stern post and finished the counter planking.

- 122 replies
-
- 7
-
-
- independence
- privateer
- (and 1 more)
-
I got a fine sharpie pen; and my problem with it is that if I rube the line with my fat finger, it is wiped off. I now prefer the Sharpie ultra fine permanent marker. It doesn't rub off. The line is still thicker than the fine sharpie pen, however. Just a FYI. Cheers.
- 421 replies
-
- 3
-
-
- medway longboat
- Syren Ship Model Company
- (and 1 more)
-
What kind of packing tape do you use. My tape won't take pencil marks. Very annoying. Your work always looks perfect. Cheers.
- 421 replies
-
- 3
-
-
- medway longboat
- Syren Ship Model Company
- (and 1 more)
-
WOW! I'm very impressed. It seems when you can't be more impressive, then you submit another post. Excellent work. Excellent carving. Excellent everything. Keep it up!
-
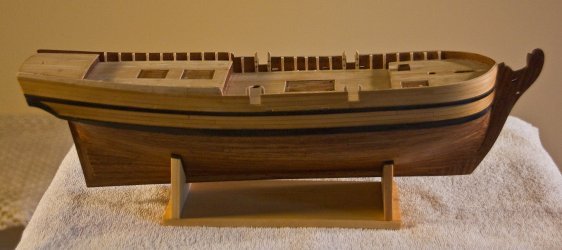
The starboard side of the lower planking is complete. It still needs to be more sanding with finer grades and then the apply clear stain and polyurethane. When I started I used pencil to mimic the caulking, but I couldn’t see it once some initial sanding was done, so I just stopped using the pencil. The planking will just look the way it looks. Most of the planks at the bow area are spiled. Some of the rest are edge bent, some not. But I’m happy with the way it turned out. There are no dropped planks or stealers at the bow. On to the port side! In my spare time I began looking at the transom. The dye-cast metal transom provided by the kit is obviously too big for the reduced scale of my model, so I know I will have to create my own. But the kit’s transom is ‘longer’ than necessary. I hangs down over the counter like a ‘skirt’. Did boats of this era really have that? None of the models I’ve seen, including those in the Rodger’s collection at Annapolis have that. I’m thinking I’ll end the transom where the counter starts. Any thoughts?
- 122 replies
-
- 9
-
-
- independence
- privateer
- (and 1 more)
-
Well, with only 3 strakes to go, the planking actually looks fine. I guess Dave and Mike were right. So thanks for the encouragement. The last strake may still be a little tricky, but I believe that is normal.
- 122 replies
-
- 6
-
-
- independence
- privateer
- (and 1 more)
-
I just checked in on your build of this odd shaped boat. Looks like you doing well so I think I will just follow along. I enjoy reading the results of you historical research. Cheers.
-
Thanks Lou, Dave and Mark. Your comments lead me to believe that I'm on the right track. My strakes do get thinner at the bow; and my Walnut must be "old". It'll be interesting to see when the planks that I'm adding from the keel upward meet those that were added from the wales down. Cheers.
- 122 replies
-
- 3
-
-
- independence
- privateer
- (and 1 more)
-
Magnificent! You did a lot apparently in one day. This will be interesting to follow along with. You know, if this turns out really well you're going to get a lot of requests for your "kit". Cheers.
- 128 replies
-
- 3
-
-
- mordaunt
- battle station
- (and 1 more)
-
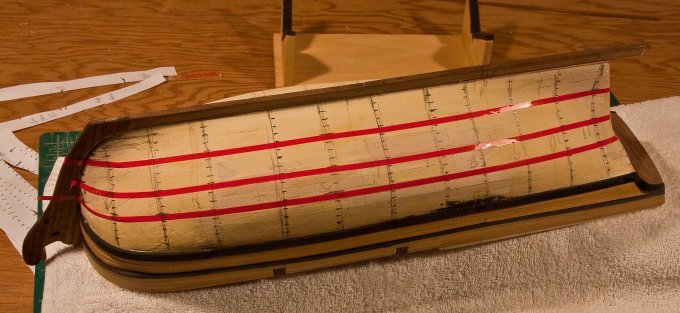
I began planking the lower hull. The first step was to create a plan so that I knew how many strakes I would need and the size of each plank. The result was that I would need 16 strakes of 1/32 walnut, 3/16 inches wide. I started from the wales working down and had a problem right away. The walnut planks always broke when I tried to edge bend them. The bend at the bow is pretty drastic and while the holly I used for the lower wale was able to withstand the bend, the walnut always snapped. Even when soaked in water for a few minutes, the strip would snap. So, the only solution was to try to spile each plank at the bow. As I haven’t spiled before, I consulted an article on this site by Chuck Passaro and found that after a few tries, I could get a decent spile. I planked the first 7 strakes. But now I have a new problem/question. This ship has a unusual bow shape. The photo above doesn’t look too bad. But when I turn the boat over, the lower strakes look off. The lowest planks seemed to curve up. I don’t know if I should have included a drop plank, or if everything will look fine when the whole side is done. I was going to plank the upper half of the other side next, but I decided to do the rest of this side and see how it looks. That way I would only have to redo one side. If anyone wants to make some suggestions, please do.
- 122 replies
-
- 6
-
-
- independence
- privateer
- (and 1 more)
-
Glad to see a long shot so I can see the whole boat. Excellent! Very impressive. I can go on but my fingers will get sore. Congratulations.
- 653 replies
-
- 3
-
-
- trabakul
- marisstella
- (and 1 more)
-
Great looking model, Bob. What is the link to Shapeways you used? Thanks.
- 359 replies
-
- 3
-
-
- prince de neufchatel
- model shipways
- (and 1 more)
-
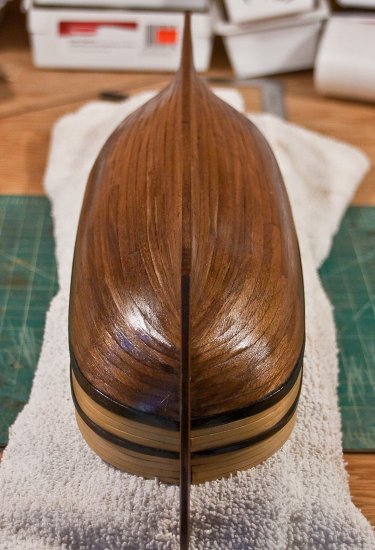
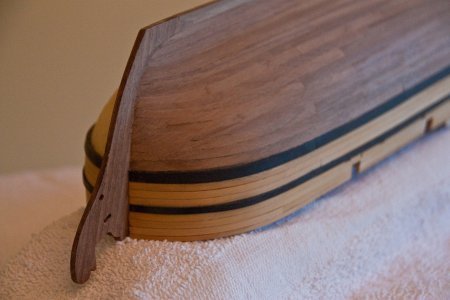
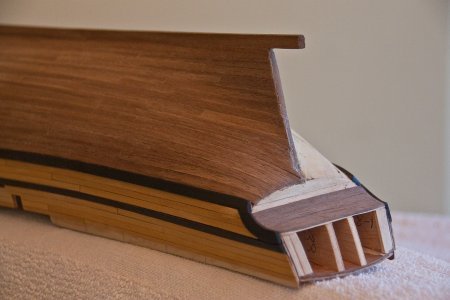
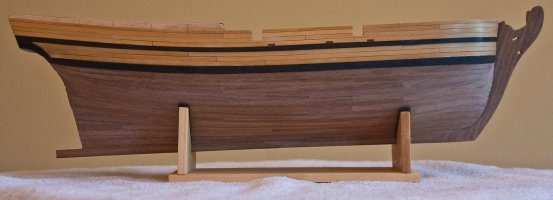
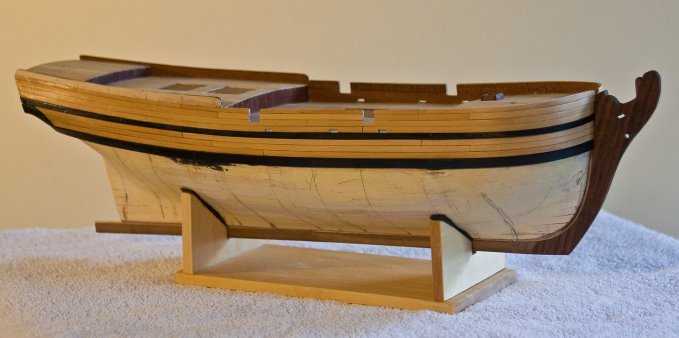
Work on the hull continues. I installed the wales and then the planking above the lower wale. I intended to use the same hull color pattern as Clare, but I didn’t have any ⅛ inch walnut. So I decided to use boxwood above the wales and walnut below. I also found that I had to edge bend the lower wale in order to get to sit right at the bow. I figure that I might as well start practicing the edge bends since I’ll be doing a lot of that when planking the rest of the hull. I also carved the fashion pieces. They weren’t that bad - I just made them longer than necessary to make the bending easier. Also, if you look closely, you can see that I applied a natural color stain to the stem to bring out the color of the walnut. I sanded and applied polyurethane. (There is no polyurethane on the stem yet.) Next up is creating a hull planking plan and then on to the edge bending.
- 122 replies
-
- 13
-
-
- independence
- privateer
- (and 1 more)
-
This boat is amazing! I wonder how long it took to build the actual ship back in those days. So much carving.
-
Thanks for your reply, Dave. I like that solution.
-
Very good precise work, my friend. Bring it to our next club meeting, please.
- 607 replies
-
- 3
-
-
- winchelsea
- Syren Ship Model Company
- (and 1 more)
-
Dave: I think you model looks great. I also like the cabin windows. The Rattlesnake didn't have quarter badges either. One question - How did you install the fashion piece? Is it painted? Thanks.