vossiewulf
-
Posts
1,477 -
Joined
-
Last visited
Content Type
Profiles
Forums
Gallery
Events
Everything posted by vossiewulf
-
 This is only correct for people who don't calibrate their monitor. Think about it, every company that has a zillion artists would be up a creek without a paddle if there was no way to get consistency of output on multiple monitor types and models. Since I've also been a long-time artist, at various times professional, I always calibrate my monitors. The Datacolor Spyder series monitor calibration tools has been the most popular for years. It has extremely sensitive light/frequency detectors and you place it in the center of your monitor with the lights in the room darkened, and it sends a large number of color values to the screen and records the screen's actual output. It then creates a color correction profile that is saved and loaded every time you start your machine, you can see it happen as all the color on screen will suddenly shift a bit on startup. Not sure if you or anyone wants to go to those lengths, but it is certainly possible to work as a distributed group and still all see identical images on screen.
 -
I'm doing Lady Nelson, one thing I haven't figured out is why instead of a bowsprit we have something called a boom, and I also read one of the advantages was they could bring it partially on board when necessary. But it didn't explain why they would want to bring it partially on board in the first place. Can anyone explain those two?
-
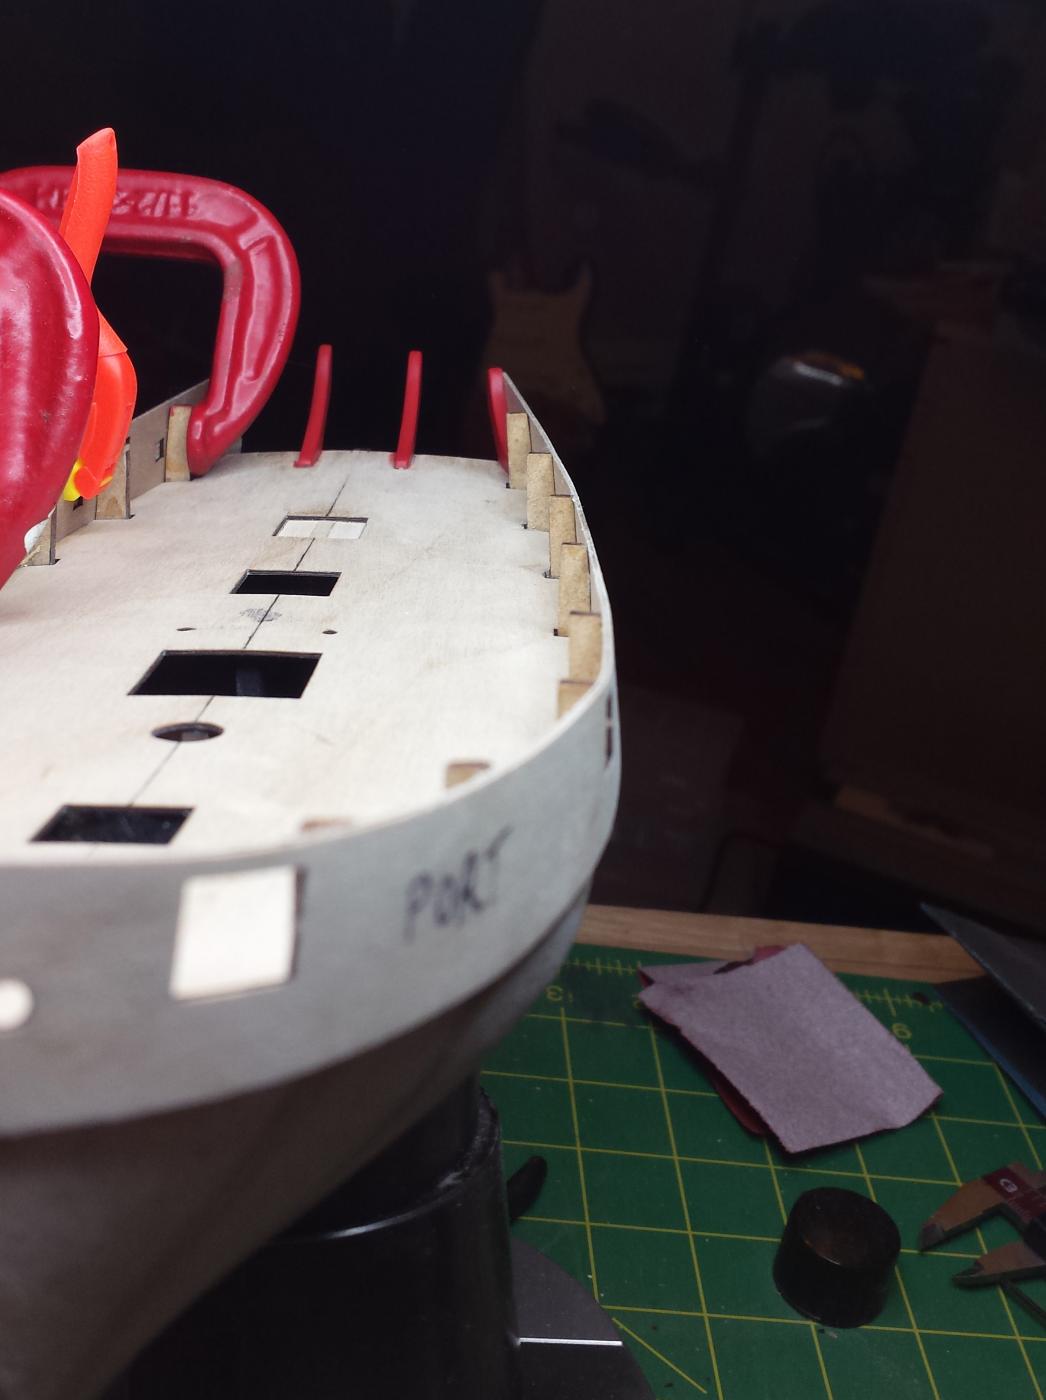
BTW finished the layout of the stern planking... I think. And spent time fitting the stern fascia piece so it's ready to glue on. So tomorrow there is nothing else to do but start fitting planks. Rick I'm going to pull the deck stanchions but only after putting on the first plank, the bulkhead strips cover just the false deck, no lower, so they only have about a 1/32" glue contact area right now. Glued to the plank below they will be much sturdier when I go pulling on them removing the stanchions. Also the fascia will get glued and then I have a voodoo priest coming in to cleanse the stern of bad modeling spirits. Note: need more goats.
- 714 replies
-
- 3
-

-
- lady nelson
- victory models
- (and 1 more)
-
Ah there we go, that saves the day. I'll go ahead with the pattern as I have it now and then make that change for the second planking. That way I don't have to redo what I have now but I'll also shift the joints slightly so they don't coincide as Pat suggests. And that's a small enough change that this still works as a dry run of the final. Thanks Pat and Rick!
- 714 replies
-
- 2
-
-
- lady nelson
- victory models
- (and 1 more)
-
Well that rains on the parade, You're correct. I won't do that in the future, but for this the advantages of the dry run outweigh the risks of popping. Particularly as I intend to do treenails on the planking since this will be unpainted, and that will help. Does the pattern look ok? That's what I'm concerned about now. If that looks ok, I'll go start work on it.
- 714 replies
-
- 1
-
-
- lady nelson
- victory models
- (and 1 more)
-
Also remember Abe Books, which pulls together the stock of a zillion smaller booksellers. I bought my copy of Boudriot's French frigates book there at a reasonable price, and they had about 25 listed in several different printings and covers. I got the limited edition leather bound with nice paper because for some reason it wasn't more expensive than the non-special ones, and very happy I did so, paper and printing quality is as good as it gets.
-
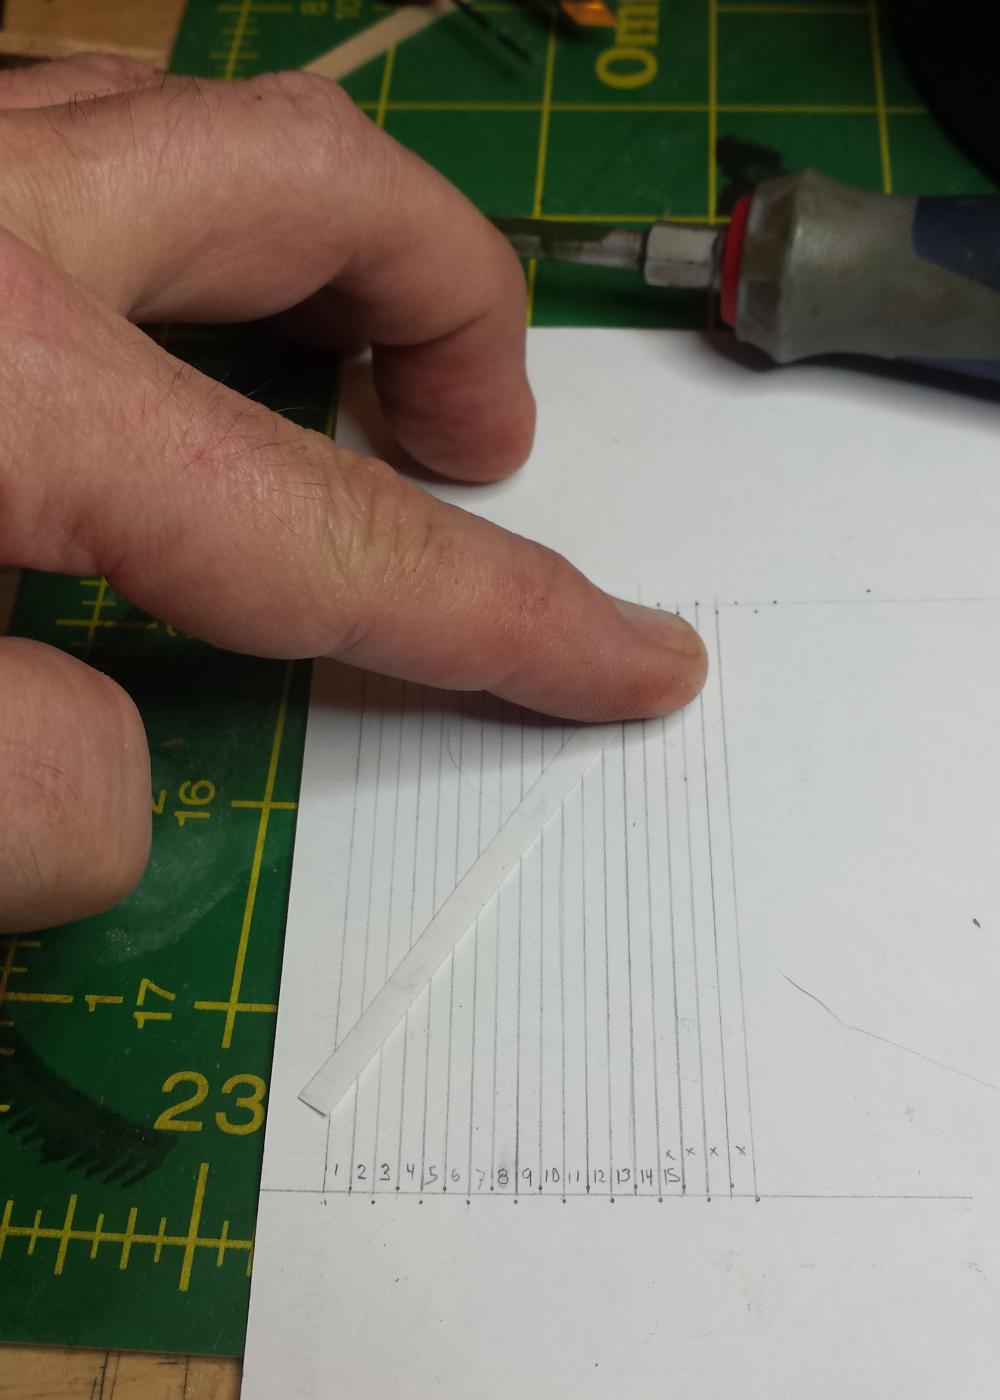
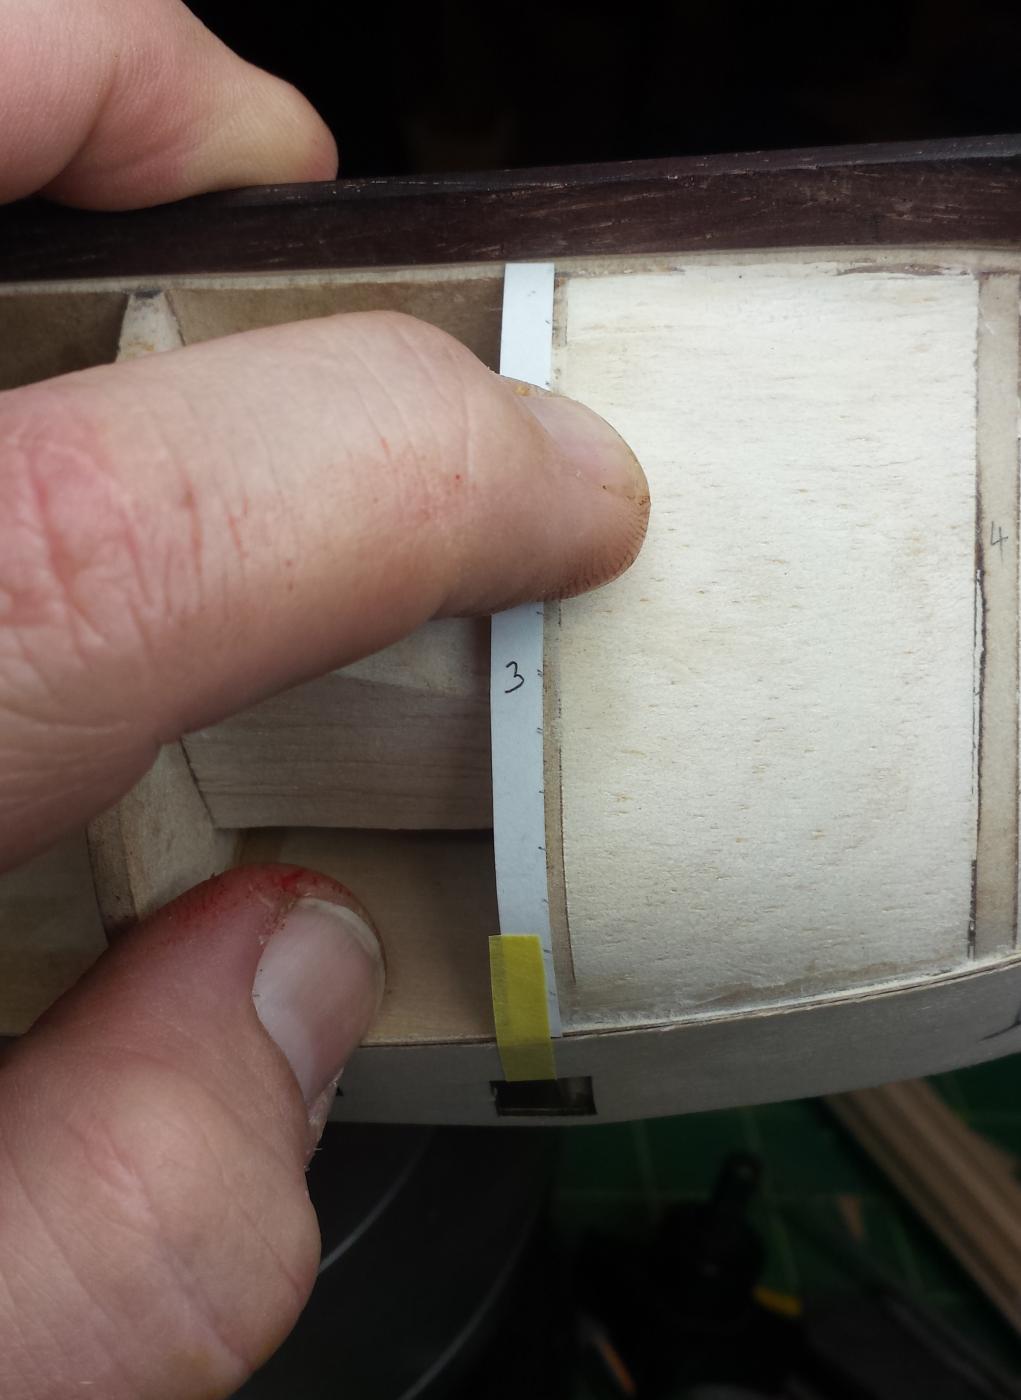
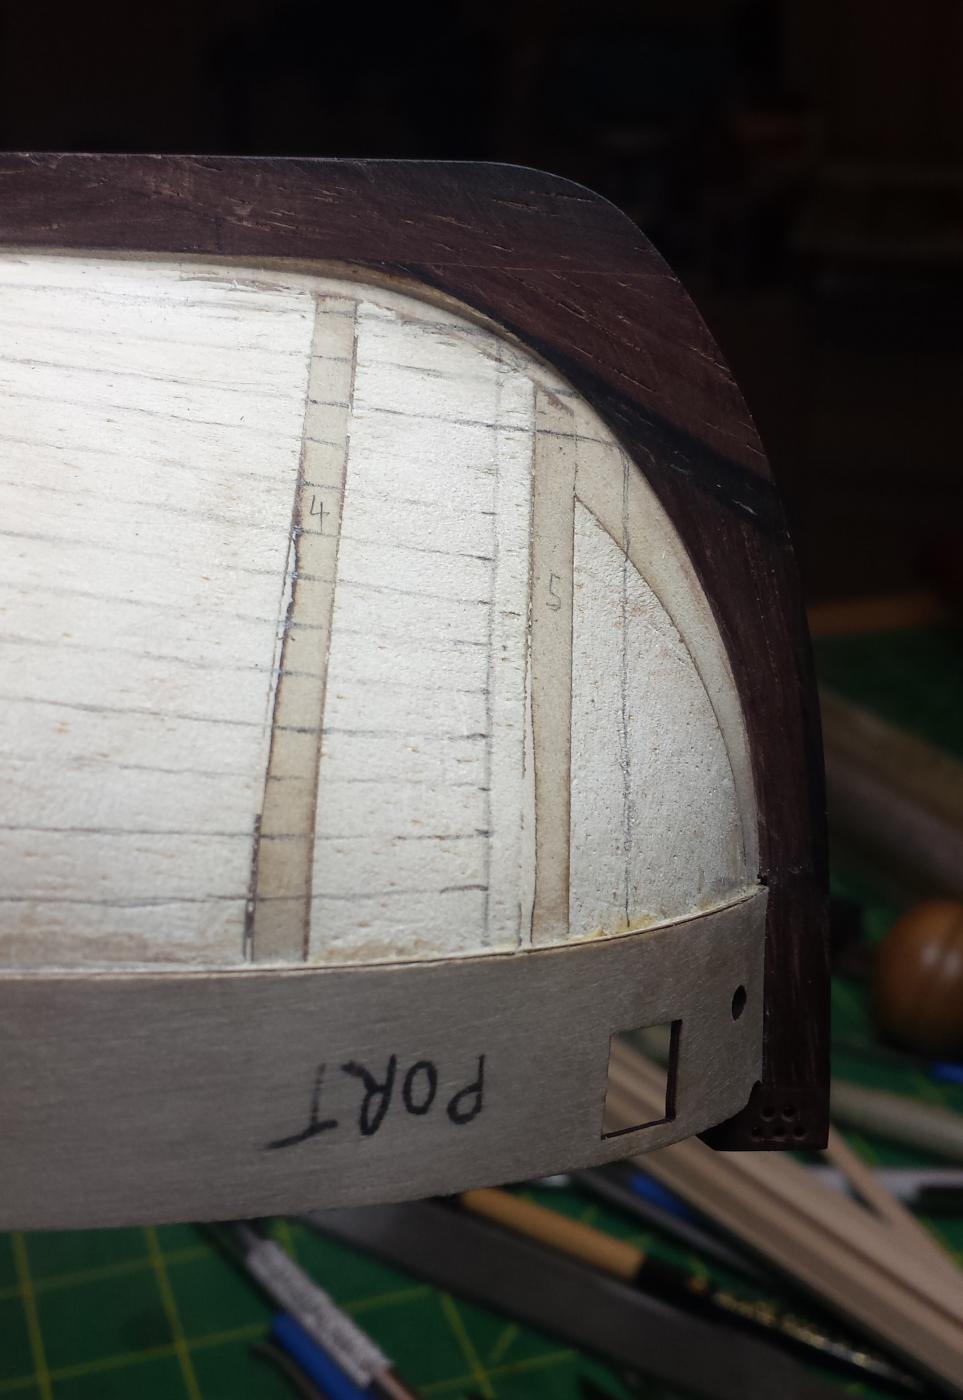
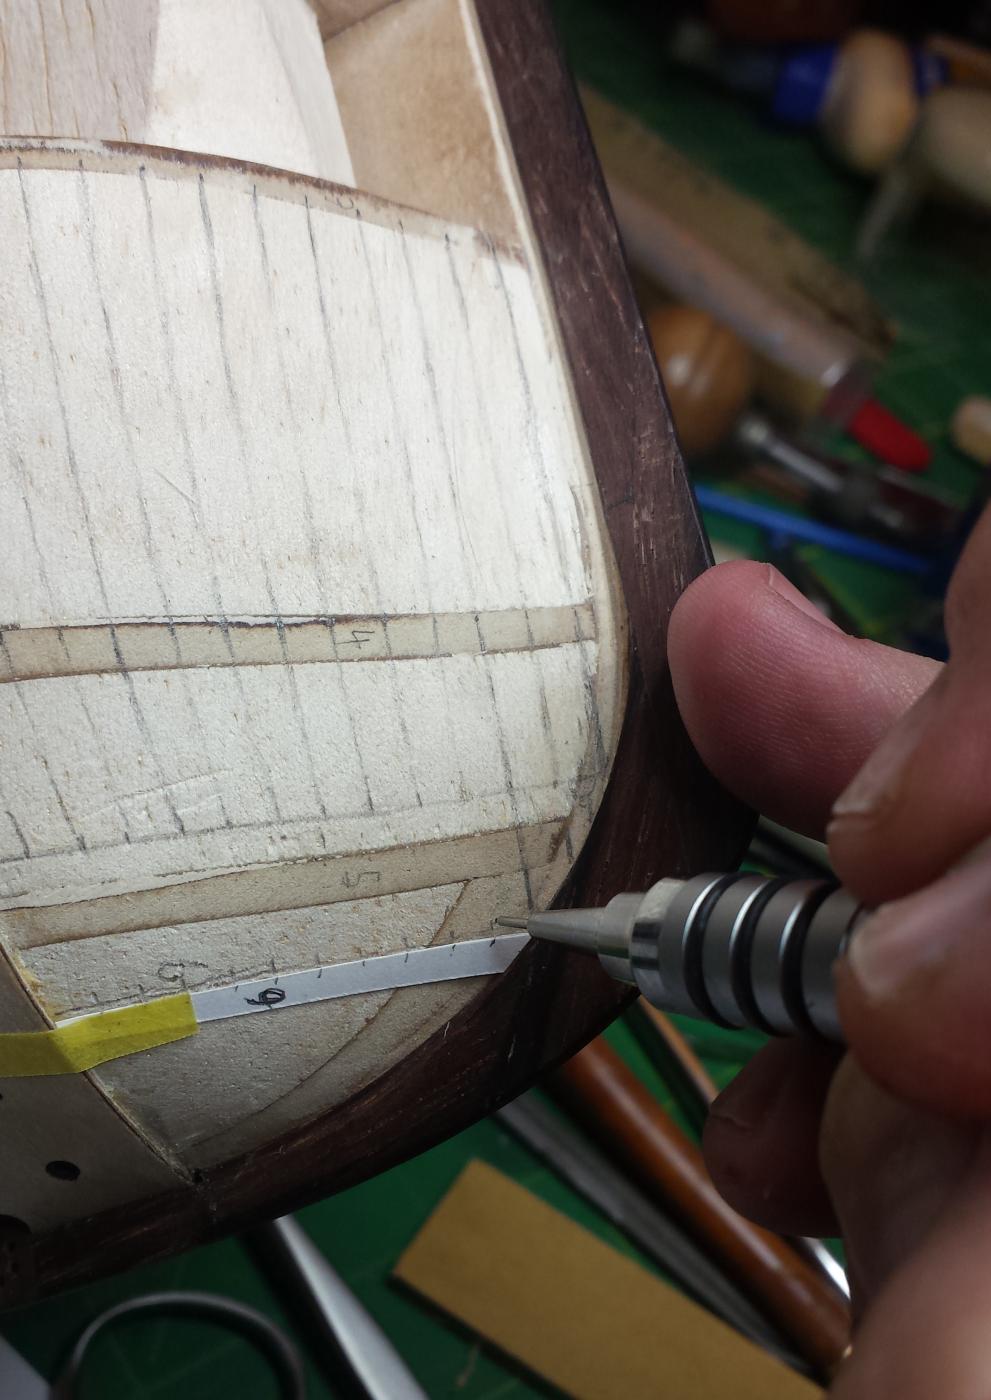
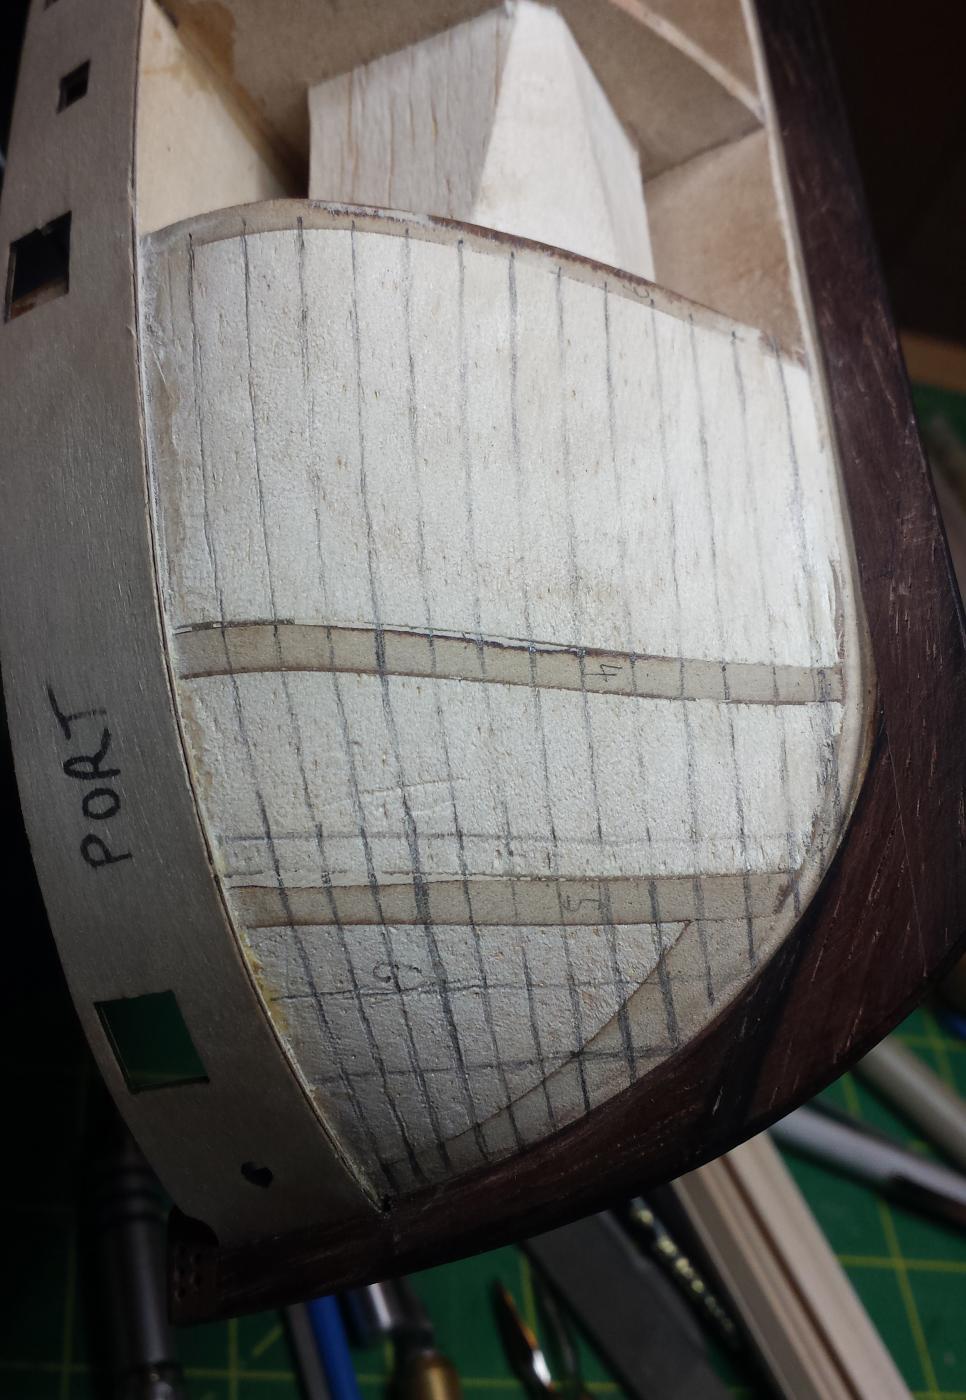
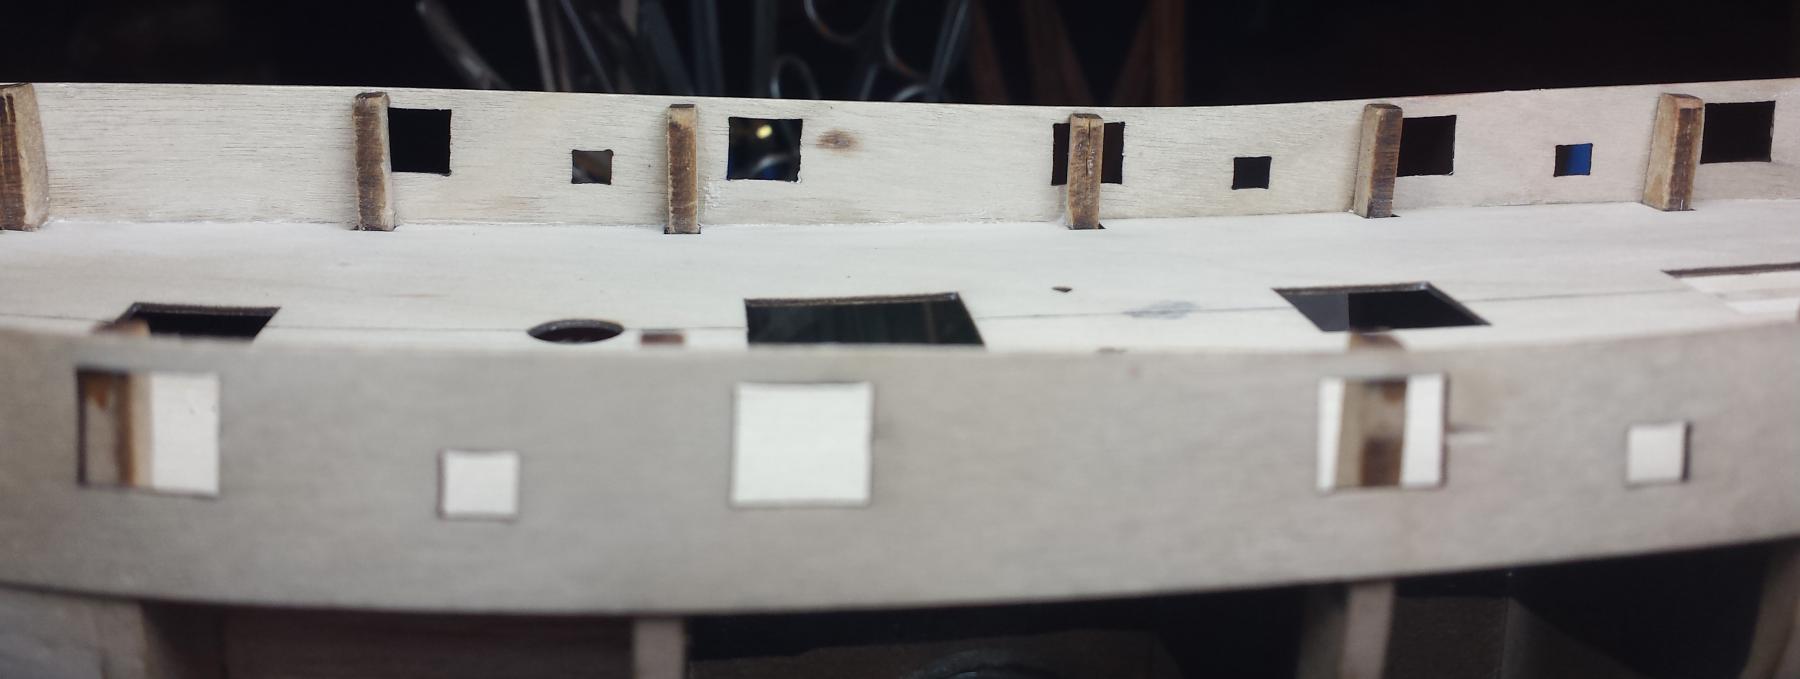
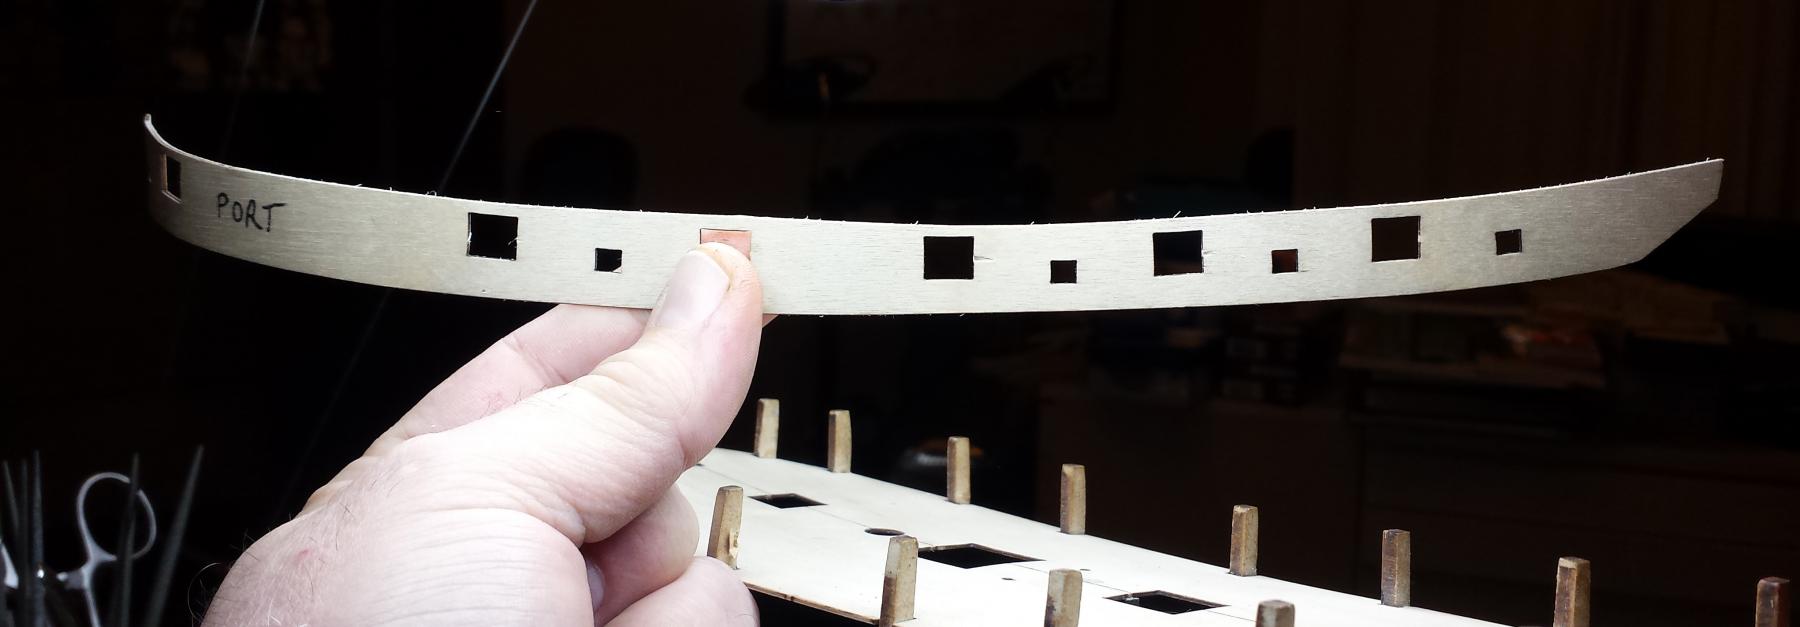
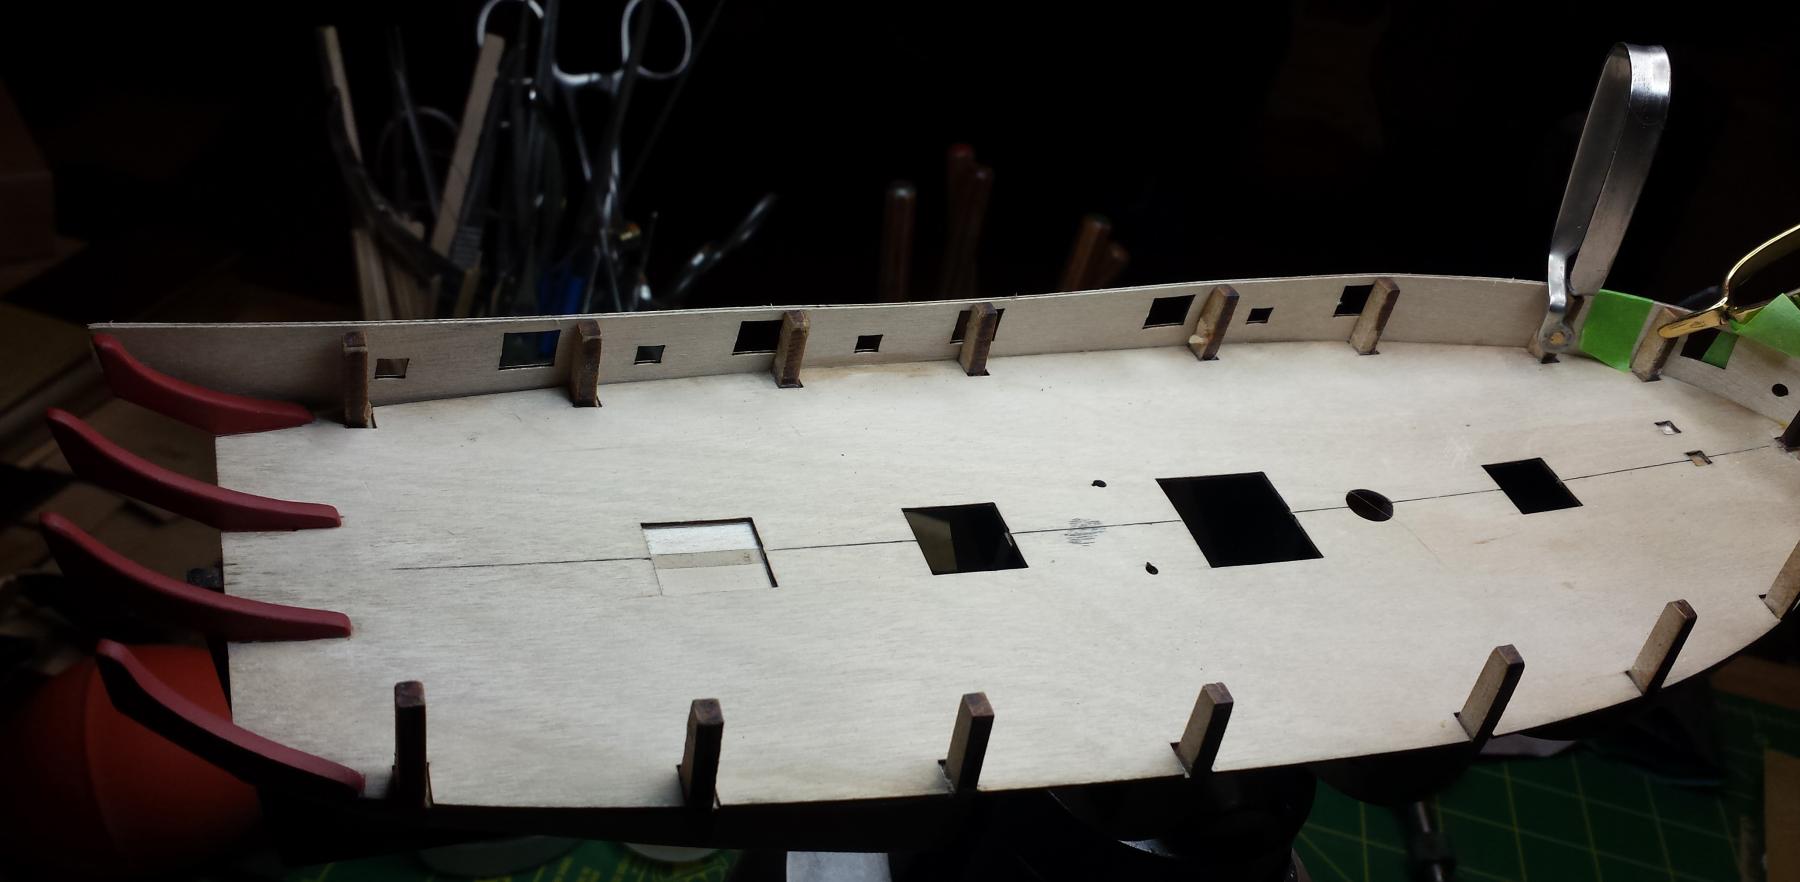
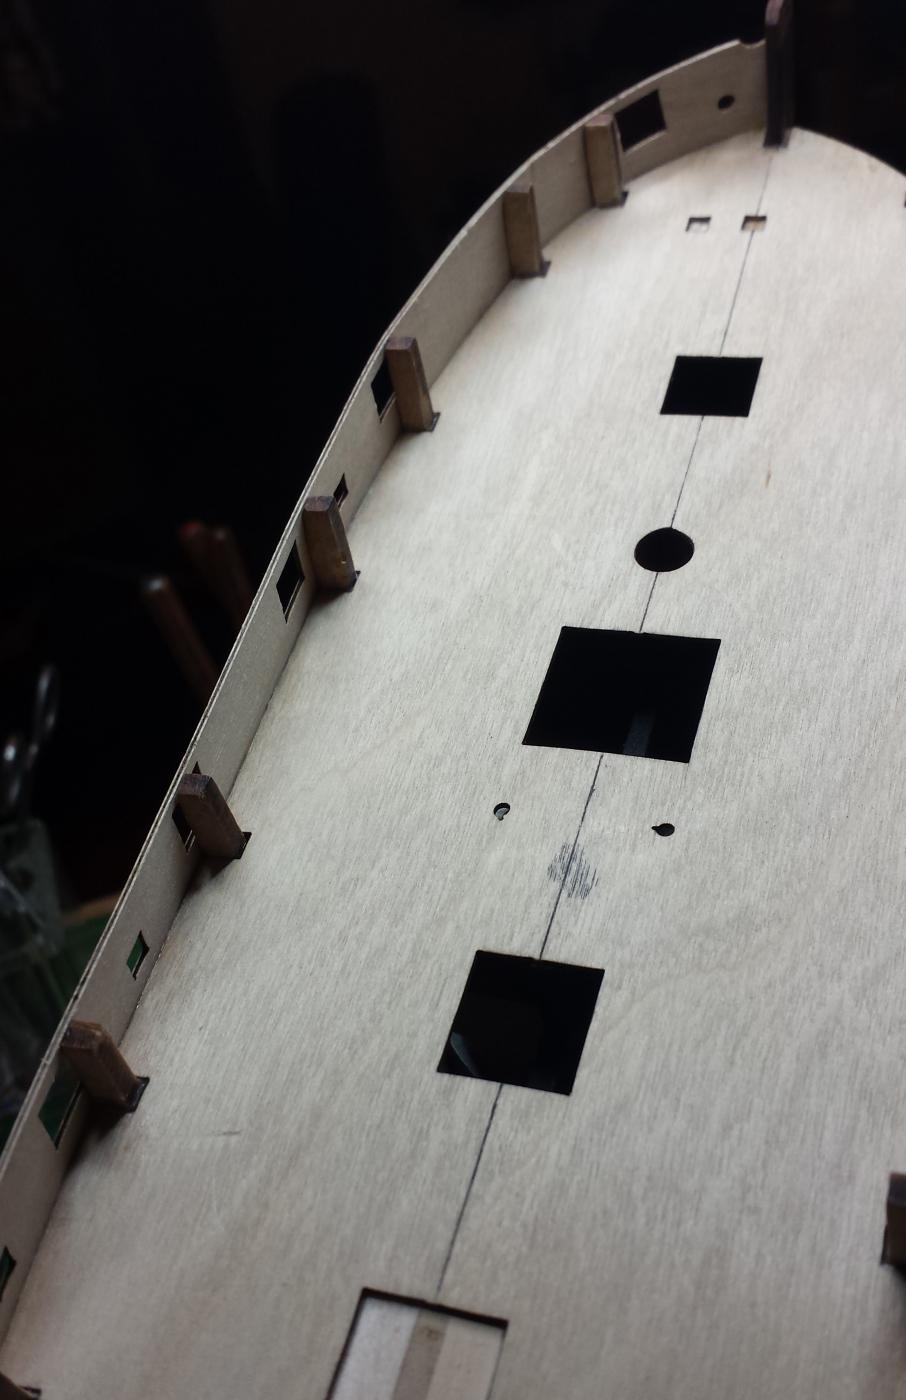
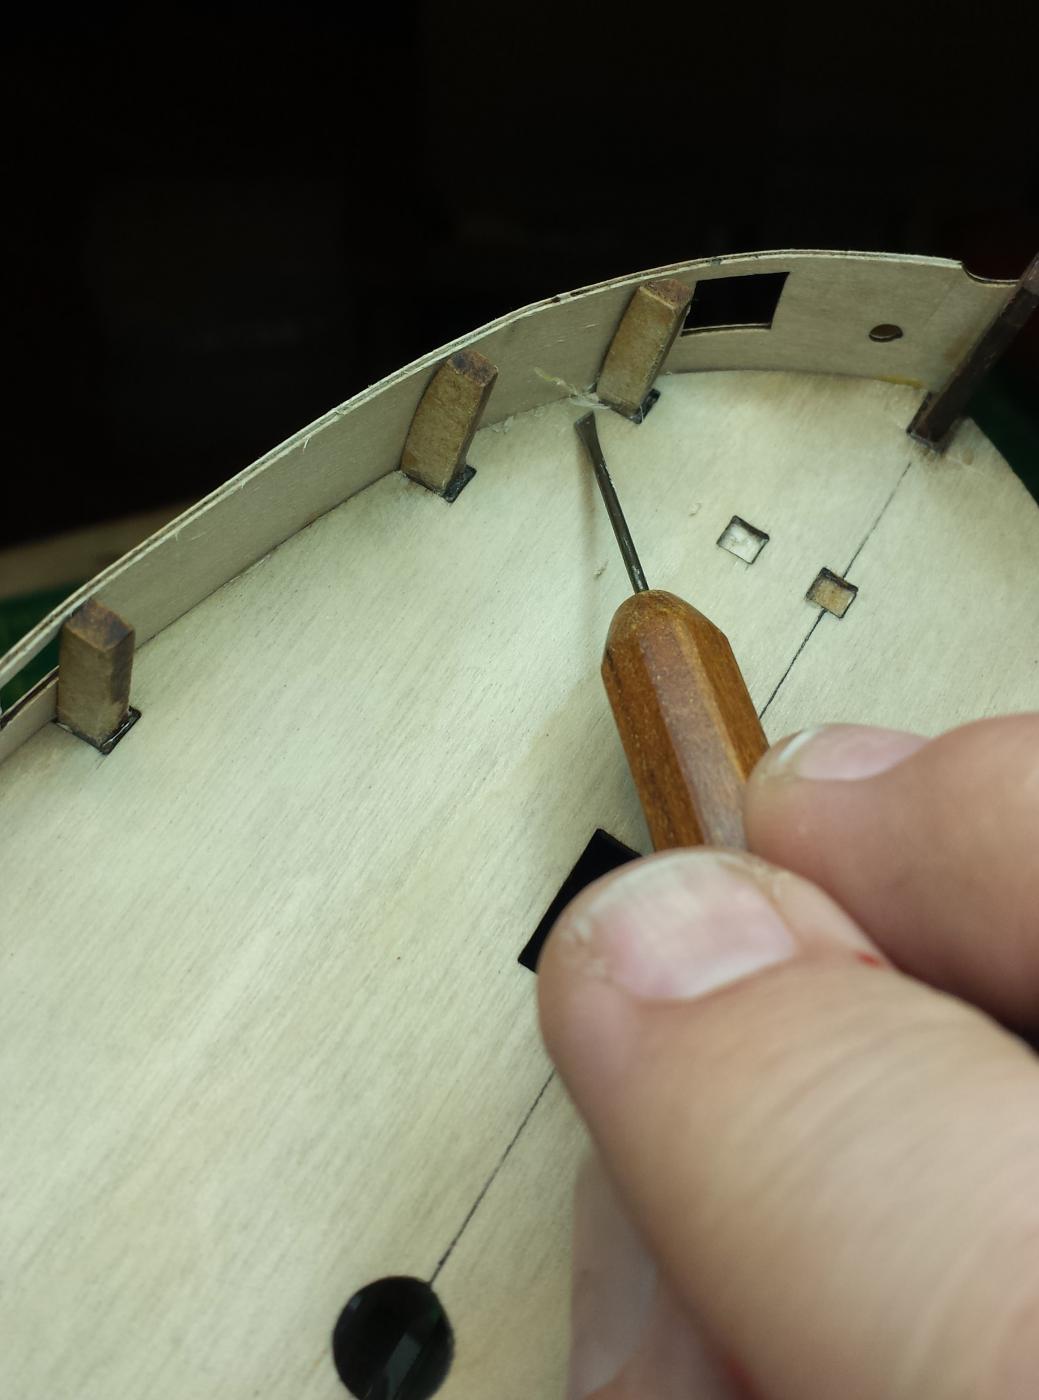
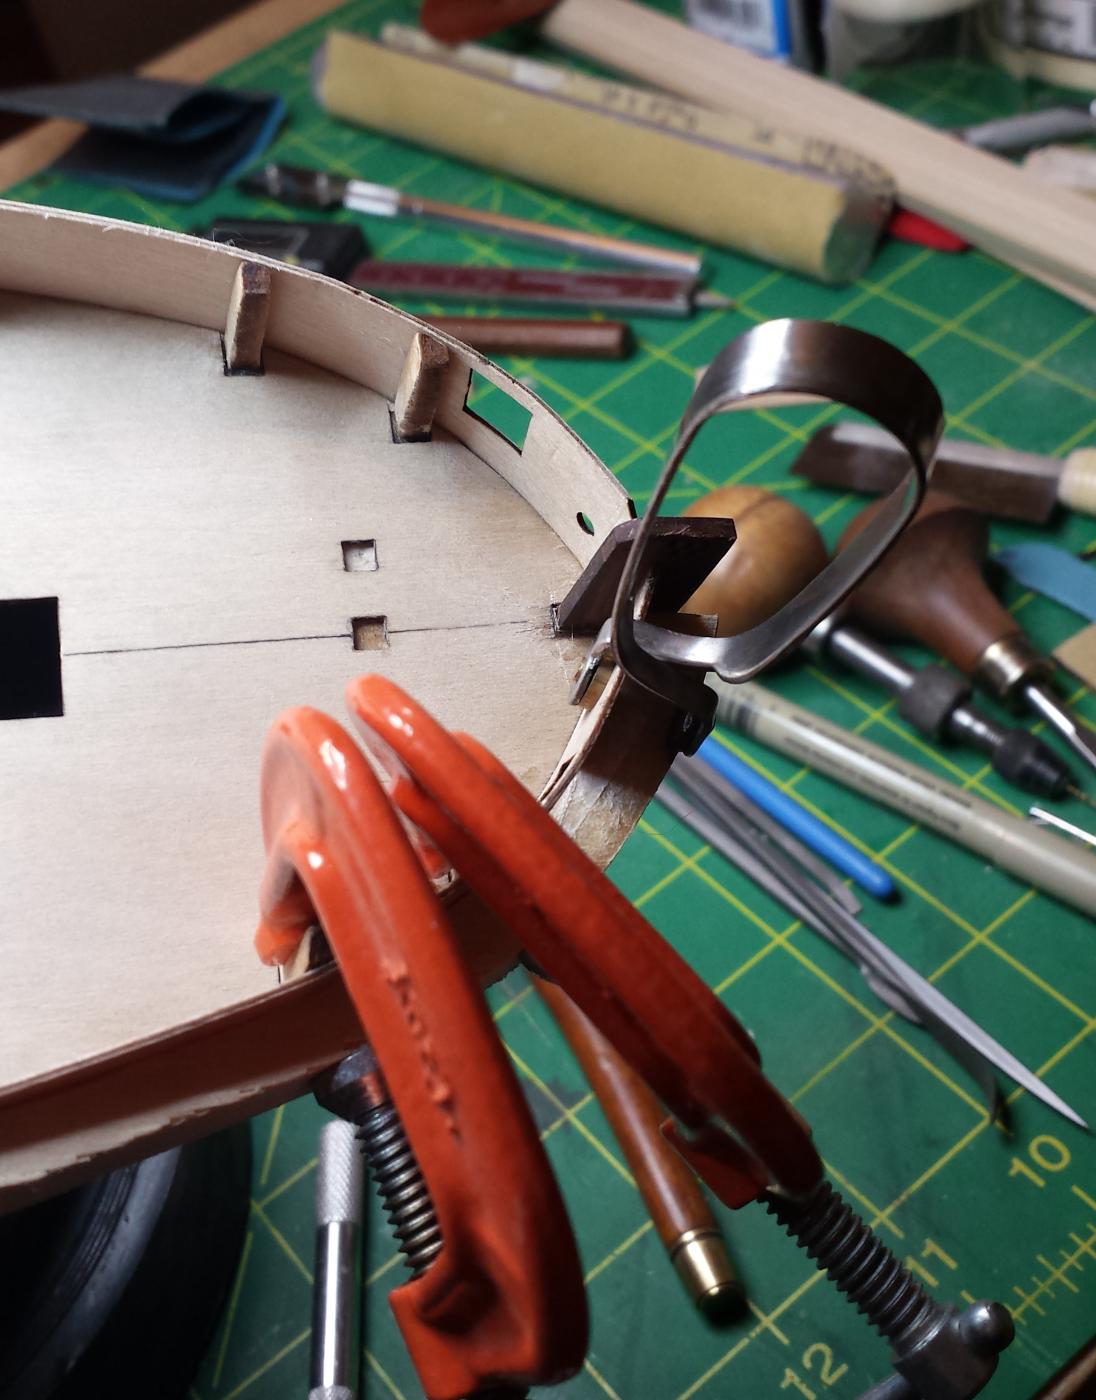
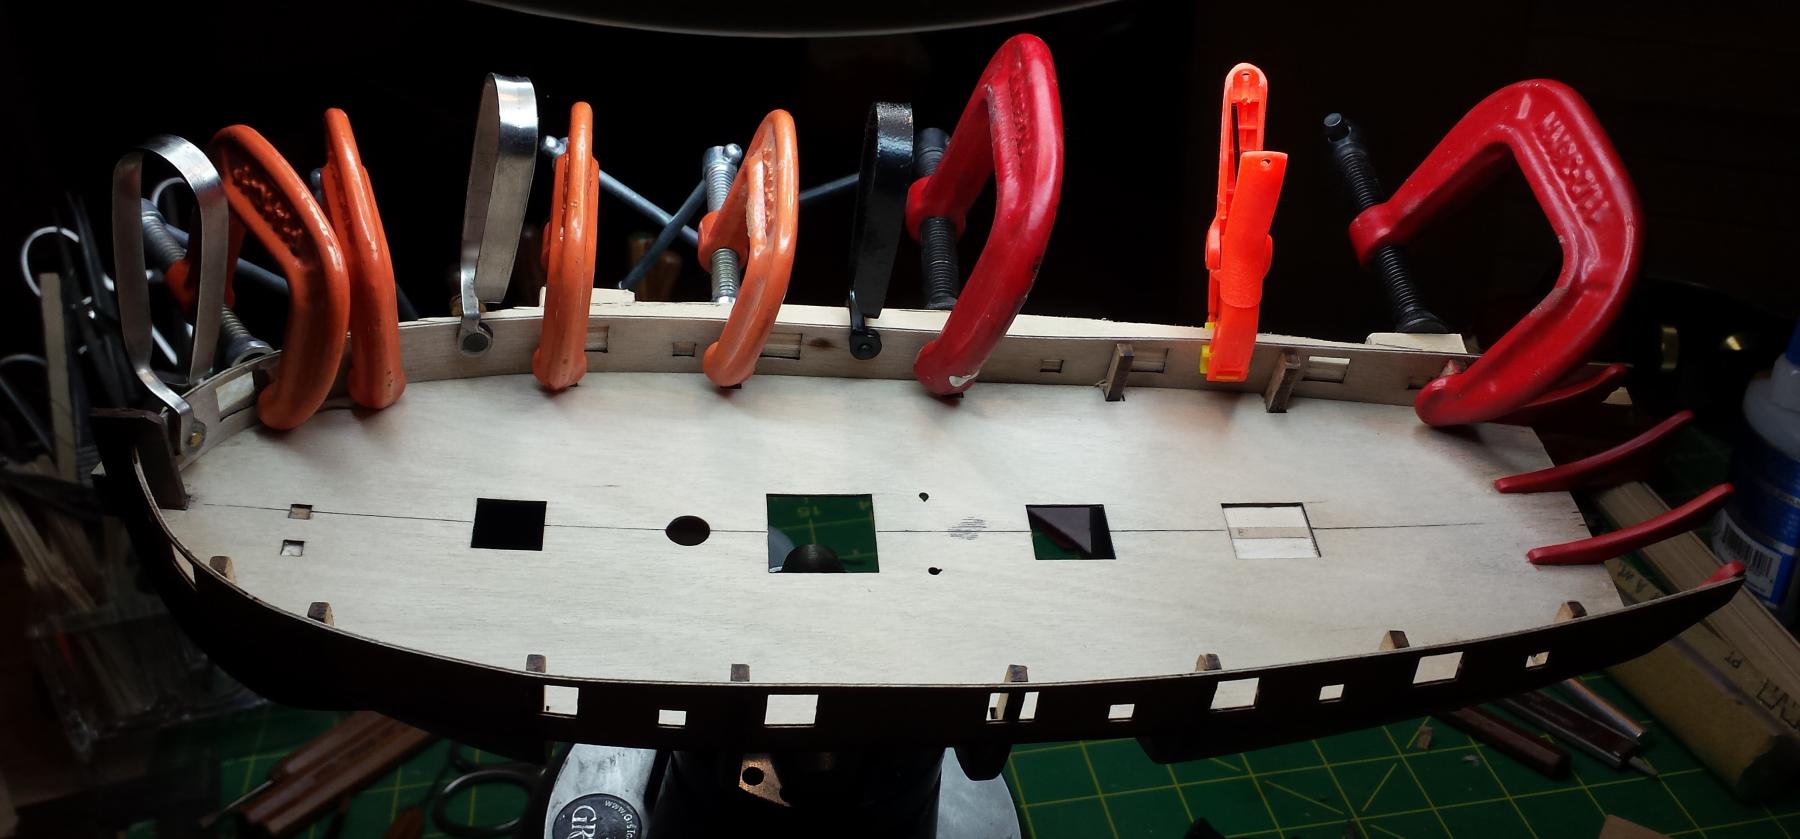
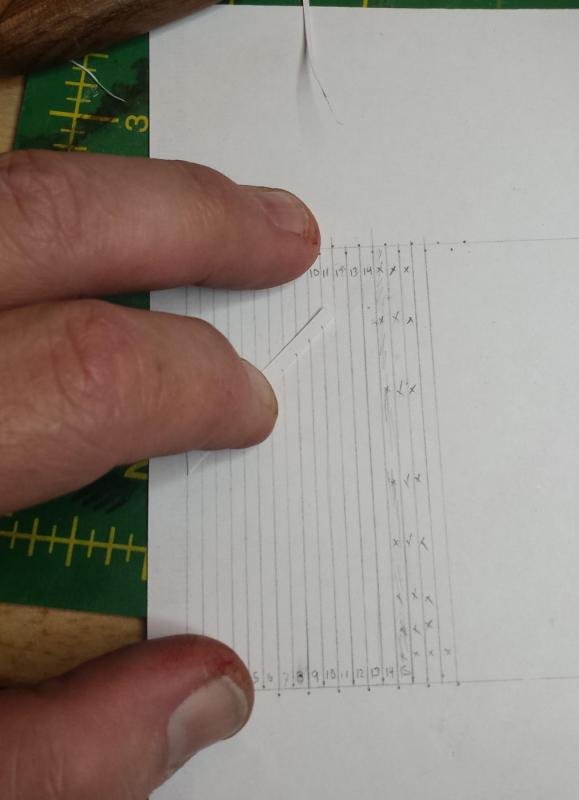
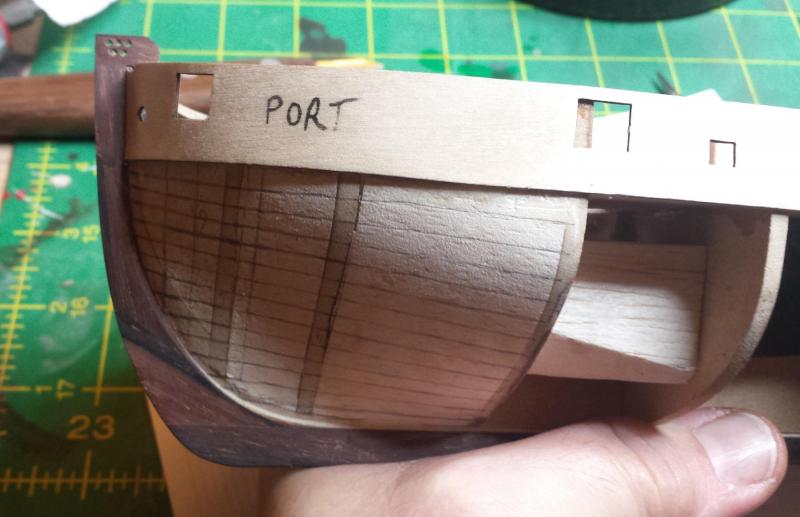
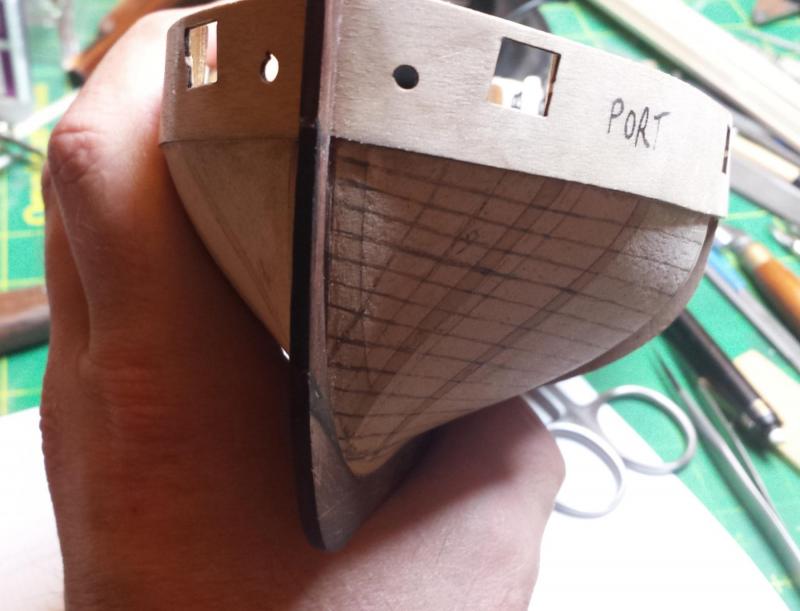
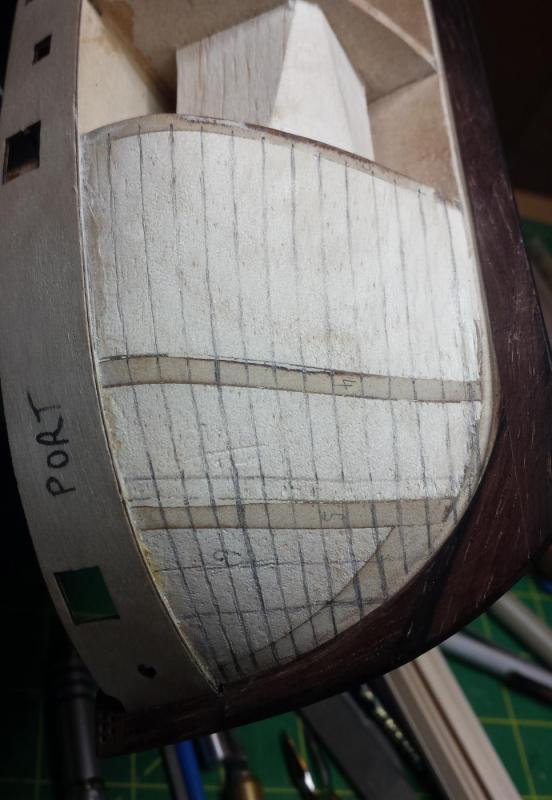
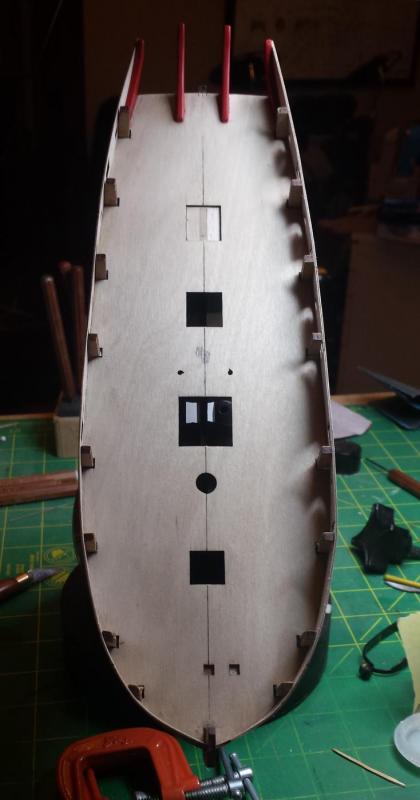
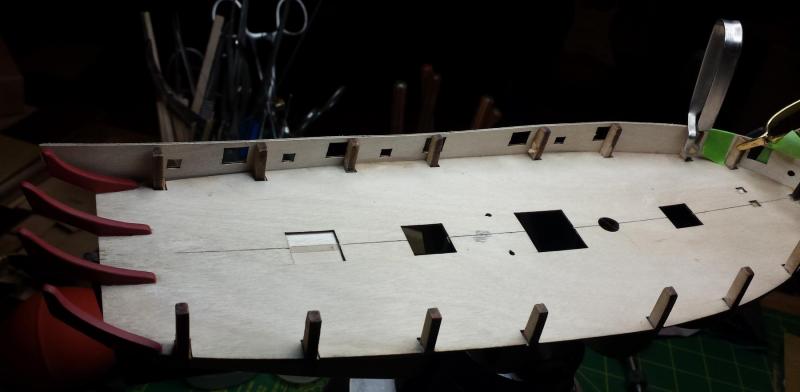
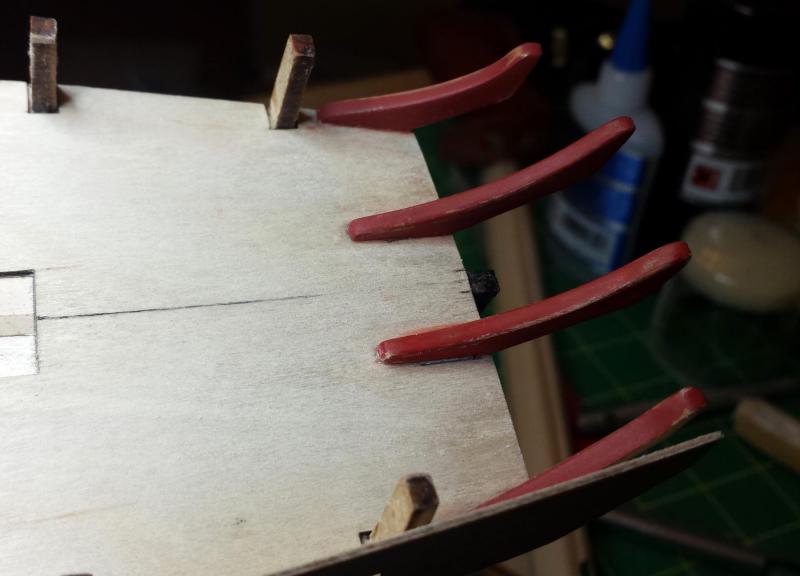
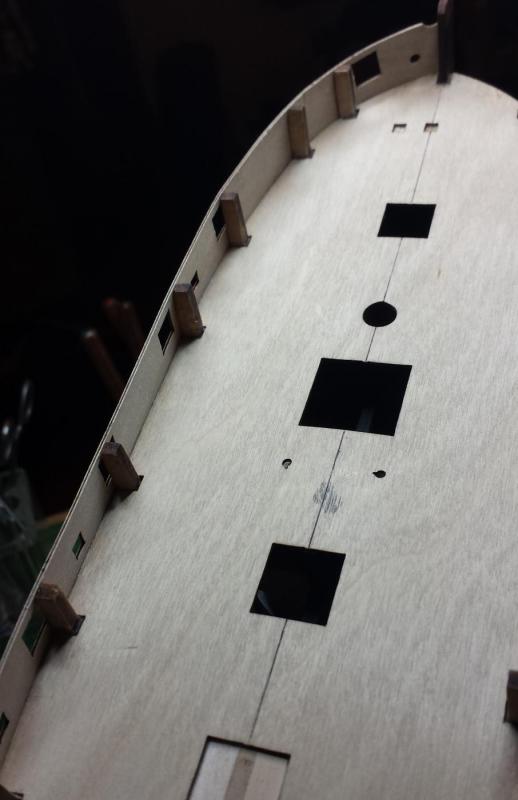
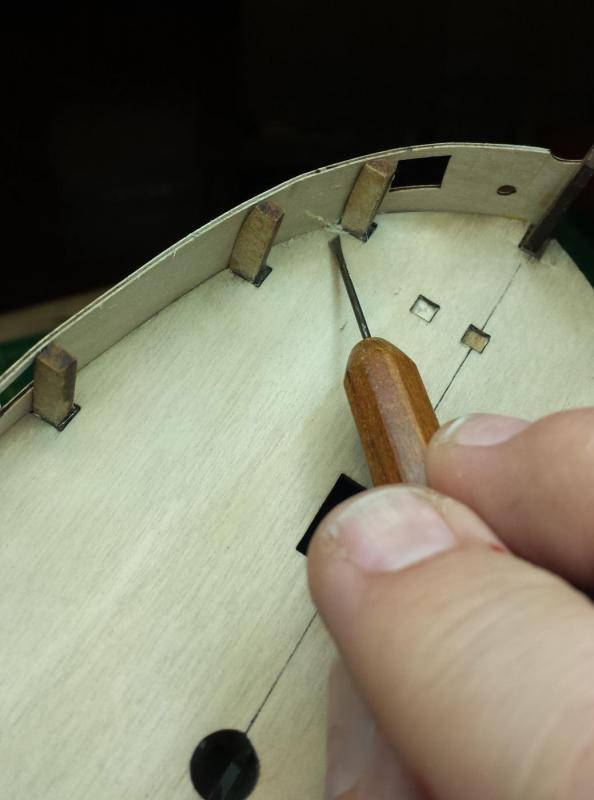
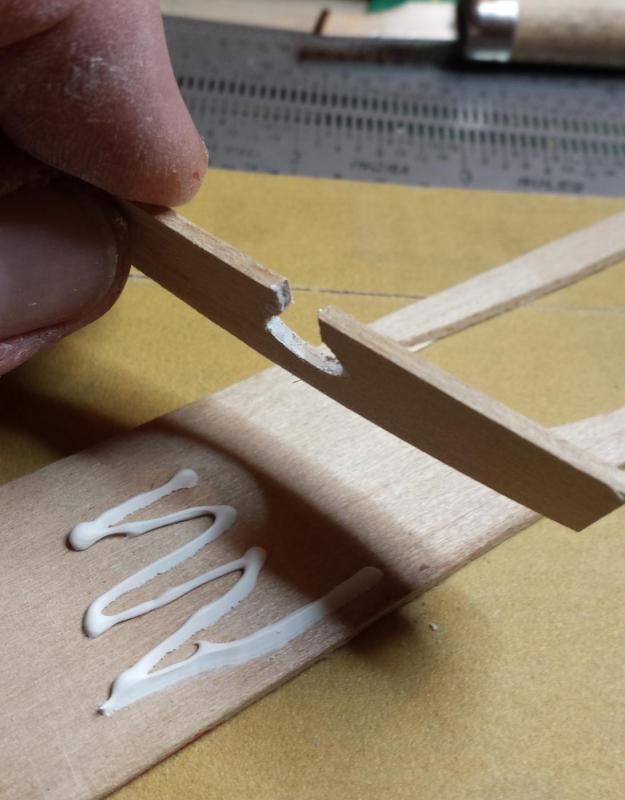
On the bulkhead strips, sigh, more things to fix, What confused me and kept me from doing something sooner is that if you look, you'll see that despite the unevenness that the bulkhead stanchions all have almost identical overhang on the strip so it looked purposeful. This material is thick enough to add pieces on top if needed, I can even reinforce with CF pins if necessary, so one way or another we can fix them. So next step is laying out planking and first, John/Landlocked thanks for the links to Chuck's videos, that is indeed a pretty simple method. I think I'm still going to use one or more planes to at least do the tapering step he does with his xacto knife, I think I can do that faster and more accurately with a plane. I'm guessing Chuck started with building ships and hasn't done much furniture work and just isn't that experienced with planes so he defaults to a perfectly workable and familiar to him method that isn't much slower. And if I find I have squirrely stock with unpredictable grain I'll put down the planes and pick up the knife for that step too. I'm surprised he doesn't bother with soaking at all, and I'm wondering how he handles bends more severe than what he needs to do here, since anything more than what he did and that stock is breaking. Since he seems against soaking I have to assume he does it in more than one step, progressively increasing the bend. Since I don't have more severe bends I'll give that a try, but I may soak also - there is no time wasted in putting stock into water a couple hours ahead of time and if anything raising the grain, at least on the final planking, is a benefit for sanding to a final surface. Long time ago I used to make very expensive corporate conference tables and one of the steps of preparing the tops was wetting down the surface to raise the grain before final sanding. But as noted I'll try it without soaking and if it's really not needed, it's not needed. Other difference is for the sake of peace and quiet I'm going to forego the screaming hair dryer in favor of my plank bender, at least if that works. The key point there is to raise the piece to bending temp and then let it cool again, doesn't matter how you heat it. The taper and bevel technique is pretty much what I was intending to do. With the bevel I actually don't think he explained it well, he only explains the convex curve where the inside of the plank needs to be smaller than the face - he left out concave (or maybe I couldn't hear it) where the converse is true and the plank face will need to be smaller. I think of planks this way from the front view, with the divisions between planks being radii of curves extending from the curve's centerpoint, which is what they need to be if they're going to fit side by side correctly, and that means wherever planking is covering a curved surface the plank edges need to be beveled. Those videos don't show how he decided how much the planks have to taper, so I went ahead with how I intended to do it, and need some feedback as to whether this looks correct. Since this hull is very simple until we get to the stern, on the bow I decided to just let the planks terminate naturally into the stem and keep tapering the rest. I started with figuring out how many are needed at midships by making a piece of paper the correct length, and then dividing it by the 3/16" width of the planking, turned out to be exactly 14. So then I made a set of parallel lines on paper into 14 divisions at 3/32" (less than the smallest anticipated taper) to use to draw the divisions on the following paper strips. Here is the first strip being marked. And then transferring to builkheads. Long term this is overkill, but I'm also sketching in the lines as I go as it's a totally unambiguous reality check as to whether my cunning plan is working out or not. Here we're at the forward bulkhead where planks start terminating into the stem. Note that if you're going to do ad-hoc divisions like I am that they need to be straight and perfectly parallel to the bulkheads from the side view like we see here. The first vertical line is the point at which the first plank ends. The second is after two more end and I'm just tapering 11 from there. Marking the paper strip for the second line, with just 11 divisions. And transferred marks to hull. From there I used Mk.I Eyeball to draw them the rest of the way. It's logical and simple, but it looks kind of straight from the side view, not exactly the most graceful lines. However, anything I do to make the lines more graceful is going to also be more complicated with drop planks in the middle required. Please let me know what you folks think, if I need to do it differently we'll erase all this and start over. Yes I know this detail isn't necessarily required for inner planking, but it's also an exact dry run of what I will need to do for the final planking where high quality is required, so I can't think of cases where I won't do it this way and work out everything I need to know for the final planking at this point.


- 714 replies
-
- 6
-
-
- lady nelson
- victory models
- (and 1 more)
-
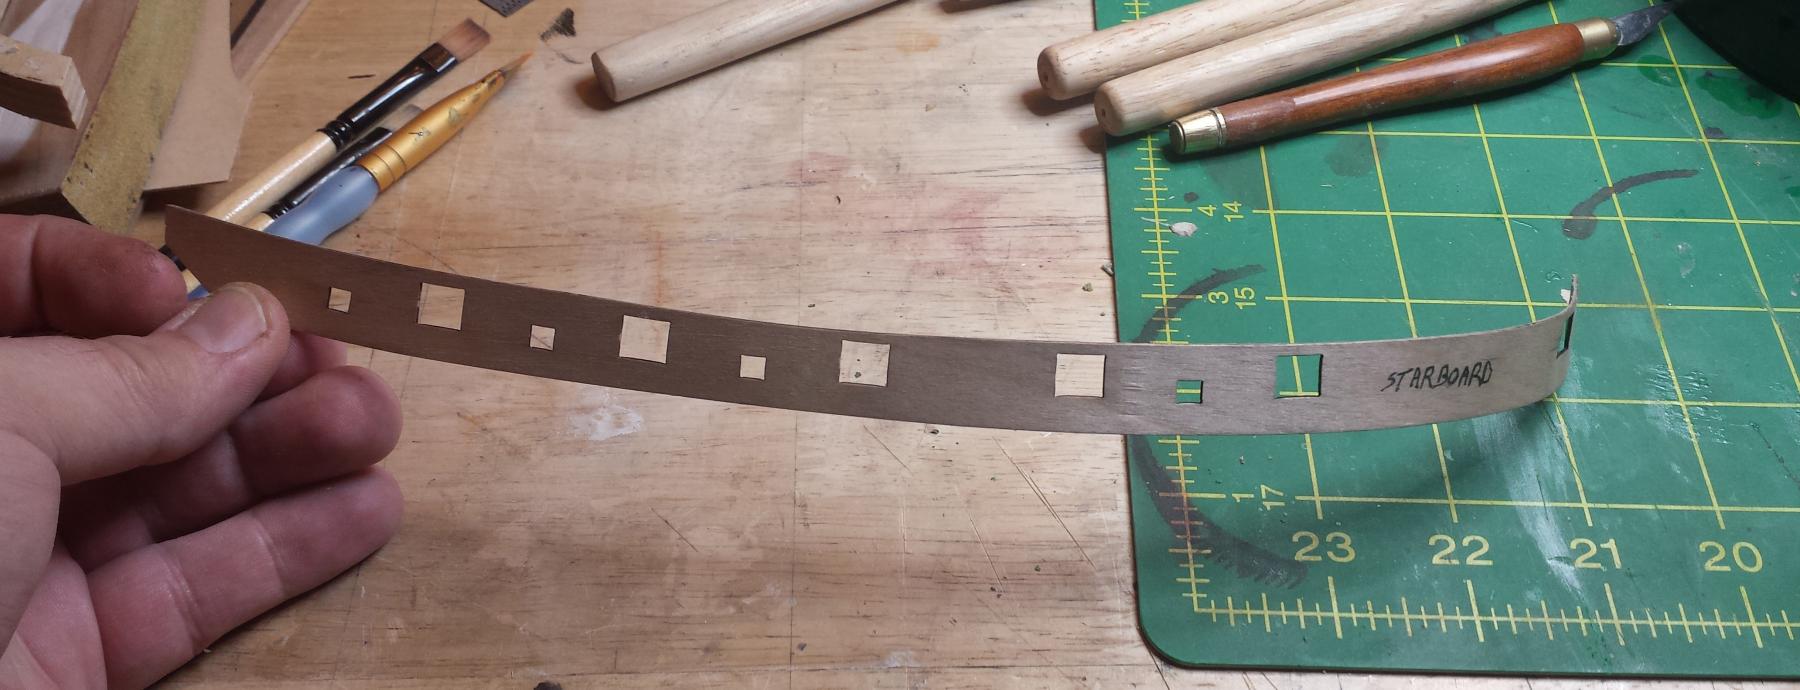
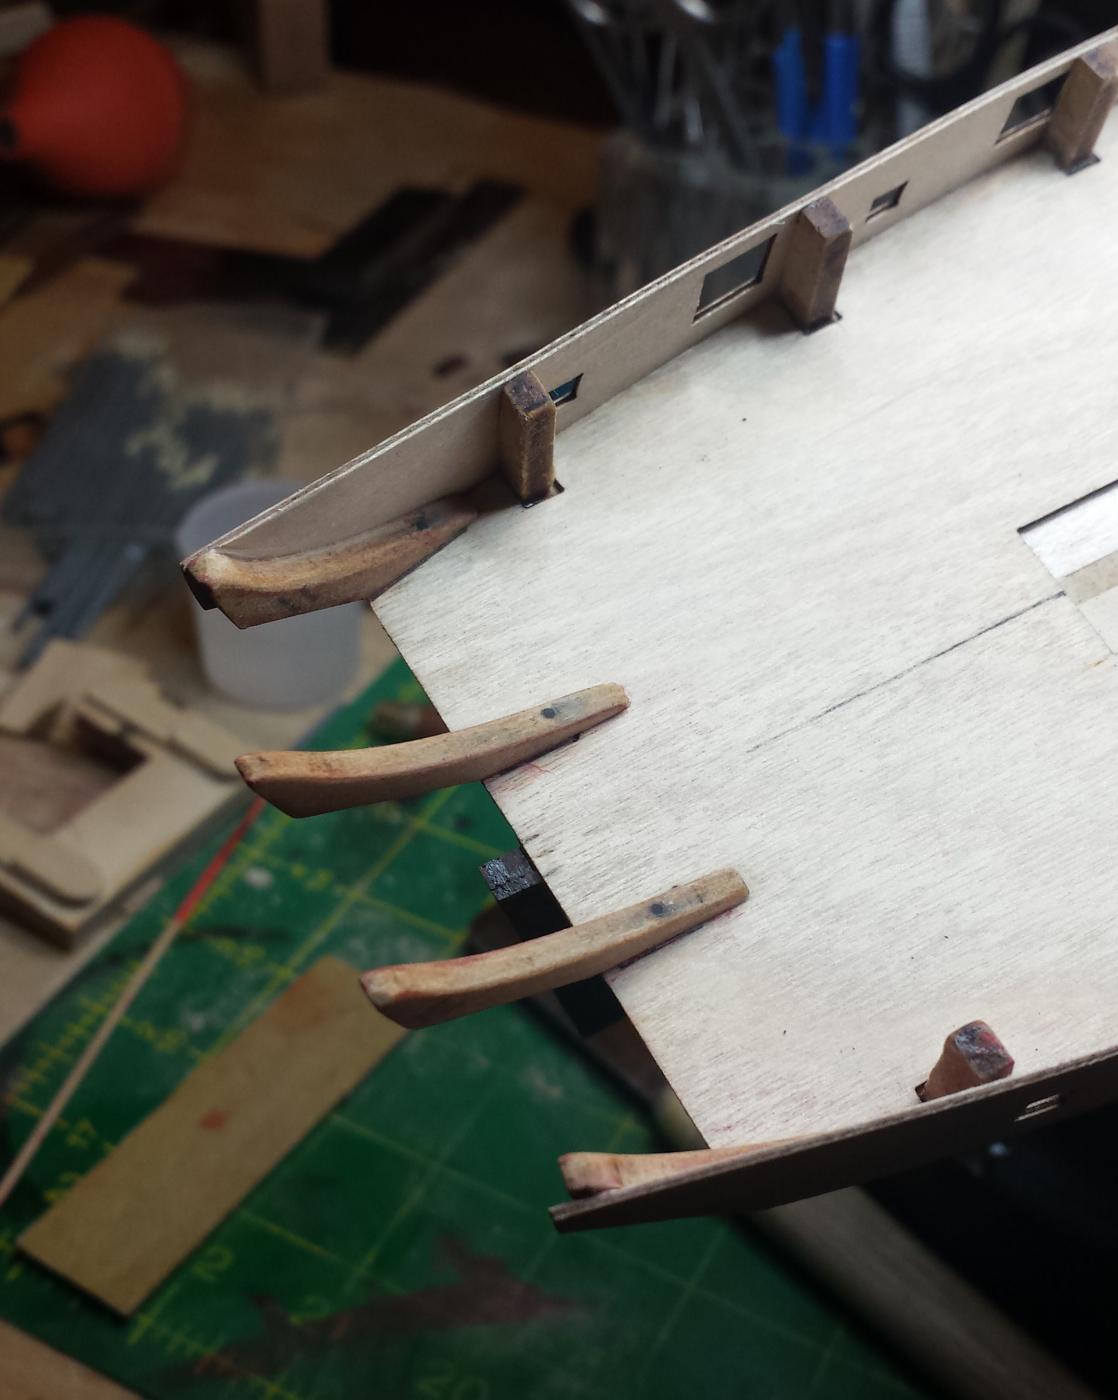
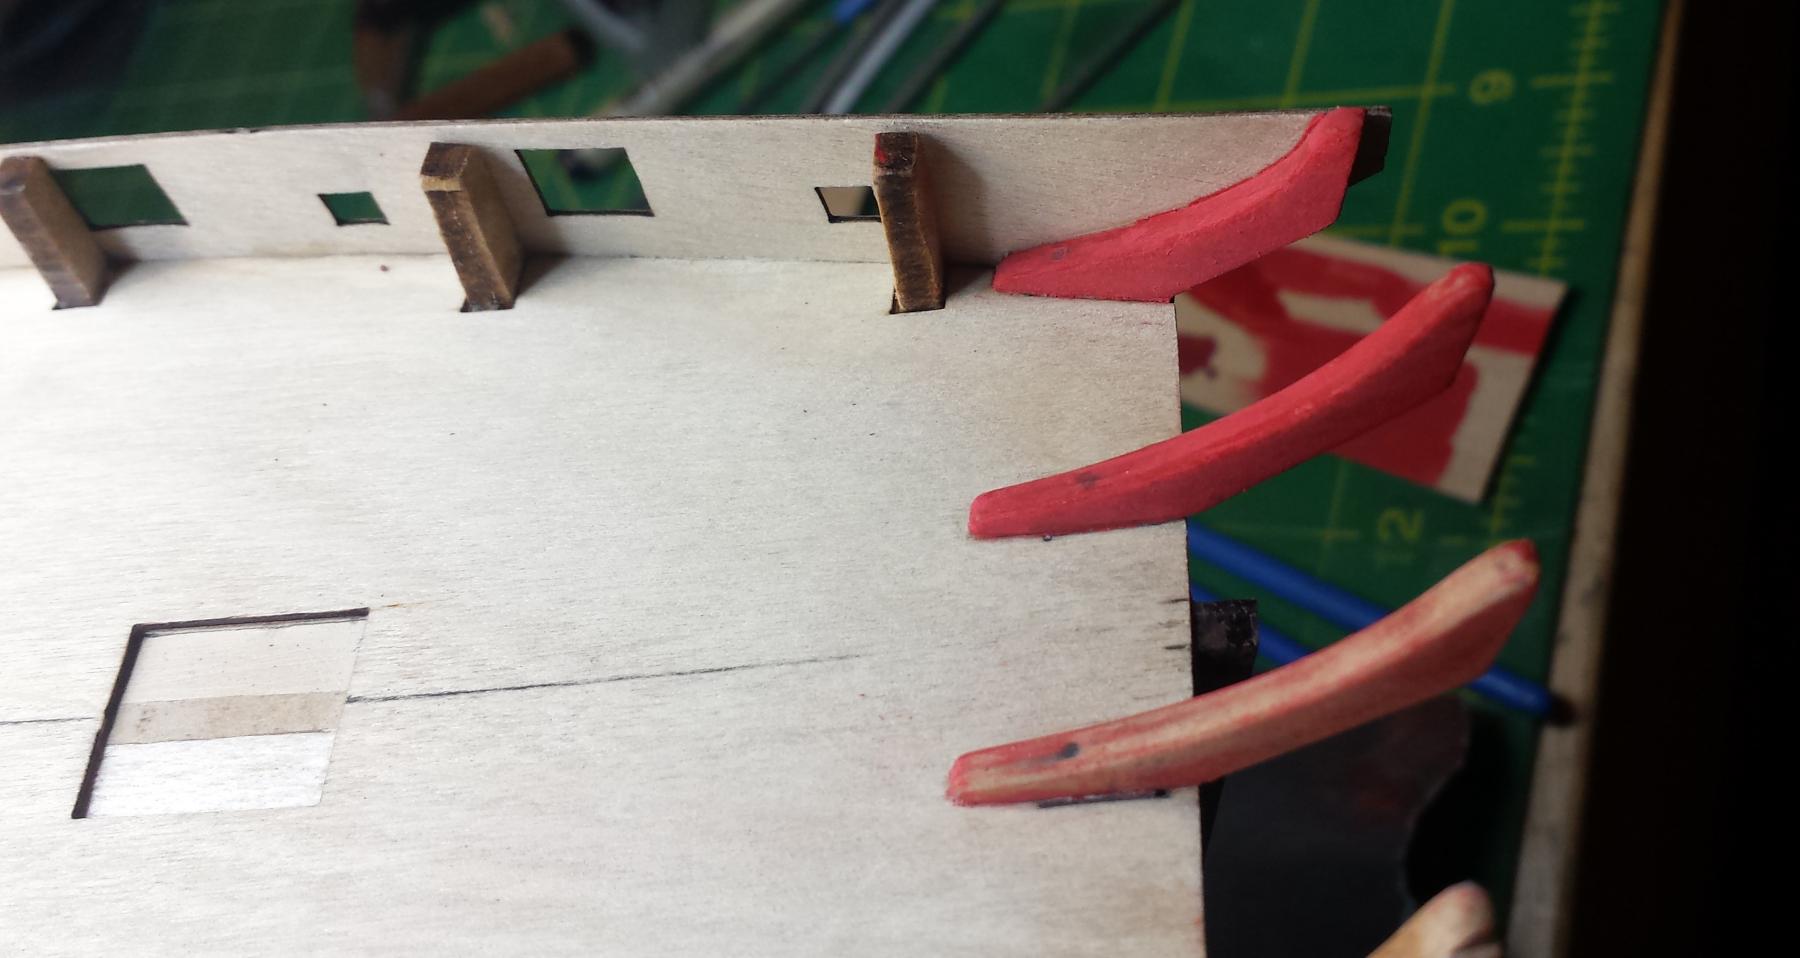
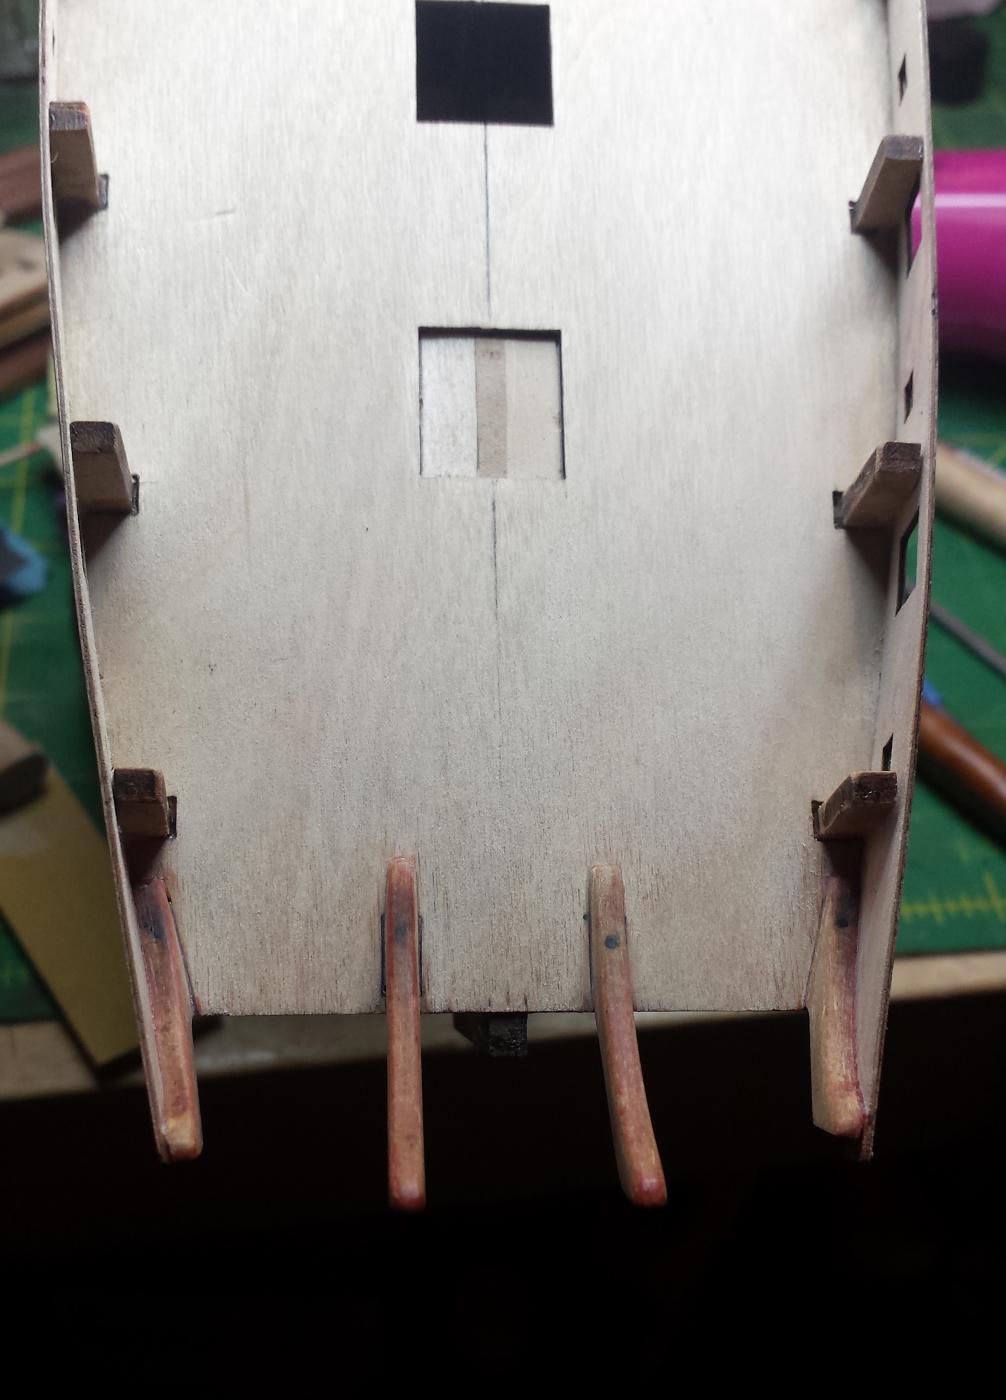
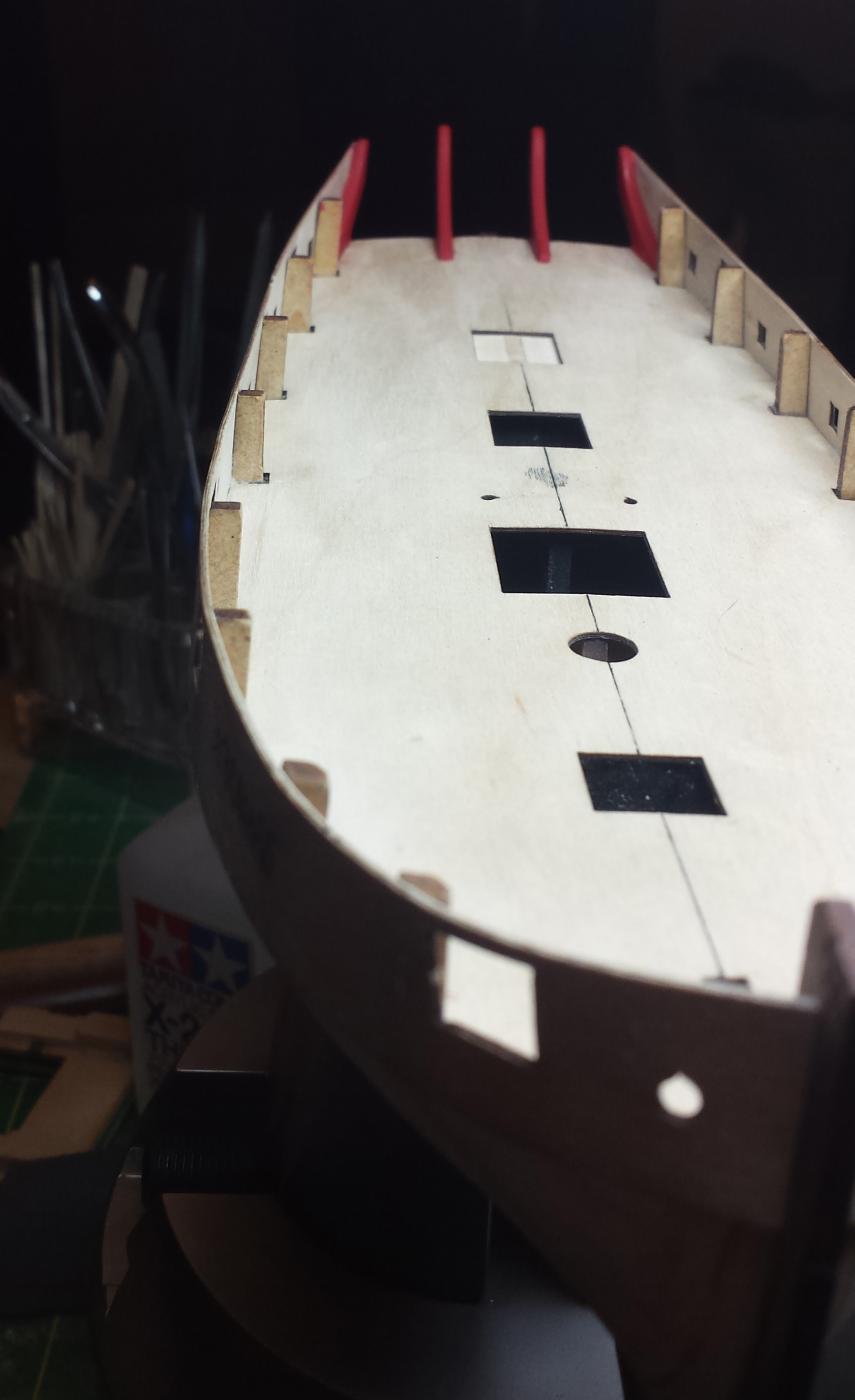
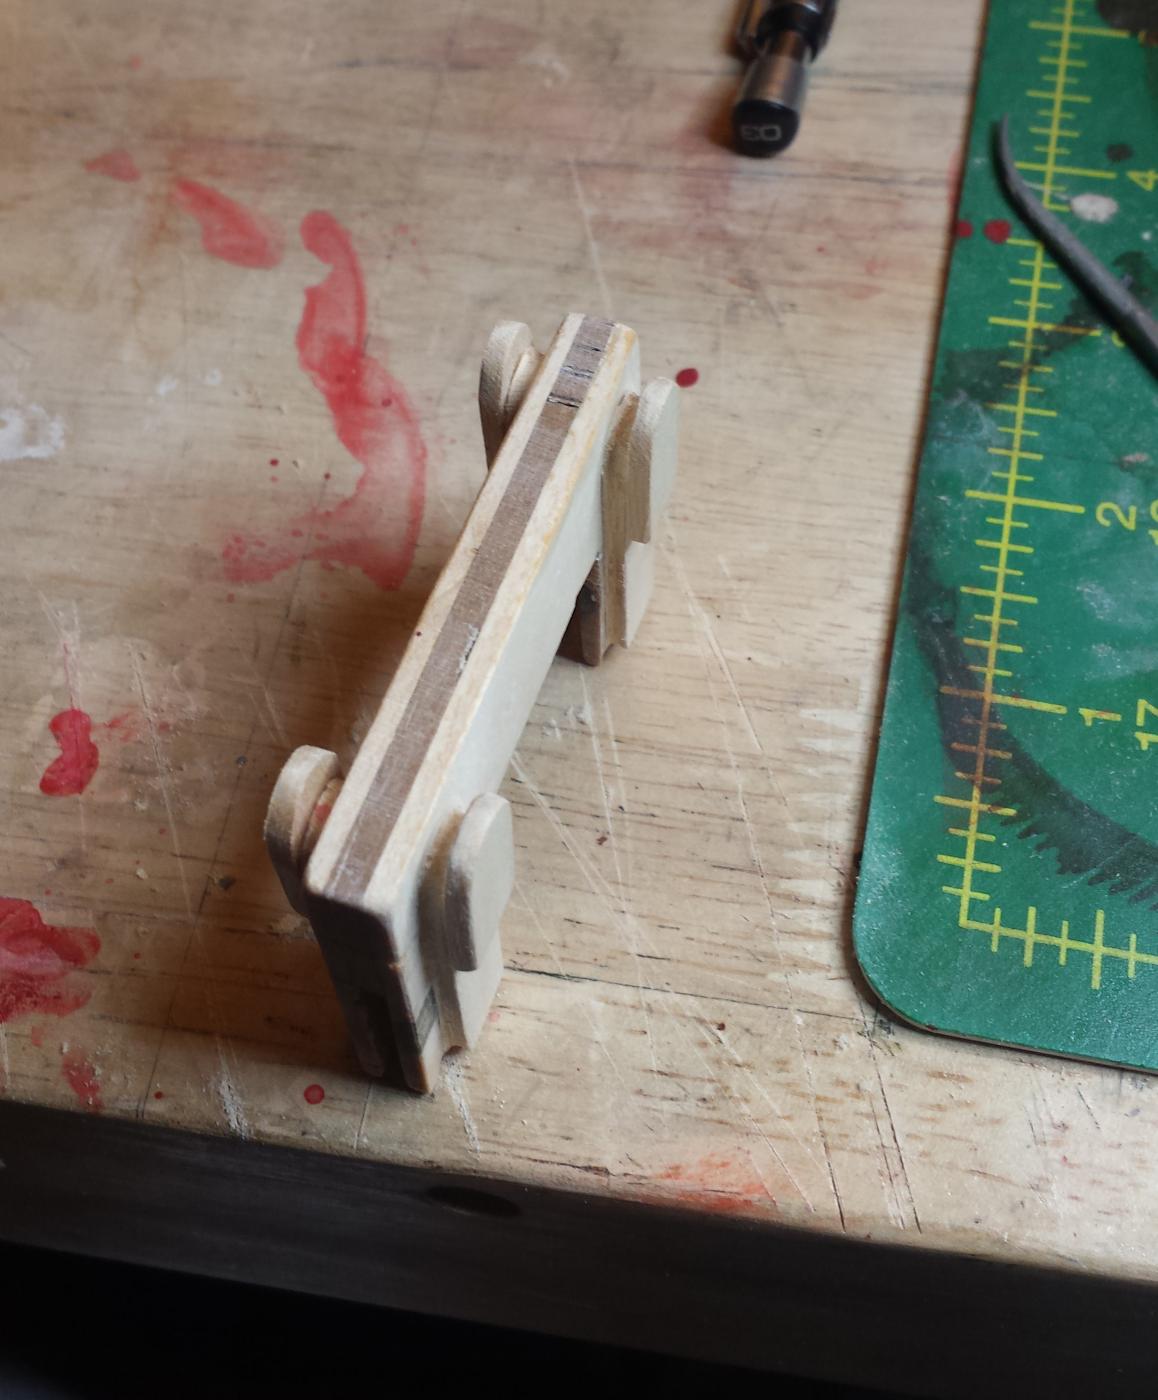
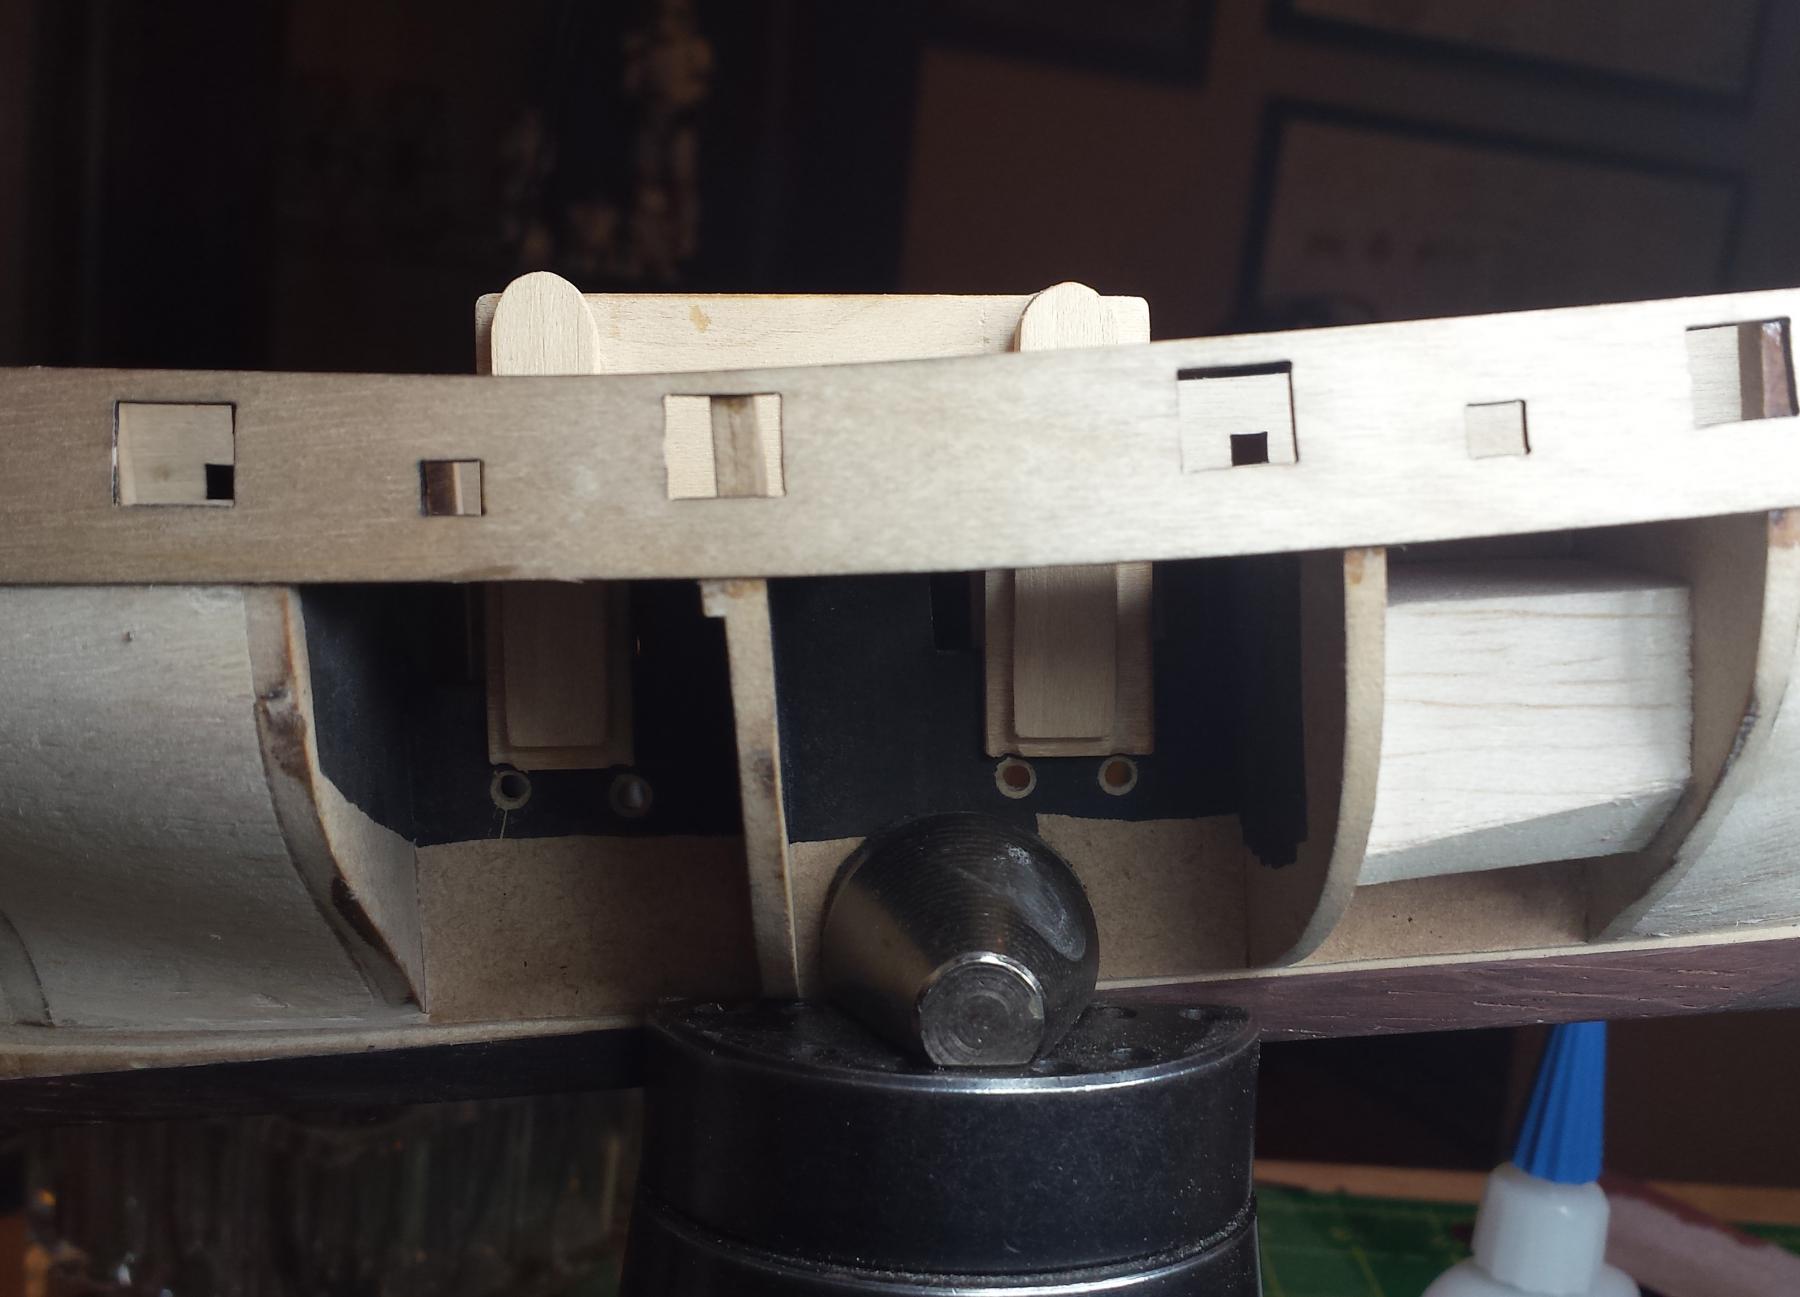
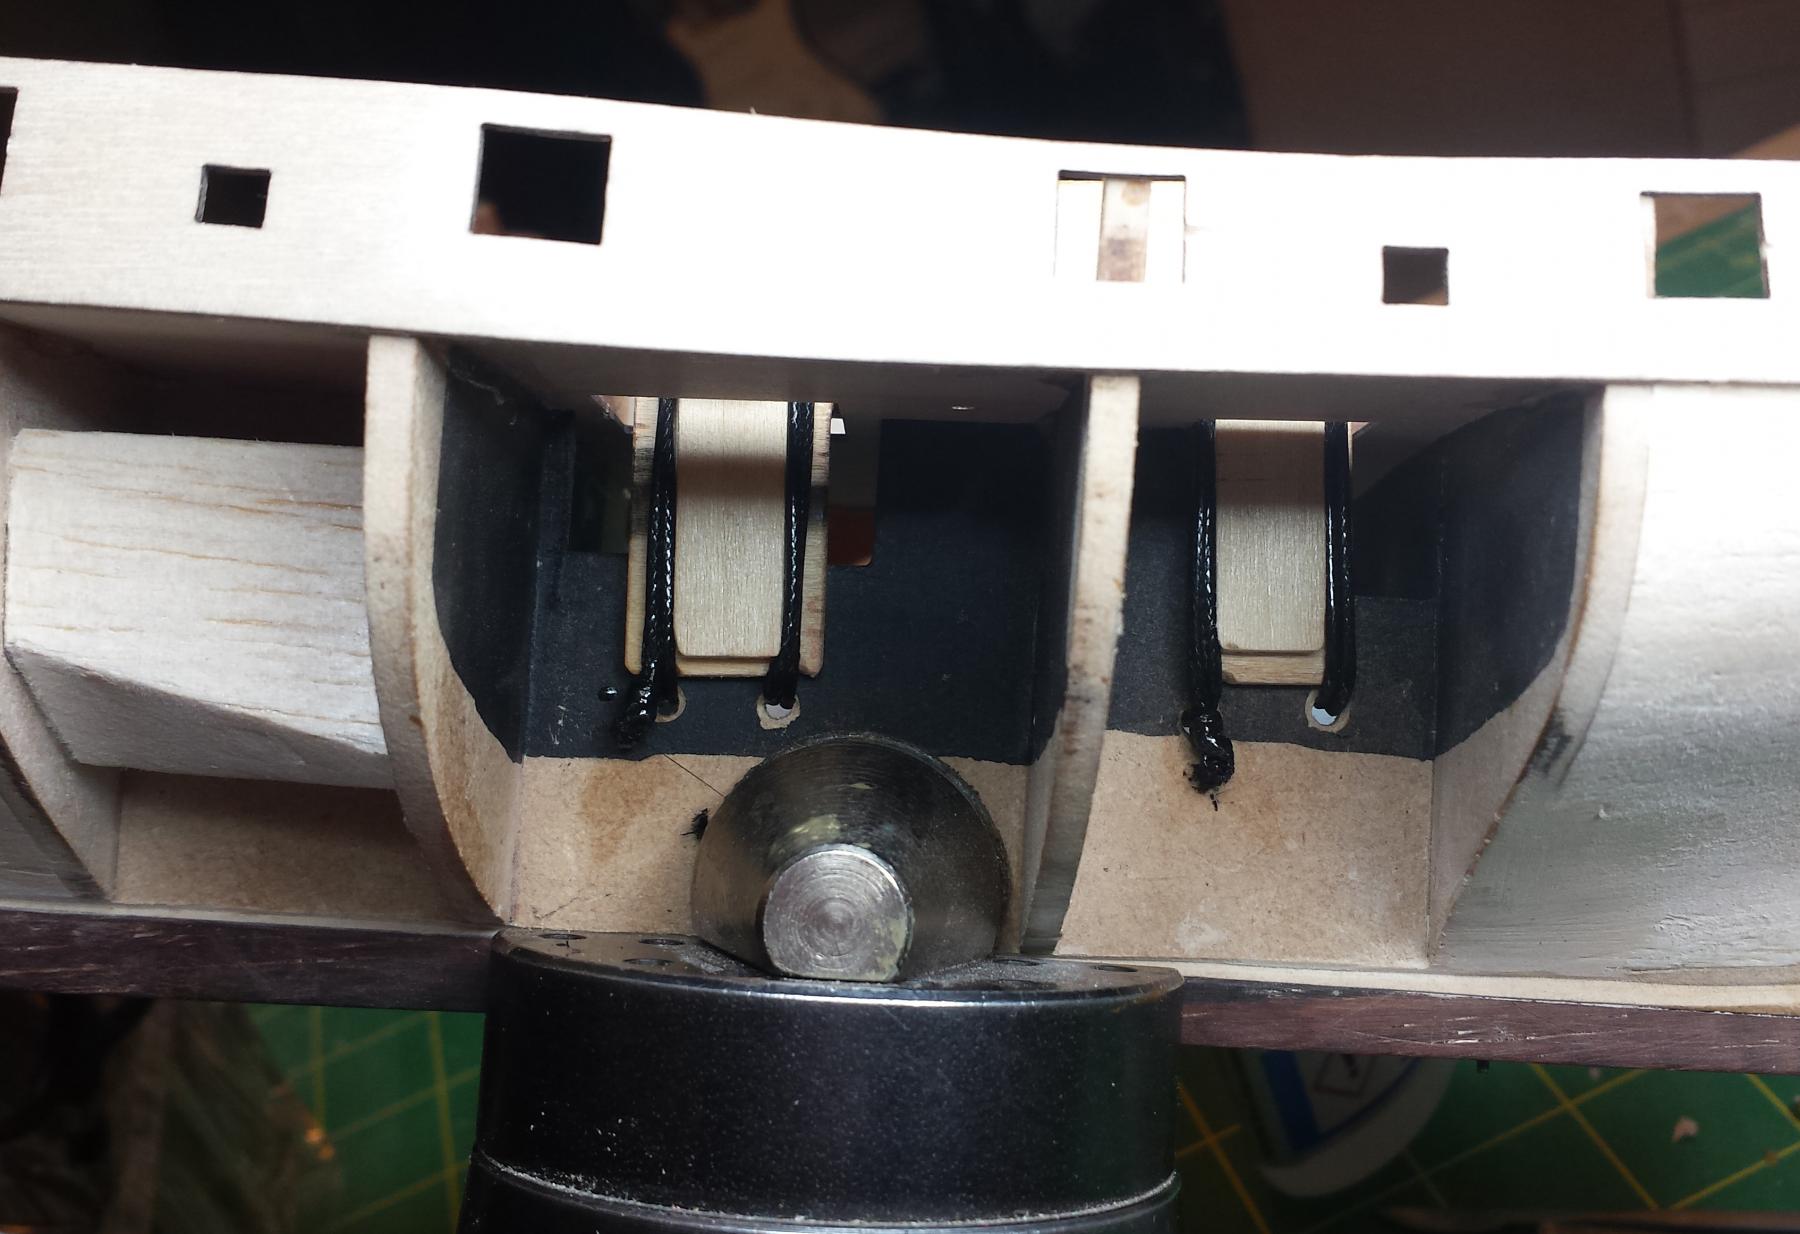
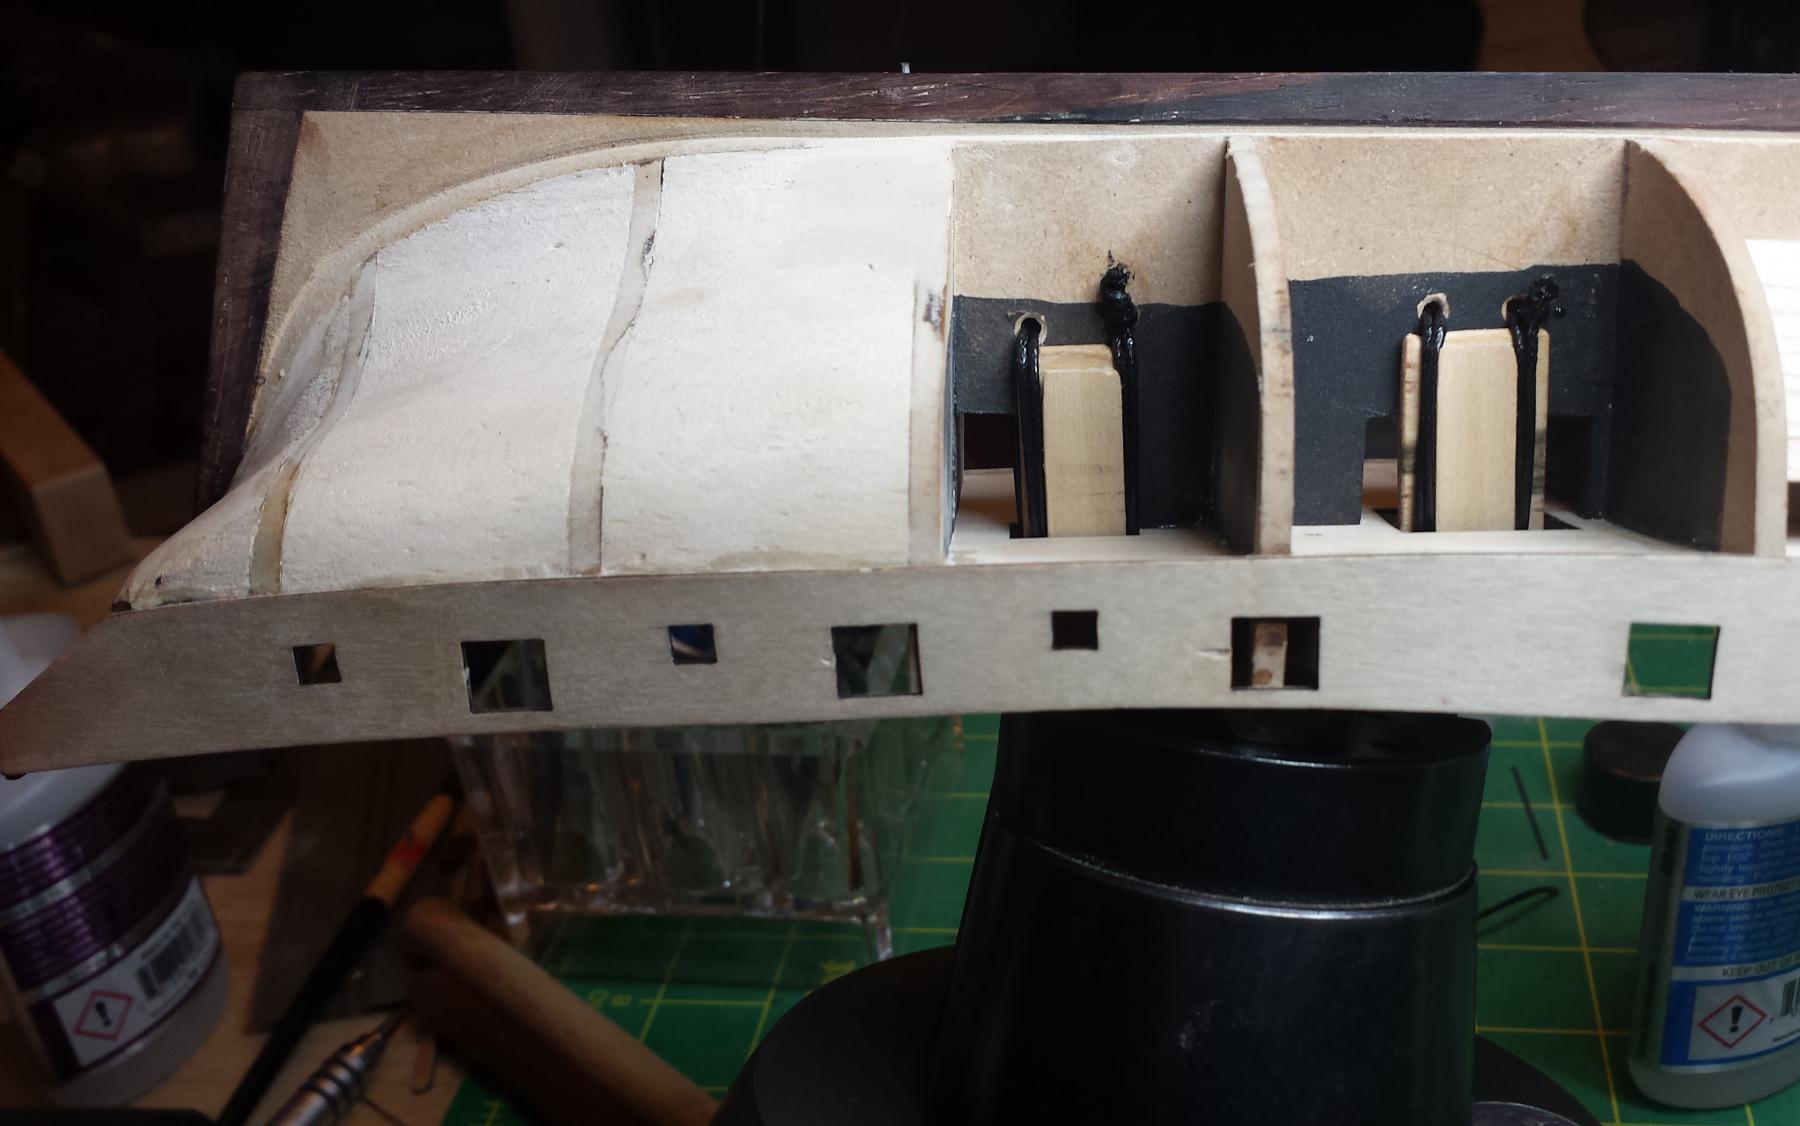
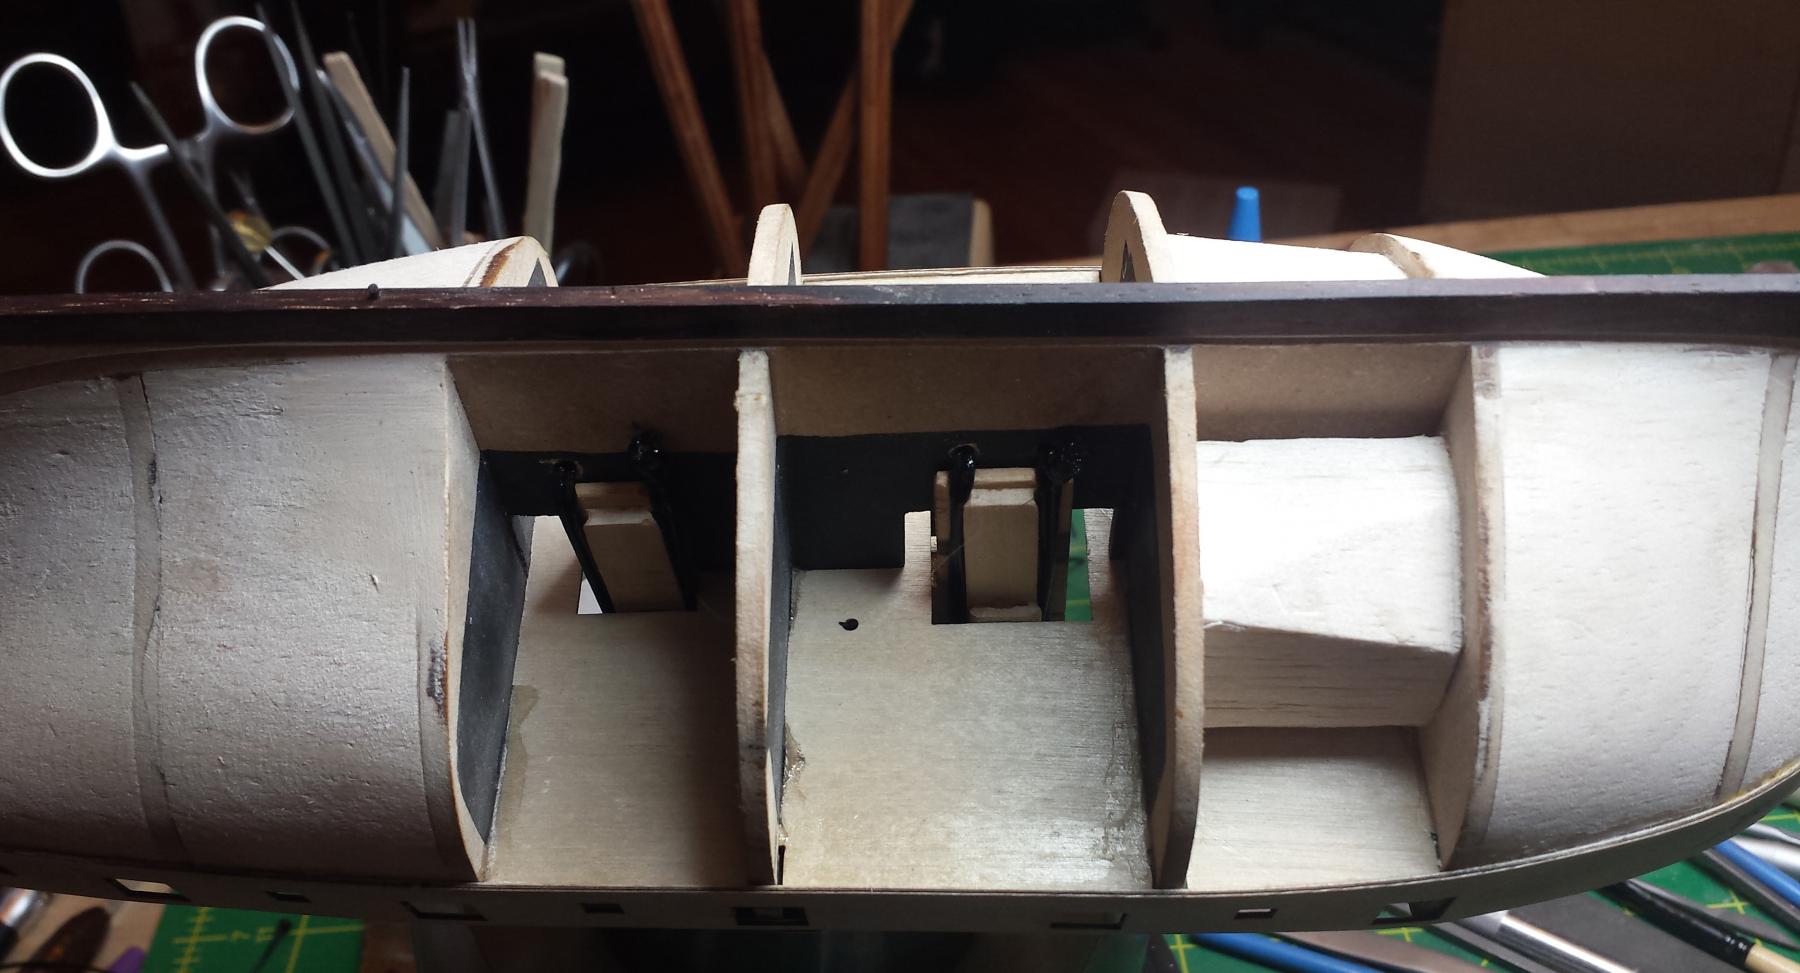
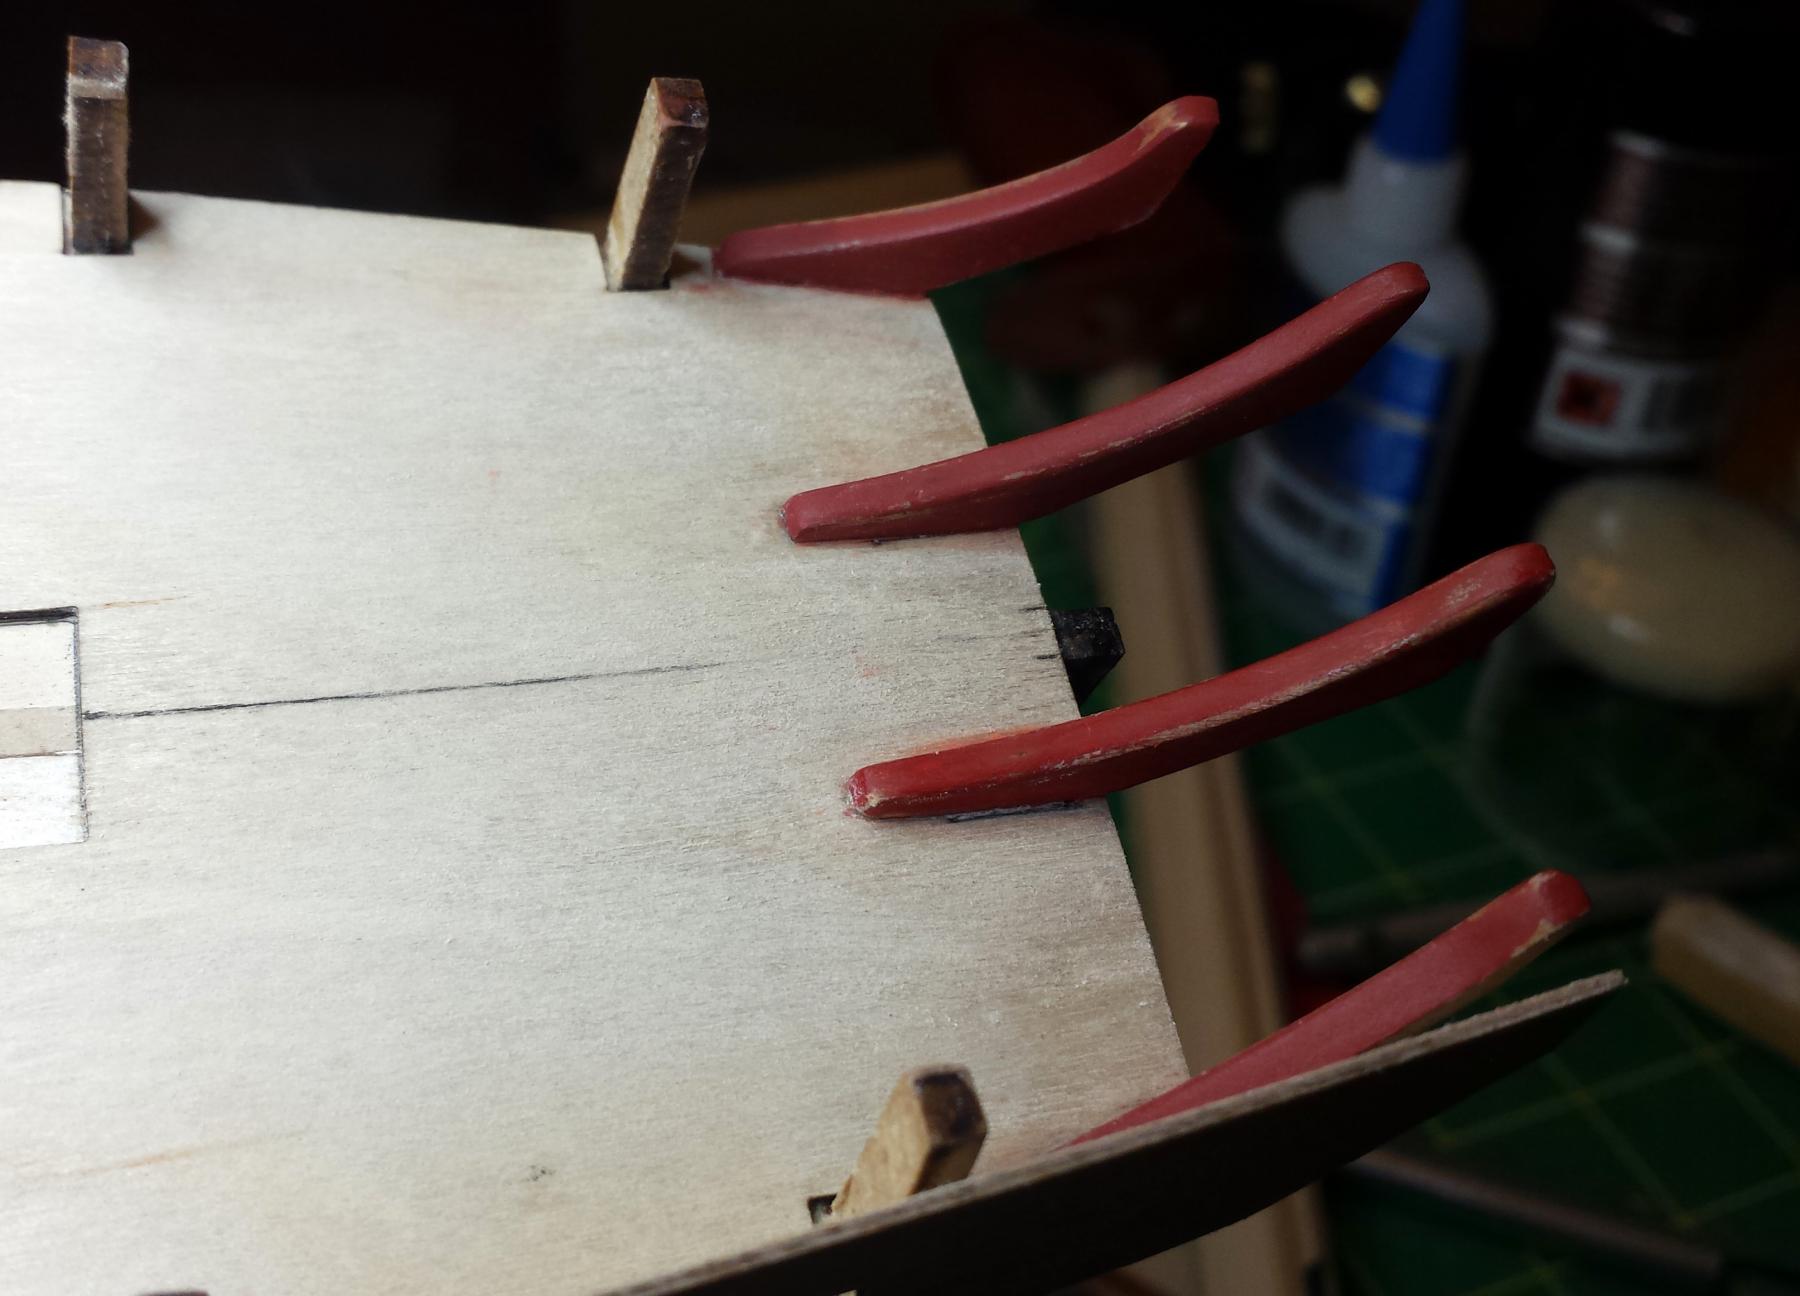
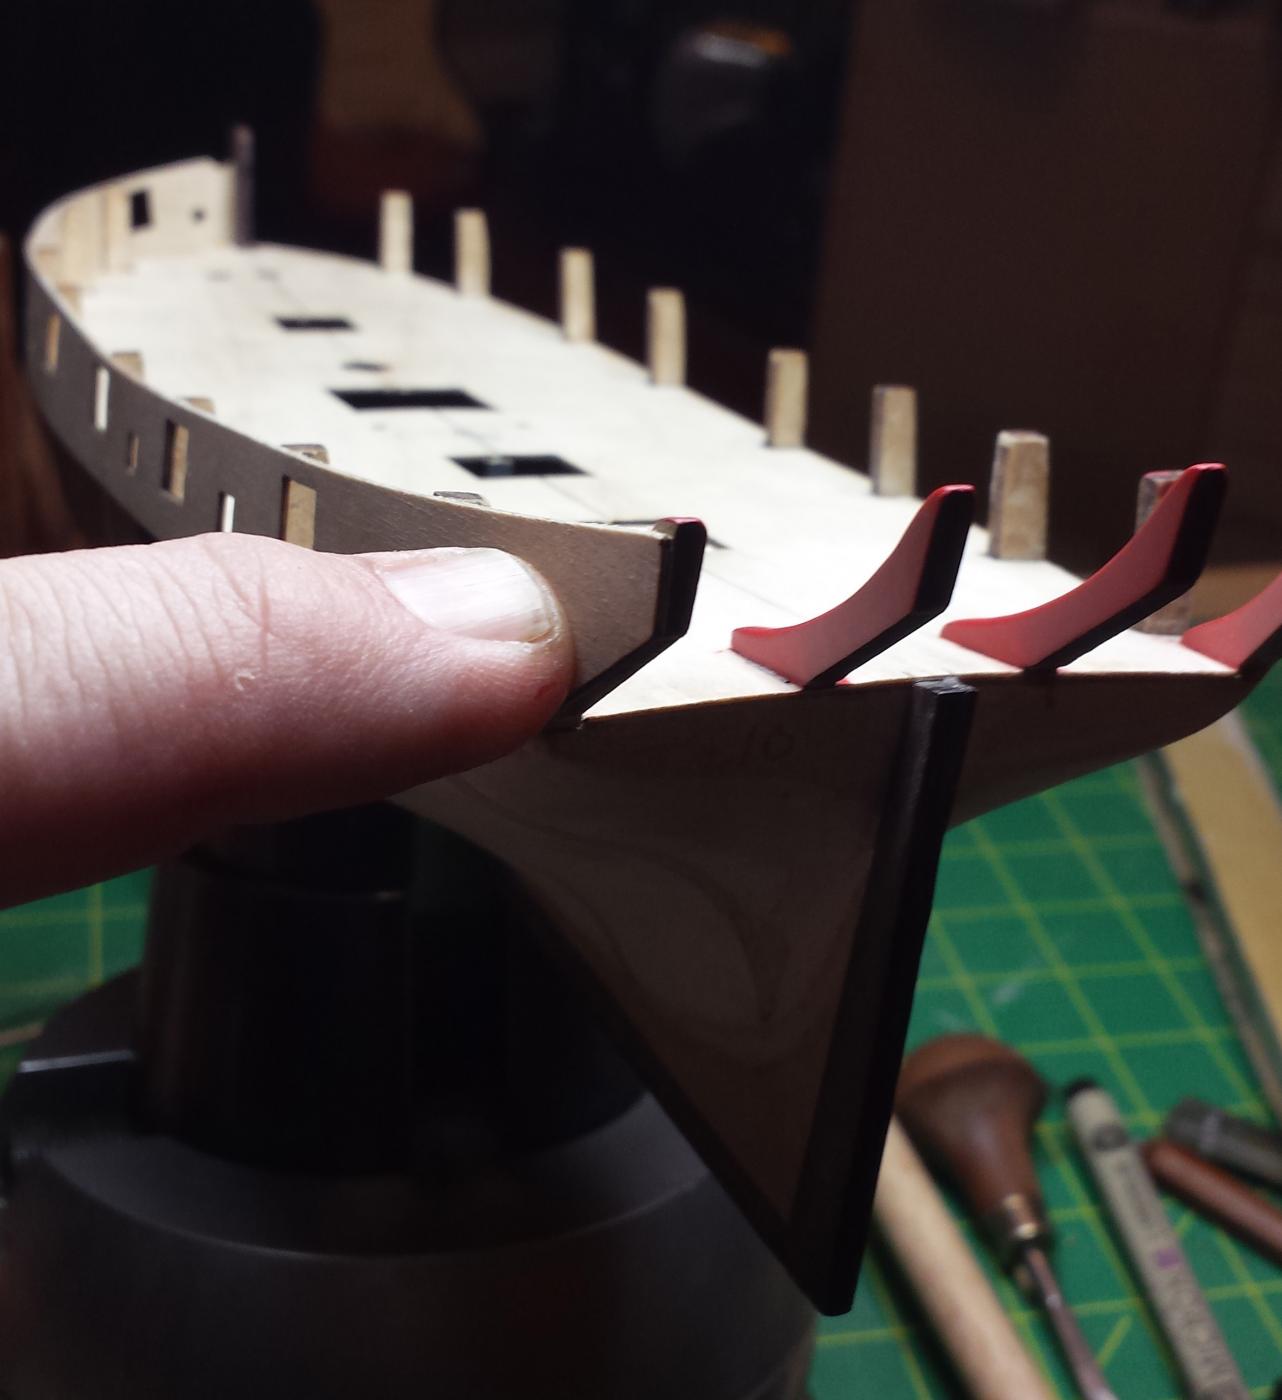
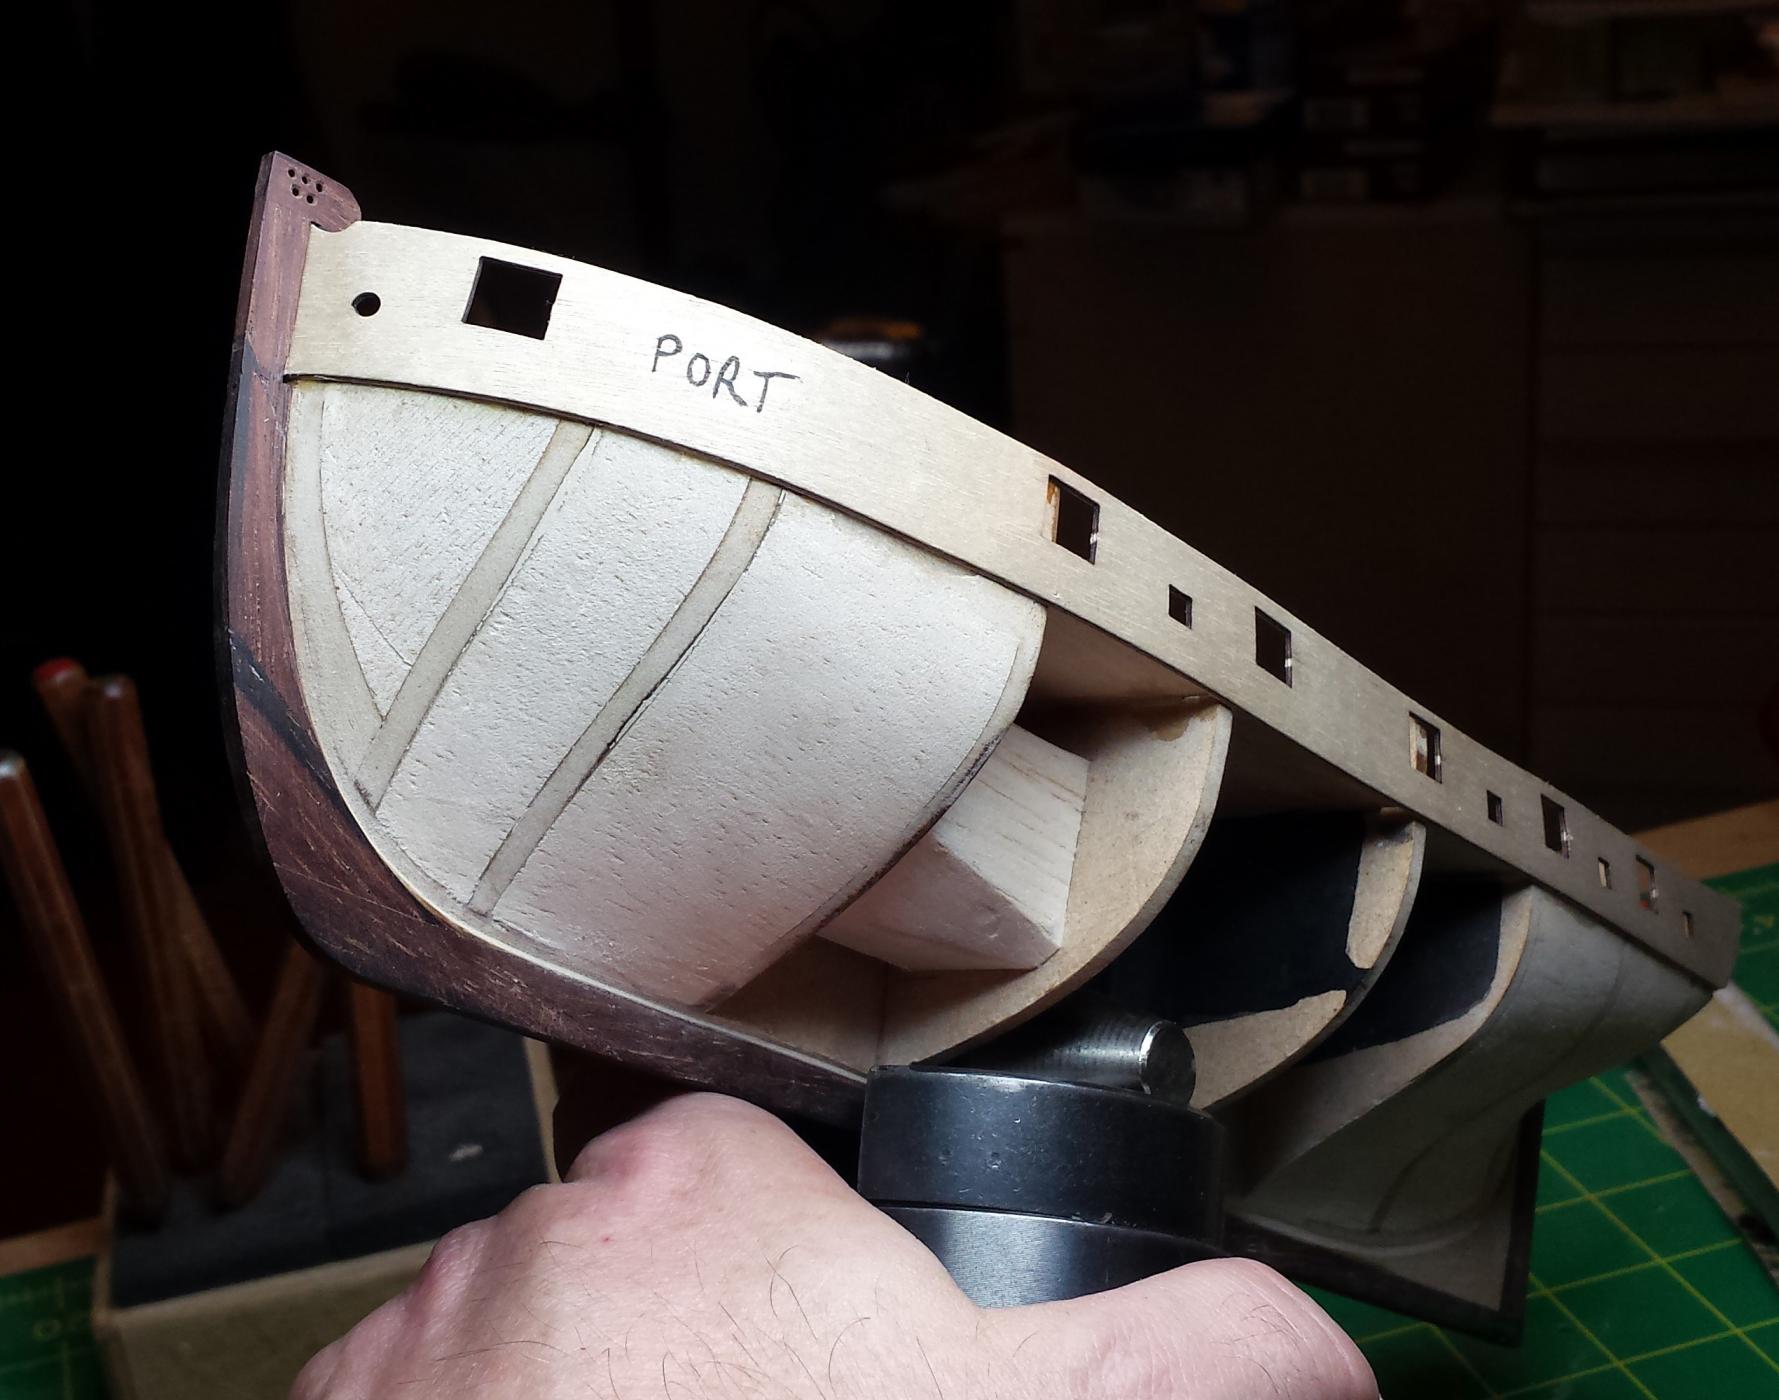
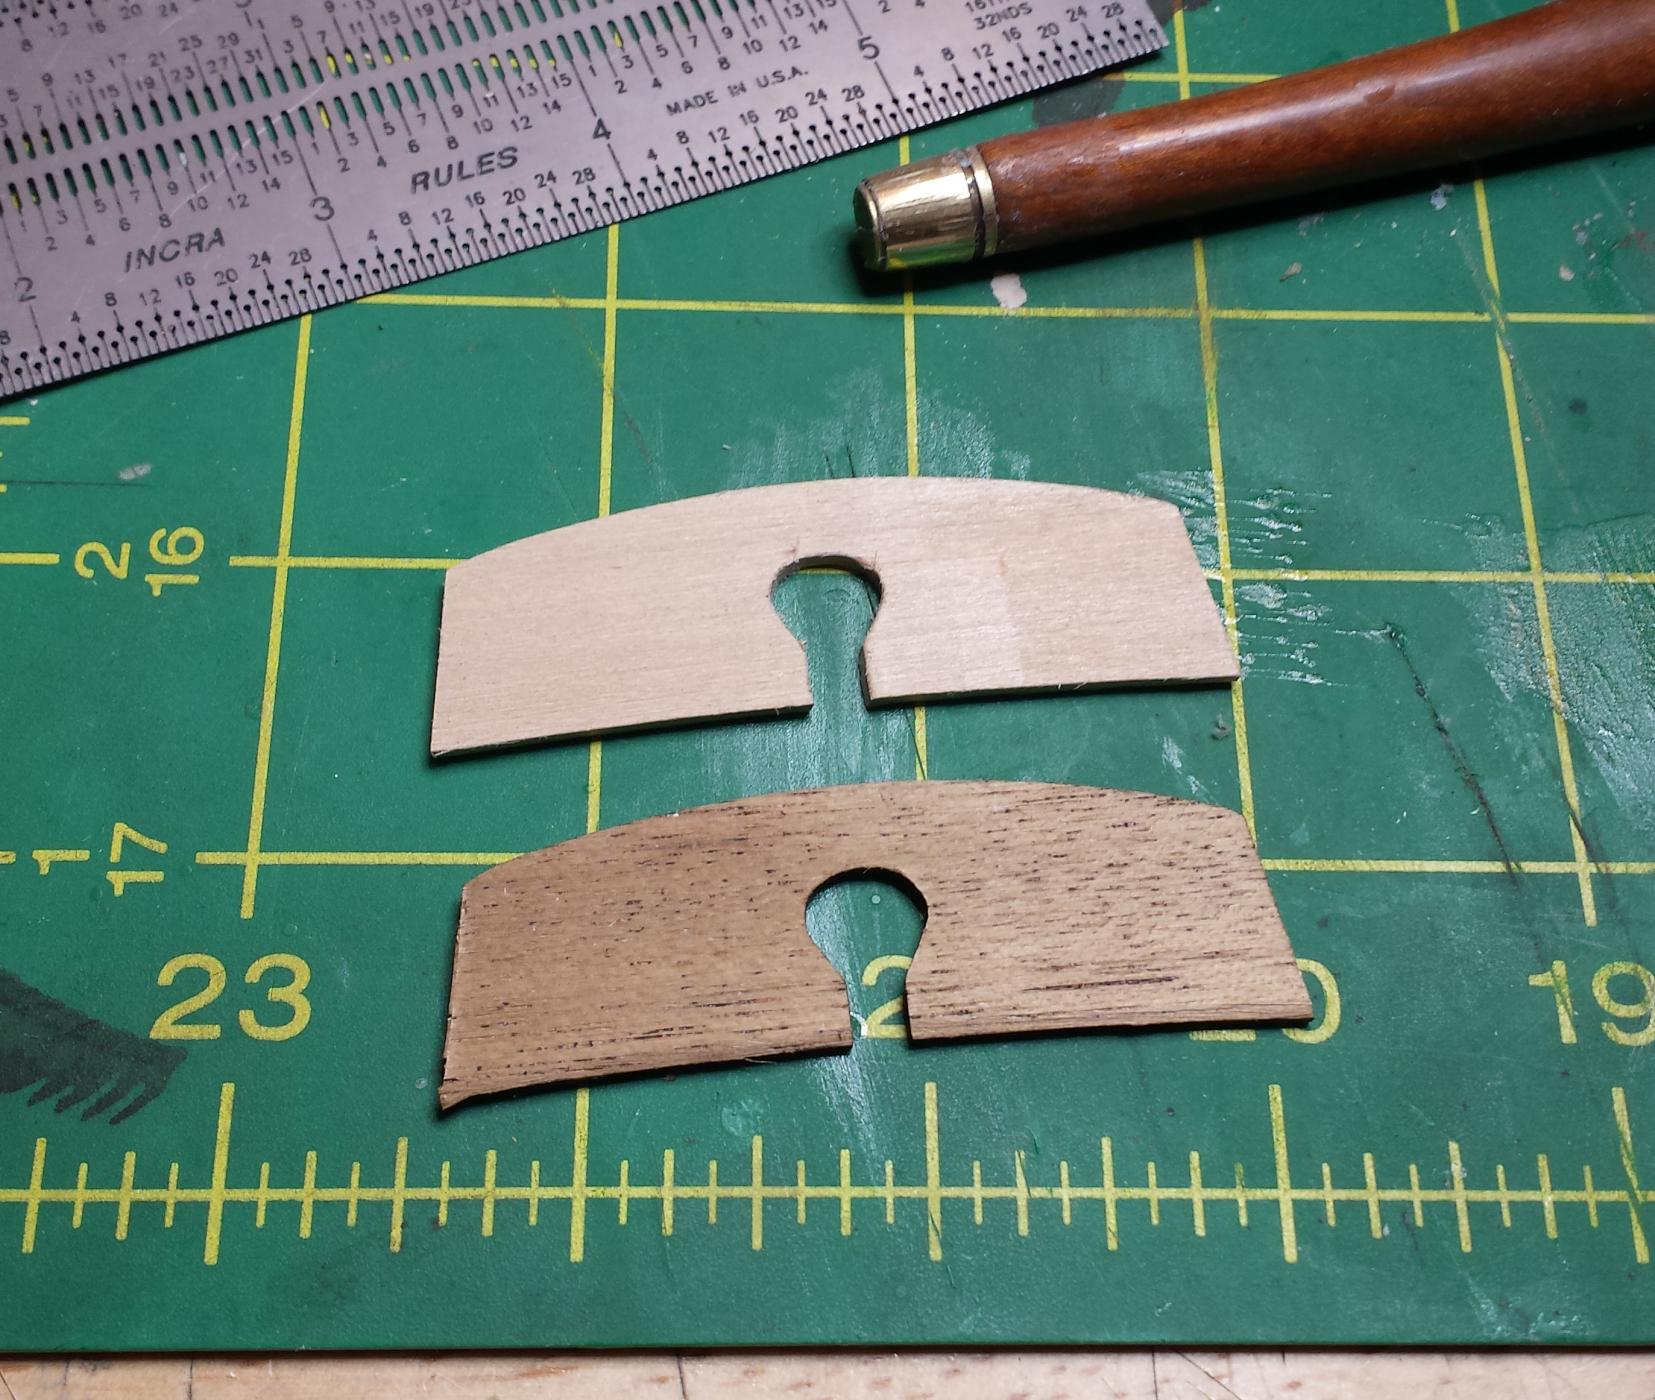
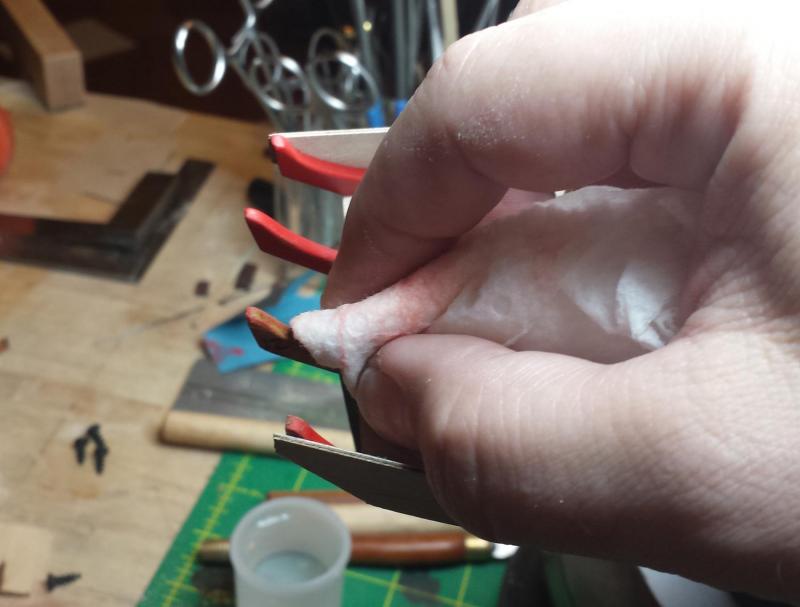
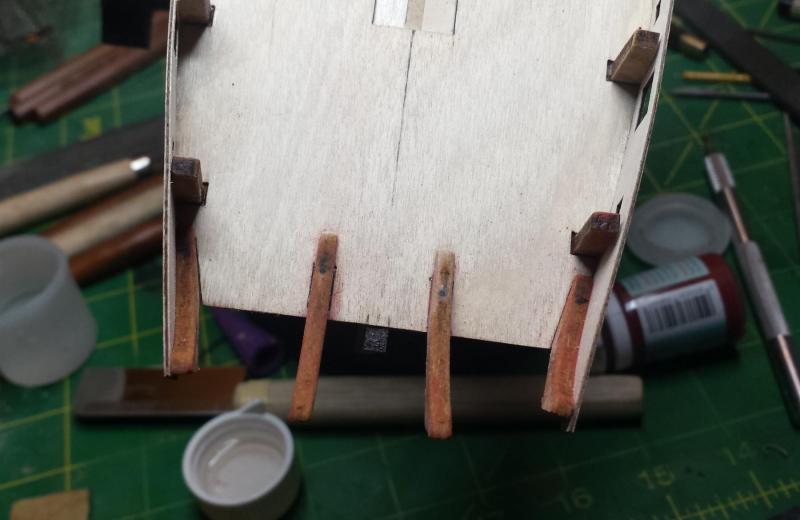
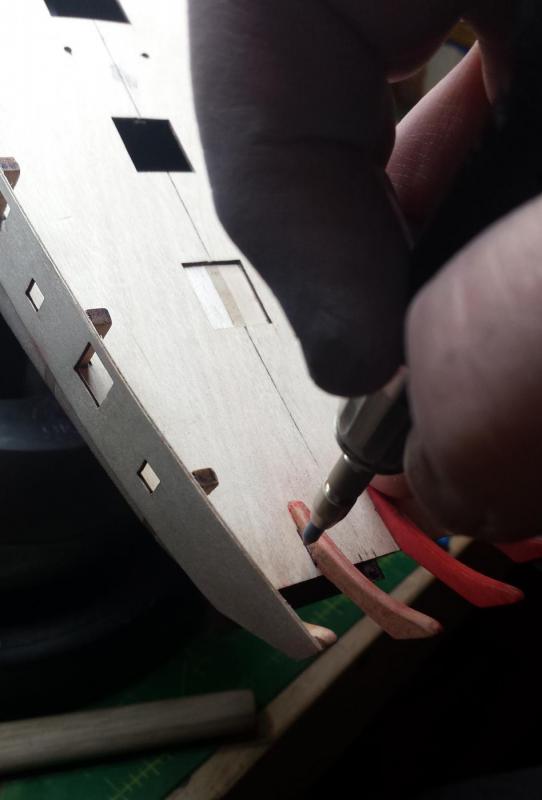
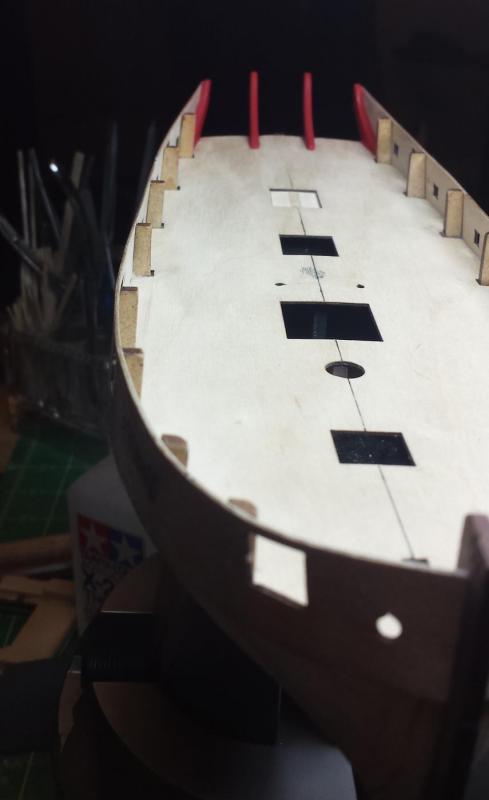
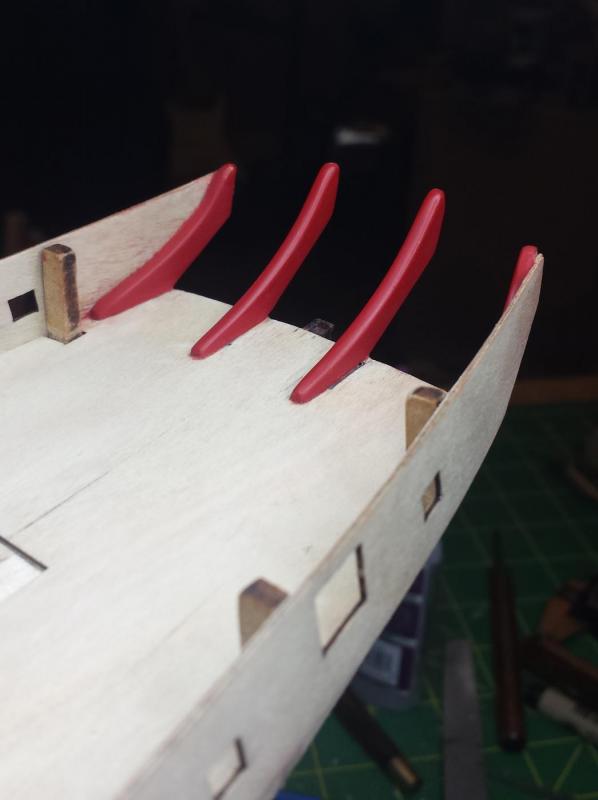
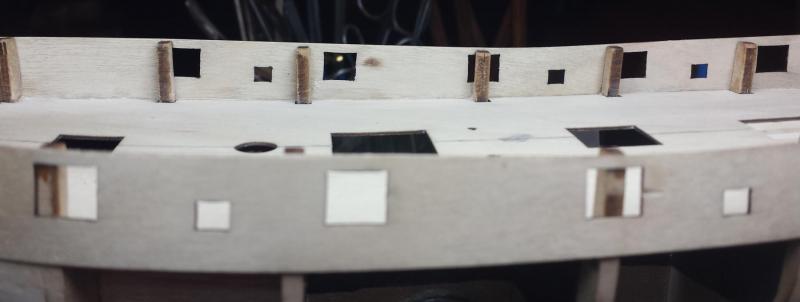
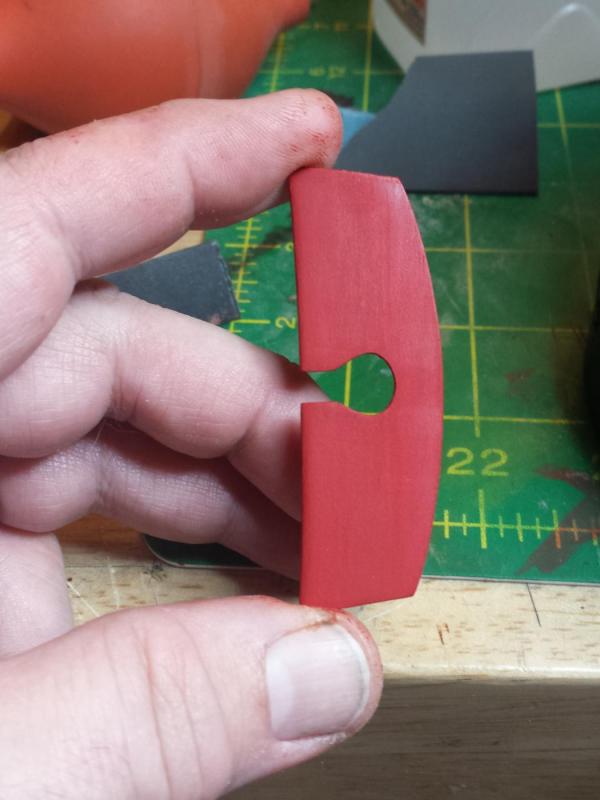
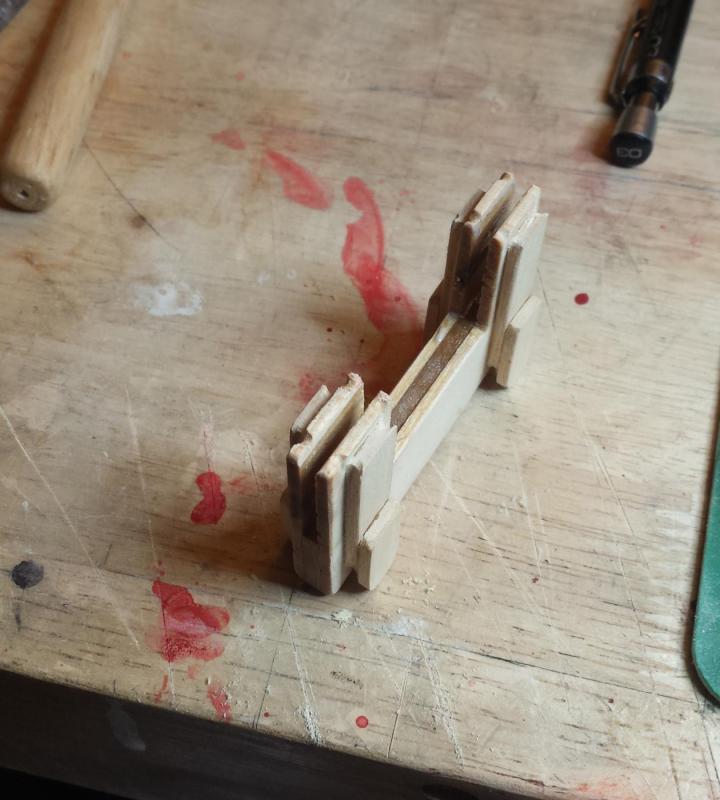
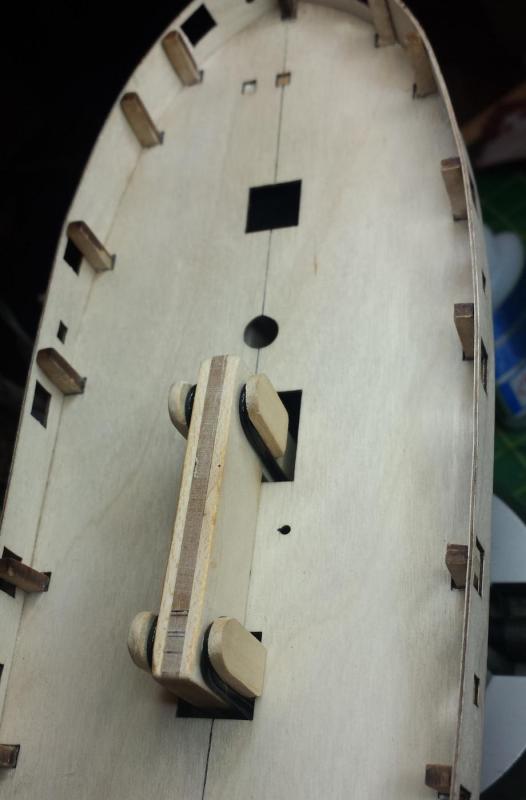
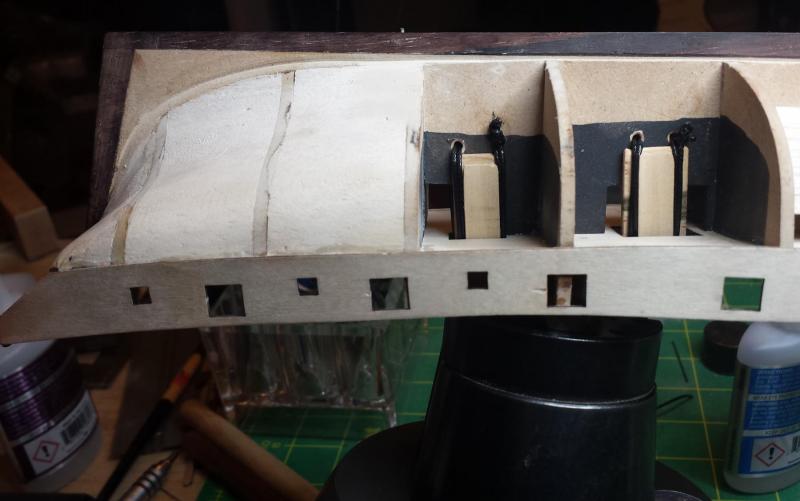
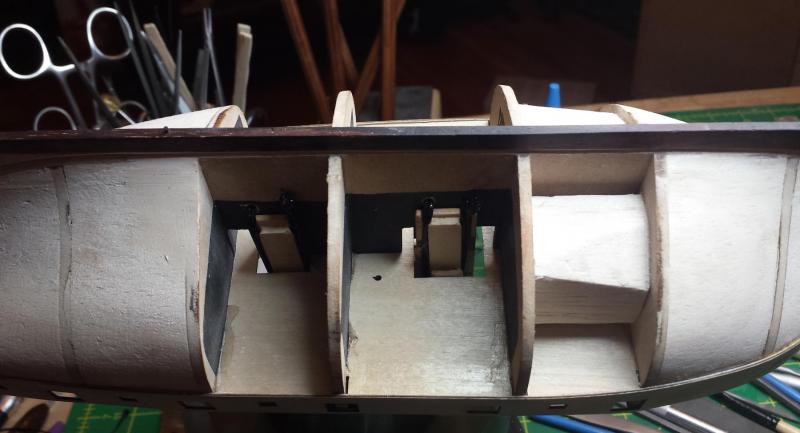
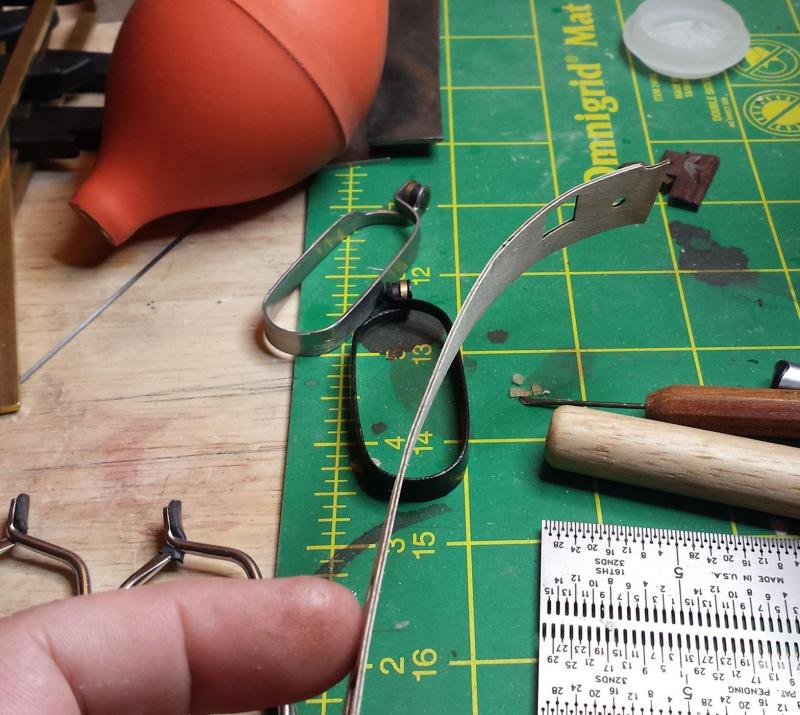
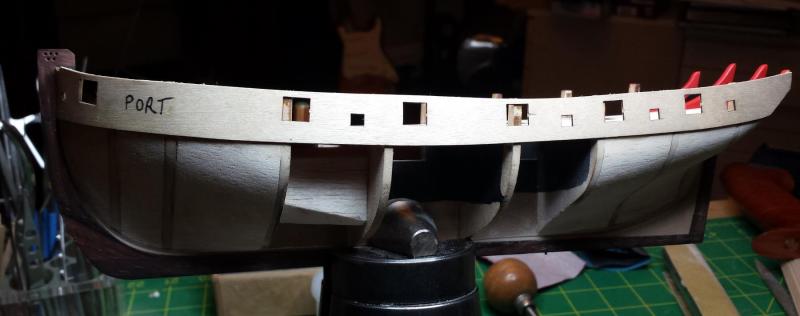
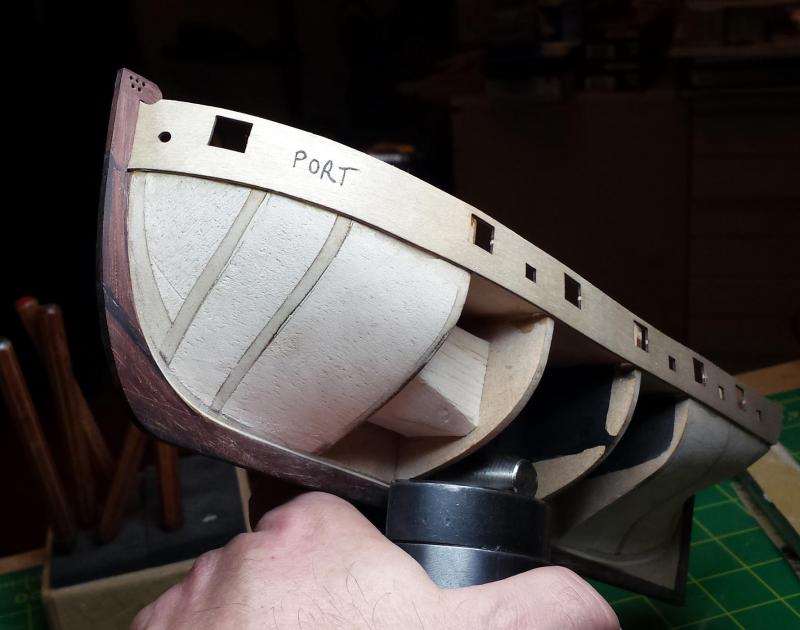
Stopping for the moment to catch up with where I am and show the Nightmare on Fashion Piece Street. So anyway, back a couple days ago we had left the starboard bulkhead strip to dry in situ prior to gluing to the ship, here he is ready to be glued on. Not showing that process as it was the same as the other side. Here checking symmetry, looks reasonable and the overhang at the stern was different on the two strips by only about 1/64" which means the two sides are pretty close to identical. And I did do better this time on ripples, basically none worth mentioning. The one hard turn as we go to the stern should disappear on its own when I remove the stanchion thing. BTW Rick what is up with these uneven and different on each side curves on the tops of the bulkhead strips? So here is where I made the fateful decision that the perfectly-painted fashion pieces were unacceptable for being too orange. We don't see pics, but the first effort of course was just overpainting, both are acrylics right? Nope, Tamiya didn't react well at all over Admiralty and really the only choice was to strip them down. Here we are blithely sliding down into the pits of modeling hell. The fact that afterward the pieces looked exactly like compressed cat vomit should also have been some kind of indicator that we were traveling through the valley of model death. And here they are ready to go. One way I try to make going backward less painful is improve it in the process. Even when I want to paint the first time the pieces felt too heavy to me, so I narrowed them all down until I was happy and then rounded them over. Considering their position leaving them with hard edges didn't make sense to me. So now that everything is super ready to go we start painting and... Holy crap how is that still happening with them sanded down like that??? I'm already removing this disaster. This time around I removed the paint with an abrasive acrylic rod held in a collet thingy held in my rotary tool. This is a pretty rough grit so it went pretty quick and they can get down into corners. This is after that operation. I then removed the rest and cleaned thoroughly with rubbing alcohol to ensure nothing was left on the pieces. We don't have pics here because this is where total madness set it. I painted one stroke of the Tamiya red and waited, and watched it do the same exact thing as before. First I had to walk away for a while because all I could thing about was ripping off the fashion pieces and making a very small bonfire with them in my driveway. Once I got over that I came back, but I was totally in "ok I've had just about enough of this crap" zone, so to solve this once and for all I coated all of them in thin super glue. Once dried I had to resand all of them for like the 14th time. Eventually they were ready and when painted the Tamiya red worked fine and here we are. Only difference between this and a previous similar pic is they're somewhat redder. Well that and many hours and steps and an urge to burn fashion pieces. What is weirder about the fashion pieces was I'd first noticed the Admiraly-Tamiya problem on the stern fascia, and I had stripped that down and sanded it a bit and the Tamiya went over it no problem. I have no idea why the fashion pieces were still able to screw up the Tamiya paint until I sealed them in super glue prison. Here it is with Tamiya color, it needs to dry overnight then it will get sanded lightly with 2000 grit and then a few more coats, surface still too uneven. Next comes planking, but before I could do that I needed to finish my Mk.I Advanced Rope-Powered Keelalator, which I did. If you can figure out how it works at this point you should be tested for wizardy. I needed something very strong and dependable to grip the keel plate through the deck grate holes, but still be detachable later even though that area was going to become inaccessible after planking. This was the result, a U-shaped piece where each arm goes in a grate hole grabs each side of the hull plate firmly and the bottom of the U bottoms out on the deck, so we have a pretty good mechanical hold. We just need to make sure it stays there. Here it is in place, I've just drilled the four holes it needs and beveled the edges with a countersink. And this is what will hold it in place: black bowstring. The reason for using bowstring is that one strand is about strong enough to hang your car off of, it's very supple and flexible, and most importantly, it does.not.stretch. At all. Negative on that stretch attempt, Ghostrider. That makes it very good for jig applications like this and is why I have four types of bowstring in my closet even though I don't own any bows. Here is in in top view, and indeed parts of the boat itself will fail well before the Mk.I ARPK lets go. And all of that was for this reason- so I could now flip it upside down and hold it correctly in my engraver's block. And here is how it will be in planking, rotated toward me. Since the engraver's block's top half rotates when you allow it to, I can put on one plank on this side and then just spin it around and be in the same basic position for the other side. I now am going outside to sacrifice a goat to the Ship Modeling Gods and ask that planking go somewhat better than this last phase did. Um... hmm.... anyone have a goat handy?


- 714 replies
-
- 6
-
-
- lady nelson
- victory models
- (and 1 more)
-
Ok I'm trying not to think about how much fun that must have been. Thanks John! I'll watch those before starting the planking. I did buy some brass thimbles at Modeling Timbers, but I'd prefer to make them long run.
- 714 replies
-
- 2
-
-
- lady nelson
- victory models
- (and 1 more)
-
Another good option is Grobet, they're an American company with files of very nearly the quality of GV. I own and use lots of Grobet files too. Search for riffler files or file sets in their storefront on Amazon.
- 714 replies
-
- 2
-
-
- lady nelson
- victory models
- (and 1 more)
-
Thanks, good to know someone else likes that color. I still thin it a bit but I agree it's pretty close to brush consistency out of the bottle. I try for zero brush marks, I find going a tad thinner than that, making them glaze coats, gets me the flattest surface. Downside is 5-10 coats instead of two, but they also dry extremely quickly. Hey Tom, thanks for the kind words. I keep forgetting the sig thing I'll see if I can add it when I post the latest pics. WRT files, I remember thinking I was being really excessive buying a set that expensive, and then 30 minutes into first use it became "I'm a complete jerk for not buying these sooner". The quality difference is at its greatest on metal, these are just wonderful for shaping brass. Do not forget that GV has a complete line of files, all of which are better than you get at the hardware store, and their second-quality files are pretty reasonable and will still make you very happy. Check out needle file sets here. You want cut 2 to start with, it's a good general purpose cut. You can get a set of 6 of their best-quality needle files in cut 2 for $42. Down at the bottom they have sets of 12 second-quality files in two sizes for $80 and $60 respectively. And even their economy set of 6 at $19 is better than what the hobby stores sell, there really is no reason NOT to buy a set of those, you use them for nastier work and save your nice files for precision work. Also look at the larger riffler file size, the Habilis files, and the machinist's files, all have tools extremely applicable to this hobby and are not too expensive.
- 714 replies
-
- 4
-
-
- lady nelson
- victory models
- (and 1 more)
-
Yes, I am. Unfortunately I have not gotten started though because I decided I couldn't accept the Admiralty color on the stern, even the bright red was actually orange. So I stripped it off, which itself took a while and was very messy, and then got on one of the runs where nothing works and hours were spent just getting back to square zero. Well not quite, I did finally get the new color on the pieces, I'm using straight up Tamiya red about same value and saturation as the Admiralty color but several notches toward red. Too annoyed to post pics now but I did take them, will post them tomorrow so everyone can follow along while I repeatedly punch myself in the face. It's basically example # 18 quintillion or something to know exactly WTF you are doing before you do it. I went ahead not being 100% sure of a color, and as a direct result found myself in a position with paint on and pieces less accessible than they were and needing to remove that color and paint over. Which itself went badly requiring two tries. Gigantic time sink. If you're wondering, having to strip the first was one because Tamiya and Admiralty acrylics don't like each other. And that should have been a giant waving flag that I was descending into the valley of modeling madness. BTW, only issue with the Admiralty paints was the color, otherwise they're excellent paints for ships and brush paint extremely well properly thinned. They come extremely thick, almost like a concentrate so the small bottle is going to cover a quite large area.
- 714 replies
-
- 5
-
-
- lady nelson
- victory models
- (and 1 more)
-
Fokker Dr.I by Torbogdan - FINISHED - Model Airways
vossiewulf replied to Torbogdan's topic in Non-ship/categorised builds
Not sure I understand the crisis, but that looks like a Dr.I aileron to me. Very nice job leaping into unknown territory and making it across successfully. And if you're interested, here's an interesting a thread on the Aerodrome from 2001 discussing the early Dr. I wing failures that killed Gontermann and Pastoris and very nearly Lothar Von Richthofen also. But the best summarization comes from my friend Dan-San Abbott who has passed away now. The reason I bring it up is that the main cause was weak attachment of the ailerons leading to flutter, which is a type of positive-reinforcement resonance specific to aerodynamics that's been the cause of death of many a test pilot. Gentlemen: The wing failures occurred when the early production Fok.DR.I aircraft were put into a turn. The ailerons had an over long balance which started to flutter as it rolled into a turn. As the flutter progressed it caused a structural failure in the aileron spar. The rib to aileron spar joint was not adequately reinforced. The fabric was tacked to the ribs. When the aileron spar failed it caused the fabric to rip away from the wing structure thus resulting in a total failure of the upper wing. The corrective action was reduce the chord of the aileron balance, to reinforce the ribs with battens, add a box rib at the end of the aileron cut-out, larger rein-forcements to the rib-aileron spar joint, and stitch the fabric to the ribs. The chord was increased from 980mm to 1000mm on all three wings. There was not a failure of the upper wing main spar. This is just skimming over the corrective action details. Blue skies, Dan-San -
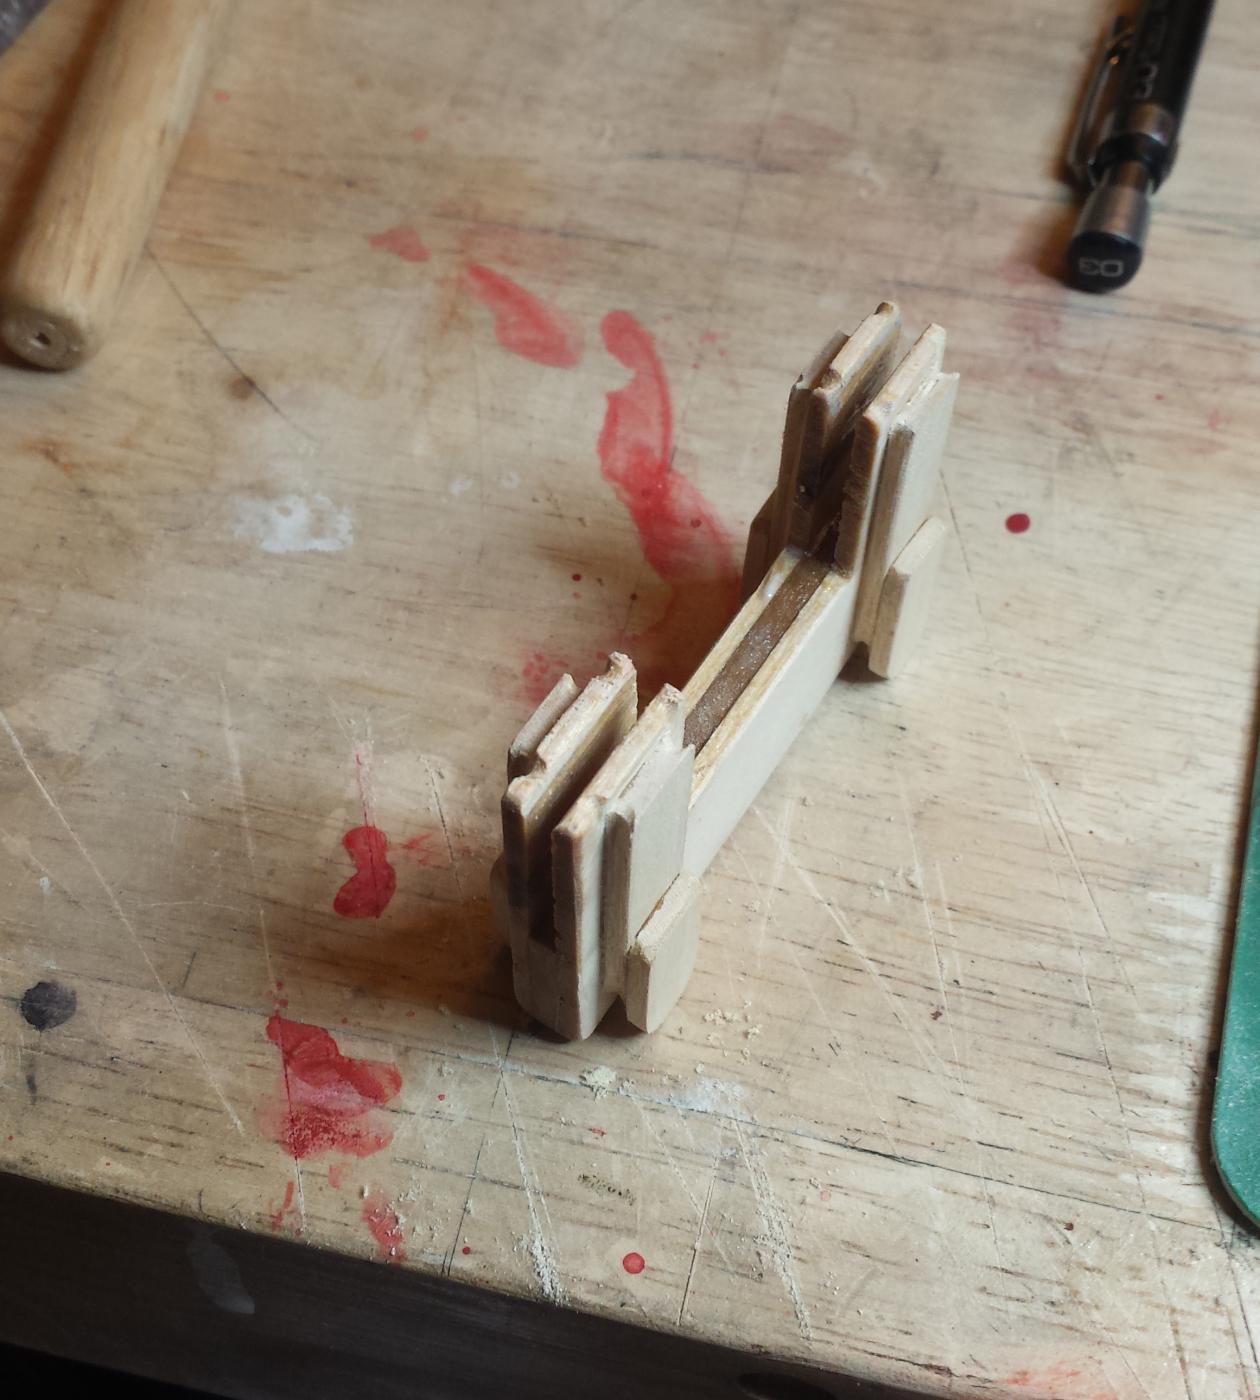
I need to make a "thanks Rick" macro ;-) That's basically what I was seeing. And although it would have been a little tricky because of them resonating, I think I could have at least reasonably prepared the joint ahead of time as mine were pinned to the deck. I got the other bulwark strip on and finished painting the fascia, then spent some time making an Advanced Rope-Powered Keelalator that is a basically a U-shaped construction, the arms of which reach down into the midships grate openings to grip the keel plate that will be locked down by a looping line running through four holes in the keel plate and over stanchions on the Keelalator. The reason is so I can flip the ship upside down and have it be held firmly in my engraver's block.for planking, and the line is because I of course can't glue or screw it as the planking will make that attachment inaccessible. So the line will function to hold it firmly and when done I can cut it and remove the ARPK. I'll show the pics after tomorrow's session.
- 714 replies
-
- 3
-
-
- lady nelson
- victory models
- (and 1 more)
-
Nah, I've already acknowledged that this is something I shouldn't do that with, a zillion hidden dangers that even an experienced person can easily miss. And in any case, I'll never react negatively to anyone who is trying to help. And I have a question I thought the fascia would be flat, but the angle of the outer fashion pieces seems to require a curve and I'm wishing now I totally prepared this joint before now, I didn't because I thought it would be better to wait until it was stabilized by attaching the outer bulkhead strips. Poor decision.
- 714 replies
-
- 3
-
-
- lady nelson
- victory models
- (and 1 more)
-
Thanks Rick, you're now anticipating my questions so I don't have to ask them I was thinking about that option too. that may very well be what I do this evening.
- 714 replies
-
- 2
-
-
- lady nelson
- victory models
- (and 1 more)
-
More tools - Luthier, jeweler, fly-tying
vossiewulf replied to vossiewulf's topic in Modeling tools and Workshop Equipment
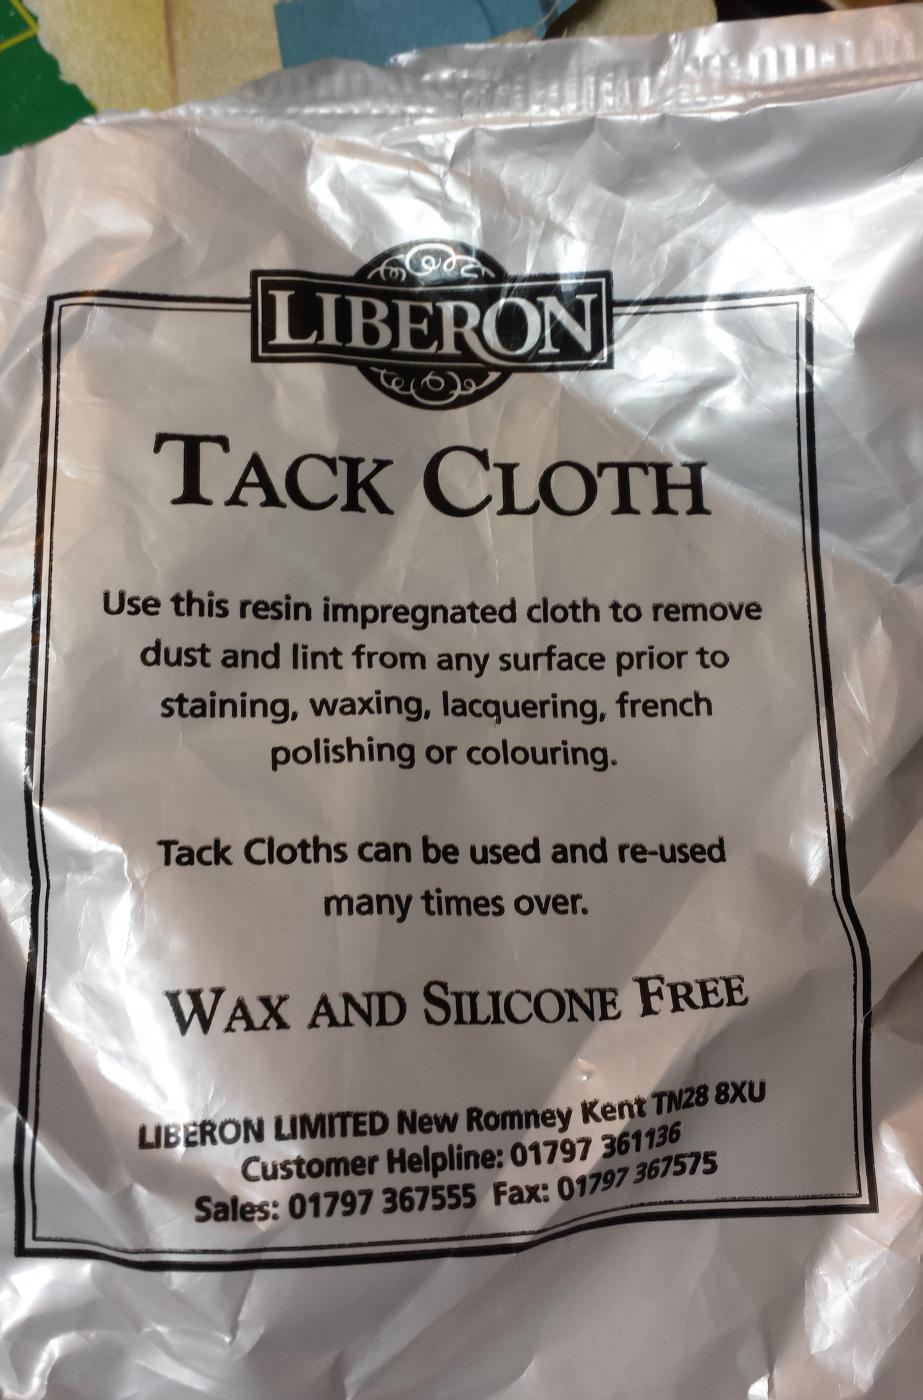
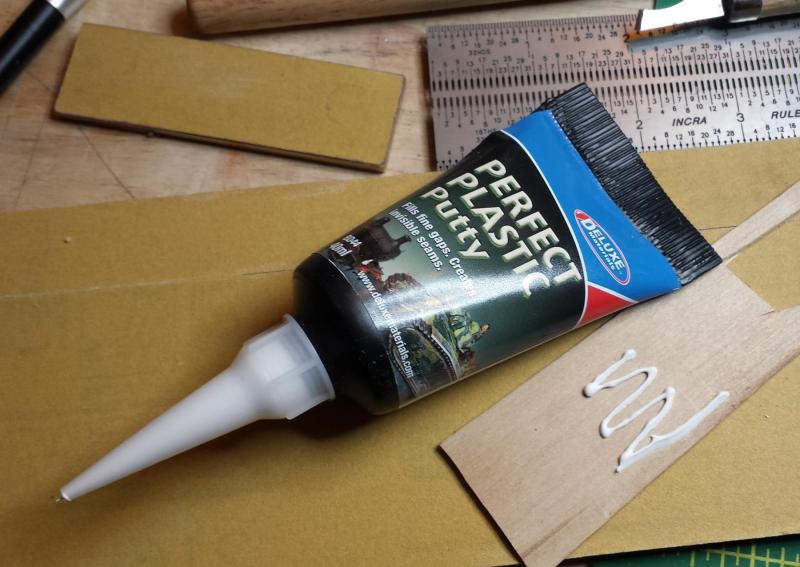
Couple more... Best tack cloth I have found. 1. Lasts forever as long as sealed in plastic bag. 2. Reusable many many times. 3. Most important, leaves no nasty sticky residue on hands or work. This filler putty is made for plastic modelers and is not appropriate for filling large areas, but it's one I still use often on wood. It's: 1. Very very smooth. 2. Does not stick to fingers and spatulas nearly as much as say Elmer's or Famo. 3. Dries at least as fast as Elmer's/Famo. 4. Water cleanup.
- 86 replies
-
- 10
-
-
Fokker Dr.I by Torbogdan - FINISHED - Model Airways
vossiewulf replied to Torbogdan's topic in Non-ship/categorised builds
The hell with email addresses, call their customer service line and tell them you've been waiting weeks for an answer and you're not going to drop this call until you speak to someone who can help you. And good luck -
Red Paint or Red Ochre
vossiewulf replied to davyboy's topic in Painting, finishing and weathering products and techniques
I needed to make a decision so I was mixing last night using the Admiralty paints, I settled on a 10-3 ratio of their Eye-Blinding Super Red (Ensign Red) and their Red Ochre. It's still more saturated than I would use on a realistic finish, but since the stern/inner bulkheads are about the only surfaces being painted on this model I'm already totally violating realistic color, and this color should provide a reasonably striking contrast with the cocobolo and boxwood and holly that I'm using. -
Welcome Grant, chips and salsa are on the table over there.
- 714 replies
-
- 3
-
-
- lady nelson
- victory models
- (and 1 more)
-
Fokker Dr.I by Torbogdan - FINISHED - Model Airways
vossiewulf replied to Torbogdan's topic in Non-ship/categorised builds
Looks great, and that's a real bummer when you're on a roll and then forced to stop because of a problem not of your causing. Are the strips solid or plywood? -
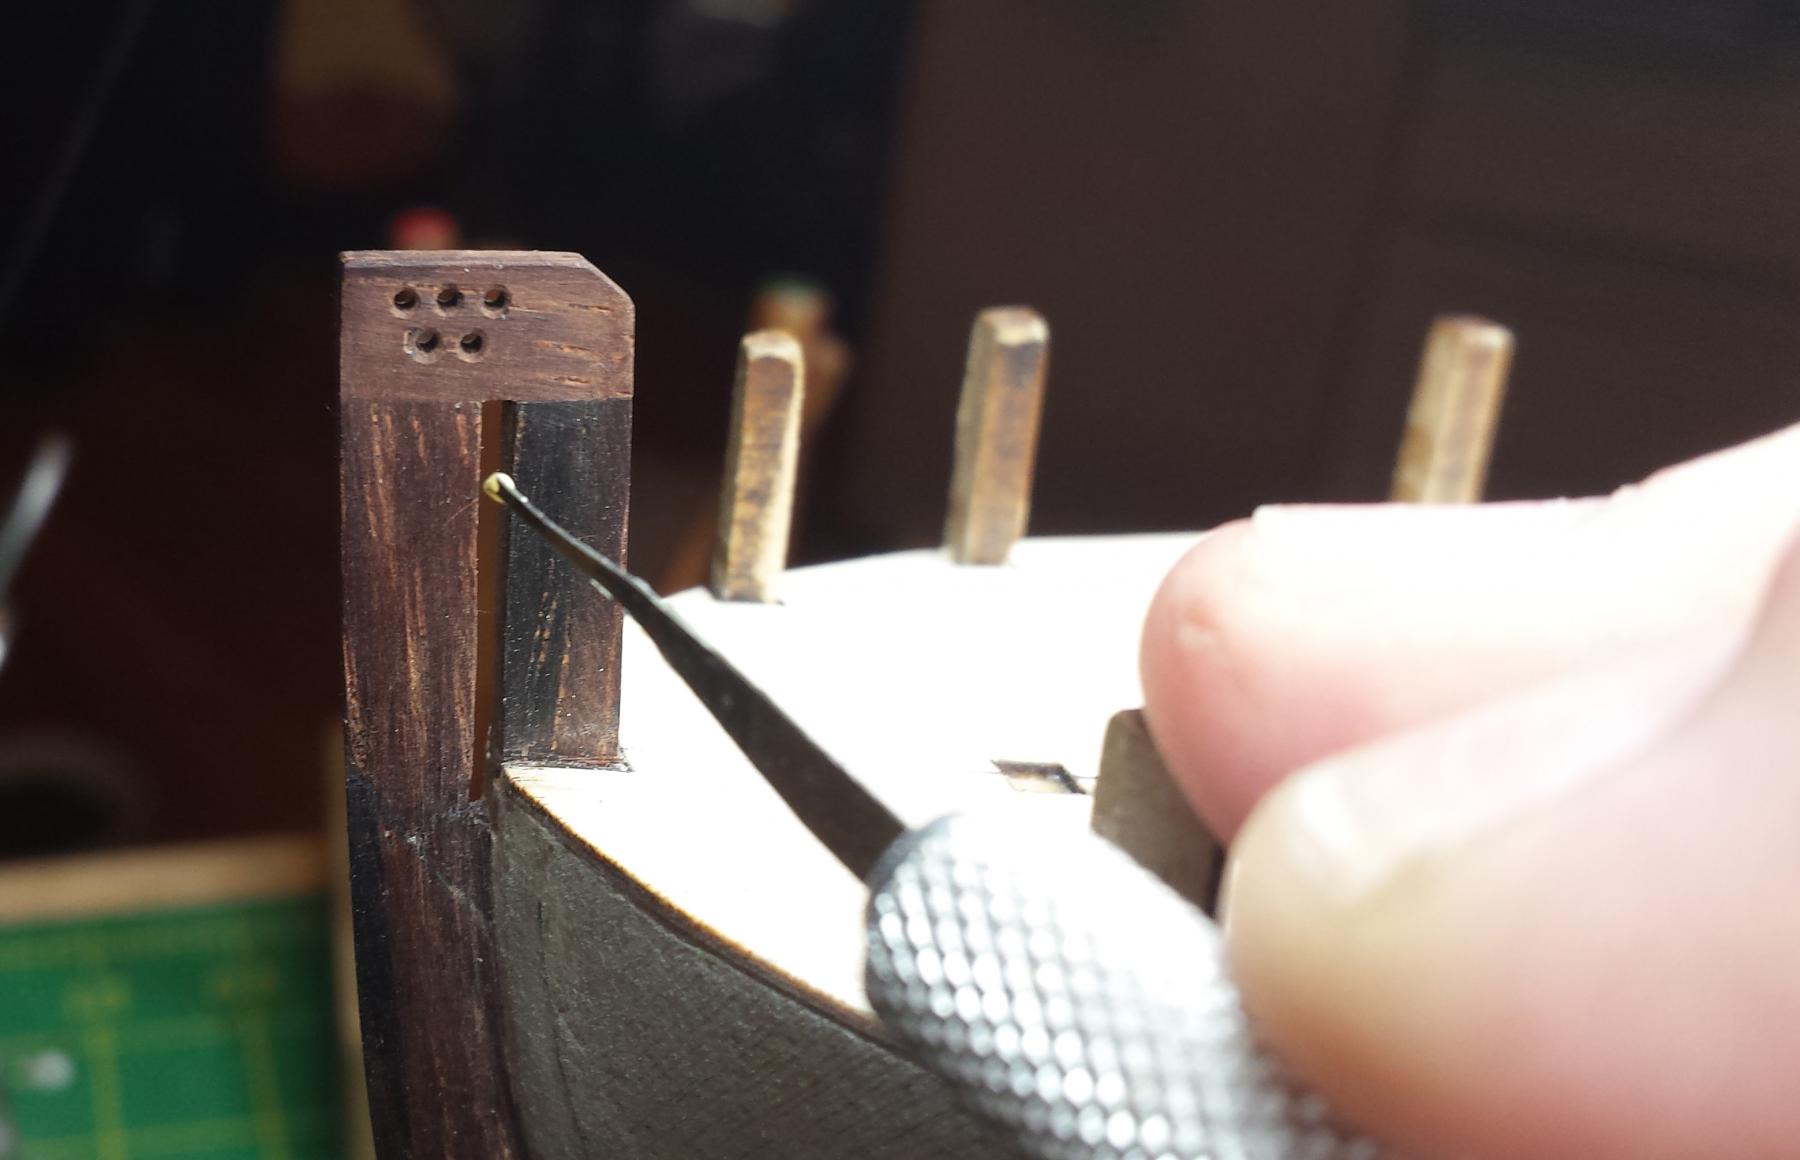
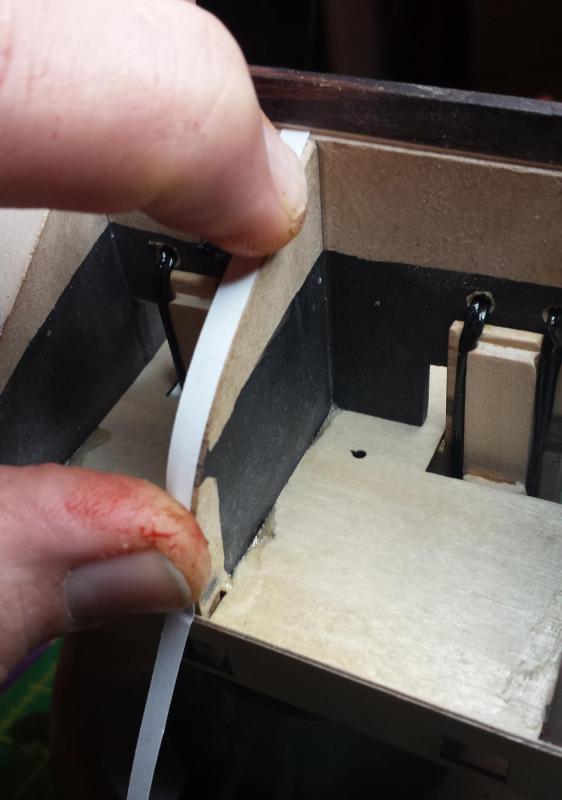
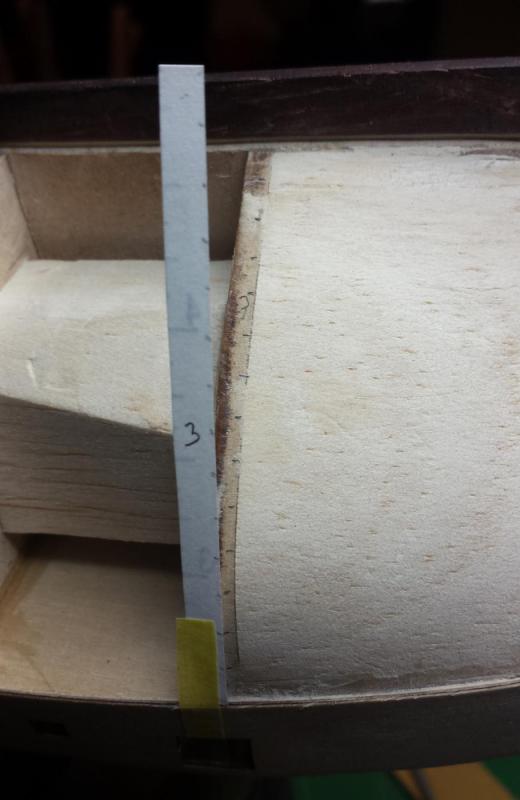
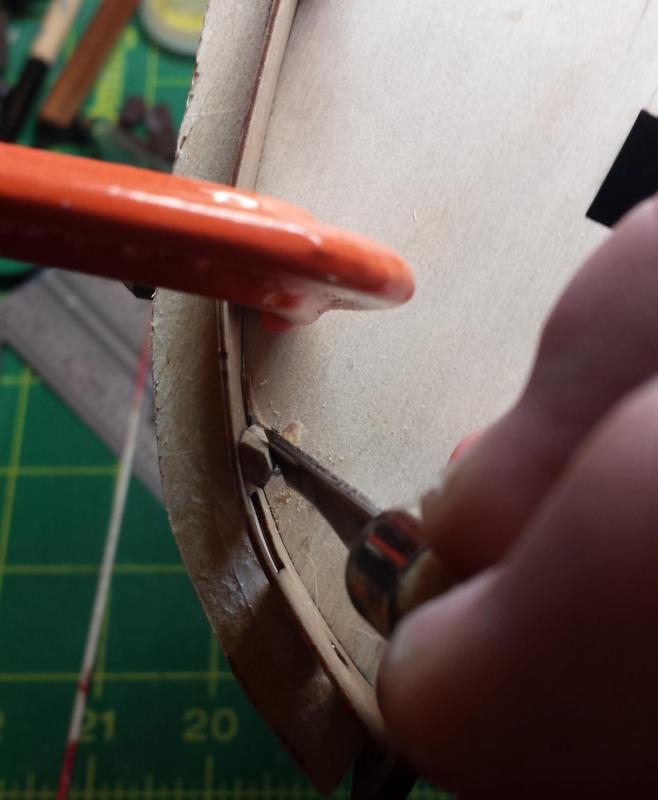
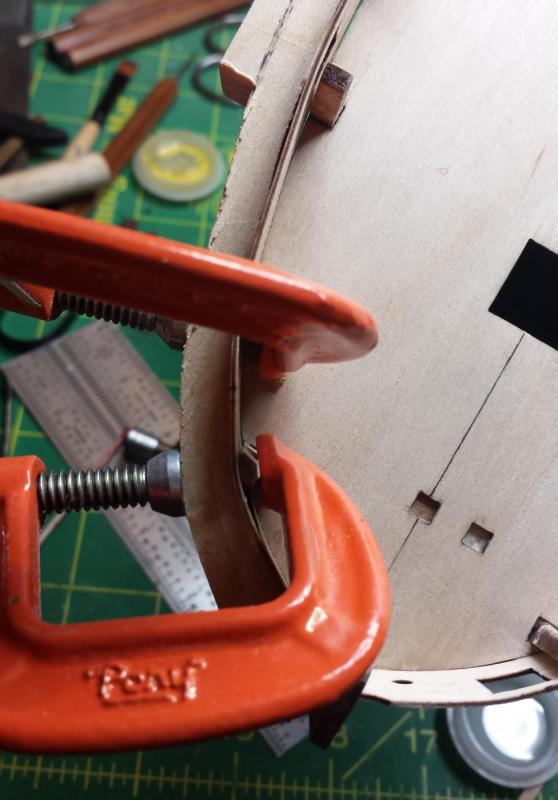
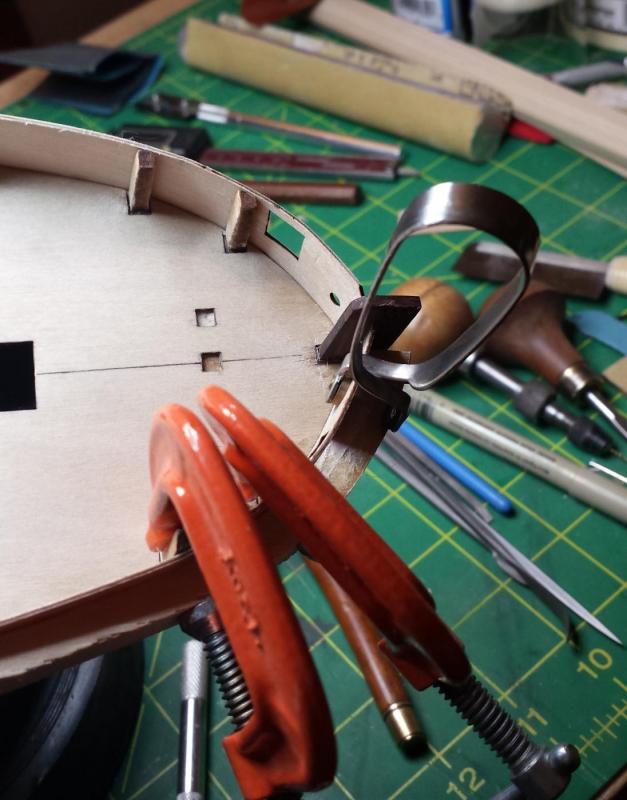
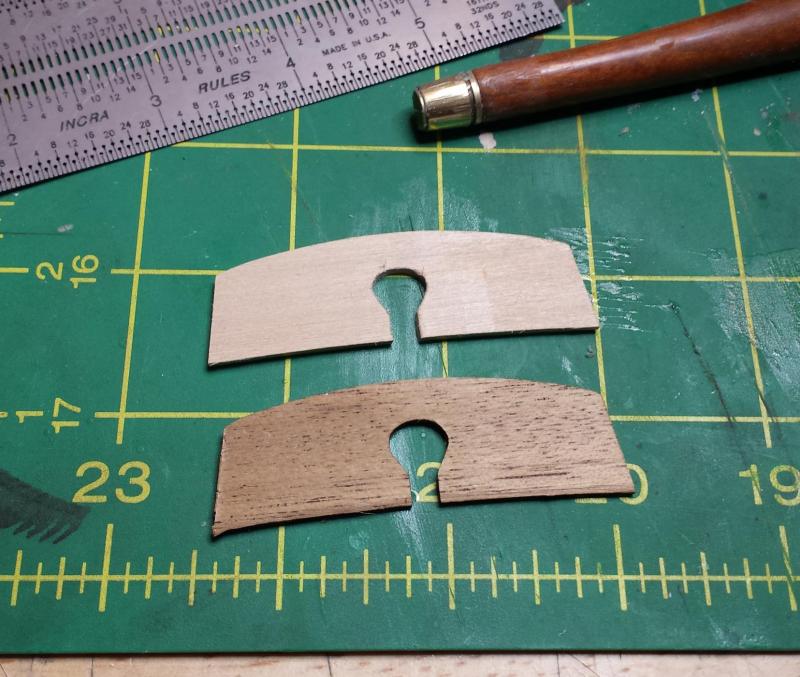
So I am really happy with what I did last night, just leaving it to dry on the ship. This is what we have this evening: It had both the sheer and top line curves exactly. The fit on the ship was perfect, and therefore gluing was extremely easy and not rushed at all. I used yellow glue and clamps only at the bow, this was the only place where clamps were needed to refine the fit, and also would required adjustment hence the yellow glue. We started here with just a tiny amount of glue in the stem, very carefully applied so it wouldn't squeeze to the other side and block the fit of the second strip. I also was very careful ensuring the bulkhead strip only went into the stem piece half way, again so there would be room for the other one, and in fact this was the fiddly part that made me opt for yellow glue here to allow me time to get it just right. I then added glue for the first couple bow sections, and clamped up top plus I used some Frog uber mongo grip multi-surface tape to pull down the bottom edges that really didn't want to follow that vertical curve The rest of it was glued on with CA with finger clamping, one bulkhead section at a time so again I didn't have to rush and could be careful and make sure I added the right amount of glue where I wanted it for each section - we have to remember the bulkhead stanchions will be removed later so we want minimum glue there, just enough to force it to shape. I was happily gluing my way down when I realized I had gotten so excited about the perfect fit that I'd forgotten that I didn't like my fashion pieces' color and needed to stop, remix something better, and get them painted first. First why not make them better, so buzzed over them with wet 2000 grit paper to take them up a notch in smoothness. The mix I decided on was 10 to 3, Admiralty Hippy Bus Acid Trip Red (Ensign Red) and Admiralty Red Ochre. As usual with brush painting I thinned the paint quite a bit and added four thin glaze coats until I had the color buildup I wanted. I always end up with a much smoother finish that way Then I continued gluing the port bulkhead strip. Happiness is a one-finger glue joint, and the fit is perfect there with the strip overhanding the outer fashion piece by only 1/64" or so. Inner glue line looks good. Only a teensy bit of glue to clean up on top, and none on the bottom, but it's glued plenty firmly. Afterward this is what we have, and I couldn't be happier with it. Fit is very good on bottom edge too which worried me plus it's perfect fitting into the stem. There are a few ripples, but within easily removable tolerance. However I'm not going to smooth out those ripples now, since most are caused by a bulkhead stanchion pushing out a bit too far so if I remove those ripples now, they'll come back reversed and even harder to remove when the stanchions go away. I'm thinking of pulling most of the stanchions prior to planking the bulkhead strip, and then I could fully smooth out the ripples before doing that planking so the planks don't inherit said ripples. Next was to do the same forming step for the starboard side strip so after soaking it here we go. First although it worked out I wasn't happy with the clamping of those Amati squeeze clamps I used on the other side, or more accurately that they don't maintain the pressure. At first it feels like they're pressing quite hard, but when I was de-clamping that side I found half of them had come loose. So doubt I will be using those except for CA clamping where they don't need to hold long term. So switched to baby C-clamps (reminder: need more baby C-clamps). The first stanchion having a point facing inward wasn't cooperating, so I cut a flat in it. And here is what I mean about clamping outward, the strip didn't want to follow the right curve going into the stem piece so I'm using this fly-tying hackle plier to clamp it outwards against the caul curve. All clamped, C-clamps are clamping inward, all the small clamps outward. I did a better job with this one than other side, there are going to be almost no ripples here. Since my stern fascia piece will be painted one side and planked the other I didn't want to use the walnut piece because the open grain would need filling, so I made a replacement out of basswood. Which made me wonder why a Euro kit made in Europe had an entire sheet of pieces that are exactly 1/32" thick, but it made it easier for me. I cleaned up the inner part with rotary tool, then filled all those edges with my superfine Perfect Plastic Putty. It's made for plastic modelers and filling small spaces so it's not a good option for giant fills, but it's 1) amazingly smooth, 2) water-based, 3) dries at least as quickly as Famo or Elmer's, and 4) doesn't stick to fingers and spreaders nearly as much as the other two. I'm going to post it over in my tools thread, I think everyone should have this in their tool arsenal. After the filler dried I sanded everything, and gave it a few coats of clear flat sanding sealer. That needs to dry along with the starboard bulkhead strip, so called it a night.


- 714 replies
-
- 6
-
-
- lady nelson
- victory models
- (and 1 more)
-
You're braver than me, when I saw the way they were bending I felt like I had to fix that immediately. I may end up with that also, but remember this is a first build and I'll want to experiment with planking techniques to find the one I prefer. I also already bought a plankling bender so it's going to get used at least once The only technique I'm sure I don't want to use is those crimping tools, the idea of partially crushing wood on one side to make the other bend the way you want is not something that appeals to me, even if it is effective.
- 714 replies
-
- 3
-
-
- lady nelson
- victory models
- (and 1 more)
-
Beautiful! Both how they look and that you got there with the shortest route possible. Glad I could help
- 1,354 replies
-
- 3
-
-
- constitution
- model shipways
- (and 1 more)