


vossiewulf
-
Posts
1,477 -
Joined
-
Last visited
Content Type
Profiles
Forums
Gallery
Events
Everything posted by vossiewulf
-
 If nothing big enough for lithotripsy I should be ok from here, starting to catch up on sleep after getting very little through much of last week. CT scan would tell with near 100% accuracy but I no longer do them as they're like 100+ normal xrays and I've already had plenty. Work was thoughtful enough to page me, but thankfully it was a transient event and we can do the forensics Monday. Although I wasn't aware of exactly why, I had noticed you had brought yours up to the main wales. I assumed you had documentation showing that was a valid choice, but also clearly waterline makes sense, of the two I think waterline will work better with what I am doing. And yes, although we can go with the paint hides all sins method, as I'm doing elsewhere on the model I'd prefer good color that still shows there is wood beneath with at least some visibility of the planking. Don't worry, it will be fine doing it the correct way with the garboard and the first couple next to it running straight and that makes sense from a keel strength standpoint, but I think my method is better from an aesthetic standpoint
- 714 replies
-
- 3
-

-
- lady nelson
- victory models
- (and 1 more)
-
Ok obviously this is very quick and dirty - in fact my eyelid is twitching at how quick and dirty it is - but it is roughly what she will look like color-wise based on the current plan, and is enough for the purpose. Please let me know what you think.

- 714 replies
-
- 1
-
-
- lady nelson
- victory models
- (and 1 more)
-
Oh BTW Rick I heard you about the garboard. I didn't like it, but I heard it I guess you're right, it just makes the stealer problem more complex, much easier to fit stealers in that nice vertical spot where you're not also dealing with bending and twisting.
- 714 replies
-
- 3
-
-
- lady nelson
- victory models
- (and 1 more)
-
Oh yeah, chances are I won't be able to make three different head types visible , mostly I just thought it was interesting that they used three different kinds of attachment mechanisms. When I said I might machine these, I mean machine a .115" or so groove in solid brass, leaving enough material at the end to properly do the hinges- they clearly weren't thin straps. Then remove material on the strap parts until they're appropriately thin. Just musing mostly, will decide when we actually get there.
- 714 replies
-
- 3
-
-
- lady nelson
- victory models
- (and 1 more)
-
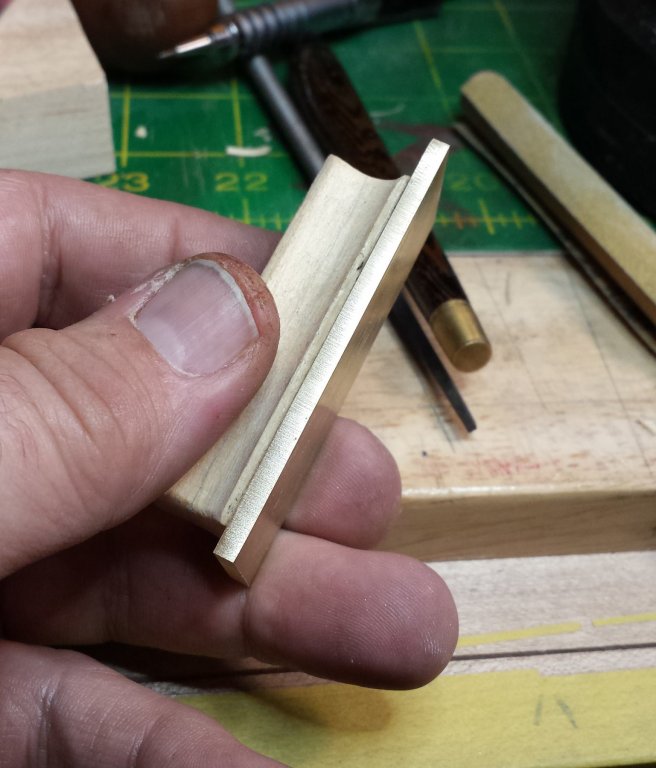
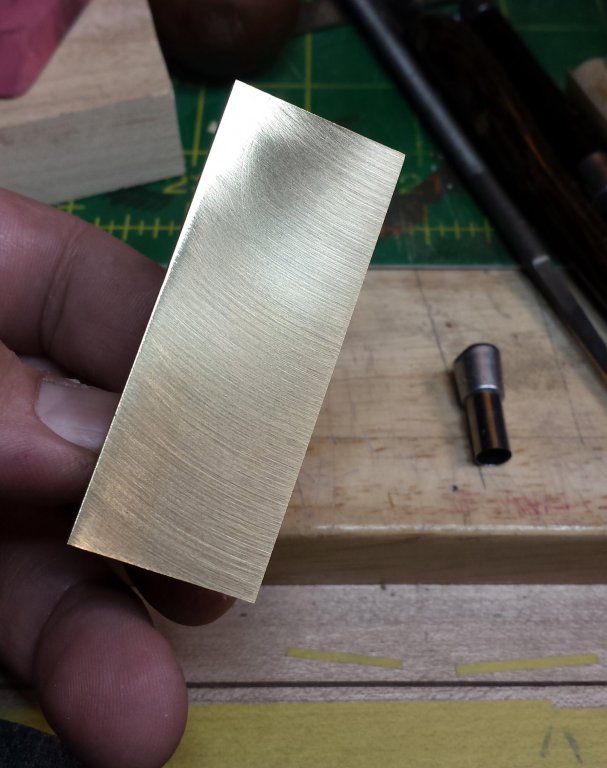
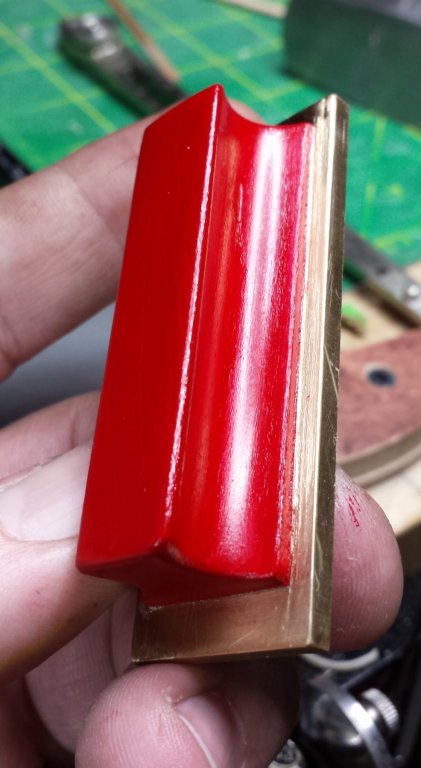
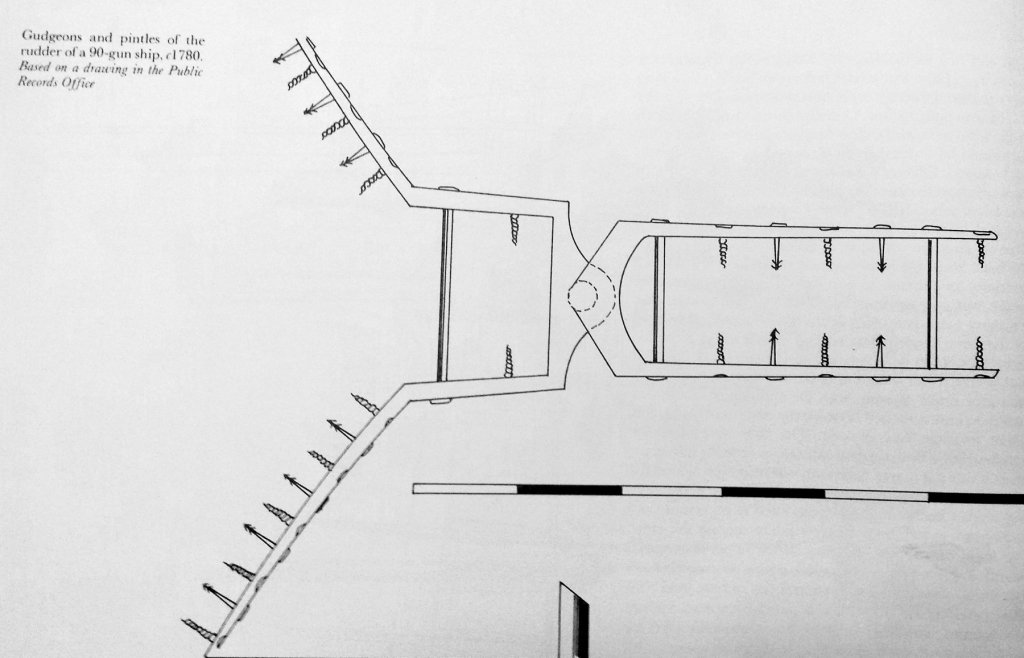
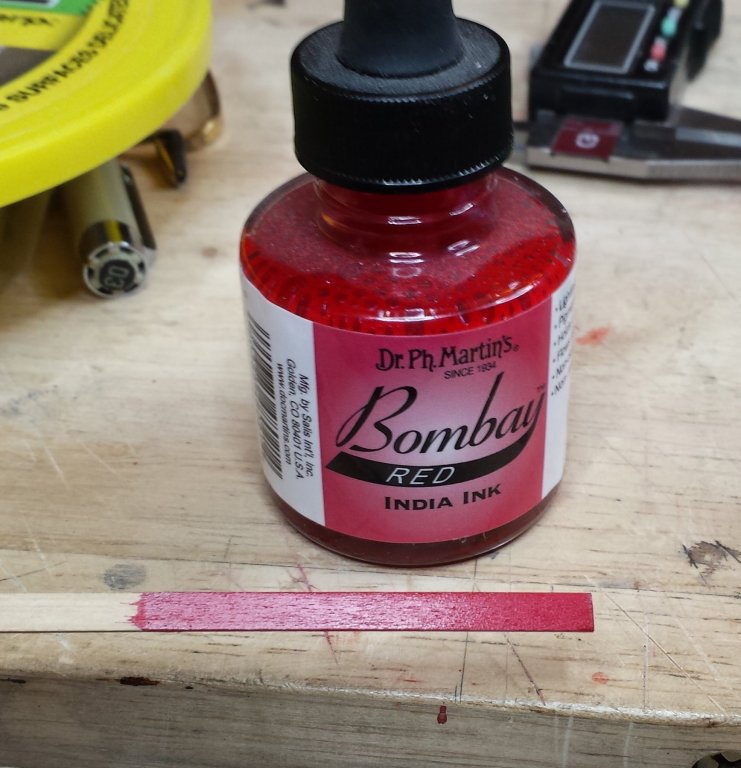
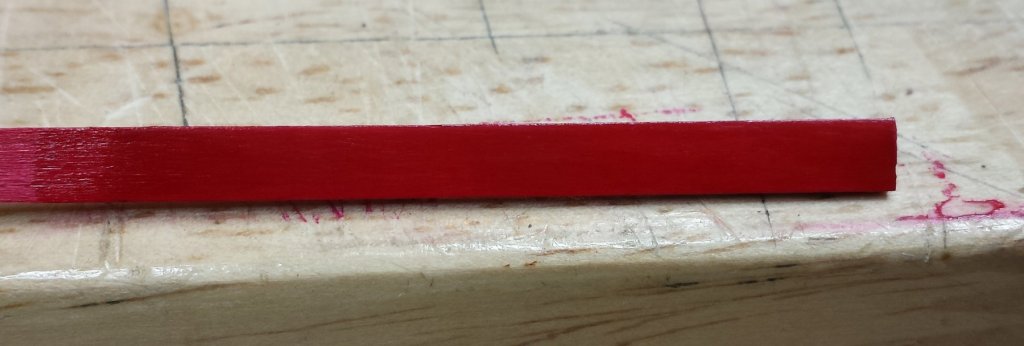
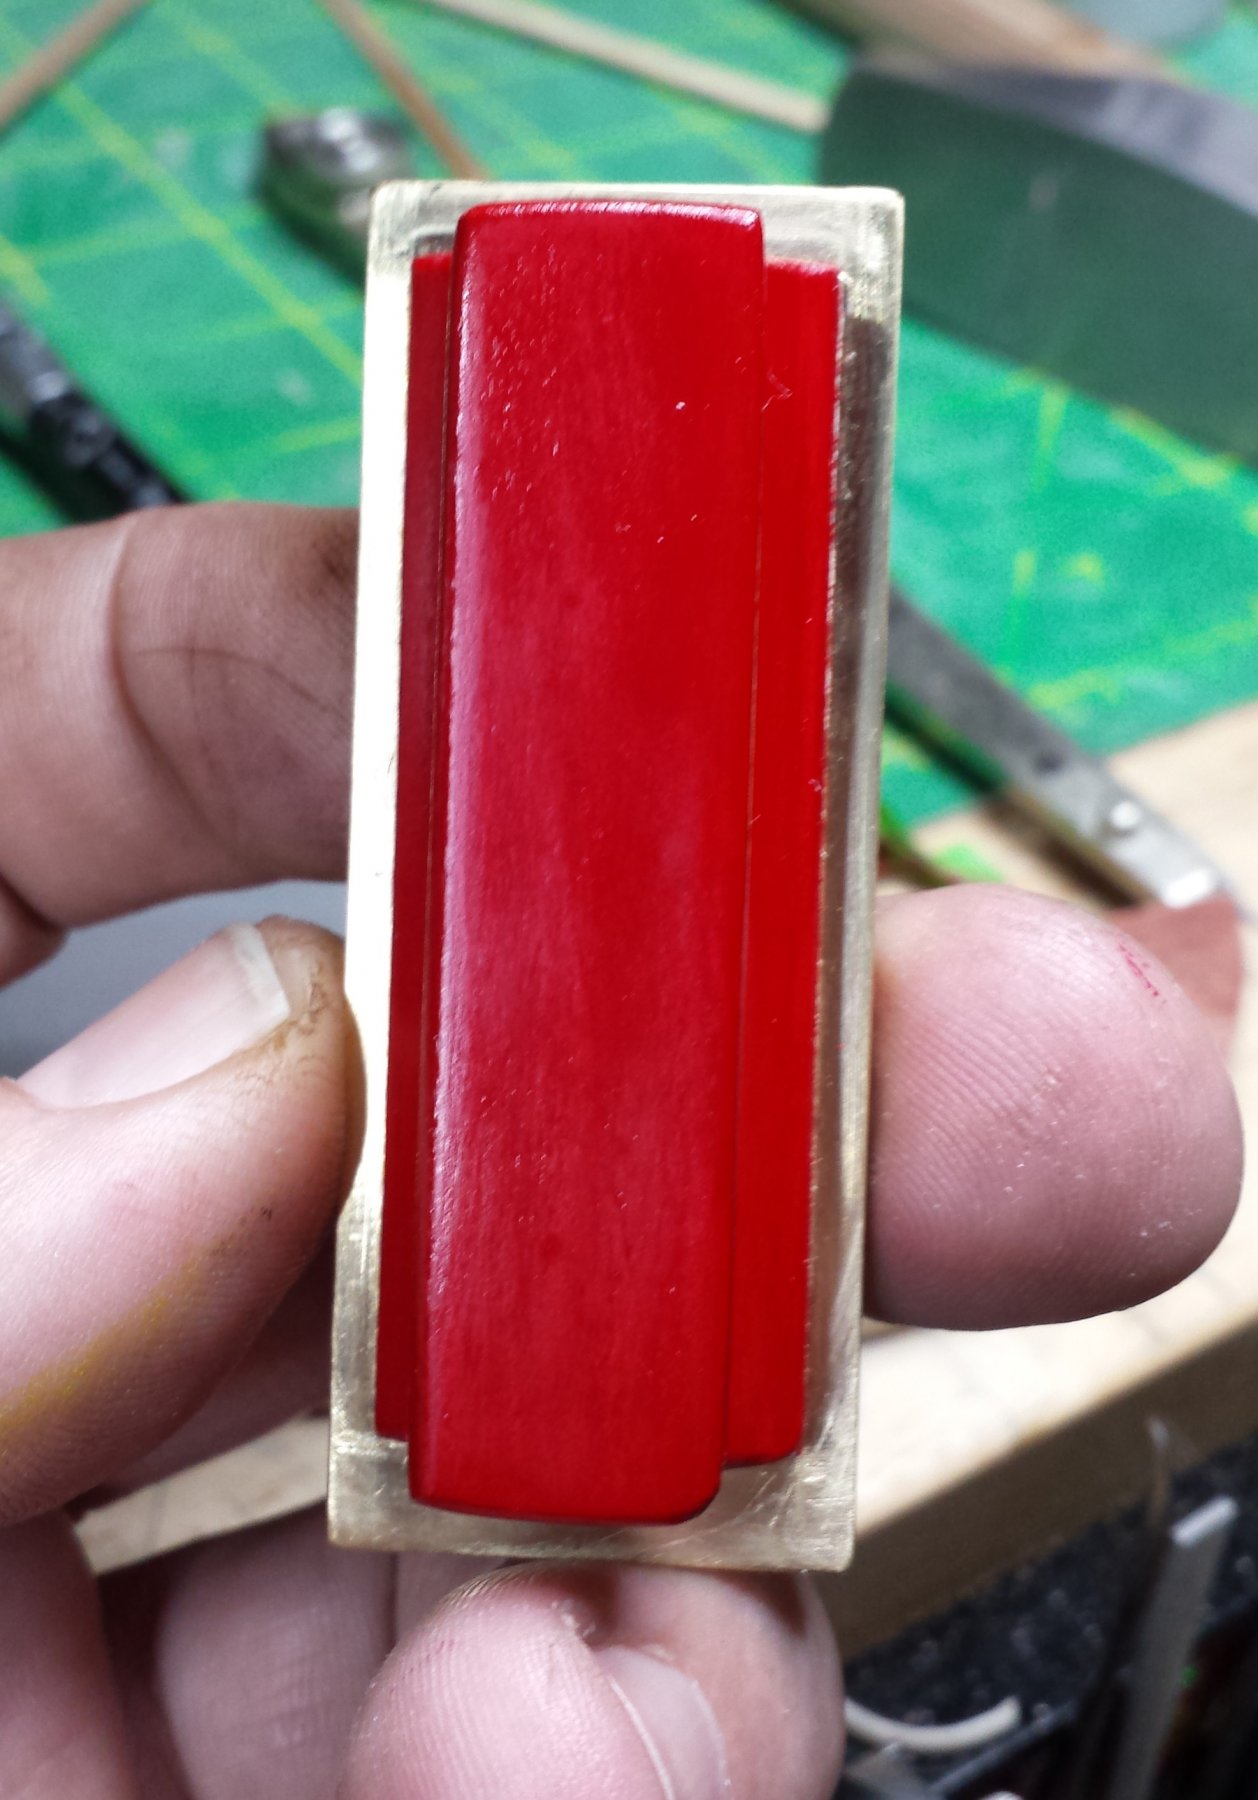
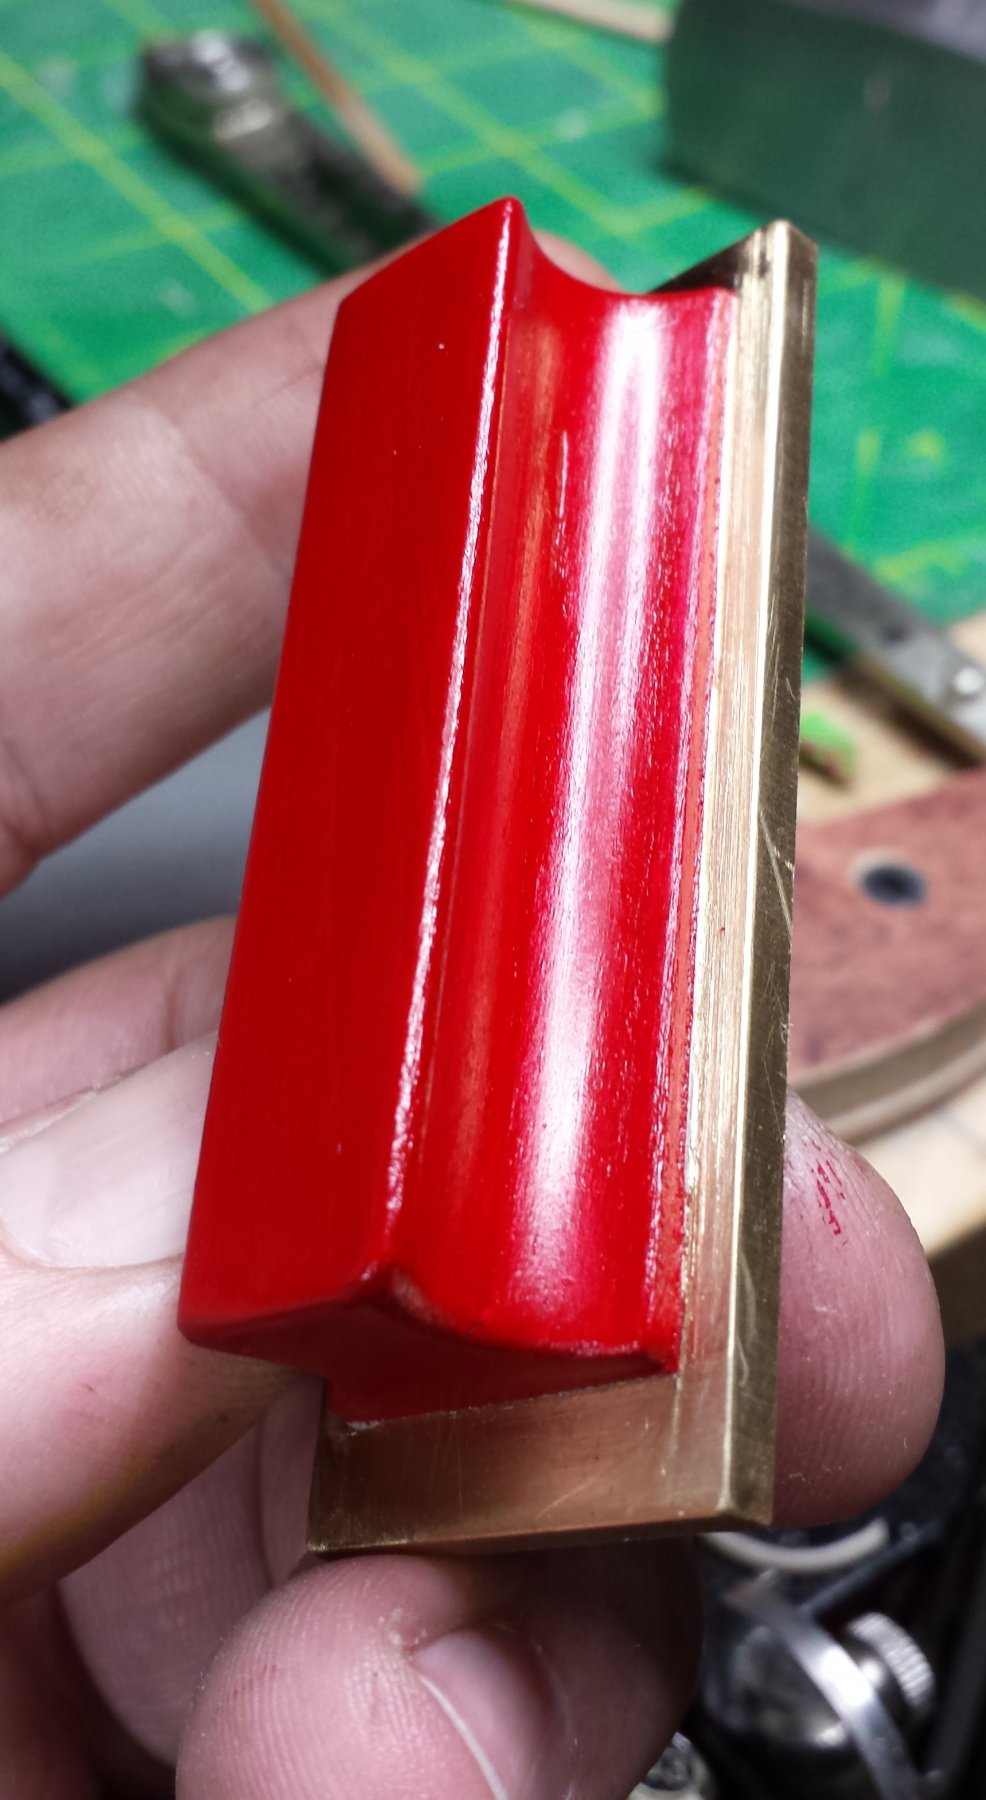
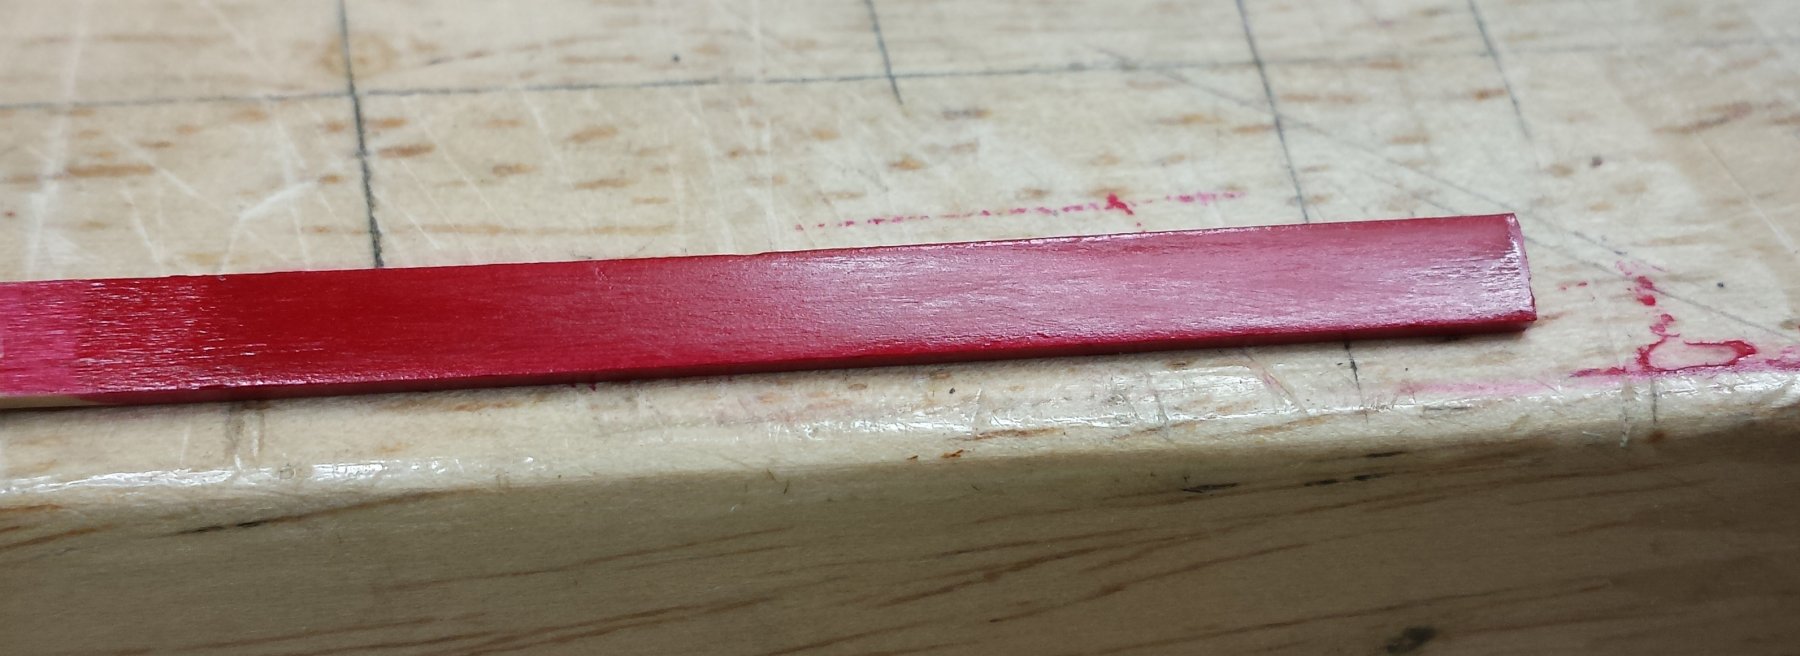
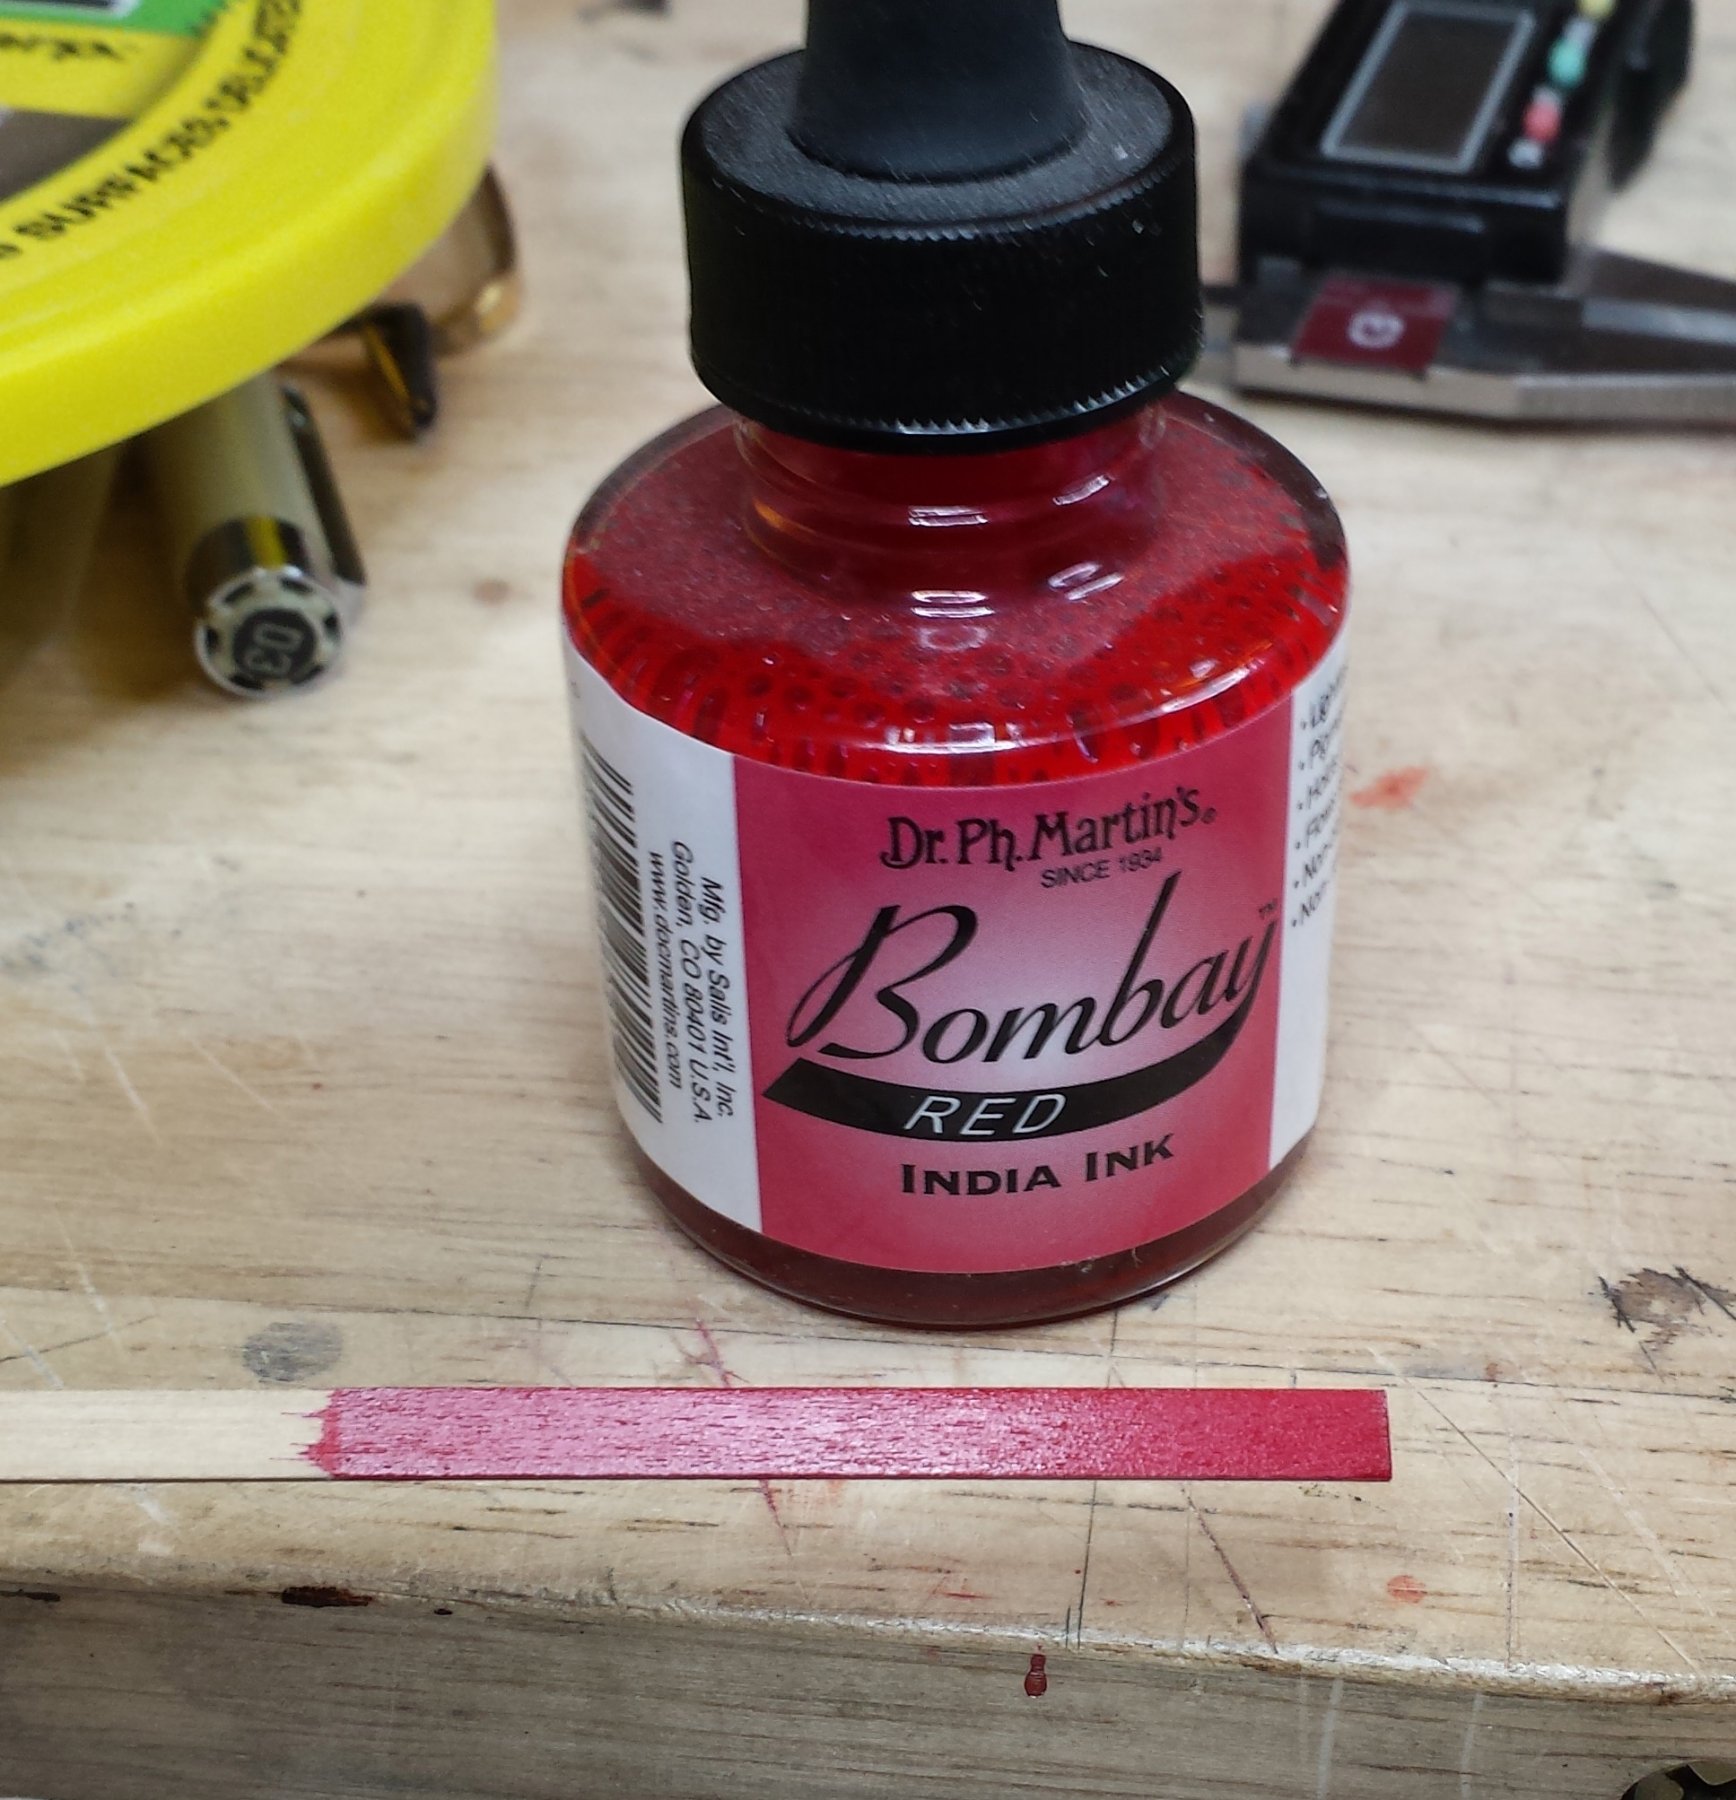
Well if nothing else we found a post that Mark doesn't like If this forum has achievements that should be one. One thing I will say is the first few are by far the worst. Also, if you're even slightly prone, you should keep a prescription of Toradol around. It's non-narcotic, primarily an anti-inflammatory, but for whatever reason it works to largely stop the really bad pain at the beginning. To get us back to vaguely more pleasant subjects, I made another little sanding block for PSA paper specifically for deck sanding and used it to test my ink idea a bit more. Here it is before inking: And I managed in few minute stretches over the last couple days to "paint" it with three coats, leveling between with 1200 grit. It looks quite good and I think it compares reasonably well with dye in terms of color and translucency while providing an actual film finish over the wood; dye needs to be followed up with a clear coat of some kind. It's more translucent than you see here, it's so red it seems to be overwhelming the CCD in the camera. I was also testing Rhino Glue, which claims to be powerful enough to stick a criminal charge to a rich guy and stick anything to anything. It seems at least closely related to CA, but it smells a bit different, and it sets up slower than CA of similar viscosity. I also scored the wood and sanded the brass with 120 grit in several directions before gluing. Unfortunately I don't think I can use the red ink for the inner gunwales, since the fashion pieces and stern fascia would have to be stripped again (!), and the fashion pieces ripped out and replaced with wood since this finish is translucent. But if I were to do this again, this is what I would use to paint all of the gunwale red surfaces, and I'm now experimenting with black ink instead of the black dye I was intending to use, the latter is quite red and that's been bothering me. And a different subject, I found this interesting pics in Brian Lavery's Ship of the Line series, in vol. II. What I find interesting is that if you want to be accurate, the pintle/gudgeon straps would show three different head types for the screws, the nail-things, and the through-bolts. I'll have to see when I get here but I'm tempted to try to machine these.

- 714 replies
-
- 5
-
-
- lady nelson
- victory models
- (and 1 more)
-
Thanks Tom. I have them every year to 18 months and have been through the ultrasound lithotripsy procedure a dozen times. I've had them on both sides at the same time a few times, including now. At least the ultrasound I had didn't see anything big, I've had them >1cm. Anything that will pass on its own is no big deal to me, when you get the lithotripsy it's like having a pro boxer beat on your kidney for a few rounds and it's a good solid week at least before you can go take a leak without steeling yourself for the pain. And no, none of the recommended dietary changes have made any difference, as my doctor said some people's chemistry is so good at making them that it doesn't matter. Just something I have to live with.
-
All shoddiness of any kind on my models will now be labeled as highly-skilled efforts at increased realism.
-
More tools - Luthier, jeweler, fly-tying
vossiewulf replied to vossiewulf's topic in Modeling tools and Workshop Equipment
Has anyone tried clamping with rare earth magnets? These are 1/4" diameter X 1/10" thick, get about 2lb pull, not sure if that's enough but if it is, they'd be perfect for things like inside gunwale/bulwark planking.- 86 replies
-
- 10
-
-
More tools - Luthier, jeweler, fly-tying
vossiewulf replied to vossiewulf's topic in Modeling tools and Workshop Equipment
LOL. I took it out and it looked exactly like a blue turd. So I tried some de-turdifying squishes before taking the pic, not noticing that I'd actually made it worse -
Tom, important thing is it sounds like you're making good progress. Last time I checked none of us paid for tickets that said you owed us pictures You'll get to putting them up when you can.
- 1,354 replies
-
- 1
-
-
- constitution
- model shipways
- (and 1 more)
-
Hey Rick, good to see you back But also hope you had a good time on your trip and all went well. I'm semi-down having another run-in with kidney stones, something I have all too much experience with, they started when I was 30. Was all I could do most of this week to spend some time with my teams at work and make sure they were mostly on track. A team in Bangalore has been added to my group as well which also means daily calls for the next few weeks of some length to talk to the local management team to get a grasp of their tempo and needs and get them integrated into my group. It doesn't help that the nature of what we do means that every single person is moving as fast as humanly possible every day so staying ahead of the curve is a challenge. And I was already on call 24/7, but now with Bangalore I'm double extra on call. Easiest way to explain what we do is to say we're payment system first responders. Something significant goes wrong with the payment systems driving large parts of the world's e-commerce system, we get called. We also do root cause analysis and fixes on all non-crisis production issues and do lots of reporting and analytics for business and sales and senior leadership. Haven't gotten anything done last couple days. Hopefully will be doing a bit better this weekend and make some progress.
- 714 replies
-
- 2
-
-
- lady nelson
- victory models
- (and 1 more)
-
Gaetan, one thing that always seems to happen to me in situations where I'm manufacturing a series of parts, and this was particularly true back in my custom furniture making days, was that just about the time I was becoming really efficient at a macro-process like you're describing above (X number of operations on Y pieces), I'd be done. The last five pieces would always be noticeably better and more quickly done than the first five, and had I another X pieces to do they'd get done way faster than that first batch. But I'd be done, and it was always a bit frustrating because now I knew how to do that particular thing really well, but I'd never need to do it again exactly like that.
-
More tools - Luthier, jeweler, fly-tying
vossiewulf replied to vossiewulf's topic in Modeling tools and Workshop Equipment
Another one I should have remembered, anyone who prefers PVA should try this. First, it's high quality PVA designed to hold together guitars that live under pretty significant stresses for decades. But that's not the super spiffy part, this also has an invisible dye that becomes visible under black/UV lighting. Guitar makers can't afford a single spot of glue anywhere, and someone at some point had this great idea and it's in common use by luthiers now. All you need is a UV light handy, and you'll never have a stained finish ruined by a spot of glue you couldn't see. I've never tested, but it's supposed to be fully repairable with joints separating at 190 degrees. LMI PVA Instrument Glue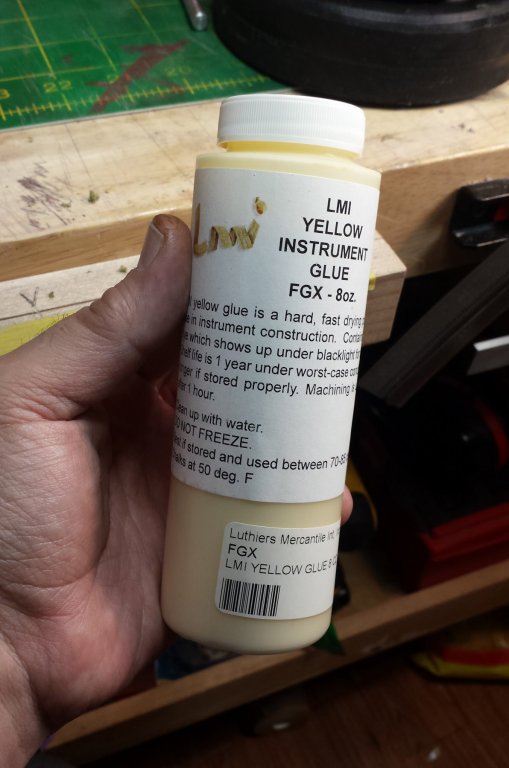
- 86 replies
-
- 10
-
-
Bolded one very good point (well they all are but this one is possibly a blocker). I try extremely hard to not have glue on my surfaces anywhere but that doesn't mean I'm 100% successful. And I'm guessing it would bead and I'm not sure it wouldn't also bead if I put down a clear flat coat or something. I'll have to go experiment. I've always liked india black so yes that was another potential reason. If you go through my build log you'll see I've tested with dyes and my current plan is to use aniline dyes to take the boxwood to black, and I'm using dyes for the same reason I'm testing ink, it doesn't completely hide the wood. But the black dyes I have tested all seem to have a pretty red hue, enough to be noticeable and a more pure black would be better. Anyway, thanks Joel, will post back here with what I find.
-
Quotes from that page: " Unlike typical carvel vessels, the planking is tightly fitted, with the seams of each plank moulded to fit the adjoining plank..." "The set work is unique on a carvel vessel of this type, with similar only seen on a shell first barges in Europe (Goodburn, 2009)..." "The flat vertical scarfs on the outer planking are also unique to frame first construction. They appear in the place of butt joints..." Citing a unique vessel is not a good example to use. From another thread a couple down from here also about planking lengths, Chuck posted the real planking expansion for his Cheerful cutter:
-
Airbrush
vossiewulf replied to Mike Dowling's topic in Painting, finishing and weathering products and techniques
Bf-109G-6? -
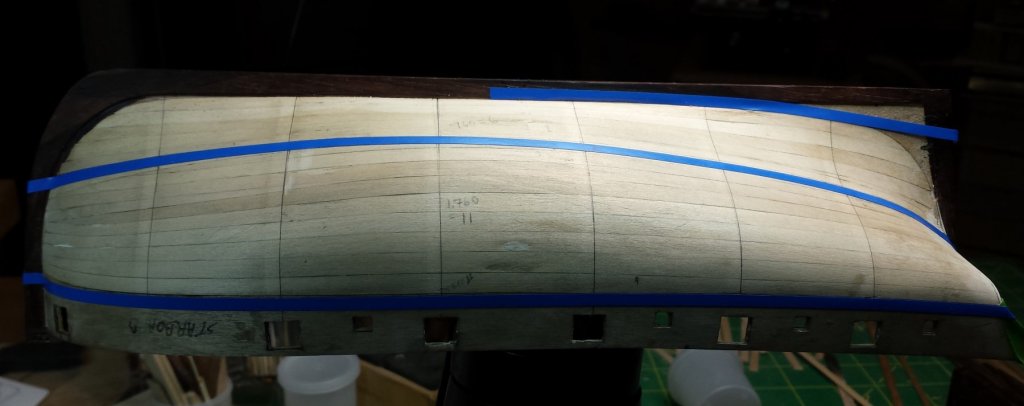
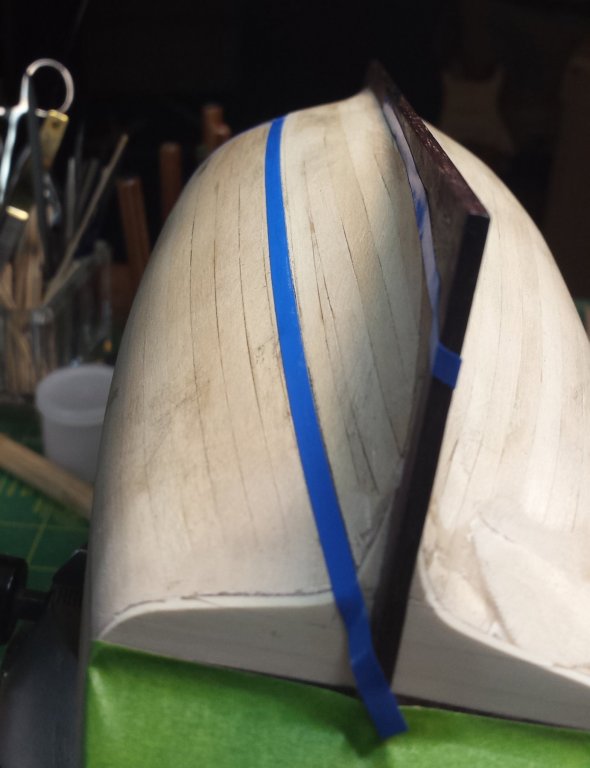
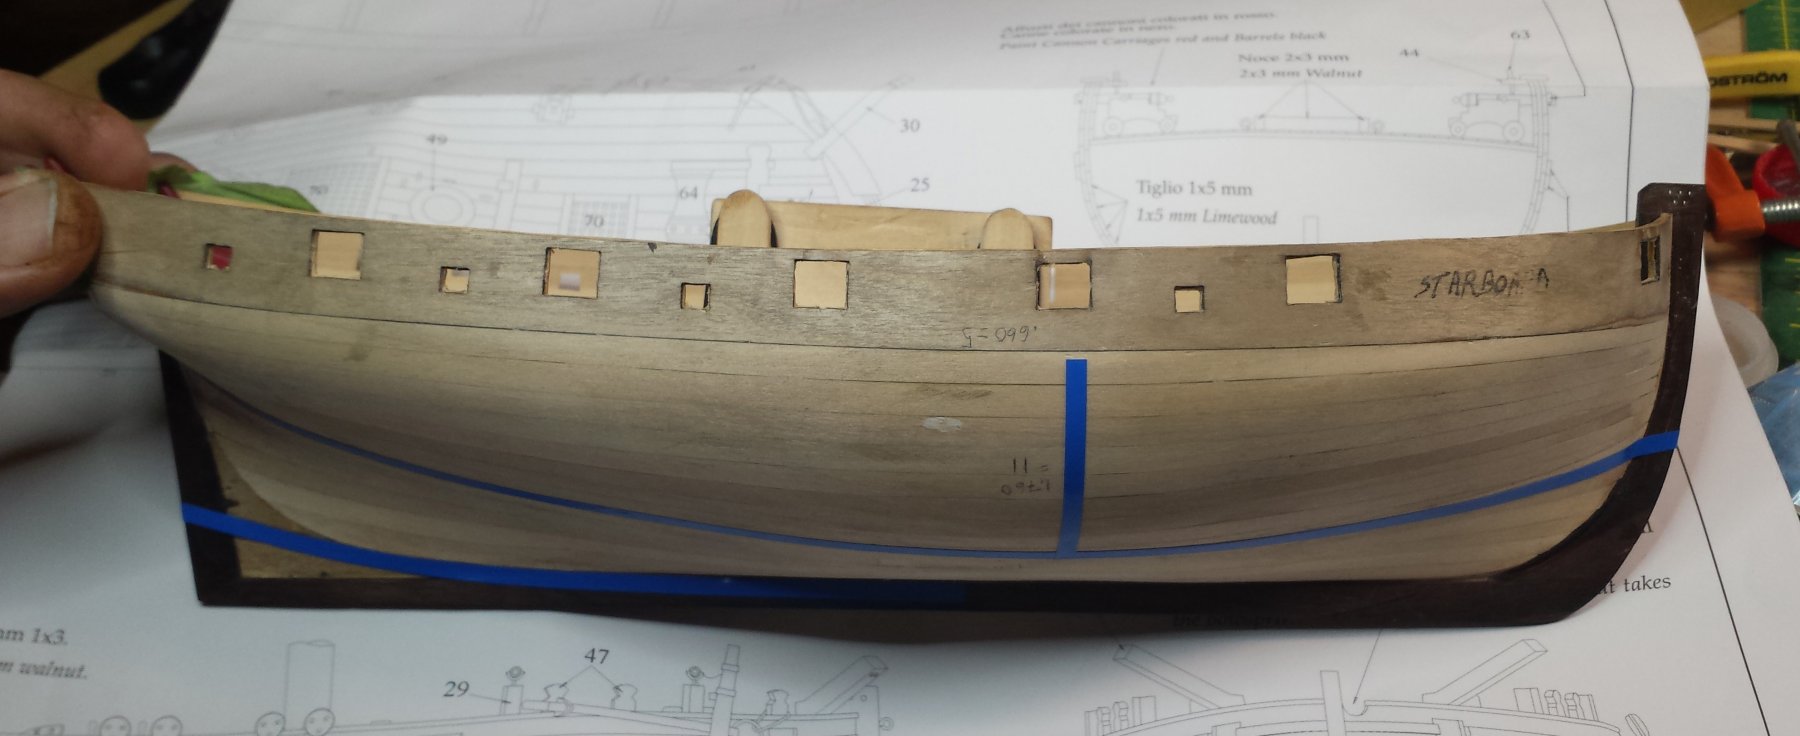
Good timing, was just about to give a little mini-update, which is I'm in blukhead strips and marking plank ticks etc. and will start actual planking soon, and will be head down for a while so you can holiday yourself and not worry I am once again experimenting and trying multiple things and doing things over, so it's a slow phase again. This time I am using Frog low-tack tape to measure lengths of stations since it is somewhat flexible and sticks but it doesn't stretch. And then I'm doing the actual tick marks with my proportional dividers. I'm then drawing planking lines for some planks by laying pinstriping tape down along the tick marks. And to ensure I have no excuses, I'm drawing those lines after sharpening a .3mm lead The tape along the keel shows what the garboard will do, similar to what I did for first planking. It will curve away from the keel and terminate in the rudder post two planking widths above the keel. That will leave a nice simple shape for the stealers that have to go someplace. One thing that was hard, and I'm still not sure they are perfect, was drawing in these stations and getting them square with the keel. Are there any tricks to this other than create frame templates fit well enough you could use them as rulers? I have no issues drawing straight lines here, the problem is figuring out which direction those straight lines should be pointing.
- 714 replies
-
- 6
-
-
- lady nelson
- victory models
- (and 1 more)
-
Anyone tried this? In my continued experimentation with about every step of my first ship I've been working through various options for paint; it's easy enough for me to do a perfectly level painted surface in most cases, but that would be extremely inaccurate, I'm looking for something more organic, allowing the character of the wood to show but at correct scale- grain bumps/grooves that scale out to two and three inches high/deep are just as bad as a perfectly smooth finish. I remembered I have a nice set of india inks that promise to be lightfast and waterproof, and I also know from previous experience that it can be applied as glaze coats and have a bit more translucency than paint, so I decided to try the red (which is pretty close to most versions of RN bulkhead red) on a piece of boxwood, which is what the inner gunwales of my little cutter are planked with. This is the plank sanded cleanly with 400 grit and then given one "coat" of ink, which is really about three passes with thin glaze coats, waiting about 30 seconds between. The color is good but the grain has been raised considerably. This is after three "coats" (~ 9 glaze coat passes) with sanding between, first with 1200 that took it almost to bare wood again and second time with 2000 that was as much leveling as possible without removing significant color. Diffuse color. Harder to see here than in real life, but it has visibly more translucency than paints (that have effectively 0) while still having nice color saturation. I like the effect overall. And here's what the surface looks like. I also like this scale-wise, mine being 1:64- this seems pretty close to me for that scale. So, pros: Perfect consistency for brush painting Goes on with zero brush marks as glaze coats, looks like 2-3 would be = to typical brush painted coat Can be semi-transluscent allowing some of the wood to show. Translucency can be controlled between somewhat translucent to 0 translucent with complete color saturation Coats can be sanded < 5 minutes after final glaze coat. No kidding, dries fast. Use a hairdryer on low and you could run through the whole three coats and two sandings continuously with no significant waiting Seems reasonably tough, more so than I thought it would be and certainly more than Tamiya paints. A little piece of dust got in a coat and dried before I saw it, and it took a surprising amount of effort and resorting to putting on magnifiers to dig that little bastard out of the finish. But the scene of the crime disappeared completely with the next sanding and coats. Cons: ? Any experience/thoughts appreciated.

-
Since when are all hull plank joints scarfed? That's not the case, only drop planks and stealers were scarfed as far as I know, rest were butt joints always over frames.
-
Fokker Dr.I by Torbogdan - FINISHED - Model Airways
vossiewulf replied to Torbogdan's topic in Non-ship/categorised builds
Great, looking forward to more pics. No such thing as too many pics of Fokker aircraft. Well at least the E series and the F.1/Dr.I and the D.VII, in between were some really horrible aircraft before they moved to the thick airfoil section. -
Thanks for the explanation Gaetan, reason I asked is as mentioned it seemed really obviously useful once I thought about it. I like especially how you managed to keep pretty large pieces of equipment mobile without losing much stability, it looks like you only had to raise the base less than 10cm, like 6 or 7? In your copious free time if you put together plans you could probably sell a few here and to the guys who do big (1:4, 1:3) aircraft.
-
What is that table Gaetan? Almost looks like a chiropractor table or something, designed to raise and lower. I guess that would be extremely useful when building as big as you do.
-
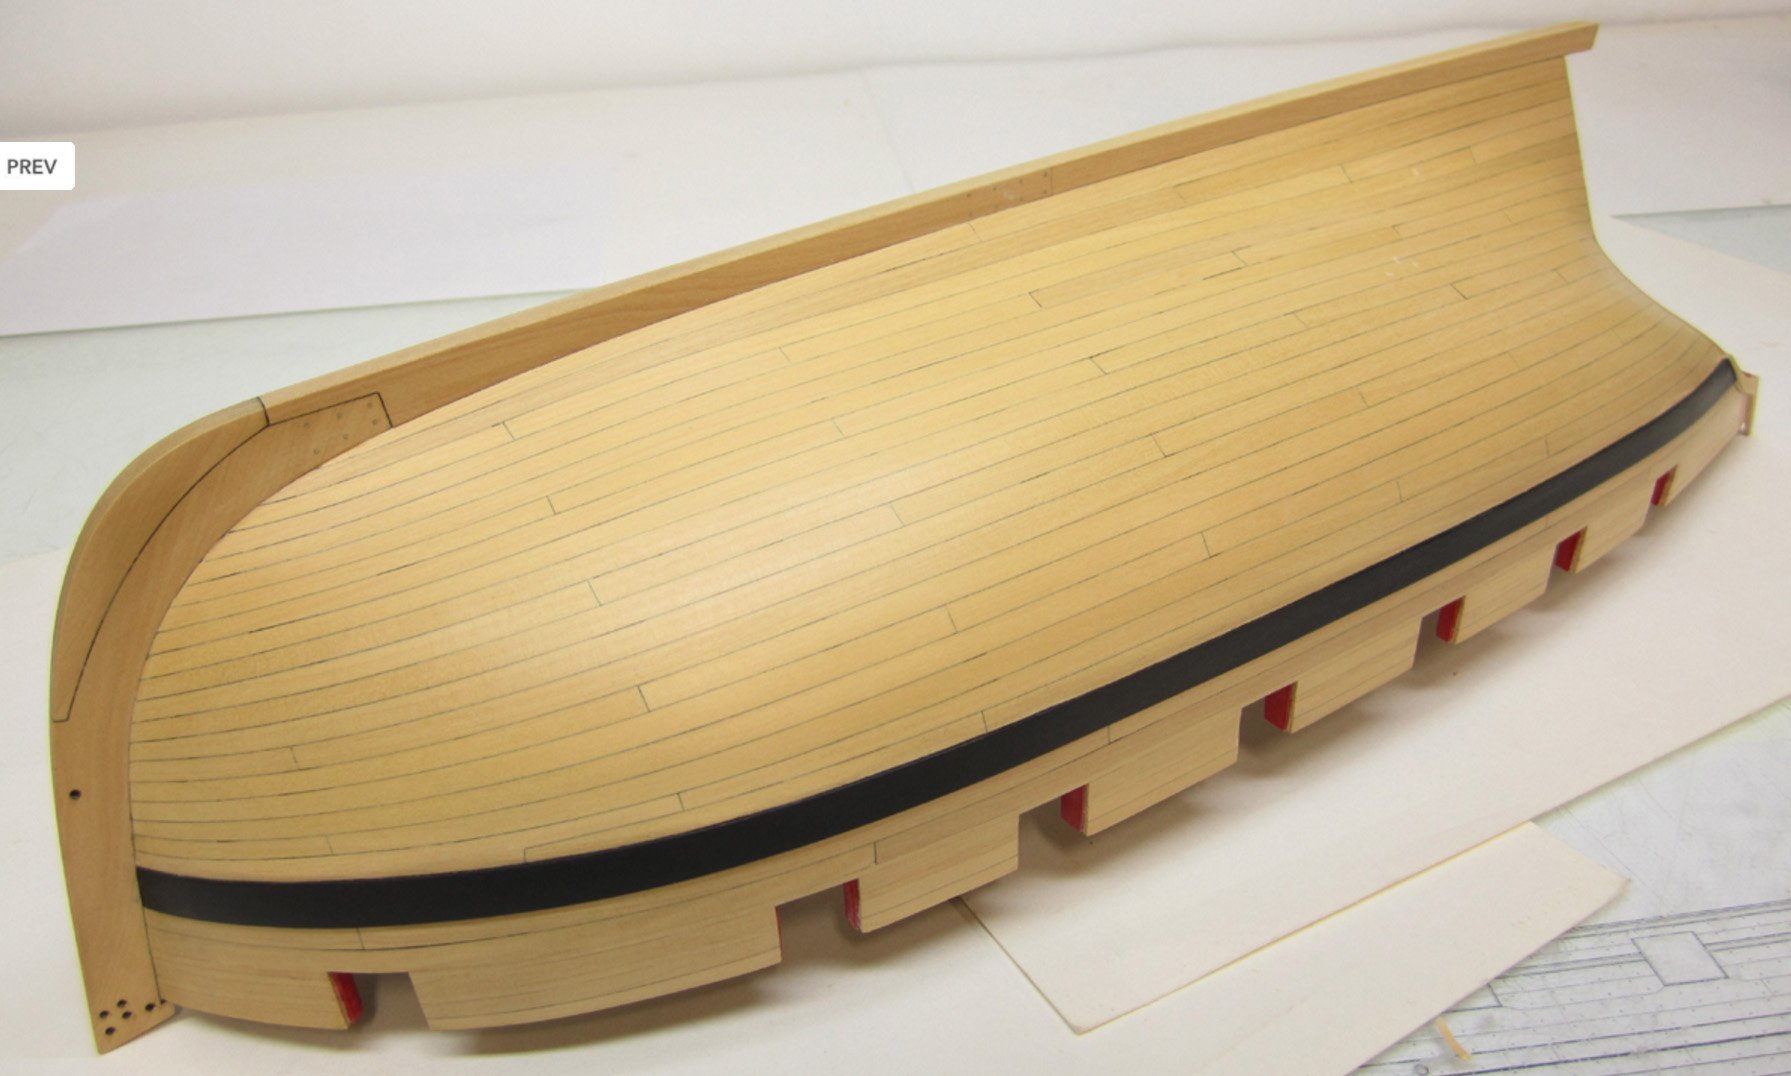
Ok this is what I have now. It looks correct to me and I think it pretty closely compares with Chuck's Cheerful. The planks on the top of this break would need to drop to close to half their width and that suggests one drop plank, and that is what he has on Cheerful. '' Cheerful, best side view I can find.


- 714 replies
-
- 6
-
-
- lady nelson
- victory models
- (and 1 more)
-
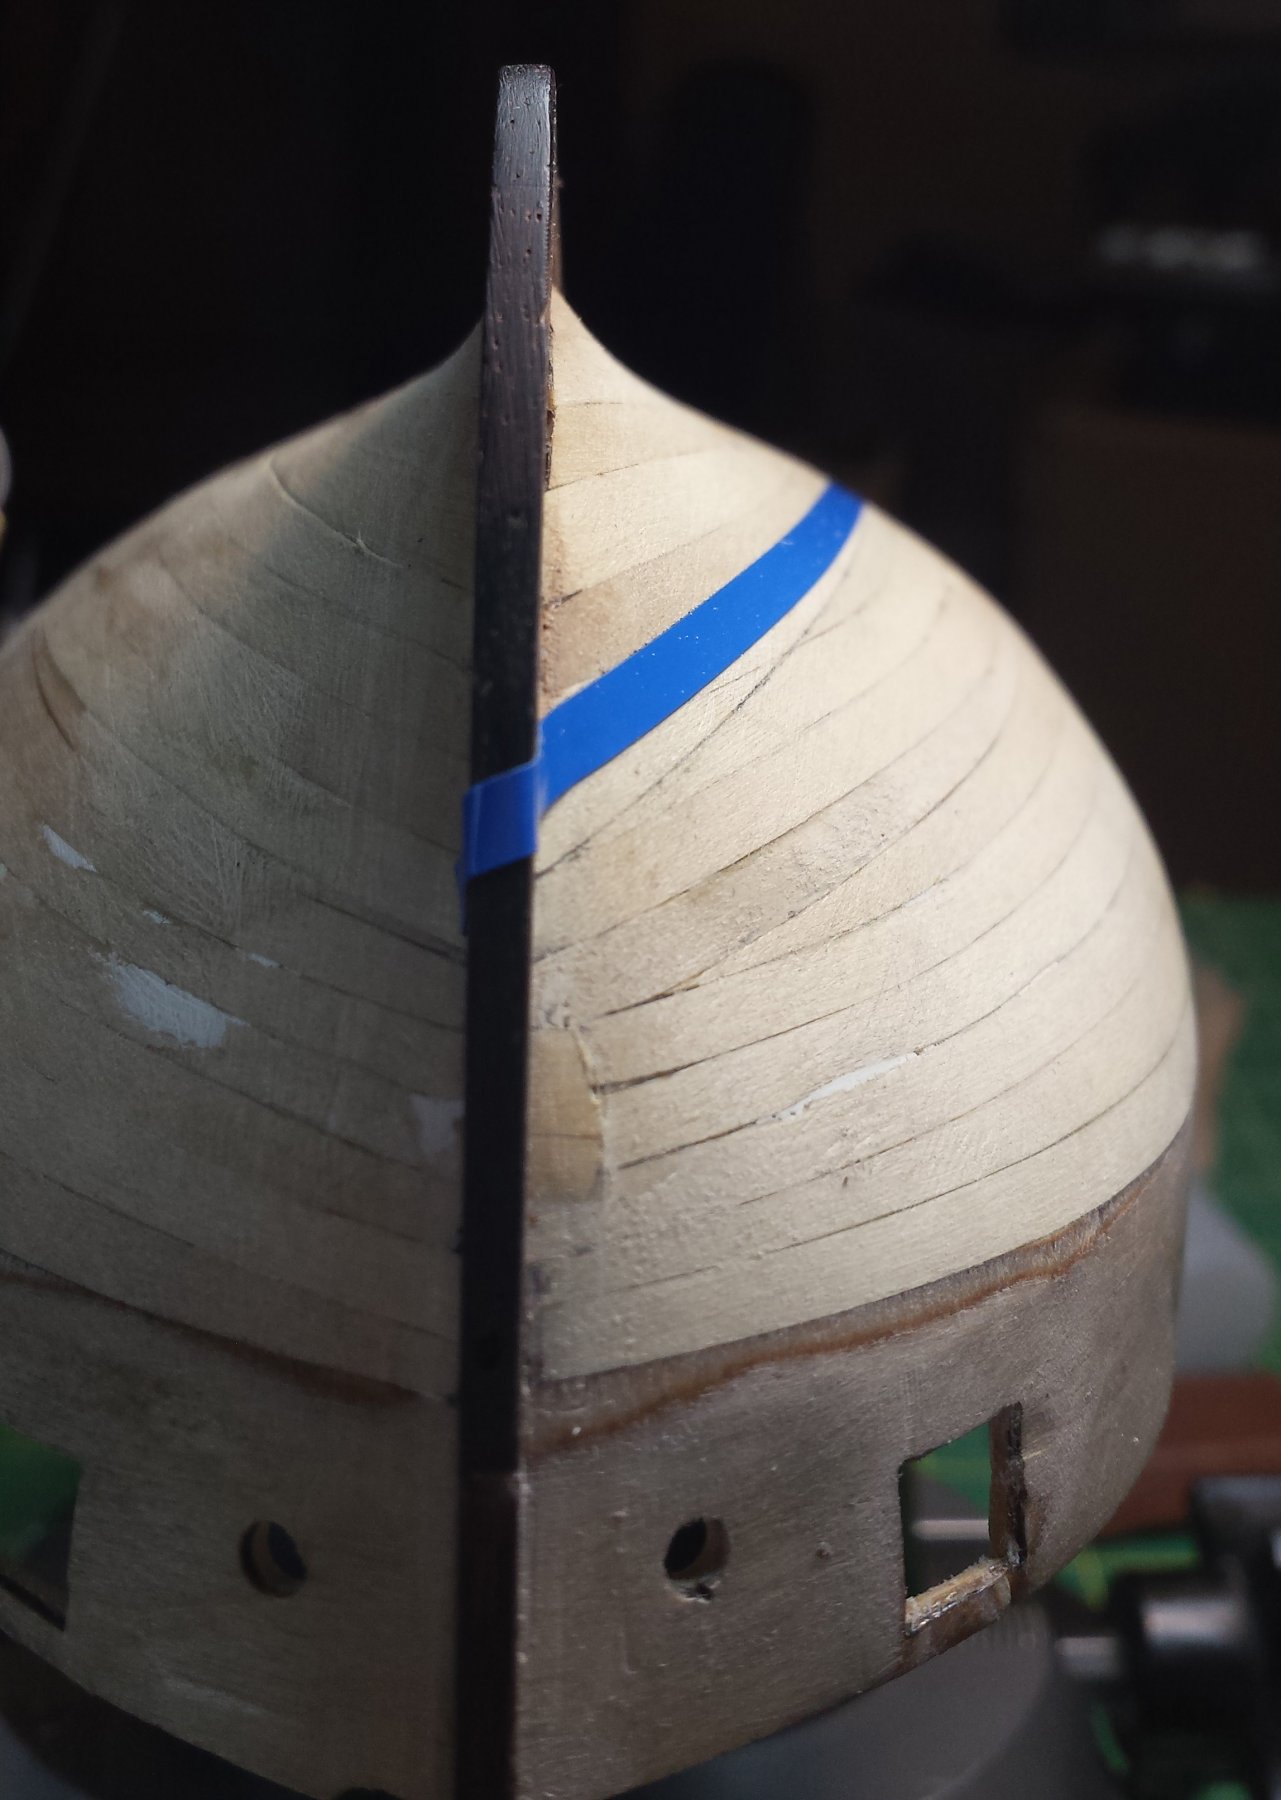
LOL Rick I appreciate it immensely but for God's sake go have your vacation and stop worrying about it Thanks on the planking I will try again, but if you see from the front it's just straight. If I make it meet the stem lower, it will have to curve down and that doesn't make much sense to me. Also it's not far above the line I used for the first planking which to me looked too flat. I'll see if I can find a middle ground and then leave it overnight and decide tomorrow.
- 714 replies
-
- 2
-
-
- lady nelson
- victory models
- (and 1 more)
-
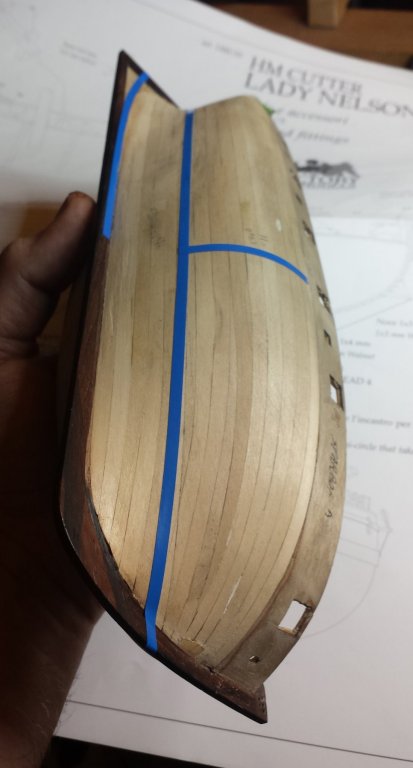
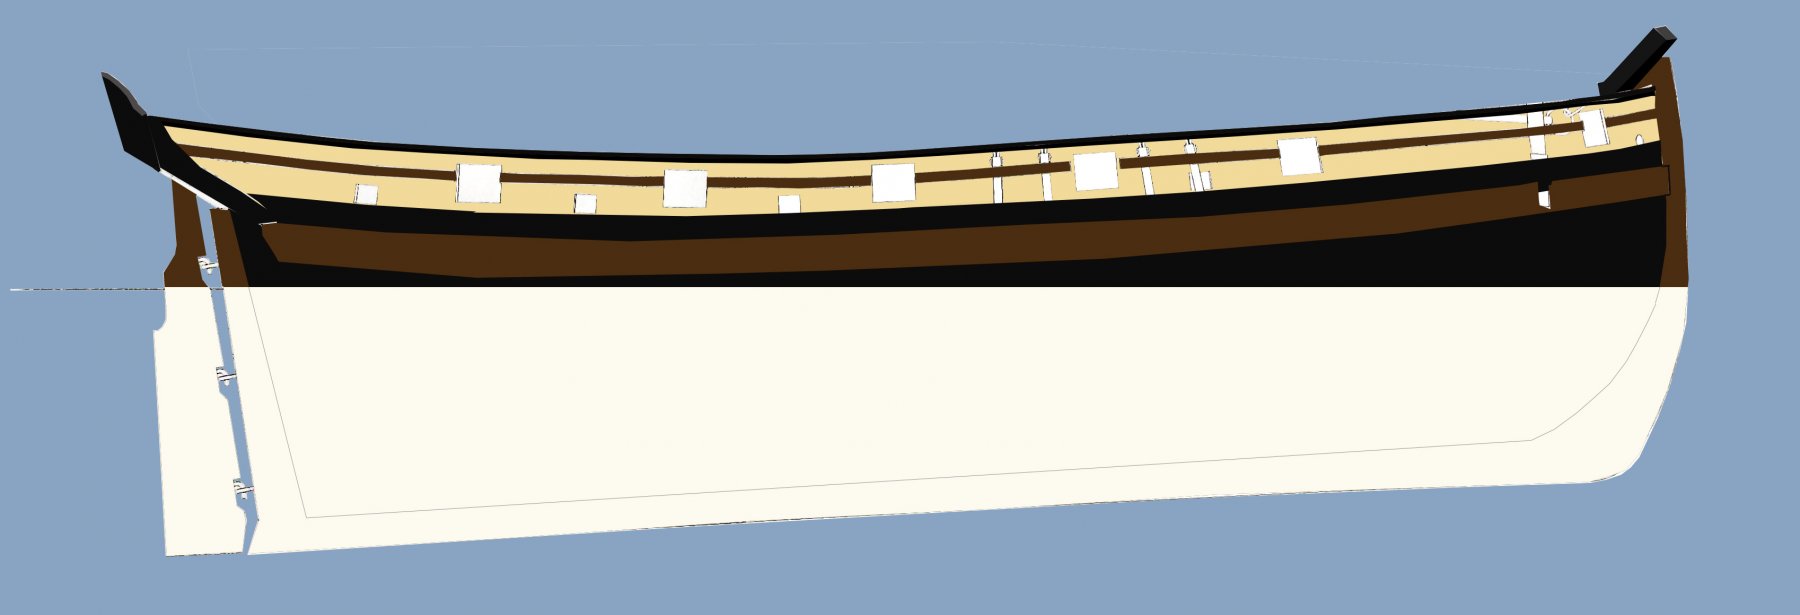
I finished the starboard rabbet and am trying to lay out the final planking. As of now, this is the "prime line" that all else will be driven off of, the dividing point being where the planks either end into the rudder post or end overhanging the stern fascia/transom. Please let me know if this doesn't look right for some reason

.thumb.jpg.9eaf9834f95391c0d4ed23f151455f43.jpg)
- 714 replies
-
- 3
-
-
- lady nelson
- victory models
- (and 1 more)


.jpg.400b3f5580d7155808dfe0f3439898de.jpg)