


Jond
-
Posts
820 -
Joined
-
Last visited
Content Type
Profiles
Forums
Gallery
Events
Posts posted by Jond
-
-
wow thank you guys it is so great to know I am not alone here in this pursuit. I must say though comments are over kind as I get a few moments from time to time to view your incredible work. I have so much to learn. example...my varnishing is horrible.
oh well if we have fun, learn something and then get to sail around the harbor this summer all is good
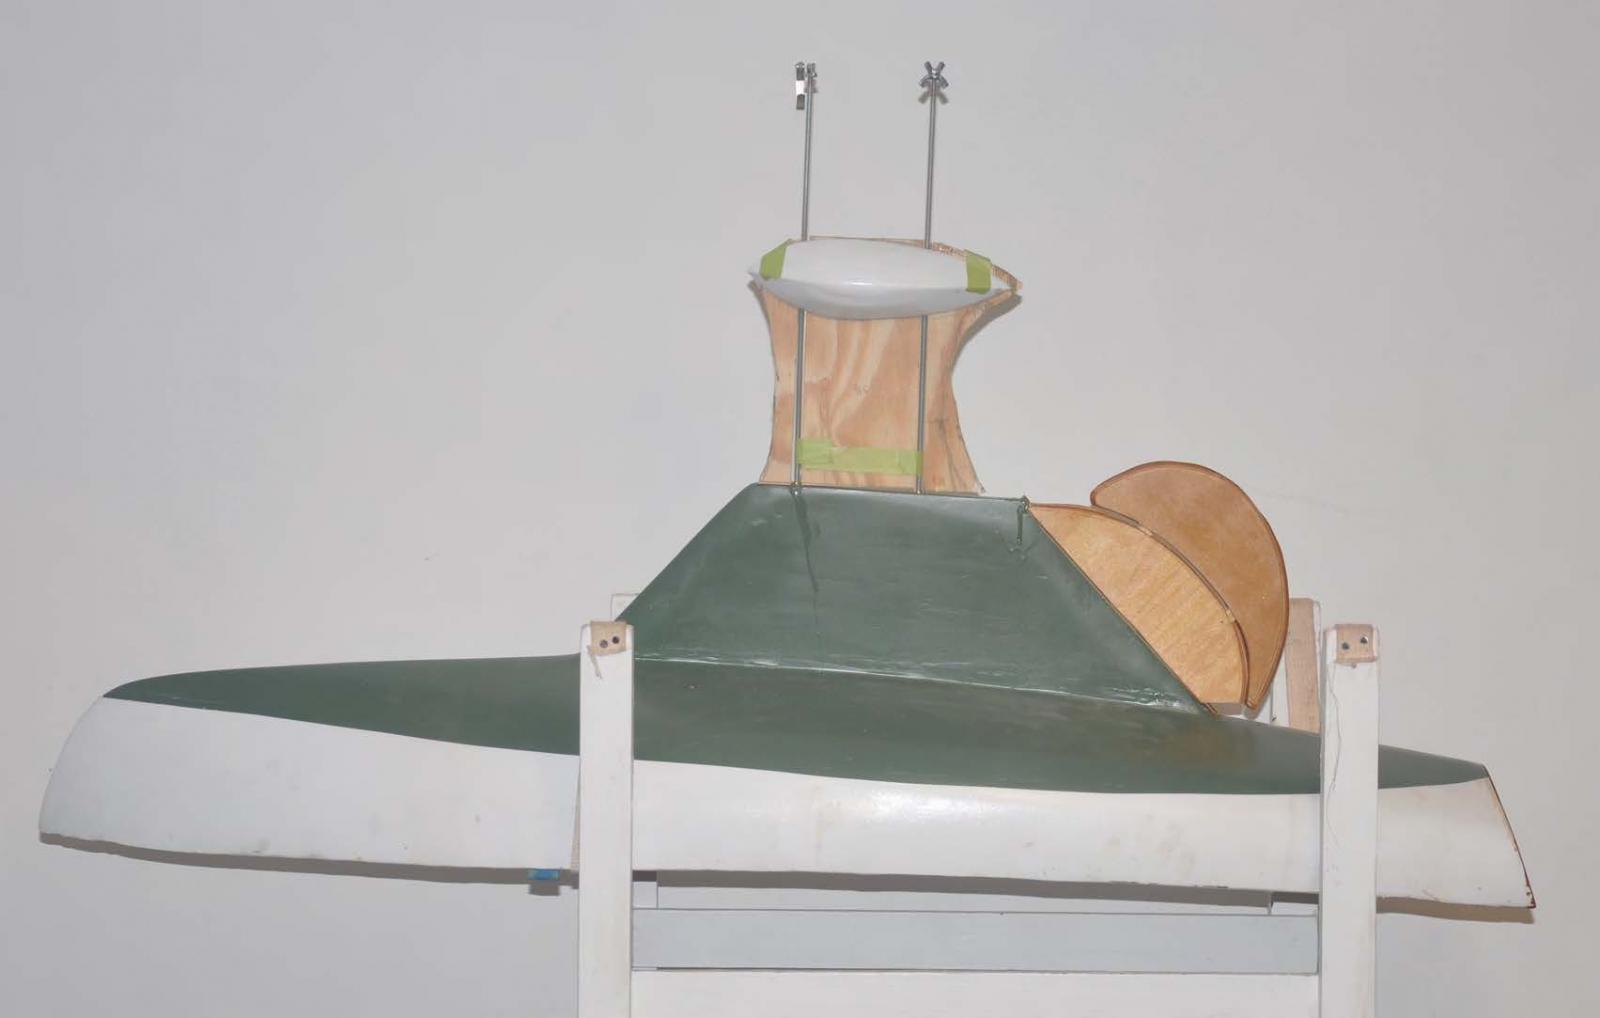
 here is a fun photo of 1955 races
cheers
-
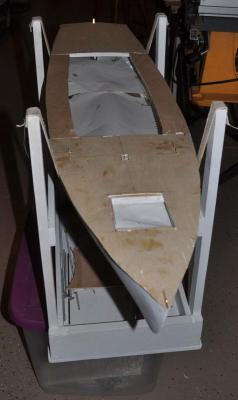
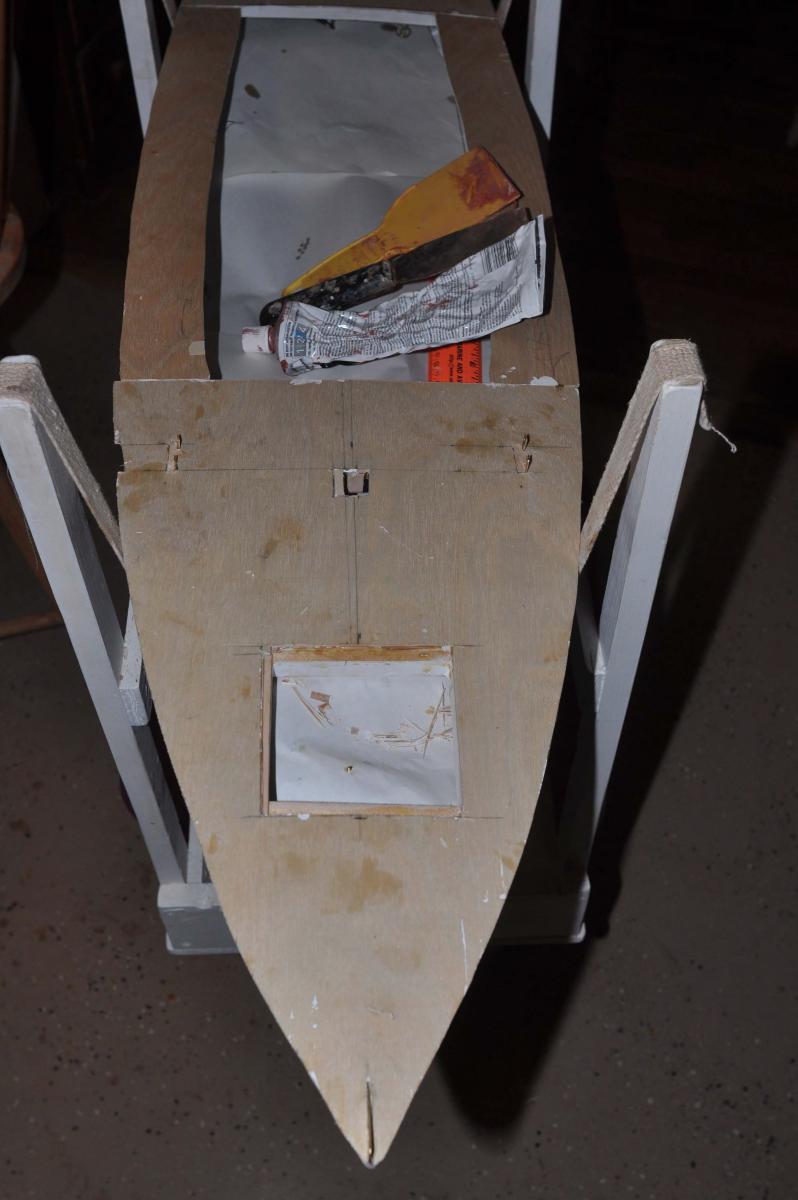
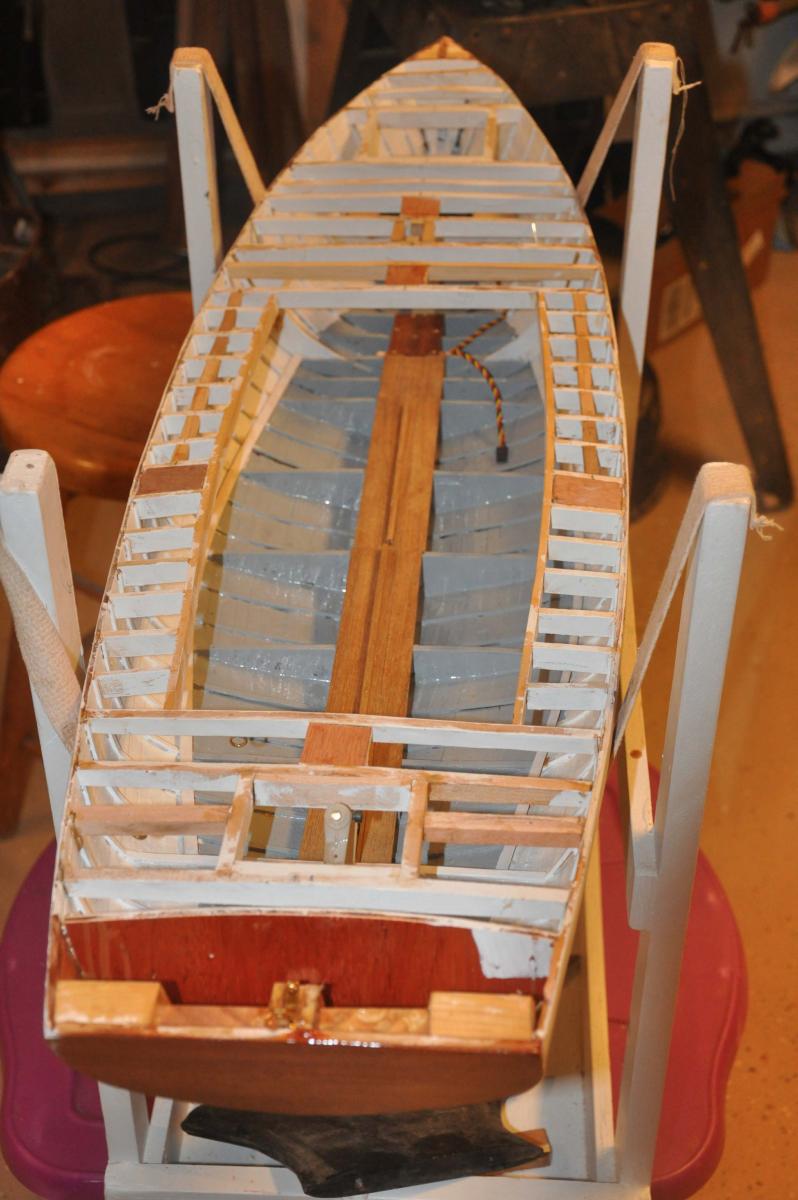
Well all it is time to bring things up to date. Hull 2 has come a long way. She even has a name, but let's catch up first; we left her with deck framing ready for deck.
-
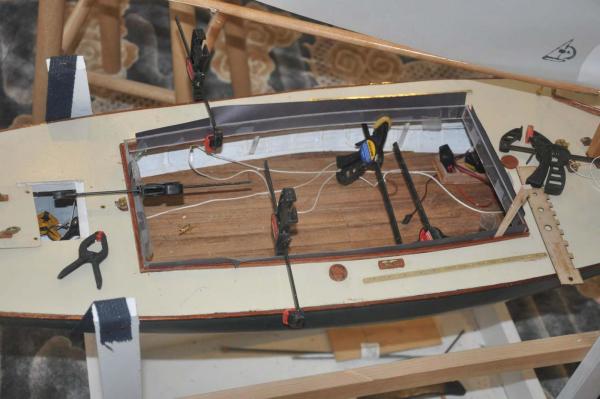
 I decided that I could do all of the deck in one go. I am trying to make this easier and faster...ha ha
-
 so we are are all set...right??
-
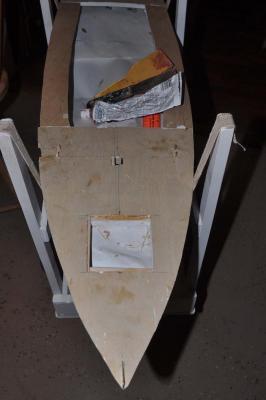 opps!!! something is wrong. Somehow the fore deck move about 1/8" to starboard. Thank goodness it will be painted.
-
 Here is the fix. A little cutting and a little auto finish putty. This is what separates me from the real modeling guys.
-
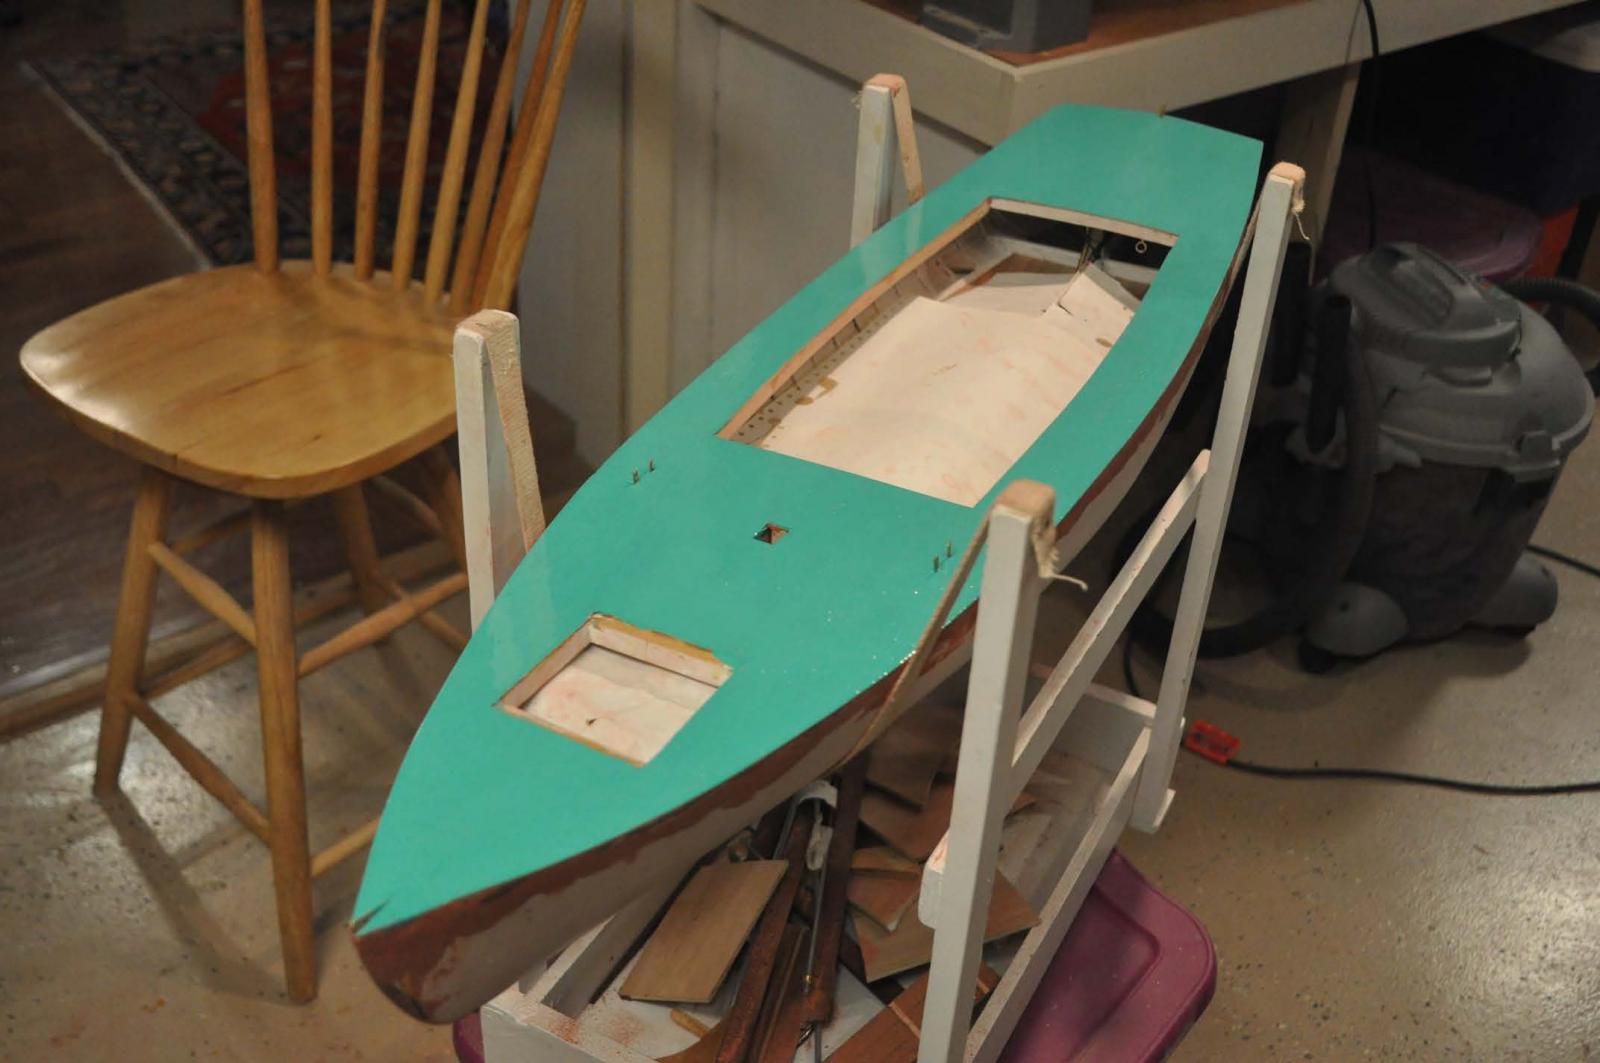
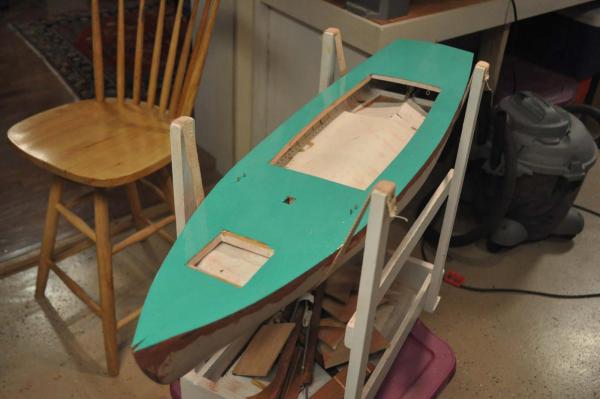 OK a little deck paint and we are off to the races. The color and material are real deck epoxy that David had in his shop. It is the deck color of Osprey the real boat of the 2006 design built at wooden Boat school and now on the web looking for a new home. You can see her in the earliest posts. let's see how she cleans up.
now time for more work on getting fittings to a production process. The idea is to make this process less daunting and try to get others to try.
-
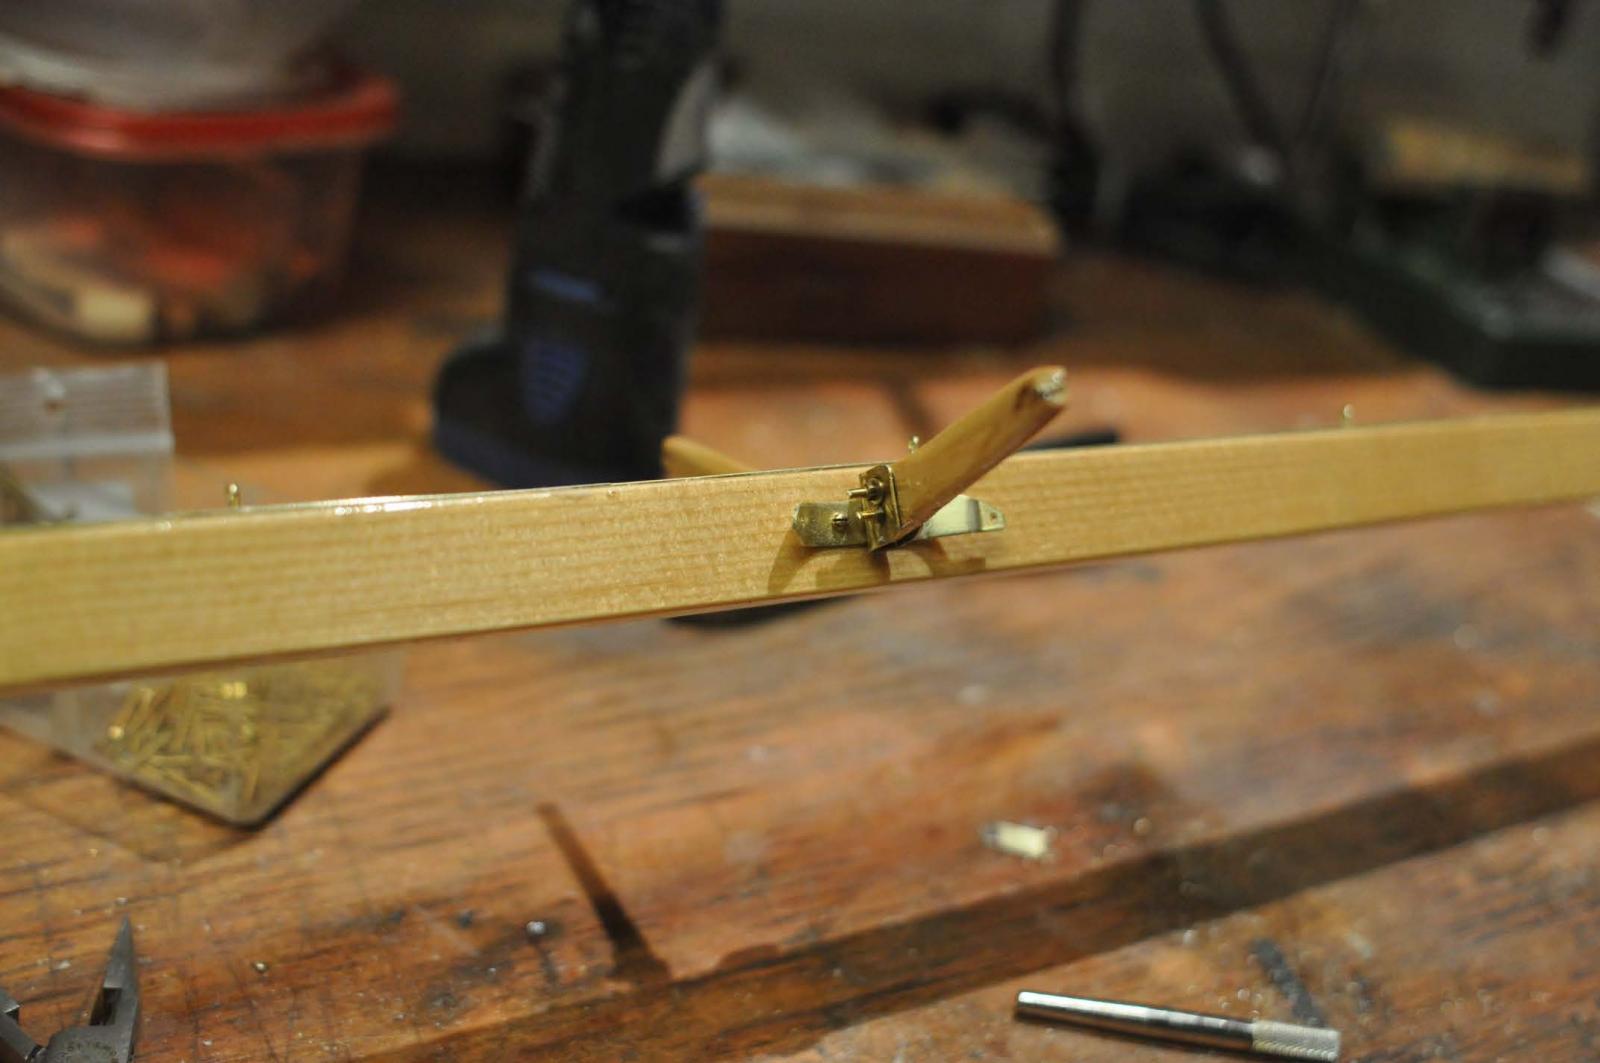
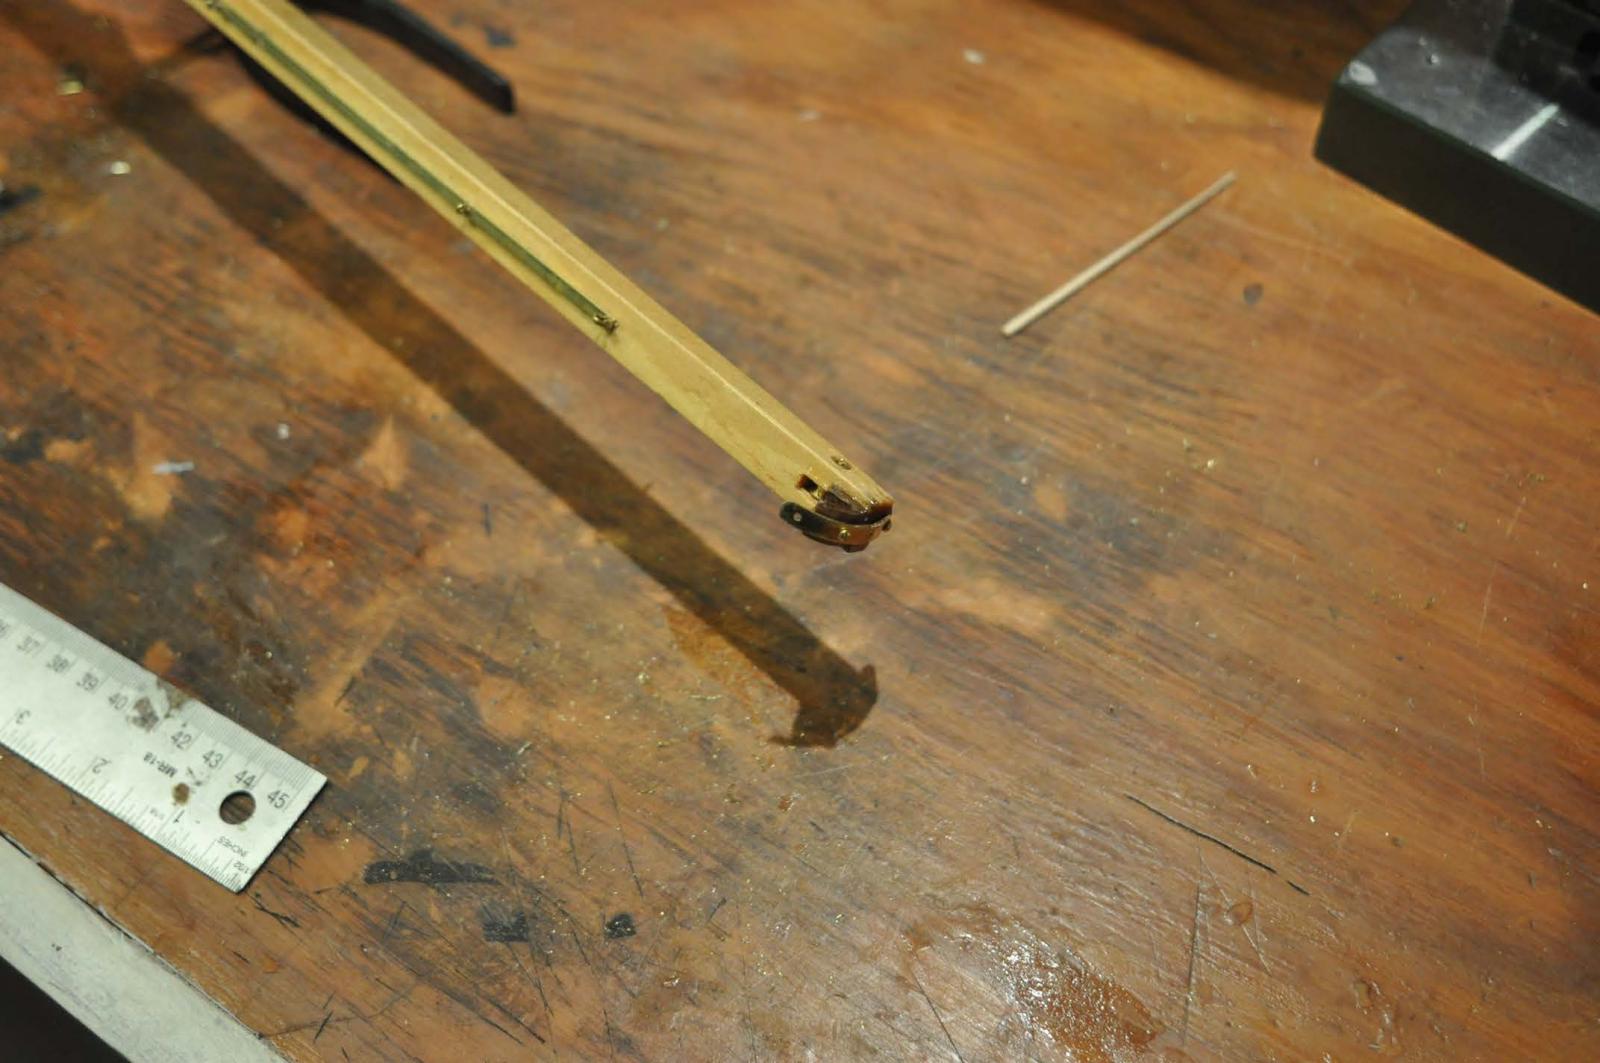
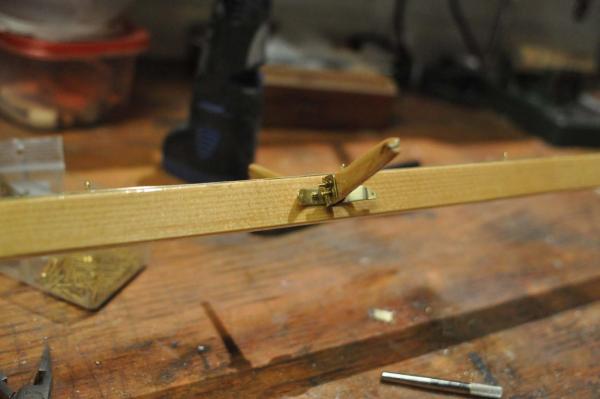 the spreader is better this time as I used screws and not tiny rivets.
-
 This jumper strut is just like the first one on Bittersweet.
-
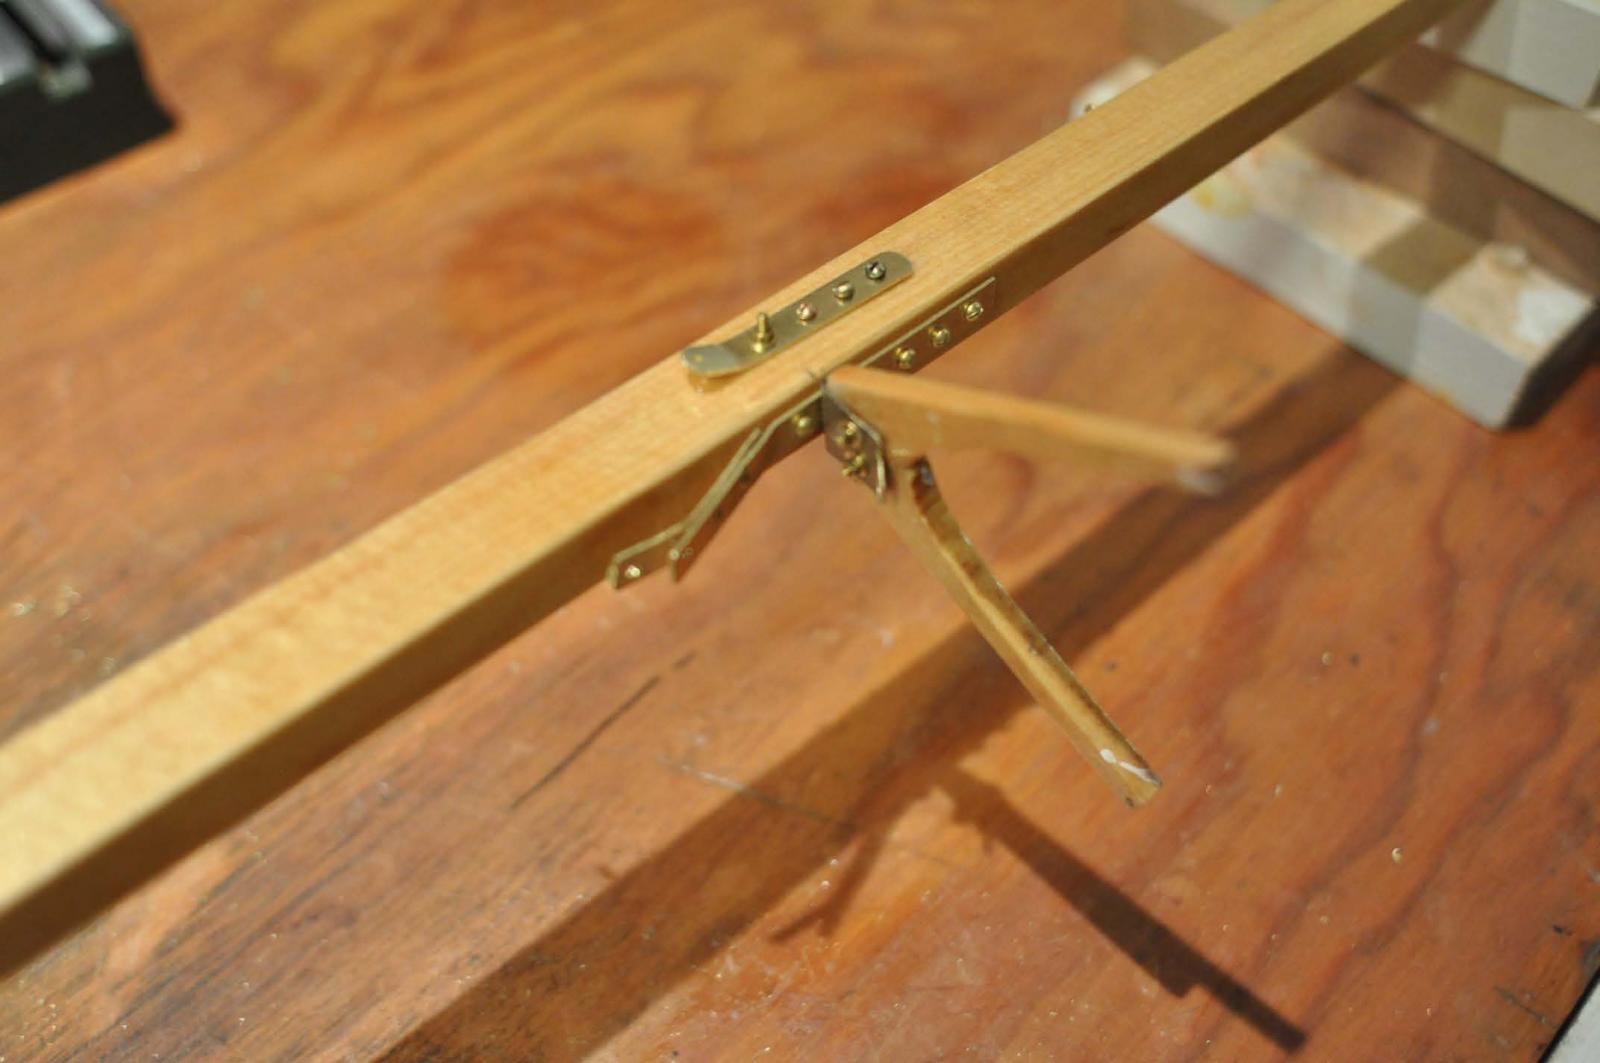
 The mast head is also the same as before
-
 Making these little parts is so easy after all the trial and error of the first time. Building two models at a time has a few benefits.
-
 I wanted the winches to become an easy production this time. I resupplied my washer collection and got to work. Here the base washers with their set pins are in place ready for final glue up.
-
 Here I am turning the head of the posts down to fit inside the base washers and making the barrel tubes. The head being actually screwed in squeezing the barrel between top and bottom make them quite stable.
-
 here in just one sitting, and a few cups of coffee we got all three winches done. The unusual foredeck winch on Bittersweet with a jam cleat on top is not normal and will not come the second hull. Honestly however i wish the base washers were just a bit smaller OD.
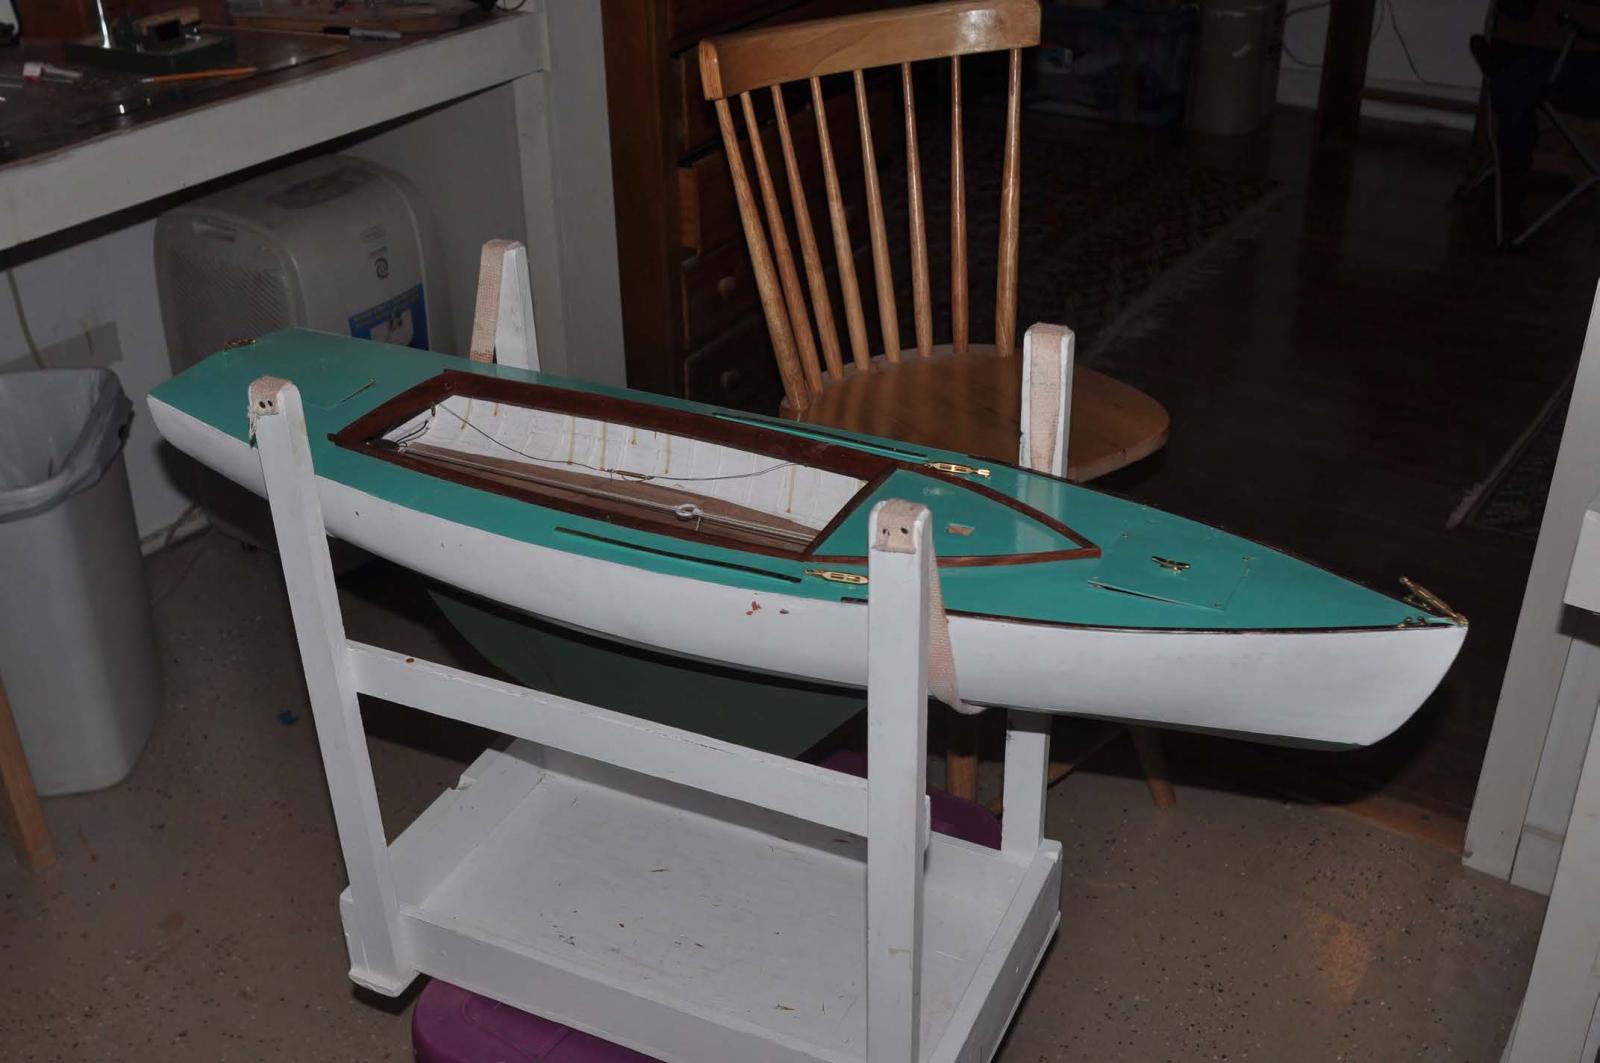
OK we are just about coming out of the shop.
 everything is on except the mahogany rub rails. They have since been installed. The whole hull has been repainted,but a few more touch ups are in order.
I have decided for this second hull to honor the effort sponsored by a long time local family to create a new 2006 design document that allowed them to cold form a new hull to give Eight bells a rebirth. She is shown early in this log and was built at Brooklin yard in Maine. There are articles about her in Wooden Boat magazine.[Issue #199 Nov/Dec 2007 DIGITAL ] There is also a second boat, Osprey, mentioned above and also shown before in this log. It is the second boat built from this design and being built at wooden boat school is also documented.
This model [ hull 2] therefore represented the 2006 design. Please notice the combing connects with the mahogany splash board that curves to a point. This cosmetic change nicely identifies these boats as a rebirth of a great class.
so stand by as in the next post. she gets her name
cheers
- michael mott, Omega1234, druxey and 5 others
-
 8
8
-
-
wow
Michael...this is really great to see. My current large scale build is plywood deck by design. I did a king plank deck once but it was smaller scale bass wood planking. You however are doing a big scale and a great job of it. Thanks for sharing your 'grout' method. a good lesson.
cheers
- cog, Bobstrake, michael mott and 3 others
-
6
-
-
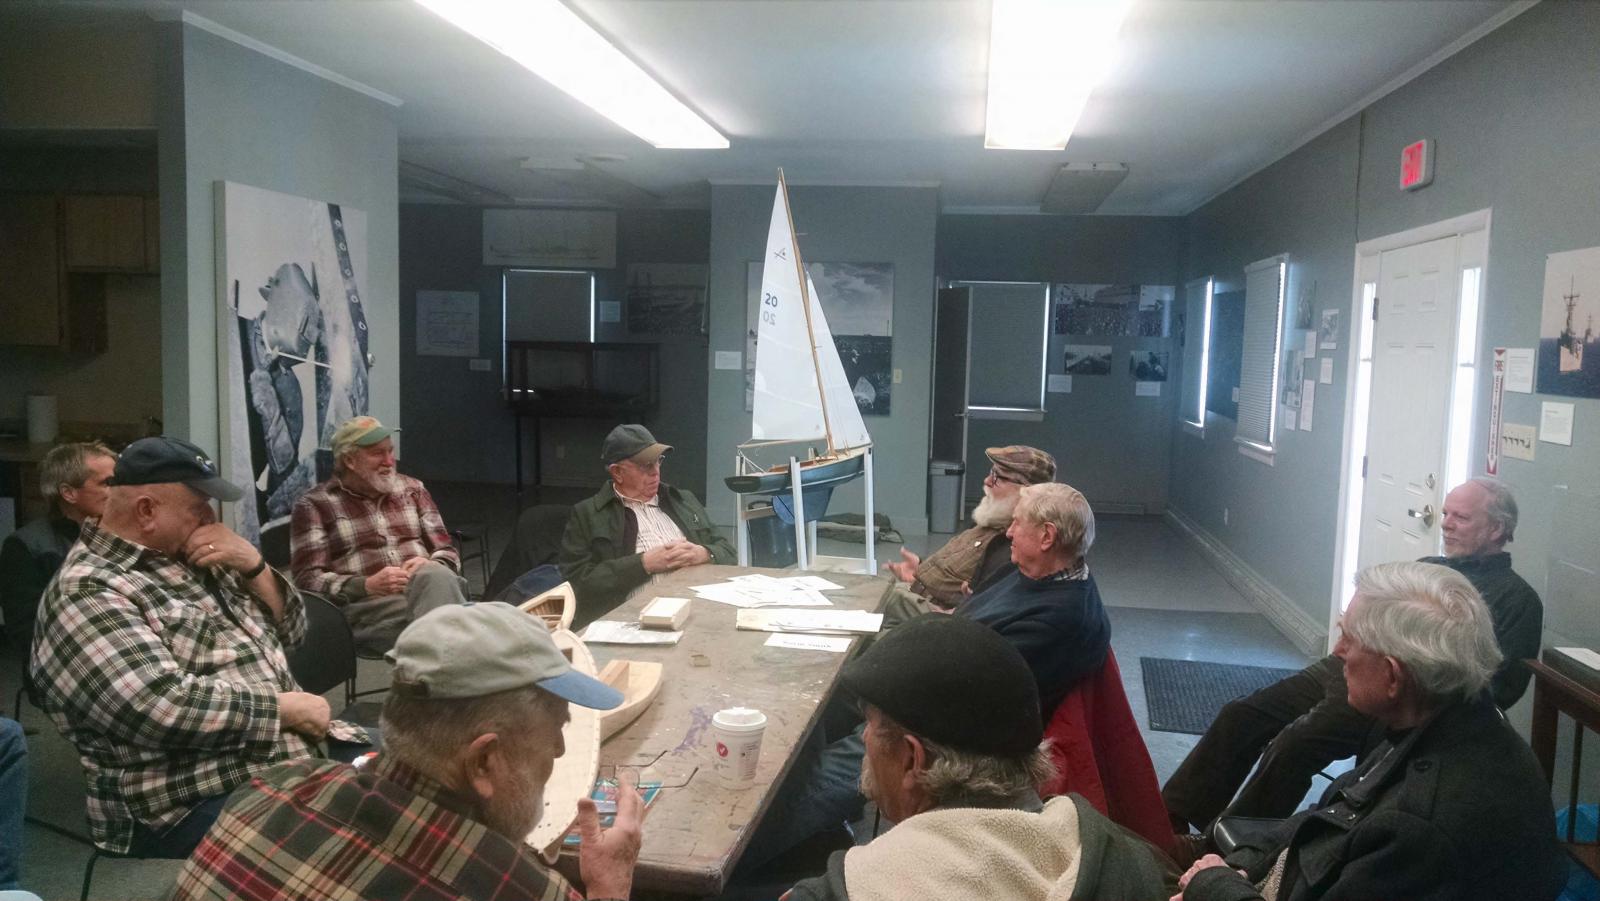
I wanted to share the results of taking Bittersweet Jr to a meeting of like minded modelers to see what they thought about sailing her.
Downeast Shipmodelers Guild
-
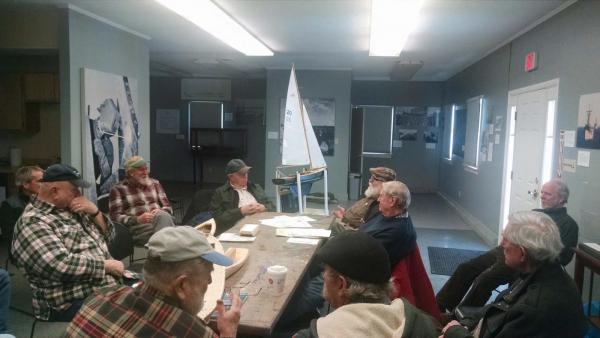 I got to take Bittersweet jr to our monthly meeting of the Downeast Shipmodeler's Guild at Maine Maritime Museum.
It was fun until we got to the point that several guys agreed with the concern that just because she is at scale, the sailing rig and ballast could seriously impact the helm. Unlike a typical pond yacht I can not adjust anything above the deck. The consensus was to make a few different options and sail them before " finishing them. another concern is I may need to add a stiffener to the foot of the jib, perhaps plexiglass.
Oh well more to think about.
cheers
-
-
Bob
thanks for your clarification on a need to consider both the water resistance and the area of the keel.[ plus added sailing keel and maybe the rudder] for this size boat. This should affect the weather / lee helm issues. I know this is quicksand...so
On this boat I aligned the center of the keel bulb with the center of displacement to keep the boat flat. I am focusing the weight on the displacement.
I know that the inch pounds of moment from the 5 pound lead keel at say 11 inches down is what will keep us upright. However the sailing keel that i have now will clearly move the CLP forward from the real hull design. I had hoped that in this size i could not worry about it. Your advise is well timed because I have not made these parts yet. I may need to make the sailing keel narrower or further back with just the bulb projected forward. I need to think more about this. thanks for the wake up call
PS thuis may have contributed to the lee helm of the big Charles Notman schooner last summer too
cheers
jon
cheers
-
Well it snowed again all day, so we had time to do a few things. Now that hull one is done cosmetically, I need to focus on sailing. Some of this effort I am comfortable with and some I am on new ground.
working the real boat
-
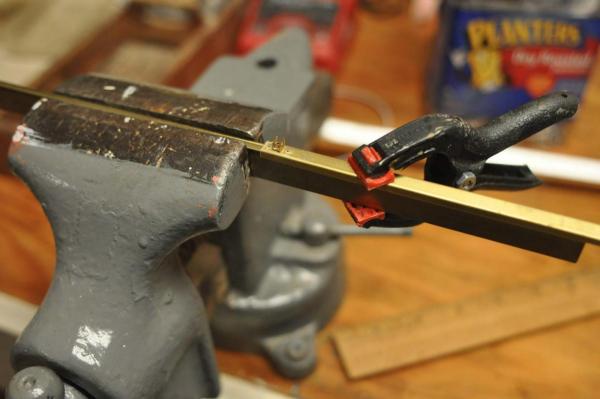
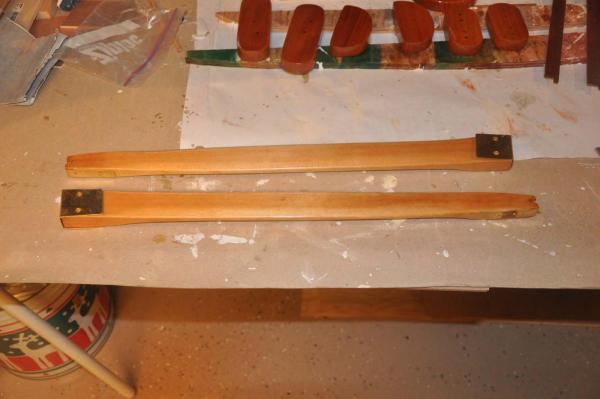 I finished the new spreaders and got them up to David. I gave up on the design of 1/16" by one inch rivets and put screws in to hold the strap at the shroud end. David laughed and said if the boat builders made models they all would used little screws. The shroud gets moused when set up and then all remains as is. I left the big clips without drilling the wood. That all gets set at 5 deg up and 10 deg back, which is easier to do with shroud supporting it during installation. I look forward to that as it also means spring will be here.
working the keel and ballast
-
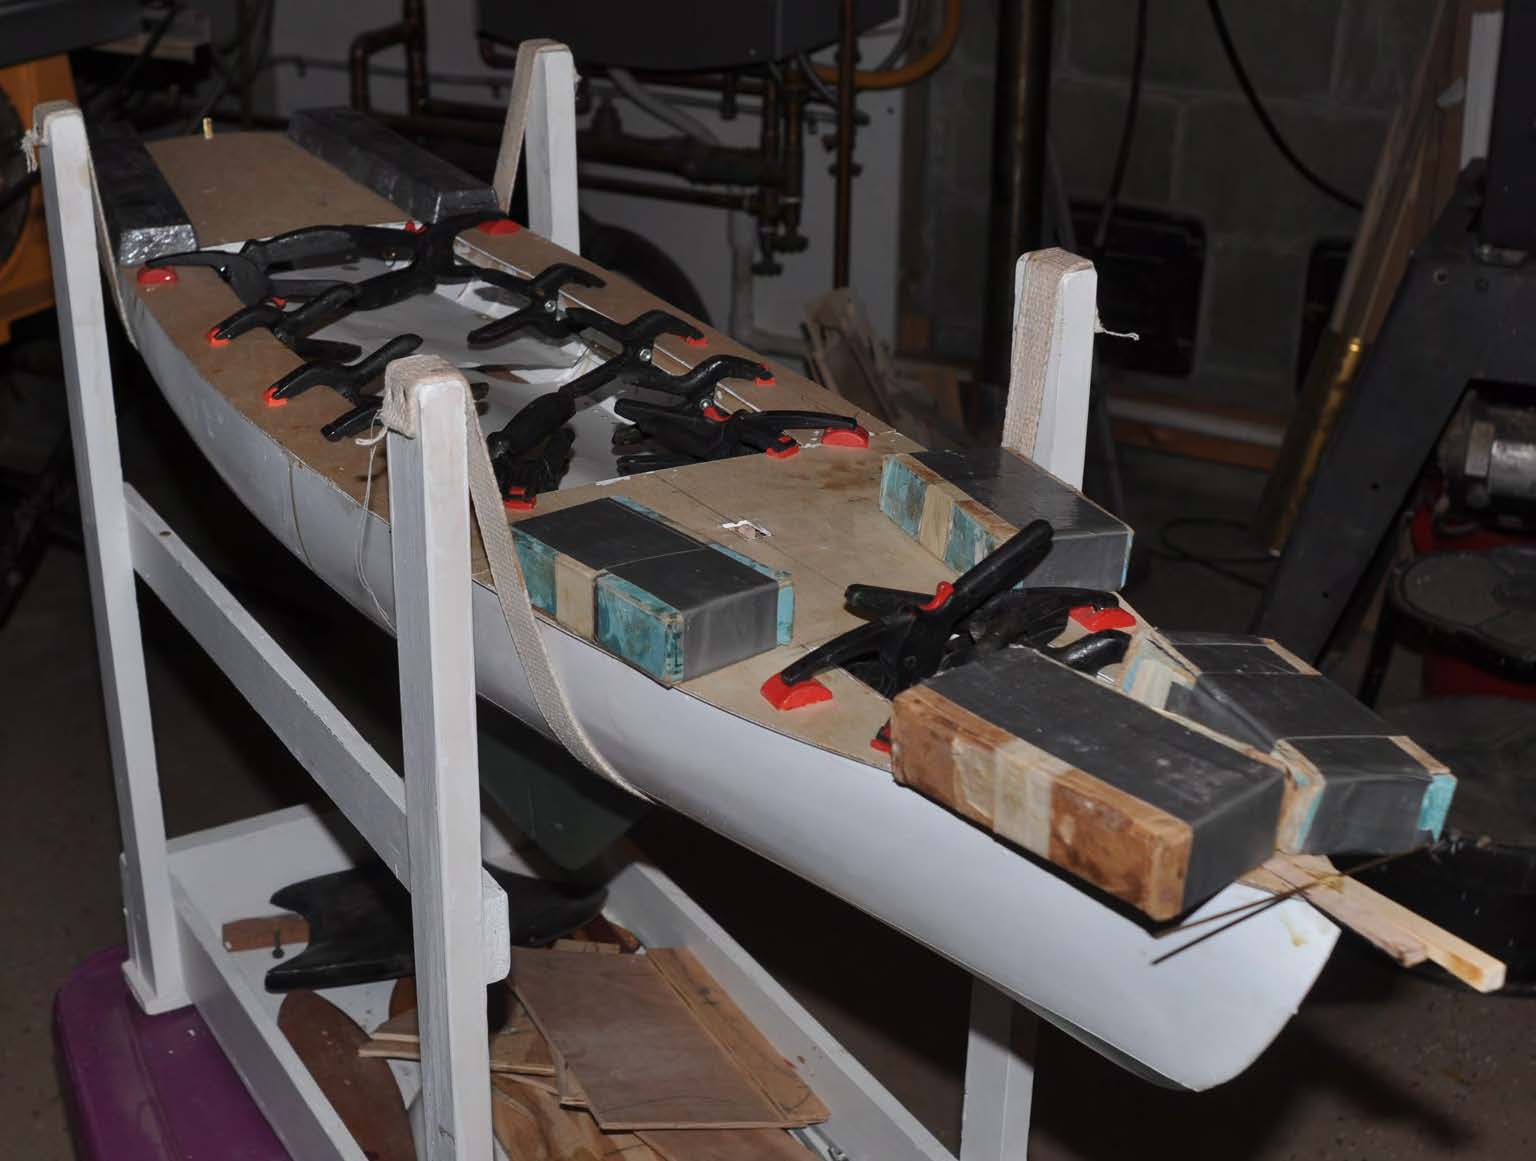
 I previously showed in the log a trial using the 5 pound [ per side] bulbs for the bigger Marblehead boats on Bittersweet. Now a need to decide how much weight and get ready for the casting. The boat calculates in CAD to displace about 8 pounds of water. That is half of a Marblehead, but the Marblehead is only 8 inches longer and 25% more sail area. I settled on roughly 2.5 + [ per side] calculated from cad and then added a little more wood to the mold in the photo. I figure I can file it down if I need. It also is smaller and a little better than the earlier mock up.
- Unfortunately though the center of effort [COE] over the center of gravity [cg] of the bulb puts the whole sailing keel forward. I am not sure calculation of the area of the keel vs. the COE applies at this small size. The keel being forward is not surprising considering the position of the lead in the real keel is also forward . If I simply copied the lead keel it would be to little and too high [ 5 inches] to create much resistance to the wind. I feel much better getting the " moment arm" down to the 11.5 inches equal to the marbleheads. With an open cockpit we do not want to go too far over.
too much info but just to share we are going into this aspect of design with an open mind.
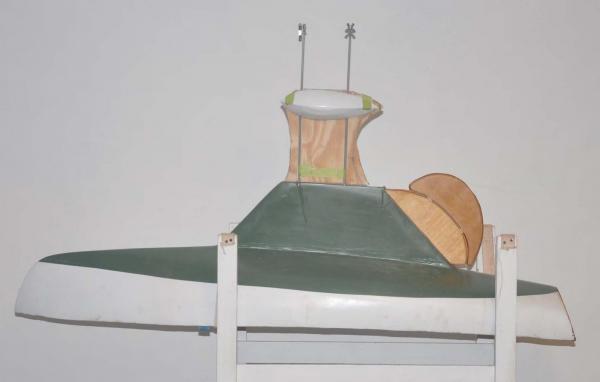
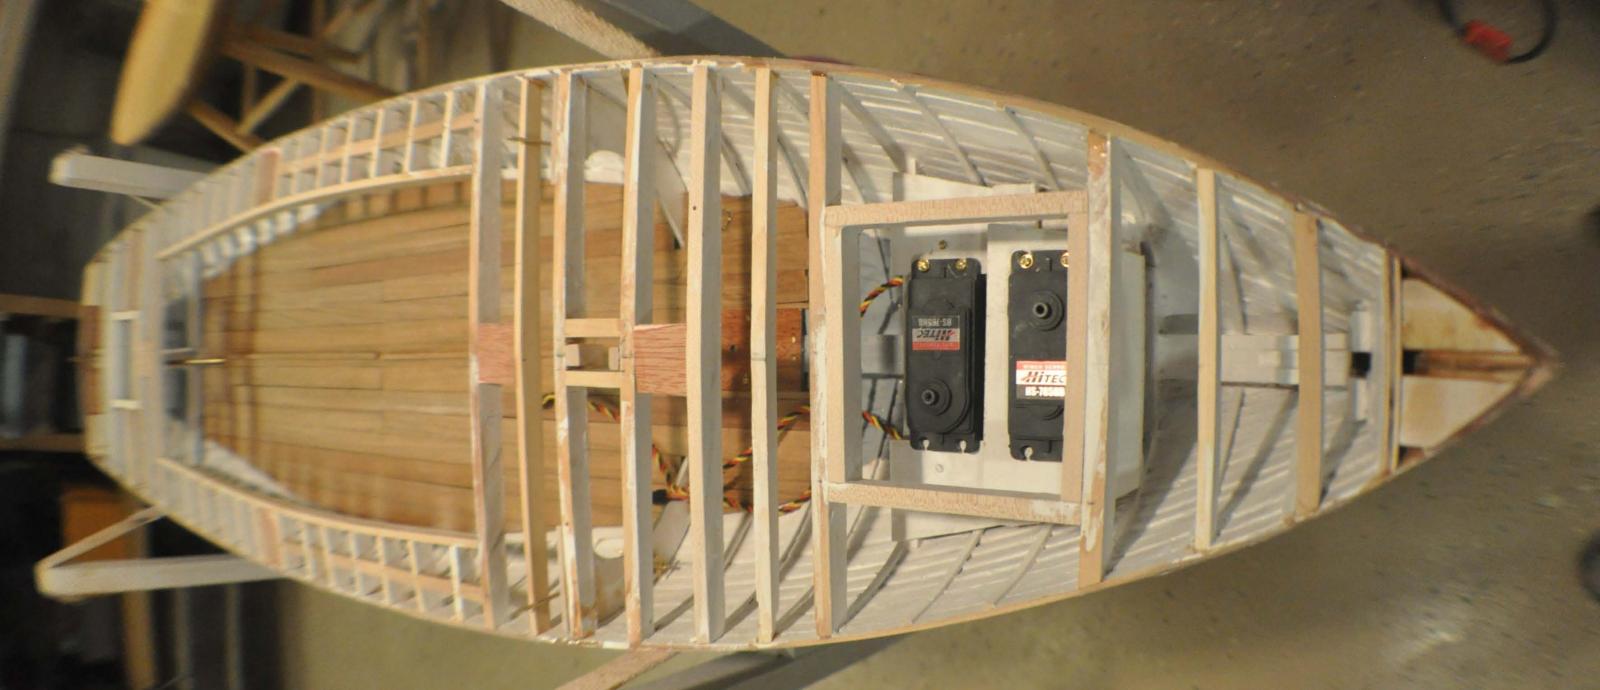
Now to the servos. they work but not very well in Bittersweet junior. My friend Tom the guru suggested changing the rudder to a see saw to make the pull more direct. So I am determined to get the second hull right before digging into the first boat to make revisions.
-
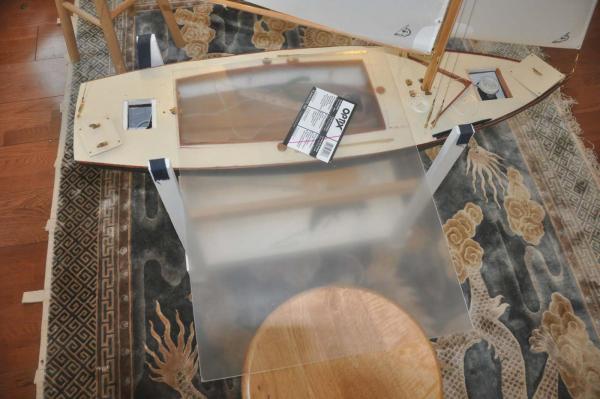
 I decided to put in the sole before the deck this time. I hope I don't drip on the teak with the epoxy glue or paint.
-
 this was the first attempted fix. I changed the elevation of the 2 servos, one low one high, so the rudder arm could swing and the drum lines go over.
in really working the servos today I could not get it to work very well. I needed to extend the rudder arms to get more pull. That meant reversing and putting the rudder on top .
-
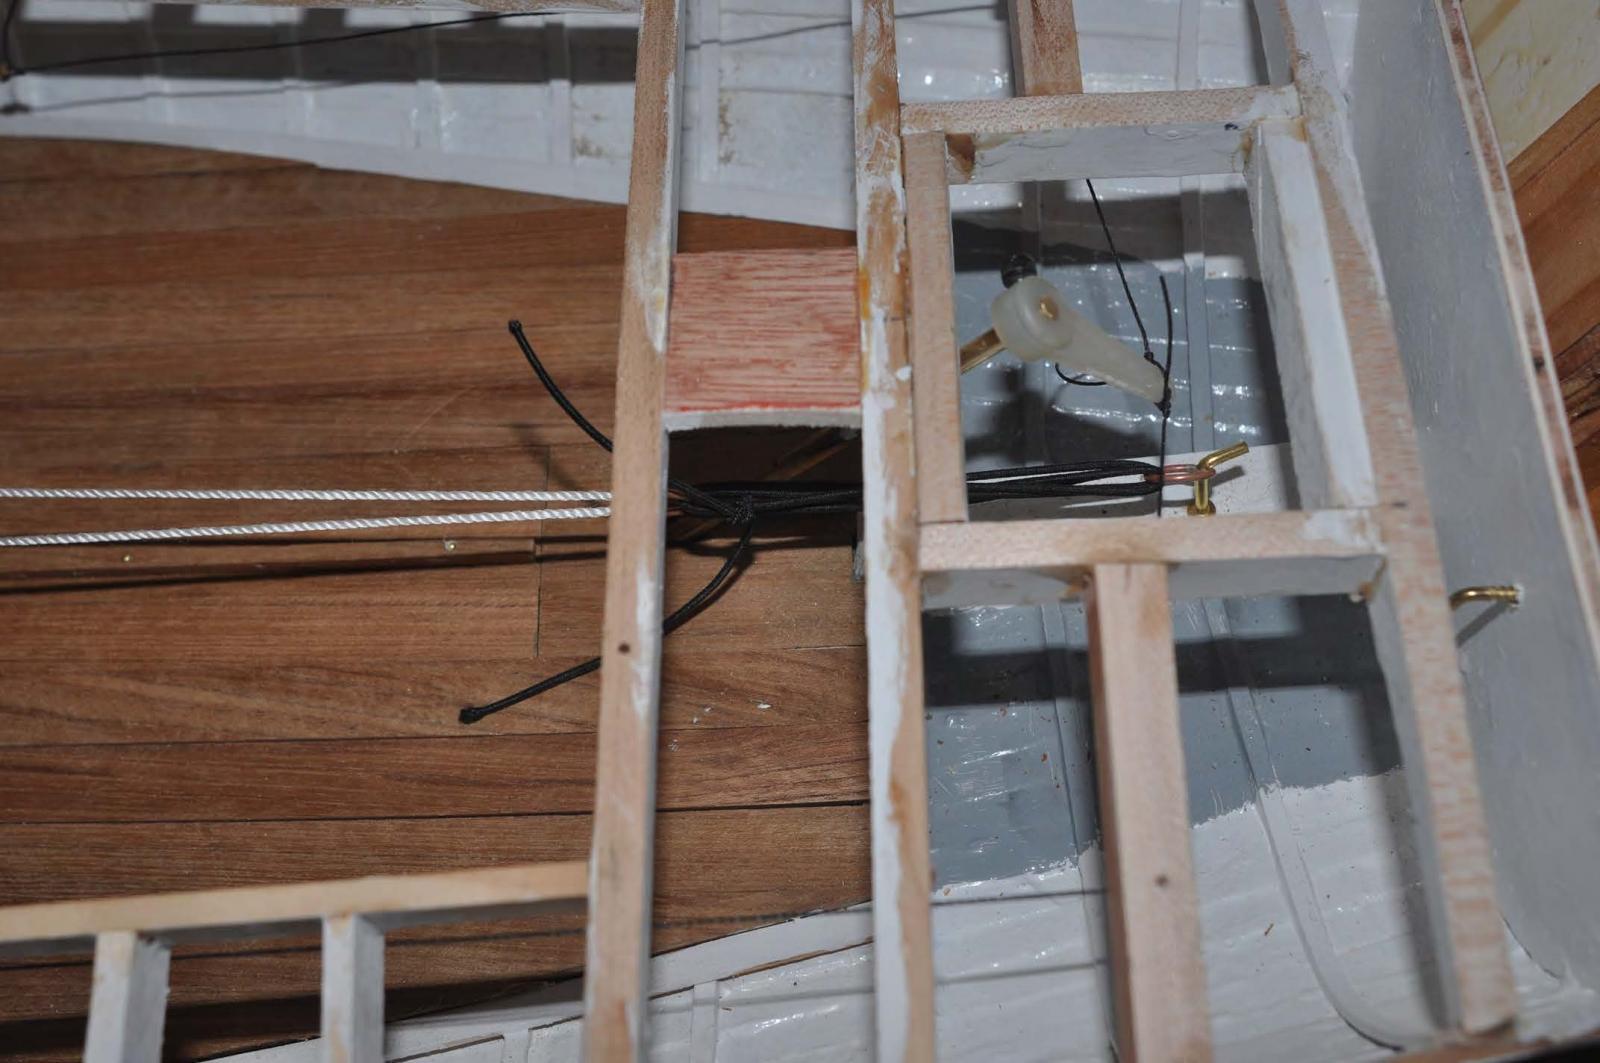
 after several tries I finally figured this out. Here I have put the sail drum low and back and the rudder arms extended and raised . it works yippee
-
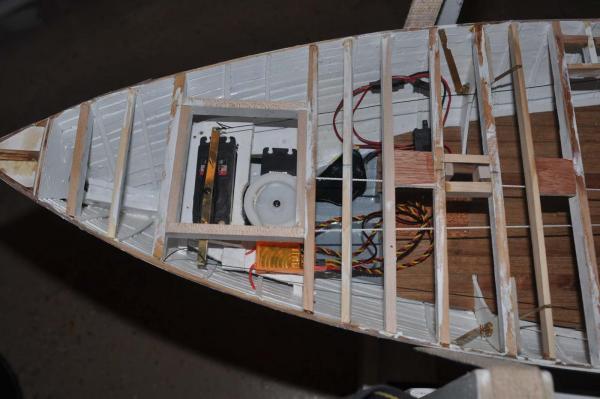
 the sail loop works because I upgraded the bungee cord into a triple shock cord. I also got rid of the little pulleys that kept hanging up and the forward fair lead. I soldered two rings......it took four tries to get two rings and added a hook easy to access through the rudder hatch.
-
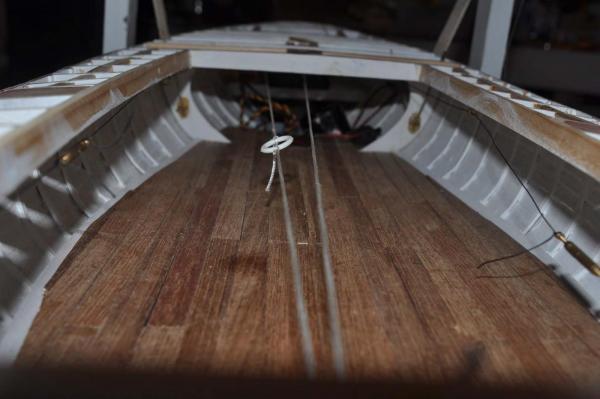 here we see the sail loop over the complete sole/ nice and simple....I hope
A little more history
I found some more images of old Bittersweet
-
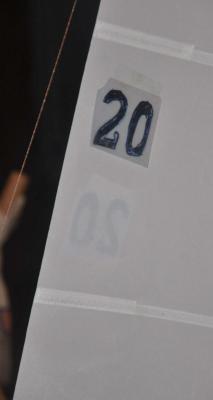
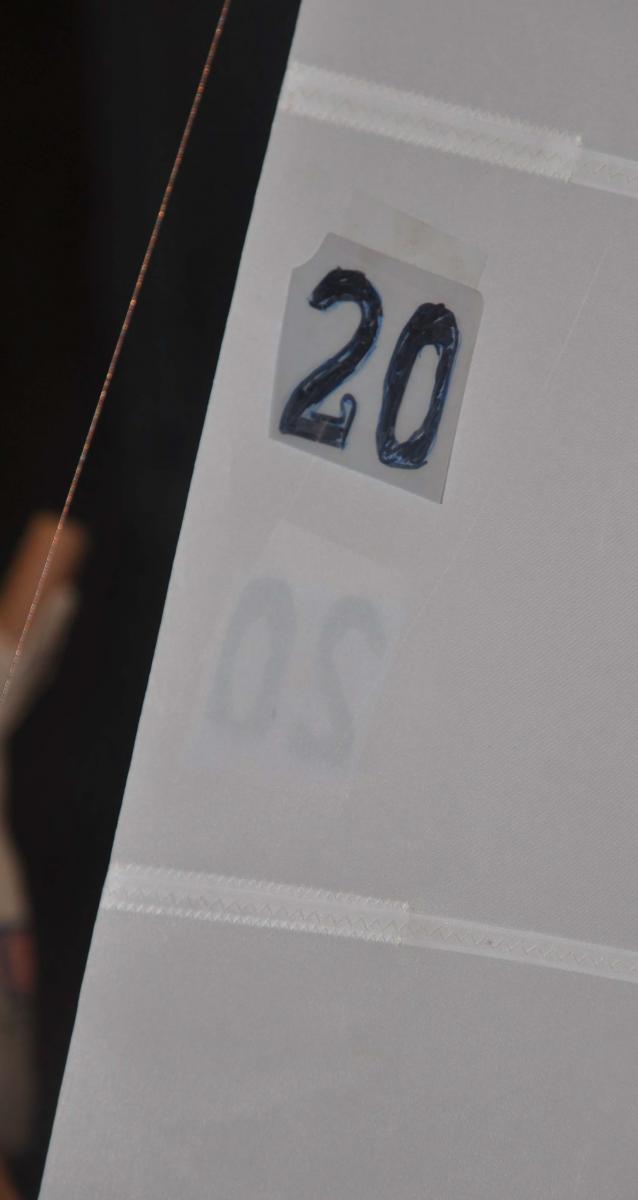
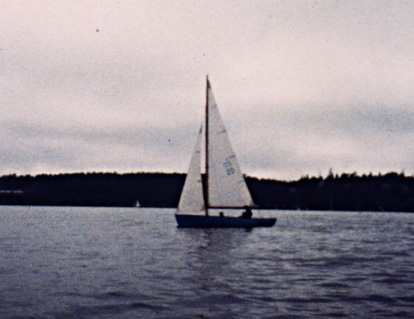 here we see sail number 20 sailing by. the link does not clearly identify the name but the number is the number.
-
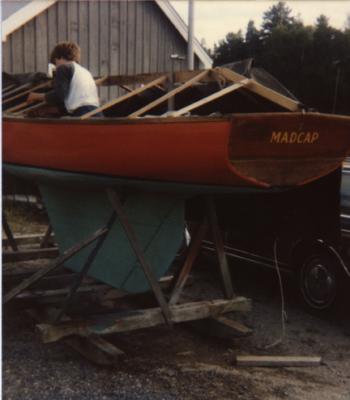 here we see MADCAP One of Bittersweet's earlier names. I am excited because that may be a mahogany transom....
- mtaylor, popeye the sailor, pete48 and 1 other
-
4
-
-
-
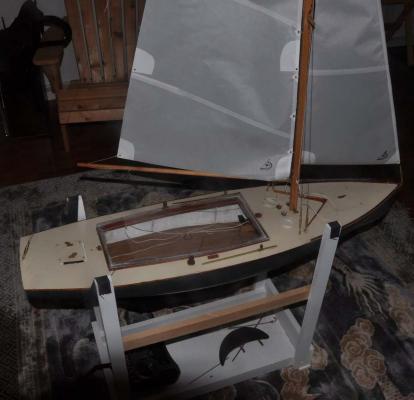
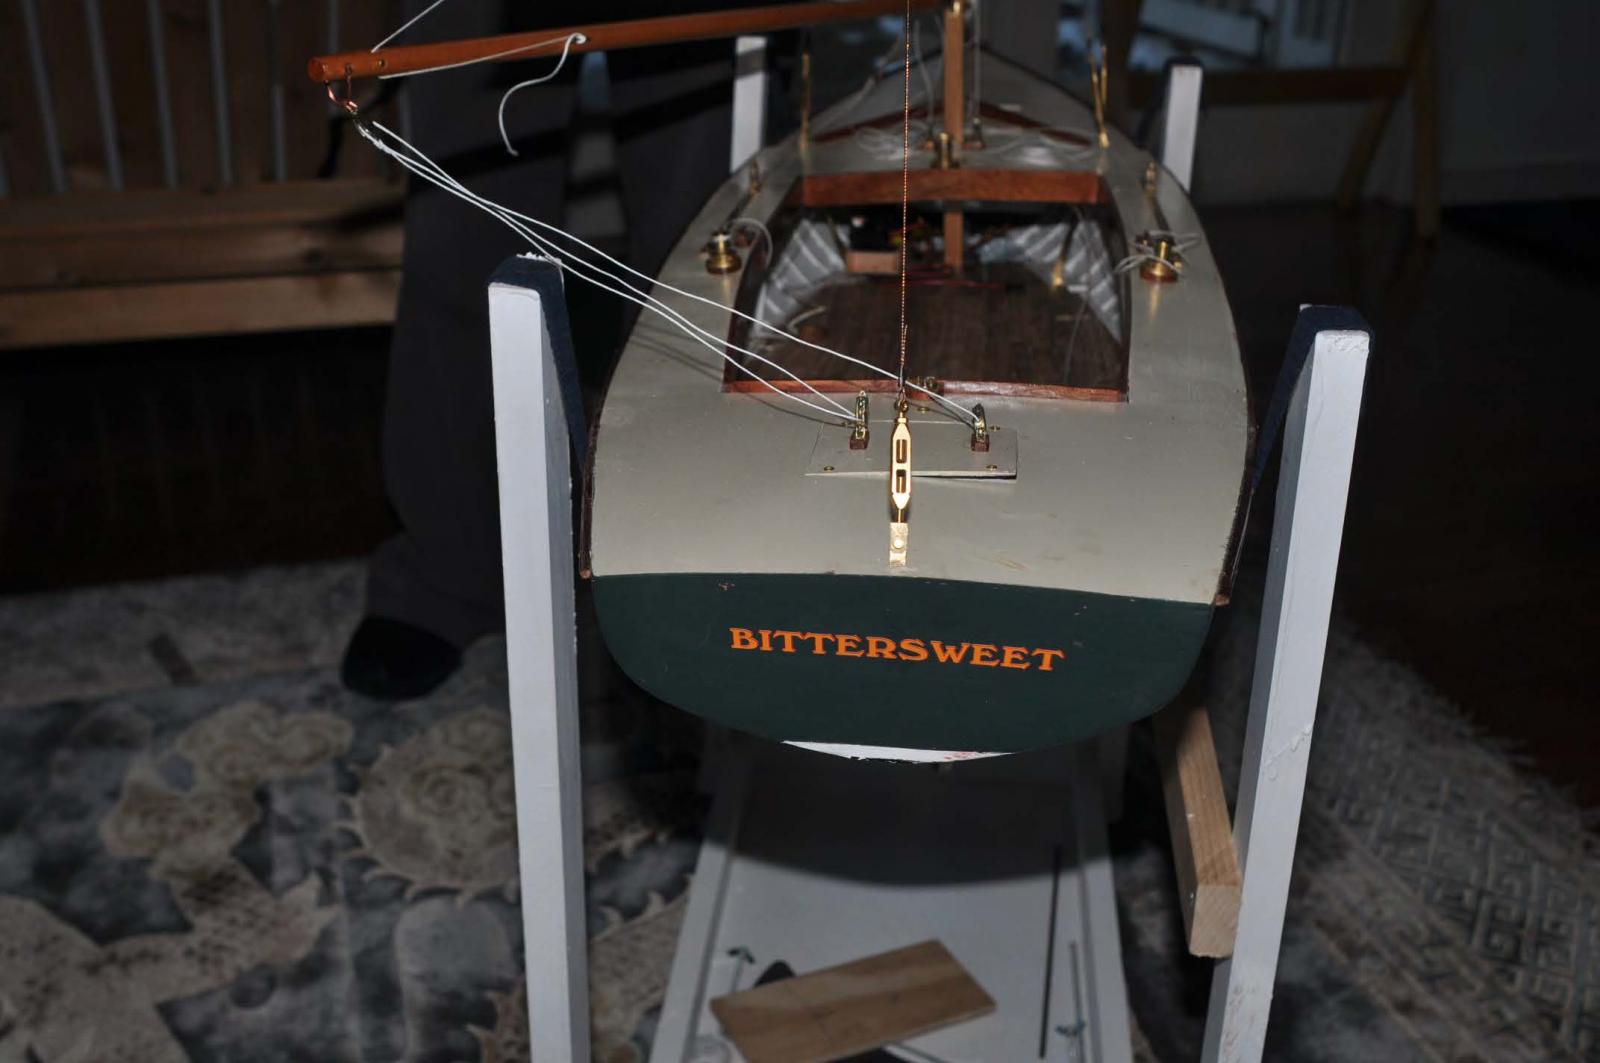
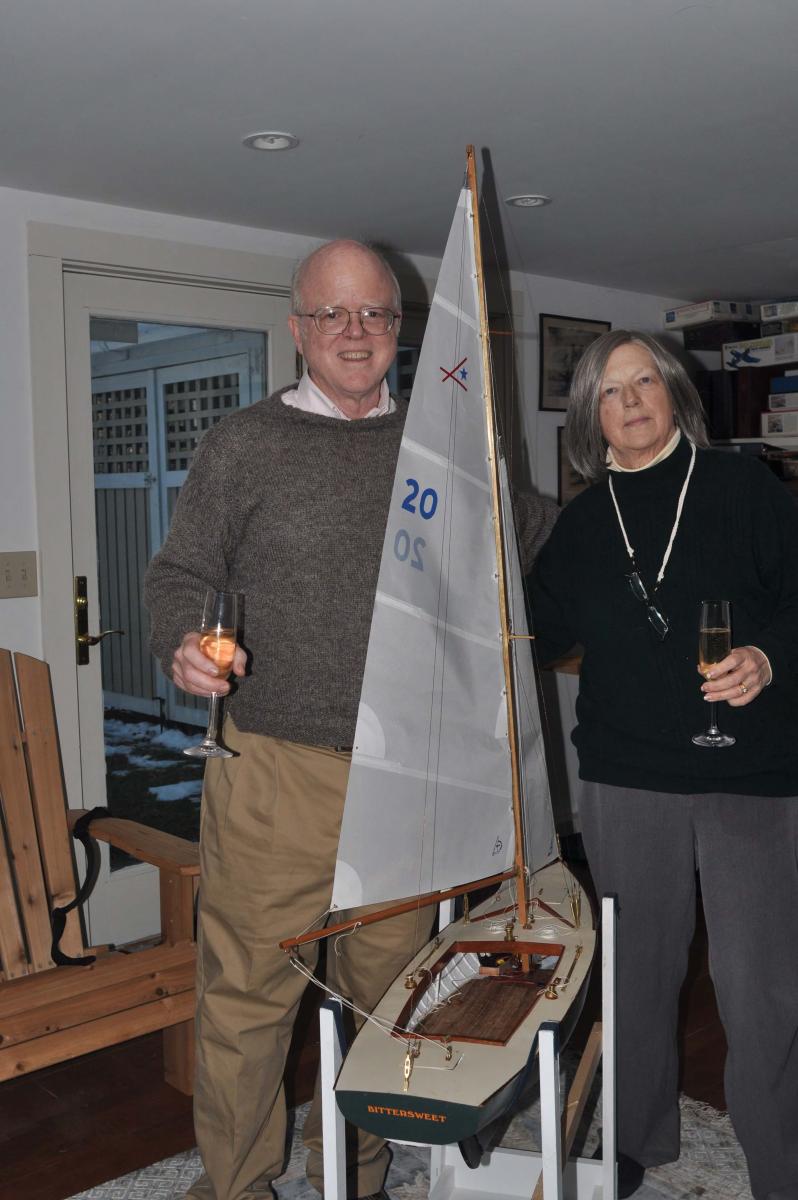
Yesterday was eventful. after a busy day out we came home and Christened Bittersweet Jr. I actually got the rear admiral and friends to visit the sail loft.
-
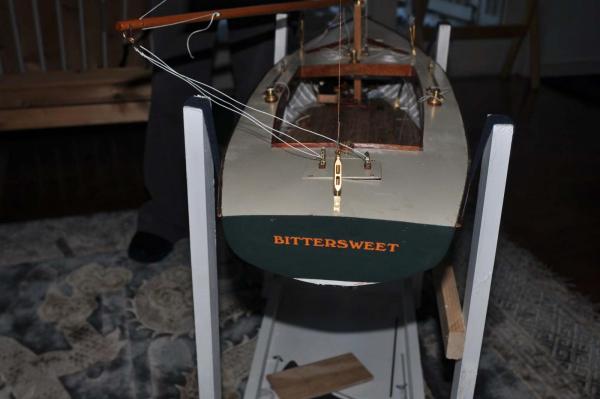 after much discussion with David and color design with the boss lady we settled on Internet ordered gold with red out lined for naming of Bittersweet. They sent us the full size for the real boat and scaled down to fit on the model. With a little ceremony and drum role she is named....
-
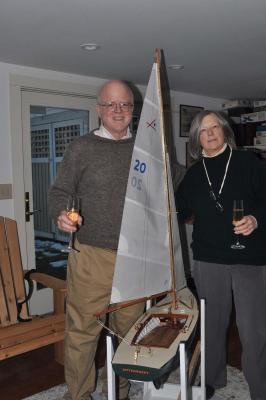 of course it's a great excuse to open some bubbly.
one down....though more work on the sailing controls and ballast etc.. and one to go
cheers
jond
-
-
-
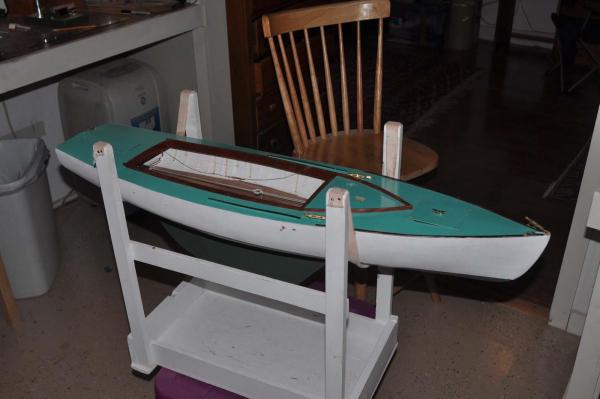
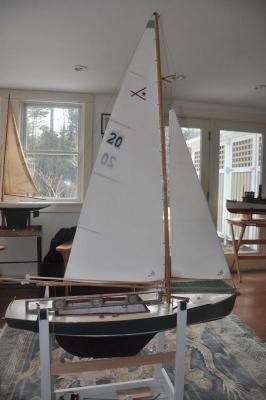
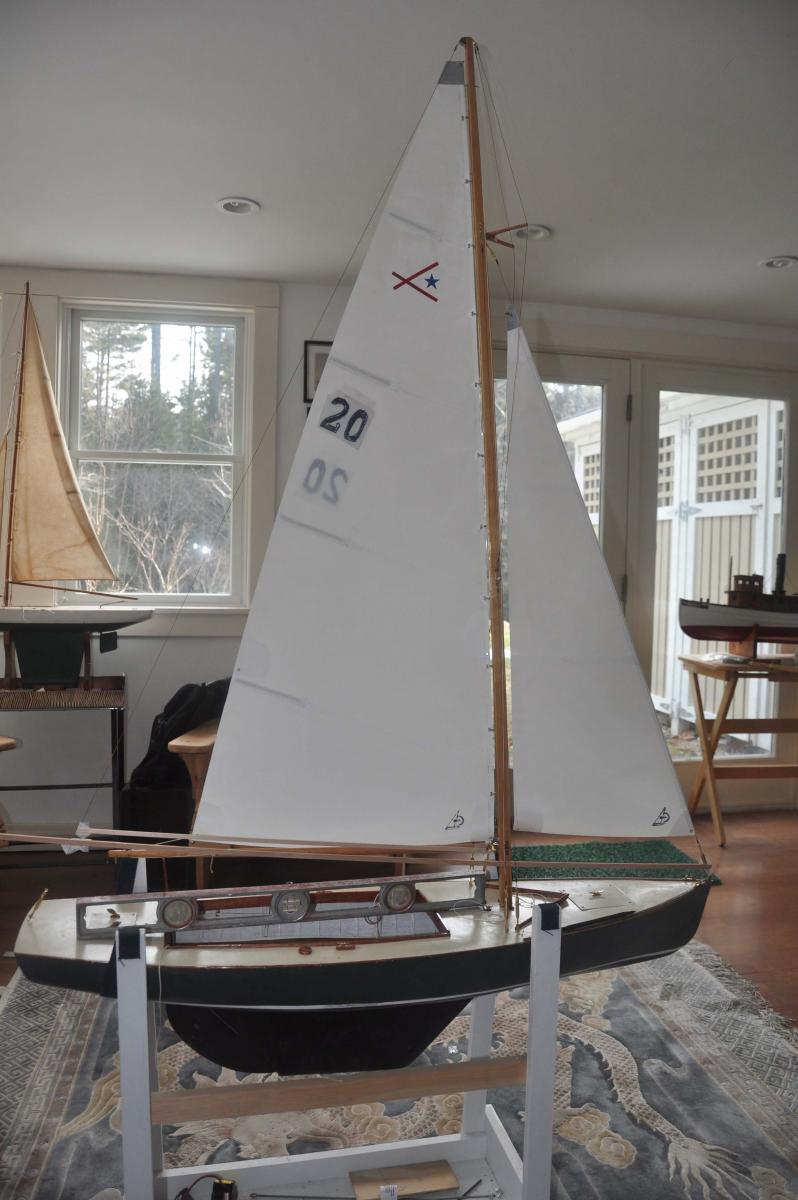
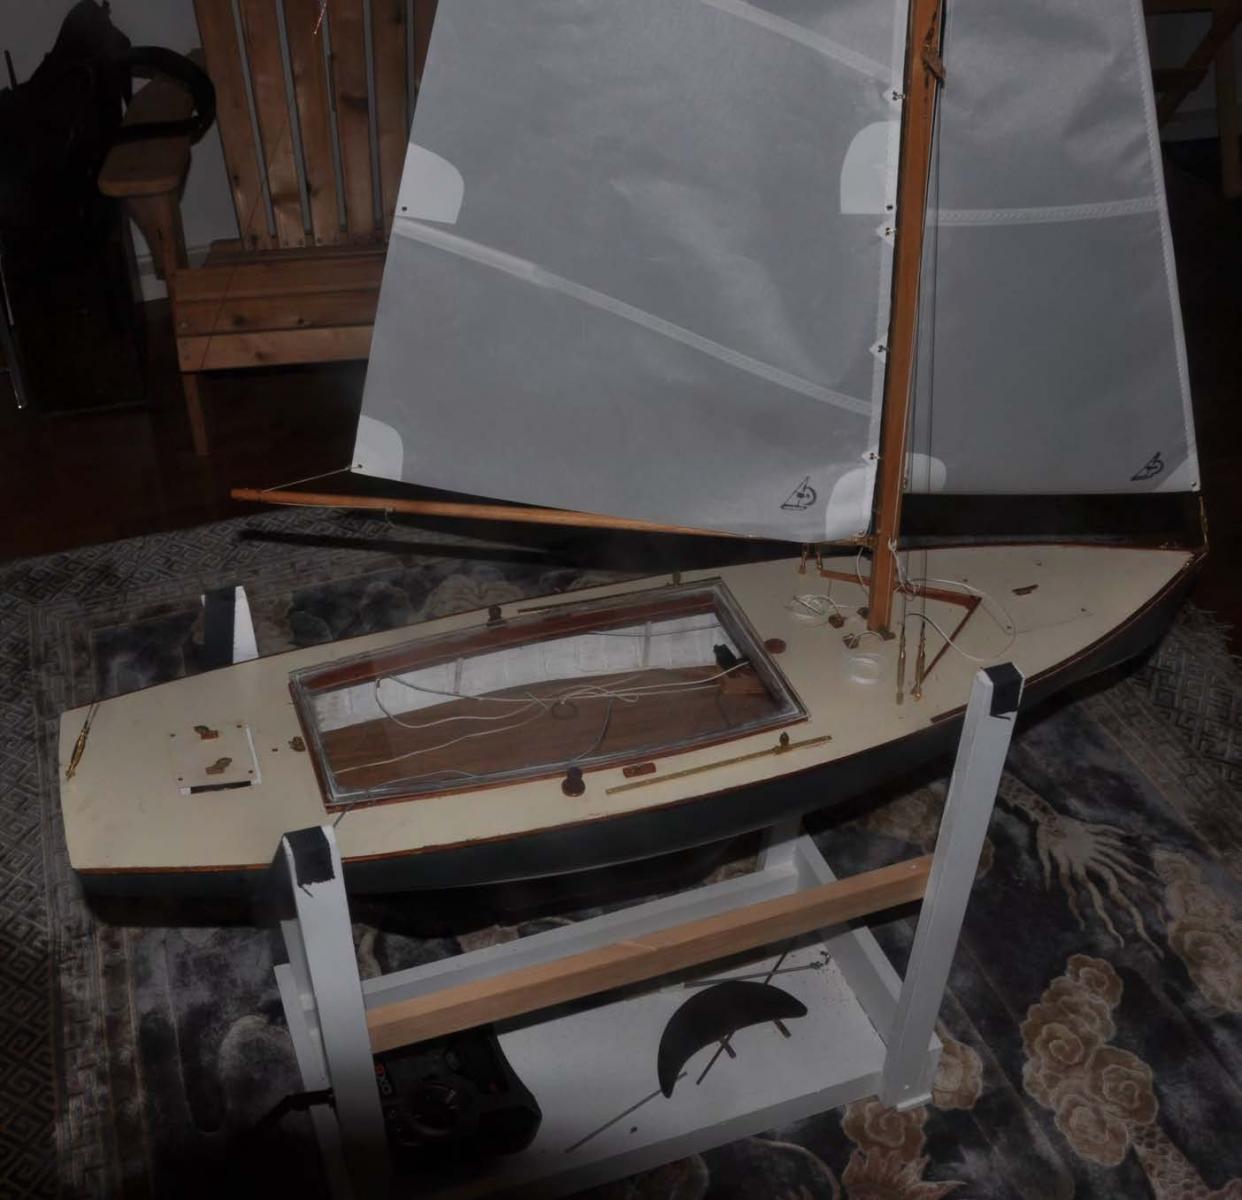
Hi all. I had hoped for a sunny day to take some sail and rigging pictures but it snowed. I went and found a screw on fish eye attachment and had some fun making some images. I am not very good at it and being inside is a bumbler. So here we go
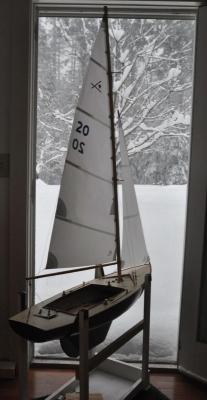 Here is bittersweet junior aching to get outside. She thinks the pond is near. Now lets look at the details and see how they came out
-
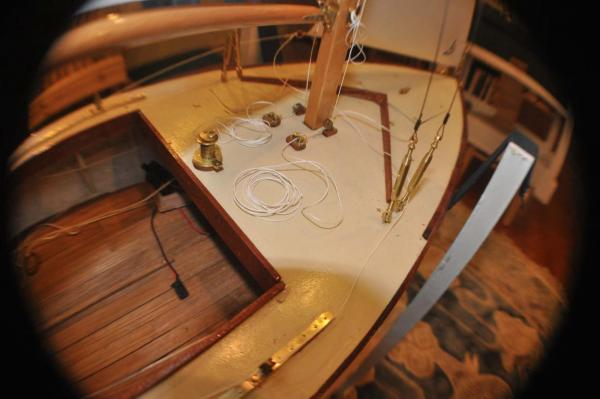 If we were going for a sail we would find this view of the foredeck. The main and jib halyards are made to the cam cleats. the jib sheets are run through the slide blocks on the tracks and currently fed to the side winches. The center winch is available to allow forward looking crew to manage the jib from there. The jib sheets are hooked to the sail so they can be removed for RC sailing.
-
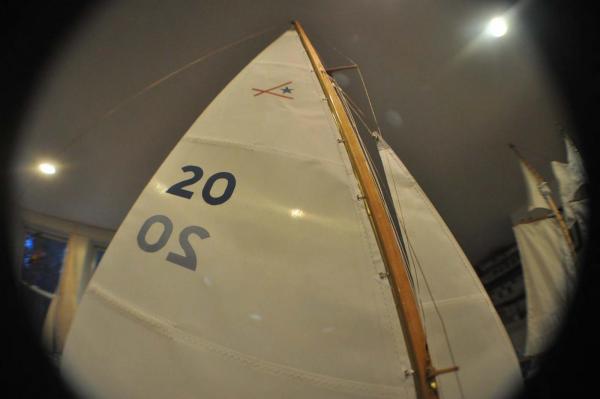 If we look up to trim the sails this could be our view. We can enjoy our new numbers....oh for blue sky!!!
-
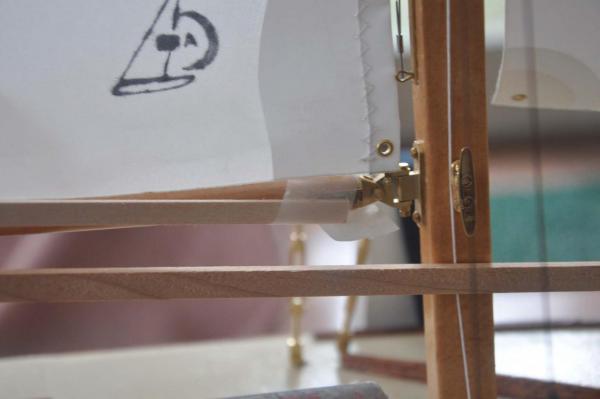
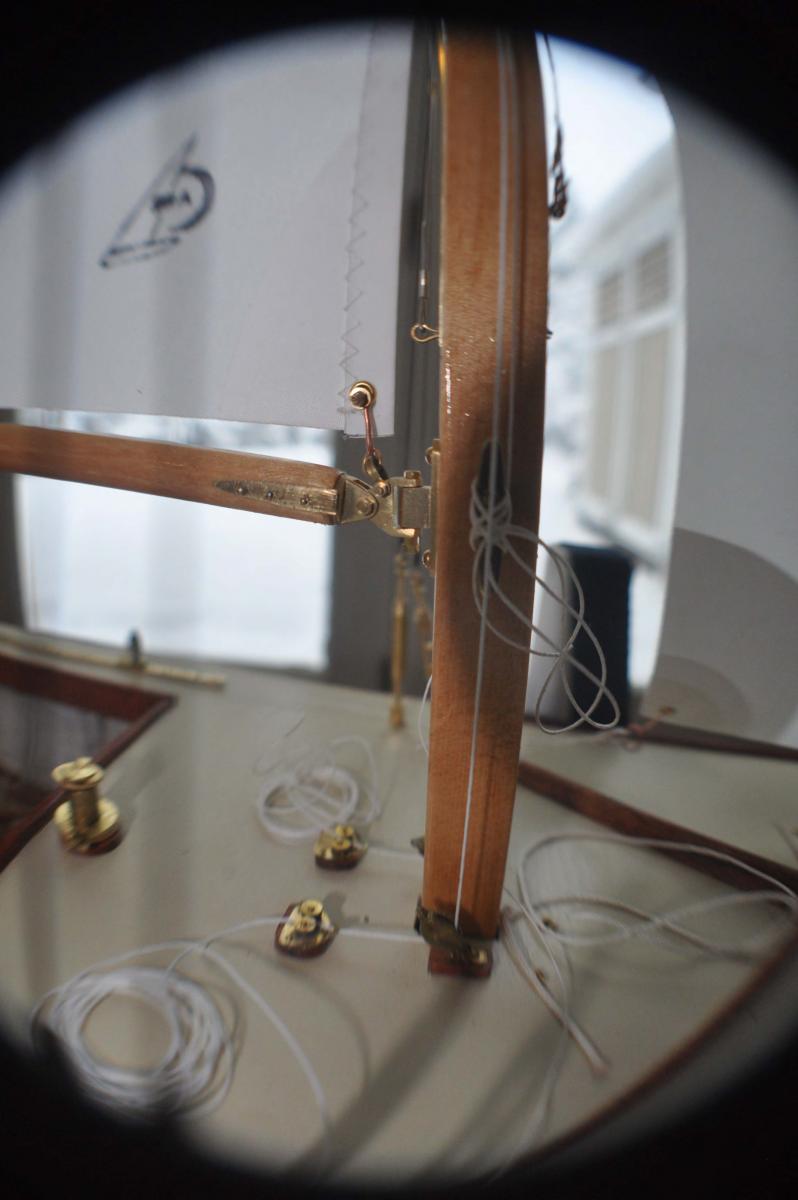
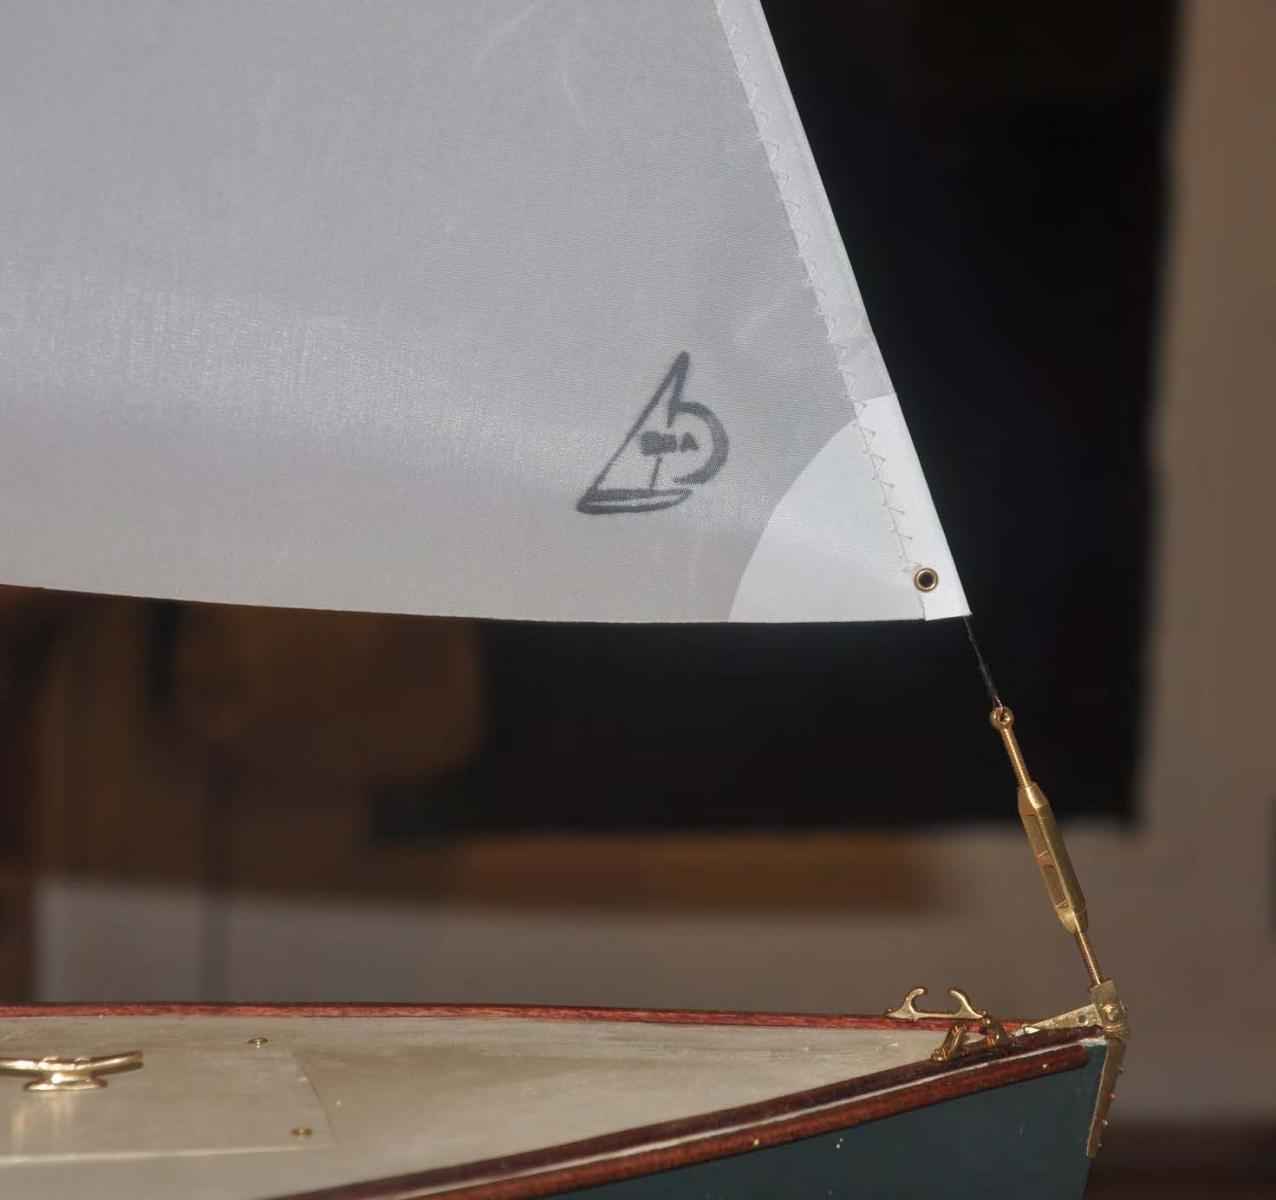
 Here is the new sail head. Rod really cut it down, so it fits nicely under the back stay.
-
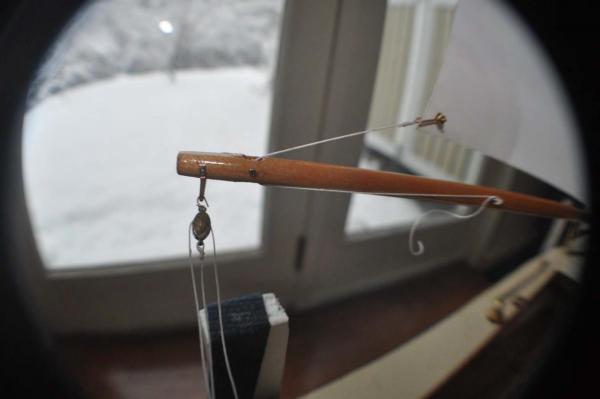 Here is the clew. You can see it rigged with an out-haul through the sheave to a small cleat on the boom. Also note the main sheet block is hooked to the bale, so we can display with all the right rigging. It then comes off for RC sailing.
-
 Here ithe main tack. Normally the tack grommet fits in the shackle attached to the goose neck. In making these RC racing sails the grommet is roughly 1/4 or so too far away. I added a shackle with a rind to simulate a swivel.
-
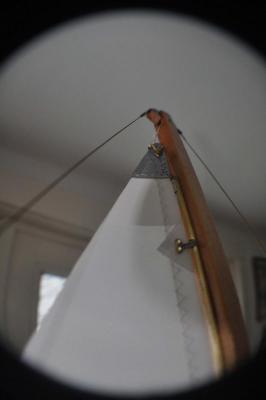
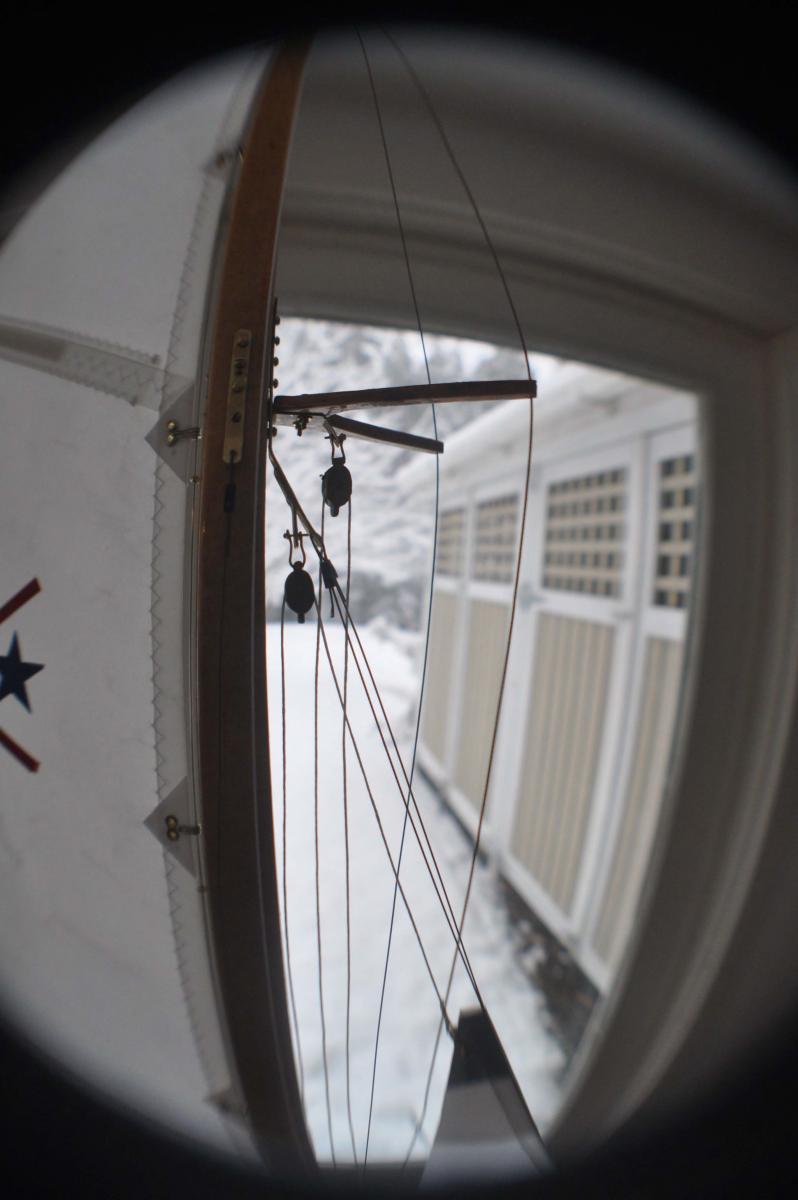
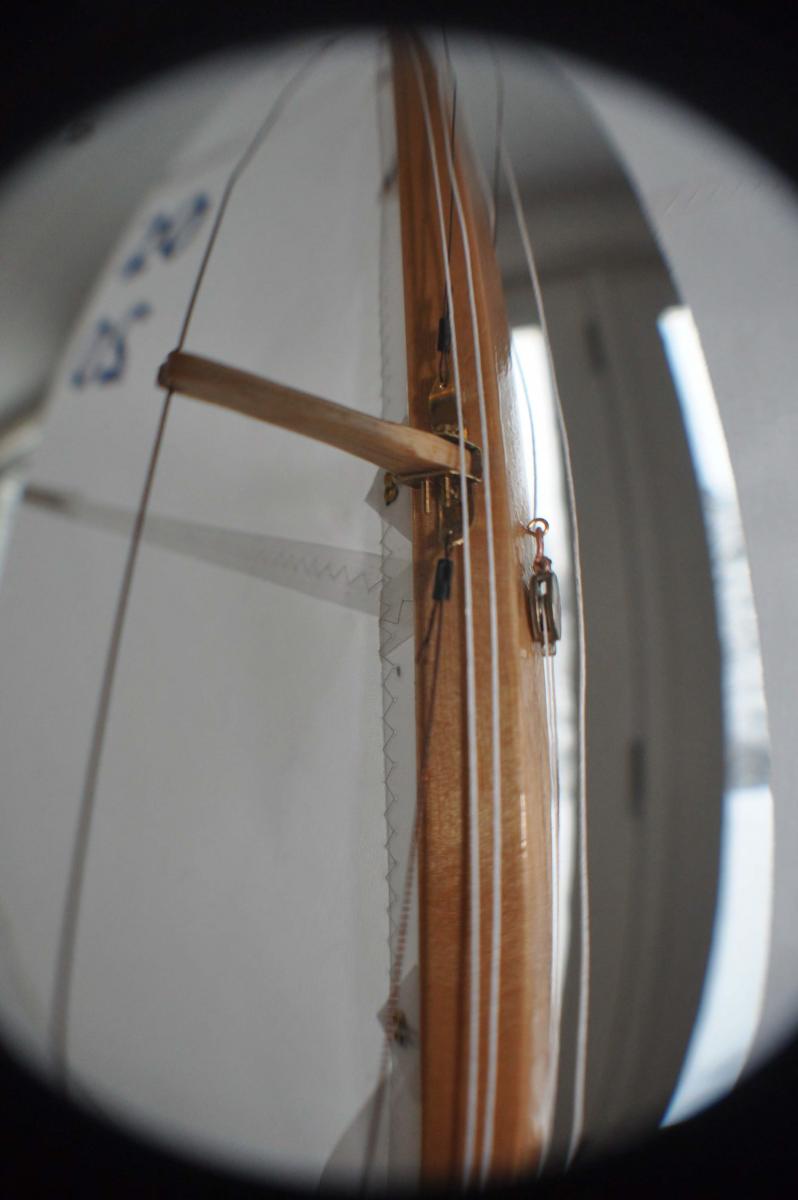
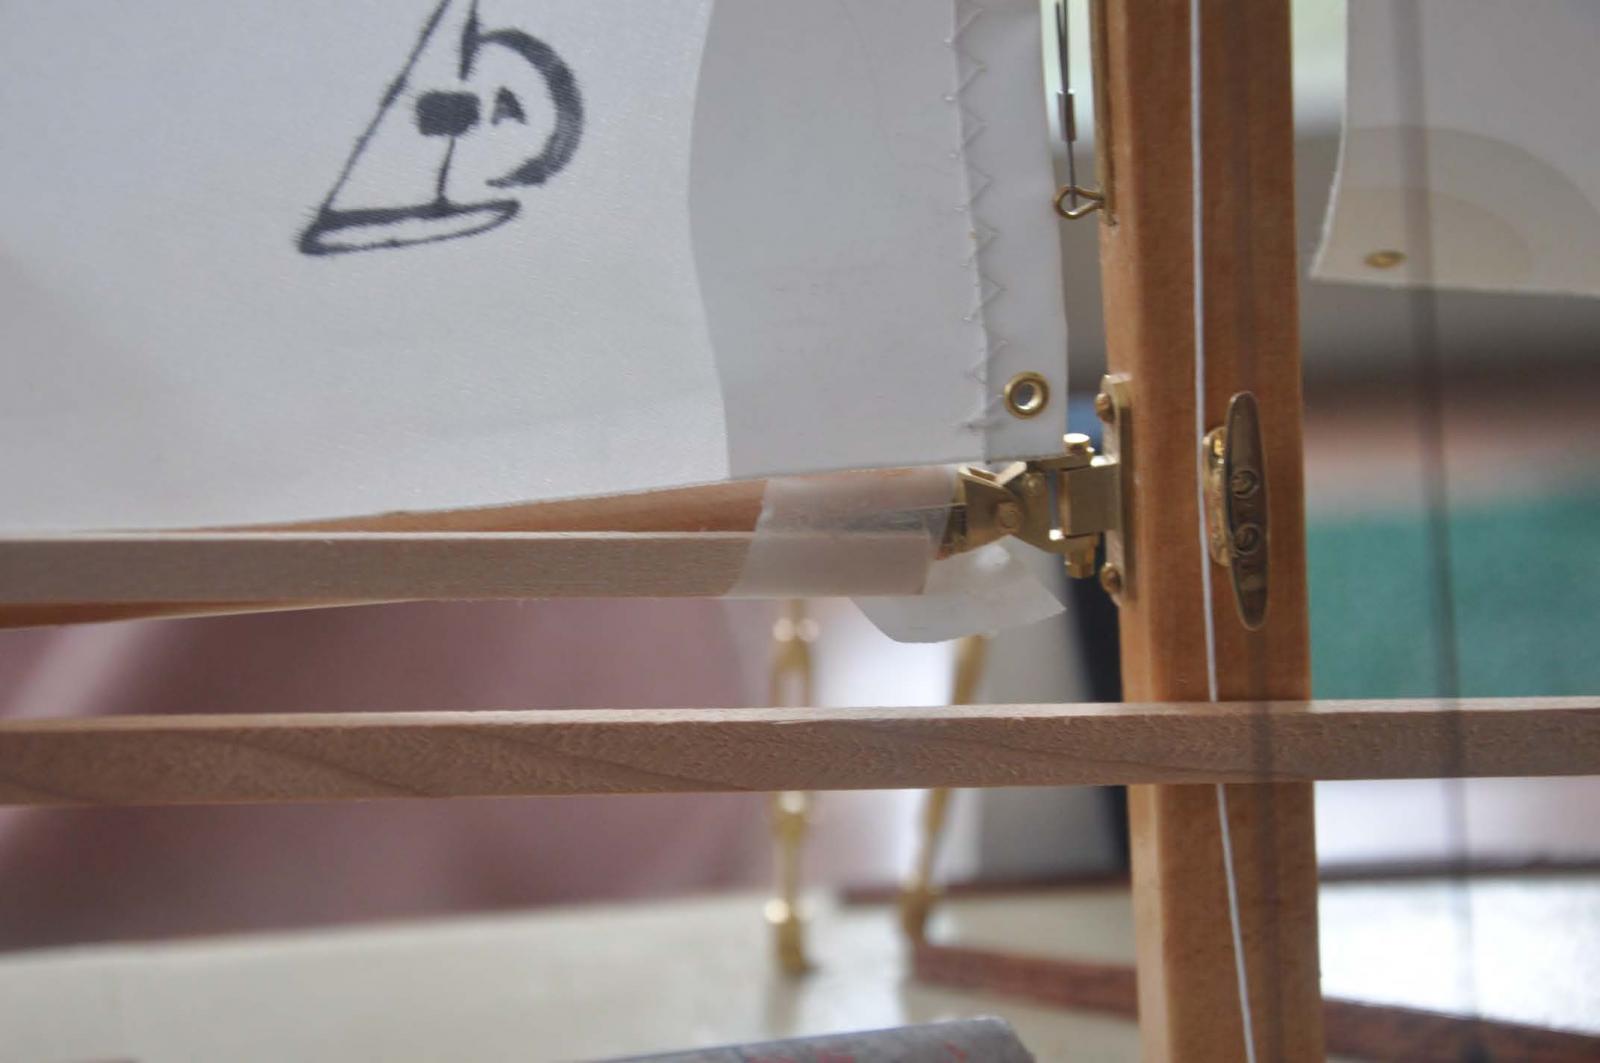
 Here is the upper jumper strut with connections for both forward sails. the Jib halyard is below and the spinnaker halyard rigged above the fore stay. the spinnaker halyard is made fast to the starboard mast cleat. To solve the previous problem of the jib riding above the turnbuckle, we have added a separate jack stay. Note there are two stays coming off the fitting. one is forward of the and the other rides inside the luff of the jib.
-
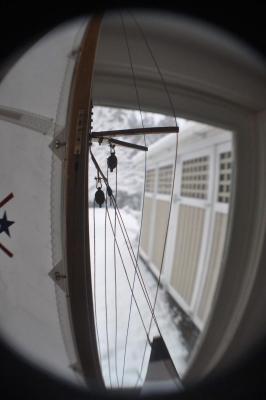
 Here we have the main spreader. The line forward of it is the spinnaker topping lift. it is lighter than other and the shackled is hooked under and line made fast to the port side mast cleat.
-
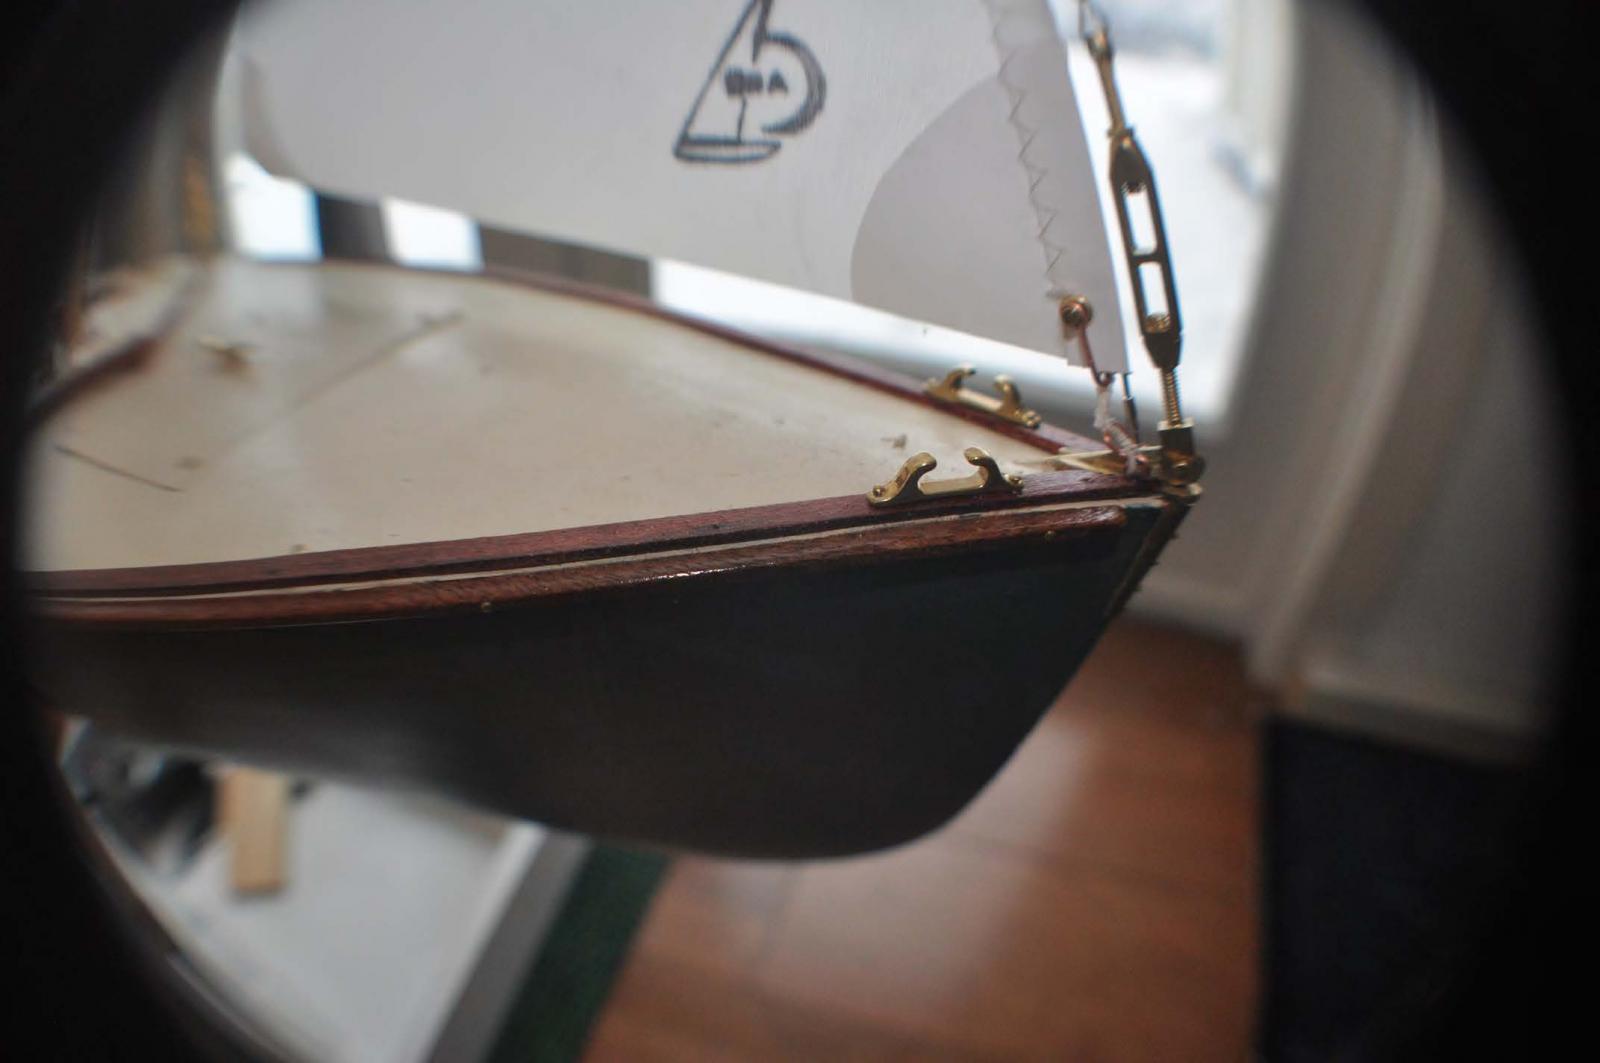
 This picture is fun. I look forward to this type view when we get outside. anyway here you see the fore stay separate from the jack stay. The jib properly rides down behind the turnbuckle. There are many variations on the connection of the tack. I chose to make what I also must make for the real boat, a double spliced line with shackle on one end and clip on the other.
This was fun for a snowy day. I will up date my progress on hull 2 on the next posting
cheers
- hexnut, mtaylor, michael mott and 4 others
-
7
-
-
-
-
Pete
i find there are several sites with nice sitka spruce. they cut stock to many dimensions so the first work is done for you without waste. also it is straight and stays straight. I use if for all my spars. I think I do more because when you get to the wooden boat shows and around the beautiful yachts have it. So a few dollars extra for model side makes me feel better.. I can not image replacing a real mast..$$$$$
this build is really looking good.
cheers
-
Michael
I am happy top read this post. i think it means we need not carve our boats names. I found the old sign board for my real boat and both my rear admiral and i vetoed it. The font was cartoon like and all small letters.The were decals on mahogany. We spent a while thinking about carving a sign board since last year we got one for our catspaw dinghy and it was great.
to my point...we have agreed to go with vinyl marine paste on from DIY on line lettering for BITTERSWEET. it will be about 24 inches long. They also allowed me to down size to model boat scale [ 1;6 so 4 inch name]and buy them to match.
anyway keep going the crisp clean lines are a joy to watch as this wonderful large scale comes together
cheers
- pete48, michael mott, Piet and 2 others
-
5
-
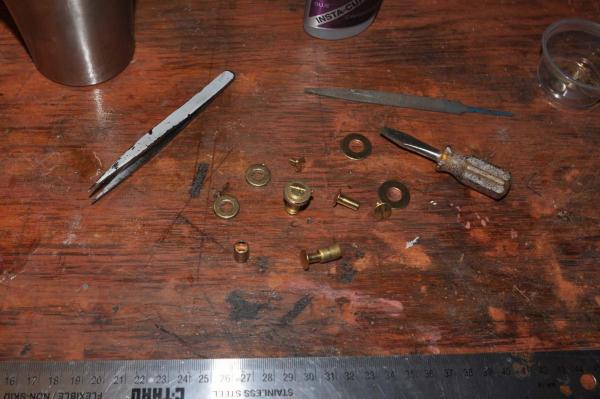
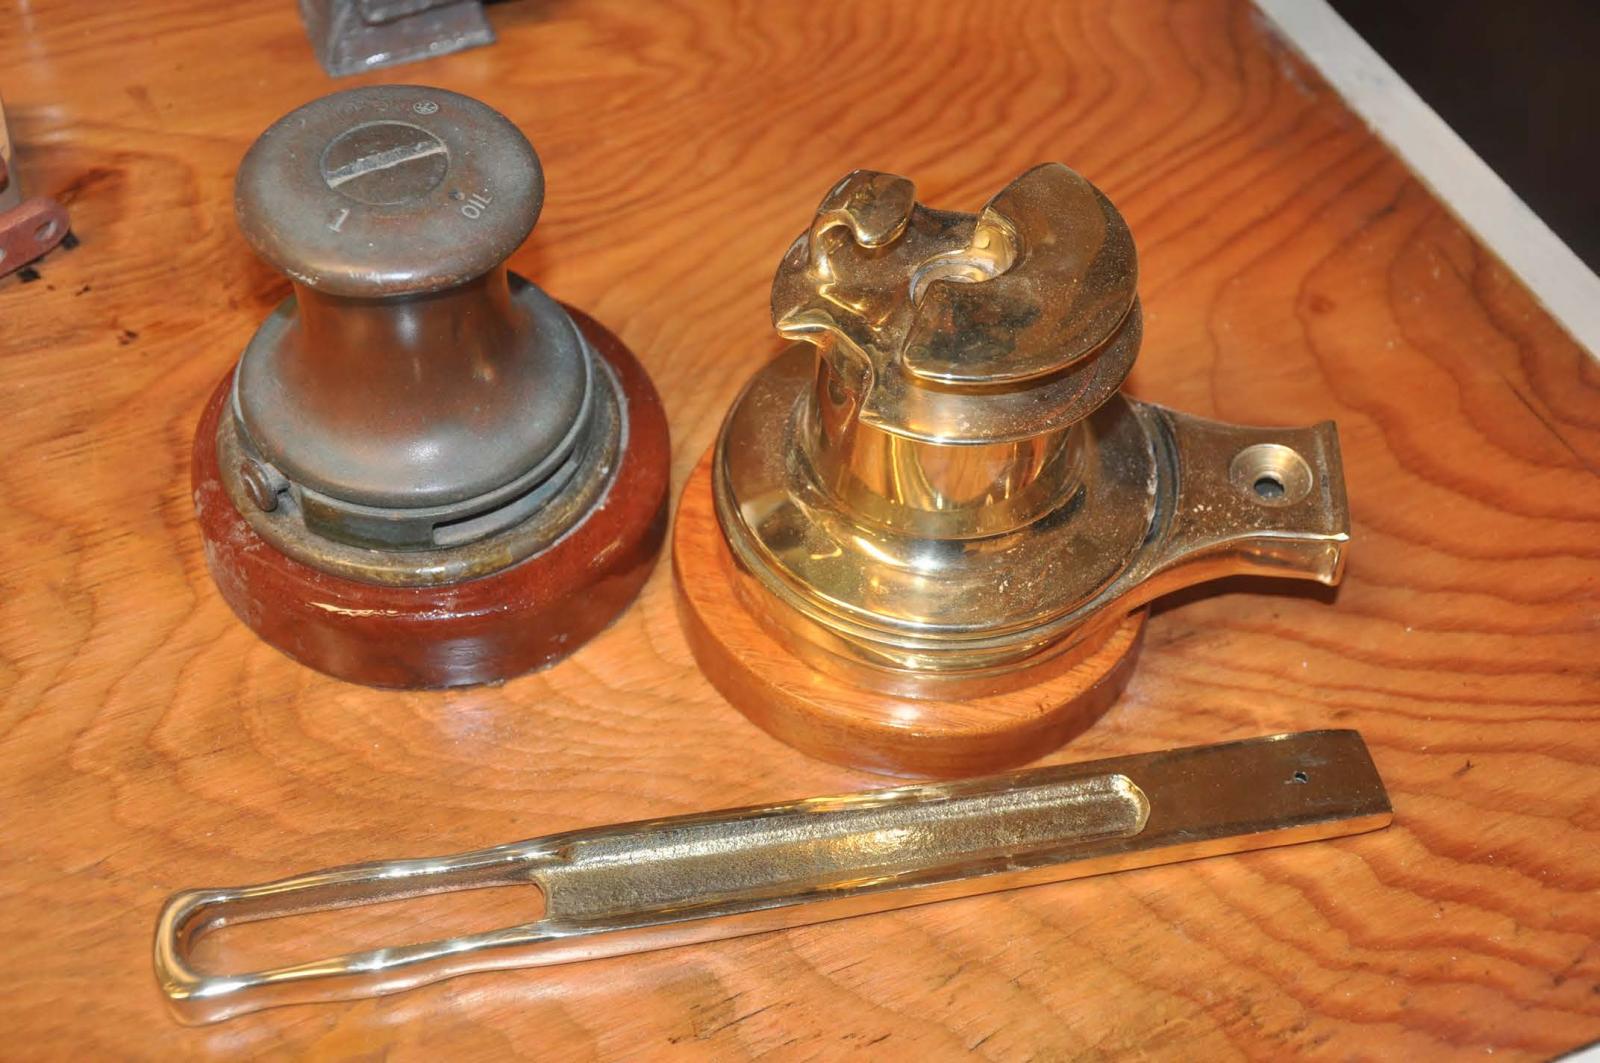
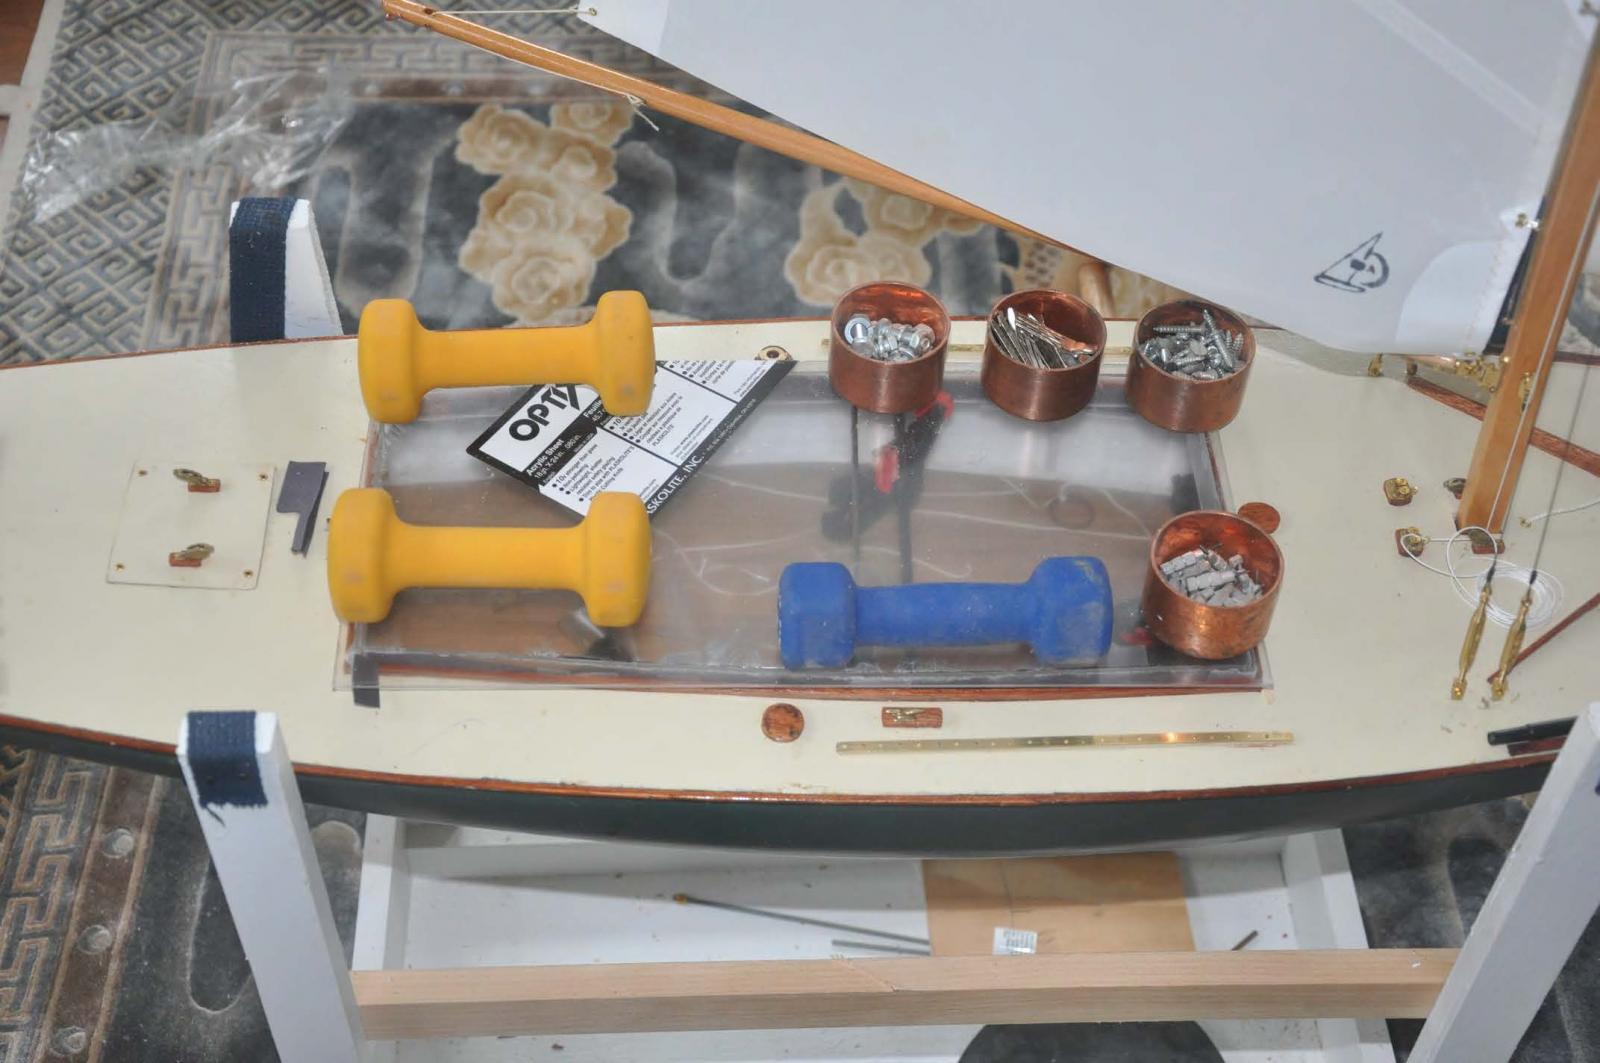
OK today I finally decided to fix the winches. I made them in an early post just to have something and to experiment with different materials. I never really liked them; painted wood just doesn't get it for me. In the end everything else except the 10 blocks are brass. So here we go on the next effort to make them in brass. I was encouraged while scrounging at the local hardware store by finding architectural posts and next to them small brass note book binding pins. Round head with post and screw in end.
-
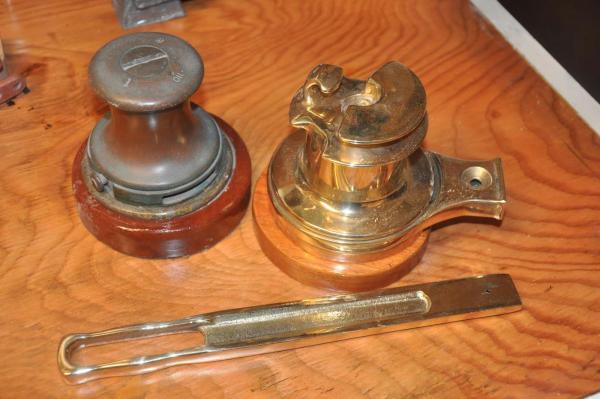 Here we have the real fittings. Please note for the foreward deck we have a new Murray winch with a jam cleat top. This design option avoids adding two more jam cleats to the fore deck just forward of the combing where folks likely stand or sit. With two or three sailors in the boat the jib sheet is managed off this winch and cleat and the side winches enjoy the ride. Murray has effectively become the vendor for small boat bronze winches. FYI it cost $65 just to ship it here from New Zealand
So first lets look at the regular side deck winch,
-
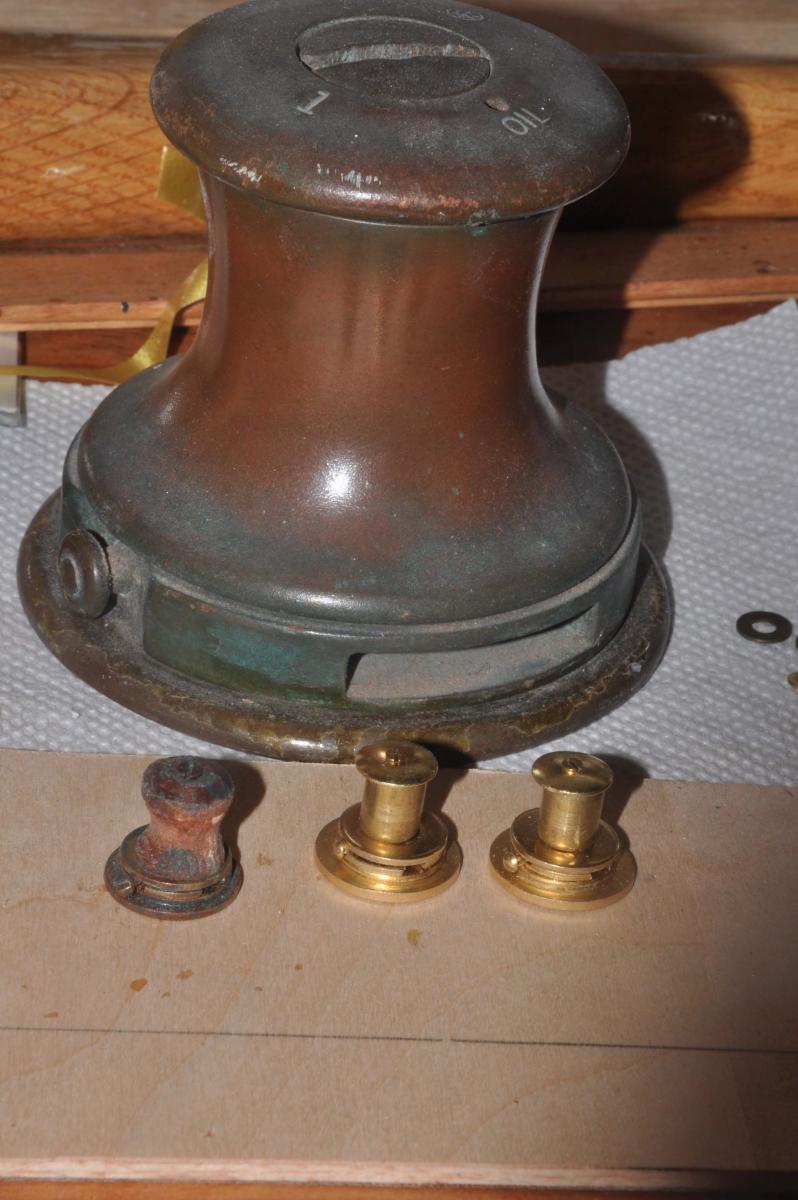
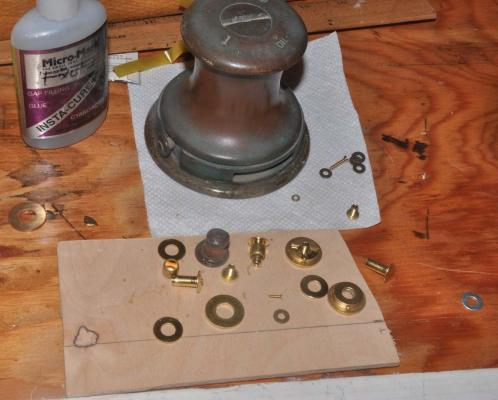 here we see the wood proto type, the new binding pins, various washers, cut pipe for barrels and the glue up stage of the bottom brass washers creating the bottom handle slots and set screw for one of the new winches.
-
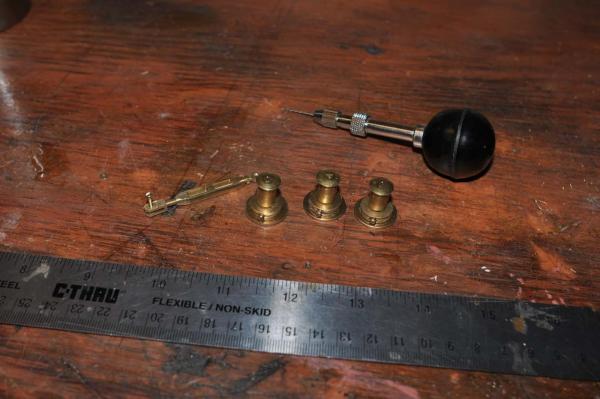
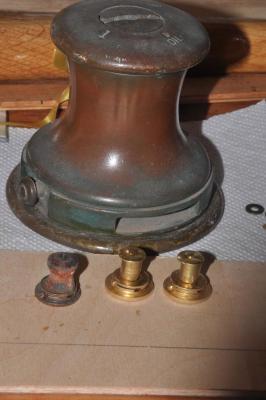 here are the two new winches under big brother. They are not anywhere as nice as turned brass especially due to the straight barrels. I may get to that later in the spring. I hope these are good for now. . For the 2 side winches I turned the binding pin upside down so I could drill the round end and add the small top screw.
-
 Here I turned the pin screw right side up. I used a side grinder to cut a way the screw head to simulate the cleat. I added two barrels. I need to get another size 6 brass washer that is filling the hole. I just used AC to hold the washers etc. and by screwing the pin together it is very firm; sort of a sandwich.
-
 I could not wait to put them on the boat. There is nothing but glue holding them down. If I loose one, I can replace it easily enough. Then I will figure how to add a screw to screw it down.
cheers
-
-
Pete and Bob
Thanks for the encouragement and concern on the cover. I like you sticky or rather viscous approach of Vaseline. I was thinking to stretch a rubber band around the legs and push it down. I would rather not mechanically secure it. we'll see. I will likely be a chicken for a while regarding serious wind .
We still have ice on the pond though so lots of time to think
cheers
- mtaylor, captainbob and Omega1234
-
3
-
Patrick
the current sails will go on the second hull. if and when there is opportunity to build more it will be simple to communicate with Rod Carr and get another set with a number. If the group decides on a number for hull 2 and a name we can add that or get a new sail leaving the proto type for future hull or spare.
cheers
-
Time for another update.
This time we reviewed the prototype sail, made a few changes and ordered bittersweet sail 20.
-
 the jib rides the fore stay and thus sits above the turnbuckle. this is wrong. the tack should be 1 inch above the deck. it attaches to the rear hole in the stem cap. we have two solutions. i will discuss when I decide.
-
 we confirmed the sizing and placement of numbers. We combined batten and seam [ the real sail has 5 seams and 4 battens on different lines but it would have been too much at this scale. Best performance Rod explained would have been 3 seams that form the shape. So we compromised with 4 and merged them with the battens. the battens are only for show
-
 Here I just had a problem. I had done everything in CAD and looking at the sail they were just not right. The boom was too horizontal....too flat. I took two sticks and made the lines based on the 1938 design. The foot of the jib rises and then the foot of the Main sail keeps the same line up about one inch.
-
 looking at this I decided to reduce the leech one inch and increase the foot one inch. One needs to remember we previously discussed cutting the foot, to bring it forward 4 inches to reduce area.
-
 Finally just to help out as a final tweak, I reduced the luff 1/4 inch
Making the jib track. This was a fun project. The real Bittersweet had a stainless track and mismatched blocks, so we were able to start from scratch. It shall be 1 inch bronze sitting on a teak strip that gets painted with the deck.
-
 here is the combined slide and block fitting we chose that is really sweet when you compare it to all the other combinations.
so let's try to make one of these.
-
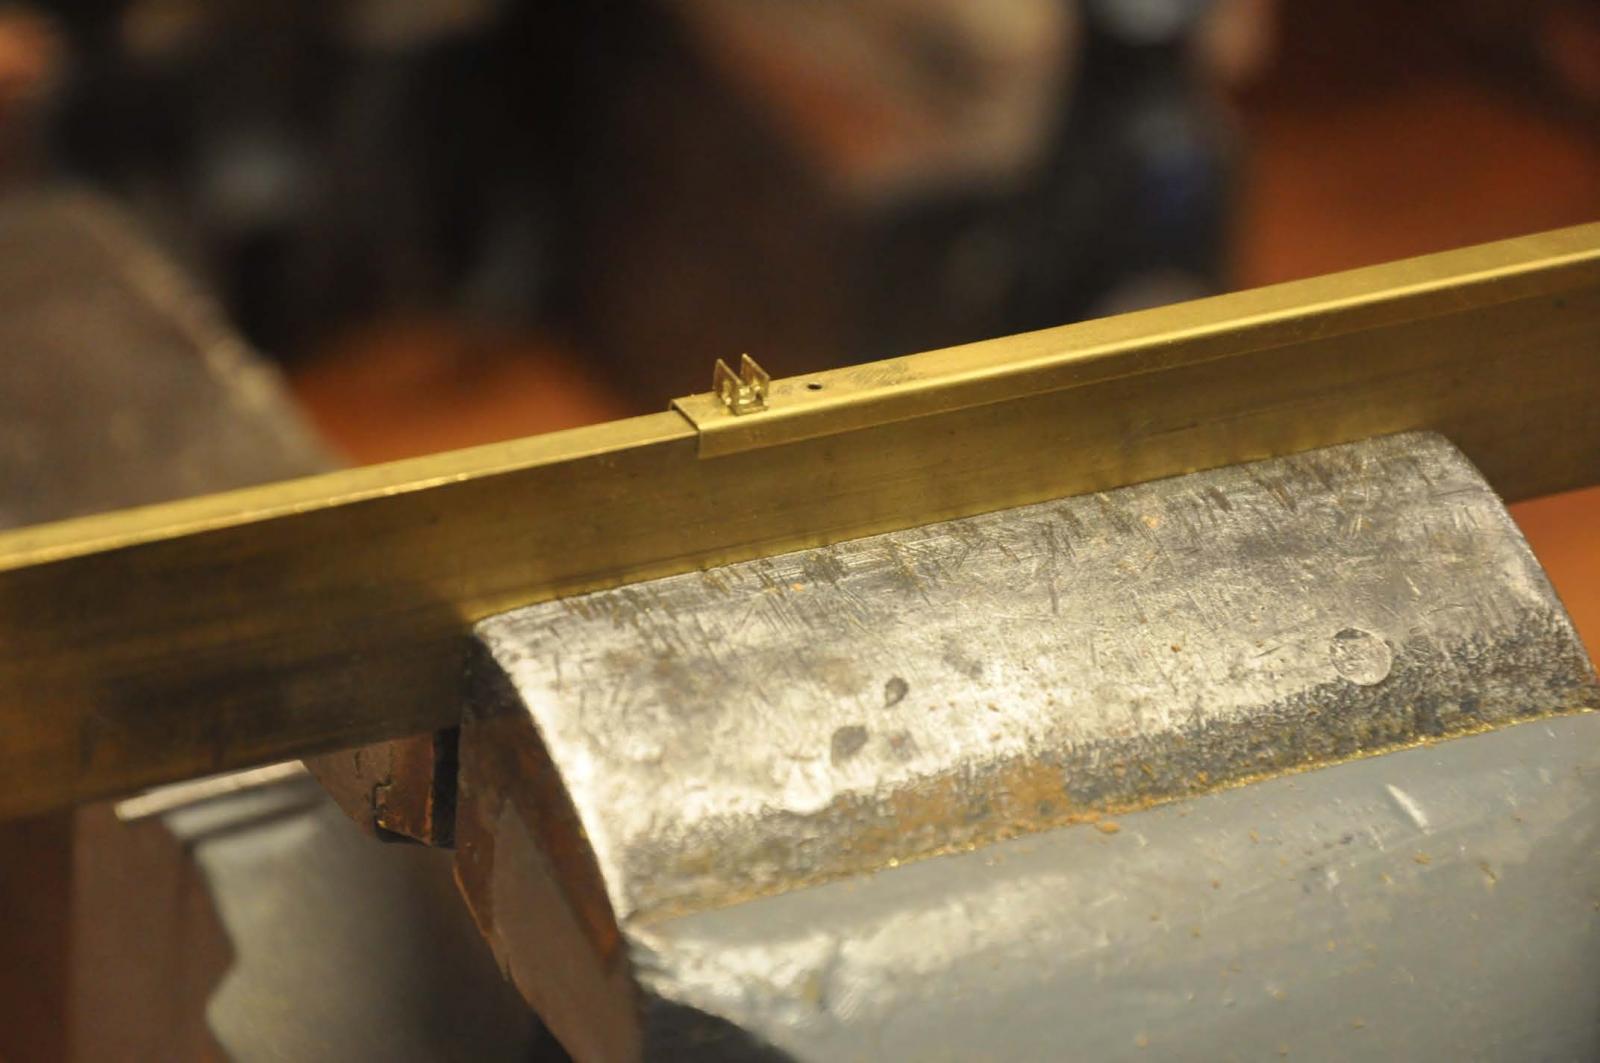
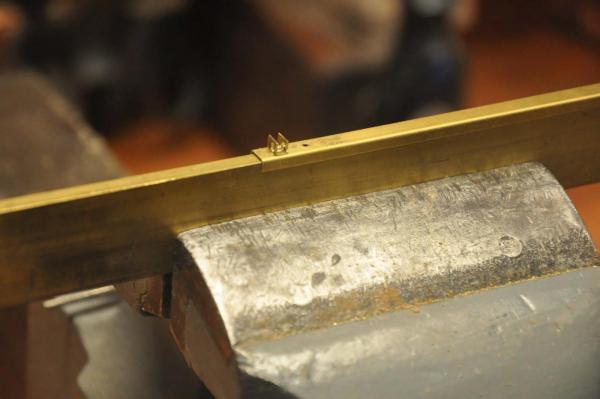 As I have said I can rivet. Soldering remains a mystery to me. so where I can I avoid it. Here are back to back channels being riveted together.
-
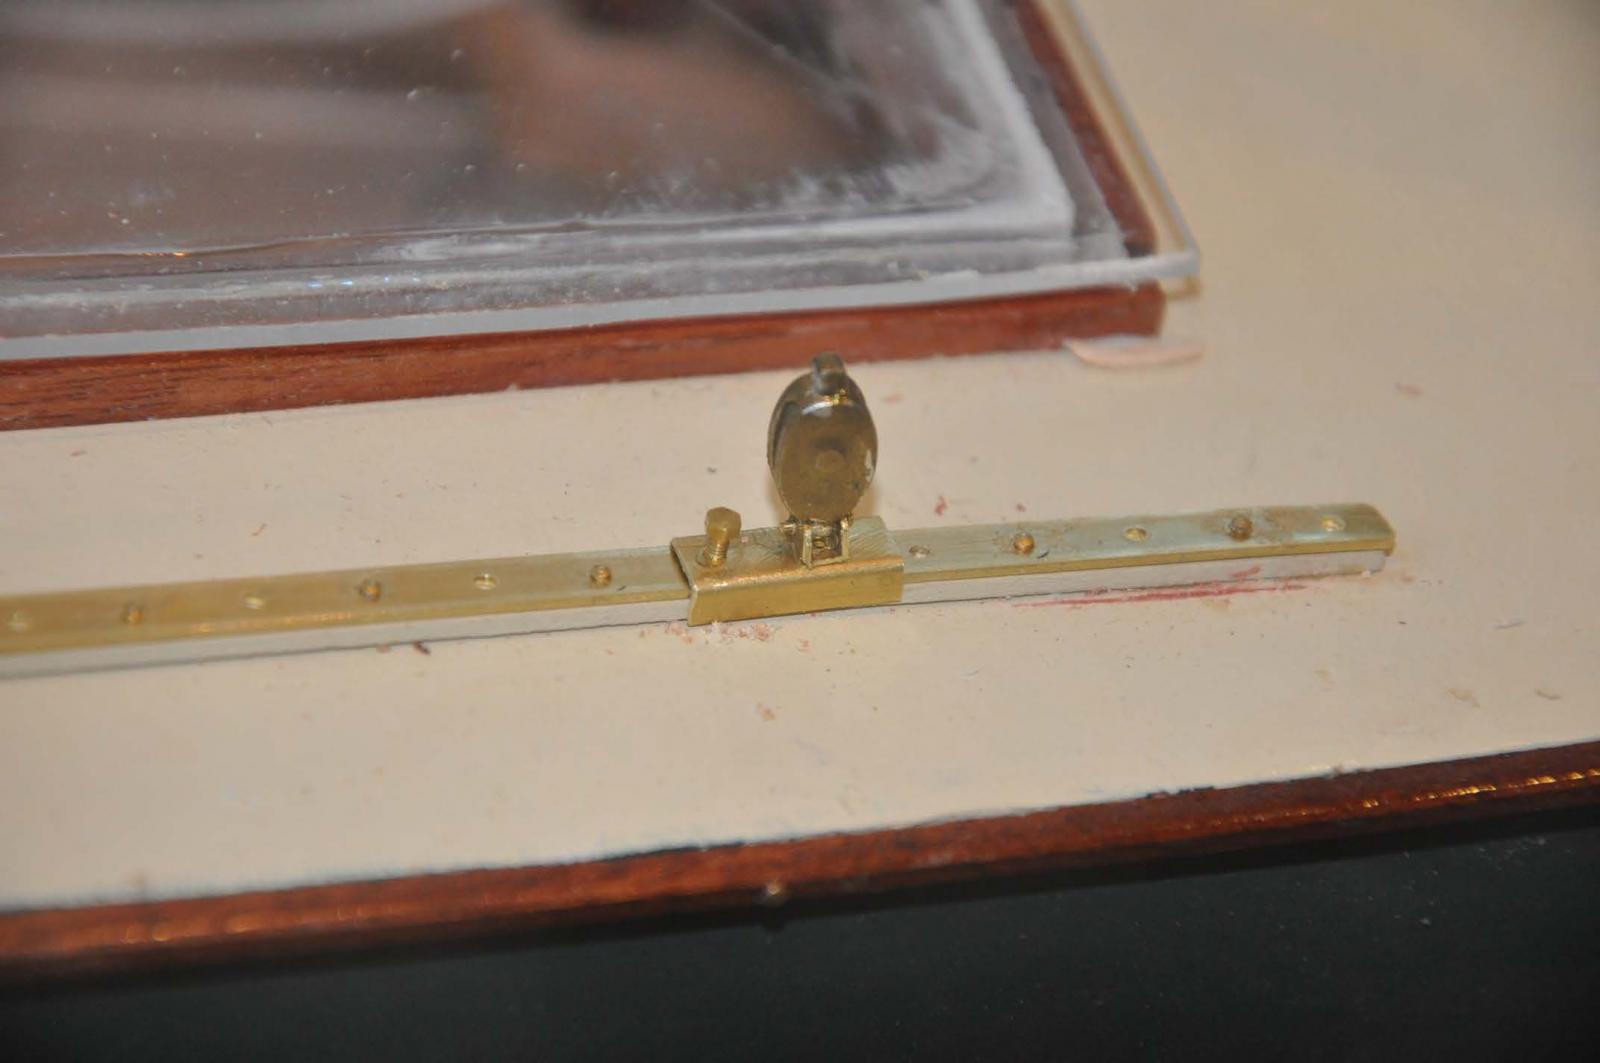
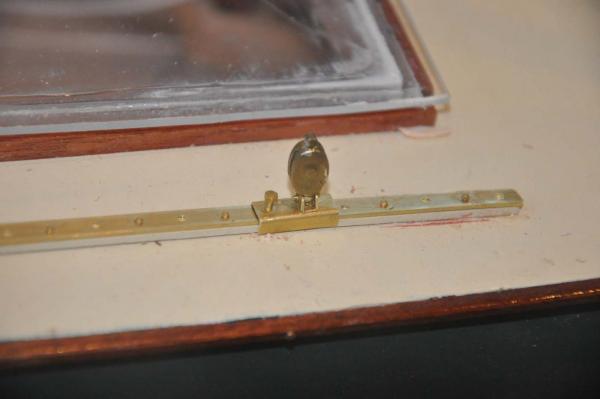 here we are in place. the track is cut down from 1/4 to get to scale one inch. it is sitting on a strip painted like the deck, It nicely fits inside the the 1/4 channel slide. The bronze painted blocks still work out and are pinned to the top channel. The machine bolts go through the deck making this a stable fitting.
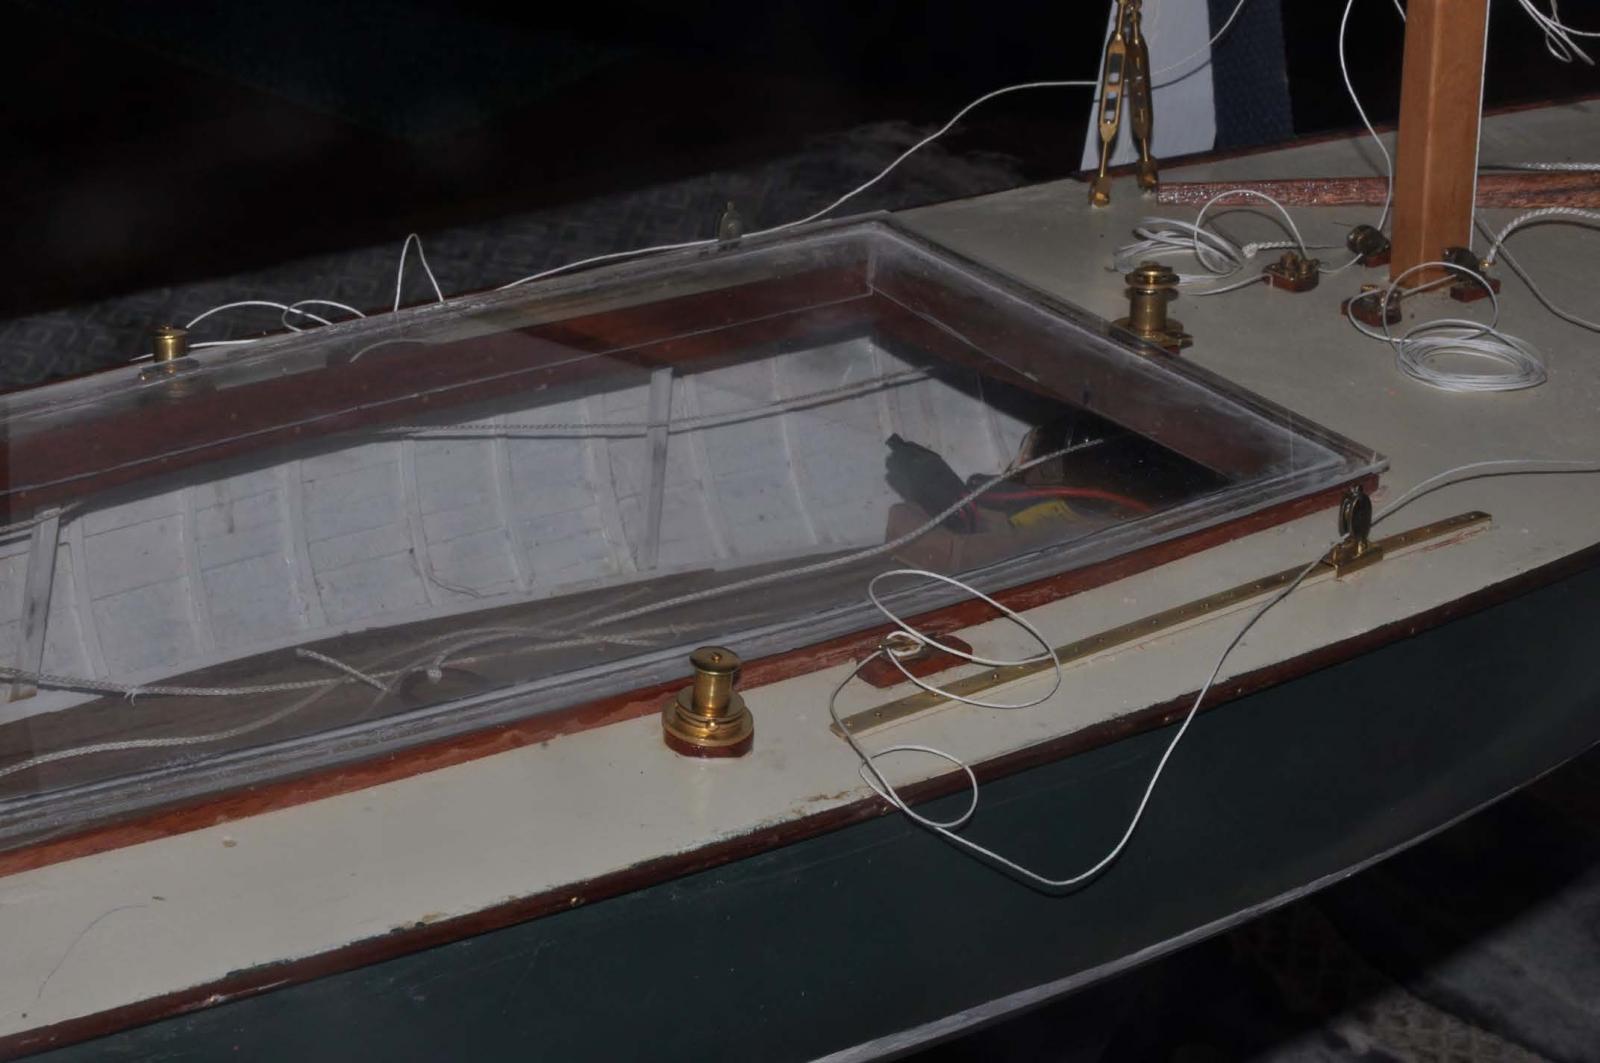
Now its time to make the cover. I went ahead and made up my experimental cover. I am doing this just following a hunch. I hope it works.
-
 I went to big box and bought the lightest and thinnest plexi-glass.
-
 the first step was to make strips for the sides and fix them to the inside of the combing. I used construction paper to give a little gap and used CA to stitch the ends.
-
 Here I rough cut the top to fit and glued it down. after setting I took it and liberally made glue fillets on the seams. I then made the outside just larger than the combing. I took it to the kitchen and yes it holds water. Now does that mean it can keep it out?
-
 here we are with he cover on, halyards rigged and jib track done.
cheers
- mtaylor, popeye the sailor, pete48 and 1 other
-
4
-
-
Pete
thanks for comment... the sails I made are on Charles Notman and other schooners. these sails though I worked on the design were made by Rod Carr. Rod is a popular supplier to the AMYA sailing folks....and yes he is good.. They are 2 oz Dacron and shaped etc. for true pond yacht racing performance. It is hard for casual builder to get into performance Dacron sails. He is now making the sails for Bittersweet junior. They should include the number. I will cut and fix what I showed and move them to hull two. Once we name here she too will get a number.
I feel good in simple metal work for cutting, bending and bolting, screwing and riveting. I still am true amateur when it comes to soldering. I got a whole bunch of different shapes to experiment with and have a mini drill press. That small stable drill makes all the difference and remains my numbner obne recommendation.
I was on your site yesterday and I really like your form [ mold] work. I plan to work on that for my next build
cheers
-
Pete and Michael
I applaud you guys who do it all. I have a friend who says i should also learn to cast lead. I probably could but we have a true artist who runs a foundry 30 miles up the coast. I will go there in April and he will cast the keels. I love visiting his shop and will share the experience.
cheers
- Omega1234, michael mott, mtaylor and 1 other
-
4
-
-
Pete
Absolutely you will see the attempt to sail. this log will stay active through the sailing season and into what get's fixed next fall. There are still big guesses like the ballast. The local foundry just shut down for a winter break so there is still some time to get ready.
There should also be fanfare and fun at the yacht club with other BHOD owners.
cheers
-
Jim
great and scary question
I bought sheets of 1/16 clear plexiglass. I plan to make covers sitting on with their sides sliding inside of the combing. While in place i hope one can still see inside.
I plan to make it up for hull two as soon as I get the deck on. then if it works make it for hull one.
the hatch covers will be screwed down after trimming the sail gear. my RC guru is visiting later this week to work on that aspect
cheers and thanks for the concern
- michael mott and Omega1234
-
2


Boothbay Harbor One Design 1938 by Jond - FINISHED - 1:6 - RADIO - 21' racing sloop
in - Build logs for subjects built 1901 - Present Day
Posted · Edited by Jond
Hi all
Today I want to share some things I have learned along the way regarding this class and the explanation of what the second hull represents. That also leads us to describe what other hulls remain unexplored.
Each summer a festival is held in late June celebrating Windjammers. Several large schooners come to town and I shared photos last year in my Charles Notman Schooner log of Bowdoin and other local beauties.
type 1 wooden hulls
1938 to the war year 1941, 21 boats were built including LOON the prototype. Bittersweet is hull 20 and was named Sea Rascal then. She was the last hull built before the moratorium, as Boothbay became a busy Navy yard in 1941-45. After the war another 17 wooden hulls were made up to the 1950's, The Hodgdon yard was a major builder of the fleet
During the 1950's, The Hodgdon boat yard made their own design and called the Hodgdon 21. It is a BHOD except they built the hull down the fin keel a bit correcting a weakness inherent in a canoe hull design. In 1972 they changed that boat to fiberglass and it has since evolved into the Christmas cove 21 and many were built.
BITTERSWEET
Type 2 fiberglass
In about 1973 Someone built the canoe hull design BHOD in fiberglass as well. Hulls 38 to 54 were made in fiberglass with a cork core. I plan to study this and learn the facts over this next summer. It sounds like another boat to build too. The design incorporated new aluminum masts and booms and corrected the rigging to include the lower spreader.
Type 3 new fiberglass
In 2006 permission was given to use the new Brooklin drawings to build a separate plug and then fiberglass hulls
Type 4 cold mold ceder and glass
EIGHT BELLS hull 11
In 2006 there was an effort by a family to recreate their boat Eight Bells. They commissioned the Brooklin yard to generate drawings and molds to cold form a new hull .
Another family bought both Bittersweet [ see above] and Osprey with the idea of taking them to wooden Boat to be born again. They were also given permission to use the new drawings.
OSPREY hull 26 rebuild
so sorry for long wind but I am using this log to collect my learning about this wonderful class.
cheers