


Jond
-
Posts
758 -
Joined
-
Last visited
Content Type
Profiles
Forums
Gallery
Events
Posts posted by Jond
-
-
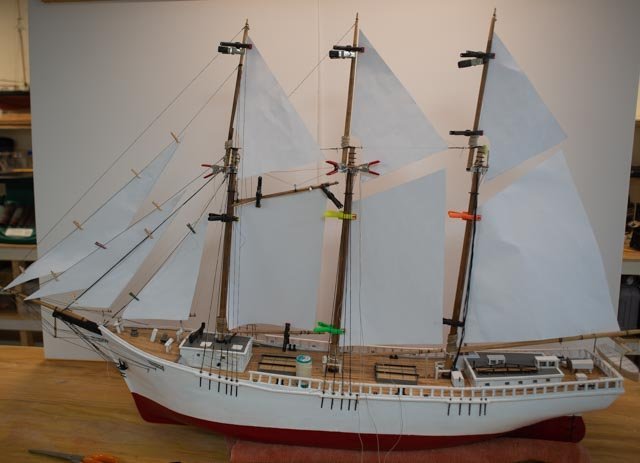
a little progress as the missing blocks came in
326.
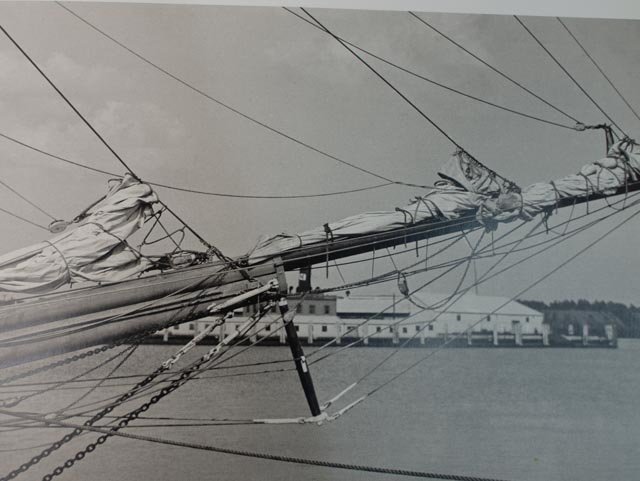
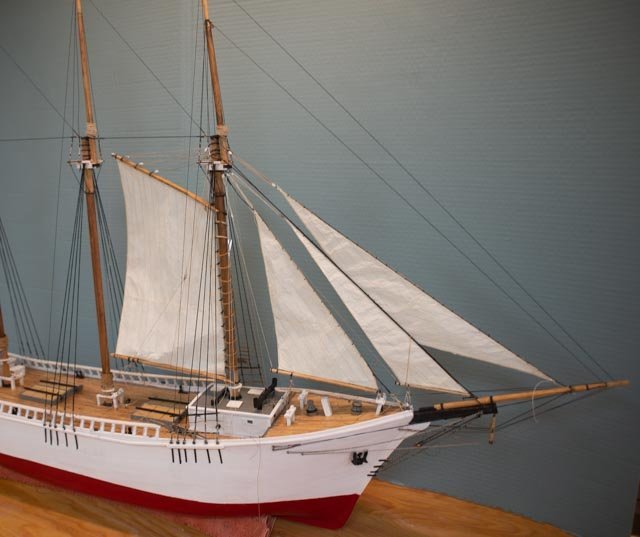
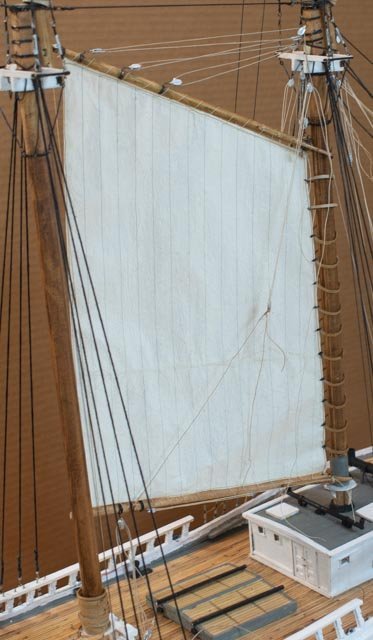
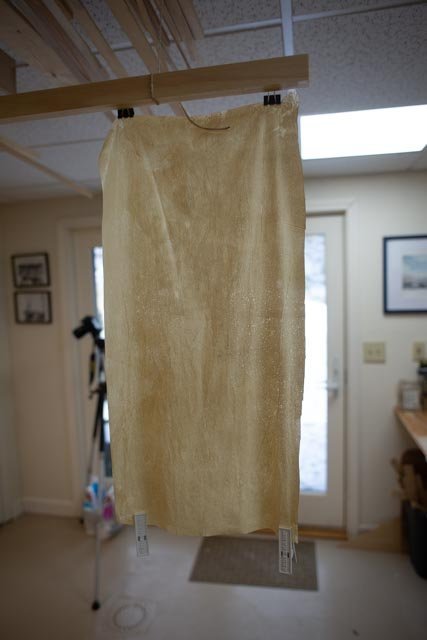
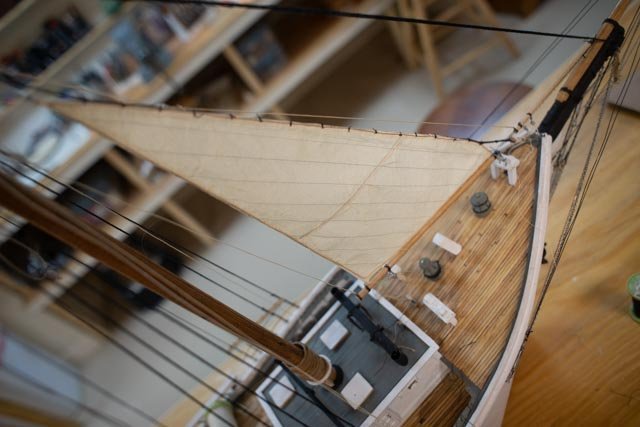
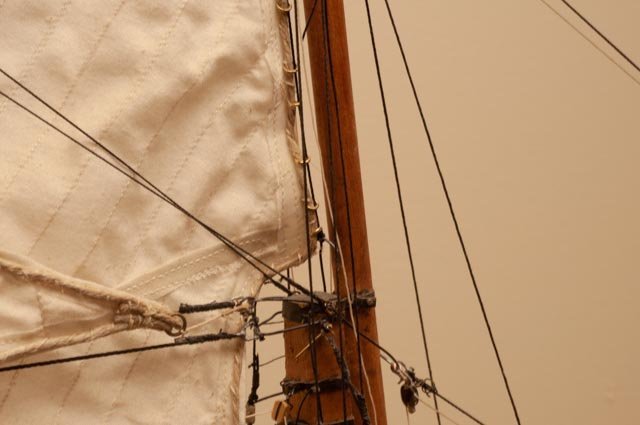
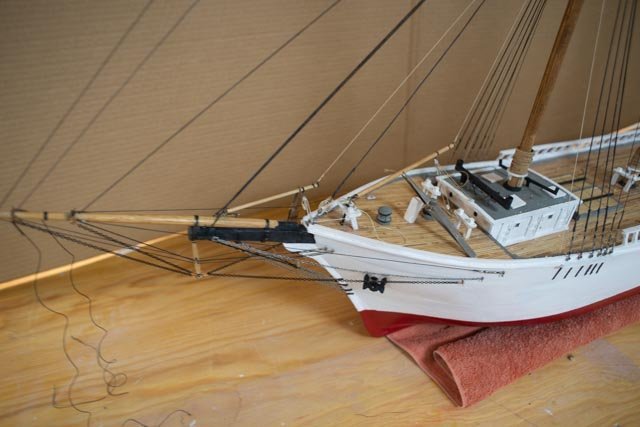
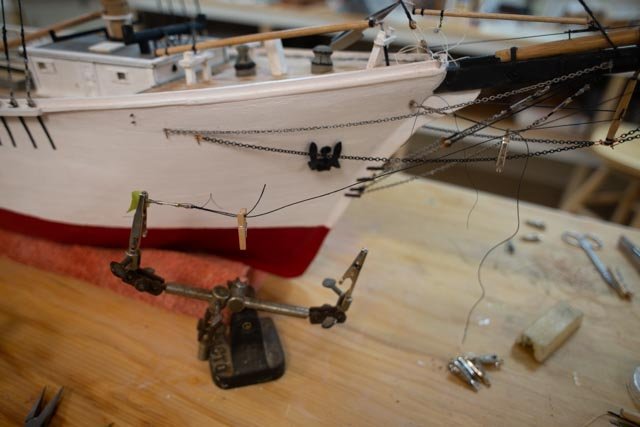
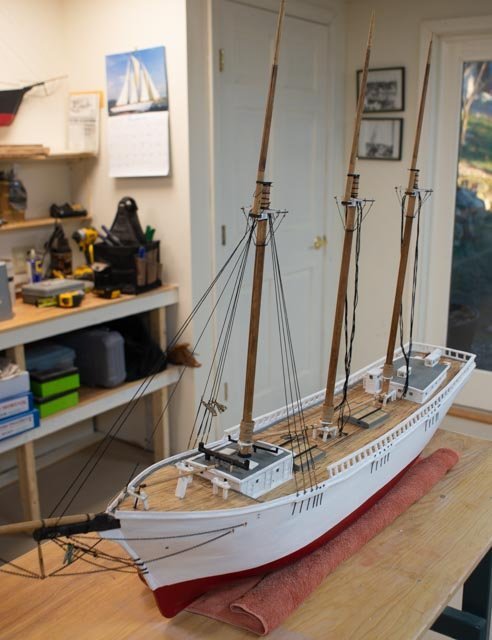
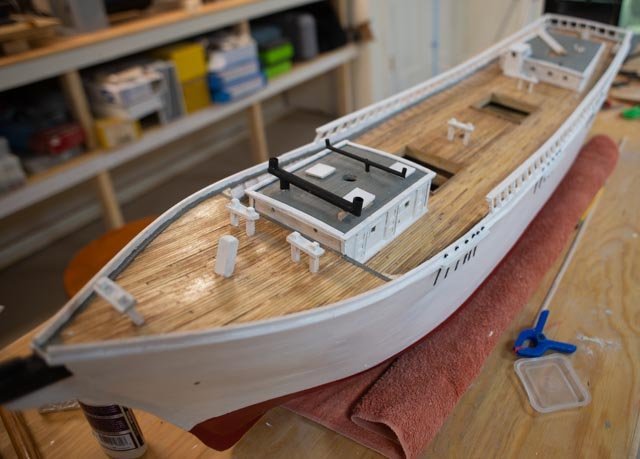
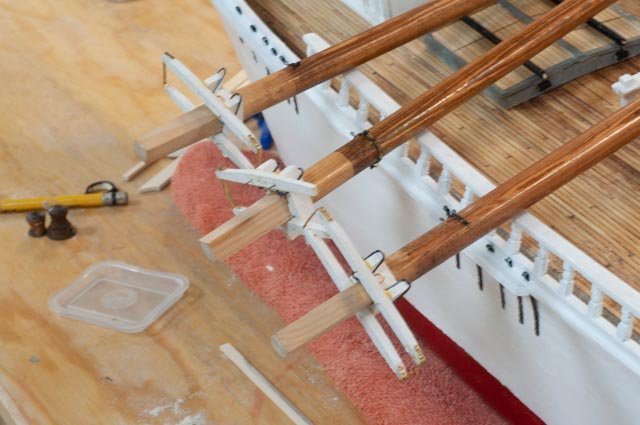
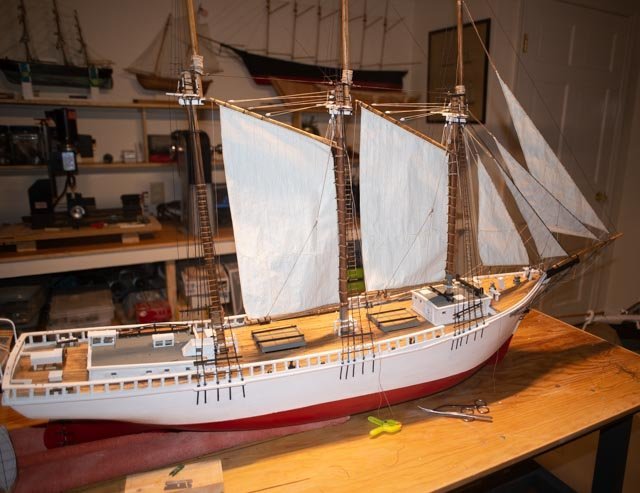 the sixth sail , or i should say the main is bent.... i am now thinking that I may stretch out the boom tackles to see if that helps with sail shape. i am nervous at this stage to treat the sails with more material. despite the look they are delicate.
cheers
- tarbrush and GrandpaPhil
-
 2
2
-
post 36
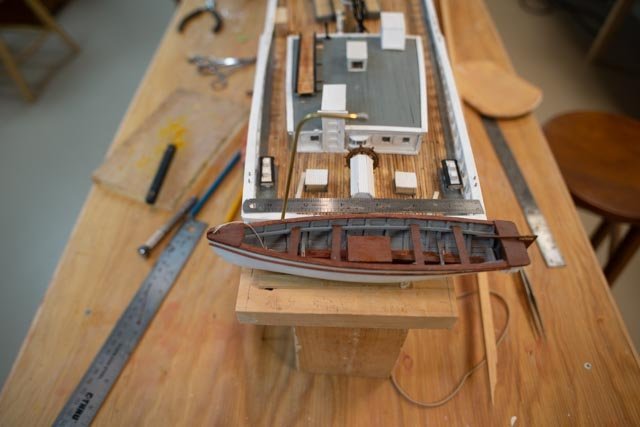
start yawl boat and complete foresails
Moving along I find there are so many different tasks. Each new task takes a time to start up. Example is the yawl boat. Last fall I decided to follow the lead of family members and switch from part windows, android and apple iPhone to all Apple. Wow. It is not just a smooth move. I kept my older windows set up in the shop so I could continue with the turbocad I owned. Starting with the yawl boat, I had decided to buy turbocad for imac. It is like studying French for three years and 20 years later moving to Brazil where French does not help with ones Portuguese. I know that example as I lived it 10 years ago.
I now have several guides and some friendly advice. The apple version is very different from the windows version. First up is the yawl boat. I will do it again in 3d, but to move forward at a reasonable pace I chose to work in 2d. wow the apple version does not like 2d.
-
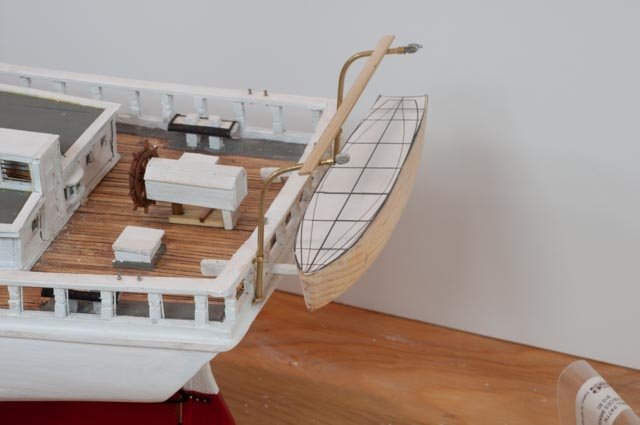
318.
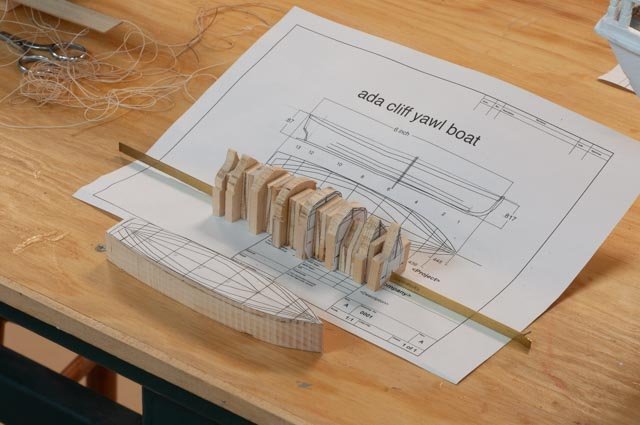 here is a printout. Apple is definitely for the modern world and is not sympathetic to 2d. nevertheless, I eventually got there. I had 8 stations and the plan to work with. I made up thick stations and added fillers to get close enough to the right lay out to move forward.
-
319.
 here after satisfying the set up….small mahogany transom included… I have prepped to add the ribs.
-
320.
 I soaked 1/32 ribs in water and let them dry before gluing. Here the starboard side ribs are glued
We’ll see how it comes out
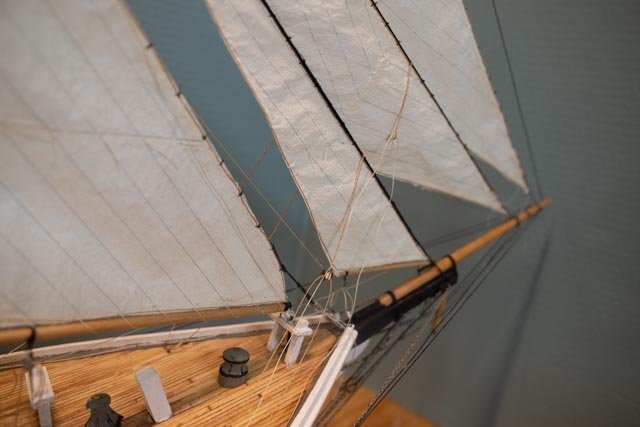
Rigging the fore sails......There are many different visuals to refer to when researching each part of either standing or running rigging to determine what material to replicate.
-
321.
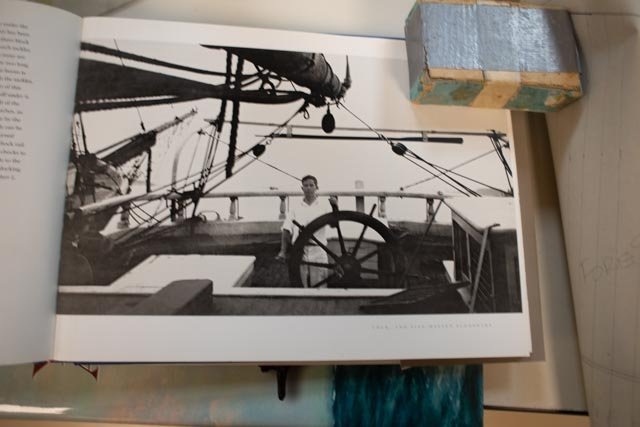
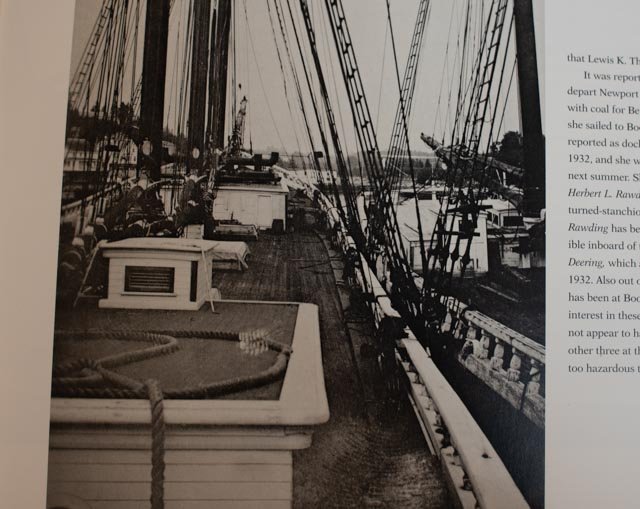
 In this photo from the flyirails book one can pick up the sheets that wrap stays for the flying and outer jib were chain. One sees here the small rings both on the stay or the flying jib luff that are laced. Before jumping to emulate that detail, one sees the bob stays in this photo were spun steel cable. On the Ada Cliff photos, one could see they were chain. The omega hanks that I have assumed avoid the lacing of rings on either sail or stay. I would imagine a pulling and stretching of the lines involved and a very difficult task to improve. The sail could pull back from the stay, not a good feature. Therefore as others have said better than I , one needs to decide what makes the best sense and what therefore is to be modeled.
-
322
 I used the chain bob stays and the omega hanks and chain for forward section of these jib sheets. i will paint the chains for a galvanized look
-
323.
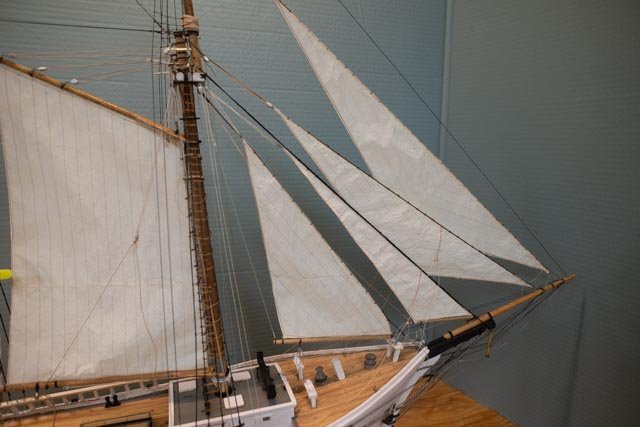 here all the forward sails are in place and running lines are in and made fast. the ratlines are in as well.
-
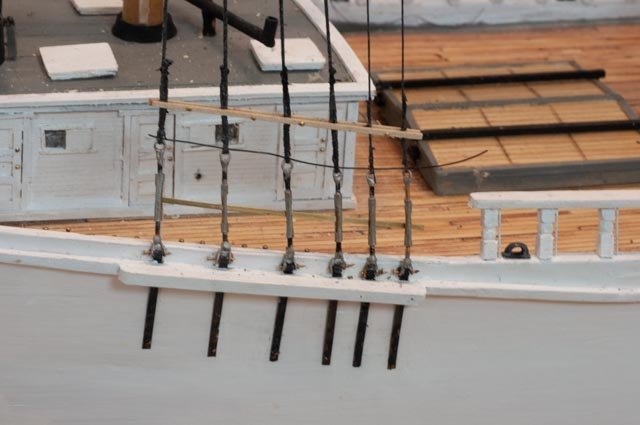
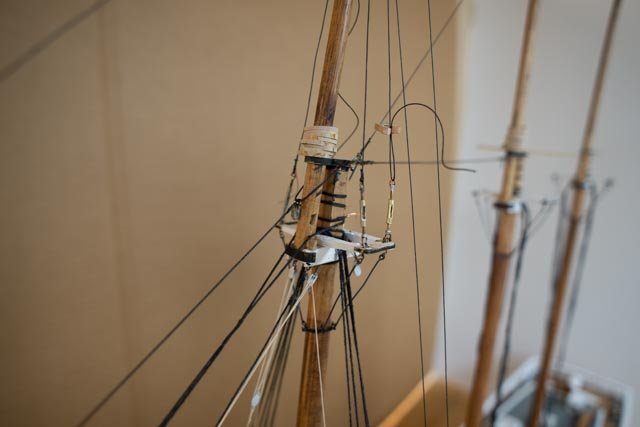
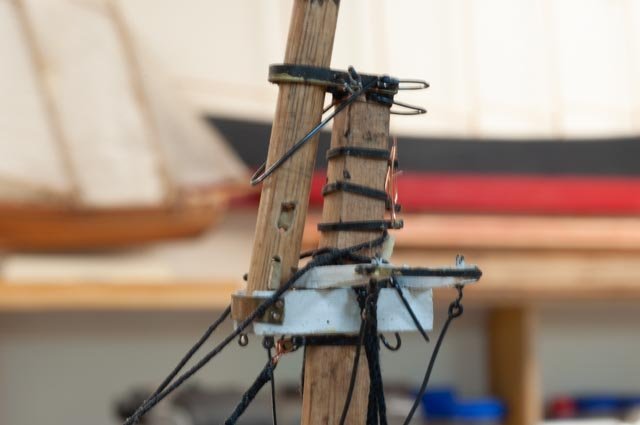
324
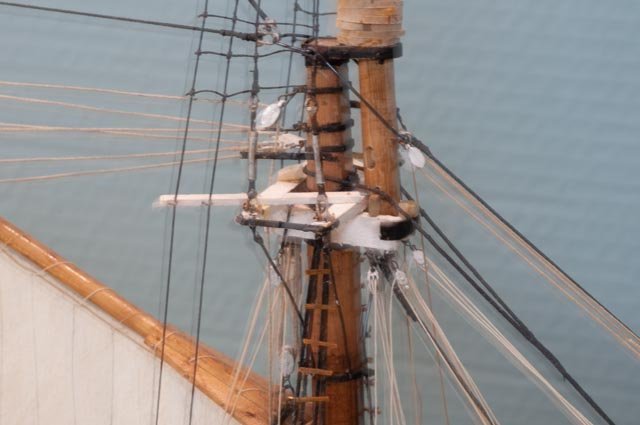 here looking at the fore mast top all parts are in place.
-
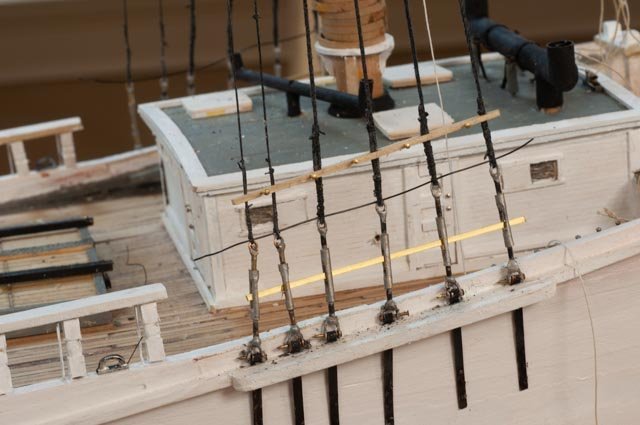
325.
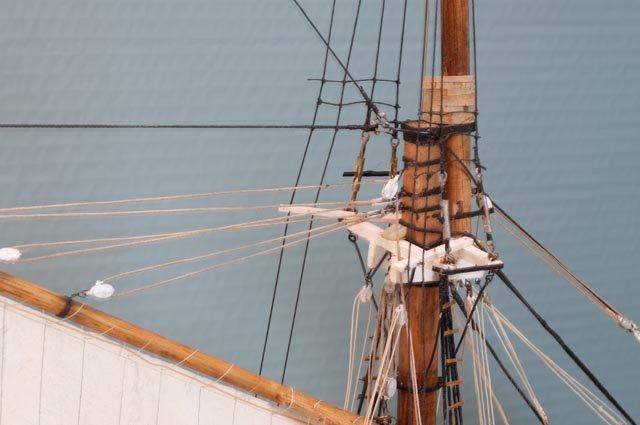 in this view one might note the farthest turnbuckle is unpainted. That was the barrel I had to replace to get the little brass bar to fit.
Ever onward. Main mast is next when I get more blocks
-
318.
-
-
One should not to be surprised, things slow down a bit at this stage. Rigging, making sails, starting the yawl boat. Moving forward, then oops, then fix then move forward. Today I found a turnbuckle did not have enough open space to receive the little brass bar. Everything around it was done [ that was the oops]. I had to undo it, eventually cut it out and make a new barrel, so I could get the little bar in. knowing sequence is truly a master’s skill.
Then later today I punched a hole in the spanker. Perhaps the patch makes it more realistic. Smile!
I made up a topsail and the realized it was the wrong one. I am waiting for more Bluejacket blocks anyway, so no lost time there. On we go
-
315.
 here is another sail on
-
316
 this one is fun playing with winter morning sun light. the blue background is just a big box cardboard. I am still trying to figure out how to take more useful and fun photos. Blocking the shop as a background I think is a good first step.
cheers
- Paul Le Wol, allanyed, Keith Black and 2 others
-
5
-
315.
-
Post 35
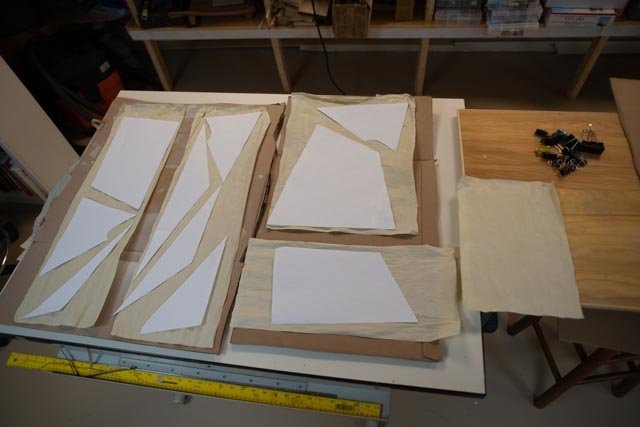
Making sails part II getting the sail trim process figured out and the first few sails in place.
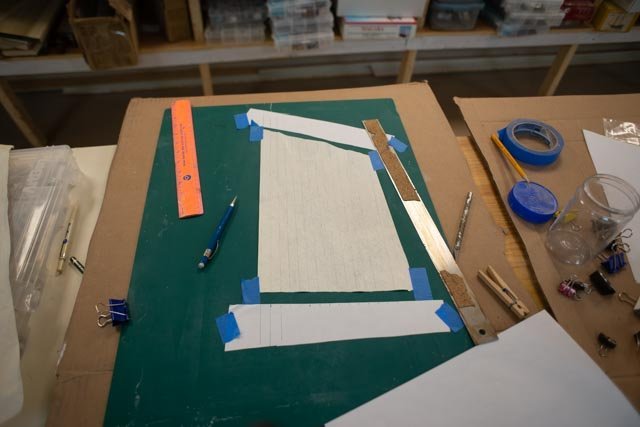
Thanks to my daughter’s vacation we got all the sails roughed out and started trimming them. After the fore sail we learned to cut out the sails roughly 1/8th too big. They were then marked on both sides. We used a homemade light table to do the second side.
-
309.
 here they are all cut out and lined
Next up was the trim work. The process that I have followed included the following:
• Cut many strips just under 1/8 inch.
• On the port side I ran a combination of strips and strings on the edges. I covered the stings with cover strips. These stings extend at each corner for connections.
• On the starboard side a ran strips and then glued a bolt rope.-
310.
 here I am doing a little of each on the first three sails
-
311
 here the fore staysail is lashed to its boom.
In my past research in Lunenburg, Canada I learned from the captain of Bluenose that the method for bending sails on the recent re-build was copied from the original. That meant the omega shaped iron hanks for all jibs and black wire wrapping the luffs to hoops that I saw was the way to go for 1921. At my 1:24 gauge Bluenose build, I was able to make little black omega hanks and sew them to the sails for the jibs. Here they would have been too small, so I simply used black thread.
-
312.
 here we have the first two sails tied off to their stays .
-
313.
 here the first gaffed sail is in place.
-
314
 I am trying to work all the related running lines with each sail as I go. I found that the combination of the bolt rope and internal string and several strips gave a secure luff for sewing the hoops in place.
So far all is going much better than I feared.
All for now
- GrandpaPhil, allanyed and KeithAug
-
3
-
309.
-
Thank you Tom
Now that I am installing them I have become a convert. I like working with silkspan and the ability to get something the first time is very encouraging. I can even think about covering u one of the hatches as they would have been under canvas when sailing. we'll see.
regards
-
Post 34
Making my first silkspan sails part 1 paint, its color, etc
This episode has been and continues to be an adventure. It went quicker than it might thanks to my daughter coming up to spend Christmas week with us. Last year she got me through updating all but one of Bluenose sails. That wa on the sewing machine, This year we worked together, figured out our method, not necessarily the best, and got basic production done on the ten sails. She loved painting hanging, then cutting them out and drawing those nasty little lines. I have to say it took two to do the larger sheets. One person I believe would be limited to sheets much smaller and only one or two at a time.
Here is the trial-and-error method. It followed advice several ventures onto u-tube and other blogs to find several “experts”. It is not surprising there is quite a range of procedures. The main choice was to follow one of the basic options. I had followed the suggestion and bought the book for Sea Watch. I read it months ago and now have no idea where it went.
• Several experts laminate silk span over marked up copy paper.
• One expert showed making the sail with one layer of silk span. There were discussions on different choices in thickness of the silk span. I simply got what Bluejacket supplied and it worked great.…..we liked the one layer approach and went that way.
Second issue is to choose paint method
• One expert said take acrylic artist paint, mix the color, spray water and then and roll it on.
• One expert said take a spray can and spray it on
• One blog said latex works just as well as acrylic. That means one can get a pint premixed and be sure of common color and have enough to do many batches. Also a Pint of latex is the same cost as maybe two tubes of acrylic, and living here in Maine it is a 45 minute drive to the nearest store that carries it.First up is the first method of using artist acrylic
-
300
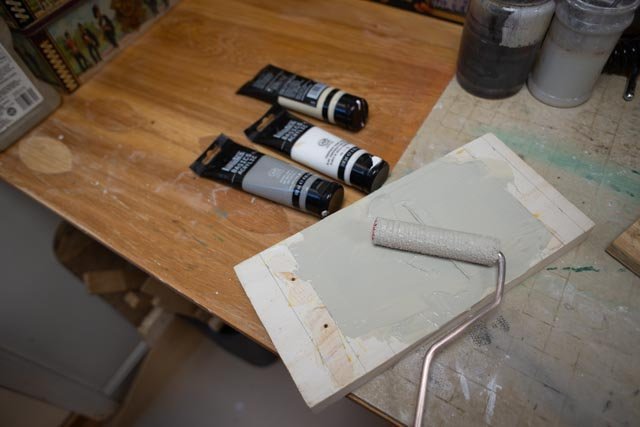 here we are mixing three tones. We knew we wanted ecru but were unsure if we needed grey to the mix. We did one sheet and quickly switched to just ecru and white.
-
301.
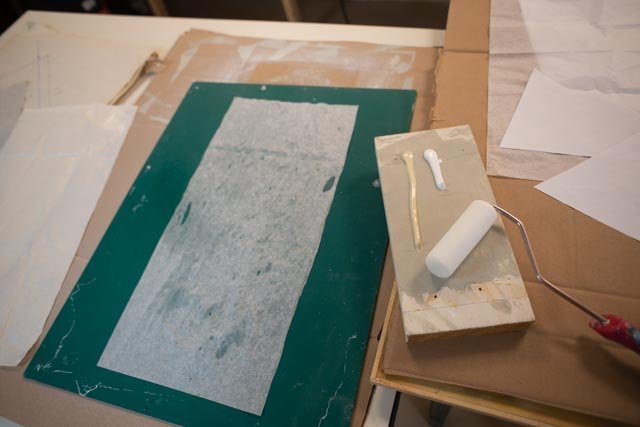 here on our third attempt we spayed the right amount of water remixed without grey and went ahead.
-
302
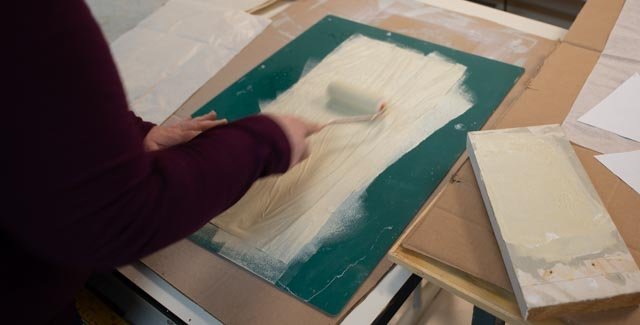 here my ringer guest is going at it.
-
303
 here is this first batch drying. Boy we lost a few sheets in this process and this one is a bit blotchy.
-
304
 here we laid out the sail patterns to see that we were making the right amount. We decided to reject this batch as there were inconsistencies and other beginner problems. I now have plenty of use for the material on smaller models at some later date.
We took a couple of ecru and off white spray cans and tried a few sheets. we found they became shiny so ruled out that procedure. After reading that latex would be OK, we reviewed our sample and chits and went to get a pint of what we felt best replicated the shade of light ecru in the color photo
-
305
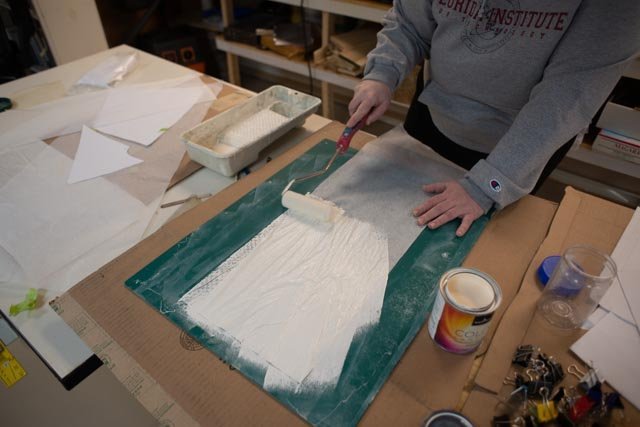 here is goes on. We learned it is very different that the acrylic to apply. Hard to describe just different. It is stickier and the time element requires speed as is sticks to the mat quickly.
-
306
 here we are drying. The color consistency was much better. We also learned not to wet nor paint the top one inch of the silk span, so it stays dry and strong for the hanging clips.
-
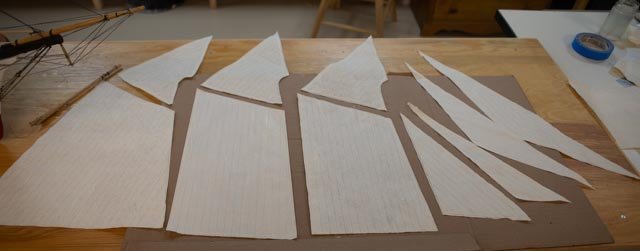
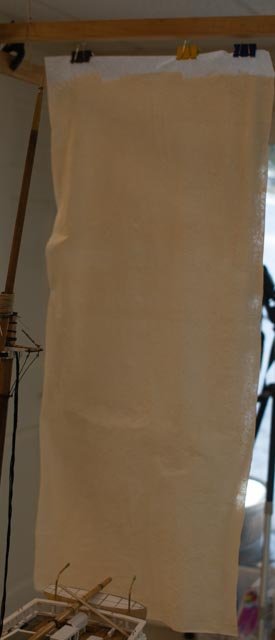
307
 here is the test foresail cut out and lined.
-
308
 here is the comparison of the first sail made with acrylic including the touch of grey with the latex out of the can. One can see the consistent color and we thought the right tone against the white copy paper for comparison. the sheet under it is the acrylic.
Next up is to get them cut out, figure out how to make them up and then get them bent onto the spars.
cheers
- KeithAug, GrandpaPhil and TBlack
-
3
-
300
-
this post is just to celebrate bending my first silkspan sail. it has been a few days and has some friends. it is such a new field I will share my beginner's saga
299.
 here we are .
-
Thanks Keith
It's always nice to hear from folks as we keep keepin on.
I am into sails now and having fun. My next few posts will catch up as I now have sails on board.
cheers
-
I am posting a few views to just catch up on where we are at the close of 2021. Much time was spent on developing sails as my daughter came for the Christmas week and encouraged the activity. In the meantime work on deck and rigging continued.
-
293
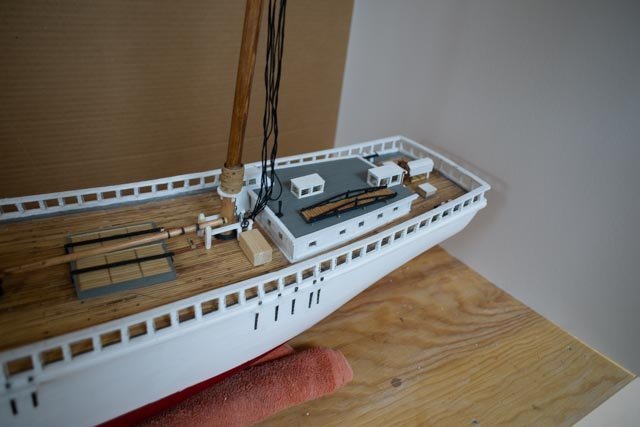
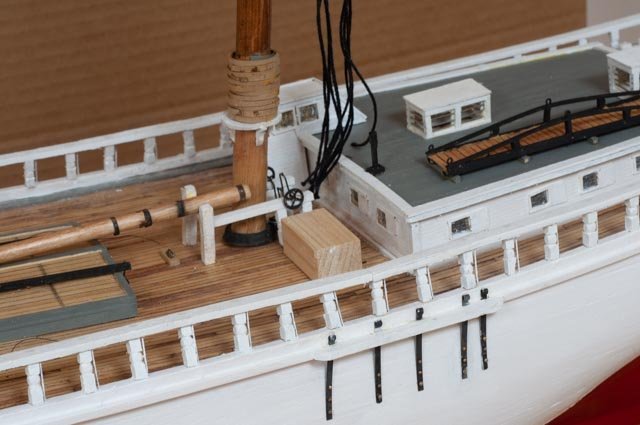
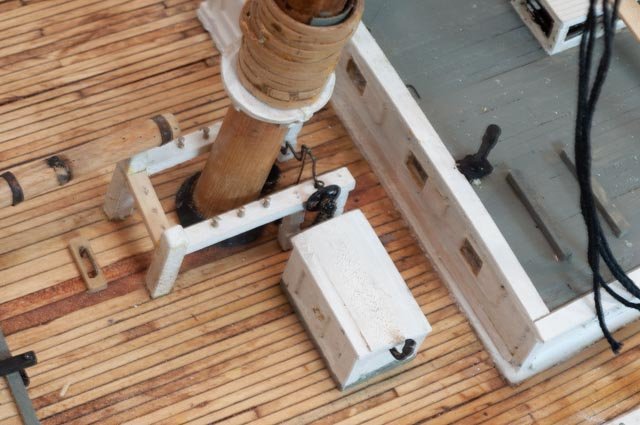 here I have installed a gas engine house for the water pumps. In the photos of the 4 masted schooners, a box just like this one is behind the third mast. Others had a small house up on the roof of the cabin which was clearly not in any of the photos of Zebedee Cliff. There is no way they were without a motor for the pumps as these girls all leaked. I added a direct chain drive outside the port side fly wheel. Thus the pump could be run by hand of the engine failed.
-
294
 time to turn out the docking bollards and wheel heads for the main donkey engine that hoisted all the sails.
Looking for the yawl boat. Most schooners carried a yawl boat. The bigger ones all needed tugs to get into the docks . In recent years the windjammer schooner Heritage uses its yawl boat to move in and out of tight harbors. Therefore, there is some point where the yawl boat pushed the bow around and as the schooners grew in length , a point where they were effectively a launch.
-
295.
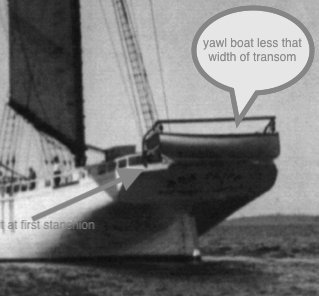 here is the sail away photo of Ada clearly showing the yawl boat.
-
296
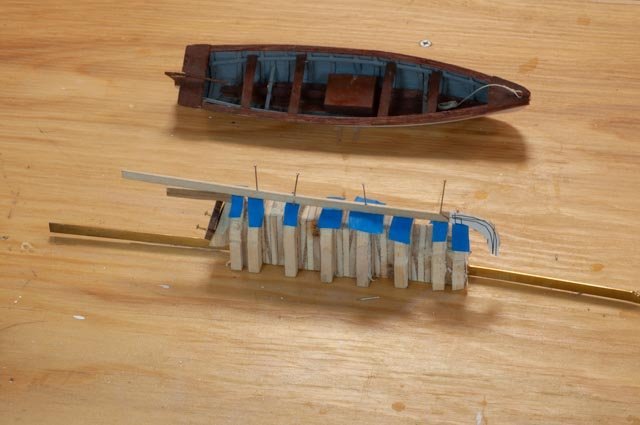
 here is the yawl boat I built for Charles Notman a bigger Bath built Schooner. The look is ok but too long.
-
297.
 using the photo and scaling, here is a roughed out block that let me figure out the davits etc.
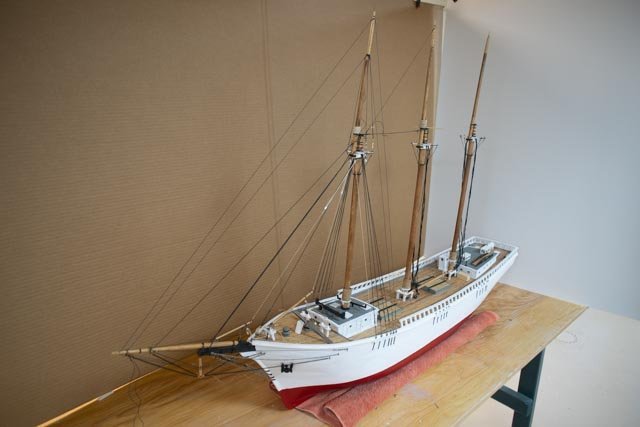
As we close out the year, we find we are nearly through with the standing rig and getting going on the preparation for the first sail.-
298.
 here we are with the first pass of templates for the sails. More on that later
Happy new year
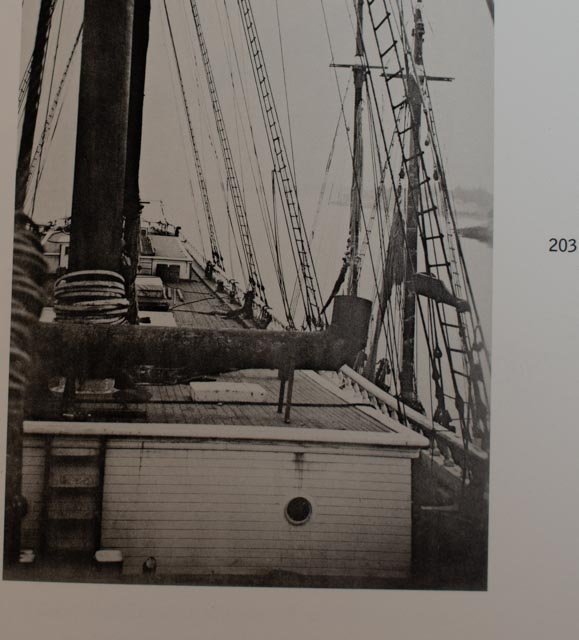
-
293
-
post 33
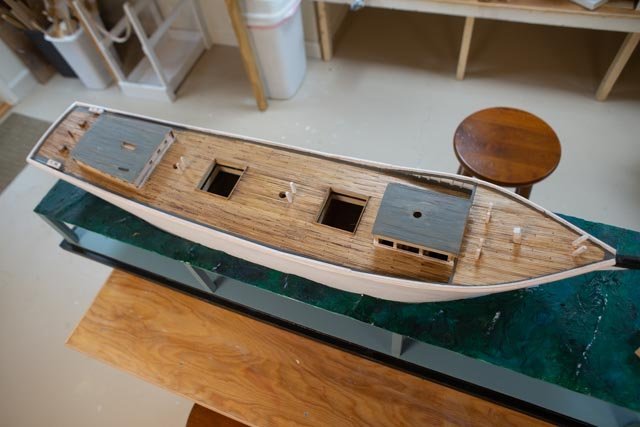
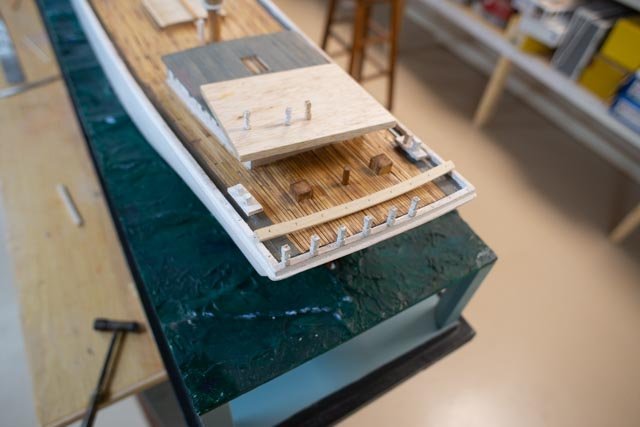
Planning the first sails, work on deck
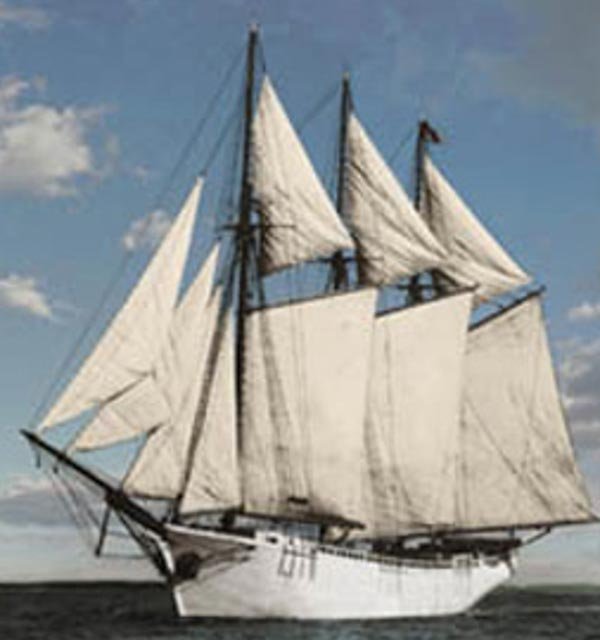
I have said my plan is to learn the silk span process as I move forward. As to sail design, my initial plan is to replicate the photo I have shared before and annotate here
-
288
 here we see a few details for rigging. I note items that are different from the reference drawings on Bertha and the Bath schooners. The foresail gaff seems to fly a little lower than the plans indicate. The gaff downhauls are clear, and the lazy jacks seem to be simplified to one drop from the lifts. Most importantly the top sails seen to fly fully above the gaff and thus easier to handle when tacking. Most plans show them hanging below the gaff.
-
289
 this working markup was taken from the cad scaled rigging plans. they seem to compare nicely between the three sources discussed before. Looking then to the actual sizes in the model I have adjusted them down a bit. Finally, I have scaled off the photo and reduced this sail’s height by one inch or about 4 feet.
-
290.
 here are the first patterns cut out and fit onto the model. The fore staysail is a bit smaller than the plans as is the jib since there is a self-tacking jib boom that showed in the launch photo. The flying and outer jibs are just the same as the drawings and seem to look ok. I may shorten them just a bit to conform with the others. This is also the view to see that different sizing of standing rigging make sense as to where the big loads lie.
Next up here for me is to make the other patterns and then gain some practice with silk span. There is much mystery to this process. I see videos that vary significantly. Some are recommending laminating layers over copy paper with all the markings. Others just use the silkspan itself, paint and mark it. I have no idea where I will end up. I bought the recommended booklet and read it. Now that I need it, I can’t find it…..sound familiar?
Related standing rig-
ac-291
 I said earlier I needed to buy some more chain sizes and do a better job with the martingale supports. Here we are in a better size.
-
Ac-292
 I feel backing away that this view makes better sense as to where the load is.
I have learned through some of my reading that the issue with these schooners that became a limiting factor was the undue loading down to the bob stays. The New England 3,4,5 and 6 masted schooners all shared a common main support system. It started at the aft most mast head and travelled forward through the spring stays. In four masted the spring stay from the main to the foremast were doubled. In all these schooners the jib stay is doubled and runs down and around the bowsprit, which is then grabbed by the chain bob stays. When many of these schooners failed and lost masts, it was the domino effect of the bobstay going and then all masts failing. There are written discussions on the efforts to challenge the design, but all that took place too near the end of sail over steam.
I believe today some of the multi masted cruise schooners all have forward stays and stay sails on the multiple masts making the gigantic 30–40-foot boom and gaff fore and aft sails of these beauties not possible. The idea that kept them going as I have read it, was the following. With the spring stays over the large fore and aft sails, that could be raised and lowered with a donkey engine, it was a very small crew that could sail the vessel loaded down with coal, lumber etc. The usual calculation I have read is 2 men per mast plus captain and cook. Thus, Ada Cliff would have had only 8 crew.
Merry Christmas
- KeithAug and GrandpaPhil
-
2
-
288
-
Roger
thank you for your helpful comments. as to the items you mentioned, I have the liquid flux that is sold with the tix soft solder. I hope that is right. For small pieces I know you are right as to process. My constant problem has been when I use the electric solder gun to get heat into the pieces, I have to touch them with the hot tip. It seems whatever I have done to secure the pieces, even those nice tungsten arms, the small pieces move and the joint fails. Sometimes the tip gets all black and does not seem to transfer heat. i clean and then it works for a few times. I have been told by others I am nuts to use the torch, especially when I am doing such small work. the only advantage for me, the beginner, is with the torch, it is a very quick flash from say three inches away and nothing moves. I agree that the copper shackles clearly get too hot. I believe I am supposed to heat the copper to pull the solder from the brass screw head into itself. I am sure annealed copper 22 gauge vs. a brass machine screw heat up differently.
I will carry on and complete I believe about two dozen more. With your inspiration, I will go back to the liquid flux with the tix solder and electric tip. If I can figure out how to avoid movement maybe I can be OK.
thanks again for looking in. Merry Christmas too
-
Post 32
Turnbuckles
I offer here here is a series of photos showing the sequence of production I used to make several dozen turnbuckles. This process ends with an obvious handmade product. I am not a metal worker, nor am I able to use my inherited lathe/mill to make more of these pieces. In a machine one can reproduce identical elements. Enough of that….
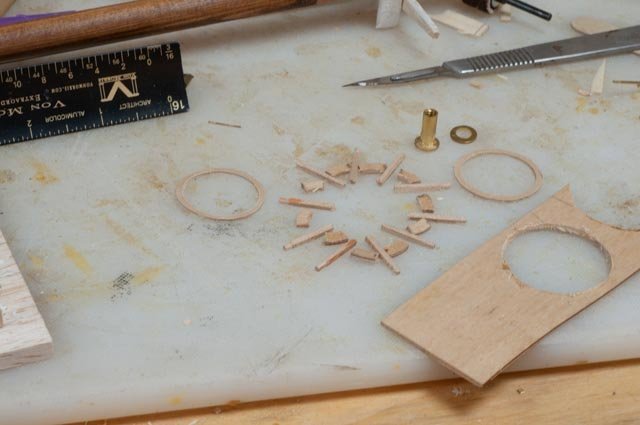
Following views from many schooners , I found a common element. On the bottom there is a clevis or shackle that connects to the chain plate. On those with a ring and shackle ,the ring is too small for me to model. Therefore, I chose to make the shackle attach to the “shaft”. I chuckle because after several searches I have never found neither good nor consistent names for the parts of a turnbuckle. In an earlier post I showed the evolution from my turnbuckles on Charles Notman to my turnbuckles here. There are three pieces, sub-assemblies, to make up the turnbuckle, the center barrel [ also called sleave or body], the bottom ring/clevis and the top ring [ eye] .
The barrel :
-
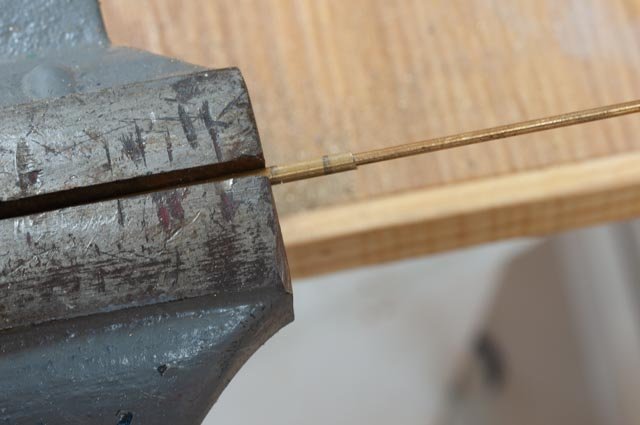
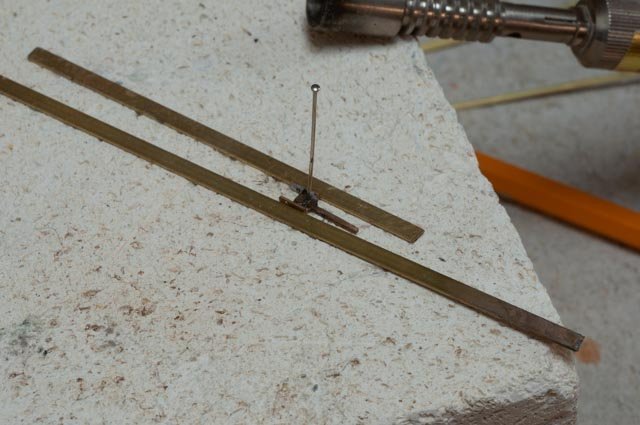
273
 This process is straight forward. In this photo one can see all the tools set up. I take a 5/32nd” brass tube [ 1/16TH” ID] and mark it off with a pencil the center section to be filed. I then fill it with a 1/16th” rod for support and place it on the edge of a small vise to help guide a square file. I file down one side then turn it over and repeat the other side. I then use the center punch to scrape out the slots.
-
274.
 Here we are set in a small vise for filing.
-
275.
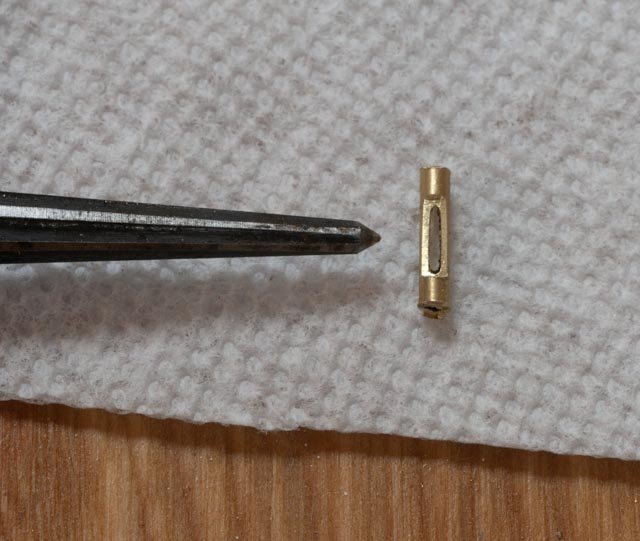 Here we are after scraping out the slot.
The clevis and ring ends
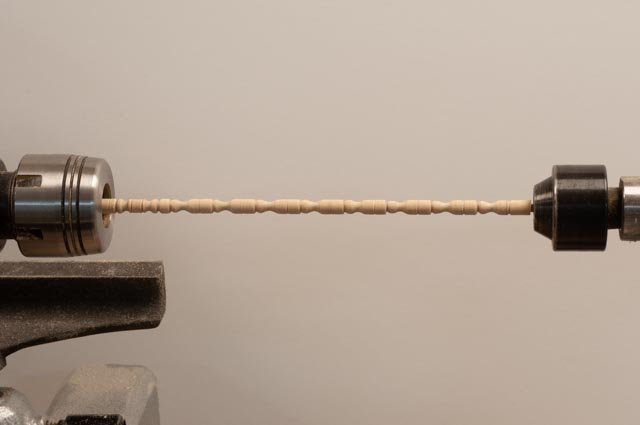
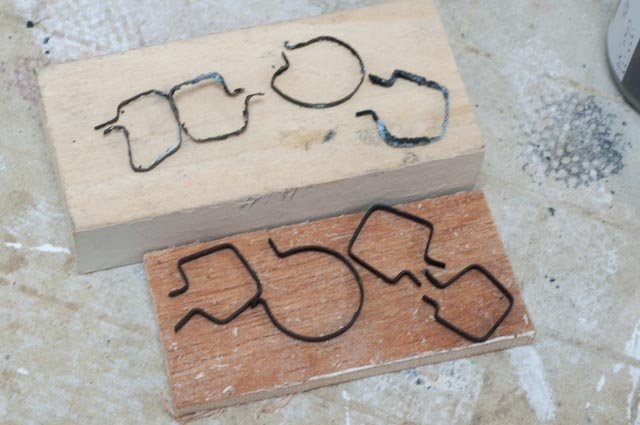
For the clevis end, I settled on using 22 gauge annealed copper, cut into 5/8th” lengths for bending the shackle. I then use number 80 brass hex head machine screws for the shaft. For the ring [top] end, used the 22 gauge copper wrapped around a 5/64th” drill bit and then cut off rings. I then used 80 brass flat head machine screws for the shaft.
276
 first we need to make the shackles. I measure the 5/8th“ length and then hand make them.
277
 second we make the rings. Wrapping around the drill then cutting off the rings.
278
 third we take the machine screws, here are flat head, put them in the vise and with a triangle file, enlarge the groove and use a small flat file to trim the sides. For the shackle end, I used hex head screws and filed them the same way.
Soldering
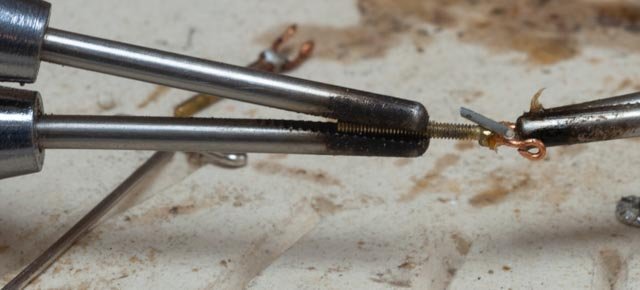
279
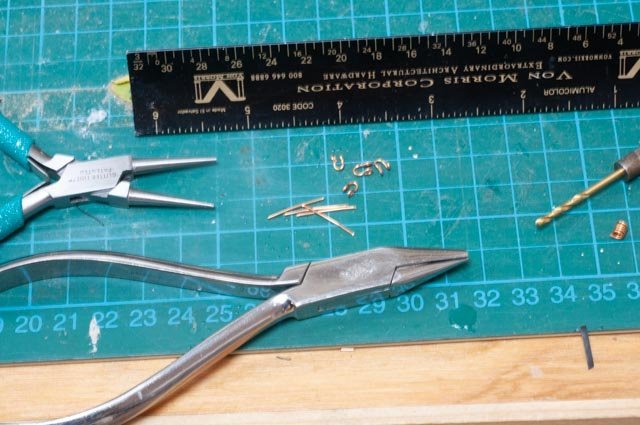
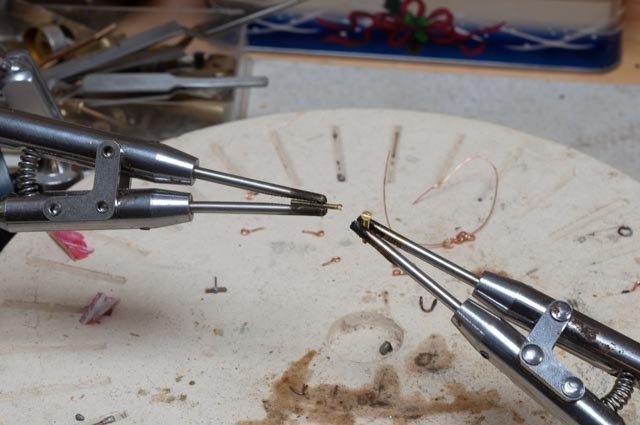
 Forth we need to solder the shackle or ring to the machine screw shafts. Note the copper wire with loose rings as they have first been pickled. I find pickling the easy way to prepare them, since they are too tiny to clean effectively. In the photo, the solder is in place on a ring end.
280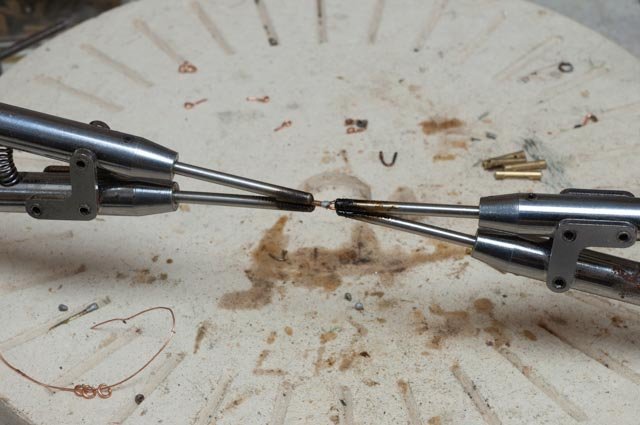 the ring end after solder. The next rings are sitting after the pickling.
281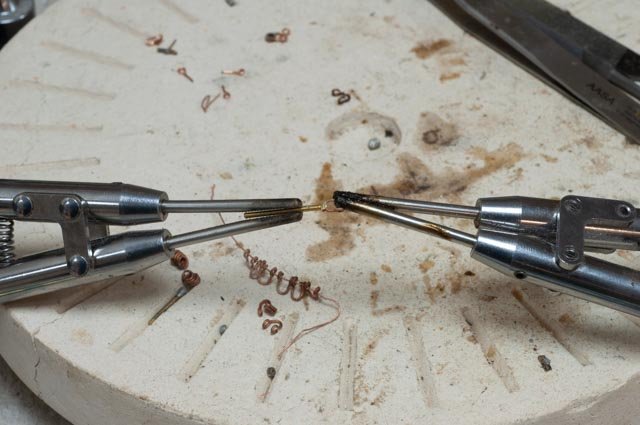 here a shackle has been soldered and the next batch are waiting.
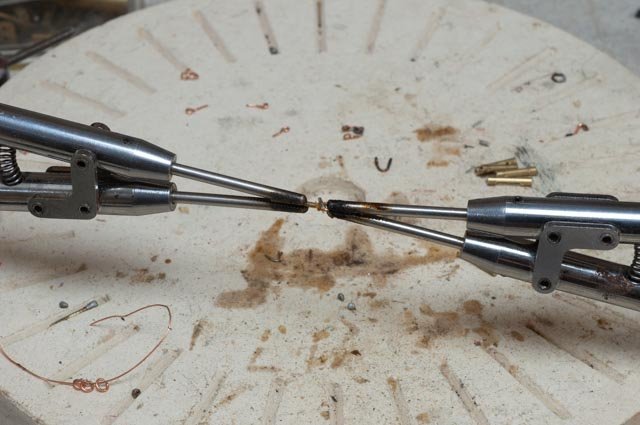
282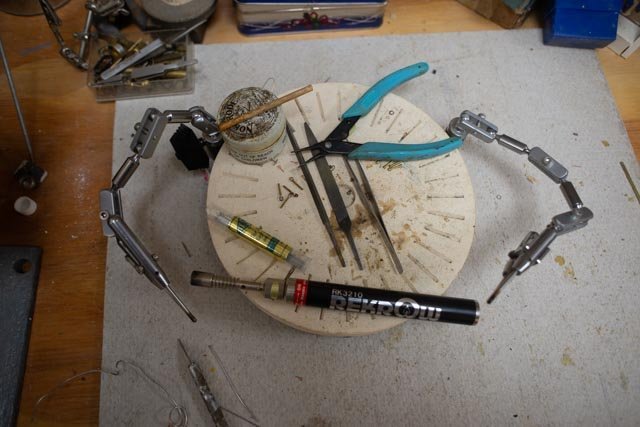 here is the combination of tools used in the process. Note I use normal flux and for these tiny connections the TIX soft solder. The pencil torch works well. I tried and tried with an electric gun and the liquid flux but found this process for me works best. This is the first project where I have forced myself to try and try again and get to where, ugly as it maybe, it is soldered.
283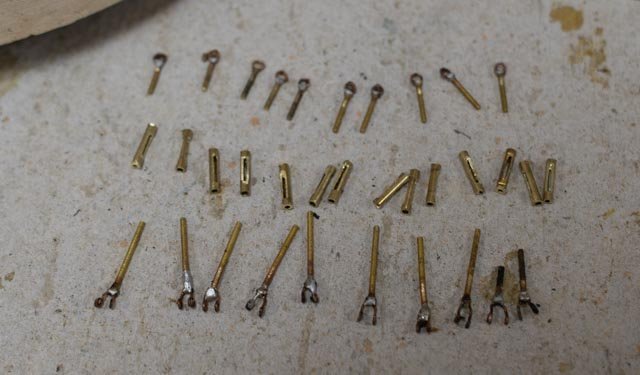 after a while I have a batch of about 8. All units need filing to clean up the over solder. The soft shackle will move around, so until these are being set up against the chain plates it is better not to work them too much. Similarly, the top rings get buried in a splice so not too many worries there.
FinishingNext up they are cleaned up, trimmed, and assembled. The ends are crimped into the tubes. Then we go for paint. They are three different materials, and we are trying to get galvanized and black grease on the threads.
284
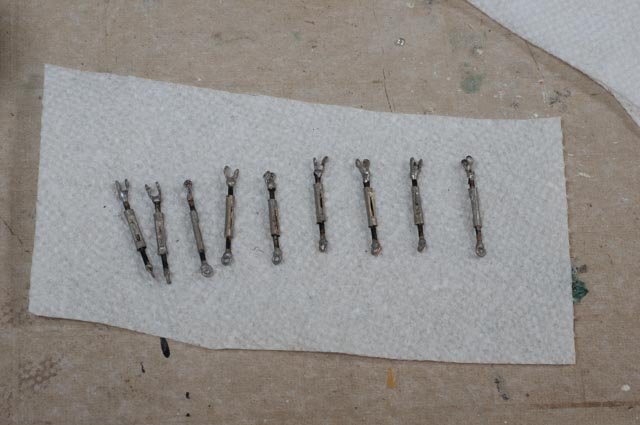 these have been assembled and painted. They are running 1 1/8th in length. What I found running through pictures is the newer schooners seemed to get smaller turnbuckles. I also found closed bodies show up on areas like cap shrouds on the foremast. I can see in the Ada Cliff launch photos clearly enough to gauge the length and to note the open body design. I use aluminum paint to replicate galvanized metal and black for the greased threads.
285
 here is the first batch installed starboard on the foremast. Crimped as they are, I can turn them and insert the small brass bar. I need to snip off the brass nails, retouch them with paint as they too would have been galvanized. The black rod is soft copper, and I need to either find a stiffer alternative or get it as straight as I can. Hopefully each batch gets better. We’ll see.
286
 here is the batch on the port side.
287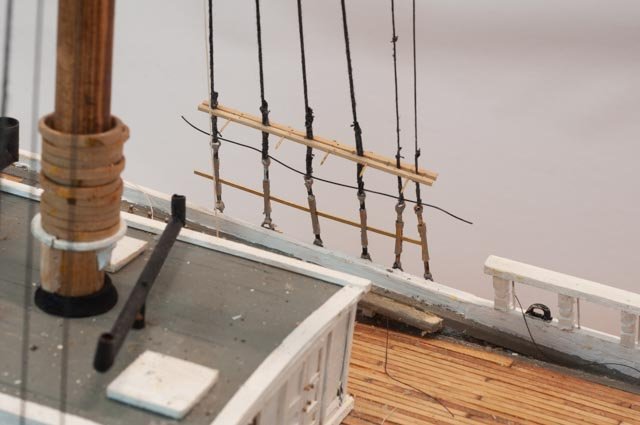 here is the view looking across the deck at the inside of the shrouds.
Since my goal is to replicate how things fit together and where appropriate how they work, I am OK with the hand made approach to things like shackles and turnbuckles. For any RC vessels, I have and will again resort to the store bought version . Threading rod and then thinking about left hand threads is way over my head. Also the load on the sailing version requires more strength that this static model.
all for now
- Duanelaker, KeithAug, GrandpaPhil and 1 other
-
4
-
273
-
post 31
My first rigging questions.
I find that each time I start to rig a schooner that I have much more to learn. Some of it is just adjusting details between vessels, some is relative to all schooners, and some is just how does one model it. My priority is to understand how to sail the vessel and try to model that. This priority overrides other goals. So first up is how to correctly represent the fore top mast. When I studied the designs from Bath, including Charles Notman and the Bertha Downs, I found a few details that made sense. My first issue is the outer jib stay hits the fore topmast about 2/3 the way up. That was no issue on the Bath schooners based on Douglas Lee research, as they used jack stays for the top sails
-
264 a
 and B show bottom and top of the jack stay on my model of Charles Notman. the sloppy sails were because she was a true RC schooner.
-

-
265 a
 and b repeat of photo ac 24 to review what we are looking to achieve overall, and b is the blow up that highlights the hoops are used and they stop below the outer jib stay. The sail “flys” above that and drifts several feet away from the top mast.
-

-
266
 here I have hung some cardboard to see if that helps in studying and photographing the rigging. I obviously need to get more white cardboard.
-
267.
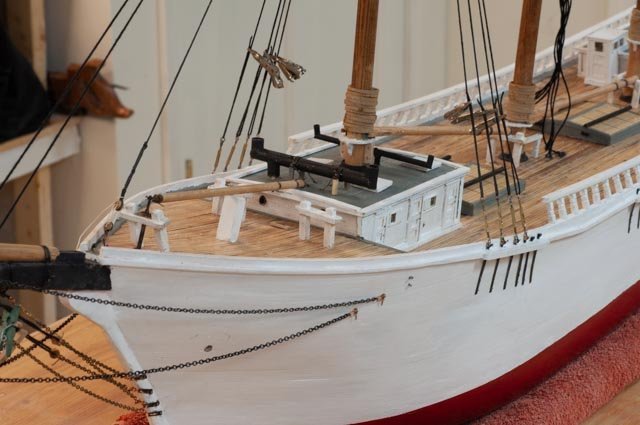
 the foremast …My goal is a to complete all rigging on the foremast as I continue with work on deck. The topping lifts and sheets for the jib and foresail are the first running rigging in place.
-
268
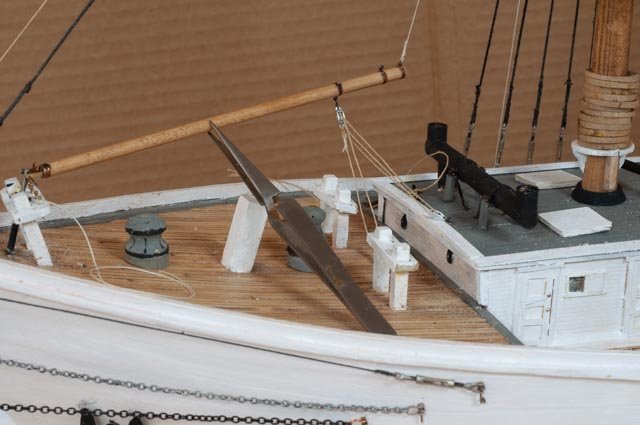 shows something I need to learn. The sails need to be out. But what is going to hold them out? I have the tools extending for the two small booms right now, but I need to find a solution. In my other rc models I tilted the whole boat in a strap cradle and gravity does the work. As of now that won’t work here when set in the water base as there is not very much of a heel in this rig.
-
269.
 work aft is plugging along. Here there is a blank box representing what I think I will add for a small engine to run the pumps. I will talk about that when I collect a few more photos and then build something. The pump details come for the bath technical drawings that do not show an engine.
-
270
 Several photos show that by the 1920’s small gasoline pumps were being used .As much as these coal schooners leaked ,there is no way the small crew pumped by manually spinning the wheel. I do not believe what read that he traveler line from forward could hook up to the pumps. that is a bull in a china shop. more important they likely needed to run at the same time.
-
271.
 here is some fun work as I add more and more stays. Here I am splicing another turnbuckle for the inner jibboom guy. As I study more photos, I am convinced that there was more and more galvanized components. I have started touching up with paint to get that look.
-
272.
 here is some progress as the top masts are now set
Production of turnbuckles is picking up. I will show that process next time. I found enough evidence to proceed with painting blocks white.
all for now
- GrandpaPhil, KeithAug and Duanelaker
-
3
-
264 a
-
This past week was full of fall outside work and little modeling progress. I do have a photo of the fun procurement items that will get me far into the rigging process.
- As i commented I like using the Bluejacket schooner fittings and blocks. New to my building since the diorama of Ernestina is my migration from annealed copper to annealed steel for many of the small hooks, eyes and other fittings that are in any tension. I still like the feel of the copper for shackles . Finally we have the new silk span for my first attempt as sails. Here we go.
- From expo I have a couple of sizes of chain, and with one I will fix the wrong one installed on the Martingale. I have read that the topsail sheets were sheeted with chain where they go over the jump stays and will try to add that detail this time as well. Also apparent in the new pile is the choice of belaying pins. I have looked at wooden and brass and have chosen to go with the brass 5/16" as they seem to look more like a 20th century items.
Still a few competing projects so it won't be quick.
jon
-
Allan
you are right! I hate to admit what the cost was on the materials I share in the next post. As to turnbuckles I have found that those on line are typically a barrel type. In the photos I have found a few samples of barrels on places like the jib stays . That would mean 6 out of maybe 60. What I see in the launch photo of Ada however, confirms the open yoke style even in those locations. Thus filling away is the only way I know to get there.
I will group some photos for a post in a few weeks. thanks for you shared thoughts. It truly is a constant learning process.
jon
-
Post 30
Slow transition deck to rigging
I write this paragraph to record the slow shift, as I am probably halfway through the deck work. That is other than clean up and touch up paint that never ends. I am moving into the rigging partly as much of that work is done on the side and brought to the schooner only for installation. Much of what I find in this stage is I get to try something, and if like the chain on the Martingale I mentioned above, I don’t like it or it is just wrong, I get to do it again. I have a few orders out for needed material to do the rigging. Unlike the master builders we all love to follow, I do not make everything. Early 20th Century navy anchors, cast iron on deck water pumps, and the like I get castings. For blocks I love to use Maine made Bluejacket blocks on my Maine schooners. I am also getting from them my first silk span.
Including the last few posts, I am working away here through this transition. A few more tidbits and overview.-
257.
 After many tries, I final got to a process to make a series of turn buckles. My first ones remain a bit crude, but hopefully as I work through the 50 odd units, they will get better. I am a full amateur when it comes to solder, but I insist on learning the trade. To get the annealed copper wire to take, I chose to make up 10 shackles and pickle them. I also pickled about ten wire rings. With that added step and the freshly filed cap screw slots, I was able, using a butane torch, to “flash off” and make the joint. I finally figured to use a flux paste and that helped hold the little cut length of solder. The electric iron and liquid flux are both back on the shelf for now as I just could not get it to work.
-
258
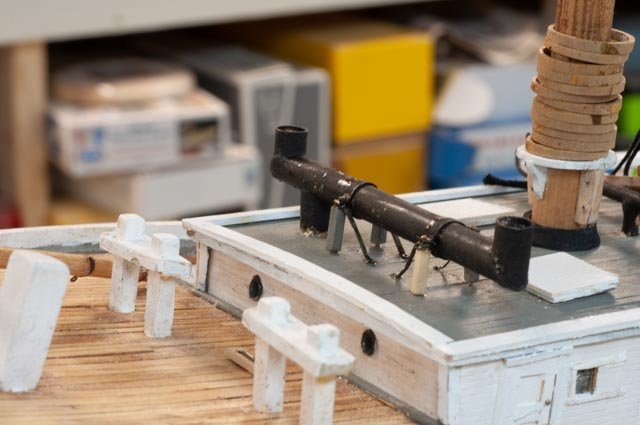 here we see I followed several pictures and made up the supports for the boiler stack. They will be part of the next round of touch up painting that this photo shows is really needed. The thin brass was blackened, but all the working after it will also needs touch up. I find the lamp black paint works well for this purpose. Also, in this view we see I finally found enough evidence that the mast wedges were not wood wedges with canvas boots as on older vessels. A few photos showed there were four quartered iron and bolted. Thus, I filed them down [ they are maple] some and added lamp black to simulate the iron.
-
259.
 backing off we see the transition beginning forward. The shrouds are clamped off. I need some aluminum paint to get the galvanized look on the turnbuckles before I make them fast. This transition also means the lower masts are there to stay.
-
260
 here we see in the transition there is still much to do aft. I have the deck house skylights roughed out. next up will be to add bars and iron rods to keep the lines from fowling. There is another stove pipe, then a gangway, yawl boats etc. much to do!!!
-
261.
 looking down we see a clean deck for the last time. Soon we need to get all though pins in place and be sure we have enough. I always find there are more lines than pins and expect no less of an issue here. Example all photos confirm lazy jacks. They go to fife rail on a fishing schooner. There are not enough fife rails for all those pins shown in any photos.
-
262.
 finally we see the tops taking shape. I am working along getting the top masts ready. I need this step more to complete the sizing drawings for the sails. More on that and rigging line issues later.
All for now
- GrandpaPhil and allanyed
-
2
-
257.
-
Here are a few more photos as I move through this long middle section
-
251.
 I am determined through this build to develop some soldering skills that have previously limited many opportunities. Here is probably my fourth attempt at this tiny fitting, the fore staysail gooseneck fitting.
-
252.
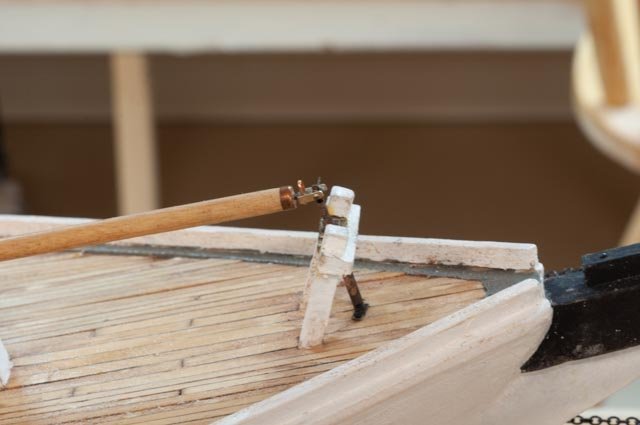 celebration …it worked. It’s Not so elegant, but functionally represents the details out of the research books.
-
253.
 here all together we have the fore stay with lashing and the complete gooseneck assembly.
-
254.
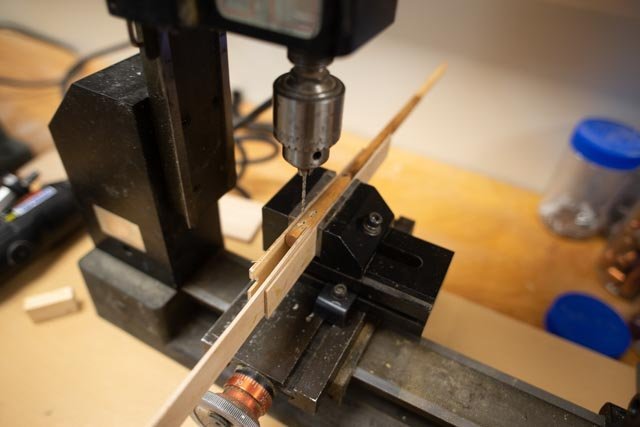 having learned the benefit of using the mill for drilling slots, we are off drilling slots for the fid and sheave in the top masts.
-
255.
 here is my shortcut to make little wooden sheaves for the top masts.
-
256.
 here we have the fore top mast resting in place with the fid and sheave in place. Both the forestay and jib stay are in place as well.
Happy Thanksgiving
- KeithAug and GrandpaPhil
-
2
-
251.
-
Not a progress posting just a few photos.
248. just in case one does not know what happens if the phone rings or some other disturbance arises, and you forget there are pieces in the blackening solution. If you leave them overnight they become toast. The top ones toast the bottom rebuilt.
249a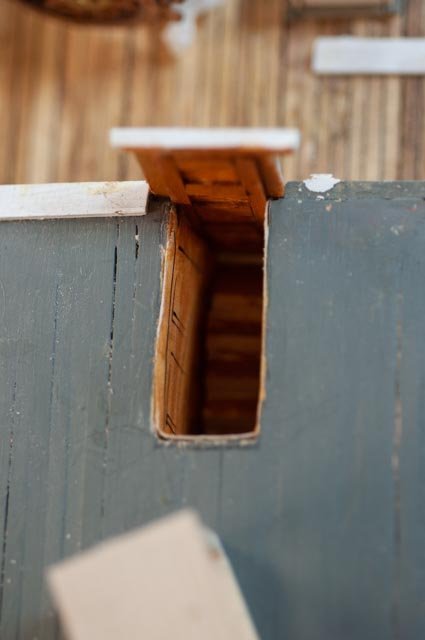 here I had some fun. I cut away the cabin to make the aft companionway.
249b.
 In the second shot we realize once I build the enclosure, there will be little to show, but it will be fun to know about. One of those little surprises
250 Here I started rigging by stringing the chains on the bowsprit. From the photos I believe these chains were galvanized. Like the two turnbuckles included I need to get some metallic paints to replicate the galvanized finish. I also note the lower chains at the tip of the martingale should be a bit smaller.
cheers
- GrandpaPhil and KeithAug
-
2
-
Post 29
The helm
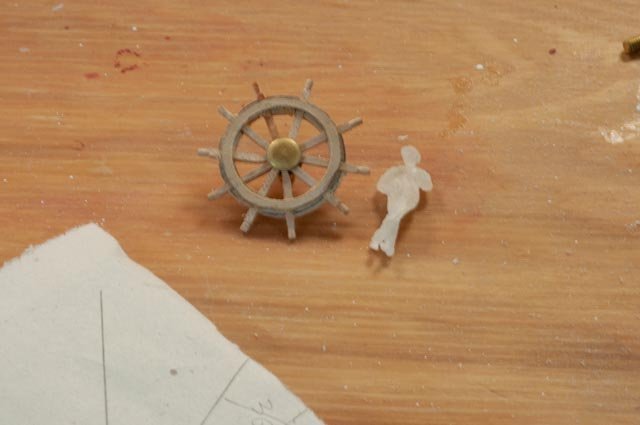
Building the helm is always fun. One of these days I hope to do the gears, but I have much to learn before trying that. Anyway, I needed to find some photos to see what I would try to do.
-
238.
 here we see the helm on Zebedee Cliff. It was built four years later but I believe the style is fine. I am not sure how tall the 1933 tourist in the photo was, so I am going for about 5-foot outer diameter.
-
239.
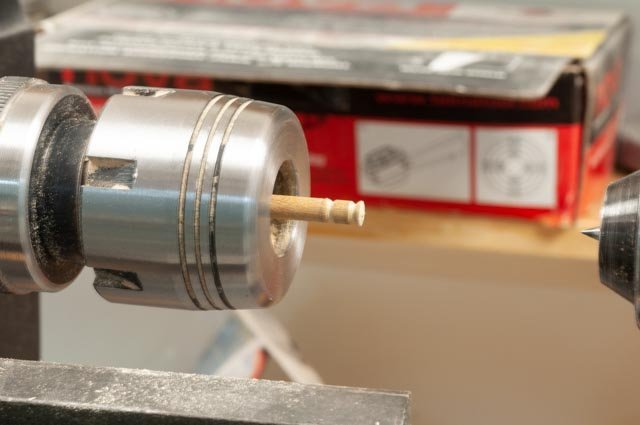
 I have used this method before and though crude it seems to work for me. I use a Forstner Drill Bit to cut inside holes in birch plywood. I use 1/16” for the center and 2 each 1/32” for the rims. The inside gets cut into segments to go either side of the spokes.
-
240
 here we are set up to glue the spokes on top of a template for the 36 degrees per spoke. I use maple for the spokes as they are turned.
-
241.
 tada….oops I think we are a bit too big. Well, this was good practice anyway.
-
242
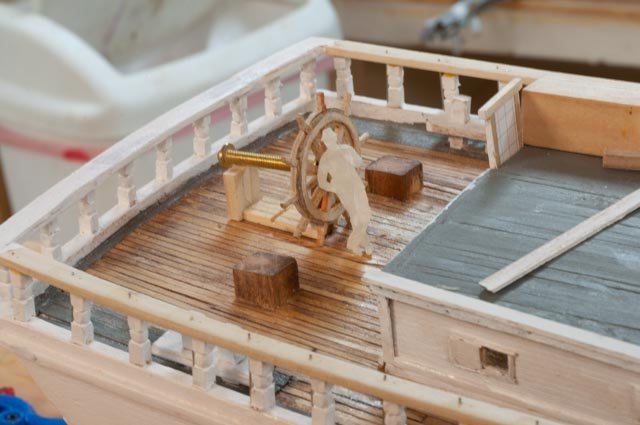 just for fun here is the too big wheel on board…..no go
-
243
 back to the drawing board we used a ¾” bit and went again.
-
244
 here we are in glue up and I think we may be ok this time. Below lying on the deck, we see the blocking and brake. I used different colors stain, so the pieces make sense. Just a few bolts and a brake slide plate and we are done. On the roof my limited supply of chocks is resting. According to the details I have found all but the forward chocks need to be closed.
-
245.
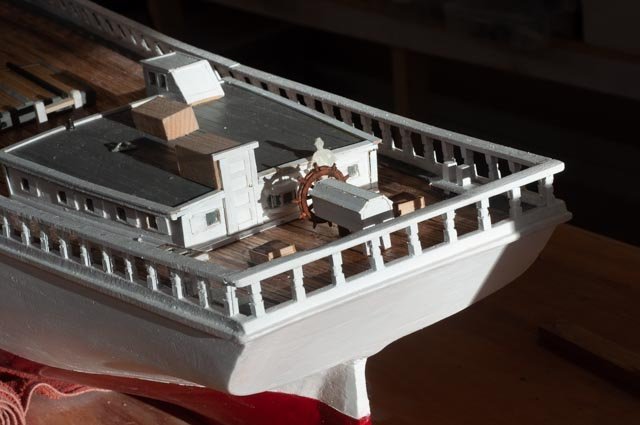 One of my joys is entering the shop in early morning in winter. The leaves are mostly down, and the winter low morning sun streams into the shop. Here the helm is in place. A few little handles and we are done.
Other work
-
246.
 Just an update I am working on the mast tops. Here the futtocks shrouds are made up based on details from booth Douglas lee at Maine maritime and the anatomy of Bertha book. I love it when I find two sources that agree. I need to adjust the stain as the mast tops are all light stain and the darker oiled finish that should be below these shrouds.
-
247.
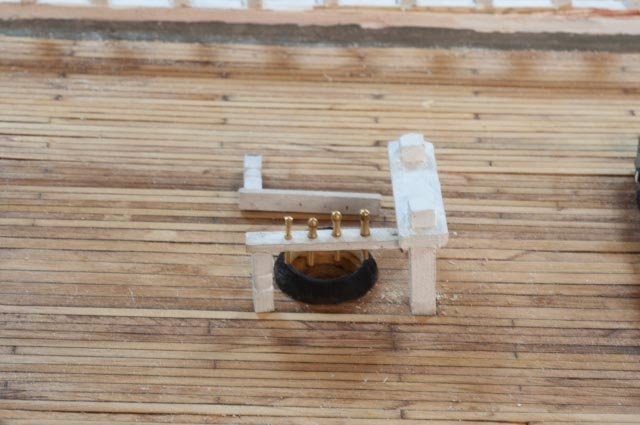 here I had a little fun and wasted a pin rail. I went to my supply of pins and found I have none at 5/16” which is the size I need. Here are 4 different designs of what is out there in a size for 1:24 left over. I need 100 and am in the market.
All for now
- GrandpaPhil and KeithAug
-
2
-
238.
-
Post 28
Fly rails are installed and helm and top works begun
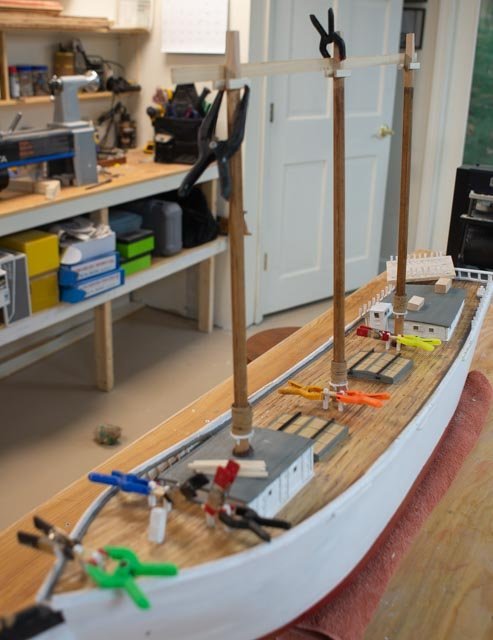
There is less time to focus during fall a Maine clean up, but some progress continues. I have the fly rails installed now and have started preparing the lower mast shrouds and cross tree assemblies as well as continued with other on deck work.
-
231
 here I am in my truly amateur area of soldering the boiler stack.
-
232
 here we are on in place on the fore cabin. The Boiler was forward of the mast and ran the steam engine to hoist sails pump water, raise the anchors etc. There is lots of conflicting information regarding the ending of steam jockey engine and introduction of smaller gasoline engines. I took that the larger schooner built at the same yard 4 years later clearly included the steam flue as justification to assume the slightly smaller schooner had the same technology in 1917. The smaller flue aft of the mast is the galley stove.
-
233
 here we have the pins going in for what is clearly shown on both sets of anatomy drawings. I say this carefully because they are labeled compression rods in one book. As a retired building engineer, I question that label. The wood stanchion was plenty strong resisting any downward forces…. compression. The fly rails contain all the tie offs for all the running rigging. Many of those lines would have tried to lift the rails, thus these rods were from that perspective in tension. The connections of the turned wood stanchions would not have been strong in upward resistance…regardless we move on. Please take note that the colorful pin heads are not xmas decorations. I just wanted to use them up in this effort.
-
234
 here the rest of the fly rails are going on.
-
235
 here we are all painted. Work is beginning on the helm. as well.
-
236.
 here again the fly rails in place giving clearer identity to our subject.
-
237.
 here I have started building out the cross trees and iron word at the mast tops. I am working on the rigging table making up shrouds as well so they will be ready when we complete the deck work
All for now
- KeithAug, GrandpaPhil and ccoyle
-
3
-
231
-
Post 27
Progress on deck
There are many interruptions these days as fall is in full swing and we need to get ready for winter. No rest in site. Regardless we plod along. Before showing a little progress I want to describe the basis I have chosen in making decisions about what goes where on deck. I take us back to the Fly rails book mentioned before where several Schooners rested in Boothbay Harbor in the mid 1930’s and were photographed. A key one was the Zebedee D Cliff, sort of a grandson of Ada Cliff ,our subject. After the Yard became the Eastern Ship Company they built 4 each 4 masted schooners. The last and most famous, here abouts anyway, was the Zebedee D Cliff. She was the last one launched. My point is that she was built in the same yard only a few years later. Therefore, the views of the deck give us a good potential of seeing what might have been on deck of Ada. I start with three photos from the book….
-
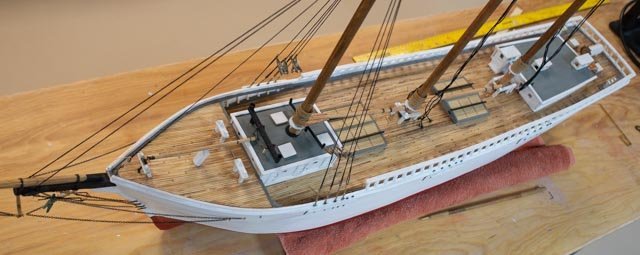
221
 starboard aft looking forward: Note the treatment of the deck house, the long rail leaning in and the bollards. It looks as though those fore cabin doors slide…oh well I copied another view where they are Dutch doors.
-
222
 port aft looking forward …just more details like the galley and crew quarter hatches on the fore cabin, gang way, white large blocks, etc.
-
223
 forward deck looking aft …at the fore cabin. Note the large exhaust for the boiler forward of the mast, the port hole etc. this schooner had only one deck level exposed. The tip-off is the fly rail going all the way forward.
-
224
 This view is not the same schooner but a lot more items are here to consider. The galley stove pipe, also, for information, note the shrouds were removed on the dock side to promote loading
A little progress
-
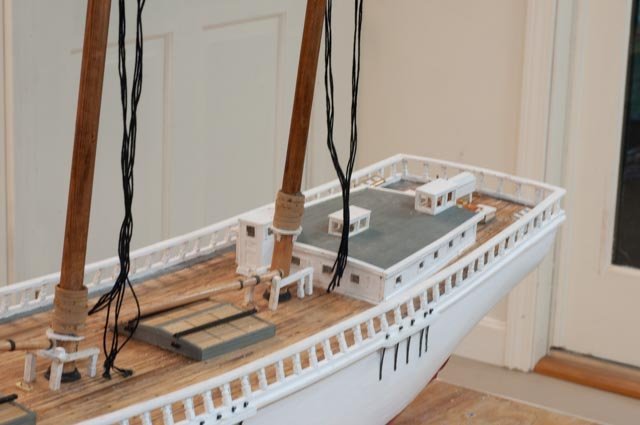
225.
 I did not show this view last time, but thought is worthwhile to document the nice clean empty deck.
-
226
 I also left out this photo showing the assembly line for the balustrades. I make roughly 8 at a time. After a single coat of white they get pinned into place. I then drill through the cap rail into the balustrade and glue a small pin.
-
227
 here we are lining up the cross trees at the mast heads.
-
228.
 I build the hatches and am working on the bitts. Most photos show not fife rails. I am still working on that because there are many lines and normally 12 of them tie off there. More to think about. I need one for the pump regardless.
-
229
 I chuckled when I read the angle of the balustrades is 14 degrees. Forgive me for using a 15-degree pin when cutting them.
-
230.
 here we have a milestone. I have made and blackened the chain plates and they, the first metal work, are now going in.
All for now
- GrandpaPhil, Schooners and KeithAug
-
3
-
221
-
Thanks Jim
from here on in is the fun stuff.
-
Thanks Keith
yes these big schooners are quite substantial. I just went back into the detailing done with photos in the late 1930’s. There are several fun details I hope to include to show how the small crews sailed these beauties
cheers
ADA CLIFF 1918 by Jond - 1:48 - three-masted Boothbay Schooner
in - Build logs for subjects built 1901 - Present Day
Posted
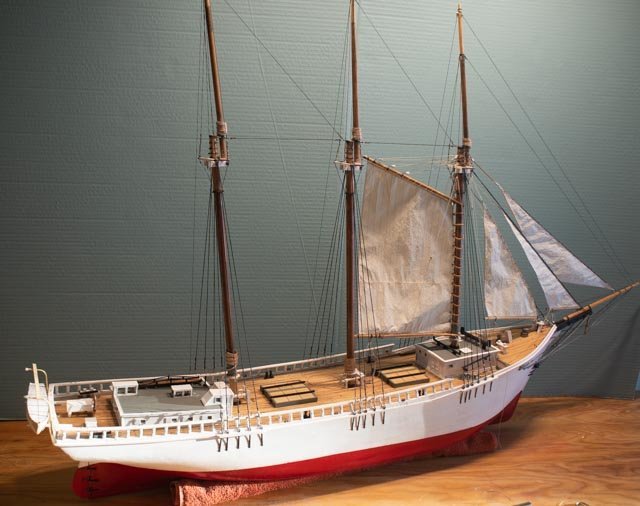
the seventh sail……