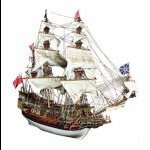
chriswi Posted September 15, 2019 Share #1 Posted September 15, 2019 Hi everyone, This is my first build log but third ship I've tackled. I started this ship about a year ago and due to the hot weather here in the Phoenix area it makes it hard to work on it year around, so in the summer I have to move from the garage into my office (office has great A/C) so I'am very limited to what I can do. I had a lot more pictures of the build in its earlier stages but when I got my new phone some pictures were lost lost during the data transfer.🙁 So, I'am hoping everyone will enjoy. Dwight, coxswain, bruce d and 6 others 9 Quote Link to comment Share on other sites More sharing options...
chriswi Posted September 15, 2019 Author Share #2 Posted September 15, 2019 (edited) Here are a few more pictures of the Diana. Edited September 15, 2019 by chriswi Peter Bloemendaal, coxswain, GrandpaPhil and 11 others 14 Quote Link to comment Share on other sites More sharing options...
Mahuna Posted September 20, 2019 Share #3 Posted September 20, 2019 Nice work, Chris. I'll be following along, and hope to see it in person sometime. Quote Frank Completed: Skipjack Kathryn; Dunbrody Sectional Model; Paragon (modified Mayflower) Scratch Build; Planning a Sectional Model of Dunbrody NRG Member Link to comment Share on other sites More sharing options...
chriswi Posted September 20, 2019 Author Share #4 Posted September 20, 2019 Thanks Frank, when I'am able to move back out to the garage you can swing by and have a look, should be soon the temps are dropping.😀 Mahuna 1 Quote Link to comment Share on other sites More sharing options...
chriswi Posted September 21, 2019 Author Share #5 Posted September 21, 2019 Had some time this week to work on the Diana. hopefully i will have a few hours this weekend to get some things done on it. GrandpaPhil, GuntherMT, coxswain and 5 others 8 Quote Link to comment Share on other sites More sharing options...
chriswi Posted September 23, 2019 Author Share #6 Posted September 23, 2019 Need some help or ideas. I've been contemplating this step for a couple weeks now and have yet to come up with a good solution, the brass widows and decorations need to be glued to the transom, I only get one shot at this and as everyone knows if it doesn't go well it's gonna look horrible. I'am not sure what type of glue to use, CA could make a big mess of things and I know contact cement is not a good glue for brass. any suggestions will be very appreciated. GrandpaPhil and bruce d 2 Quote Link to comment Share on other sites More sharing options...
coxswain Posted September 24, 2019 Share #7 Posted September 24, 2019 Just a guess, but I would try a two part epoxy - worked very well on an outdoors project I had with plastic and metal............there should be a lot of people that know more than I..........Steve M Quote Link to comment Share on other sites More sharing options...
Mahuna Posted September 25, 2019 Share #8 Posted September 25, 2019 I agree with Steve - I would use two-part epoxy. The five-minute type would be my choice. A couple of points: when you clamp the piece to the hull you'll find that the wet epoxy is pretty slippery and the piece may want to slide while you're clamping it. Also, the epoxy will tend to run and ooze out of the small holes. This can be cleaned up while it's still wet by washing the unwanted epoxy off with a brush dipped in 90% isopropyl alcohol. You need to make sure you get the unwanted epoxy off before it has cured - after it's cured you'd have to grind it off. Chris - like doing anything for the first time I'd use some scrap pieces for testing until you get familiar with using the epoxy. Epoxy is super strong when cured, so you won't need to use a lot of it. And you're always welcome to come over so we can play around with the epoxy before you put it on your model. Quote Frank Completed: Skipjack Kathryn; Dunbrody Sectional Model; Paragon (modified Mayflower) Scratch Build; Planning a Sectional Model of Dunbrody NRG Member Link to comment Share on other sites More sharing options...
chriswi Posted September 28, 2019 Author Share #9 Posted September 28, 2019 (edited) Thanks Frank and Steve, I went with the epoxy, Thanks for the offer Frank that is very kind of you to help me out. I've quite a bit of experience with the 2 part epoxy from my RC airplane days. it all went very smooth. (having a glass of wine now) 😅 I'am just not happy with how Occre does this part of the ship, they seem to cut corners on this part of the build, other than that I'am very happy with the kit. The only thing left is to fix the cannons on the main deck then it's on to the masts. Edited September 28, 2019 by chriswi GrandpaPhil, bruce d, Mahuna and 2 others 5 Quote Link to comment Share on other sites More sharing options...
chriswi Posted October 11, 2019 Author Share #10 Posted October 11, 2019 Hi everyone, Finally have most of the top deck done. The cannons, belaying pins, barque chocks for the life boats and eyebolts. Mahuna, GrandpaPhil, bruce d and 3 others 6 Quote Link to comment Share on other sites More sharing options...
chriswi Posted October 11, 2019 Author Share #11 Posted October 11, 2019 A good start on the dead eyes, I have spent allot of time trying to decide weather or not I was going to use black chain or thread for the chain plate, the instructions show thread and I also think the chain would not be correct for the time period of the ship, so I went with black thread. I think chain would look better but need to keep it somewhat correct. Also finished up the rudder chain so I don't lose the rudder if the ship hits some rocks.😂 Edwardkenway, GuntherMT, bruce d and 3 others 6 Quote Link to comment Share on other sites More sharing options...
Mahuna Posted October 12, 2019 Share #12 Posted October 12, 2019 Very nice work, Chris. You're making some real progress now. Quote Frank Completed: Skipjack Kathryn; Dunbrody Sectional Model; Paragon (modified Mayflower) Scratch Build; Planning a Sectional Model of Dunbrody NRG Member Link to comment Share on other sites More sharing options...
chriswi Posted October 16, 2019 Author Share #13 Posted October 16, 2019 Thanks Frank, looking forward to the weather to cool off enough so I can move back out into the garage, easier to get more done out there. Mahuna 1 Quote Link to comment Share on other sites More sharing options...
chriswi Posted January 3, 2020 Author Share #14 Posted January 3, 2020 Finally some time to post a couple pics of the Diana. finished up all three lower mast and started the shrouds and also the anchors are just hanging around now, not sure if I want the anchors tied up or just hanging, I kinda like them hanging. GrandpaPhil and bruce d 2 Quote Link to comment Share on other sites More sharing options...
chriswi Posted January 3, 2020 Author Share #15 Posted January 3, 2020 GrandpaPhil, coxswain and bruce d 3 Quote Link to comment Share on other sites More sharing options...
chriswi Posted January 3, 2020 Author Share #16 Posted January 3, 2020 John Cheevers, GrandpaPhil, coxswain and 1 other 4 Quote Link to comment Share on other sites More sharing options...
Snow Posted January 3, 2020 Share #17 Posted January 3, 2020 Hi mate great work I also built the Diana it took me 2 years ,if you want to see any pictures see occre Diana ship by snowy Cheers snowy Quote Link to comment Share on other sites More sharing options...
Retroship Posted January 3, 2020 Share #18 Posted January 3, 2020 Nice work. I started on Diana about a month ago, so I will follow your log build closely. I am currently working on the first planking. JayCub and bruce d 2 Quote Link to comment Share on other sites More sharing options...
DavidG Posted January 3, 2020 Share #19 Posted January 3, 2020 Chris, nice to see another Diana being built. You did a very fine job. I especially like how the head turned out. And your stern looks very good as well. I have the same ship on my desk for 12 years now on and off, you made already much more progress than I did. Keep on the good work. Quote Past builds: Prins Willem, Amati Coca Current Build: Occre Diana Link to comment Share on other sites More sharing options...
Mahuna Posted January 4, 2020 Share #20 Posted January 4, 2020 Nice work, Chris. Keep the updates coming - you're making great progress. Quote Frank Completed: Skipjack Kathryn; Dunbrody Sectional Model; Paragon (modified Mayflower) Scratch Build; Planning a Sectional Model of Dunbrody NRG Member Link to comment Share on other sites More sharing options...
chriswi Posted January 4, 2020 Author Share #21 Posted January 4, 2020 So, I found out something interesting today about Occre and there new procedure regarding replacement parts. Let me first say that Occre is amazing when it comes to replacement parts and there customer service. I had an issue with 2 of the dowels to be used for the yards on the main and fore mast, they were to warped to use so I put in a replacement request and received my parts but they were sent in Ramin instead of Sappeli, so I emailed Occre of this and asked if I could get the parts in Sappeli, they said that is how they are sending replacement parts now and I needed to stain the new ones in the Sappeli color. Well just one problem Sappeli stain is not available anywere, I emailed Occre again asking if they have ideas or send me some stain havn't heard back yet. I hope this helps anyone who will be building an Occre kit and need replacement wood. My idea is to just paint the yards black witch is not all bad, it should look even better than the stock Sappeli color GrandpaPhil and coxswain 2 Quote Link to comment Share on other sites More sharing options...
chriswi Posted January 4, 2020 Author Share #22 Posted January 4, 2020 20 hours ago, Snow said: Hi mate great work I also built the Diana it took me 2 years ,if you want to see any pictures see occre Diana ship by snowy Cheers snowy Thanks snowy, I have seen your Diana and very nice work, you put in a lot of extras that give it a nice touch. Im on my second year building her, my biggest issue living in Phoenix Arizona I lost a lot of build time the first summer, about 5 months lost due to being to hot in my garage. about 125 degrees 😓 but if i go into this summer I should be able to work on it in the house just the rigging left to do. Quote Link to comment Share on other sites More sharing options...
chriswi Posted January 4, 2020 Author Share #23 Posted January 4, 2020 Thank you DavidG and Frank for the kind words. Quote Link to comment Share on other sites More sharing options...
Snow Posted January 4, 2020 Share #24 Posted January 4, 2020 Yeah thanks mate your ship looks great. And yes i painted my yards black on the bottom 2 yards and mahogany or maple stain on the rest ,here's a picture if it helps .I love these stains. Cheers snowy GrandpaPhil 1 Quote Link to comment Share on other sites More sharing options...
Retroship Posted January 4, 2020 Share #25 Posted January 4, 2020 (edited) Hi chriswi. In my kit all the masts and yards are made of ramin. I have spent some time wondering how i will paint or stain these. Painting them black sounds like an good option. I think i will stain the mast in mahogny and paint the yards black. Edited January 4, 2020 by Retroship Quote Link to comment Share on other sites More sharing options...
chriswi Posted January 5, 2020 Author Share #26 Posted January 5, 2020 Started the long road of ratlines last night, they are not in there permanent place yet need to make a few adjustments before gluing them. Also finished up painting and clear coating the three lower yards for the fore, main and mizzen mast. GrandpaPhil and coxswain 2 Quote Link to comment Share on other sites More sharing options...
chriswi Posted January 6, 2020 Author Share #27 Posted January 6, 2020 One down 5 to go. 😎 JayCub, coxswain, JeffT and 1 other 4 Quote Link to comment Share on other sites More sharing options...
Snow Posted January 7, 2020 Share #28 Posted January 7, 2020 Looking good Very tidy Cheers snowy chriswi 1 Quote Link to comment Share on other sites More sharing options...
RichardG Posted March 26, 2020 Share #29 Posted March 26, 2020 Looking good. I hope you've been continuing the build. Richard Quote Richard Current Build: Early 19th Century US Revenue Cutter (Artesania Latina "Dallas" - messed about) Completed Build: Yakatabune - Japanese - Woody Joe mini Member: Nautical Research Guild & Midwest Model Shipwrights Link to comment Share on other sites More sharing options...
chriswi Posted April 4, 2020 Author Share #30 Posted April 4, 2020 Its been while since my last post, I will be taking the build log all the way through the finished ship in the next couple of days. Started shaping the yards and more rat lines. GrandpaPhil, coxswain and Mahuna 3 Quote Link to comment Share on other sites More sharing options...

Recommended Posts
Join the conversation
You can post now and register later. If you have an account, sign in now to post with your account.