MateuszPL Posted May 6, 2022 Share #1 Posted May 6, 2022 Hello. I am starting to build my third ship from the Columbus expedition. La Nina by Artesania Latina in 1:65 scale. I hope it goes easy, but not too easy GrandpaPhil, ccoyle, Prowler901 and 1 other 4 Quote Link to comment Share on other sites More sharing options...
MateuszPL Posted May 6, 2022 Author Share #2 Posted May 6, 2022 Before that, I made figurines from Artesania Latina. Until La Nina is launched, Vicente Yáñez Pinzón will wait on Santa Maria and oversee the construction. 😂 Canute, GrandpaPhil, Prowler901 and 2 others 5 Quote Link to comment Share on other sites More sharing options...
MateuszPL Posted May 7, 2022 Author Share #3 Posted May 7, 2022 First day of work. The easiest part. The frame parts fit very well. I just decided to nail a few nails to the deck because I glued the rest. Then I filed down the front and rear frames. I don't know if I did it well enough. I will decide in the process of making the hull plating. Knocklouder, Canute and GrandpaPhil 3 Quote Link to comment Share on other sites More sharing options...
Louie da fly Posted May 8, 2022 Share #4 Posted May 8, 2022 That's great, Mateusz! Looks like you're well on the way to another really good model. By the way, I love those crewmen figures. Very nice. Steven MateuszPL and Canute 2 Quote It's not really a ship model unless you've bled on it. CURRENT BUILDS Venetian merchant Ship from Basilica of San Marco Golden City - Ballarat paddlewheeler FINISHED Australian couta boat RMS Titanic HMVS Cerberus 11th century Byzantine dromon Winchelsea Nef - Late 13th century Mediaeval ship Henry Grace a Dieu - Rebuild of 1:200 model I started in 1967 https://modelshipworld.com/topic/36379-mistydeefer-by-louie-da-fly-finished-restoration-decor-yacht/#comment-1040663 Mistydeefer - restoration of decor model yacht Link to comment Share on other sites More sharing options...
MateuszPL Posted May 8, 2022 Author Share #5 Posted May 8, 2022 The figurines are very nice. There are only ten of them, so they may not be visible when I divide them into three ships. Today I just put the floor on the deck. I decided to divide the baswood battens into 6 cm long sections.They look more realistic now. Hartron, GrandpaPhil, Canute and 2 others 5 Quote Link to comment Share on other sites More sharing options...
MateuszPL Posted May 9, 2022 Author Share #6 Posted May 9, 2022 Third day of work. Upper deck under construction. Hartron, GrandpaPhil, Knocklouder and 2 others 5 Quote Link to comment Share on other sites More sharing options...
MateuszPL Posted May 12, 2022 Author Share #7 Posted May 12, 2022 Based on the experience of building previous ships, I decided to add the ship's keel and stem at this stage.It's my first time doing it so I don't know if it's a good move. In previous ships, installing them was the most difficult for me. Therefore, this time I want to try this method. I've already installed the side waterways. Now I will proceed to the initial hull plating. This may take me several days. Canute and GrandpaPhil 2 Quote Link to comment Share on other sites More sharing options...
MateuszPL Posted May 23, 2022 Author Share #8 Posted May 23, 2022 Work in progress. GrandpaPhil, Canute, ccoyle and 1 other 4 Quote Link to comment Share on other sites More sharing options...
MateuszPL Posted June 8, 2022 Author Share #9 Posted June 8, 2022 I have finished building the first plating of the hull. Gaps and unevenness will be smoothed out with a wood putty. Next step is to carry out the second and final plating of the hull. ccoyle, Canute, GrandpaPhil and 1 other 4 Quote Link to comment Share on other sites More sharing options...
Louie da fly Posted June 8, 2022 Share #10 Posted June 8, 2022 Nice work on your first planking, and filling and sanding should smooth it off well. However, may I suggest that before you begin second planking, you check out the planking tutorials at https://modelshipworld.com/forum/98-planking-downloads-and-tutorials-and-videos/ - these show you how best to achieve the best planking finish, the way it was done with real ships. Good work! Steven MateuszPL, Canute, Knocklouder and 1 other 3 1 Quote It's not really a ship model unless you've bled on it. CURRENT BUILDS Venetian merchant Ship from Basilica of San Marco Golden City - Ballarat paddlewheeler FINISHED Australian couta boat RMS Titanic HMVS Cerberus 11th century Byzantine dromon Winchelsea Nef - Late 13th century Mediaeval ship Henry Grace a Dieu - Rebuild of 1:200 model I started in 1967 https://modelshipworld.com/topic/36379-mistydeefer-by-louie-da-fly-finished-restoration-decor-yacht/#comment-1040663 Mistydeefer - restoration of decor model yacht Link to comment Share on other sites More sharing options...
allanyed Posted June 8, 2022 Share #11 Posted June 8, 2022 Please do take Steven's advice above and thoroughly study the planking tutorial by David Antscherl (https://thenrg.org/resource/articles) in the Article data base and Chuck Passaro's 4 part videos on proper planking techniques so at least the second layer looks good. There is no need to use metal pins, especially on the second layer. Is there a reason you used pins? Good luck! Allan Canute and MateuszPL 1 1 Quote PLEASE take 30 SECONDS and sign up for the epic Nelson/Trafalgar project if you would like to see it made into a TV series. Click on http://trafalgar.tv There is no cost other than the 30 seconds of your time. THANK YOU Link to comment Share on other sites More sharing options...
MateuszPL Posted June 8, 2022 Author Share #12 Posted June 8, 2022 Thanks for the advice. I will try to make a second planking according to the art of boatbuilding I'll do my best😁. Why did I use pins? Because the manual said so. I will not use pins on the second layer. 🙂 Canute 1 Quote Link to comment Share on other sites More sharing options...
allanyed Posted June 8, 2022 Share #13 Posted June 8, 2022 2 hours ago, MateuszPL said: Why did I use pins? Because the manual said so No surprise there. After studying the tutorials you will see that this is totally unnecessary. Sanding and otherwise fairing the hull is difficult at best with hundreds of nails with which you have to contend. Allan Canute 1 Quote PLEASE take 30 SECONDS and sign up for the epic Nelson/Trafalgar project if you would like to see it made into a TV series. Click on http://trafalgar.tv There is no cost other than the 30 seconds of your time. THANK YOU Link to comment Share on other sites More sharing options...
knightyo Posted June 8, 2022 Share #14 Posted June 8, 2022 This looks like a fun model! When the hull planking was attached, was it glued in addition to having the pins? If so, I'd strongly recommend removing the pins before starting the second layer of planking. Once the pins are removed, filler is applied to the hull (including any damage incurred during pin removal), and the hull sanded smooth, you should have a very good surface in which to apply the second layer of planking. Alan Canute 1 Quote Alan's POB Build Log HMS Triton 1/64 Alan's POB Build Log USS Syren 1/64 Alan's Build Log Nina 1/106 Link to comment Share on other sites More sharing options...
MateuszPL Posted July 12, 2022 Author Share #15 Posted July 12, 2022 Unfortunately, I did not manage to put the second layer in accordance with the art. Maybe I don't have the skills. This is my current progress. Knocklouder, BLACK VIKING, wool132 and 2 others 5 Quote Link to comment Share on other sites More sharing options...
Knocklouder Posted July 12, 2022 Share #16 Posted July 12, 2022 Hi, even if it's not planked by the book that's a ready good job , I could not get mine by the book either.But we will on our next one. 😊 It looks really good mate!! MateuszPL and Canute 2 Quote Start so you can Finish !! Finished: The Santa Maria -Amati 1:65, La Pinta- Amati 1:65, La Nina -Amati 1:65 , Hannah Ship in Bottle-Amati 1:300 : The Sea of Galilee Boat-Scott Miller-1:20 Current Build: The Mayflower: Amati On Hold: HMS Pegasus: Amati Link to comment Share on other sites More sharing options...
MateuszPL Posted August 1, 2022 Author Share #17 Posted August 1, 2022 (edited) I've completed the construction of the rudder stick and the gunwale covers. I've started building the stern rail. Edited August 1, 2022 by MateuszPL ccoyle, flutlo6180, Prowler901 and 2 others 5 Quote Link to comment Share on other sites More sharing options...
MateuszPL Posted August 4, 2022 Author Share #18 Posted August 4, 2022 I added cleats and painted stern rubbing strake, side and stern strengtheners. I used Vallejo black acrylic paint for painting. Hartron, clearway, ccoyle and 3 others 6 Quote Link to comment Share on other sites More sharing options...
MateuszPL Posted August 4, 2022 Author Share #19 Posted August 4, 2022 This time I would like to put varnish on the ship. I wonder if this is the right time? I've never done this before. Quote Link to comment Share on other sites More sharing options...
modeller_masa Posted August 4, 2022 Share #20 Posted August 4, 2022 5 minutes ago, MateuszPL said: varnish Of course, yes. Some varnishes, such as wax for wood, don't allow any bond, but most of them still have good adhesive to additional deck fittings. I would recommend the dewaxed shellac from Zinsser's. Shellac is a nearly all purpose varnish and bond for wood and thread. - Dry within 15 minutes. (Faster than oil and water based varnish) - Safe (Alcohol based) - Convenience (A little bottle of shellac lasts for a few days.) - Easy removable (Ethanol or IPA) - Nice coat (A little yellowish satin surface - not glossy) - Long shelf life (more than 5 years + add some alcohol to thin) - Application - Nearly all place of wooden model ship! Wood conditioner ◎, wood varnish ○, great paint primer (especially metal surface) ◎, good bond for thread and knot ◎ MateuszPL 1 Quote Link to comment Share on other sites More sharing options...
MateuszPL Posted August 8, 2022 Author Share #21 Posted August 8, 2022 OK. Effects before and after varnishing. Looks nicer modeller_masa, Prowler901, wool132 and 3 others 6 Quote Link to comment Share on other sites More sharing options...
MateuszPL Posted August 10, 2022 Author Share #22 Posted August 10, 2022 I'm starting to work on details. Louie da fly, Knocklouder, modeller_masa and 3 others 6 Quote Link to comment Share on other sites More sharing options...
MateuszPL Posted August 21, 2022 Author Share #23 Posted August 21, 2022 Current progress. flutlo6180, modeller_masa, Knocklouder and 4 others 7 Quote Link to comment Share on other sites More sharing options...
MateuszPL Posted September 4, 2022 Author Share #24 Posted September 4, 2022 Beginnings of manoeuvres with the rigging and mast halyards. flutlo6180, wool132, Knocklouder and 1 other 4 Quote Link to comment Share on other sites More sharing options...
MateuszPL Posted September 7, 2022 Author Share #25 Posted September 7, 2022 Final stretch! There are only details left. 😄 ccoyle, Altduck, flutlo6180 and 3 others 6 Quote Link to comment Share on other sites More sharing options...
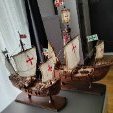
MateuszPL Posted September 16, 2022 Author Share #26 Posted September 16, 2022 The construction of my Christopher Columbus fleet is complete. I think this is my best ship so far. Michiel Frirz, modeller_masa, flutlo6180 and 4 others 4 3 Quote Link to comment Share on other sites More sharing options...
Prowler901 Posted September 16, 2022 Share #27 Posted September 16, 2022 Congratulations! A beautiful fleet of models you have recreated. When I think about the men who sailed them I am amazed at their bravery and skill. Such small ships in the big ocean without an idea of how far they would be going. Todd MateuszPL, Altduck, flutlo6180 and 1 other 3 1 Quote Link to comment Share on other sites More sharing options...
flutlo6180 Posted September 17, 2022 Share #28 Posted September 17, 2022 I like the figurines engaged in typical shipboard tasks. Great looking model and a fleet to be very proud of! MateuszPL 1 Quote Ken Current Build HM Alert - 1777 - Vanguard Next Build Fair American - Model Shipways Completed Builds 18TH Century Merchantman Half Hull Planking Kit - NRG San Juan Felucca - OcCre Link to comment Share on other sites More sharing options...

Recommended Posts
Join the conversation
You can post now and register later. If you have an account, sign in now to post with your account.