Iseaz Posted June 26, 2022 #1 Posted June 26, 2022 (edited) Hello everyone! I'm going to start my first build log with the King of Prussia from Corel. This is my 4th wooden ship, following the big HMS Prince from Constructo which kept me busy for more than a year. It's a smaller but quite detailed ship that I chose, my first from Corel. Here are some pictures of the box: Start of the build: Scratch build interior (will be visible through a hatch): First planking: I decided to paint this part directly in white without a second planking, because I was satisfied with the initial result, which brings out the lines of the planks. Here is the first coat, which shows some areas that need further sanding: Then I will cover the deck and add the inner planking. Feel free to share your thoughts on this build ! Edited June 26, 2022 by Iseaz catopower, GrandpaPhil, BenD and 2 others 5
BenD Posted June 27, 2022 #2 Posted June 27, 2022 You managed to get really fair curves on her despite only having 11 bulkheads to lay the planks across. Is it single or double planked? allanyed 1 Ropes of Scale.com - Rope and cable for the scale modeler. Finished builds: HM Cutter Sherbourne - Caldercraft - 1:64 - 9th century longship - Falkonet - 1:72 Current builds: HMS Snake - Caldercraft - 1:64 - Tender Avos by BenD - Master Korabel - 1:72 - 19th Century Four-Oared Yawl by BenD - Falkonet - 1:24 scale
Iseaz Posted June 27, 2022 Author #3 Posted June 27, 2022 I only make a single planking even though a second planking is provided in the kit. To help me with the curves, I added wood to the bow like this: GrandpaPhil, BenD, ccoyle and 1 other 4
Ian B Posted June 27, 2022 #4 Posted June 27, 2022 Never seen this build before -- keen to see how it turns out-- good luck HMAV Bounty 'Billings' completed ⛵ HMS Cheerful - Syren-Chuck' completed Steam Pinnace 199 'Billings bashed' - completed ⚓ HMS Ledbury F30 --White Ensign -completed 😎 HMS Vanguard 'Victory models'-- completed Bismarck Amati 1/200 --underway 👍
ccoyle Posted June 27, 2022 #5 Posted June 27, 2022 1 hour ago, Ian B said: Never seen this build before I believe this is the first one we have ever had featured in a build log here, so I'm sure many of us are curious to see how this turns out. No pressure, though! 😉 catopower and BenD 2 Chris Coyle Greer, South Carolina When you have to shoot, shoot. Don't talk. - Tuco Current builds: Brigantine Phoenix, Mitsubishi A6M5a,
Iseaz Posted June 27, 2022 Author #6 Posted June 27, 2022 (edited) There is only a build log on an Italian website, but it is not very detailed. I will try to do my best! Also, I specify that this build will be balanced between aesthetics and feasibility, it will not necessarily be historically accurate. To change from the planking, I worked a bit on the rudder, creating lines to imitate the planks. I also added 1.5x4 walnut pieces around it as I have seen on other builds: I started to make the deck planks, cutting 6 cm pieces, then blackening the sides with a felt pen. I then fix them to the deck with neoprene glue: Edited June 27, 2022 by Iseaz BenD, Ian_Grant, Paul Le Wol and 4 others 7
Iseaz Posted July 1, 2022 Author #7 Posted July 1, 2022 The work continued with the inner planking. I then carved the sides to insert the half circle pieces that represent the gunports. The quality of these pieces is not very good, half of them were not the same thickness (1mm difference) and I adjusted them to obtain correct curves. I also built a gun, for once they are of good quality, already blackened and with few traces of molding, which is a big improvement compared to my HMS Prince guns which were terrible. The supports are well shaped (but maybe a bit too big). I added some pencil marks to detail them, but I'll add the other details later. I then glued the pieces and painted the inside. I also did some tests for the blue paint that will be applied on the outside: lmagna, BenD, Ian_Grant and 3 others 6
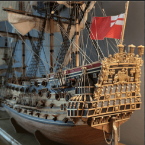
Iseaz Posted July 4, 2022 Author #8 Posted July 4, 2022 I continued the work on the inside, adding some putty, sanding and repainting. I added this piece to the bow (does it have a special name?) which required a lot of adjustments, then the whole thing was covered with a coat of satin varnish: On the outside, I painted a first coat in light blue, added 2 second planking strips with the nails and then the wales, which will be painted in black. Later, the outlines of the ports will be highlighted in gold, as on the pictures of the box. As a bonus, a size comparison with my HMS Prince: BenD and Ian_Grant 2
Iseaz Posted July 20, 2022 Author #9 Posted July 20, 2022 Last week, I slightly curved the stern plate, which was not easy because of the thickness of the plywood piece. Despite that, the gluing was a bit tricky... Then, I prepared the fake windows, with 1x1 strips instead of the 1x2 recommended in the instructions which seemed too big. I don't know if I paint them gold because the walnut colour looks good, The rudder chains were blackened and installed. The white part of the hull was varnished. The storage of the cannonballs was drilled out with a round drill bit and painted with walnut colorant. I added the top part of the rails with 1.5x5 walnut strips. However, these strips had to be bent to fit the shape, I tried to do this with an steam iron but the strips broke. As I can cheat by painting the walnut pieces, I took some leftover sapelli, glued them and then cut them to form the railings. I'm quite happy with it! Ian_Grant, Ian B, ccoyle and 1 other 4
Iseaz Posted July 25, 2022 Author #10 Posted July 25, 2022 Today is a sad day. Mistakes were made. I started the weekend by installing the railings, after bending the pieces flat to follow the hull. It was difficult to apply the glue because of the size of the small supports and the stresses induced by the rail. I was satisfied to see that it held. But today, as I was drilling the holes for the swivel gun with a rotary tool, I don't know why, the right hand rail exploded taking part of the stern rail with it. I quickly tried to glue it back together but it made it worse because of the glue residue. It's very frustrating, I've stopped everything for the moment and will start again next week to fix everything. I should have attached the supports with pieces of nails Some pictures before the accident, how I sanded the supports to the right height : ccoyle and BenD 2
carlo_l Posted August 2, 2022 #11 Posted August 2, 2022 Nice and clean work 😃 Iseaz 1 YouTuber and Blogger talking about the world of model ship making. You might also know me as Tagliamare ⛵
ccoyle Posted August 2, 2022 #12 Posted August 2, 2022 Bummer! But at least the damaged pieces are made from wood -- wood is pretty straightforward to rebuild. Iseaz 1 Chris Coyle Greer, South Carolina When you have to shoot, shoot. Don't talk. - Tuco Current builds: Brigantine Phoenix, Mitsubishi A6M5a,
Iseaz Posted August 9, 2022 Author #13 Posted August 9, 2022 Hello everyone! I didn't have a lot of time to make progress or repairs in the last few weeks, I only did the gratings. Now I'm wondering how to glue them as the deck is quite curved. I have 3 ideas: bend them (is there a method?) sand them to fit the curve of the deck enlarge the opening of the bridge to insert them What would you recommend? BenD 1
Iseaz Posted August 22, 2022 Author #14 Posted August 22, 2022 Before finding a solution, I repaired the railing and repainted the whole thing black to hide all the glue stains. The paint is really a cheat code on this build 😅... I saw on another build that the stair cover was bulging, it's a good detail that I tried to reproduce, by soaking the parts in hot water and then using a plank bender. I then worked on a big piece: the capstan. This involves cutting a 12mm diameter round piece into a hexagon. It was quite challenging to keep a good shape, but I'm happy with the result (far from perfect). Also, I carved the mast of the bowsprit in square at the base, then I added a thickness of wood to fill the lack of material: Here is a preview of the deck, with most of the elements not glued: Snug Harbor Johnny, Mr Whippy, BenD and 1 other 3 1
DavidG Posted August 24, 2022 #15 Posted August 24, 2022 (edited) nice work on an interesting subject for the gratings, any of your options may work, while I had success in the past sanding them, by placing sandpaper on the curved deck (with the help of masking tape if needs) then moving the workpiece over it until the required shape reached. Edited August 24, 2022 by DavidG BenD, Iseaz and Quimp Slattery 2 1 Past builds: Prins Willem, Amati Coca Current Build: Occre Diana
Iseaz Posted September 11, 2022 Author #16 Posted September 11, 2022 Hello everyone, Thanks for the advice! The deck is almost finished, but I need to install the guns before making the mast. I'm wondering if I should paint them red or leave them in natural wood to add contrast (like on the box illustration). Were the supports always painted red at that time? Do you have any suggestions? Here is a photoshop editing to see the result : BenD 1
BenD Posted September 11, 2022 #17 Posted September 11, 2022 I like the unpainted gun carriage. The painted one with natural wheels is a fine choice too. The rest of the ship is looking really good. Iseaz 1 Ropes of Scale.com - Rope and cable for the scale modeler. Finished builds: HM Cutter Sherbourne - Caldercraft - 1:64 - 9th century longship - Falkonet - 1:72 Current builds: HMS Snake - Caldercraft - 1:64 - Tender Avos by BenD - Master Korabel - 1:72 - 19th Century Four-Oared Yawl by BenD - Falkonet - 1:24 scale
Iseaz Posted September 18, 2022 Author #18 Posted September 18, 2022 (edited) Hello again, As I still can't decide on the colors of the cannon carriages 😅, I started to make the main mast. The top had to be carved, tapered and cut into a square section. For the upper part, I cut the square section in another larger piece of wood and glued it to the mast by adding a brass rod to reinforce the connection. For the mast, I chose to make the supports (1) in two parts of 2mm+3mm instead of 5mm because I failed to precisely cut the piece to insert the bars (2). Thanks to the walnut dye, the connection between the 2 and 3mm parts is barely visible. Now I have a problem because I don't know which way to orientate the mast: the instructions indicate direction 1 whereas all the models I have made so far are in direction 2. I don't know if this is a typical detail of this kind of ship 🤔. Then i made the anchors, which had a problem: the hole in the bar was too big, so I filled it with the remains of another model mast and re-drilled the hole. The reinforcement rings are simply made with black cardboard (like on the capstan). Here is a last view with the coloured carriages in walnut (nothing is glued): Edited September 18, 2022 by Iseaz BenD and yvesvidal 2
Iseaz Posted October 16, 2022 Author #19 Posted October 16, 2022 The guns were finally painted red and attached after many minutes of thinking. I chose to attach them in a more " ordered " way, like in another model I saw. Before that, I slightly modified the carriages by cutting horizontal lines and imitating the nails with a pencil, as well as the wheels. At the risk of running out of thread for the rest of the model, I used leftovers from other kits. I re-tooled some HMS Prince hinge scraps to simulate the “capsquare” (?). After that, the rigging really started with the standing part. The rope provided is only one colour, I used TAMIYA panel line to blacken them, which is very effective. As this model is bigger than my previous ones, the rope can be more easily detailed, for example on how to attach the blocks more realistically yvesvidal, Heimdahl, BenD and 1 other 3 1
Iseaz Posted November 4, 2022 Author #20 Posted November 4, 2022 The rigging continues with the start of my construction of the yards (gaff-sail boom?). The gaff jaws had to be cut out of 2 blocks of wood, then the dye was applied. In the same time, I also started the installation of the shrouds. With only 2 shrouds in 3 parts, this boring step is quite fast (even if I still haven't finished...). Despite a few mistakes on the plan numbers, the rigging is a very pleasant step on which I like to take my time. yvesvidal, Prowler901, BranPie and 1 other 4
Iseaz Posted November 28, 2022 Author #21 Posted November 28, 2022 The next part of the model consists of the rigging and the making of the yards. I made them by inserting the wooden rod in an electric drill and sanding progressively. On the central part, I covered with 0.6x4 wood to create a hexagonal section. Then I sanded, painted, added the details and blocks, and attached them to the mast one by one. The end of the construction is approaching, there are still a lot of rope knots to place to finalize the detail work. The future model has already been ordered during this black friday, I hope not to receive it before finishing this one ...😅 Quimp Slattery, ccoyle, BenD and 4 others 5 2
Quimp Slattery Posted September 9, 2023 #22 Posted September 9, 2023 That's a beautiful build and a very useful log. I have one of these models and your experiences will help me lots. Thank you. Quimp

Recommended Posts
Create an account or sign in to comment
You need to be a member in order to leave a comment
Create an account
Sign up for a new account in our community. It's easy!
Register a new accountSign in
Already have an account? Sign in here.
Sign In Now