edmay Posted September 13, 2014 Share #31 Posted September 13, 2014 Hello Testazyk, You do not have to go to the local store, for a bag of confidence as you are making a masterful job, You explain alternatives and why very well,thanks .Will continue to follow,have a great week. Edwin. Quote Link to comment Share on other sites More sharing options...
testazyk Posted September 13, 2014 Author Share #32 Posted September 13, 2014 Thanks Ulises and Ed! Appreciate it. Quote Tom Current: Sergal Sovereign of the Seas Previous builds: AL Swift, AL King of the Mississippi, Mamoli Roter Lowe, Amati Chinese Junk, Caesar, Mamoli USS Constitution, Mantua HMS Victory, Panart San Felipe, Mantua Sergal Soleil Royal Link to comment Share on other sites More sharing options...
testazyk Posted September 13, 2014 Author Share #33 Posted September 13, 2014 Thanks Brian! You will love it and it is a great addition to any collection. But beware--some people have said that the latest version of the kit since Panart became part of Mantua Sergal has some quality issues: http://modelshipworld.com/index.php/topic/6214-panart-san-felipe-175-updated-version-review/?hl=%2Bsan+%2Bfelipe Quote Tom Current: Sergal Sovereign of the Seas Previous builds: AL Swift, AL King of the Mississippi, Mamoli Roter Lowe, Amati Chinese Junk, Caesar, Mamoli USS Constitution, Mantua HMS Victory, Panart San Felipe, Mantua Sergal Soleil Royal Link to comment Share on other sites More sharing options...
testazyk Posted September 13, 2014 Author Share #34 Posted September 13, 2014 The link refers to problems with the plans but someplace else I saw something about the fittings not being up to scratch. If I find it again I'll let you know. Brian the extraordinaire 1 Quote Tom Current: Sergal Sovereign of the Seas Previous builds: AL Swift, AL King of the Mississippi, Mamoli Roter Lowe, Amati Chinese Junk, Caesar, Mamoli USS Constitution, Mantua HMS Victory, Panart San Felipe, Mantua Sergal Soleil Royal Link to comment Share on other sites More sharing options...
Ulises Victoria Posted September 13, 2014 Share #35 Posted September 13, 2014 I think I want to build this kit one day. Great work. I definitely see this one as my next project. Good thing is, I already have it, and I got it really cheap. edmay 1 Quote There aren't but two options: do it FAST, or do it RIGHT. Current Project Build Log: Soleil Royal in 1/72. Kit by Artesania Latina. Last finished projects: Royal Ship Vasa 1628; French Vessel Royal Louis 1780. 1/90 Scale by Mamoli. 120 Cannons Future projects already in my stash: Panart: San Felipe 1/75; OcCre: Santísima Trinidad 1/90; Wish List: 1/64 Amati Victory, HMS Enterprise in 1/48 by CAF models. So much to build, so little time! Link to comment Share on other sites More sharing options...
Shipyard sid Posted September 13, 2014 Share #36 Posted September 13, 2014 Hello testazyk Wonderful work, I wanted to buy this as my next build. But decided it may have been beyond me, so I will enjoy following your own build, and watch something special going on. DAVID Quote Link to comment Share on other sites More sharing options...
testazyk Posted September 16, 2014 Author Share #37 Posted September 16, 2014 (edited) Thanks for the feedback! Once most of the exterior work is finished, it's time to work on the deck. Like the rest of the ship, the deck furniture is very interesting and presents some interesting but not impossible challenges. First you finish off planking any exposed bulkheads. Here is an overview of the deck--you work from the stern towards the bow. I enjoy this kind of work because there is lots of variety--here is a shot of the stern flag and lantern supports, the main mast bits and fife rails and the architrave above the poop deck. The next step is to form the railing around the deck balcony. You use strips to make the frame and the kit includes very nicely precut balusters. The railings have a nice circular return at the top of the stairs. You make it by cutting an L-shaped piece and sanding it to the correct size and shape, In addition to these railings at the stern you have to make two more--one in the waist and another up to the focsle which means twelve rail ends altogether (top and bottom). It's a good idea to make them all at the same time so you can ensure they all the same size and shape. And here they are installed. There are round metal balls in the centre of the returns and the instructions call for drilling holes and inserting a wire peg in the end balusters and the two in the corners to provide stability to the structure. Be careful when you do your drilling because the balusters are thin and can chip if you're not careful. I did just that with the first one and afterward drilled them by hand with a pin vise. Unlike just about everything else, the kit did not provide a lot of extra balusters and I didn't want to have to make a whole set because I was short one or two! Here are the completed railings. Edited September 16, 2014 by testazyk schnu, maggsl_01, WackoWolf and 4 others 7 Quote Tom Current: Sergal Sovereign of the Seas Previous builds: AL Swift, AL King of the Mississippi, Mamoli Roter Lowe, Amati Chinese Junk, Caesar, Mamoli USS Constitution, Mantua HMS Victory, Panart San Felipe, Mantua Sergal Soleil Royal Link to comment Share on other sites More sharing options...
maggsl_01 Posted September 16, 2014 Share #38 Posted September 16, 2014 Hi testazyk, what a Pearl within a grey sea your SF becomes... Very nice Job. Still thinking about to build the ship too - although there are the Little Problems we mentioned before... But every model is a challenge - and therefore... Cheerio Max Quote Next: Friedrich Wilhelm zu Pferde by Euro Model 1:47 Finished: Half Moon Corel; HMY Royal Caroline Panart; HMB Endeavour Occre 1:54; Fregatte Berlin, Corel, 1:40 A life without dogs is possible... but worth to live? Link to comment Share on other sites More sharing options...
Shipyard sid Posted September 16, 2014 Share #39 Posted September 16, 2014 Greetings testazyk Looking good. Lovely work and clear explanations . Just keep enjoying it. DAVID Quote Link to comment Share on other sites More sharing options...
testazyk Posted September 17, 2014 Author Share #40 Posted September 17, 2014 Thank you Max and David! Quote Tom Current: Sergal Sovereign of the Seas Previous builds: AL Swift, AL King of the Mississippi, Mamoli Roter Lowe, Amati Chinese Junk, Caesar, Mamoli USS Constitution, Mantua HMS Victory, Panart San Felipe, Mantua Sergal Soleil Royal Link to comment Share on other sites More sharing options...
testazyk Posted September 17, 2014 Author Share #41 Posted September 17, 2014 [My last post may have left you wondering how you were going to get down from the poop deck to the quarter deck. The answer is with curved stairs. I have to admit that of all the challenging features on this ship I was most concerned about doing the stairs. You have three pairs to do and the good news is that they aren't difficult at all, but do require a lot of care and planning. The kit includes trapezoidal shapes which are the steps. The first step is to cut dowel rods which form the central support. Carefully assemble the steps in a spiral taking care to have the steps all even sized. You also need to have the top step and bottom steps at a ninety degree angle. I taped the sections together to try out the spacing and also to make sure the height would be correct. This is a good shot of how you have to play around to get the spacing correct and spacing problems. Here I am happy with the height but need to even out the spacing. Once you are satisfied with everything, glue the steps to each other and to the dowel. Then you build the curved walls around the steps. The walls are dark walnut on the outside and lighter walnut on the inside and the kit includes a plastic cylinder that you use to build the curves. Follow the instructions and you won't have any trouble, even if the instructions seem counter intuitive. You glue the white walnuts strips to the cylinder and then glue the dark strips over the top and let them dry, I was terrified that I'd end up gluing the whole thing to the cylinder--which theoretically you could do. Just use enough glue to secure the first layer of walnut strips so they don't move around. And its a good idea to move the assembly on the cylinder as the glue dries. Once everything is dry, you cut the assembly to the right size, glue it to the steps and add the decorative strips. And then you can install the steps. I thought that the end faces of the walls looked a little too much like plywood so I made a stringer to go on the ends of each stair case. maggsl_01, WackoWolf, GuntherMT and 2 others 5 Quote Tom Current: Sergal Sovereign of the Seas Previous builds: AL Swift, AL King of the Mississippi, Mamoli Roter Lowe, Amati Chinese Junk, Caesar, Mamoli USS Constitution, Mantua HMS Victory, Panart San Felipe, Mantua Sergal Soleil Royal Link to comment Share on other sites More sharing options...
maggsl_01 Posted September 17, 2014 Share #42 Posted September 17, 2014 Hi, really a GREAT job an the staircase... It sounds very cloise to the technique I used at my Royal Caroline. The instructions look impressive and difficult - but indeed it's quite easy. But you are right - you have to be very carefull. Looking forward to your next step Cheerio Max Quote Next: Friedrich Wilhelm zu Pferde by Euro Model 1:47 Finished: Half Moon Corel; HMY Royal Caroline Panart; HMB Endeavour Occre 1:54; Fregatte Berlin, Corel, 1:40 A life without dogs is possible... but worth to live? Link to comment Share on other sites More sharing options...
testazyk Posted September 19, 2014 Author Share #43 Posted September 19, 2014 You continue working from the stern to the bow putting in lots of interesting details as you go. There are two more sets of fife rails, four more stairways and several grates to install as you go. The main challenges with this work are the capstan and the belfry. There is a circle of boards around the capstan to give the sailors traction on the wet deck. You want to take extra care to get them all the same size and perfectly aligned like a clockface. The capstan is highly visible on the completed ship and if your boards aren't even it will be obvious. I made a template on tracing paper by drawing a circle and measuring out the lines. Then I placed it on the deck and held it down and poked little holes with a push pin to show where the boards should go and it seemed to work all right. The belfry is built out of five wooden blocks and you have to carve them to shape. At the time I hadn't done much carving so I opted for a very simple look but you can be as creative as your imagination and skills permit. Once completed the deck is a very interesting place with lots of detail. coxswain, WackoWolf, GuntherMT and 3 others 6 Quote Tom Current: Sergal Sovereign of the Seas Previous builds: AL Swift, AL King of the Mississippi, Mamoli Roter Lowe, Amati Chinese Junk, Caesar, Mamoli USS Constitution, Mantua HMS Victory, Panart San Felipe, Mantua Sergal Soleil Royal Link to comment Share on other sites More sharing options...
WackoWolf Posted September 20, 2014 Share #44 Posted September 20, 2014 Beautiful detail work. Keep the pictures coming. Thank you for sharing this. Quote Wacko Joe Go MSW :) Link to comment Share on other sites More sharing options...
testazyk Posted September 22, 2014 Author Share #45 Posted September 22, 2014 (edited) Thanks for the kind comment WackoWolf! The next step after finishing the deck work is to finish off the bow. There are a few interesting challenges. The kit provides metal coverings for the two semi circular rooms in front of the foc's'le. I've seen them referred to as "roundhouses" and "officer's latrines." Take your pick! There is a bit of an issue that I forgot to mention earlier. The Victory which I'd done had similar structures and when I did that I failed to test the sizing of the metal pieces with respect to the half dowel pieces that form the structure. You attach the dowel pieces early in the build so now if your metal pieces don't exactly fit you can have a rather acrobatic sanding job. The moral of the story is to check the sizing early on before you attach the wooden dowels. That means you've been able to bend and shape the metal before doing it on the ship and everything is a lot easier when you do the final assembly. Of course the decorative strips, which are easy to bend, can also disguise any problems but it's best to avoid them if you can. Then you put in the rest of the decorative trim. Take extra care to cut everything a half a millimeter longer than it needs to be and then sand it so the joints are flush, especially the corners where they join the wales. Enjoy installing the struts under the beakhead because that is the last easy task you will have for a bit! Now comes one of the most challenging parts of any build, at least for me--the headrails. On the San Felipe they are even more difficult than usual because instead of timber or brass cutouts you have to form them from the decorative brass strips. If you've worked with those strips, you know they don't easily bend laterally. I did it by heating the strips to make the focsle railings and that's was was required this time--with an added twist! In more ways than one. You form the rails out of three strips which start from a carved medallion on the focsle and terminate in a scroll sort of carving under the figurehead. Each of the strips is a different length and, as they are parallel to each other, has a slightly different curve. One of the plan sheets is an actual size drawing of the model and I traced the rails on the plan to create a template. I then cut out each rail and laid it on a board (sorry I don't have a pic of that). I pounded nails in to make the form of the rail and then went down to the kitchen and heated the strips over the flame of the stove. When each was soft enough to work I laid them in my jig and tapped them into shape with a hammer. You make two from each template (one port, one starboard) and flip the strip over for one to make it's mirror image. There are holes in the castings that the rails are attached to so that you can nail them in and I sanded the tips of the rails and drilled a hole so I could keep everything very secure. I was really happy how close I managed to get them on the first try but they did require a bit of bending to get them just right. The kit includes decorative brackets that join up the three rails and once you install them, the lines should be even all the way around. The last step is to add the figurehead. I don't paint any of the decorative pieces because of personal preference so I just left everything gold. One thing I forgot to mention--when you use a hammer to shape the rails, or even do any bending, you can mark up the rails because the moulding pattern is very fine. You can bring back the shine by rubbing with steel wool and then painting the strips with gold enamel. Edited September 22, 2014 by testazyk edmay, maggsl_01, WackoWolf and 3 others 6 Quote Tom Current: Sergal Sovereign of the Seas Previous builds: AL Swift, AL King of the Mississippi, Mamoli Roter Lowe, Amati Chinese Junk, Caesar, Mamoli USS Constitution, Mantua HMS Victory, Panart San Felipe, Mantua Sergal Soleil Royal Link to comment Share on other sites More sharing options...
GuntherMT Posted September 22, 2014 Share #46 Posted September 22, 2014 Fantastic looking bow you've got there! Quote Brian Mystery project coming soon! Current build - Medway Longboat Complete - Armed Virginia Sloop Complete - Carmen (First Build) Link to comment Share on other sites More sharing options...
maggsl_01 Posted September 22, 2014 Share #47 Posted September 22, 2014 Hi my friend what a GREAT job you did on the bow. Chapeau The brass strip-system is used at the Royal Caroline too... I HATED to bend the strips for the bow, but of course and at least - everything found its place and - indeed - it was not as difficult I thought. But the metal ist quite stiff... wish they would use tin for the strips. Would be much easier and more accurate to handle. But - not challenge, no fun .D Cheerio Max Quote Next: Friedrich Wilhelm zu Pferde by Euro Model 1:47 Finished: Half Moon Corel; HMY Royal Caroline Panart; HMB Endeavour Occre 1:54; Fregatte Berlin, Corel, 1:40 A life without dogs is possible... but worth to live? Link to comment Share on other sites More sharing options...
testazyk Posted September 22, 2014 Author Share #48 Posted September 22, 2014 Thanks Brian and Max! You are right about the metal strips Max. If only I could carve them out of wood! Quote Tom Current: Sergal Sovereign of the Seas Previous builds: AL Swift, AL King of the Mississippi, Mamoli Roter Lowe, Amati Chinese Junk, Caesar, Mamoli USS Constitution, Mantua HMS Victory, Panart San Felipe, Mantua Sergal Soleil Royal Link to comment Share on other sites More sharing options...
testazyk Posted September 22, 2014 Author Share #49 Posted September 22, 2014 After the bow is finished there are a few more details to finish off before starting the masts and rigging. First is finishing off the decorative parts of the stern and installing the lanterns. Next is installing the gun port lids. This is a relatively straightforward project. I made a little template to guide where to drill the holes for the hinges. The kit provides little rings and pre cut wires for the job. This was the first kit I've built that had ports that don't fit flush to the hull--the lids are larger than the ports and there is a flange around the outside of the cover as you can see from the picture. Normally I don't paint the insides of the covers but because the ship is so light I decided to do it to brighten things up. I don't like the bright red that is usually used so I toned it down to a reddish brown. And the last step is to put on the interesting entryway ports and ladder. I thought the suggestion for timber for the steps in the kit was a little too heavy so I cut some very thin strips and used them. maggsl_01, WackoWolf and GuntherMT 3 Quote Tom Current: Sergal Sovereign of the Seas Previous builds: AL Swift, AL King of the Mississippi, Mamoli Roter Lowe, Amati Chinese Junk, Caesar, Mamoli USS Constitution, Mantua HMS Victory, Panart San Felipe, Mantua Sergal Soleil Royal Link to comment Share on other sites More sharing options...
testazyk Posted September 24, 2014 Author Share #50 Posted September 24, 2014 Now it's time to start my favourite part of any build--mast and rigging. The rigging was an easy and enjoyable task, mainly because the instructions are very good. But there are some interesting challenges. The rigging on the Victory is probably more complex and ambitious but the SF has some unusual items such as crow's feet and a sprit topmast on the bowsprit. I know that there is a running debate on whether to build up the mast structures independently and then install them on the ship or to build them on the ship. I've always been more comfortable building them up on the ship and that's what I did this time. Then the wooldings and the bumpers go on. And then you build up the tops At that point I took a break to tackle a job that I'd been worrying about from the very beginning. I don't know if you have a specific aspect of building that you think you can never get just right but for me it's building boats. Doing the four boats on the Victory was a major mission for me and I just couldn't get them to where I was happy with them. The SF has two boats and I'd been putting it off long enough and decided it was time to get them out of the way. As I've mentioned, this version of the kit was pre-laser cutting so I'd cut all the frames and false keels out earlier. They were white plywood so I experimented with different stains until I found the right colour. You plank the boats similarly to the ship. It's theoretically easier because the curves are more limited but (1) you are doing a single planking job and (2) there are so few planks, any imperfection gets greatly magnified. So I took extra care and was pretty happy with the results. The other challenge is that you can't glue the planks to the frames because the frames are a temporary structure to create the shape around which the planks are formed. GuntherMT, WackoWolf, maggsl_01 and 1 other 4 Quote Tom Current: Sergal Sovereign of the Seas Previous builds: AL Swift, AL King of the Mississippi, Mamoli Roter Lowe, Amati Chinese Junk, Caesar, Mamoli USS Constitution, Mantua HMS Victory, Panart San Felipe, Mantua Sergal Soleil Royal Link to comment Share on other sites More sharing options...
cwboland Posted September 24, 2014 Share #51 Posted September 24, 2014 WOW. Those ships boats look like a great build all on their own Quote Carl Completed builds: AL Bluenose II 1:75 Gallery Amati Hannah SIB 1:300 Gallery Current Build: Bluenose II - SIB - unknown scale Link to comment Share on other sites More sharing options...
testazyk Posted September 24, 2014 Author Share #52 Posted September 24, 2014 Thanks CW! I appreciate it. Quote Tom Current: Sergal Sovereign of the Seas Previous builds: AL Swift, AL King of the Mississippi, Mamoli Roter Lowe, Amati Chinese Junk, Caesar, Mamoli USS Constitution, Mantua HMS Victory, Panart San Felipe, Mantua Sergal Soleil Royal Link to comment Share on other sites More sharing options...
edmay Posted September 24, 2014 Share #53 Posted September 24, 2014 Hello and Wow Testazyk. Your modeling skills are superb,the indepth methods of explanations and why ,make your build log informative,helpful to those who may build this beautiful ship,well worth downloading.thanks.Edwin maggsl_01 1 Quote Link to comment Share on other sites More sharing options...
maggsl_01 Posted September 24, 2014 Share #54 Posted September 24, 2014 Hi Testazyk jup - I only can repeat: What a beautiful bulid and, as Edwin says, a almost perfect instruction sheet for People (like me) who will dare to create the San Felipe too. Go on my friend - I look Forward for every step you share with us Cheerio Max Shipyard sid 1 Quote Next: Friedrich Wilhelm zu Pferde by Euro Model 1:47 Finished: Half Moon Corel; HMY Royal Caroline Panart; HMB Endeavour Occre 1:54; Fregatte Berlin, Corel, 1:40 A life without dogs is possible... but worth to live? Link to comment Share on other sites More sharing options...
testazyk Posted September 25, 2014 Author Share #55 Posted September 25, 2014 (edited) Thank you very much Edwin and Max. I really appreciate your kind feedback. --Tom Edited September 25, 2014 by testazyk Quote Tom Current: Sergal Sovereign of the Seas Previous builds: AL Swift, AL King of the Mississippi, Mamoli Roter Lowe, Amati Chinese Junk, Caesar, Mamoli USS Constitution, Mantua HMS Victory, Panart San Felipe, Mantua Sergal Soleil Royal Link to comment Share on other sites More sharing options...
Shipyard sid Posted September 25, 2014 Share #56 Posted September 25, 2014 Greetings. Testazyk Wonderful build, it's a joy to watch your progress. Just keep enjoying it, I am. And nobody is getting my chair. DAVID maggsl_01 1 Quote Link to comment Share on other sites More sharing options...
testazyk Posted September 28, 2014 Author Share #57 Posted September 28, 2014 Thanks David! Quote Tom Current: Sergal Sovereign of the Seas Previous builds: AL Swift, AL King of the Mississippi, Mamoli Roter Lowe, Amati Chinese Junk, Caesar, Mamoli USS Constitution, Mantua HMS Victory, Panart San Felipe, Mantua Sergal Soleil Royal Link to comment Share on other sites More sharing options...
testazyk Posted September 28, 2014 Author Share #58 Posted September 28, 2014 It was time to get back to the rigging. As far as tools, I use several different kinds of tweezers, little clamps to hold lines out of the way until I need them and probably most important a pair of surgical hemostats which are like super locking tweezers and also just the right weight to put tension on lines, and a good pair of scissors that are sharp at the tips for snipping off lines. I've had a lot of trouble finding good scissors over the years and one problem is that rigging is the only place on a build where I use CA glue. I use it to secure knots and a lot of times when snipping off the end of a line that I've dabbed with CA it will get on the scissors and over time basically ruin them. So I usually now just buy cheap scissors from the two dollar shop, bend them so they will cut at the tips and use them till they give up the ghost. The last important rigging tool I think is a needle threader. I usually don't need it for blocks and deadeyes but sometimes its very useful. Lastly, I have a 24 inch lazy susan which is like a turntable. I put the ship on it and it's easy to turn the ship and work on alternate sides. Here are the hemostats and scissors in operation. The standing rigging job starts with the shrouds. The instructions don't tell you this specifically but you should alternate port and starboard pairs as you go up so that the shroud lines look neat at the top of the mast. You also want them to fan out neatly and not be twisted or overlap at the top of the mast. I suppose you could reeve the deadeyes as you prepare each shroud pair, but I do that work all at once. I put a piece of tape and sequentially number each of the stays so I can easily sort them later. Here they are in place and ready to be reeved. And after the reeving: It's always a challenge to get each of the top deadeyes in a perfectly straight line. I use a heavy wire bent to the right length. I put one end in the bottom hole of the bottom deadeye and the other end in the top hole of the top deadeye as I'm securing the top deadeye to the shroud. Technically, they should all be equal but inevitably a few imperfections occur, usually because over or undertight reeving. The next task is tying the ratlines--or as it's called 'rattling the shrouds.' I don't know about you but I can only do a little bit at at time. It's not a bad idea to make a jig out of cardboard that you can lay in behind the shrouds to serve as a guide for how far apart to space the lines. I've never been able to do it by eye. You then do the same process with the topmasts as far as shrouds and ratlines. And the next step is to secure the stays and also install the futtock shrouds. GuntherMT, maggsl_01 and WackoWolf 3 Quote Tom Current: Sergal Sovereign of the Seas Previous builds: AL Swift, AL King of the Mississippi, Mamoli Roter Lowe, Amati Chinese Junk, Caesar, Mamoli USS Constitution, Mantua HMS Victory, Panart San Felipe, Mantua Sergal Soleil Royal Link to comment Share on other sites More sharing options...
testazyk Posted October 7, 2014 Author Share #59 Posted October 7, 2014 The next rigging challenge is doing something called the "crow's feet." It's an impossible thing to describe so I'll start by showing a picture of the finished product: When you make the trestle tree platforms you have to drill holes evenly around the front half of the platform to take the end ropes. Make the holes as small as possible so that you can get away with the tiniest knot you can to secure them under the platform. Once you install the ropes, gather them together and tie them at the end, then tie the whole bit to the stay. The secret is to flatten out the lines as much as possible so you don't have a big ugly wad. It takes time and patience but it not hard to do. The next step is do install the last of the standing rigging stays. Once I finished the standing rigging I stepped back and prepared the spars. The only caution here is that the spars on the foremast and the bowsprit spritsail are very thin and break easily. Ulises Victoria, maggsl_01, cristikc and 2 others 5 Quote Tom Current: Sergal Sovereign of the Seas Previous builds: AL Swift, AL King of the Mississippi, Mamoli Roter Lowe, Amati Chinese Junk, Caesar, Mamoli USS Constitution, Mantua HMS Victory, Panart San Felipe, Mantua Sergal Soleil Royal Link to comment Share on other sites More sharing options...
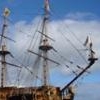
testazyk Posted October 12, 2014 Author Share #60 Posted October 12, 2014 The running rigging went together very easily--the only challenges being the usual of getting into tight spaces. The rigging is very clean and the instructions are excellent. Probably the most difficult part of the rigging is securing lines to several belaying pin racks along the bulwarks in the waist and the quarter deck. The lines go through a little eyelet at the bottom of the racks. I used a sewing needle threading tool which made life easier but it's still very finicky work. Here are some shots of the rigging work from stern to bow. And once the flags are attached it's all finished! cristikc, maggsl_01, GuntherMT and 2 others 5 Quote Tom Current: Sergal Sovereign of the Seas Previous builds: AL Swift, AL King of the Mississippi, Mamoli Roter Lowe, Amati Chinese Junk, Caesar, Mamoli USS Constitution, Mantua HMS Victory, Panart San Felipe, Mantua Sergal Soleil Royal Link to comment Share on other sites More sharing options...

Recommended Posts
Join the conversation
You can post now and register later. If you have an account, sign in now to post with your account.