robnbill
-
Posts
841 -
Joined
-
Last visited
Content Type
Profiles
Forums
Gallery
Events
Everything posted by robnbill
-
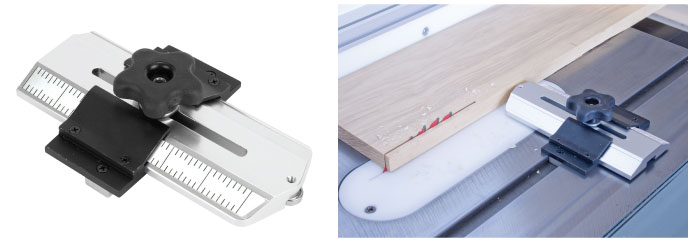
The largest difference this jig has over push sticks and feather boards is the ability to control both sides of the wood through the entire path of the cut. This ensures there is no kickback since the wood does not veer side to side during the cut. It does not allow for cuts smaller than 1/8th but as Mike said, that does leave lots of cuts it does work for. The interior of the jig is movable so it can be adjusted for the various size cuts. It still can be used to cut smaller thicknesses if you have the cutoff to the left of the blade. The jig would just not straddle the blade and only be used on the part to the right. This still leave you more in control than just pushing the wood through from the end. I know others have used feather boards for this, but there is a guide for ripping thin sections for the table saw. It rides in the miter slot to the left of the blade. It has a wheel in the end to allow the wood to easily slip past. You set the width of the cut you want ( to the left of the blade) then slid the wood between the fence and the wheel. Make the cut and shift the fence to the left until the wood contacts the wheel again and make the second cut, snd so on. This allows for consistent thickness cuts to the left of the blade. Anyway, both of these jigs/guides make my life easier and a bit safer. As Mike said, I don't have any interest in these companies other than I use their products. If you are interested both of these are available for a number of different sources on line.

-
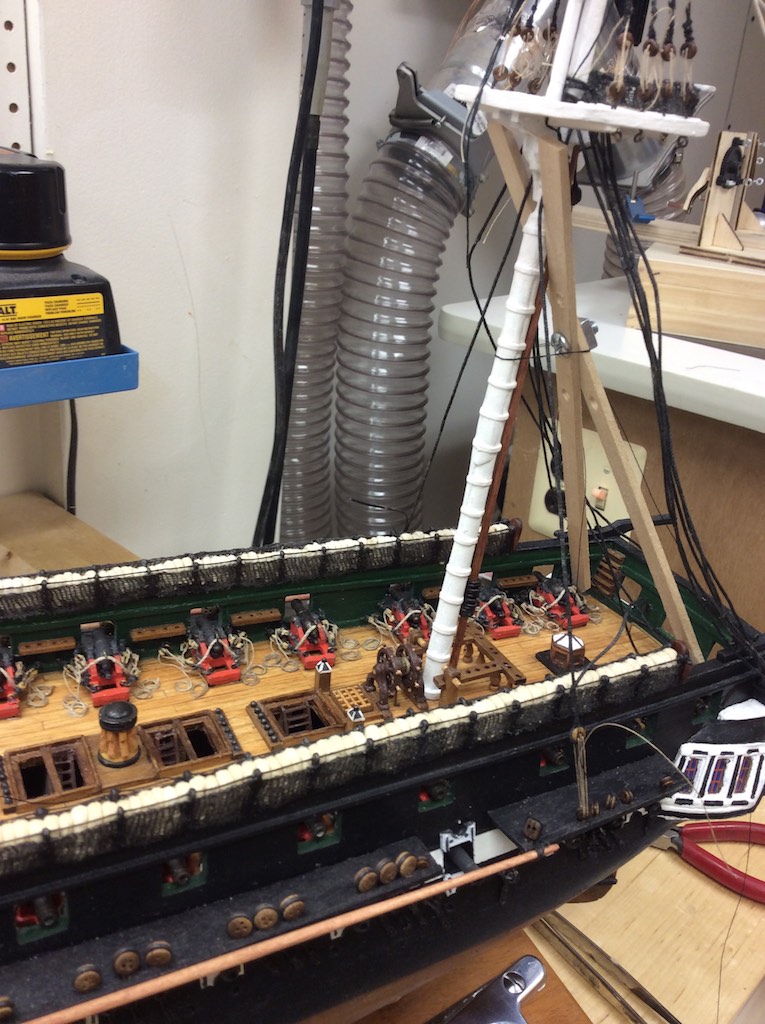
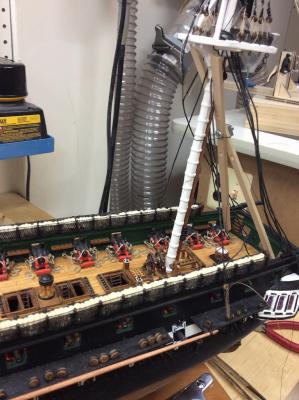
 I was able to complete rigging the lower mizzen shrouds today. I had a small setback when I discovered that the forward most shroud was actually attached to a block. So I had to remove the deadeye that I had attached to it. Unfortunately I did not notice this until I had attached nearly all of the shrouds. So I spent awhile unlacing and relaxing the shrouds to the correct deadeyes. I learned a trick. The laced deadeyes had a tendency to spin around once I actually put tension on them. This was due to the shroud untwisting. I know this would be sorted out eventually with the bar that is lashed across the shrouds just above the deadeyes but I still had rather they did not do it to begin with. What I figured out was once I threaded the lanyard through the top deadeye I would pull tension on it. This caused it to spin as the shroud untwisted. Once it stopped, I would hold it then lace it through the lower deadeye. Then once it was all laced and tensioned it no longer wanted to spin. I also made a futtock brace out of brass wire then hand served this with black thread. I attached this to the third shroud from the back, which aligned it with the mast. I ran it between the mizzen mast and the spammer masts. I lashed the ends of the brace to the shroud, then brought the futtock shroud ends through the rings and affixed it to the shroud. Then I served the bundle to the shroud and tried everything up. The main and the foremasts all have Bentinck shrouds but the mizzen did not. Next I will work on the shrouds from the tip of the mast to the futtock shrouds. Currently I have a temporary stay run to the ring at the main which you can see in the photo. Making progress.
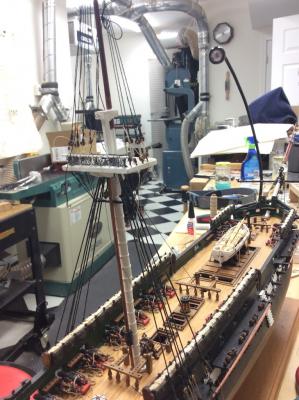
- 335 replies
-
- 4
-

-
- Constitution
- Mamoli
- (and 3 more)
-
The CA is used to firm the knot up. It also keeps the knot from deforming and pulling through the deadeye hole. This allows me to lace the thread into the deadeye with the knot firmly up against the deadeye and no excess thread sticking out of the dead end of the line. I used the CA on the other end of the thread to make the needle end. So I have a knot on one end (trimmed closely to the knot) and CA needle on the other end.
- 1,756 replies
-
- 5
-
-
- constitution
- constructo
- (and 1 more)
-
I take the line and wet the end with CA then wipe it off. Then snip the end at a 45 degree angle and you have a needle. However, if the line is very close to the circumference of the hole, the CA can swell the line to be too large to fit. However, the line should not be that close to the same. So on the dead eyes, I start by tying a double knot on the end, hit that with a bit of CA then snip the line at the knot. Then CA the other end, snip it, then start lacing. It works for me. I used this on the Cannon as well.
- 1,756 replies
-
- 3
-
-
- constitution
- constructo
- (and 1 more)
-
I passed a milestone today. I started rigging the Mizzen Mast to the ship. I first took the jig I built to keep the mast centered to the deck and looped a thread around that to hold it to the mast. Then I started rigging the upper dead eyes on the foremast lower shroud. I did not lock the servings to the line yet with glue since I wanted to look it over tomorrow with fresh eyes before I do. I attached the deadeyes to align with the rail or slightly above. Once I have them rigged I can adjust them to set the mast rake. I think tomorrow I will run a temporary line from the bow and stern to the mast top to assist in setting the rake where I want it. Then I can fine tune it once the shrouds are in place. Once the mast is in place and rigged, I can put a touch if PVA under the mast ring on the deck. This will still allow the mast to be easily removed if needed.
- 335 replies
-
- 7
-
-
- Constitution
- Mamoli
- (and 3 more)
-
I too have decided NOT to glue my masts in. If you look through the threads there is a large amount of discussion on gluing or not. Basically the argument not to glue is the standing rigging will hold the masts in place, just like on the real ship. By not gluing you are able to use the rigging to move the masts to the proper position and still be able to adjust them as the rigging mounts to the ship without distorting the masts. The BEST argument for me was - the masts are the most fragile part of the ship and stand to receive damage (if not protected well) over the years. By not having the masts glued in, it will allow future repairs much easier should they need to be done. Hopefully they would never occur, but it is insurance. Your build is going great.
- 1,756 replies
-
- 2
-
-
- constitution
- constructo
- (and 1 more)
-
There is also a very nice tool called the MicroJig. It allows the control of both sides of the cut wood all the way through while keeping your hand away from the blade.
-
Activity on the ship has been light the last few days. I am installing my new toy (a very early Xmas gift from Rob) in preparation for my next build the Eagle. A new SawStop table saw! I can't wait to start making more sawdust but alas once it is built and installed it will have to wait. The new deadeyes arrived and I need to get back on the Connie. I hope to have the new saw completed by sometime tomorrow and return to the ship.
- 335 replies
-
- 4
-
-
- Constitution
- Mamoli
- (and 3 more)
-
This is my first build so I have vacillated over how to approach this myself. What I have done is to attached the shrouds to the masts and the upper shrouds to the fighting tops. I have attached and run all of the standing rigging for the bowsprit, other than those running to the masts. My plan is now to attach the lower stays for the Mizzen and work my way back forward per the TFFM. I have tried to add all the hooks, rings, blocks etc that I could possibly do before installing the masts. This is just my two cents. I have read of other highly successful builds that went from bow to stern, stern to bow and everything in between. I just had to pick a method and follow it. The TFFM suggested stern to bow so that is how I am going to build this one. The next one I may decide differently based upon this build.
- 1,756 replies
-
- 1
-
-
- constitution
- constructo
- (and 1 more)
-
I have a fairly complete woodshop. One tool that has been in the shop for well over 20 years was a 10" Ryobi Table Saw. Recently I have been retooling getting ready for my next build which will be a scratch verison of the Brig Eagle. As a result I was left with either buying extensive parts to retune the old table saw or buy a new one. Looking at table saw reviews, I was drawn to the Sawstop saw. Not only was it a well made 10" table saw, but it also contained the safety stop. I have been working with table saws all of my life yet it still is the machine I feel has the largest risk in my shop. I ALWAYS watch what and how I do around the saw yet I still have had my share of kickbacks and other near misses over the years. Anything I can do to make the saw safer is desirable. Having a saw that operates smoothly and accurately is paramount, but adding the safety of the blade stop makes this, for me, a no brainer. As others have mentioned, there are many videos on YouTube of how the saw works and how quickly it reacts. When a finger touches the blade, while under operation, a spring sends the aluminum block flying into the blade. This reacts quicker than your car's airbag. This stops the blades spinning and uses the spin of the blade to withdraw the blade below the table level. The blade makes a fraction of a revolution before it is over and the blade safely out of the way. There is actually a You Tube demonstration where a user slung a sausage into the blade quickly like a hand would in a kickback. The sausage was cut, but just barely. Certainly if it had been a real hand it would have saved the digits. If the Sawstop is tripped it is an easy 5 minute replacement of the stop cartridge and a new blade. Woodcraft, where I bought the saw, said given the stress the stop puts on a blade, they would not recommend repairing the blades for reuse, which is theoretically possible. The saw itself is very solid, well made, and still has the normal cabinet saw safety featured such as the riving knife, and a normal blade protector, and efficient dust control system for both below and above the blade. It comes with zero inserts and operates smoothly enough that it should allow very thin cuts to be done safely. All of this in itself does not take the place of being extremely vigilant in using a table saw. However, this does greatly increase the likelihood that should an accident occur, it will be mitigated as much as possible. All of that said, the saw is still being put together in my shop but I am looking forward to working with it and reporting back.
-
The Mamoli plans show 5, 5, and 4. This agrees with the current photos of the ship as well as the rigging plans for the 1927 refit. I just checked the AOS and it also has the same scheme.
- 1,756 replies
-
- 1
-
-
- constitution
- constructo
- (and 1 more)
-
I have found that PVA works well for me when laying decking. It dries quickly enough but still allows for time to move the pieces should I need to. I certainly use CA, or epoxy but for decking I have found PVA to work well.
-
I managed to get most of the deadeyes relaced today. There are still a few left on the Main that I plan on completing tomorrow. I know my new deadeyes have been mailed so hopefully I will get them tomorrow so I can continue. There were a number of the 3.5 deadeyes that I plan on replacing since I will now have plenty. There were a few that the holes were so misaligned that they ended up with two holes. So baby steps. I do like the look of the beige lacings.
- 335 replies
-
- 2
-
-
- Constitution
- Mamoli
- (and 3 more)
-
Thanks. We are at very similar stages. Comforting to learn from each other here.
- 335 replies
-
- 1
-
-
- Constitution
- Mamoli
- (and 3 more)
-
For mine, I just used some light card stock. Nothing too heavy since I did not want it to split. I pulled it from some junk mail that we received. I cut the strip, rubbed white glue over it, then wrapped it. When I got to the diameter I wanted, I tore it so the edge was uneven and tapered. This allowed me to smooth it out. Once it was dried, a couple of quick passes with an emory board smoothed it into the band I desired, then I painted it. This was FAR easier and gave me a better look than using the brass. I ended up removing the brass and redoing it with paper since I liked it better.
- 1,756 replies
-
- 3
-
-
- constitution
- constructo
- (and 1 more)
-
I made some with brass banding but found strips of paper and white glue worked much better.
- 1,756 replies
-
- 2
-
-
- constitution
- constructo
- (and 1 more)
-
It is looking good Rich. Will you be tapering the masts?
- 1,756 replies
-
- 1
-
-
- constitution
- constructo
- (and 1 more)
-
Well I guess given that Mamoli is now out of business it could be much worse. At least Model Expo seems to have the correct size and wood to match there deadeyes I already have installed. It is funny, I ended up with a lot of extra wood and a complete extra set of their canon ports. Otherwise, it is just a piece here or there that I have left. The only other thing I was short on was cannon balls. Since I decided to fully rig the cannon, I had to order more blocks and associated ropes. The plan only had the breeching lines as part of it. I see light at the end of the tunnel - I just can't tell how long this blasted tunnel is right now!
-
Well progress continues on the Connie. I completed adding the deadeyes to the mizzen fighting platform. I also counted the number of remaining deadeyes needed and found I was pretty short on the actual number needed to complete the ship. I do not currently have enough to actually attach the mast to the ship. I have ordered more of these from Model Expo. In the mean time, I have changed my mind again on using black or beige lanyards to lace the deadeyes. The current Connie has dark lacings. The plans recommend beige. Most models seem to have beige. Since beige makes it stand out better as well when looking at the model, I have decided to re-lace the deadeyes I have already done with beige. I have started performing this. Hopefully in a couple of days, I will have the additional deadeyes needed and can begin stepping the masts and attaching them to the ship.
- 335 replies
-
- 1
-
-
- Constitution
- Mamoli
- (and 3 more)
-
Very true and Mamoli tends to really know how to muddy the waters at times.
-
Thanks. That is the way I ran them. I was just unsure why occasionally they marked both the plans and the tables BIS instead of their normal D. Also, I need to seize them both as they go through the Dolphin Striker? The plans only showed the bottom one seized. The others all run through holes in the striker. Should I still seize them?
-
I have a question regarding how the plans are marked. I detailed it under rigging. It concerns Mamoli's use of BIS. I am confused on what it means. The link below has examples of what i am talking about. http://modelshipworld.com/index.php/topic/8392-help-what-is-the-meaning-of-bis/?p=248636
-
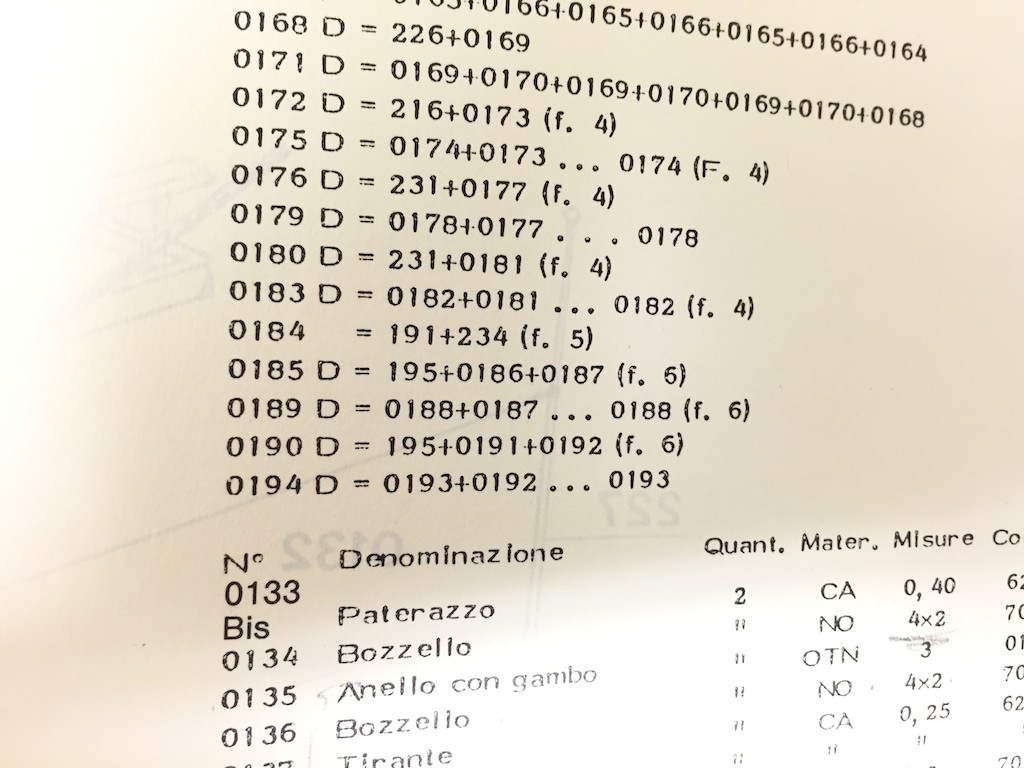
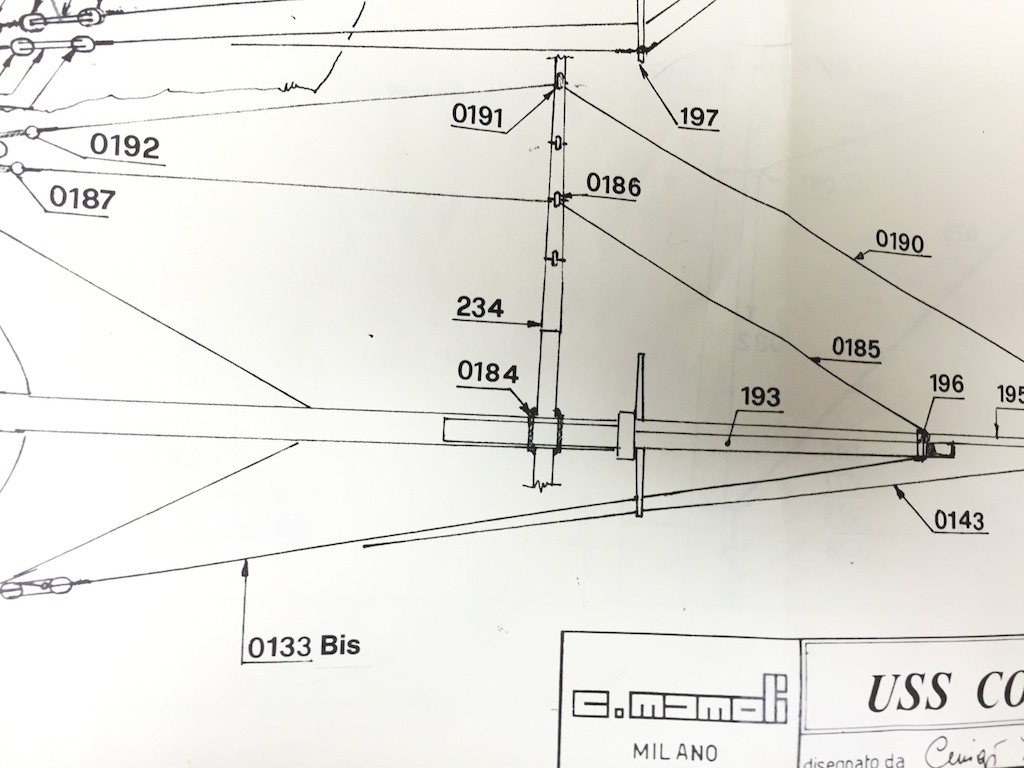
I am rigging my Mamoli Constitution. When a line is doubled, i.e. Port and Starboard it has a D right after the numerical designation. However, some of the lines have BIS both on the table and the plan. The translation means, again, or encore, but I do not know how it applies to the rigging or why it is different from D. You can see from the photos below, 133 is marked BIS but has a quality of 2 and BIS is marked in the drawing as well. 185 is also doubled, but is only using the D designation in the table. Anyone? Bill


-
You are welcome. The Navy site has many plans available for downloading free from the 1929 restoration work. There are many photos of the ship as it is currently as well. I use it a great deal when there is something I need more information on. Of course this doesn't tell you what it may have looked like in 1812, but at least you know how it was once.
- 1,756 replies
-
- 2
-
-
- constitution
- constructo
- (and 1 more)