robnbill
-
Posts
841 -
Joined
-
Last visited
Content Type
Profiles
Forums
Gallery
Events
Everything posted by robnbill
-
 The good news is I made a bit of progress with the foremast rigging. The bad news, isn't there always bad news after a sentence that starts with "the good news is", my fix to the bowsprit is not holding well. I decided I need to replace the spar. So tomorrow I will start that process. It should not be too bad. I will take photos during the process and post them.
 -
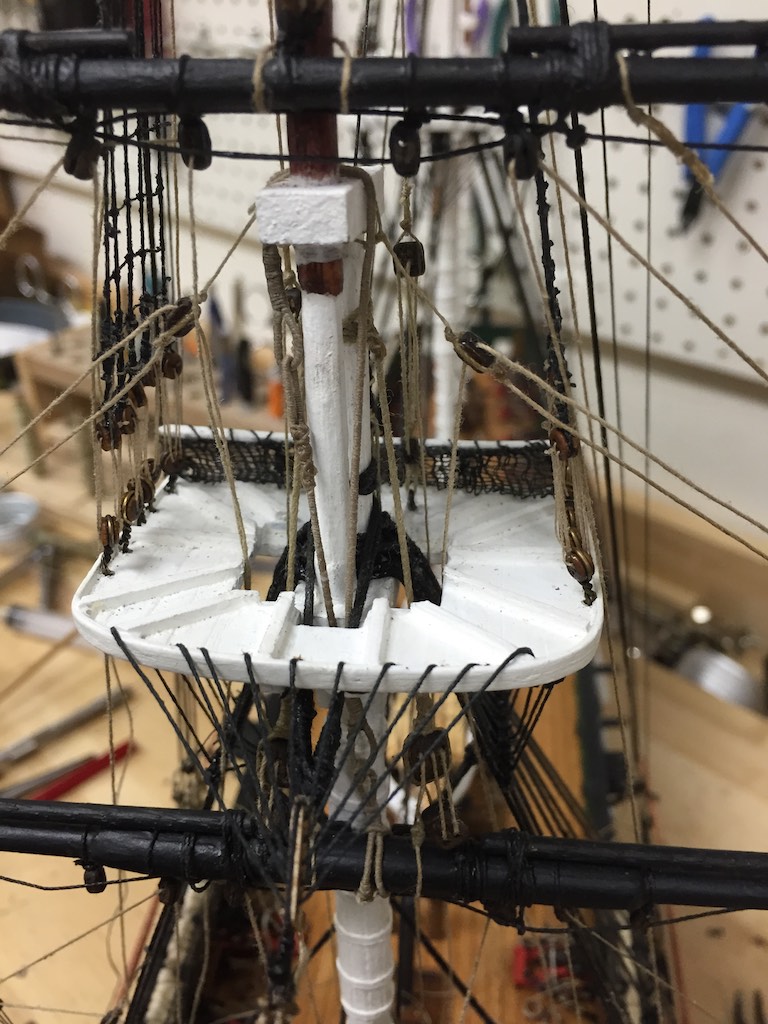
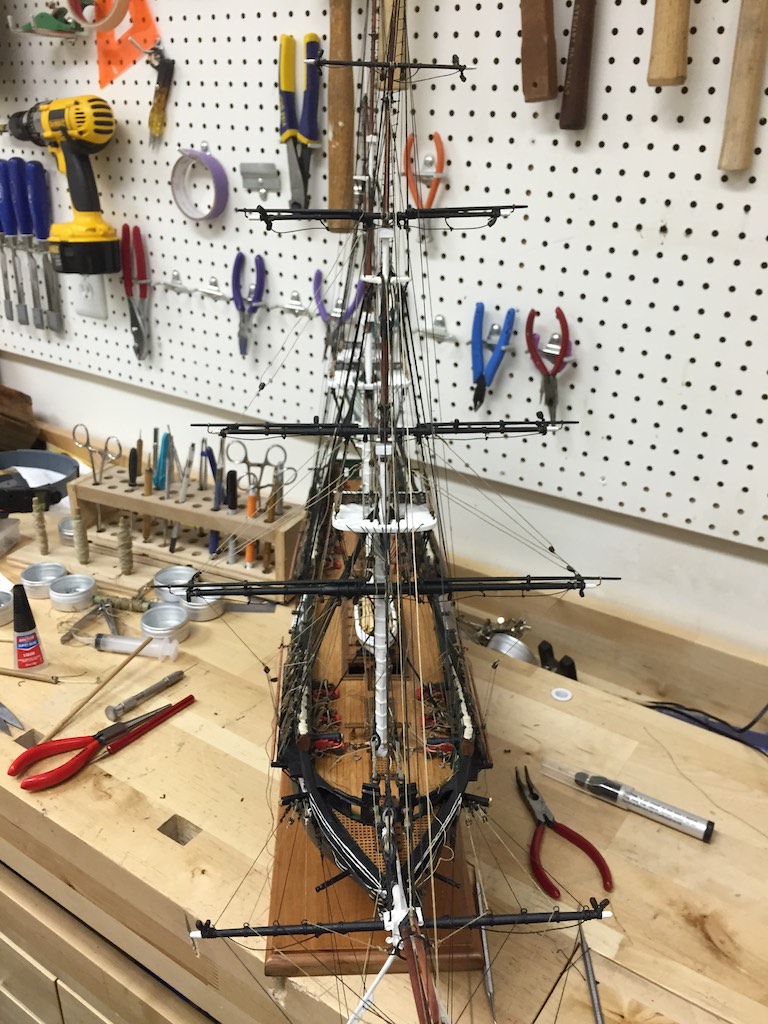
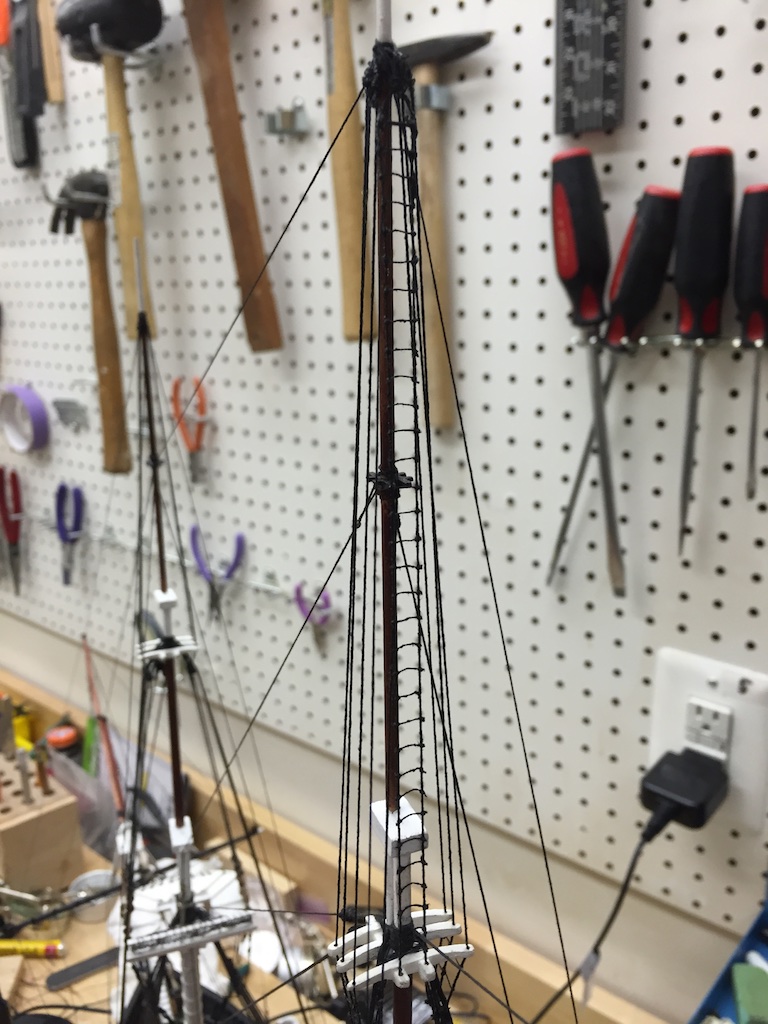
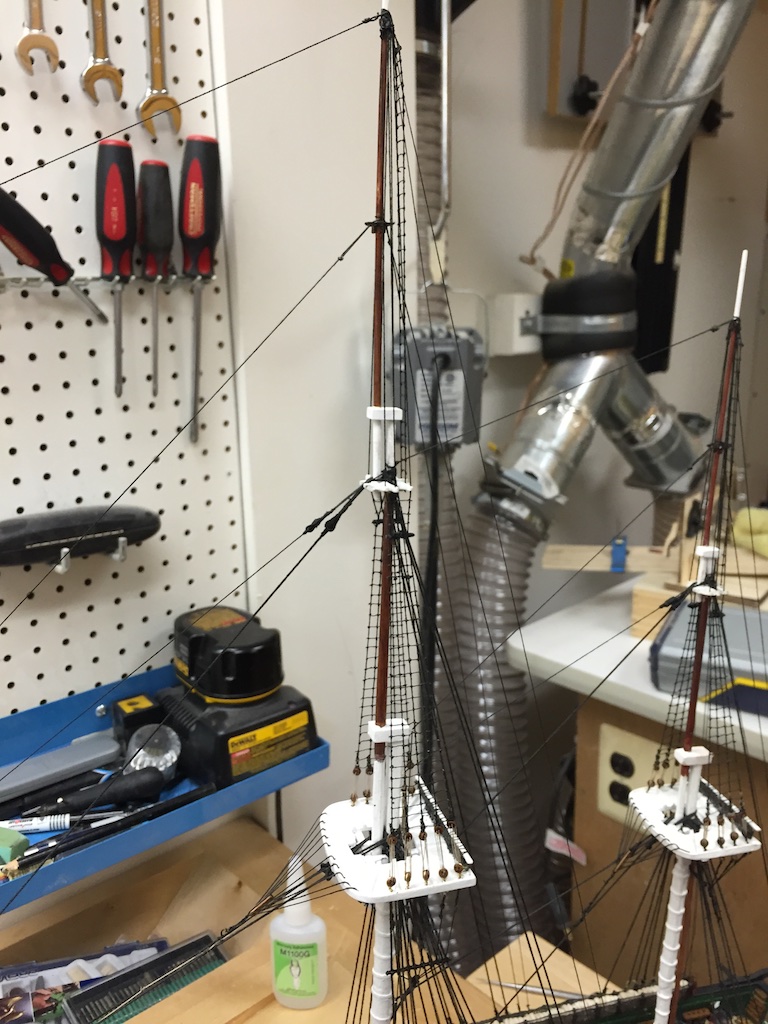
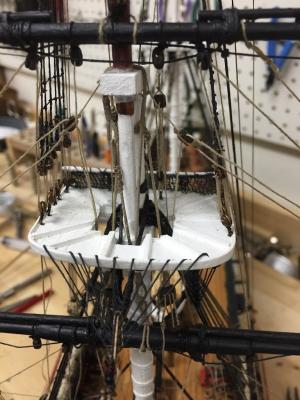
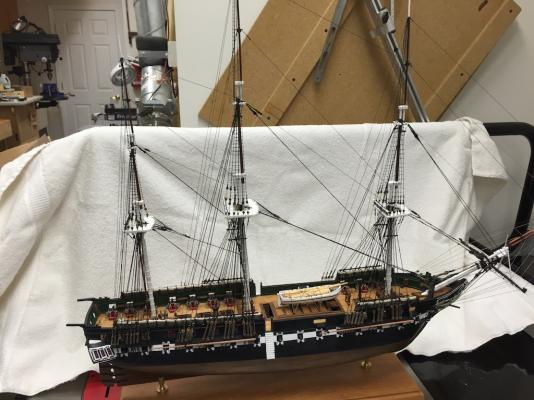
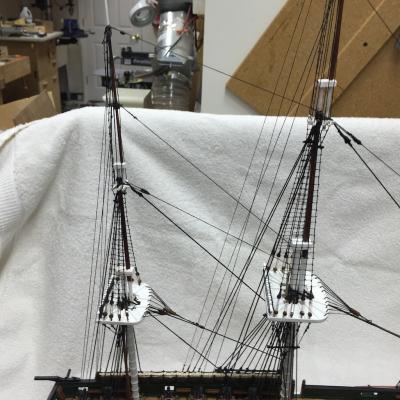
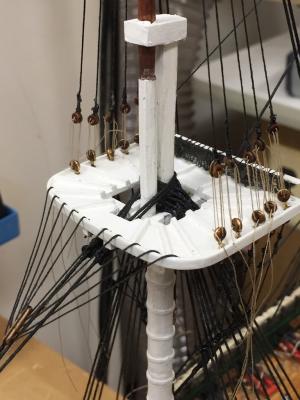
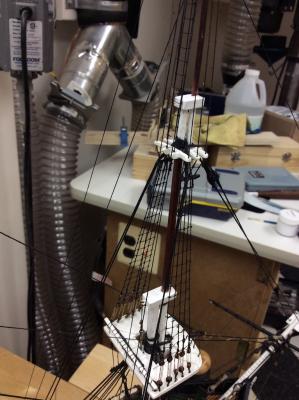
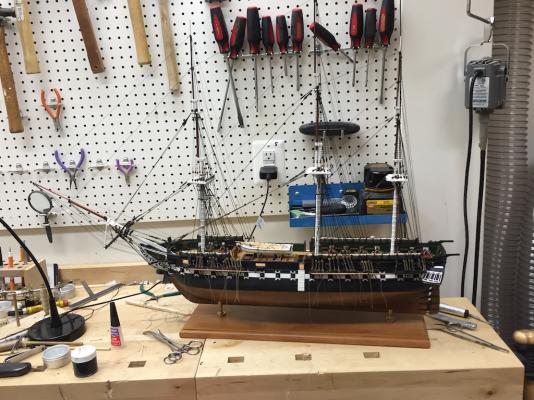
I have continued to rig the fore mast. During this I learned I misinterpreted the Mamoli plans on the placements of the blocks. I had placed the upper end blocks forward of the stunsail booms. This is incorrect. So I am removing these blocks and reinstalling them correctly as I get to them. This cleans up the rigging well. It just looked wrong before. I have rigged and tensioned the lower two spars. I have started the rigging for the next spar up. I have found I can tension them once both sides are fully installed. I have attached a few photos of the ship from the bow aft and closeups of the lower spar rigging. I have to say, I am SO glad I did not rig any of the lower ratlines. They would have been in the way to the point I am sure I would have ended up messing them up. I may rig the ratlines as I complete the rigging for each of the masts. That would break up the ratline knotting sessions a bit. I have a couple of days to decide that.

- 335 replies
-
- 5
-

-
- Constitution
- Mamoli
- (and 3 more)
-
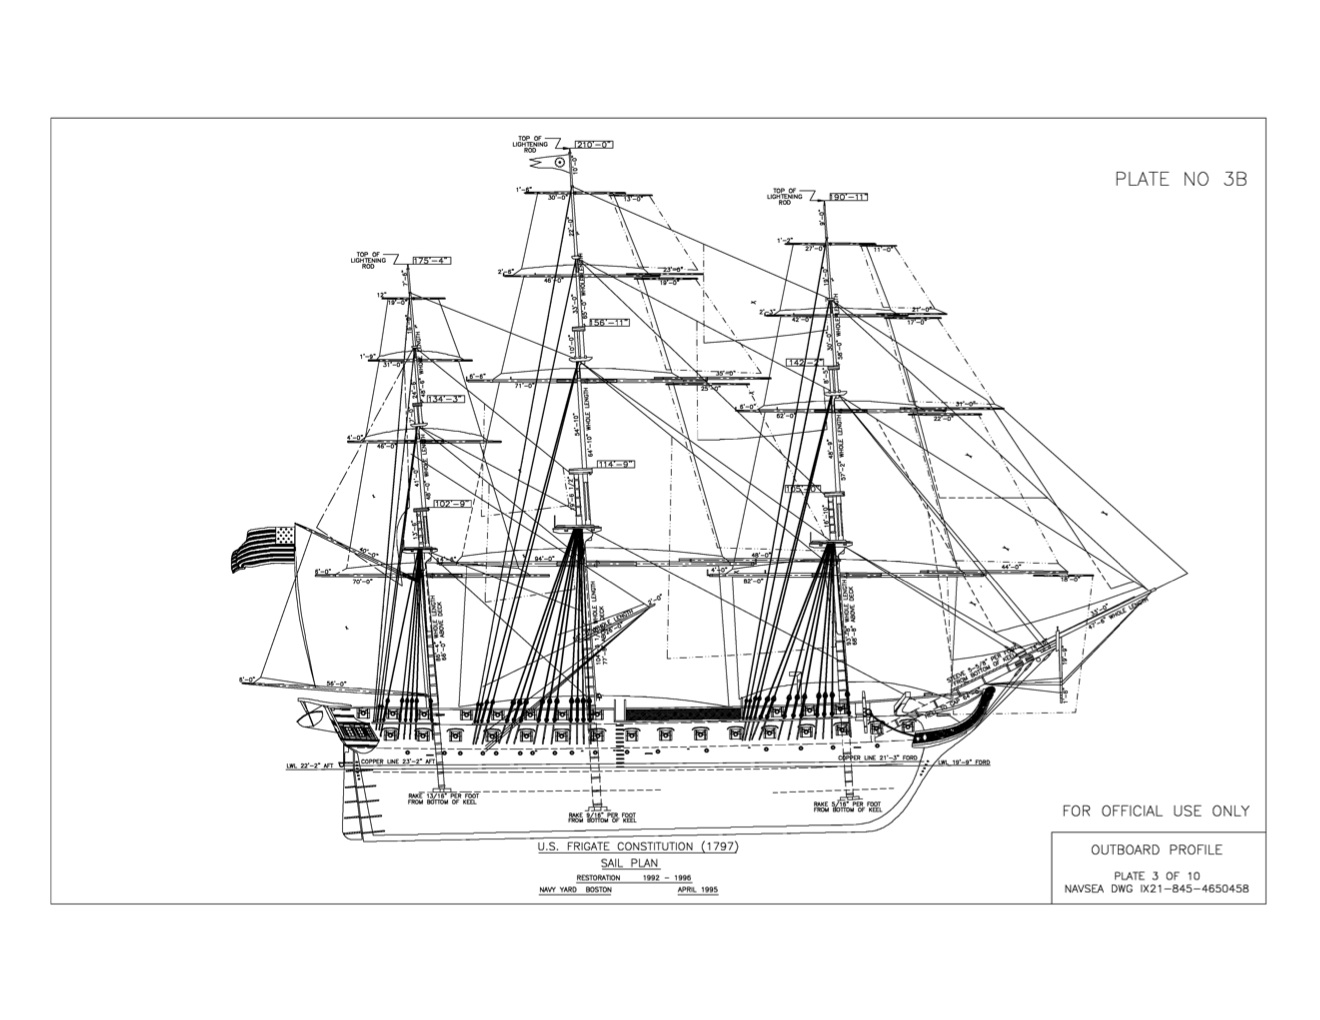
Rich, You are going to end up with 13 stays on that channel. There should be 9 shrouds going up to the fighting platform (which will all have ratlines), and 4 stays running up higher in the mast. These are the last 4 on the channel. I can't tell from you photo, but do you have room for all of these? I have attached the sail plan from the Connie that shows the shrouds and stays attached to that channel.

- 1,756 replies
-
- 2
-
-
- constitution
- constructo
- (and 1 more)
-
Rich, I am sure your gunport are correctly laid out. When I installed my channels I focused on where the front of the channel should be on the plans. and glued them up there. What I found was I should have been focused on the chainplate holes in the channels and their relationship to the cannon ports. I did have to remove and adjust the channels on my stern plates. They totally blocked some of the ports. The others could have been done better but I could live with them. The stern ones I could not. So I removed the channels and shifted them so the alignment worked. That said, you will probably be the only one who sees this error. Unless it becomes more egregious you could let it go. On mine, it was adding the additional shrouds that were not in deadeyes or have chain plates that put me over the edge. That is what totally blocked my ports on the stern.
- 1,756 replies
-
- 1
-
-
- constitution
- constructo
- (and 1 more)
-
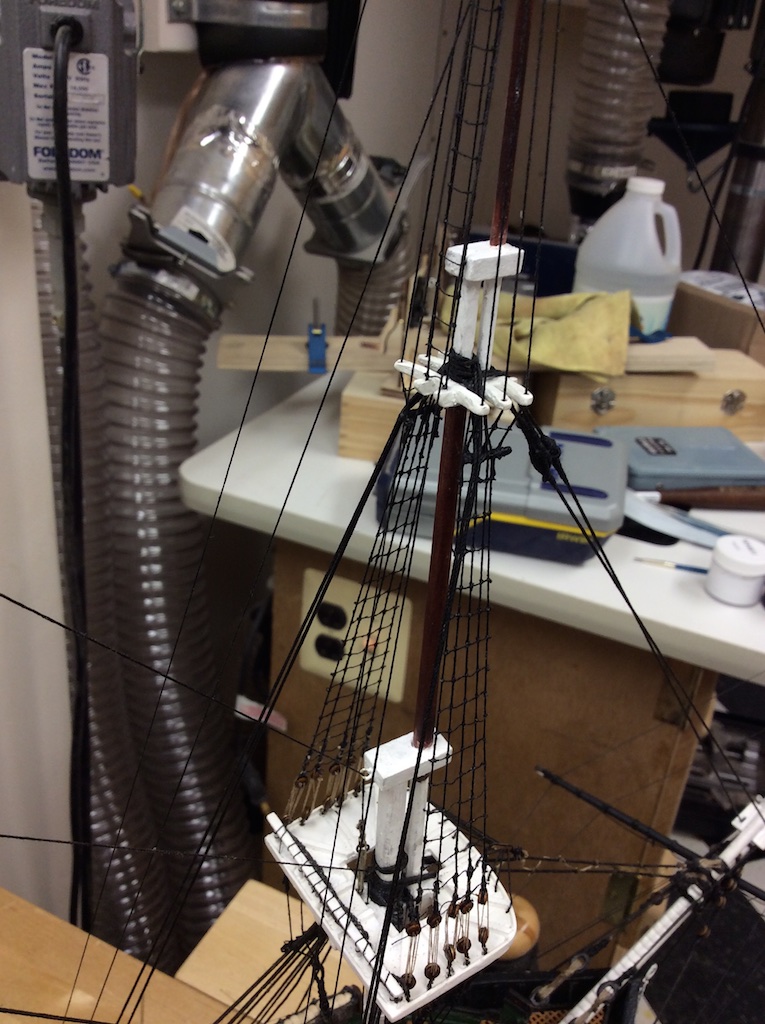
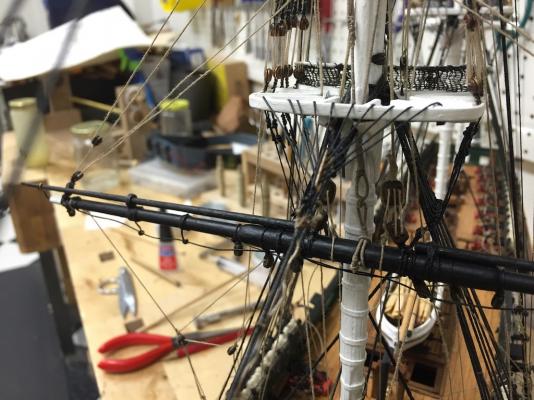
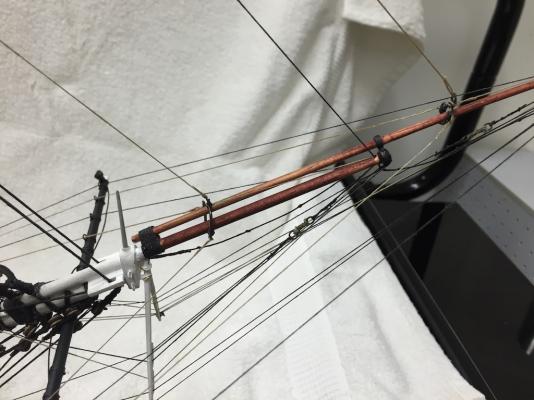
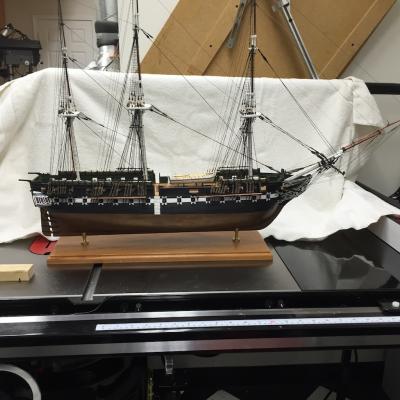
So the rigging slowed down a bit today. The first thing I did was clean up the bow a bit by adding secondary seizings and trimming. I completed rebuilding the top spar. I adjusted the lower spar hanger and mounted it as well as the jeers. I ran the lines from the jeers down to the deck and through the balusters but did not tension them since this would result in the spar rising until the jeer blocks touched. Once I add the counter lines to this, I will start tensioning them. The next spar up was added and the jeer lines were run down to the side belaying plates. I added the remaining fore mast spars to the mast, but will continue rigging them tomorrow. I am running the lines actually down through the hole in the rack and gluing the pin on top of it. Then I do the lashings around the pin and trim the ends at the rail. Once the coils are placed over the pin, it will look like it was done that way. At least that is my hope. Gosh these pins are small! I have added the other spars to the mast and will continue rigging them tomorrow. I did have a mishap when I was moving around from one side to the other. I had my magnifying headset on and was focused in the rigging. I caught and snapped the tip of the Jib boom. Luckily, the break was not smooth but splintered. As a result I was able to effectively glue the tip back on with thick CA and thin CA. I used needle nose pliers to push the sides in together. Then a quick light sanding and restaining the break area and it was all good again. I did adjust the bow lines a bit to ensure the tip was being held correctly and straight. I read of others breaking their booms and now I have done it. I do not feel the over powering need to ever do this again!
- 335 replies
-
- 6
-
-
- Constitution
- Mamoli
- (and 3 more)
-
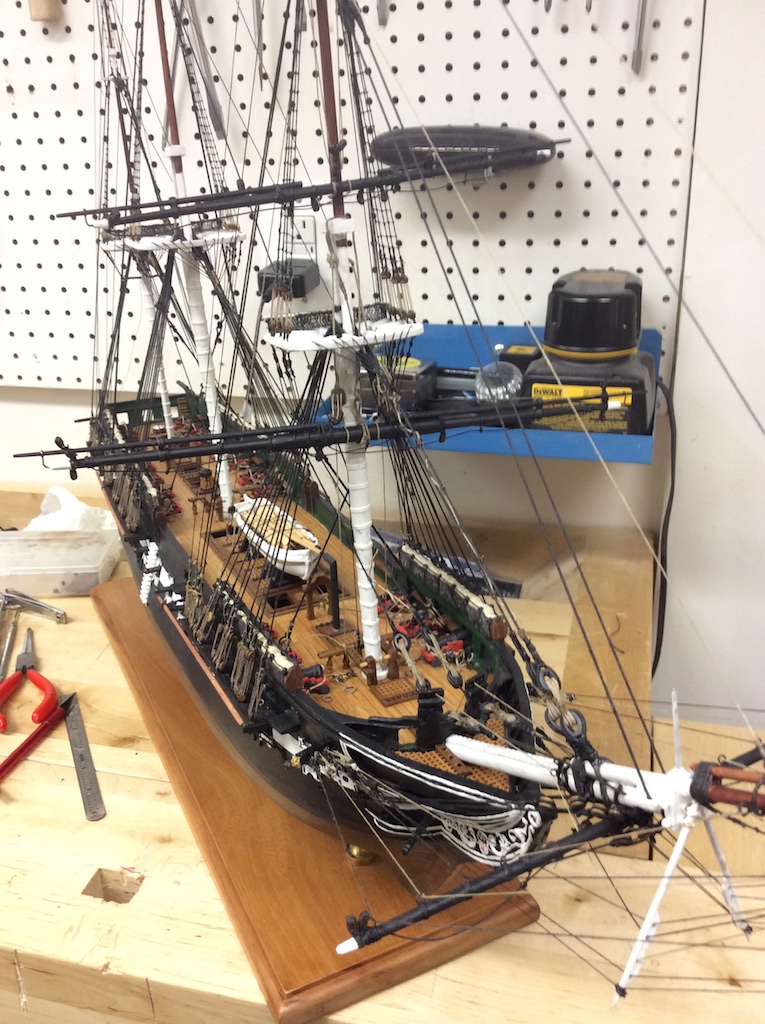
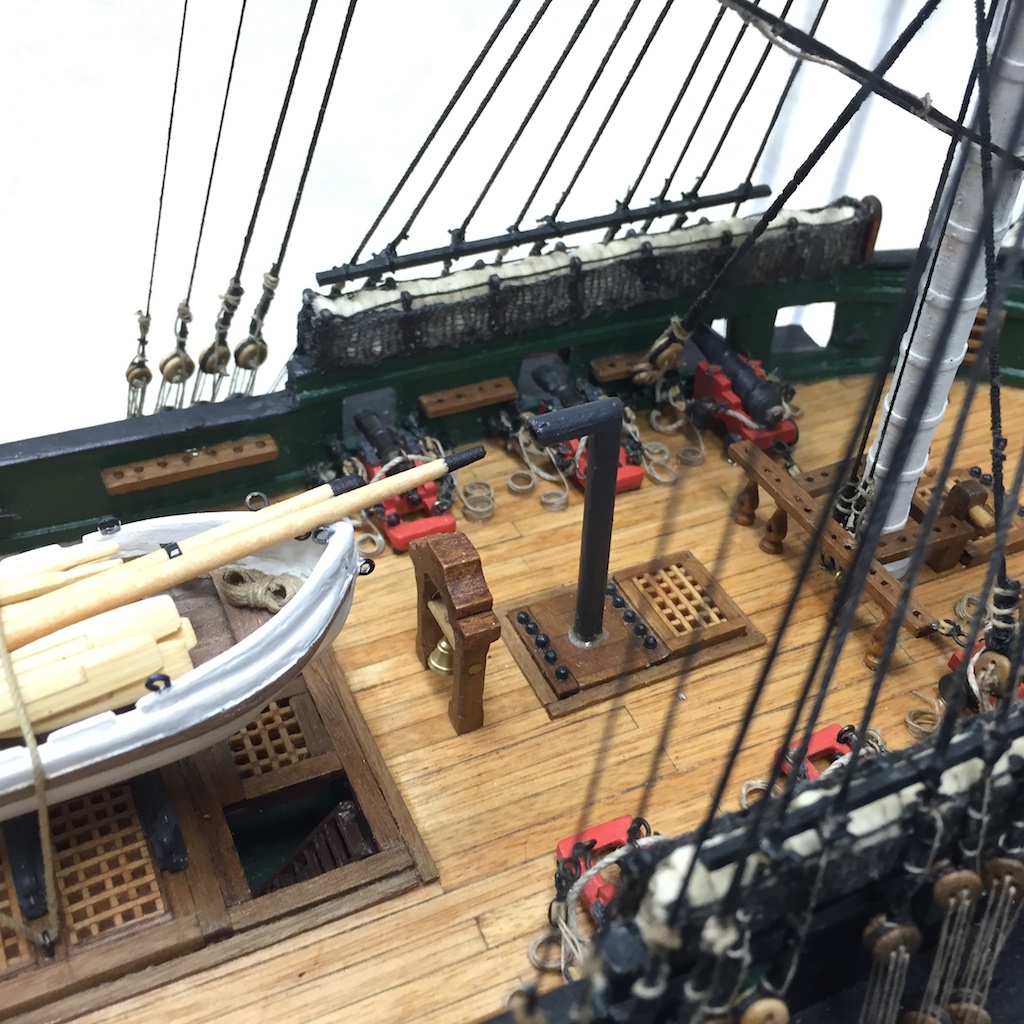
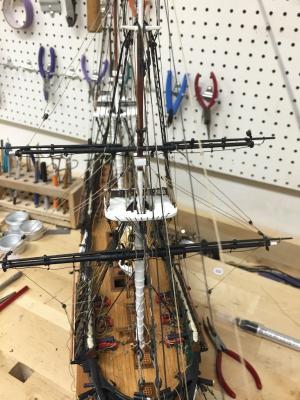
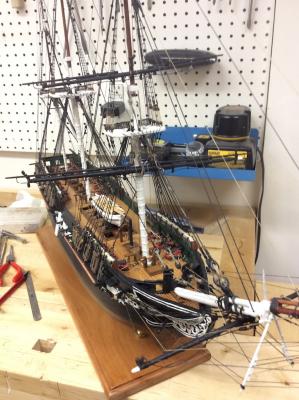
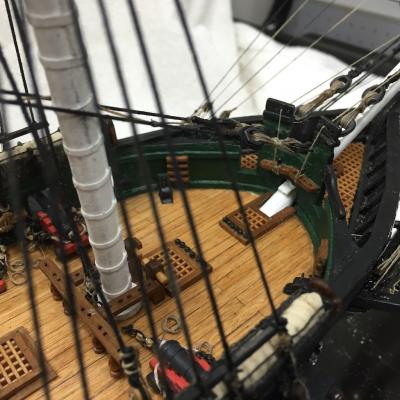
Thanks for all the likes and comments. She is coming together now. I passed two milestones today. I started the running rigging and I installed my first two belayed lines. Many more to come. It did enforce that my idea of not installing the lower ratlines was a good thing since many of the belaying racks are below them. The first thing I did this morning was to fix the mizzen’s crows feet. I noticed last night that I had them attached to the lowest stay. They needed to be on the next one up. I completed the futtock shrouds on all masts as well as dressed the lower shrouds. The masts are now all in alignment. After dressing the lower shrouds I added the staves. I will not put on any of the lower ratlines until the running rigging is installed. Today I started working on the running rigging. The Mamoli plans started with the bowsprit assembly so that is where I started. I created the rings for the jib stays. And installed the various lines. There will be more tomorrow as the Fore mast spars get installed. I did an inventory and sort of the spars. These were made months ago. Somehow I lost one of them. Luckily it was the simplest to redo. The upper spar on the fore mast. I turned down a new one and painted it today. I will add the blocks to it tomorrow. It has no other fittings. Yeah! I also served the loop going over the lower fore mast spar as well as the hanger for it that gets served to the mast tomorrow. I did this in beige since that is what the plans called for. I learned a trick on the rigging today. When one end is a block and the other end attaches to a ring or other device other than a block, it is easiest to install the line and lace the block first. This allows me to match the blocks and put it in the final position needed then adjust the length of the line at the other end. I used this to match the port and starboard lines from the Bowsprit to the cathead. I tried putting a white towel behind the Connie to get a bit better shots of the rigging. I need a bigger towel (or a sheet) she is a big girl.
- 335 replies
-
- 8
-
-
- Constitution
- Mamoli
- (and 3 more)
-
The problem I have with using a bench grinder is overheating the blades. I have a real tendency to do that when I try to use the grinder. That is one of the things with the Tormek is it uses a water bath for the stone as it is turning keeping it wet and cool. Since I lack skills in sharpening, using the Tormek helps me get really sharp blades. You certainly can do it with wet stones, I just tend not to have the patience for them.
-
These are still being shown as pairs. When you serve all the lines, then stack the pairs, it does end up stacking pretty good. Here is a photo of the main mast on my Connie. These were done in pairs. So doing them separately will cause them to be higher. However, I assume that you will not be serving them so that will shrink them down some.
- 1,756 replies
-
- 2
-
-
- constitution
- constructo
- (and 1 more)
-
I have completed the futtock shrouds on all the masts as well as the Jacob's Ladders. Tomorrow I will do the final tweaking to the mast alignments and lock them down. Once I dress the lower deadeyes, I will attach the staves. This will leave the lower shroud ratlines to be done once the running rigging is complete. Next I will start working on the running rigging!
- 335 replies
-
- 4
-
-
- Constitution
- Mamoli
- (and 3 more)
-
Well it will last forever. As a warning, the jigs are expensive too, but you can get them as necessary.
-
I have the need to sharpen turning tools as well as chisels and planes. Years ago, about the time I got the lathe, I bought the Tormek sharpening system. It is expensive, but it has jigs and guides that allow me to sharpen everything from turning tools to kitchen knives. I also bought a granite table top that is insanely flat. This is the base of my sharpening station and allows me to also use sandpaper to flatten plane blades. Over the years I have aded to the various jigs for the sharpening system. I still have the traditional stones, and they work well if you know the exact angle to hold the blade, but I can't sharpen by hand to the degree the Tormek allows me to do. If you are good, you certainly can use a grinder and the stones to get something really sharp. I just don't do it enough to really get good at it. That is why I chose the Tormek.
-
You build it how you like it Rich. I am enjoying watching it. You have brought a new method to all of us.
- 1,756 replies
-
- 1
-
-
- constitution
- constructo
- (and 1 more)
-
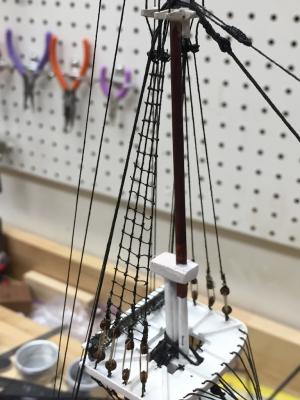
I completed the futtock shrouds on the main today. This completes the main and mizzen with the exception of the lower ratlines. I decided to add the Jacob's ladders to the top of the masts. These were not part of the Mamoli plans. I was not happy with the first try. I used just lines to create it. I know on the ship it has hard rungs, but at this scale that would be problematic. The first set compressed the ladder rungs since it came together at the top. This did not look good. So I took a small piece of guitar wire and added a hard rung to the top with rope rungs on down. This worked. The top hard rung keeps the ladder shape. I took the lower ends of the ladders through the tree by drilling small holes through the rear of the tree and threading them through and using a small amount of CA to lock them to the tree. I did have to remove and redo one of the forestays since they tie directly through the ladder and I built the ladders off ship. I will have to do the same on the foremast with one of the stays. After I took the photos, I did some shaping on the ladder rungs so they hang better and do not arch up. I also learned that I can tie the rungs so the knots cause them to hang the correct way. I learned this after I did the main masts ladder. Next I will work on the foremast futtock shrouds and Jacobs ladder. After that I plan on dressing the main and foremast lower shrouds adding the staves. I am not planning on tying the lower shroud ratlines until at least the inner the running rigging is complete. So once the staves are added I will be ready to start with the running rigging. Whoo hoo!


- 335 replies
-
- 5
-
-
- Constitution
- Mamoli
- (and 3 more)
-
Still you probably want to leave some extra line. I am assuming this would still be coming out of the forward lower deadeye hole. Then once you have them installed on the ship and the shroud attached, then tie half hitches (I used three) around the should and serve the end to the shroud.
- 1,756 replies
-
- 2
-
-
- constitution
- constructo
- (and 1 more)
-
I did the same. However for the forestays i used seized loops and mice.
- 1,756 replies
-
- 2
-
-
- constitution
- constructo
- (and 1 more)
-
The main thing I found out was balance. If you add a shroud pair to one side, it must be matched by a pair on the other side. If you add a forestay it needs to have the backstay next. In this manner I was able to tension the rig without causing distortion. Not that I have completed the tensioning but I am on my way.
- 1,756 replies
-
- 2
-
-
- constitution
- constructo
- (and 1 more)
-
I have completed the futtock shroud ratlines on the mizzen and dressed all the shrouds. To dress the lines I tie three half hitches then server the line end to the shroud. Once I hit the ends with CA I trim the lines off with the knots. This completes the standing rigging for the mizzen except for the lower ratlines. Tomorrow I plan on dressing the main shrouds. Once I have the shrouds dressed I will complete the futtock ratlines. I will try to get some photos tomorrow to show the progress.
- 335 replies
-
- 1
-
-
- Constitution
- Mamoli
- (and 3 more)
-
Start the pairs front to back and alternate sides. Other than that I don't think it matters which mast you do first.
- 1,756 replies
-
- 1
-
-
- constitution
- constructo
- (and 1 more)
-
I did something similar with mine. I cut formers that were much taller then the boat. I then bent strips to fit each former. Then I glued the formers down to a flat piece of plywood. Then I glued the keel, stem and stern pieces and planked it. Once dried, I cut the formers from the plywood based then broke them from the strips. The tips had only been glued on the ends so they did not stick to the formers where the boat would be. Once I have the formers removed, I added more bent strips for the remaining frames. Then It was just adding the remaining boat features. Certainly more work than carving the blanks out, but I liked it much better.
-
With the Mamoli kits, they supplied roughly carved hulls. I ditched these and went with a custom plank on frame boat based upon the dimensions in the AOS. I have built the boat over the main hatch and will be building the whale boats as bit later in the build. I also plan on using some of the wood I received from the real Connie in the ship's boats. I played with carving out the supplied forms from Mamoli but just felt I liked the POF better.
-
I guess that would depend on how coordinated the two bell ringers wiuld be!
- 1,756 replies
-
- 1
-
-
- constitution
- constructo
- (and 1 more)
-
We were going through the Maritime museum/park in San Francisco today and read on one of the figurehead exhibits that it was in such good shape because the figureheads were removed once the ship was at sea. I had never read that before. Was this a period thing?
-
FYI, when I was at that stage in my build I noticed I had two bells in the kit. Since the Connie has a bell attached to the mast, and the Mamoli plans only showed the one in the belfry on the foredeck, I asked Popeye2Sea about the mast bell and should it have two. He said this was a modern addition to the ship. It looks good though!
- 1,756 replies
-
- 1
-
-
- constitution
- constructo
- (and 1 more)
-
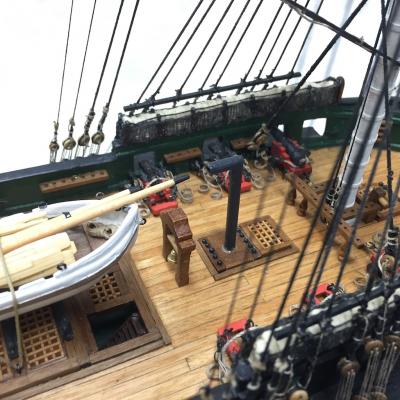
It also depends on if the kit plans fully rig the cannon or not and how far you want to go. For the Connie spar deck I used 4 double and 4 single blocks per cannon. The double blocks would be attached to the bulkhead and the singles to the cannon. Since mine was 1:93 scale I will not suggest sizes.
-
Today I performed the first rigging tuning. I tensioned up the various lines to align the masts. Once aligned I used half hitches on a number of each set of shrouds to hold the masts I will leave this for a few days to see if anything stretches or needs any tweaking before dressing them all. Since I had already tensioned and dressed the mizzen futtock shrouds weeks ago, I started installing the ratlines. I plan on installing the futtock shroud ratlines before moving on to the running rigging. I will hold off on the lower ratlines until the majority of the running rigging is in place. I used David Kump's fantastic Youtube video on how to tie the ratlines as the method I used. The only thing I did differently was I found at least for this set, my bent tweezers were the easiest to use to tie the knots. I found once I got into a rhythm, they moved pretty fast. I am SURE I will tire of making them before all is said and done, but I was pretty happy with the way the first set came out. As I tied them I would lock the end knots with CA once I was sure they were in the correct place and the line was not deforming the shrouds. Once I completed the entire set, I used the CA to set each of the knots. A link to David's Youtube video is here. Here is a photo of my first set.
- 335 replies
-
- 7
-
-
- Constitution
- Mamoli
- (and 3 more)