robnbill
-
Posts
841 -
Joined
-
Last visited
Content Type
Profiles
Forums
Gallery
Events
Everything posted by robnbill
-
 I soaked mine in black tea and coffee testing until I got the color I was looking for. Te turpentine mixture was made by shaving beeswax into turpentine. and letting it soak over night. I read that I should use as much as would dissolve and to strain out what didn't. As it turned out, it was just right. I shook it a few times and let it dissolve. As I made the hammocks I used the turpentine mix on my fingers to assist in rolling the hammocks. Then once I placed them in the racks they dried and the hammocks were locked into place. Not sure how you will do this with them already in place, perhaps thin it more and use a brush. I have read where you can add dye to the mixture, but I have never tired that, but I could see where it would work. The neat thing about the mixture is it is thin enough to soak into the material then the turpentine evaporates leaving the wax matrix throughout the material. Evenly distributed so no need for heat or machinations to make it soak into line.
- 1,756 replies
-
- 2
-

-
- constitution
- constructo
- (and 1 more)
-
Congratulations! She is looking great. In inspiration for me to tackle my Connie now.
-
They are looking good. How are you holding them in the netting? I used the beeswax/turpentine mixture.
- 1,756 replies
-
- 1
-
-
- constitution
- constructo
- (and 1 more)
-
The vendor i bought mine from thriugh Amazon was vxb. They have bearings down to 1mm in size and up incrementally from there. http://www.amazon.com/s/ref=sr_nr_p_89_1?rh=n%3A16310091%2Cn%3A%2116310161%2Cn%3A16310181%2Cn%3A16410991%2Cn%3A16411231%2Cp_89%3AVXB&bbn=16411231&ie=UTF8&qid=1411224040&rnid=2528832011
-
I found on Amazon there were. Number of vendors that sold small enough balls for my 1:93 version of the Connie. They have very fine balls out there.
-
I thought the model expo cannon balls were plastic. Hiwever it has been a long time sice i looked at them. I could be wrong.
-
Mine were coated so without heating they did not react with the blacening solution. I dont remember any of mine rusting. I did dry them by rolling them between two paper towels.
-
That is a LOT of wood. I can't wait to see the model you build with all of that. You are going to need a real dry dock!
-
I just finished lofting the Eagle following Gene's practicum. I used DeltaCAD on my Mac laptop. Very easy to use. Does not do 3D but I was not looking for that. There is a PC version as well. It retails for about $40 I believe. Well worth the time and effort.
-
Hey Tim. Is that a 10 spoke ship's wheel? I am trying to figure out what configuration to build to replace the metal one in the kit, 8 or 10.
-
Interesting. I looked at their site today after reading this thread. They were offering two different sets of the Connie. I at 1:76 and another at 1:93. I do not know of any other manufacturers that have the Connie at 1:93 other than Mamoli. So I suspect these sets are Model Shipways and Mamoli.
-
So I was wondering what others have found in their research on the configuration of the Connie's wheel. The current configuration as well as that prior to the 1927 restoration were 10 spoke wheels. I found that there was a mention in an online article of a Connie Wheel set in the US Maritime Museum. I looked it up. It is an 8 spoke set. However, they state this wheel was originally on the Guerriere and was taken off of it after the battle to replace the one shot away. No question that the wheel was in the battle (providing the provenance is correct) but did the Connie have an 8 spoke or 10 spoke wheel before and during the battle? I am assuming that it probably was a 10 spoke since that is the common construction. However, I just found out about the 8 spoke yesterday. Interestingly the Mamoli Kit came with an 8 spoke wheel. I am probably going to replace it with a wooden wheel, I will make. Thoughts anyone? Bill FYI, here is a PDF of the wheel based upon the Navy plans on their site. They attribute it to the preexisting wheel prior to the 27 restoration. Constitution Double Ships Wheel.pdf
-
They are looking great. These are more difficult than mine since my rails, stanchions, and netting were all black. I could hide issues easier.
- 1,756 replies
-
- 1
-
-
- constitution
- constructo
- (and 1 more)
-
I did my final shaping with a file once I attached it to the spar. You can make quick work of it.
- 1,756 replies
-
- 1
-
-
- constitution
- constructo
- (and 1 more)
-
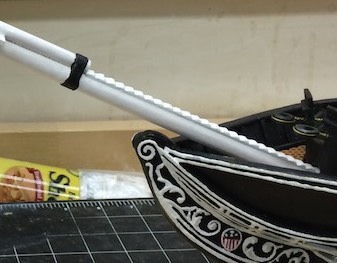
Rich, - This is looking good. You have come a long way in a short period of time. I do have a question for you. The stairs up the bow spirit look like they are reversed. It is probably the angle of the photo.The riser should be around 90 degrees to the keel with the run as horizontal as possible. Here is a photo of mine showing what I mean.
- 1,756 replies
-
- 4
-
-
- constitution
- constructo
- (and 1 more)
-
I think the problem is more that ca does not always hold metal well.
- 1,756 replies
-
- 1
-
-
- constitution
- constructo
- (and 1 more)
-
I glued the netting to the outside of the racks. I looked at this on a number of models and this seemed to be the practice. Also gluing it to the interior really made the slots too small. So I dyed the nets, then attached the web to the racks with small amounts of CA. I used my dental picks and small wood splints to hold the net to the racks until the CA set. This was only seconds. Then I looped black thread around the racks on the ends to attached the netting where they were visible. However, my racks are black so black thread really doesn't show up easily beyond that in the net. With the brass colored racks it would be much more visible so you might have to use more thread. However, you can still glue the netting to the racks then use the thread to make it look like they were bound to the ropes with it.
- 1,756 replies
-
- 1
-
-
- constitution
- constructo
- (and 1 more)
-
Congratulations! The hammock cranes are looking great.
- 1,756 replies
-
- 1
-
-
- constitution
- constructo
- (and 1 more)
-
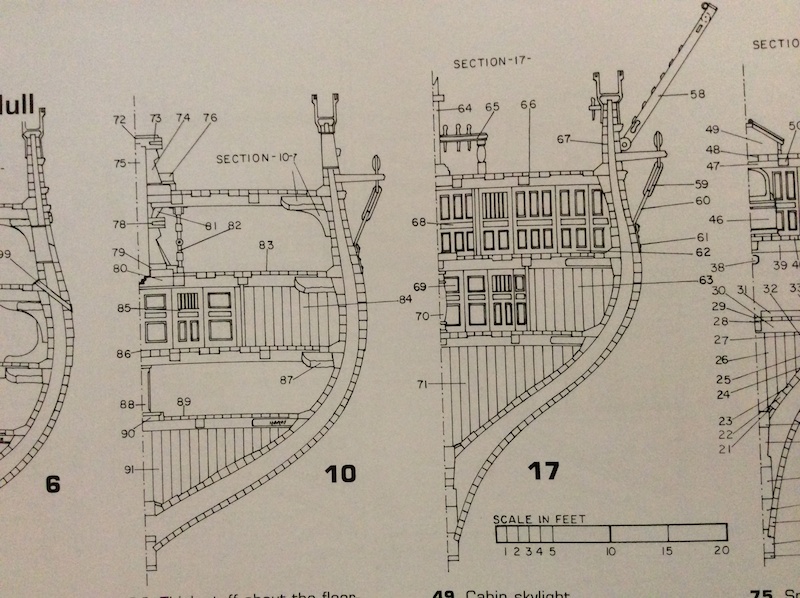
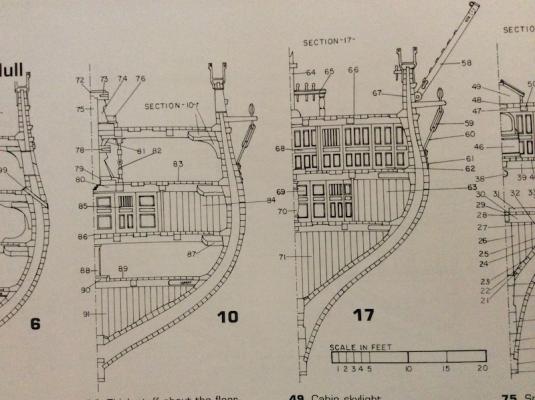
According to the AOS, they pretty much are aligned with the centerline. More so than the sides. So if you look at them, they appear to tilt out from the tumblehome lines, but really are parallel with the keel's centerline. This makes sense as it squares the cranes with the deck. Bill
- 1,756 replies
-
- 2
-
-
- constitution
- constructo
- (and 1 more)
-
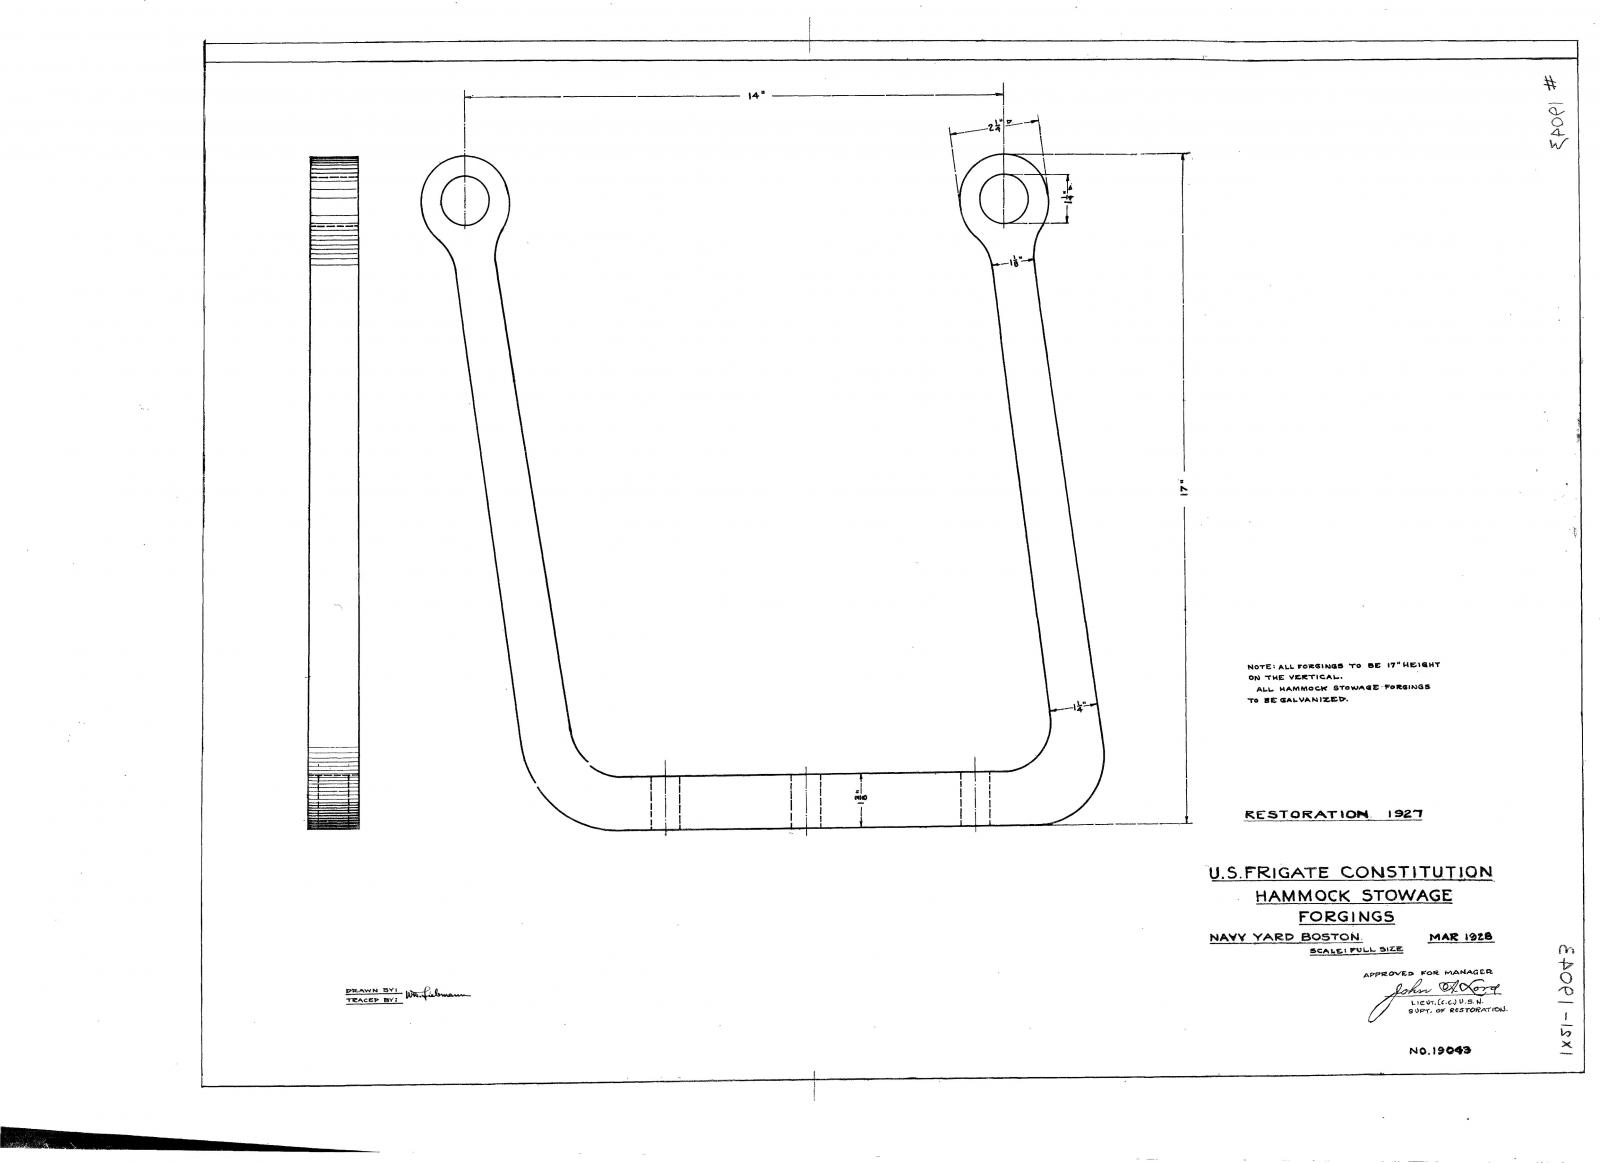
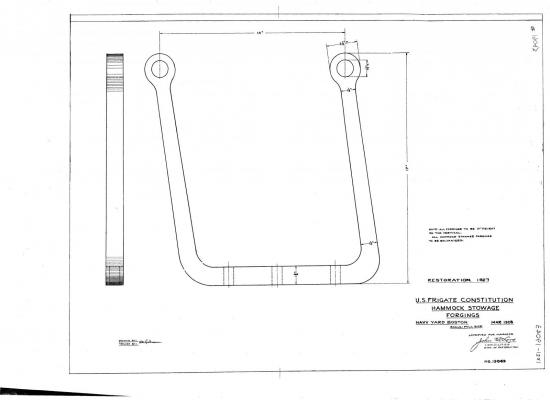
You probably already have this but here is the Navy Plans for the stanchions. Bill
- 1,756 replies
-
- 1
-
-
- constitution
- constructo
- (and 1 more)
-
I did a couple of things. First, I worked until I liked the length of the string that IU wanted to coil. This was just trial and error until I found what I liked. Then, I cut the lengths I needed, ran the beeswax and turpentine mixture over it. I took a board and nailed two small nails in and cut the heads off. Then I polished the ends with my rotary tool. I wrapped the waxed lines around the two nails and pulled them off once they were wrapped. Then I shaped them like I wanted them and let them dry. The the next day, I placed a small drop of glue on the deck where I wanted the coil to go then used tweezers to place them on the glue. Once done and dried, I lightly sprayed the glued coils with the matt spray I used on the hull to eliminate any shiny spots from the glue. Bill
- 1,756 replies
-
- 1
-
-
- constitution
- constructo
- (and 1 more)
-
I placed my coils on the deck after attaching the cannons. I just glued the end of each of the lines to the deck where the coil would be glued. So if you change your mind, it can be added after. Looking great. They do go faster as you move along.
- 1,756 replies
-
- 2
-
-
- constitution
- constructo
- (and 1 more)
-
I know there have been a number of threads discussing this, or the various kit manufacturers in general. I am building the Mamoli kit with a lot of bashing. If I chose again, it would probably be the Model Shipways version. It is larger and has more detail out of the box. Since it is larger, adding more detail to it is a bit easier. The instructions for Mamoli are not very detailed. It assumes the modeler will know many things, so an activity that might take weeks, might be a sentence in the instructions. The BlueJacket kit bill's itself as the most accurate and it seems that many modelers who are familiar with it agree. However, this is a solid wood kit so you have to be prepared to carve the hull. Accuracy of a Connie kit is always up to a lively debate since no one knows for sure what she really looked like (exactly) during the 1812 battles. There are MANY discussions on this forum regarding that. All of these kits are substantial in that you will probably be several years in building any of them. Build logs of all of these can be found on this forum. Look through them. I am sure any of the modelers will be happy to give you more information if you PM them with specific questions regarding their build or experiences. Bill