Mark Pearse
-
Posts
840 -
Joined
-
Last visited
Content Type
Profiles
Forums
Gallery
Events
Everything posted by Mark Pearse
-
 thanks, it's been great learning how to do metalwork & soldering & the interest is heartening. Art, thanks for that, but I feel that your work on your own current model is beautiful indeed. thanks also Harley, & I looked up what a Ranger 29 is, a new yacht type to me. They are very nicely proportioned & I hope that you did get to sail in one. This yacht will have a large mainsail by comparison, which is good & bad....a 28' gaffer is powerful but maybe getting close to a handful. Sailor, thank you, that's good information. I asked a friend who remembers well many yachts racing before WWII & confirmed that they all had some sort of gammon iron; but interestingly his father's yacht was built without whisker stays because it was easier to drop & retrieve the anchor. Ultimately they did put whisker stays on, as they did more racing & preferred the bowsprit in one piece. Mark
 -
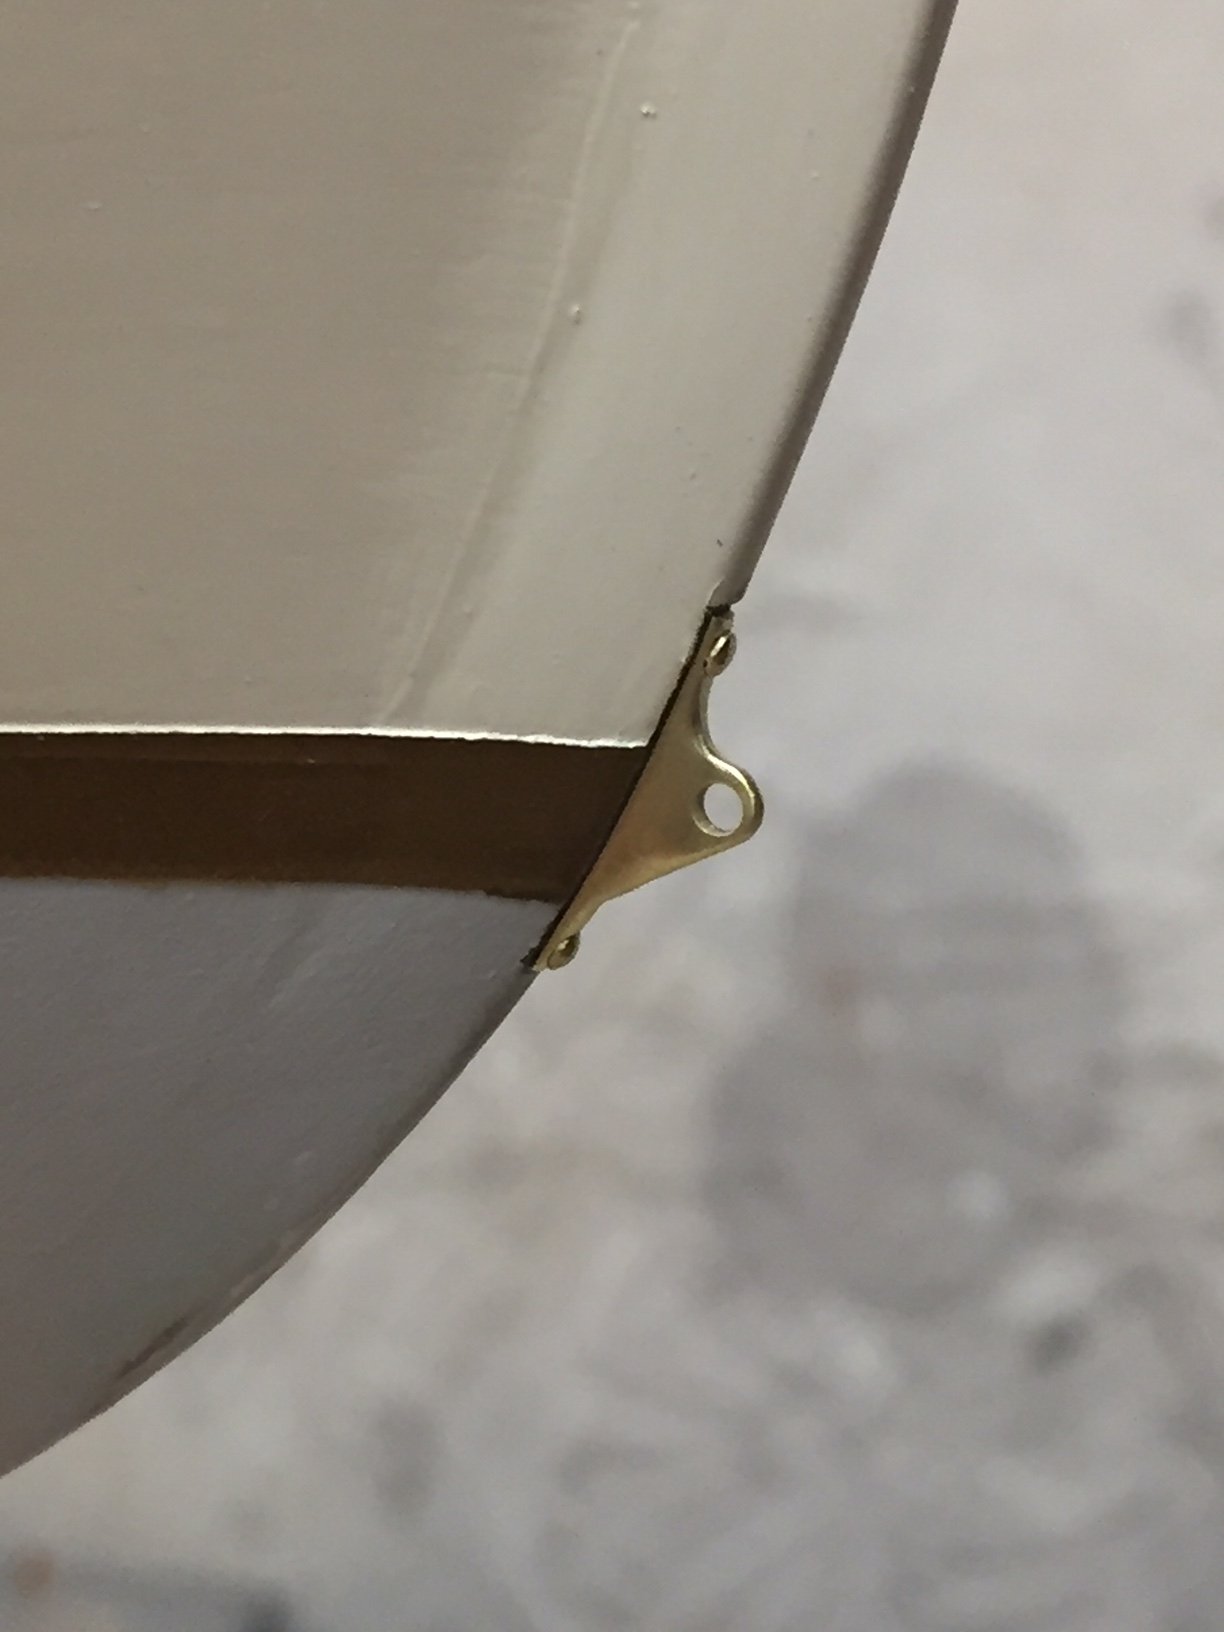
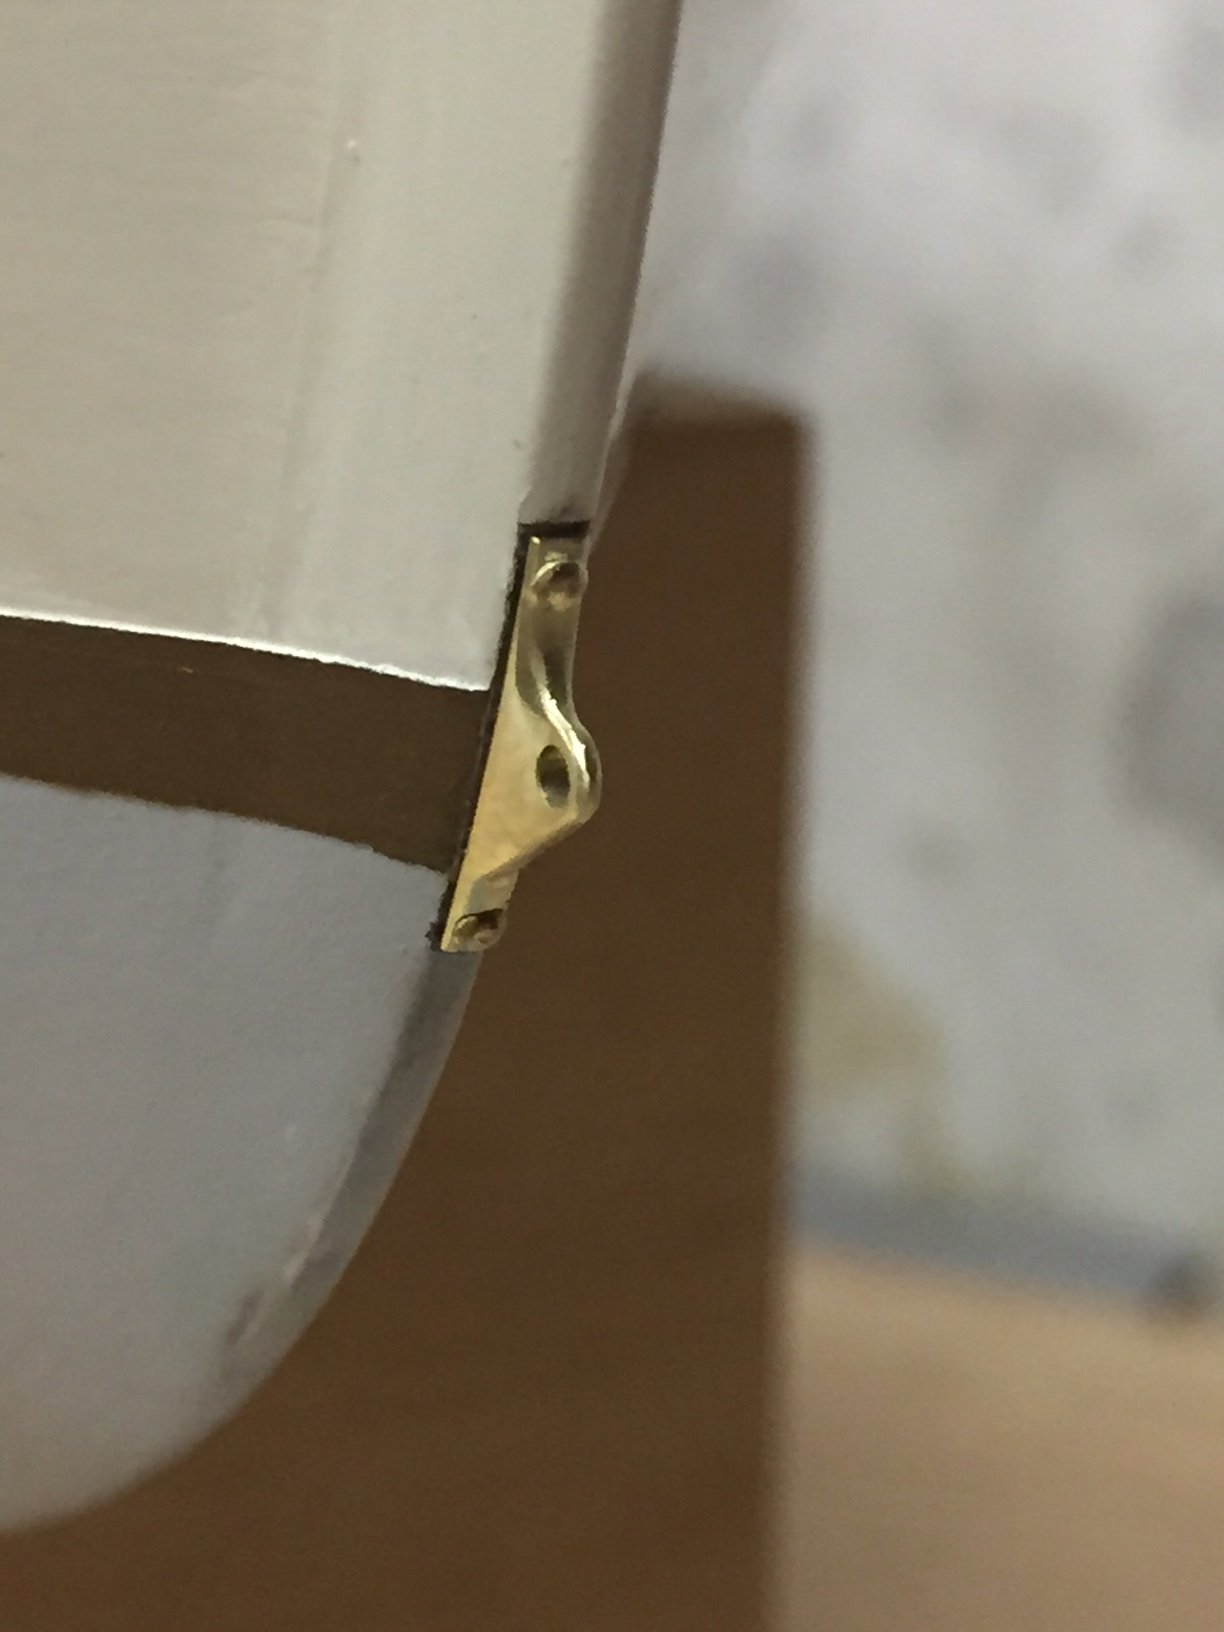
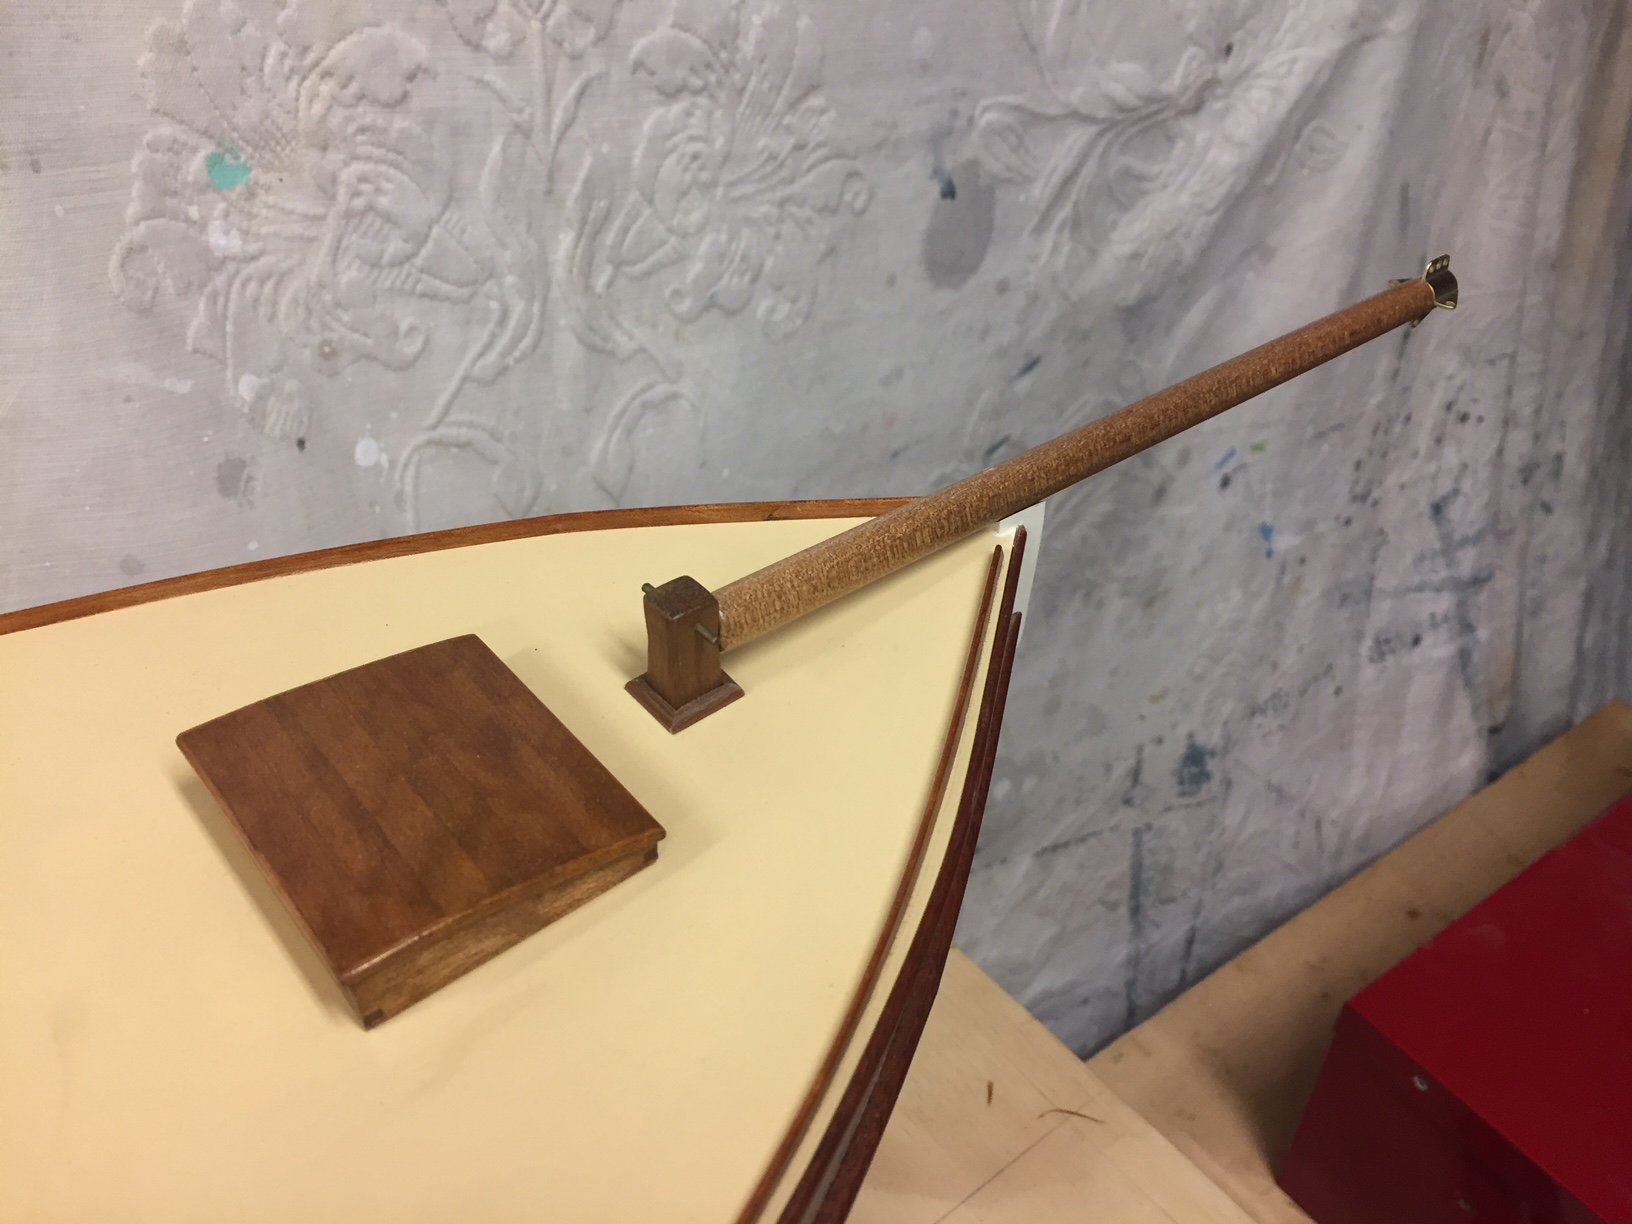
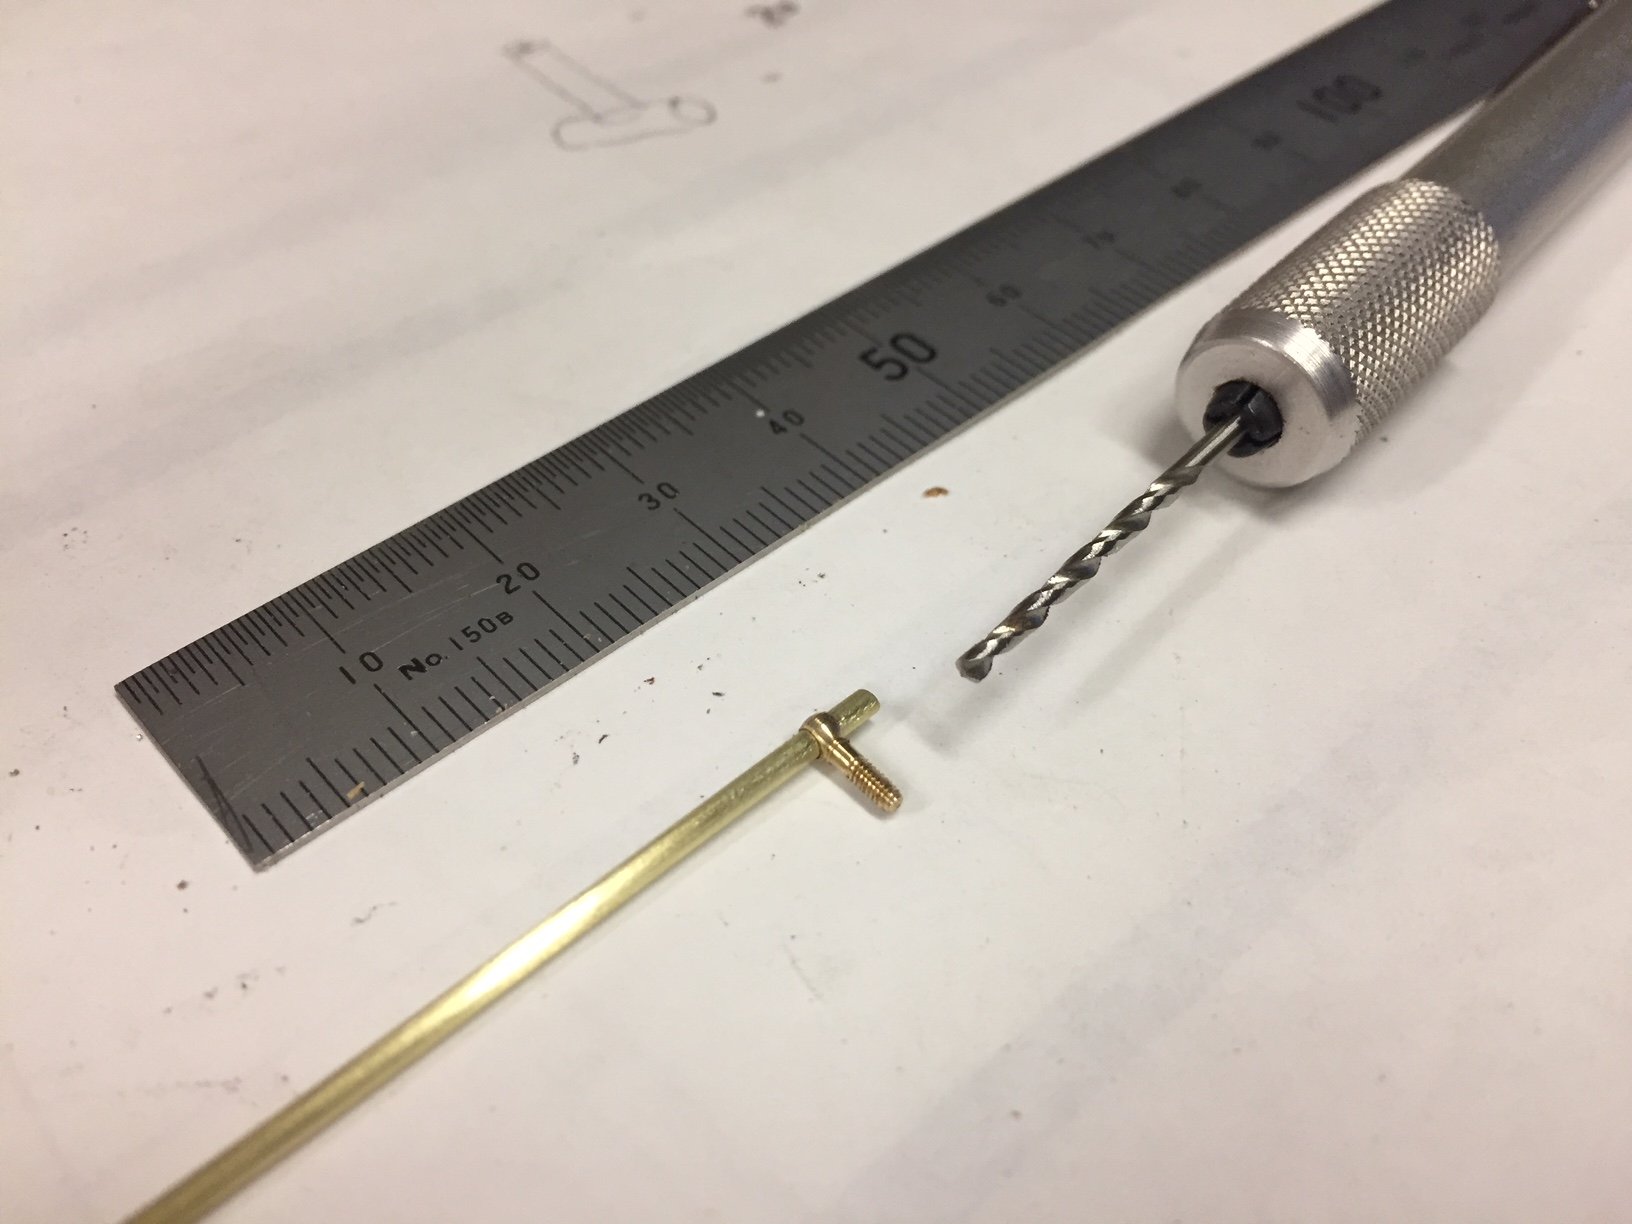
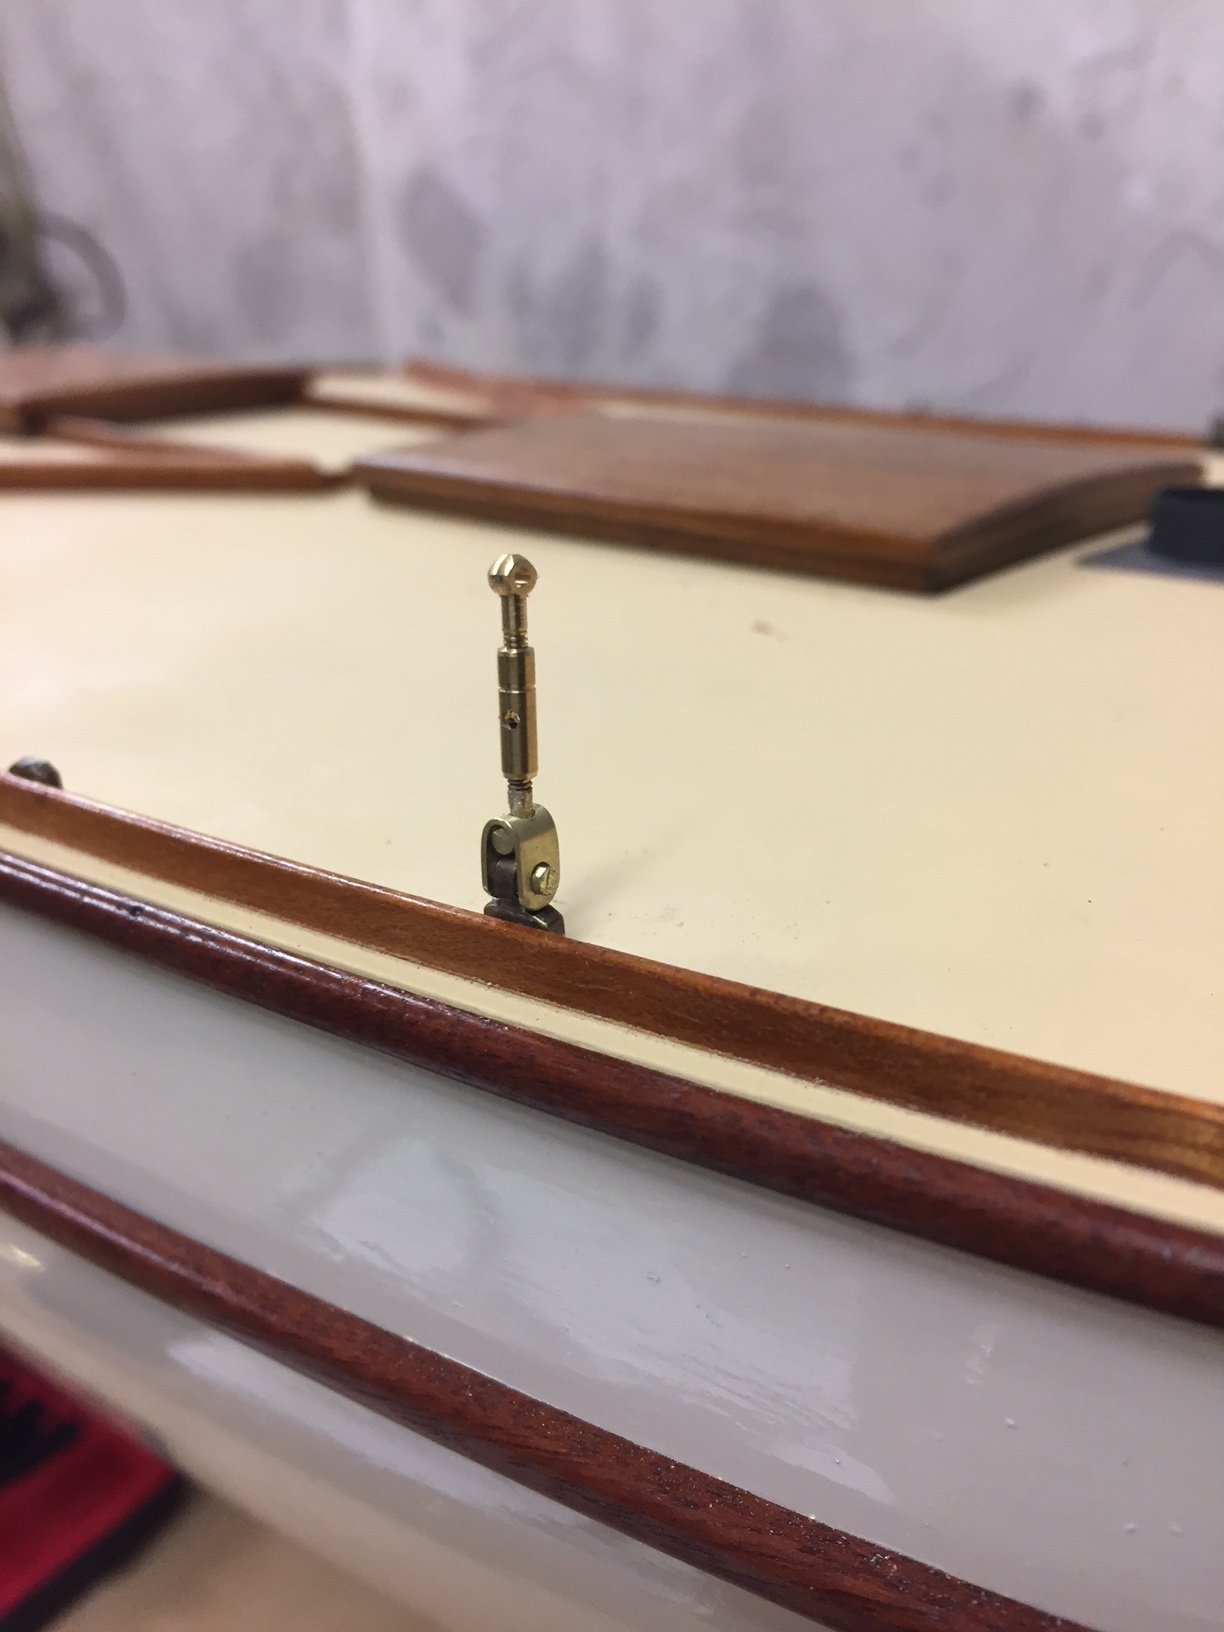
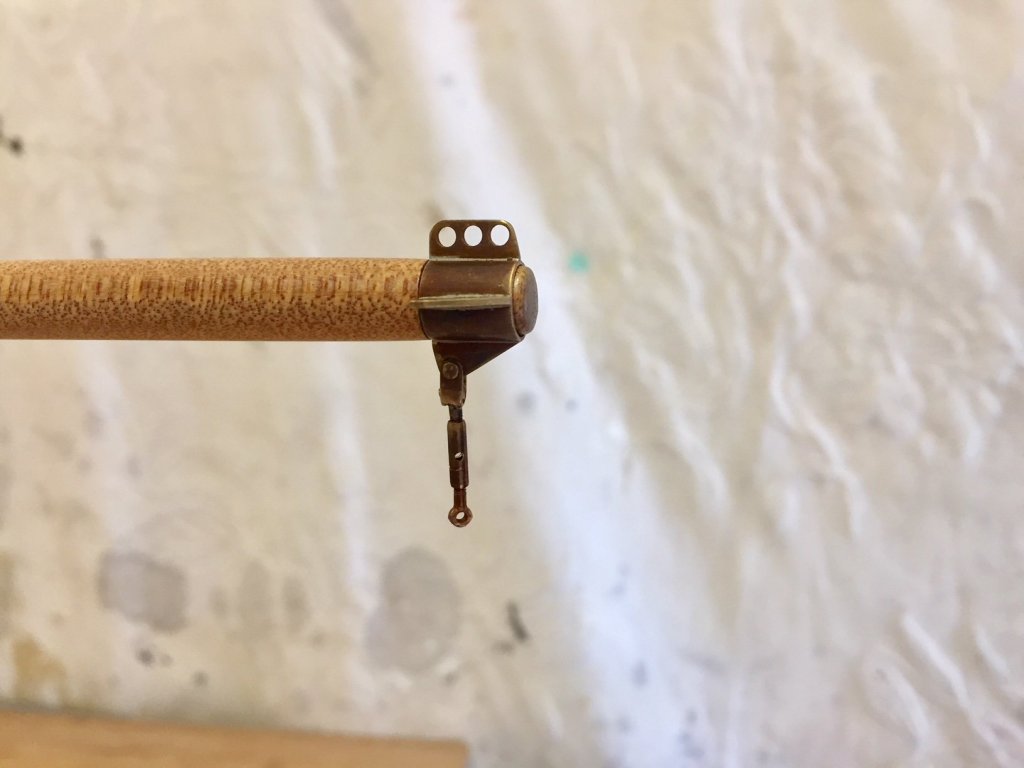
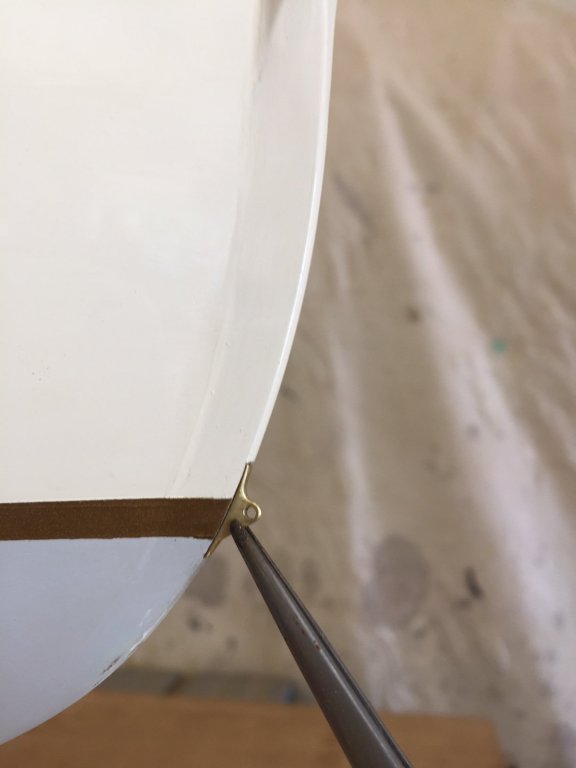
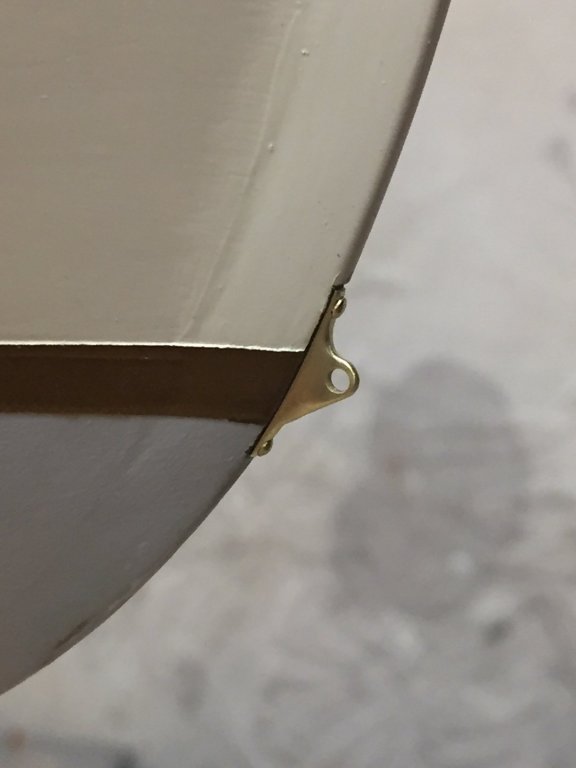
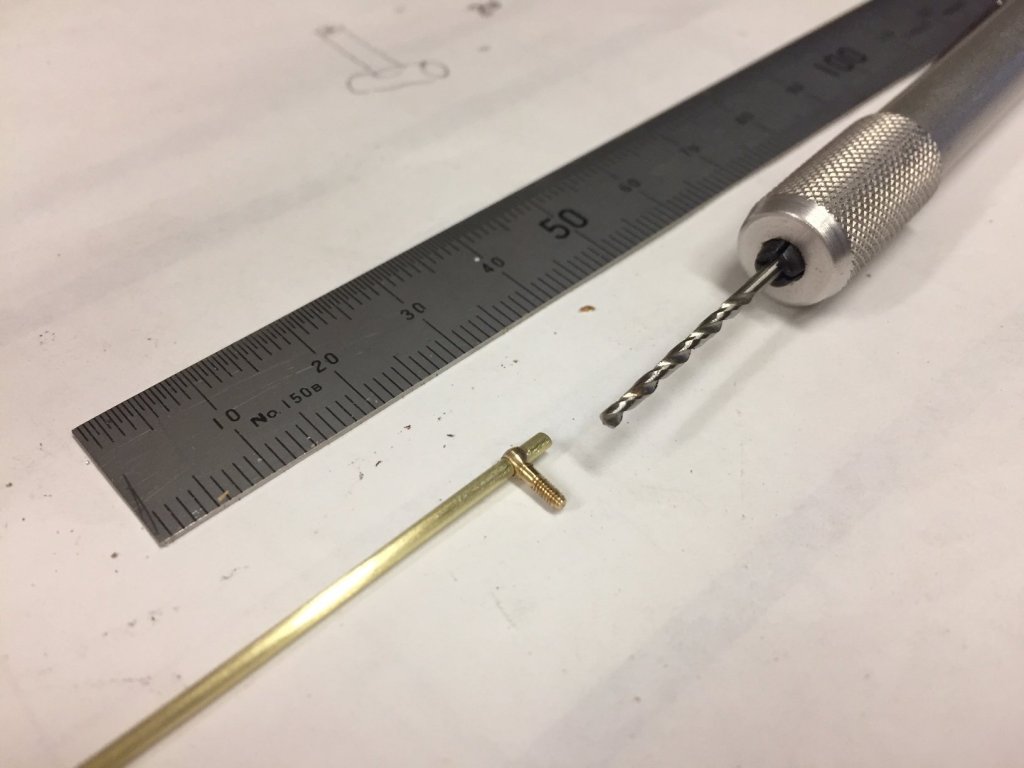
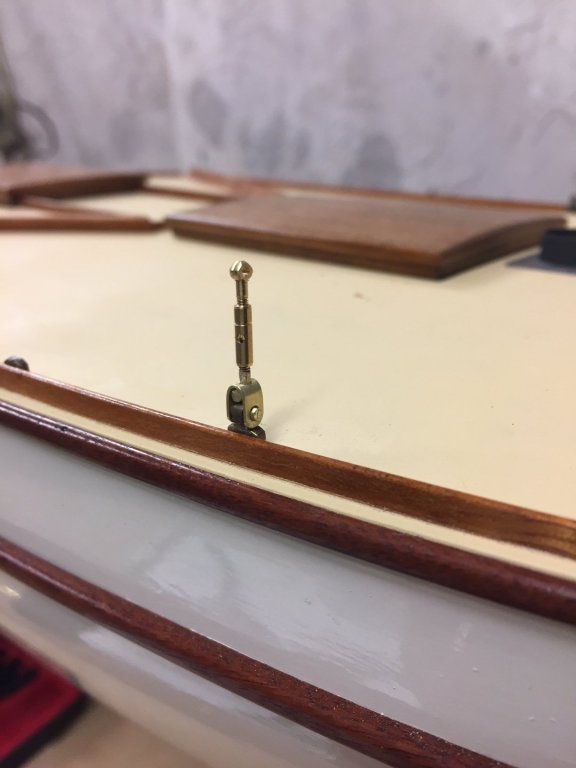
turnbuckle for the whisker stay done & coloured: I was in a quandary about the bobstay chainplate.... the type I want to use has the base part faired to the stem shape; or the alternative is that sometimes the fitting has two plates in a Y, surface mounted on the hull but I am not so keen on that type, I think it would be better to bolt through the stem timbers for this most significant fitting, than laterally through it & planking (maybe solid blocking was used). If the protruding flange was all I made (& pretend the rest was there but just painted over), then fixing it would be tricky as there would be some load on the model fitting. But the base part & flange all in one seemed tough. In the end I shaped it all, cut & shaped down from some brass flat bar about 2mm thick. Then fixed in place. The rivets are glued into holes, & when the glue is dried I will sand the heads down a bit, they stick out a bit too much. Then fill around the sides a bit & paint it, & do the bobstay itself. I haven't gone through it completely in my head yet but I think that then I can do the stays & shrouds. The actual fitting would have a central cast bolt also, behind the flange, but the two end ones must be loose because the three bolts would not be parallel. The fitting is about 20mm long, so 240mm actual, & about 25mm thick actual dimension.

- 411 replies
-
- 13
-

-
yes, that's it - the fitting at the top of the stem - like this, in this case it also has some bow rollers - but I'm not sure it's needed to hold the bowsprit down in all cases, assuming the bowsprit is housed into the samson post thanks for clarifying - & what do you mean by "gammoning is the rope"?

-
thanks all. Keith, I stabbed myself with a piece of brass & was bleeding, (& I won't say what I was using as a hammer but it's right up there with using a chisel as a screwdriver). Sailor - thanks, yes that does sound familiar now. Do you recall what the name of the fitting at the top of the stem would be? Gammon....?
-
It still looks like canvas to me, painted canvas. Interestingly the patterns look like ecclesiastical architecture of the same period ie: gothic; & in some examples shown they have a cross at the peak. Also these last 2 pictures appear again to show the canvas open to the forward side. I wonder if they were an on-board chapel (or maybe just the nave part), & when the canvas was opened to expose the nave & altar - facing forwards - the deck became like the chapel interior. If the outside were painted using architectural imagery, that would also follow. The peak represented the tower....? Would these vessels have had a priest on board?
-
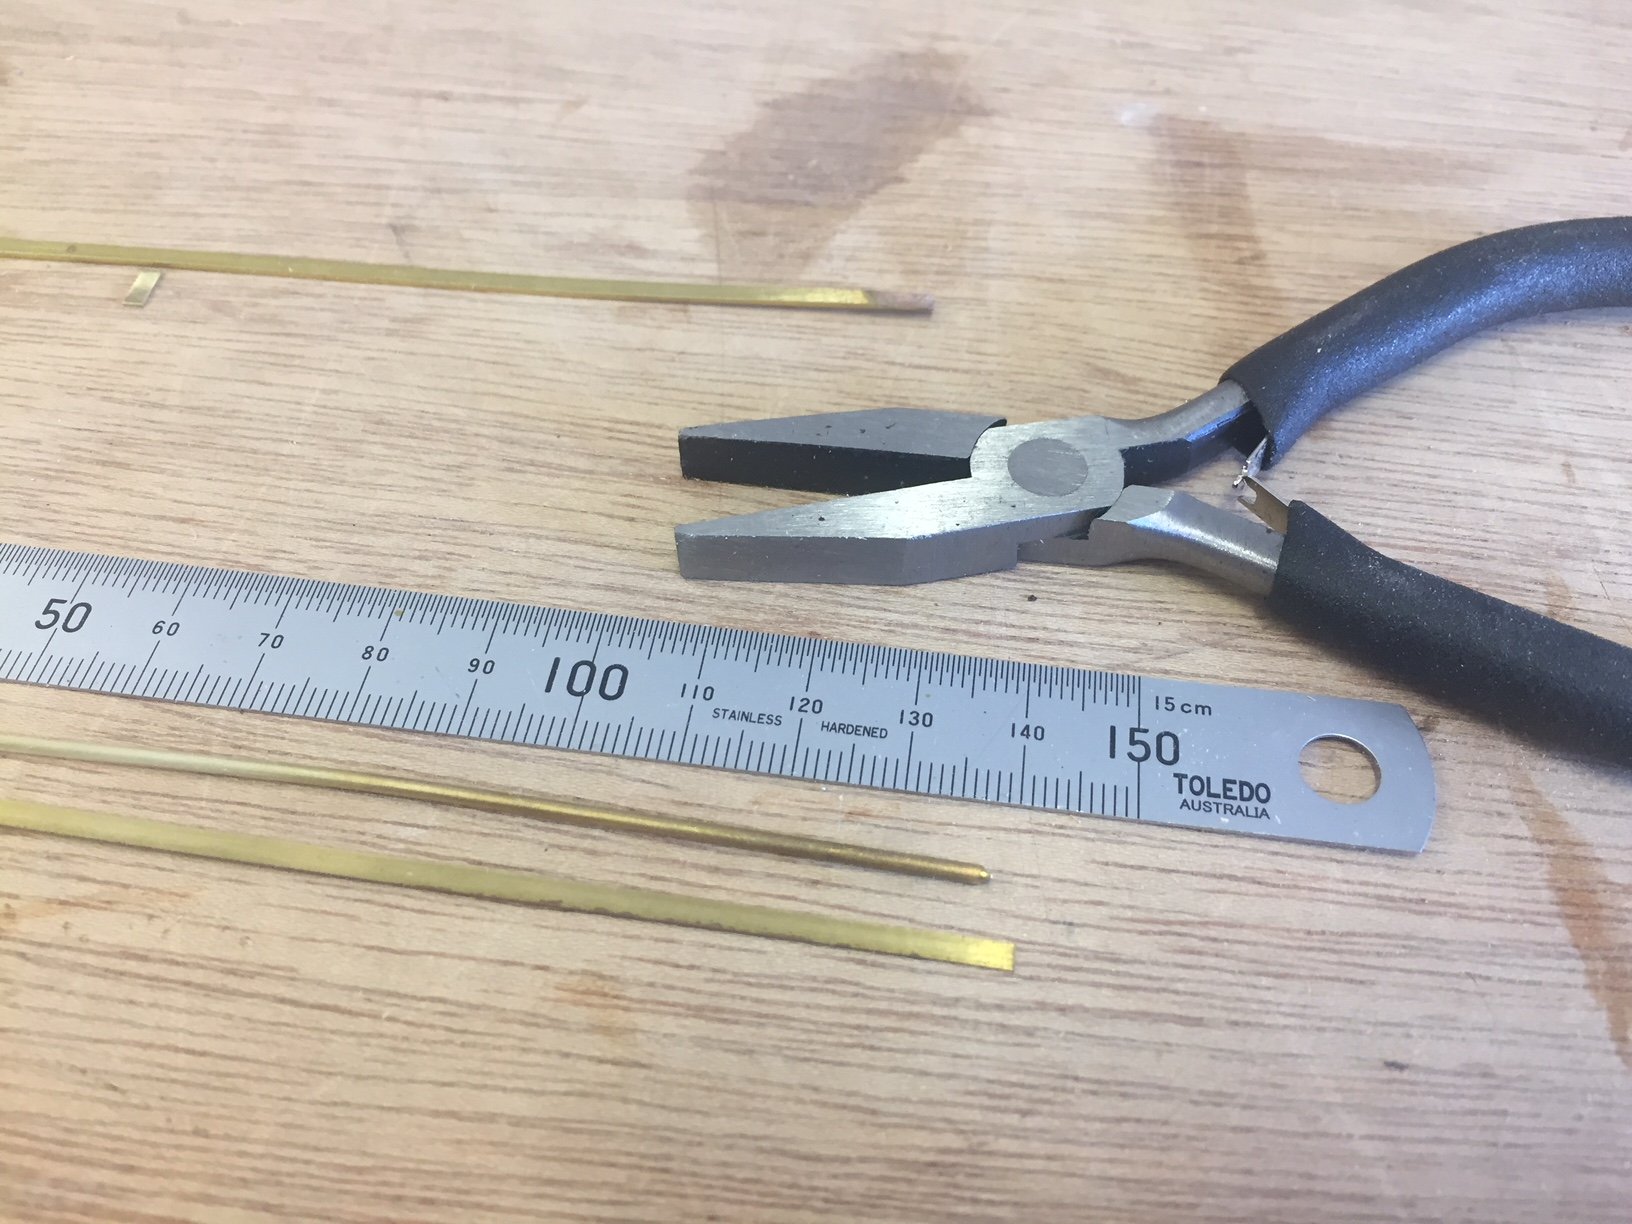
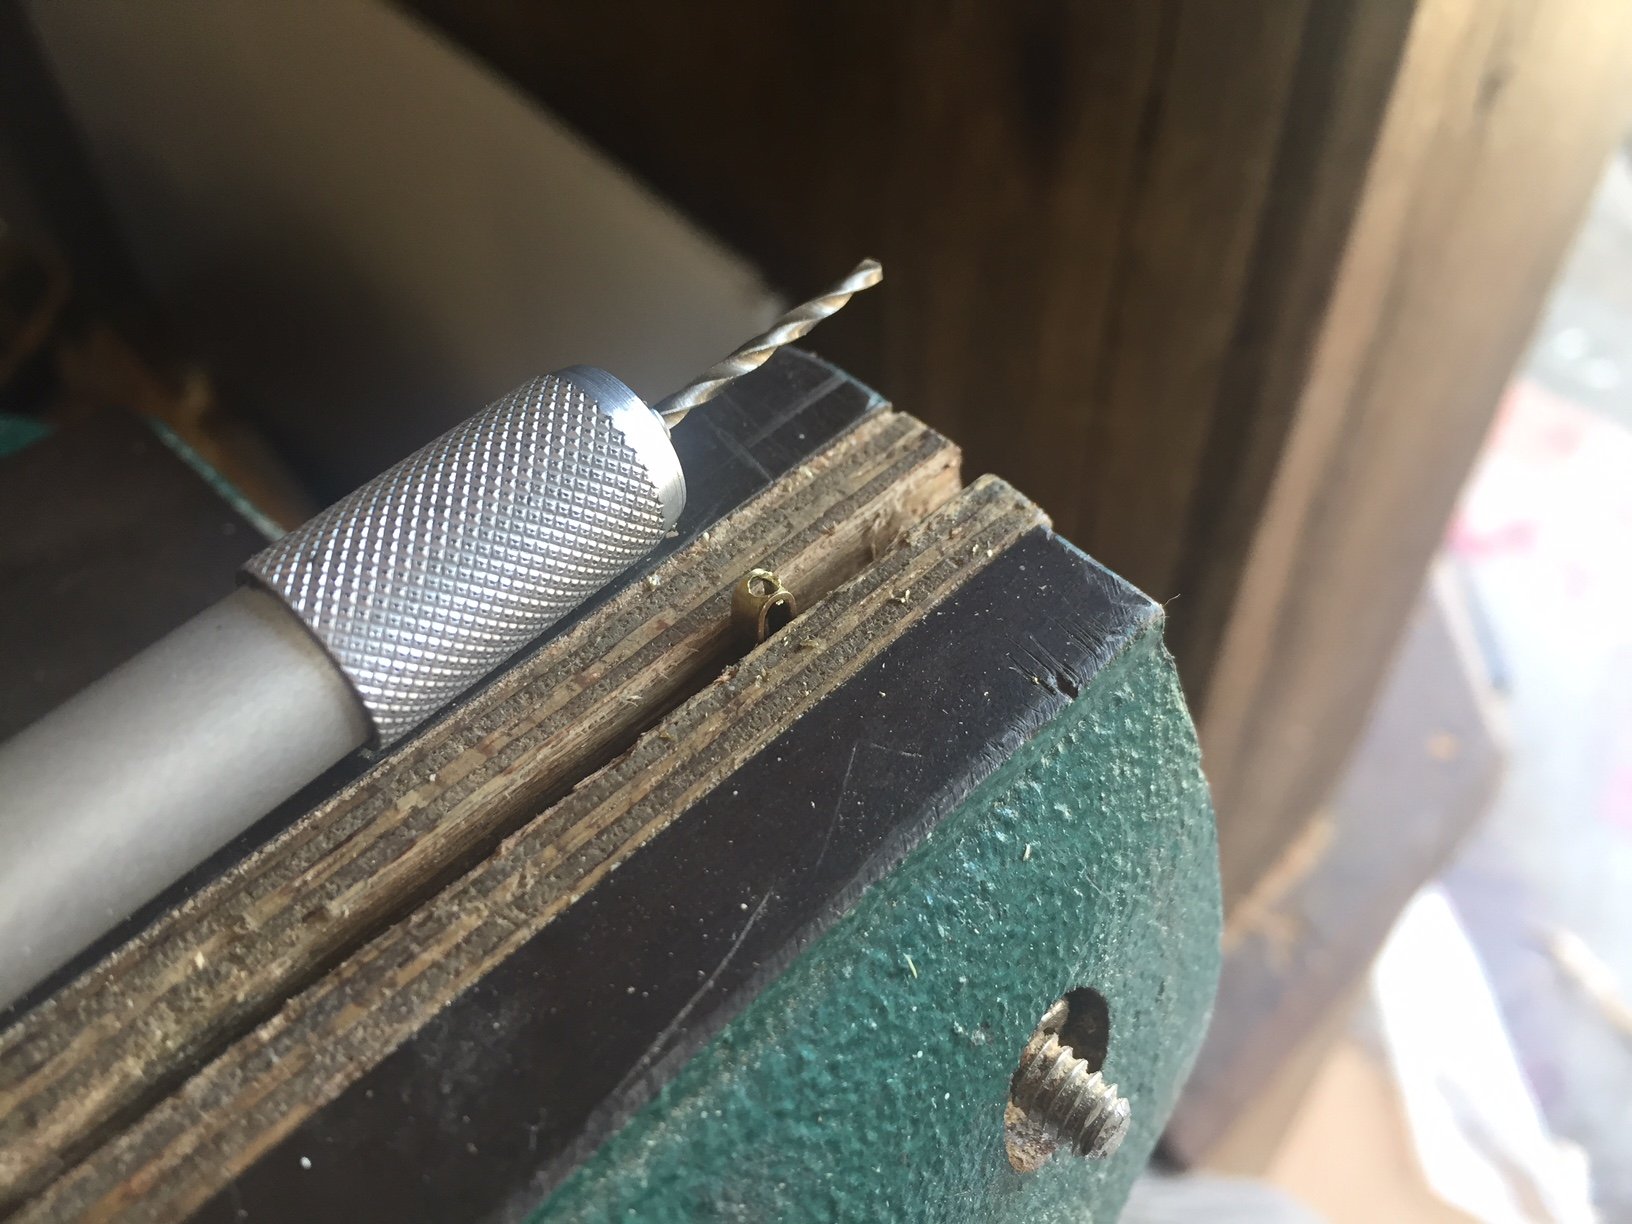
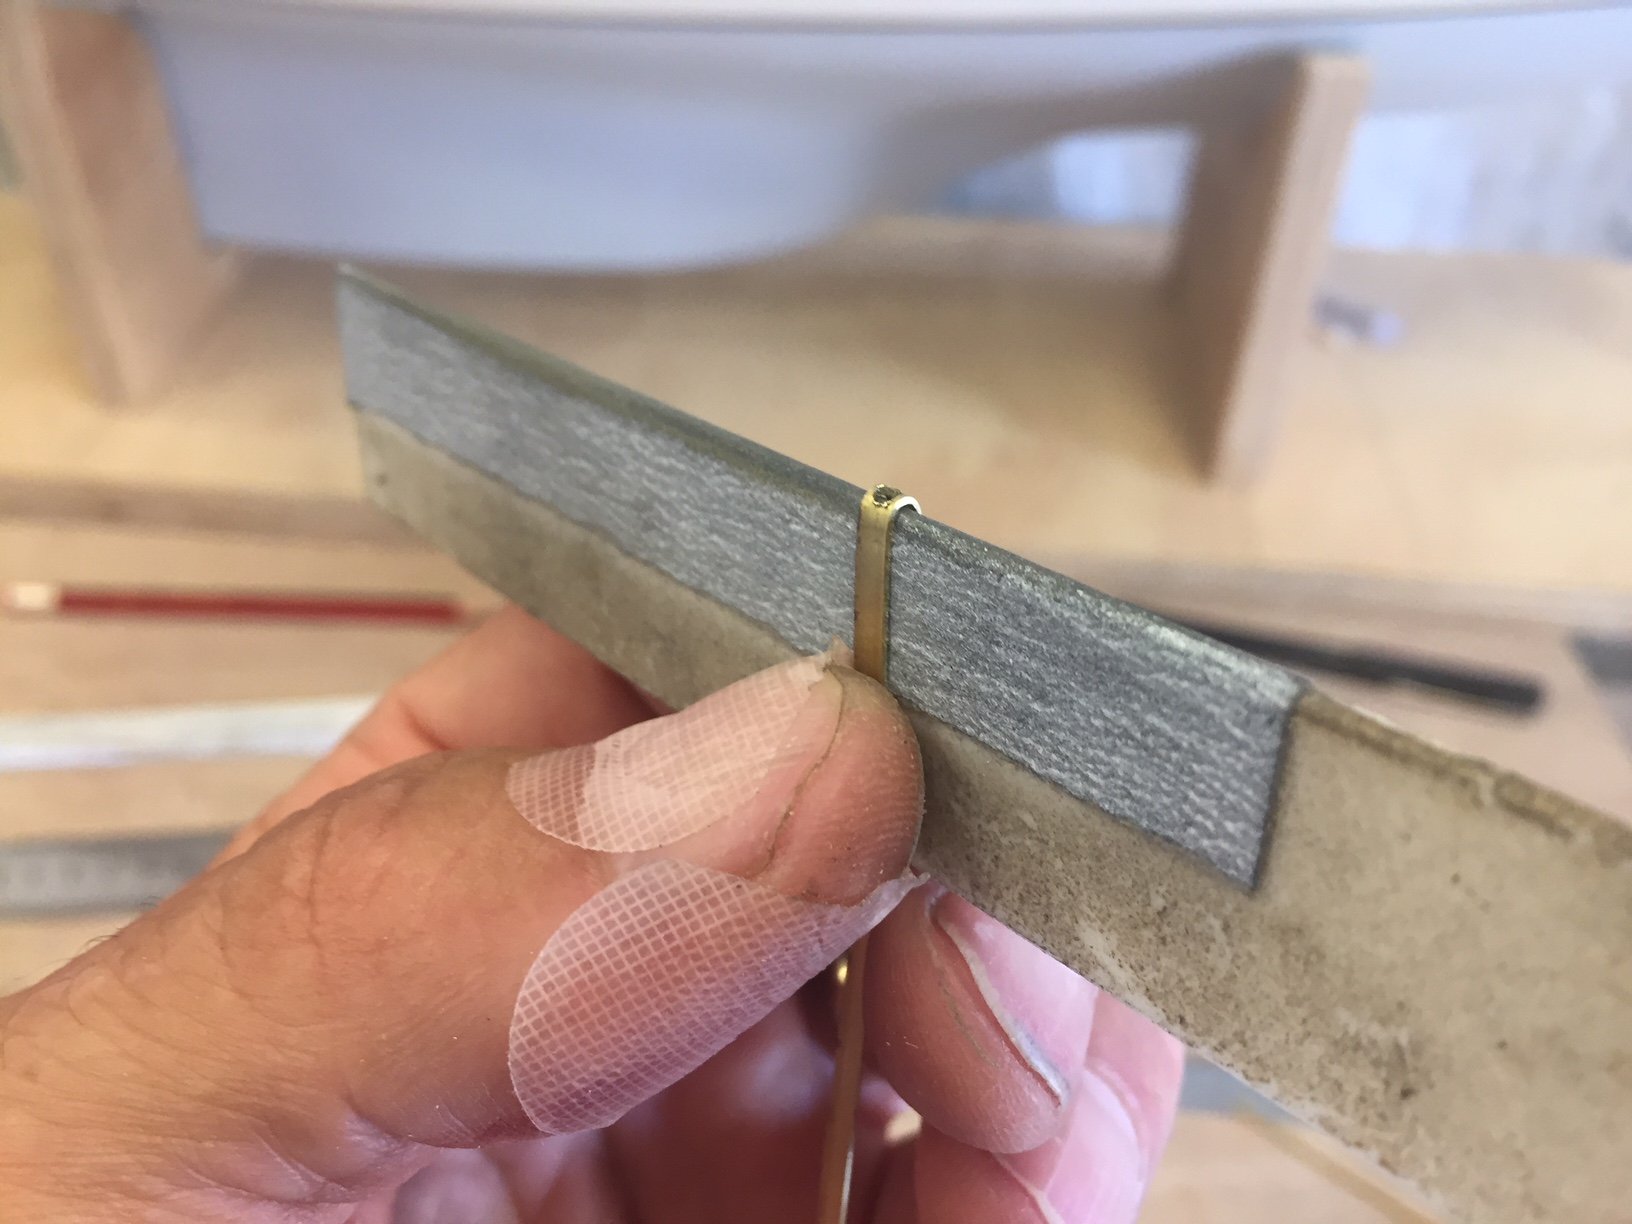
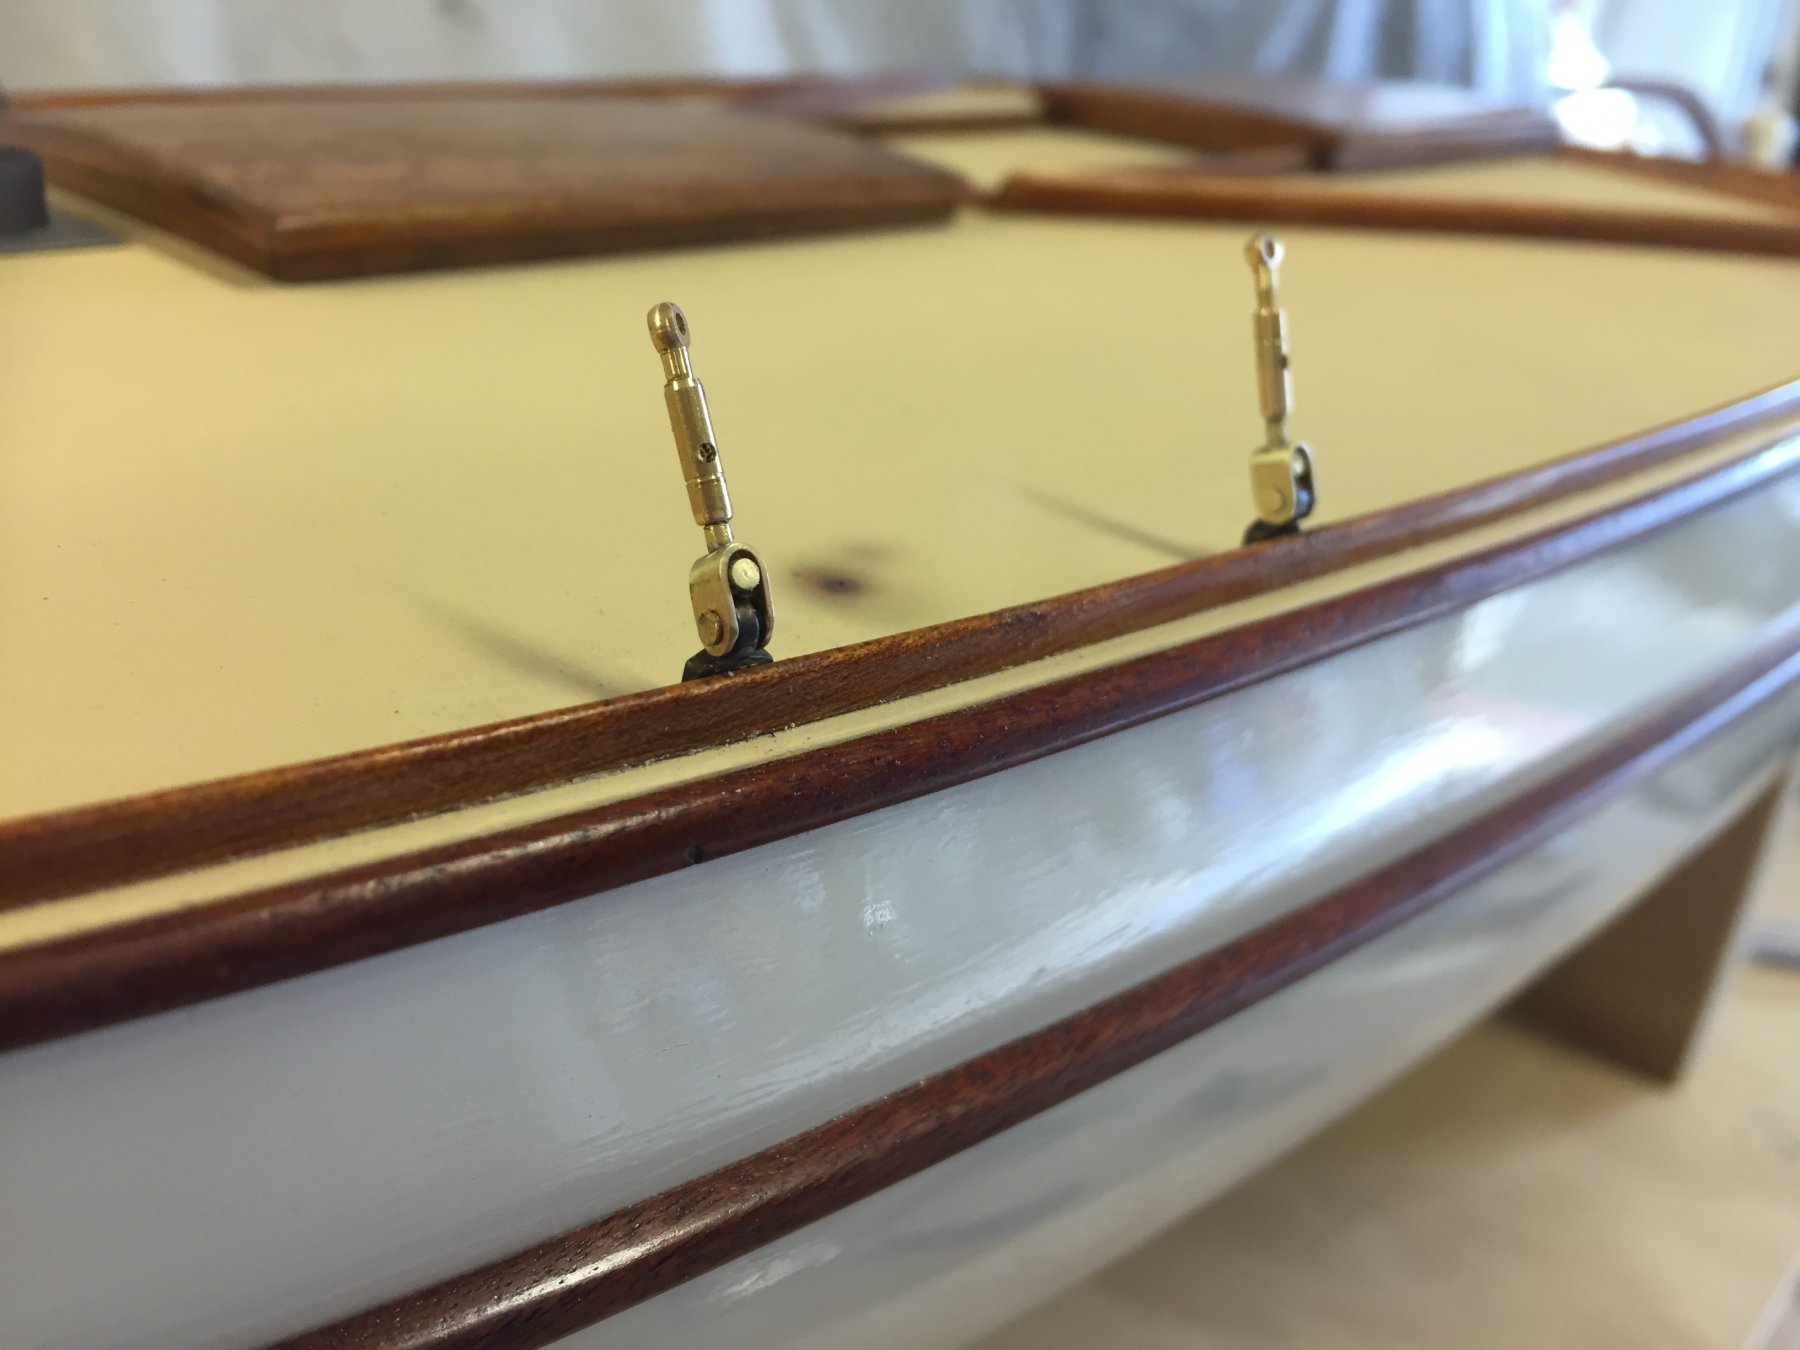
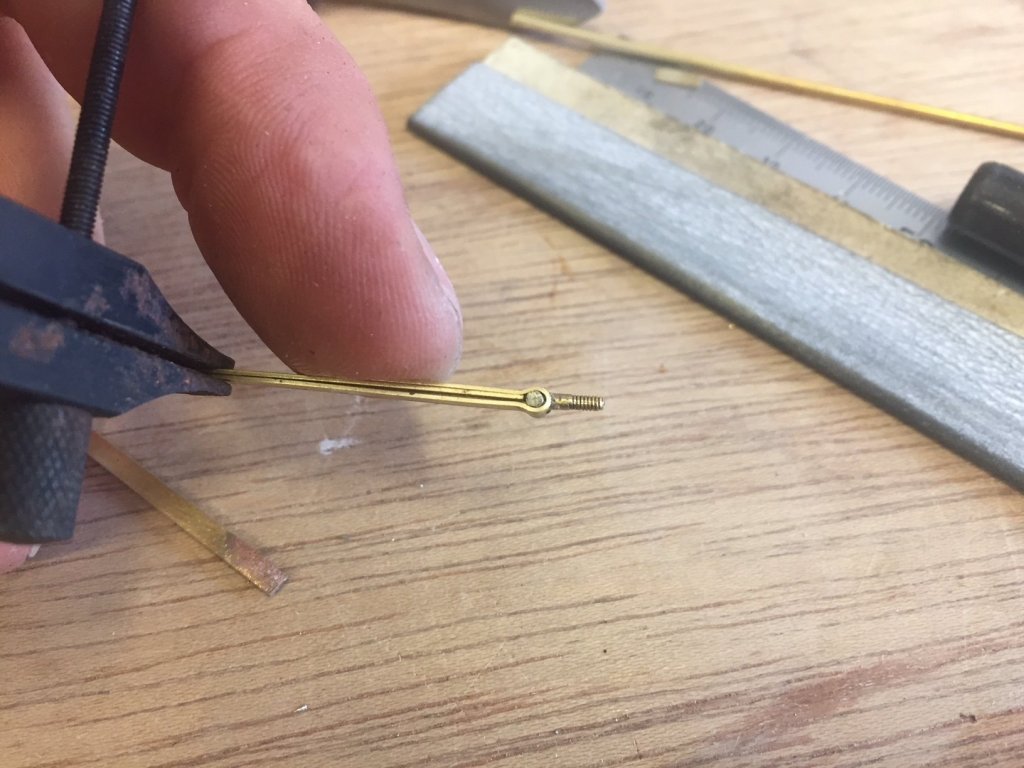
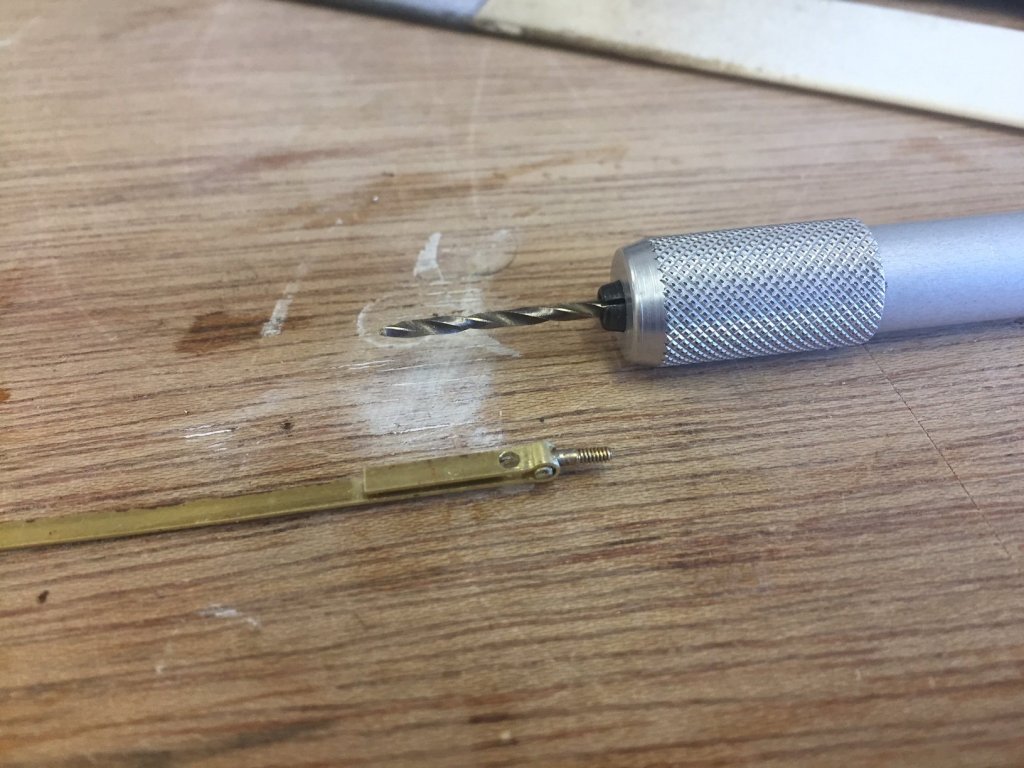
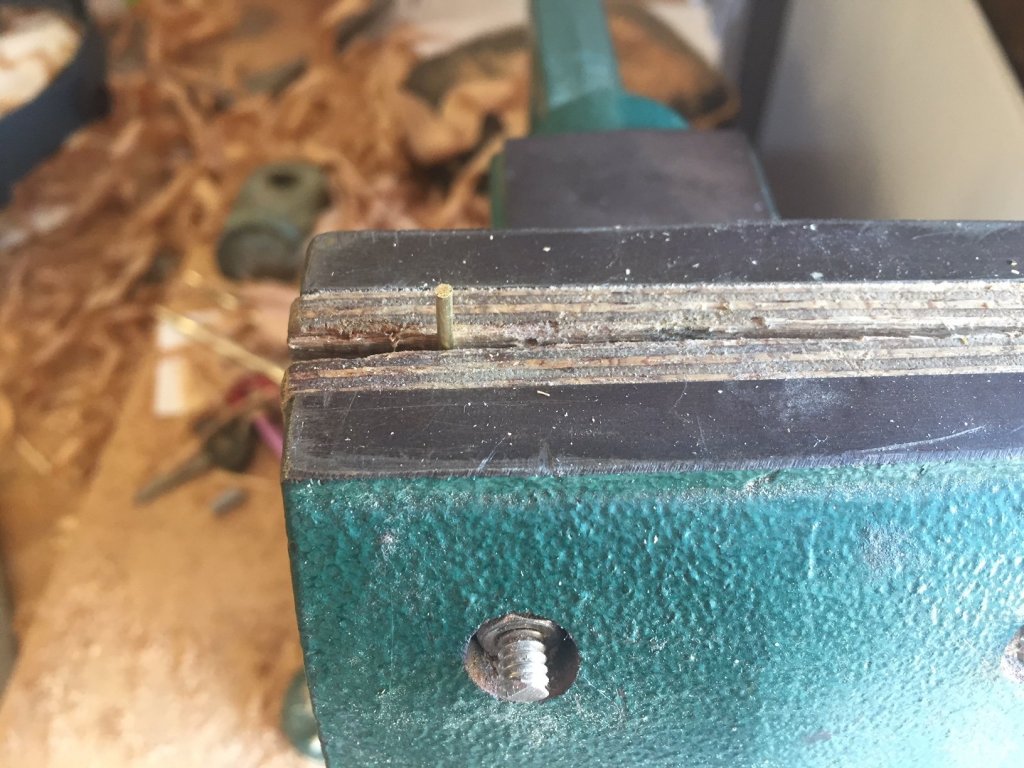
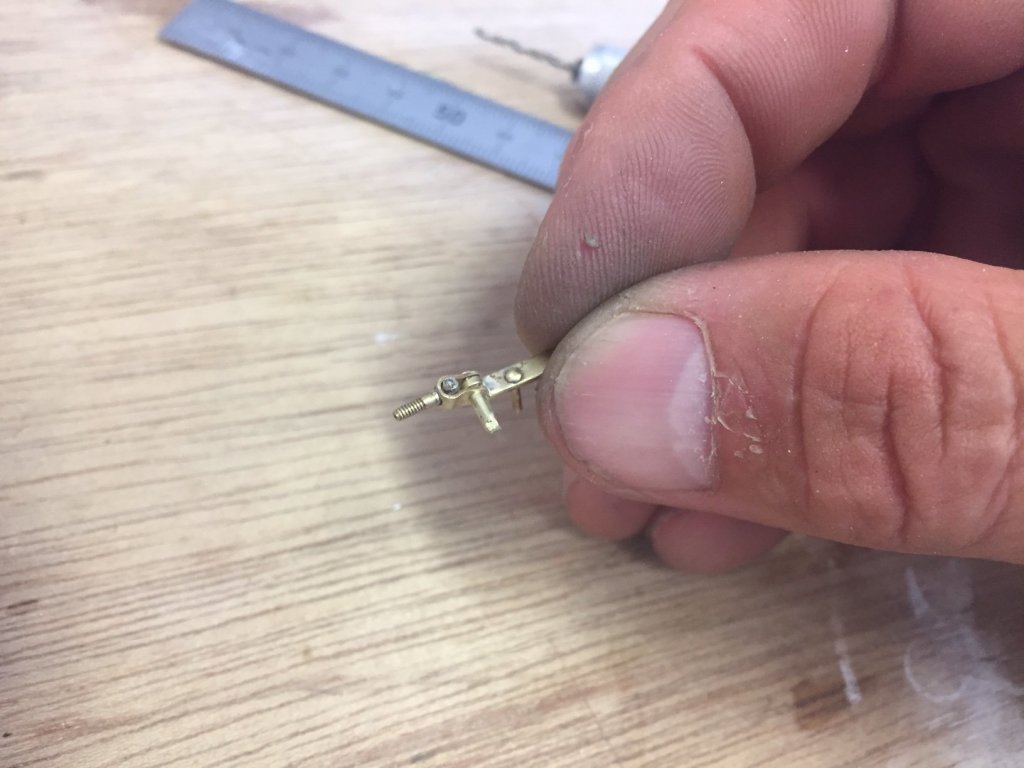
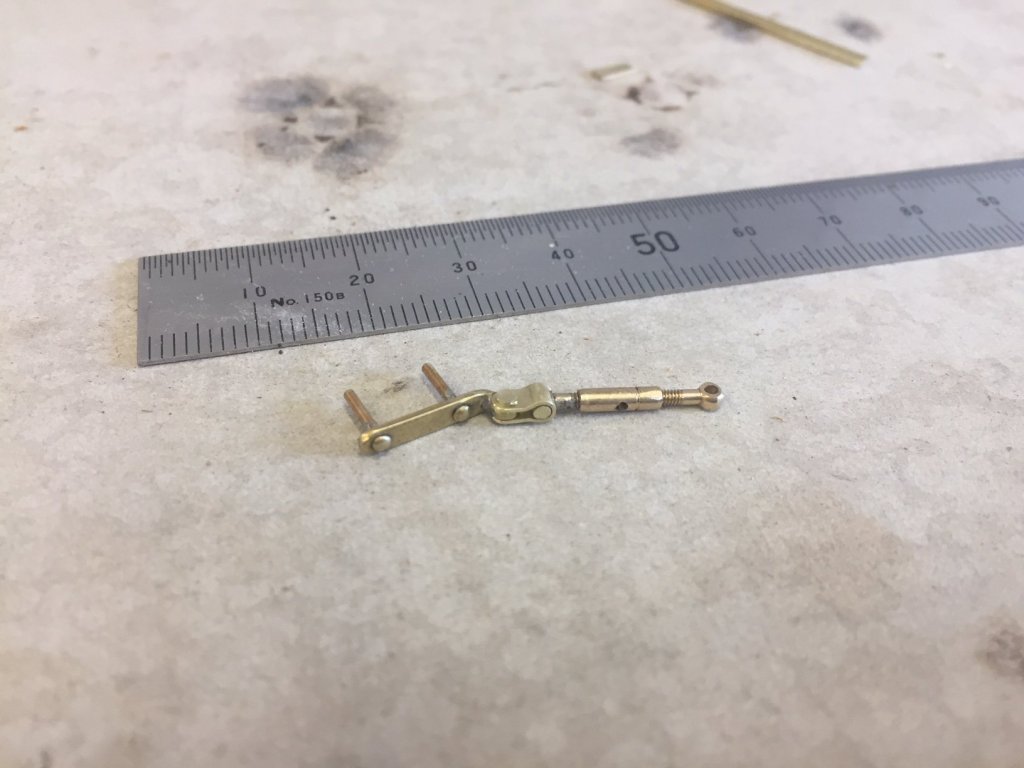
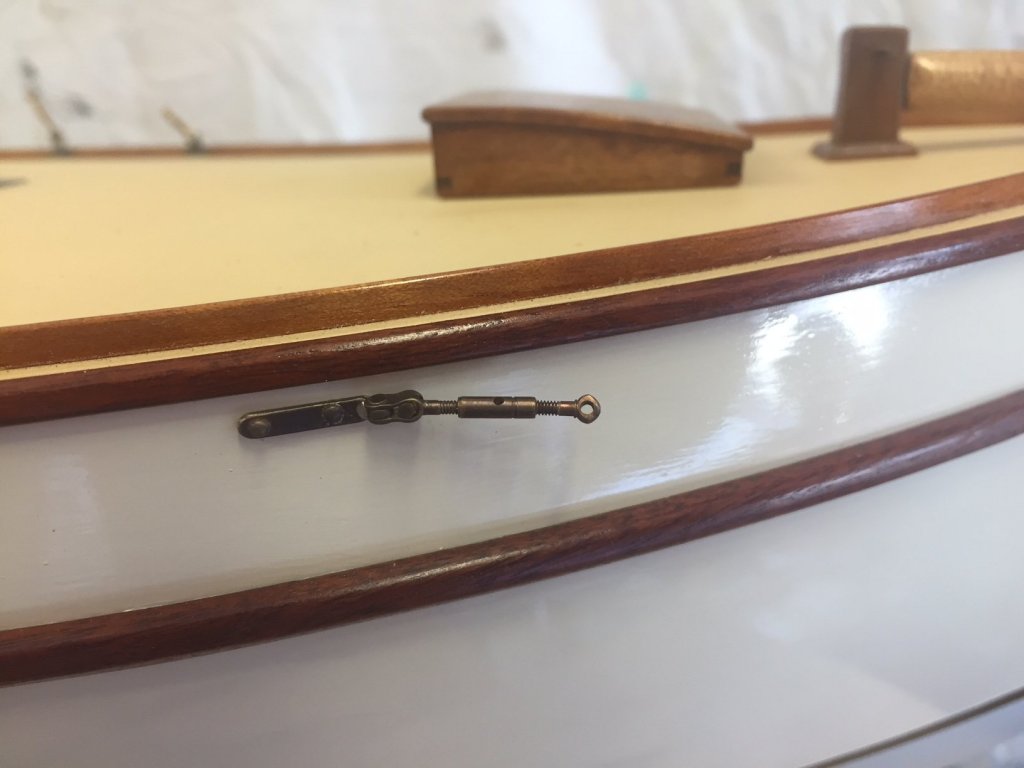
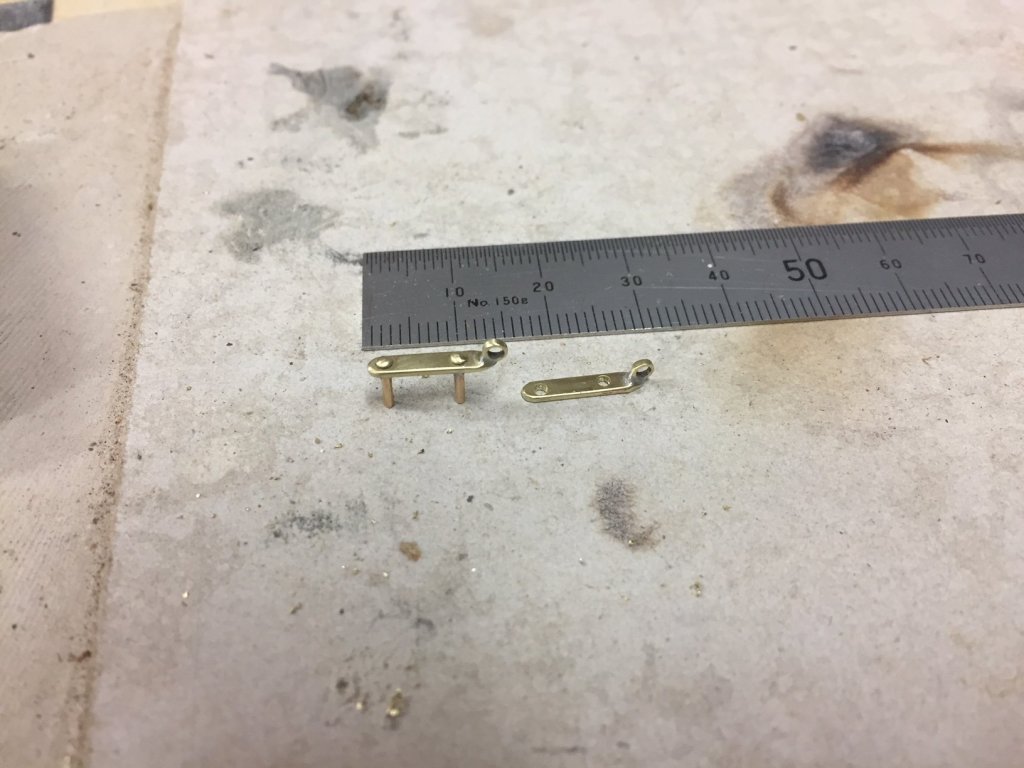
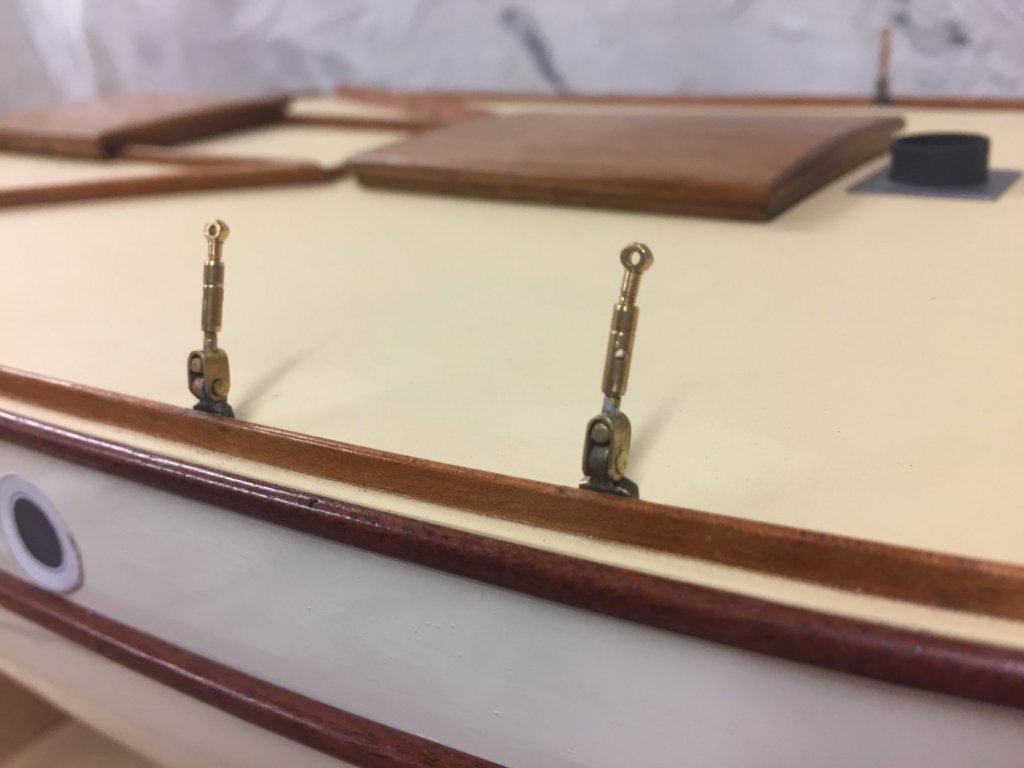
I managed a couple of hours today of happy modelling & made the whisker stay turnbuckle connections. And this time I thought I'd photograph how I made them, I doubt the technique is original but it is interesting to see how others do things & I've been a bit reluctant considering the refined techniques that others here are masters of - but it's time to be "out & proud" as they say....no more being sheepish about using mediaeval technology. The whisker stay chainplates were already made, & I had purchased some very nice - & well scaled - turnbuckles. The turnbuckles had previously had one end converted from an eyelet to a T end, to allow this junction. The point of the junction is to have the turnbuckle directly connected to the chainplate, similar to an actual rigging detail. The basic equipment - rod, think flat bar & a thicker flat bar for use as a spacer: Bend the thin flat bar, the rod is what I used for the T end of the turnbuckle so it's the correct diameter for the inside of the U: Drill the U bend in the flat bar, the turnbuckle shaft will go through here: Clean up the inside of the U (the sanding block is on 1.5mm styrene, with a rounded edge): Clamp the spacer & squeeze the U closed a bit more, the thickness of the spacer matches the width of the chain plate eyelet: Drill through both: Make a rivet, thicken the end with some gentle taps: Roughly assembled: Cleaned up & fully assembled: 15 seconds in the darkening solution, then installed on the hull by glueing the chainplate rivets into holes in the hull:


- 411 replies
-
- 14
-
-
Hi Keith beautiful. Also, your techniques were very well thought out. On the prop, I agree with all you said except that you usually wouldn't need to remove the rudder to slip the shaft out: a scallop in the leading edge of the blade would give the space to slide it out with attached rudders like this. Mark
-
Hi Hakan for this model, are you doing the hull shape by eye - same as you described the actual builders did?
-
Yes from the picture I'd also guess some sort of fabric construction. I know nothing of these craft, but the artwork itself is interesting: they attempted accuracy, but it was before "scientific" art, "true" perspective etc so it does look a bit funny to us. They showed things in a stylised & perfected way, if it was fabric it was without breeze, dirt, disorder. I can't see the details well on the reproduction, but it possibly looks as if it can be open or closed on the bow side. A bit of shelter is always good on a boat & even better if it's adaptable, could it be as pragmatic as that?
-
the results with the sails is superb, it shows how much life it gives to a model to have the sails set like that Mark
-
Hi Vaddoc I bought some 2mm birch 5 ply for the deck (or maybe 7 ply), beautiful stuff made in Finland, it did the double curve well but I used tiny screws to hold it down instead of clamping. The ply curved more easily on one direction than the other, which was used across the hull. A cabin structure - if your model has it - would also act as a break in the stiffness of the plywood & allow it to be more flexible. However, you don't seem to be afraid of a challenge, so maybe planking & canvas....
-
Hi Hakan I was lucky enough to visit the Danish Roskilde viking museum & found myself chatting with one of their boatbuilders, as (you probably know) it's a living museum where they actively build replicas. I had heard that these boats are flexible & I asked him about it - he gave me a very graphic display of just how much these hulls are able to twist using one of the full sized replicas. If they are intentionally this flexible it is very hard to see how they could be carvel & keep the water out (just as you noted). The internal framing was so simple & light as well. all the best, very interesting & enjoyable build Mark
-
thanks Dick, very interesting stuff. The space shuttles of their day. One question & one thought: Would the mizzen halyard always be pulling straight downwards, or would the angle of loading vary? When I look at the vangs, I wonder if they were also used to adjust the sheeting angle...in a modern boat to change the shape of the sail the sheeting point is adjustable so you can change the sheeting angle, but you could achieve the same thing by adjusting the angle of the mizzen spar between the forward tackle & the vangs, & flatten the sail or have it full & rounded. Just a thought. Mark
-
looking good, & your house looks very nice too. I hope the older wooden houses are well insulated Mark
-
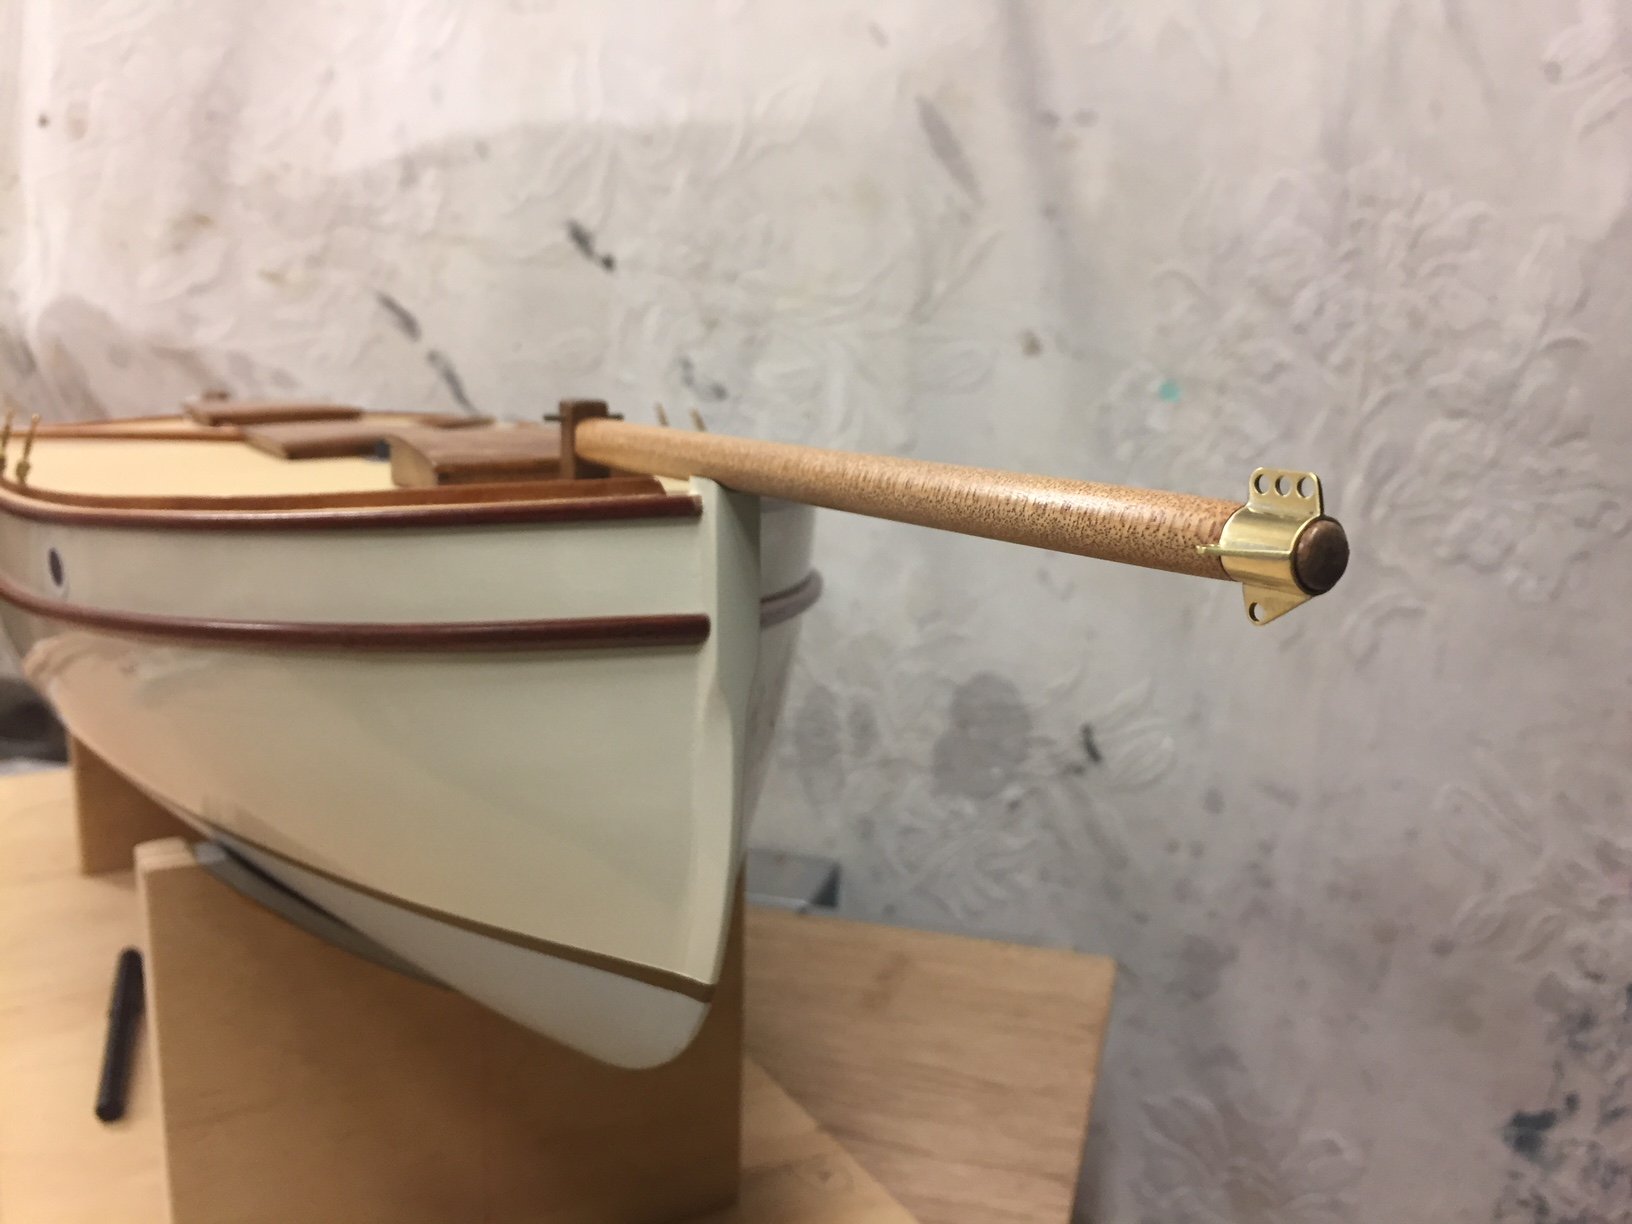
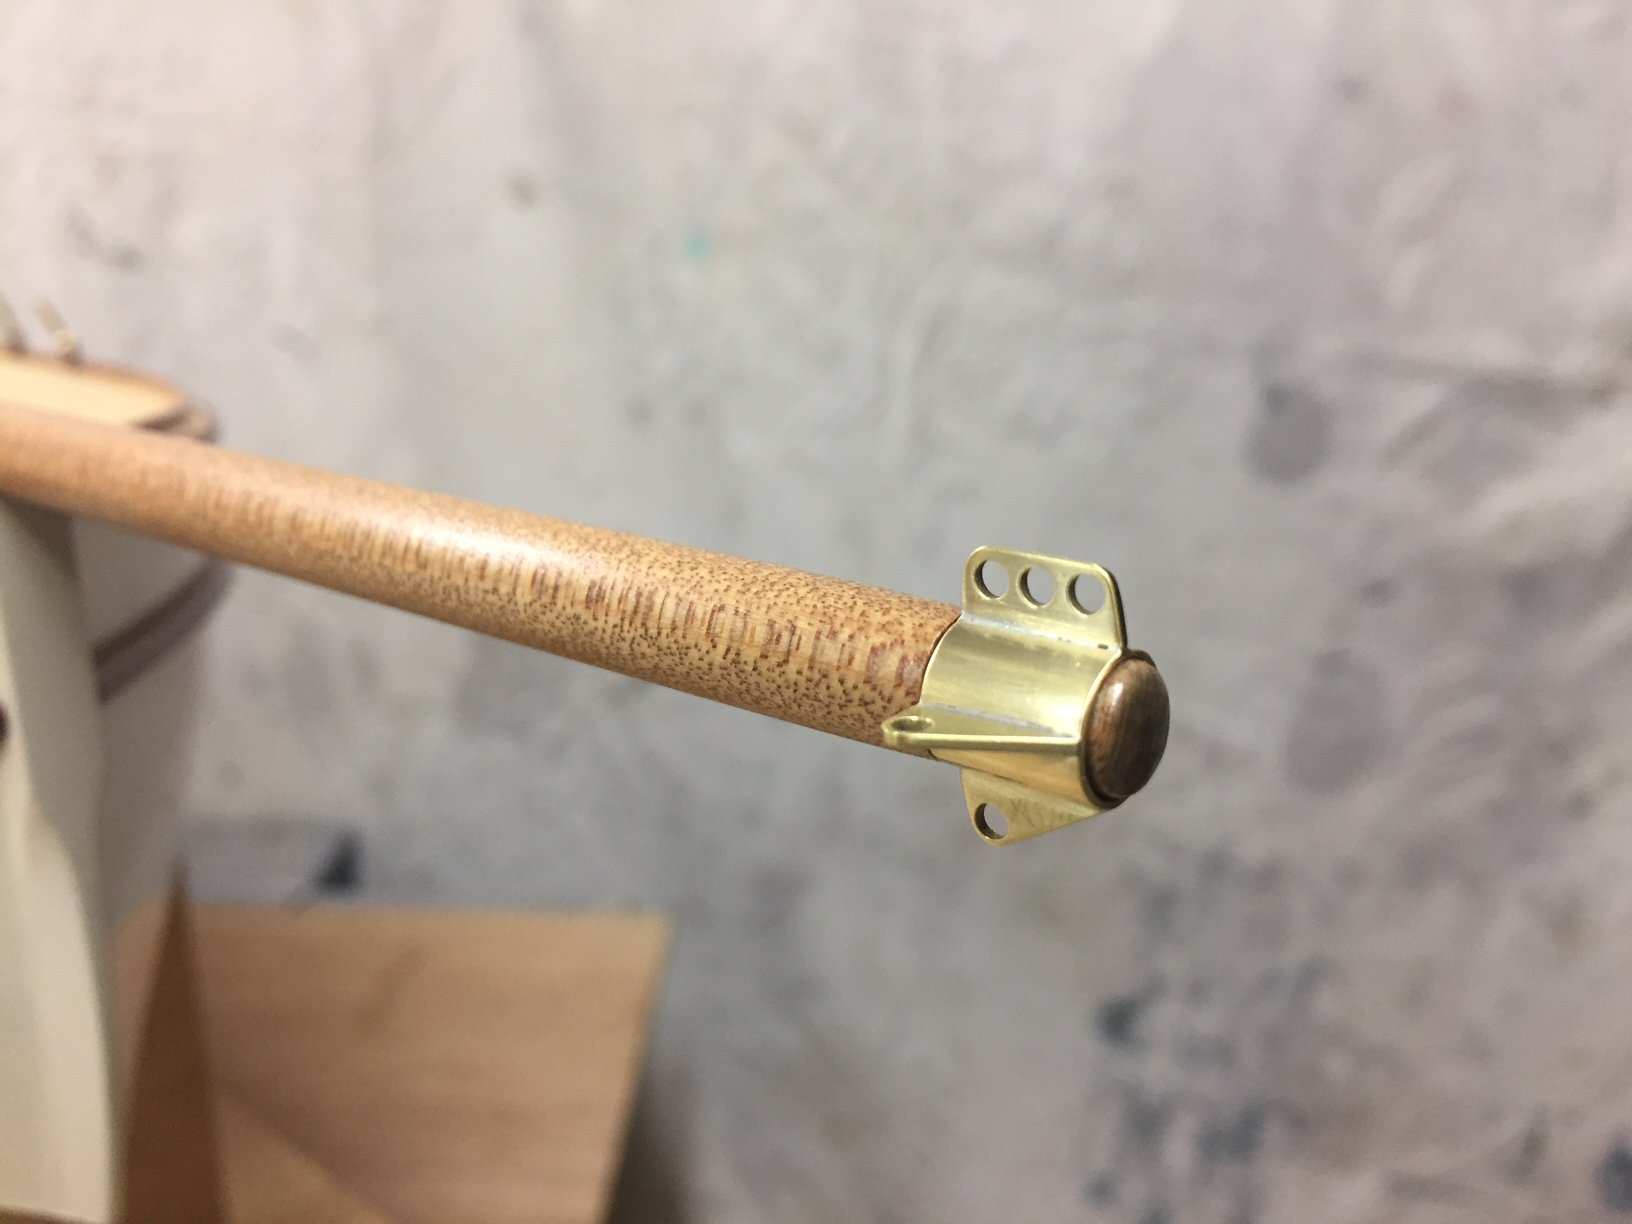
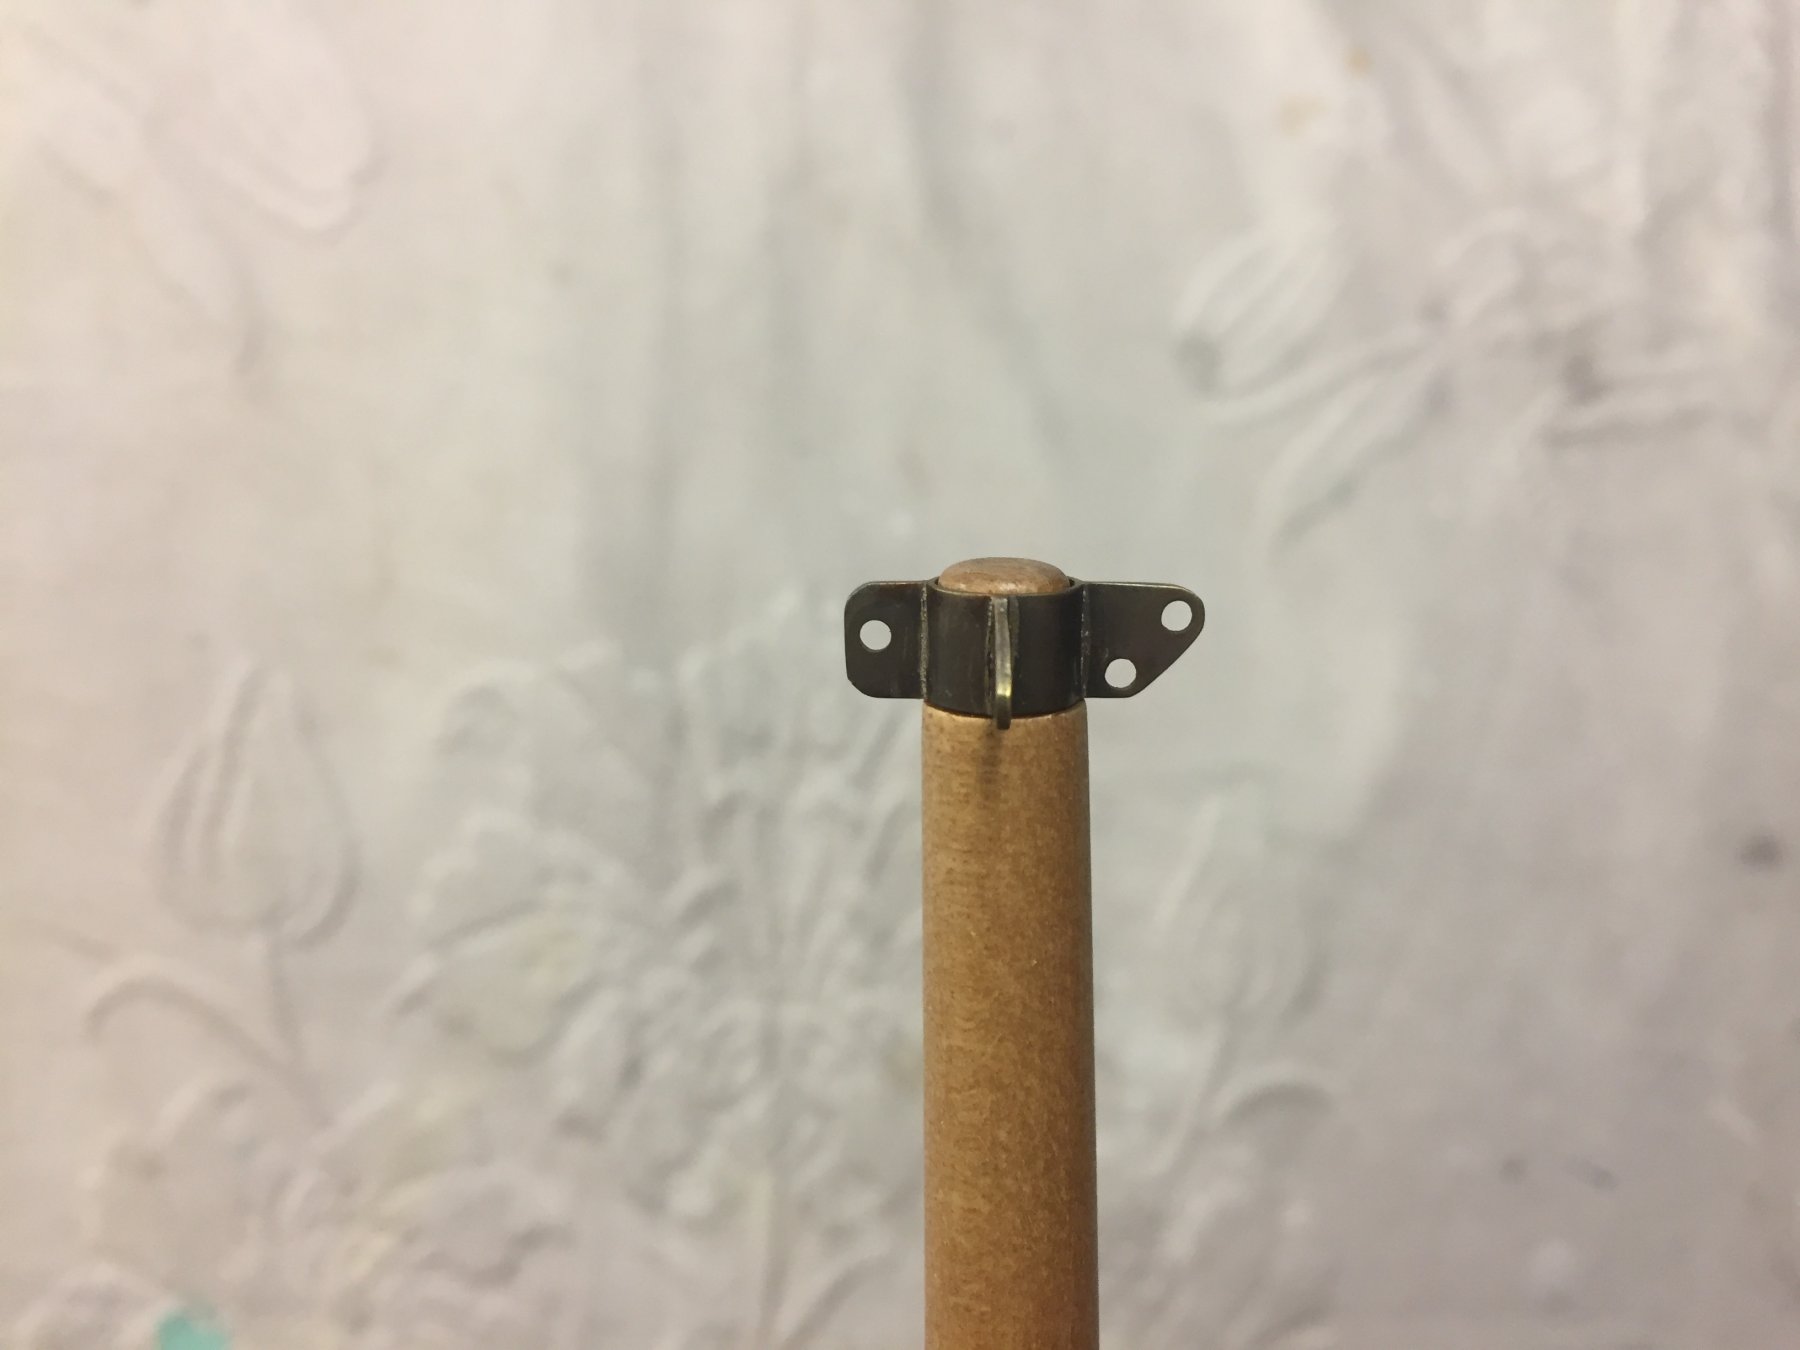
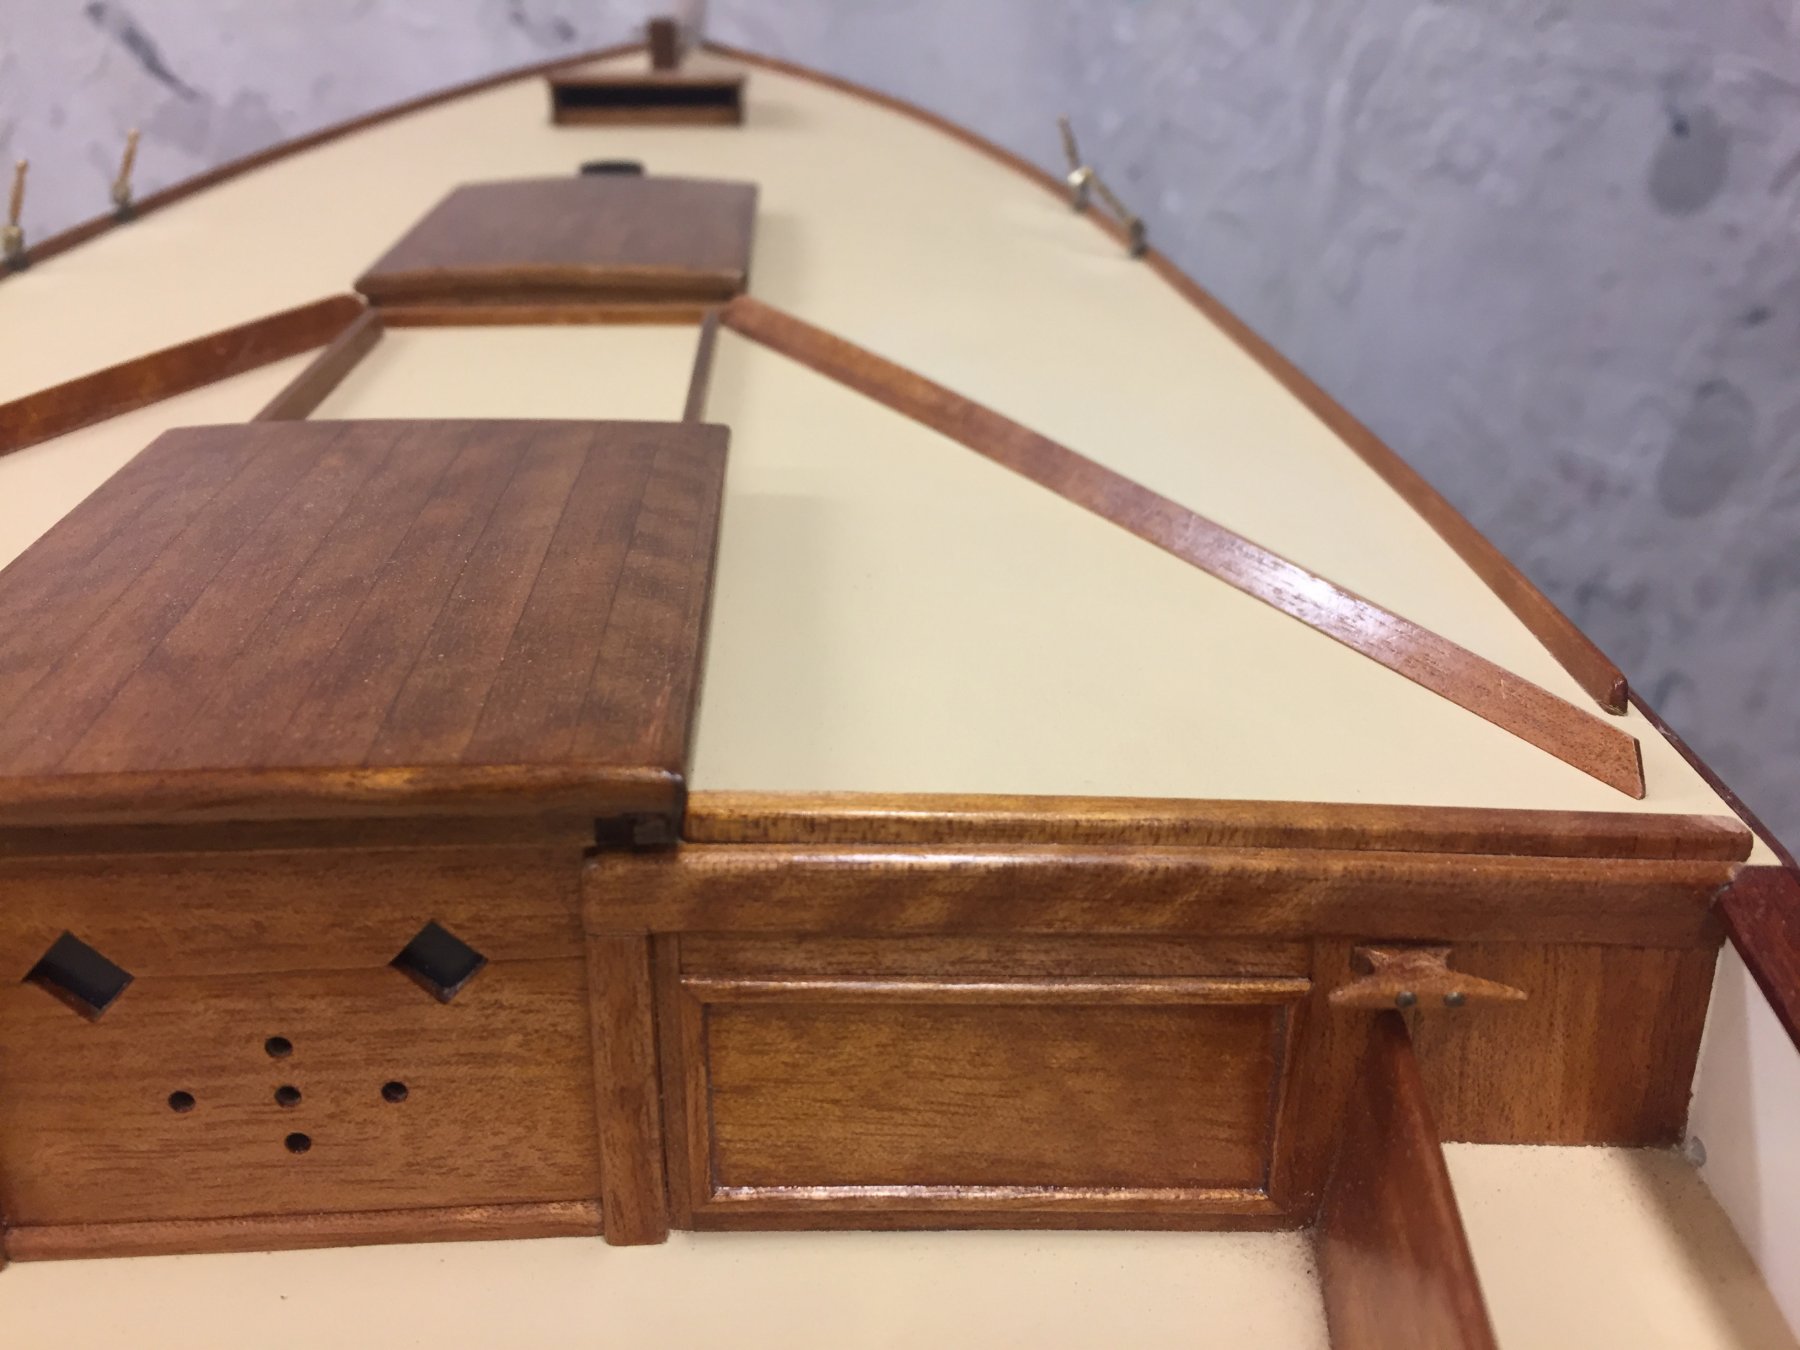
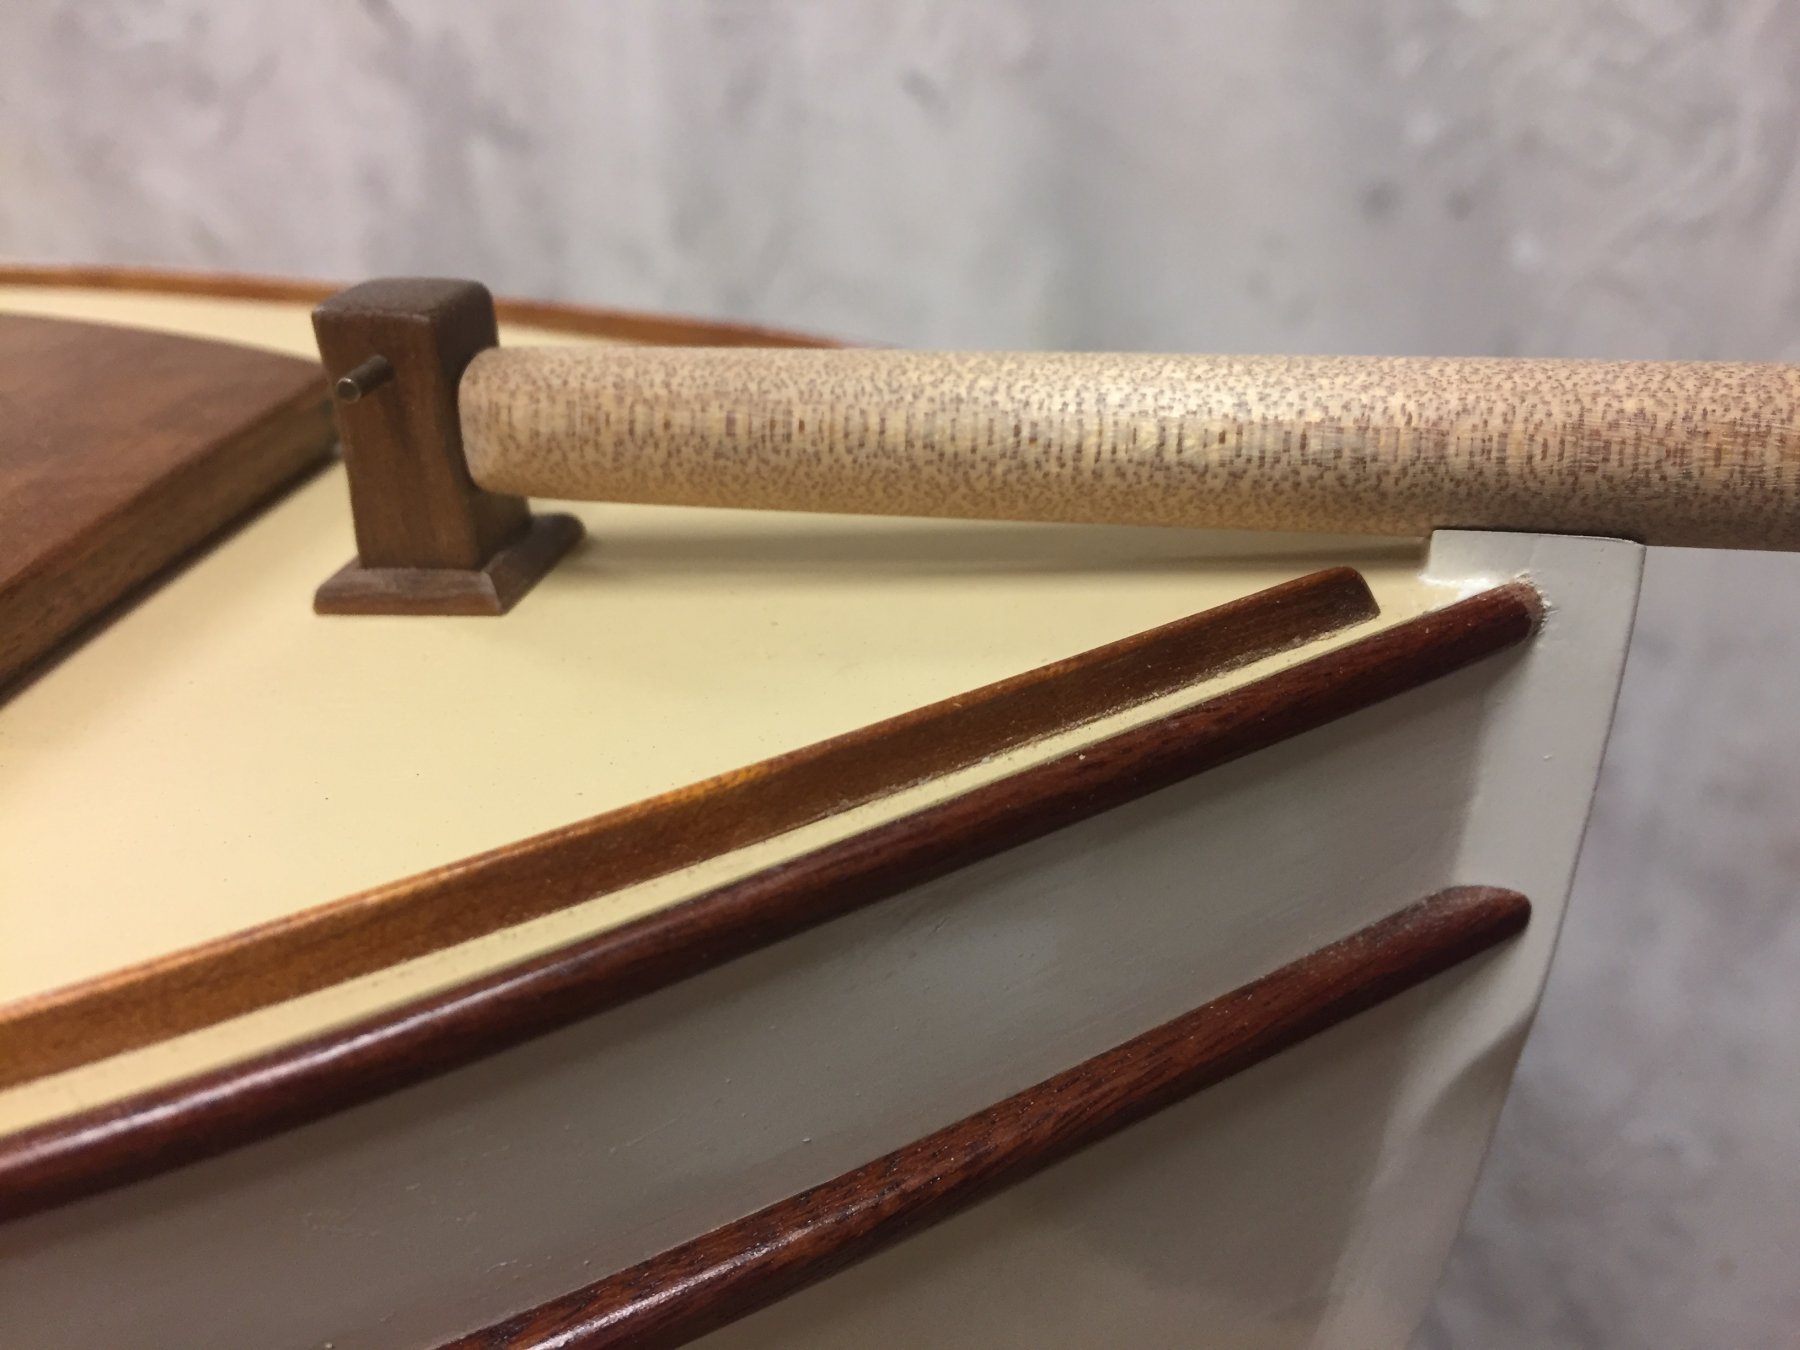
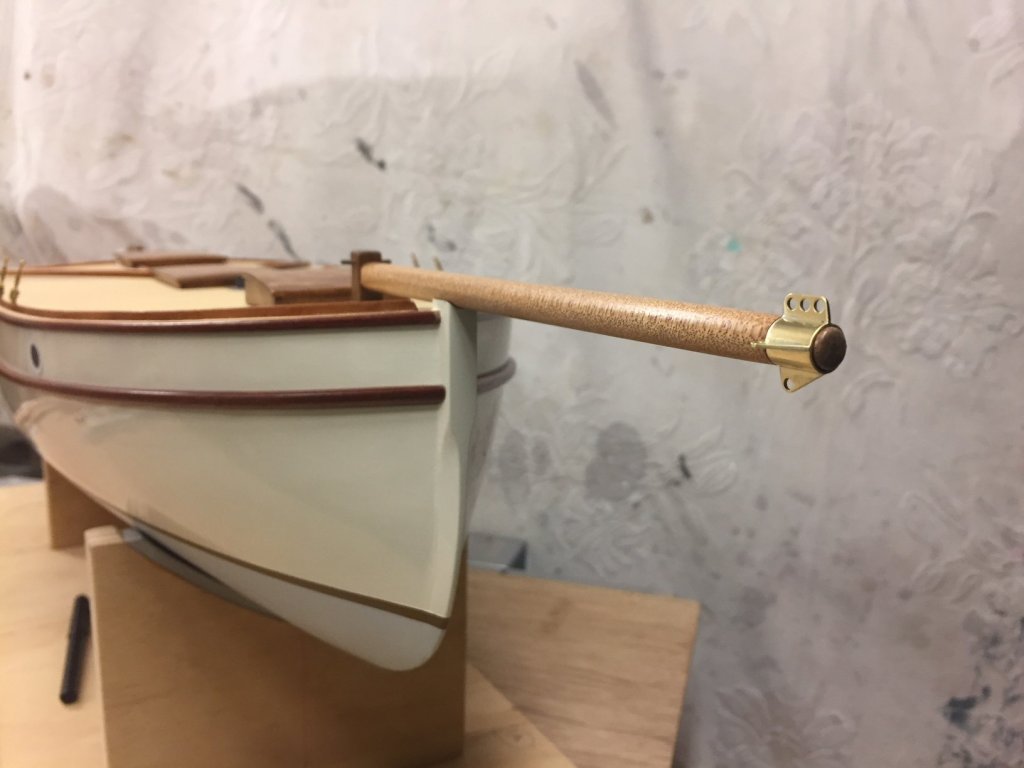
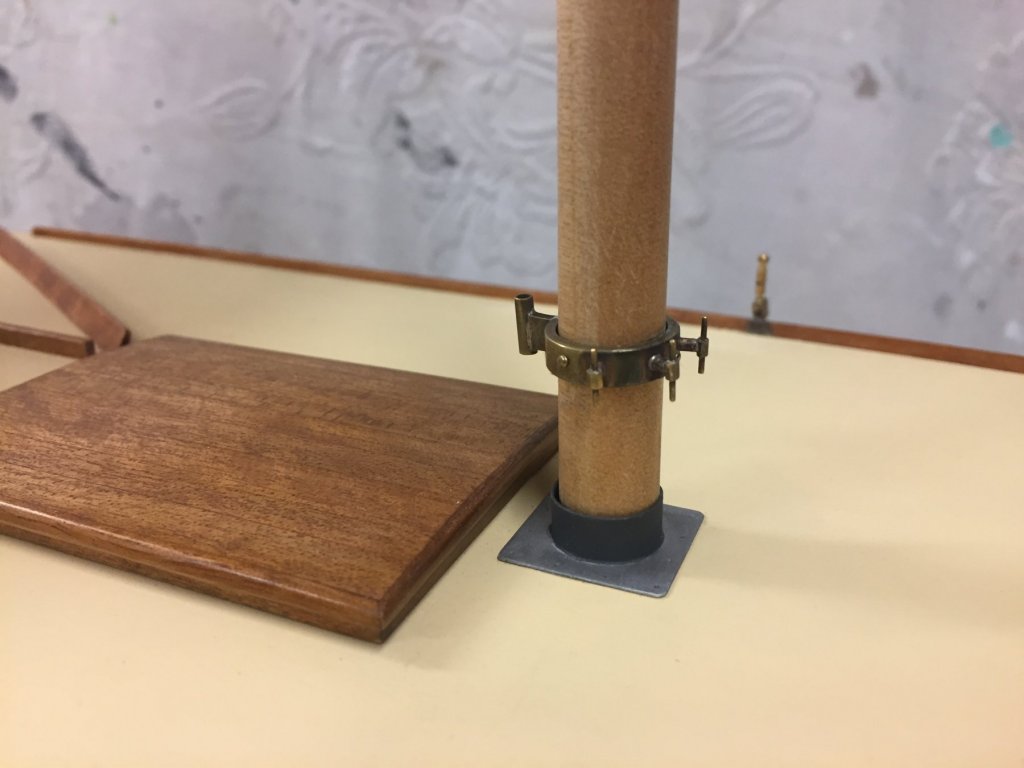
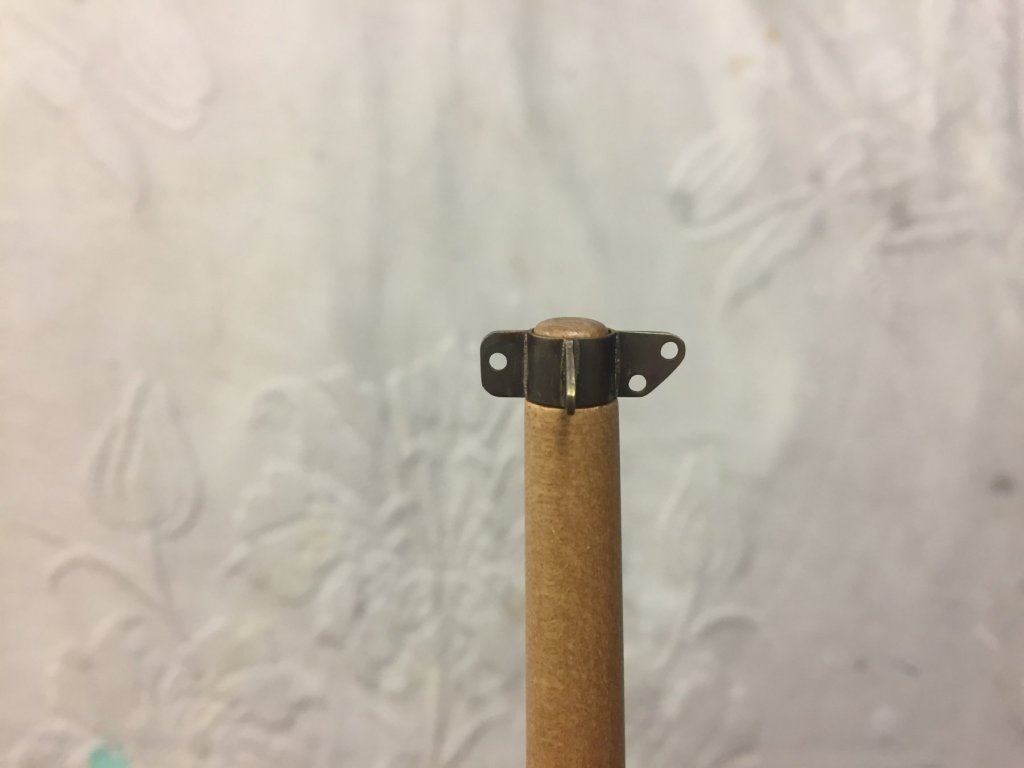
thank you Egen, I appreciate your interest. I'd previously thought the bowsprit looked good, but after looking longer it looked too thick - & also the entasis looked wrong. Rather than a straight taper it was a curved taper & thickest at the stem. So now it's looking better, but it doesn't really show in the photos. It's also finished now too, my usual technique of wiping with a rag dipped in varnish to give a satin finish. As with the other spars the timber is Kauri Pine. The bowsprit cap fitting (correct name anyone?) is done as well, & that photographs well. The drama of shiny brass is interesting but I feel it makes the part look larger, so darkening it will have it looking a little less noticeable & a little more like a practical fitting. The whisker stay chainplates are almost done as well. Simulated rivets, which will also help with fixing to the hull. thanks, Mark


- 411 replies
-
- 15
-
-
Hi Keith that's an elegant & original design idea, I look forward to seeing it develop. Mark
-
thanks John, a good suggestion & I that's what I did initially on my sketch drawing of the rig. However, Cherub's bowsprit is very long as it was lengthened by about 350mm when we converted her back to a gaff rig, to improve the balance on a rig that was larger than the original (with the mast position staying in place, a larger main was going to worsen a weather helm that in polite company is called "heavy"). When I saw that length on this model, I realised that it was almost certainly longer than what would have been in Cliff Gale's mind when he penned this last iteration of the design, & decided that I had better stick to a length that was more historically consistent. Mark
-
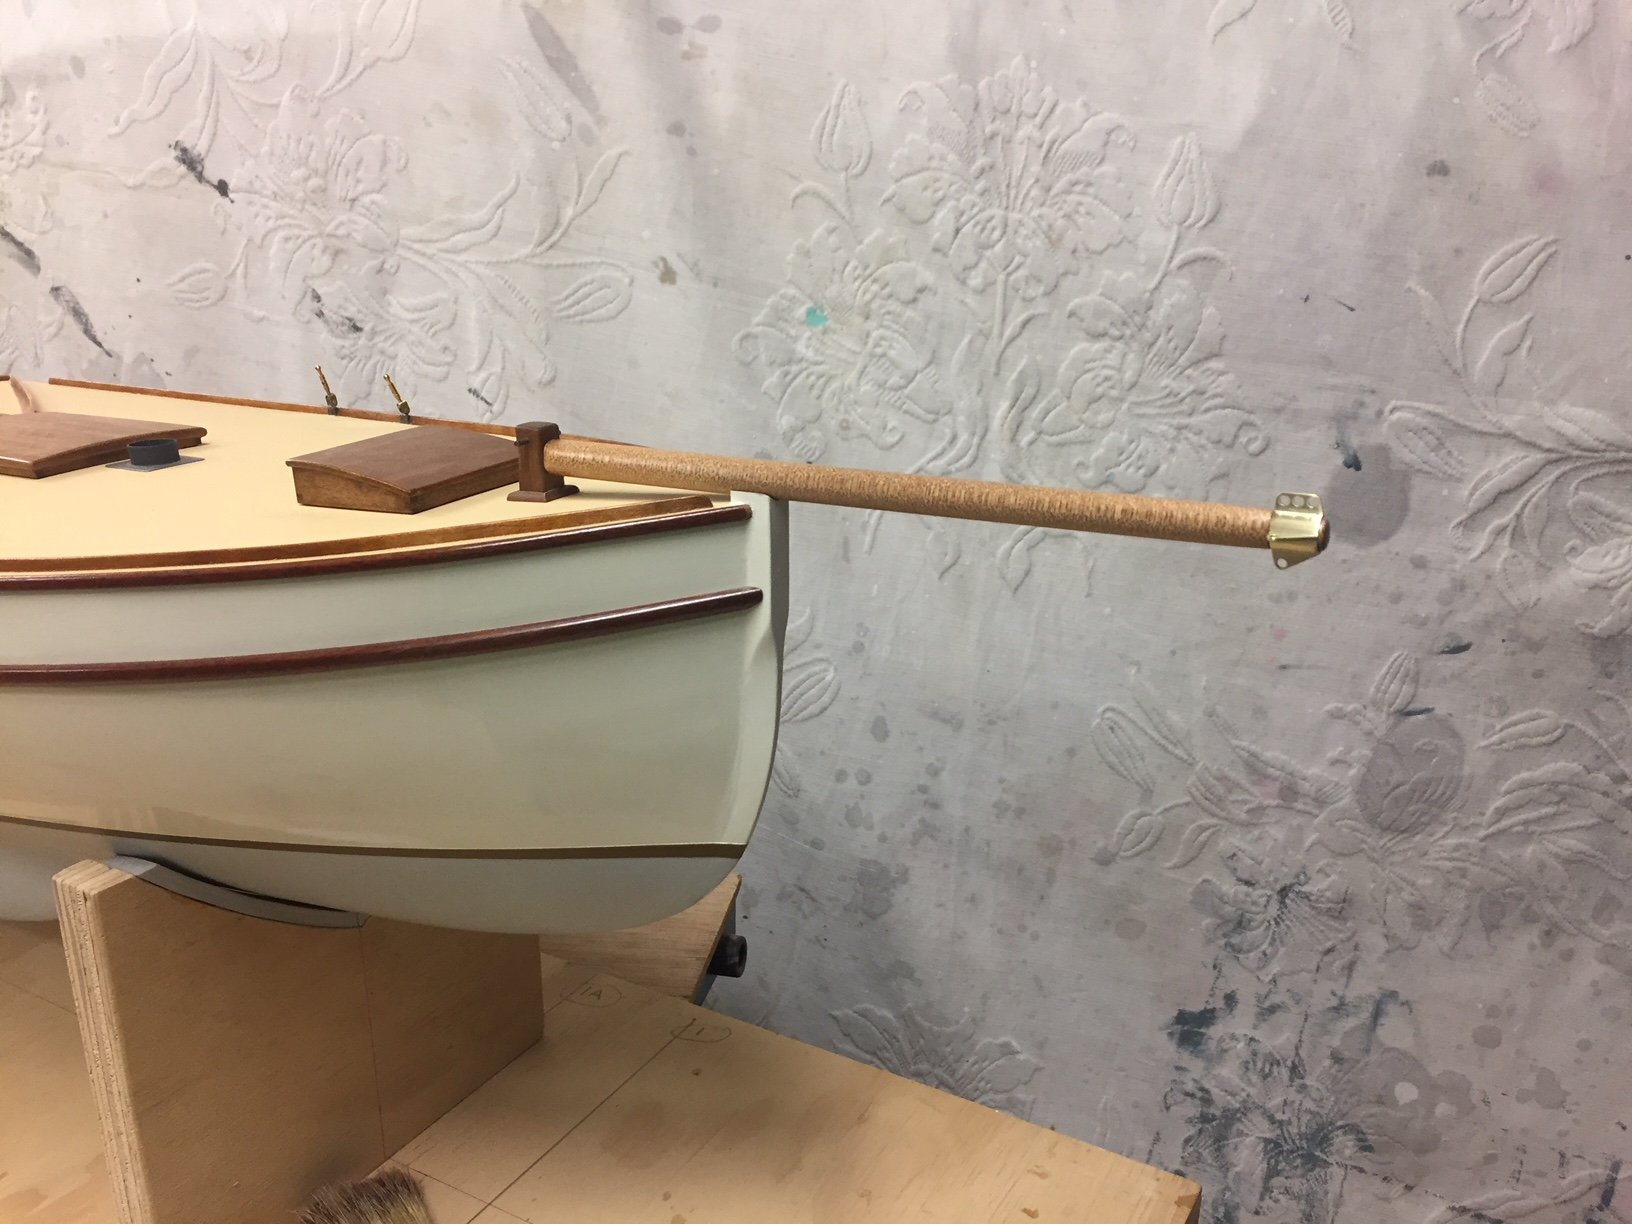
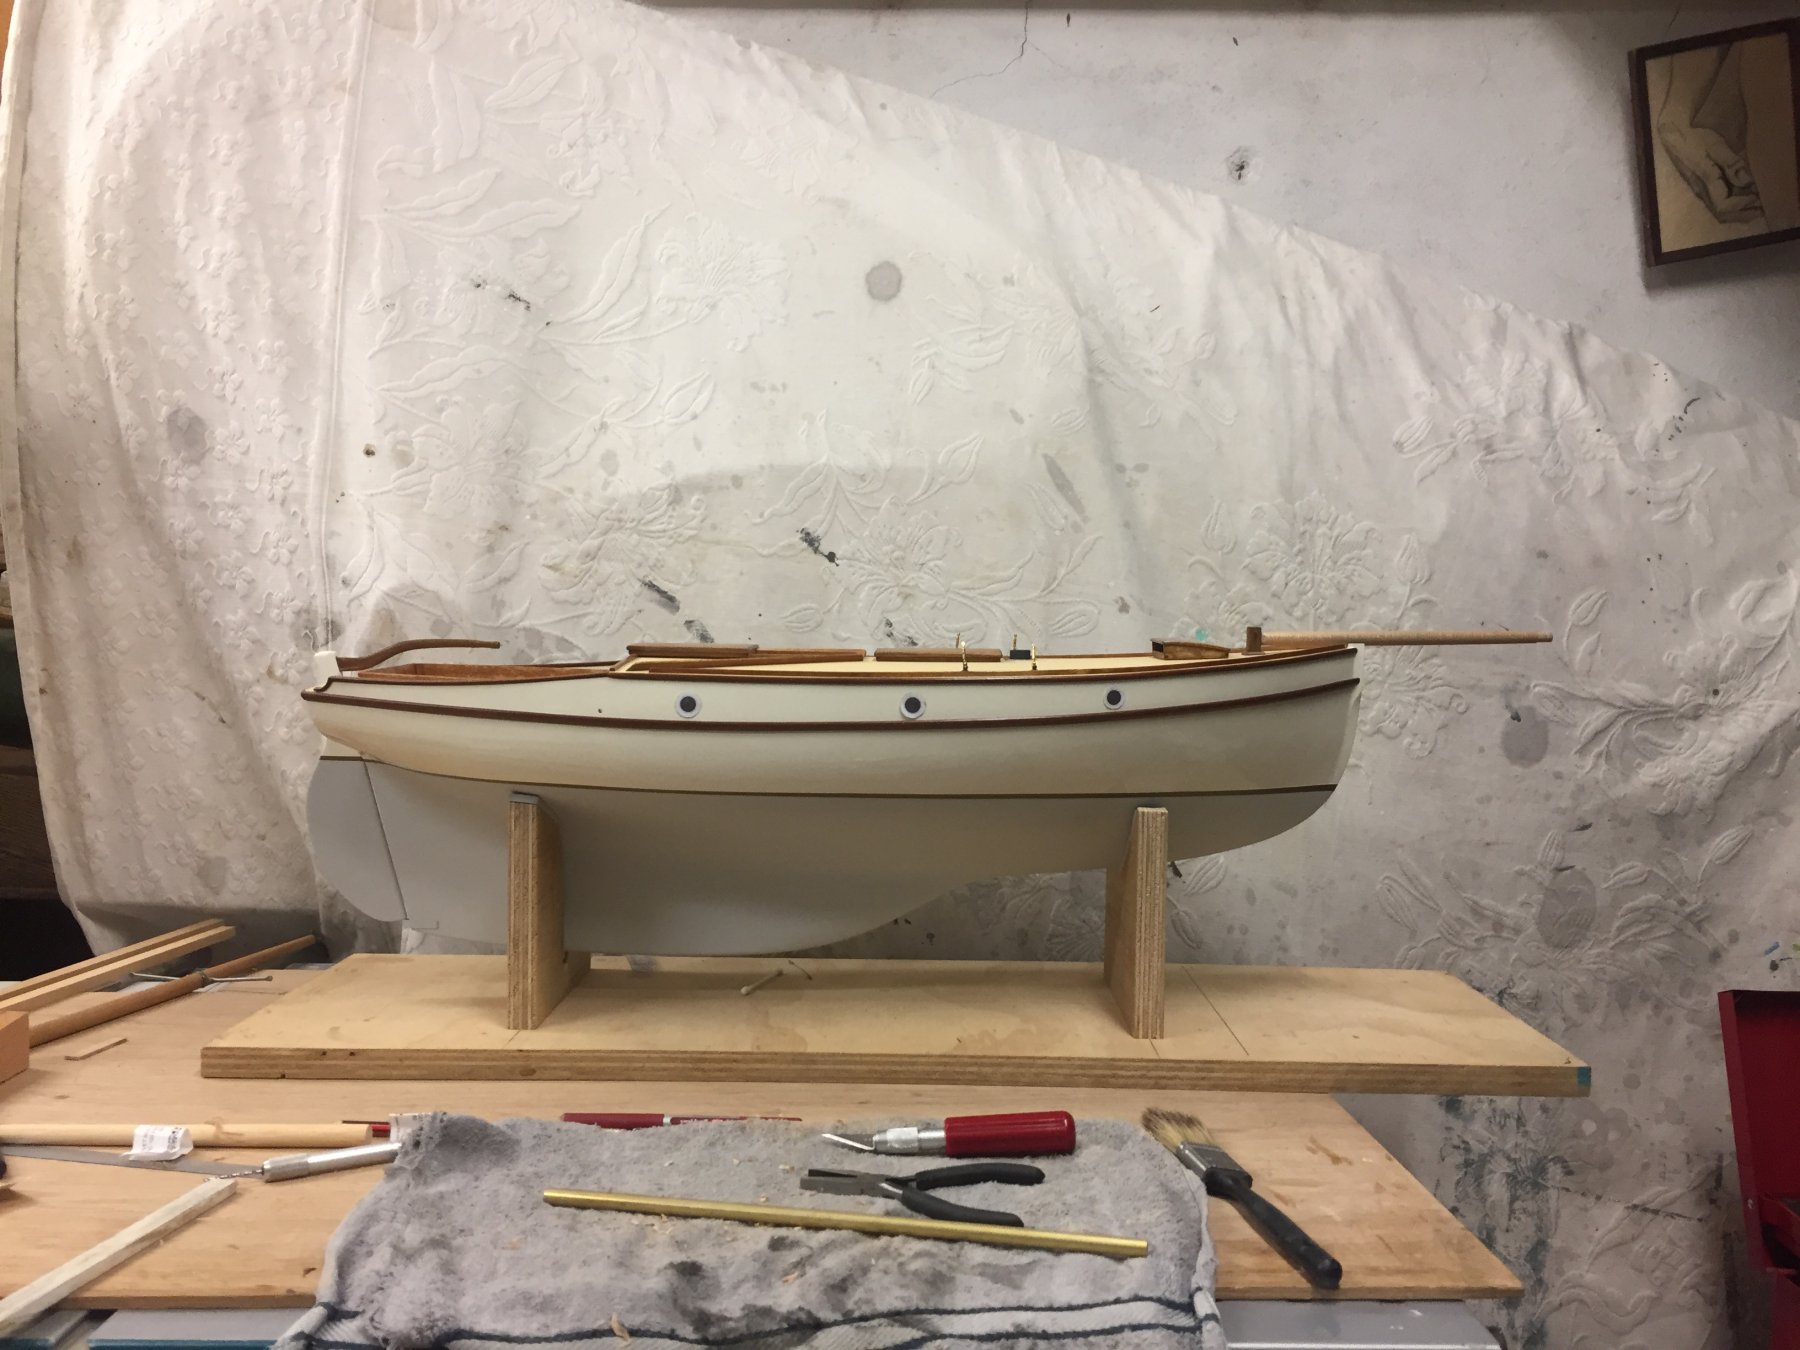
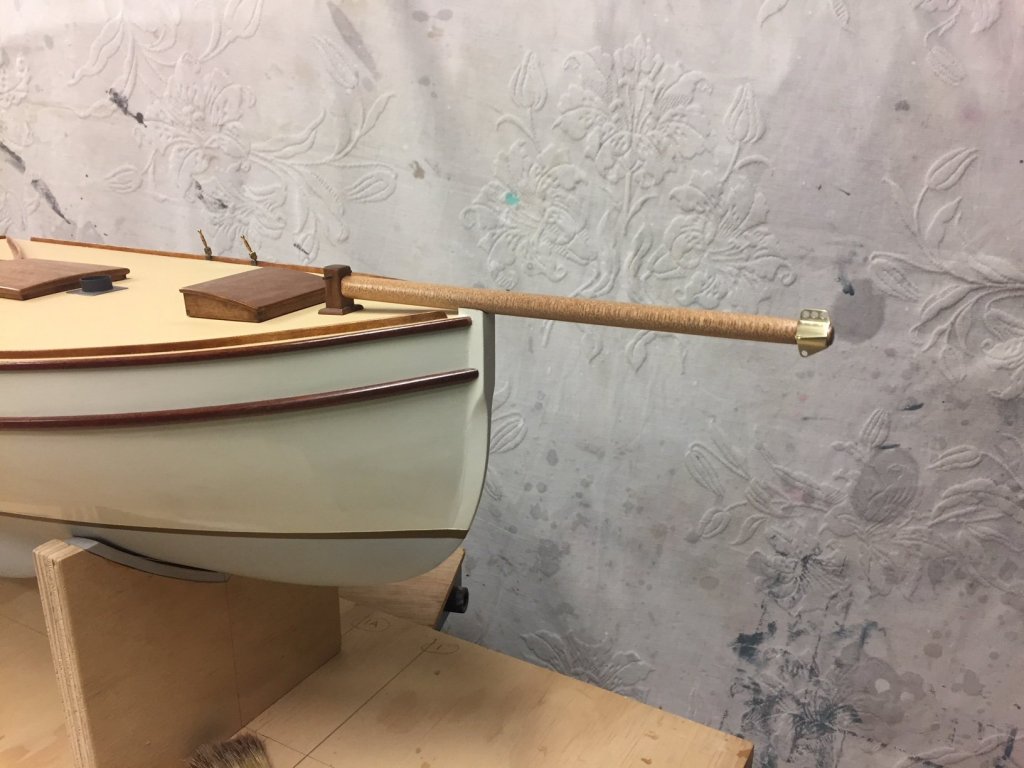
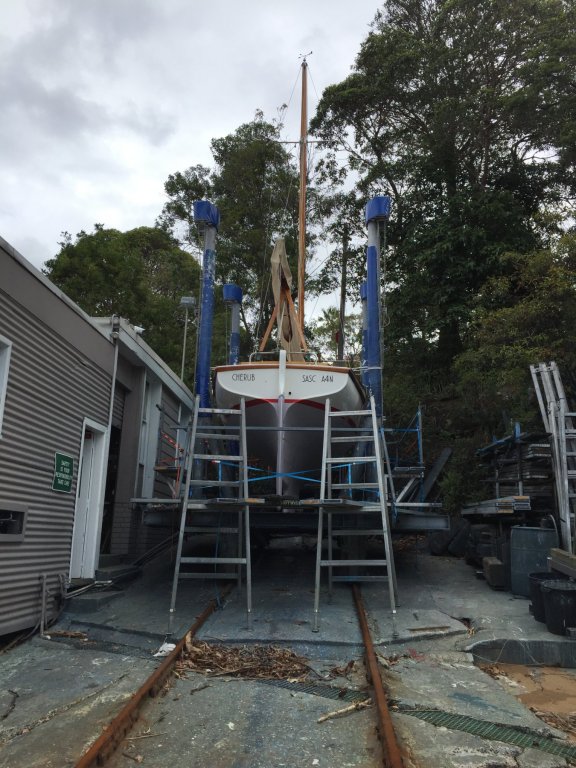
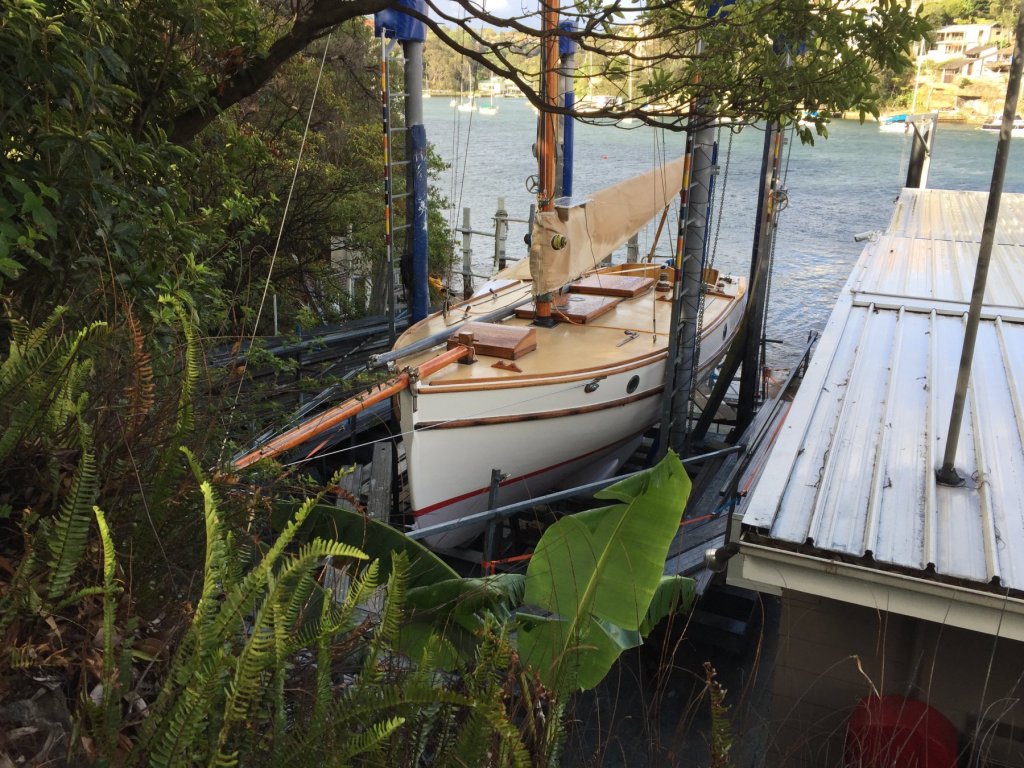
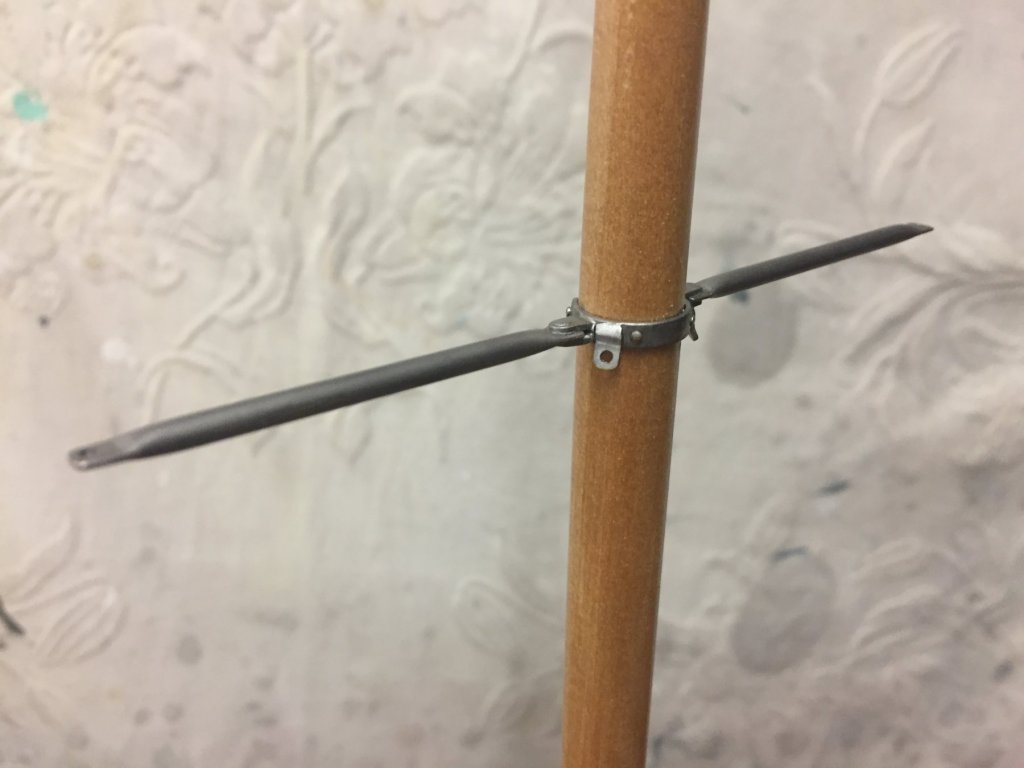
Hi everyone, I've been working on the model boat but haven't posted due to some other projects. Technical Advisor to my daughter on her build: & repainting the 1:1 boat: But on the model I've finished & mounted the gooseneck/spider band. The ageing of the brass is not entirely successful but can probably be improved by removing some. The mast cap, bow side on the right: & spreaders were painted silver to replicate SS. Not sure on that one either but we'll see Bowsprit is shaped. From drawings that I drew it was quite a bit longer, but when I made it that size it just didn't look right - so I reduced it by about 300mm actual size. The boat design drawings don't give rigging, but I reasoned that it could be longish as the boat was designed for harbour racing with picnicking & some near coastal cruising - but not 'romantically' long. There's the temptation to do it solely on looks, & there's not many things that beat the visual flourish that a nice bowsprit gives to a yacht....so it was one of those decisions. Anyway, this is what I came up with: I also reduced the height of the aft ends of the cutwaters, they were just too high, about 75mm actual is enough. It doesn't really show in the photo, but they taper downwards from the forward end. And after some biblical-grade trials, the detail connecting the (bought) turnbuckles to the chainplates was completed. I'm thinking of a simpler detail for most other shroud end details, where the wire terminates at a tang with a hole. Mark


- 411 replies
-
- 15
-
-
Hello Hakan I look forward to this build, what a pretty boat. Looks like she'd sail well also. PS does the bowsprit have a bobstay? It's quite light & looks to be bending up in the book cover photo - Mark
-
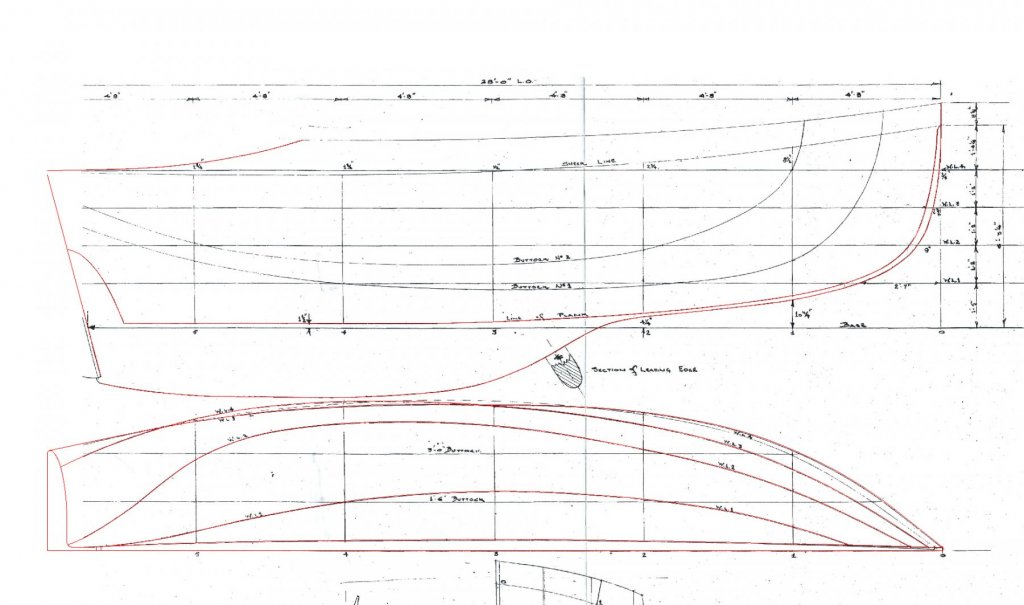
Hi Vaddoc with the planking, the timber (Huon Pine) is very supple so it was happy to flex across the planks & I was able to push a plank up against the next one. If I understand correctly, 'crown height' is deck camber? ie: the amount of curve? If that's correct, then yes it's got pretty flat decks, just a slight camber. I measured the height on a similar boat & set up the curve based on that, & all the deck beams have the same radius. The decks also curve up slightly towards the bow, I was concerned that the plywood wouldn't want to do that double curve, but I used some minute screws that were strong enough to hold the curves down while the glue went off. The model scale is 1" to 1'. I got the deck shape from the half plan on the lines drawing, as copied below. Thanks for complement on the painting. The underwater paint is a water based acrylic, matt finish. It took a few coats, but my main recommendation is to get brushing thinners, it will help to keep a wet edge when you paint. Quality brushes help a lot too, I use synthetic sable flat brushes, one about 12mm wide & one about 6mm wide. Using brushing thinners is a balance between opacity & the extra time that you get to 'join' the new paint to the old. I used the same technique that you use on a full sized boat - a series of vertical applications, starting at the bow or stern. Where each of the vertical strips meets the next is where the brushing thinners will help to avoid a visible overlap of paint. Another suggestion is Tamiya masking tape is worth getting for the boot top line & any masking jobs. I'm actually painting our yacht this week, I'll post some photos when it's done. Hi Hakan, nice to meet you. Well spotted, yes this boat is similar. The boat is the Sydney/Hobert was launched in 1931 & is also 28', & both were designed by Cliff Gale, this yacht was designed in the mid 1960s but never built. Maluka was designed for ocean voyaging, with stiffer lines & more buoyancy in the bows so the bows. This yacht is the last version of this design that Cliff did & was primarily for harbour racing & some cruising, so needed only to be able to deal with medium offshore conditions. The introductory post for this build includes a couple of Maluka photos, & you can see how her keel is much deeper, & you might be able to see how how lines a much 'squarer' - to give additional righting moment from buoyancy. Thanks for your kinds comments on the metalwork, I'm struggling with the rigging still but will have something to show for it in a couple more weeks. Mark
-
yacht rigging for 1:12 scale
Mark Pearse replied to Mark Pearse's topic in Masting, rigging and sails
sorry for the late reply to your comments - thanks both. MNL: the design is basically a 1930s design (maybe even old fashioned in the 1930s), but a variant that was tweaked in the 1960s, so the last iteration of an earlier old fashioned (but successful) design. I'm going to replicate SS wire shrouds, & probably rope for the backstays - I'm really not sure if anyone used rope then as backstays but all of the gaffers I know use rope, spectra etc. For a 28' boat it will have a lot of sail area, probably more than a Mumm/Farr 30, short fat heavy boats both need it & can handle it. Wallace2: Hi, thanks the model will be static. Since my last post above I've come across woven SS wire for jewellery, to scale at about 0.8mm diameter. Also, I have working turnbuckles that are nicely to scale. This is the progress, similar to the sketches but I integrated the bottom part of the turnbuckle with the rigging. The chain plates have also been done, as you can see. I'm happy with the result thanks, Mark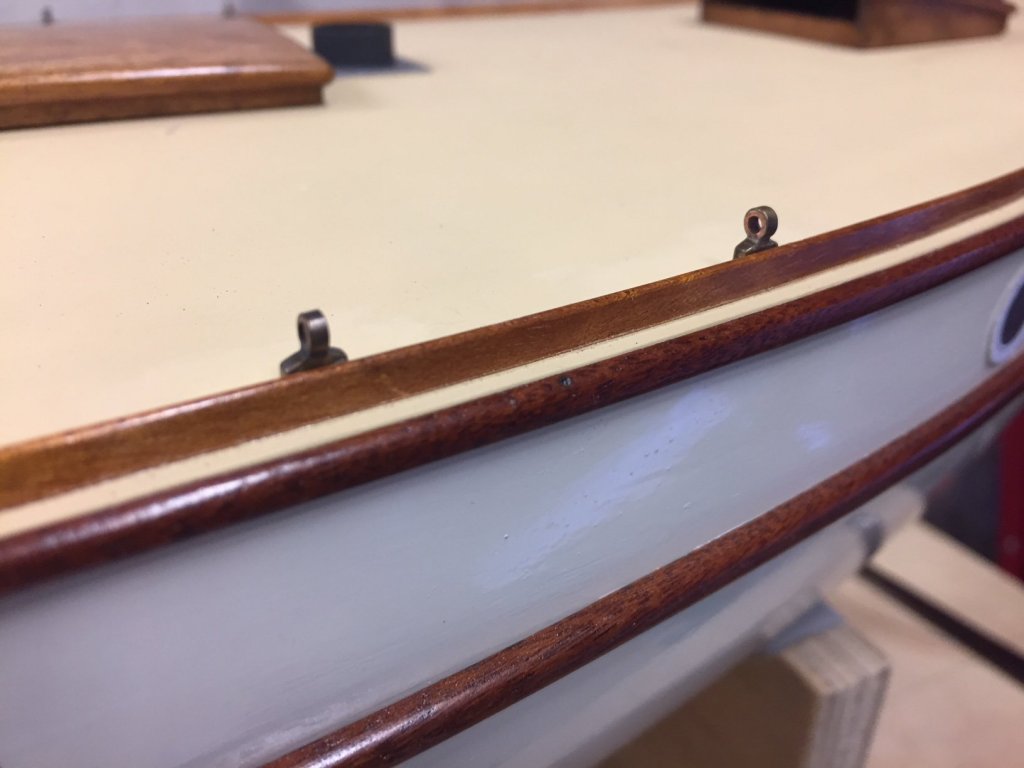
-
Real silk is destroyed by UV light, it will literally fall apart - as you found.
- 749 replies
-
- 3
-
-
- albertic
- ocean liner
- (and 2 more)