ChrisLBren
-
Posts
787 -
Joined
-
Last visited
Content Type
Profiles
Forums
Gallery
Events
Everything posted by ChrisLBren
-
 So far after two coats of 1lb blonde shellac on some scraps Im not happy with it - I think I will mix up to a 2lb cut. Its almost a "non finish" at this point after buffing in between coats with steel wool. I do like the pure tung oil finish better at this point however dont want to give up yet. I also understand many modelers use a wax finish as an alternative. I am a fan of more natural finishes than a poly finish. Any tips are appreciated as always.
 -
Hi Group, I bought some blonde shellac flakes at Rockler to experiment with on Black Friday. I am wondering for those of you who use this finish what sort of cut rate you use. Many recommend a two lb cut rate however I wonder if this is too thick. I created my first batch at a 1lb cut rate and would rather build up a finish than lay on one that is too thick. Any advice is appreciated ! Chris
-
OcCre HMS Victory Limited edition
ChrisLBren replied to modeller_masa's topic in Wood ship model kits
That model looks terrible in my opinion - a bastardized attempt at accurate construction. Build the Caldercraft model or Chris's design with Amati if it ever sees the light of day -
Jim Byrnes Saw Rattling Vibration
ChrisLBren replied to ChrisLBren's topic in Modeling tools and Workshop Equipment
Problem solved - the belt guard was causing the issues. I removed it - with the new motor the saw cuts better than ever. Belt guard is probably bent - will need to straighten it out before re - installing -
Jim Byrnes Saw Rattling Vibration
ChrisLBren replied to ChrisLBren's topic in Modeling tools and Workshop Equipment
Thanks Kurt - will check this out and get back -
Jim Byrnes Saw Rattling Vibration
ChrisLBren posted a topic in Modeling tools and Workshop Equipment
Hey Group, I am wondering if any of you have a tip for me here. Recently I had the saw's motor replaced by Jim and it was shipped back to me. Once I turn the power I noticed a rattling vibration noise where the motor plugs into the rear belt gear of the saw under the guard. After maybe no more than 10 or 15 seconds if I touch the belt guard its red hot. Something is causing friction back here obviously. The belt guard does look properly seated on the unit. I have an email into Jim - I know he's trying to take some time off right now. Any ideas are appreciated - I do not want to operate the saw until I can solve this issue. Chris -
Nice work Greg ! I do love this ship and enjoy watching your progress Chris
-
Looks great Greg - will be following along
-
Looks fantastic Rusty - love the all pear look - very elegant. Congrats !!!!!
- 642 replies
-
- 1
-

-
- winchelsea
- Syren Ship Model Company
- (and 1 more)
-
Thanks John - the instructions that came with the JET are crap - but I have almost assembled it and will check out this video. It feels more solid than the competitors - once I have it built I will share a review.
-
I bought the JET and am very happy - now I have an entire array of saws without having to change any blades - the mini Preac, Jim Byrnes table saw, Dewalt Scroll 788, JET 10 inch Bandsaw and Dewalt 10 Inch Table Saw all suited to their various purposes in the shop. Fingers crossed I can focus on model building vs honey dos around the house !!!!!
-
Honestly I dont want to spend an additional 600 dollars for the 14 inch Grizzly. From examining both machines the JET feels more solid - better fence and table than the Rikon and for my purposes of cutting 1 inch hardwood and under - it should be up for the job. I am not resawing. I think the key here is setting up the saw properly with the right blade.
-
I will probably purchase the JET - it has the HP I need, a solid stand and a good fence. I am not a golfer - they will spend 100s on a club for certain situations during the game. For me having the right tool and not having to adapt one that's not suited makes a lot of sense.
-
Thanks for the responses. I already own a Dewalt 788 Scroll Saw (great for curves) along with a Byrnes Saw (and his other tools) and have a with a fully equipped shop including two mills (Proxxon and Taig) a Unimat Lathe and various sanders - thickness and oscillating etc. I am about to start on a fully framed build in 1/36 and want a saw that does not stall making precise straight cuts in 1/2 - 1 inch hardwood that is safe and handy (unlike my full size Dewalt 10 inch circular saw) which is a scary beast. It would be great to have the ability to handle other household jobs (shelves for the wife and wainscotting etc) but accuracy for my ship modeling with a solid fence is most important.
-
Hey Group, I am finally about to buy a bandsaw - keep in mind I have my cabinet maker cuts my wood to spec - so I am not cutting more than 1 inch thick nor am I resawing. I have narrowed it down to these two models - both under 600 dollars. I do like the flexibility of the Jet for other non ship building projects and the 1/2 HP with a solid fence. However the Rikon has less horsepower with 1/3 HP but is 200 dollars cheaper. It does get better reviews though. Any feedback is appreciated. Jet® JWB-10 Open Stand 10'' Bandsaw | Rockler Woodworking and Hardware RIKON 10-305 Bandsaw With Fence, 10-Inch - Power Band Saws - Amazon.com
-
Hi Group, Hoping to get some tips here. I know this saw is designed very well, however I am having problems. I recently replaced both the blade and the belt, and I am still barely able to cut 1/4 inch pear wood with it. 6 inches into the cut it stalls. I am sure I am doing something wrong here. Any advice is appreciated. Thanks to everyone's tips on the thickness sander it now works like a dream - hoping I can figure out the saw.
-
Looks really nice ! Is the black planking painted, dyed or ebony used ? Nice work !
-
Thanks for all of the responses - both ships are on their way to their new homes.
-
Hi Mark, Please share what blade you bought from Martindale for standard ripping of planks and also for stock thicker than 1/4. I have adjusted my fence quite a bit per instruction and still get stalling in anything much over 1/4 depending on the length of the cut. This is one of the main reasons I want to buy a band saw. Thanks Chris
-
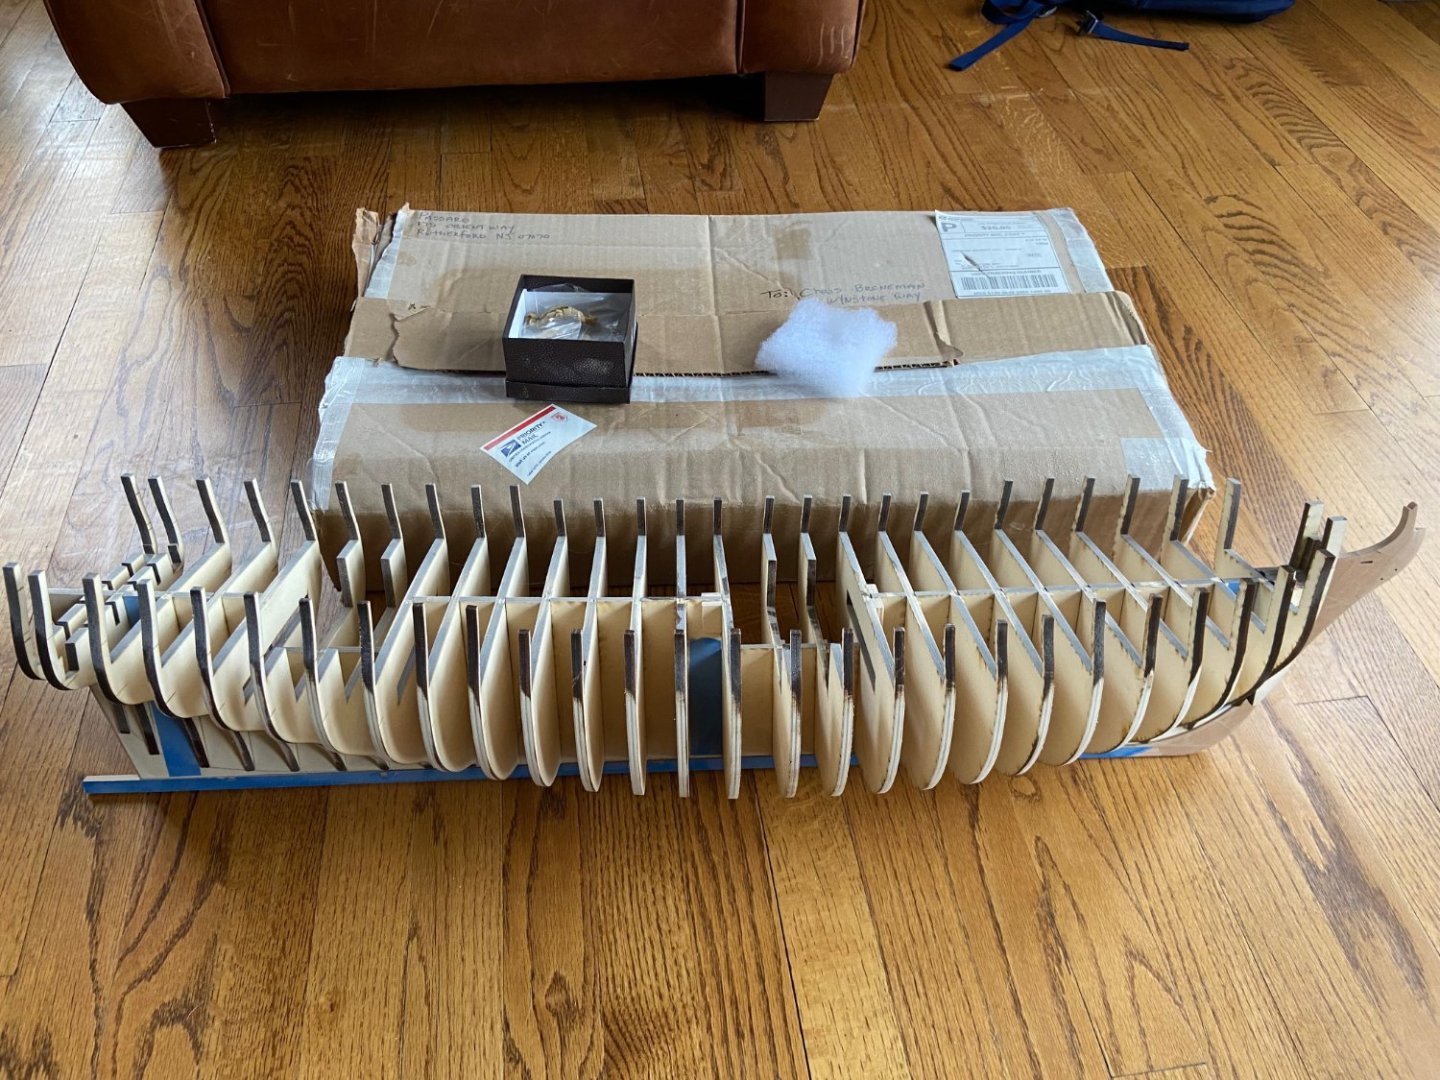
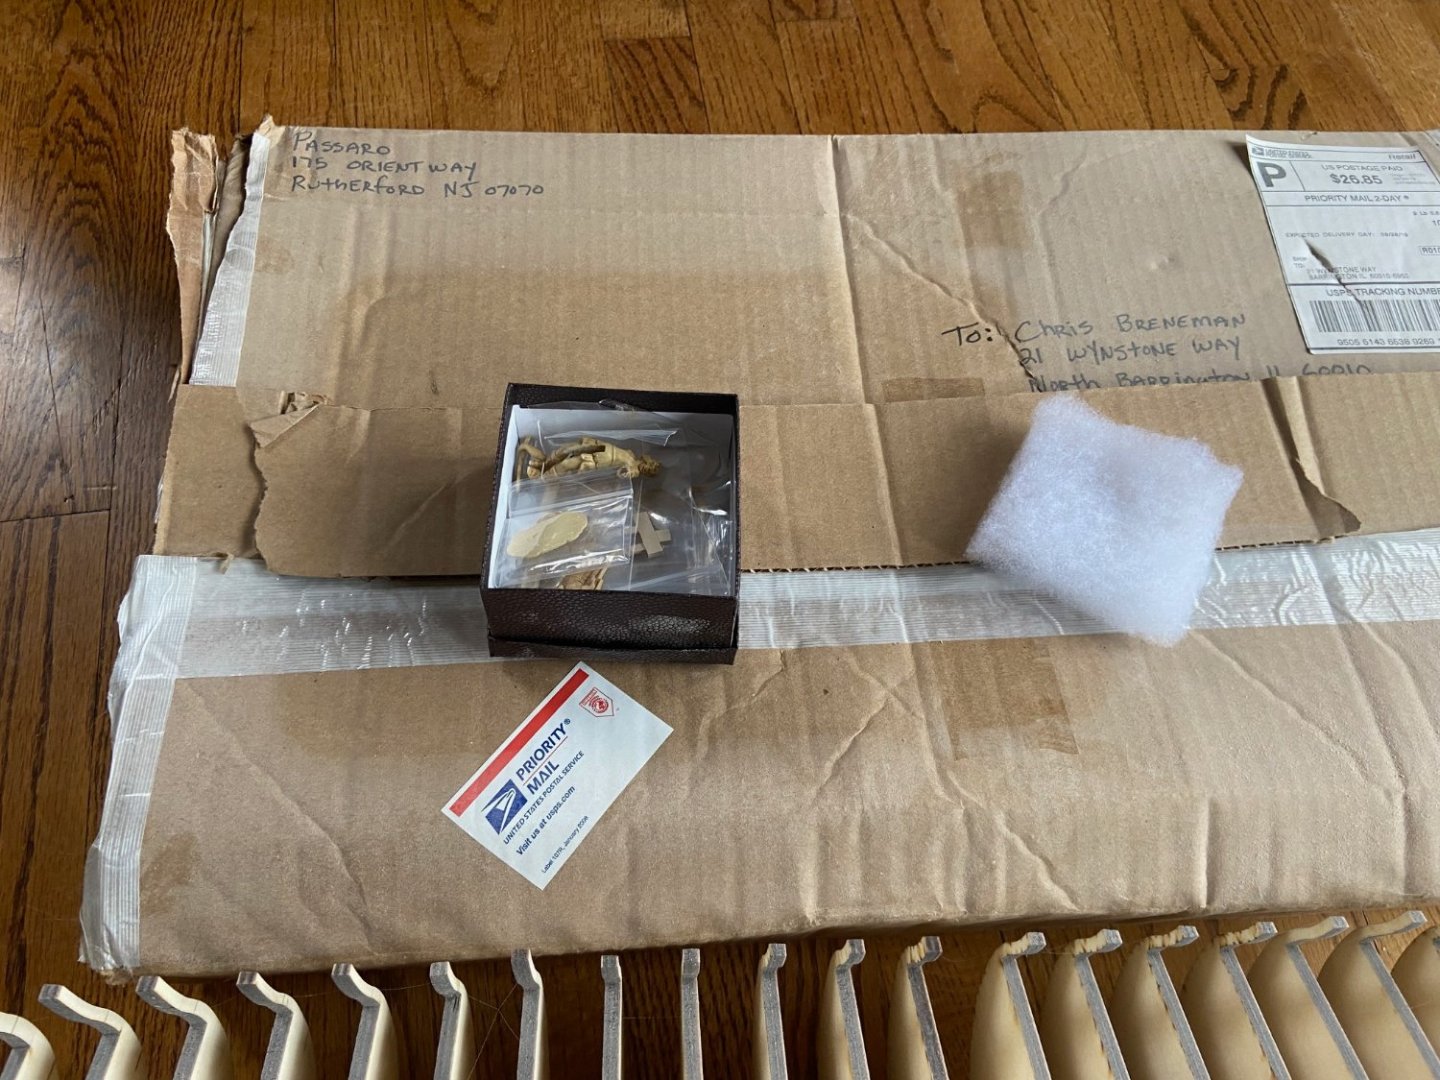
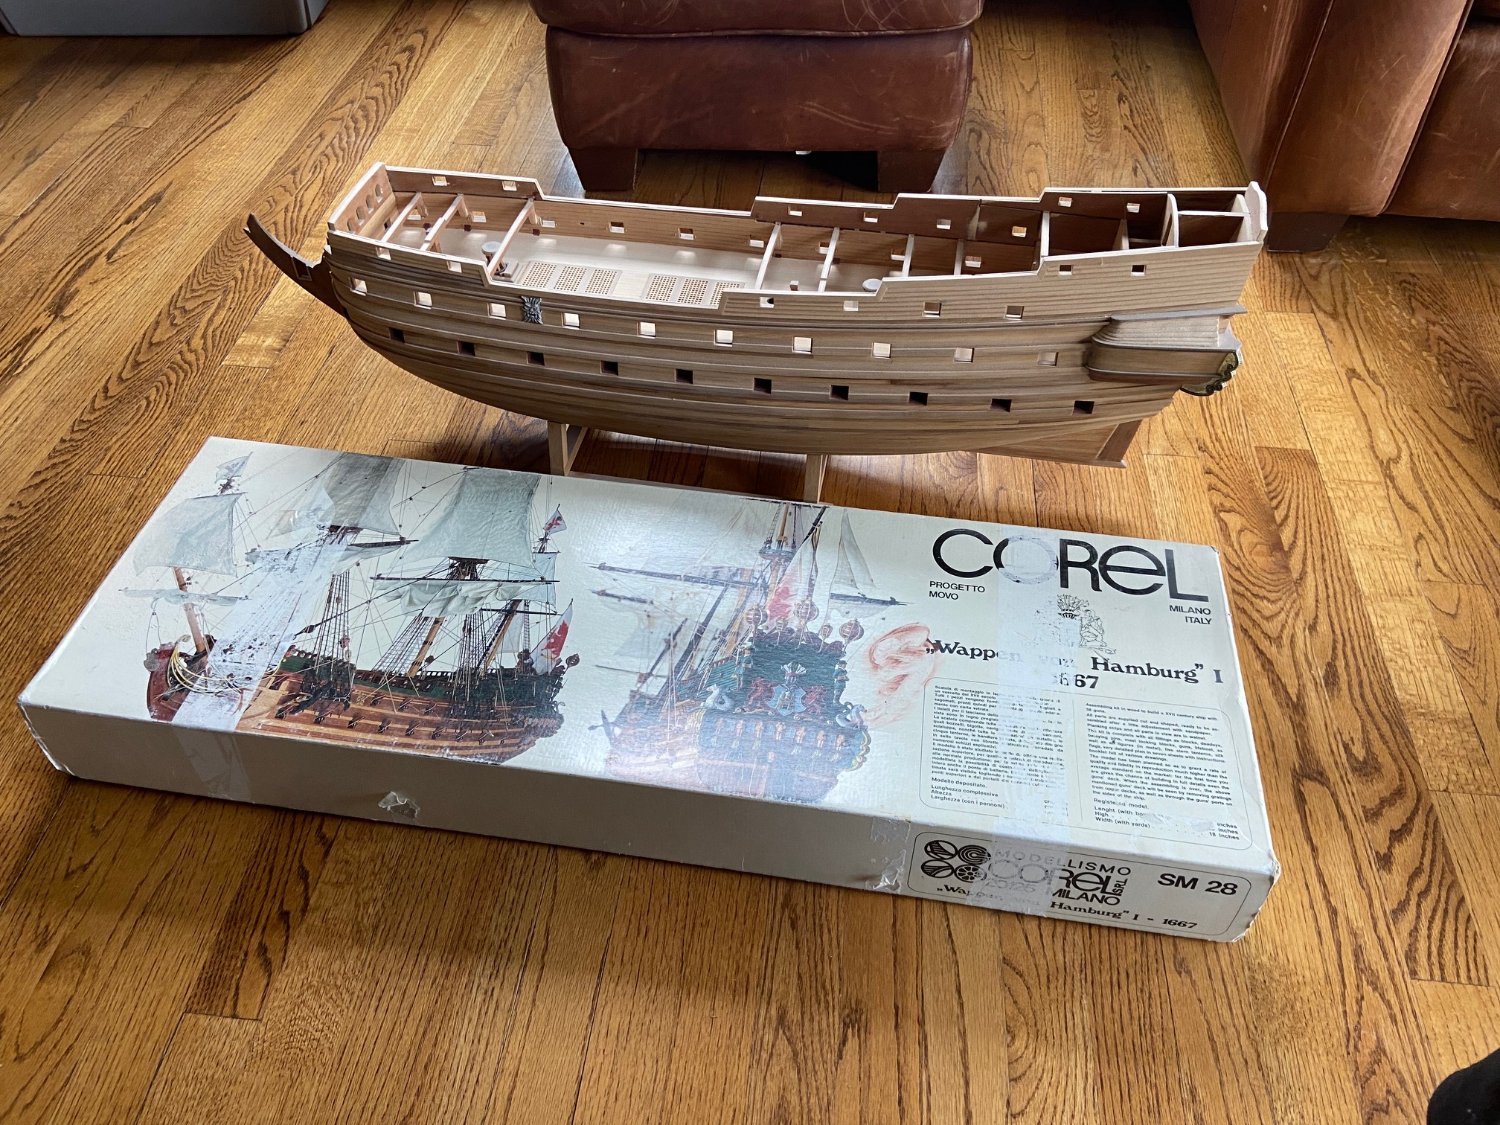
The Winnie is now spoken for. The Wappen Von Hamburg still needs a home. Thanks ! Chris
-
Postage to FL shouldnt be bad. The keel was assembled with my stash of Swiss Pear - should blend nicely with the cherry package. Let me know
-
Gentleman - clearing the decks for the next project along with my LGV and I will never get to these. They are looking for a home. You pay for the shipping from Illinois and make a donation to the NRG and they are yours. Wappen hull is complete as are the kits contents and Chucks Winnie is ready for the gunport framing with the cherry included in stage 2 along with the boxwood carvings. Contact me with any questions.