DONATION DRIVE - SUPPORT MSW - DO YOUR PART TO KEEP THIS GREAT FORUM GOING!
×


usedtosail
-
Posts
2,417 -
Joined
-
Last visited
Content Type
Profiles
Forums
Gallery
Events
Everything posted by usedtosail
-
 I added the head rail supports to the stem then glued on the head rails. Next are the planks for the head area, which on this model get put on under the supports, which does not seem right to me but I am doing it that way. I have the two outside planks glued on. All of these pieces will be painted black eventually, but for now I just painted the ends of the head rails and planks where they are glued to the stained hull to make it easier later when I paint the rest of them.
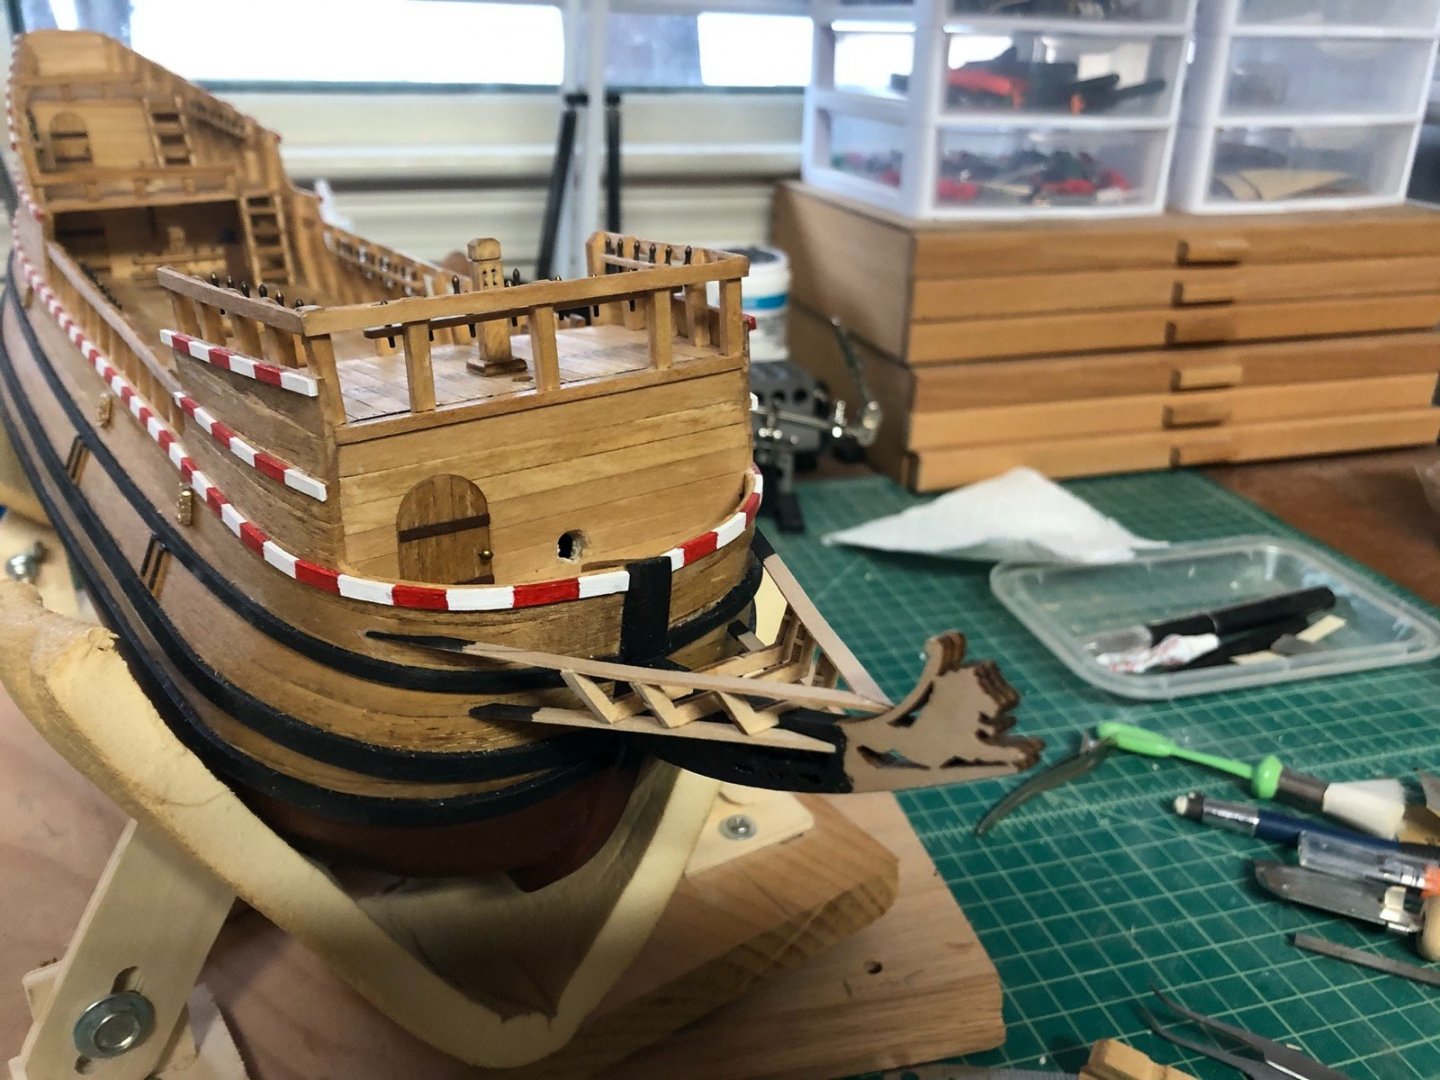
- 135 replies
-
- 4
-

-
- billing boats
- half moon
- (and 1 more)
-
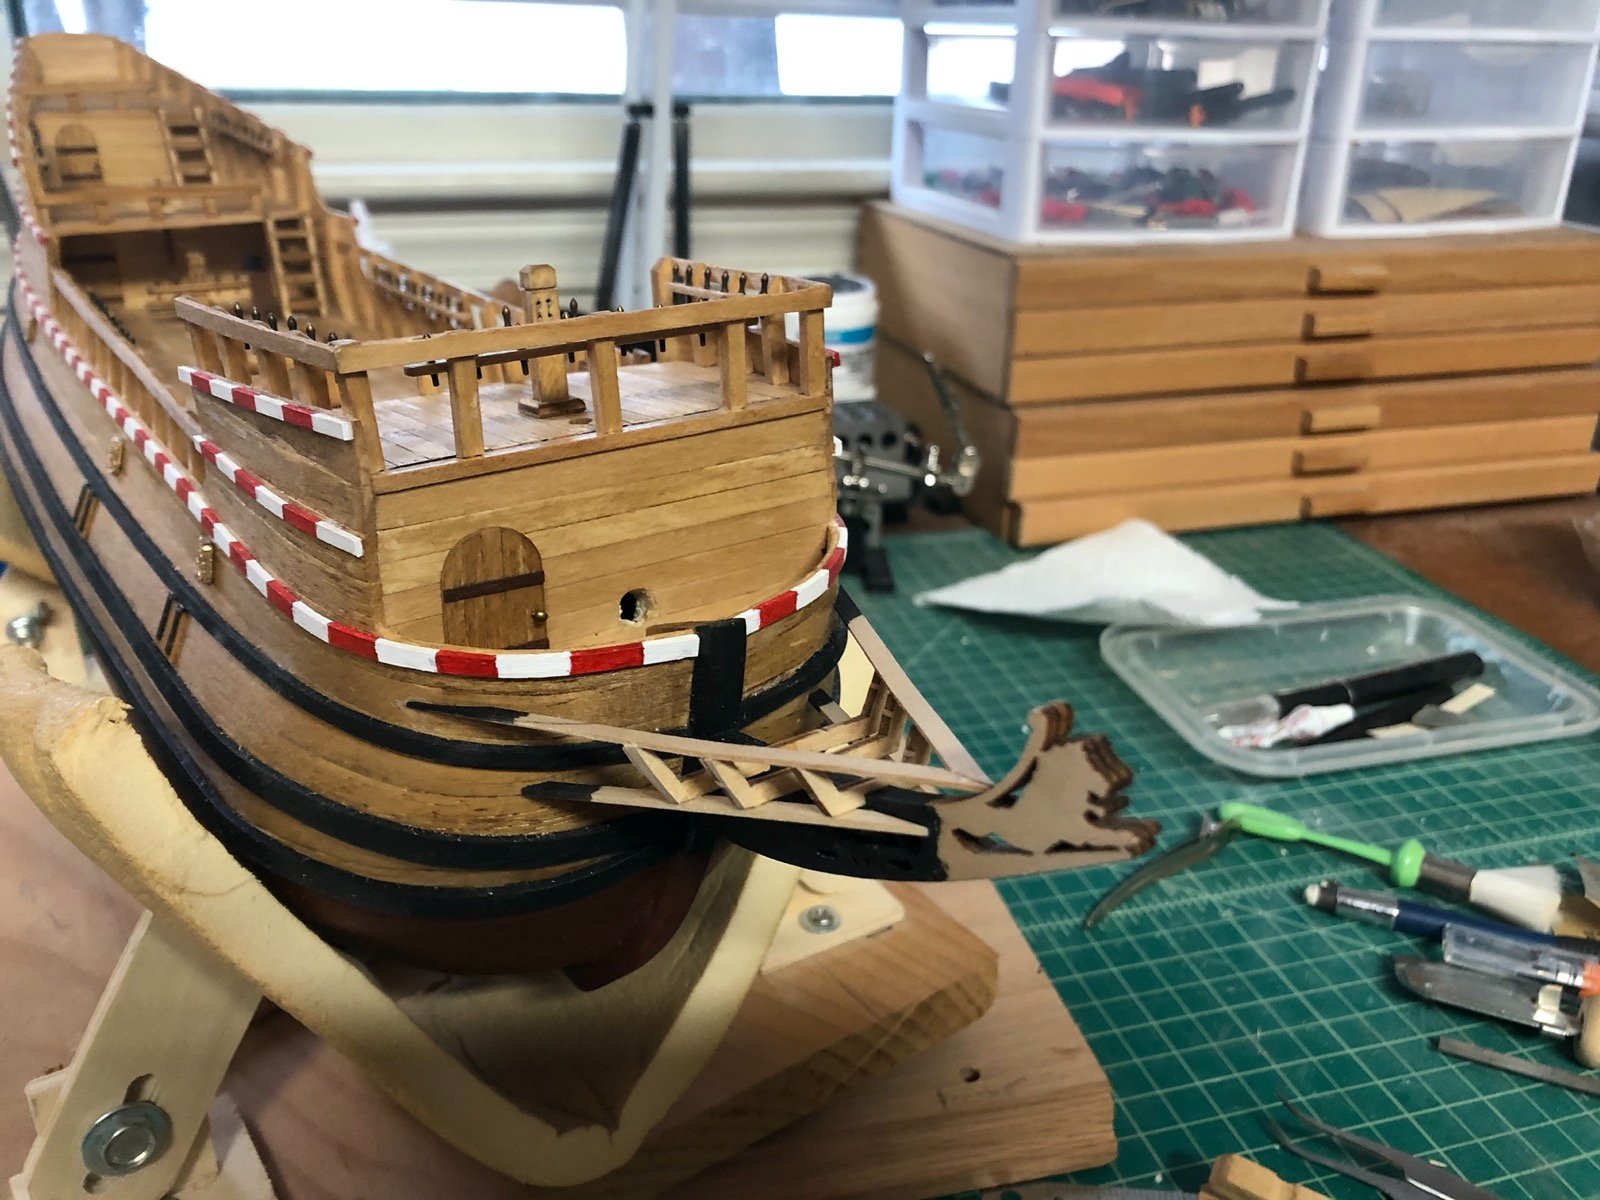
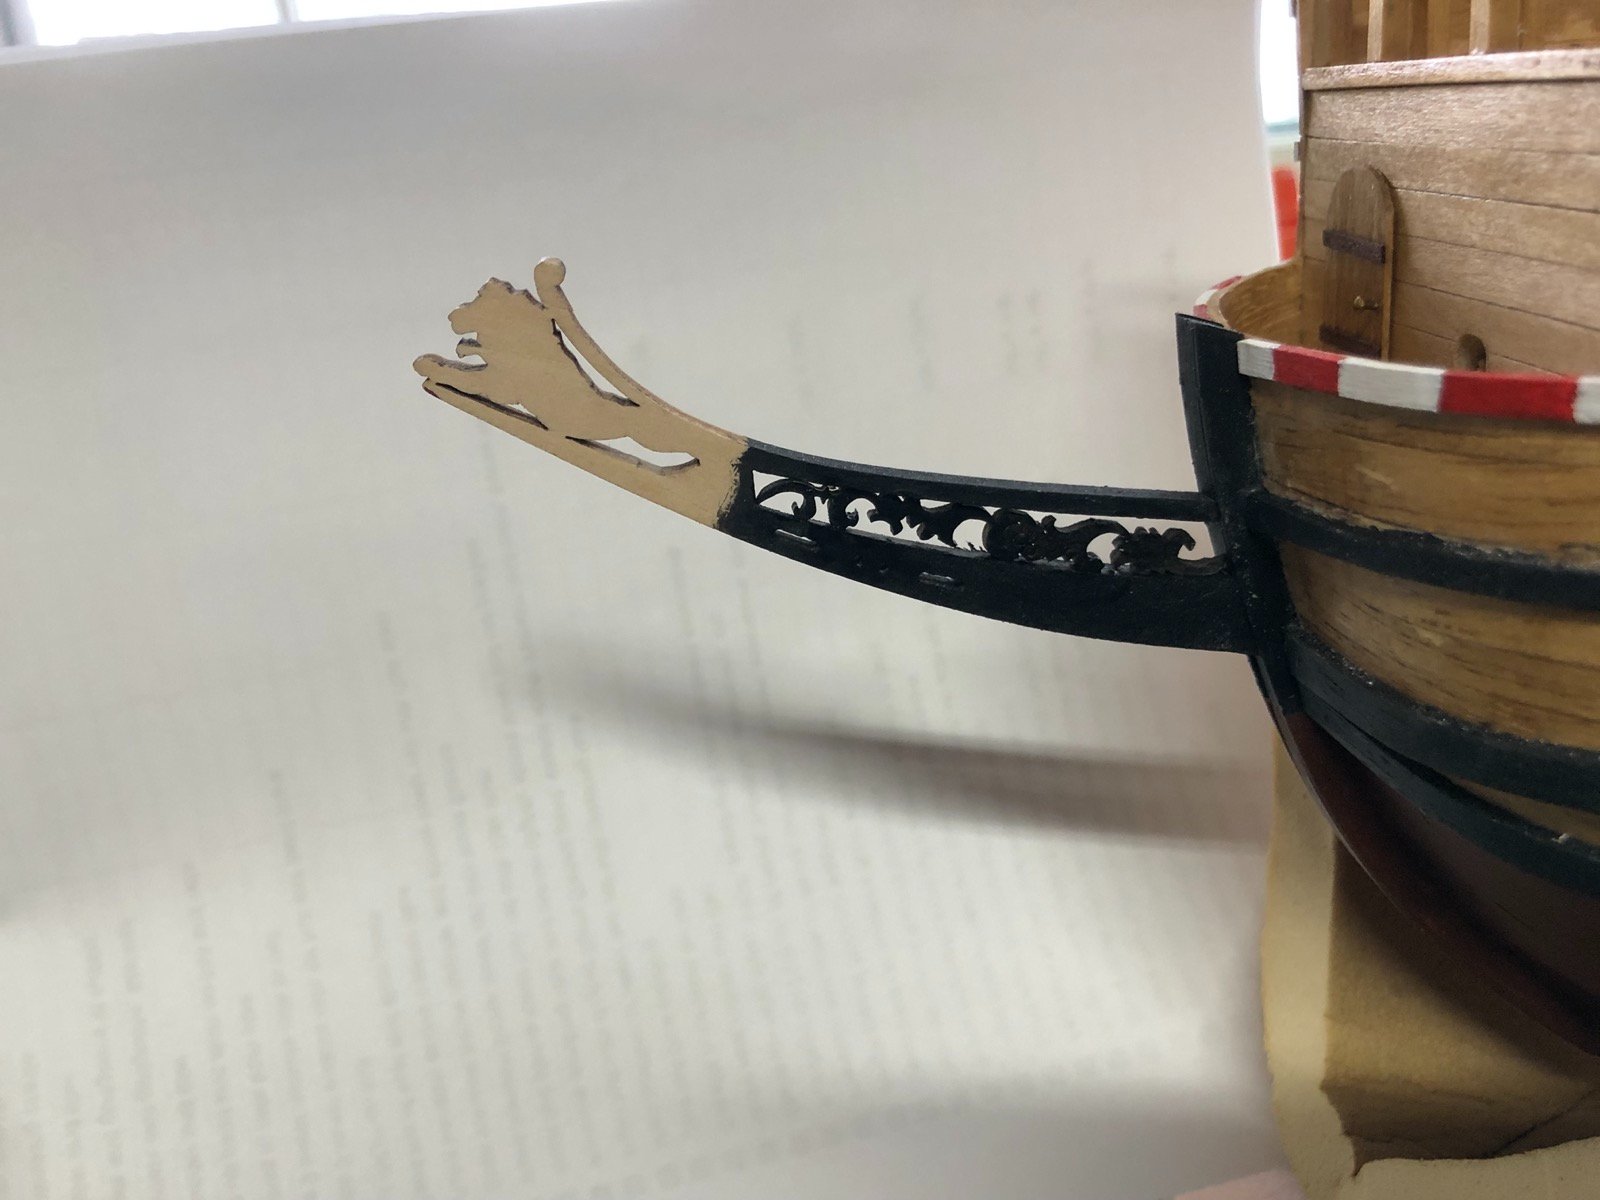
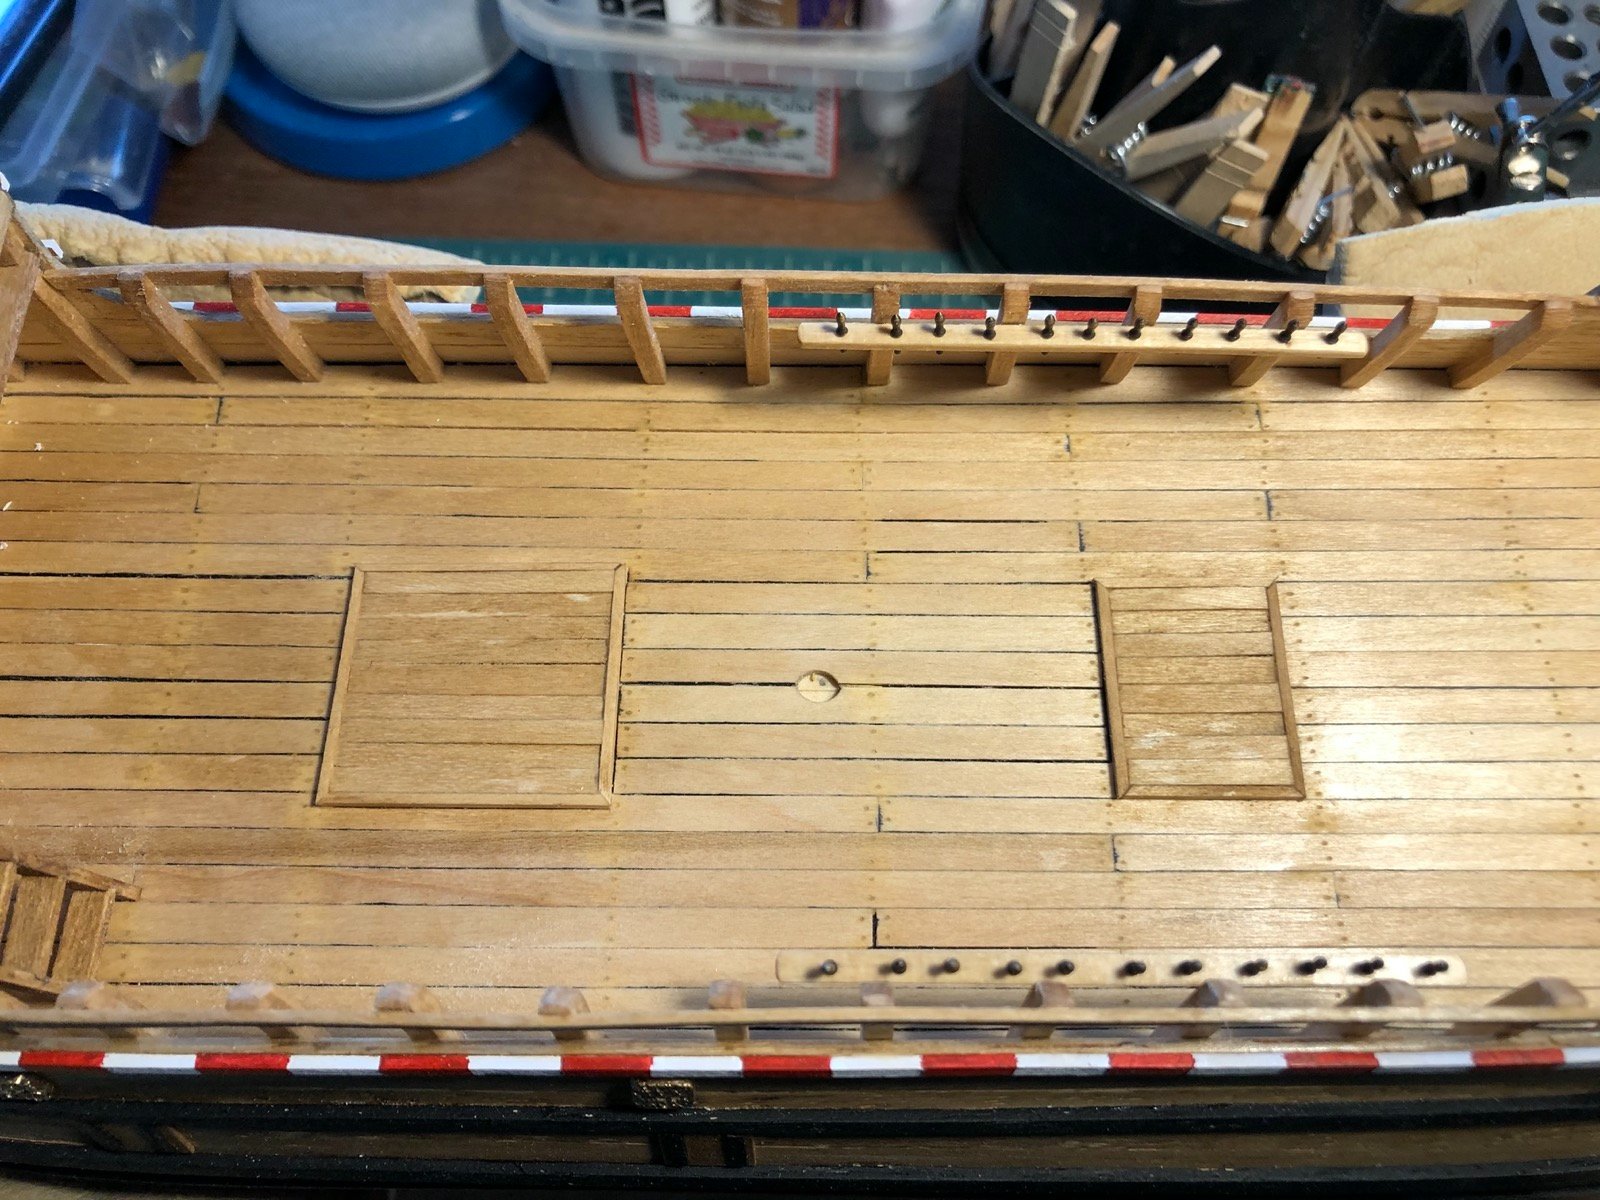
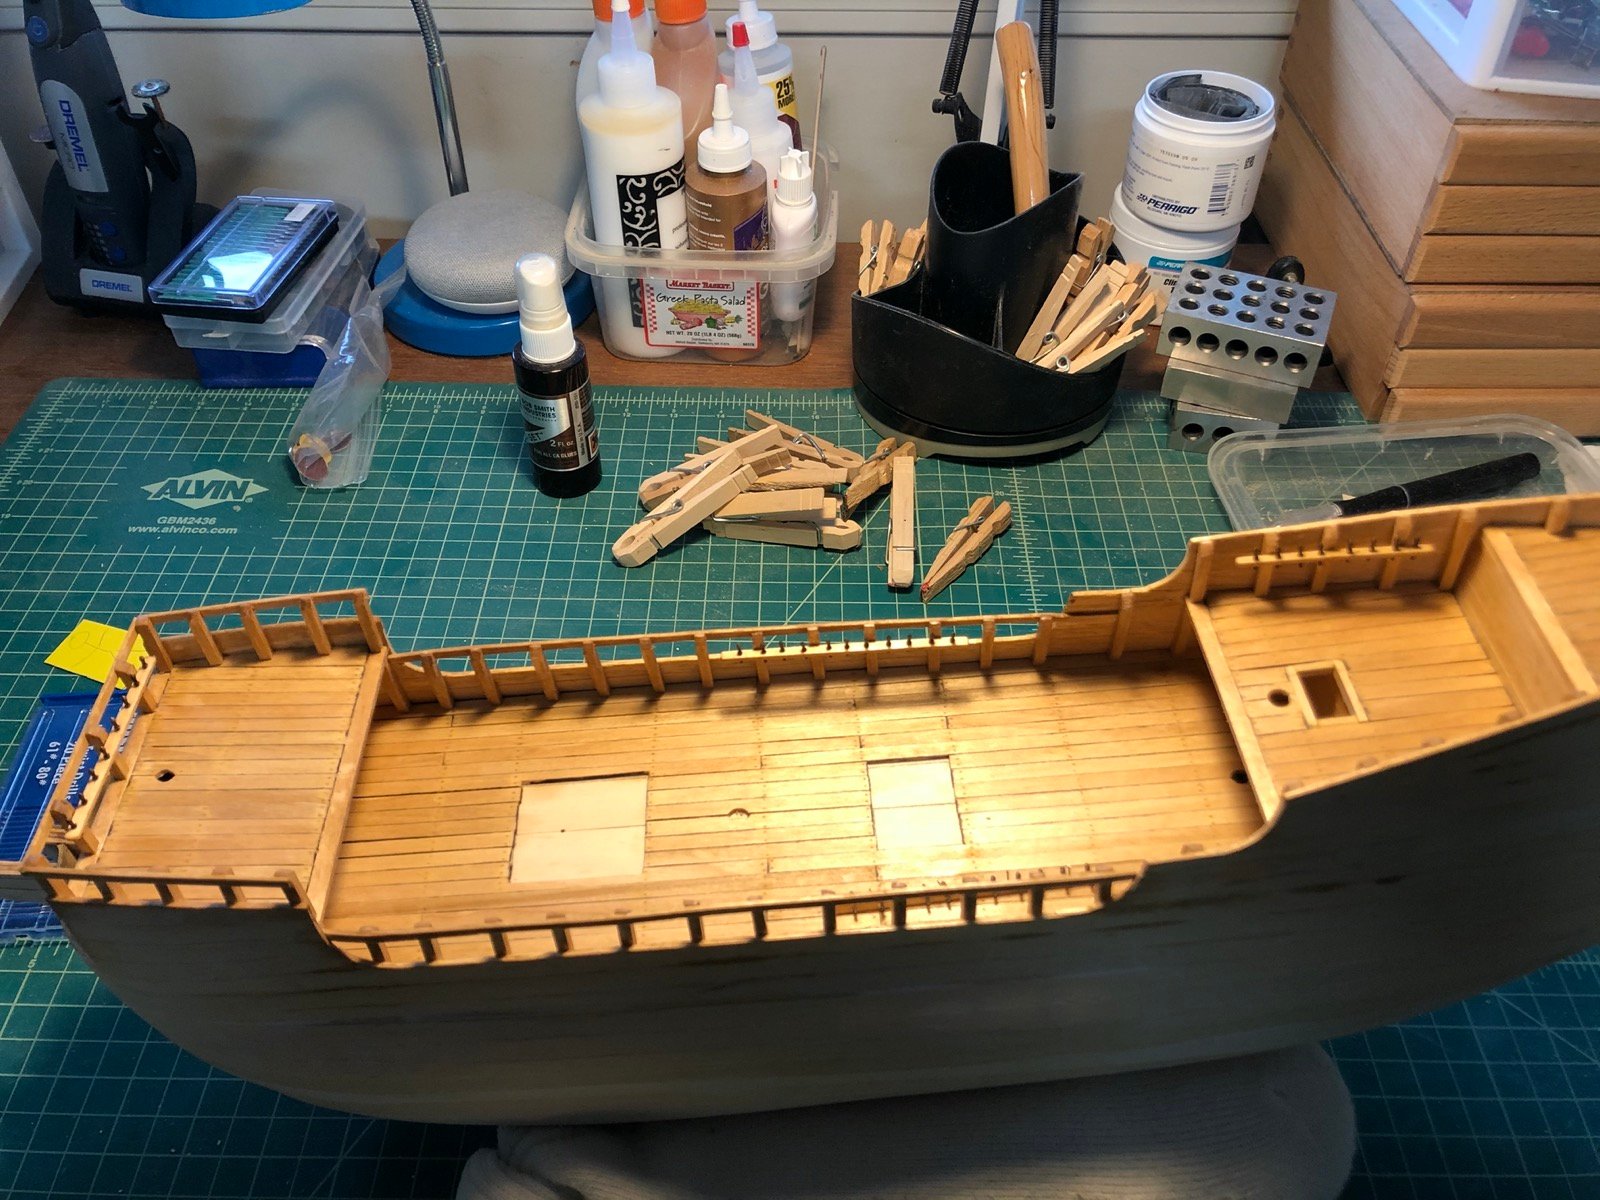
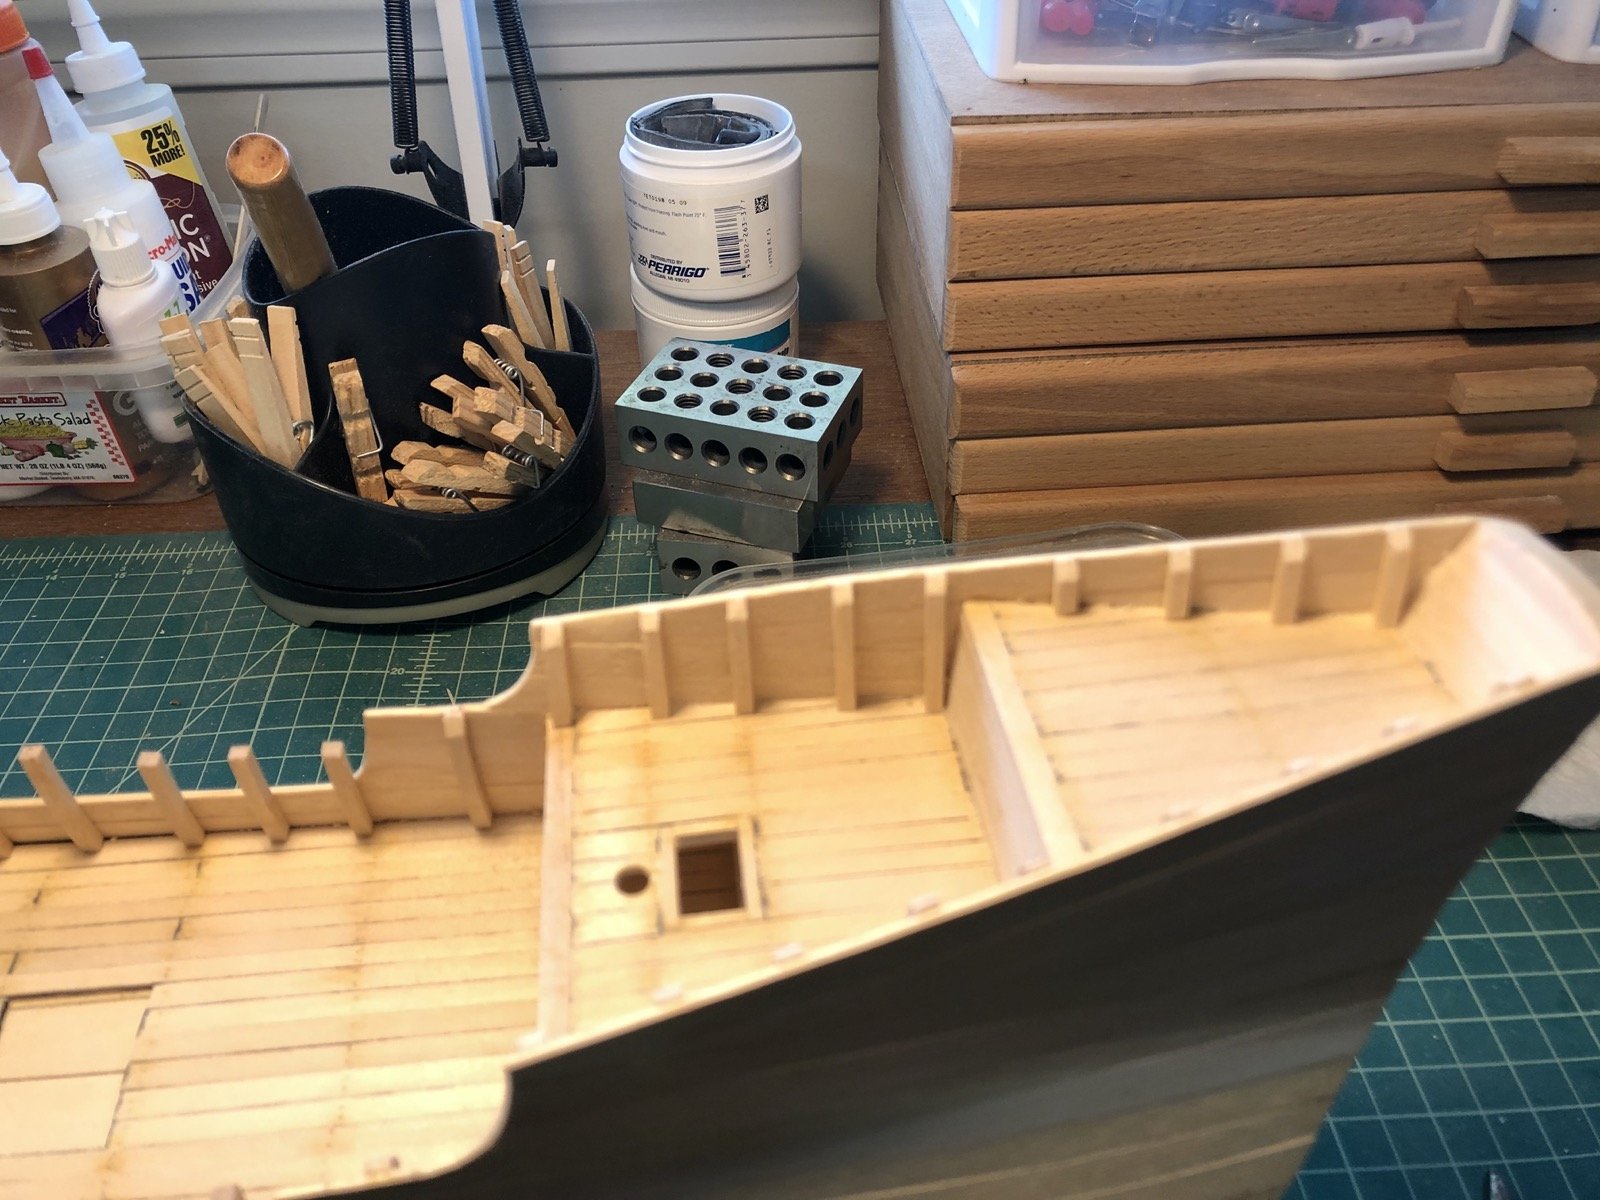
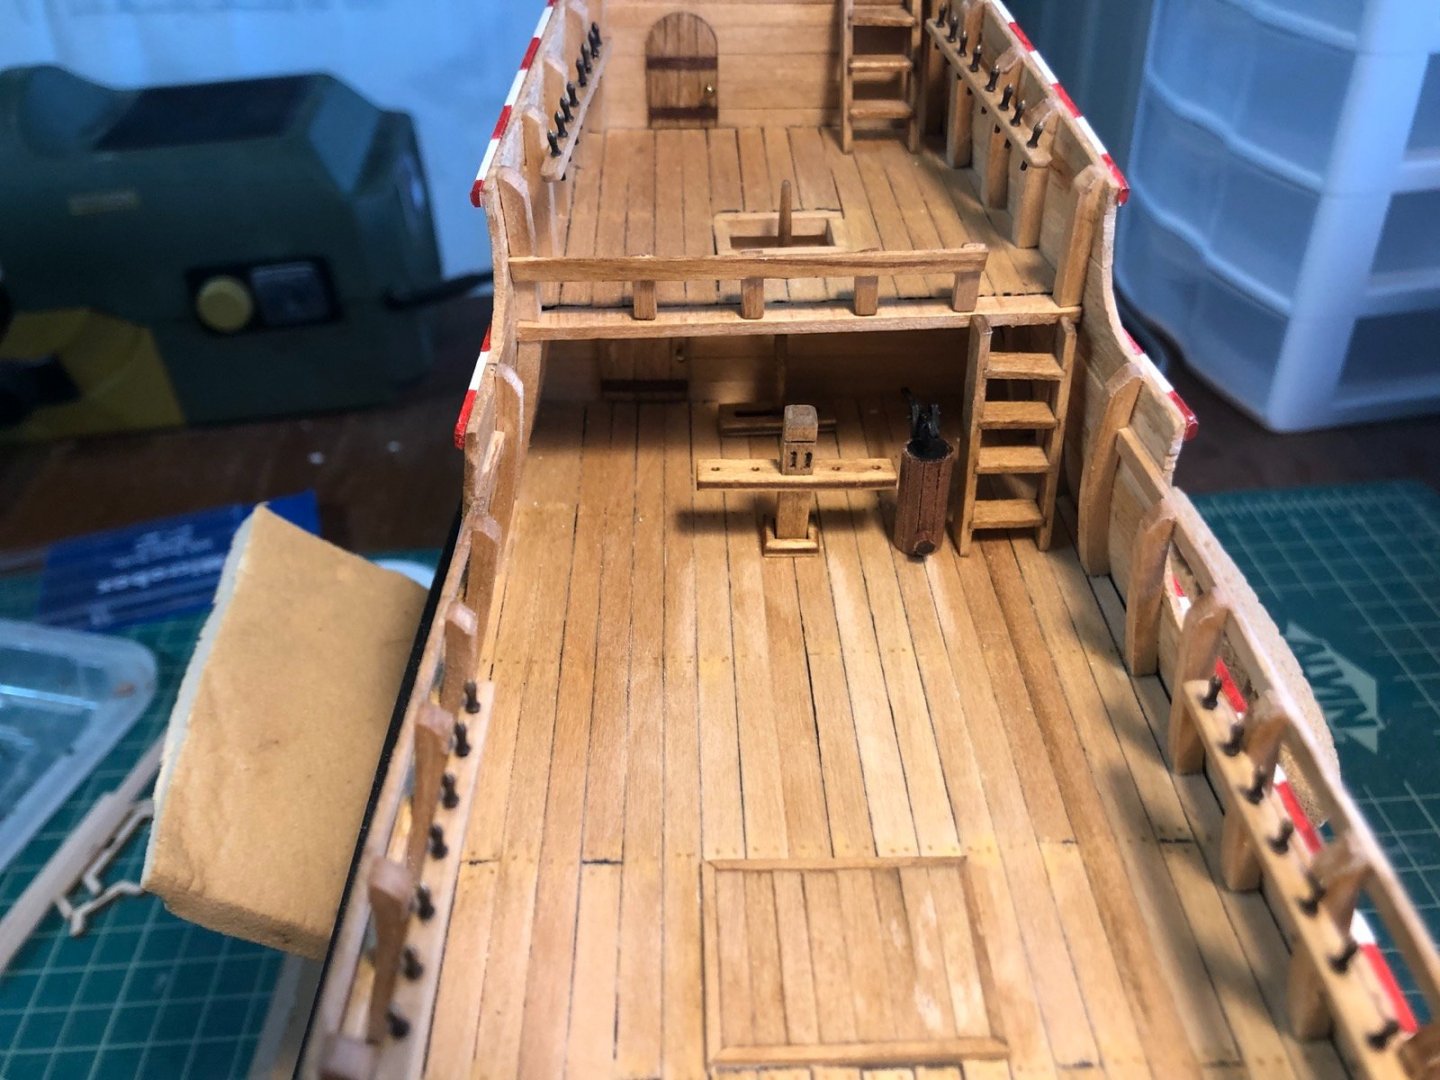
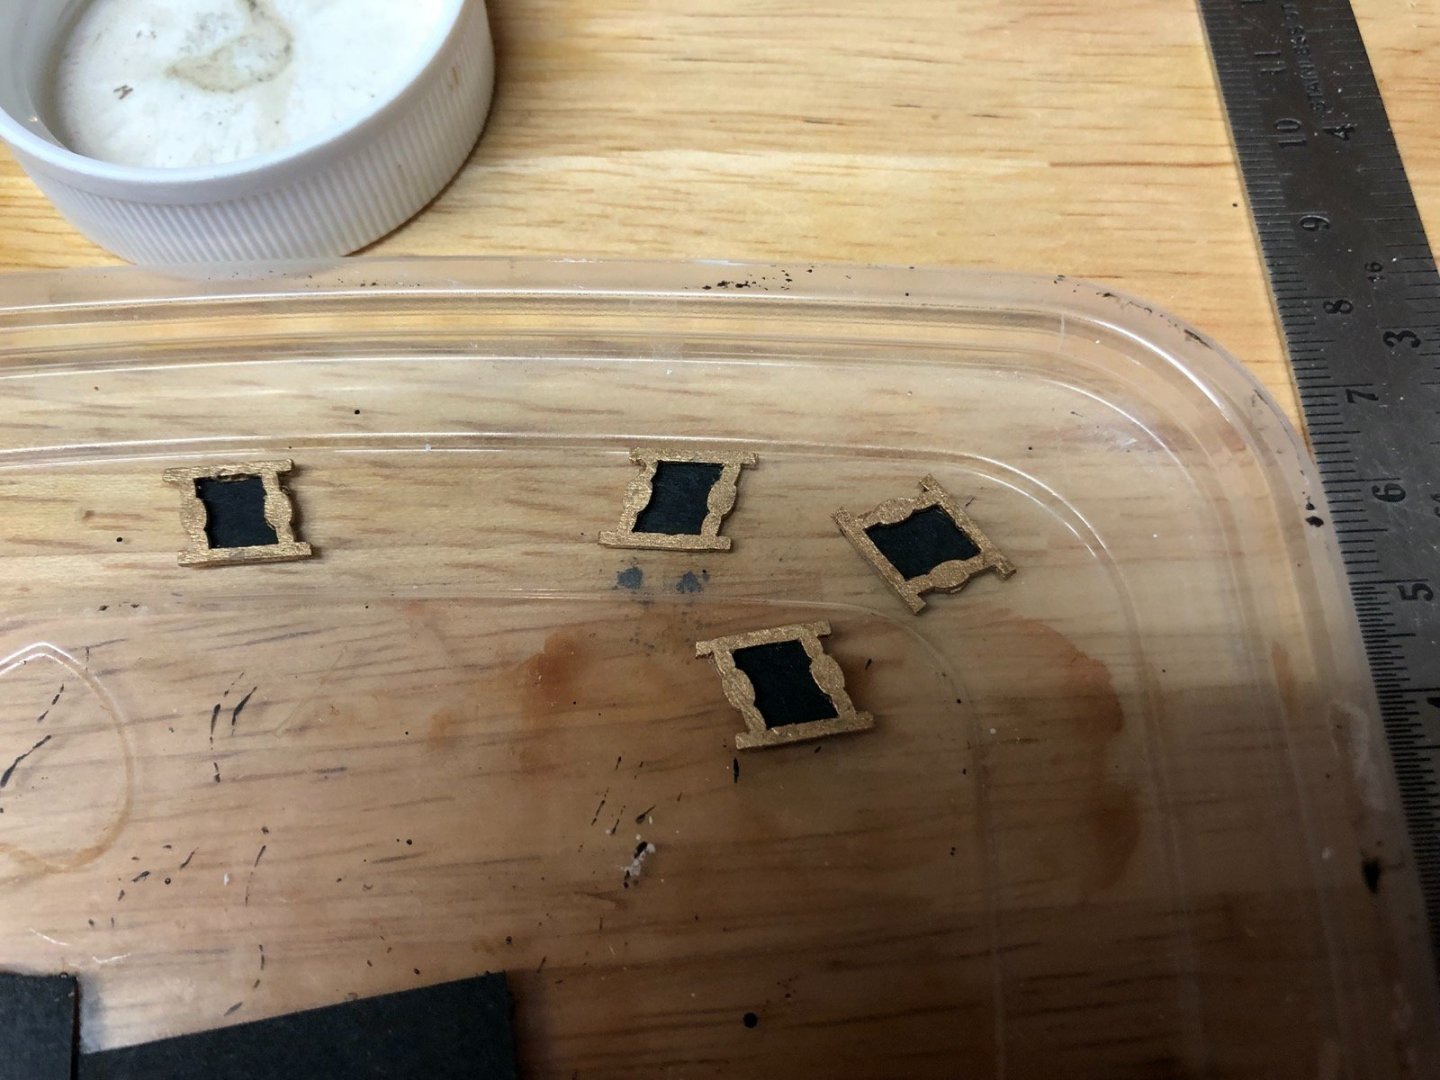
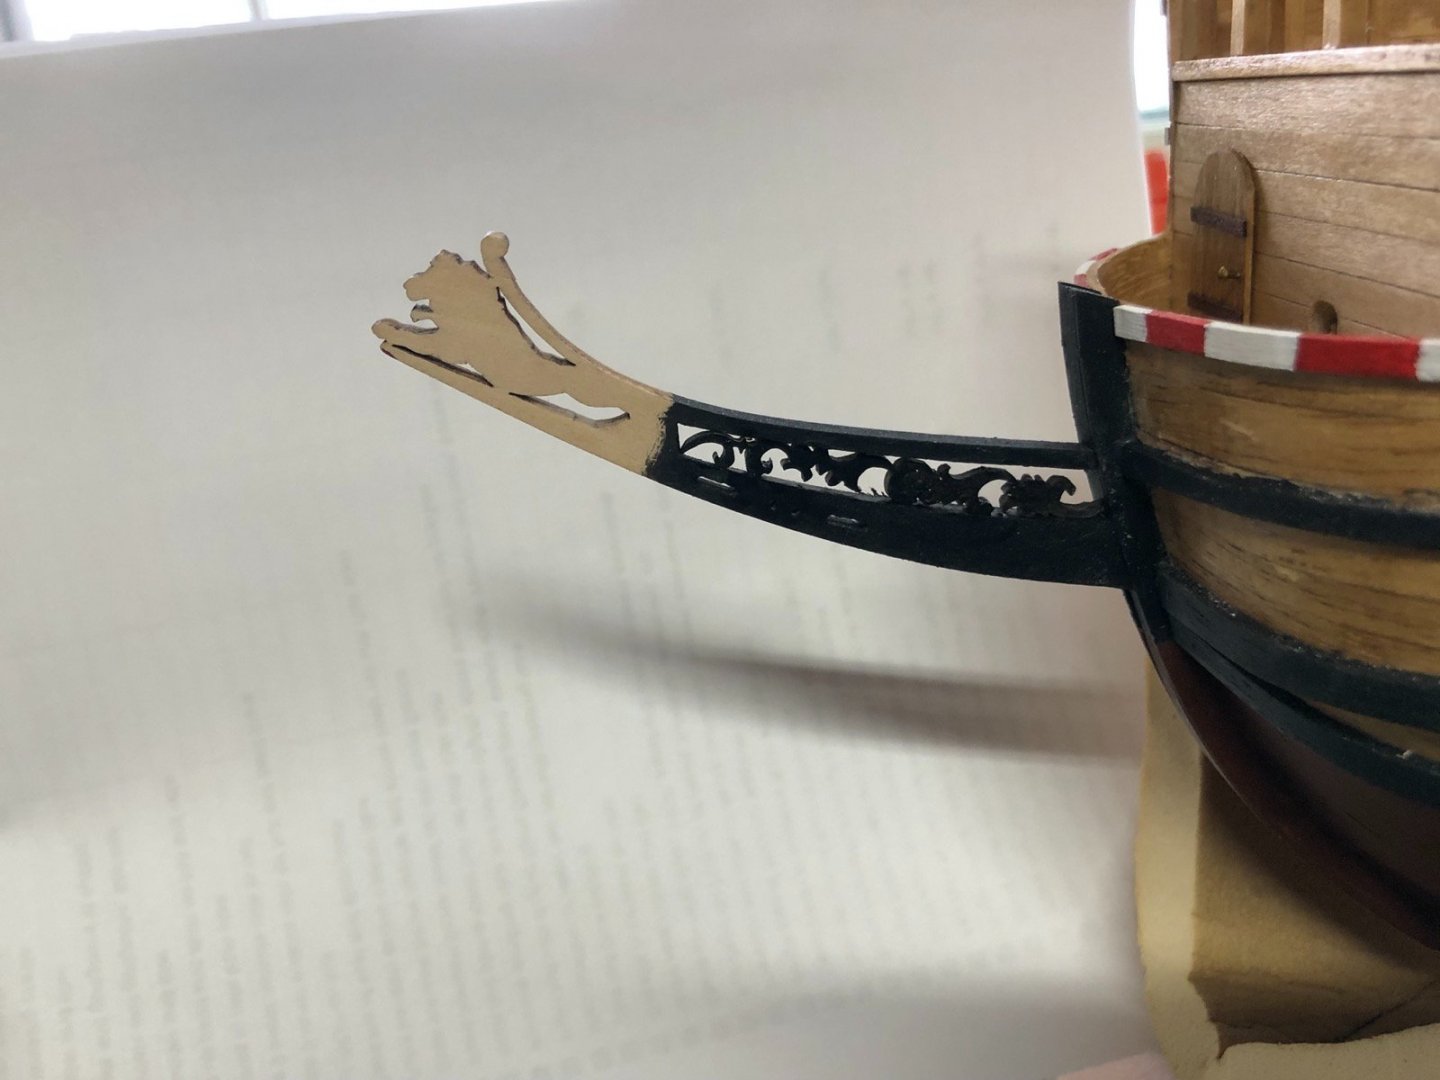
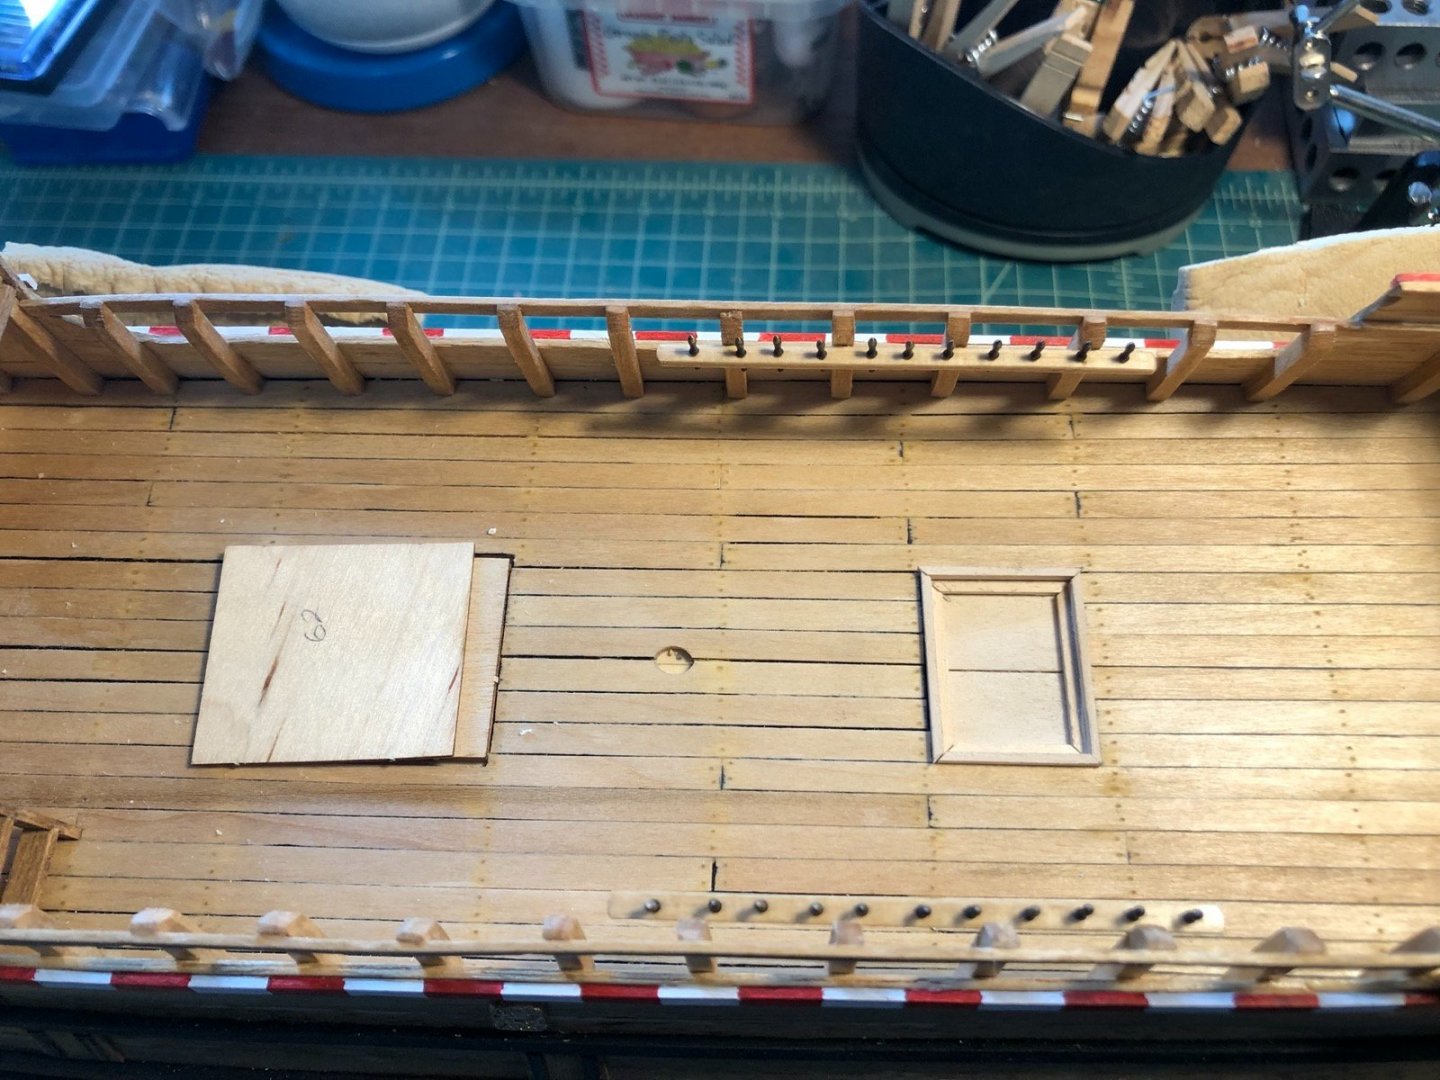
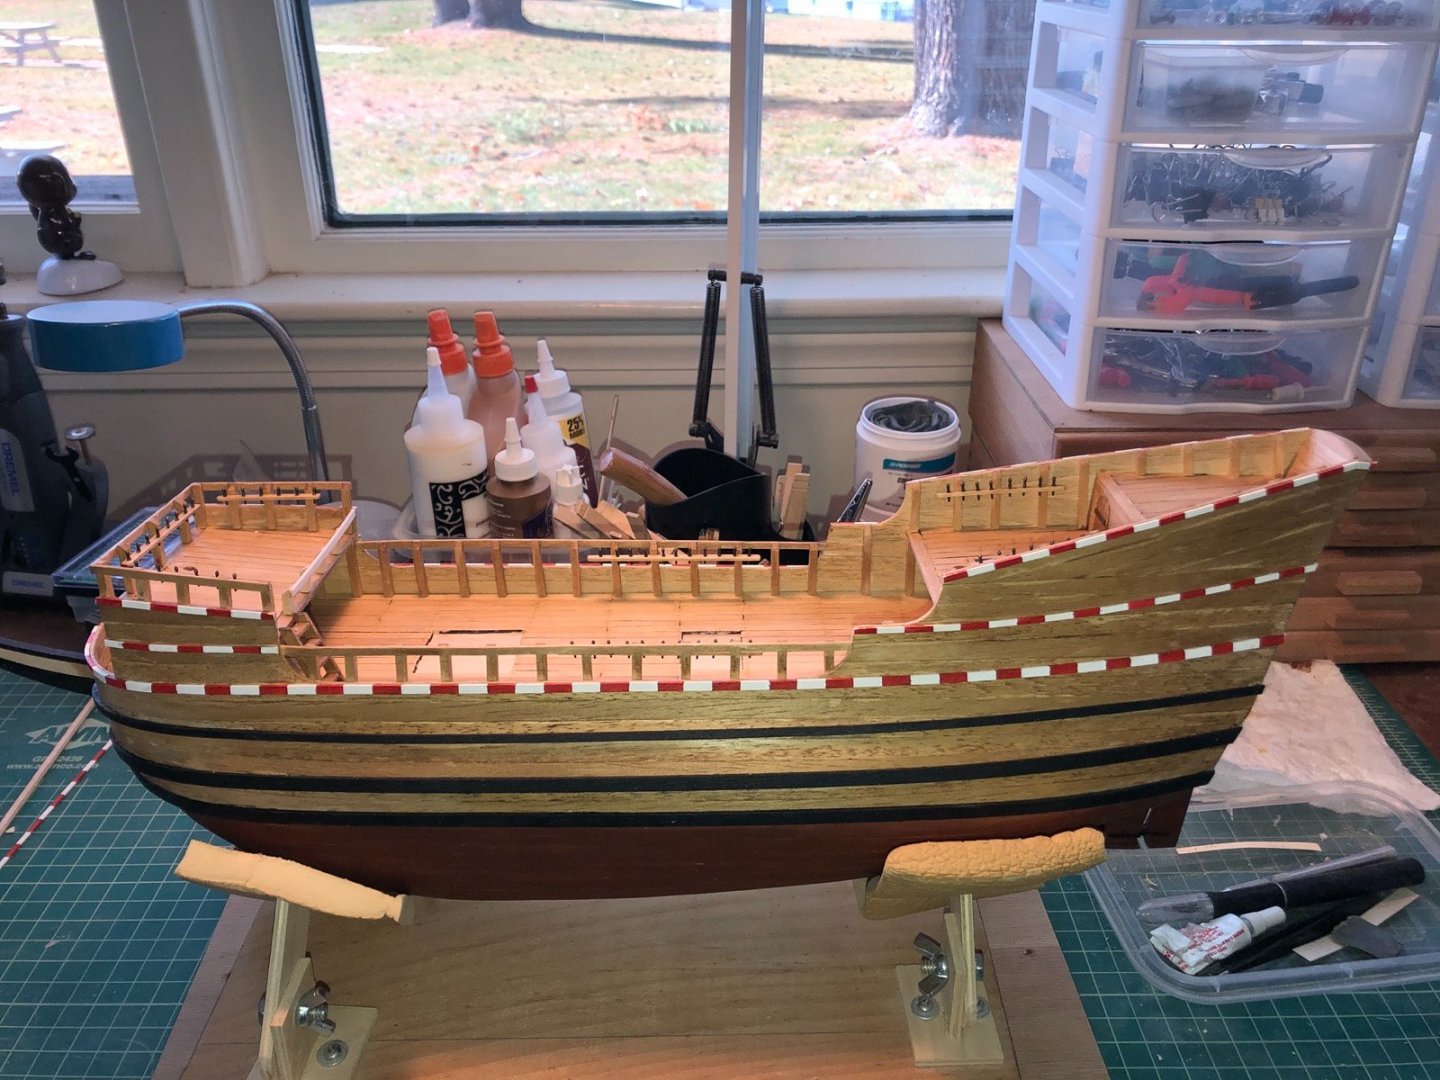
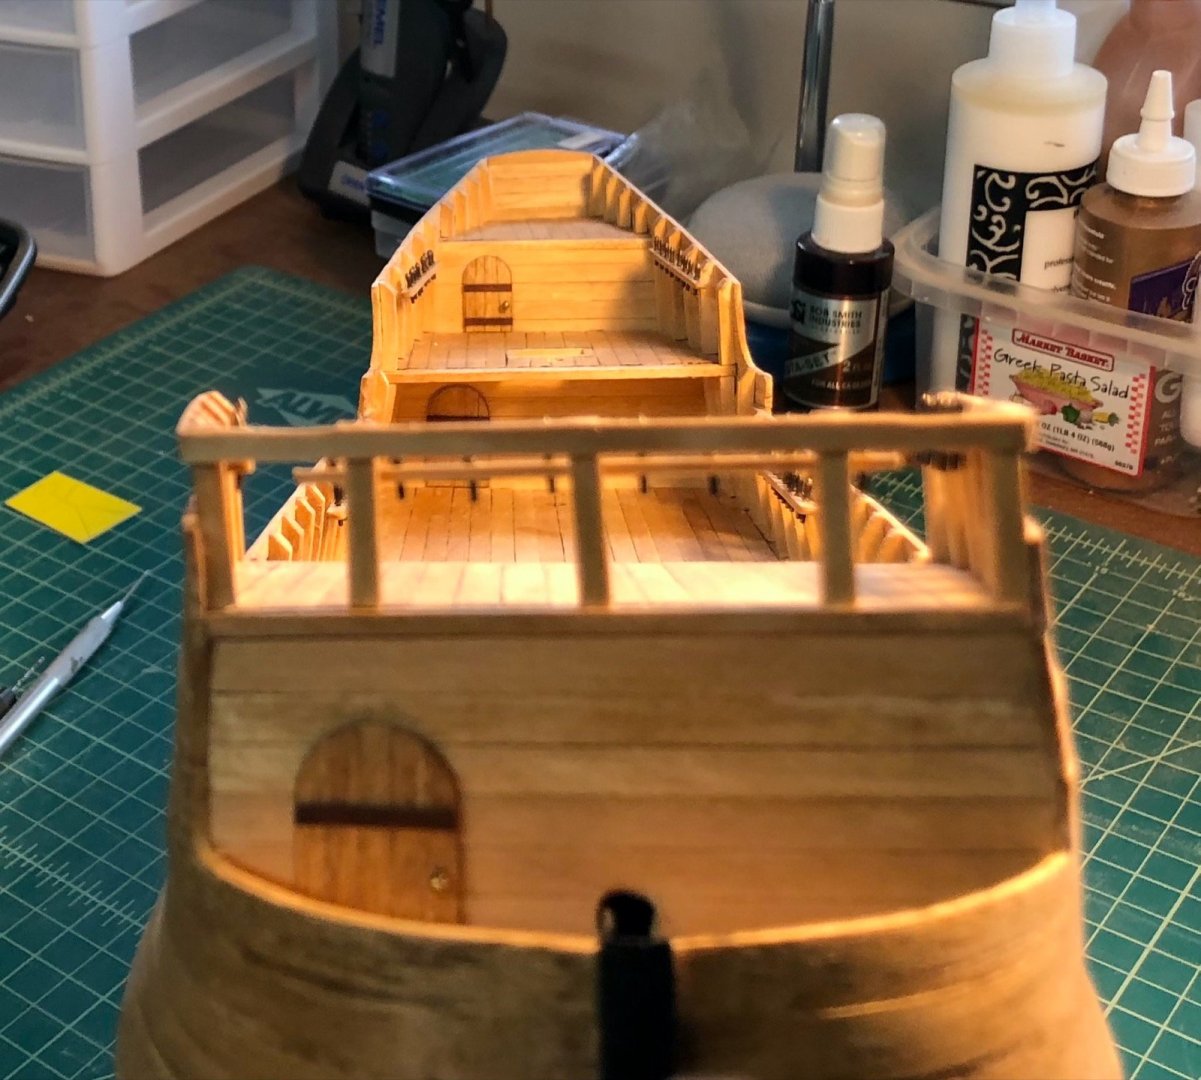
I finished the deck pin rails and glued them to the deck using a piece of wire as a pin. I then glued in the pump which is a tight fit between the ladder and pin rail. There are four windows that go on the side of the hull. Instead of painting black beneath the window frames I glued black construction paper onto the back of the frames. I thought about putting acetate between the paper and the frames but I didn't like the look. The first item to be installed on the head area is a decorative piece that is laser cut and fits in the opening in the stem. This piece is very fragile and there is no way I could have cleaned up the laser char so I painted it black after gluing it in place. I did break it into two pieces getting it out of the laser cut sheet, but I was able to glue each piece in place. One thing to note is that the instructions show this piece installed the other way round but it is clearly taller on one end as is the opening, so that is the way I glued it in. It did not fit the other way and I did not want to try sanding it shorter to fit.

- 135 replies
-
- 4
-
-
- billing boats
- half moon
- (and 1 more)
-
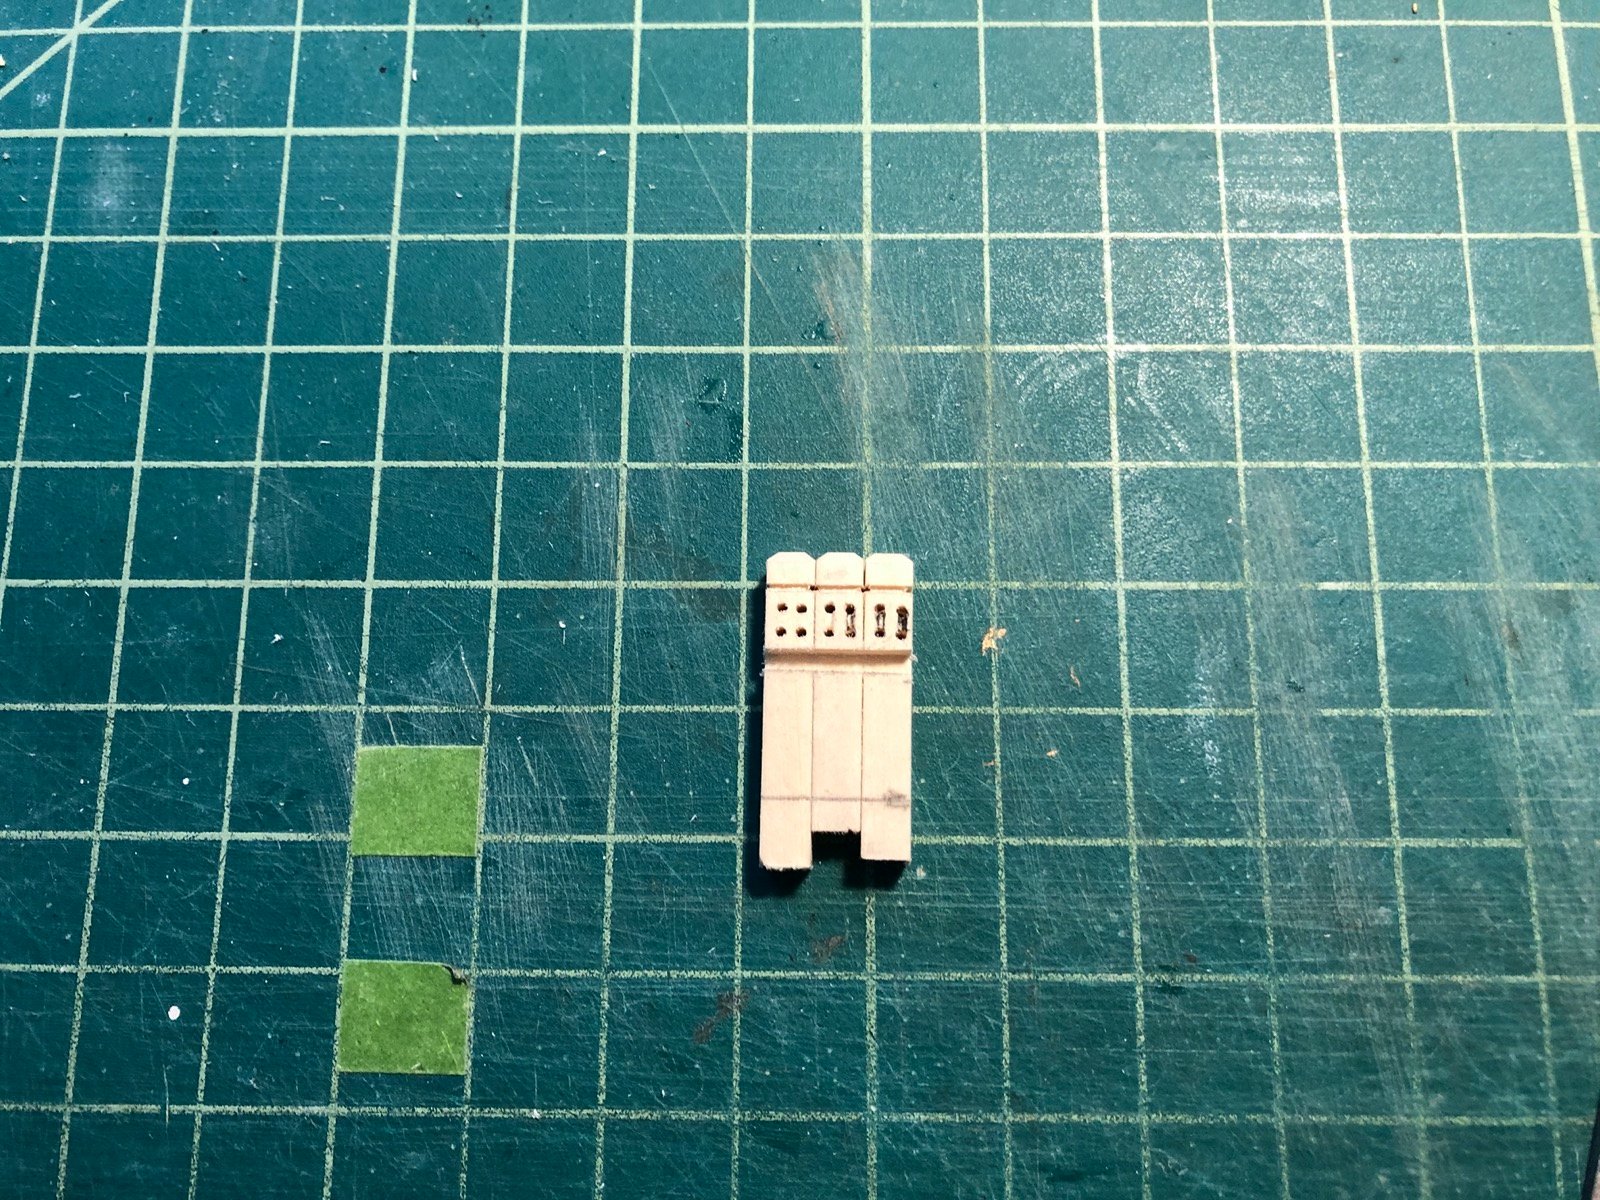
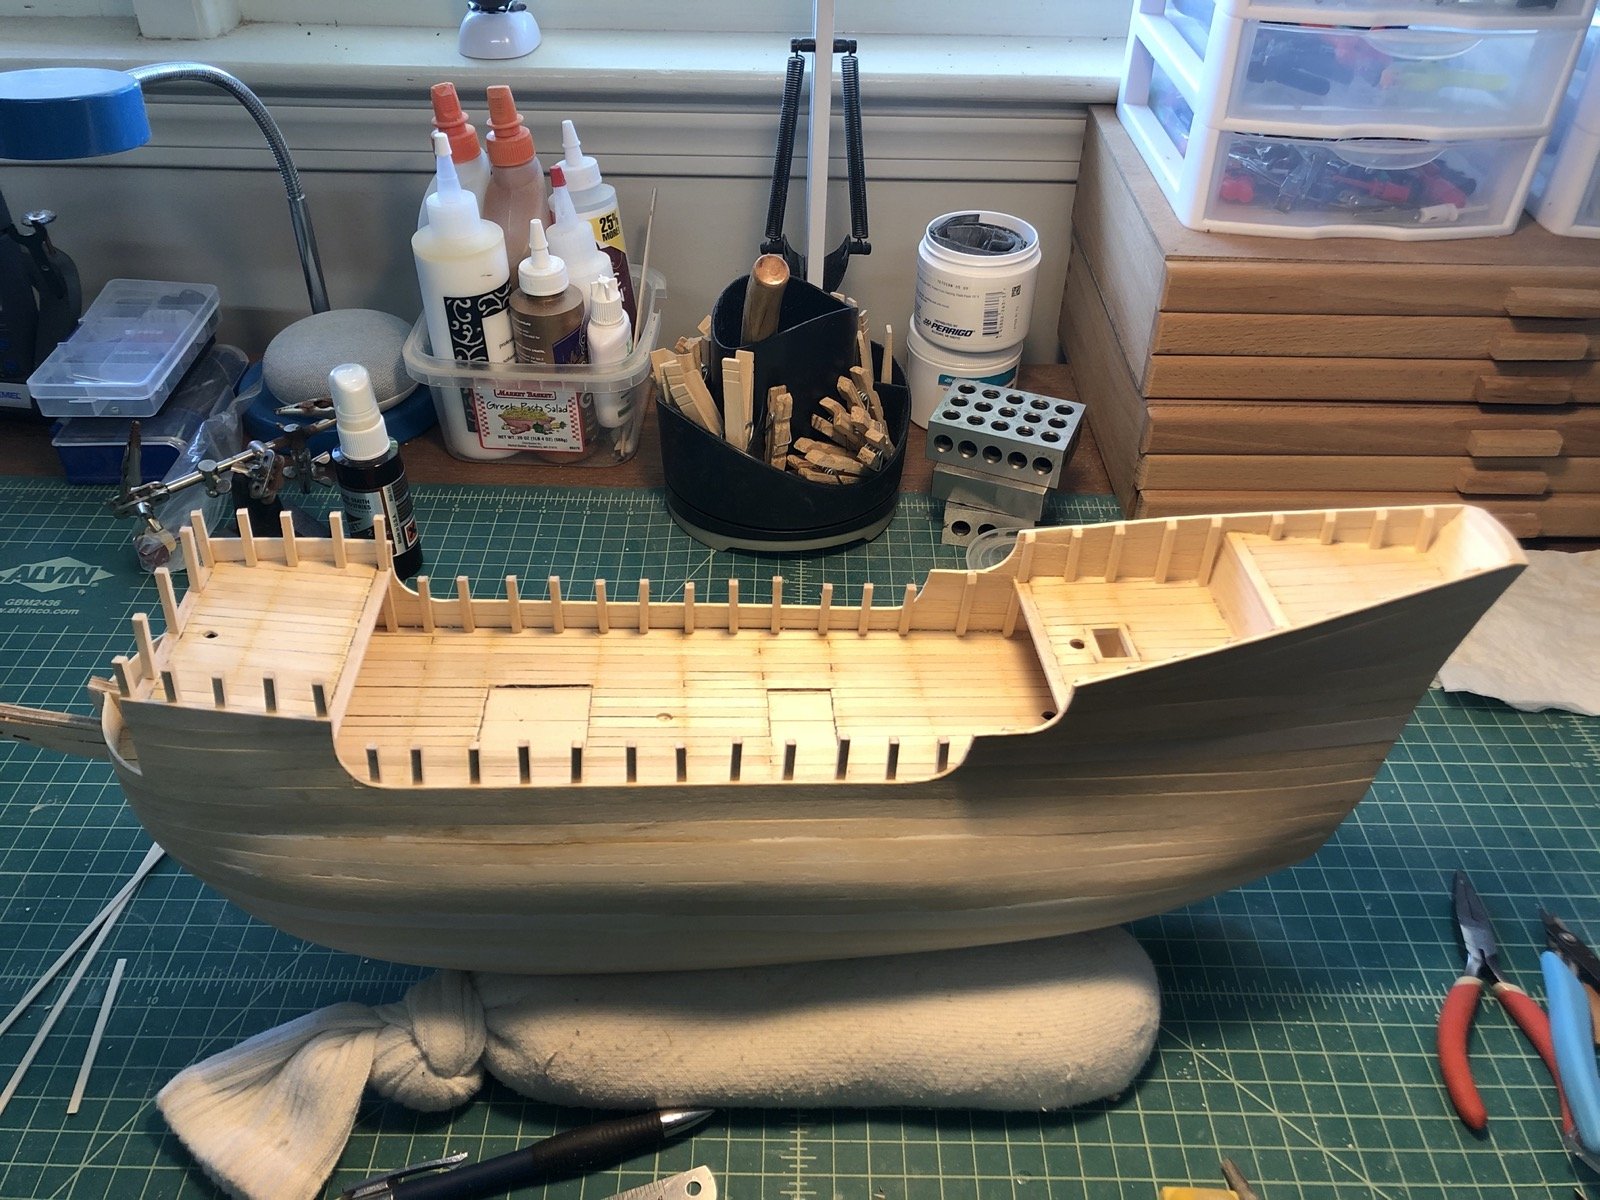
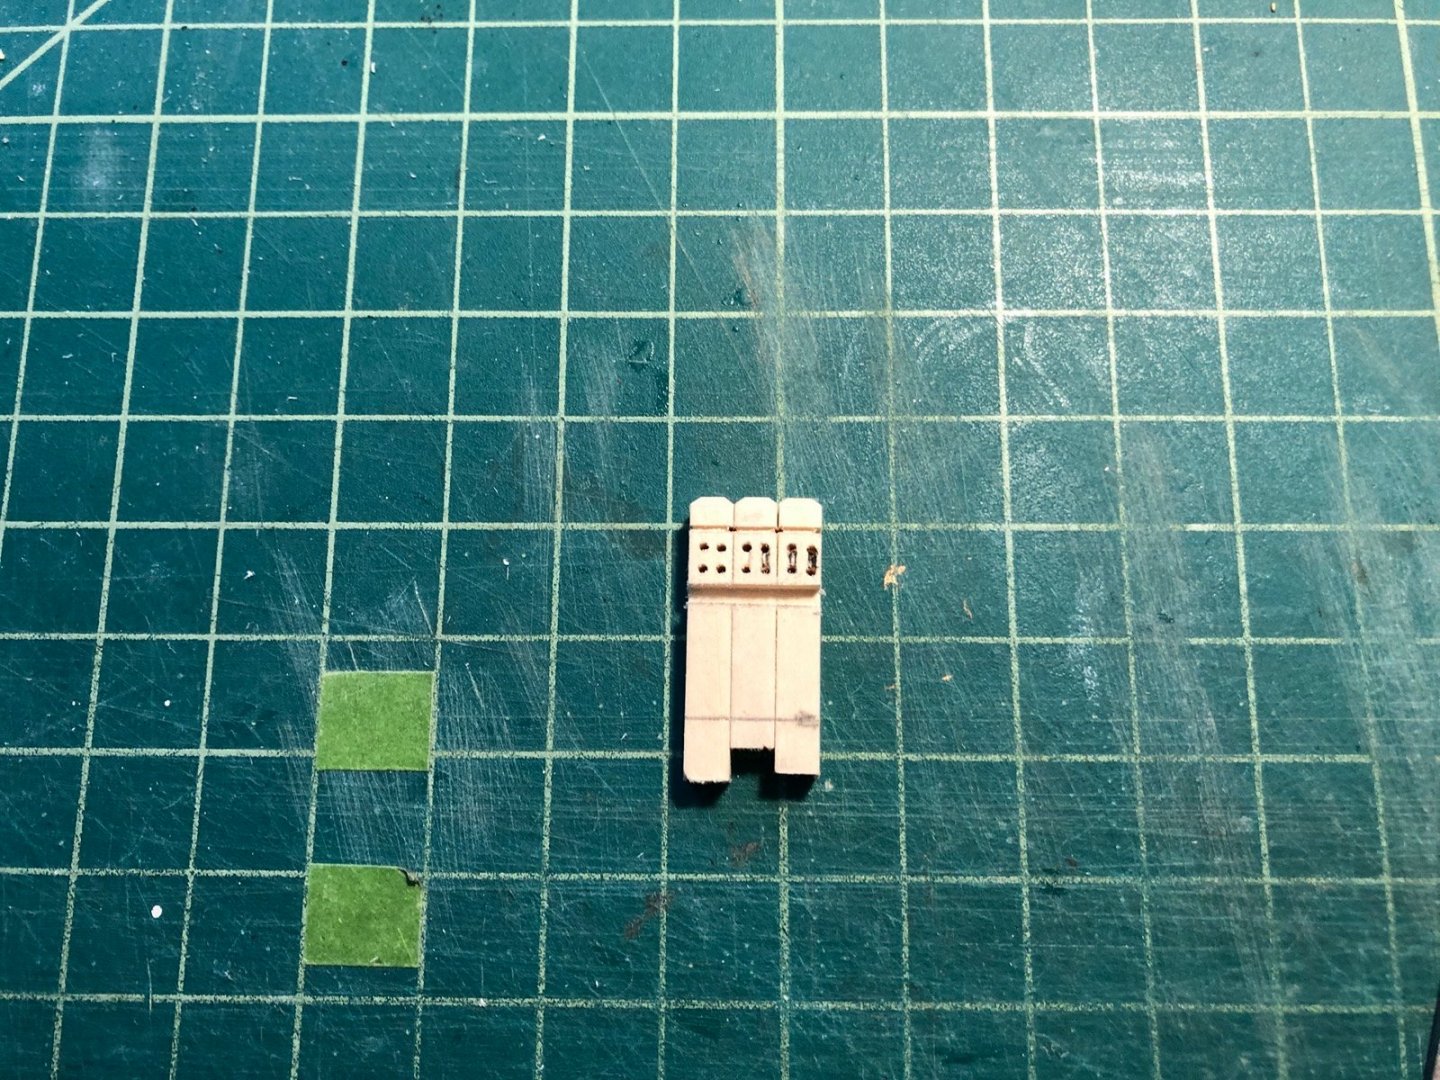
The kit provides a couple of square laser cut pieces that you are supposed to plank over and glue on top of the deck planking for the hatches. Instead I left the hatches unplanked when I planked the deck. I used the table saw to cut a rabbet into a 1/8" square strip of wood then cut out the four sides of the hatch coamings. I am using 45 degree angle joints for this which I know is not right but that's what I did. Here you can see my hatch coaming on the right hatch with the supplied hatch cover piece on the left. I then cut strips of wood for the hatch cover and glued them into the rabbet on the coamings. I used 1/16" thick strips so they would be flush with the coamings. I then gave everything a coat of oak stain and wipe on poly and here is how they came out. I then started making other deck furnishings like the pump and the deck pin rails. For these I made the posts by first beveling the tops of each one using the disk sander. I sanded four 45 degree bevels and then sanded the top at 90 degrees to get a flat top. I then used the table saw to cut a decorative groove in all four sides. I then glued the three posts together and used the mill to cut the slots for the pin rails to fit into. I also drilled four holes in each post to make two sheaves, instead of just drilling two holes as the plans showed. I used an X-Acto knife to carve away a bit of wood between each set of vertical holes and a thin round file to create the illusion of a sheave. Here I have 3 of the six done on this side. I did the same with the holes on the other side, then cut then to length on the band saw. I cleaned them up, stained them and gave them a coat of wipe on poly. I will add a pin to the bottoms and drill a hole in the deck for the pin when I add them to the deck, so they don't pull out later when I rig them. The sheaves are used for the yard halyards. I have the pump made but I will wait until I add it to the deck to get a photo. I am now starting to work on the head rails, always a fun adventure.

- 135 replies
-
- 3
-
-
- billing boats
- half moon
- (and 1 more)
-
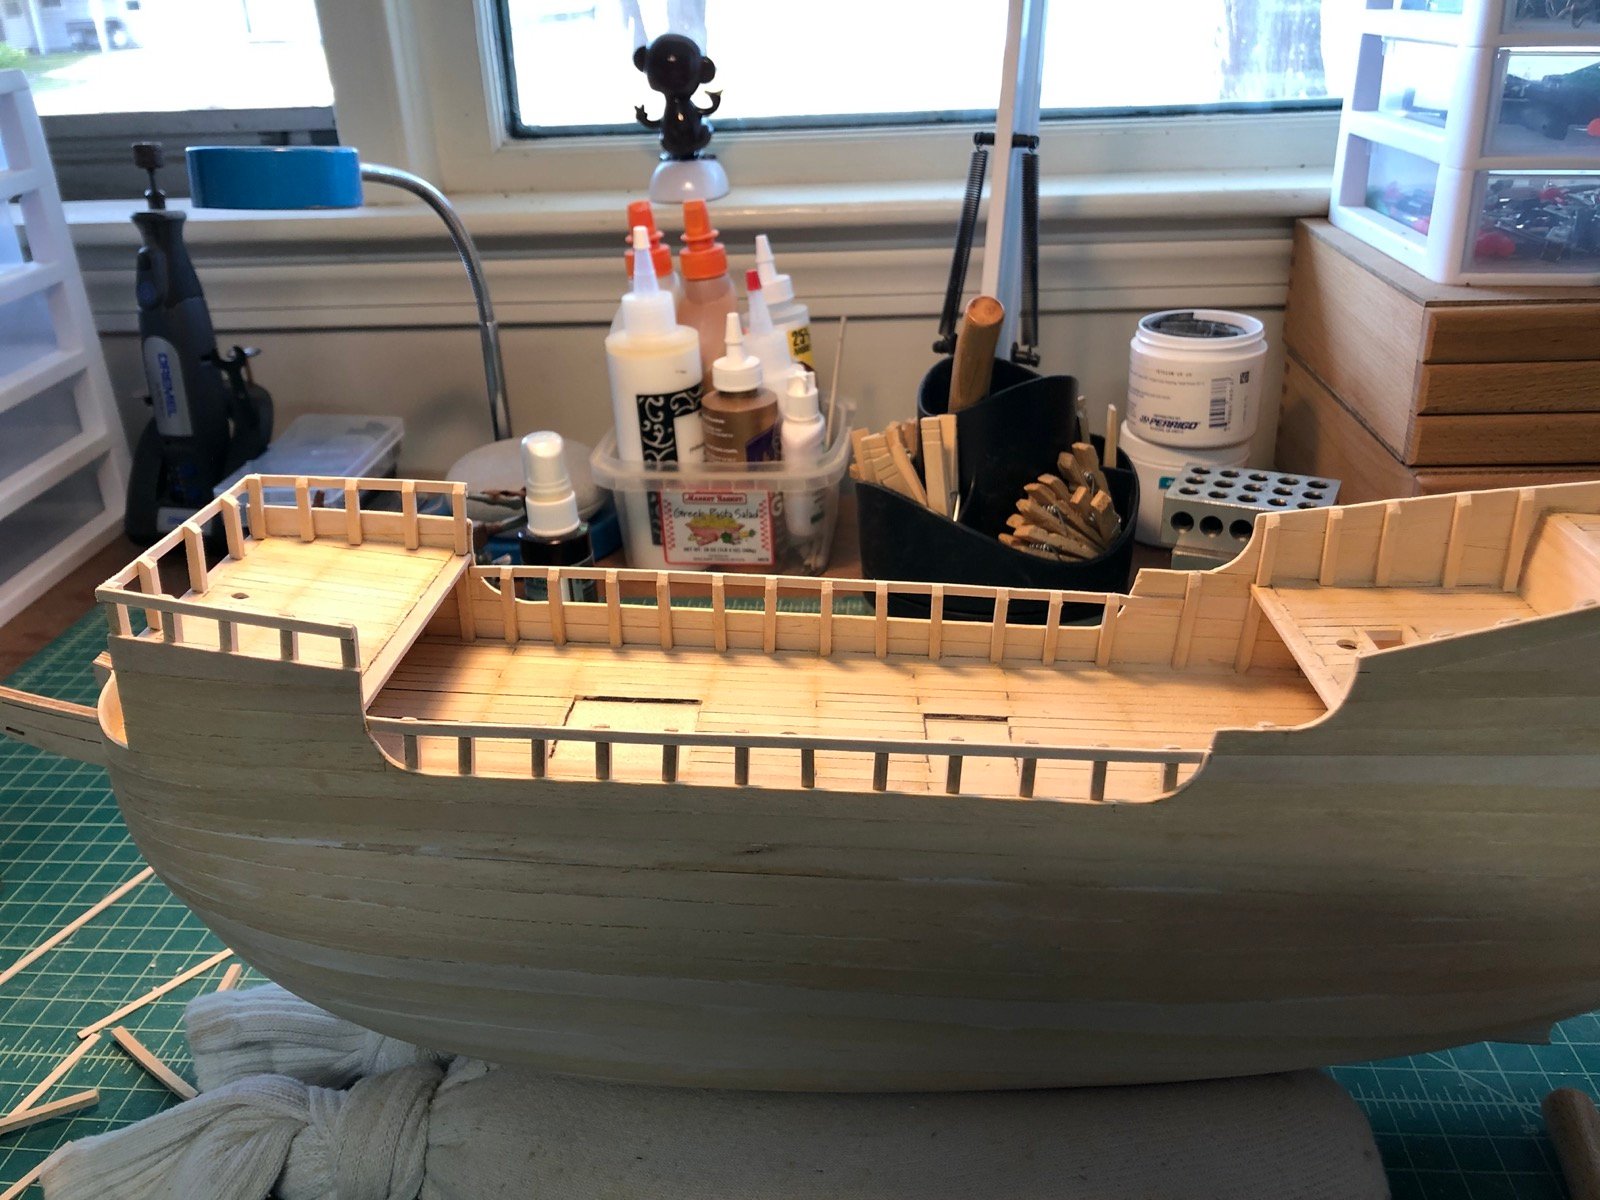
So it turns out the sheaves are on the main deck not the lower deck so I will have no problem rigging the lines through them. After I finished adding the rest of the rails and staining them, I glued the ladders in place. I glued the sheave covers to the hull and drilled through them for the sheaves. I assembled the gun port lids and glued them to the hull too, along with the transom decorations. I am in the process of making the hatch coaming and hatch covers, which will be added next.
- 135 replies
-
- 5
-
-
- billing boats
- half moon
- (and 1 more)
-
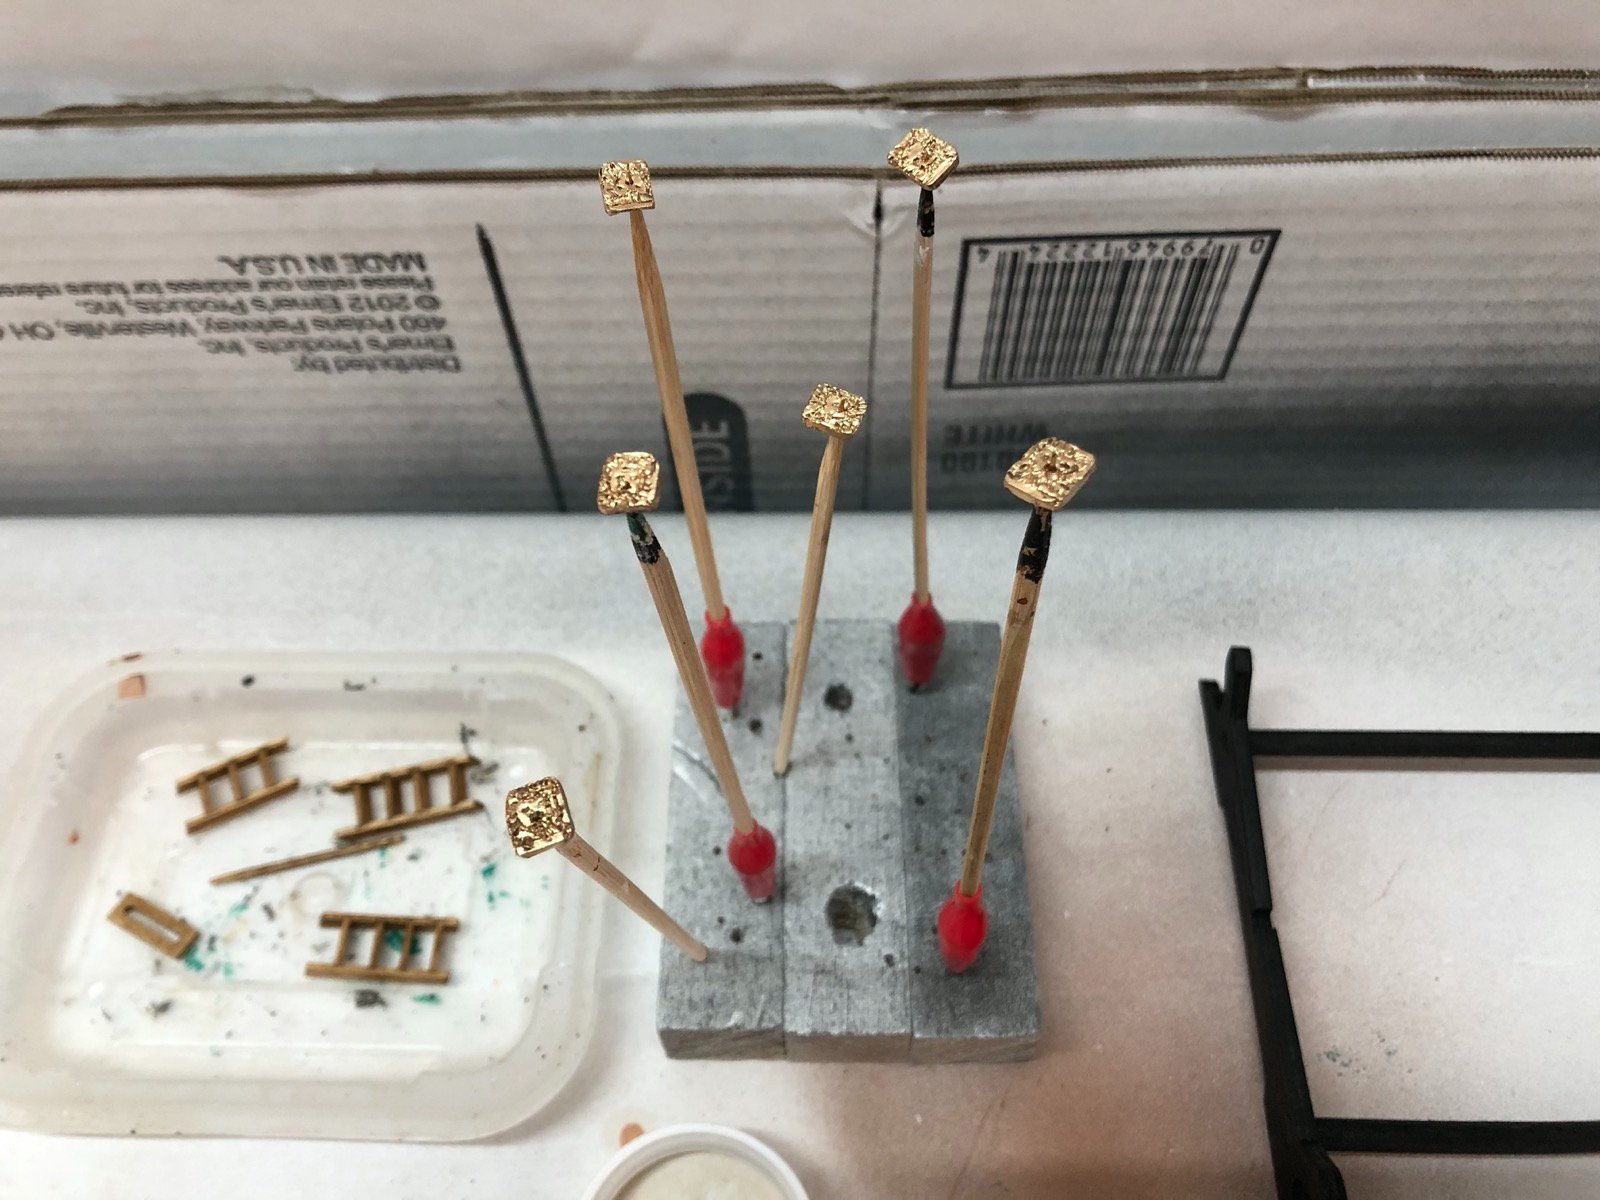
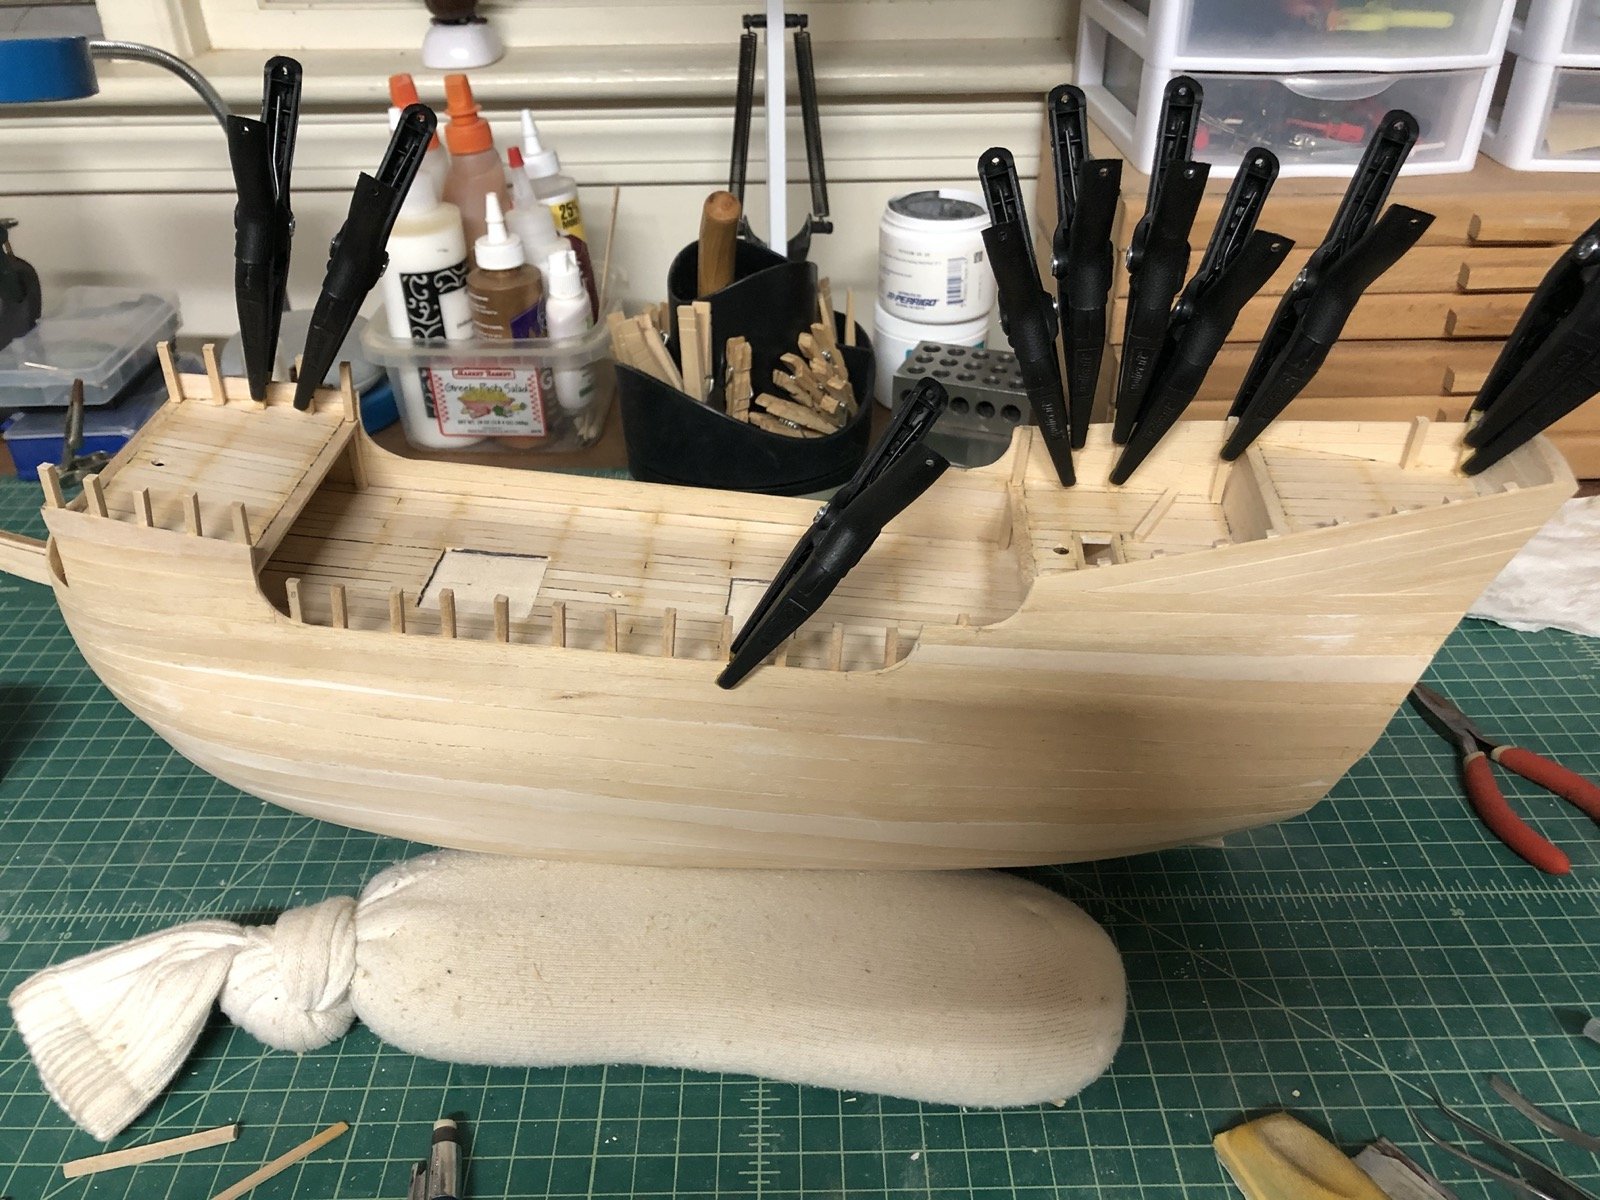
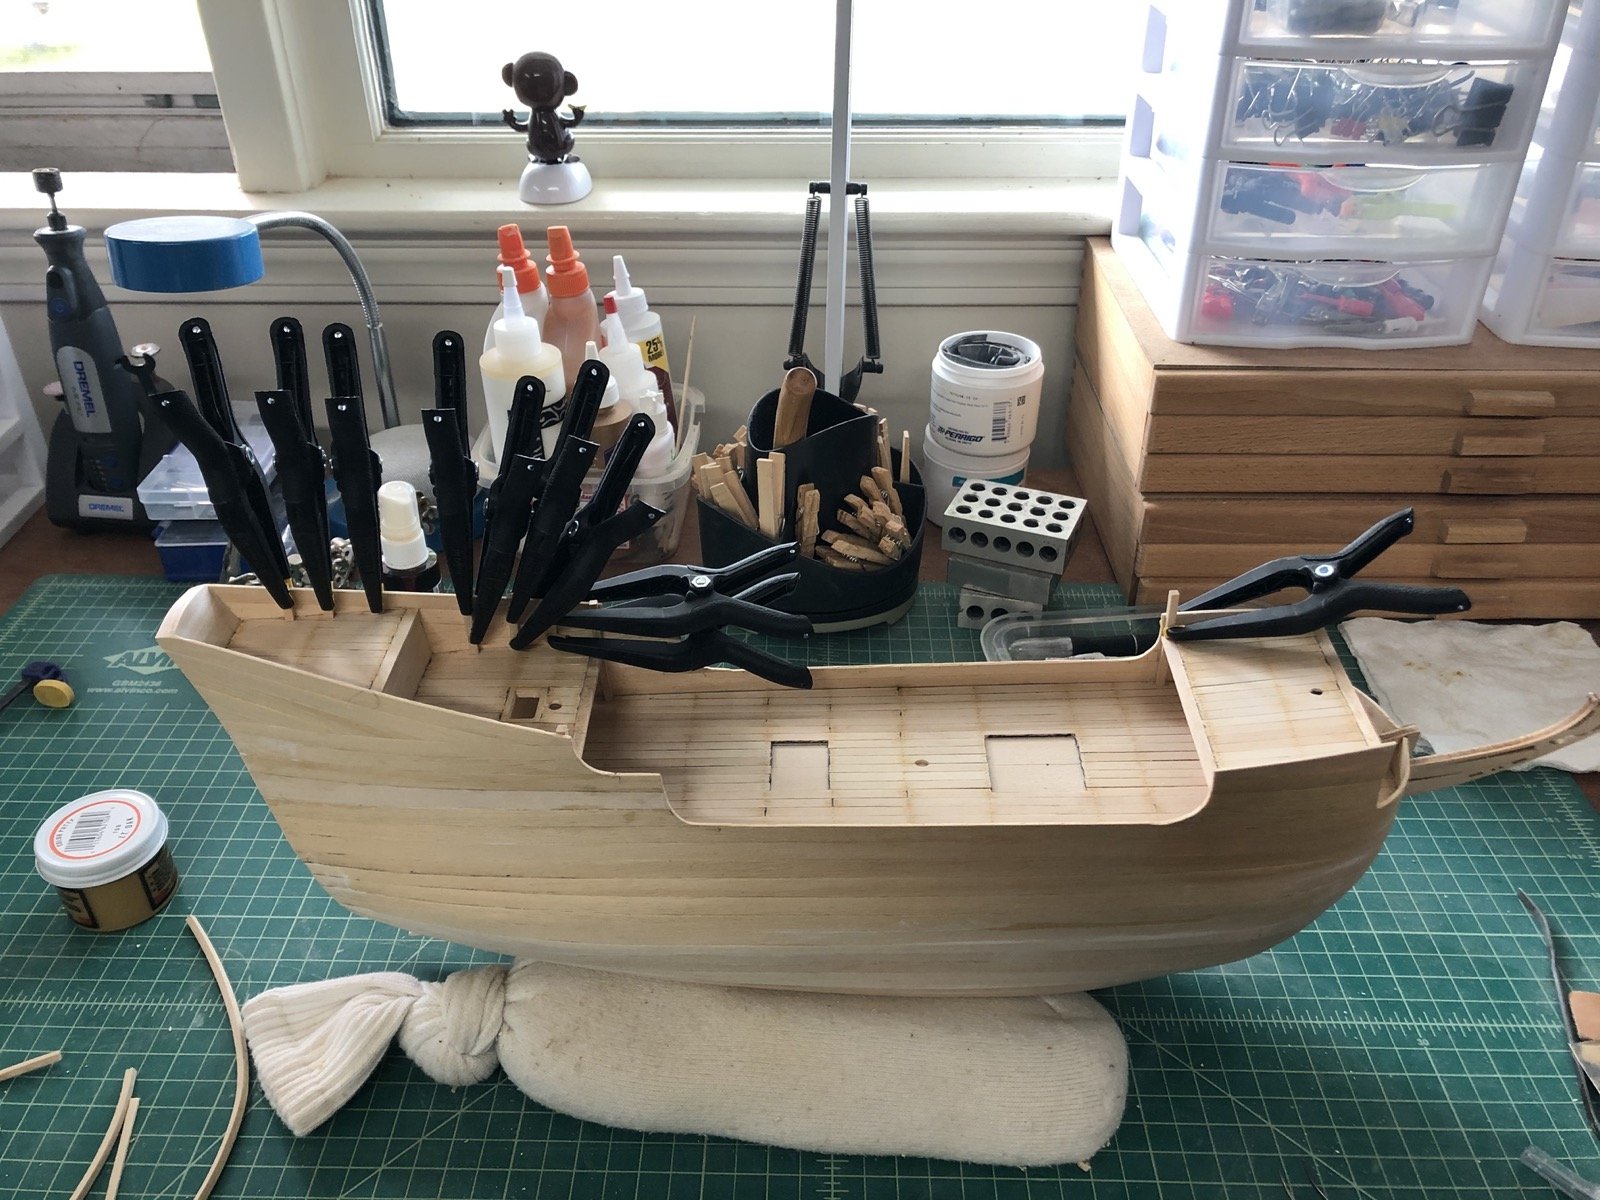
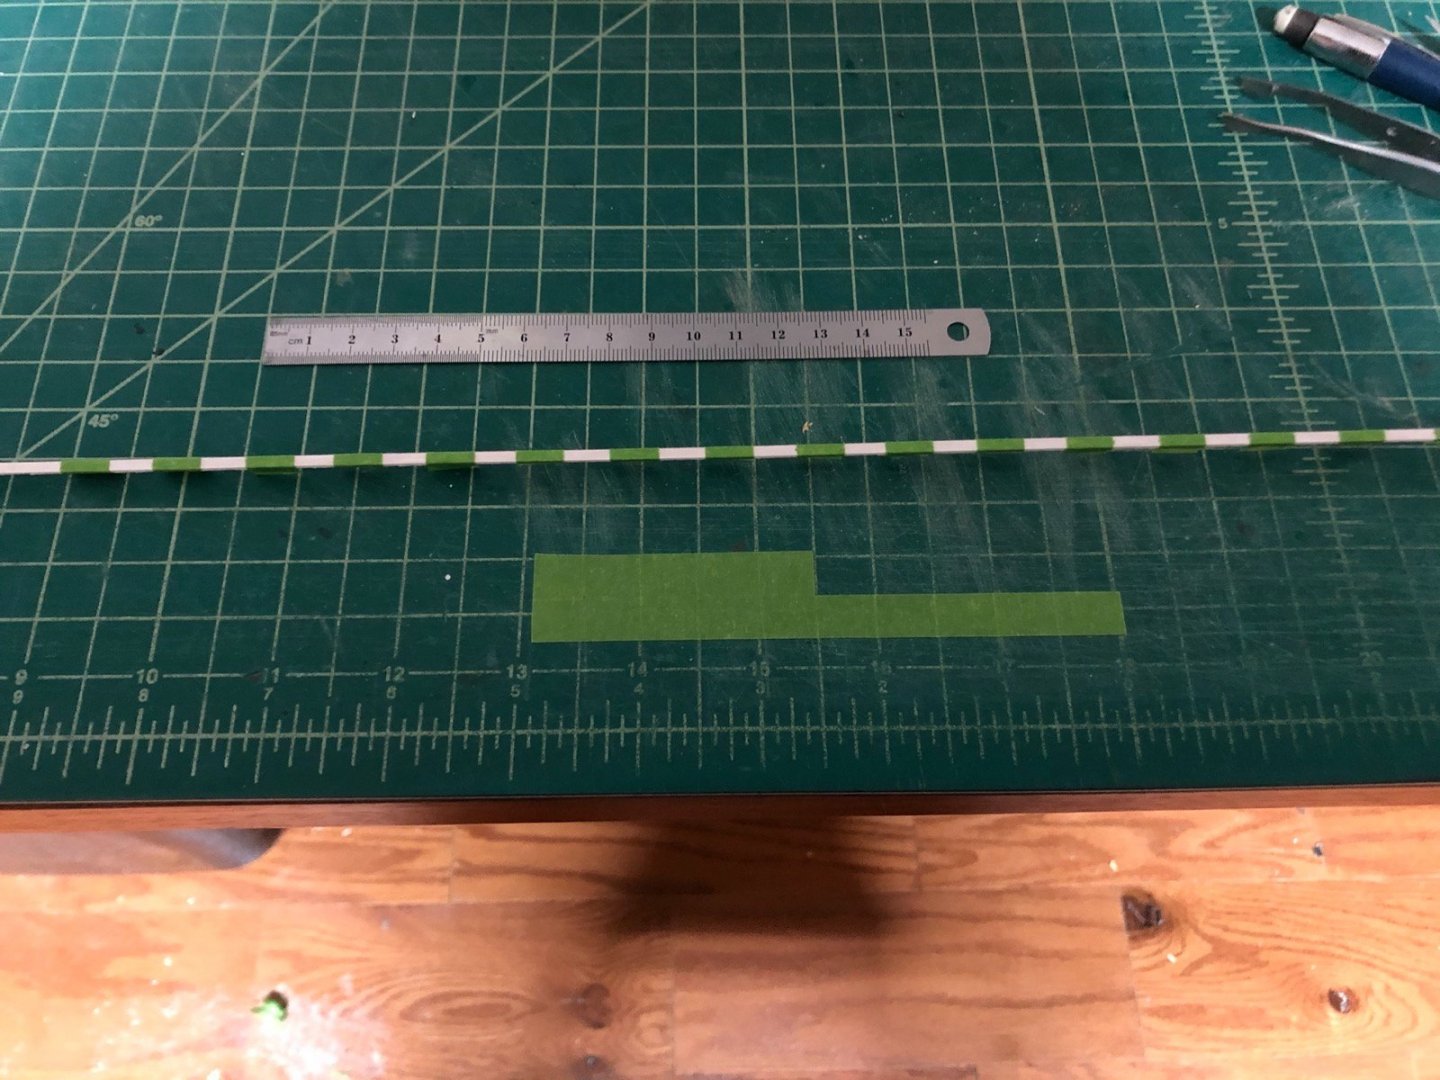
Thanks Jonathan and for the likes. I have all the rails on the outside of the hull now. I only need to touch up the paint on the ends where I sanded them flush with the hull. You can also see that I have started the rail on the inside edge of the fore deck. It just needs to be stained. I will be adding similar rails to the to stern upper decks. The ladder is not installed yet but it is just there to see where the rail needed to end. I learned from Popeye's build log of this kit that the Corel model has covers for the sheaves in the hull that are lion heads. He ordered them from Corel but I decided to try my hand at making them from Sculpey. I rolled some out to a thin sheet then marked off the dimensions of each one with an awl. I then used the awl to draw a lions head albeit a pretty abstract one. After the Sculpey baked for 90 minutes I was able to separate the individual covers. The drawing was there but hard to see, but once I painted them gold I could see the lions head pretty well. Anyway here is what they look like after painting. I will glue these to the hull and then drill through the hole in them into the hull for the sheaves. I am not sure how to secure the lines in these holes when it comes time for rigging. I don't think I trust just gluing it into the hole. Maybe I can tie a small piece of wood to the end of the line and slip it into the hole, then pull it tight to the inside of the hull? You can see in the above picture the display cradle which is provided in the kit, although I had to adjust the lengths of the dowels between the ends to get it to fit right. I painted it black to hid the edges of the plywood. You can also see the ladders and jack staff pieces now stained and ready to install. I have started making the gun port lids and jack staff opening cover.
- 135 replies
-
- 3
-
-
- billing boats
- half moon
- (and 1 more)
-
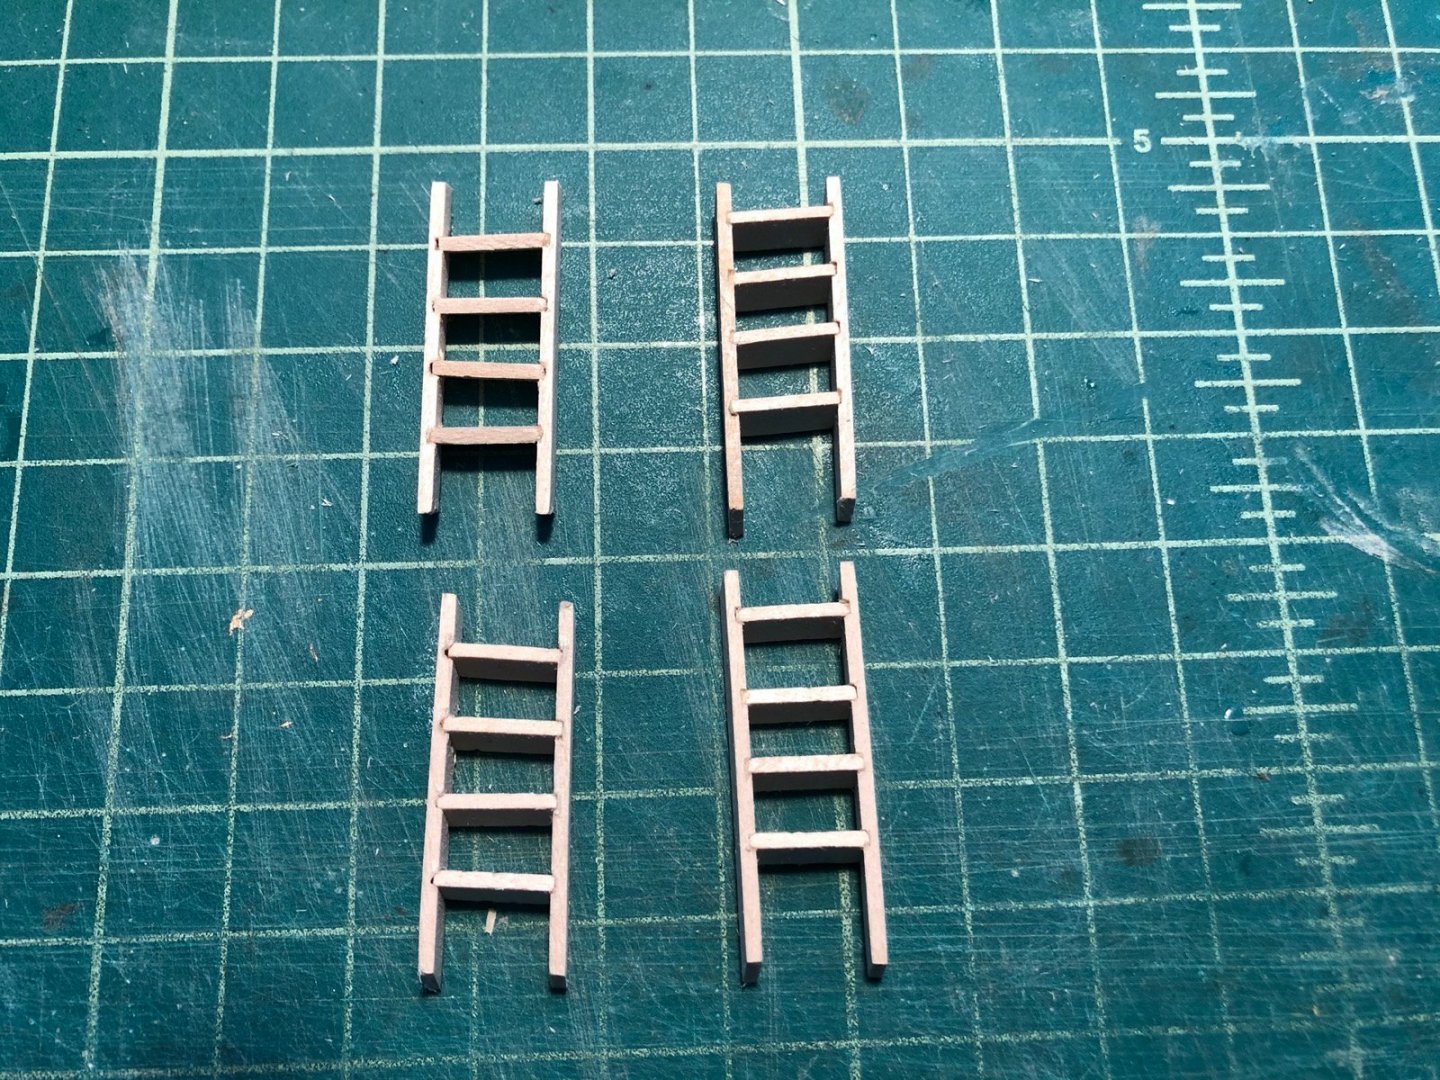
I completed the new ladders and here they are on the right with the old ladders on the left. Now they need some oak stain before adding them to the decks. I am going to add the jack staff between decks before I add the ladders, so I made it and will stain it too along with the slotted trim piece that goes on the bottom of it. I continue to add the upper rails to the outside of the hull. I have to do these one or two at a time so it is taking some time.

- 135 replies
-
- 5
-
-
- billing boats
- half moon
- (and 1 more)
-
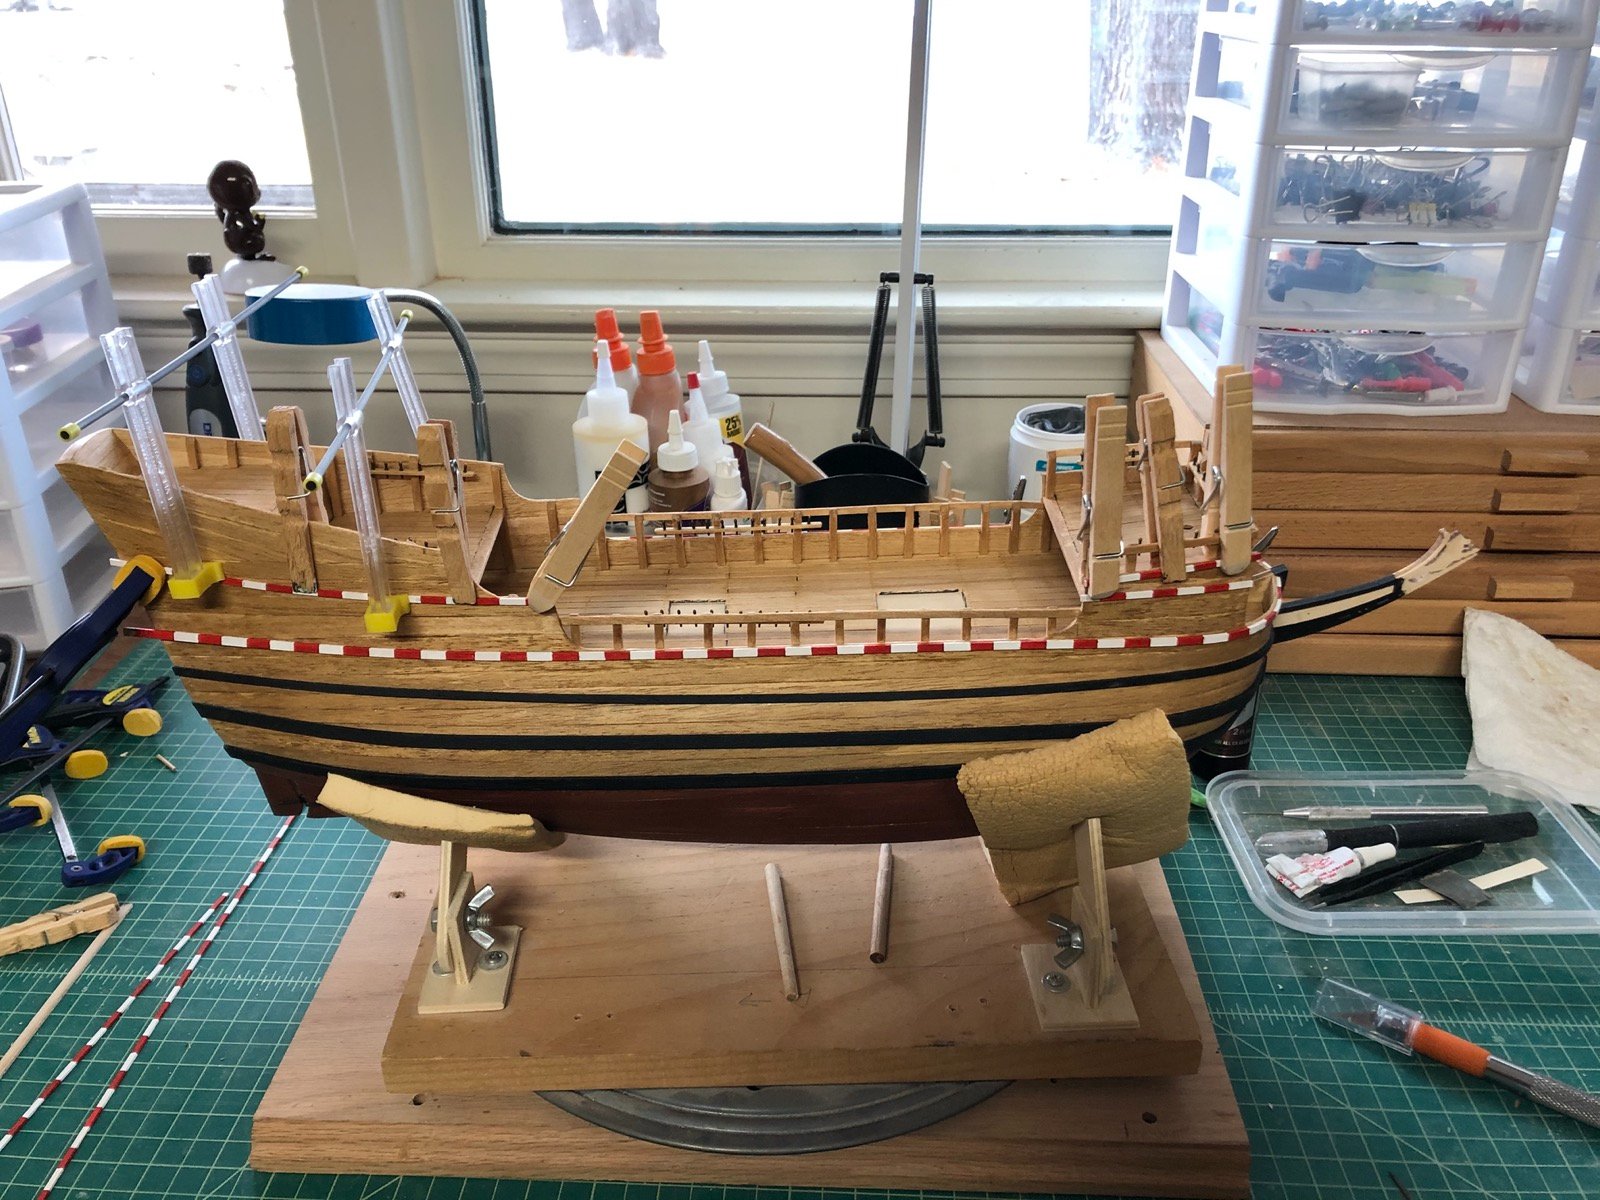
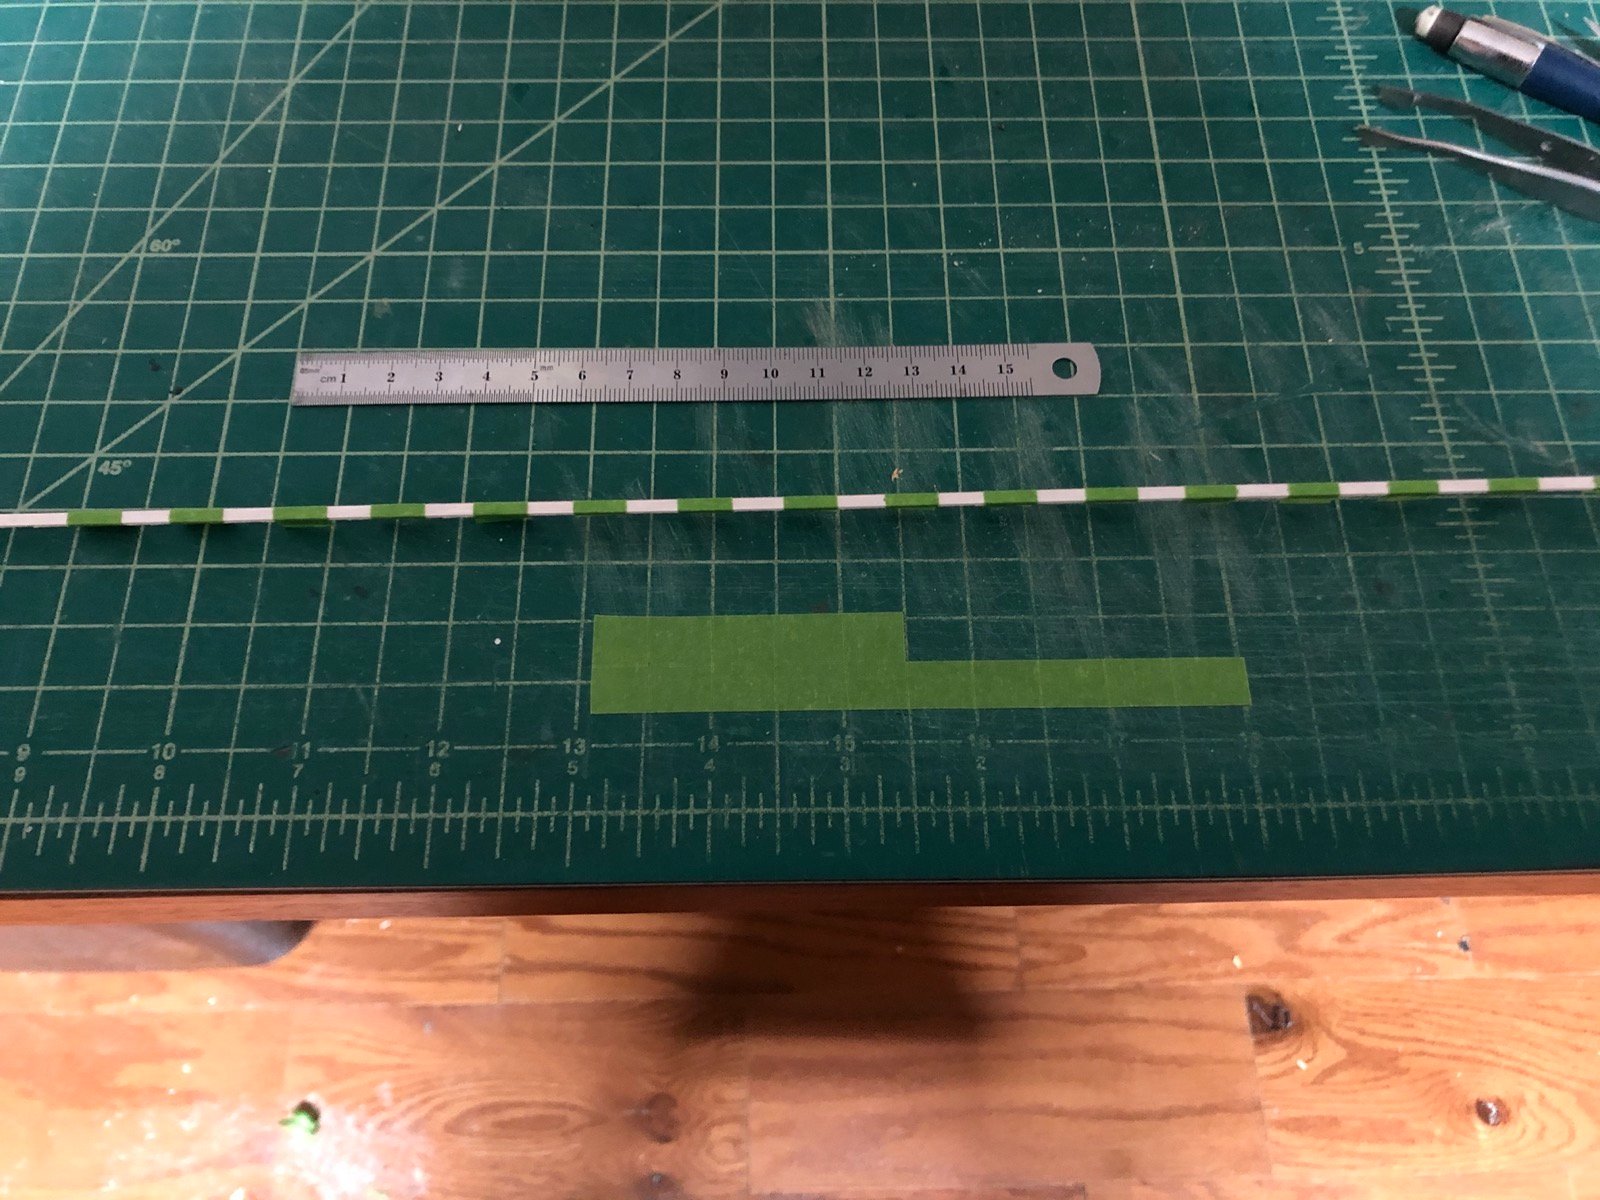
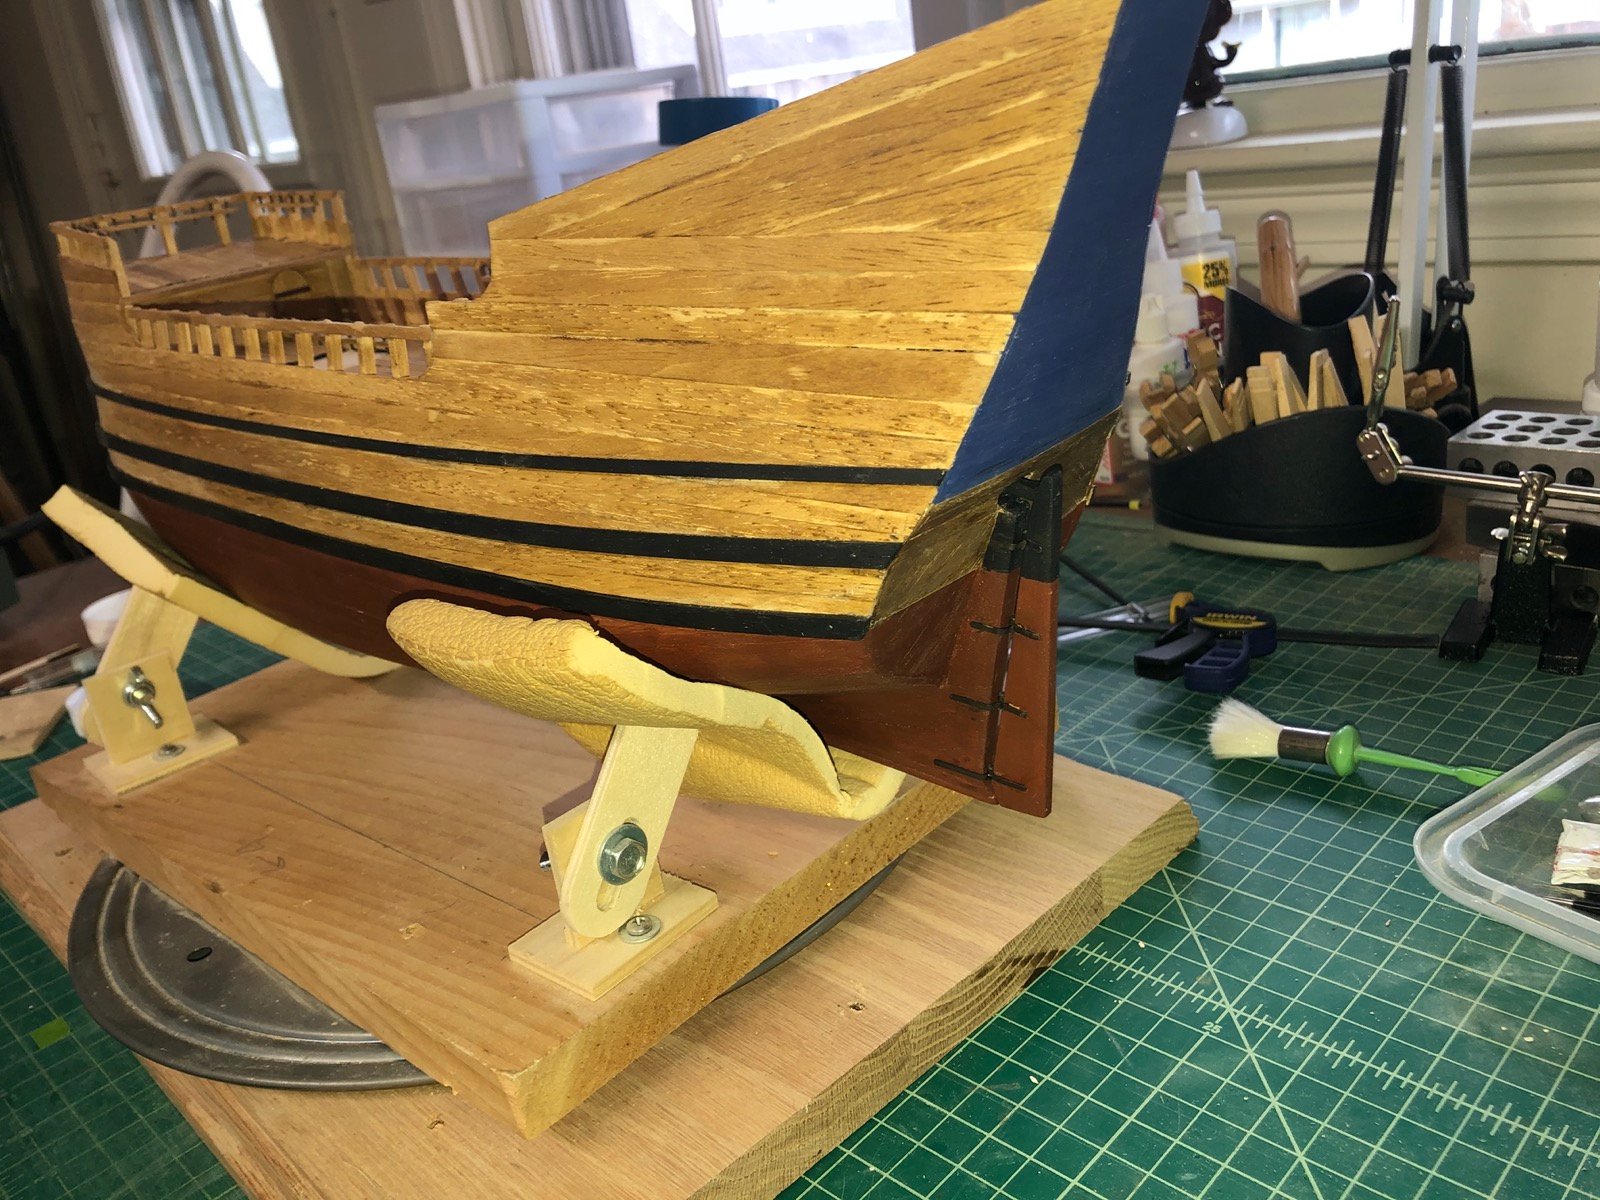
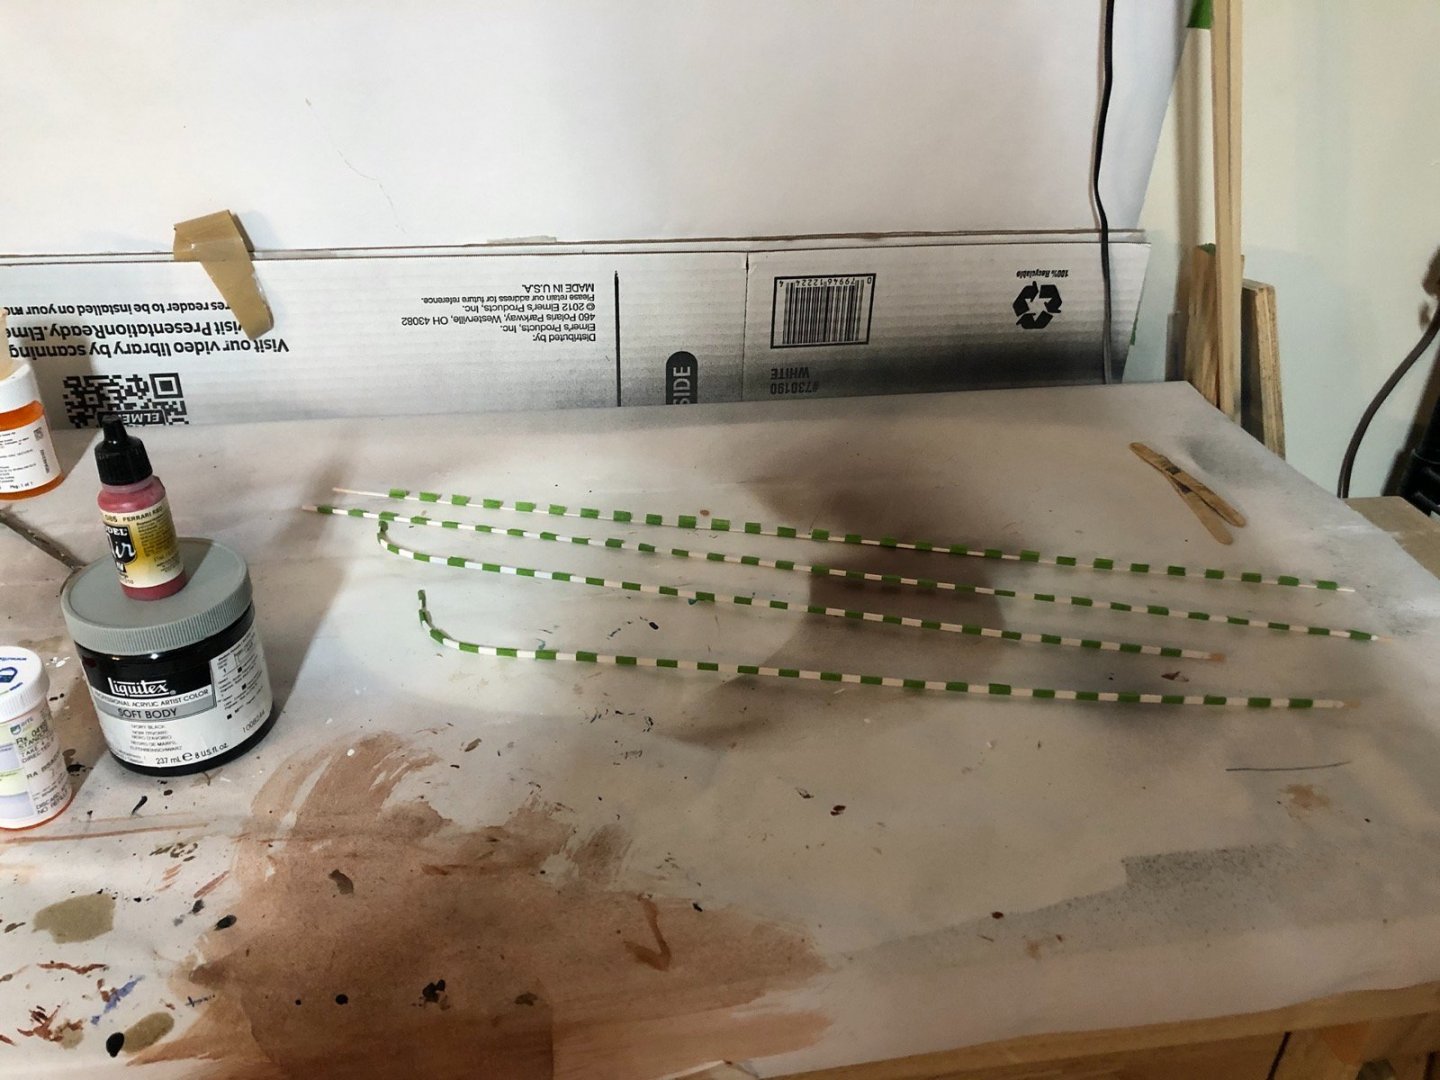
I finally attached the rudder to the hull. Because the tiller was already attached to the rudder I could not attach the gudgeons to the hull and slide the pintles into them, so I glued them to the pintles after gluing the pintles to the rudder, making sure they were all aligned. I was then able to slide the whole assembly onto the stern post and glue the gudgeons to the hull. I was a bit skeptical but it worked very well. I then made the upper rails. The lowest of these is bent around the bow but the others are just straight sections on the sides of the hull. I bent the two rails and then painted them and two straight wood strips with a red and white pattern, as on the replica. I first painted all the rails white, then masked off the white sections with 1mm wide pieces of masking tape that I wrapped around the top and bottom of the rails. I mixed up some red paint with some black to mute it a bit, then painted the areas between the tapes. After removing the tape pieces, this is how they looked. I still had to do some touch up painting on some of the edges between read and white but overall it worked pretty well. I have the bent rails glued and clamped on the hull now so the next post will show them on the hull. I also made some ladders for between the decks. For the first try I used the Byrnes saw with a regular blade to cut 1/16" slots in the ladder sides for the steps. This worked OK and the shortest ladder I made this way came out good. The other two ladders are taller and the spacing between the steps looked off a bit. I then used the mill to cut the slots, cutting both sides at the same time. I glued the sides down on a piece of wood so that they made an A shape (sorry I should have taken a picture) and then milled across both sides in one pass. After making the four slots for the steps I soaked the wood in alcohol and removed the sides. After they dried I cleaned them up with a square file and glued the steps in. I'll have pictures of them in the next post also.


- 135 replies
-
- 5
-
-
- billing boats
- half moon
- (and 1 more)
-
Lars, Nice work for only your second model. I built the Mamoli Beagle many years ago and I remember how much fun it was but it was also very challenging.
-
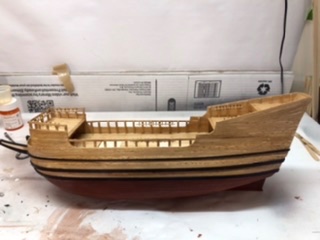
I attached the three lower rails to the hull. Since I couldn't clamp these I used medium CA to attach them. This was not without consequences though. I had to clean up excess glue along them in places and touch up the finish around them. I think they came out OK. I also painted some of the decorations for the transom and hull. Most of these are plastic pieces but once painted they look pretty good. The next step will be to attach the rudder then make the upper hull rails.
- 135 replies
-
- 2
-
-
- billing boats
- half moon
- (and 1 more)
-
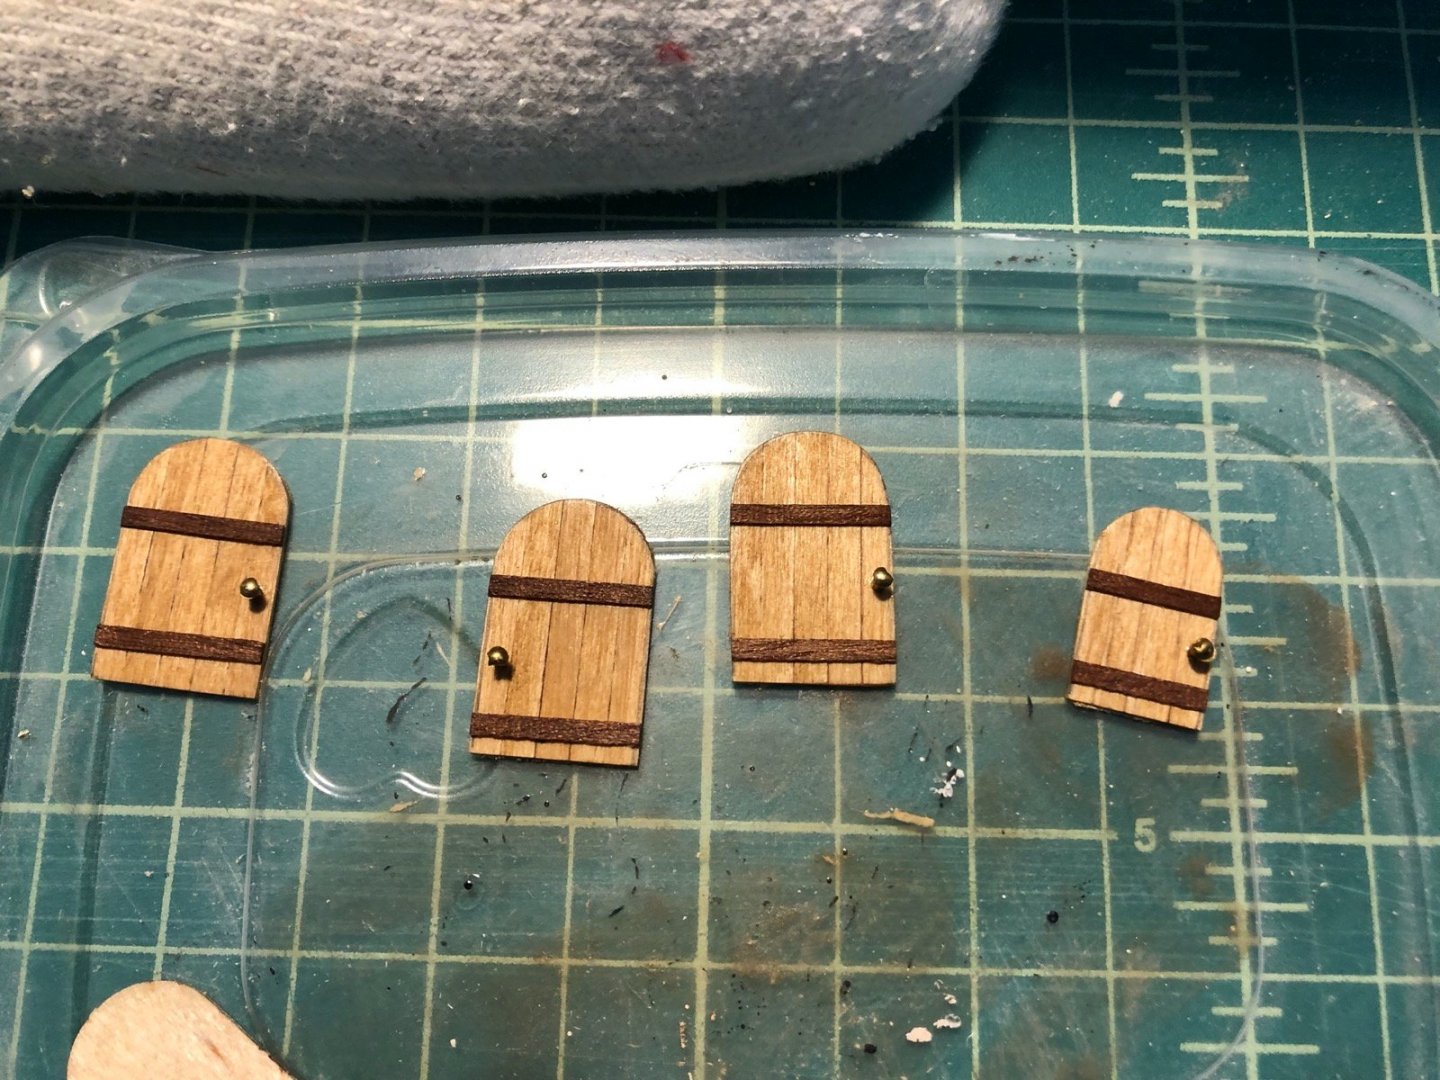
I started making the rails that go around the outside of the hull. I soaked each wood strip and bent them with an electric plank bender, then pinned them to the hull to dry. After I made the six strips for the three lower rails, I sanded them then gave them two coats of black paint. I also gave the stained part of the hull a coat of Wipe On Poly and painted the bottom portion of the rudder with a few coats of brown paint. I also finished the doors. I stained them with oak stain, gave them a coat of WOP and added nails heads as door handles. Here are three of them glued to the bulkheads. After attaching the lower rails to the hull I will make the upper rails. These will have a more interesting paint scheme.

- 135 replies
-
- 3
-
-
- billing boats
- half moon
- (and 1 more)
-
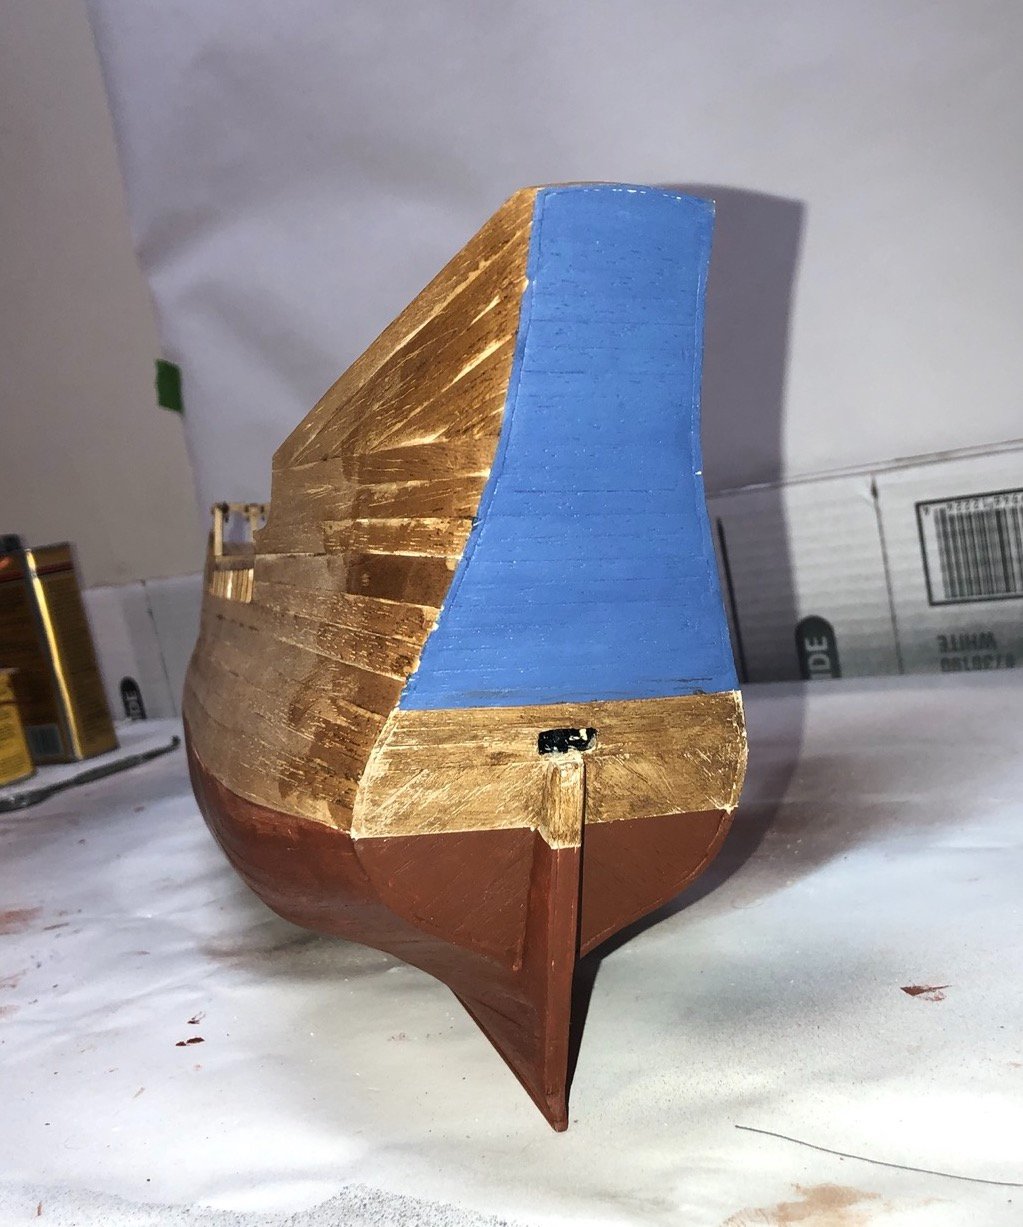
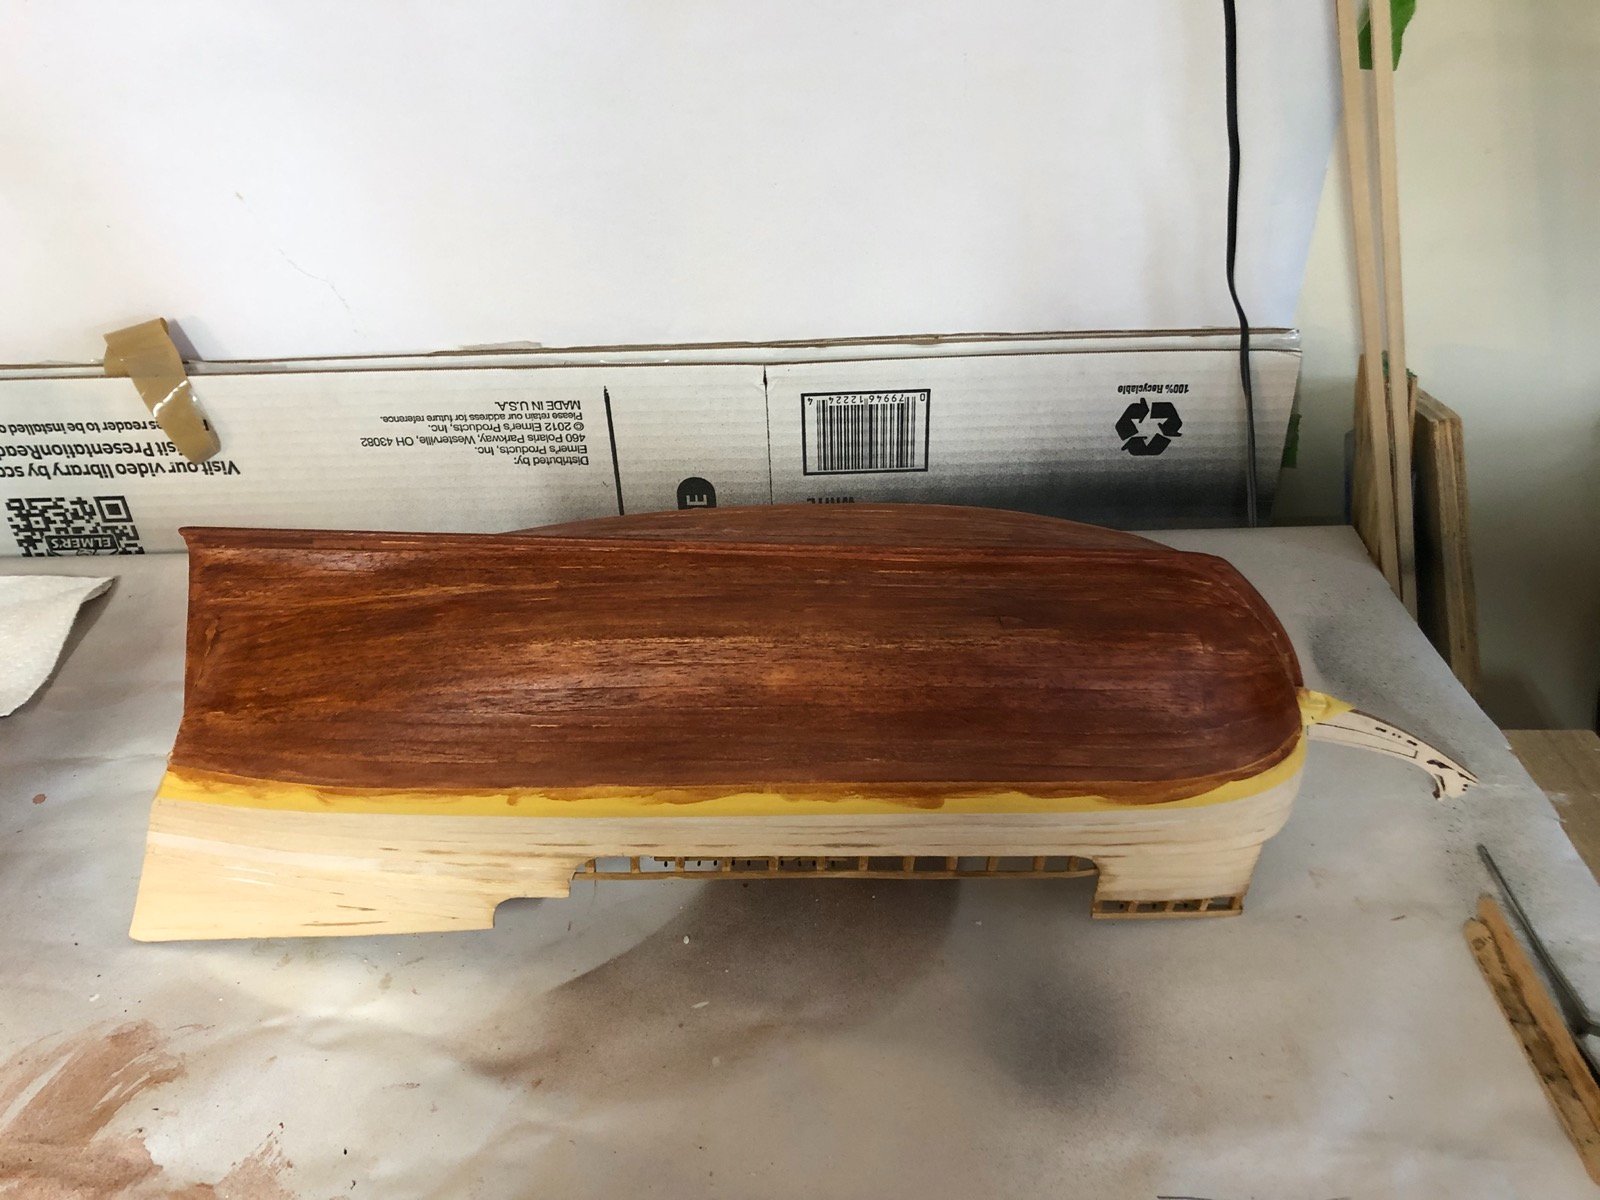
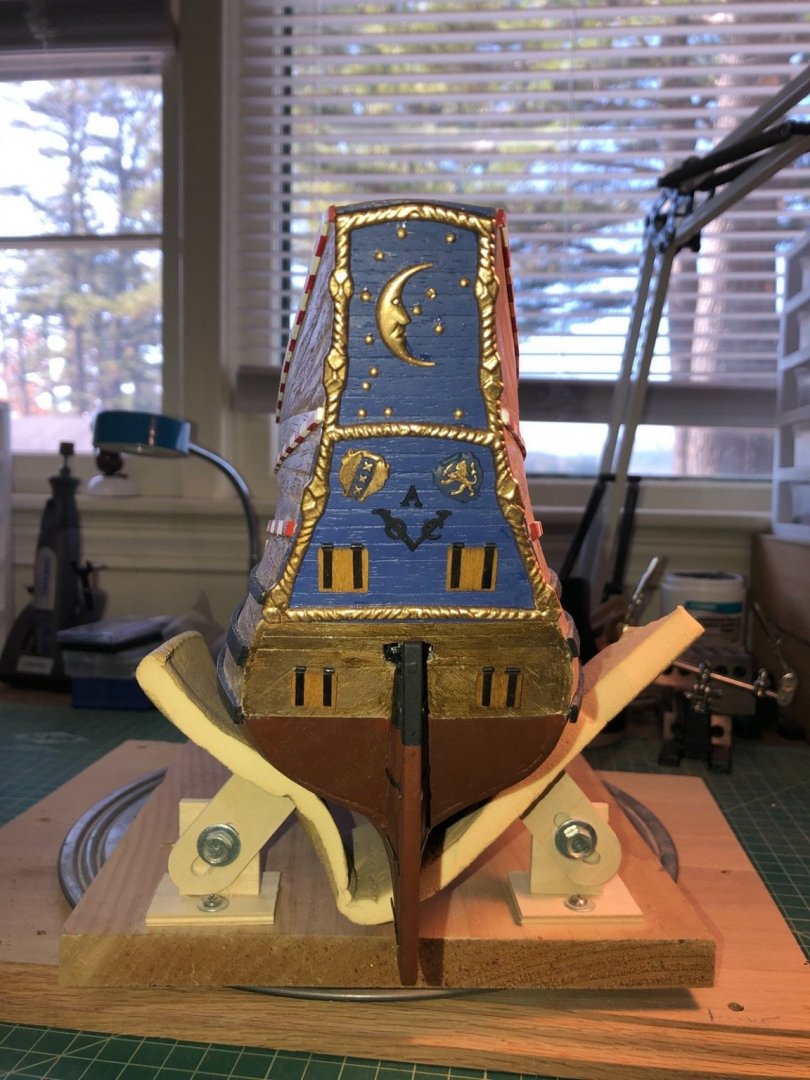
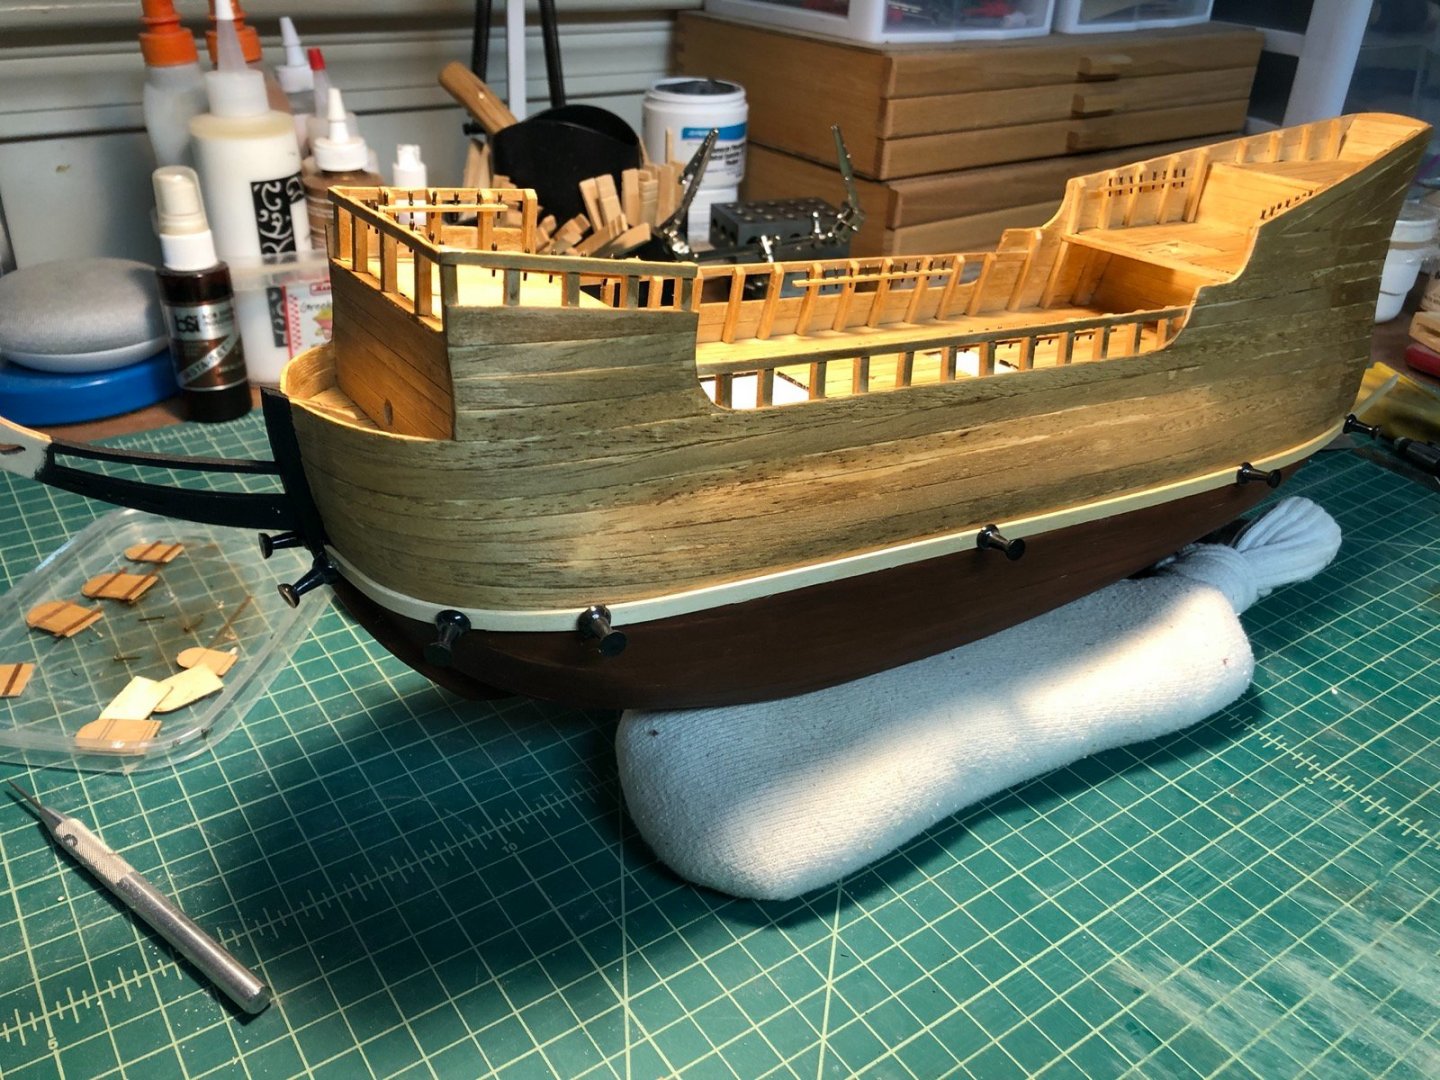
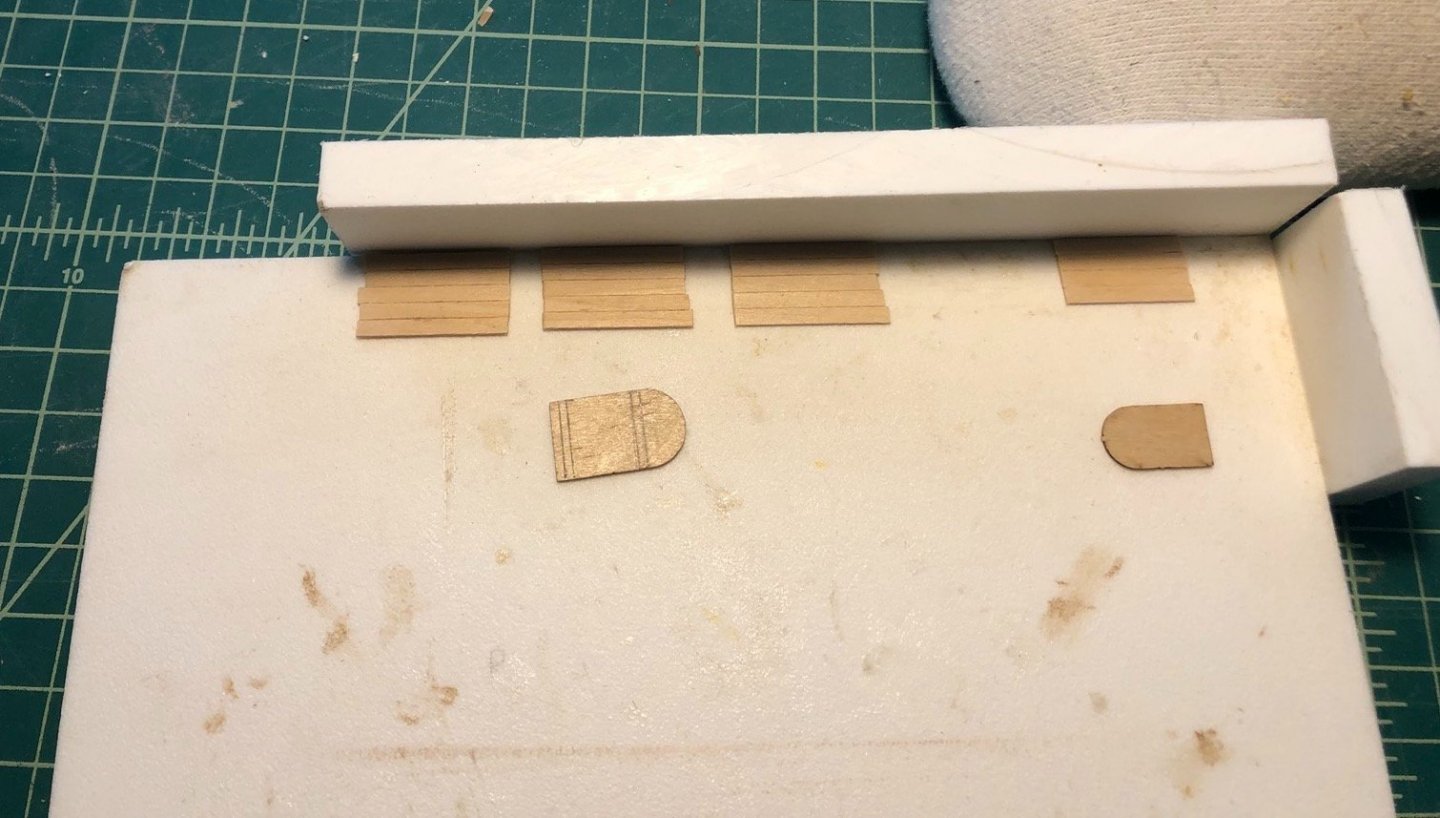
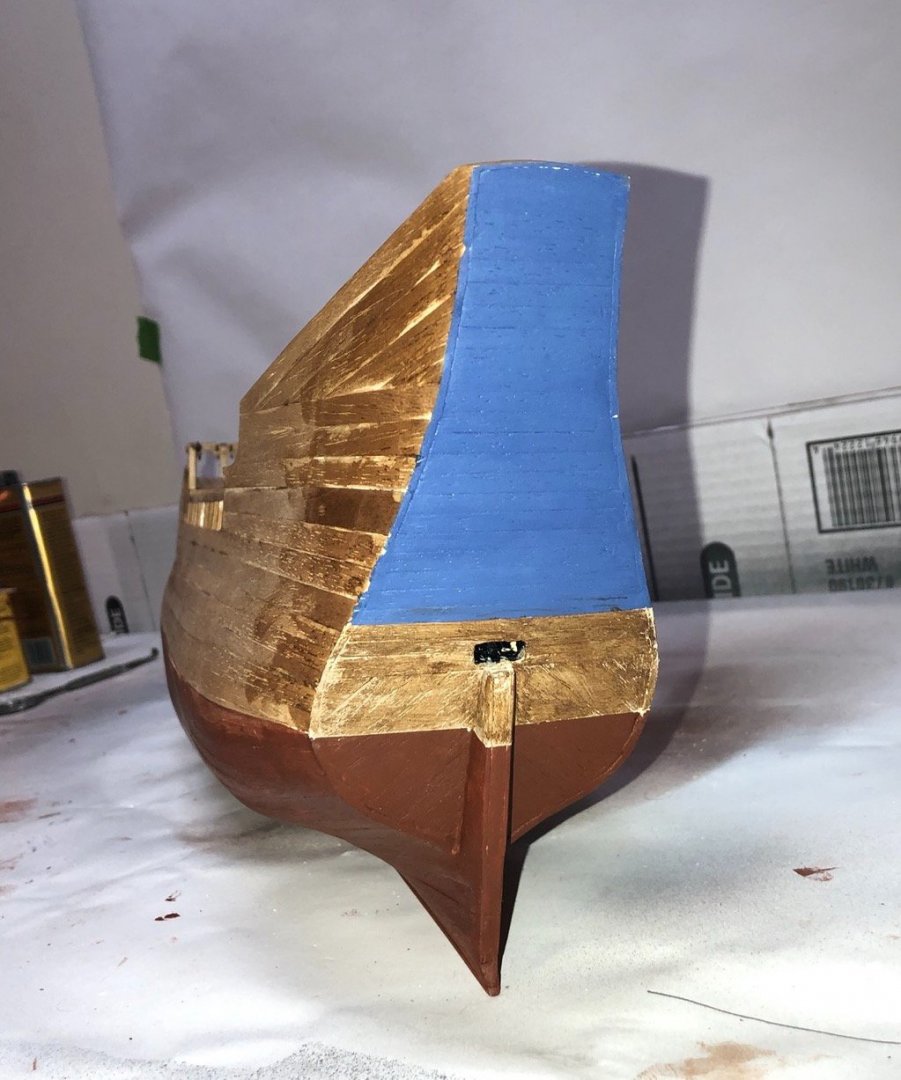
Finishing work on the hull continues. I did stain the upper hull planks with oak stain and did not have any noticeable bleed through, so I pretty happy with that. I also gave the bottom hull another few coats of the diluted burnt Sienna paint and it looks much more even now, which I am also happy about. The transition area between the stain and paint will be covered with a rail plank which will be painted black. I have also started painting the transom. The upper part is blue and the lower part is the same paint as the hull. The middle should have been oak stain but I painted the blue too far down so I mixed up some tan paint to try to match the color of the stain, which it didn't really. I then dry brushed some raw umber paint over the top and I think I have as good a match as I can get. I still need to touch up the edges of the blue paint in spots and paint the stern post and the stem black, and that should finish the hull off for now. I also have to paint and mount the rudder. I started making the doors for each of the bulwarks this morning. The kit supplies four pieces of thin laser cut plywood for them but I am not going to use them. Instead I edge glued some planks and I will use the plywood pieces as templates to cut out the new doors. I penciled into one of the plywood pieces where the cross beams will go. I wasn't going to add rails to the edges of the upper decks but after more thought I have decided to add them when I add the ladders between the decks.

- 135 replies
-
- 4
-
-
- billing boats
- half moon
- (and 1 more)
-
Thanks Hardee and Patrick. I decided to only use the thinned paint under the bottom most hull rail, and will use the same Oak stain above it as on the inside bulwarks. This should solve the bleed through problem or at least make it less noticeable. I marked off the location of the bottom rail with masking tape and painted below that with the Burnt Sienna and black thinned paint. I gave it two coats then sanded it and gave it a coat of wipe on poly. I am going for a dark weathered hull look so I like how it came out. When this is completely dry I will remove the tape and mask off the paint, then stain above this to the tops of the bulwarks. You can't see it in this picture but I also masked off the transom as that will be painted blue.

- 135 replies
-
- 3
-
-
- billing boats
- half moon
- (and 1 more)
-
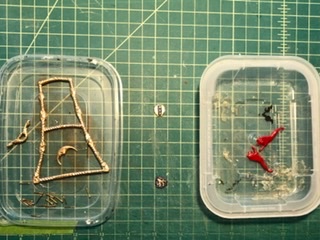
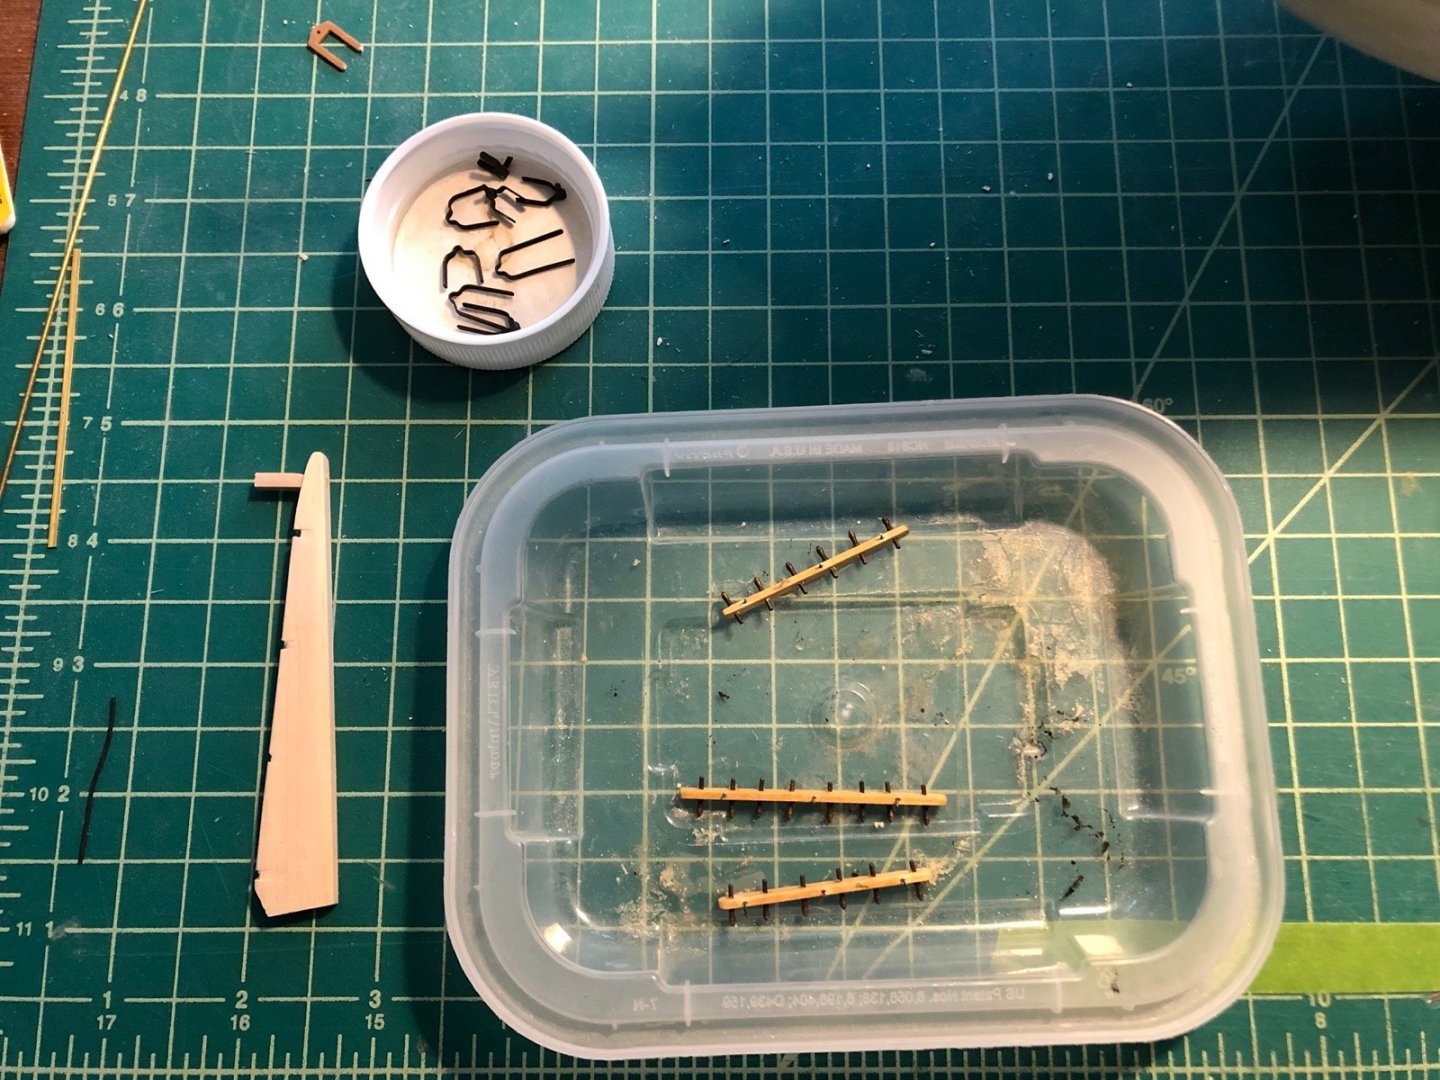
I made a new rudder from some basswood sheet because I did not like the plywood one in the kit. I milled slots in the rudder for the pintles then made the pintles and gudgeons from brass strip and rod. Again I did not like the kit supplied plastic ones. I blackened them with Birchwood Casey blackening solution after pickling them because of the solder joints on the pintles. I made all of the belaying pin racks that attach to the rails and finished them with oak stain and WOP. I used Brass Brown on the belaying pins. You can see in the above picture that tiller that is attached to the rudder. I cut a rectangular slot in the transom for the tiller by drilling three holes them cleaning up the slot with some Dremel bits and square and flat files. I will paint the inside of the slot black. I stained the decks, bulwarks, extensions, rails, and bulwarks with oak stain then a coat of Wipe On Poly. When that dried I started adding the racks to the bulwark extensions. I have wire pins in the racks at each of the bulwark extensions that they are attached to, and these are glued into holes in the extensions using medium CA. They appear to be very sturdy when I took the clamps off. Here you can see a few of them being glued on, then in place. Once all the belaying pin racks are added I will start finishing the outside of the hull. I still have some rails to add to the hull but these will be different colors from the rest of the hull so I will add them later. The transom will be painted blue and the stem and rudder above the waterline will be painted black. For the hull I have made a very thin wash of Burnt Sienna and a tiny bit of Black paint. My only concern is that it is so thin it will bleed through some of the plank seams and show on the inside bulwarks. I really don't know how to avoid that but I am hoping if it happens it won't be too noticeable.


- 135 replies
-
- 3
-
-
- billing boats
- half moon
- (and 1 more)
-
I added the rails and sanded the bulwark extensions flush to them. I then angled the tops of the extensions. Here is how the hull looks now. My next step is to stain and finish the decks, bulwarks, and bulkheads.
- 135 replies
-
- 3
-
-
- billing boats
- half moon
- (and 1 more)
-
I stopped buying large bottles of CA for that very reason. Now I buy many small bottles and store the unopened ones in the fridge.
- 436 replies
-
- 2
-
-
- vanguard models
- alert
- (and 1 more)
-
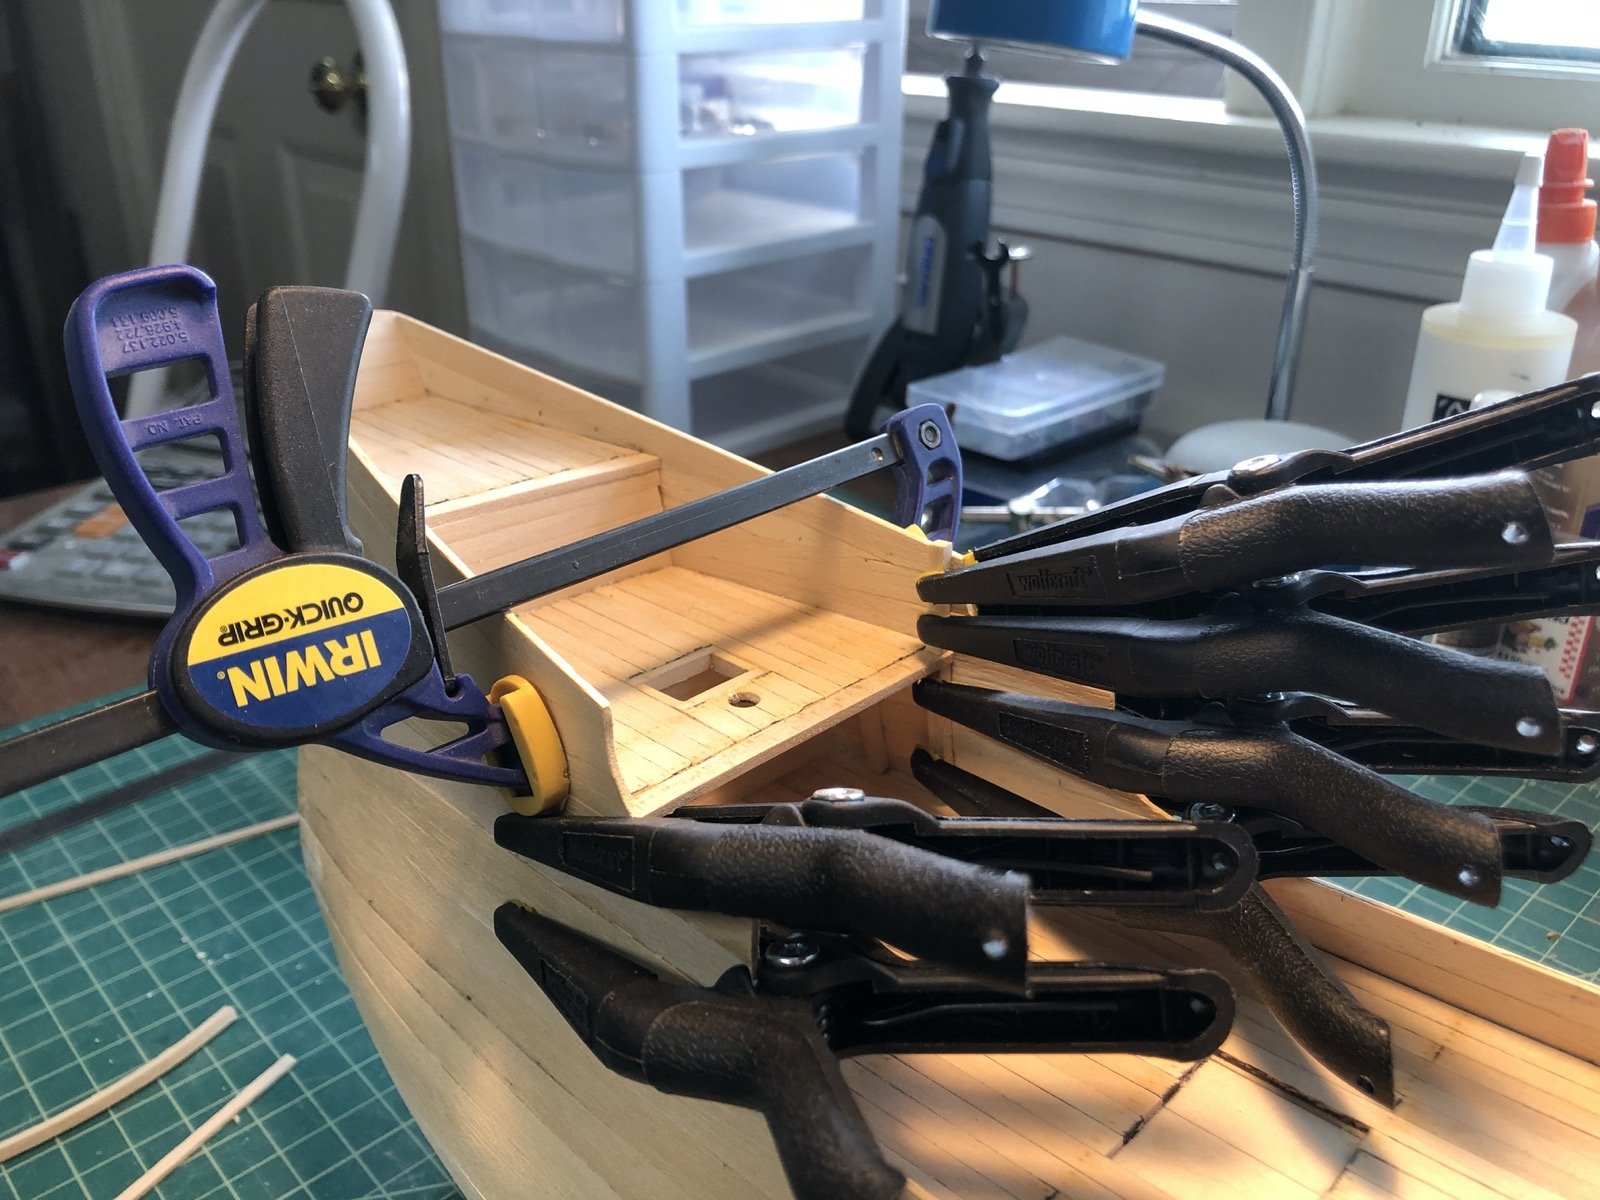
Thanks Louie and K, and the likes. I am working off pictures of that replica K and will use some of the elements in the final paint scheme but not all the designs. The kit is much different from the replica which I why I am not using the very wide rails that came in it, for instance. I have added all of the bulwark extensions and sanded those down that are flush with the deck planking. I then used a sanding drum on the Dremel to angle the tops of those extensions. I also added rail supports across the front of the forecastle, which will have a pin rail and a rail. I soaked some wood strips for the rails and clamped them to the extensions to dry. The main deck rails go behind the hull planks at each end. Once these are dry and glued on I will sand the tops of the extensions flush with the rail and angle the tops like the others. I have five of the pin rails made with just the two on the main deck yet to make. These will be pinned to the extensions to give them more support. Once I add the rails I will start putting some finish on the hull, decks, and bulkheads.


- 135 replies
-
- 3
-
-
- billing boats
- half moon
- (and 1 more)
-
I continue to add the bulwark extensions and as of this morning I have most of them glued on. I used a sanding drum in the Dremel to get the port extensions at the two upper decks almost flush with the hull planks, then sanding blocks to get them flush. I will do the same to the other extensions on the main and forecastle decks after I install the rail, sanding them flush to the rail. I have also started making the pin rails that will be pinned to the extensions. I need to make a pin rail that goes across the front of the forecastle too.

- 135 replies
-
- 4
-
-
- billing boats
- half moon
- (and 1 more)
-
I have started adding supports under the overhanging parts of the upper decks and the bulwark extensions. I am trying to line these up so they look like a single piece of wood that goes through the deck with some success. Here you can see the supports under the forecastle deck. Here I am gluing the supports under the first aft upper deck as well as the port bulwark extension above one of them. And here I am gluing most of the extensions on the two aft upper decks and the first extension that will support a rail on the fore castle . Luckily I have a bunch of these long reach clamps that work great for holding these tight to the bulwark planks. These extensions are also providing support for the bulwark planks, which at this stage are just edge glued together. There will be rails on the main and forecastle decks but not the aft upper decks, as that is how the replica was made. The bulwarks on the upper decks are pretty high so this makes sense to me.


- 135 replies
-
- 3
-
-
- billing boats
- half moon
- (and 1 more)
-
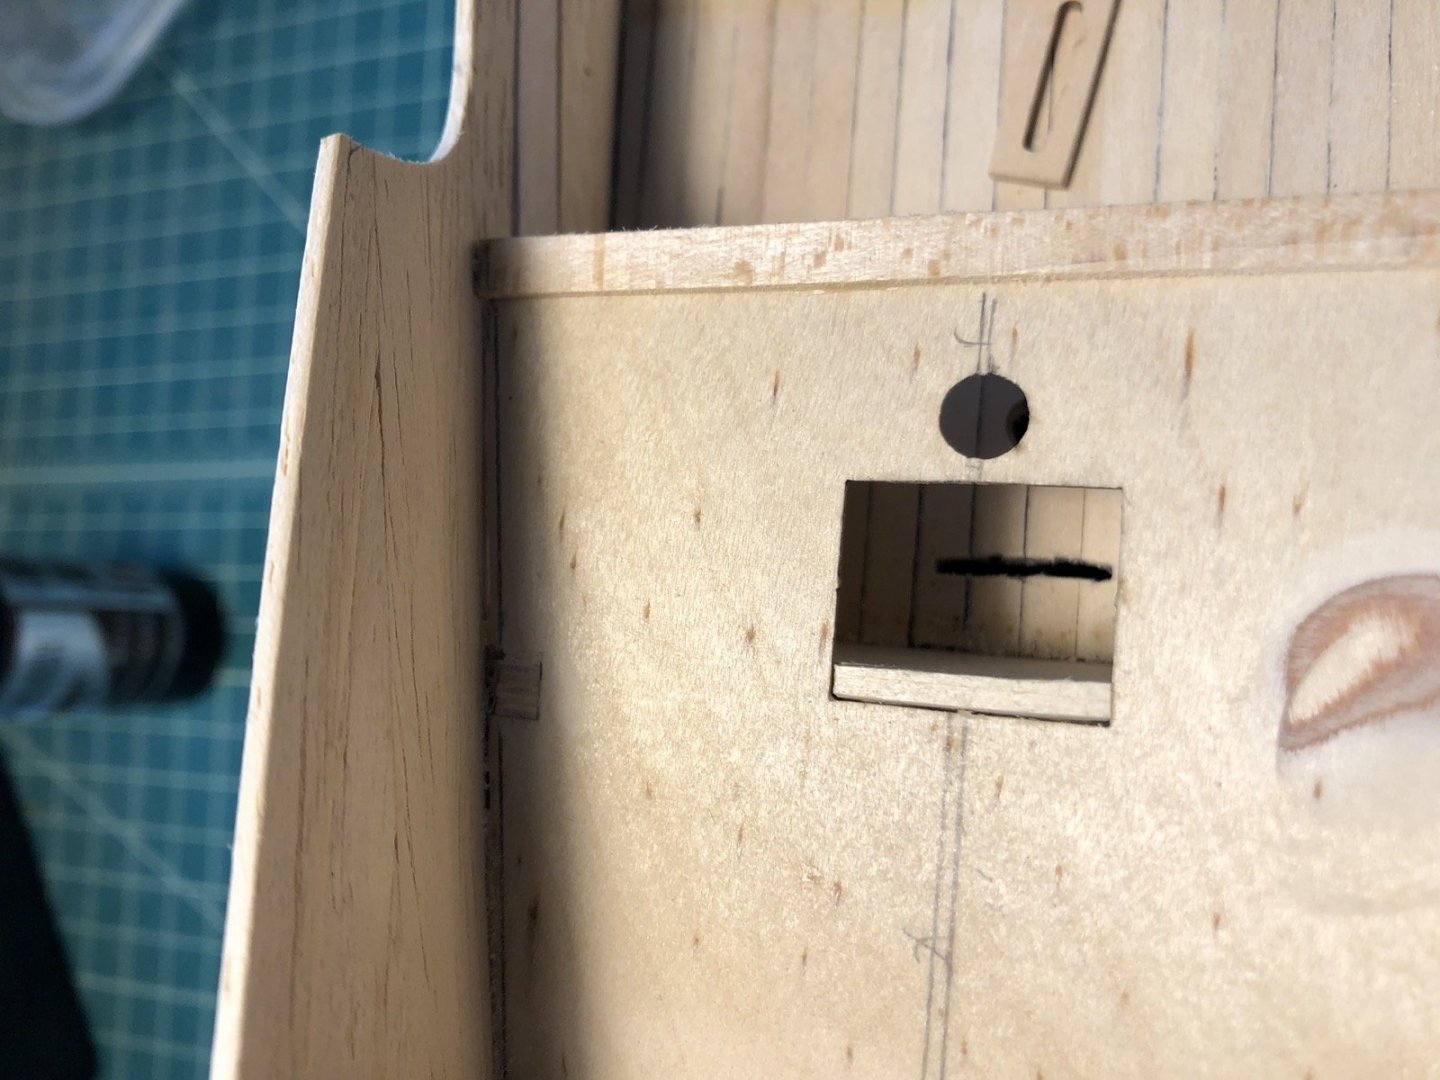
Thanks Popeye. I have the fitting that goes over the slot on the lower deck too. What did you do with the opening in the upper deck? Did you just plank to the edges of the opening?
-
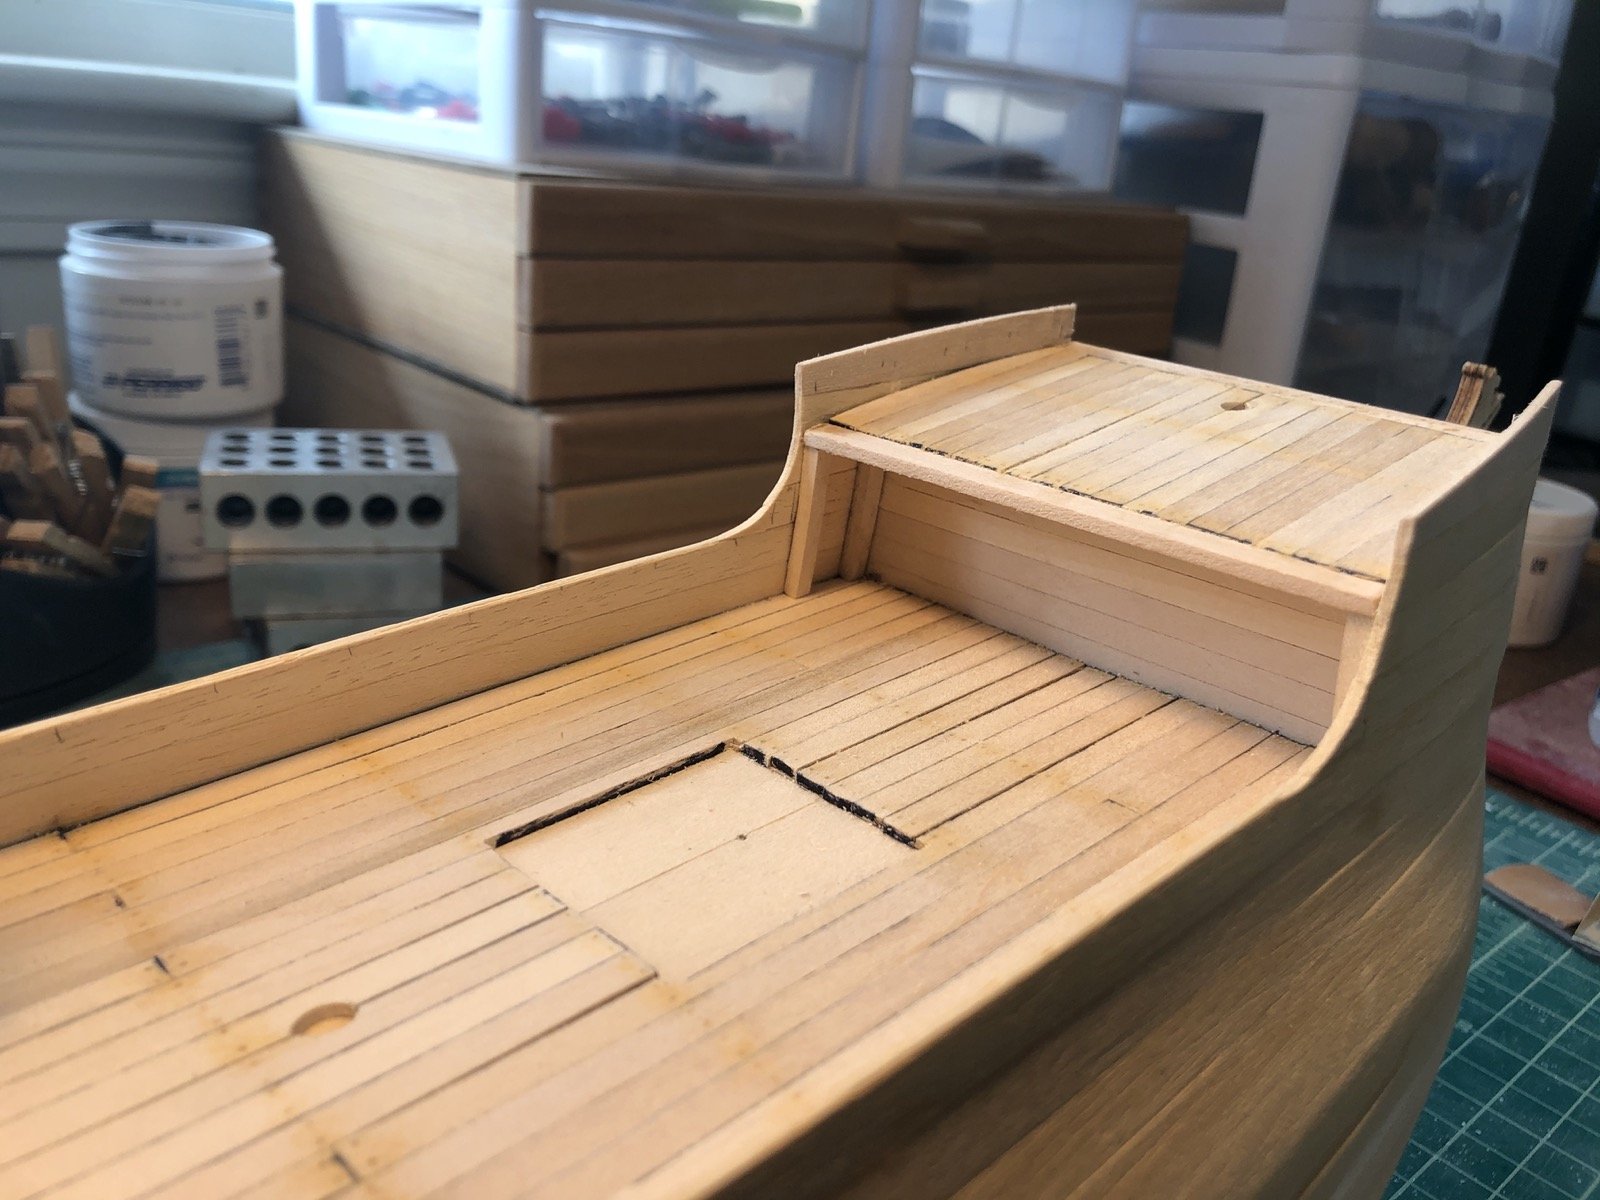
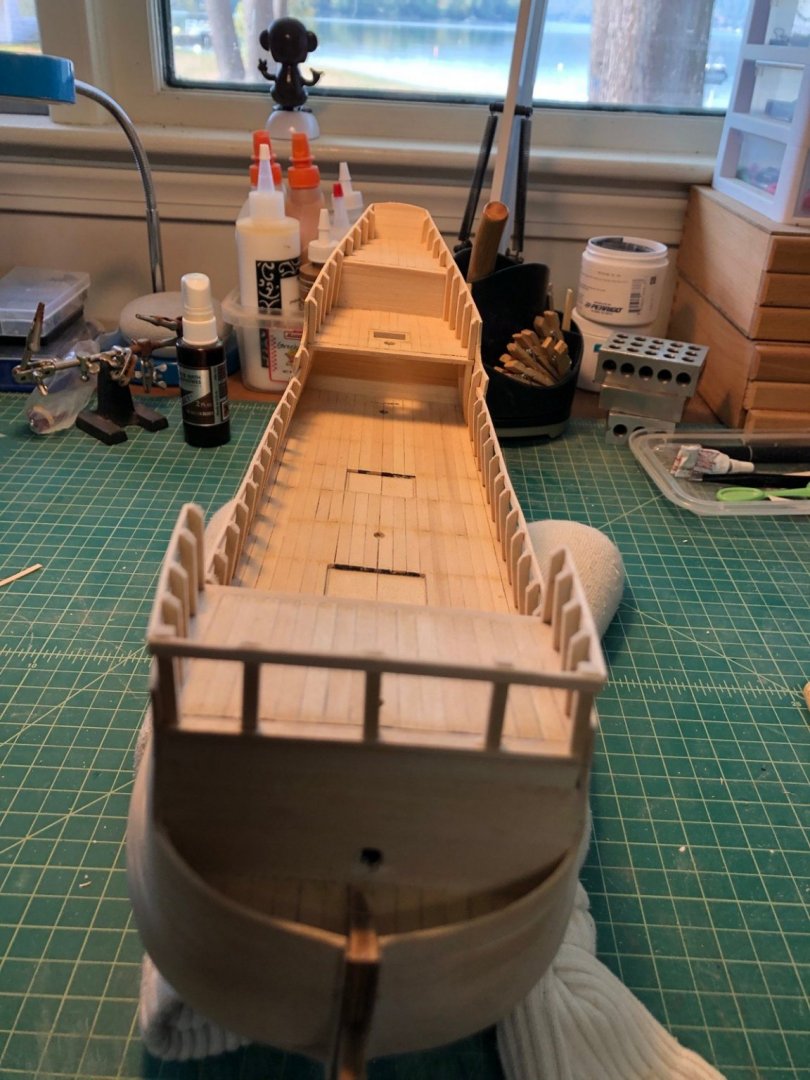
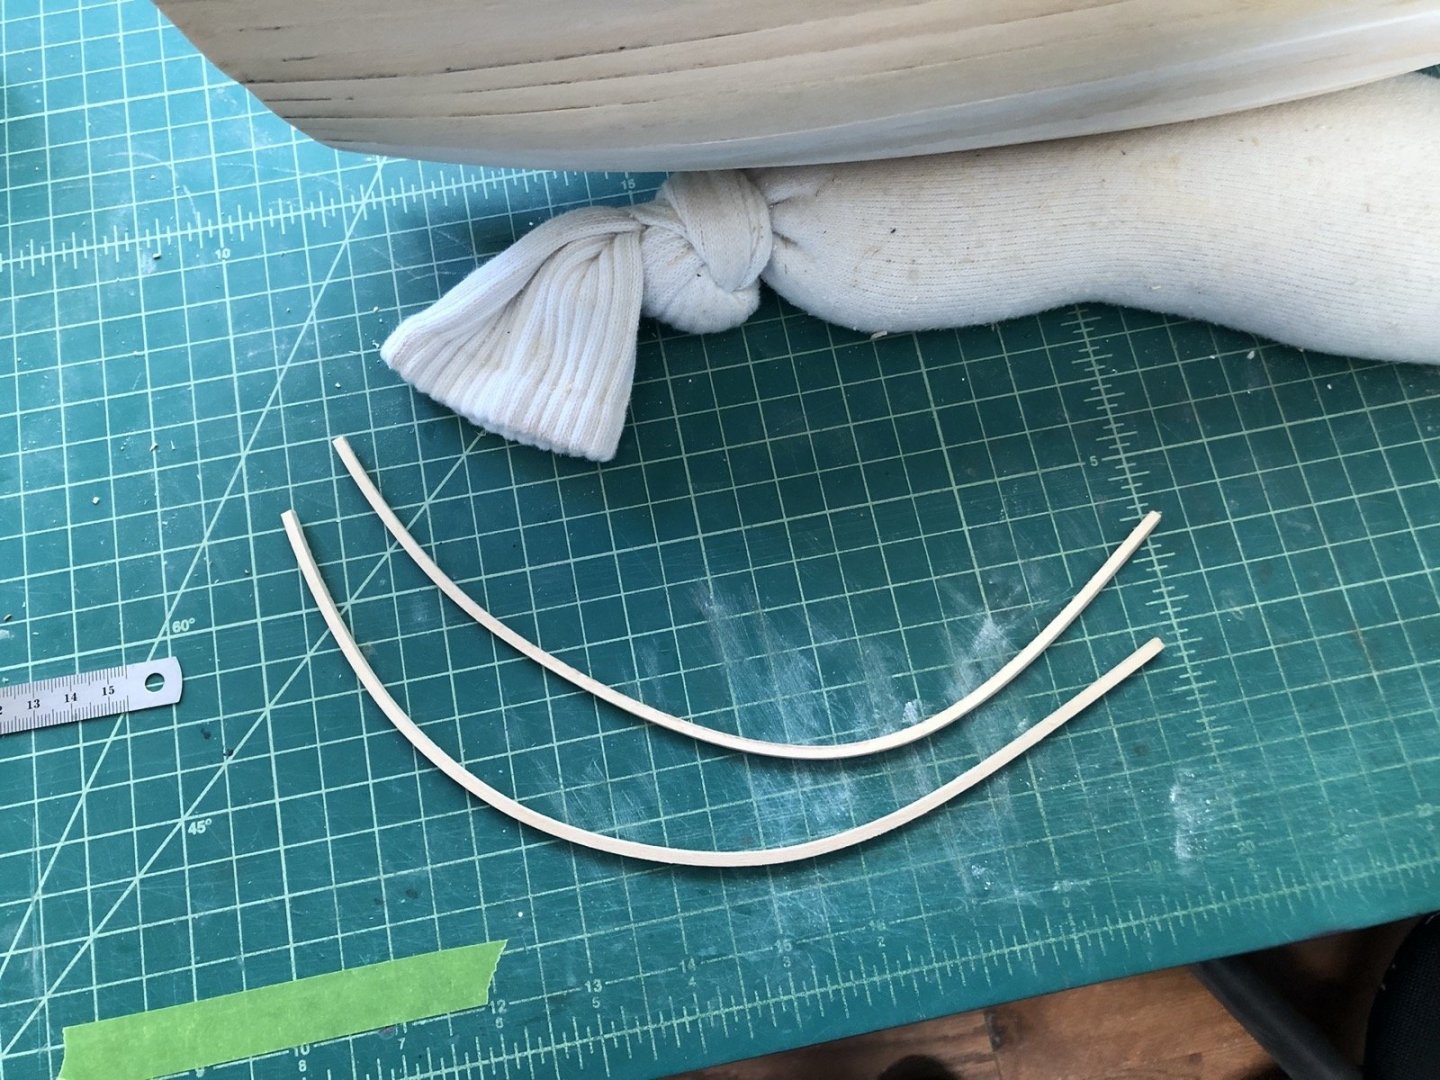
I have finished planking the two aft upper decks. I added the coaming around the whipstaff opening then planked around it. For the mast hole, I first drilled the hole in some basswood sheet, then cut out a rectangle around it that was two planks wide. After fitting it in the space, I split it down the middle and glued the two halves to the deck. This made a much better hole than trying to file it into two separate planks. I sanded the decks and added the fake treenails. I am going to make the bulwark extensions from curved strip wood. I soaked a long piece of 1/8" square stock and started bending it with a plank bender. I then curved it between two posts on the workbench and continued to heat it and dry it with a heat gun. I cut it in half then gave each piece the same treatment, bending them to a tighter radius. Here is how they came out. I will see how many of the extensions I can make out of these pieces, but if I need more I will bend another strip or two.
- 135 replies
-
- 3
-
-
- billing boats
- half moon
- (and 1 more)
-
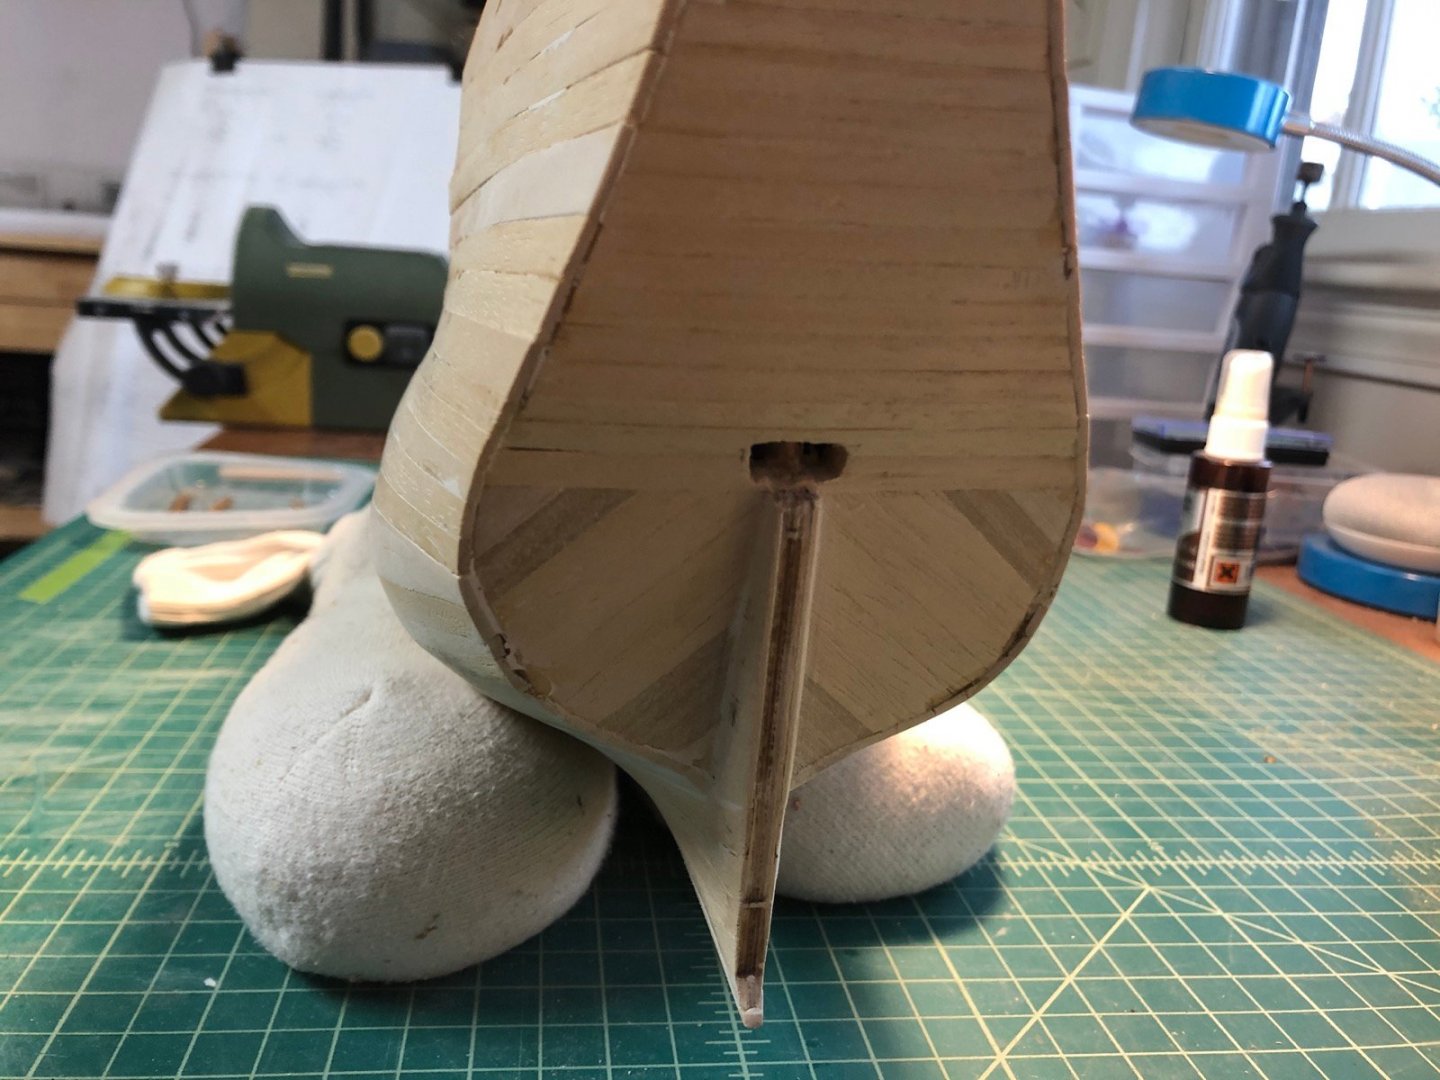
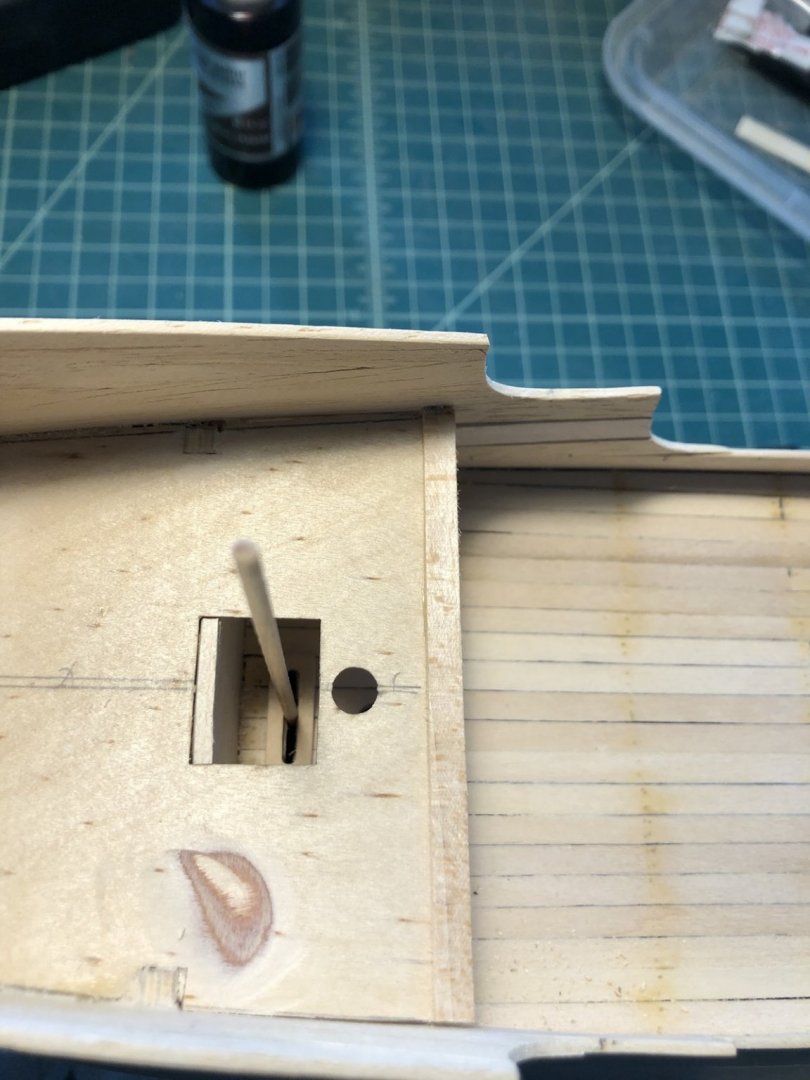
This is the area I was talking about in the last post. There is a post that comes up through the deck below, called a whipstaff, that is attached to the tiller below the main deck. I opened up a slot in the main deck for the whipstaff by drilling a series of holes and connecting them with a file. There is a trim piece that goes over the slot. I am working on the coaming that will go around the opening on the upper deck before I plank that deck. I have finished planking all the bulkheads so I need to sand and finish those up too.
- 135 replies
-
- 1
-
-
- billing boats
- half moon
- (and 1 more)