
Supplies of the Ship Modeler's Handbook are running out. Get your copy NOW before they are gone! Click on photo to order.
×
.JPG.ca33079f5815b861e67b9c2cccd37982.JPG)

Blue Ensign
-
Posts
4,553 -
Joined
-
Last visited
Content Type
Profiles
Forums
Gallery
Events
Everything posted by Blue Ensign
-
 She's looking very nice Doug, well done, I like your new cutter.👍 B.E.
- 102 replies
-
- 1
-

-
- Flirt
- Vanguard Models
- (and 1 more)
-
You're welcome Håkan, best wishes for Tuesday, hope things go well. B.E.
-
Loving what I see Håkan 👍 B.E.
-
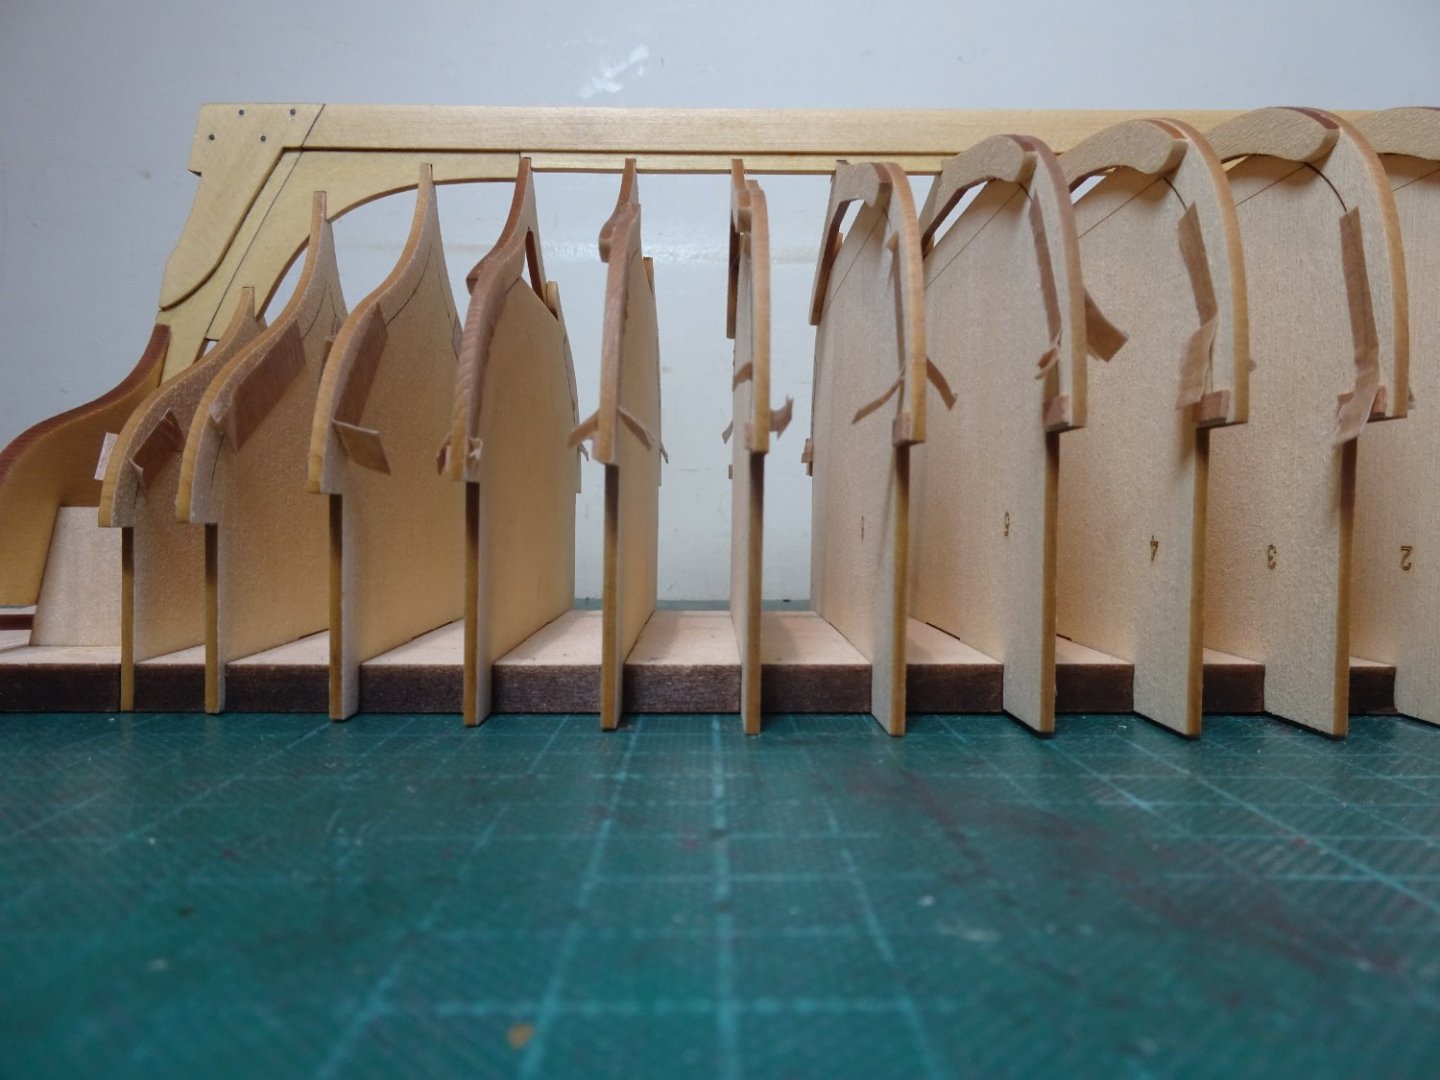
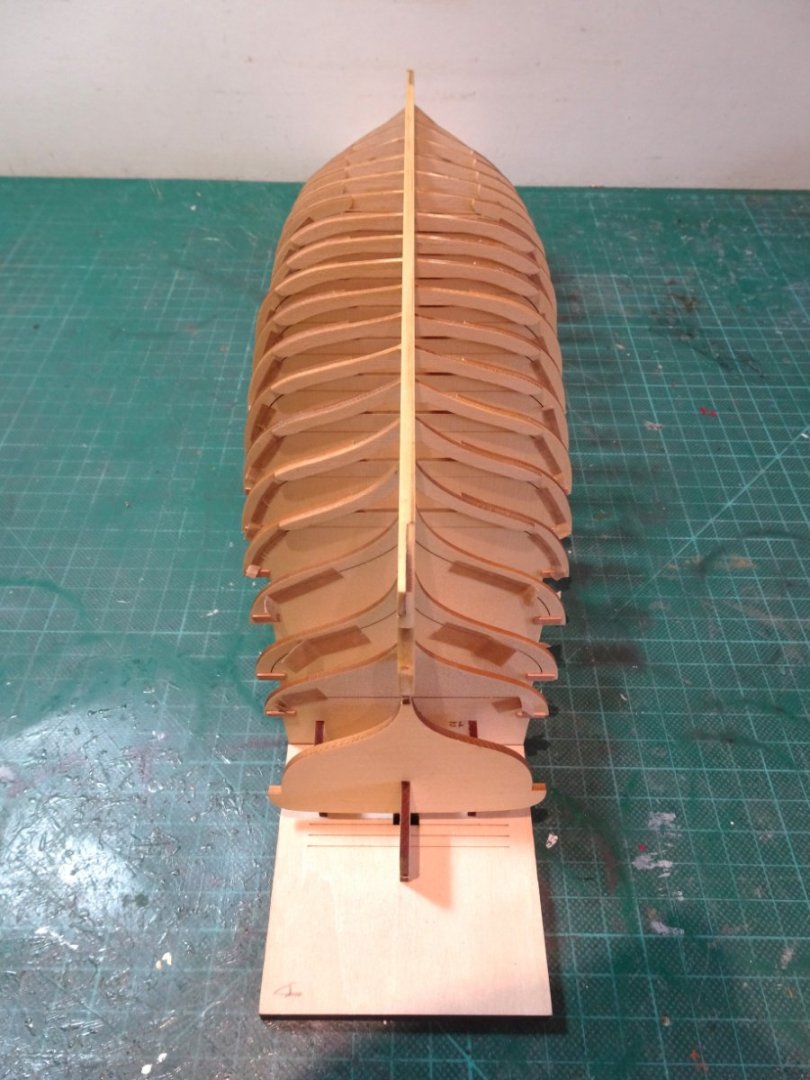
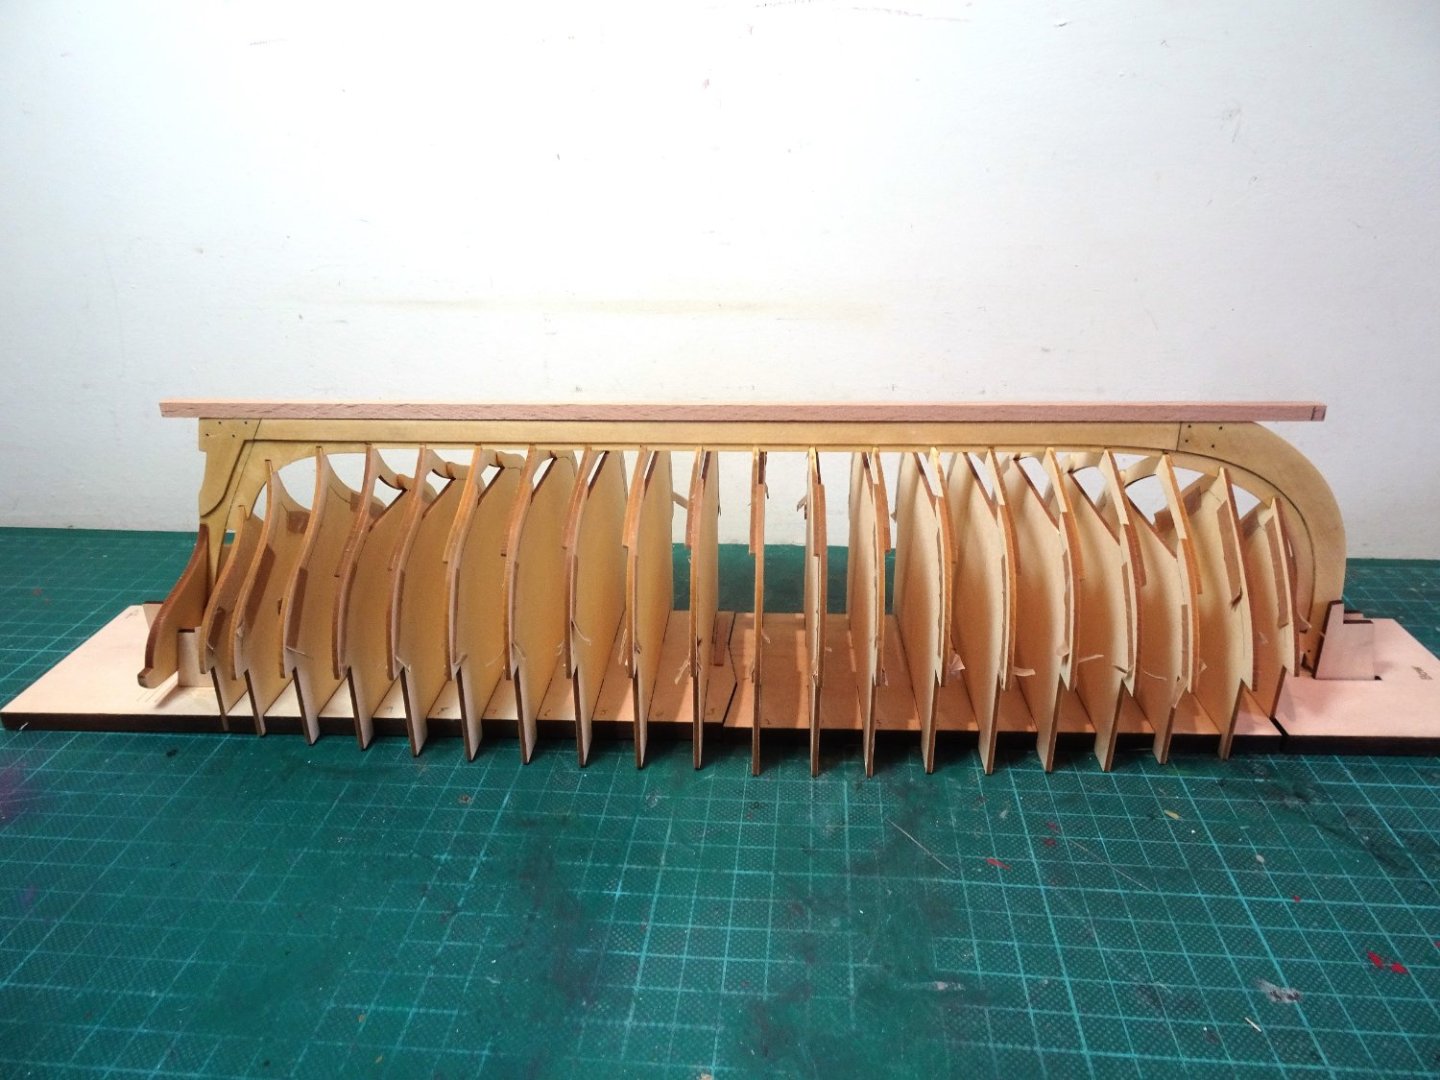
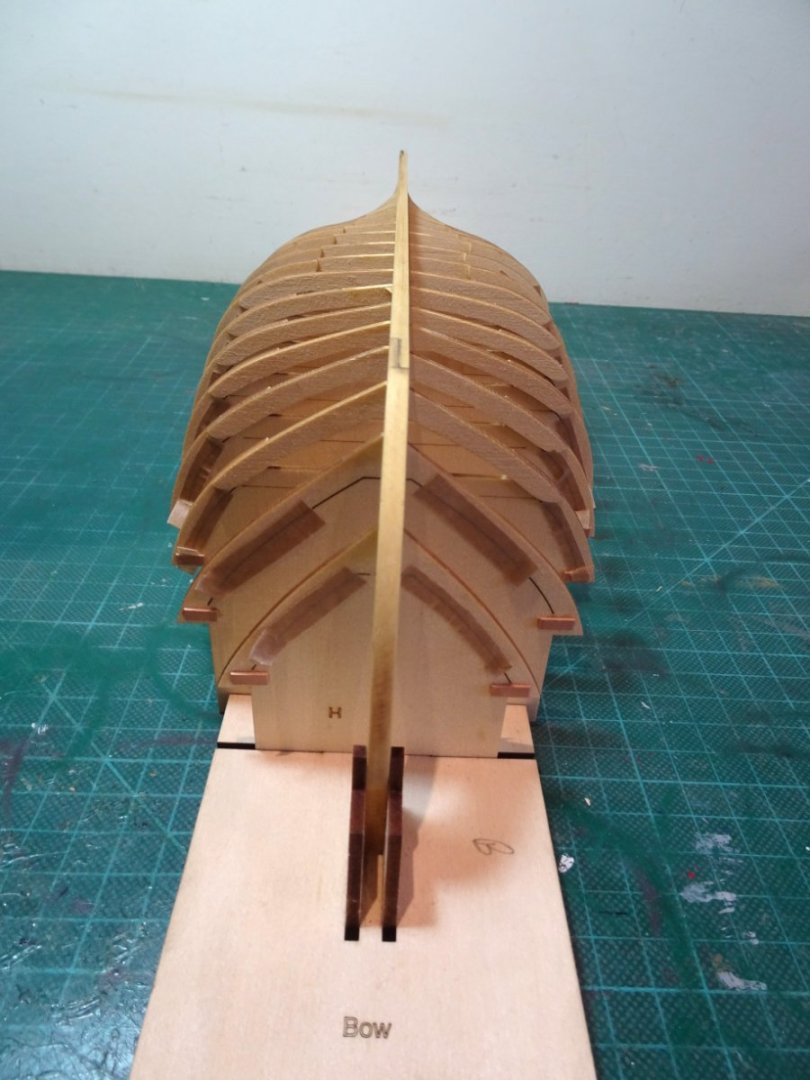
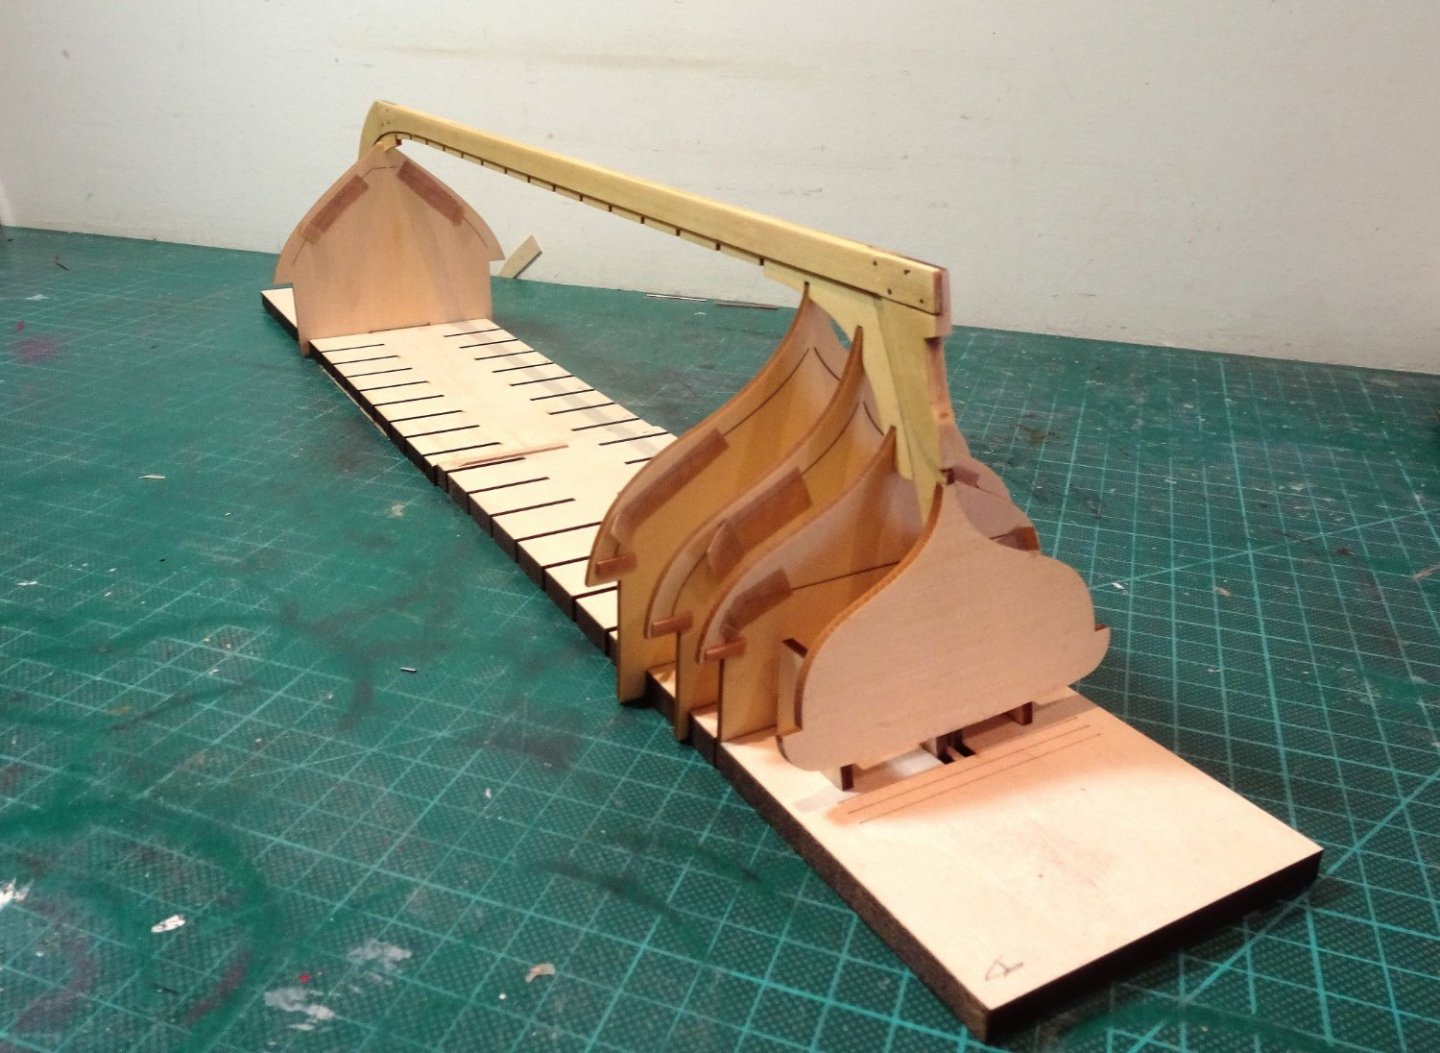
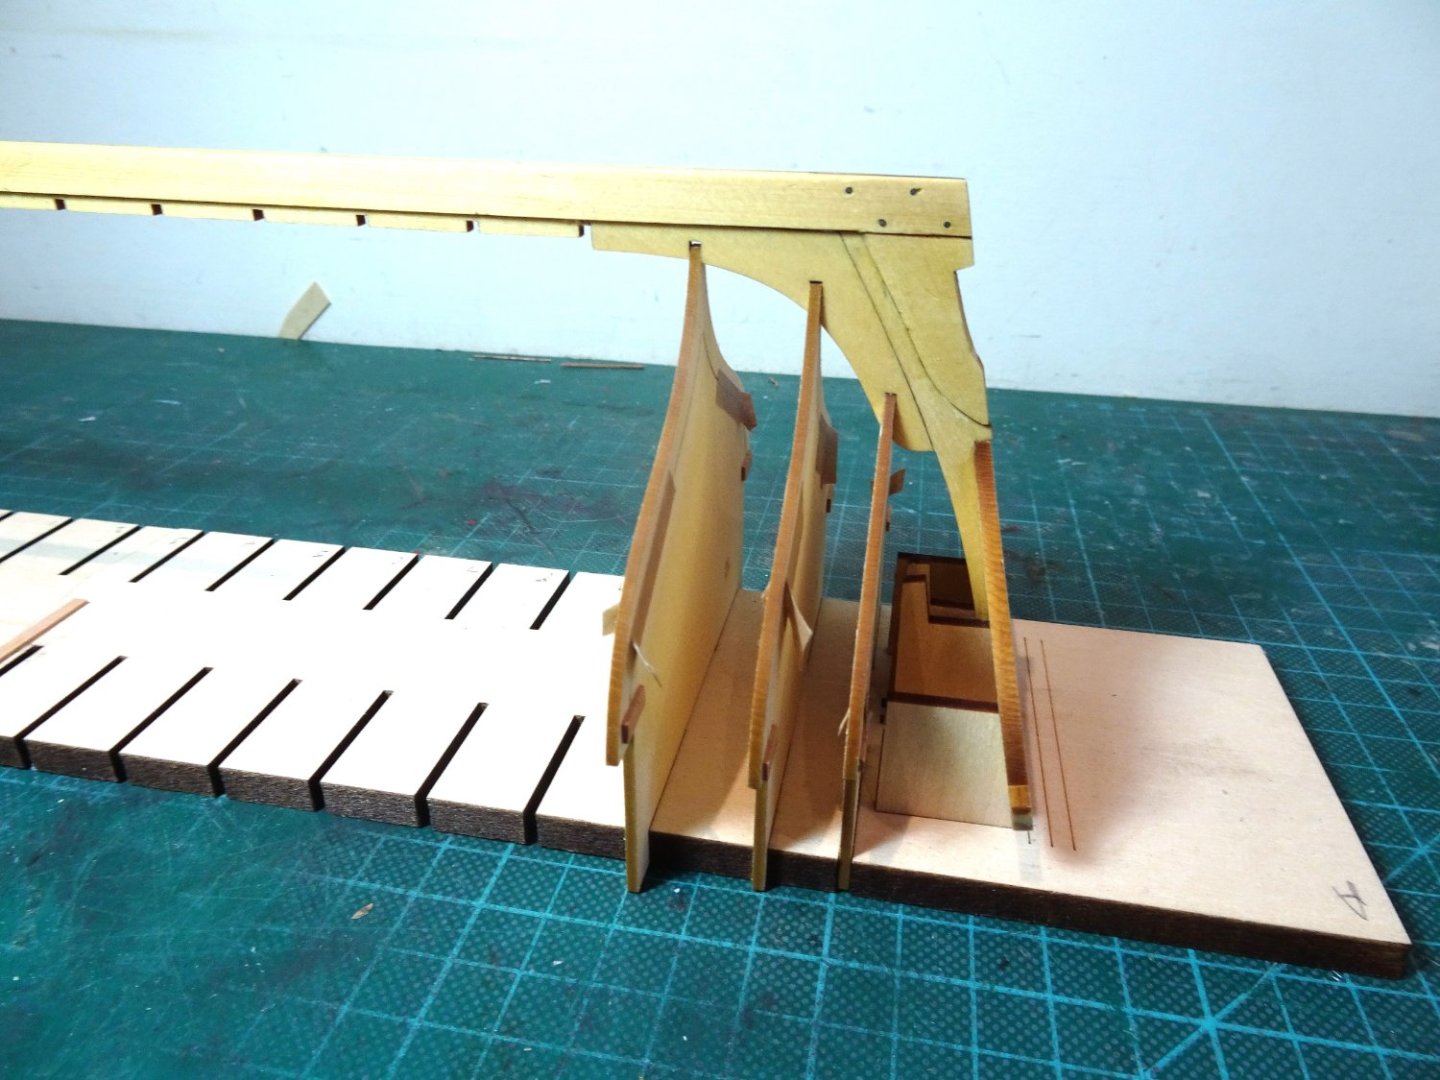
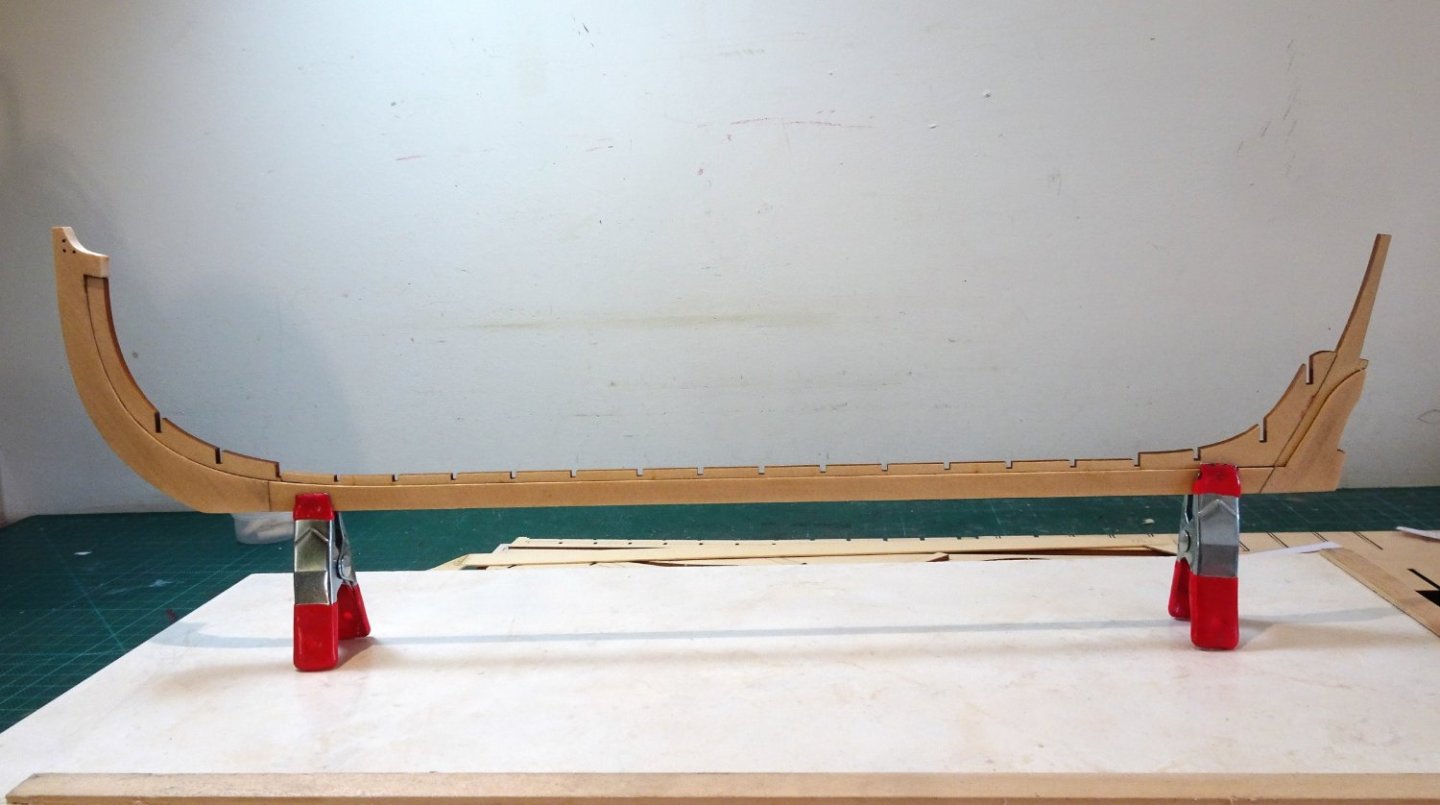
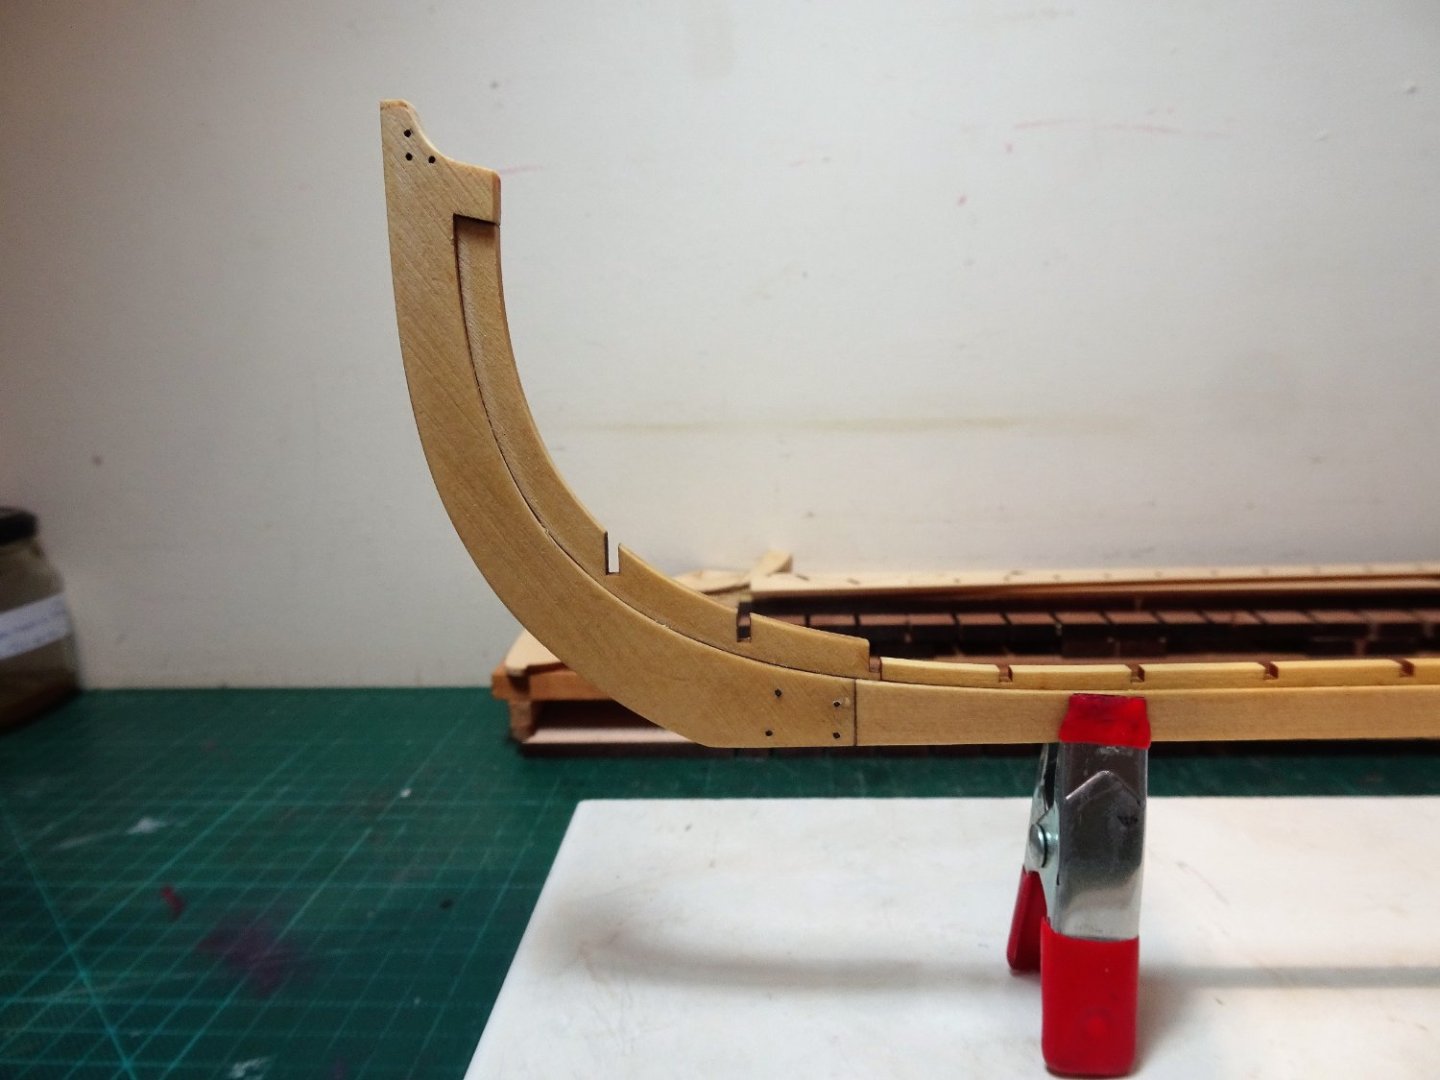
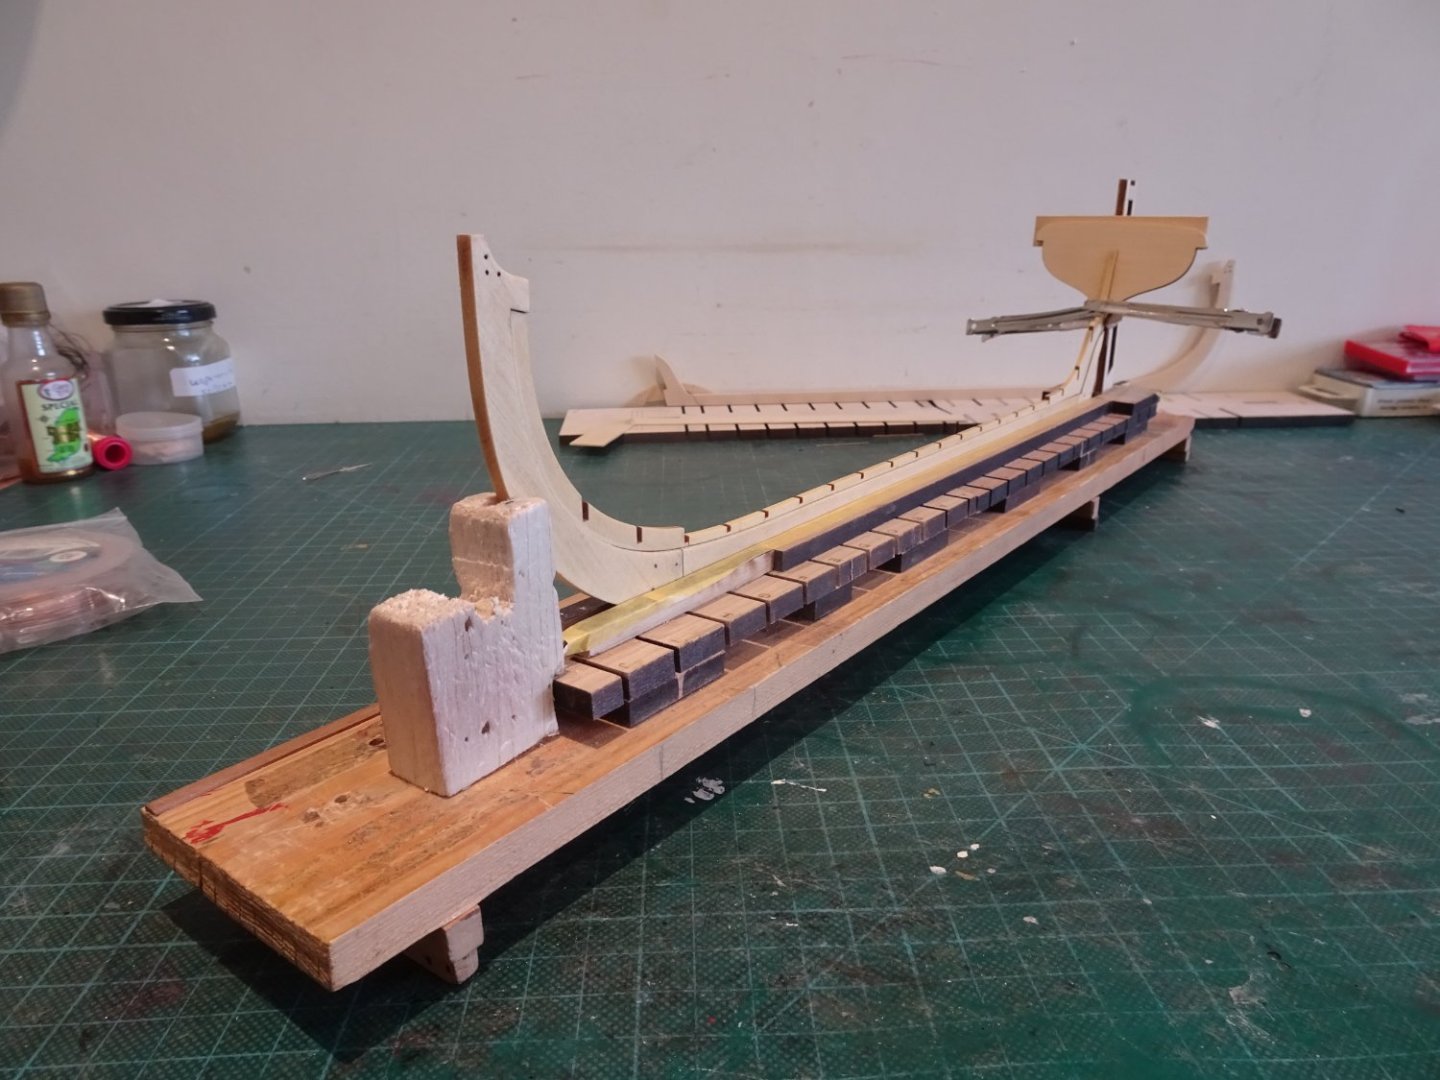
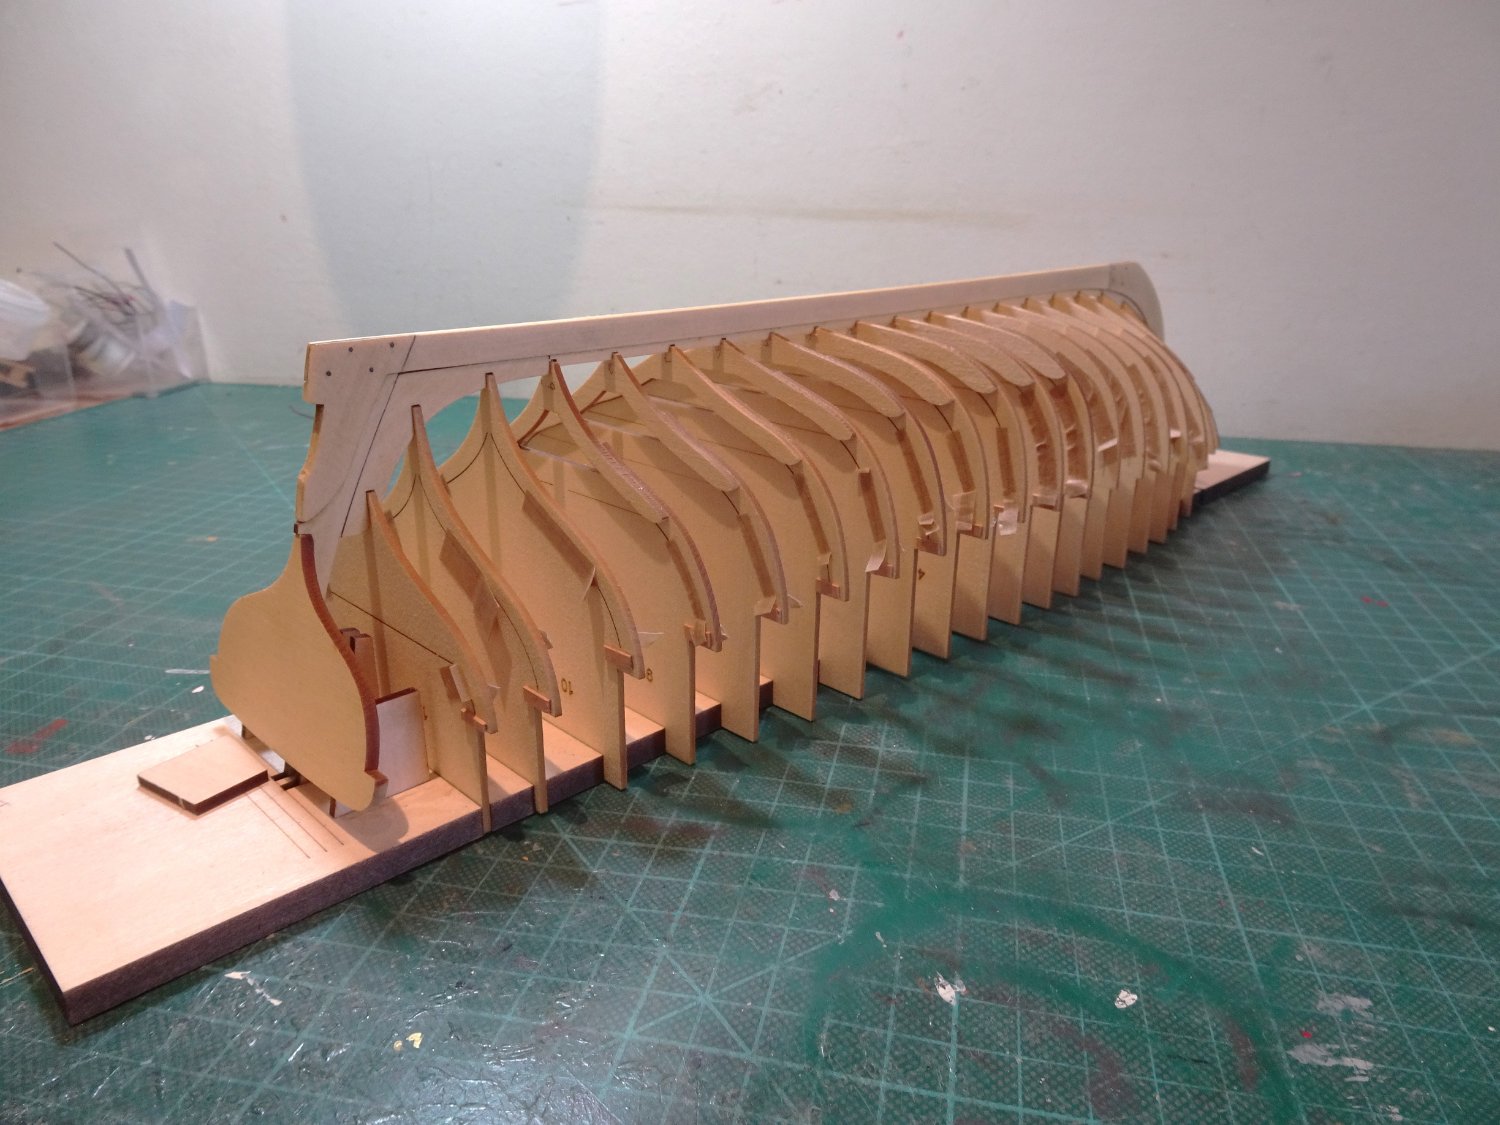
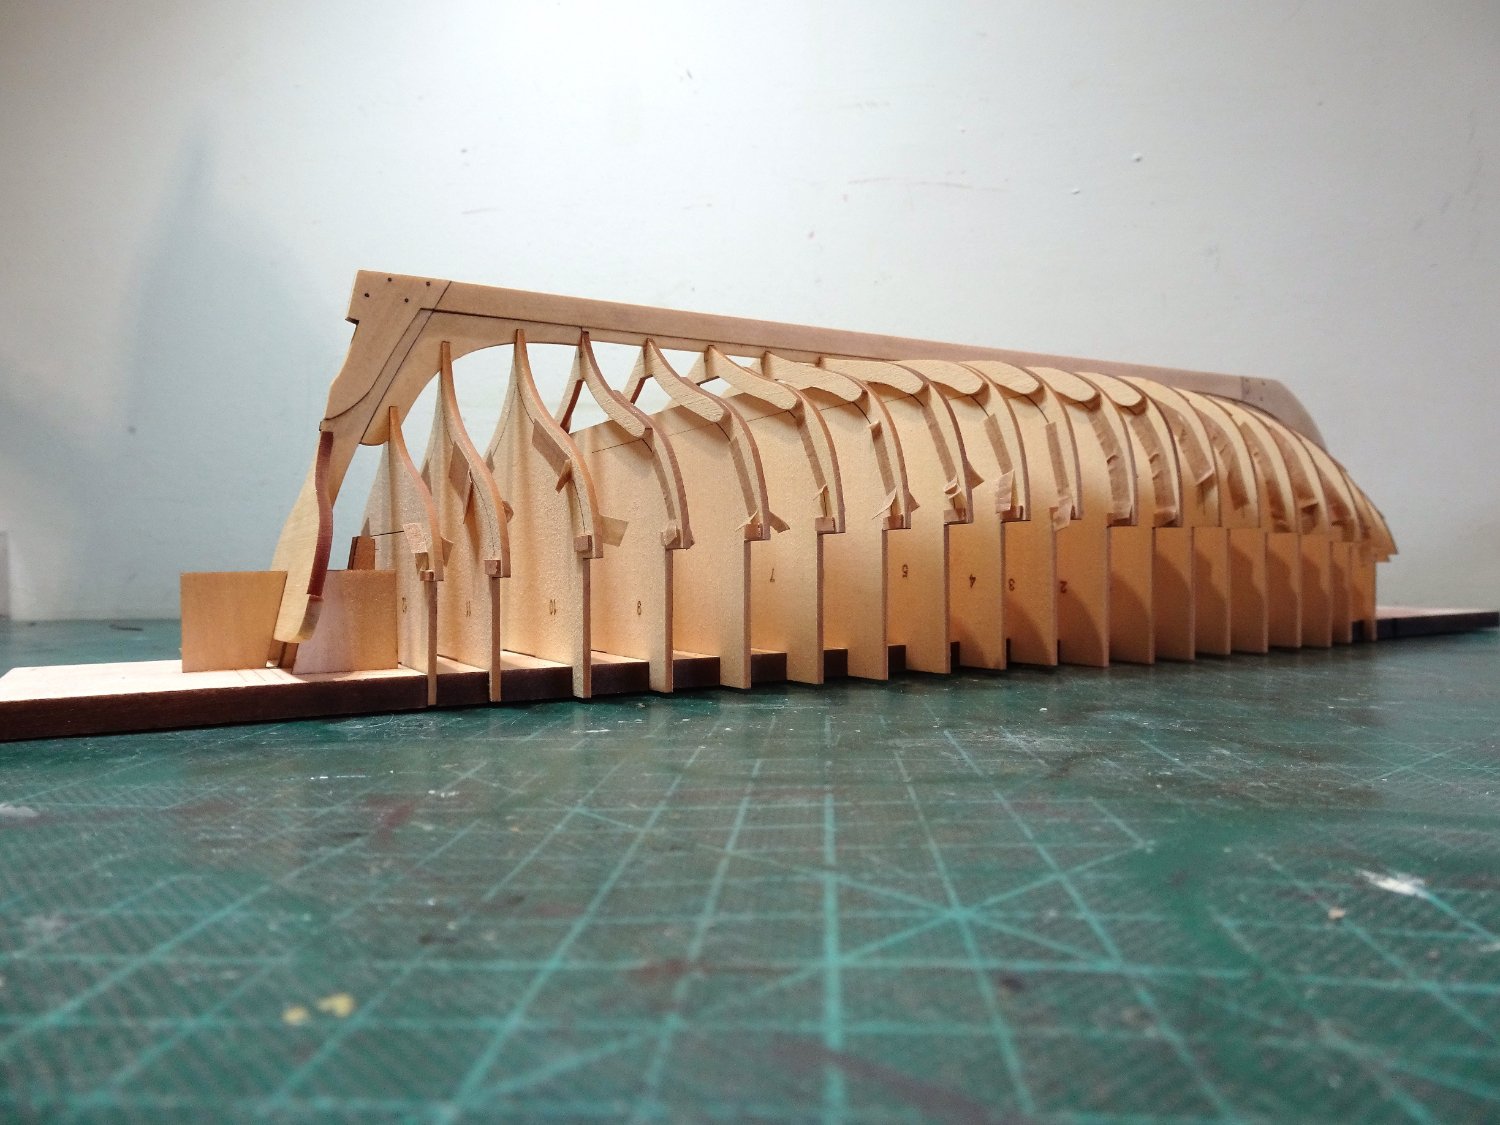
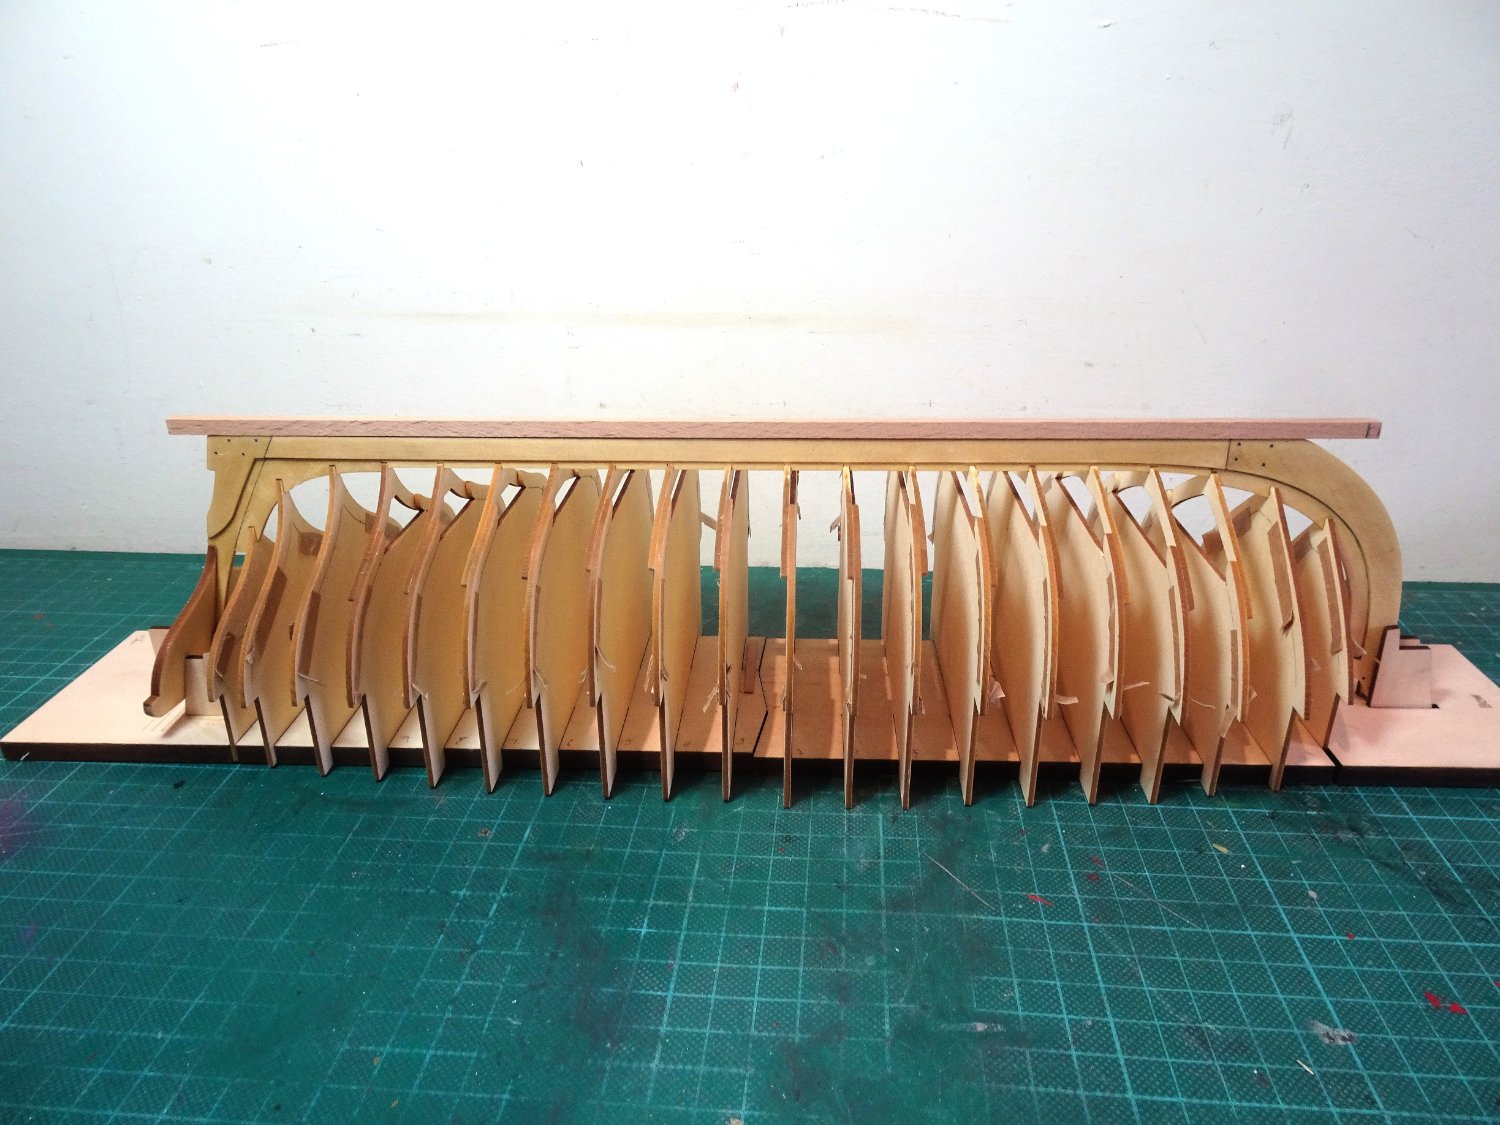
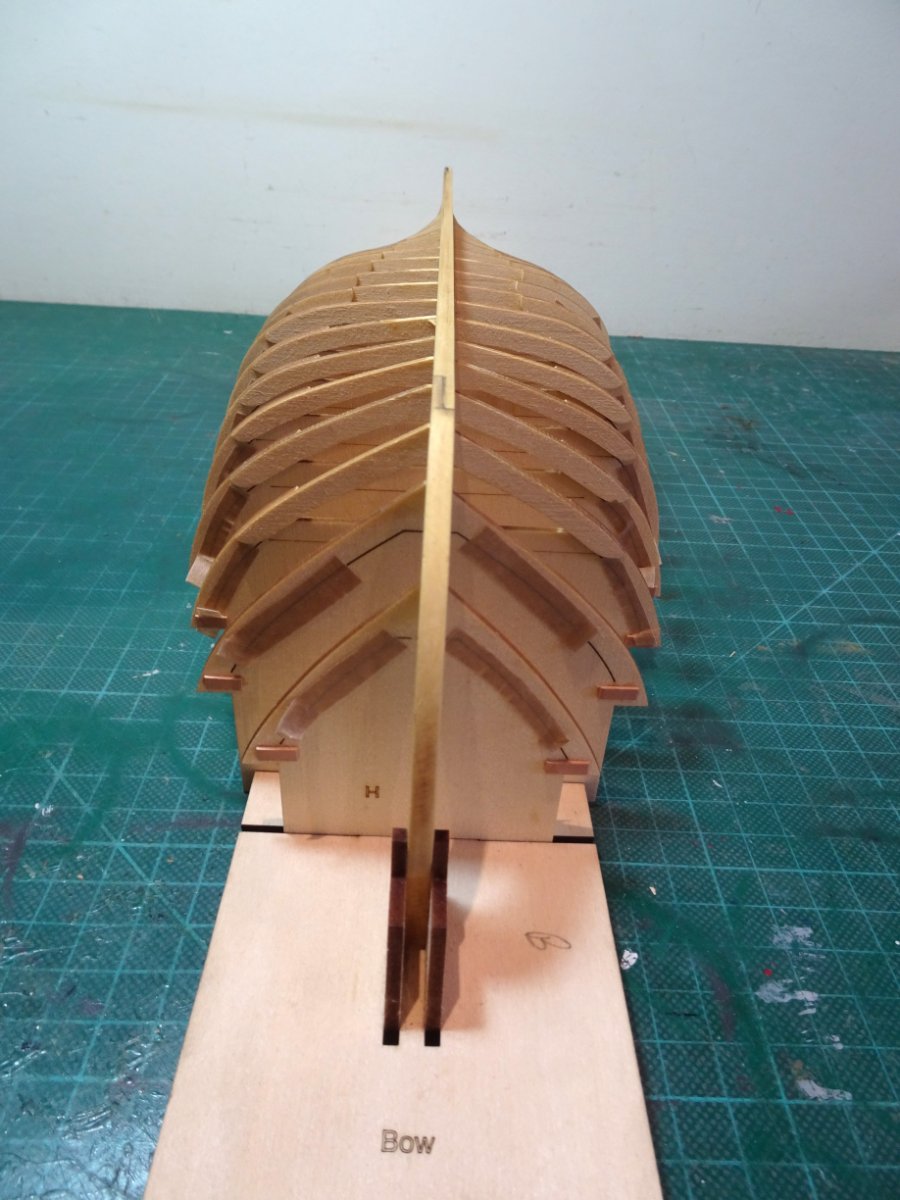
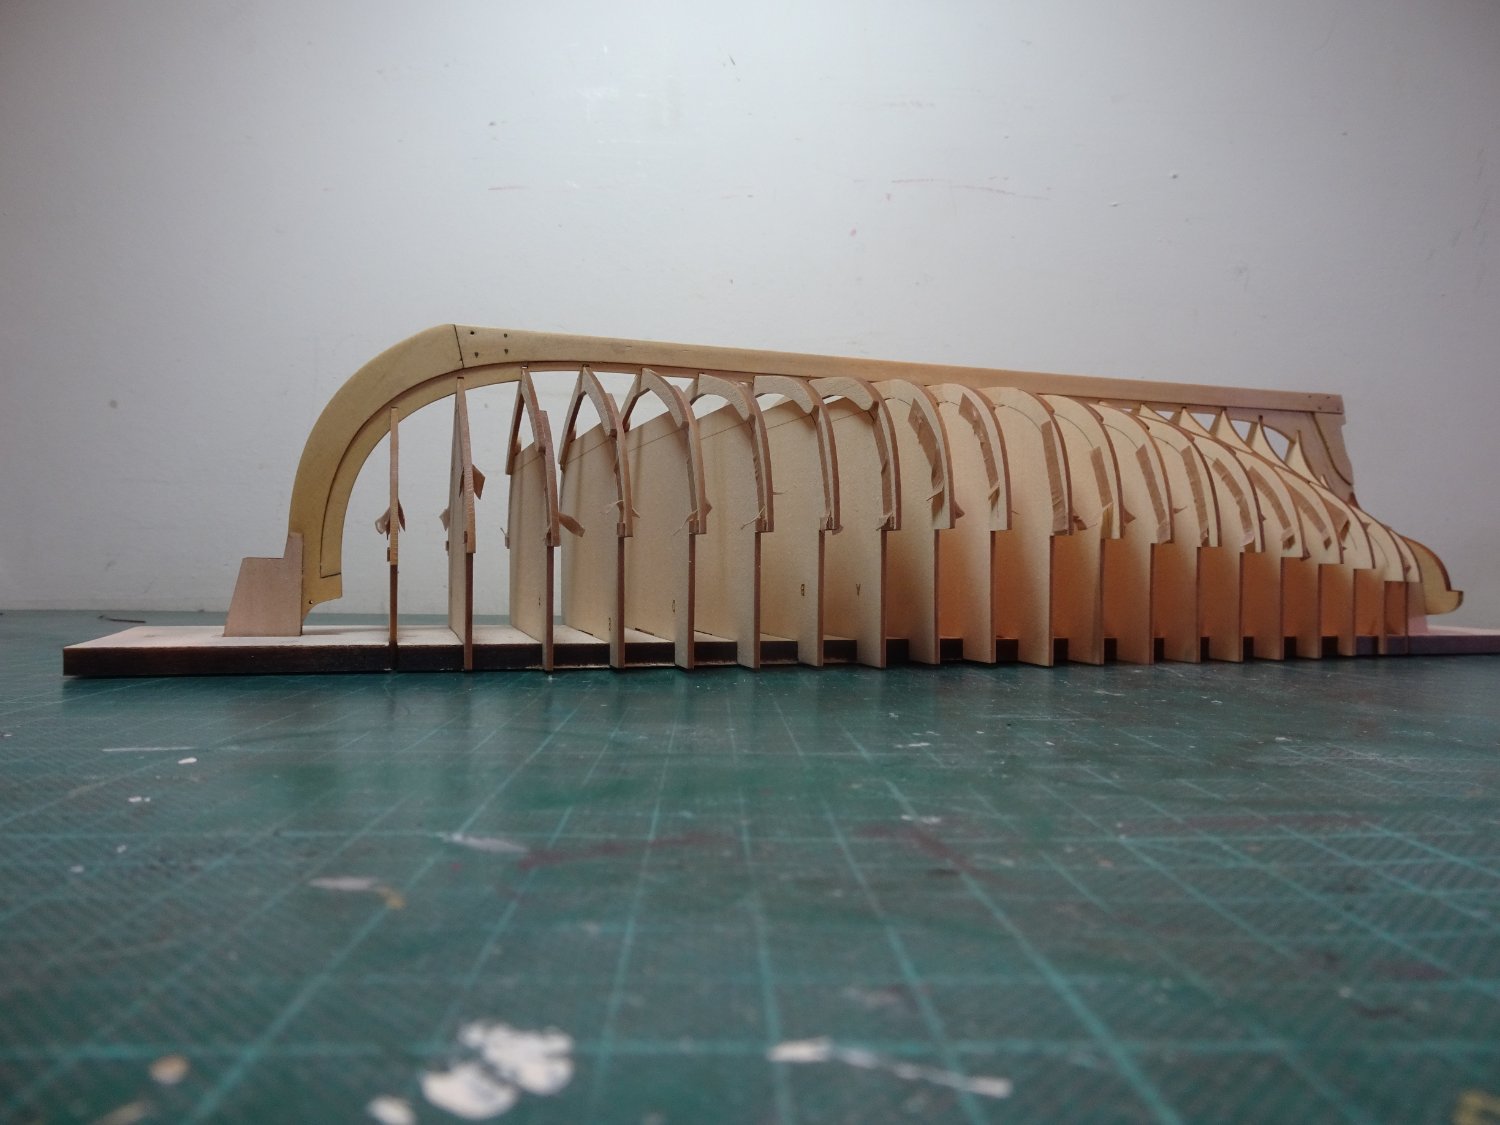
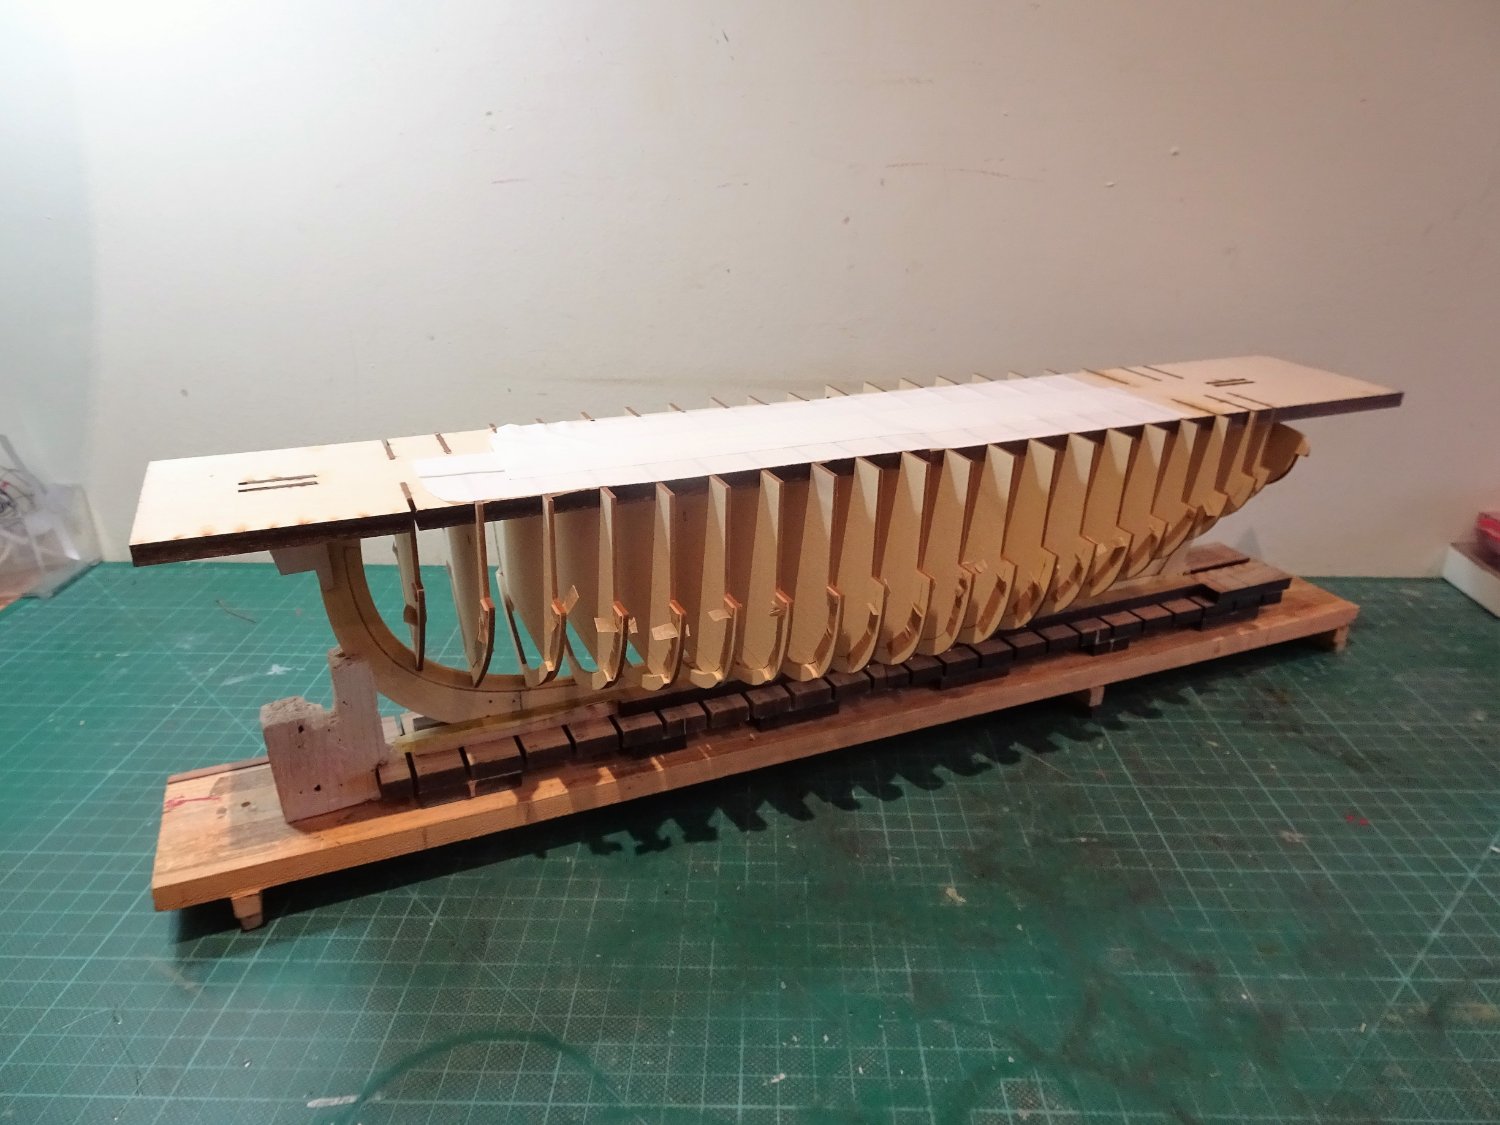
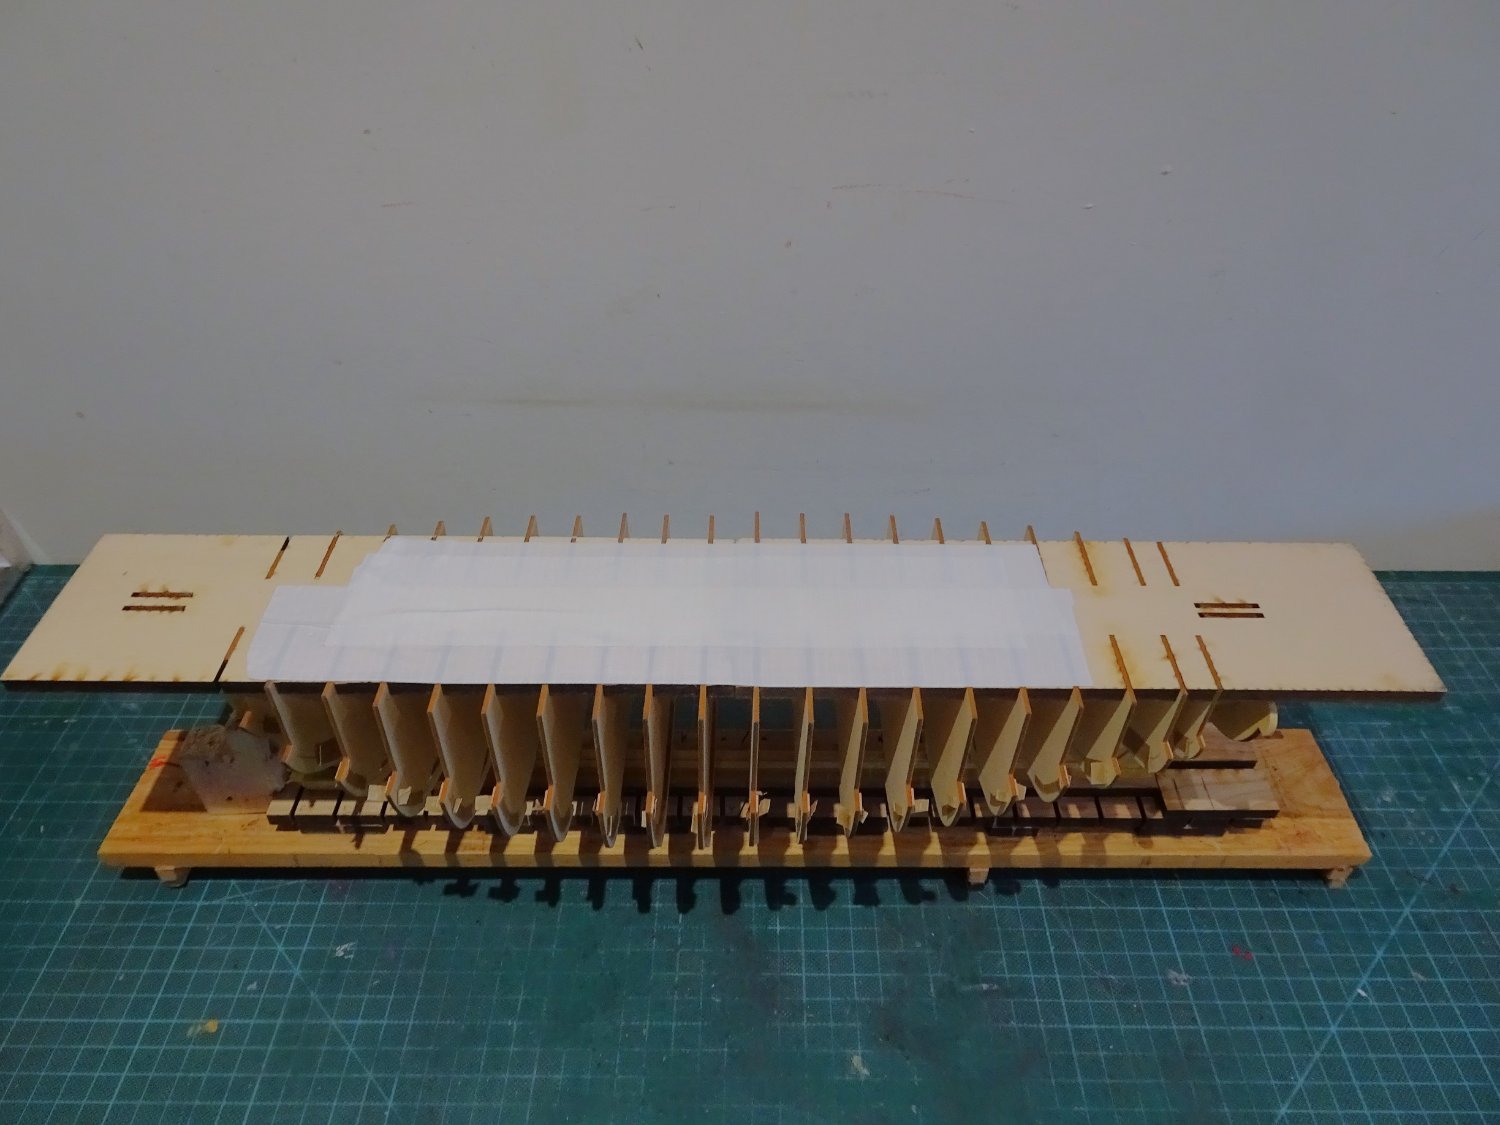
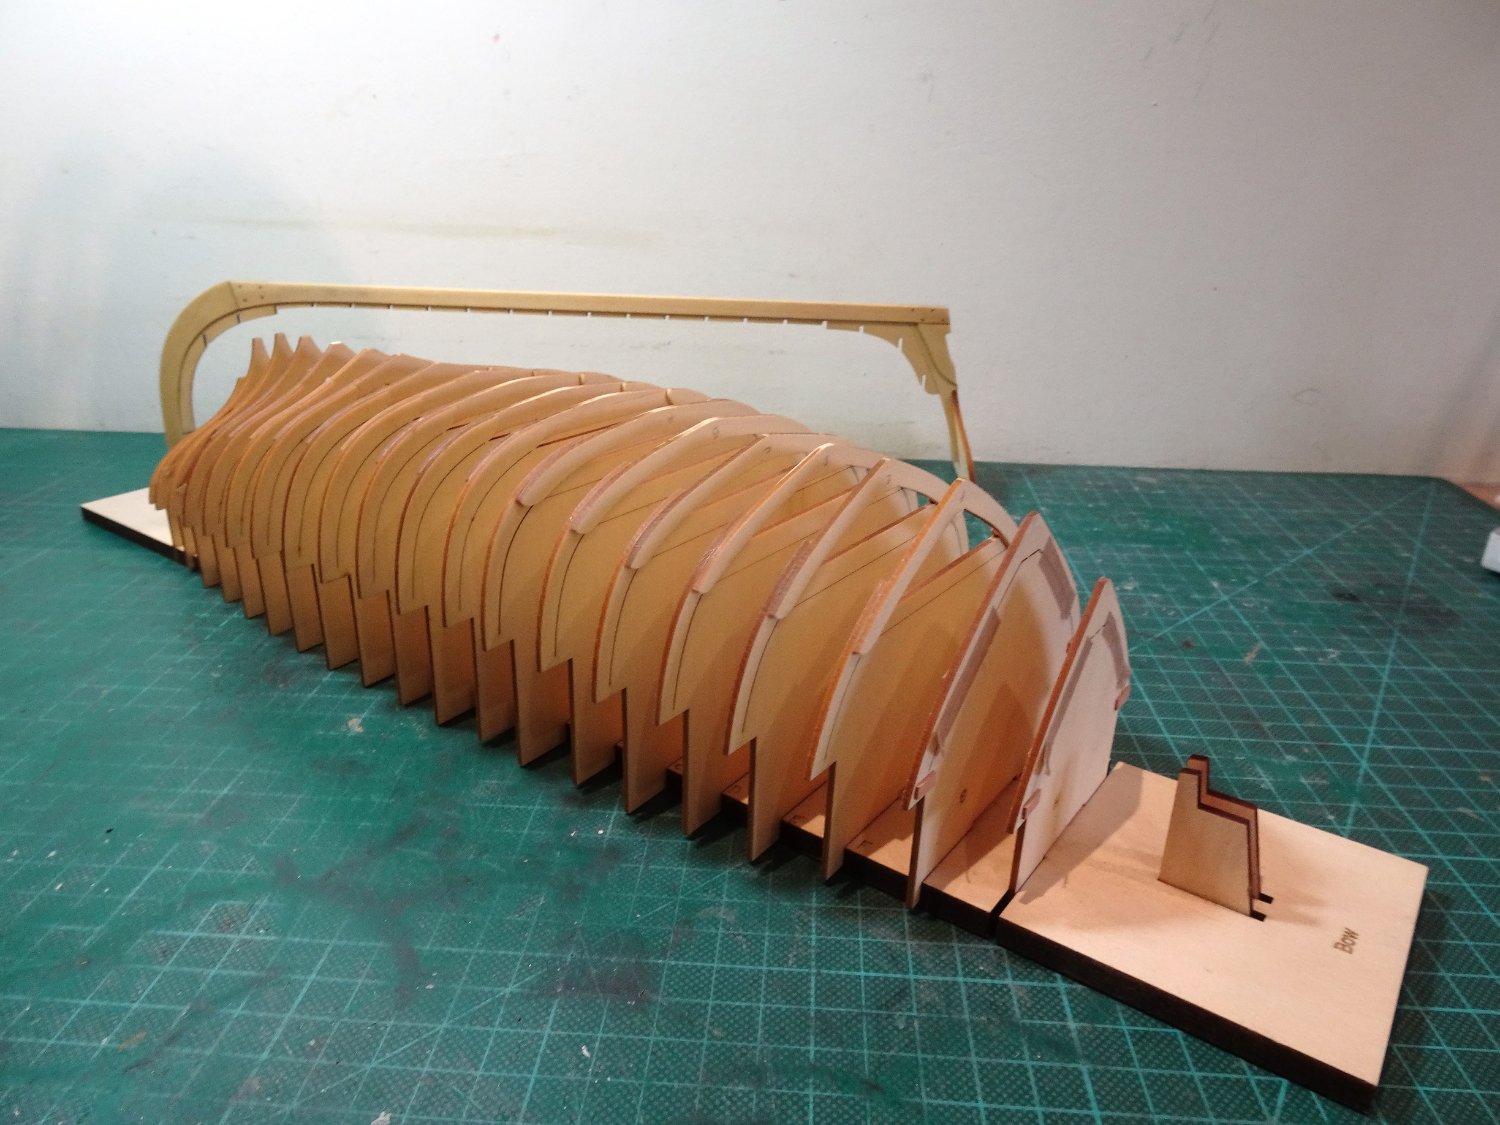
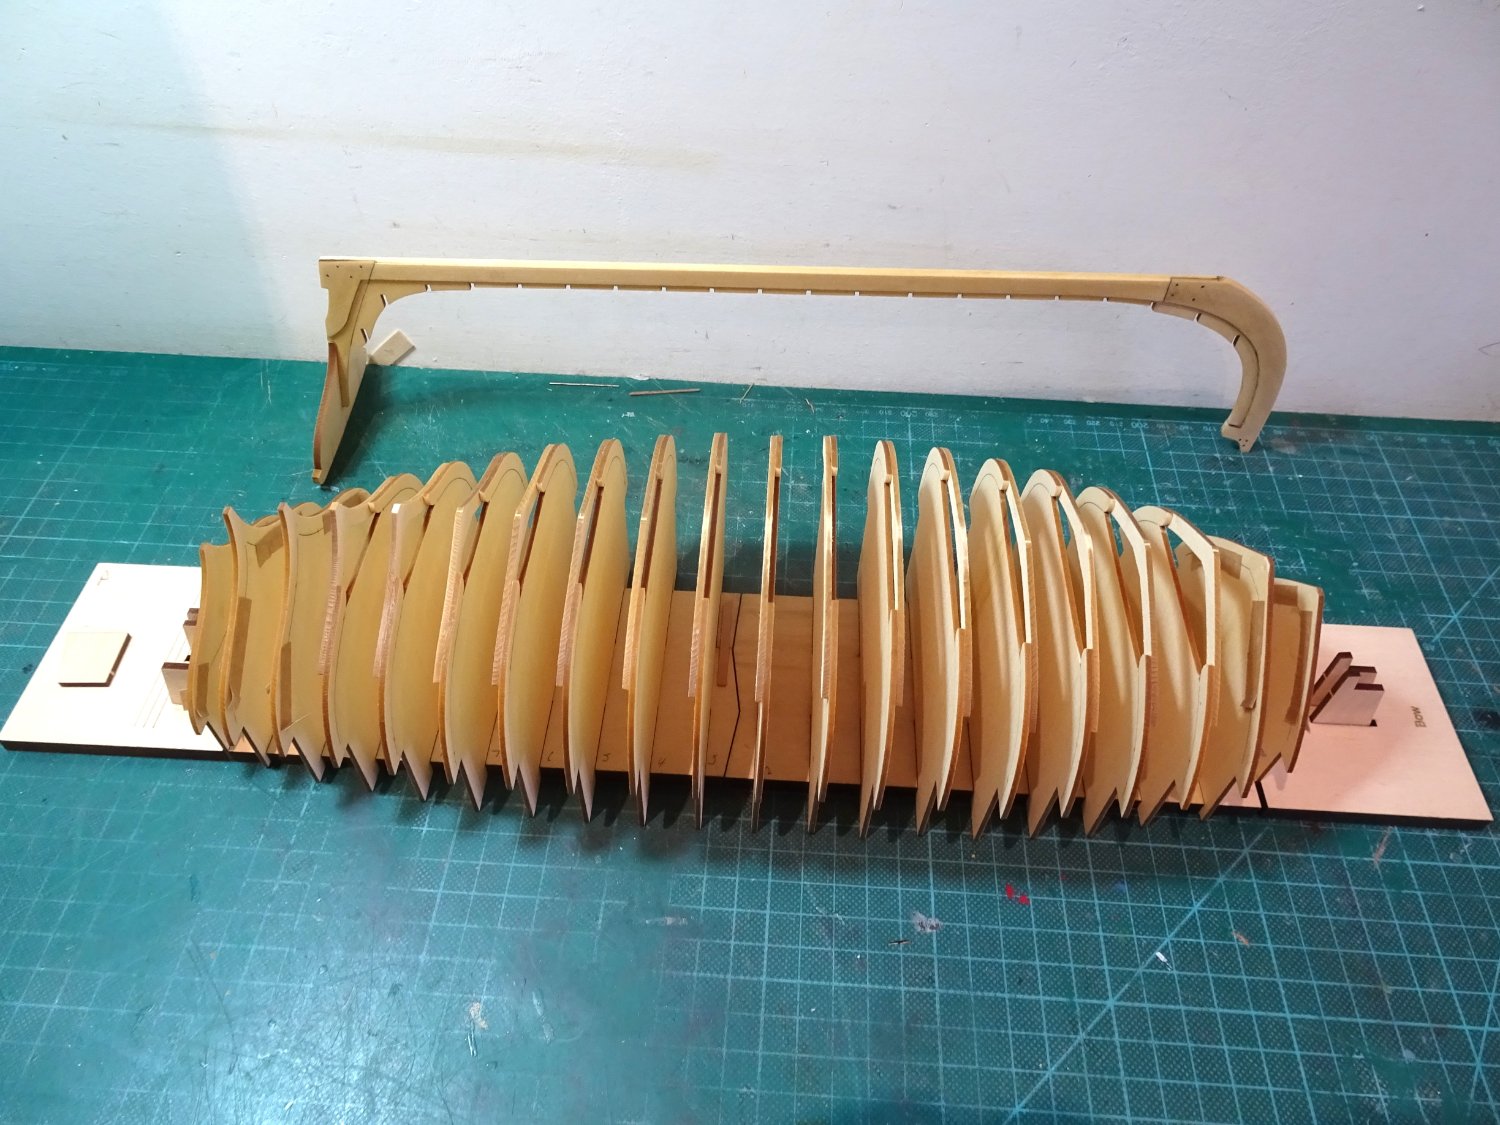
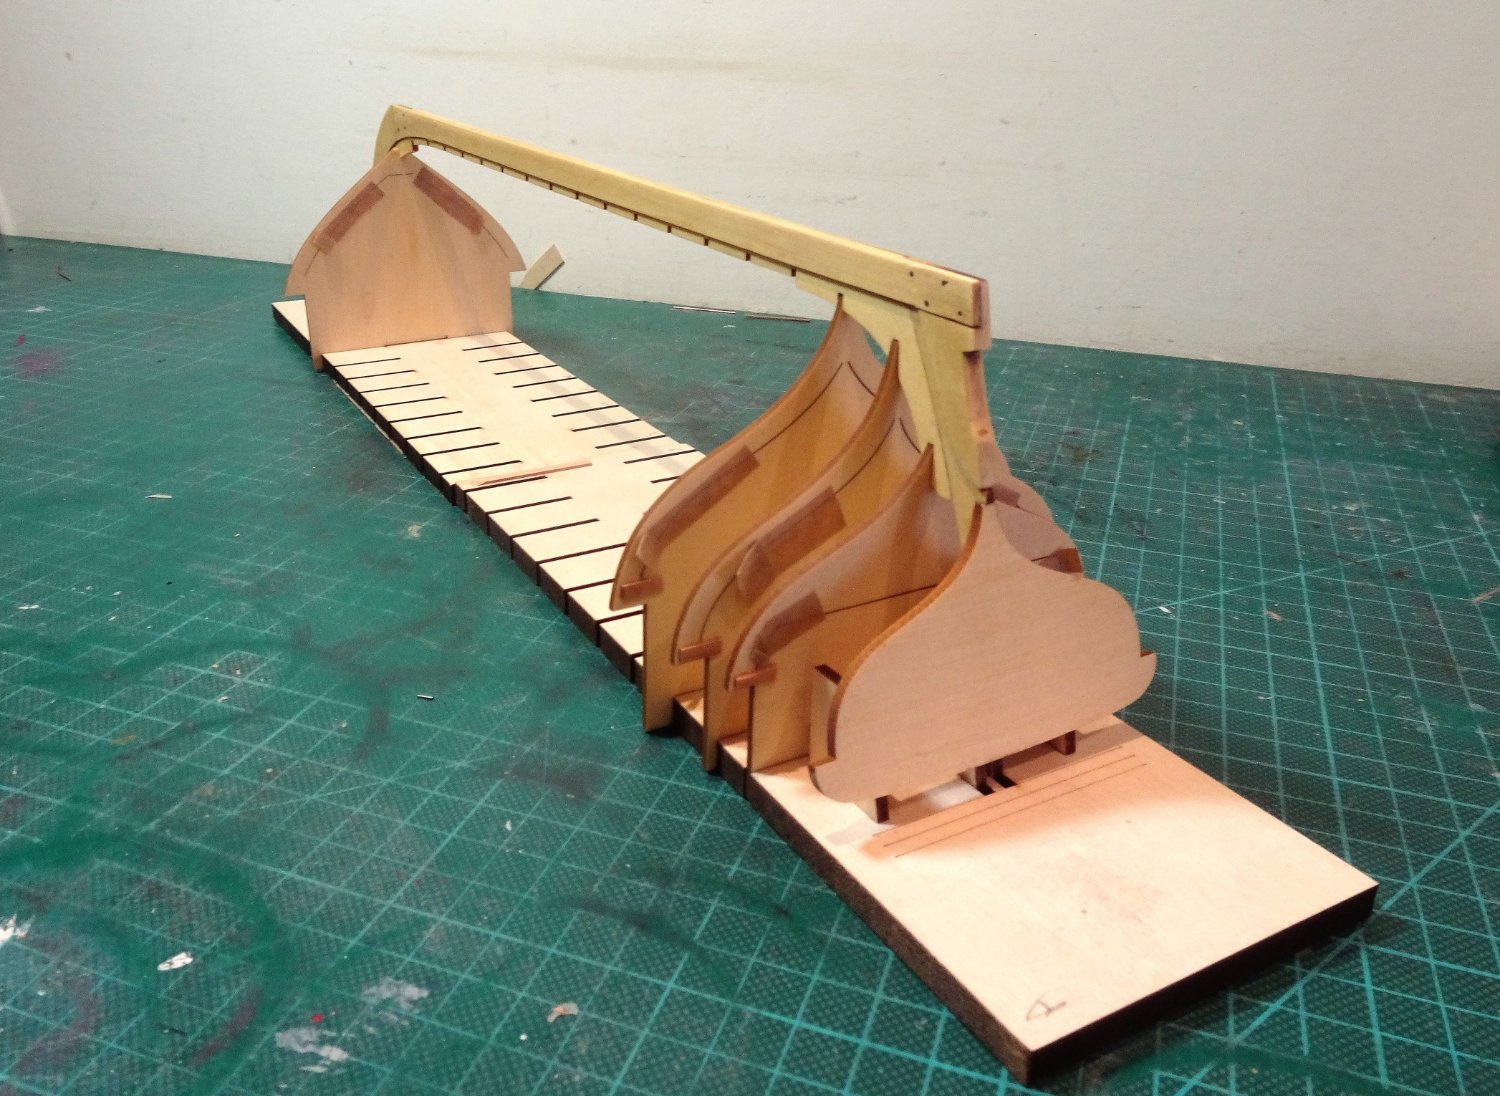
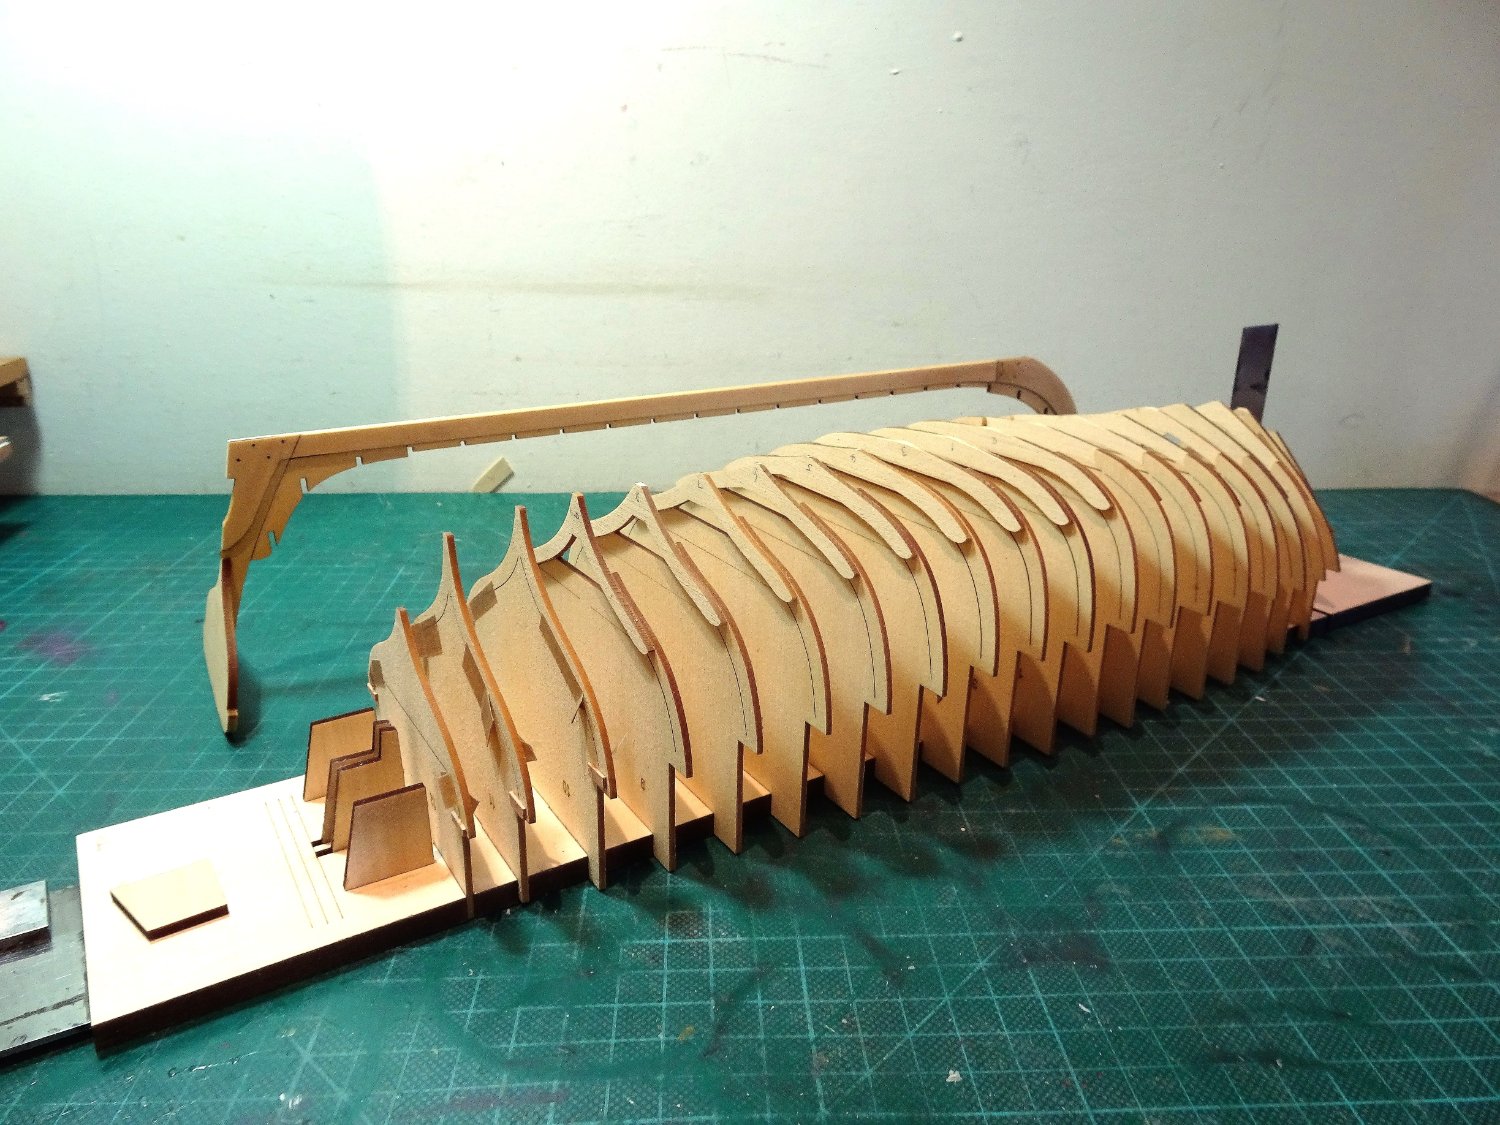
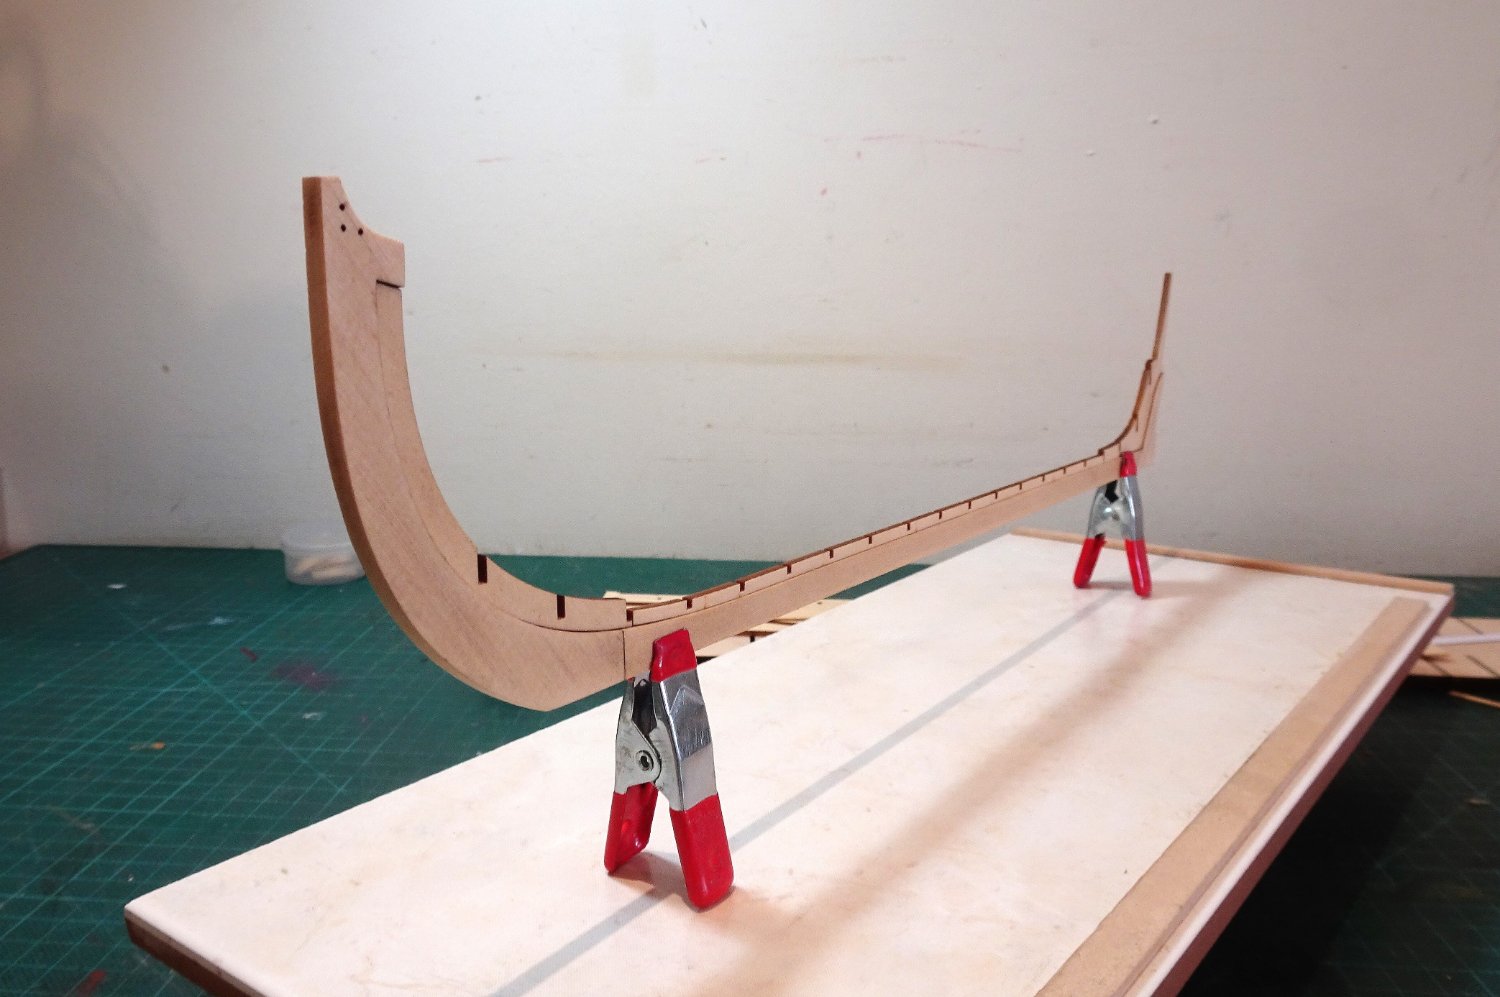
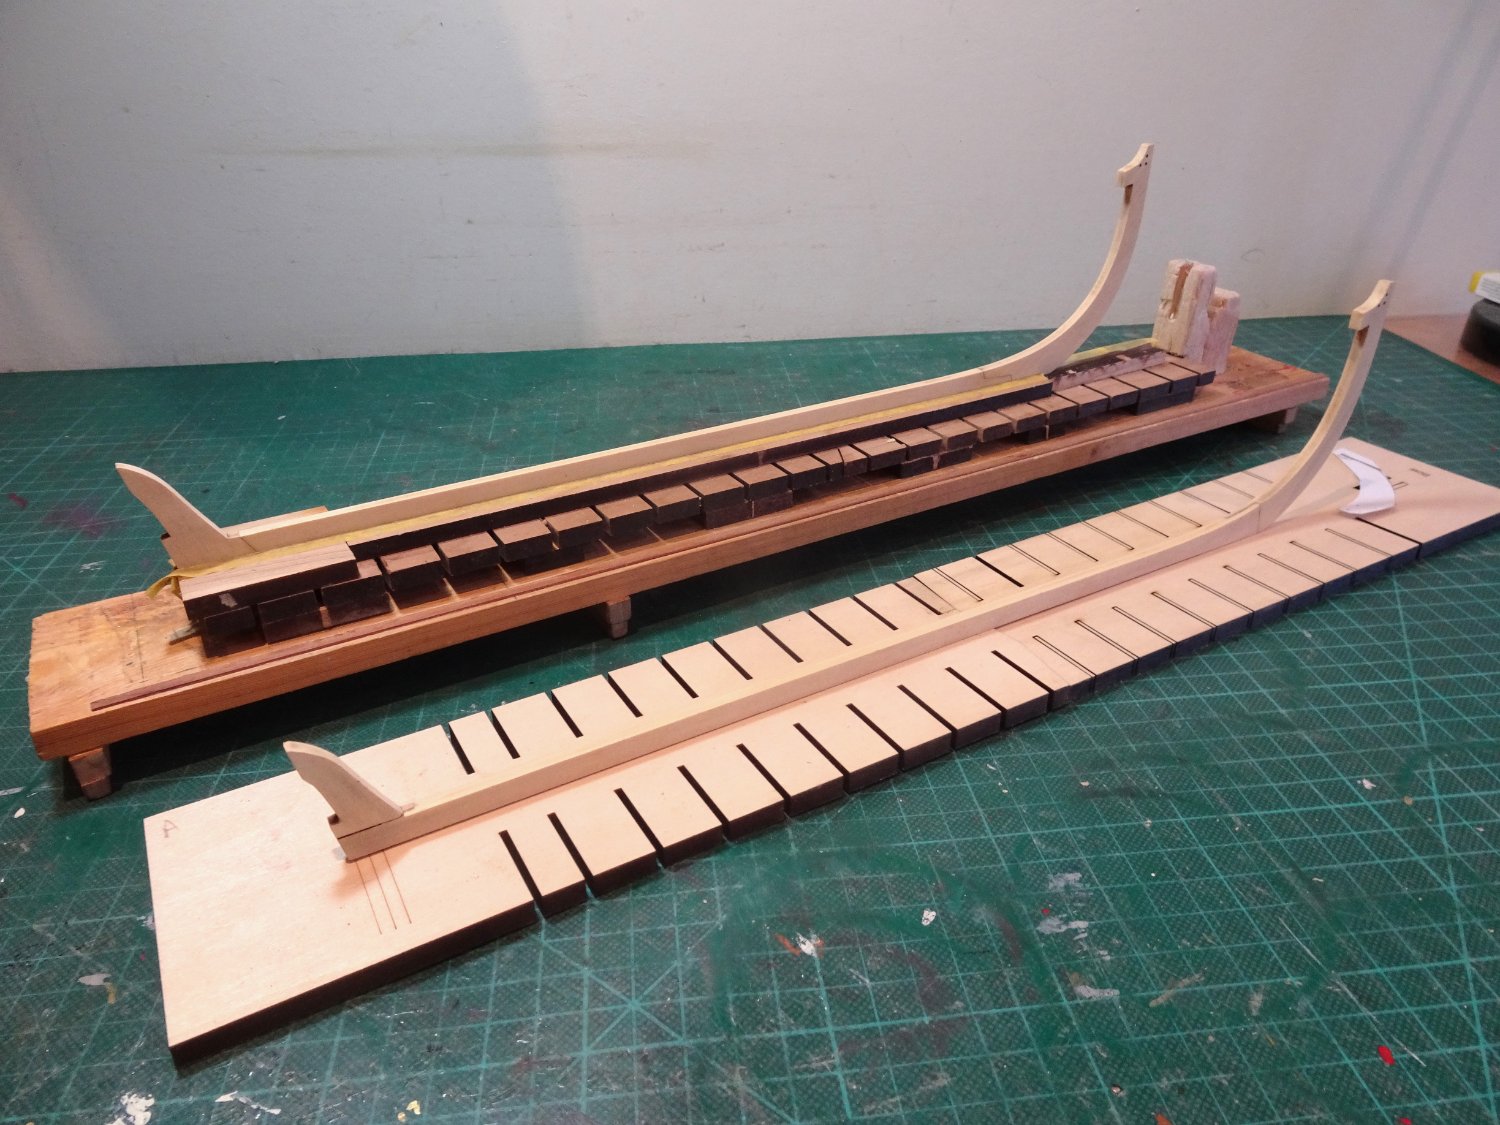
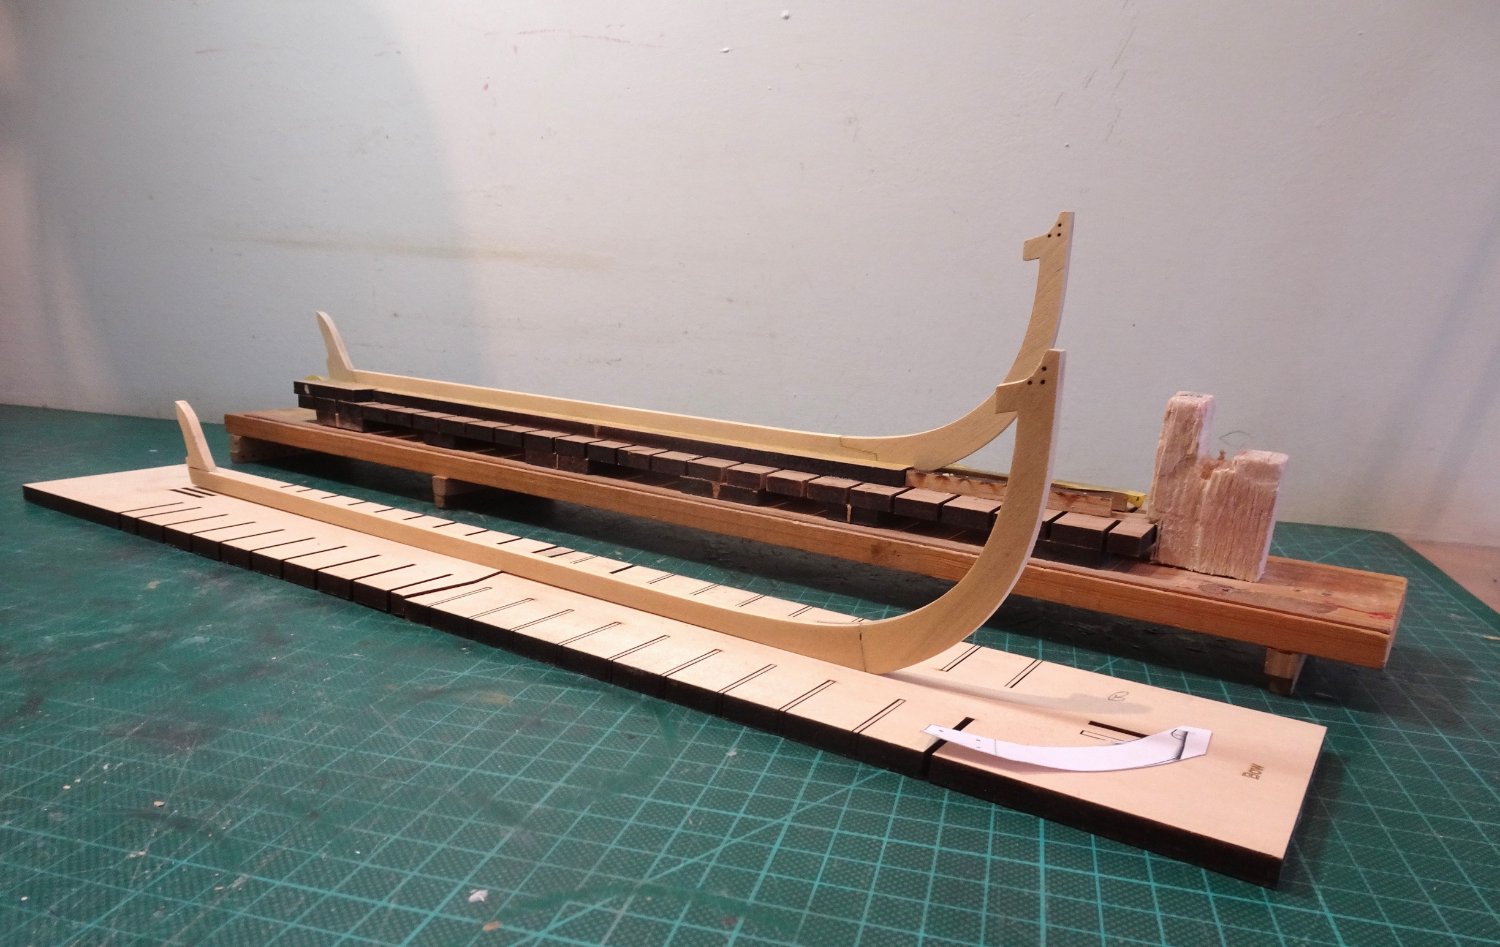
Post Four Being a belt and braces sort of chap I applied the tape and wooden tabs to all the frames in preparation for fairing. 0128 I spent time assembling/disassembling the frames and keel on the building board. I didn’t find it an easy task getting all the keel slots to sit fully down on the frames, but until this is done there is no point moving on. Some of the frames required a slight sanding where they fit into the keel slots. 0132 Once I could assemble the aft section in a fairly seamless manner, I proceeded to glue. This process took but a short time. 0139 No hogging in the keel. 0137 0145 … and no keel warp. 0146 Always a relief when this first part has been completed without mishap. 0136 I added an extra support for the transom using spare brace pieces. 0148 The hull is flipped for the application of tape to the underside of the building board. 0147 The tricky business of fairing beckons. B.E. 27/01/23


- 131 replies
-
- 13
-

-
- Medway Longboat
- Syren Ship Model Company
- (and 1 more)
-
Thank you Hakan, chuck and Paul. @ Hakan - Those frames are delicate enough to make me twitchy when it comes to fairing. That cutting mat has seen a lot of service, probably due for replacement, a lot of battle scars over the years. @ Chuck - Love the Alaskan Cedar you are now using. @ Paul - I still feel nervy starting a new project, even after all these years. Thank you for looking in on my build. Regards, B.E.
- 131 replies
-
- 4
-
-
- Medway Longboat
- Syren Ship Model Company
- (and 1 more)
-
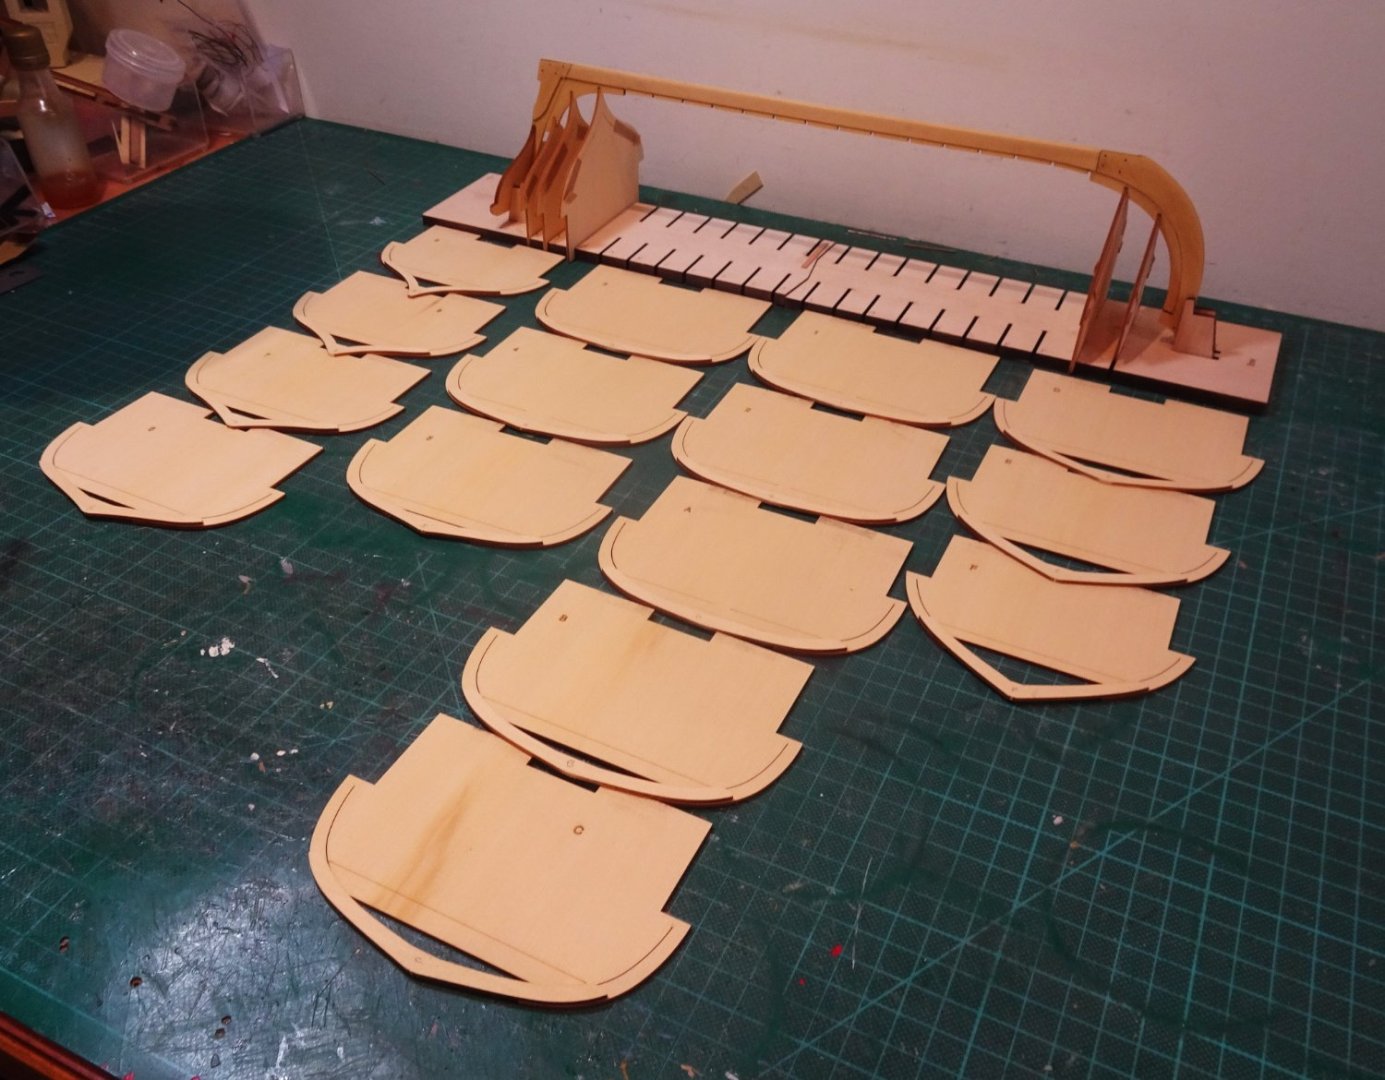
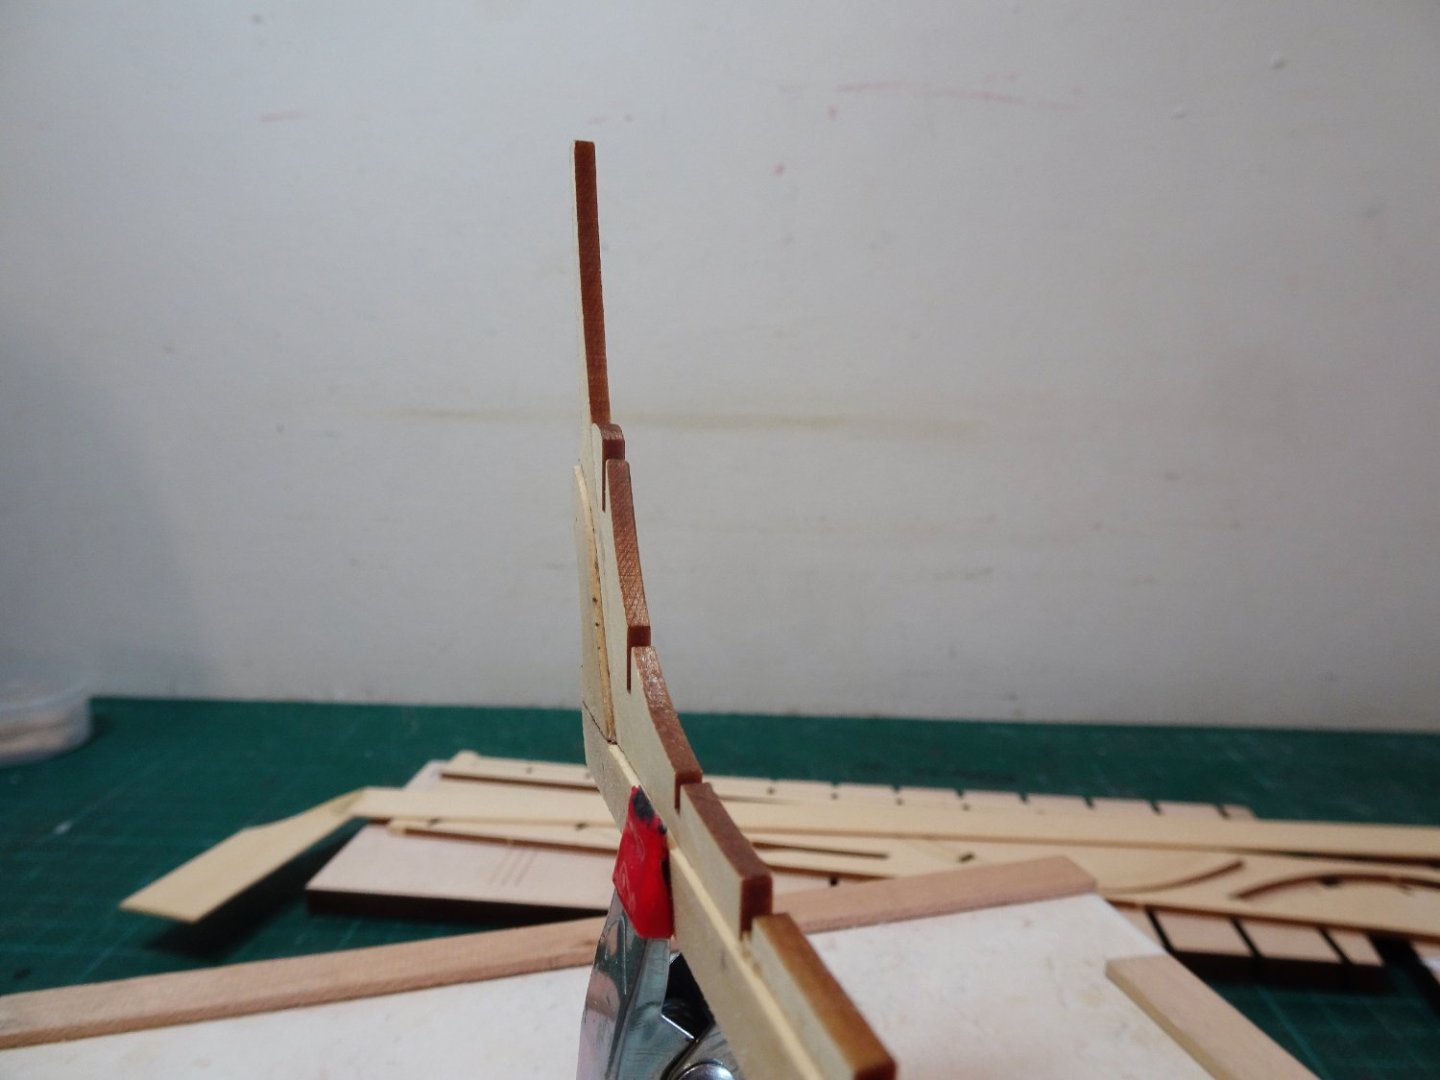
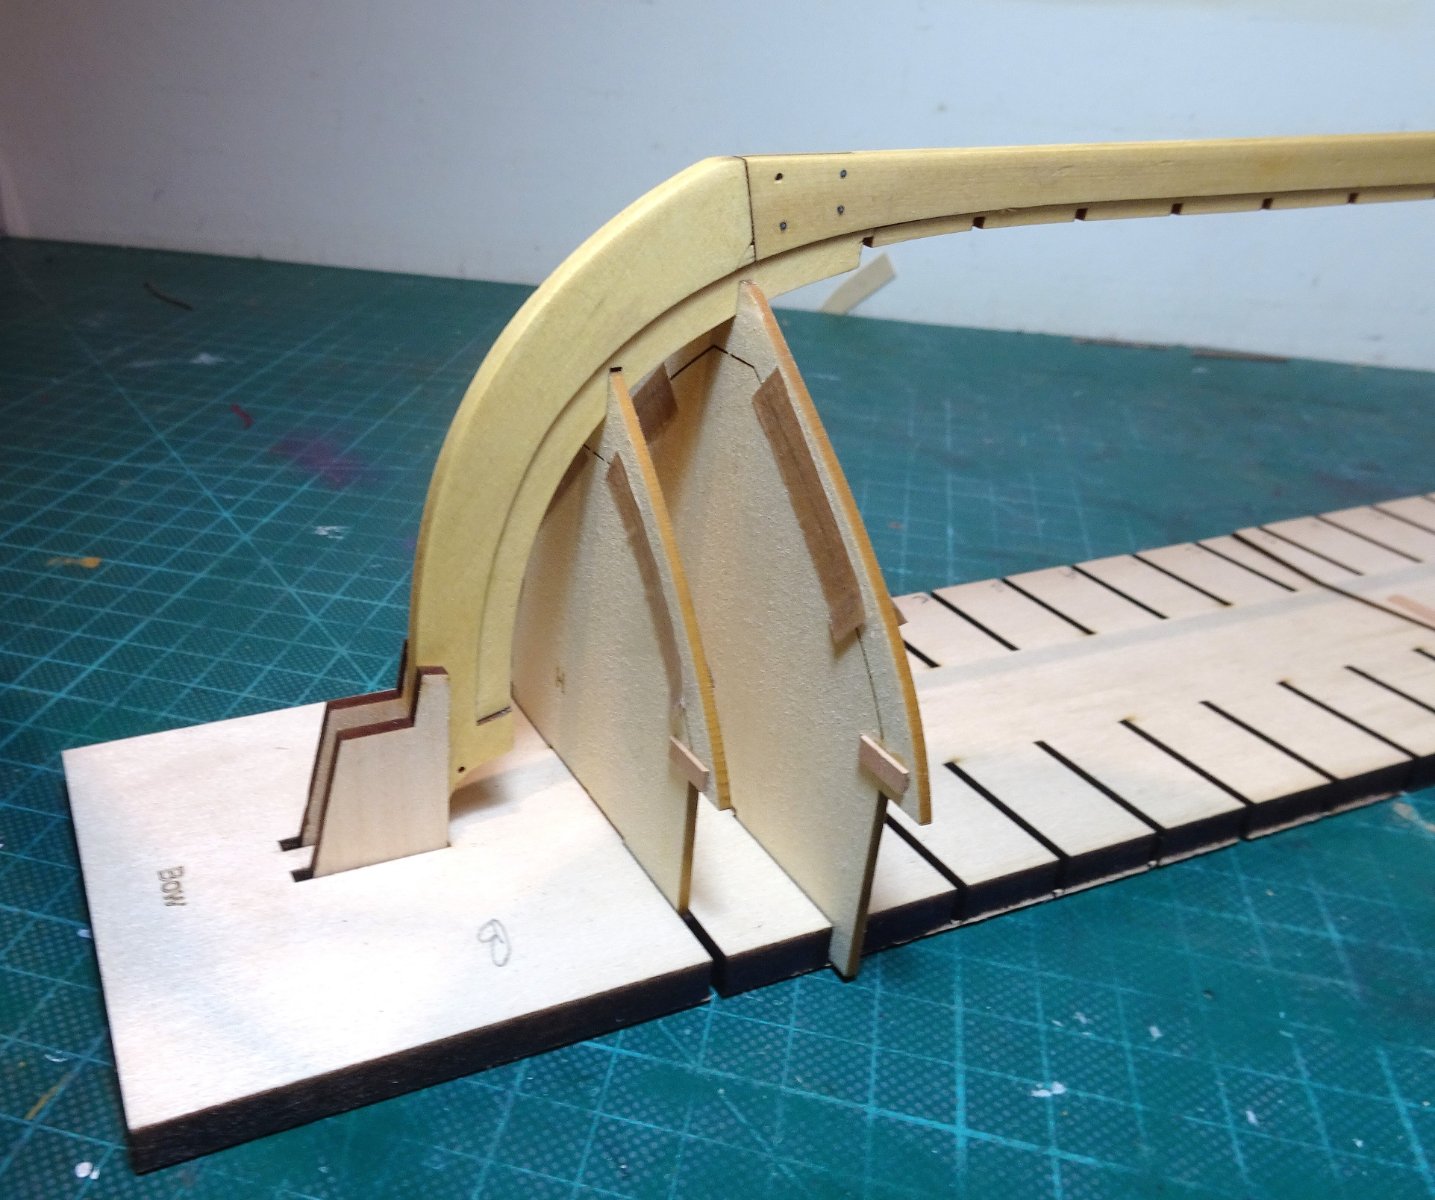
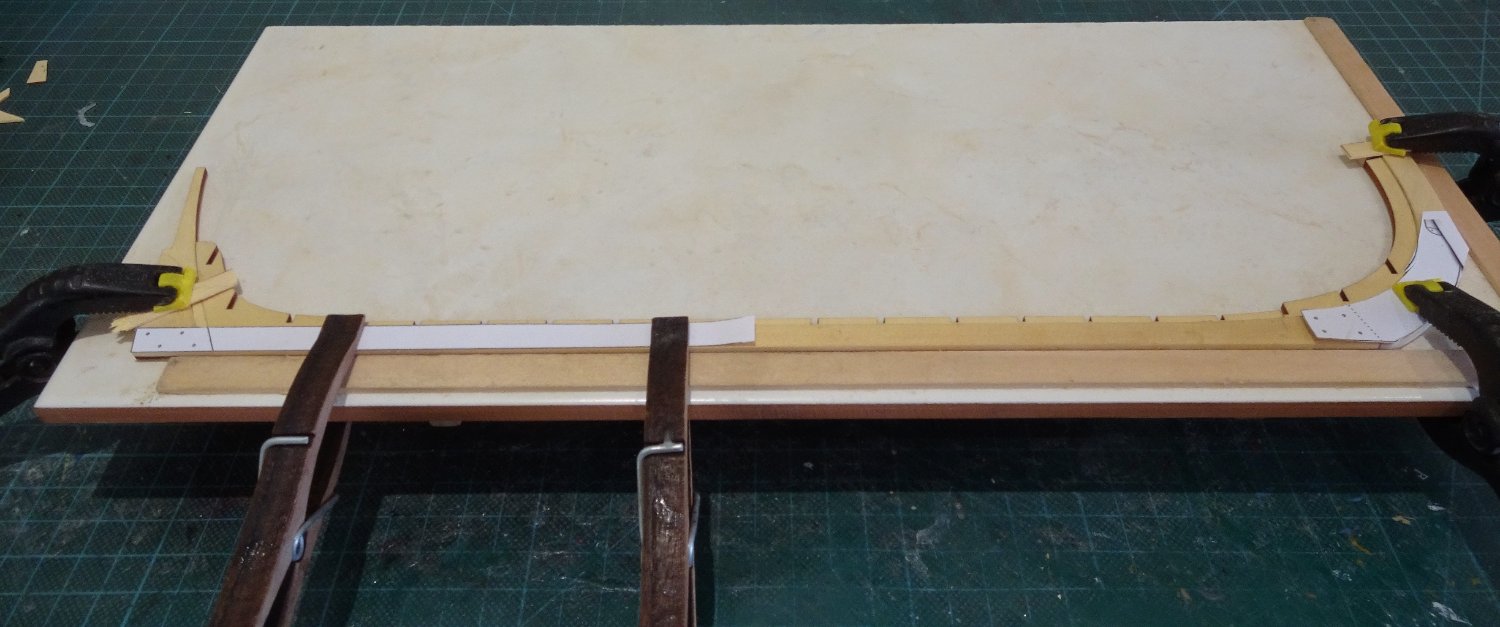
Post three Frame preparation is the next task. 113 It starts with the fore and aft single frames. In accordance with the advice, tape is applied both sides of the frames to support the cut line during fairing, and small tabs are glued in place to support this weak area. 0112 Provided blocks are used to protect the transom. 0111a 0110 Dry test fitting of the keel, the first of many such tests before any glue is applied. 0109a The double frames comprising Top timbers and floors are assembled. 0122 On the stern section board, the floor sections face aft. 0116 On the bow section board, the floor timbers face forward except for frames 1 and 2 next to the board join, which also face aft. 0126 The frames slot into the build board with very little need for adjustment. I will now play around with the keel fit before I commit to glue. B.E. 25/01/23


- 131 replies
-
- 16
-
-
- Medway Longboat
- Syren Ship Model Company
- (and 1 more)
-
Carr Laughton has something to say about the decoration of Figures, which had been painted in natural colours, certainly from the 17th c altho' there may have been periods prior to 1770 where the fashion had lapsed in favour of gilt , varnish, or yellow paint. During the late 18th c it is highly likely that figures were painted in natural colours, so I doubt that anyone could argue with the scheme on the Indy model. The other consideration is aesthetics. Many of the beautiful 18thc models show unpainted figures, and personally as I like as little paint on models as possible I have always favoured the 'varnished' look. Indy is slightly different as it is an all painted model and is perhaps better suited to a coloured figure. It has really got to be in the 'eye' of the builder but I don't think there is an historical reason not to colour the figure. B.E.
- 488 replies
-
- 11
-
-
- Indefatigable
- Vanguard Models
- (and 1 more)
-
Thank you Glenn, no others of a similar scheme , oh, except the Queen Anne Barge, the 1:24 pinnace, the 1:48 Longboat, and the 1:64 Admirals barge.😉 Trouble is I rather like the effect of red ochre for the inboard works on these models, and after all in the 18thc Georgian Navy you could have any colour you like as long as it was Red Ochre. Not used it before but I do like the cedar wood finish of this kit, it's a great substitute for Boxwood, and is now my second favourite wood. Cheers, B.E.
- 131 replies
-
- 3
-
-
- Medway Longboat
- Syren Ship Model Company
- (and 1 more)
-
Thanks Captn, it's a fairly common approach, used by others in the group build section, but it's one I've used over quite a few years , similar adaptations have all sorts of applications in ship model building. Regards, B.E.
- 131 replies
-
- 2
-
-
- Medway Longboat
- Syren Ship Model Company
- (and 1 more)
-
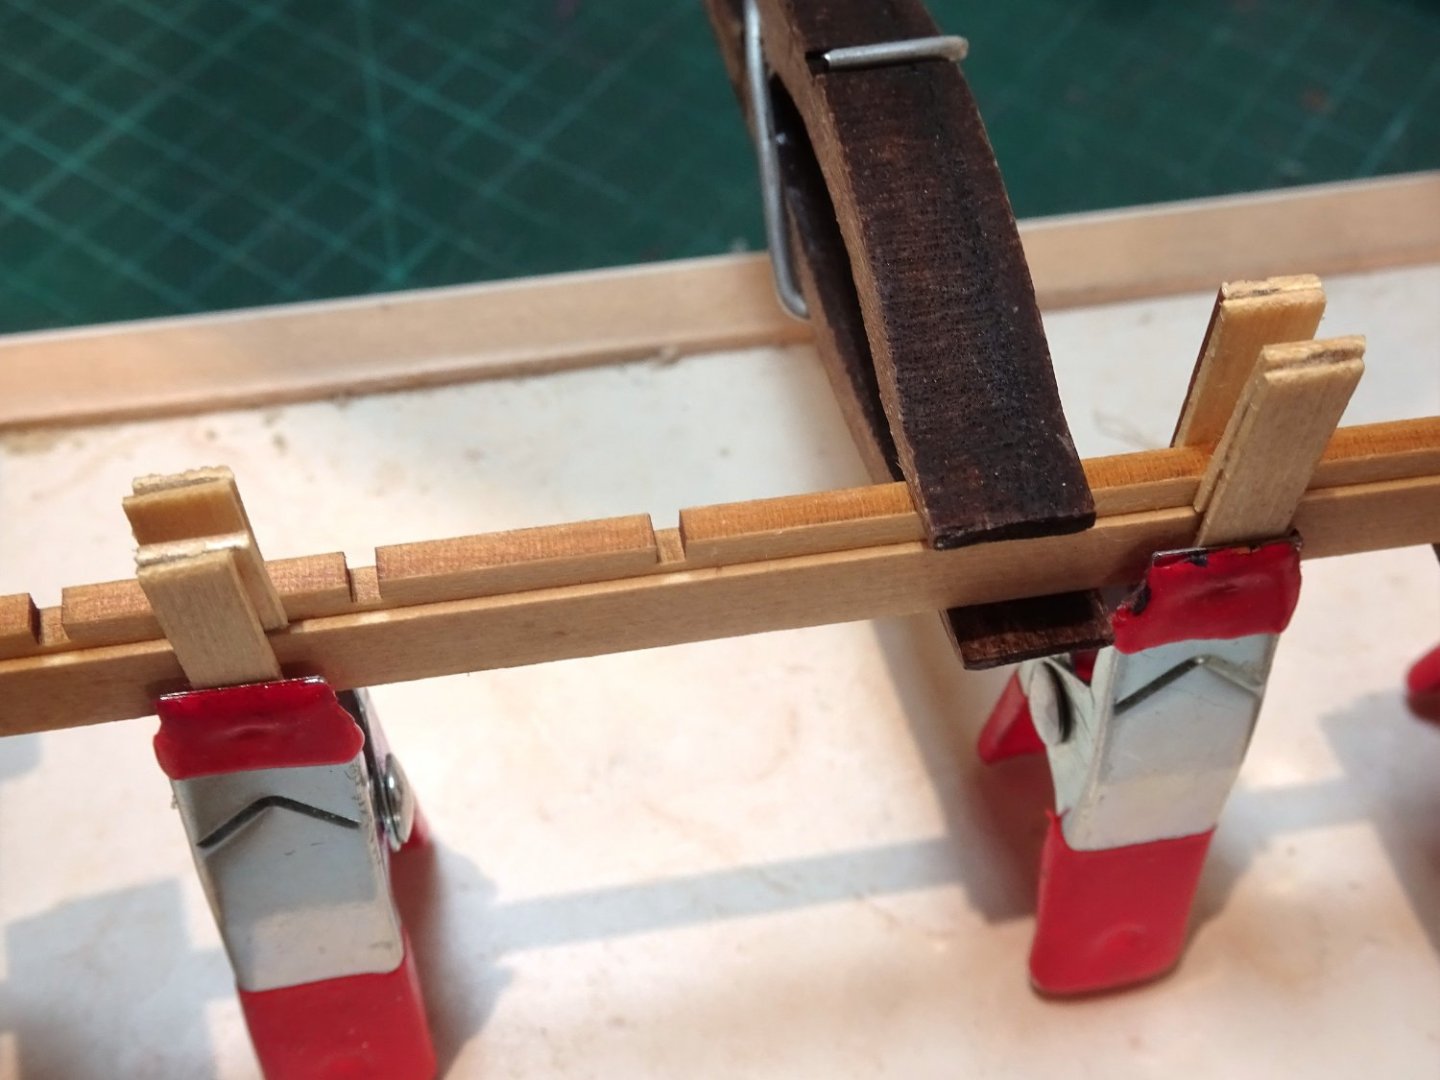
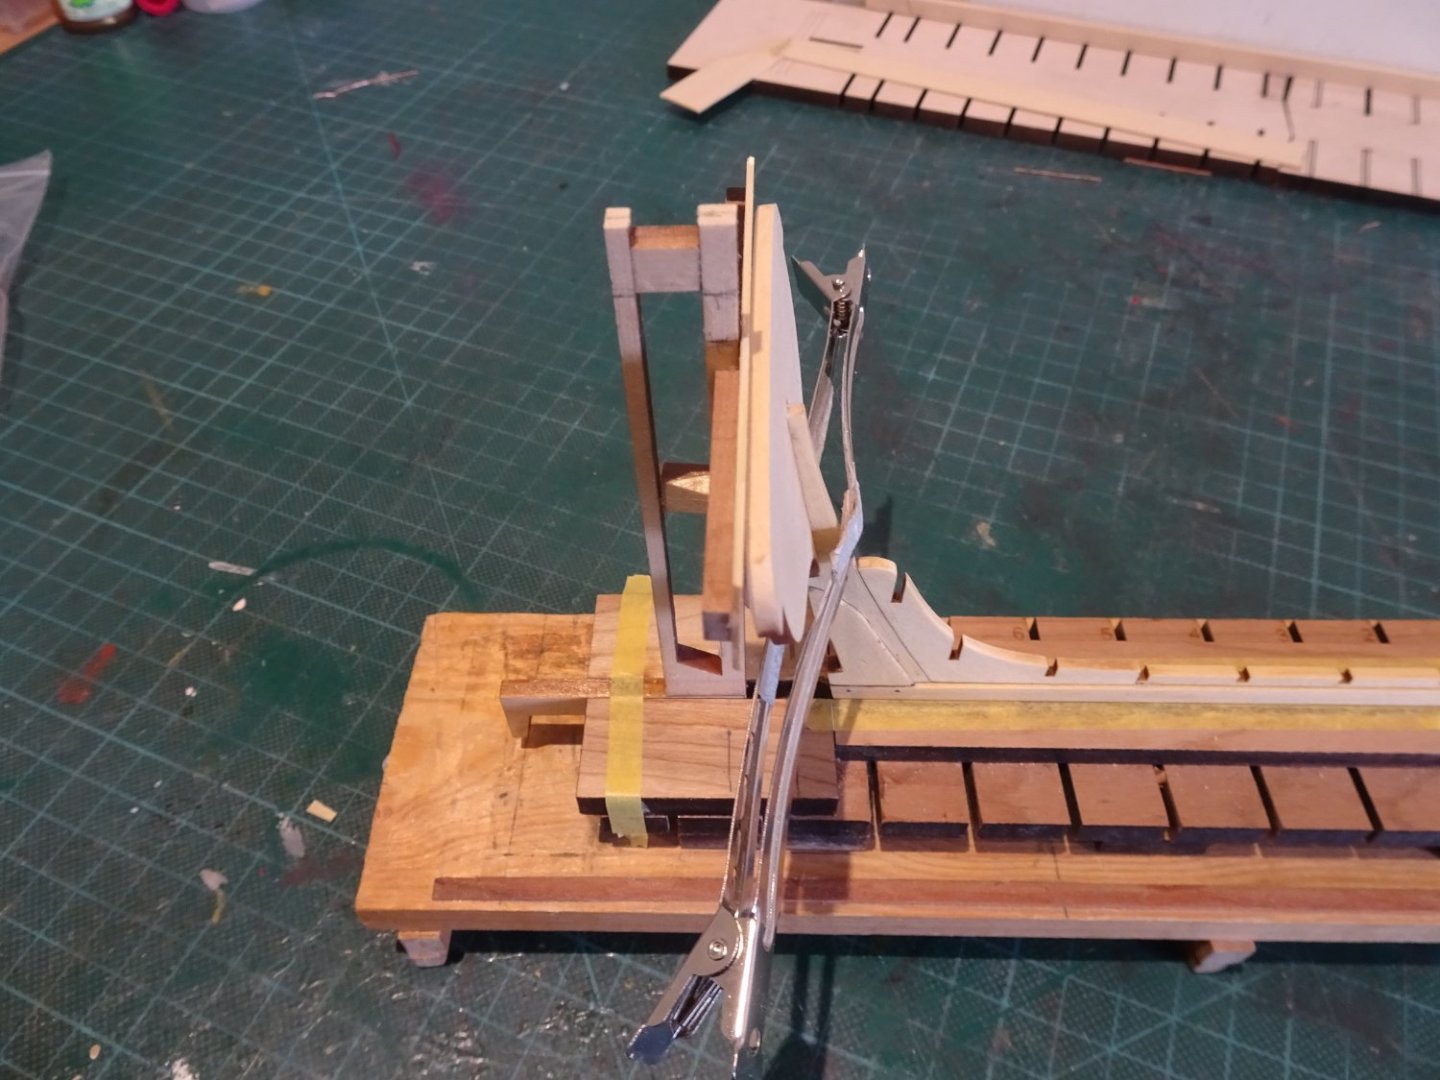
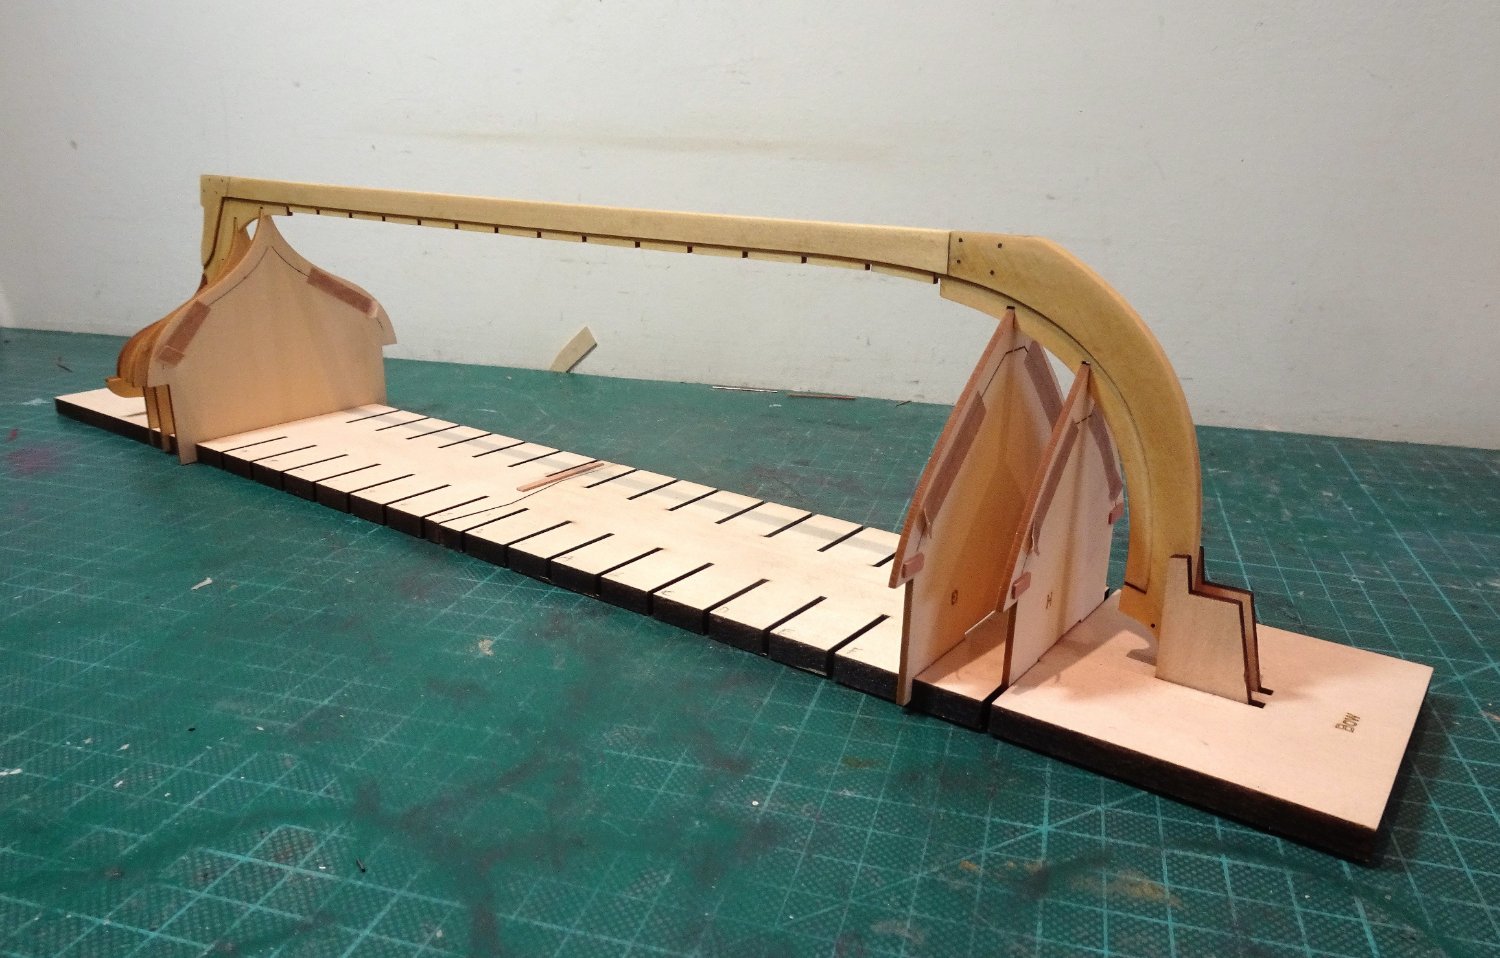
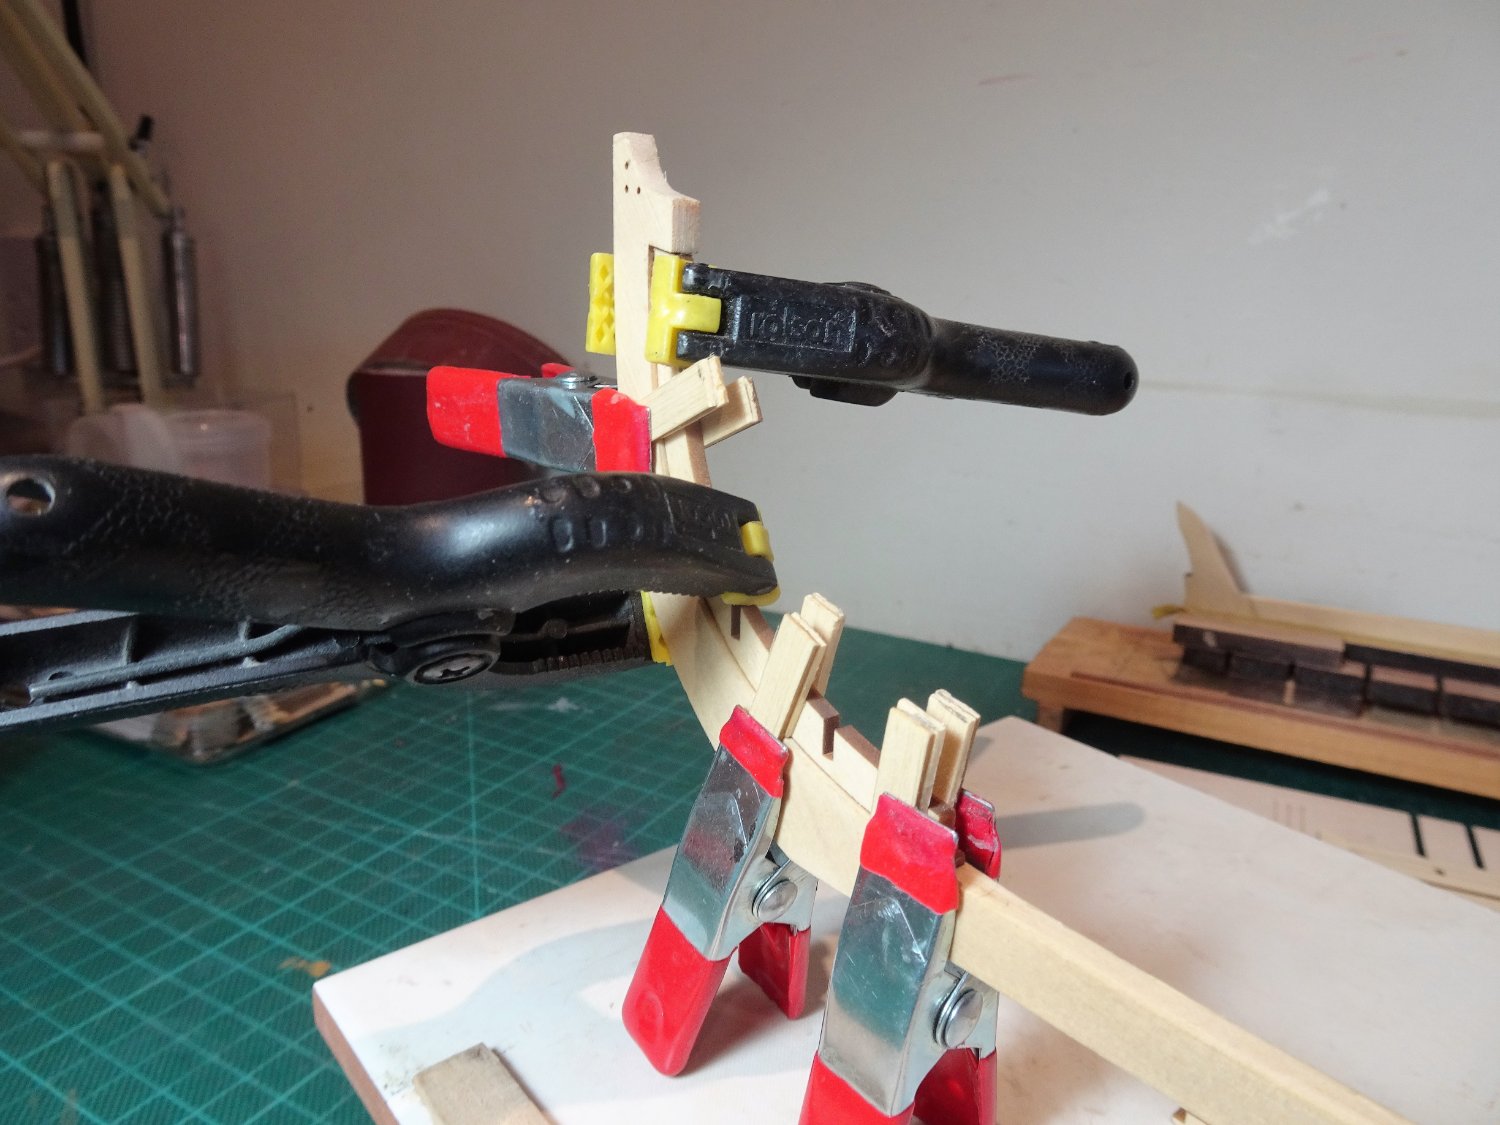
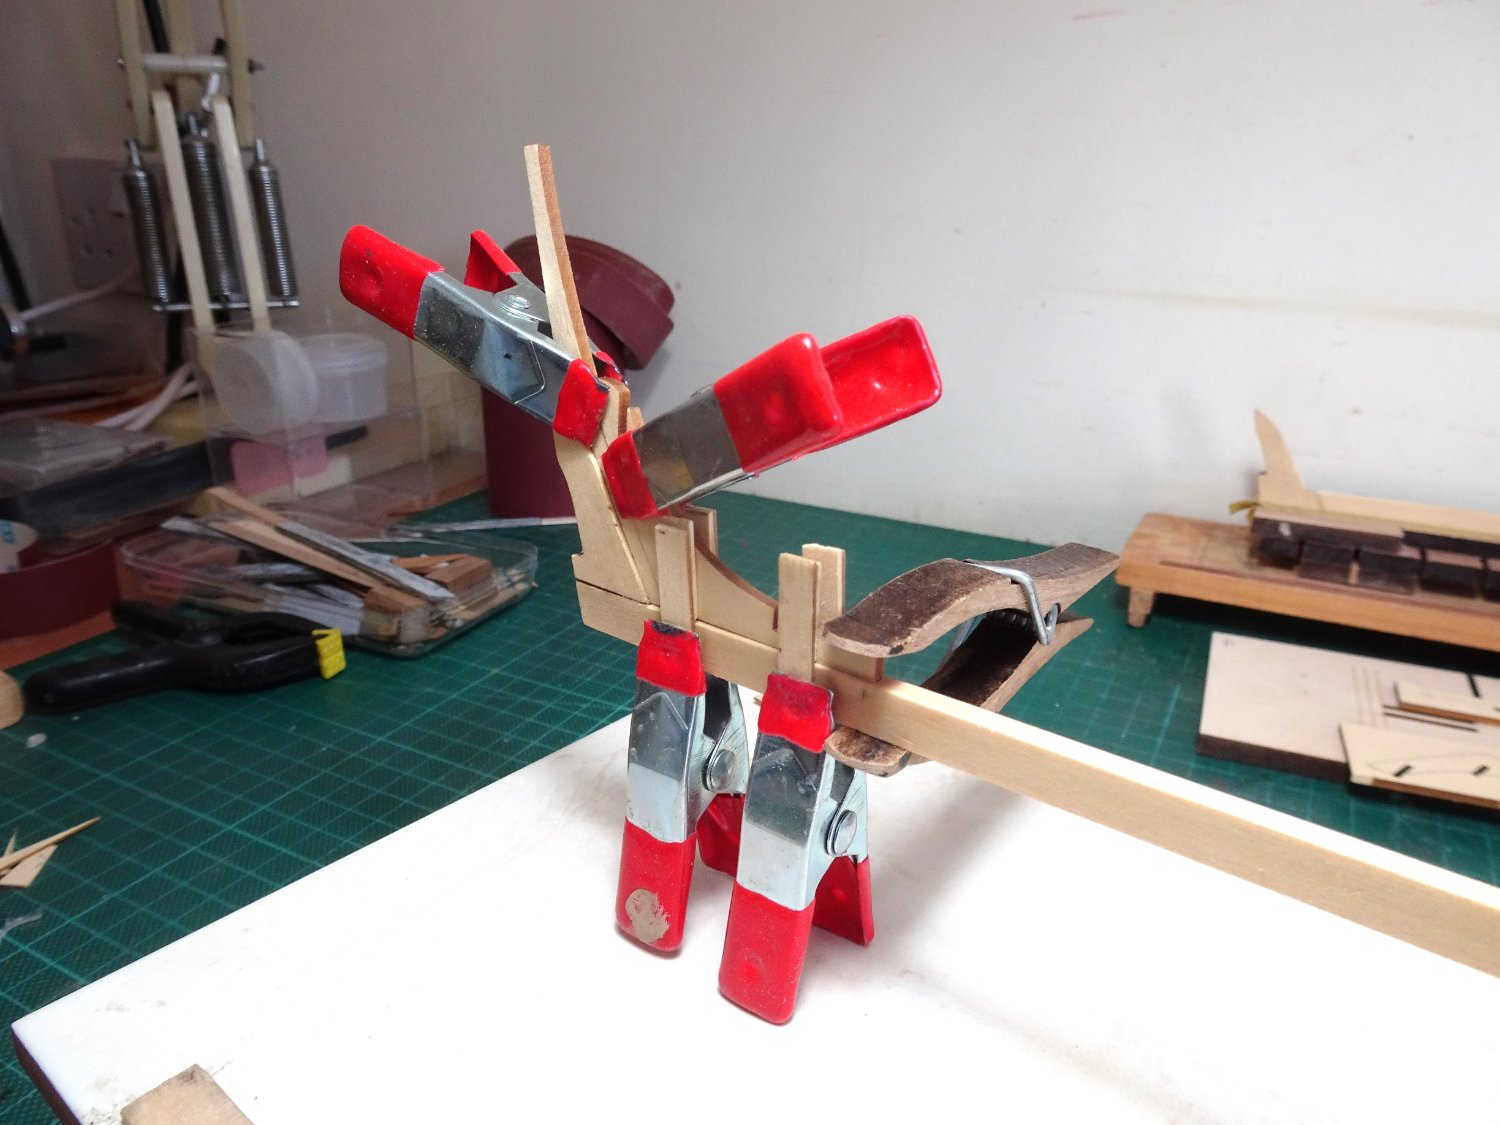
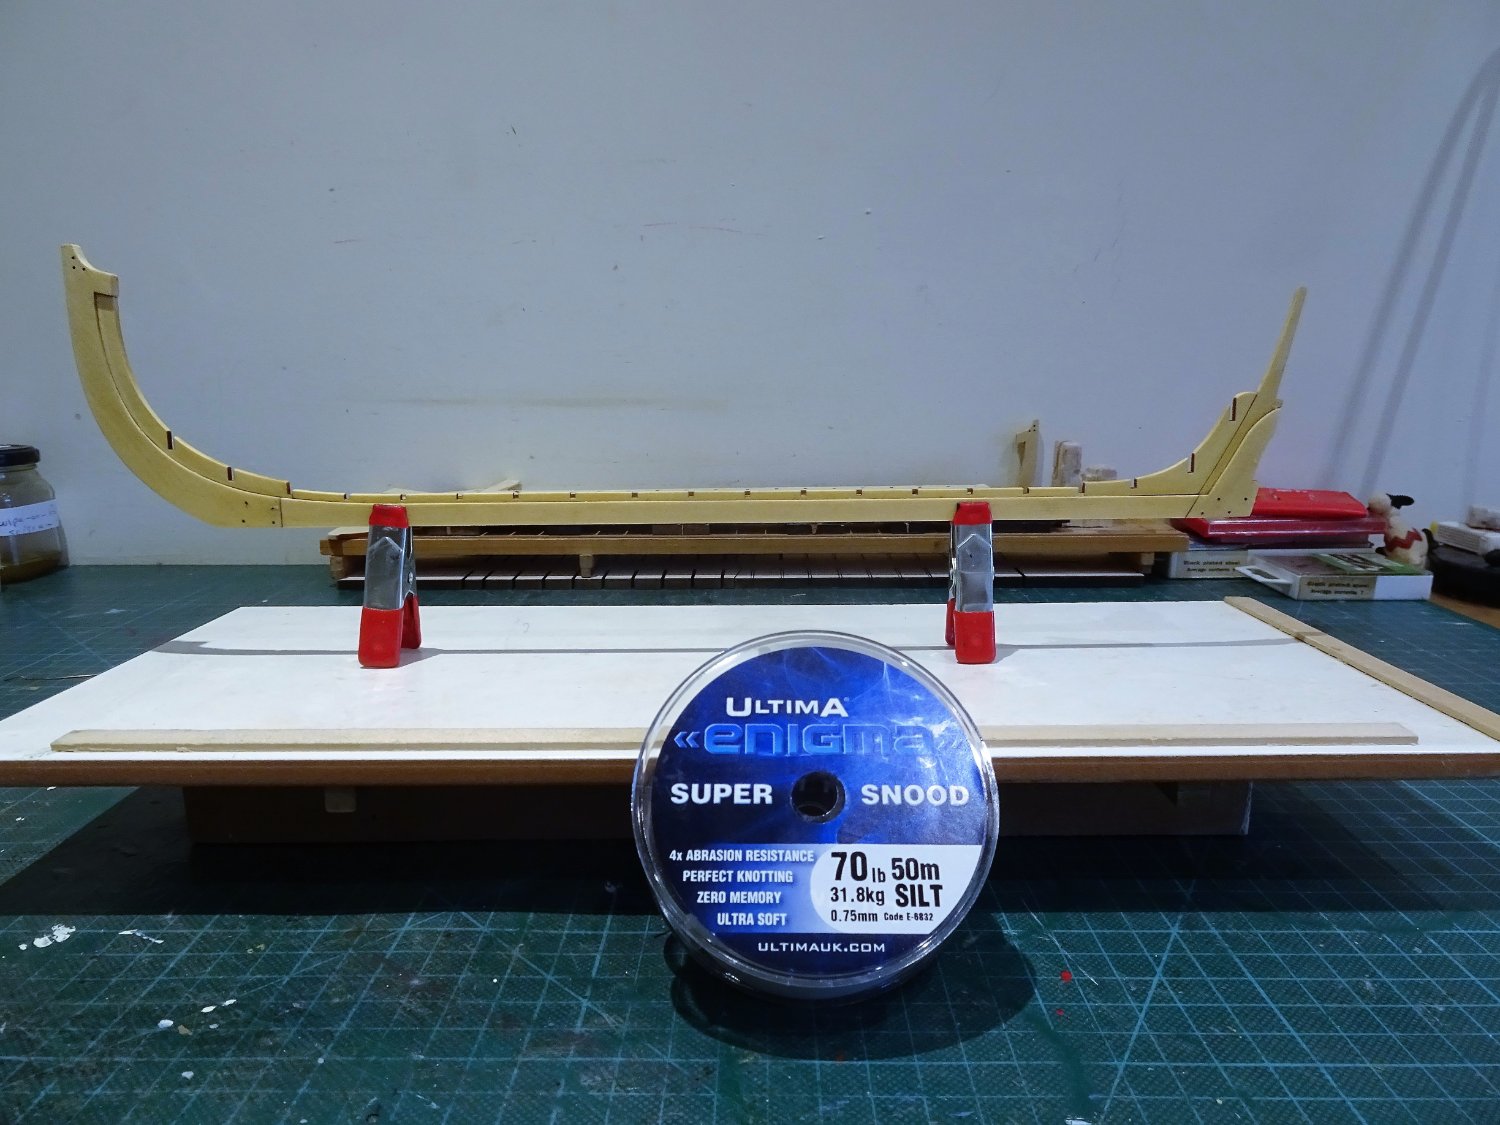
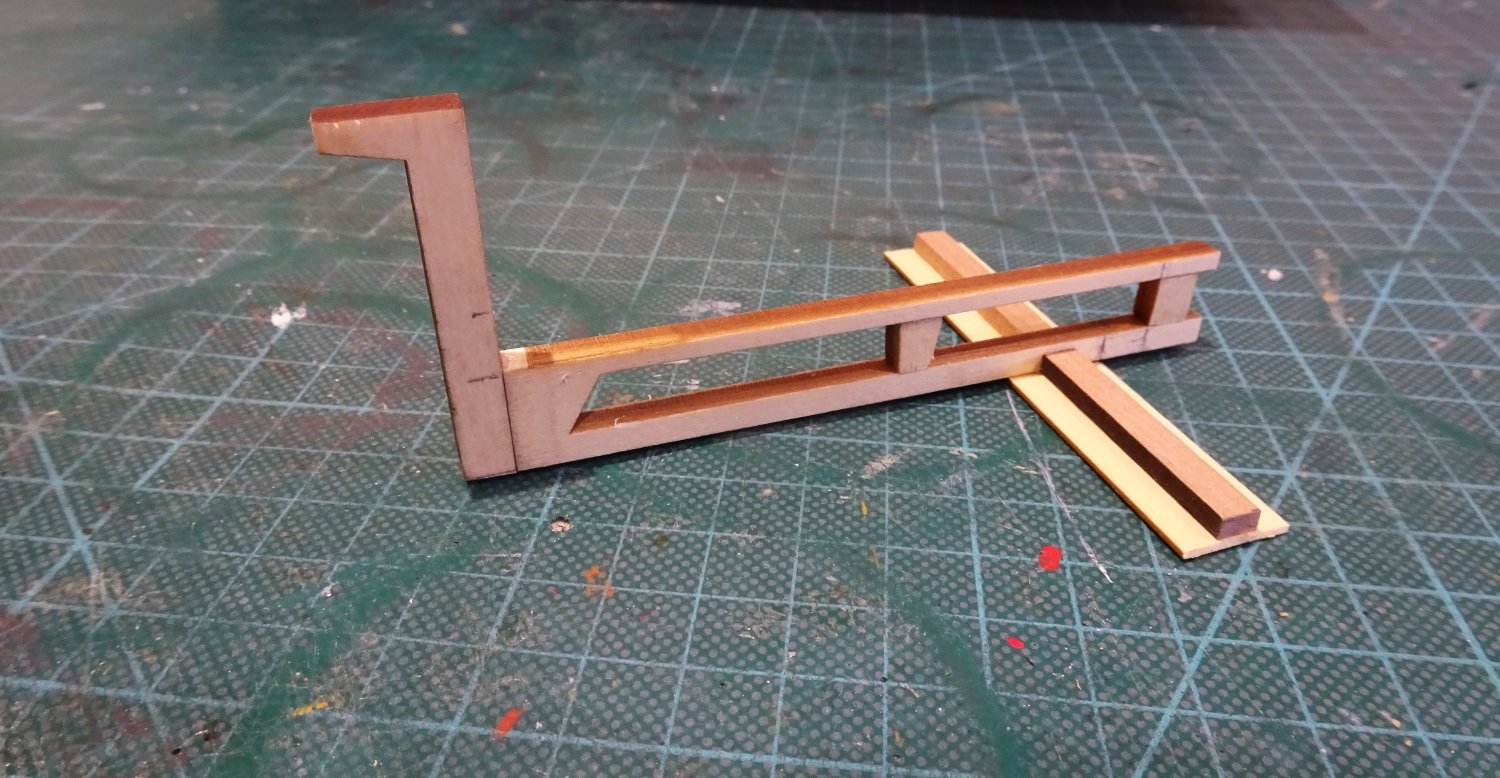
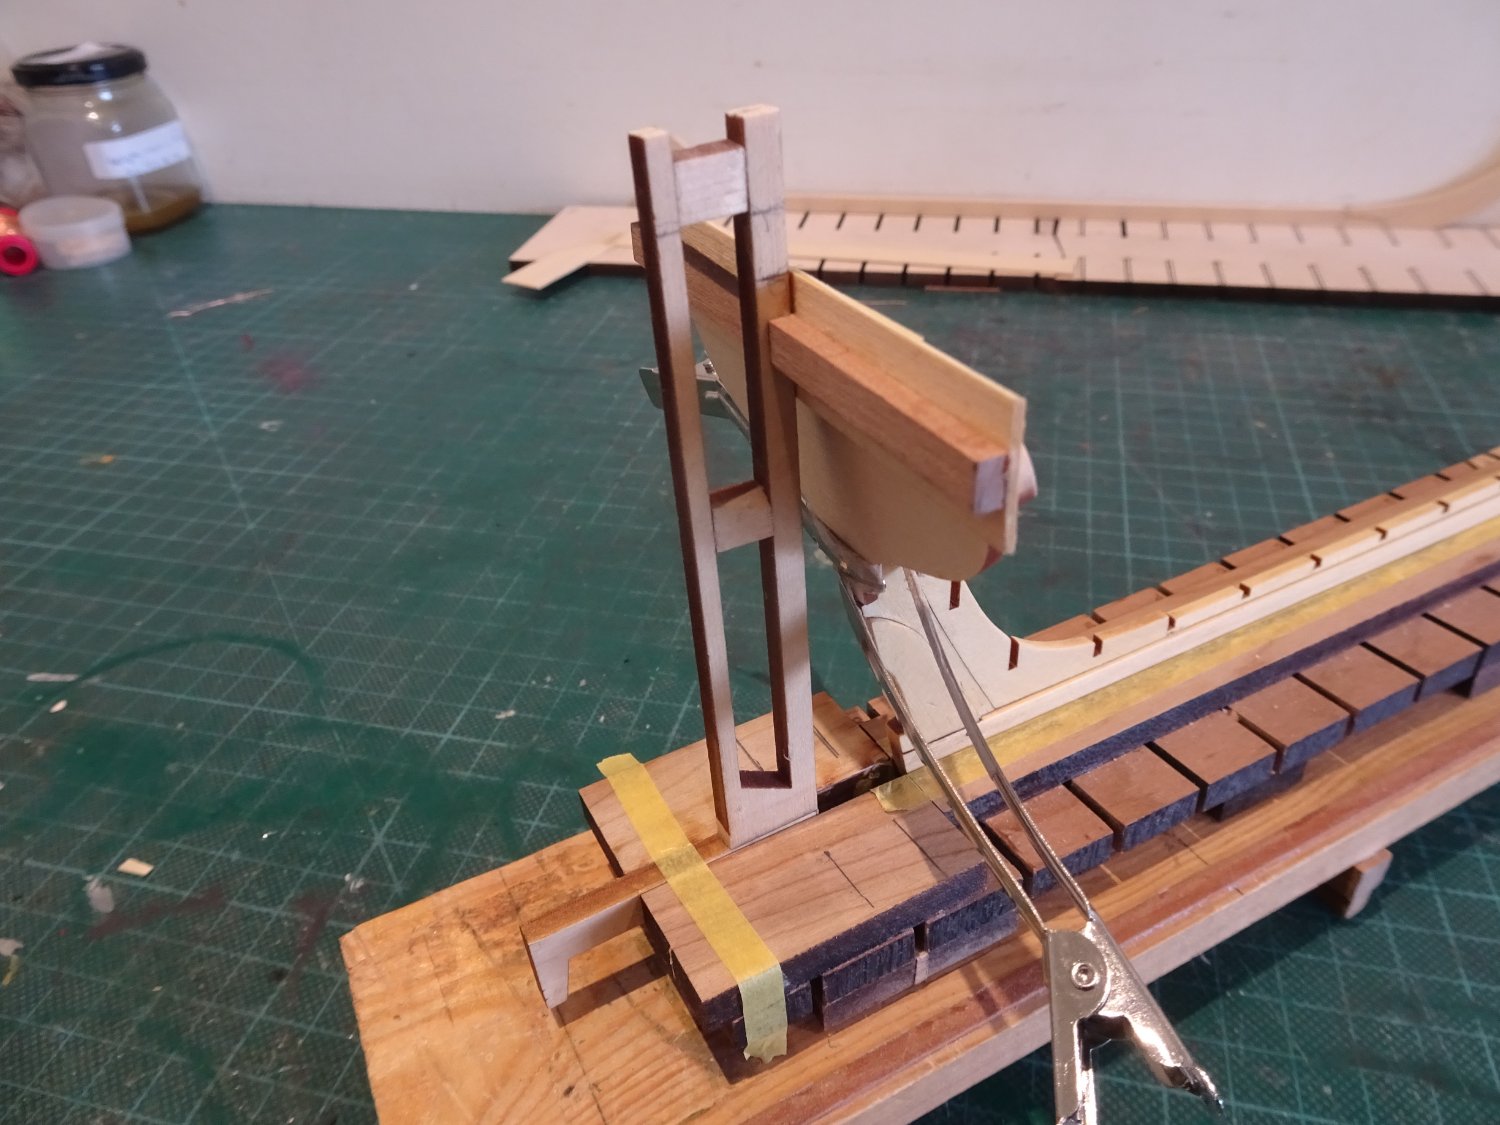
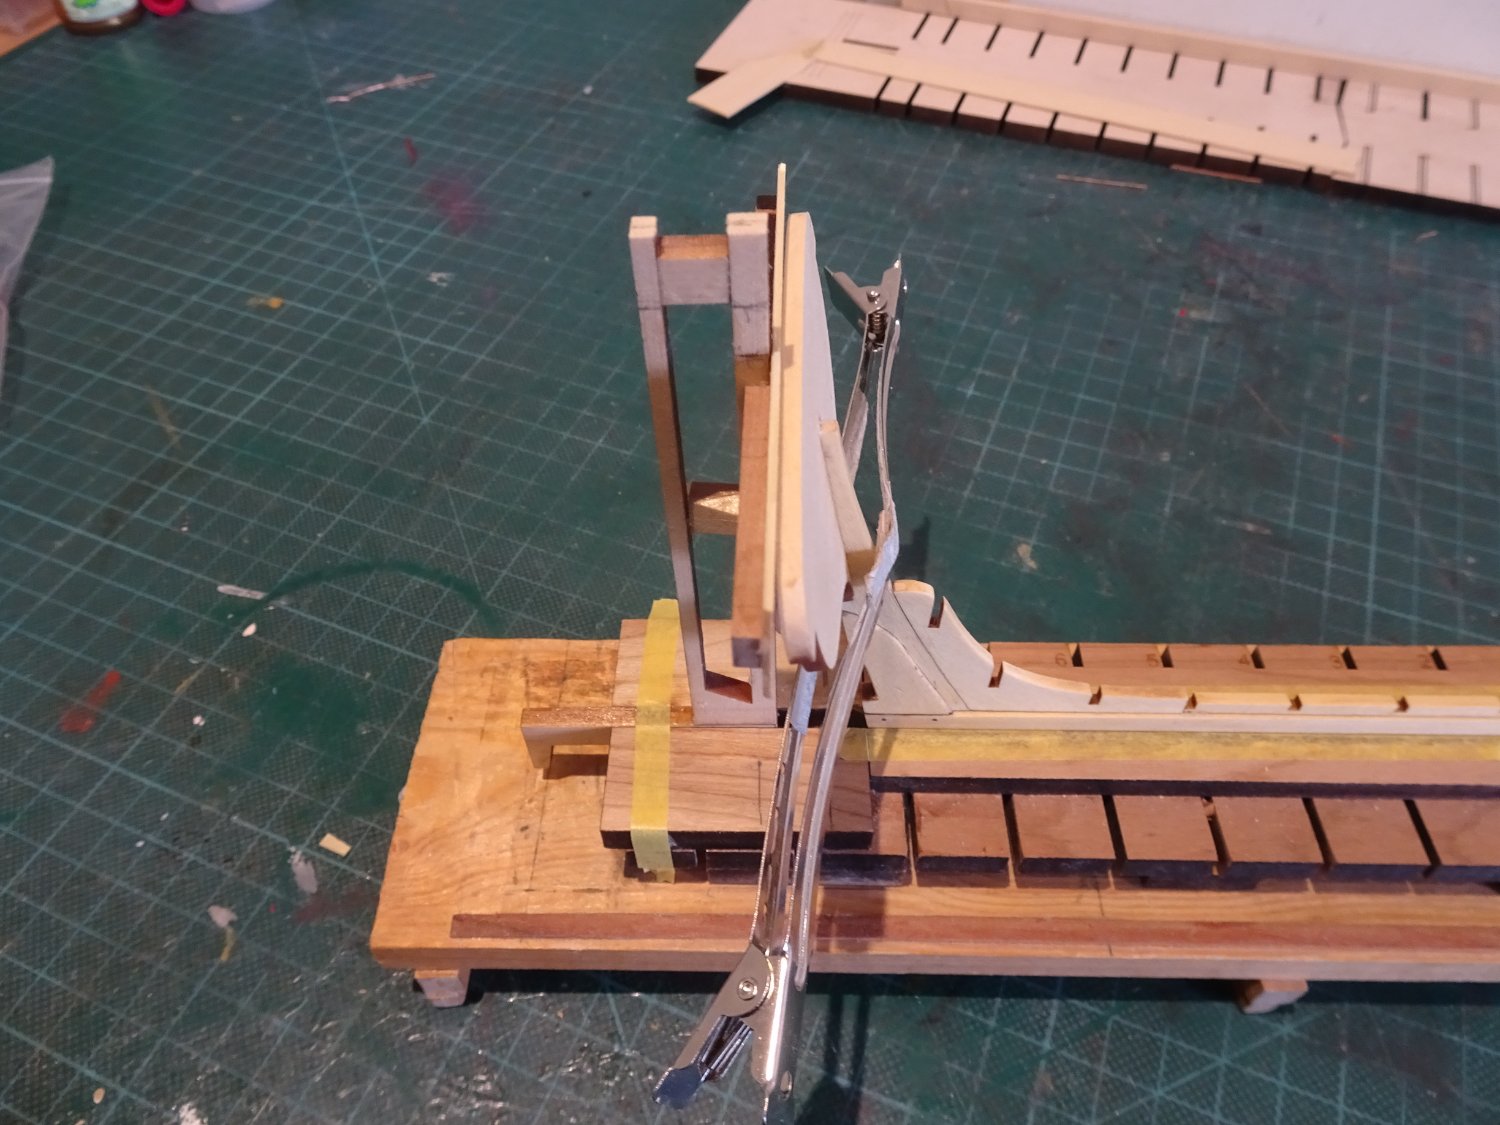
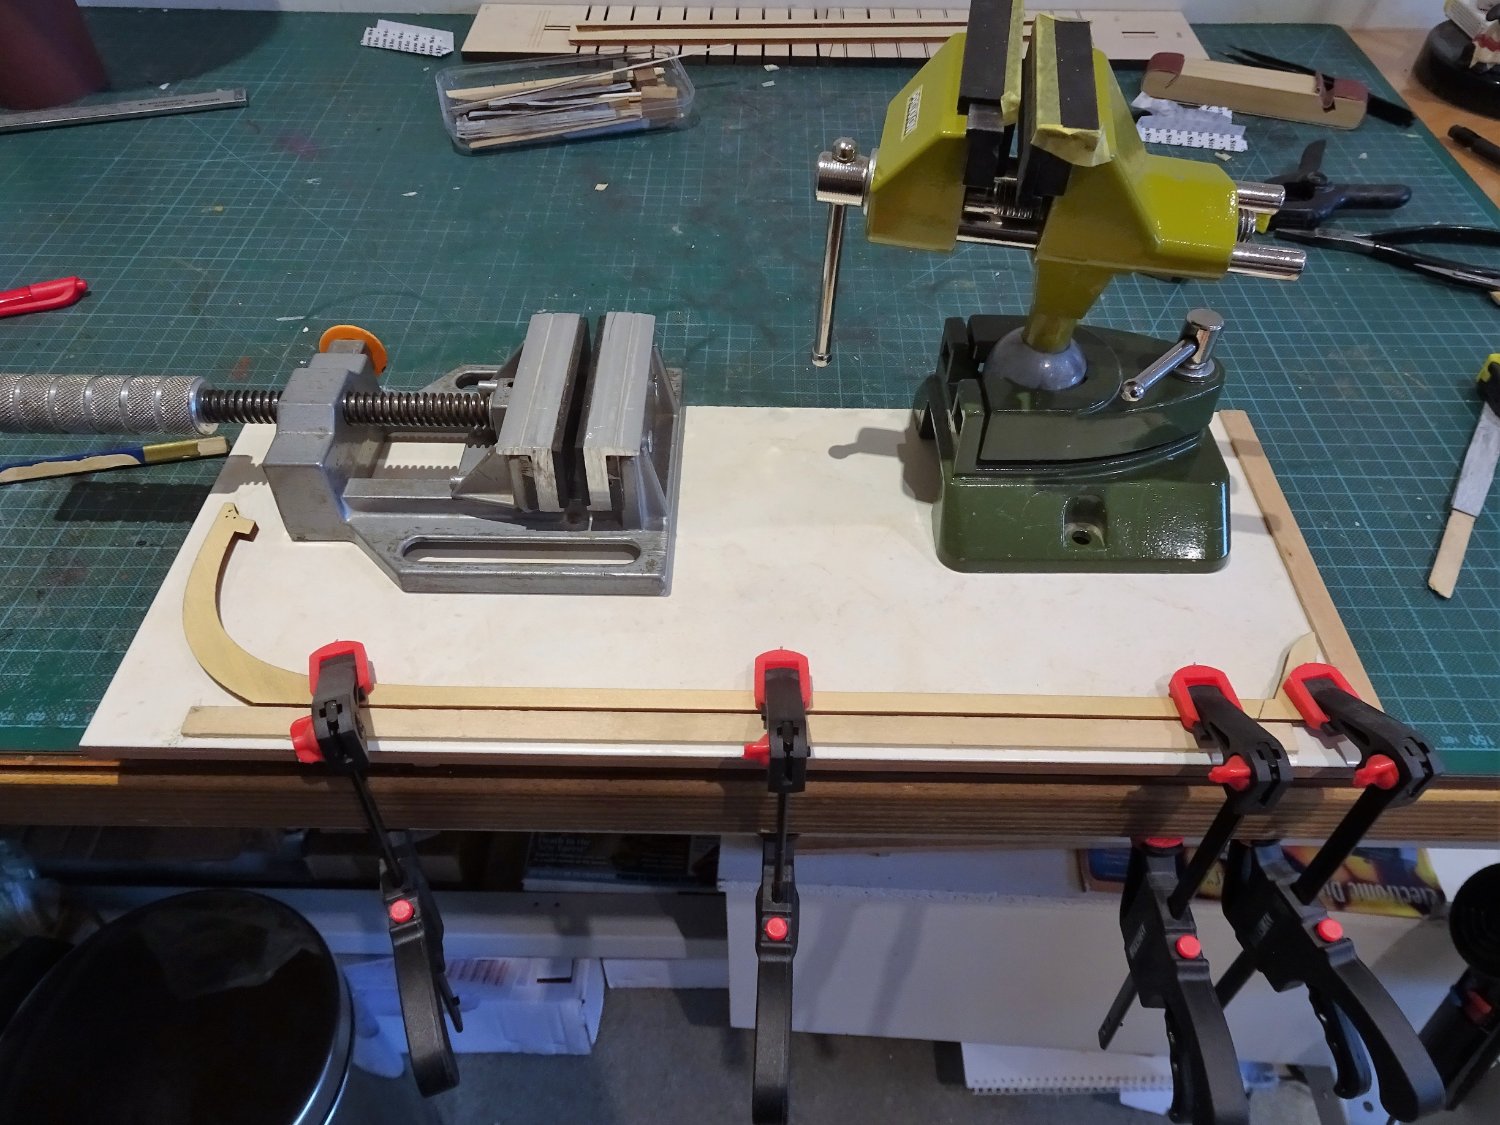
Post two The keel is completed by the addition of notched strips into which the frames will be fitted. These need to be centrally placed to form a rabbet either side. I used strips cut from spare 1/32” cedar sheet to provide spacer pieces to ensure the fit is central to the keel. 065 The stem notched section is fitted first. 067 The first part of the sternpost addition is fitted next but has been sanded a little to provide an adequate rabbet. 073 The second part of the stern fitting also sanded a little to enhance the rabbet. 080 The long keel section is fitted lastly and is centred by use of four spacing jigs along its length. 083 The long keel section fitted perfectly along the keel without the need for any adjustment. 084 So far, So good. 087 Chuck specifically mentions ensuring an adequate rabbet at the stern. 091 Templates used to mark the bolt holes through the lap joints. Using it both sides aligned the holes and allowed for through drilling. I used a 0.70mm ø drill, and a coat of wipe-on was then applied. 092 There seems to be some variation in the line to use for the bolts. The instructions say 25lb monofilament line, but Chuck’s own log mentions use of 201b or as an alternative 22 gauge copper wire. The kit list indicated 10lb, 20lb, and 40lb black filament but I could only find 10lb filament. 28 and 24-gauge wire was also provided. 095 In the end I settled on 70lb/31.8kg (0.75mm) monofilament line. The final part of this section is attaching the transom. There is a useful vertical shallow slot lasered into the fore face of transom which assists both positioning and gluing the piece into place. The other main consideration is ensuring that the transom sits squarely to the keel at 90 degrees. 097a I created a simple jig to check the square, made from bits of fret from the kit. 0101 0102 0105 My Queen Anne Barge build board proved useful for aligning the Transom. A further coat of wipe-on will now be applied before moving on. B.E. 23/01/23


- 131 replies
-
- 13
-
-
- Medway Longboat
- Syren Ship Model Company
- (and 1 more)
-
Thank you, shipman, I’m not sure I agree with you about this kit being hackneyed on MSW. Compared with many other builds there are relatively few in active progress, and even less completed. The decoration is a minor element of the build, which produces a superb version of the contemporary model in the NMM. I don’t see much scope for giving the build a different treatment that would improve on the basic model. If you have anything in mind, I’m all ears. As a serial kit basher, the Syren kits are the only ones I have not felt the need to make any significant modifications to. I am considering whether to fully plank of leave partially in frame to match the Royal Barge, but that’s about it. A long time ago I copied this photo from a log. I don’t recall whose build it is now, but I liked the display of the Longboat very much. Sorry to disappoint you, but I hope you will still look-in periodically to see progress. Regards, B.E.
- 131 replies
-
- 10
-
-
- Medway Longboat
- Syren Ship Model Company
- (and 1 more)
-
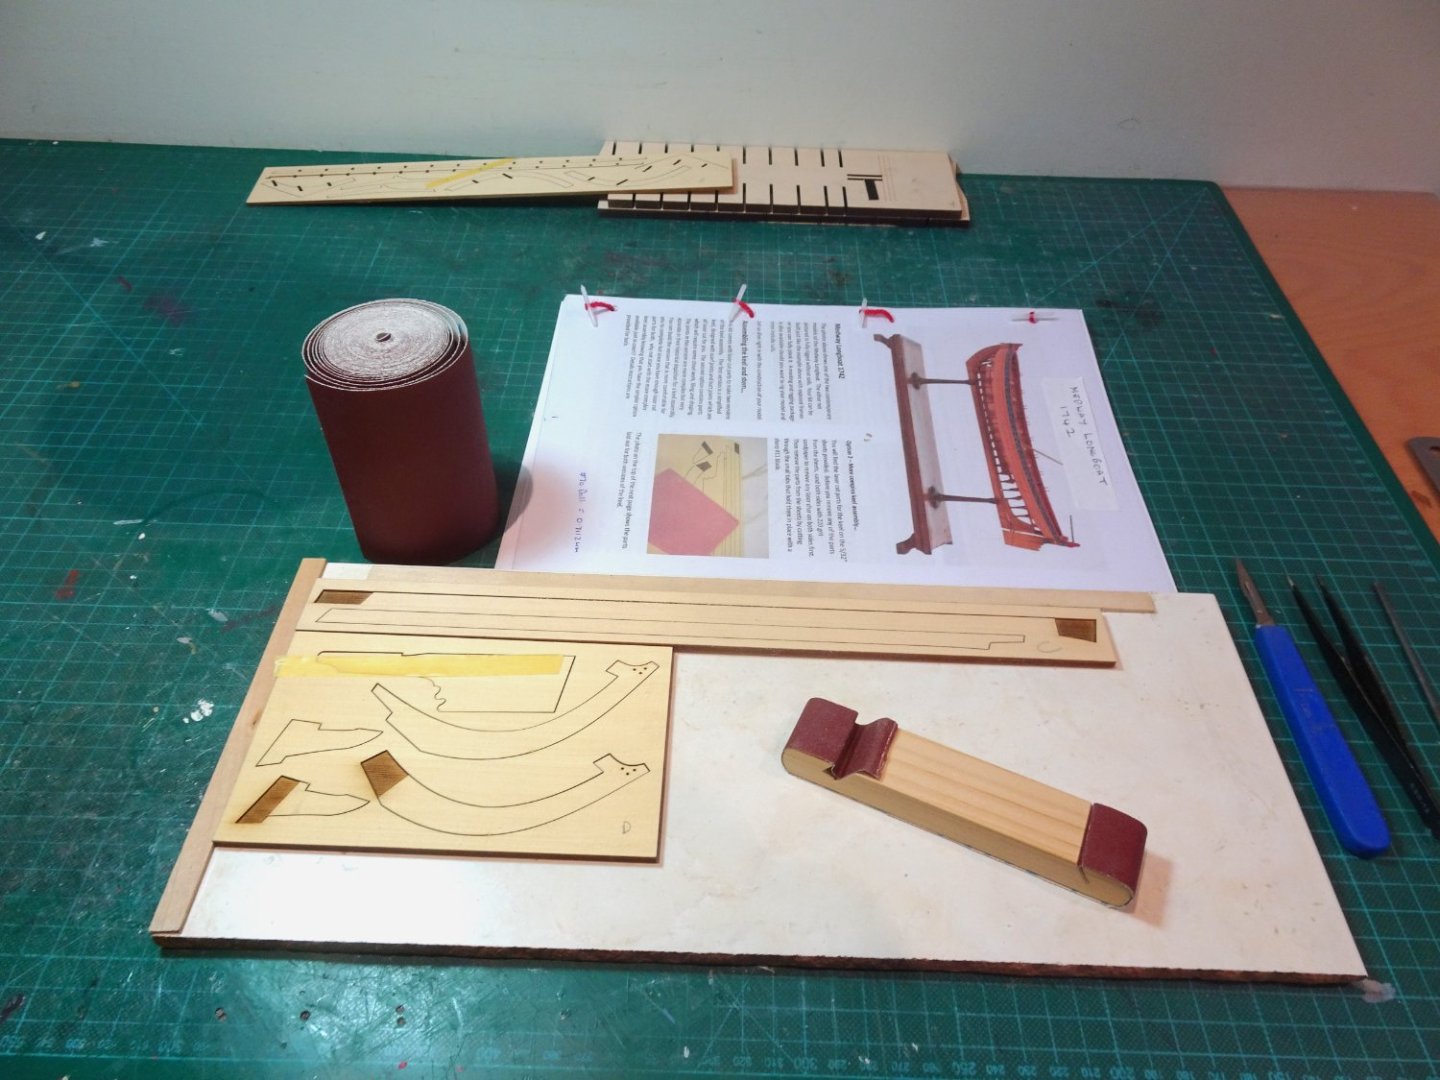
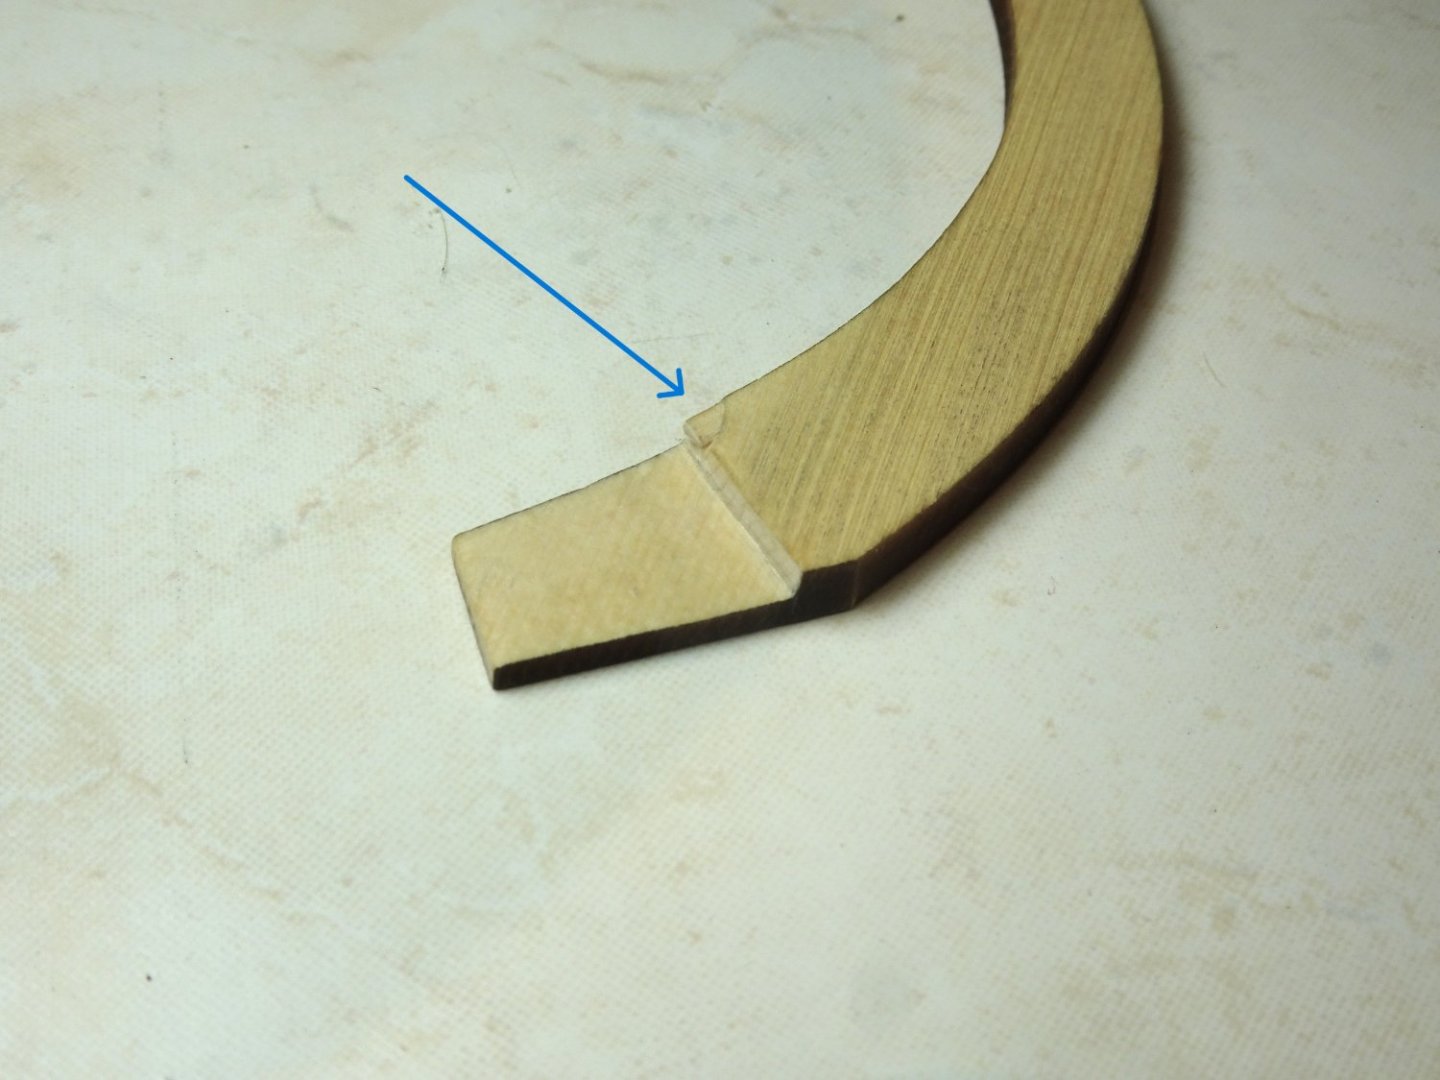
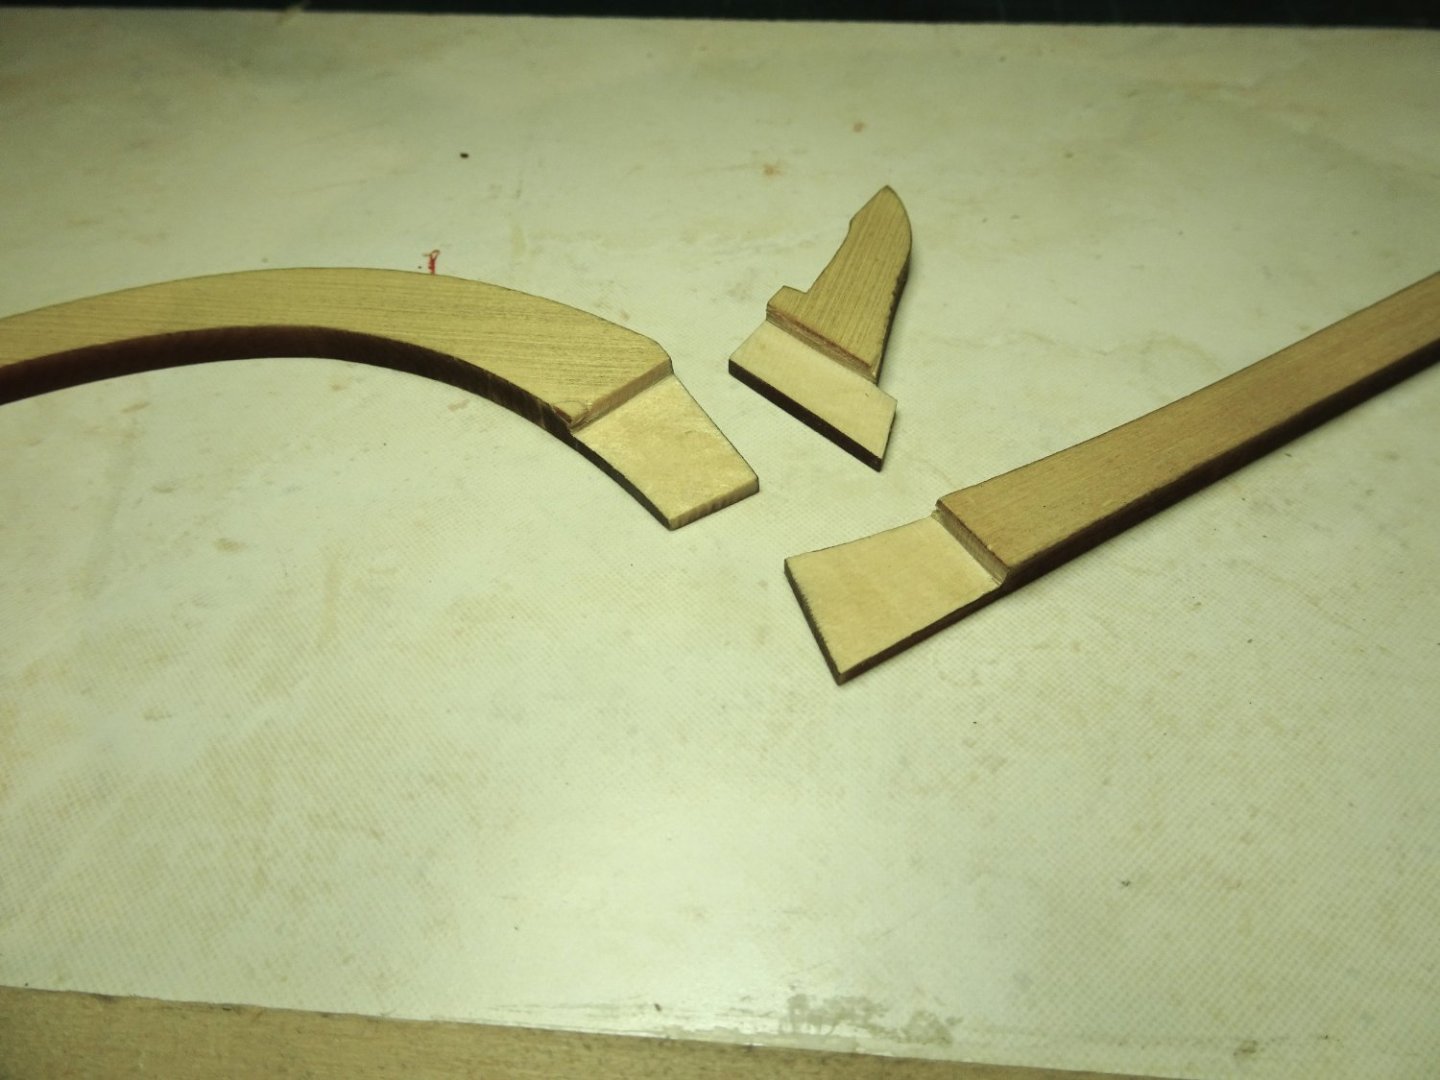
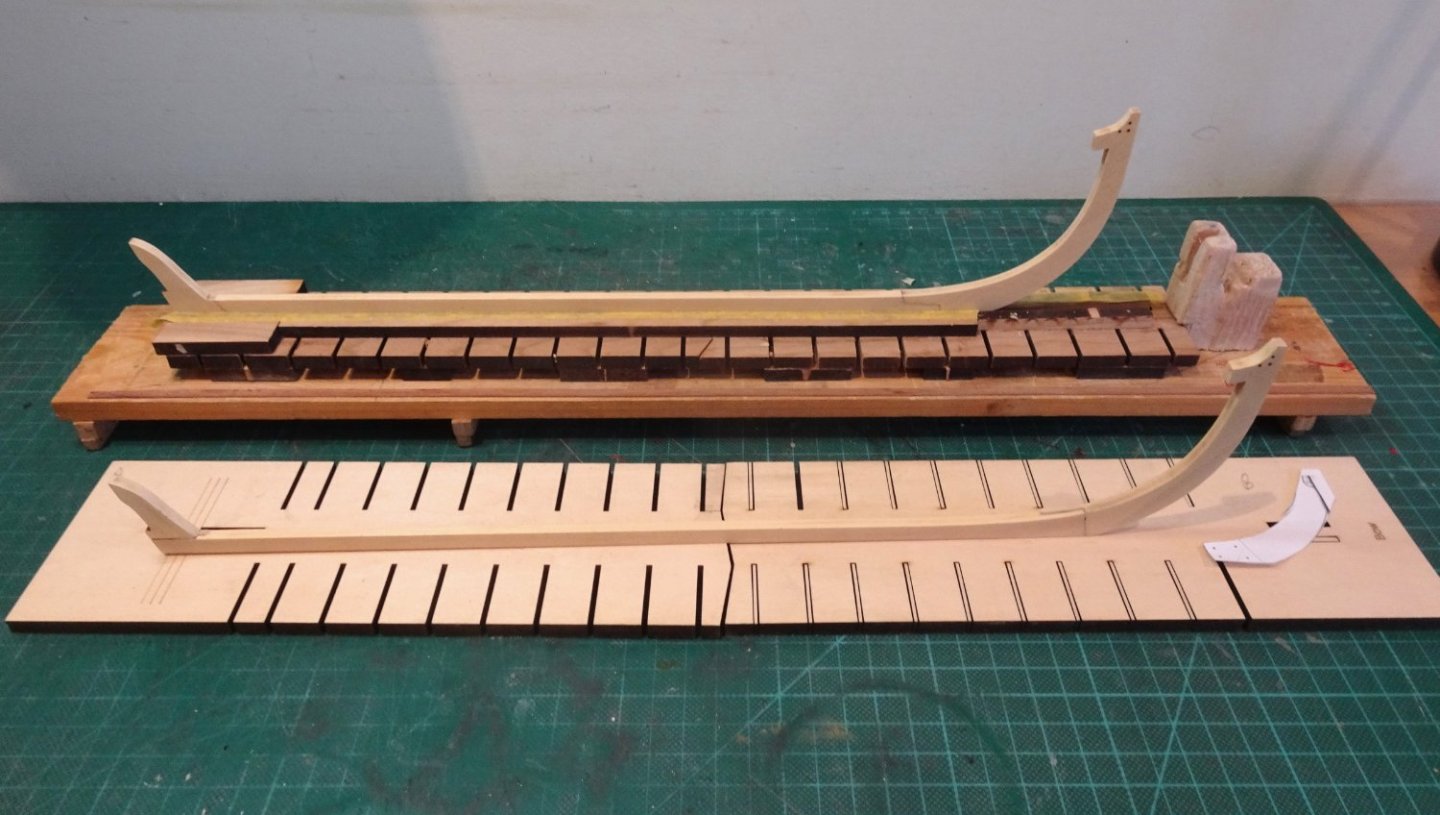
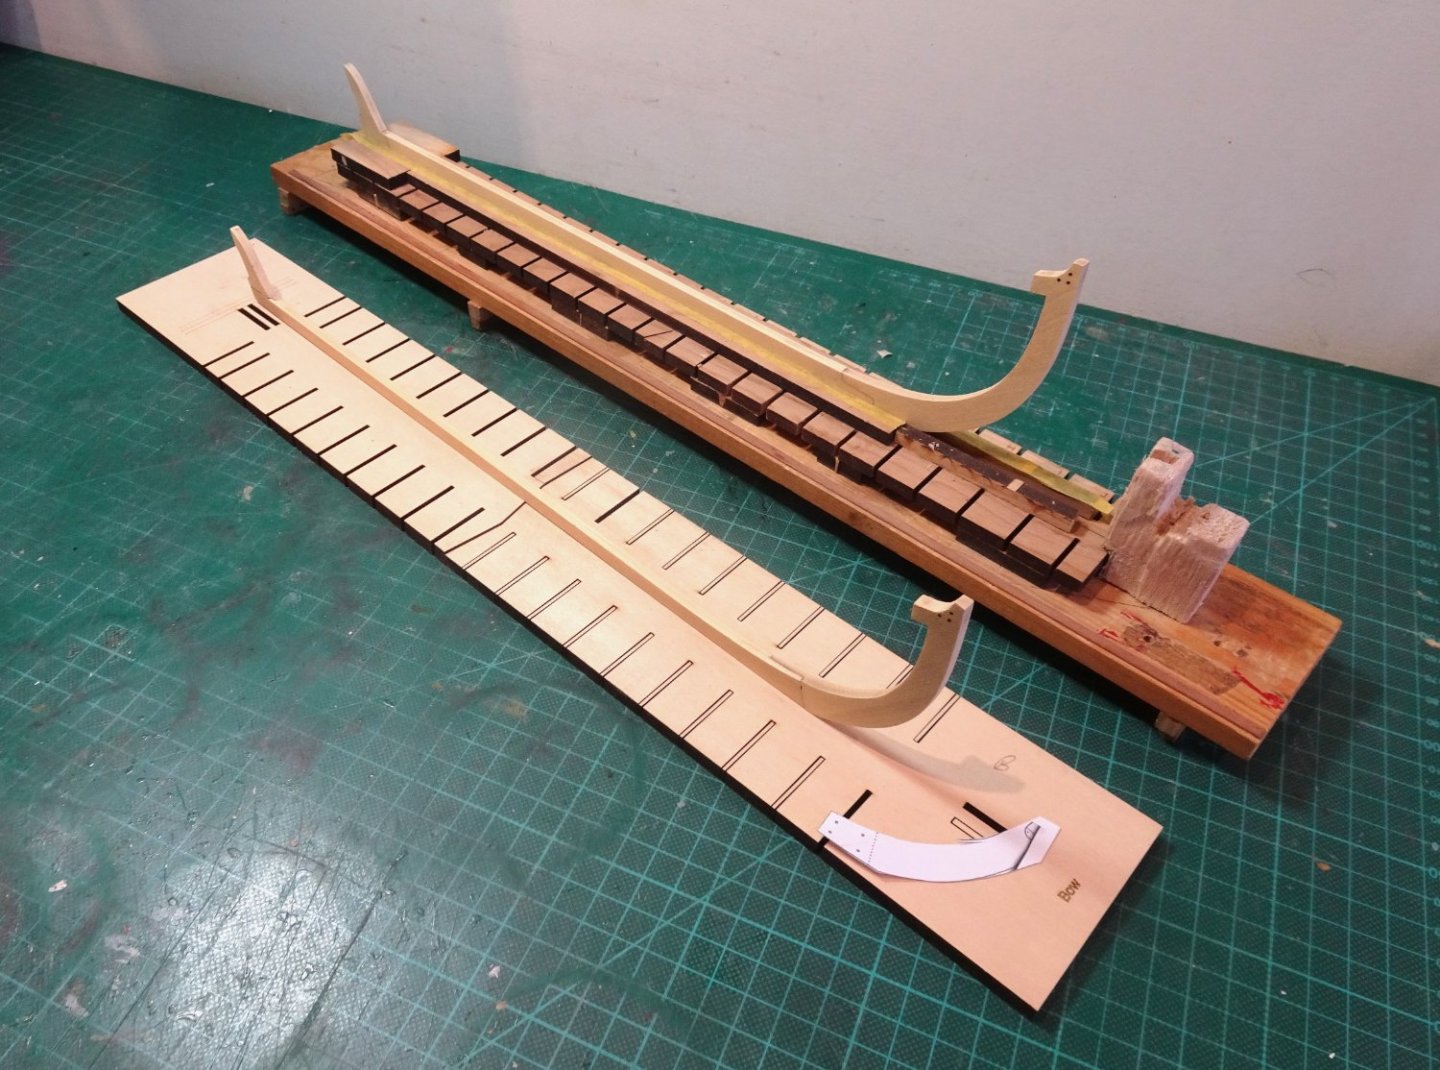
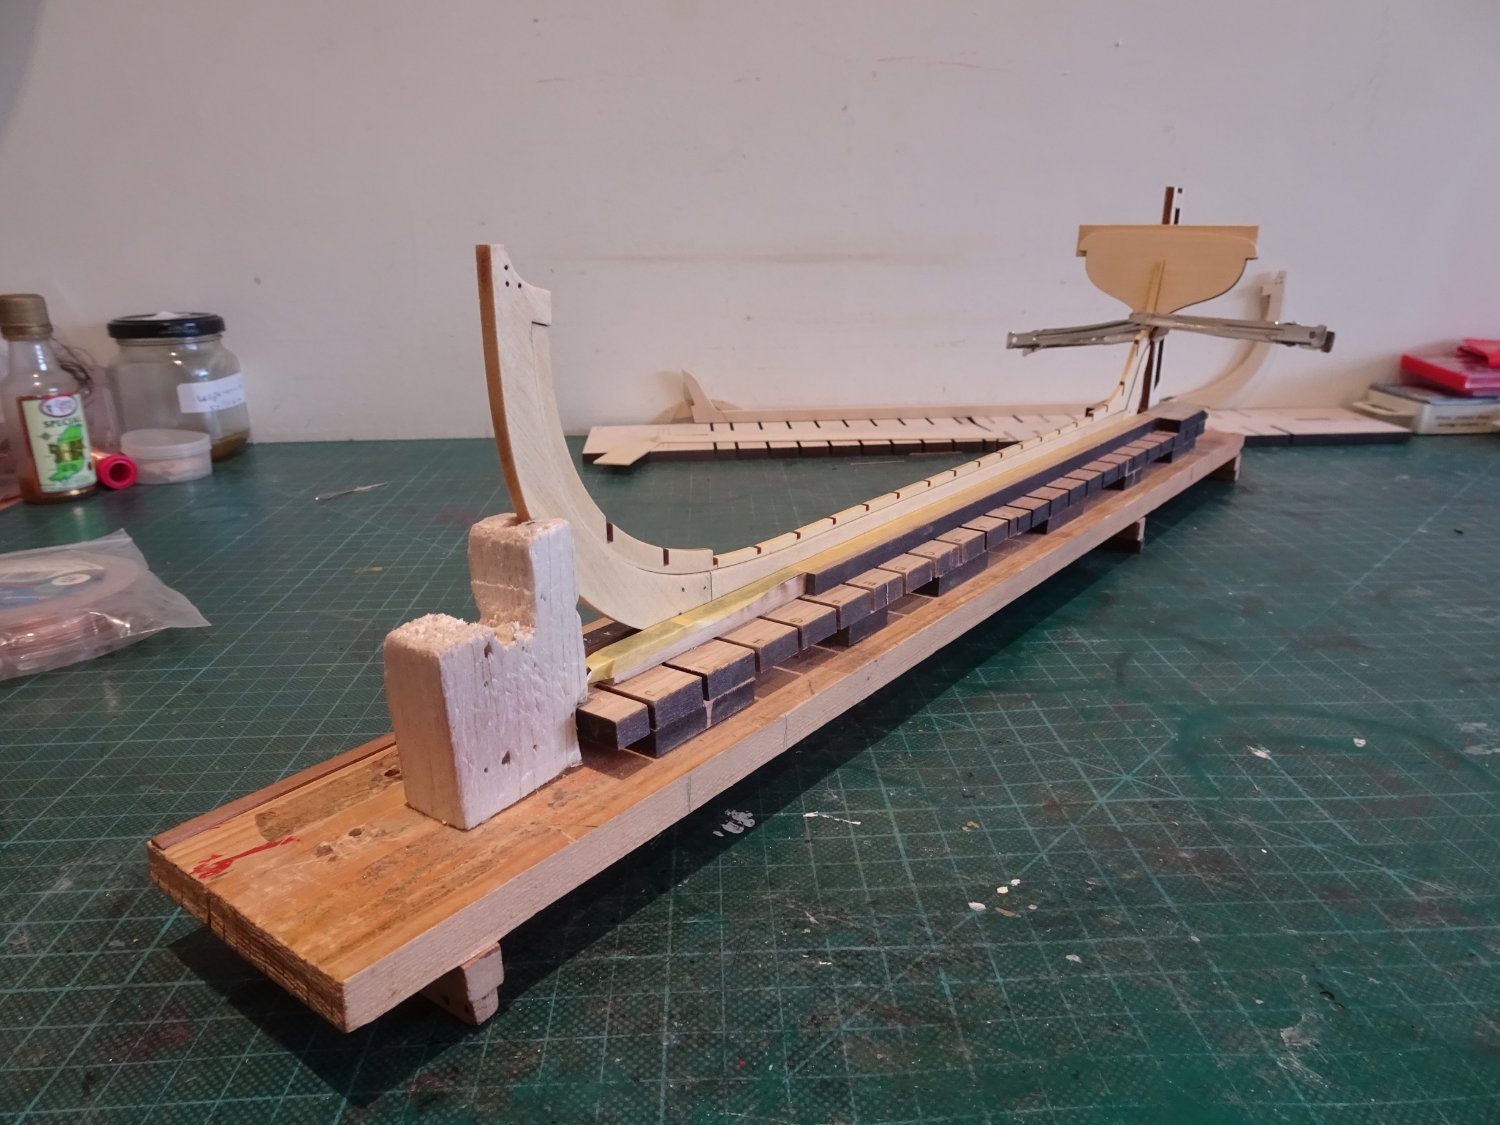
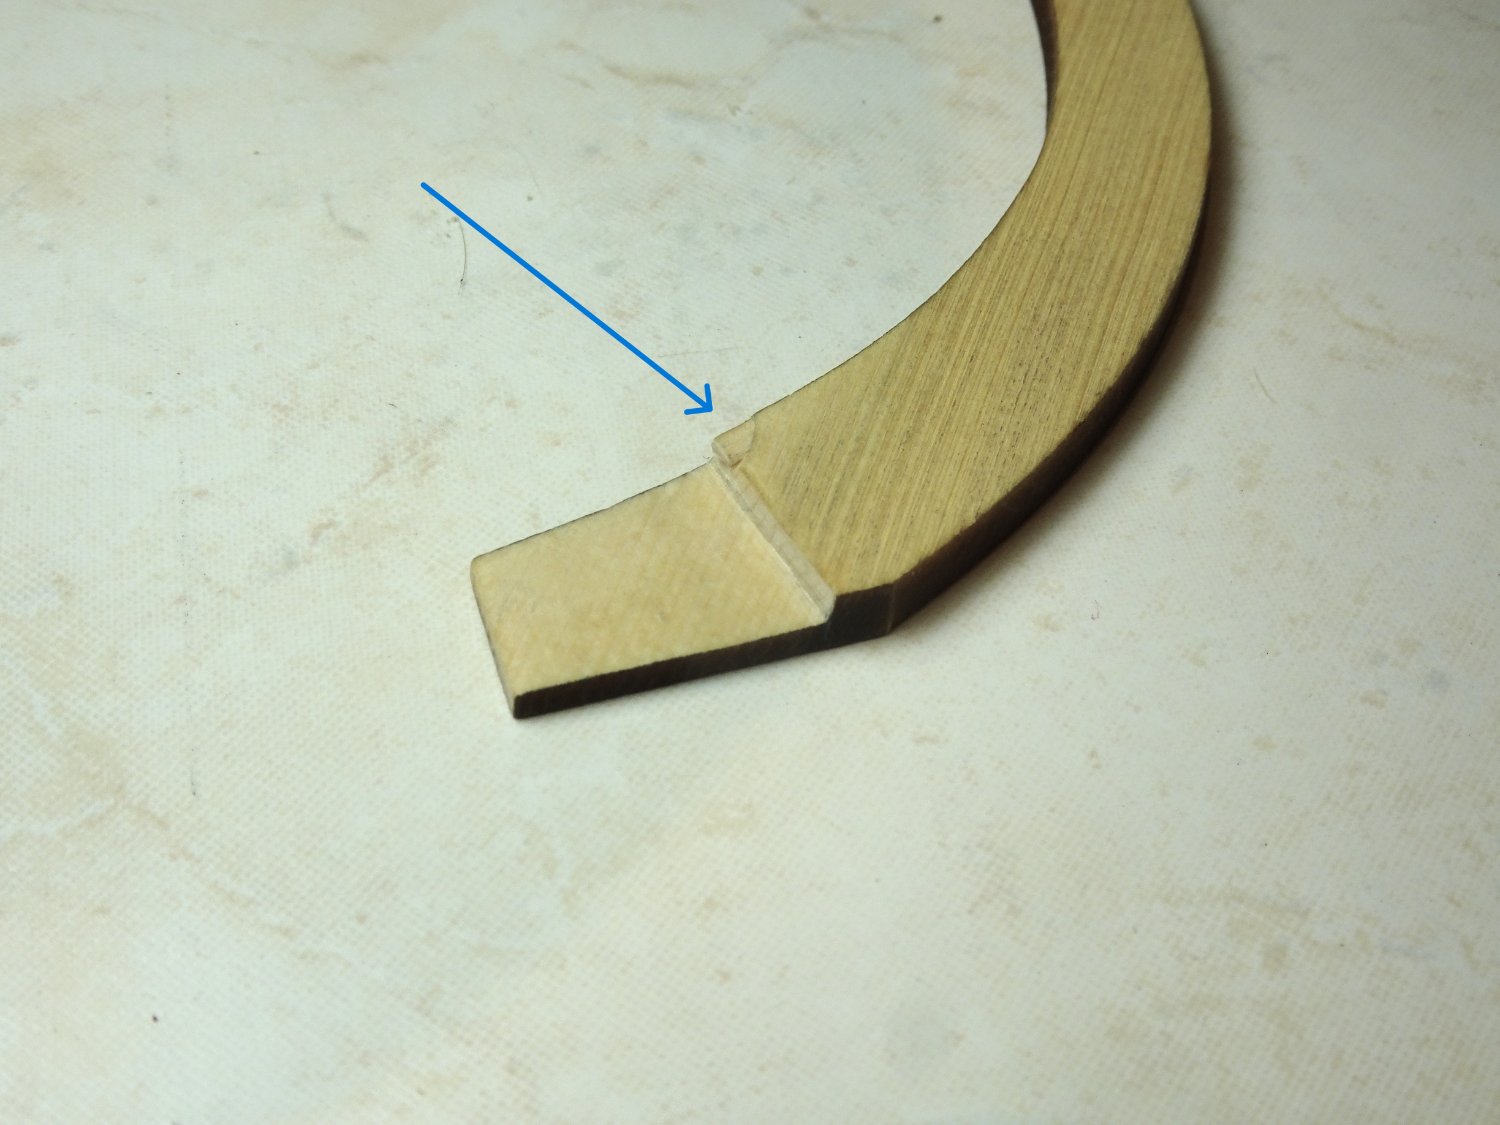
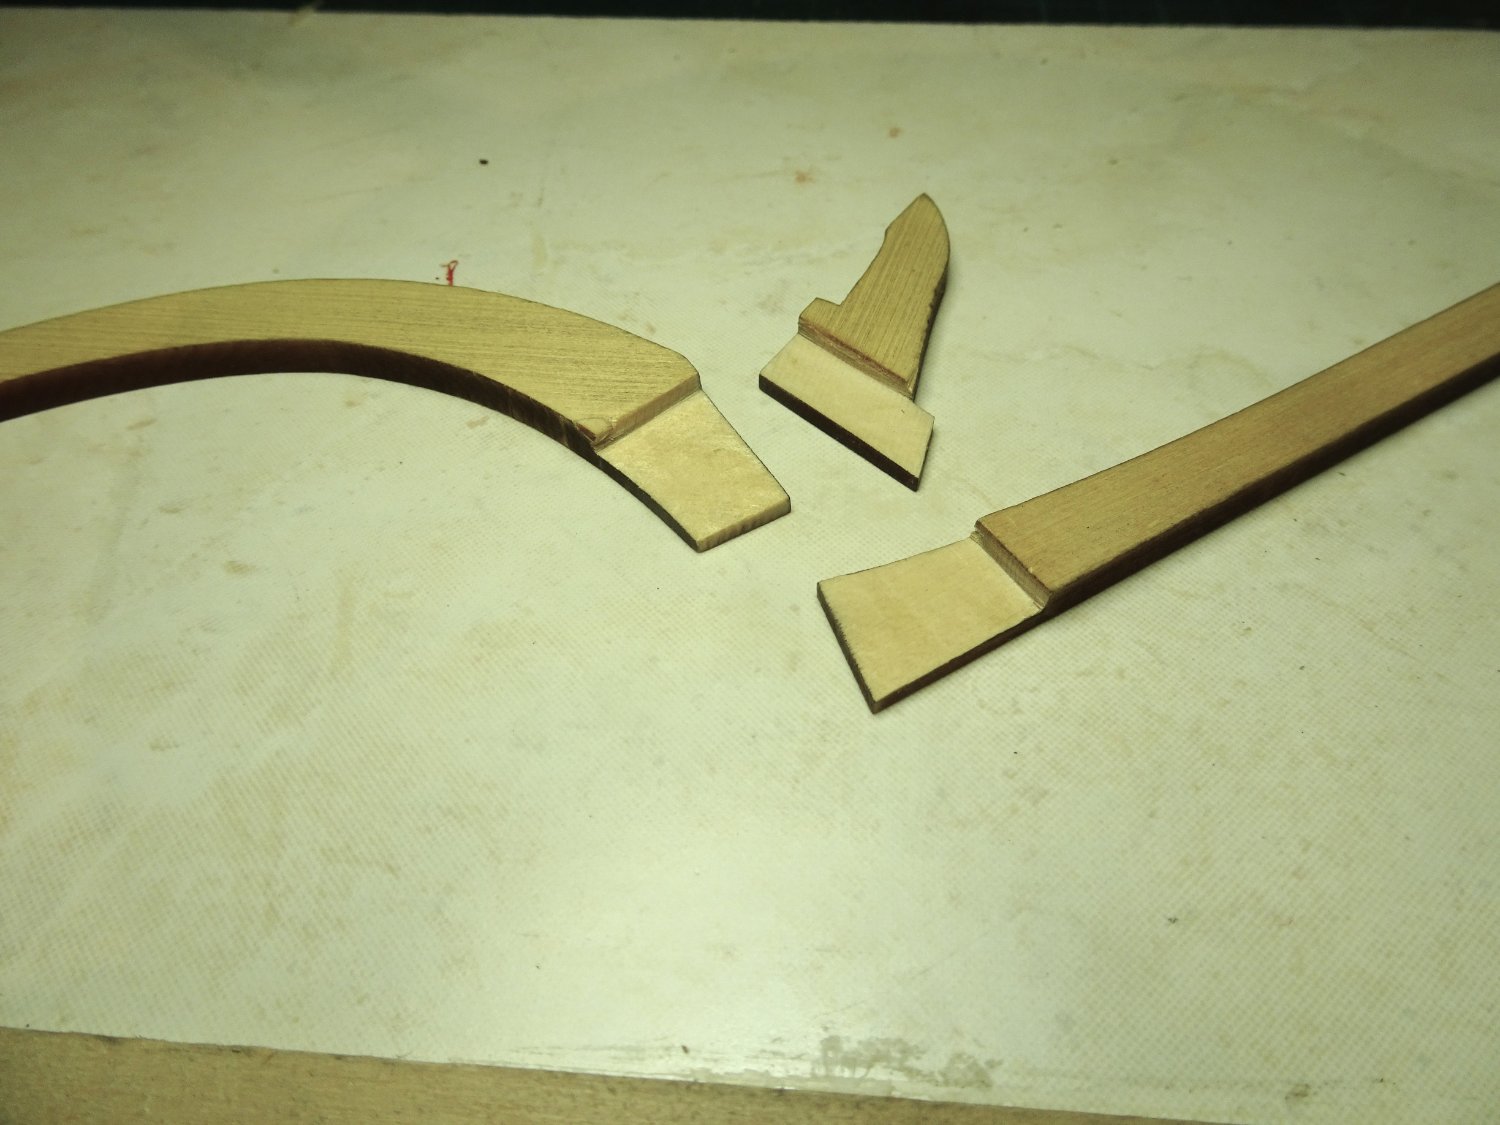
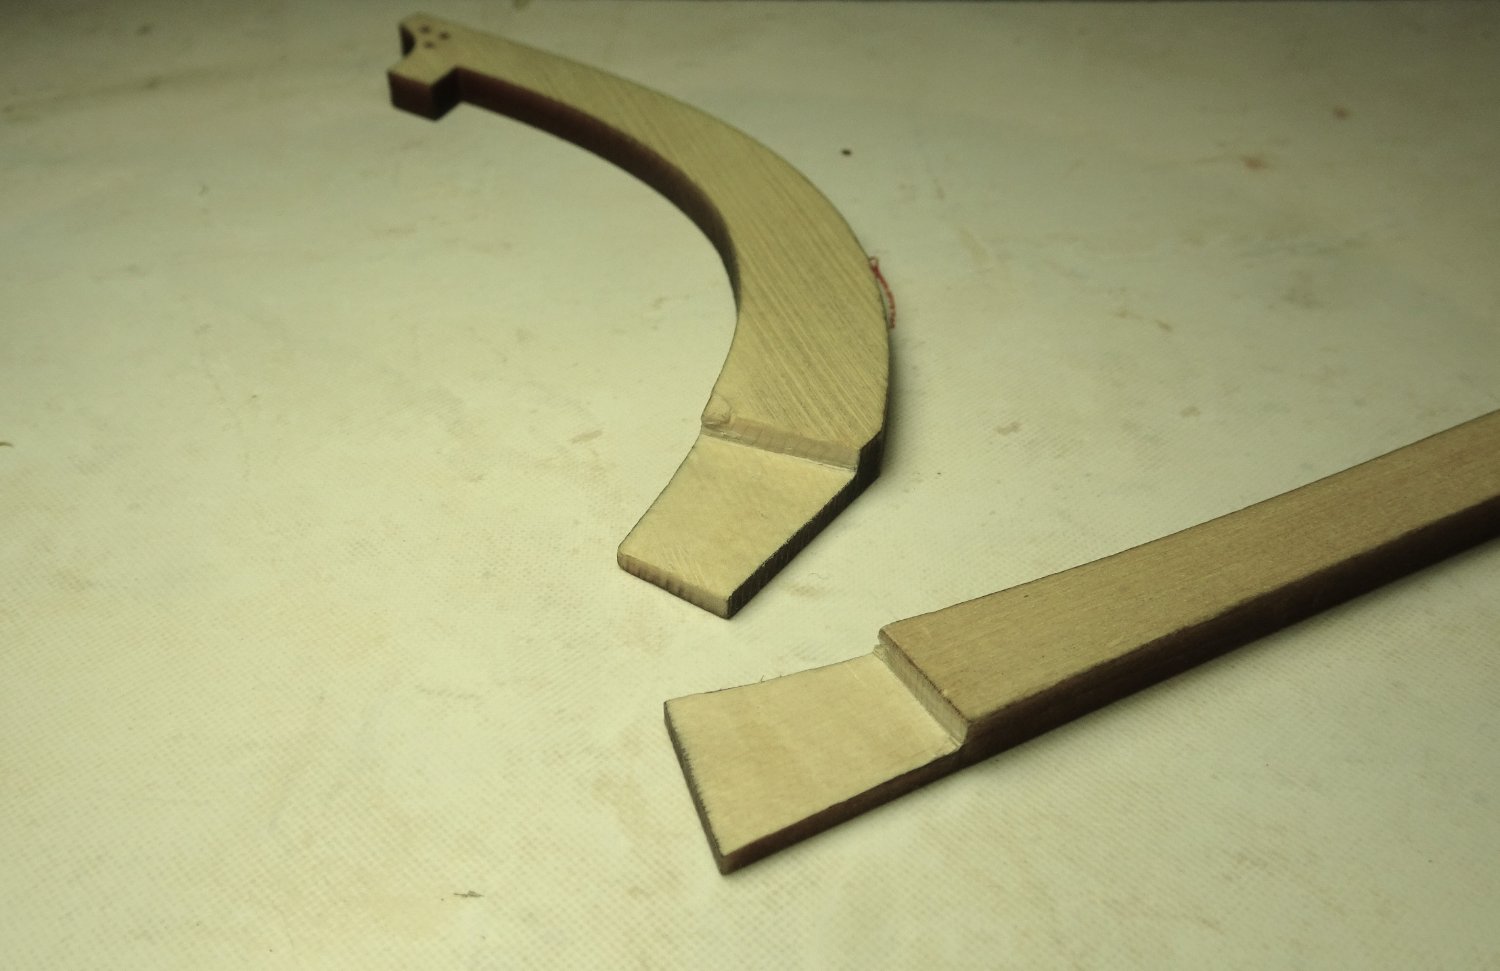
Post One. The journey begins. Parts one and two of the guide have been printed out and a supply of 320 sandpaper obtained to prep the keels. A fresh mix of wipe-on-poly has been made up so it’s time to get going. 023 I have decided to build both keel versions, simply because they’re there. I quite like the look of the scarph joint version but as Chuck has gone to the trouble of creating the more authentic lap joint arrangement, I hope to use that one. 032 I used a No11 blade in the scalpel to pare down the lap joints and finished with 320 paper. 036 The cedar cuts cleanly, but I got through 10 blades fettling the lap joints. One annoyance was that a tiny corner piece of the stem broke away on the top side where it meets the lap joint rebate. 030 I added a small piece of timber and sanded flush, hopefully it won’t draw the eye. The scarph joint arrangement keel is much easier to assemble, but despite Chuck’s assurances that the simple butt joint at the stern will hold, I am still nervous, but resisted the urge to dowel it. 037 I do the assembly on an old tile which provides a flat surface and can be kept clean. 045 038 The simplified version is shown here on the old build board for the Queen Anne Barge. 040 041 042 A paper template has been cut out to mark the nail positions on the lap joints. B.E. 16/01/2023


- 131 replies
-
- 11
-
-
- Medway Longboat
- Syren Ship Model Company
- (and 1 more)
-
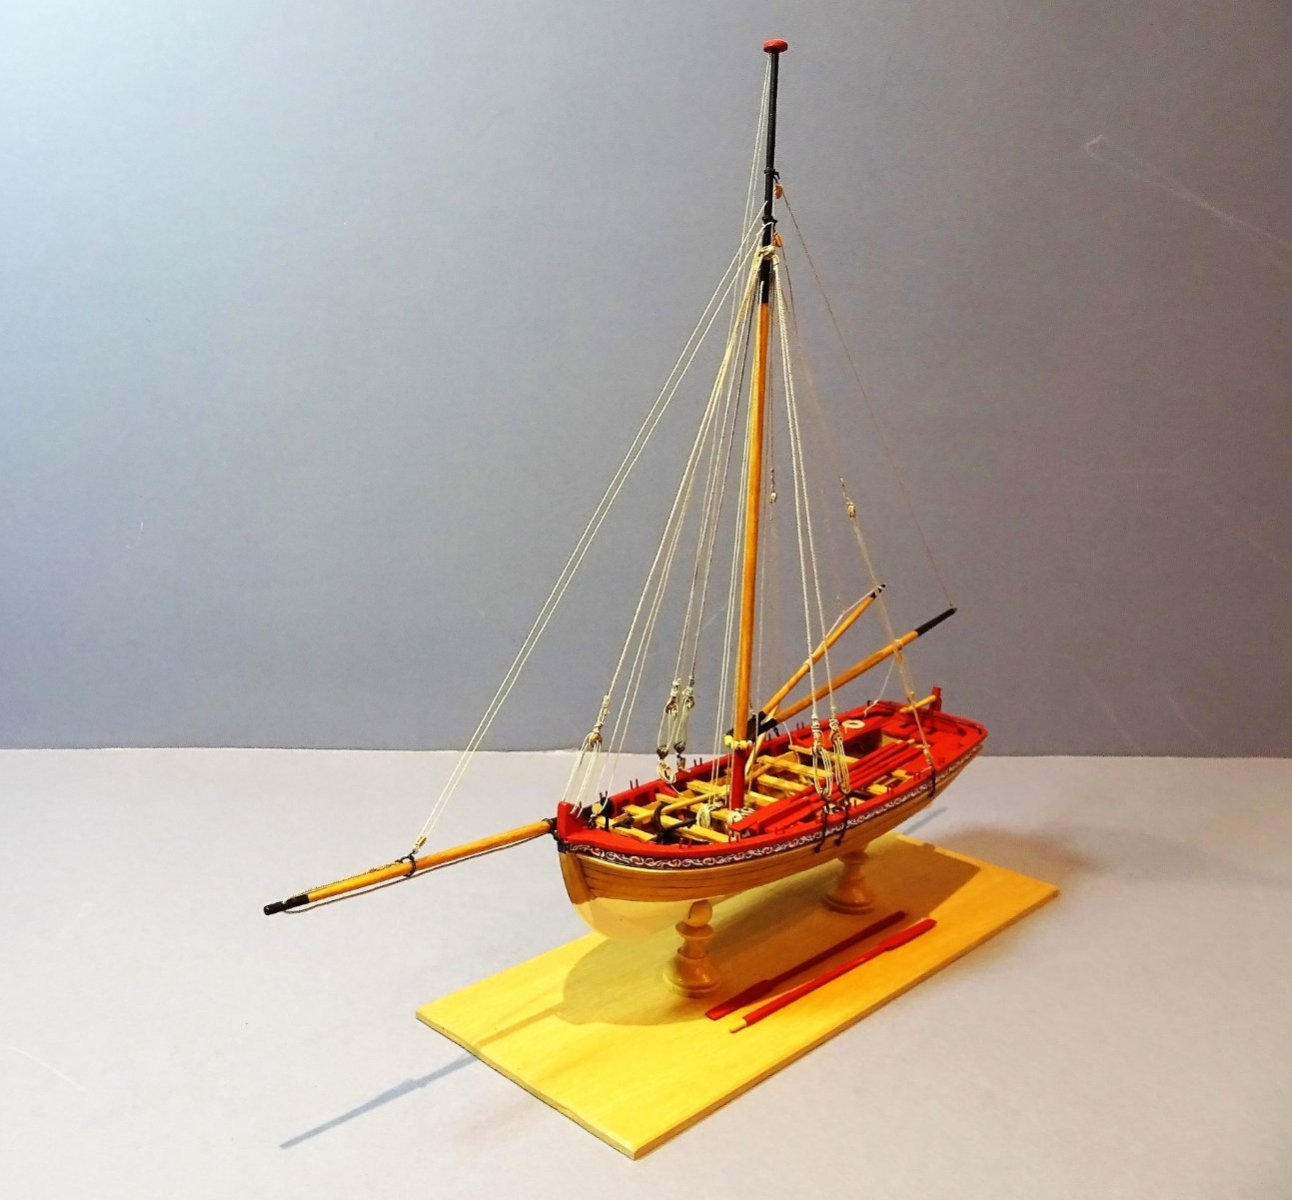
I have been harbouring this offering from Syren for nearly four years, so it’s time to come out from beneath my bench. My kit dates from 2019 and this will be my next project, and the third from the Syren SMC. Having thoroughly enjoyed both Cheerful and The Queen Anne Barge I am very much looking forward to the Longboat. I am not completely unfamiliar with the Longboat style as I completed the MS 1:48 scale version (also a Chuck Passaro design) back in 2017. 2780 I enjoyed that build and it makes a nice-looking model, but the ½” version is a significant step up in terms of accuracy, materials, and quality. I am a late arrival to the Medway Longboat party, and I doubt I can add anything to the wealth of experience as recorded in the public group forum for Medway, not only Chuck’s build, but also from others whose work I have long admired. I am fortunate to have all this to hopefully smooth my way along. I will spend some time reading thro’ the logs before I begin. B.E. 08/01/23

- 131 replies
-
- 16
-
-
- Medway Longboat
- Syren Ship Model Company
- (and 1 more)
-
More examples of your ingenuity David, loving the look of your Diana, the QD breast rail looks excellent. B.E.
-
I love to see nice framing, and yours fulfils that need admirably. I could happily display an in-frame model as a finished article and enjoy looking at it every day. B.E.
-
Thank you, James, those figures you directed me to turned out better than I had feared.👍 @ Chris, good luck with that, what you can’t see are the other models resident in my office – Norske Love, a French Seventy-four, and a Flower Class Corvette. Apart from the Shower room and Kitchen virtually all rooms have their ship model(s). I do have an understanding wife but she draws the line at the bedroom, but I got away with a couple of ship paintings. 🤞 @ shipman – he is but a lowly Rear Admiral of the least senior squadron (Blue) and besides he ain’t going anywhere.😉 @ Jason – Thank you Jason – it looks fine providing a macro lens is not allowed anywhere near it.🙄 B.E
- 106 replies
-
- 3
-
-
- Admirals Barge
- Vanguard Models
- (and 1 more)
-
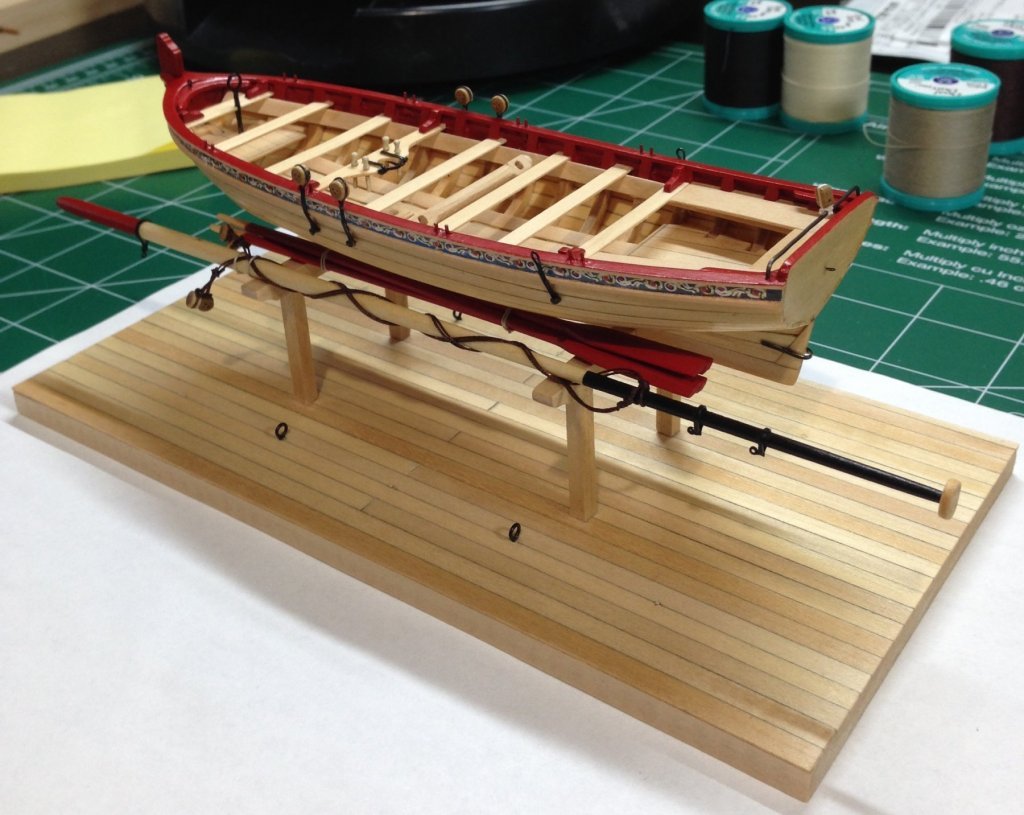
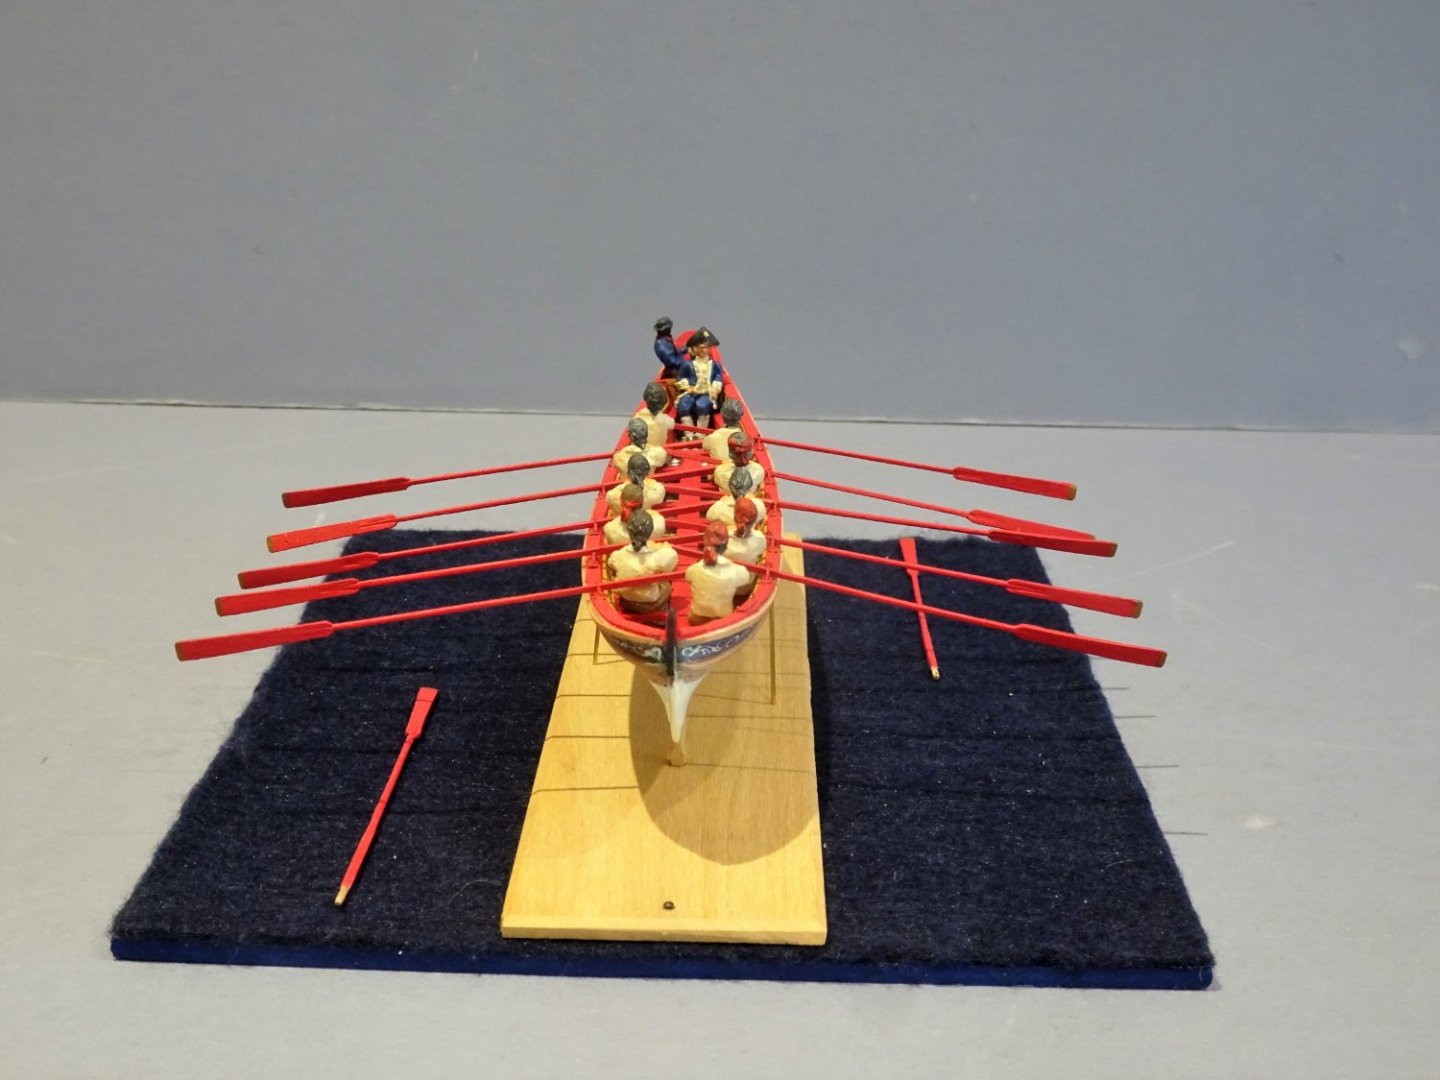
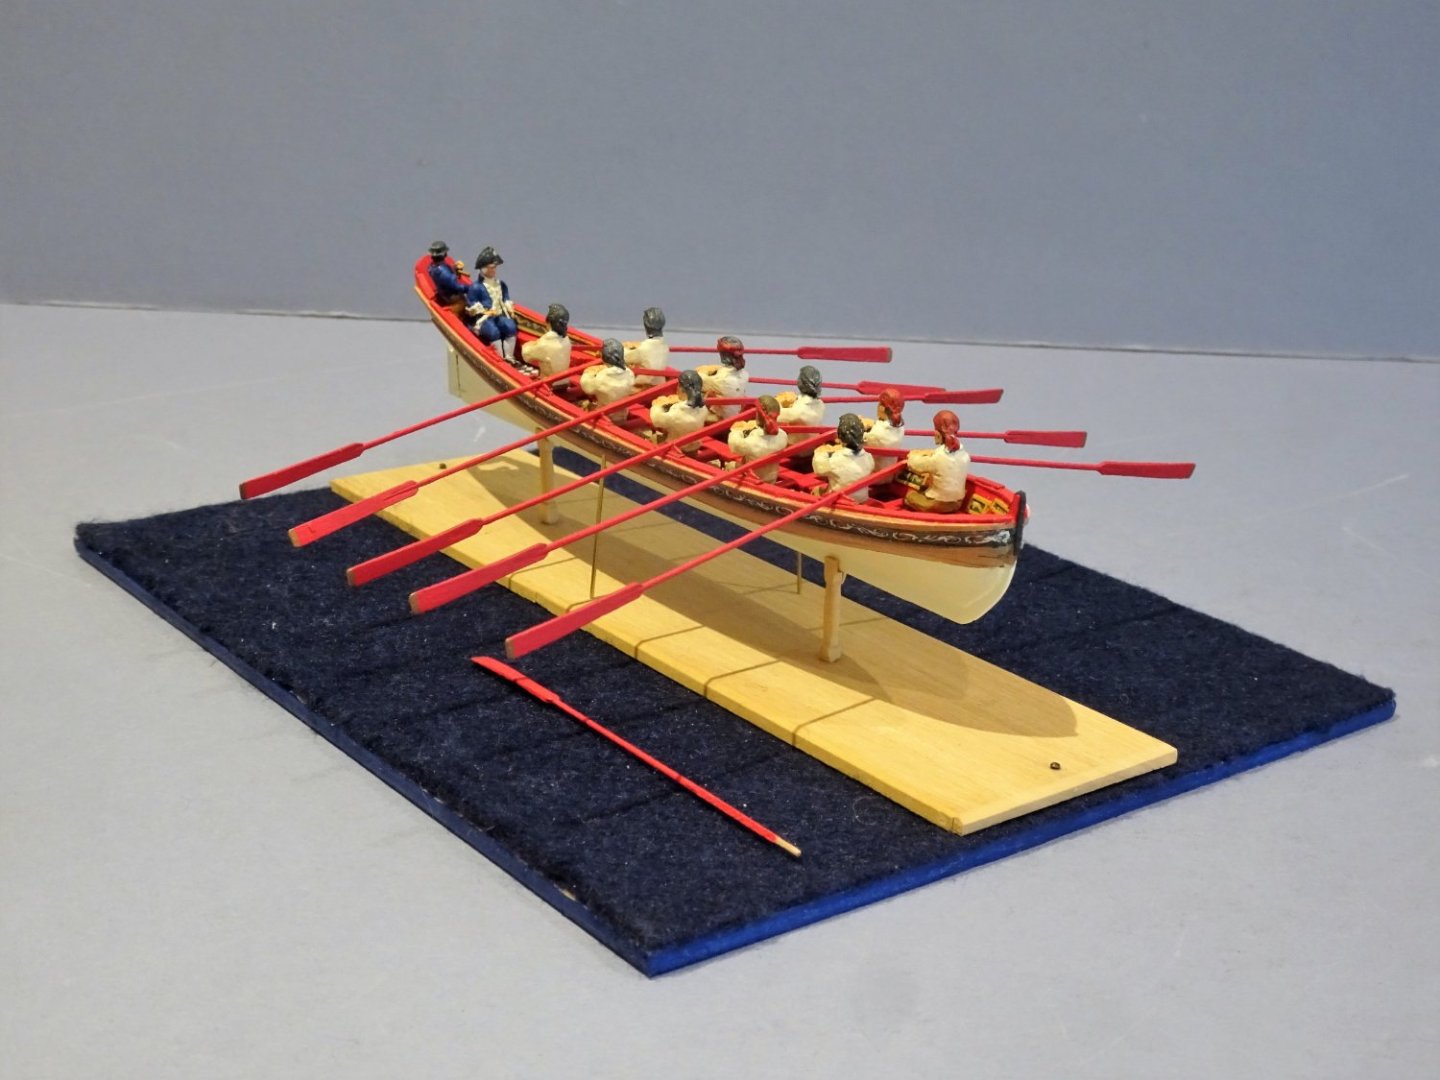
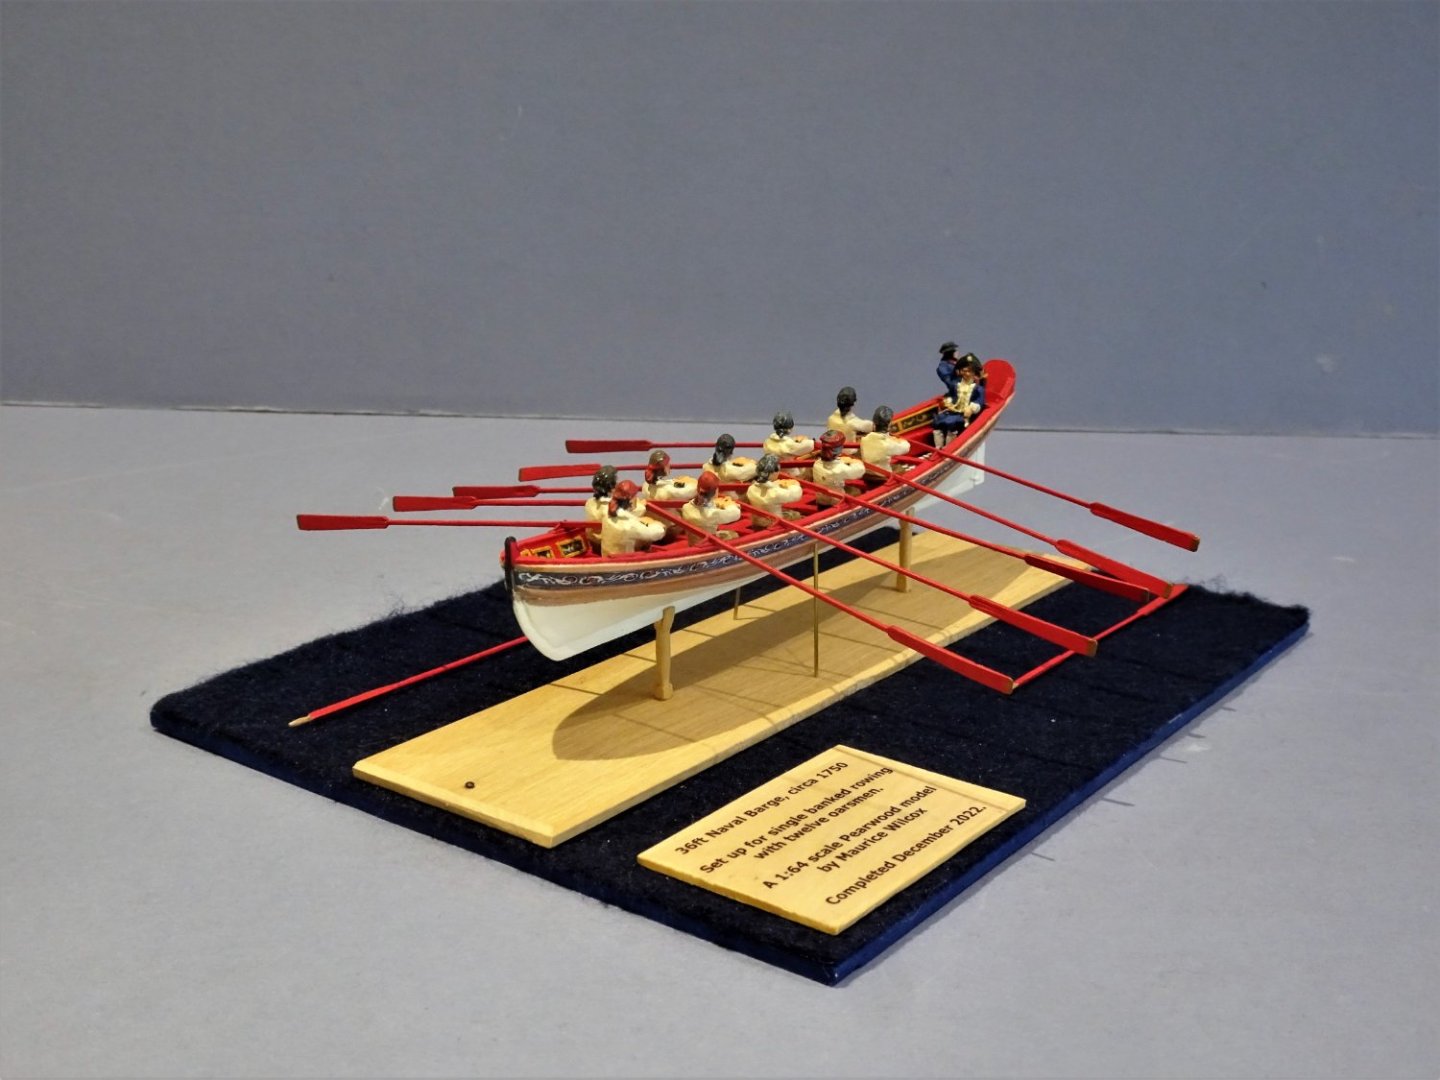
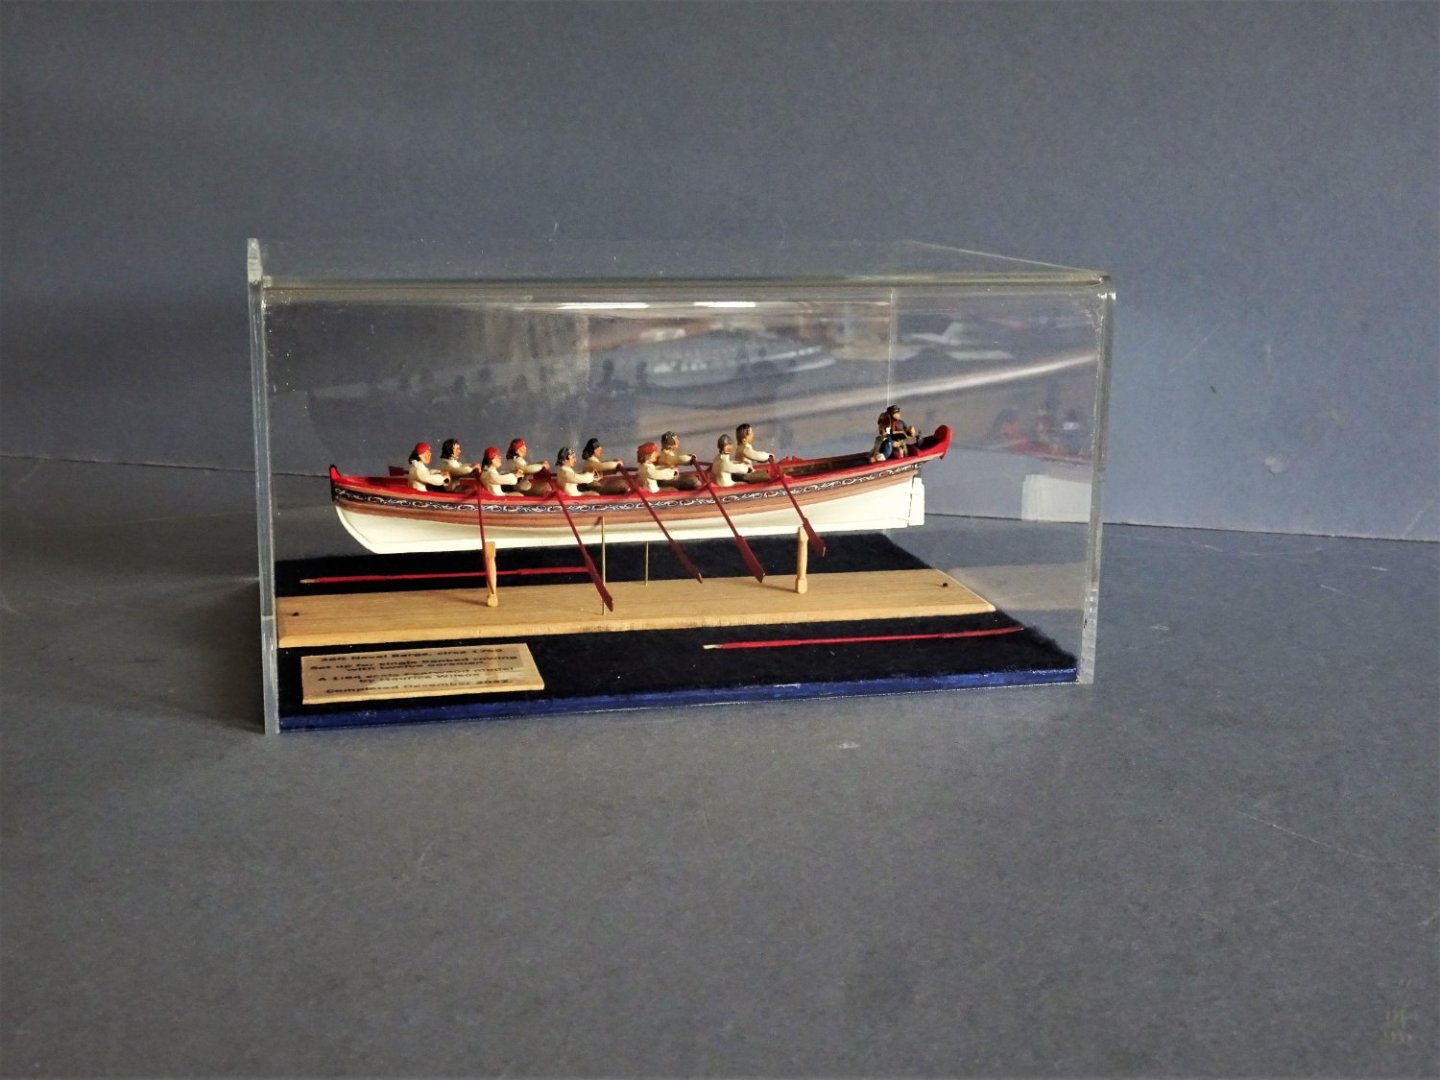
Post Twenty-eight Completion and thoughts about the kit This two-month mini project is complete. 9953 The barge kit provided me with a filler while I thought about a more substantial project. I have taken it further than I had originally intended, and it would have been nice to have had properly moulded crew figures of the standard of those produced by Vanguard. 9951 The kit is quite a challenge particularly if some of the simplifications are to be addressed. It is rightly classified at the ‘experienced’ level of modelling, as are all the small boat kits in the Vanguard range. 9944 Although I have enjoyed addressing the challenges presented, I would have preferred not to have had to make the hull modification which during the build is risky because of the delicate nature of the construction. Having built an example of each boat type in the Vanguard range I experienced a small sense of disappointment in the design of this kit, not felt about the others. 9945 Still, the exercise has provided me with a heady mix of entertainment/frustration over the past two months, and overall, I am happier at the finish than I was at the start, which must count as some sort of result. 9942 These kits were perhaps not designed with standalone display in mind, there are larger scale boat models more suited for that purpose. Nevertheless, we are lucky to have Chris providing this boat range at 1:64 scale, the level of detail and realism compared with what went before is a major step forward. 9940 As far as I know no one else has attempted to produce a Barge kit at this scale, and for this Chris is to be commended. 9938 I have discussed the kit with Chris, and I understand that he is to re-visit the design in conjunction with his HMS Bristol kit development. I hope that at least some of the modifications and changes I have made will be taken into consideration in any revisions. 9956 Tricky business slipping the cover over the base, only just enough room, I had visions of those delicate oars snapping! 9958 Always tricky taking photos of models thro' acrylic. 9961 The diminutive barge now joins the 1:24 Pinnace, and 1:48 Longboat atop Victory. Thank you to those who have shown interest in this build, if nothing else I hope it has provided some ideas of what can be done at this scale. Time to move on… B.E. 04/01/2023


- 106 replies
-
- 21
-

-
-
- Admirals Barge
- Vanguard Models
- (and 1 more)
-
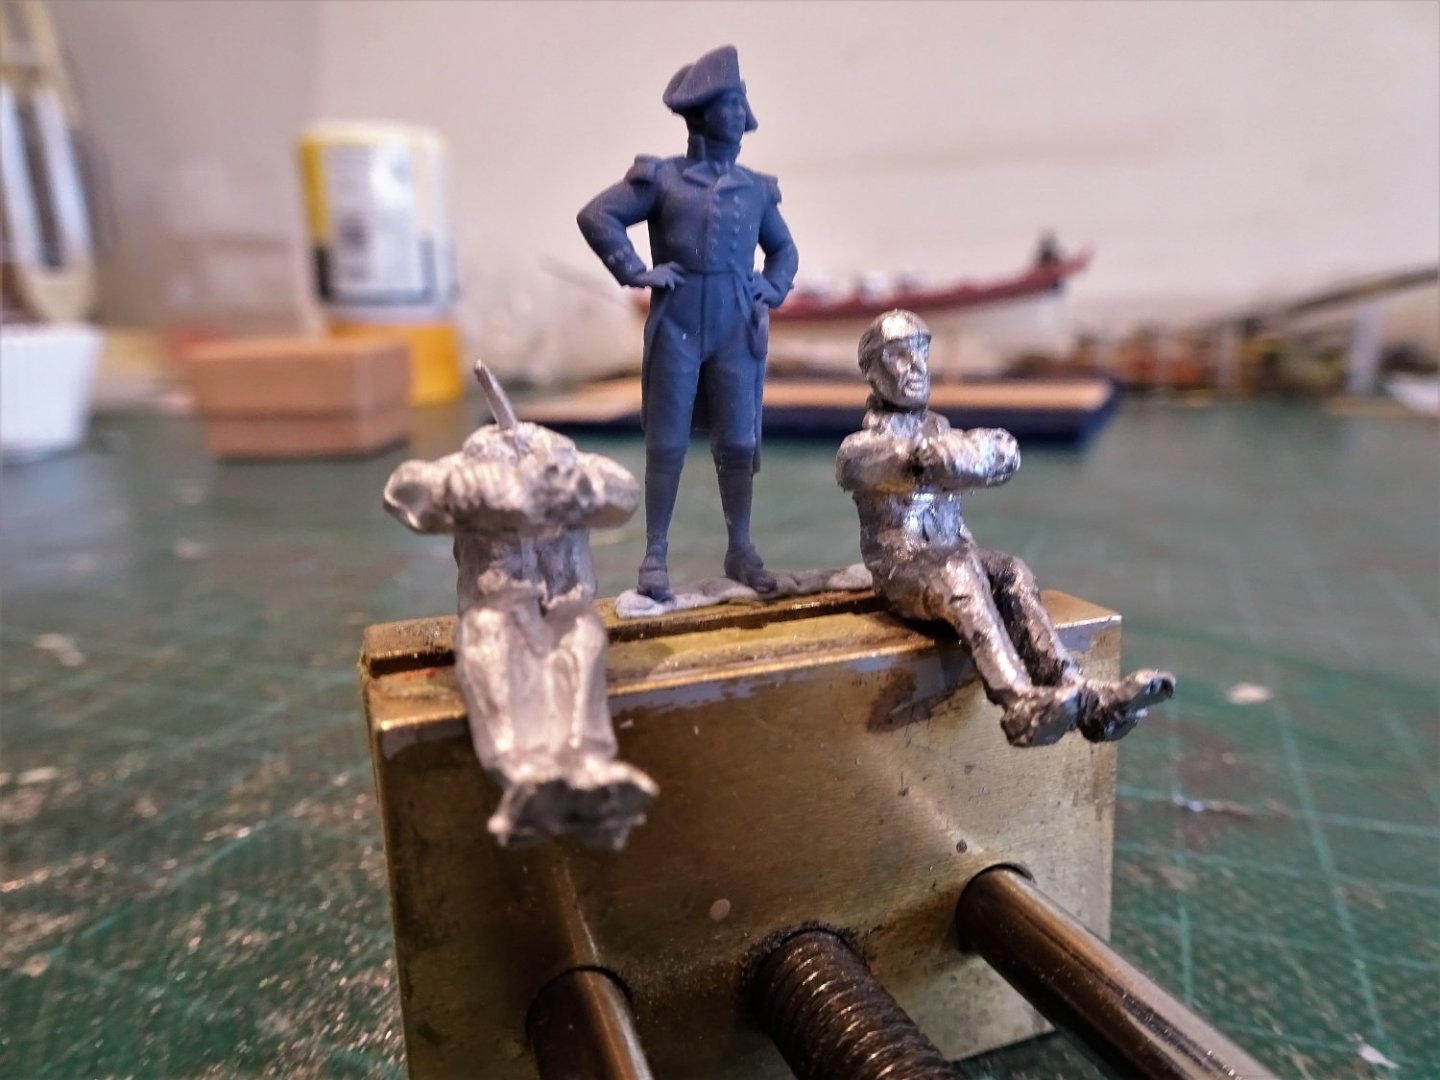
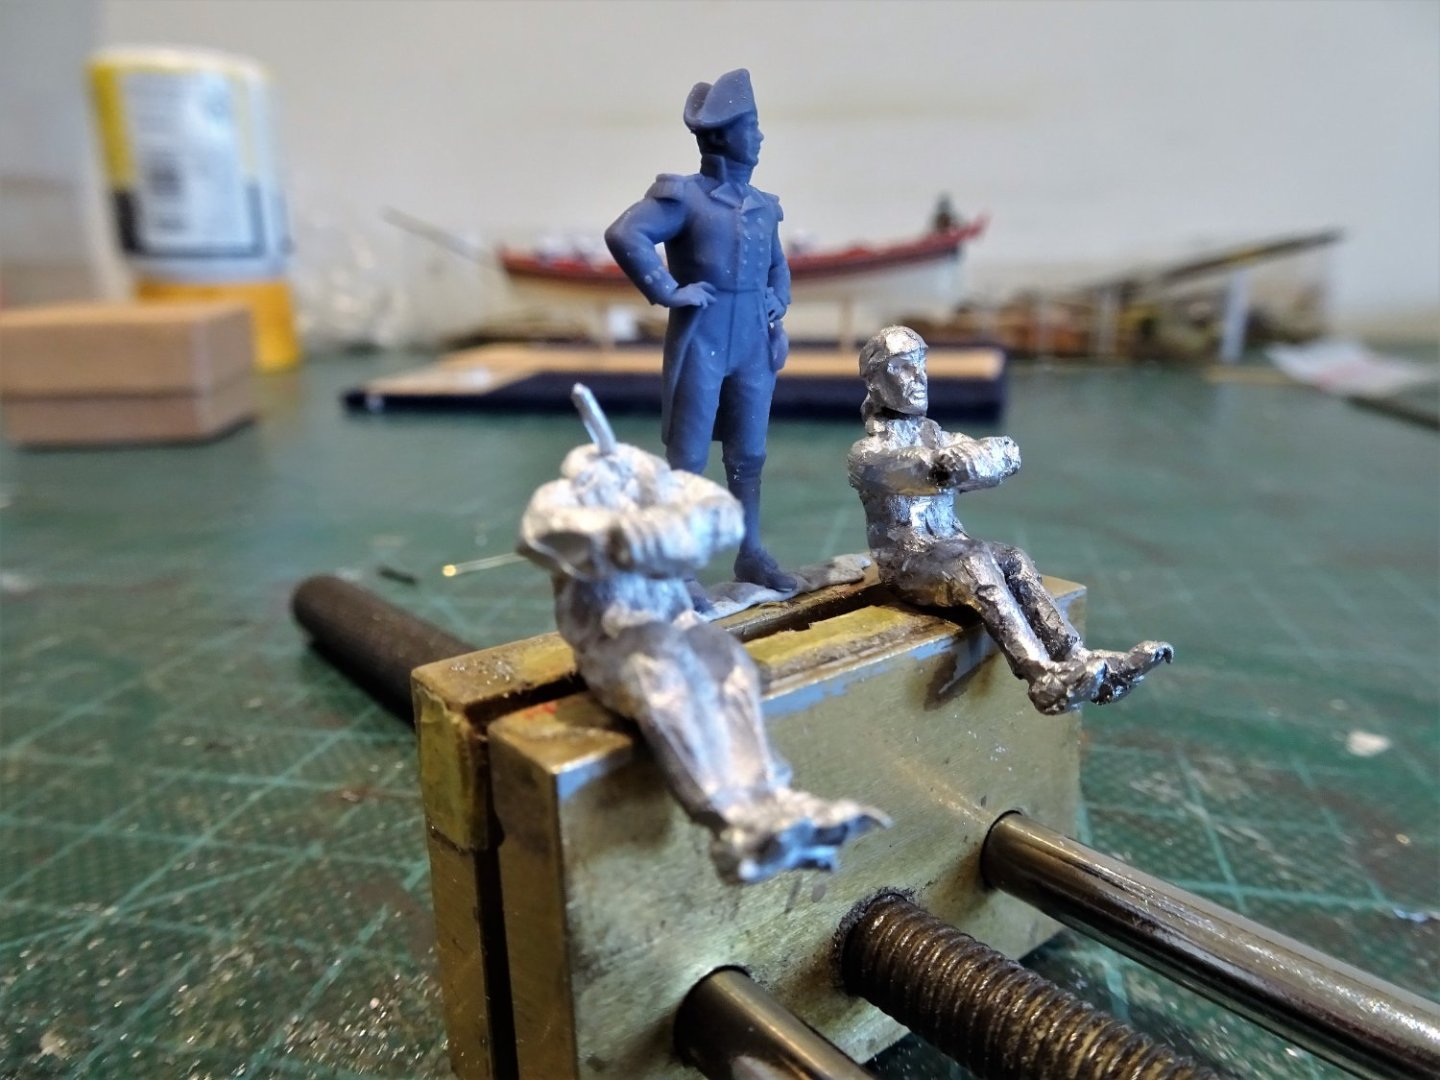
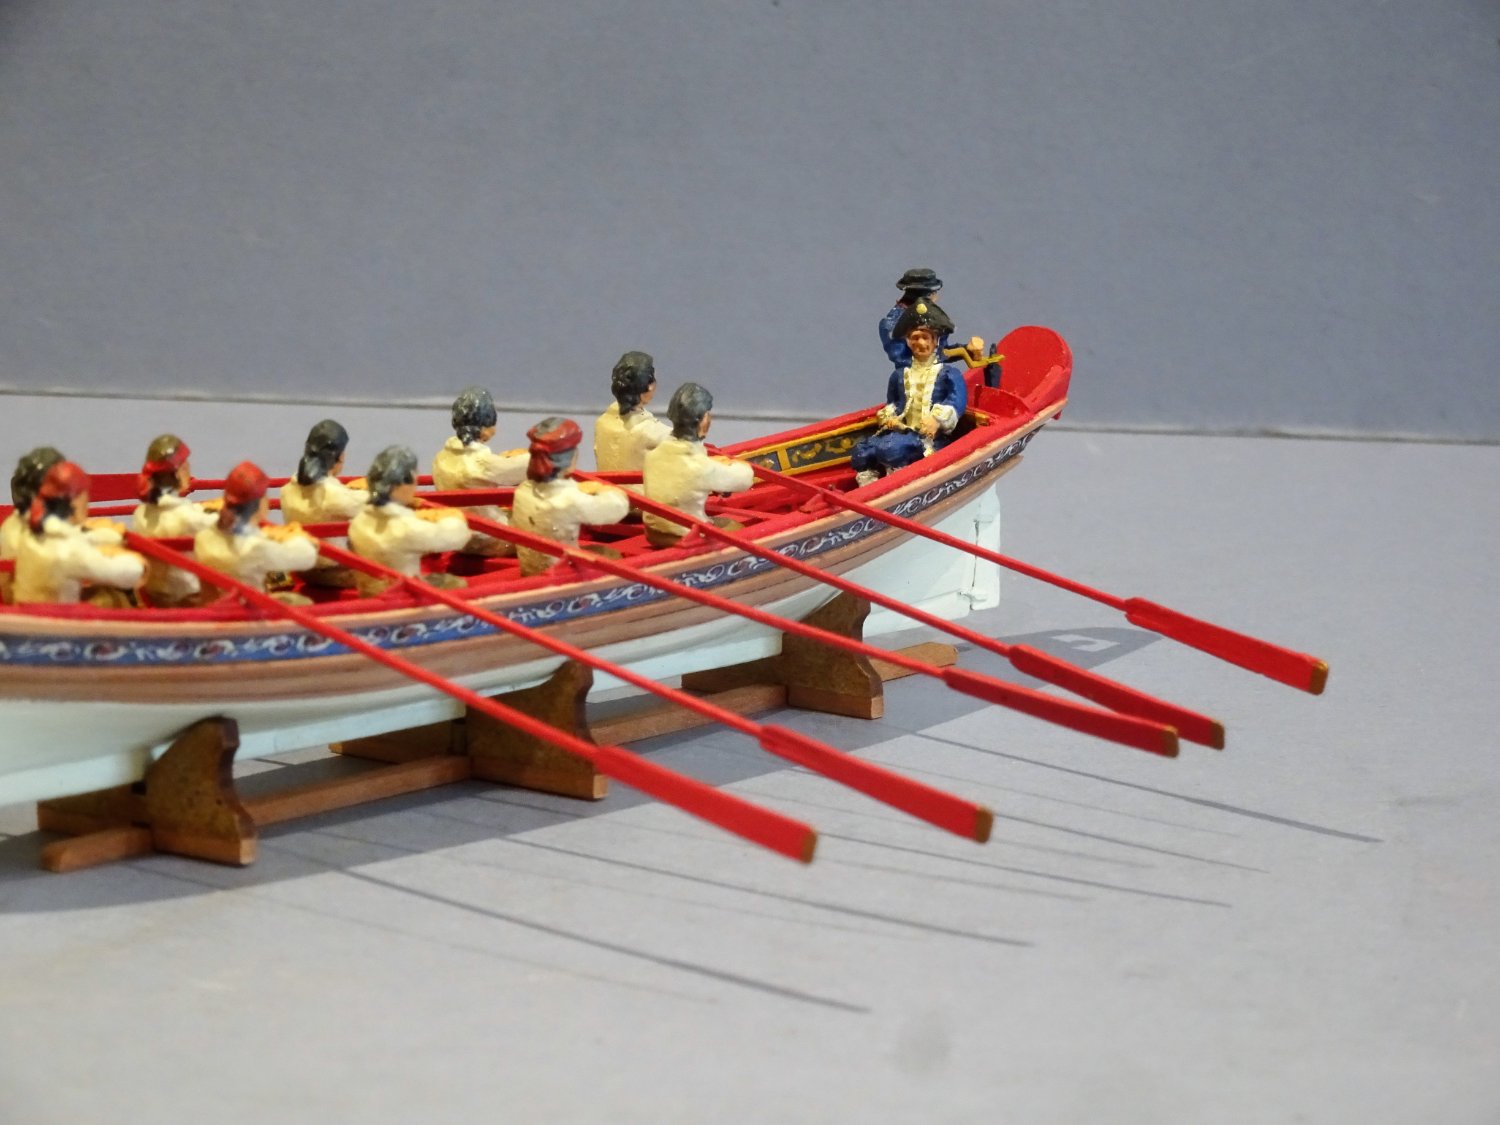
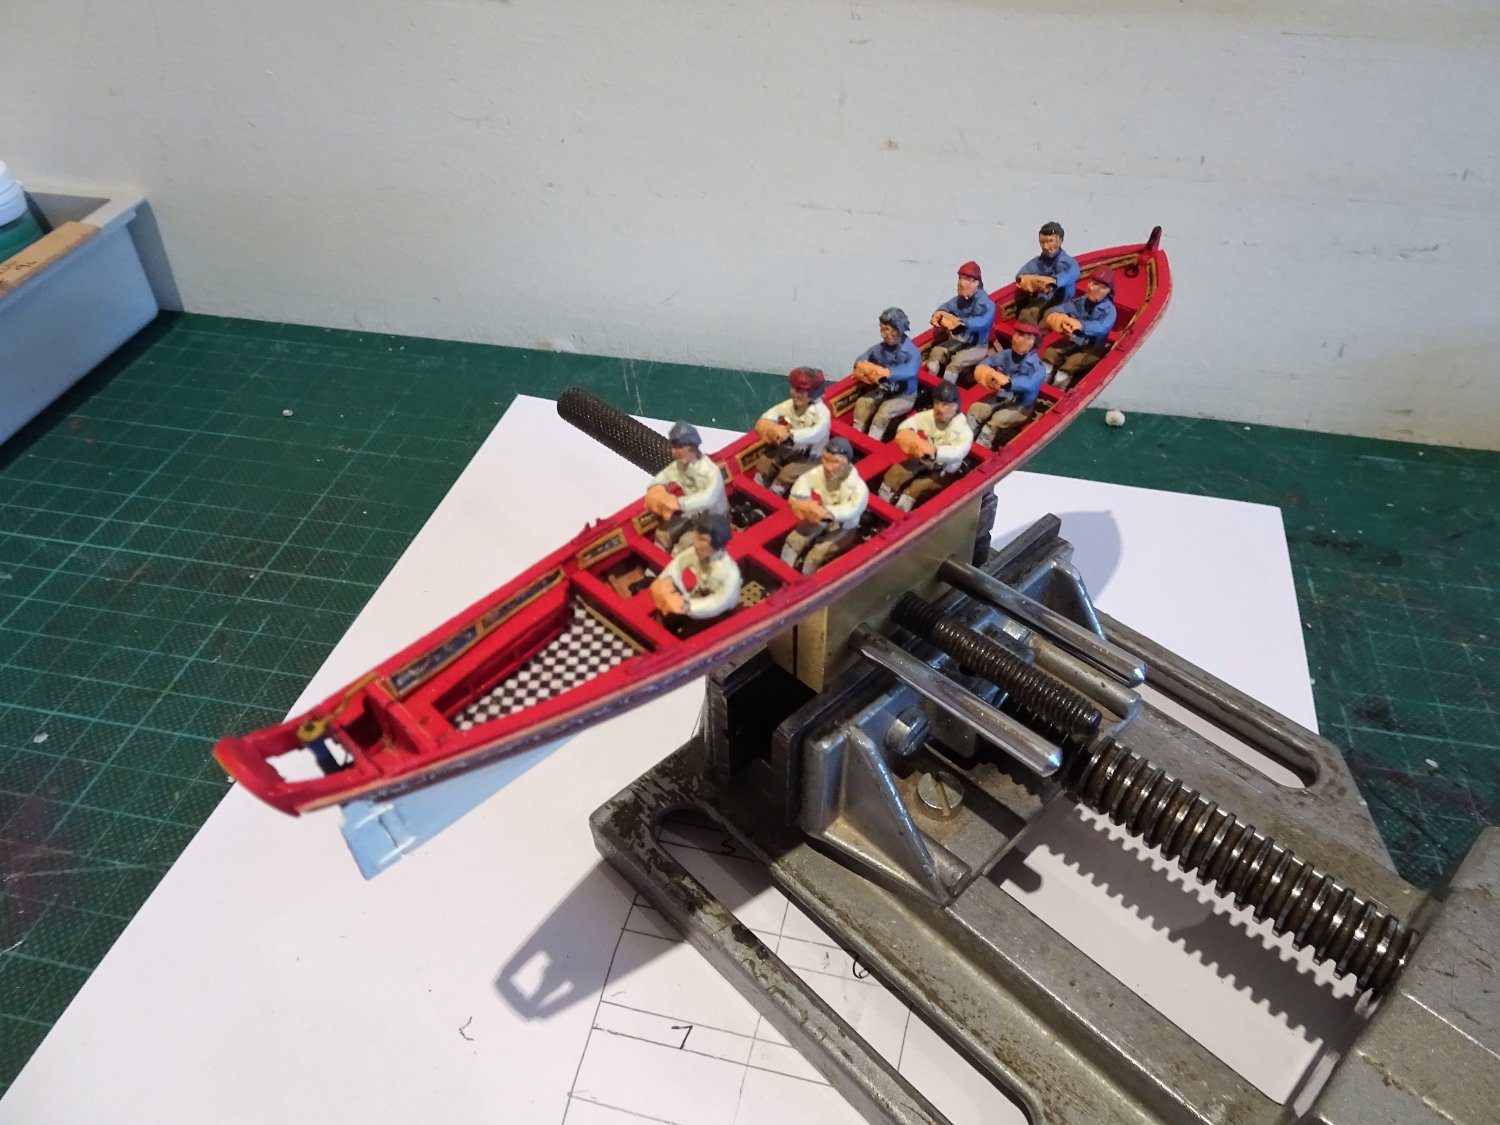
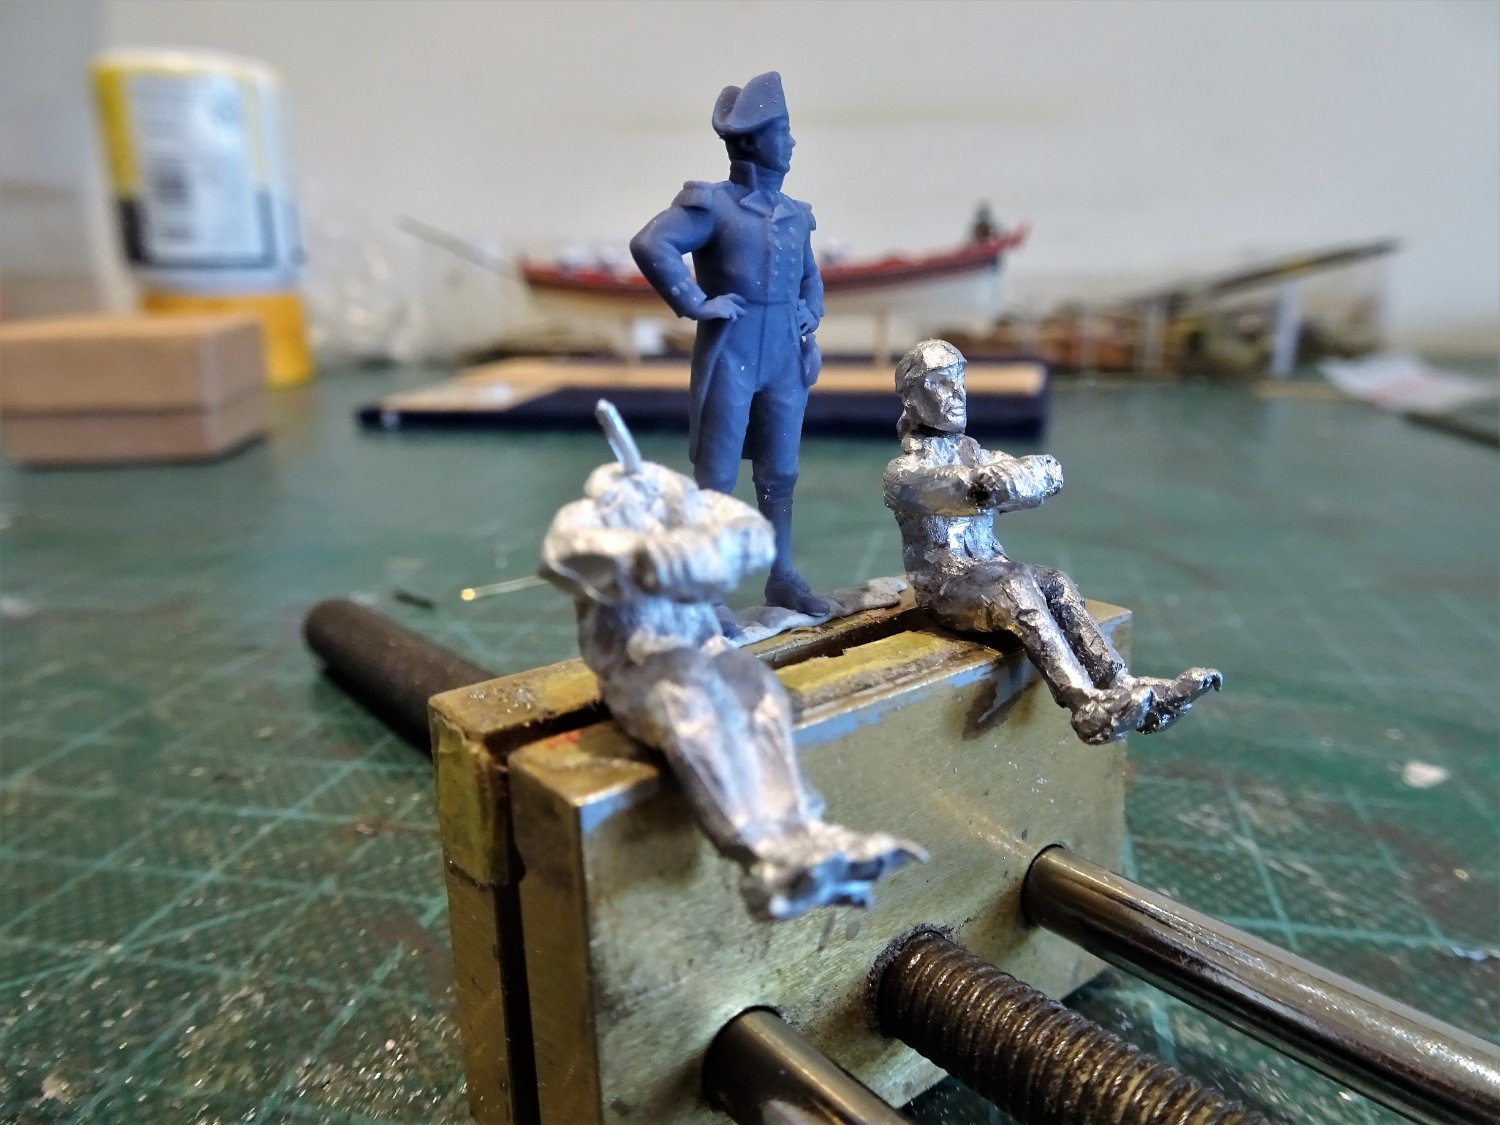
Not just the crew Haken, junior officers struggled to pay for their uniforms. There is one recorded case where one uniform coat was purchased to be used by several officers, and worn when on duty, or visiting another ship. What was required was prize money to boost the available funds. Post Twenty-seven The final hurdle is how to produce a 9” Admiral; that is a figure that looks ok at that distance, at least to a blind man on a galloping horse. I have no such figure and one would have to be cobbled together. Obviously, a sitting figure, looking like a senior naval officer. My admiral is a man of many parts, the body of a sailor from a Flower class corvette, the lower legs of a Royal Navy Marine, and the head of a French Artillery officer circa 1805. Additions of modelling paste and evergreen styrene strip hopefully complete the effect. 9915 1:64 scale is very small to make bespoke figures, not crafted by a proficient artist and sculptor. Cobbling together a ‘Frankenstein’ Admiral is the best I can do. I think he just about passes muster, even more so under the more generous twelve-inch rule. There was no formal officer uniform design before 1748 and hats were not mentioned in uniform regulations before 1795. The book Dressed to kill by Amy Miller is a very useful reference work for naval uniforms from 1748 – 1857. The fashion around 1750 based on the 1748 regulations included a frock coat with deep turn-back cuffs, long waistcoat, and blue breeches. The coats were adorned with increasing amounts of gold lace according to rank, but the sting was that the wearers bore the cost of the uniforms. 9912(2) The final addition is the helmsman also a product of the Frankenstein school of crew production. 9934 A fellow of slight build, well he would have to be to fit in this barge to work the tlller. 9909 9923 9920 9928 9932 With the crew onboard the boat is surprisingly heavy, hence the photos taken on the cradles. The pedestal stands will require a couple of wire supports outboard midships to keep the barge upright. The final post will see completion of this project. B.E. 03/01/2023
.thumb.JPG.833c60f4ecbc07f55c368d2c8c7ec53d.JPG)

- 106 replies
-
- 15
-
-
- Admirals Barge
- Vanguard Models
- (and 1 more)
-
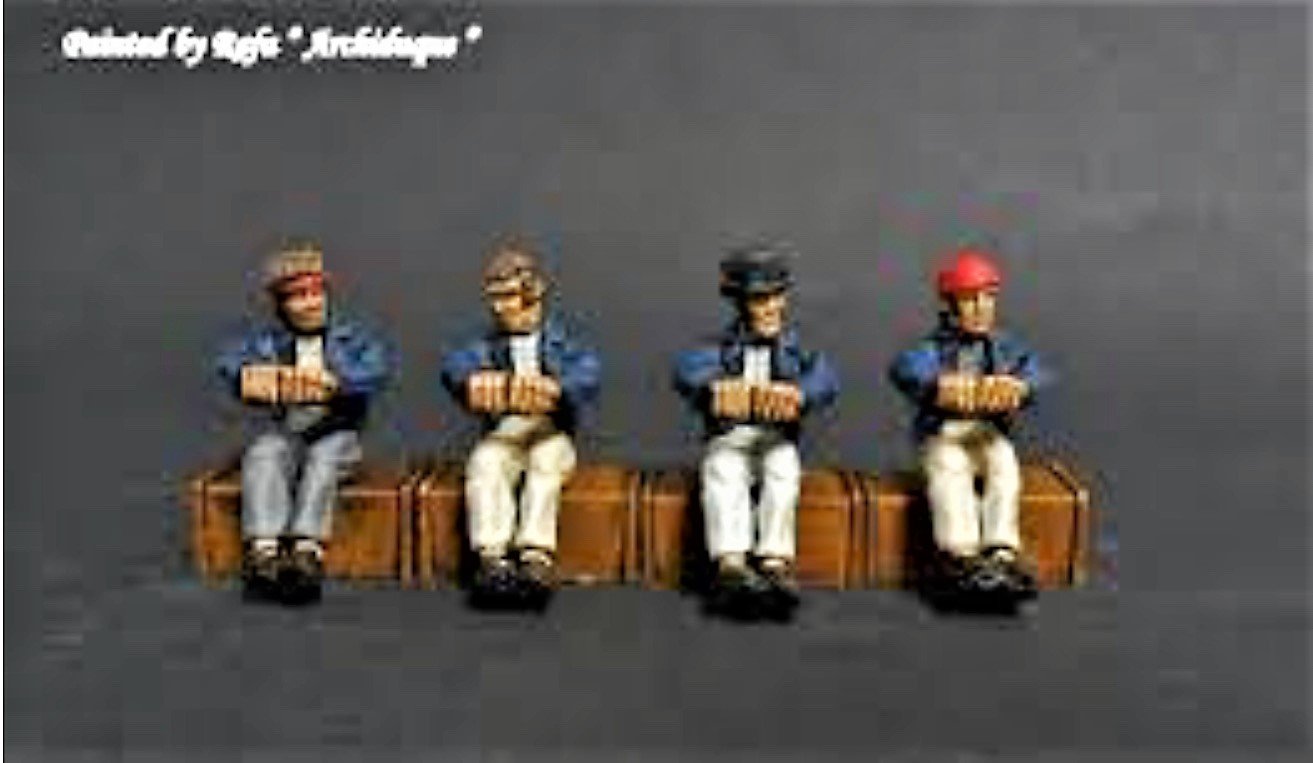
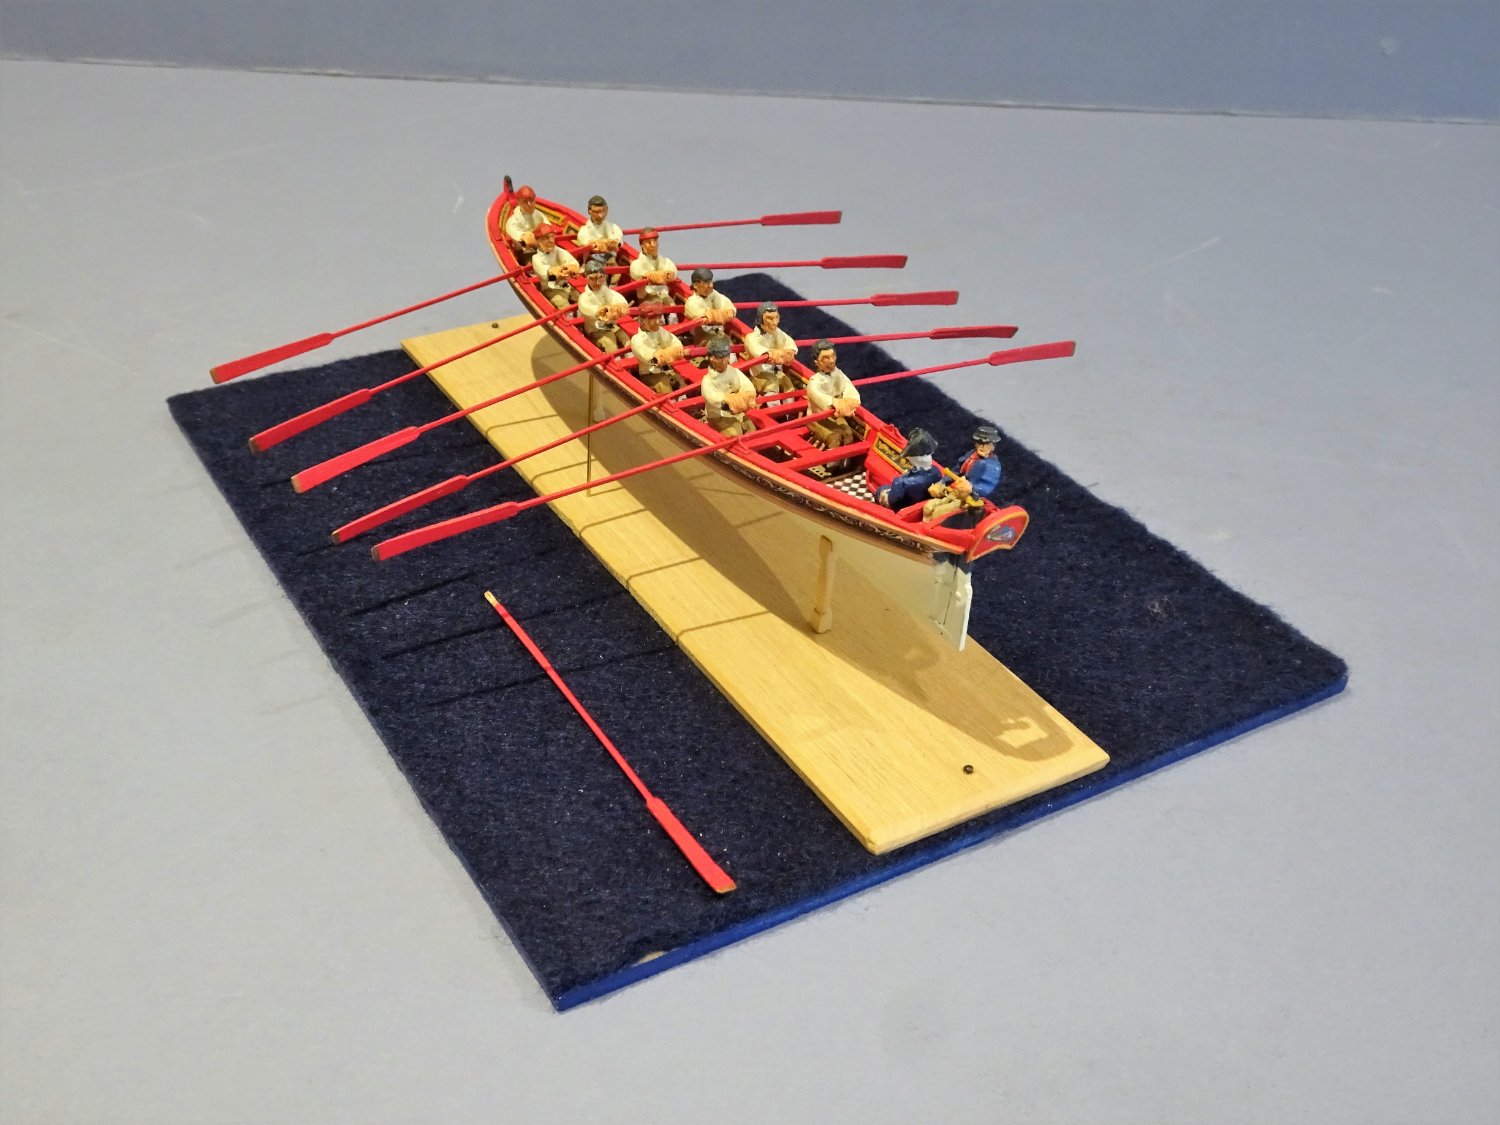
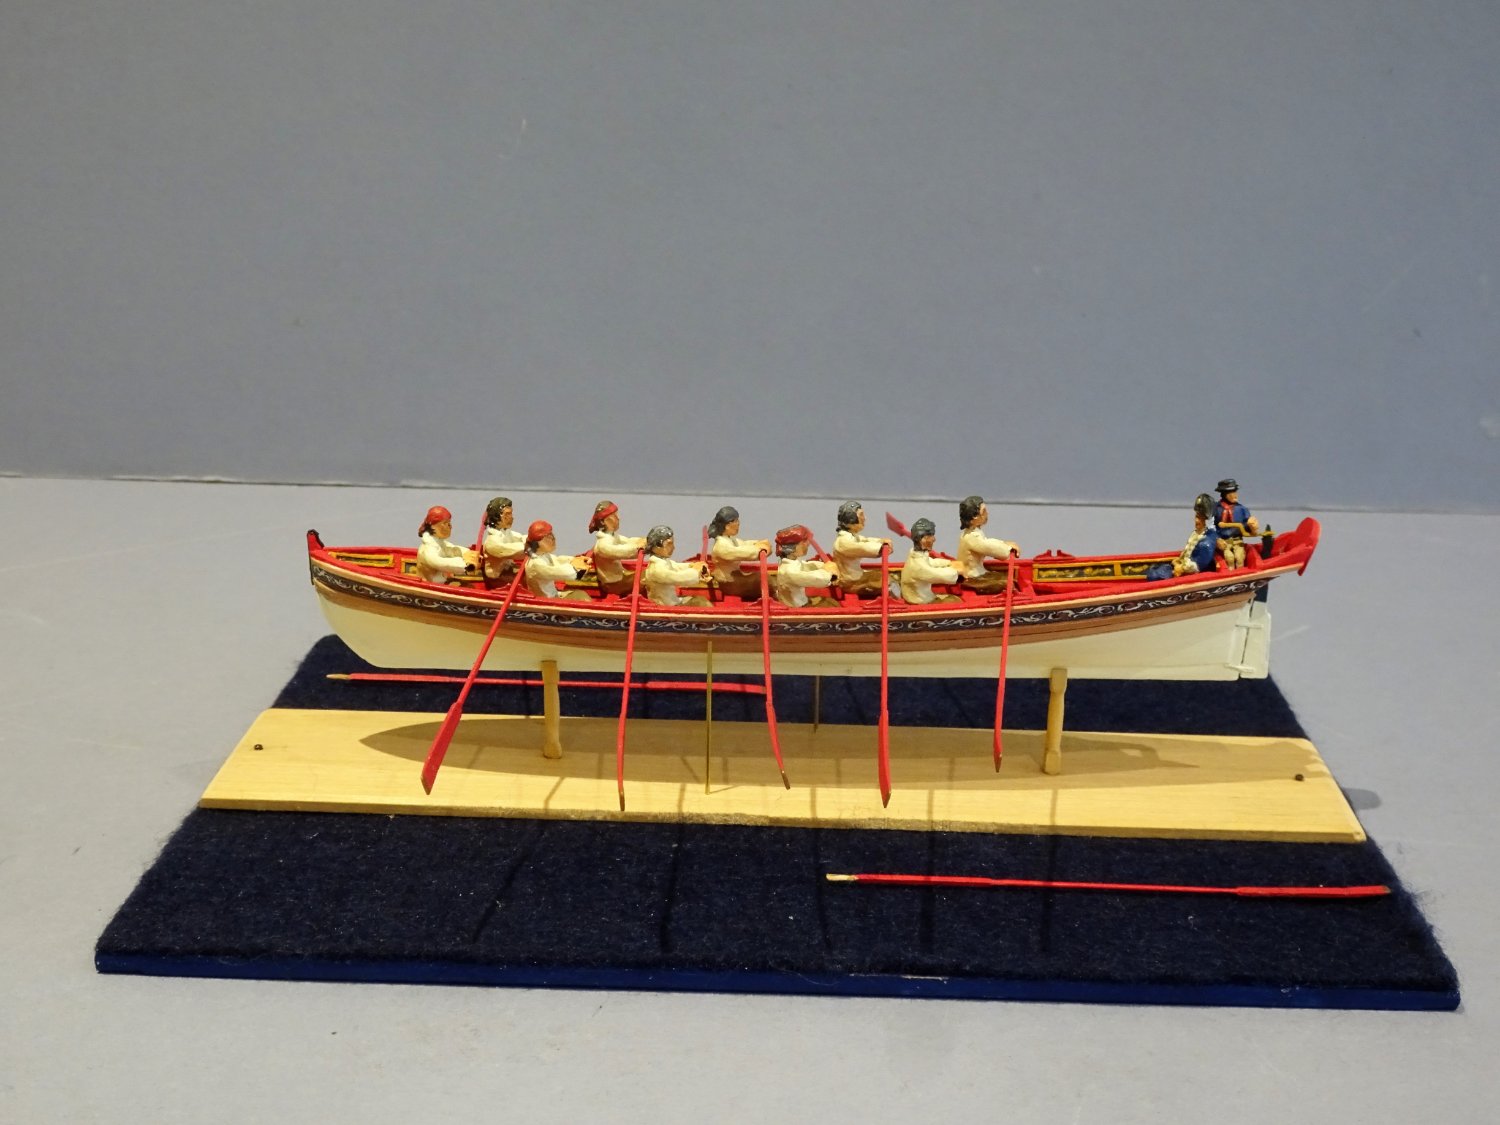
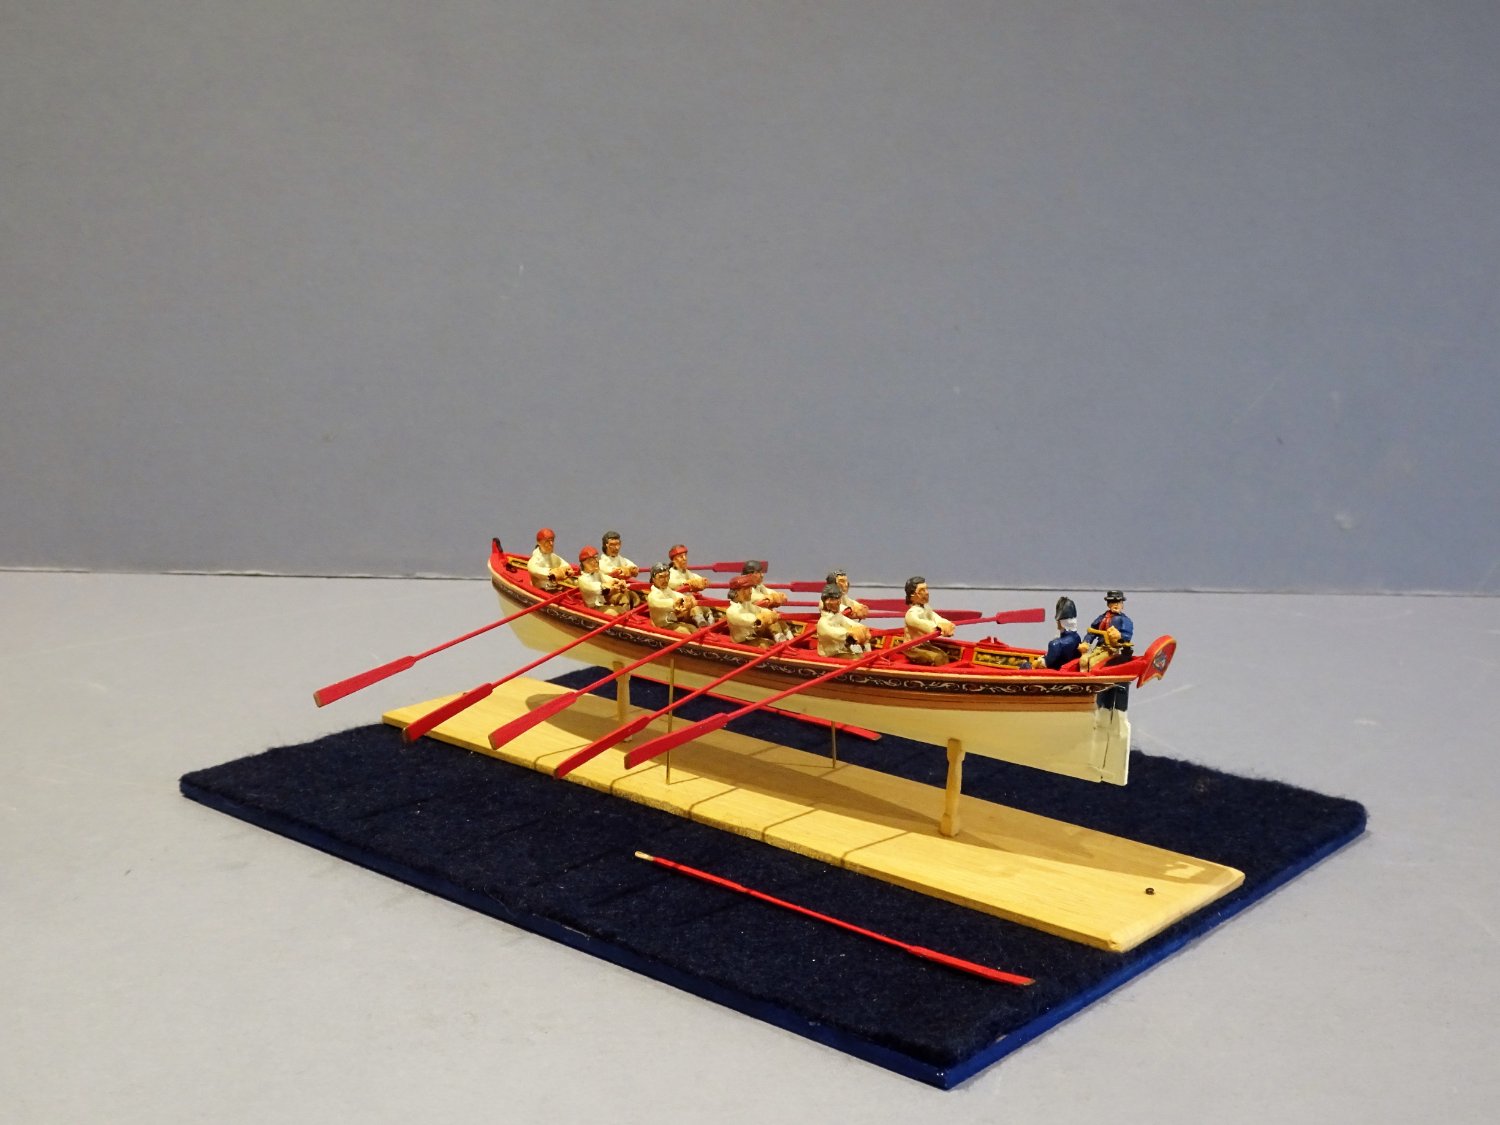
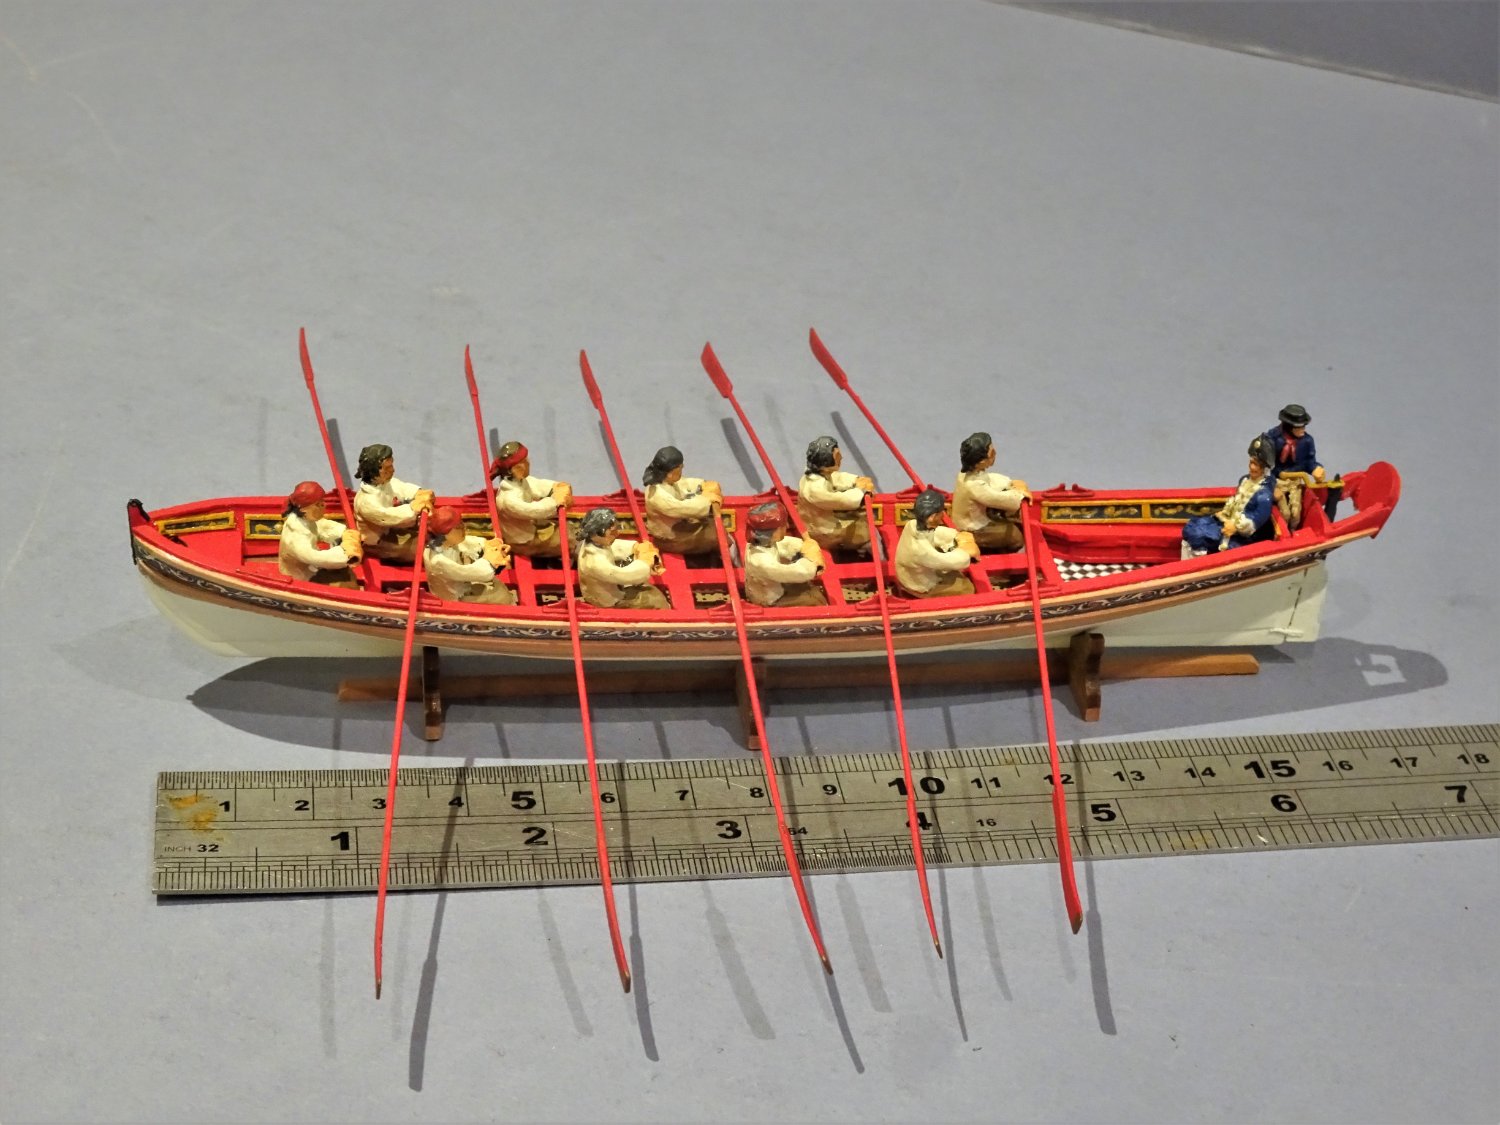
Thank you Hakan, James, and Allan, and for those who have looked in and 'liked' Post Twenty-six The chemical blackening didn’t work on these metal figures, so priming and painting was necessary. I have decided to paint the figures in life colours albeit using a muted palette. More fiddly and time-consuming than simple silhouette painting, but I though it better suited the overall effect. Admirals and Captains were known to kit out their boat crews in matching clothing, and sometimes headwear, all at their own expense. 9865 I started with blue shirt tops, but had some doubts, so I changed to a natural undyed colour which I like much better. 9879(2) This also accords with the contemporary models. 9875(2) The crew need fixing to the thwarts to provide stability when arranging the oars, I used spots of ca for the purpose. 9872(2) Altho’ the barge is set up for twelve oarsmen I have settled for ten, which I think is the most aesthetically pleasing. The foremost position is very cramped, and the aftermost involves the oarsman sitting in the stern sheets. 9874(2) 9871(2) An Admirals Barge need an Admiral, and this will be the next task. B.E. 02/01/2023

.thumb.JPG.7fa95320890b8ab3fad140377505760c.JPG)
.thumb.JPG.4023f2f9ea797144efd60aeb60e1e423.JPG)
.thumb.JPG.14ec0f70a464f11ce842decf2ccf245d.JPG)
.thumb.JPG.8456f91cc798419d36b2ccadec0be1ac.JPG)
.thumb.JPG.aff3b6e62929d3b87f2e7d1a9c8b61cd.JPG)
- 106 replies
-
- 17
-
-
- Admirals Barge
- Vanguard Models
- (and 1 more)
-
Nice job Andrew, the fishing boat range from Vanguard does provide the opportunity for 'dressing' the boat and yours looks excellent. There's a great pleasure to be had from building these kits, I loved doing Fifie and Zulu. Cheers, B.E.
- 206 replies
-
- 2
-
-
-
- Vanguard Models
- Brixham trawler
- (and 2 more)
-
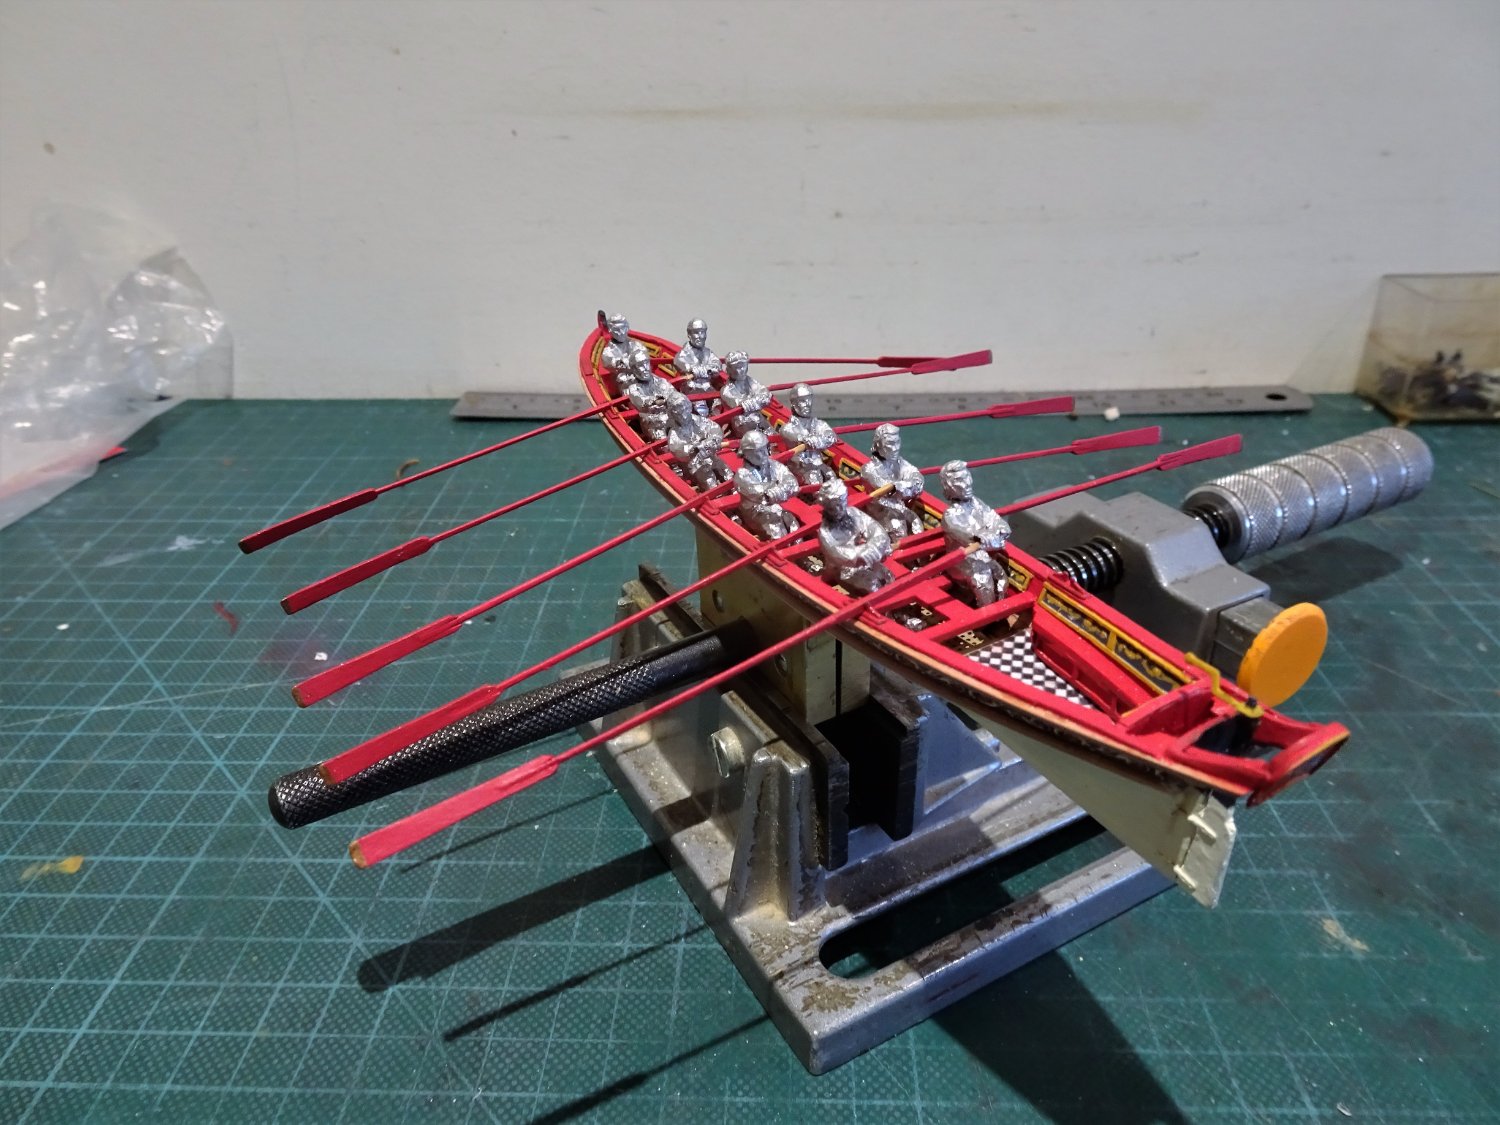
Post Twenty-five – fettlin’ the crew Working these figures is hard on the fingers, drilling out the flash between the legs, holes drilled to secure the heads to the bodies, drilling and filing of the hands to fit over the oars. The figures are then filed to reduce their bulk, to make them a better fit. After a couple of days, the basic figures are complete, and an opportunity to get an impression of how the set up would look. 9862 9858(2) 9856(2) 9855(2) 9853(2) 9849(2) I think it’s going to work, a little more fettlin’ of the individual figures, and then a chemical black wash. B.E. 31/12/2022
.thumb.JPG.555acc4328902184195504637032f40f.JPG)
.thumb.JPG.c3f6f992b20a7d7aeea14a803e201f00.JPG)
.thumb.JPG.8831ef066666aa566bf3eaeae9fedf73.JPG)
.thumb.JPG.dbea87a154421218993358b22c85ce0a.JPG)
.thumb.JPG.3b23f995878afaaef637406b41edc2ab.JPG)

- 106 replies
-
- 19
-
-
-
- Admirals Barge
- Vanguard Models
- (and 1 more)
-
Not a false path James, they seem to be the only game in town as far as scale rowers are concerned. I still hope I can make a passable job of them, fingers crossed it's not a forlorn hope! B.E.
- 106 replies
-
- 3
-
-
- Admirals Barge
- Vanguard Models
- (and 1 more)
-
Post Twenty- four After nine days the crew have arrived and a motley crew they are, Vanguard figures they certainly ain’t. 9830 White metal figures, as rough as rough can be, they make the Amati range look classy. On the left is the basic figure (the heads are separate) the figure on the right I have started to clean-up. 9827 At this stage the figure has been thinned down the legs separated, and a head drilled and fixed to the body. 9835(2) For scale, the figures are a bit chunky, but they sit on the thwarts ok. The figure I have started to fettle already looks a better fit, but a long way to go. 9836(2) In their basic form the figures certainly won’t pass muster so it’s down to my fettlin’ efforts on the test figure to determine whether I can retain the will to live with the prospect of twelve to do. 3829 This screen shot shows apparently how they should eventually look but they bear little reality to the raw figures. I have little experience with these 28mm gaming figures, but I pity those that do if this is the standard of stuff they have to work with. 9839(2) I will persevere with the one I’ve started and see how I go. B.E. 29/12/22
.thumb.JPG.8bf14bb736e652aafcc04ad80e24b7f2.JPG)
.thumb.JPG.2a44cf48ee9e044647e6216e47393a00.JPG)
.thumb.JPG.22ac0d17c92a2f8c140d27f8636a7242.JPG)
- 106 replies
-
- 10
-
-
- Admirals Barge
- Vanguard Models
- (and 1 more)
-
Wow, that must be some sort of record. B.E.


.JPG.9443e0442eeb90082698493584fd7a0e.JPG)


.JPG.1add250c1484754940055f939d862979.JPG)
.JPG.0072ddb9a8b01663ce804264f9ec3efd.JPG)
.JPG.da81b29559e18630c5d4b53f8bee5b7f.JPG)
.JPG.2b07feb6386f452e6328b12f2e440635.JPG)
.JPG.653e1bc6c96e642e9892395ae4e64788.JPG)
.JPG.5c8d0235d08cfadee149393525c9ba55.JPG)
.JPG.14518ad3b8d5dc23288a5bdaccc02664.JPG)
.JPG.af9deac9324c2a81abe3dba42305d584.JPG)
.JPG.1b8a6d2606b46f7c88cfa39829f83e75.JPG)
.JPG.12be7c5129e8463a954cc57692a38fc4.JPG)

.JPG.5706a8653f0ea2c9a0b0de257ff32e05.JPG)
.JPG.4634293146a1567434c07168d5dbcf69.JPG)
.JPG.e20fffcb2c411d06907293a8beedc885.JPG)
