
.JPG.ca33079f5815b861e67b9c2cccd37982.JPG)

Blue Ensign
-
Posts
4,574 -
Joined
-
Last visited
Content Type
Profiles
Forums
Gallery
Events
Everything posted by Blue Ensign
-
 Fun of course is a relative term; I'm missing a pathfinder build log from you James, where I can sit and stare at the process, does not Indy have a barge? I think my Flying Transom has shifted somewhat since I fitted it, but as long as the arms don't break the panel can be re-jigged. The more I look at your Indy build, the more my resolve not to succumb to it weakens - repeat I cannot do another large-scale build, I have not the room for another large-scale build...... B.E.
- 106 replies
-
- 4
-

-
- Admirals Barge
- Vanguard Models
- (and 1 more)
-
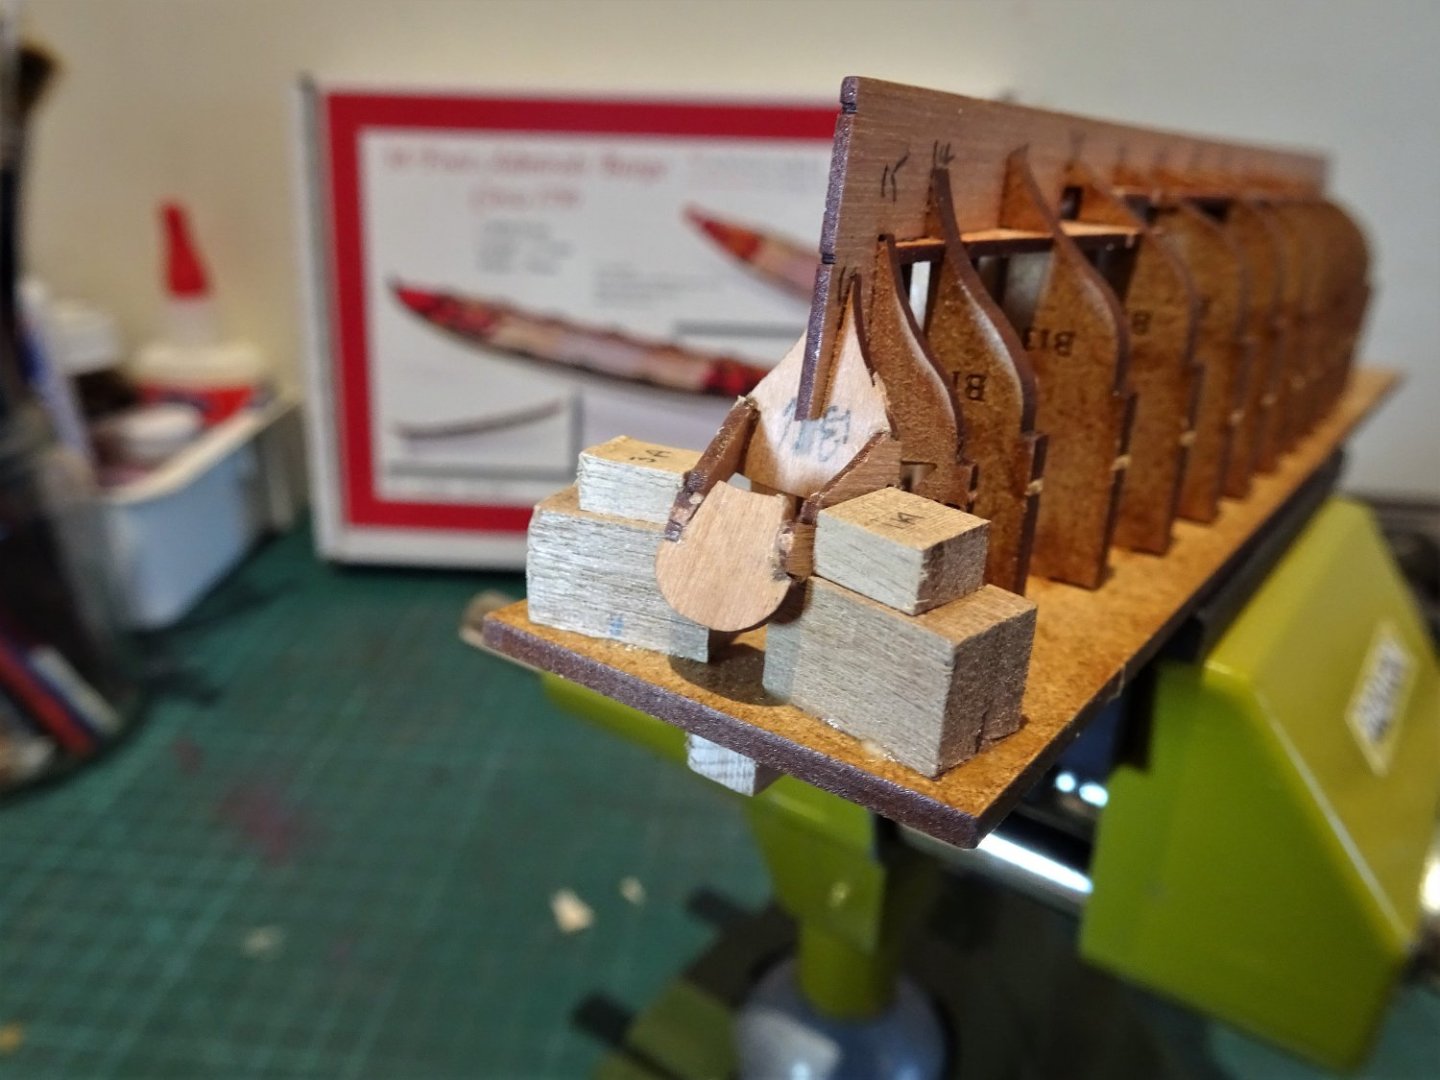
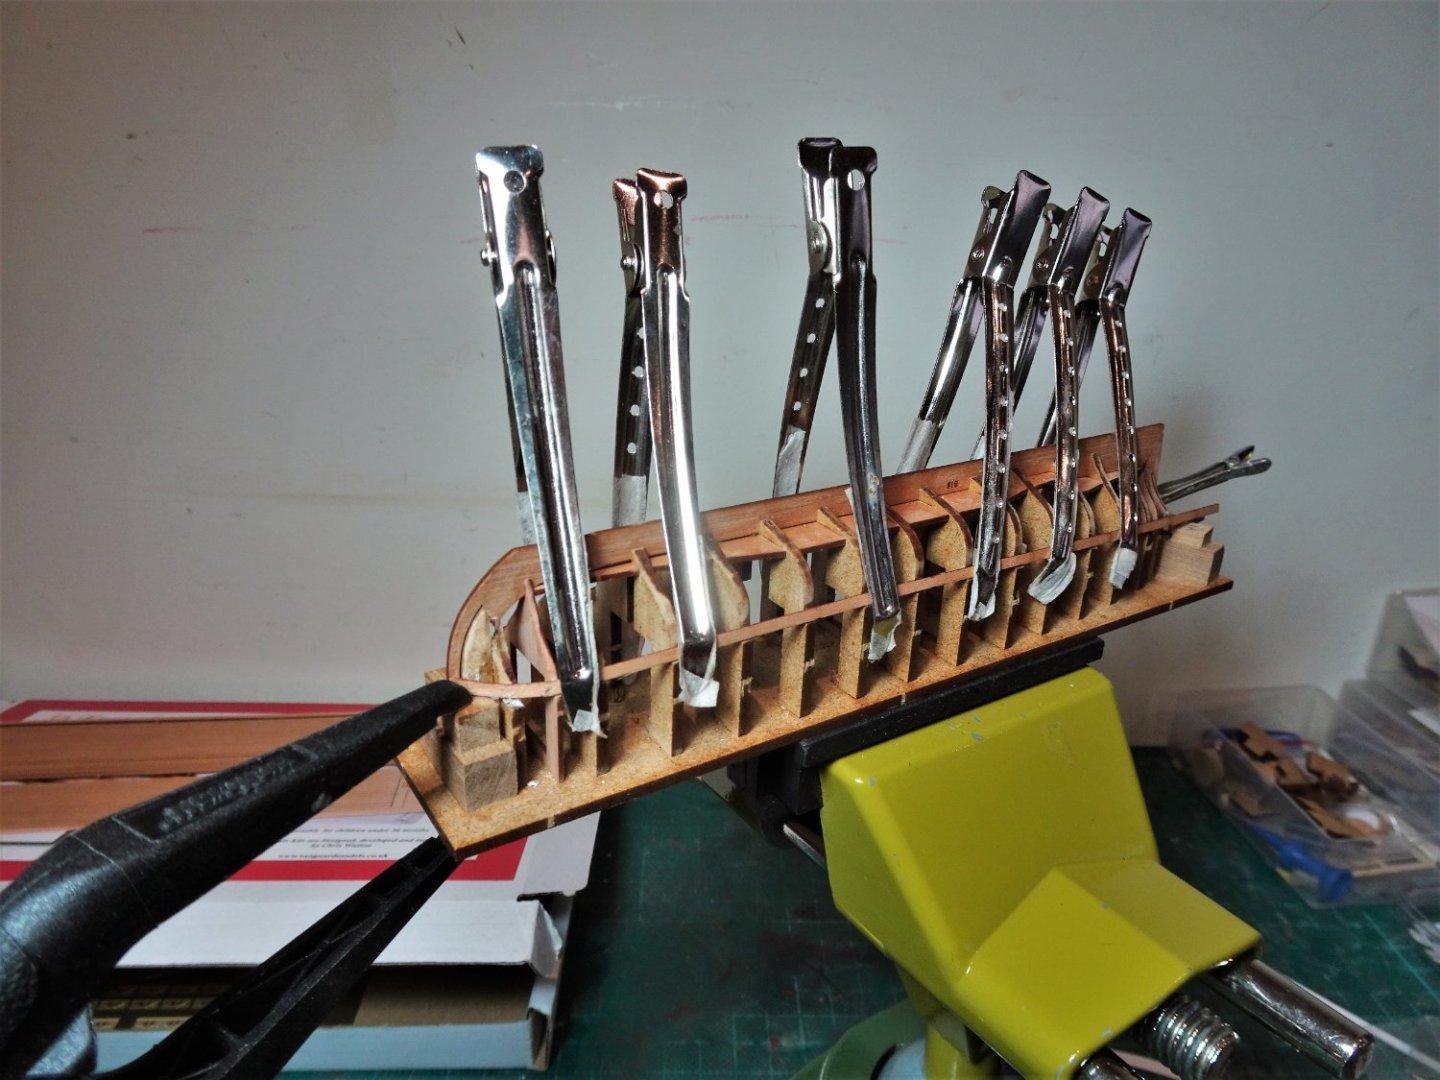
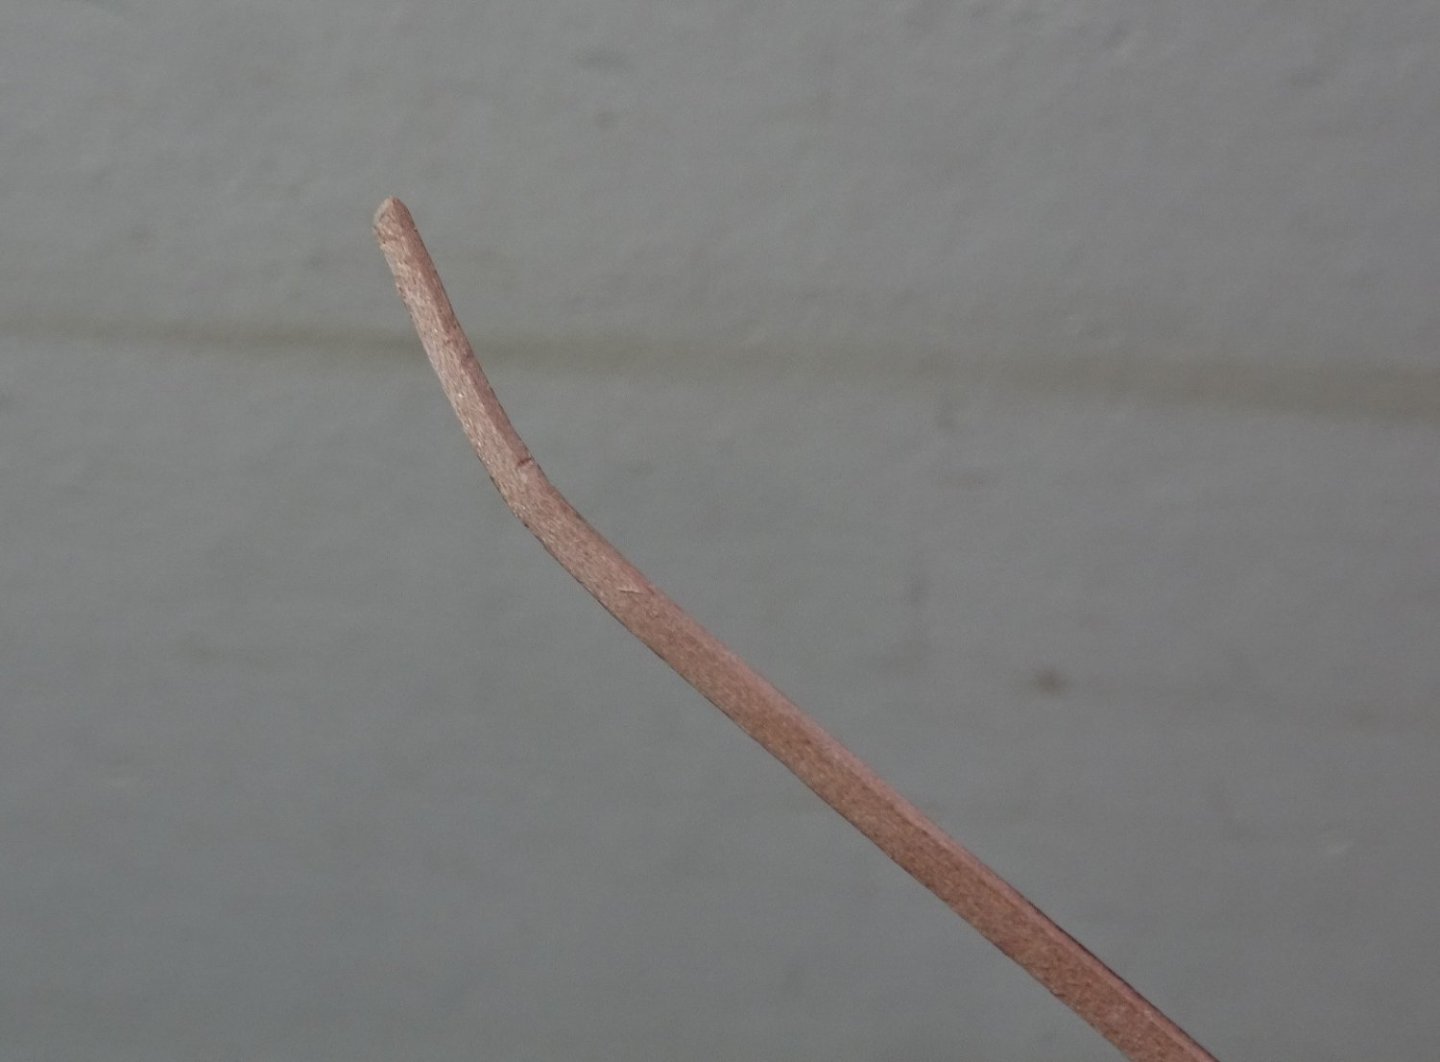
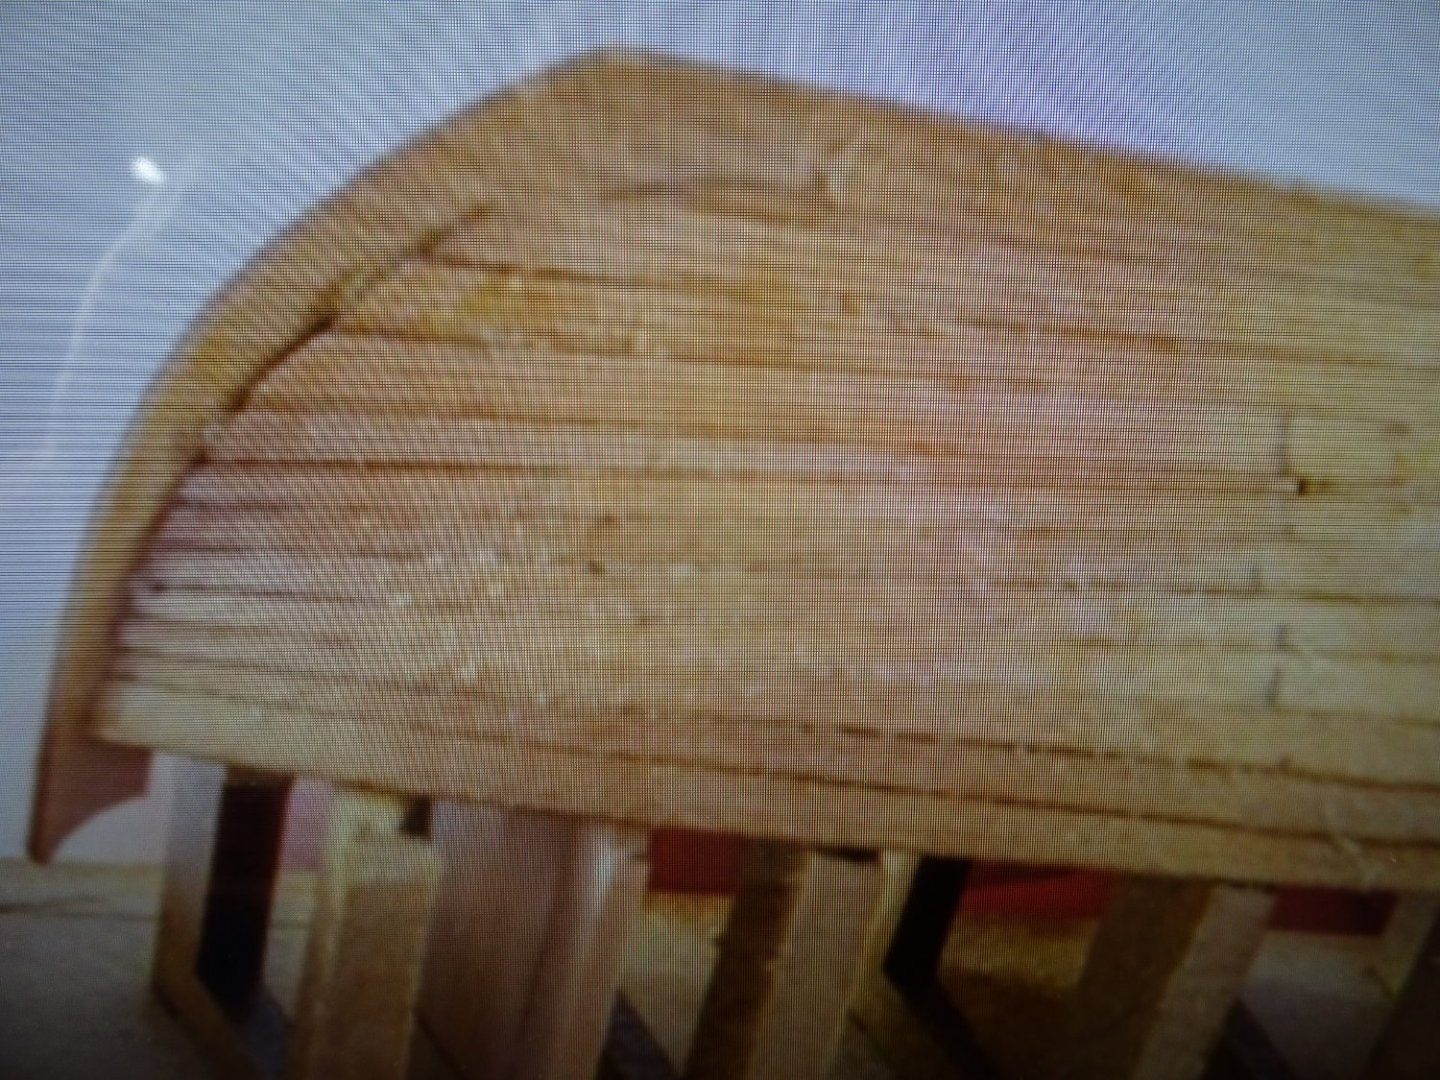
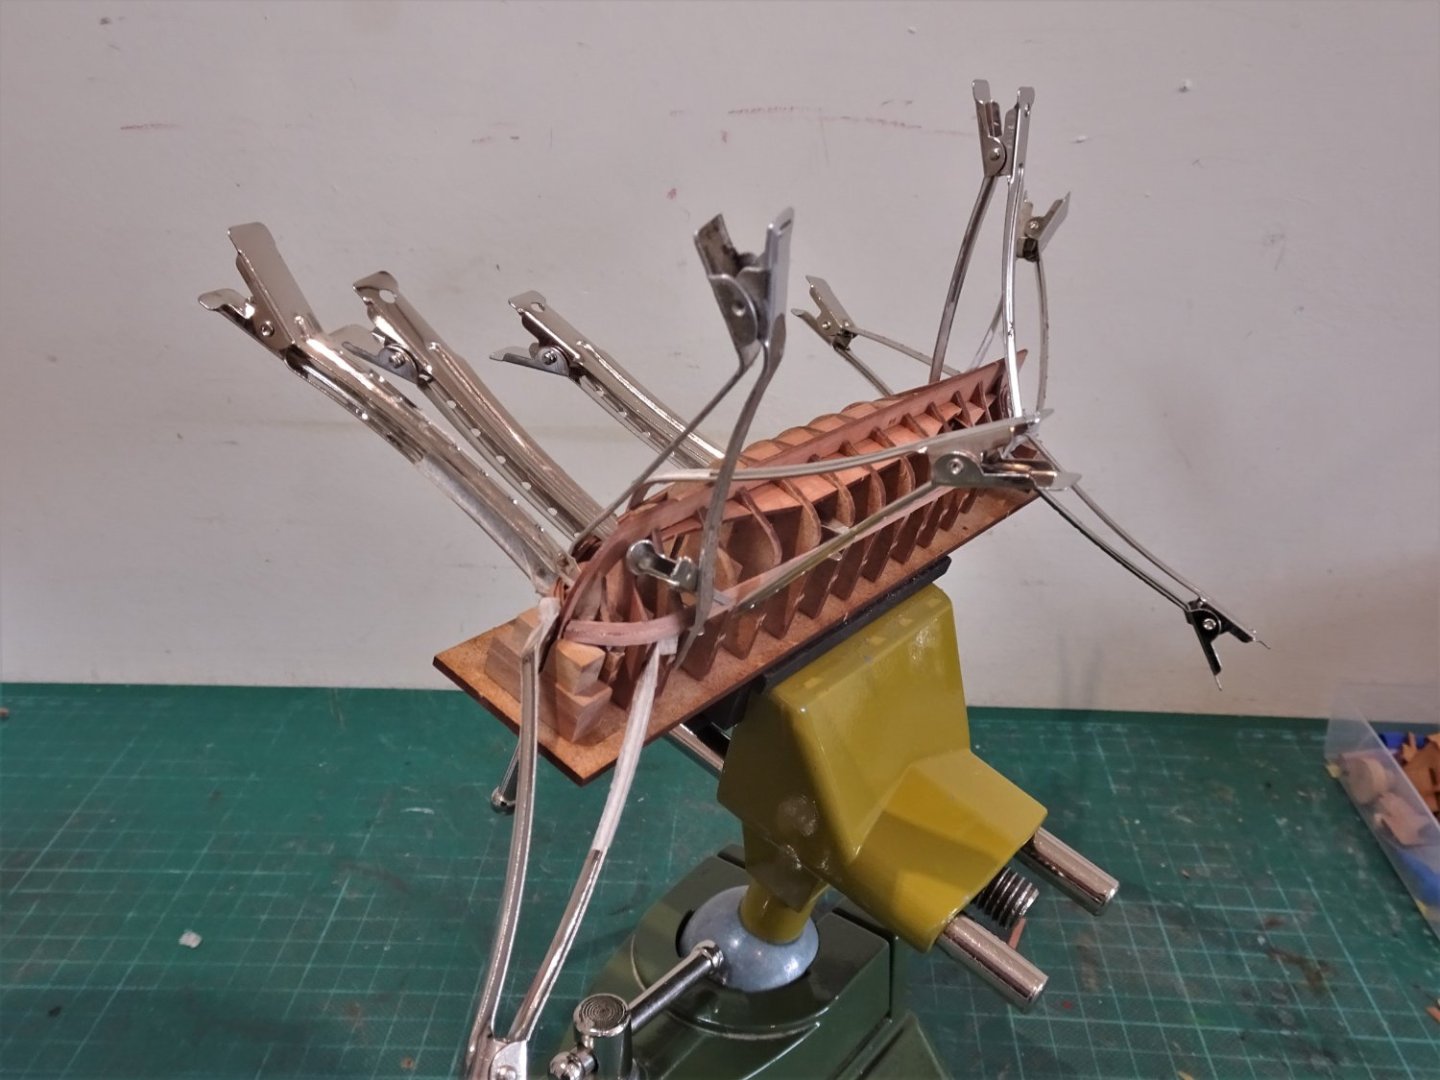
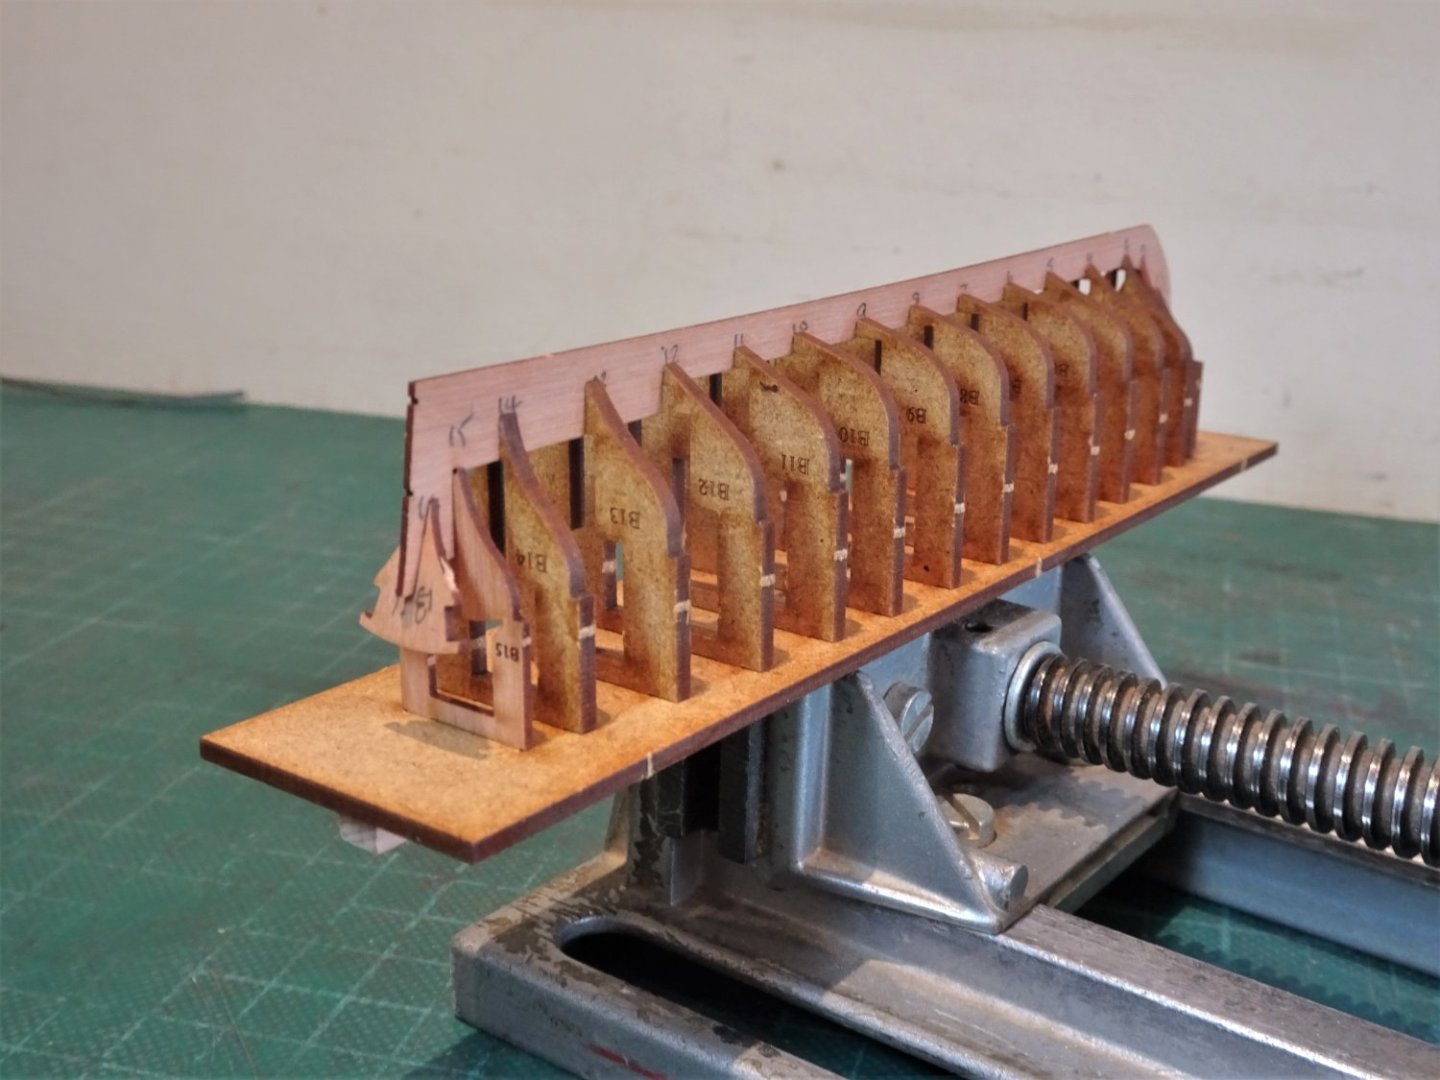
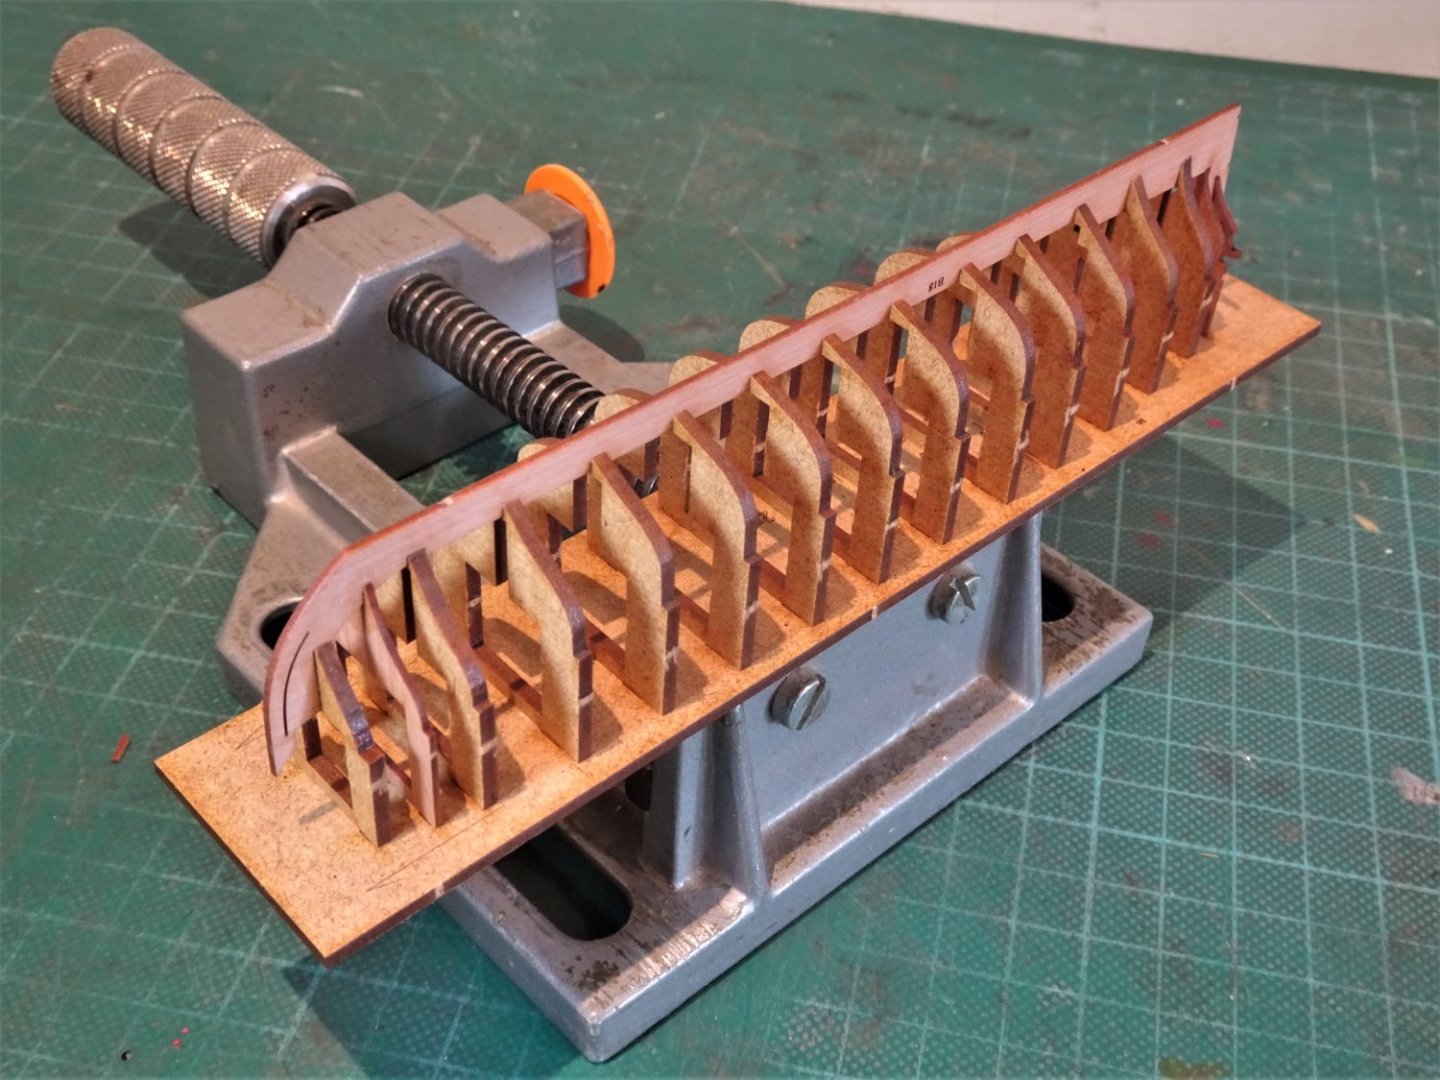
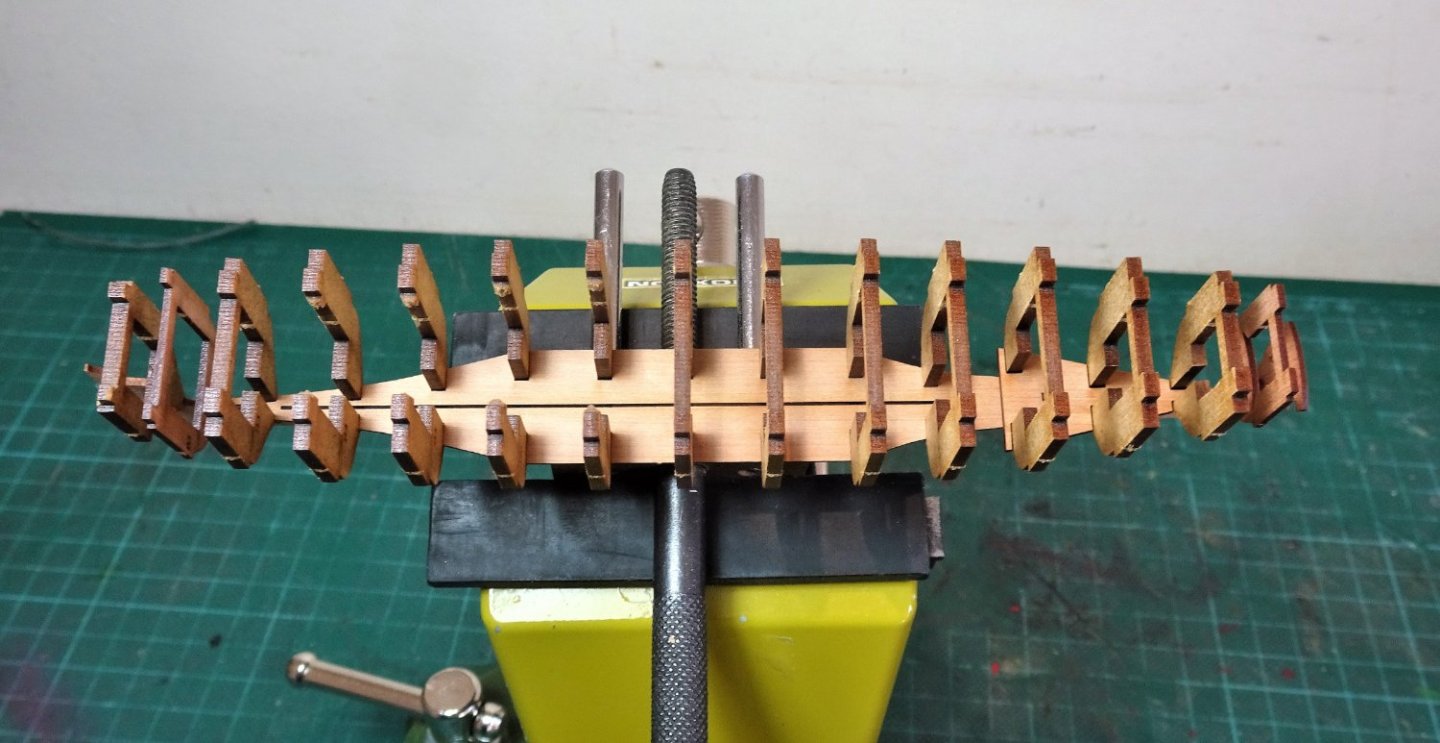
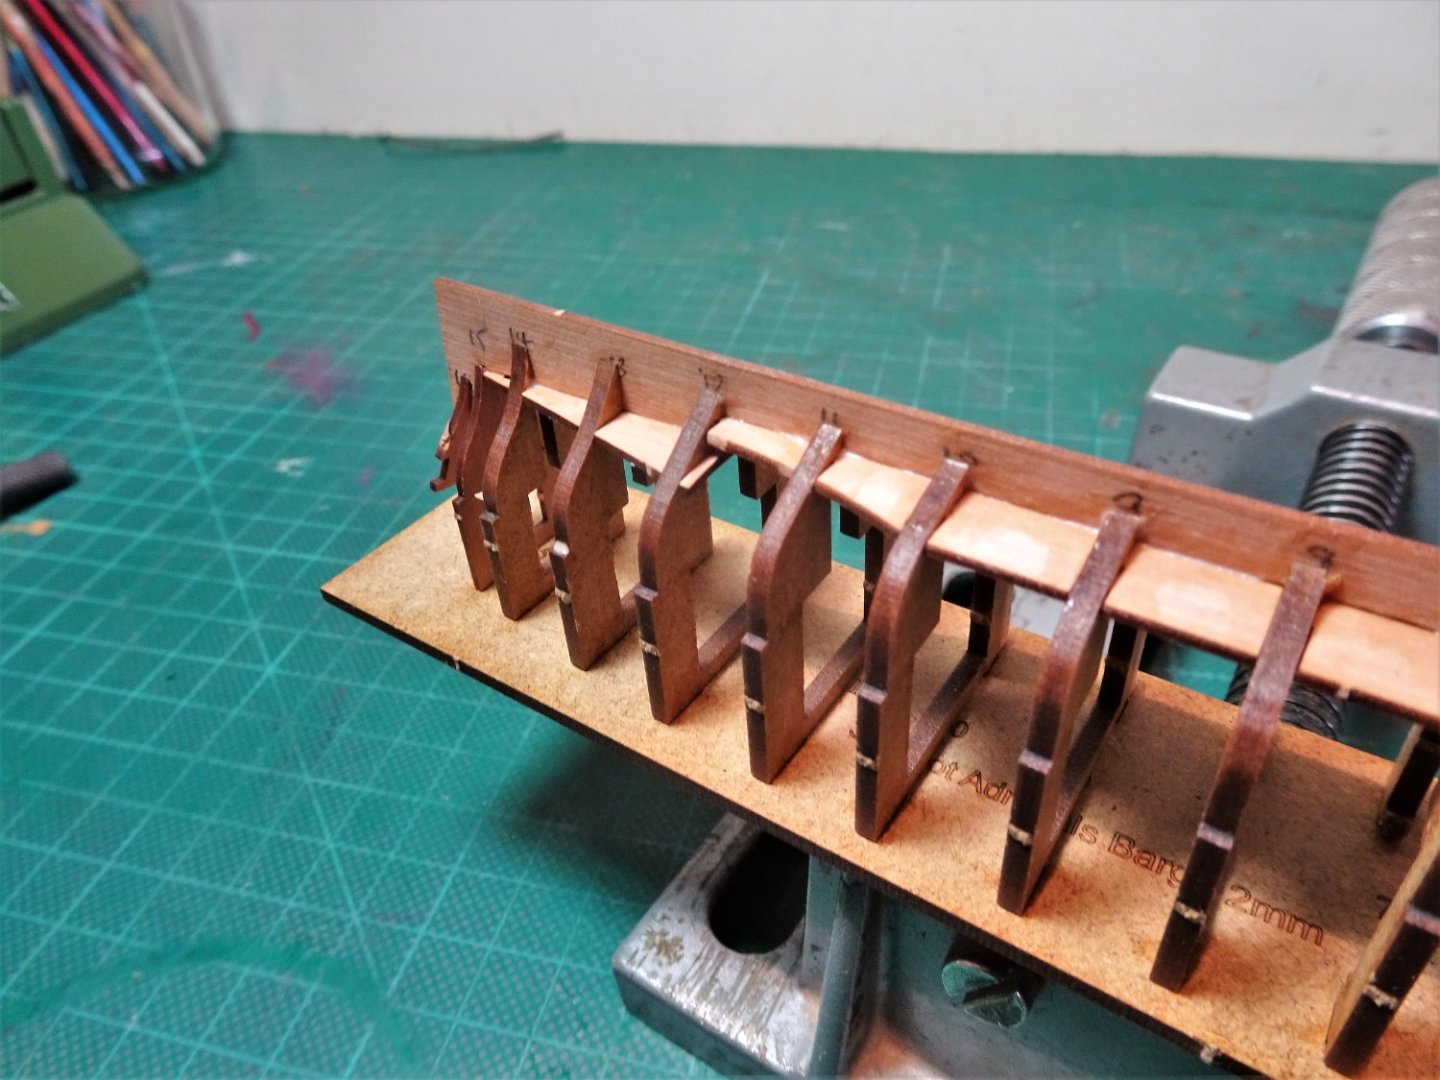
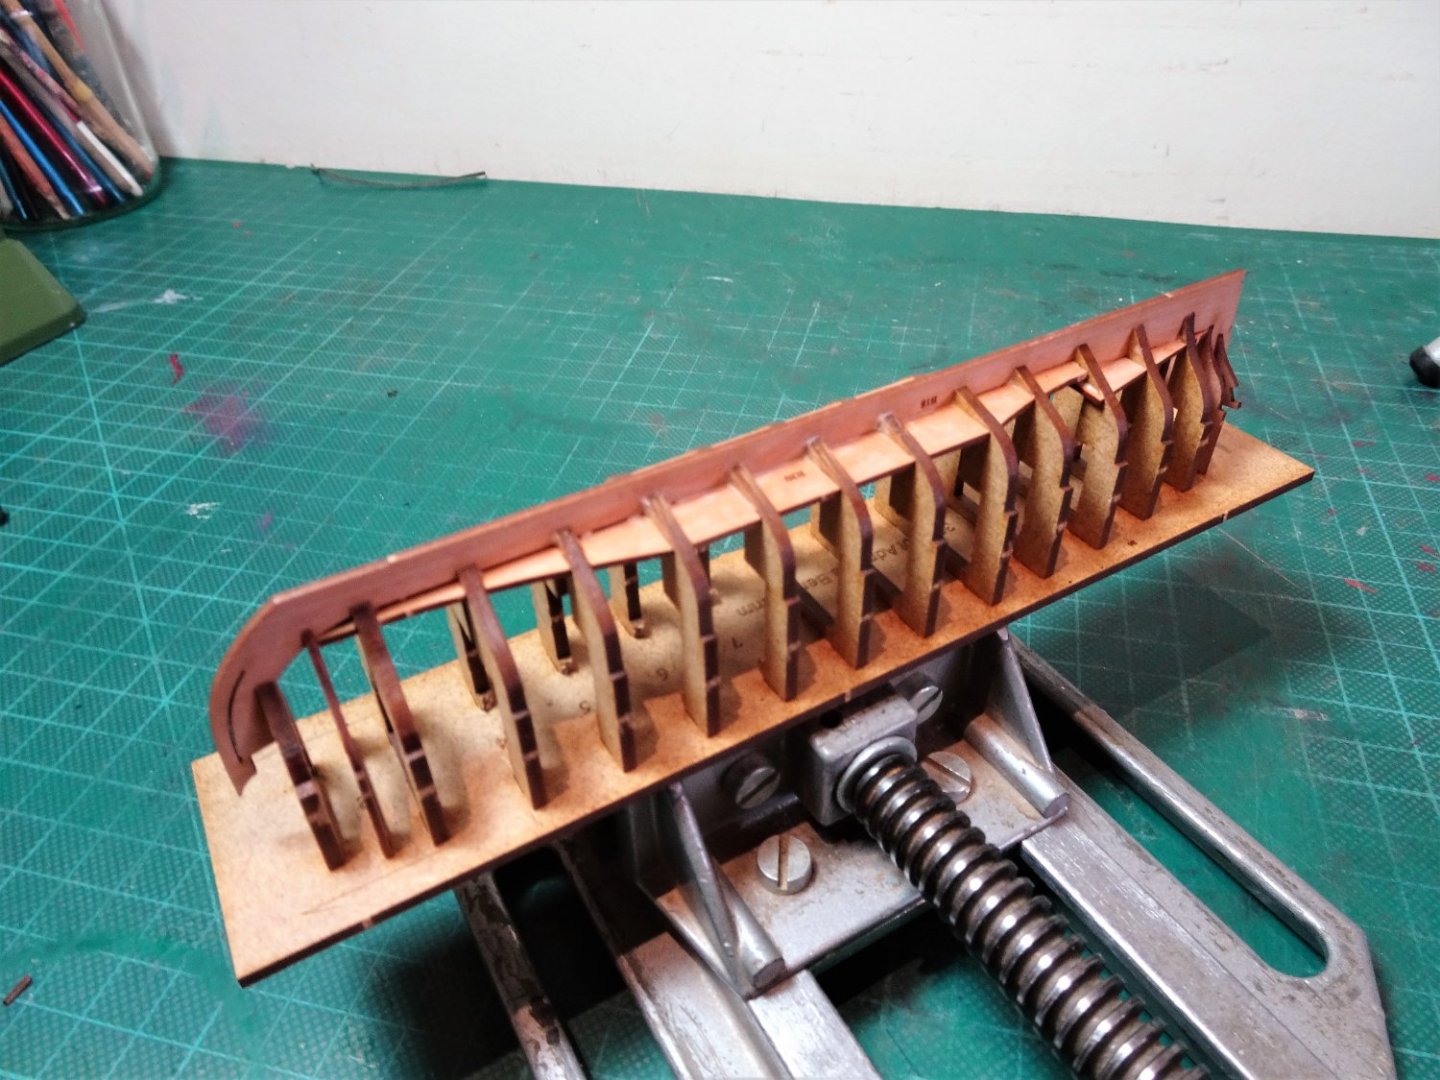
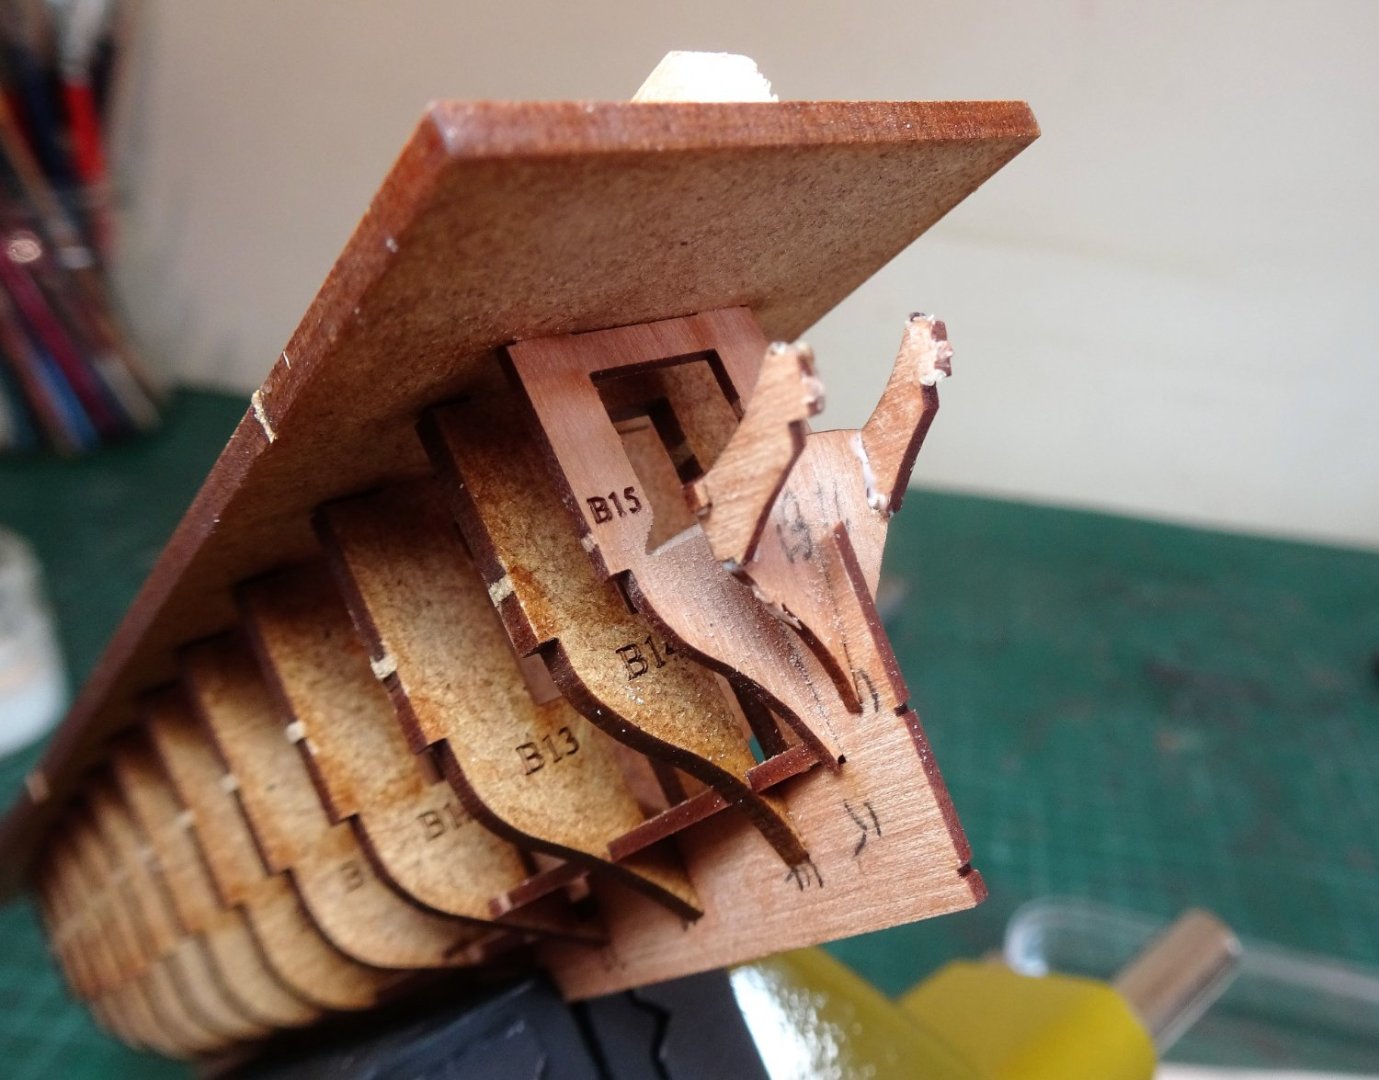
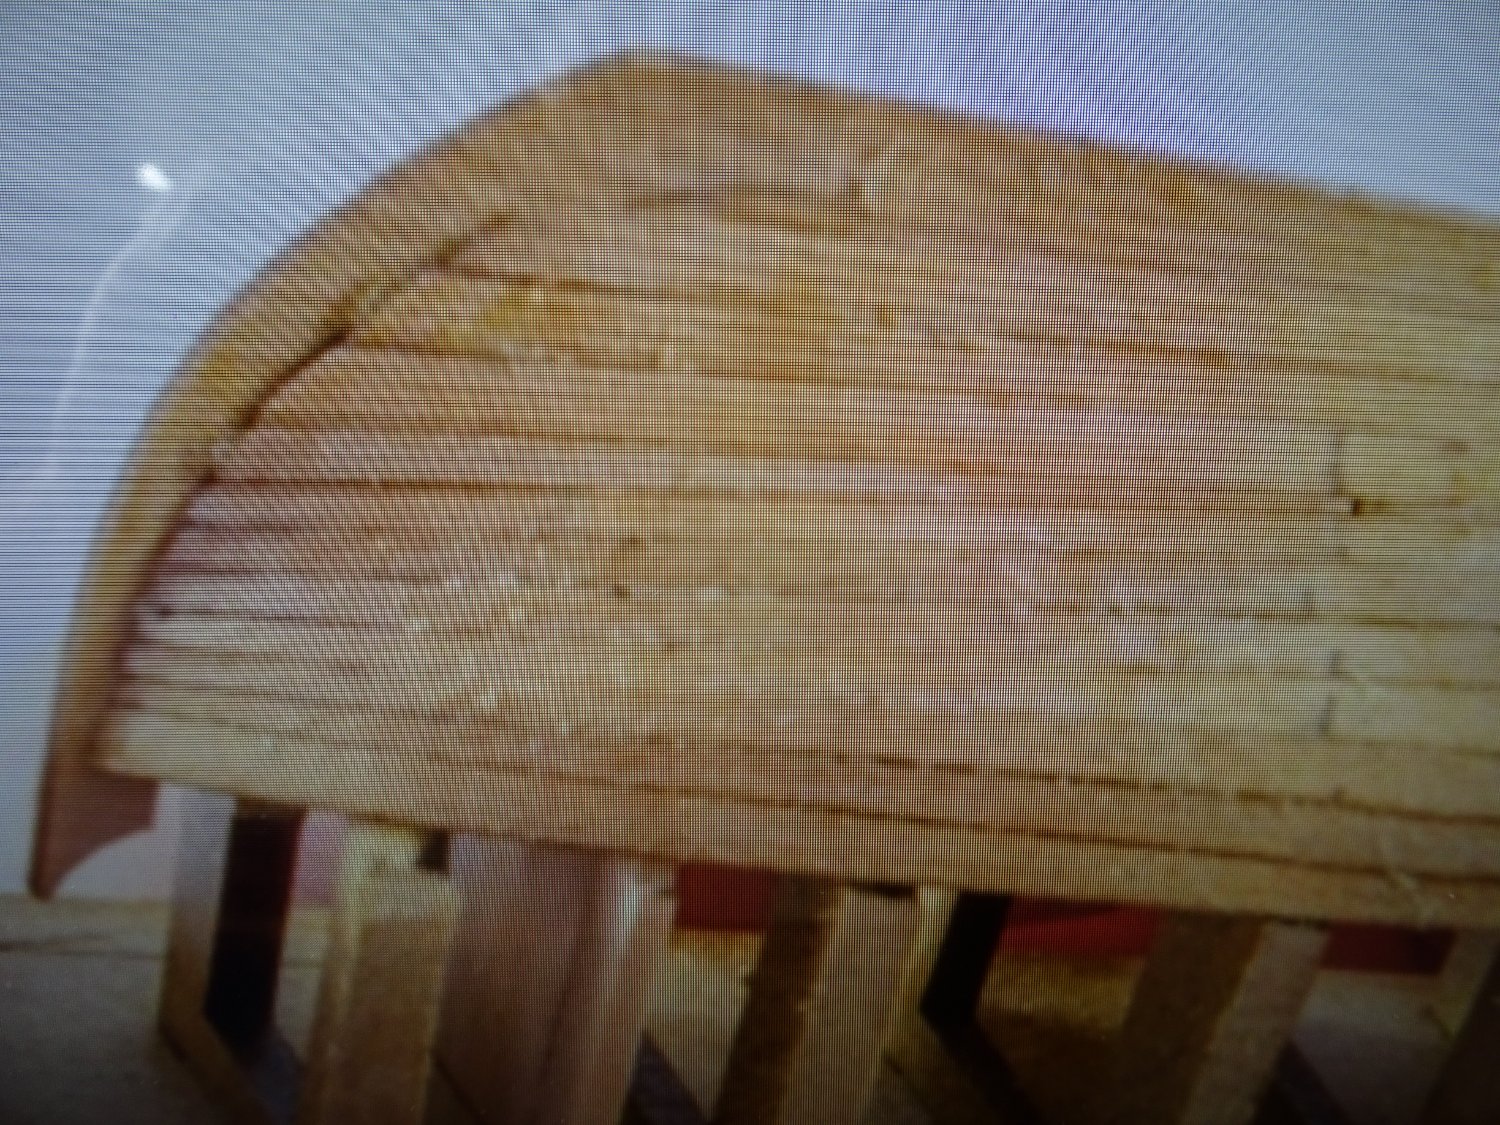
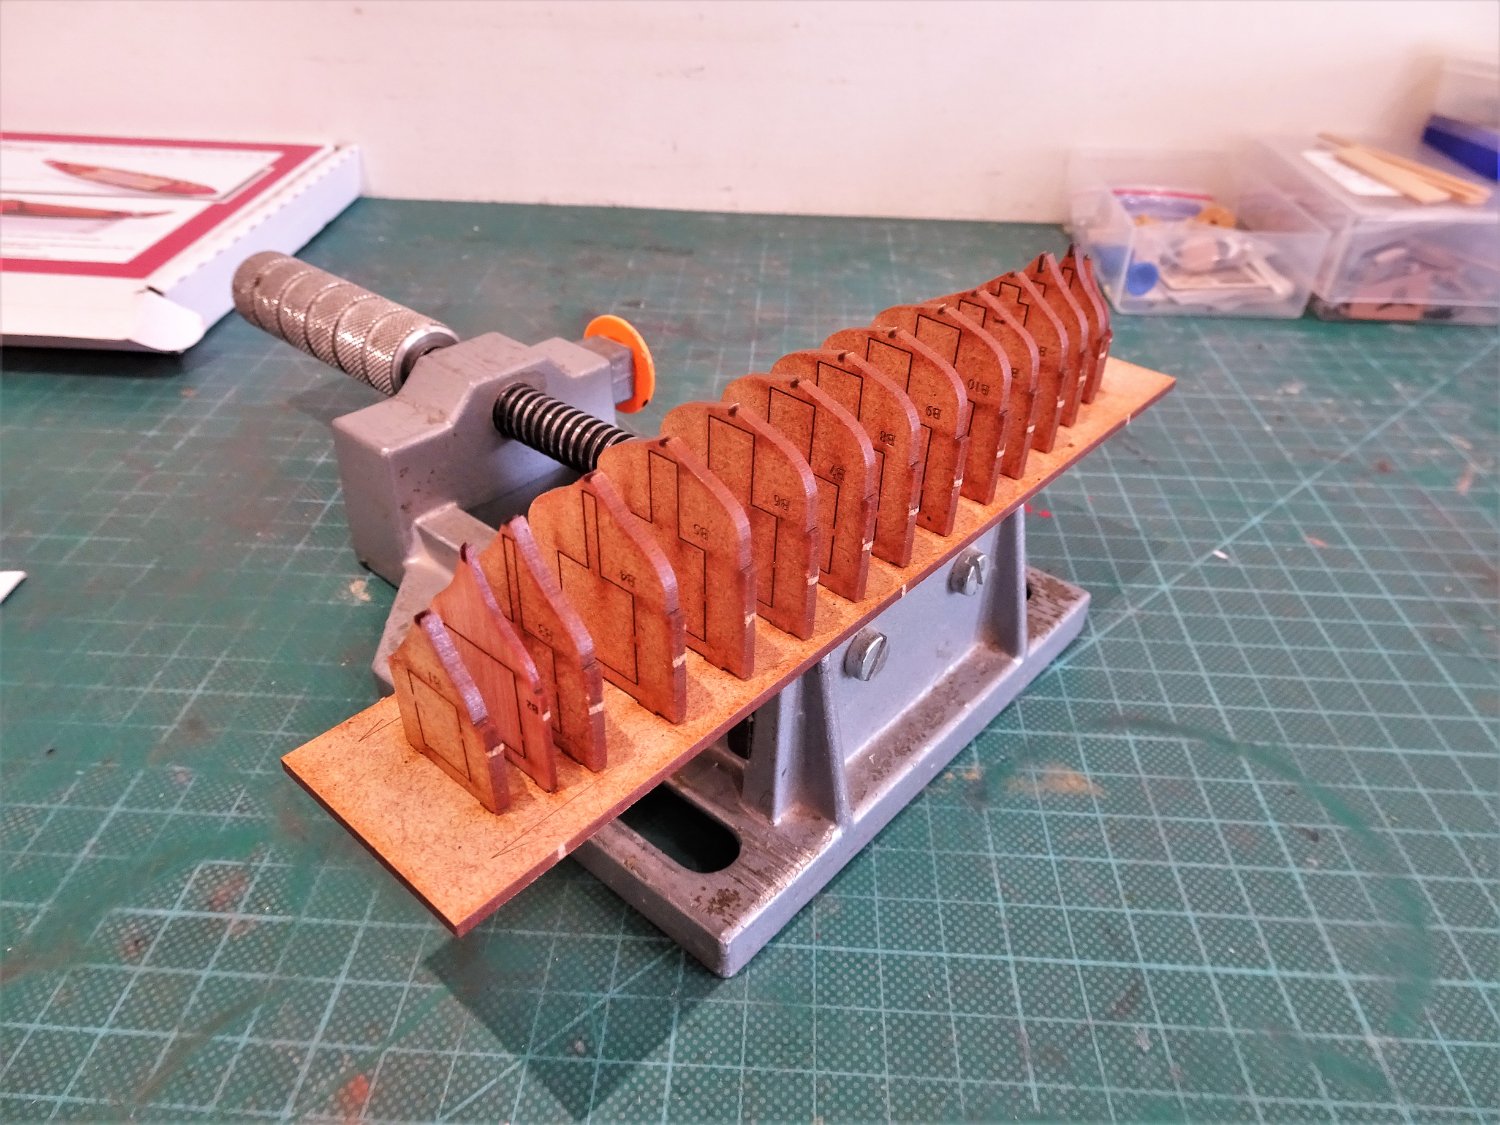
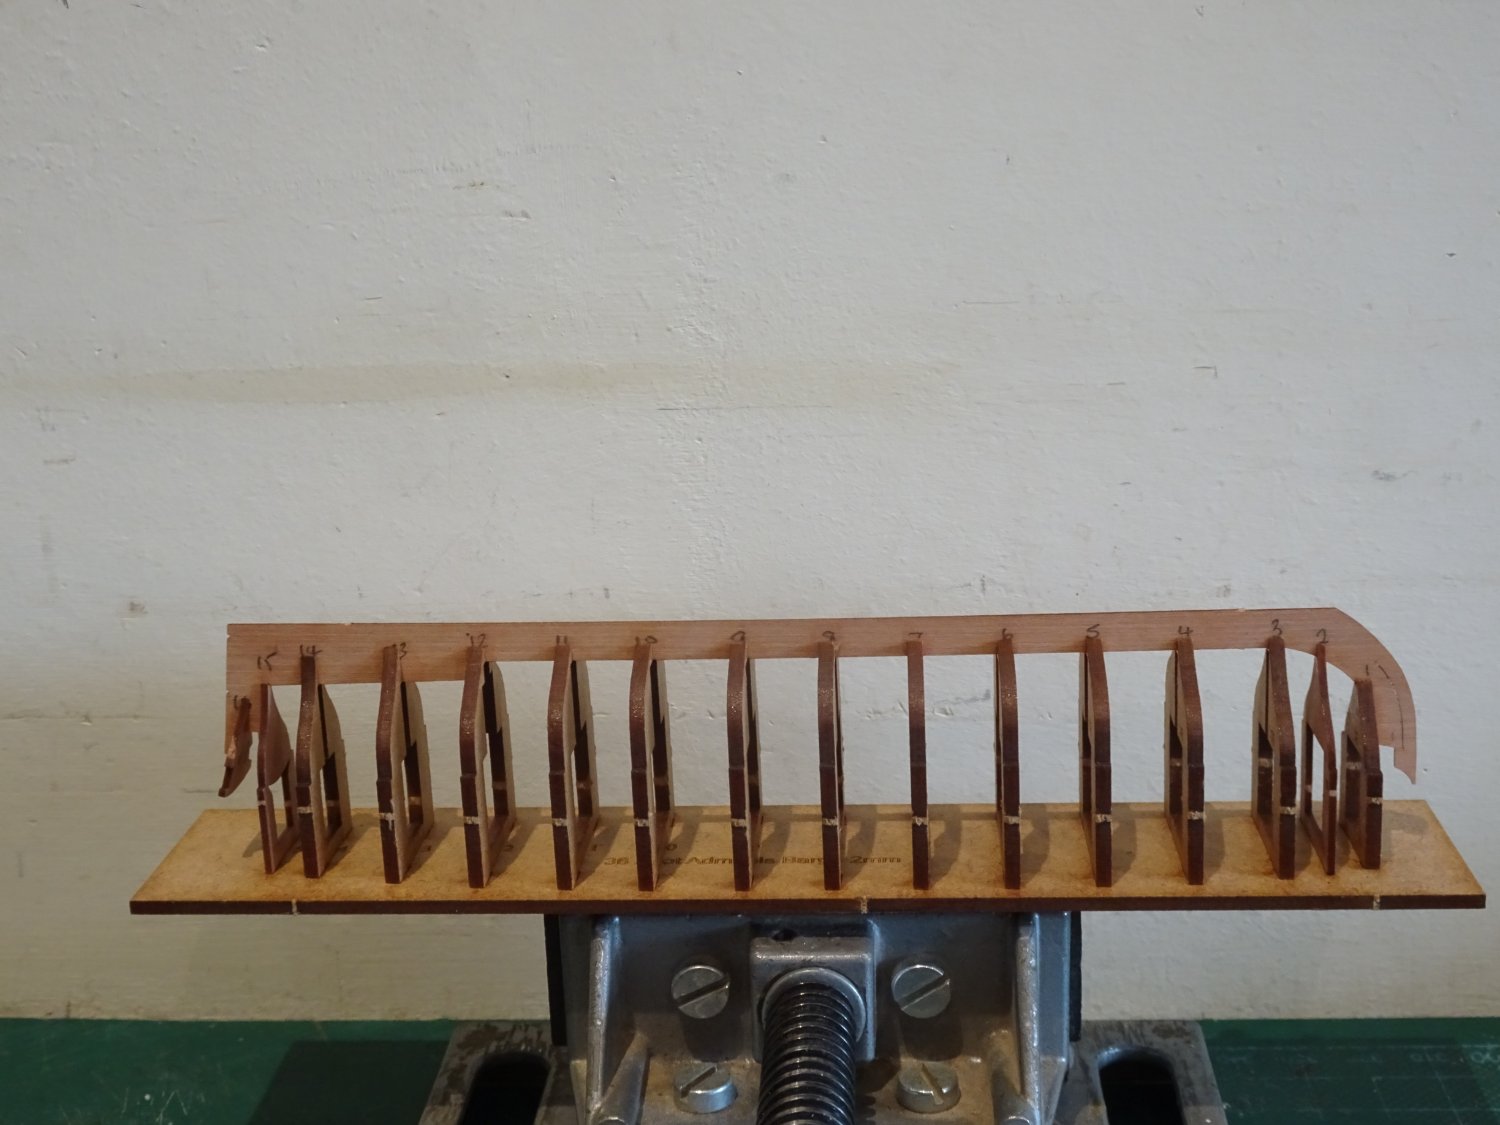
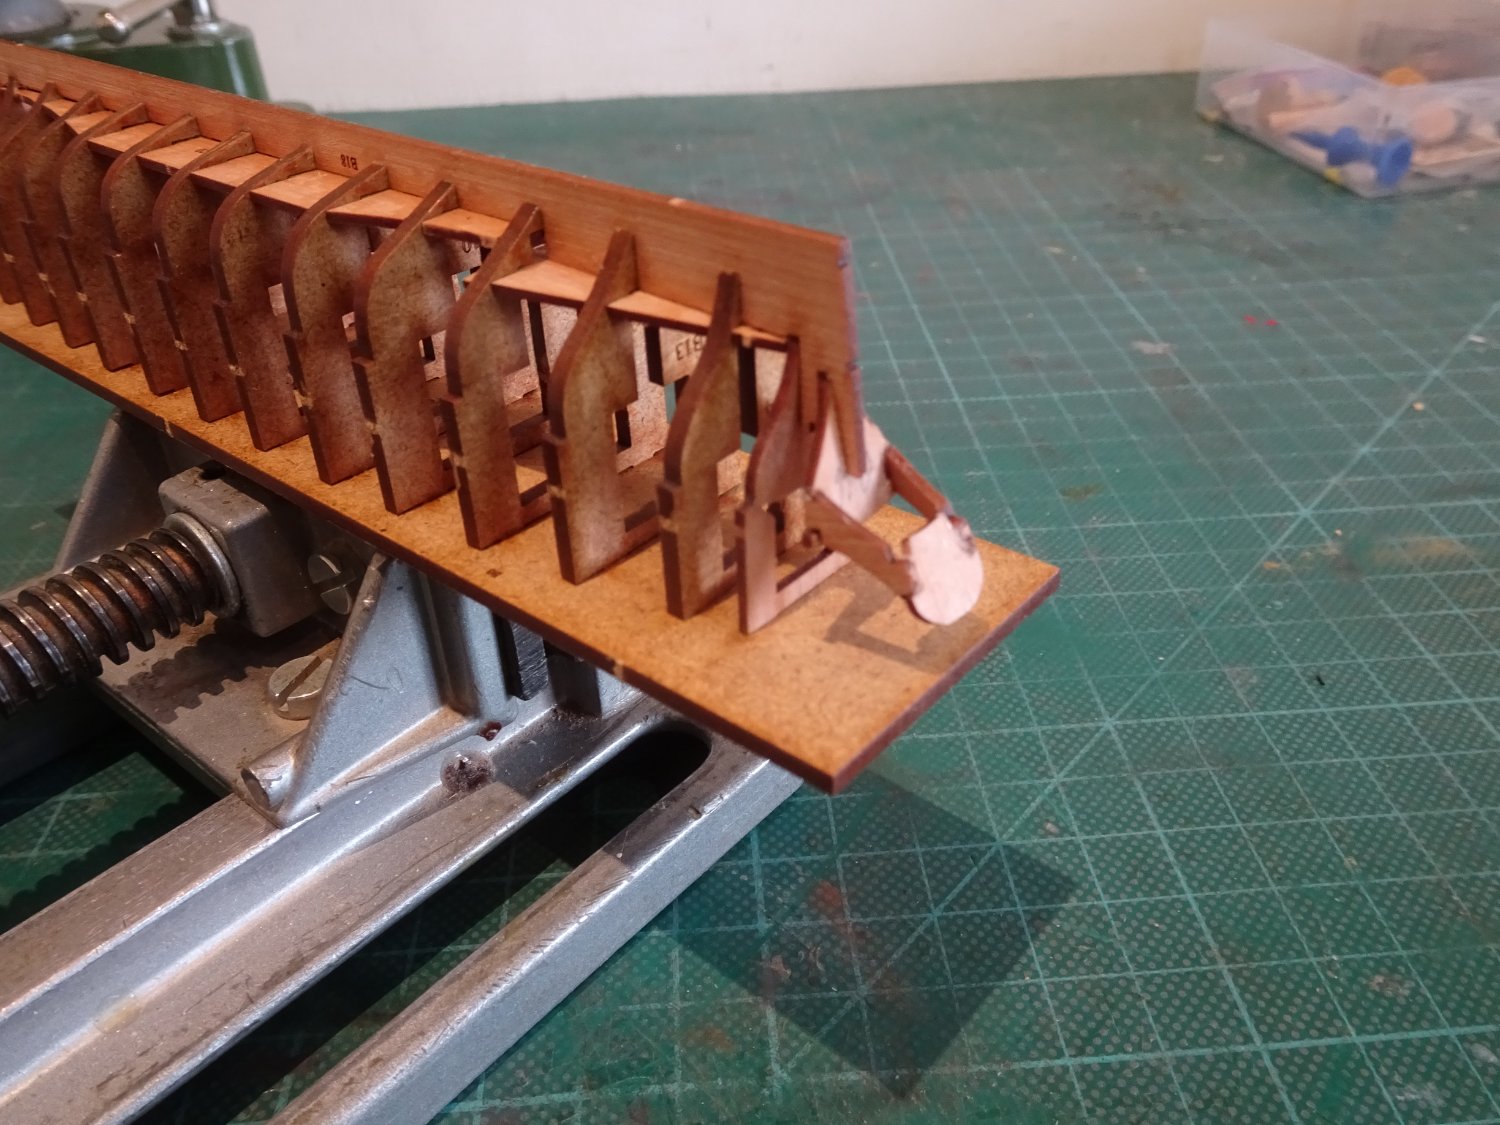
Post Three Bevelled bow patterns have been attached. 9202 These are tricky to hold for bevelling, I use my toolmakers clamp which works very well. 9211 Before the fairing is started, I add support blocks to protect the Flying Transom; at this stage it is very vulnerable. For the fairing I am using 320 grade paper attached to various width sanding sticks. Being mdf the fairing is quickly done, the four bulkheads from the bow and stern are the ones involved. As with all this range of boats the first plank rests on the shoulder of the bulkheads to give the correct line and sheer. More easily said than done at the bow in relation to the Barge. The bows of Barges were fairly bluff so there is a tight turn from the stem around the first two bulkheads. 9213 Coupled with this there is a sharp drop in shoulder levels from Bulkhead 1 to bulkhead 3 requiring lateral bending also of a greater curve than is easily achieved. The instructions don’t mention any need for lateral bending on the first strake, only referring to tapering from the second strake plank. To secure the planks spots of ca are used from the stem to the third bulkhead, and pva thereafter. 9217 After a fair bit of fiddling around including breaking the end off the first plank, I am relieved they are finally fitted. I derived a small amusement that the box contained the statement Not suitable for children under 36 months Double that, call it years, and then some, and I still wonder if it’s suitable.😉 I don’t think this is going to be an easy planking job. Close examination of the prototype pics indicate that stealers have been employed at the bow and what look like broader planks for some of the strakes towards the keel. Prototype close-up – the pdf photos are a little small for detail, but it can be seen how James achieved the result. This will get the job done and as the hull is intended to be painted such simplifications are perhaps less relevant. However, I will try to attempt a more conventional arrangement. From the second plank tapering is indicated. 9222 I opted to leave the plank full, but edge bend it to follow the first. On the question of tapering, the planks used are 2mm x 0.8mm which makes it difficult to adopt the usual tapering method of cutting the line using rule and scalpel. Tapering is done by means of scraping and careful sanding on a flat board to finish. Any tapering should not exceed half the plank width ie 1mm. Fortunately, I do have some 0.8mm Pearwood Strips in varying widths, which will give more options. 9228 It is more difficult edge bending the kit lengths as it has to be done at the end of the strip which is obviously less flexible. Having soaked the planks, the bend was induced by hand, fitted to the hull, held in place as above, and blasted with the hairdryer. 9236(2) Spots of ca are used to secure at the bow, with pva along the edge joints, and sparingly on the bulkheads, which will eventually be removed. 9234 9237(2) The sheer of the hull can be seen in these shots. 9241(2) Note the blocks glued to the base board to protect the delicate stem. Hours of unremitting fun now to be had completing the hull planking.🙄 B.E. 06/11/2022


.thumb.JPG.d7123ee3b3fc1c1e49c0c3c6201c3db1.JPG)
.thumb.JPG.0a612c6738a32fcc76db36ea00579c1c.JPG)
.thumb.JPG.1d915ee59da35a91ccde2eb051cf45e2.JPG)
- 106 replies
-
- 15
-

-
- Admirals Barge
- Vanguard Models
- (and 1 more)
-
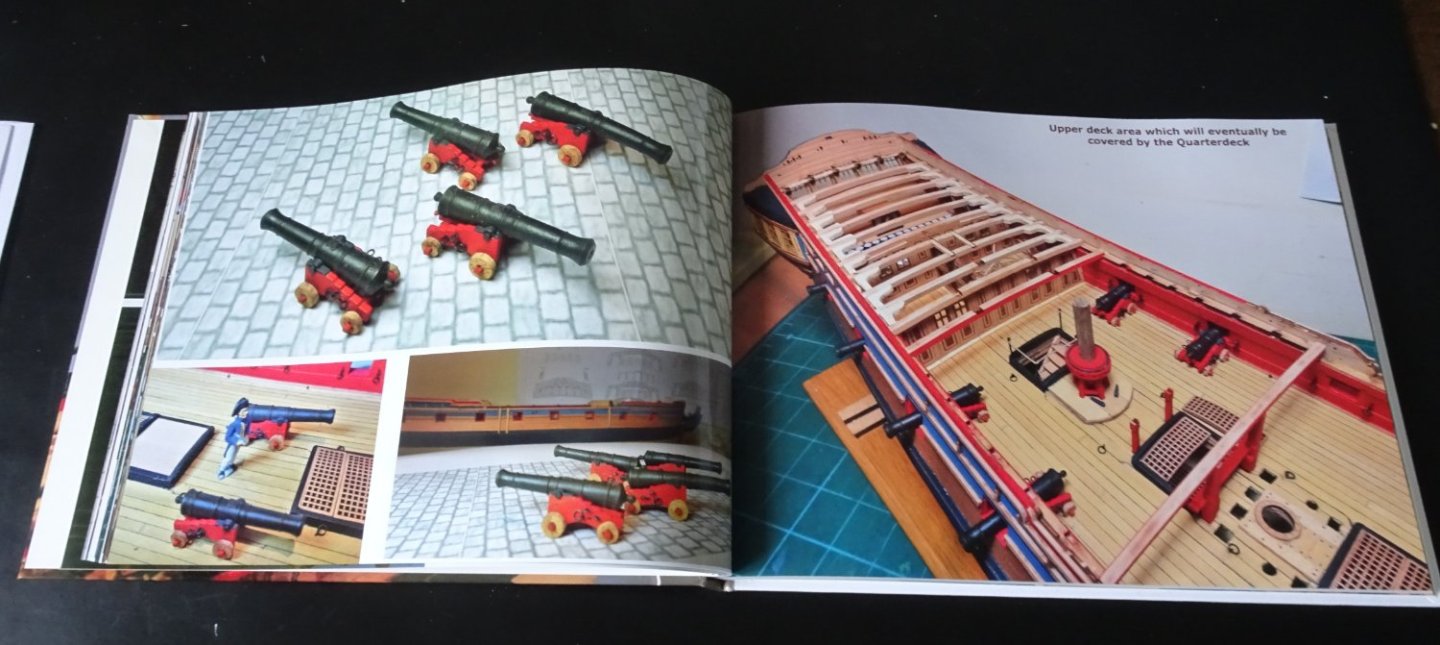
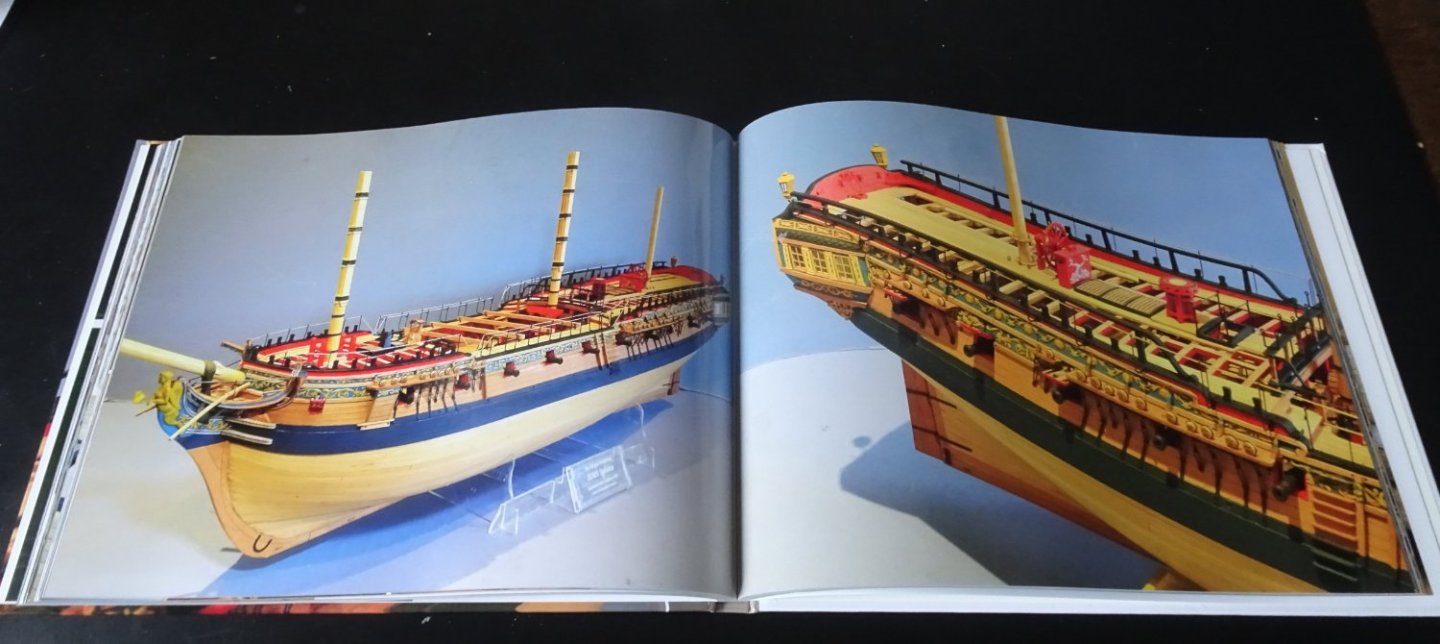
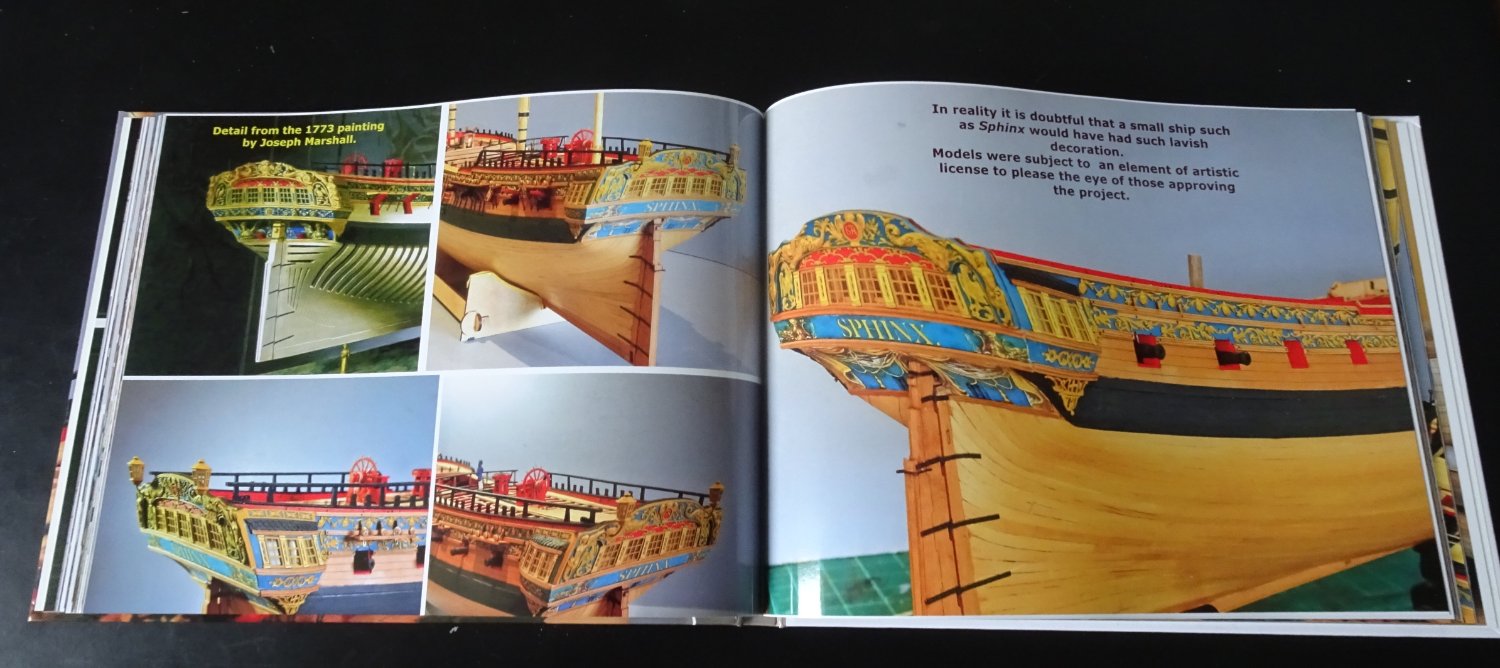
Cheers Guys, As it happens in the past week, I have received my printed pictorial build album. I have done one of these for all my builds, it is a shame not to use all those build photos and record those internal details lost from view. A few pages to give a flavour. 9094 9095 9096 9097 9098 8926(3) Once again, thanks for your support, much appreciated. B.E. 05/11/2022
.thumb.JPG.3dde3f42fcf7baa29e2f061f0b22ea7c.JPG)


- 857 replies
-
- 45
-
-

-
- Sphinx
- Vanguard Models
- (and 1 more)
-
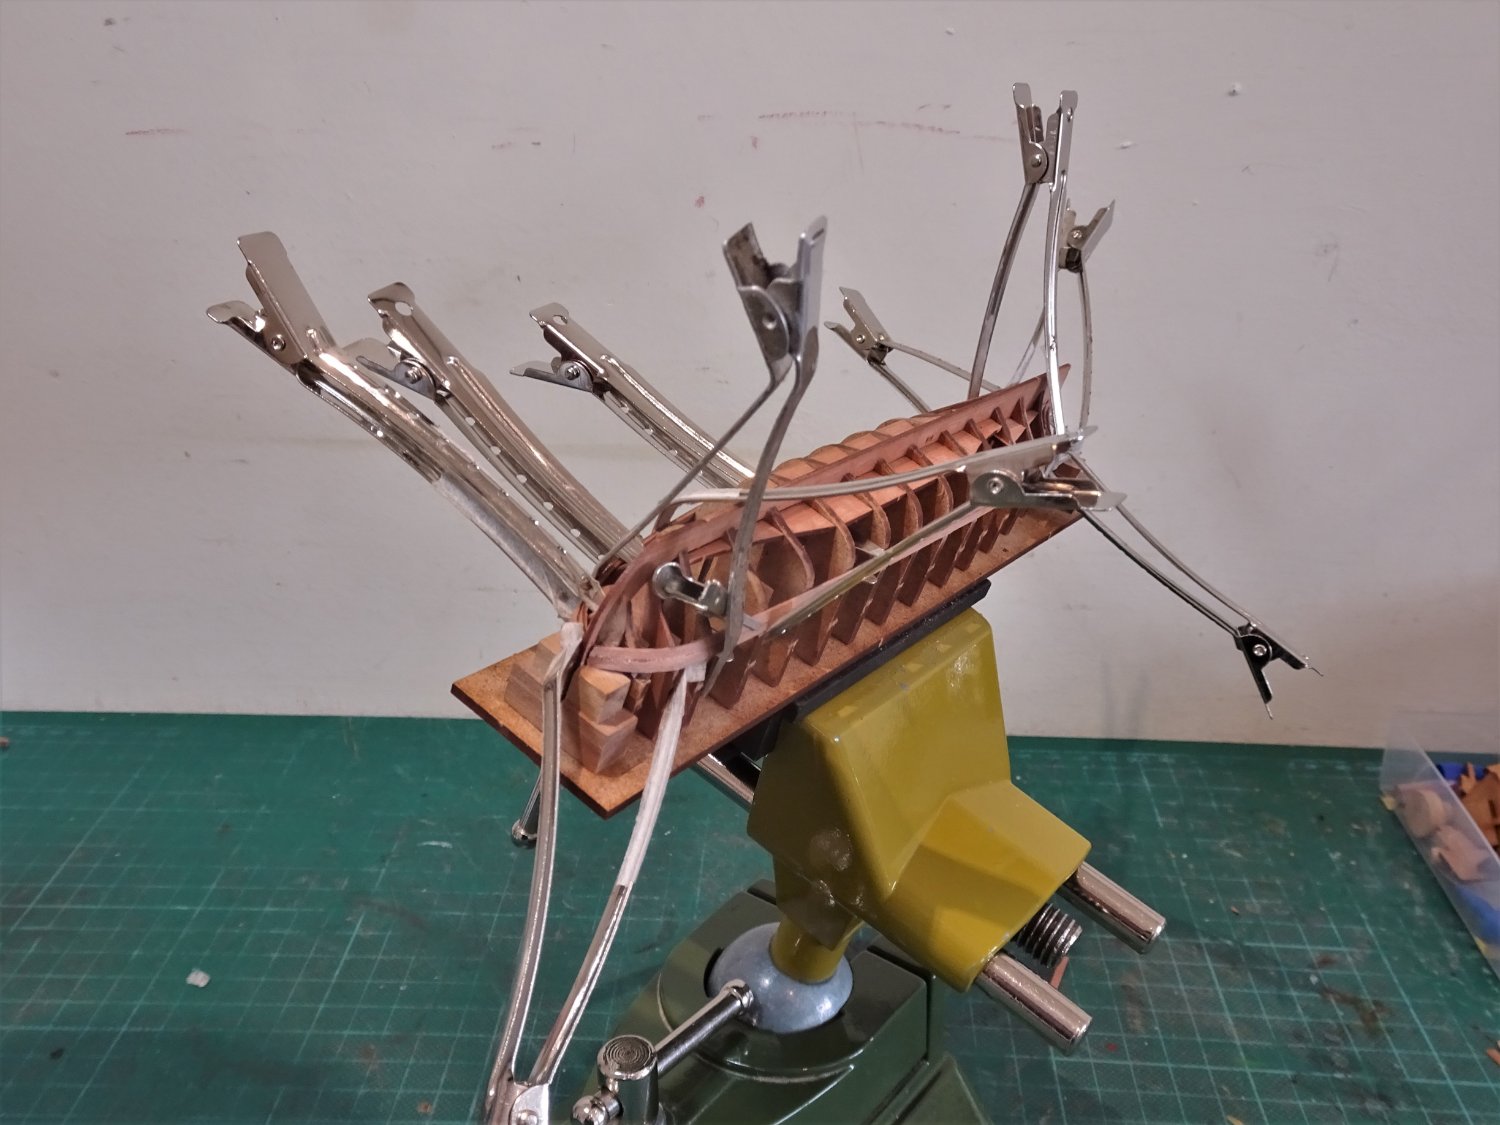
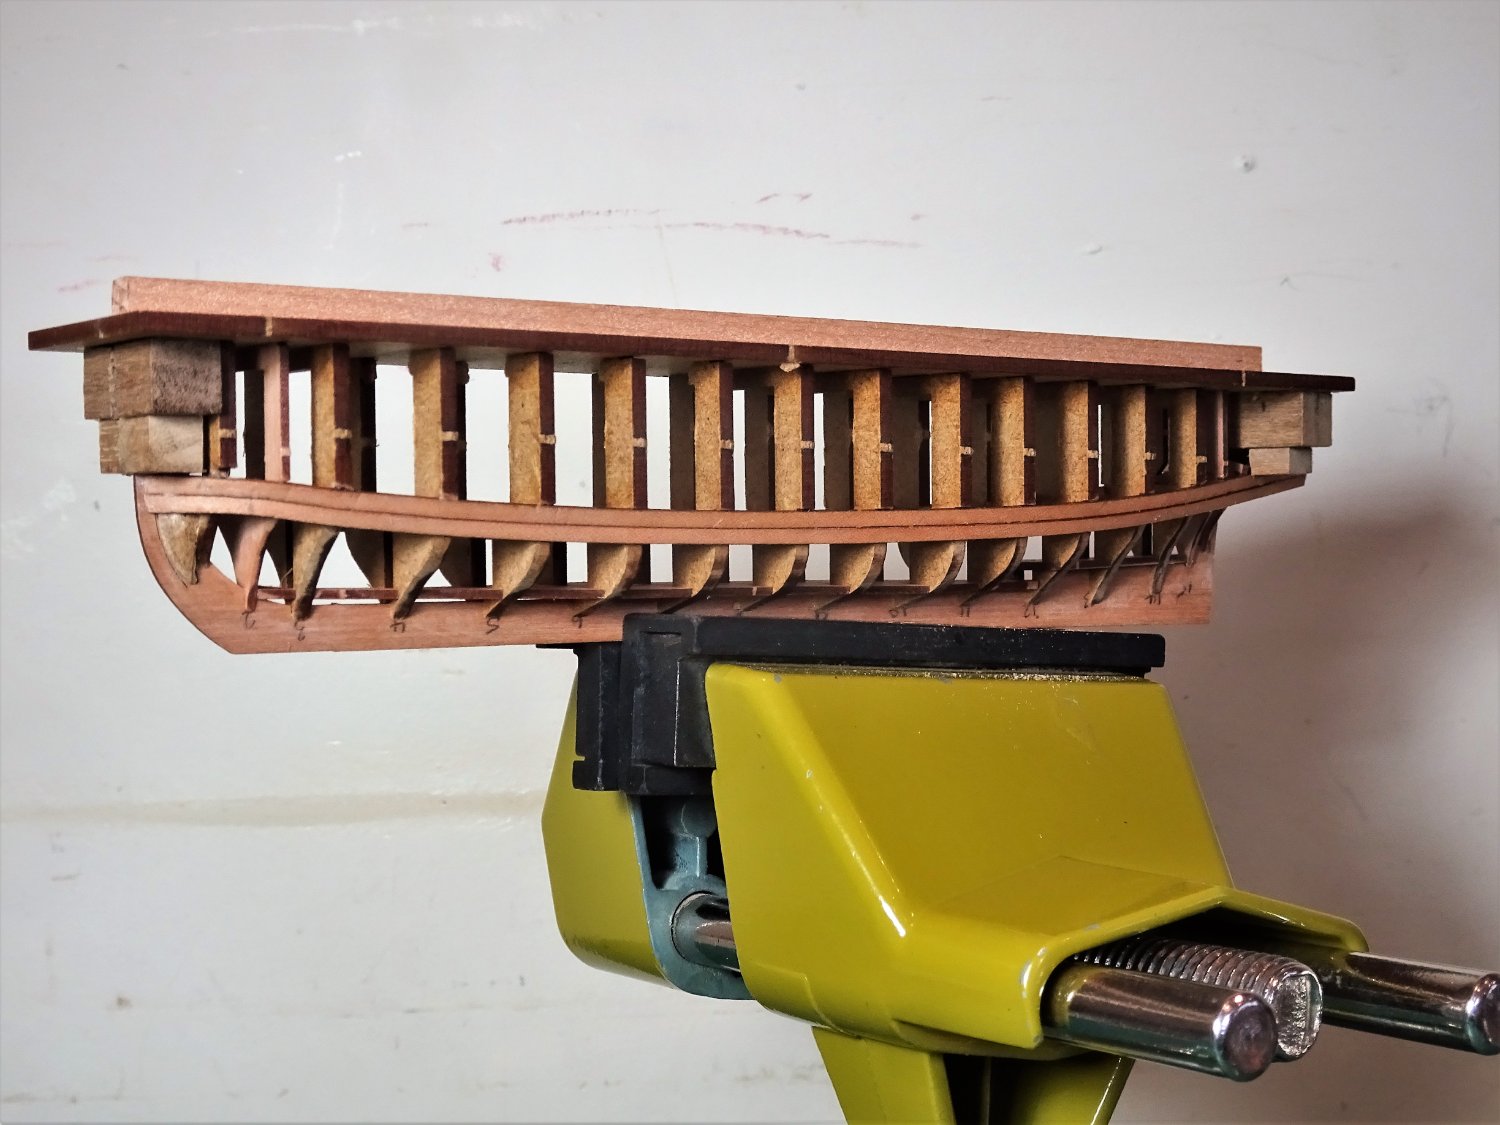
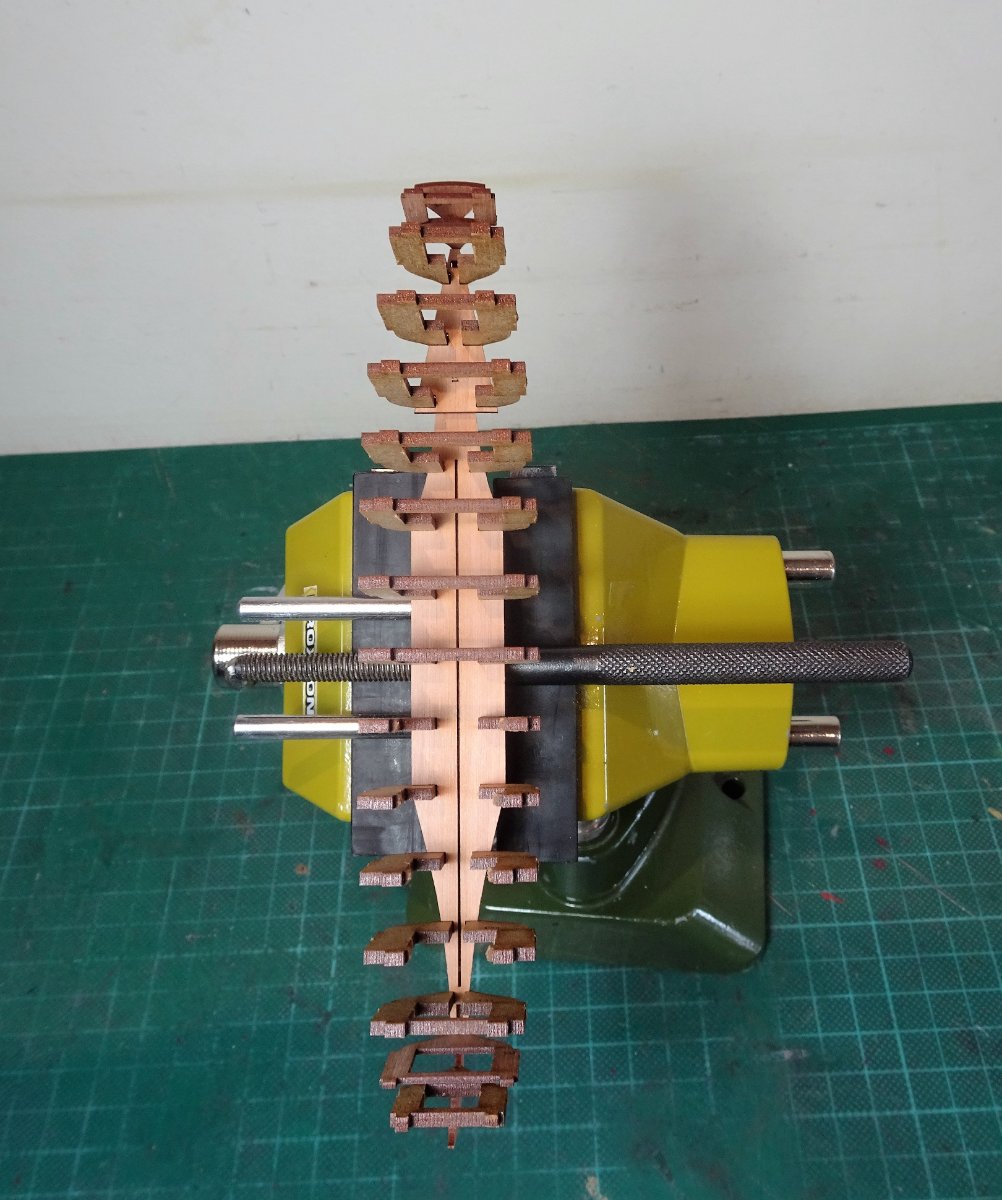
Post Two Not the most exciting part of a build, but I don’t think James has covered the Barge in his build logs, so I’ll run thro’ the initial stage. The bulkheads fit snugly into the building board to the underside of which a grip is glued to secure in a vice. 9165 In short order the next stage is to fit the delicate Pearwood keel. This is a soft hands procedure and care must be taken not to force the keel slots into the bulkhead slots which are very fine particularly those at the bow and stern. I tested each keel slot against its bulkhead partner before attempting the keel fit. 9170 9167 The keel is eased into position, and I ensure it sits fully down on the bulkheads. 9173 The keel is also checked for true. Once satisfied diluted pva was run into the joints. 9186 Unlike other boats in the range the barge has a sub-deck. To fit this four of the bulkhead bridges have to be removed to allow access. 9177 9189 9192 One of the advantages of the sub-deck is that it should help to counter twist in the bulkheads once the fairing begins. 9193 The arms of the Flying Transom are glued into place. 9199 Fitting the Flying Transom is a tricky business, I opted to glue the arms to the fixed transom first, and then slotted the Flying transom between before the pva hardened off. The hull is now set aside for the glue to set. B.E. 04/11/2022


- 106 replies
-
- 15
-
-
- Admirals Barge
- Vanguard Models
- (and 1 more)
-
Nice work on the fitting out Yves, love the shot of the stern counter and rudder. B.E.
-
Thank you, Peter, and Tom, much appreciated. It's great that these days we have Chuck and Chris providing the makings which allow me to indulge in this sort of thing. Regards, B.E.
- 27 replies
-
- 2
-
-
- galley stove
- Syren Ship Model Company
- (and 1 more)
-
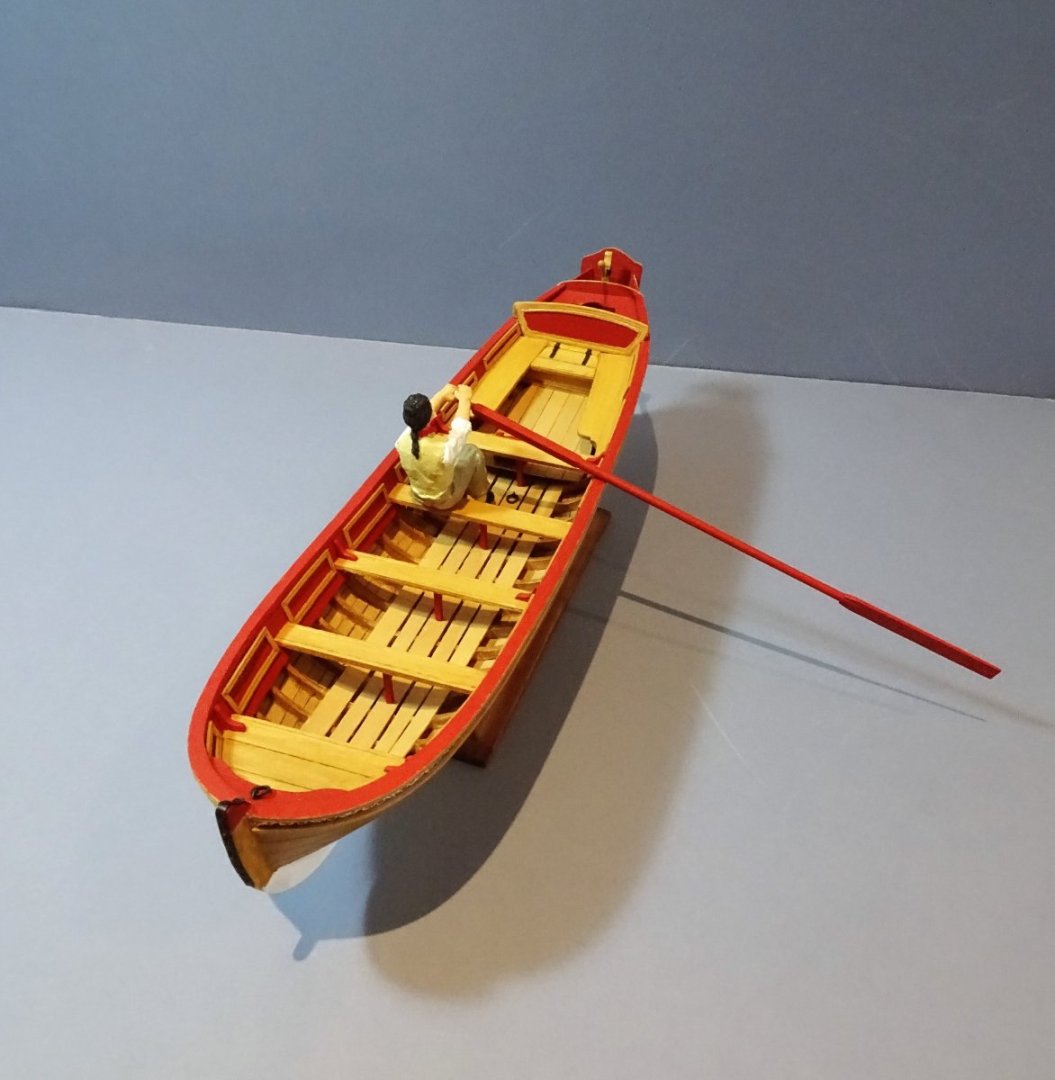
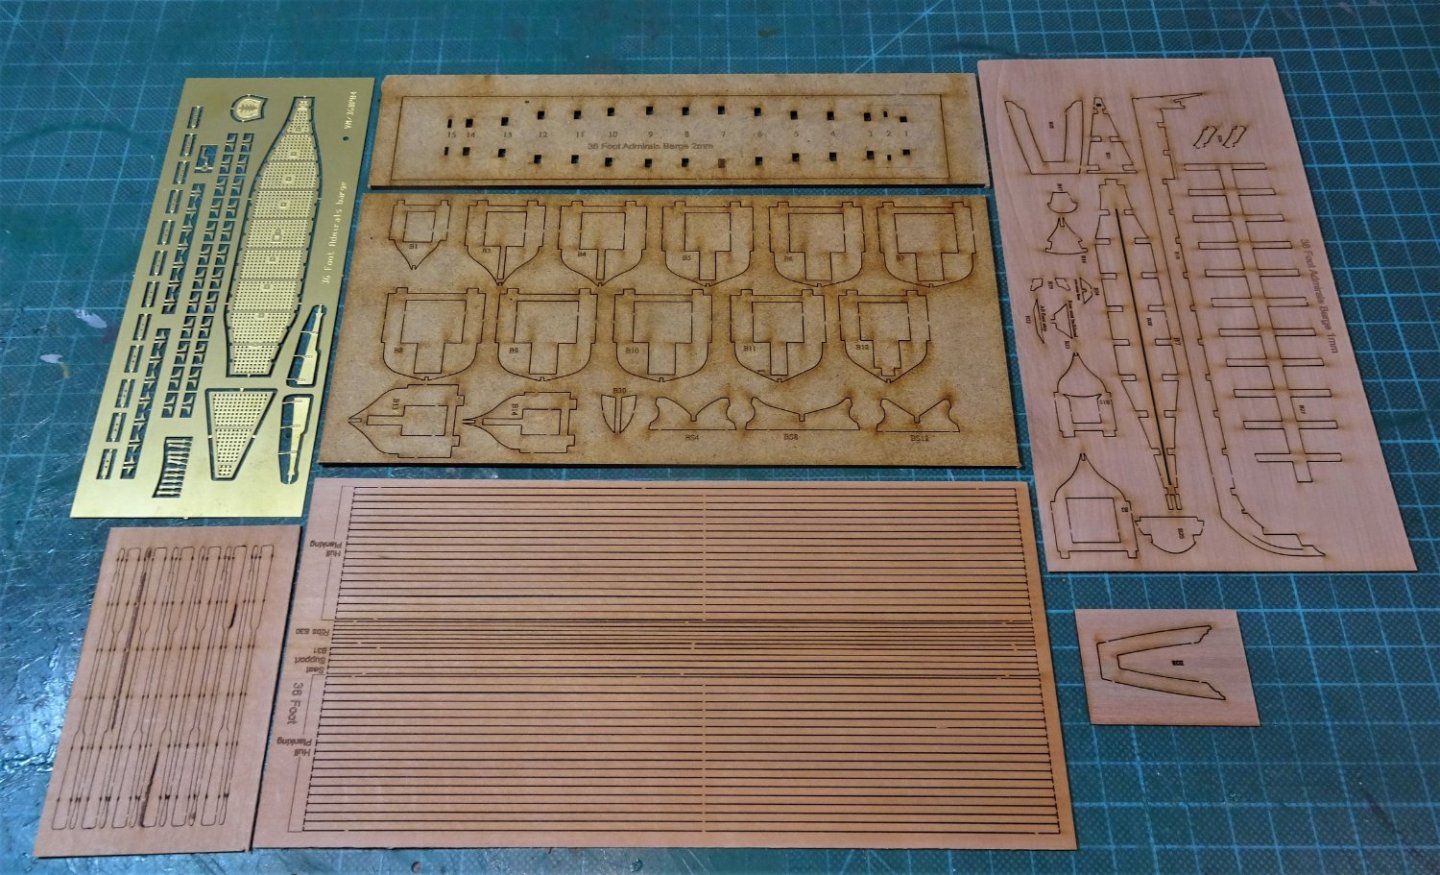
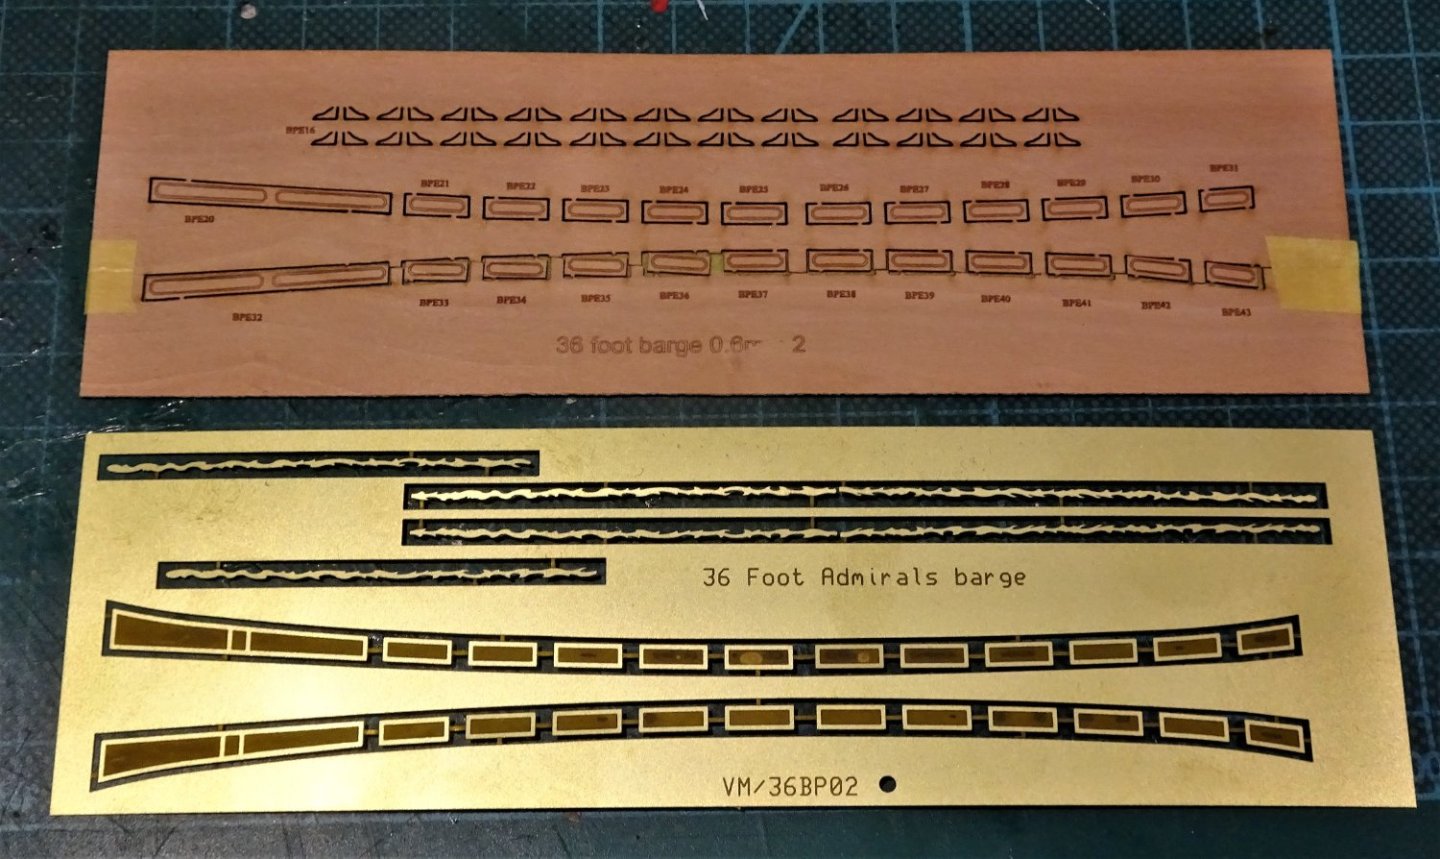
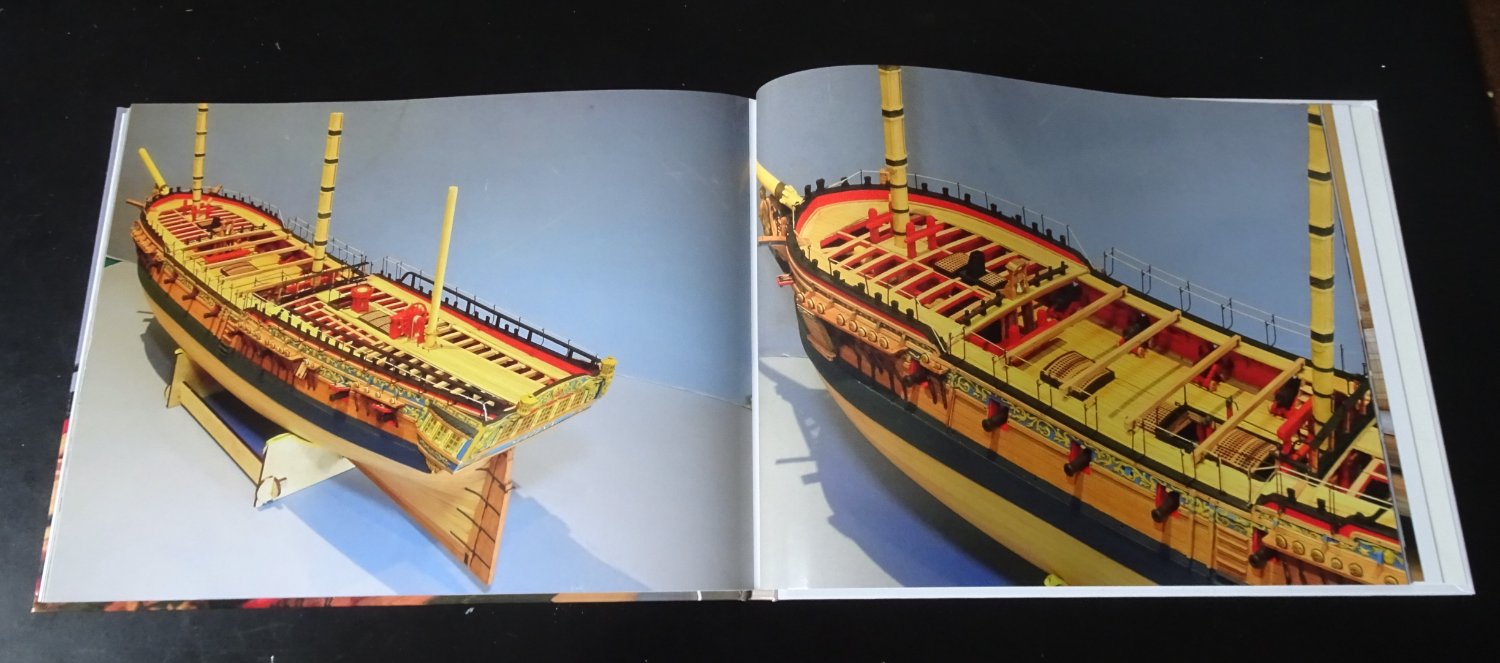
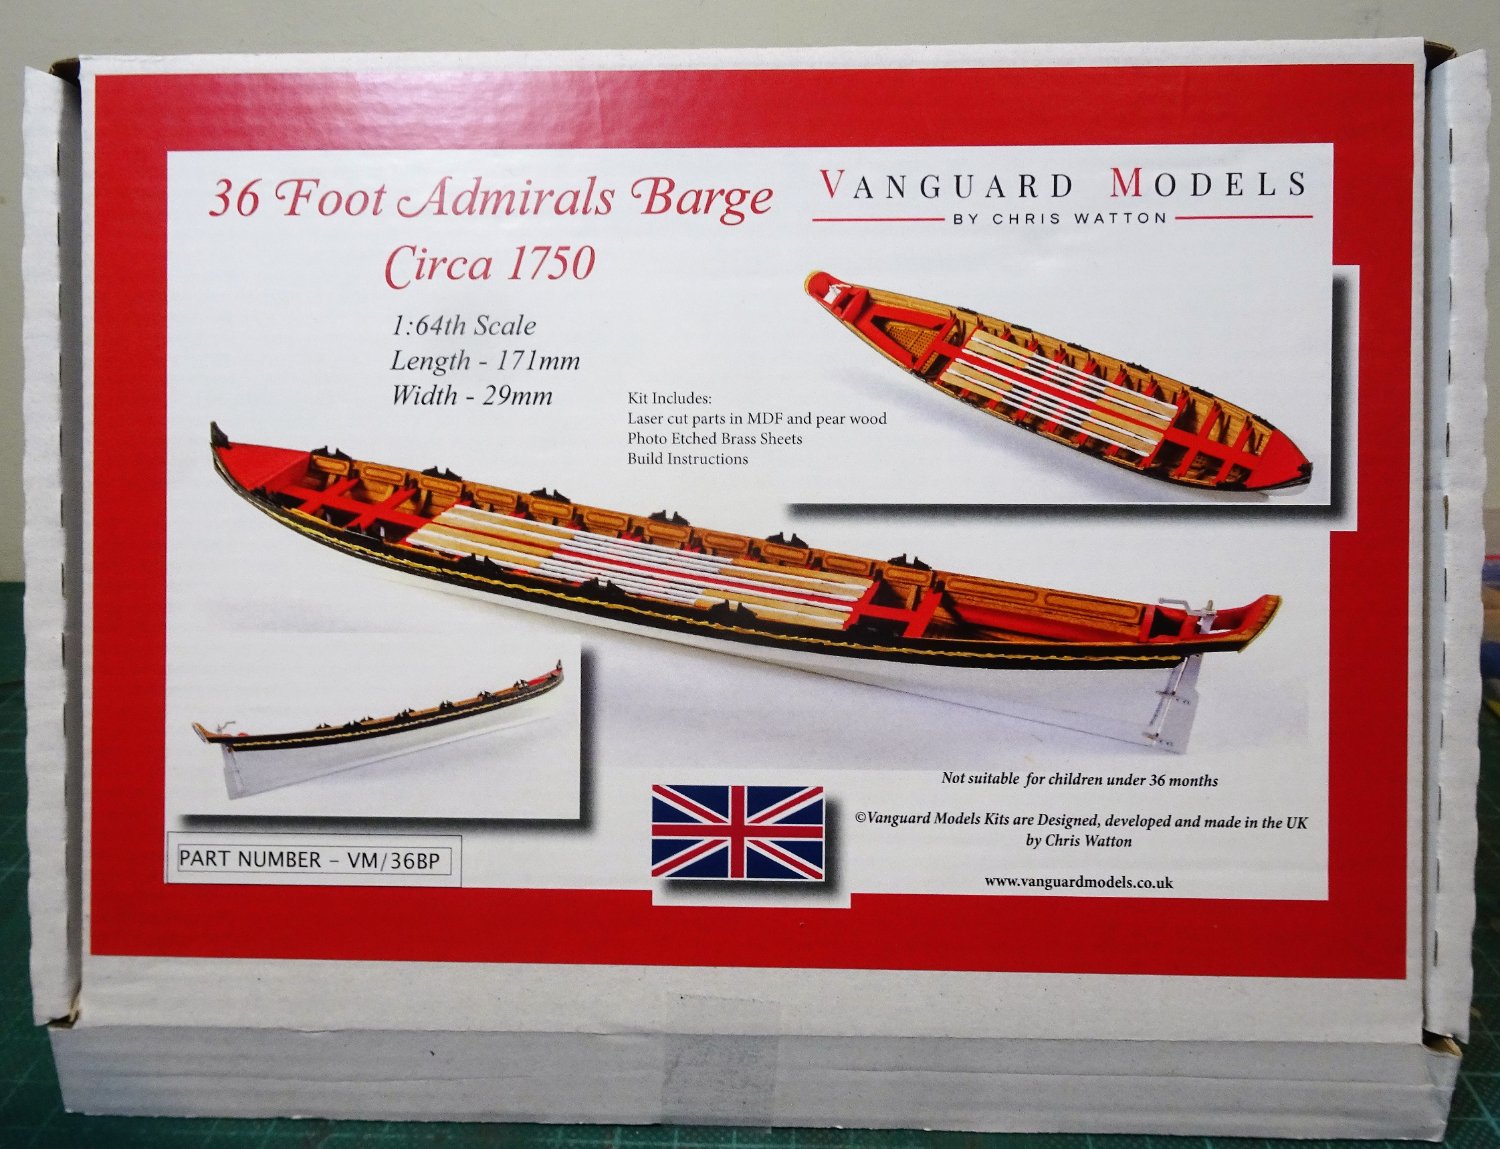
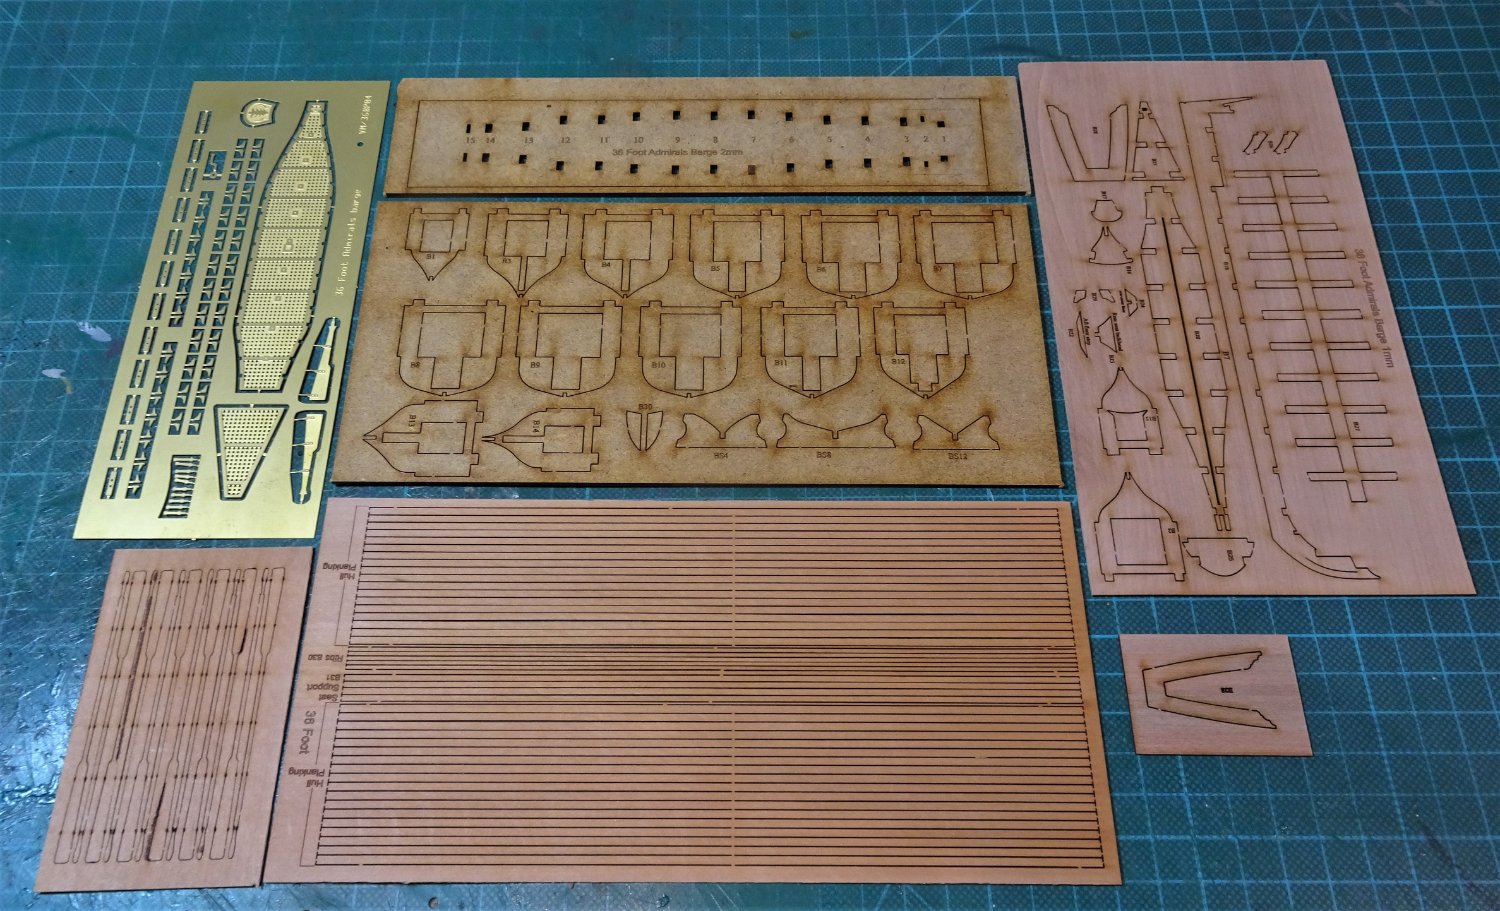
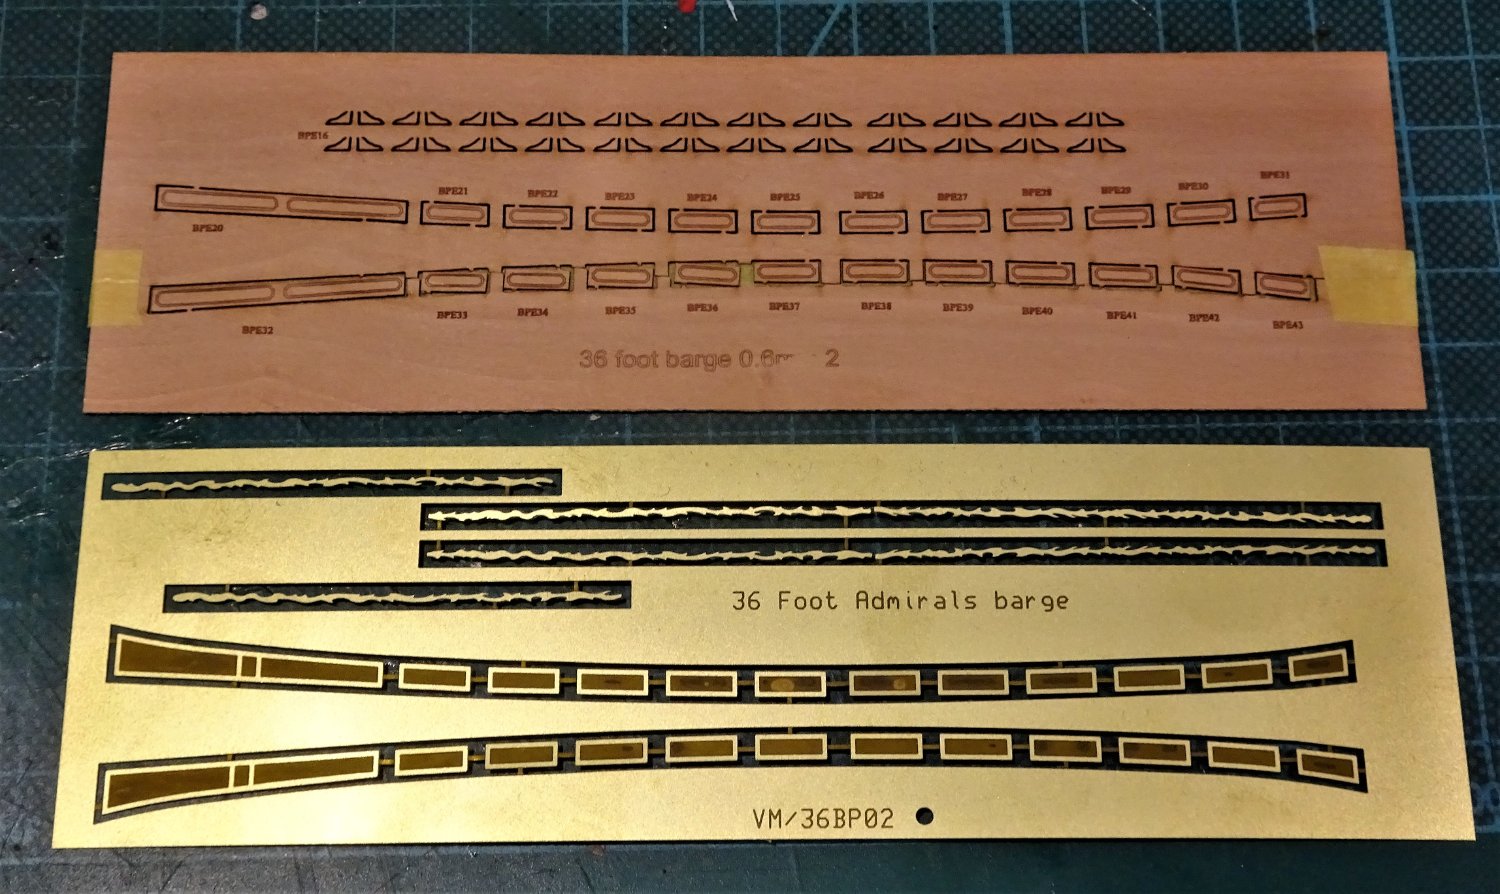
I am still not ready to move onto a larger project, but I have had for a while an example of Vanguard Models 36’ Admirals Barge circa 1750. I have included this build in the 1751-1800 section as it generally reflects the style from the middle to late 18th century. 09158 At £48 this is the most expensive of the current boat range, an added incentive not to cock it up. The model has a length of 165mm - 6½” in old money – still pretty small to fit in the extra detail applicable to an Admiral’s Barge. 09160 The kit follows the build method common to this Vanguard range, plank over inverted bulkheads using Pearwood planks. 09162 Brass etch is provided for the footwaling and decoration, but the provided brass etch panelling has been replaced with Pearwood detailing also included in the kit. I do have a fondness for this type of boat, having built three Pinnaces and Queen Anne’s Barge, and this bijou version presents some interesting challenges. It is fortunate that there are several contemporary models of Barges in the NMM at 1:24 scale from which to draw detail. One thing that catches my eye is that the kit is set up for double banked rowing - thole pins both sides for each thwart, and two rowers per thwart. The contemporary models of this period invariably show Barges set up for single banking - one rower to each thwart seated alternatively port and starboard, with a longer oar shipped over the opposite side of the boat to the rower. 0929 A mock-up on my Pinnace build shows the arrangement for single banked rowing. This is all a fair way ahead in the build and need not concern me yet. Basics first. B.E. 03/11/2022

- 106 replies
-
- 25
-
-
-
- Admirals Barge
- Vanguard Models
- (and 1 more)
-
Thank you kindly Druxey, I have enjoyed this little infill project and I would love to oblige but the Cook's assistants have doused the fire, raked the grate, and cleared the ashes. I've now moved back to the boatyard for another testy little project. Regards, B.E.
- 27 replies
-
- 4
-
-
- galley stove
- Syren Ship Model Company
- (and 1 more)
-
Wots that you say Yves, mess up my pristine deck, the very idea. I've had it Holystoned especially for the inspection by MSW.😉 ... and don't you start Mark, sand is for the gundecks, can't have getting in the burgoo, could start a mutiny.😀 B.E.
- 27 replies
-
- 3
-
-
-
- galley stove
- Syren Ship Model Company
- (and 1 more)
-
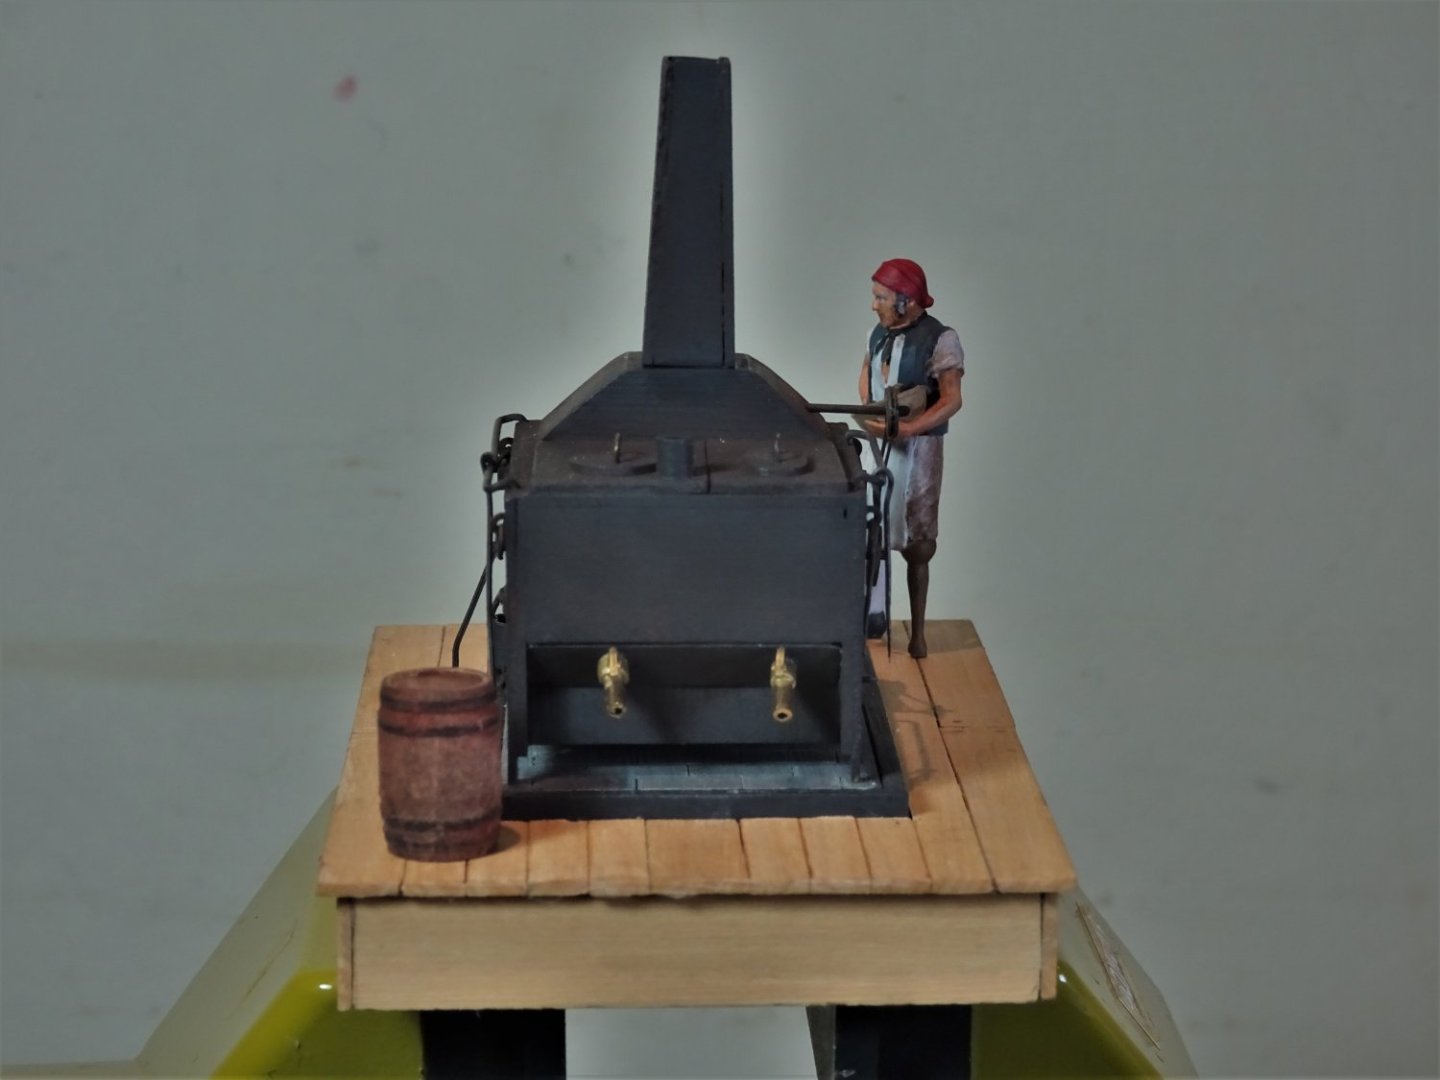
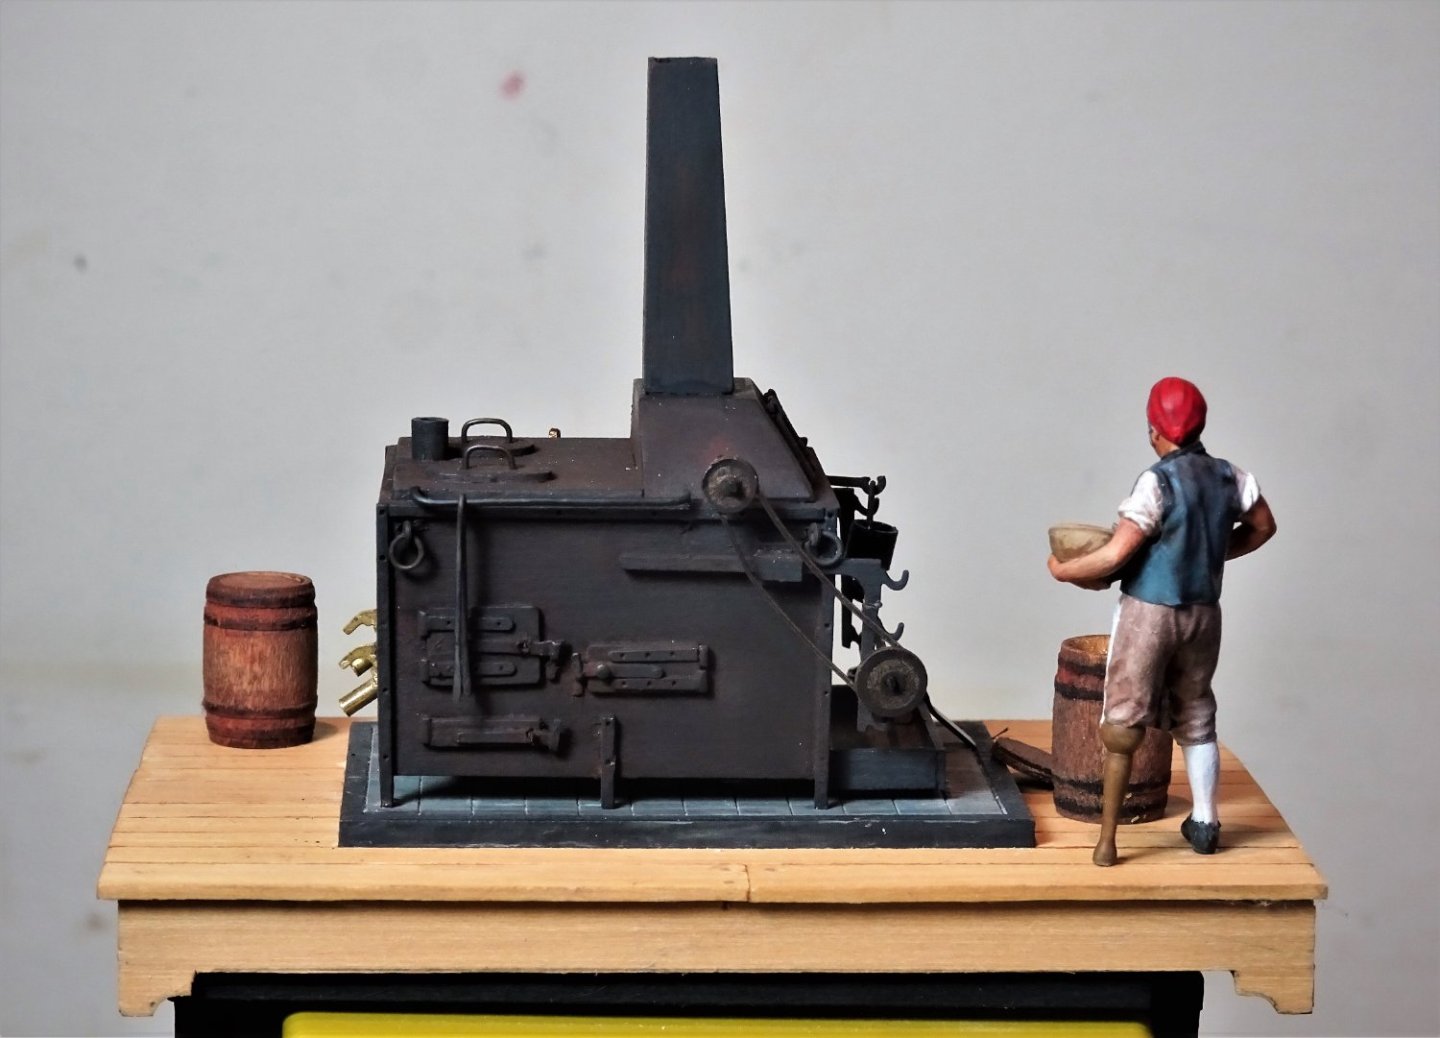
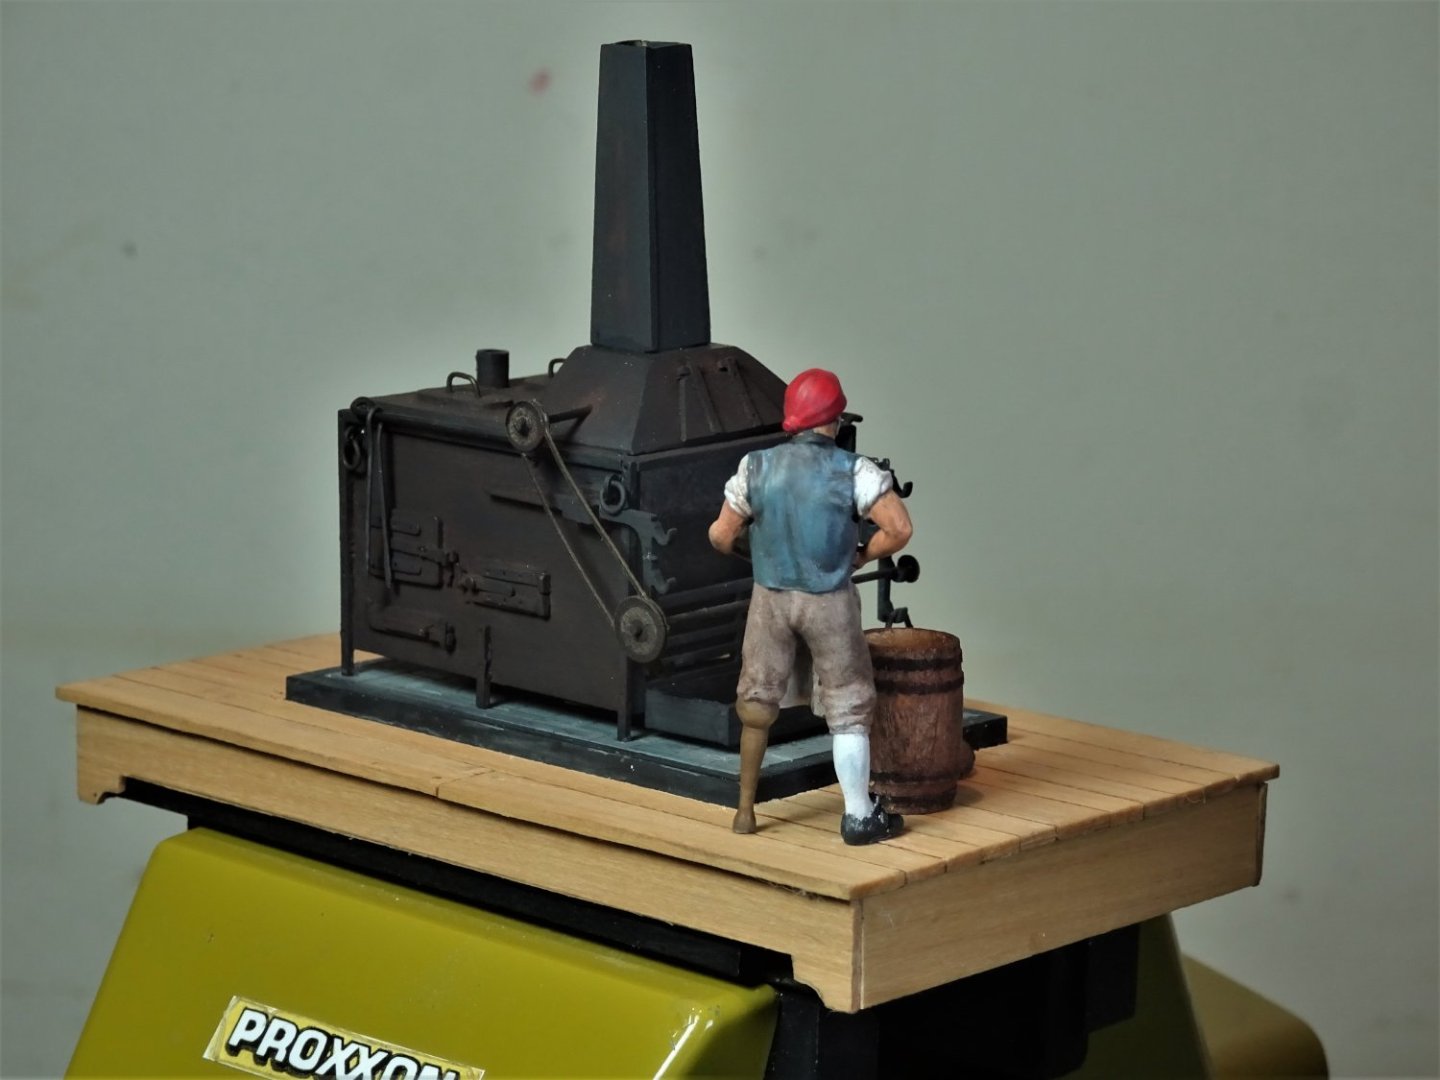
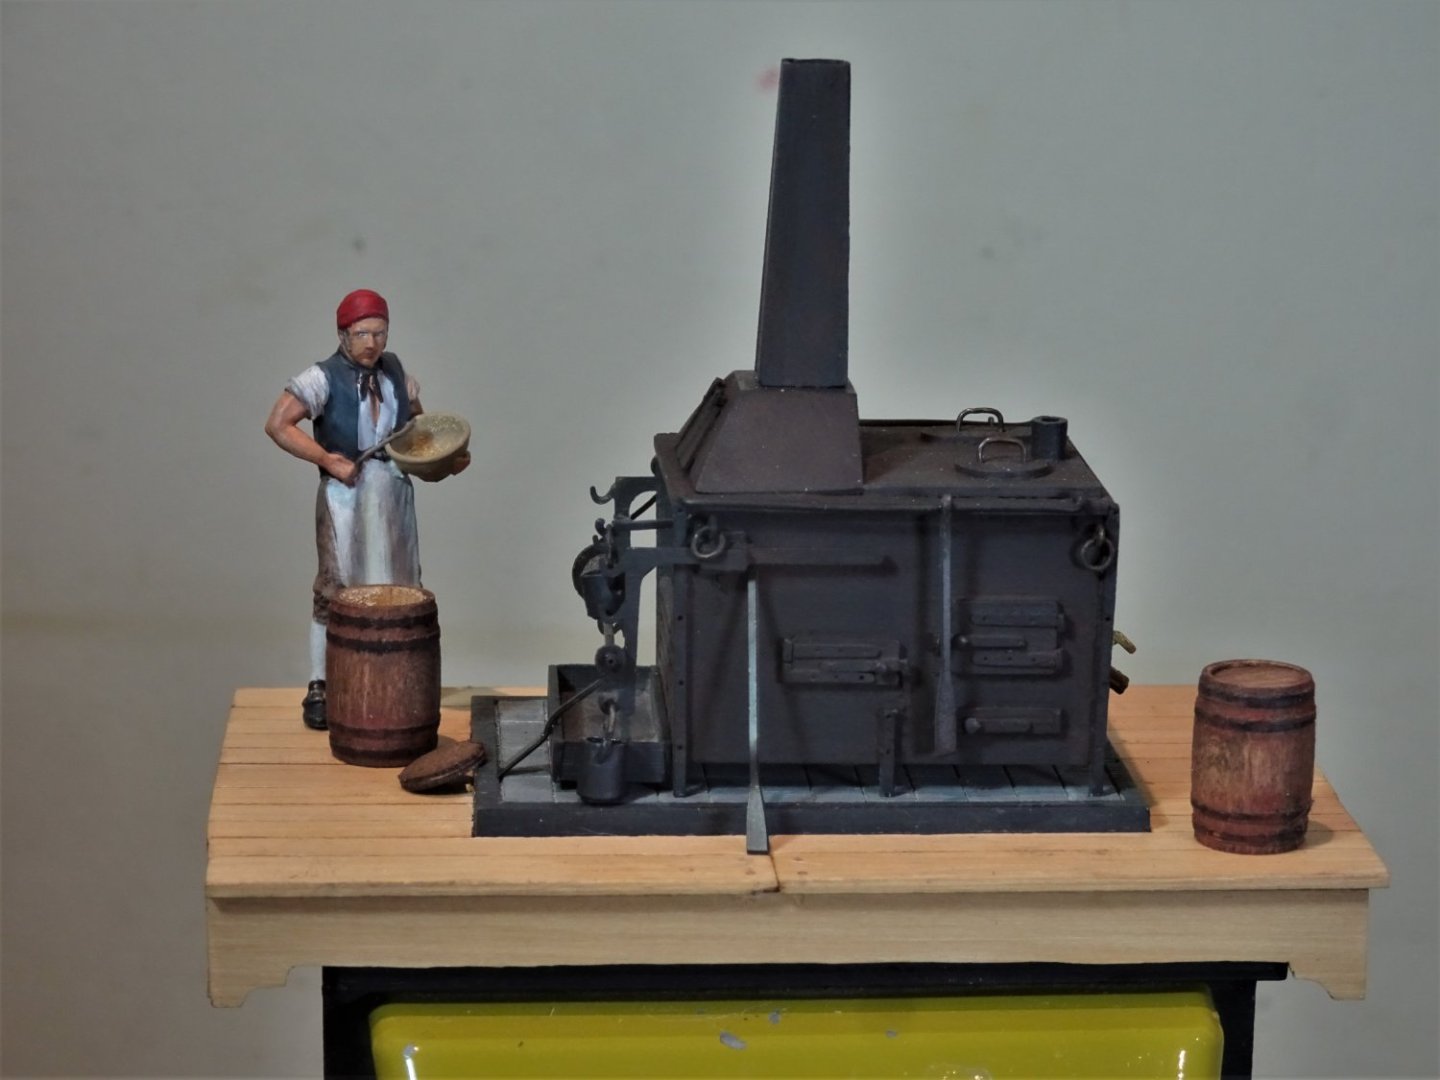
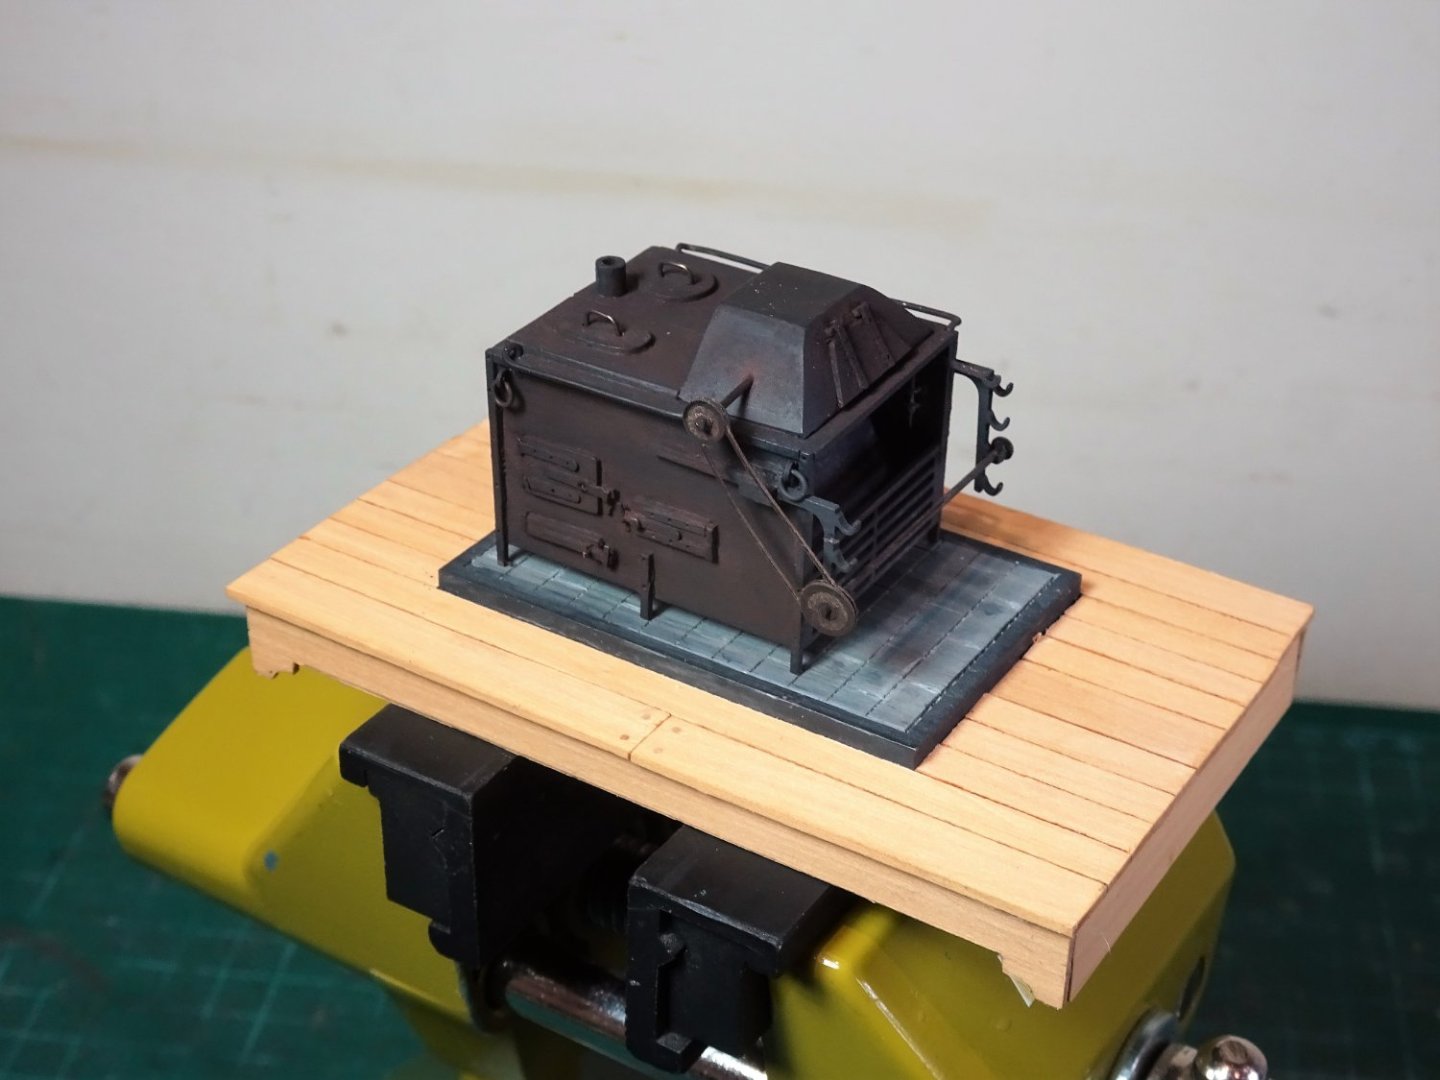
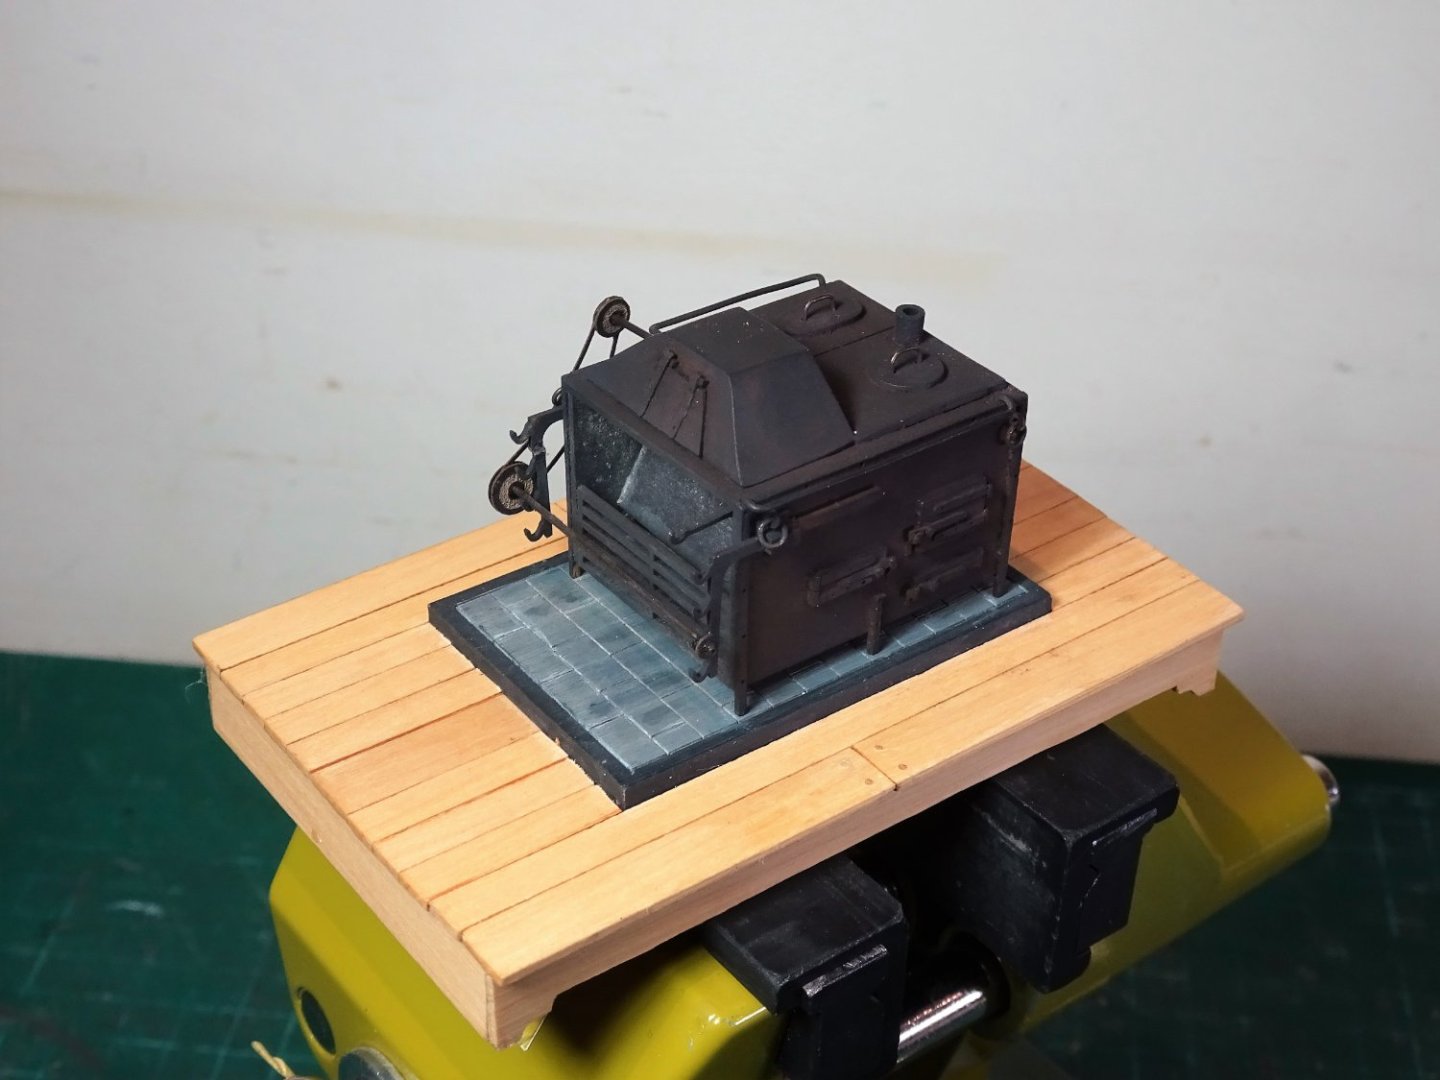
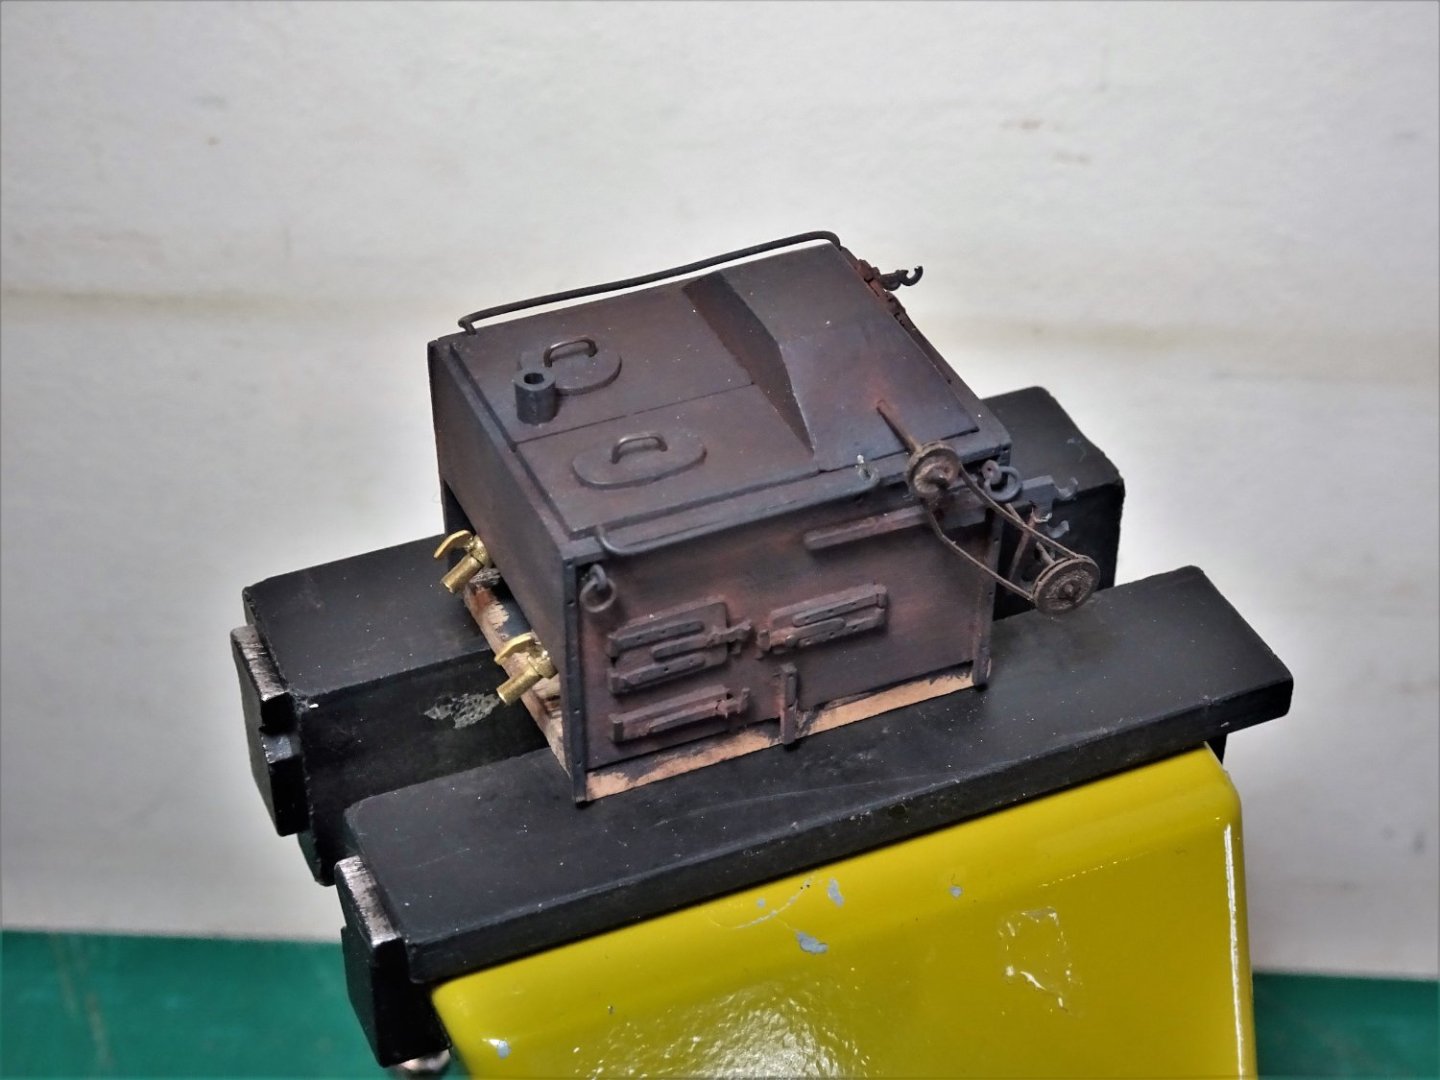
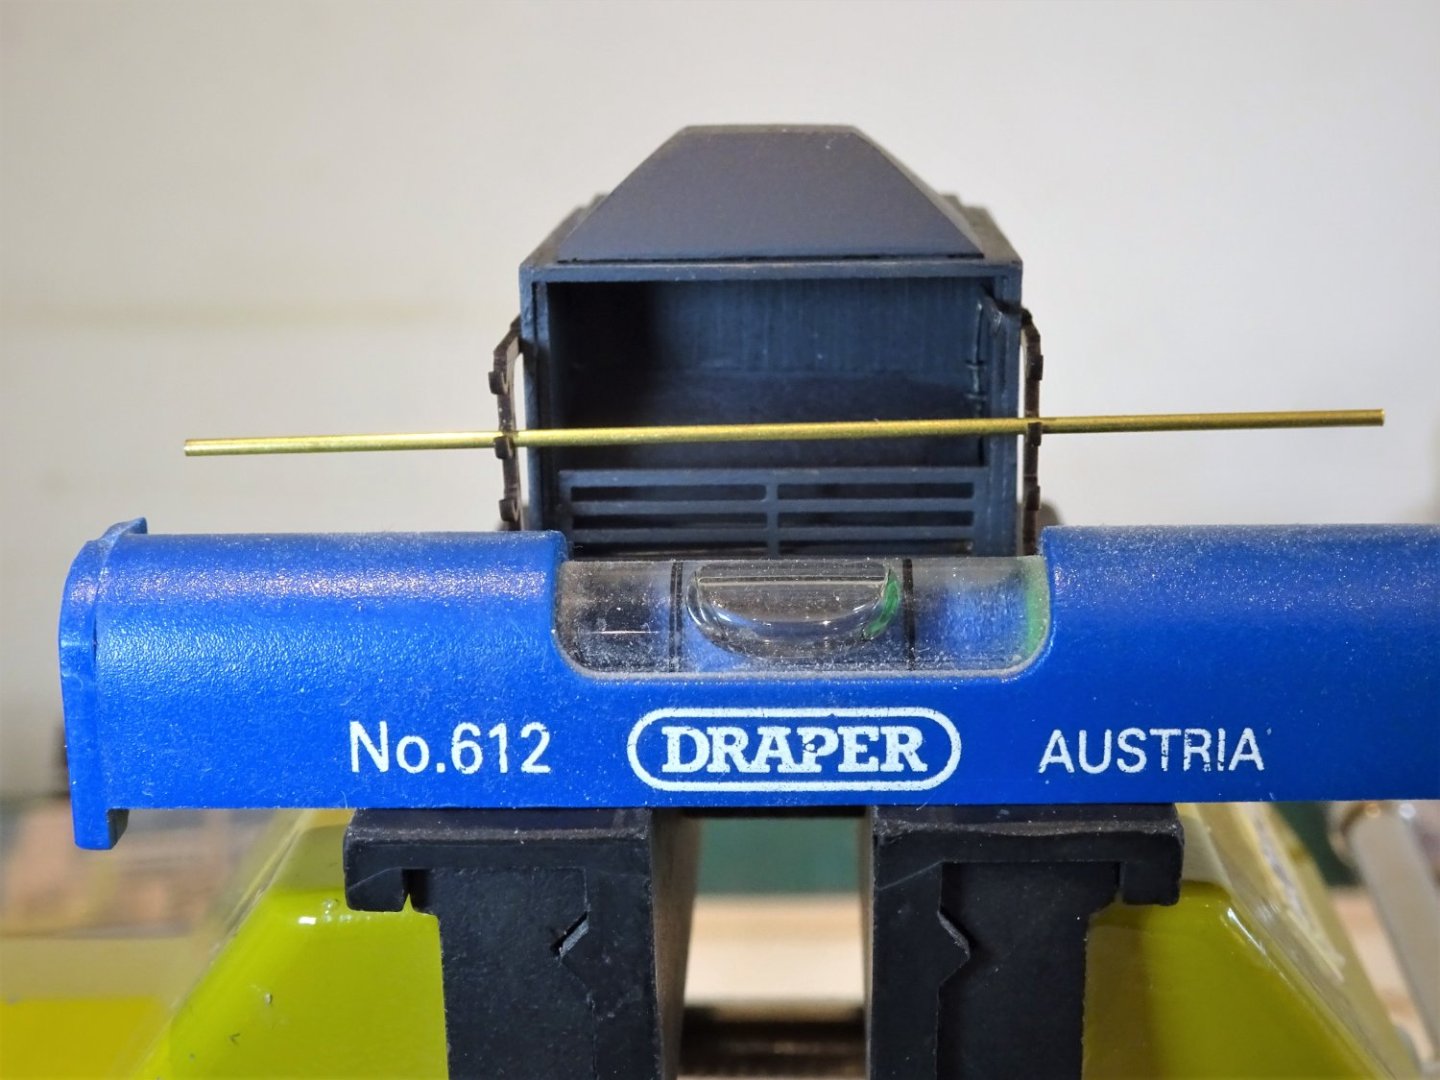
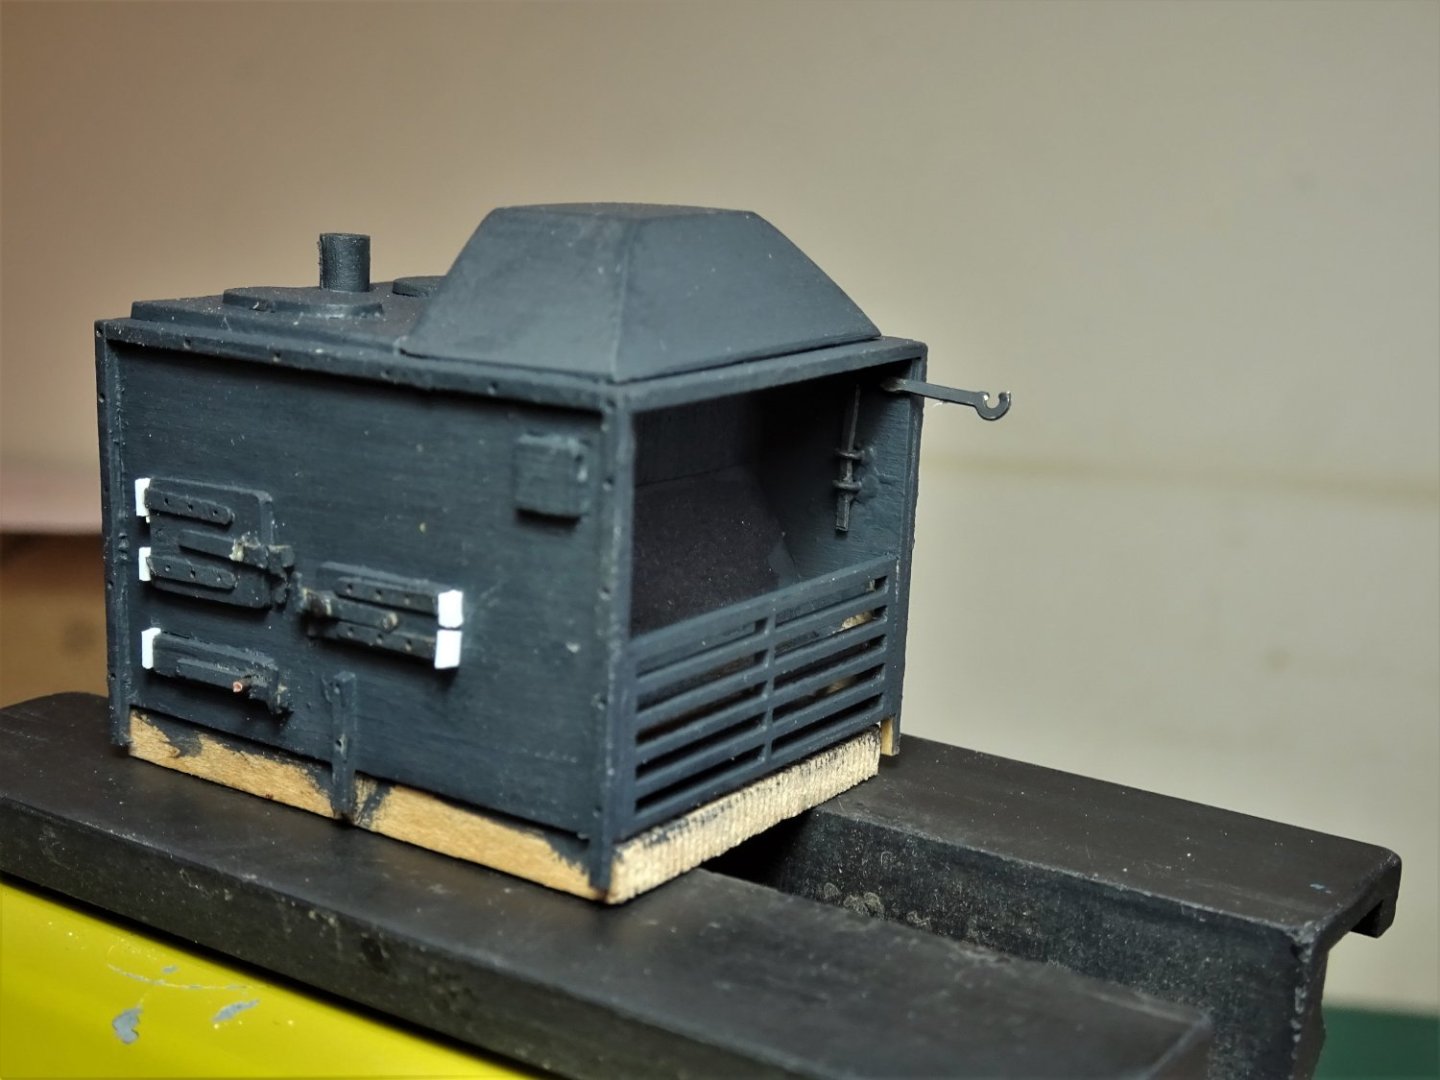
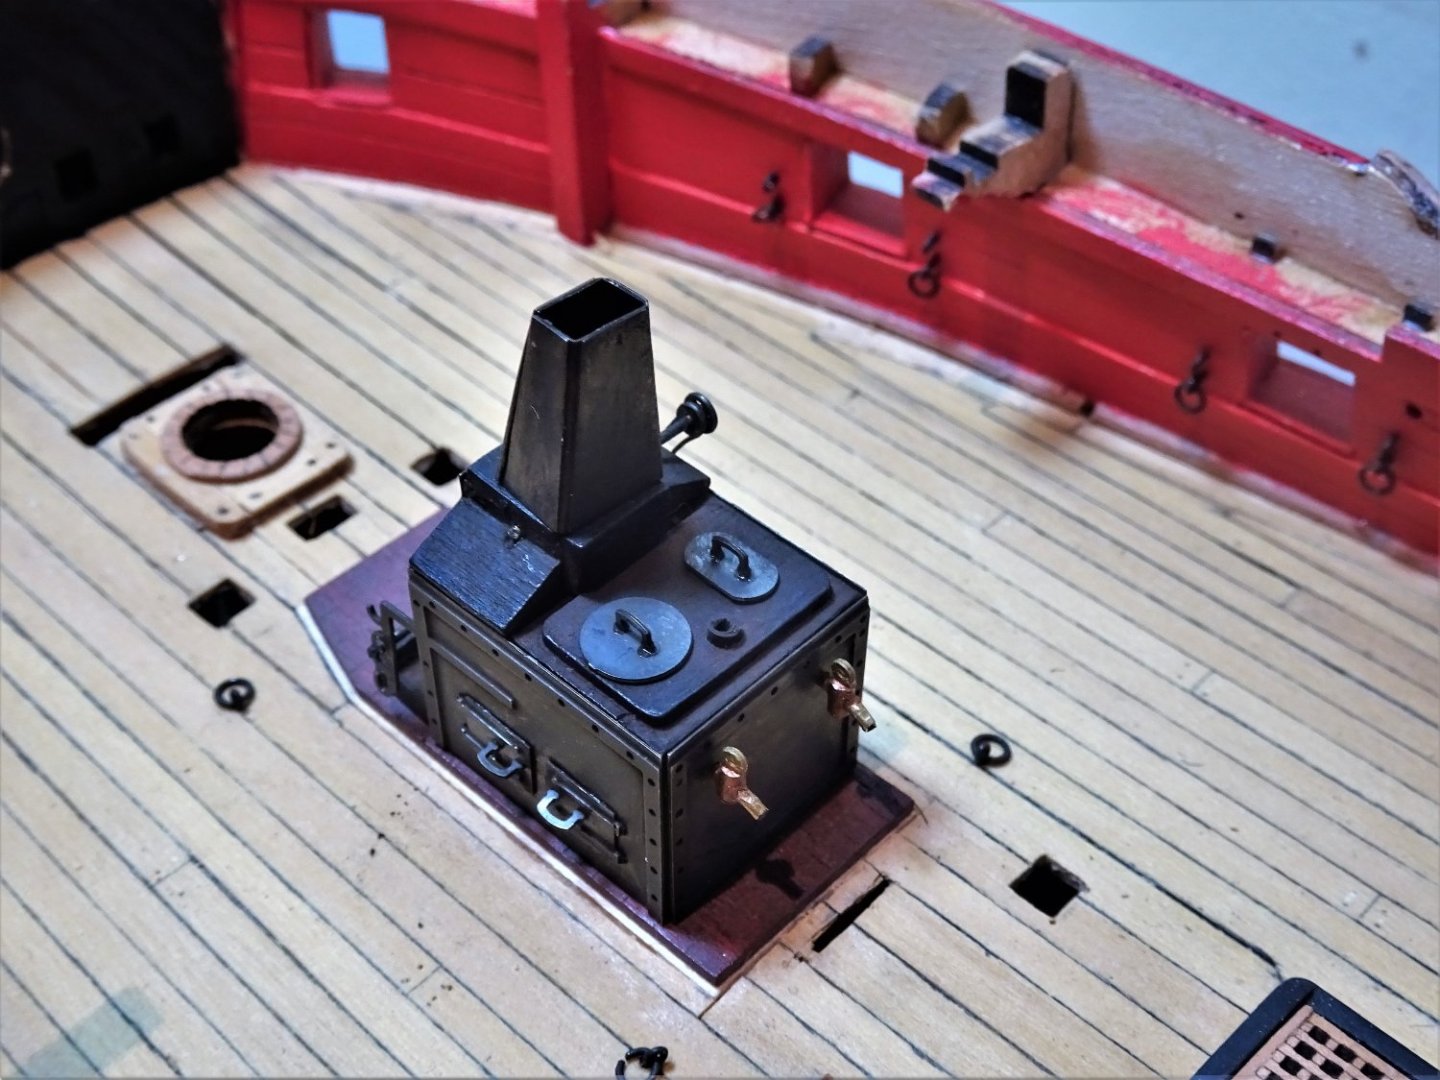
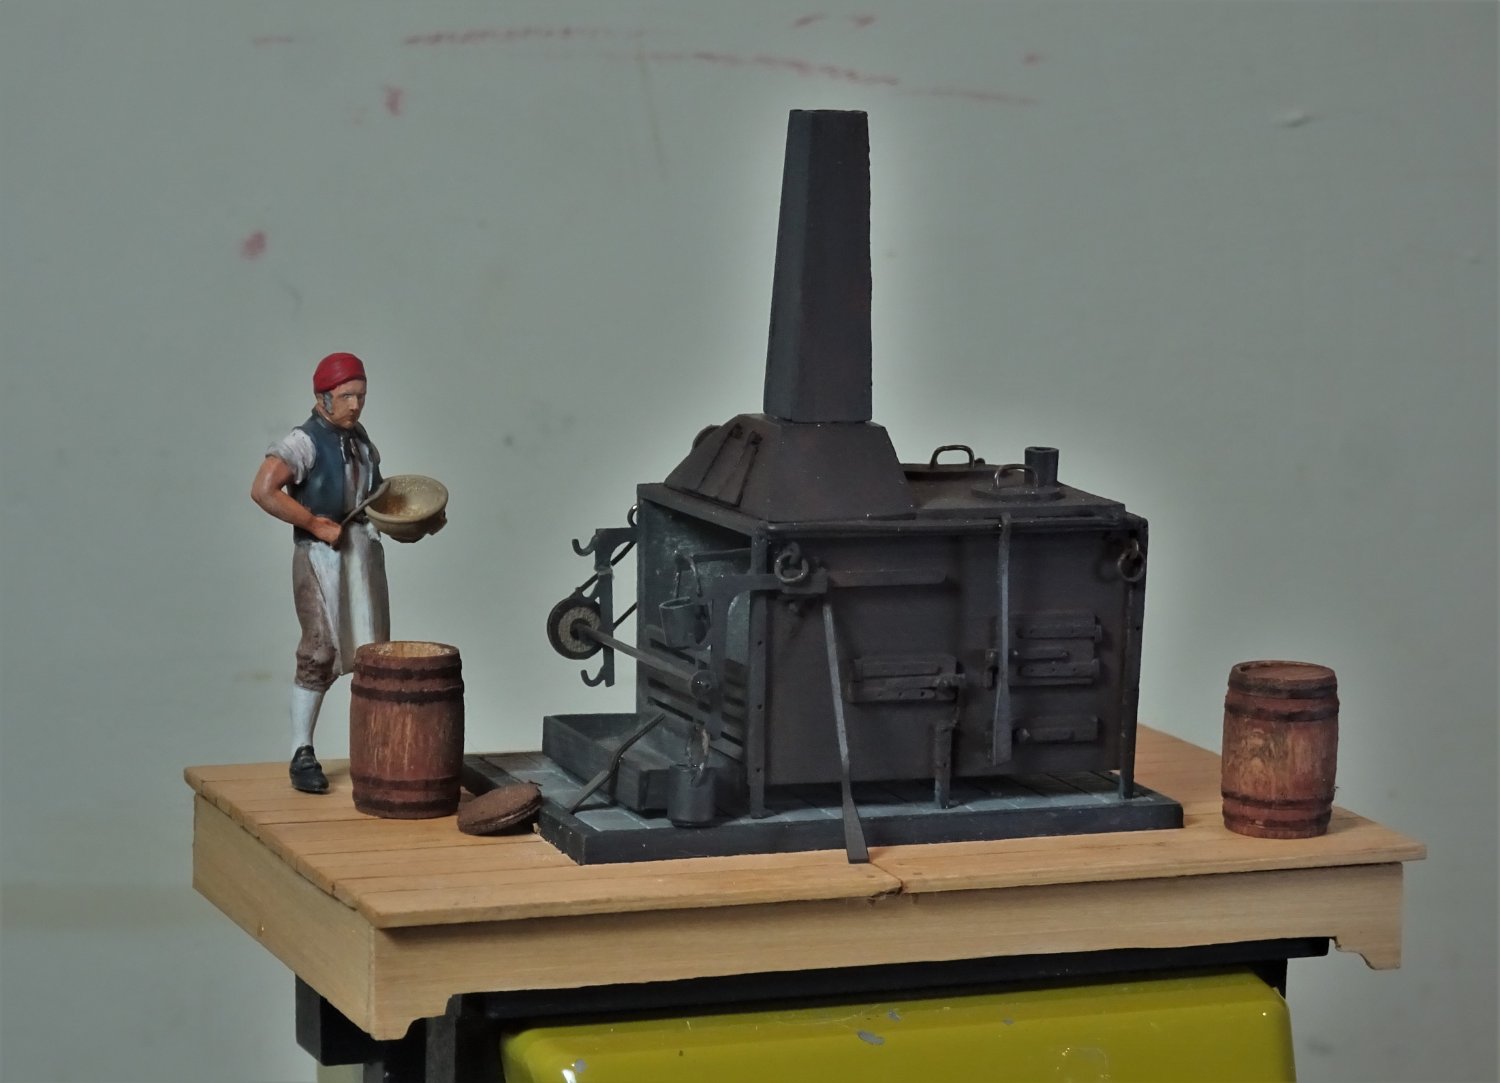
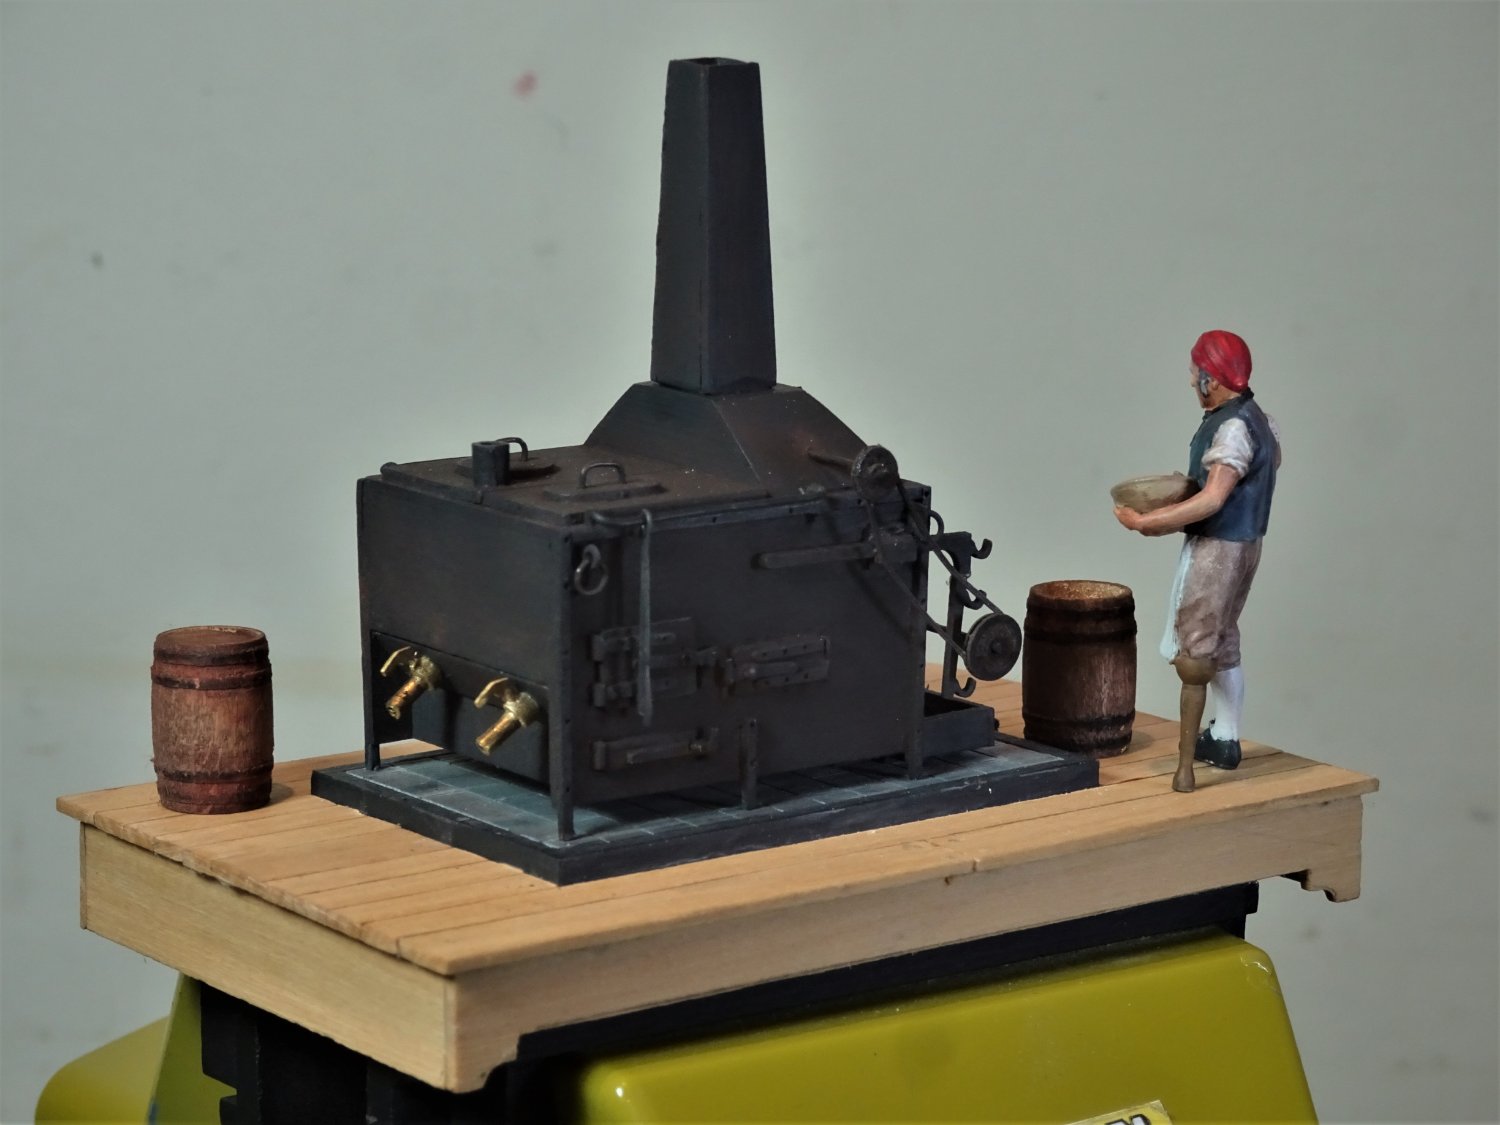
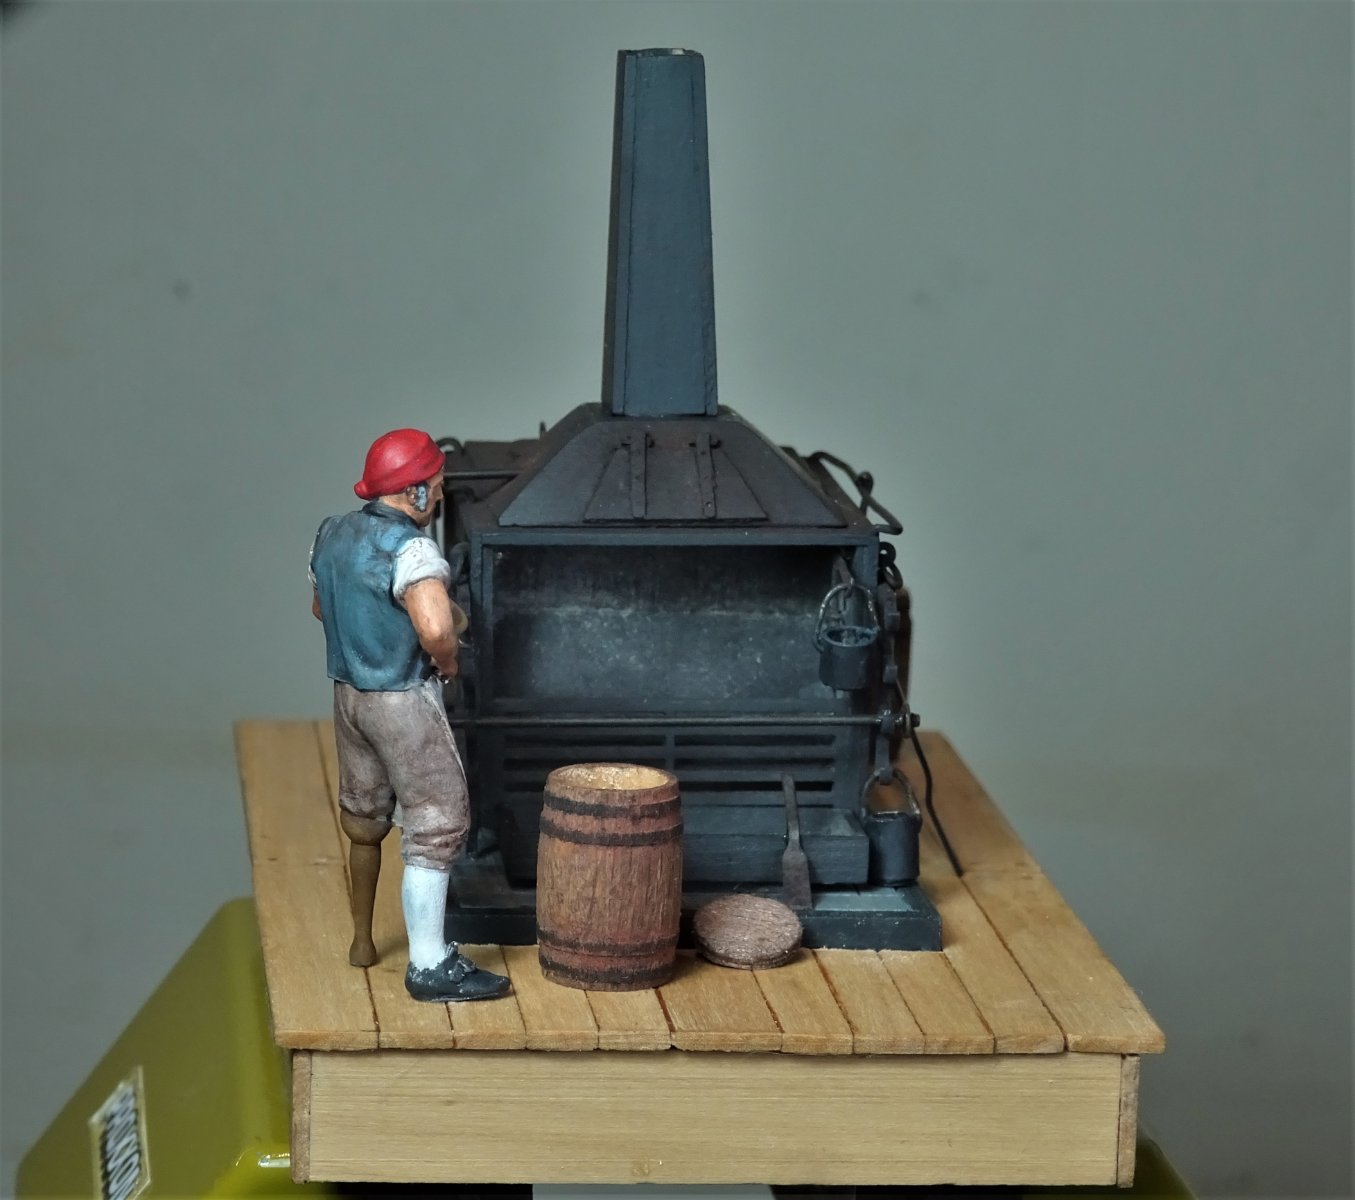
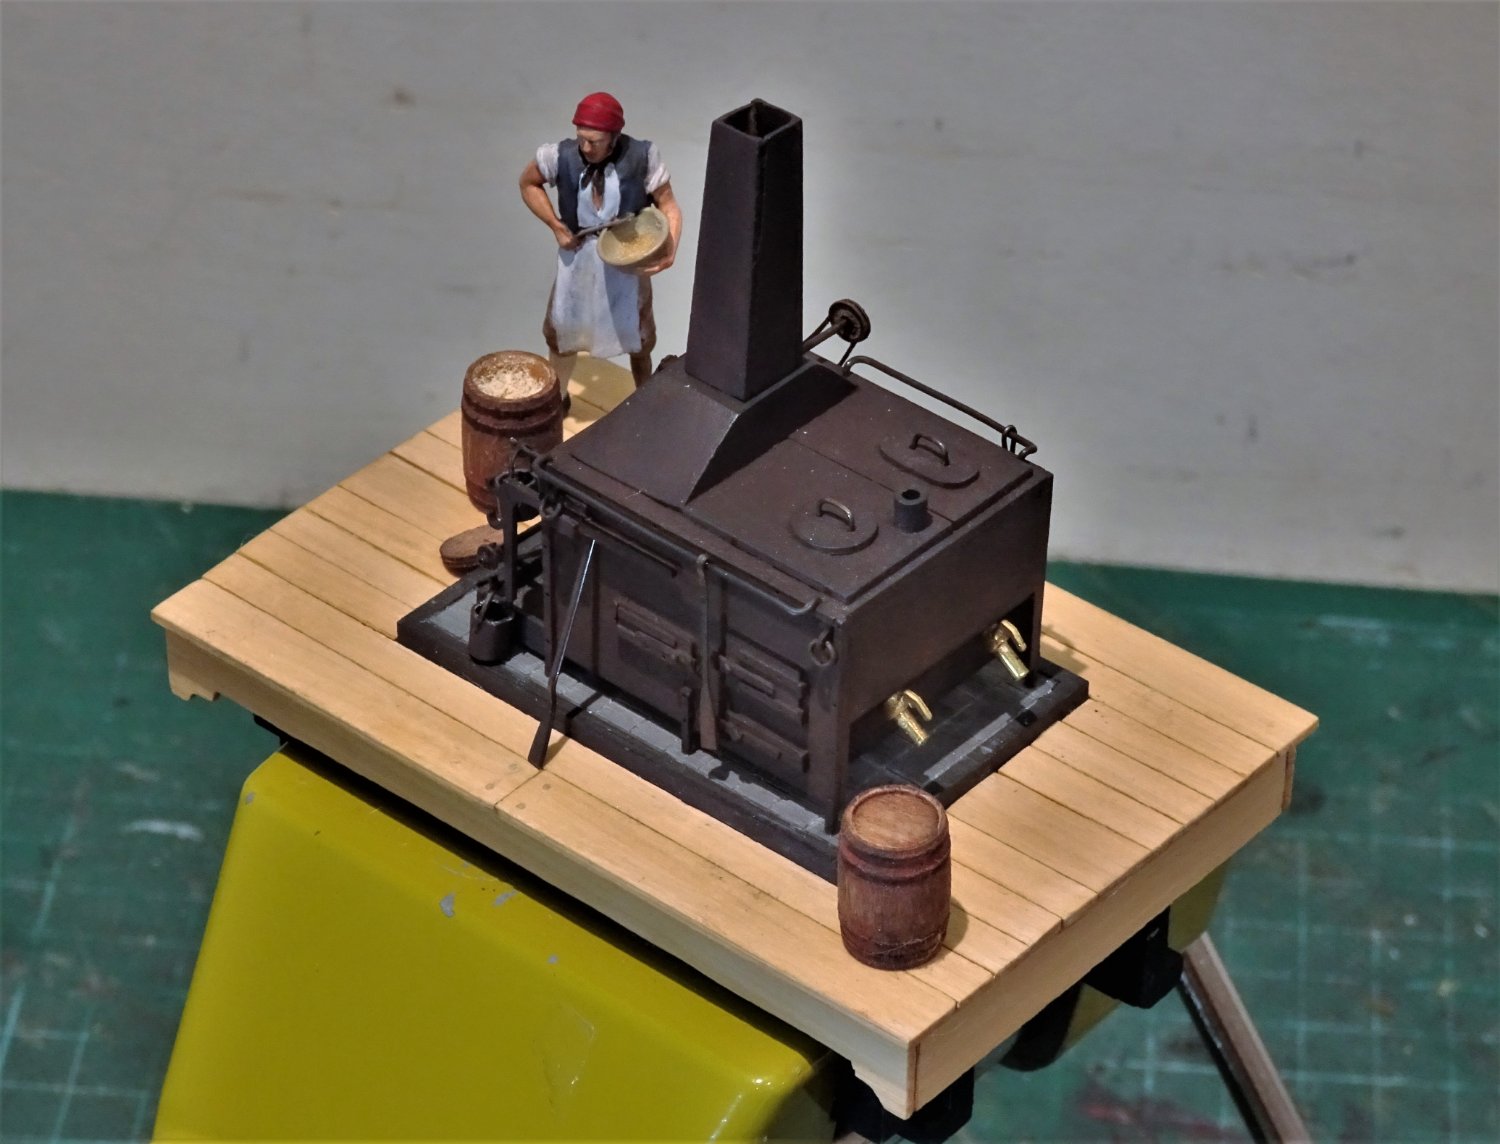
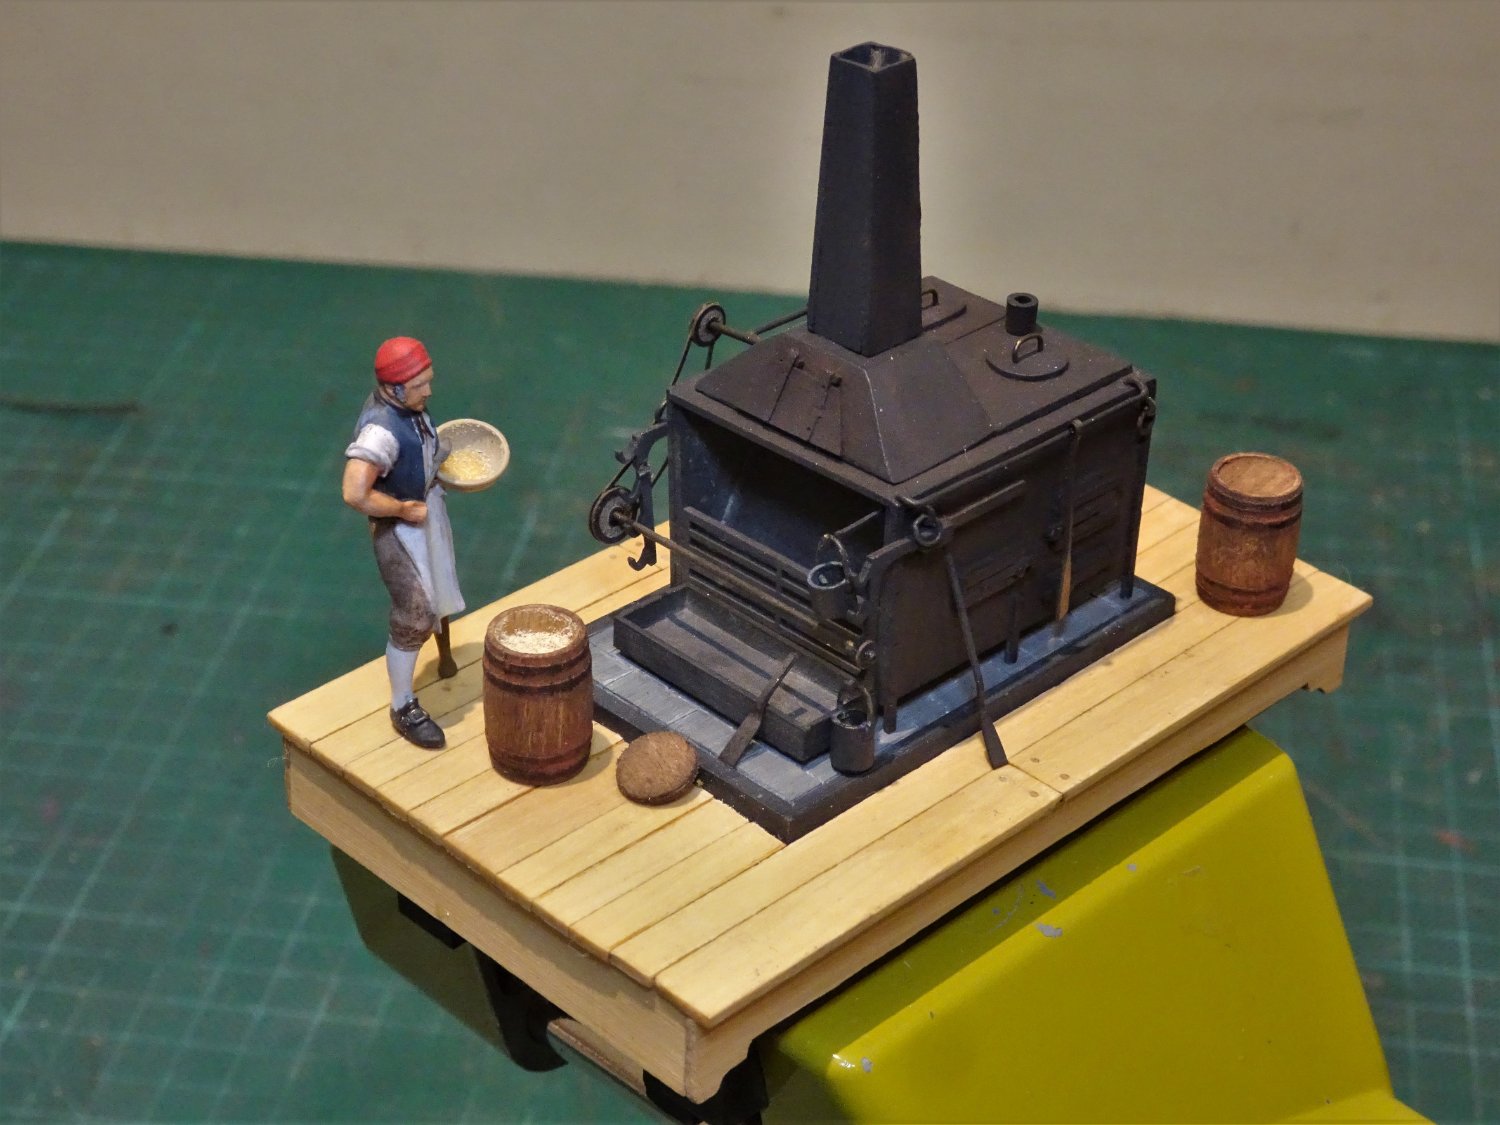
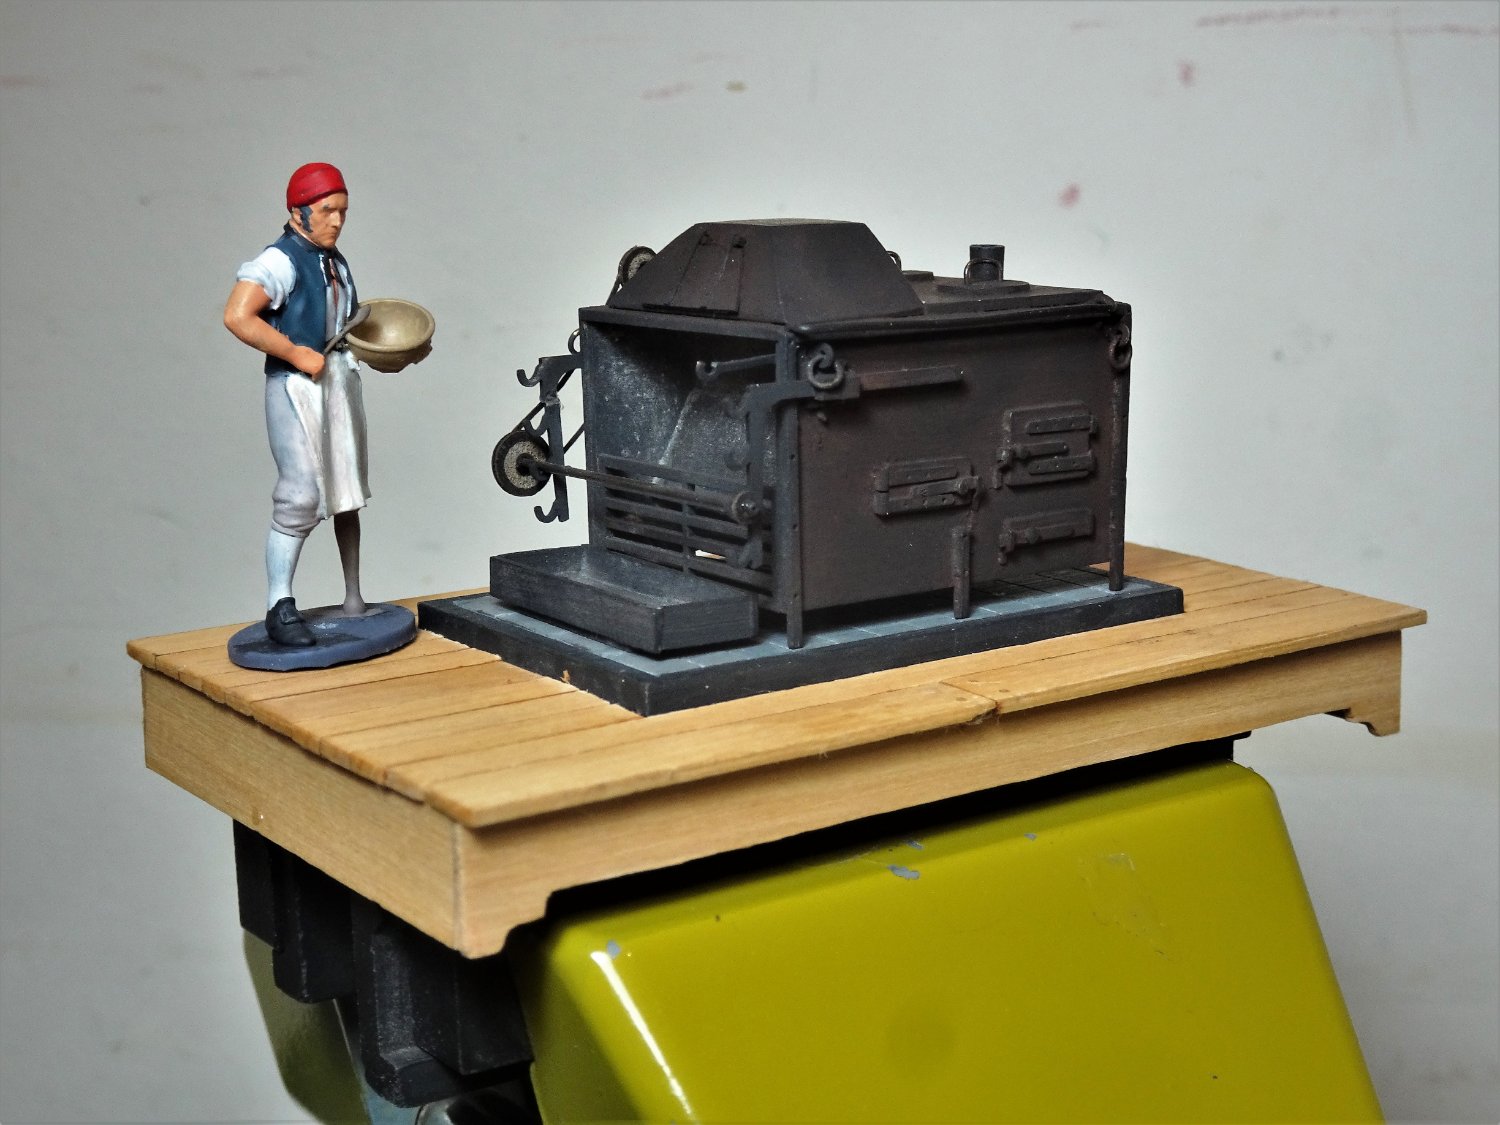
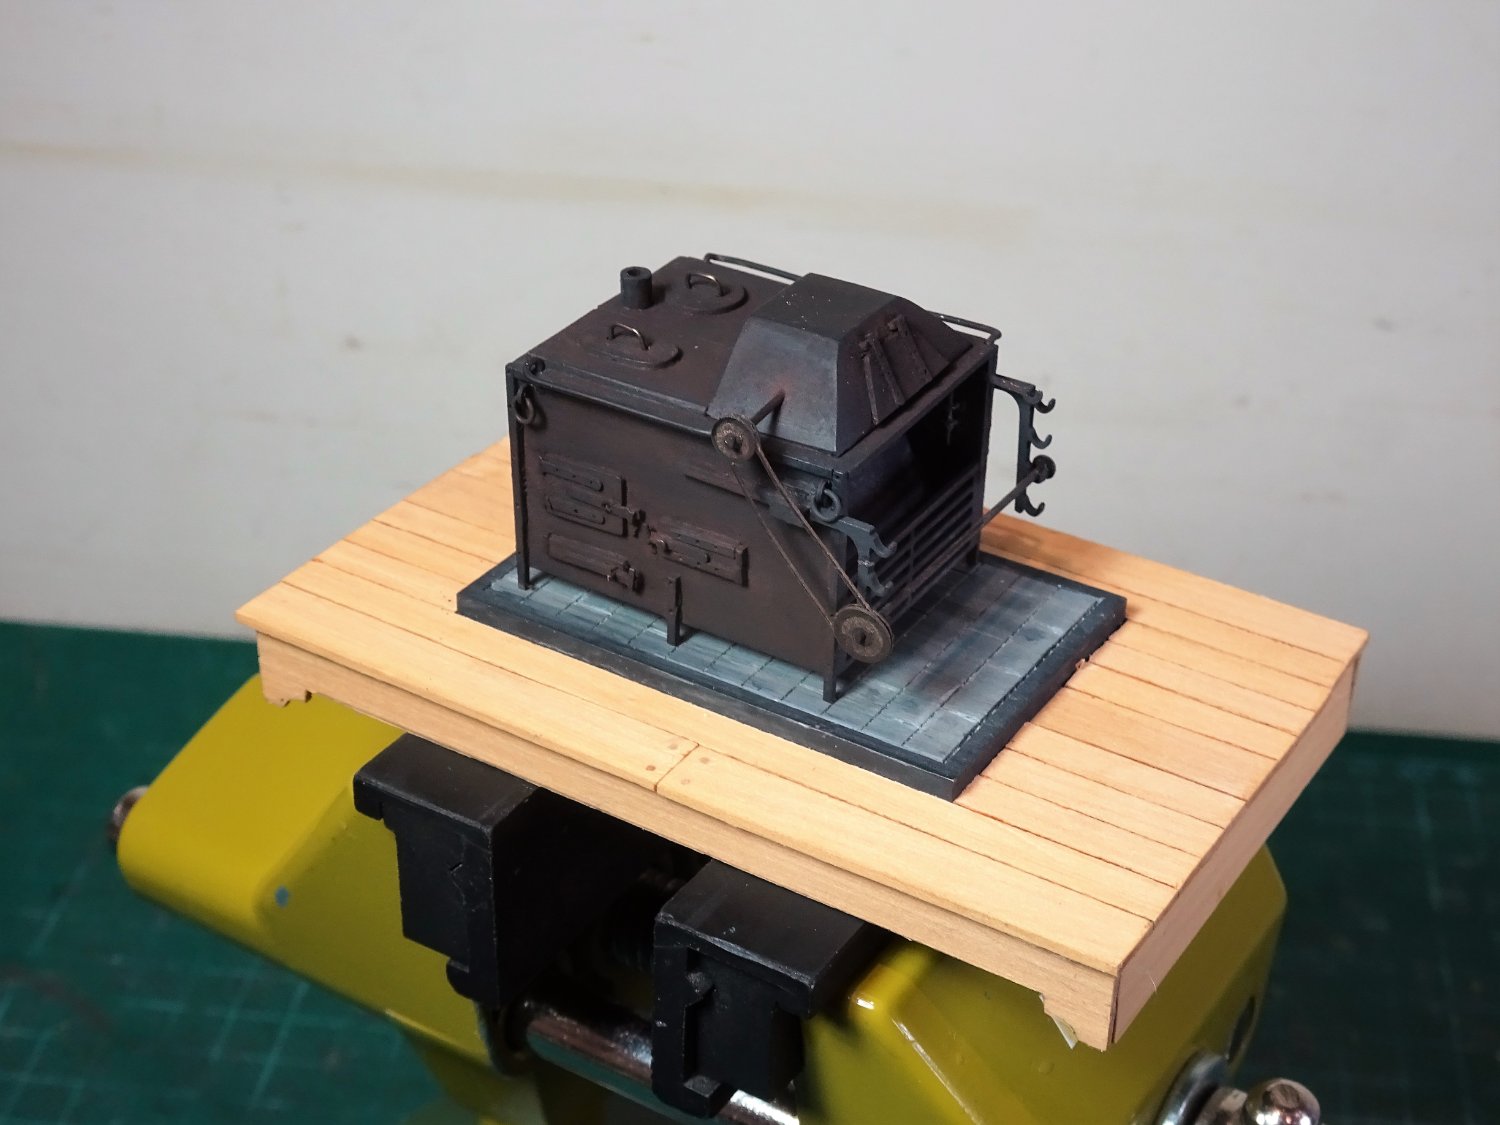
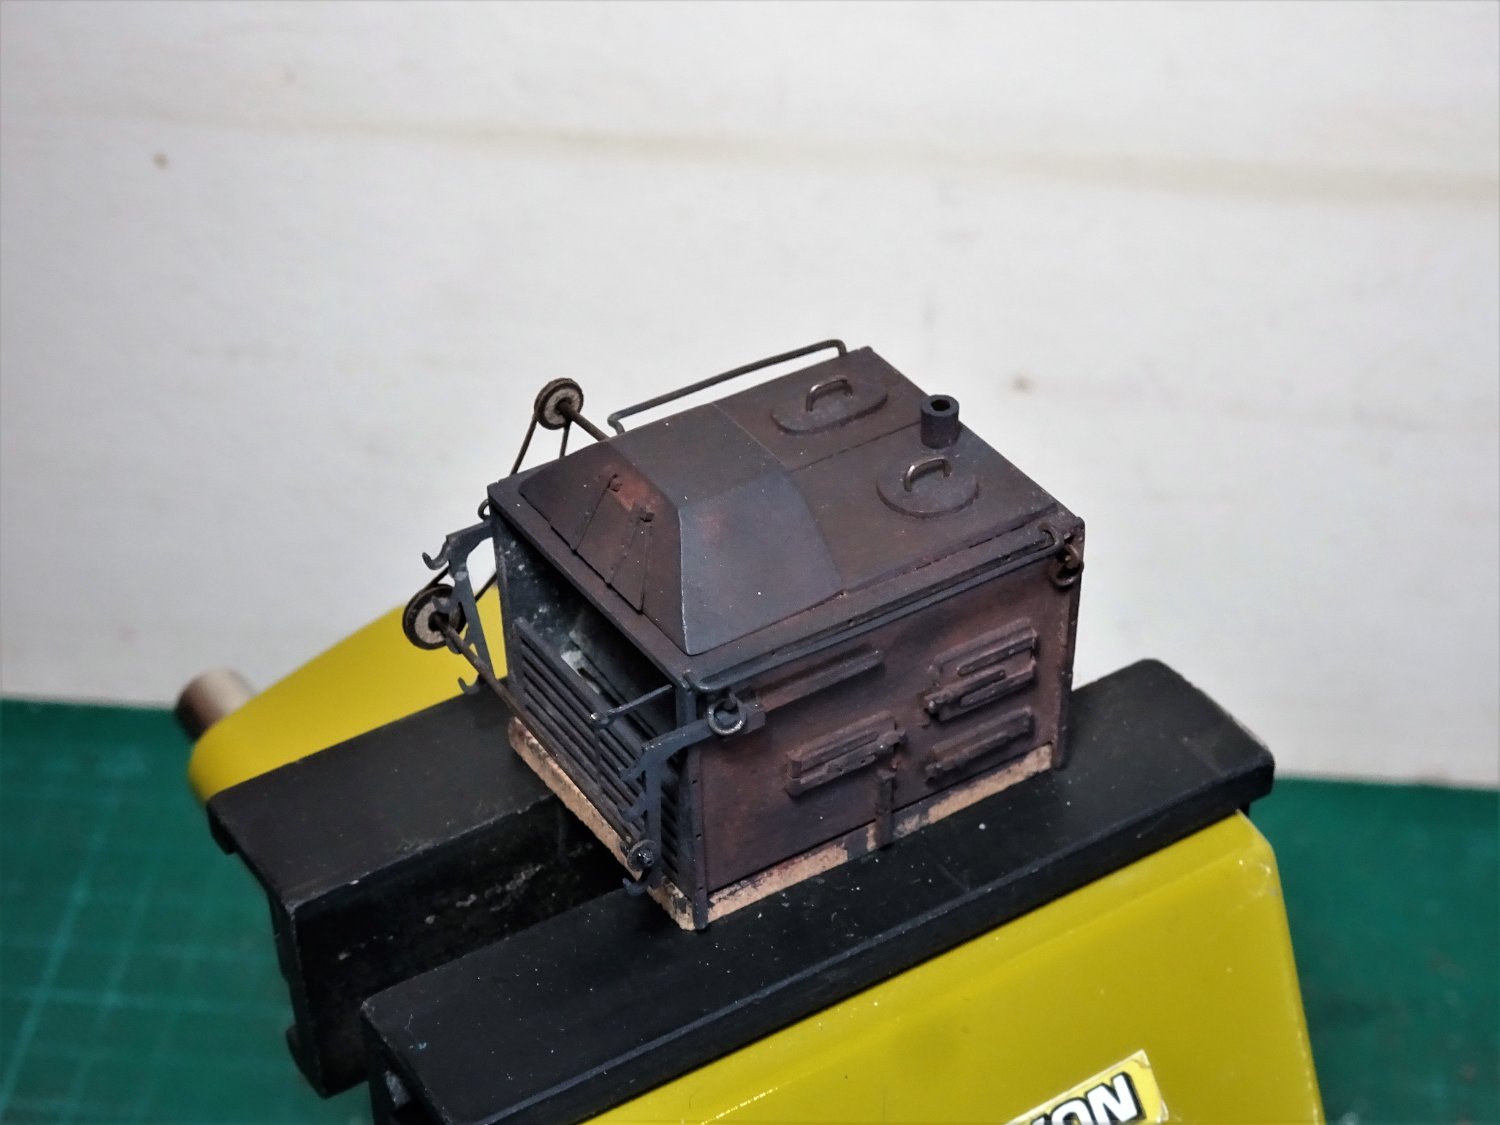
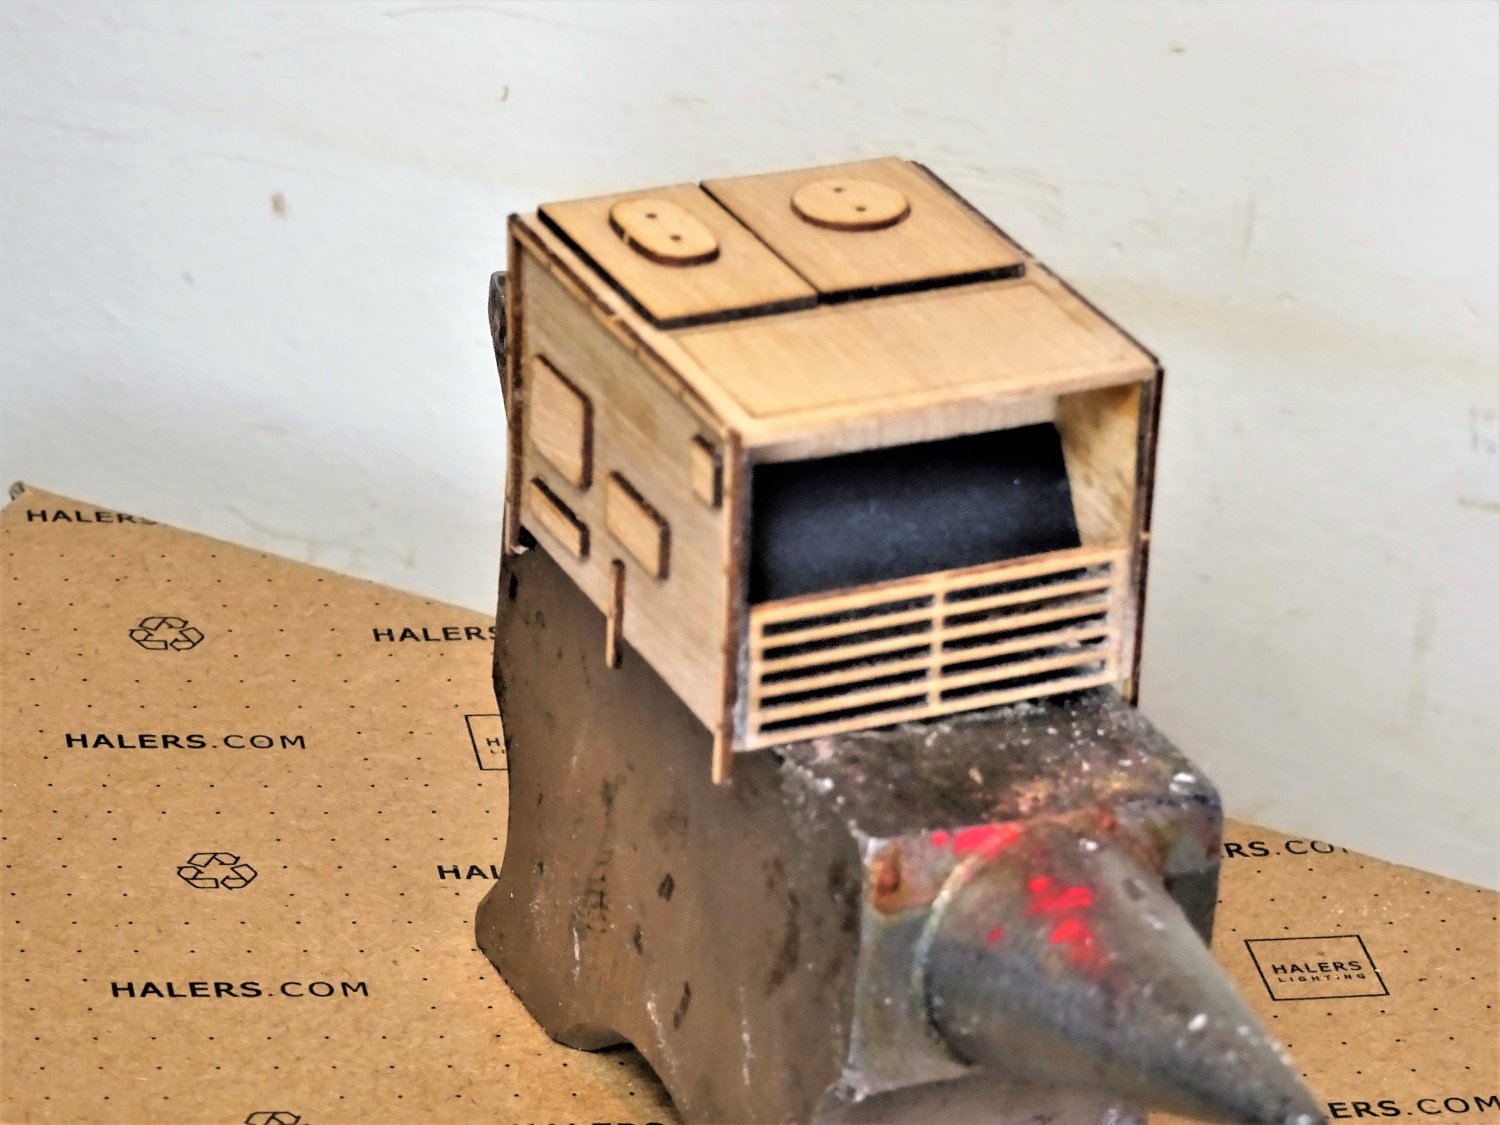
Thank you, Chuck and Mark. Post Nine Completing the Galley display. I think I over did it with the washes. 9101(2) Mrs W cast a critical eye and opined that he is far too grubby for a cook, even one with only one leg. She is correct of course; in fact the Navy was obsessed with cleanliness (relatively) and the crews were required to wash and keep their kit in good repair for which time was set aside. So, in the interests of good discipline cook was ordered to wash both himself and his kit and present himself for inspection. A walk around the Galley. 9118 9123 9124 9127 9130 9132 9136 9140 9145 9147 9150 9156(2) I hope folks have enjoyed seeing this little project, I have certainly enjoyed myself over the past couple of weeks, and my thanks go out to Chuck for his Stove kit. It strikes me that a nice little display at 1:48 scale could be made up simply using a combination of the fittings available at Syren. Hmmn🤔 Cheers, B.E. 01/11/2022
.thumb.JPG.9c348c3037ada351cdf57040342c9fd3.JPG)


.thumb.JPG.4d8587e0fe063e2d8aea5ad76bea3c7e.JPG)
- 27 replies
-
- 21
-
-
-
- galley stove
- Syren Ship Model Company
- (and 1 more)
-
Very nice work on the rattlin' down Derek, and those crowsfeet look spot on. I would go with what pleases your eye best. B.E.
- 345 replies
-
- 1
-

-
- Duchess Of Kingston
- Vanguard Models
- (and 1 more)
-
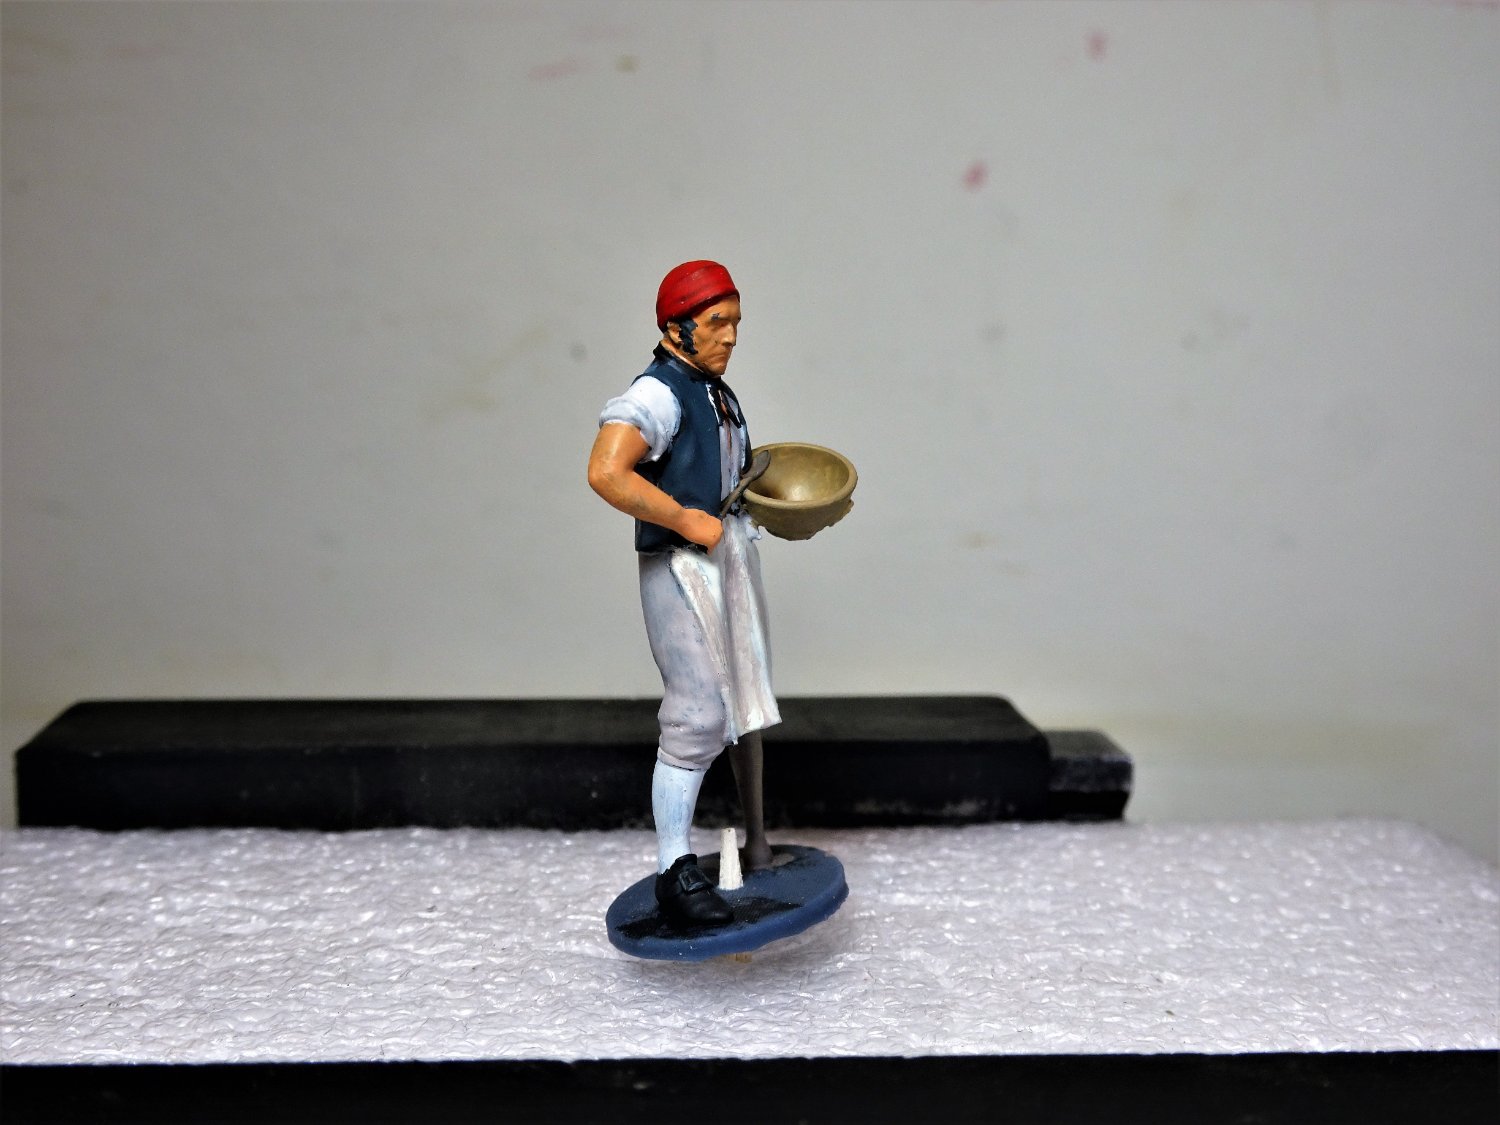
Post Eight Dressing the dio. No Galley display should be without a cook, and thanks to Chris Watton, a cook complete with wooden leg, at 1:48 scale, is available to give scale effect to the Galley Stove. For this dio I will be painting the figure, not one of my favourite or best skilled talents, but needs must. I have used Vallejo paints throughout. The following pics show the figure after the colours have been blocked in, and the macro is used to torture myself with the deficiencies in my skill. 9064 I am using a fairly muted palette, the one splash of colour being the cook’s red headscarf. 9059 At this stage no washes, or highlighting has been applied, but overall, I am happy with the colour scheme applied. 9060 Still a way to go, the macro reveal where touch-ins are required. 9088 9090 The base of the figure will have been removed in the final version. B.E. 30/10/2022


- 27 replies
-
- 20
-
-
-
- galley stove
- Syren Ship Model Company
- (and 1 more)
-
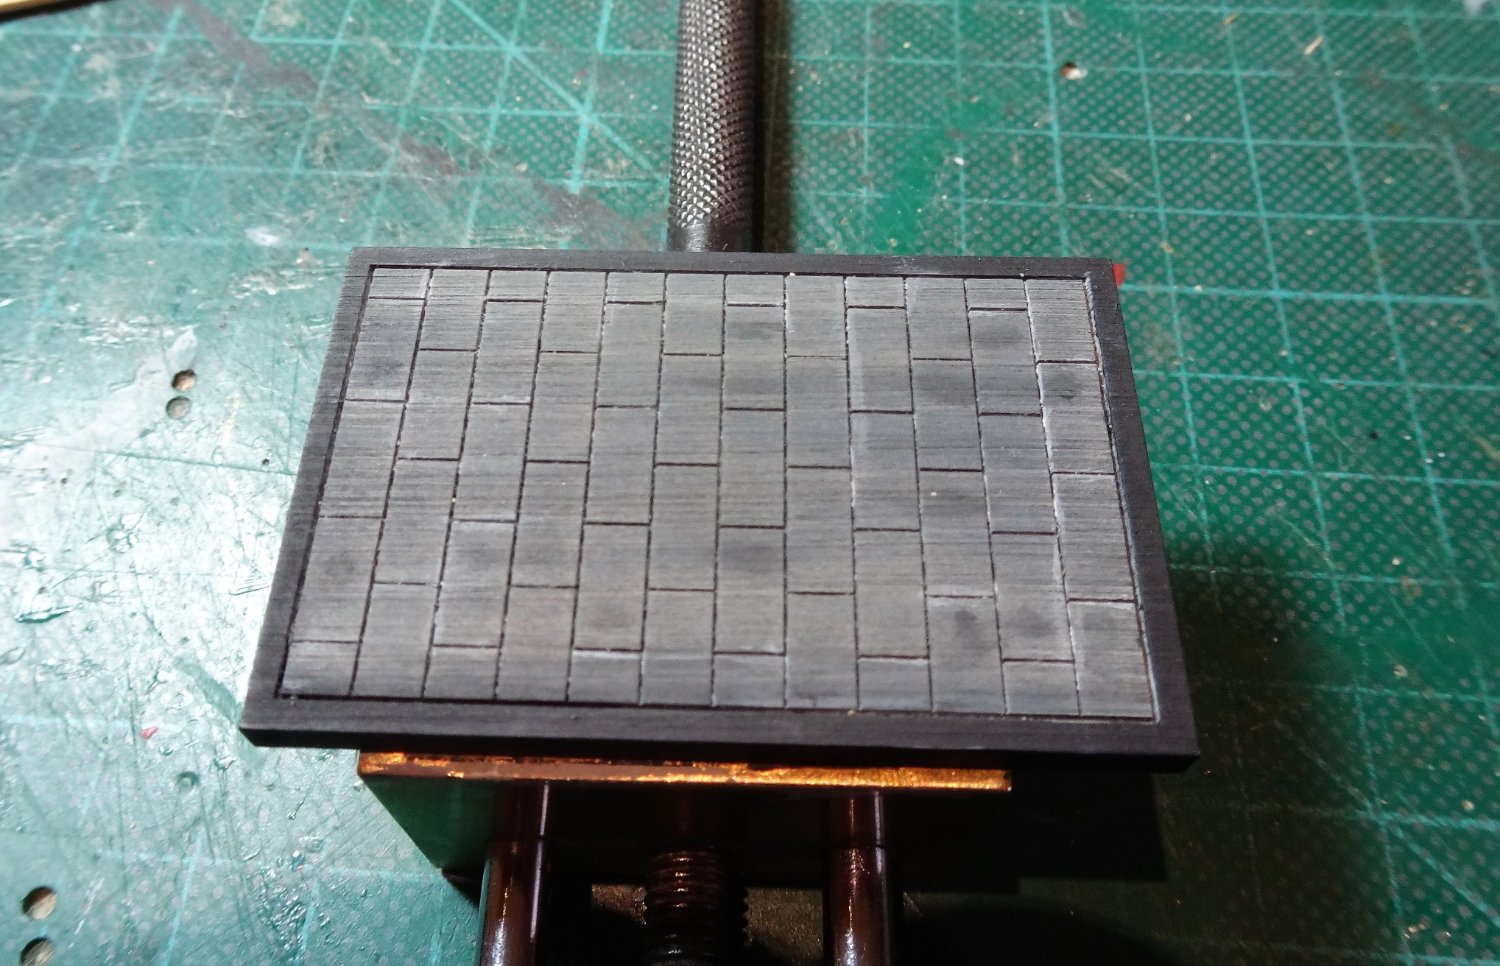
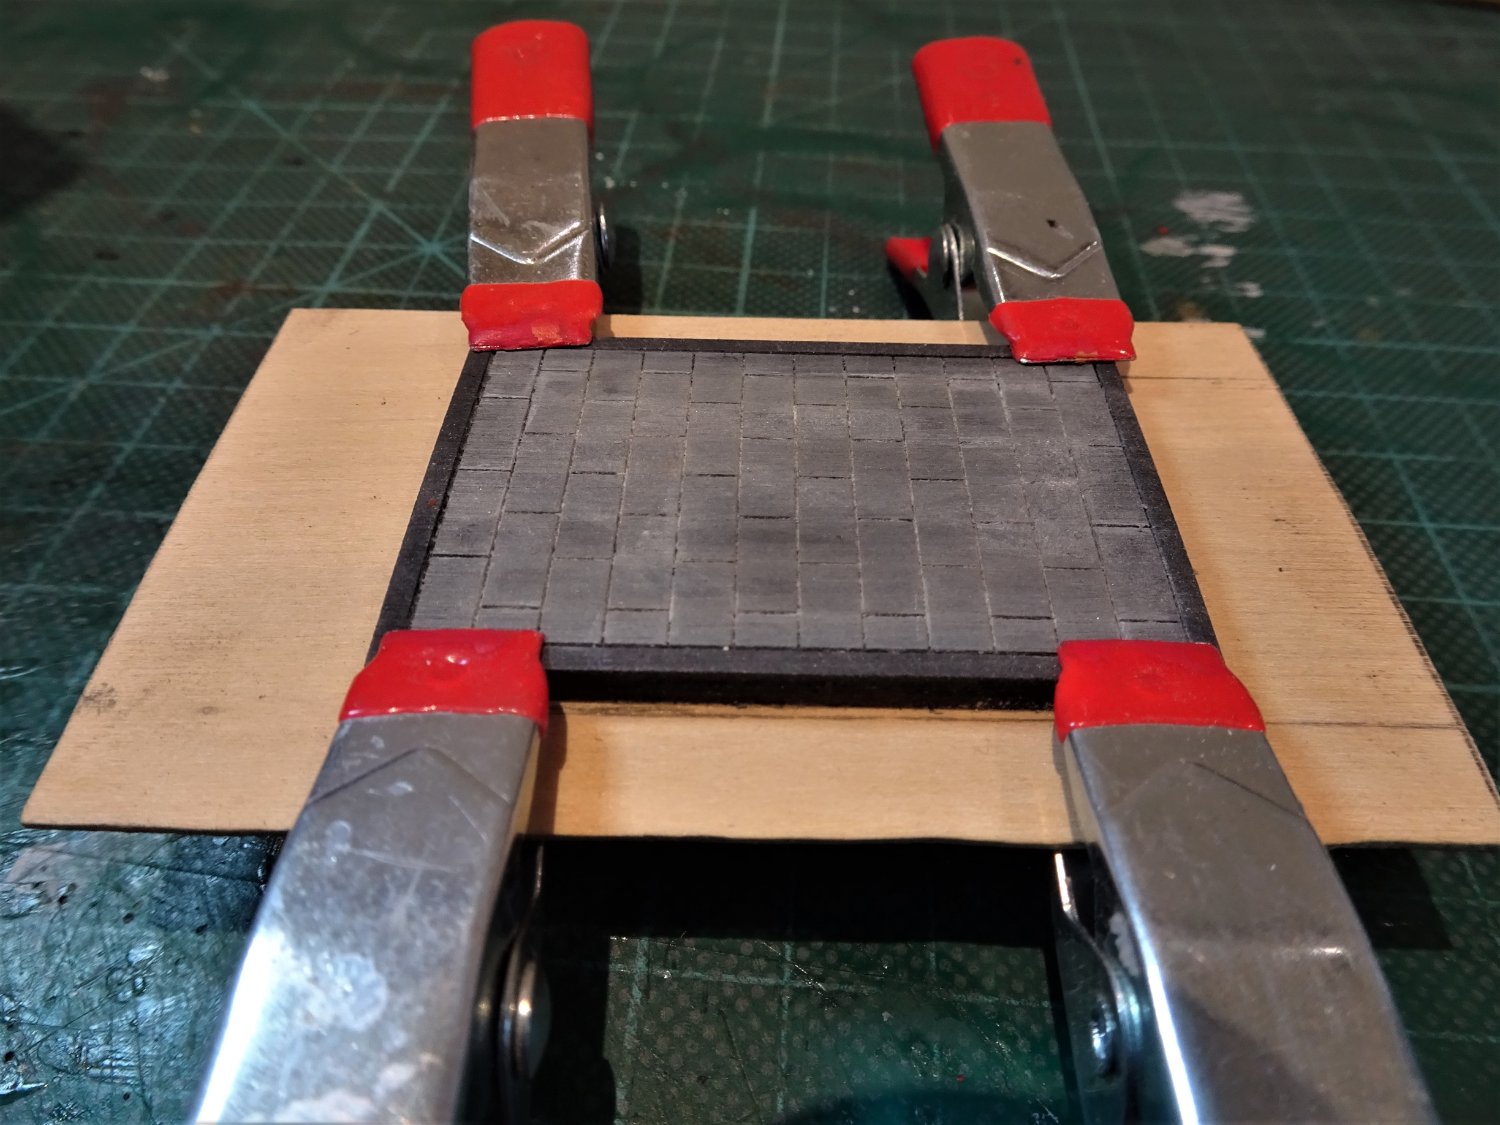
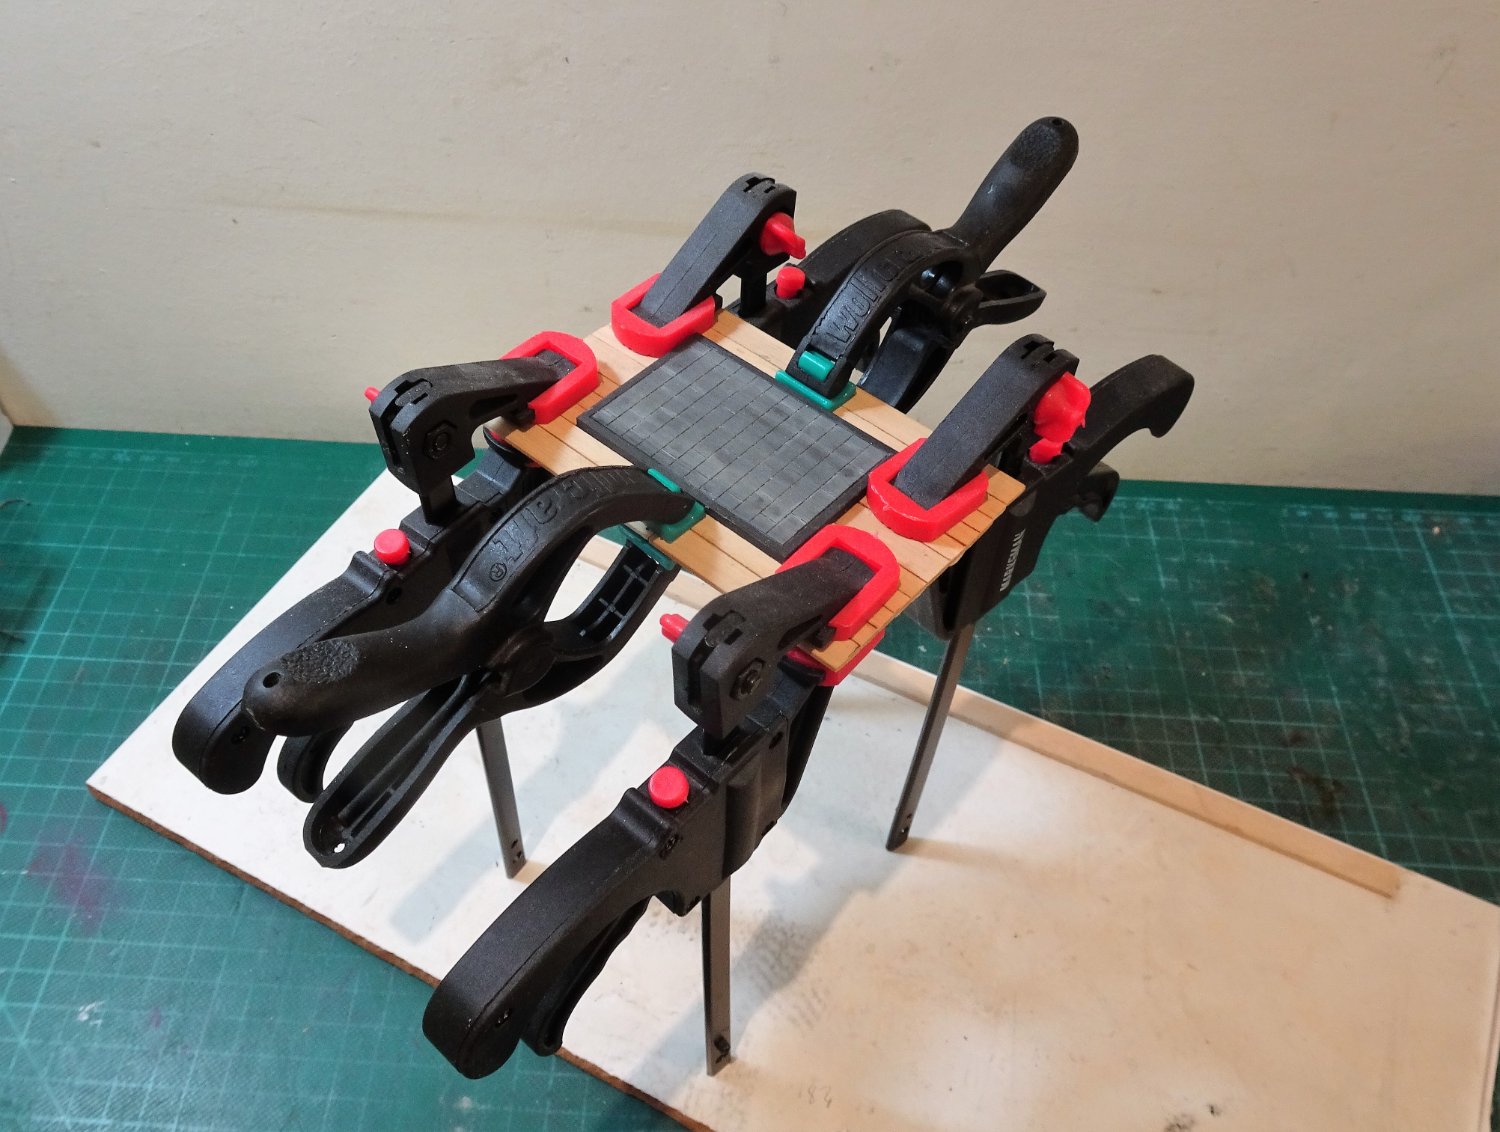
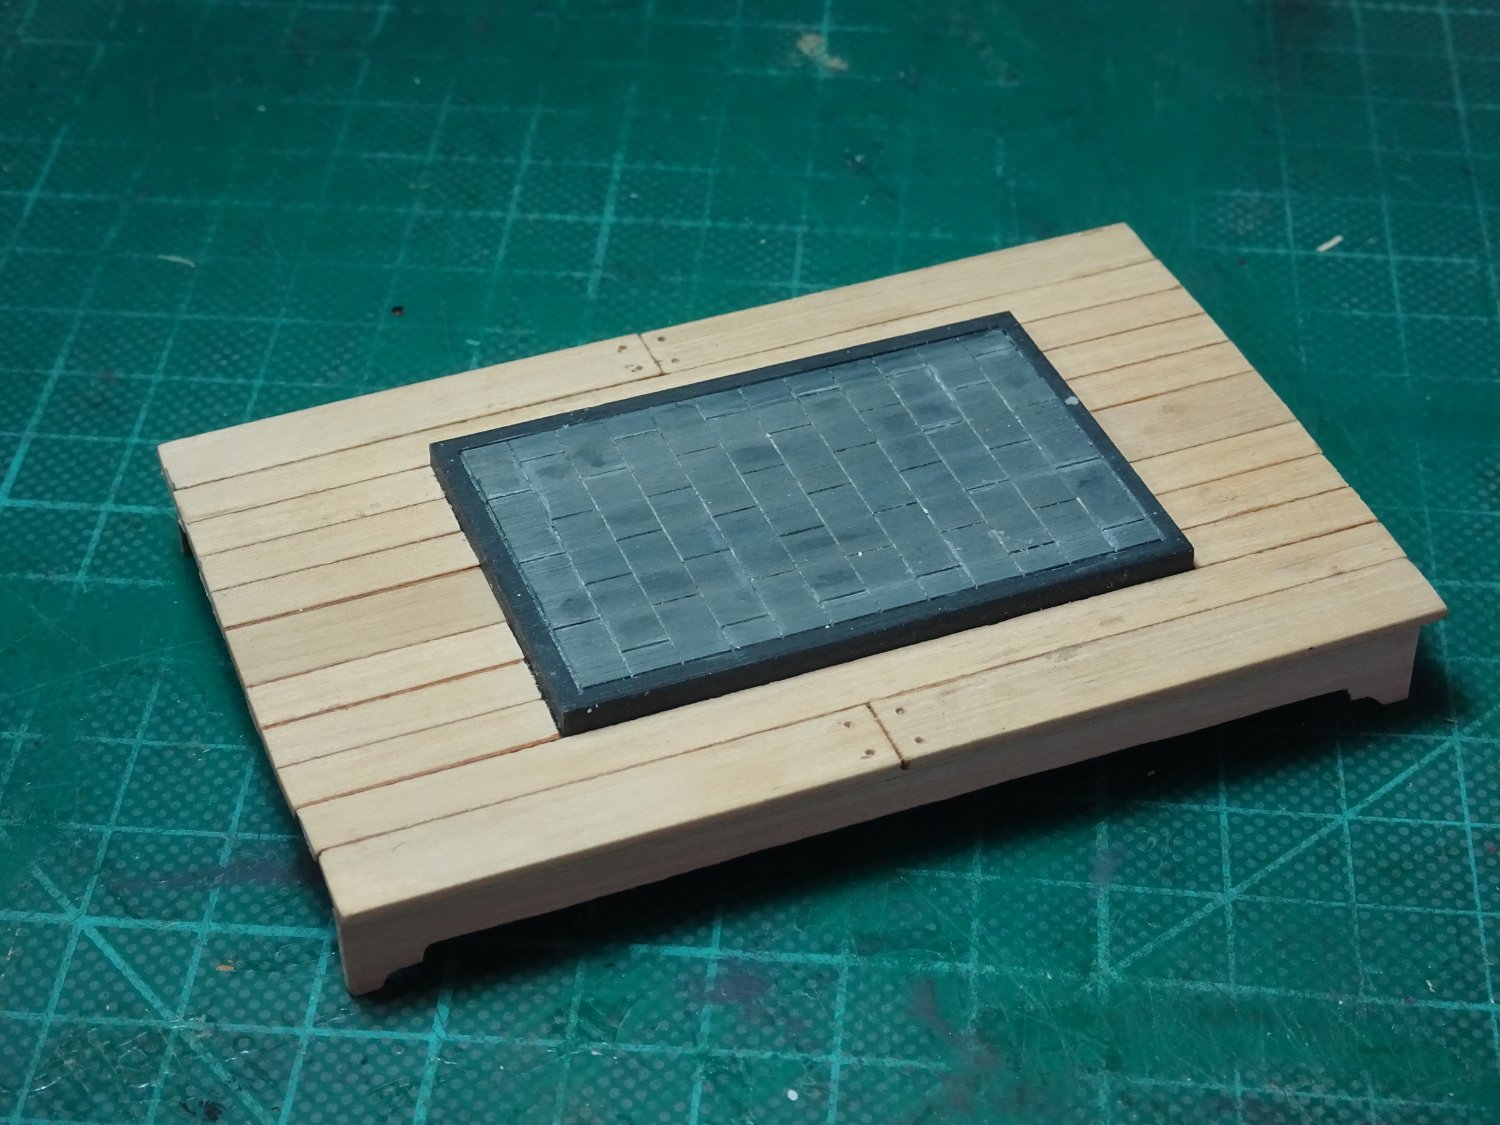
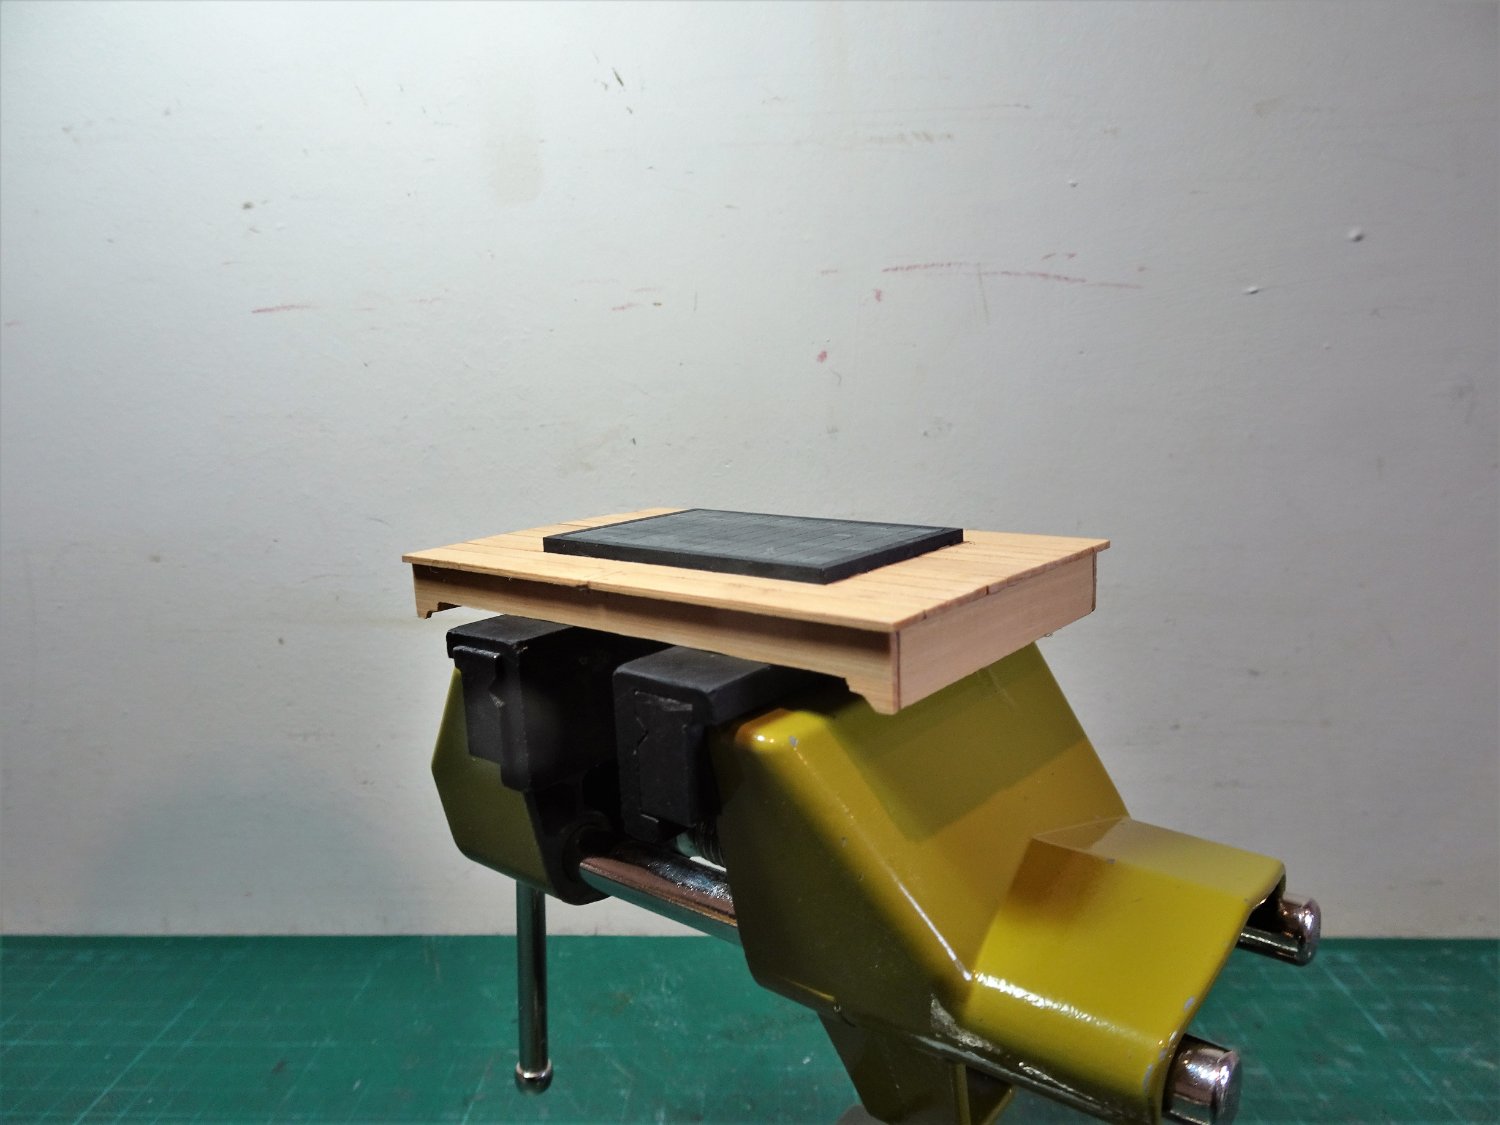
Thank you, Yves. Post Seven Making the display base. I utilised part of the kit display base but decided to put it on a deck setting. 9025 The brick design is washed over with Vallejo Black/grey. 9036 It is glued to a 1.3mm thick rectangle of Boxwood, which will then be planked also using Boxwood strip. 9039 The planked base is glued a thicker 3mm piece of Boxwood sheet to counter any risk of curl. 9051 The basic display base, work in progress. 9066 9068 The deck boards are finished with wipe-on-poly. 9082 9084 The ‘rust’ element on the stove has been toned down. Next time I will be looking at dressing the display. B.E. 29/10/2022


- 27 replies
-
- 11
-
-
-
- galley stove
- Syren Ship Model Company
- (and 1 more)
-
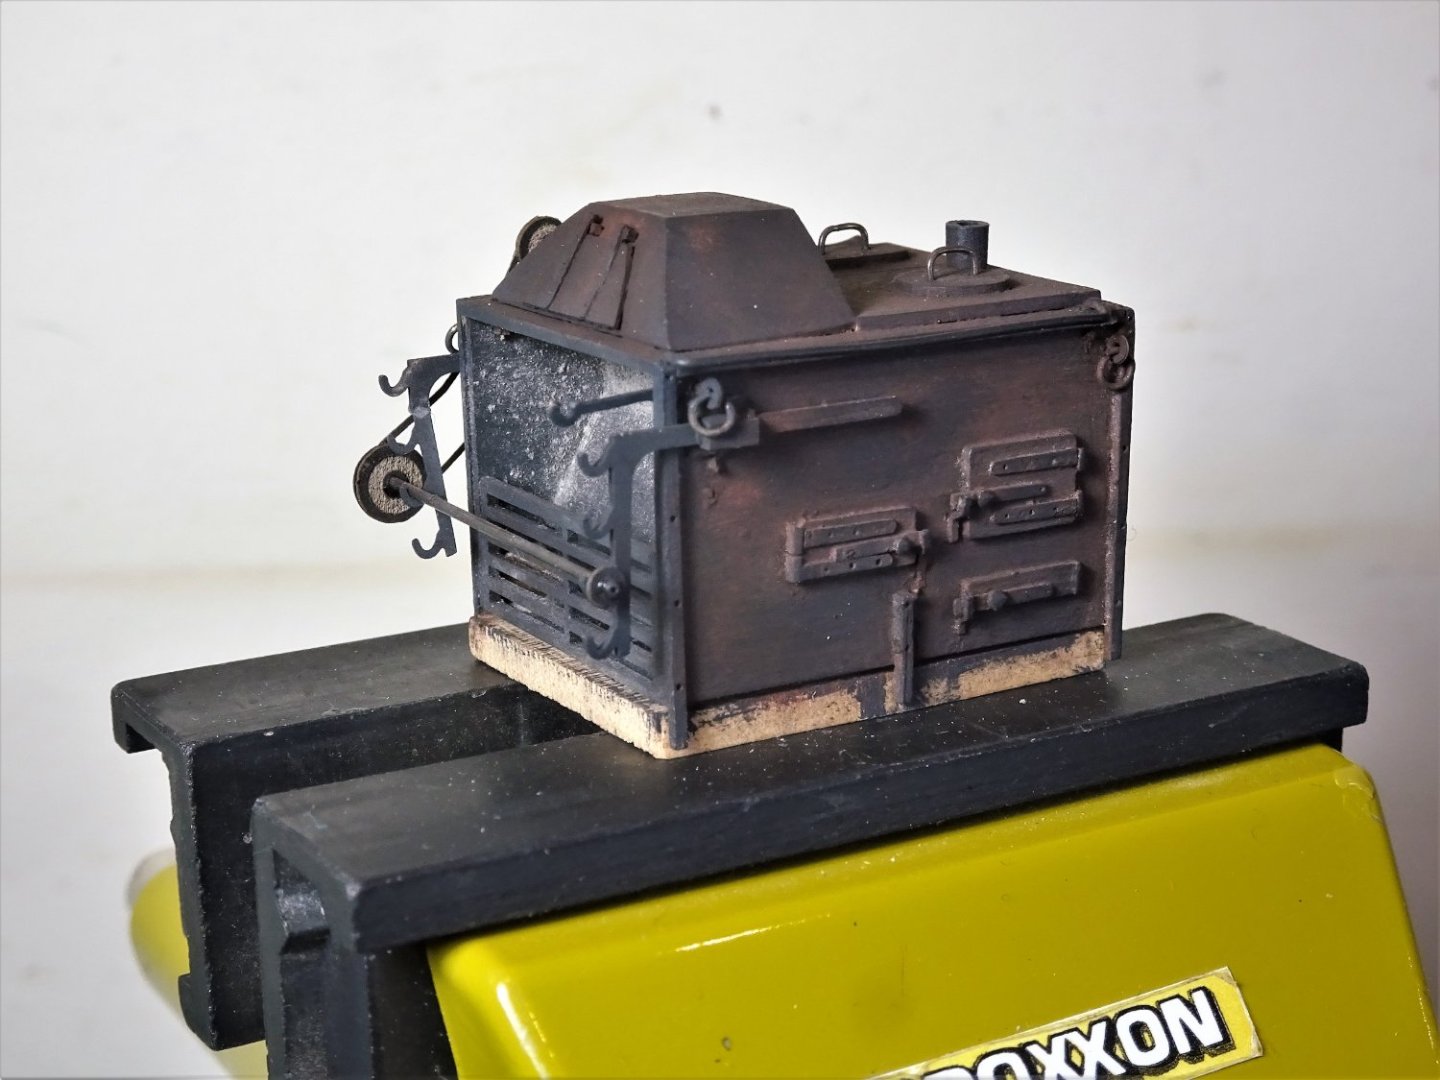
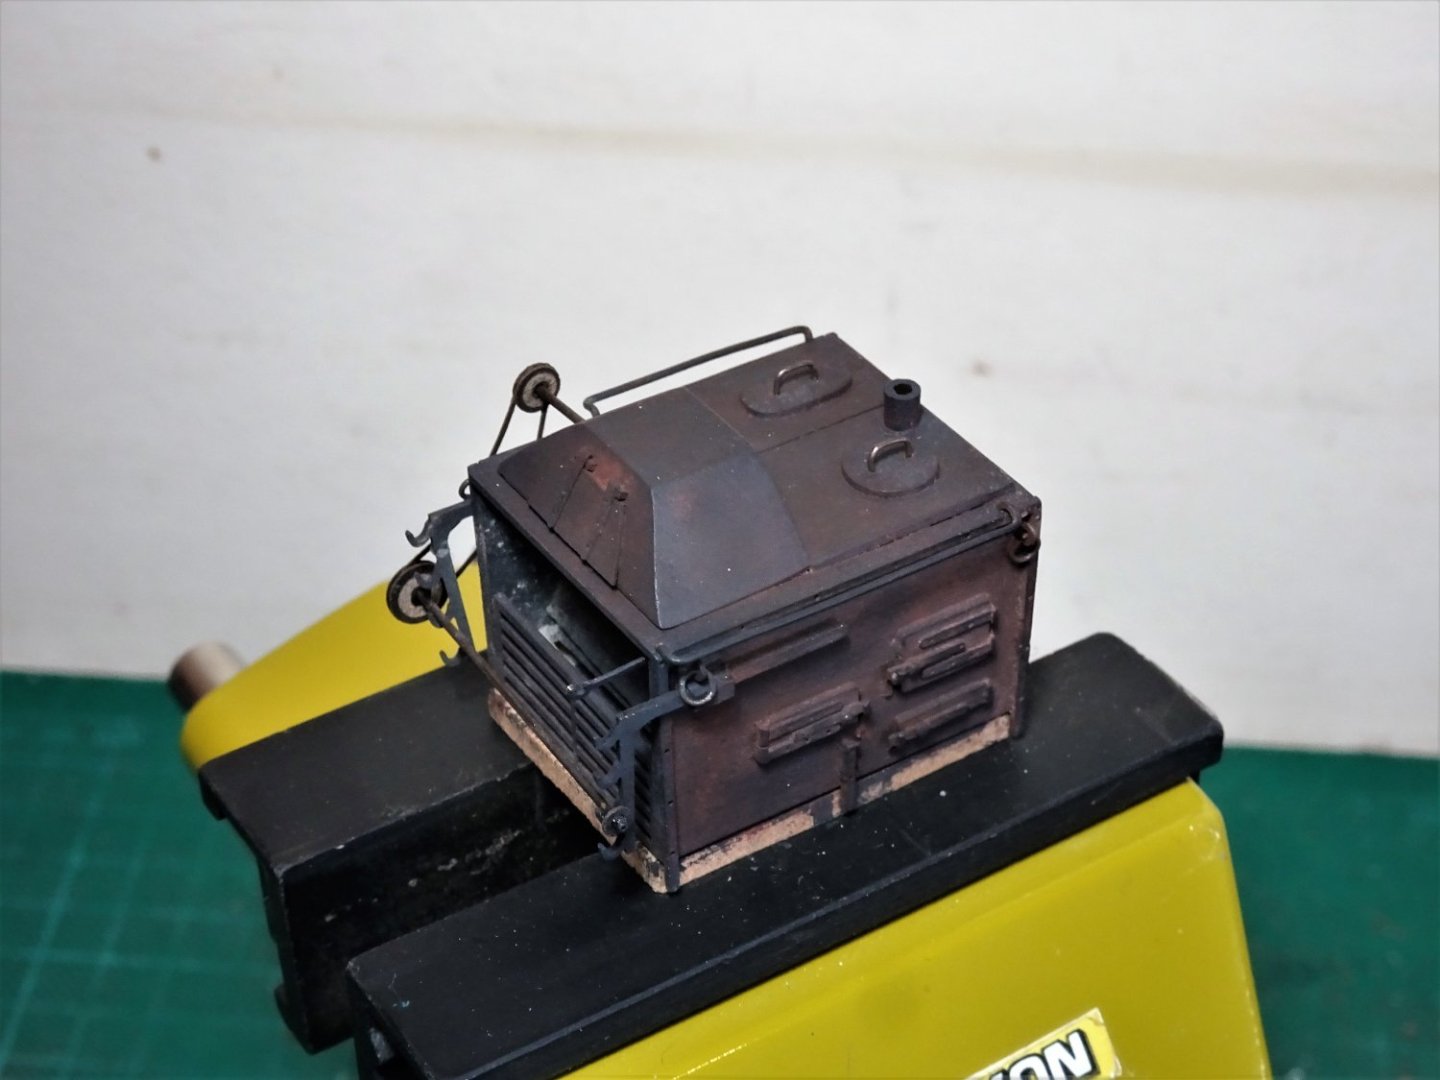
Thank you, Glenn. Post six Playing around with weathering powders is great fun, I used powders from two brands, Revell, and Vallejo. Revell - Dark brown, Rust red; Vallejo – Slate grey. 9048 9047 9046 9041 9057(2) I think I will tone down the rust a little, no self-respecting cook would be happy with the state of that stove. I do like the ash effect in the grate tho’. The beauty of weathering powders is that they can be endlessly tweaked at least until interest or patience wanes. Moving on to the display base preparation. B.E. 28/10/2022

.thumb.JPG.67b01e8efbbc9711ae0b825b9180adac.JPG)
- 27 replies
-
- 10
-
-
-
- galley stove
- Syren Ship Model Company
- (and 1 more)
-
Thank you, Rusty and Yves, I'm enjoying this little fill-in project, having fun playing around with the weathering powders. I'm thinking mini dio for the presentation. Cheers, B.E.
- 27 replies
-
- 2
-
-
- galley stove
- Syren Ship Model Company
- (and 1 more)
-
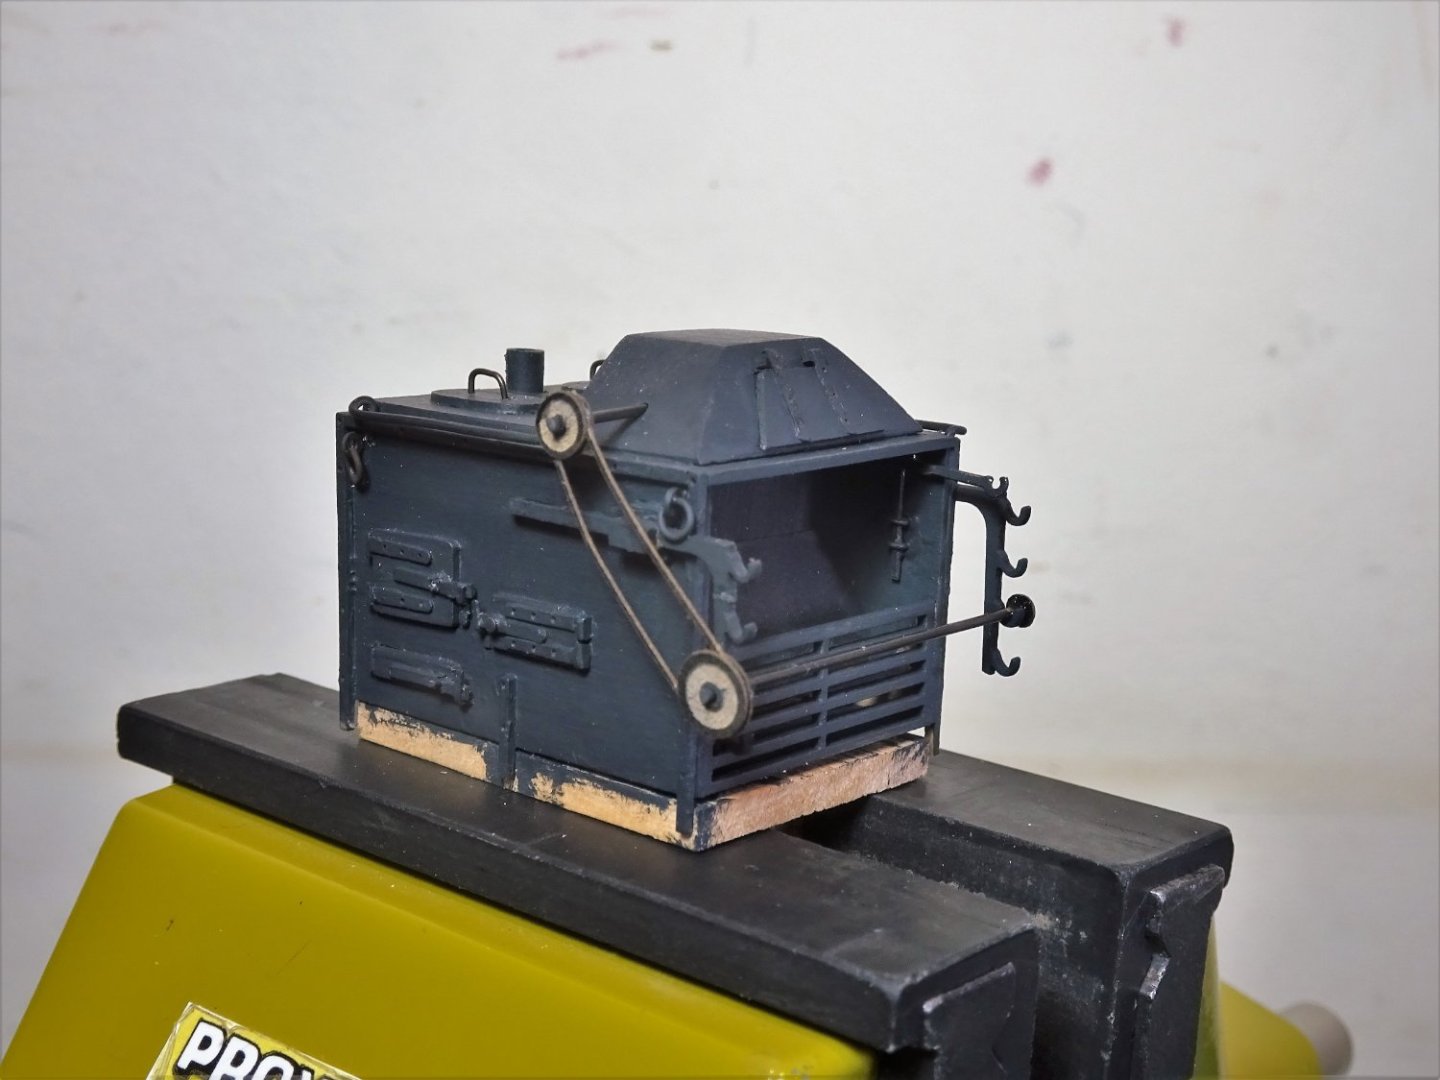
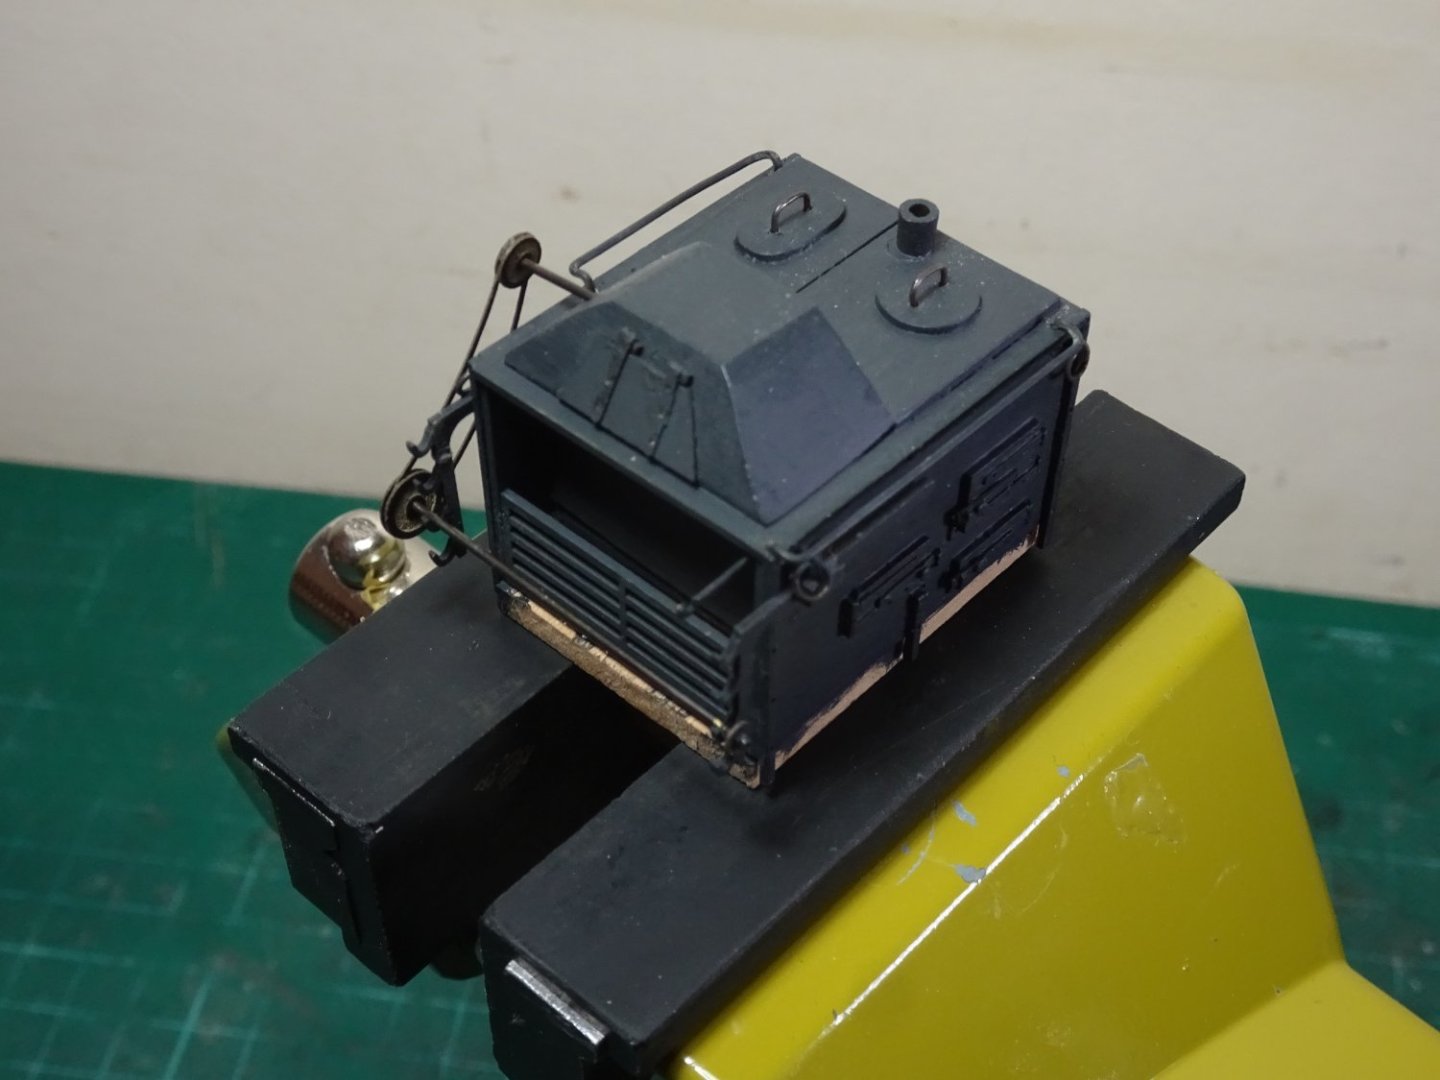
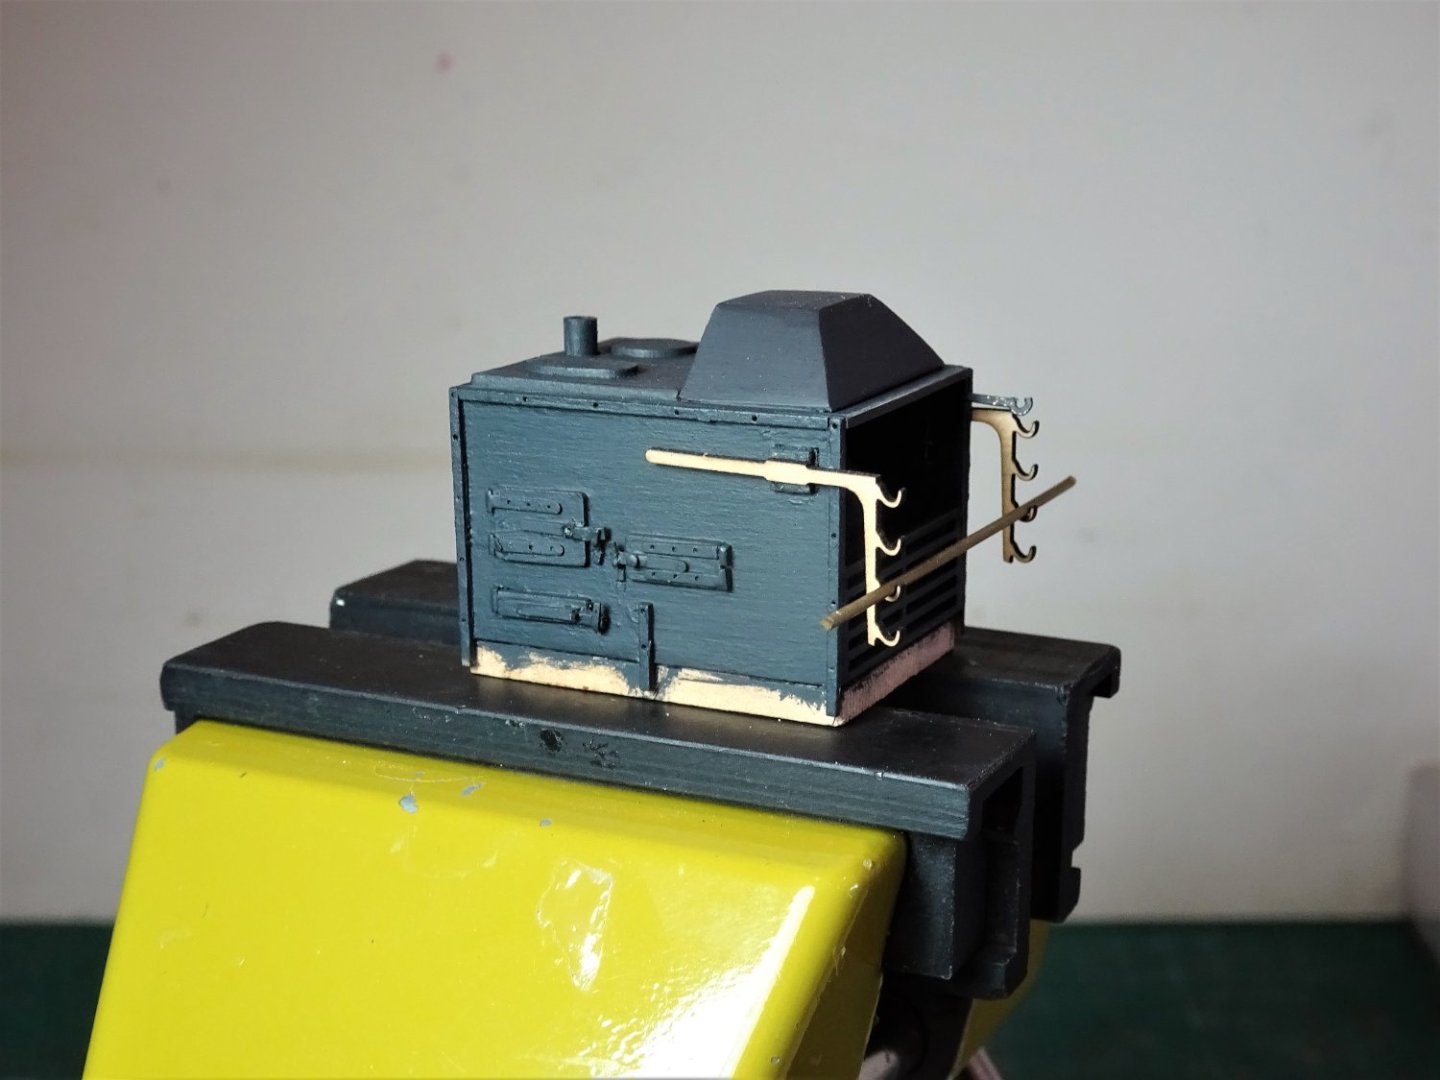
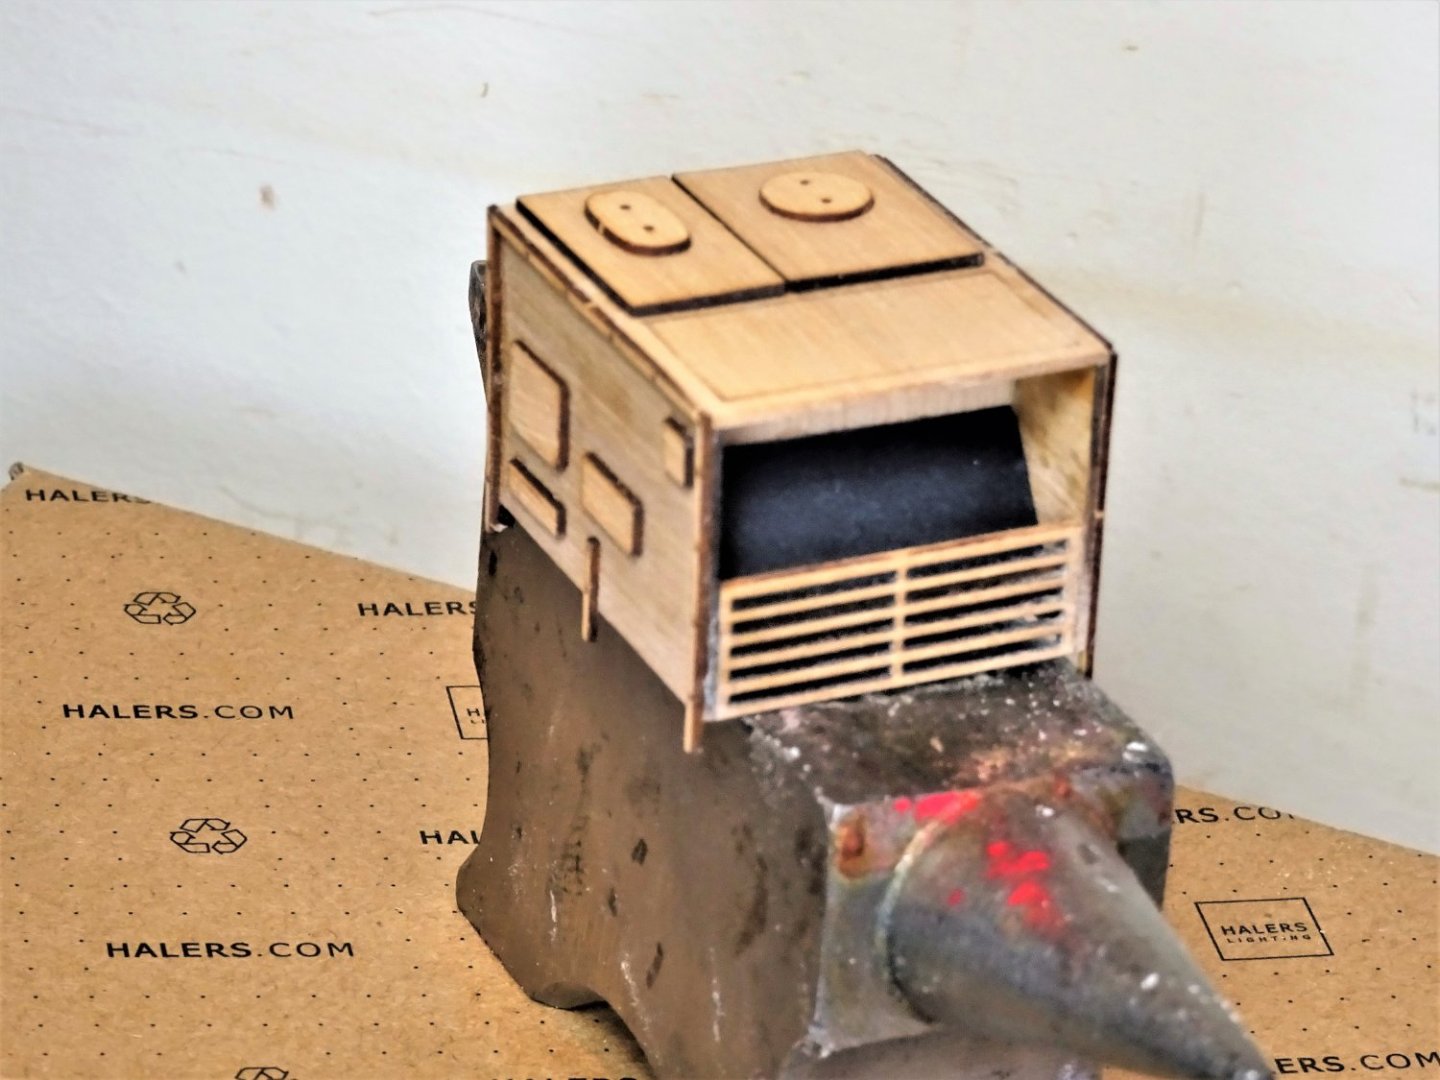
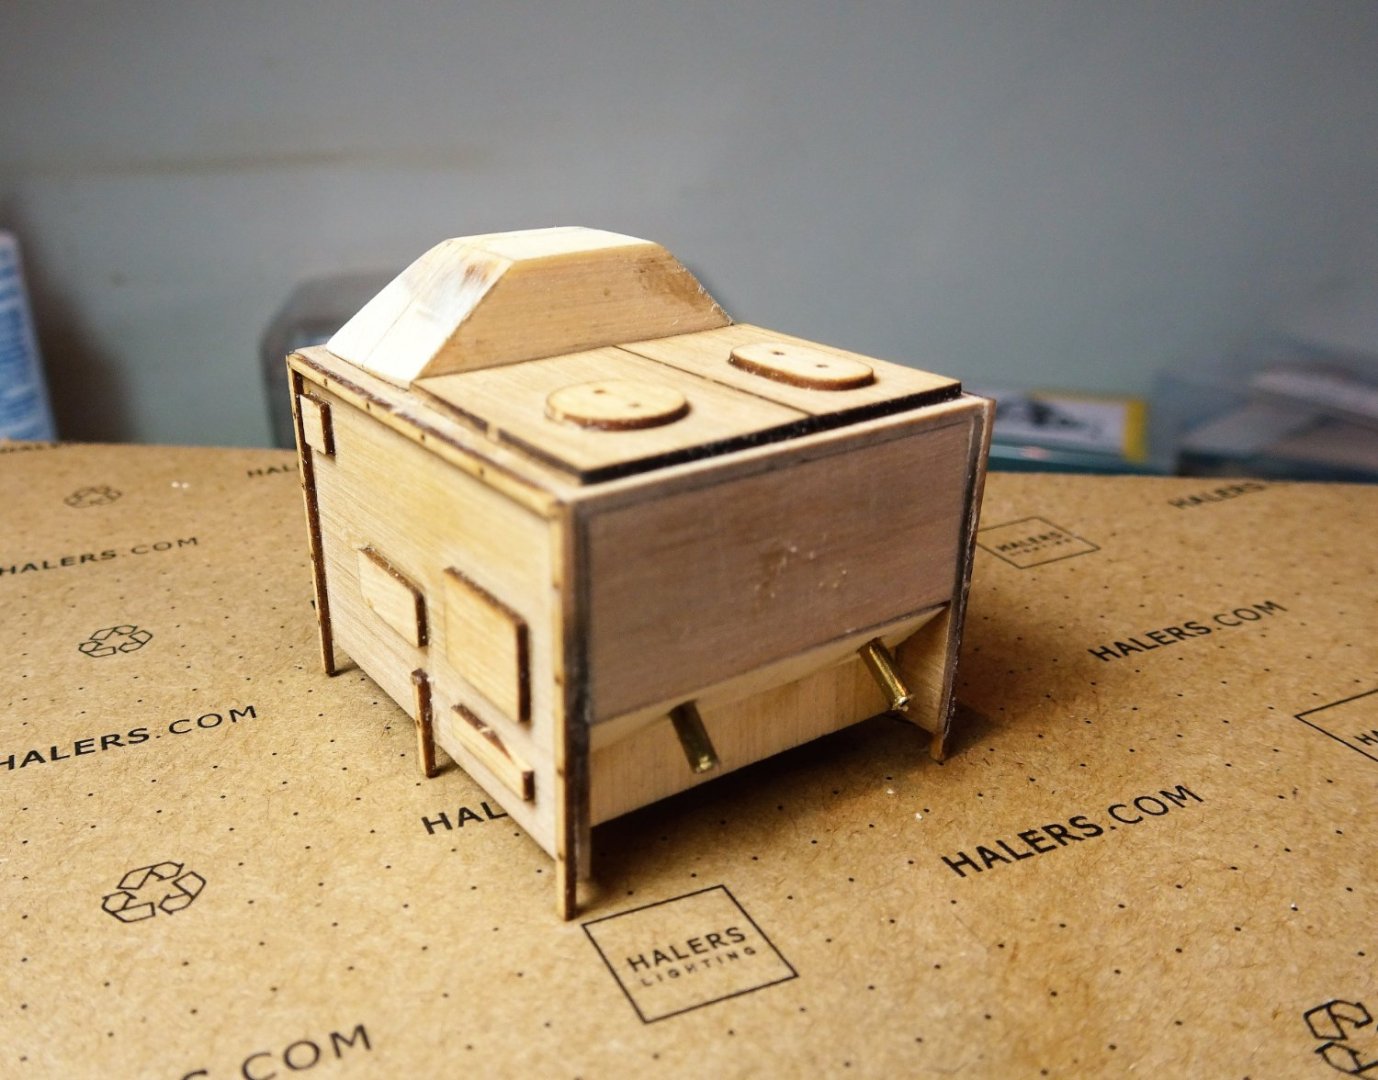
Post Five Work continues to add detail that wouldn’t be clearly visible on a stove installed on a model. 9020 Lifting rings, top rails, and pot lid handles, are prepared. 9023 The access hatch to the lower chimney/flue is added. 9035 9034 9029 9028 With the basic structure now complete I move onto the weathering, and hopefully turn wood into iron. B.E. 27/10/2022


- 27 replies
-
- 14
-
-
-
- galley stove
- Syren Ship Model Company
- (and 1 more)
-
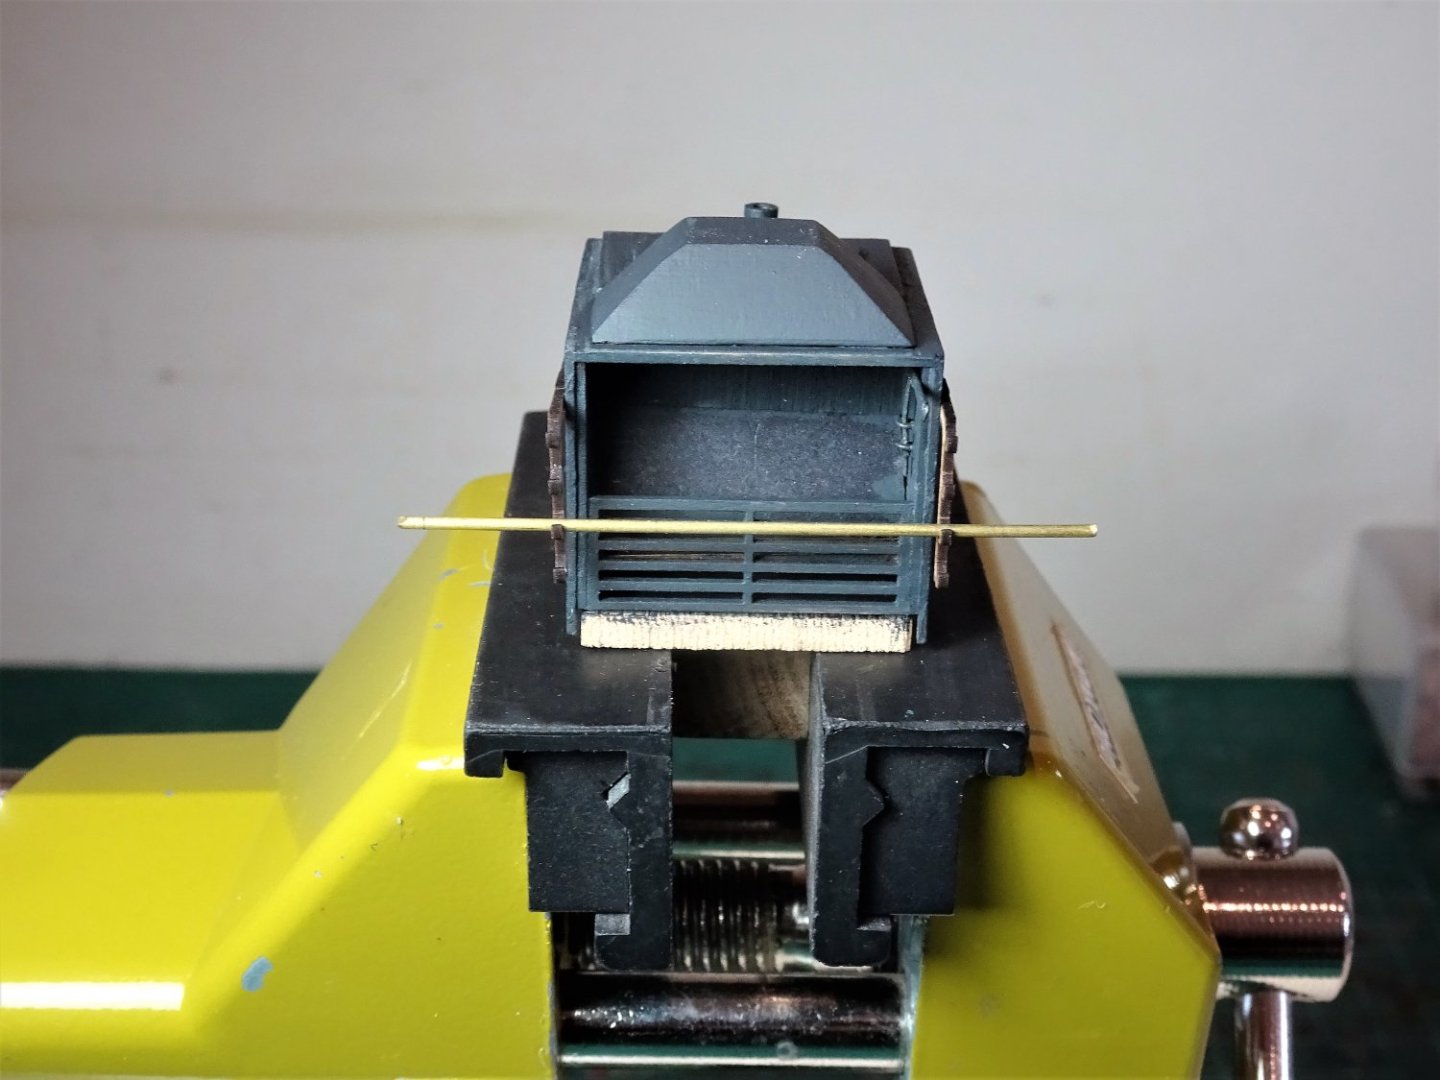
Post Four The Spit support cranes are delicate pieces that require gentle handling. Laser cut from wood they are susceptible to breaking of the spit iron support cradles. 9000(2) Fortunately, a couple of spares are provided. 8999 Having secured one crane, the second is tweaked to ensure the spit is horizontal before the pva sets. (A further tweak is evidently required) 9002 That’s better! 9001 From this point on care is required not to catch the spit cranes as they will surely snap off. The next stage is to fit the pulley mechanism for the spit. 9010(2) These are laser cut assemblies supplied in three different sizes to suit individual builds. These are also delicate fittings requiring soft handling to avoid breakage. 9006 Fitting the spit assembly is a tricky business. The stove does need to be securely held, and the spit iron held in place whilst the upper spindle position is marked. 9013 Once in place I secured the non-pulley end with a spot of ca beneath the iron. 9016 9019 Detailing will continue in the next post. B.E. 26/10/2022
.thumb.JPG.e7cb0d45e0e9fd8b3e40ca54858a196b.JPG)

.thumb.JPG.e8beecfdb0b1d2dc2500b7966783f521.JPG)


- 27 replies
-
- 10
-
-
-
- galley stove
- Syren Ship Model Company
- (and 1 more)
-
I have sympathy with your view Derek, the kit is likely to have a hefty price tag £1000 + and the kit looks to be ideal for a Navy board style where a lot of the stuff won't be needed. I have a hefty stack of stuff left over from my Sphinx build, but of course the overall price was lower. B.E.
-
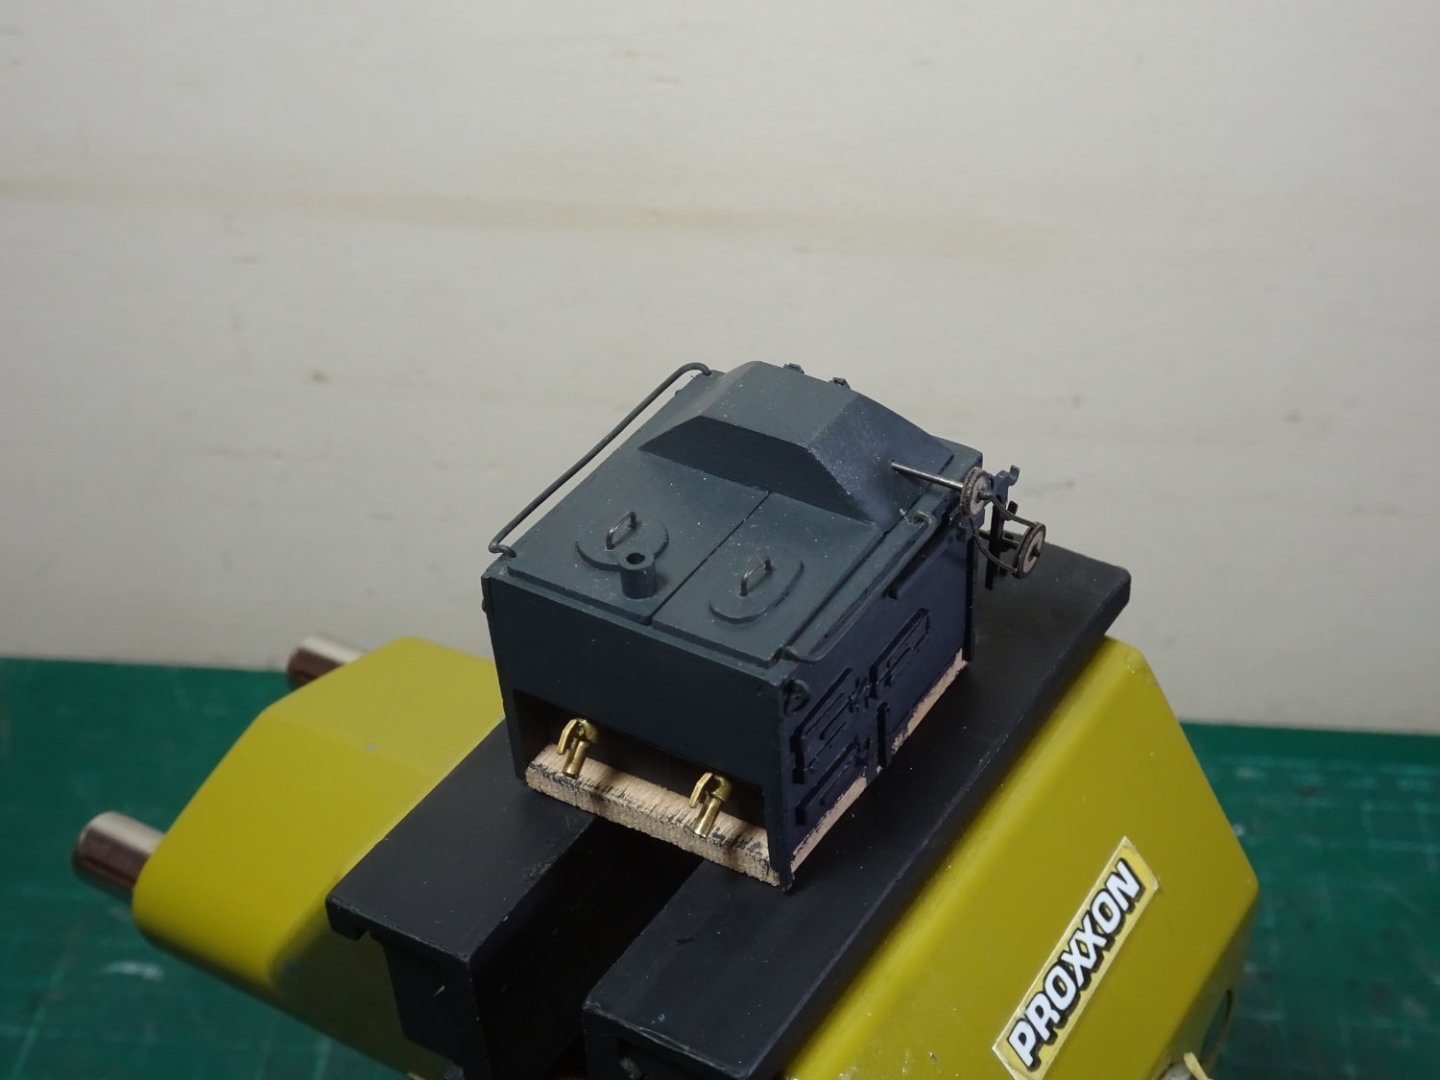
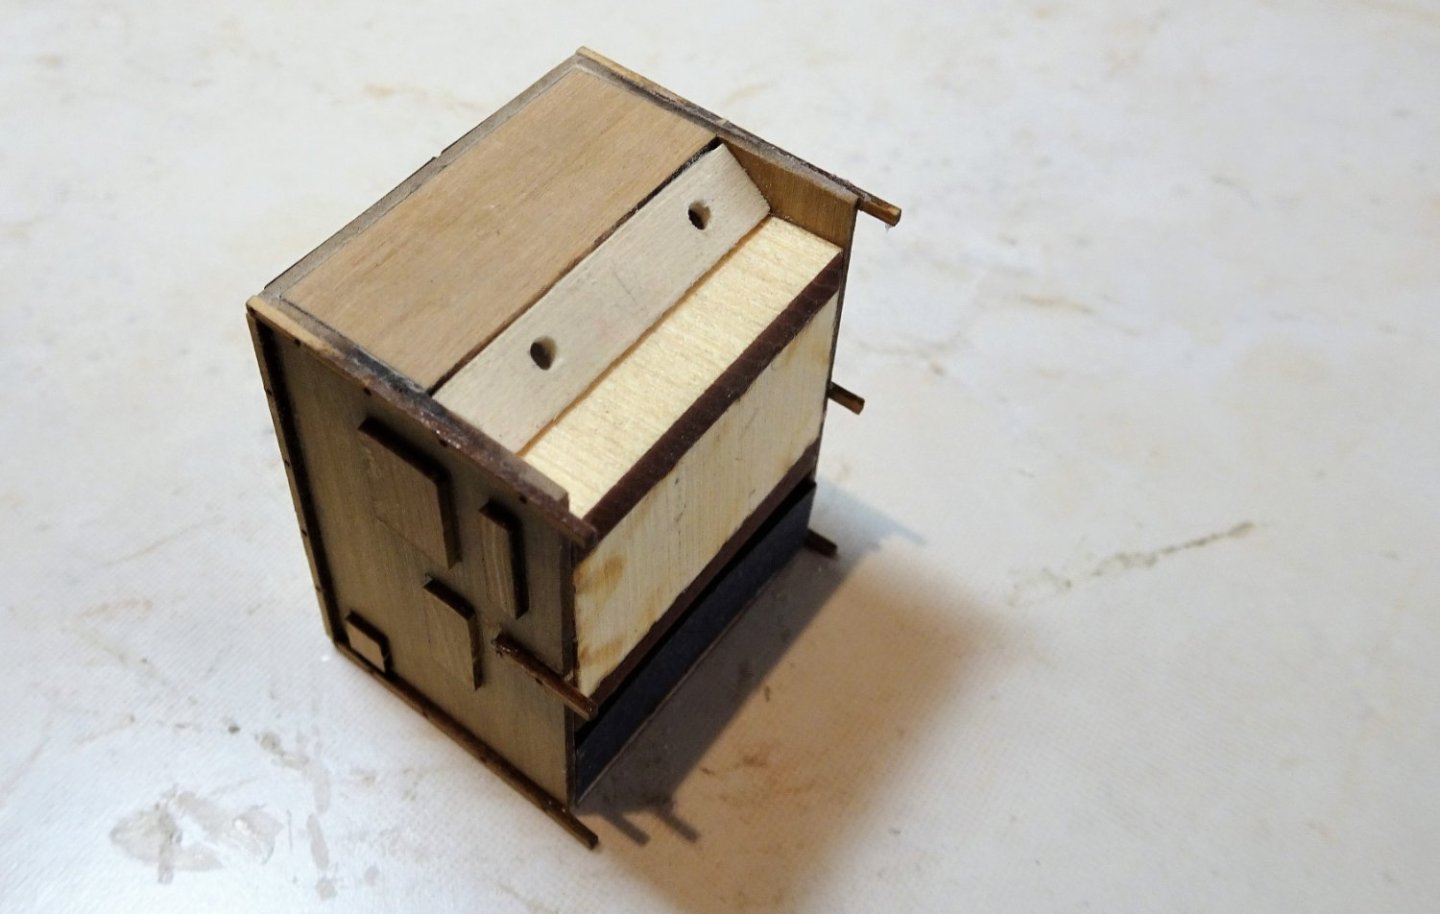
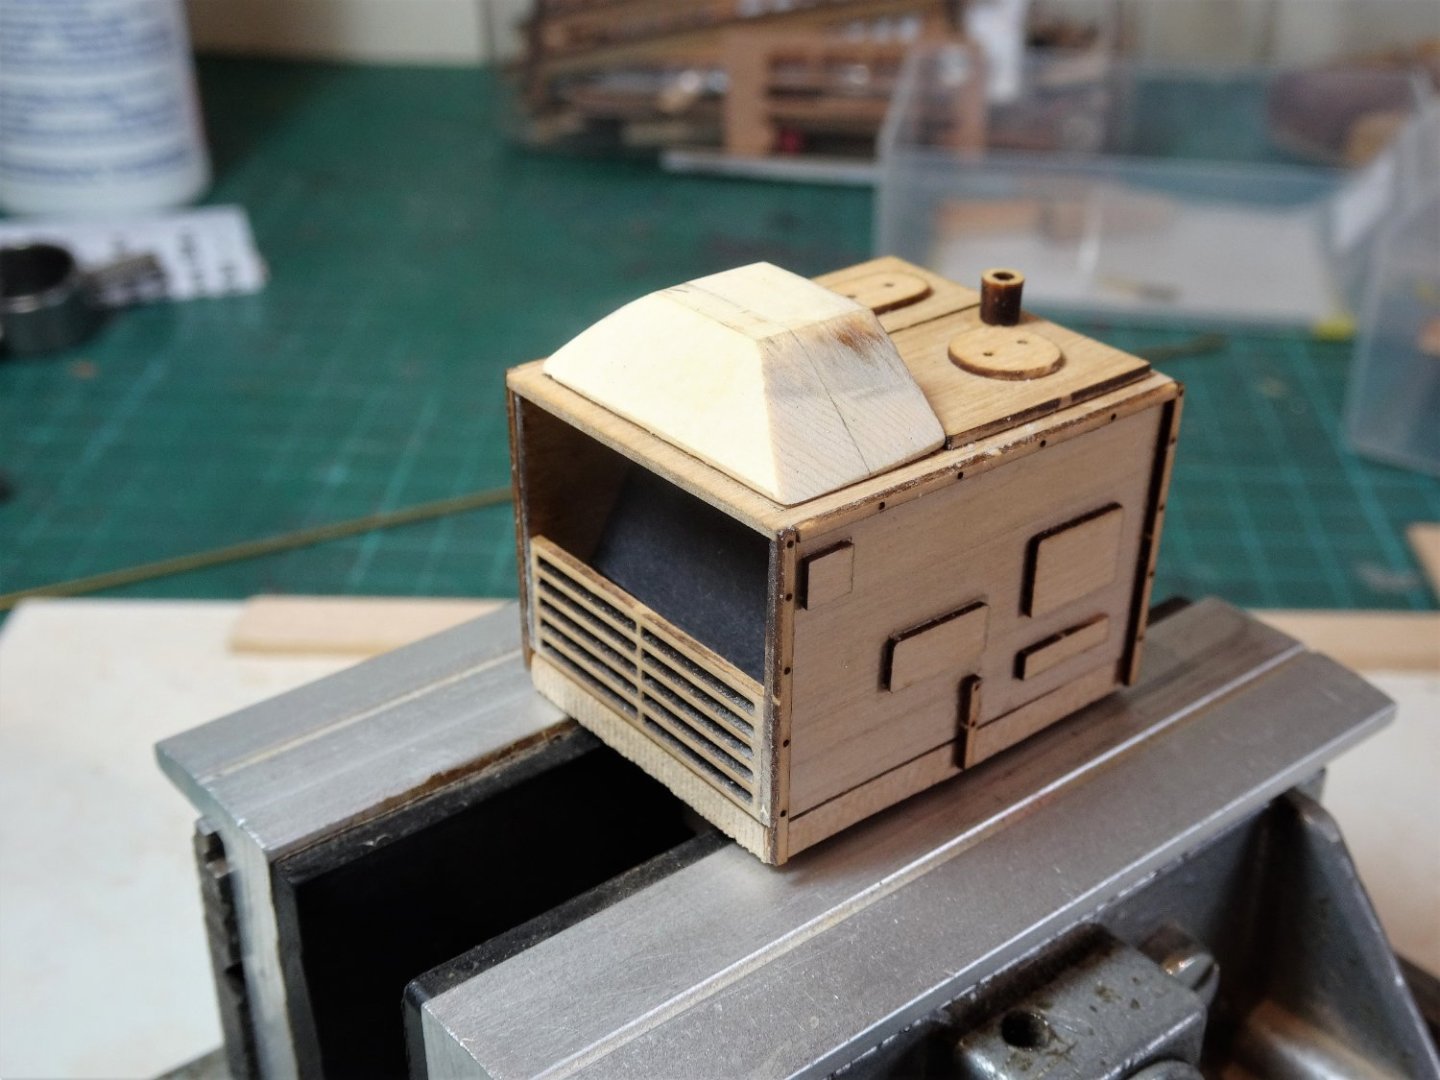
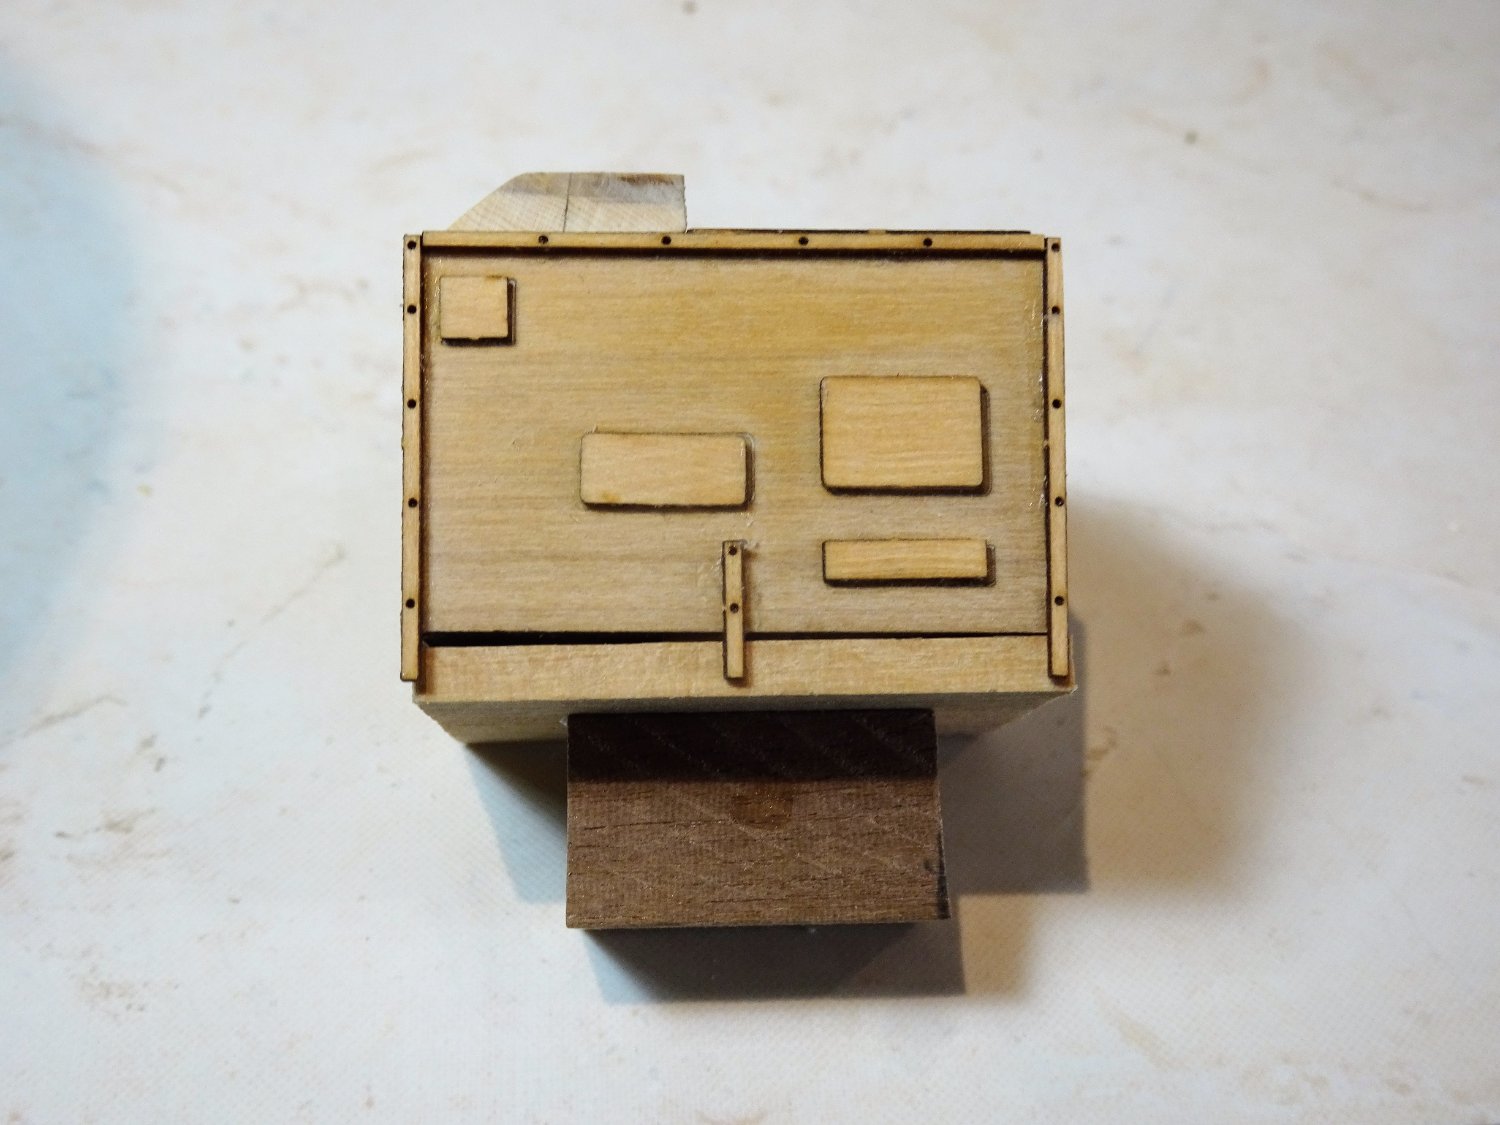
Post Three The next task is to detail the oven doors. Laserboard straps are provided to represent the door furniture, but these can be enhanced a little by adding hinge and latch representations. 8982 Pieces of styrene strip are used for the purpose, sanded to shape post fitting. One of the trickiest fittings to make is the hinged pot arm which sits inside the open fire grate. 8991(2) Would have been much easier to fit this before completing the open grate. 8981 8988(2) The brass drain cocks for the two boilers have now been completed. Two coats of paint have been applied; I am using Vallejo acrylic Black Grey for the paintwork. I think this gives a better scale colour than full black. From around nine inches it doesn’t look too bad at this stage, but the macro eye tells another story. It will need more attention before I move onto the next stage. B.E. 24/10/2022

.thumb.JPG.a517083b3882dce57ec9fd47527d0c53.JPG)
.thumb.JPG.b72e06ab862709ff1eddd5bd4284837f.JPG)
- 27 replies
-
- 15
-
-
-
- galley stove
- Syren Ship Model Company
- (and 1 more)
-
Post two The basic assembly is fairly straightforward, just need to ensure that all the parts are properly aligned. The trickiest build areas for me were assembly of the chimney (the narrow sides need to go inside the wider sides) and the forward end of the hood has an aft slope which needs to be sharply cut to reflect a ‘metal’ appearance. 8948 The hood slope angle was taken from the plan, marked on the piece, pared down using a scalpel blade, and sanded to finish. 8951 I may yet change the configuration of the chimney. The first modification is to add the fire grate. 8958 Conveniently provided by a section of the kit fret. This is fitted from below. A piece of black card will be used to make the ash tray that sits below the grates, not that this will be seen. 8953 Black card is also used to form the back plate to the open hearth. 8962 The aft end of the stove is modified to give a more realistic impression of the boiler drain cocks. 8963 Brass cocks, yet to be fitted with the valves. 8966 At this point I have used double sided taped to secure a small square of wood to the base of the stove, primarily to protect the delicate legs from damage. A small block also provides a convenient grip to hold the stove during painting and working. 8967 The hood has been attached to the stove body along with the connector for the still. Now glued into place, final fettlin' will be applied to the Hood. A little cleaning up and it will be ready for a first coat of black paint. B.E. 23/10/2022


- 27 replies
-
- 11
-
-
- galley stove
- Syren Ship Model Company
- (and 1 more)
-
Thankyou Yves, Your Bellona stove is nicely detailed, and at least you have the photos to show it is there, now hidden below decks. I like the detailed boiler drain cocks, something I have to replicate on the Syren version. The Sphinx version is a combination of a wooden core with brass etched facings, and had Vanguard done a 1:48 scale version I would have bought it. The Syren stove is nicely designed, as are all of their products, and it does provide scope for detailing which always piques my interest in a build. I am looking forward to turning wood into iron, or at least trying to. Regards, B.E.
- 27 replies
-
- 2
-
-
- galley stove
- Syren Ship Model Company
- (and 1 more)
-
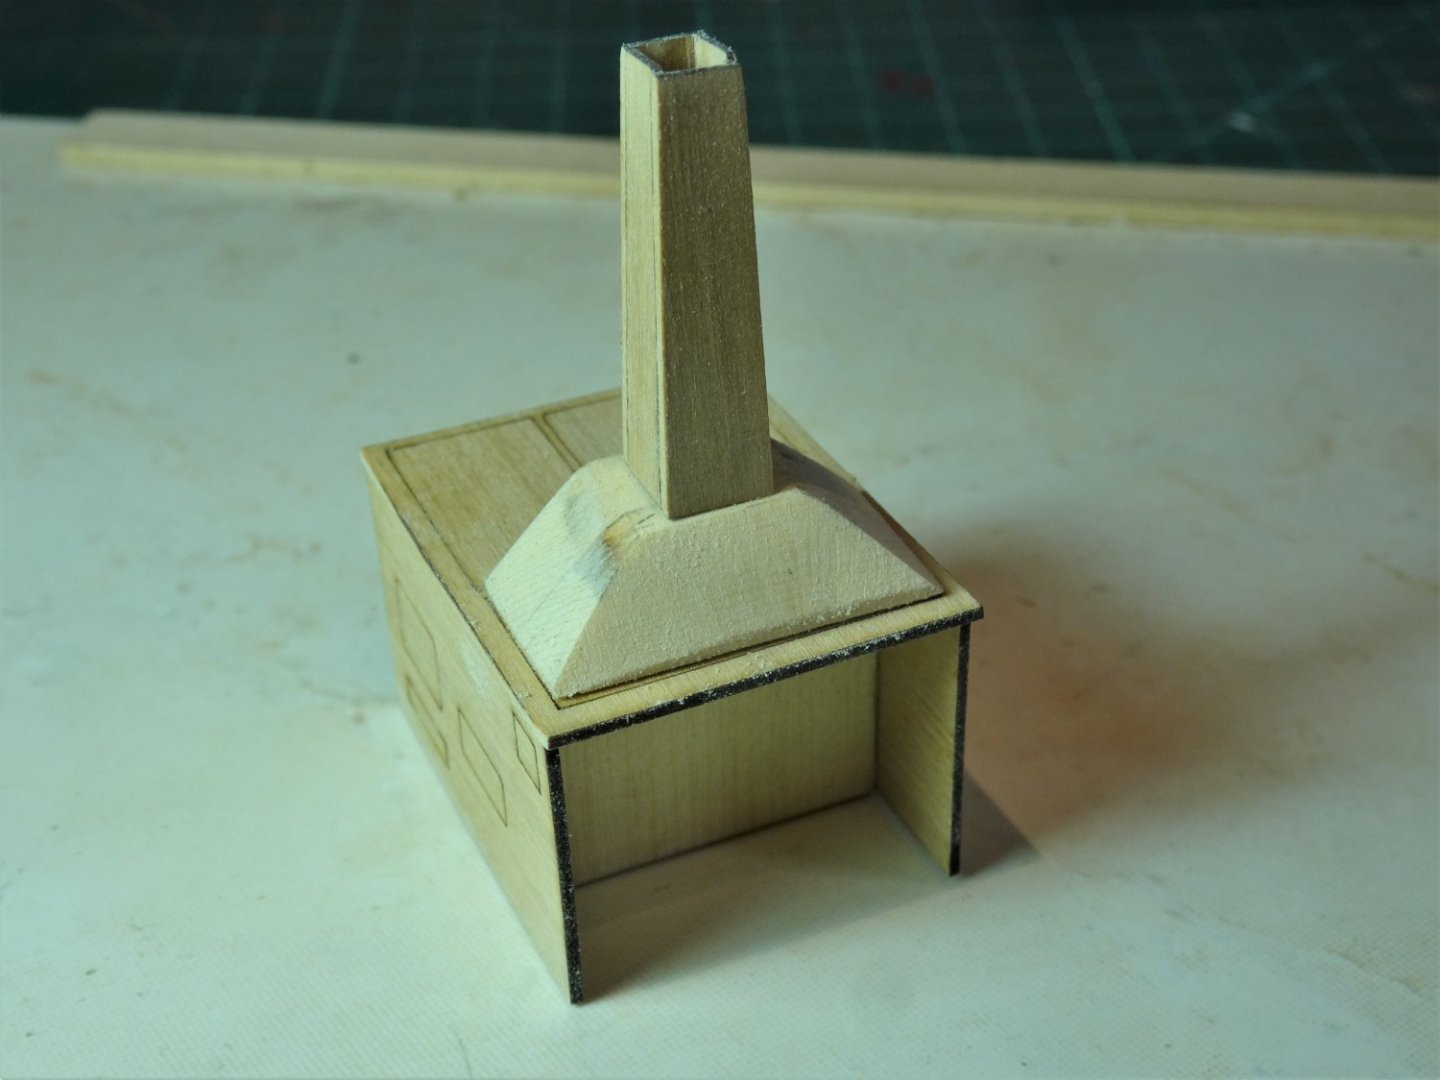
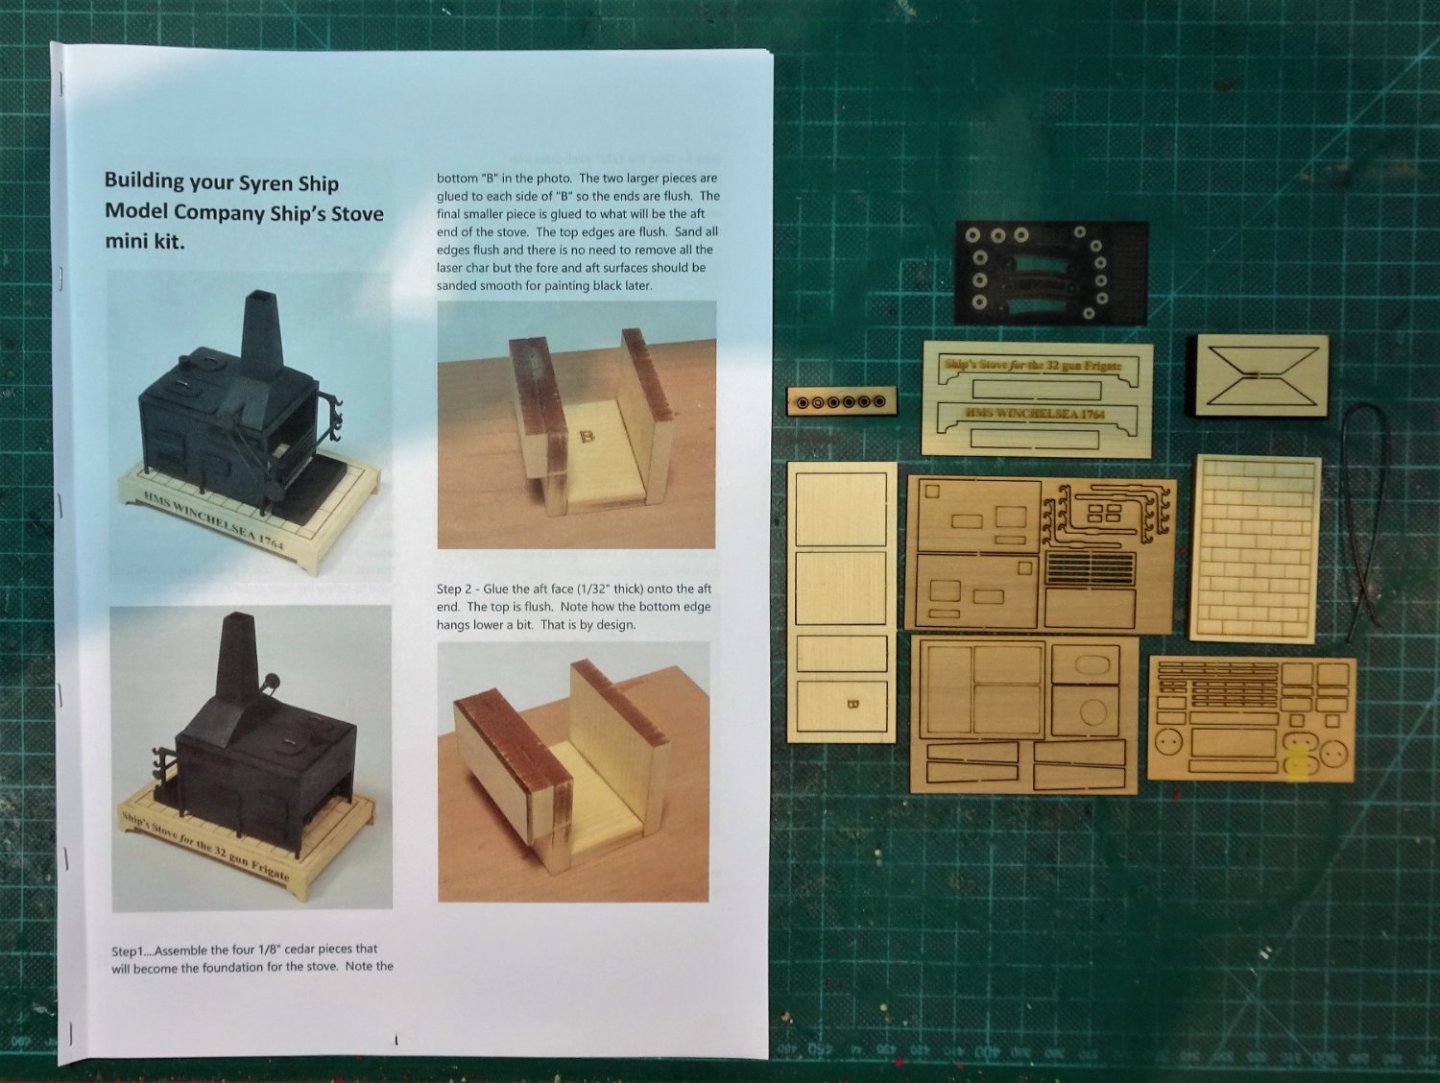
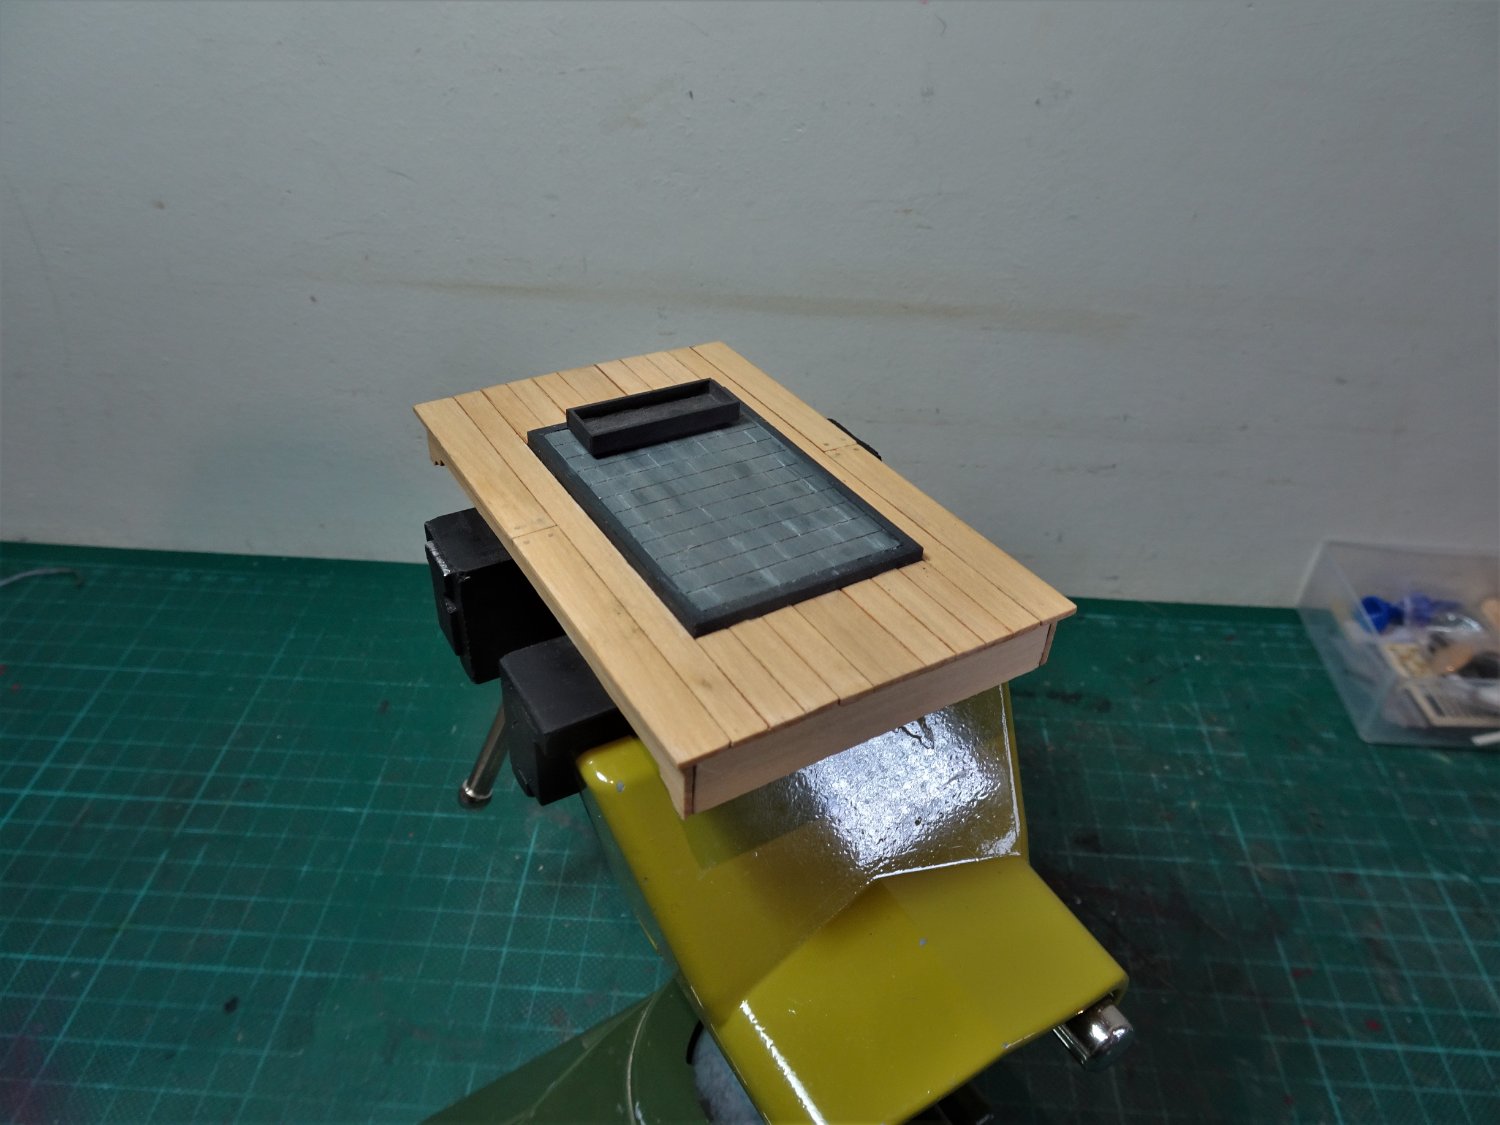
8818 This is a rare sight in my office and not one that can stand for long. When I started Sphinx I had the idea of including in the display case a larger model of the Galley Stove. I did the same with the Double Capstan, where I had previously made the 1:48 scale Syren model (ex-Winchelsea) There is a very nice stove included with the Sphinx kit. 6240 6226(2) but of course, it is largely hidden beneath the Foc’sle deck. For this display stove I am again using a 1:48 scale kit from Syren also ex Winchelsea. This is an all-wooden kit, no brass etch involved, and the main challenge will be turning wood into iron using weathering powders. So, the trick is to turn this…. 8814 … into this Chuck’s stove If I can achieve a finish close to that produced by Chuck, I will be well satisfied. The stove for Winchelsea is designed to fit beneath the Foc’sle deck and detail has been simplified as much of it would be hidden from view. My version will stand as a model open to full view and therefore added detail will be required. The proposed additions will consist of: Lifting rings Side rails Back plates for open hearth Drain cocks- brass (1mm) Fire grate Pot arm And maybe a few other things that come to mind as I progress the build. B.E. 22/10/2022
.thumb.JPG.cbc93c68bbd54f23245970218824d7f0.JPG)
- 27 replies
-
- 10
-
-
- galley stove
- Syren Ship Model Company
- (and 1 more)
-
I would have concerns about using lime wood for decking. If it’s anything like the hull planking strips it would be too soft to get a good scraped finish and subject to dinks. There is also the question of even colouring if a slightly darker colour was required. I have no experience of Alder. I’ve never really been a fan of the pre-engraved decks because the shadowing always catches my eye, altho’ I did use it on the lower deck of Sphinx as it wouldn’t be seen. It is an aggravating situation for you Chris, but you can’t carry on wasting money on unsuitable material. I will continue to use 0.6mm Boxwood strip in multiple widths from Original Marquetry, Bristol, both for hull and deck planking. I do hope you resolve the issue. B.E.


.JPG.3279f973485cbb7a50be78616a4d92f8.JPG)
.JPG.eee0c9c9445356b4365620b8f2aa03c3.JPG)
.JPG.e96f7c888e3fb4a12ffebaf9630824bc.JPG)
.JPG.3dd8d1a5ce6f2d2a7837d31c2350df6d.JPG)


.JPG.85b239a1647a97ee376f4b91e6026984.JPG)


.JPG.17a244063fd4b31d251ef7317c706858.JPG)


.JPG.6f99e372852ace12484ae6ded8a5d8e6.JPG)


.JPG.a6fcc62f05708496d7d43aec8b2875f3.JPG)


.JPG.eb78284a52f887d9e7d0d5f6786a463a.JPG)


.JPG.a60e8b7d641ea6c32a9bdc4590546438.JPG)
.JPG.25e2df6c09b81932f0f8574c692e0c17.JPG)


.JPG.161c64cbabad6b3dda05c1f07fba85fd.JPG)


