MORE HANDBOOKS ARE ON THEIR WAY! We will let you know when they get here.
×


Chuck Seiler
-
Posts
1,869 -
Joined
-
Last visited
Content Type
Profiles
Forums
Gallery
Events
Everything posted by Chuck Seiler
-
 I hope to get a look at those bad boys Wednesday.
 -
Decided to build the USS Constitution 1/96 Scale Model
Chuck Seiler replied to kmgreene's topic in Plastic model kits
This is a great model. It makes a great display piece with much less effort than it's wooden counterpart. As pointed out, it is by no means easy. I made one many years ago, before I got into wooden ship building. I had it proudly displayed (without a case) until one of my cockatiels landed in the rigging and brought the whole thing crashing down. :-( ...but I digress. If I were going to make it today, I would consider planking the deck, making wooden mast and yards, or reinforcing the existing plastic masts and yards, and using after market wooden blocks/deadeyes....and getting a case. Chuck -
I was going to question the MS Armed Virginia Sloop as a first model, however I recall a couple folks I know made that as their first model and it turned out rather well. I think in both cases they used Bob Hunt's practicum to help the build. It is a dandy model (and can be easily based to become Blackbeard's ADVENTURE....arrggghhh matey!!) Chuck
-
Standing rigging color preference and historical musings
Chuck Seiler replied to Chuck's topic in Masting, rigging and sails
Oh, I meant to include...If I could purchase a coil or two of the grey so I could test coloration and work into my PHILADELPHIA (still about a month from rigging) that would be great. Could you make some without having to go full production? CHuck -
Standing rigging color preference and historical musings
Chuck Seiler replied to Chuck's topic in Masting, rigging and sails
Chuck I am probably a bad source for rigging interest, since once I get to the rigging stage...progress slows to a crawl. Like Frank, I like a black with a brown tint, to simulate old pine tar. I have used black rigging dipped in sepia ink and natural linen dipped in black india ink, then sepia ink. I like the look, but am not sure how long it will last. Brown waterbased wood dye intrigues me. Back on topic. The dark grey looks interesting but I would like to see its effect as rigging on a model rather than coiled up. Chuck -
Good luck Richard!
-
Richard, I would start off saying that the Longboat is NOT a good kit to start with. It looks easy, but is actually complex. (Planking issues). Randy is correct that Midwest makes good starter kits. They are relatively simple and give a good opportunity to learn about planking and how the lines of the ship/boat come together. If you want soemthing a little more complex, I recommend Model Shipways SULTANA. It give you a nice model, a sailing ship versus a small boat and provides alot of 'learning opportunities'. Much depends on your skill level and own wants. There are many good starter kits. It should meet the following checks in the box: 1. Expendable. 50/50 chance you will end up crapping it up beyond all hope of recovery and will have to trash it. A good model on sale helps there. Wood is a great medium. It allows you to make mistakes and recover by tearing apart and redoing. ...on the other hand, sometimes you cannot undo the banana shape your modl has become. 2. Simple plank on frame or solid. Both have their pros and cons. Each gives an opportunity to have a relatively stable form which you can get a handle on how a hull curves, etc. Both give you an opportunity to plank (solid hulls can be planked). 3. Not too much frill and pieces-parts. After you have learned how to build a model you can play around with 100 guns and 100 gunports and 200 pieces of deck furniture. No need on the starter. How to build a windlass, a grating and a few other items is enough. 4. Simple/basic rigging. The CONSTITUTION and SULTANA use the same rigging principles. Learning about blocks and belaying lines and stuff follows the same principle as above. A little is great at first. Once you get that first model under your belt (and you are hooked on the hobby for all eternity) you can take on the big beasties that take time. People who take on big projects too early have a tendancy to quite them and the hobby over frustration. Tools: Dremel, exacto knife, clamps-lotsa clamps, basic wood glue, sand paper....nothing exotic. (but exotic helps :-) as time goes by). Chuck
-
octagon portion of a yard/mast
Chuck Seiler replied to Juan Carlos's topic in Masting, rigging and sails
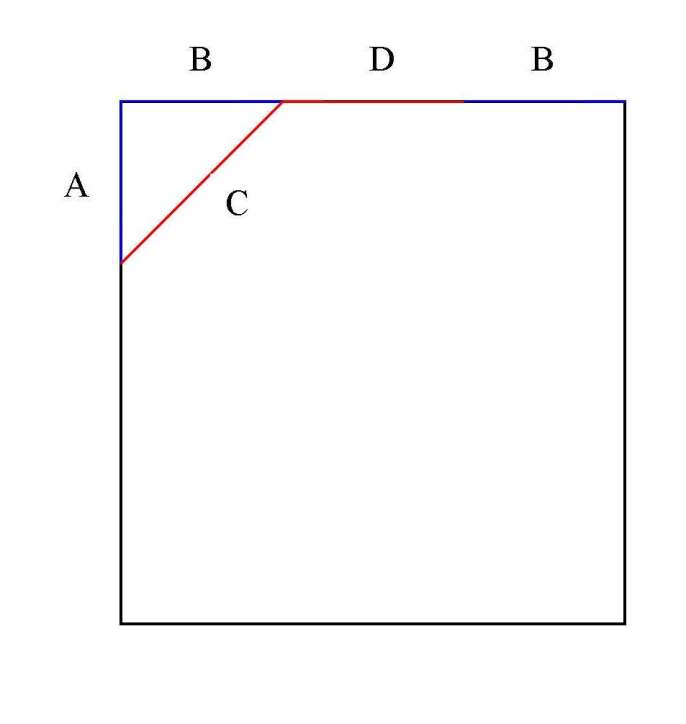
Juan, The reason for 2-3-2 or 7-10-7 is geometry, specifically triangles. A squared + B squared = C squared. In the above diagram you want to shave off the corners (A and so that the remaining side © is equal to D. (2x2)+(2x2)= 4+4=8 D=3 so 3x3=9 Close (7x7) + (7x7) = 49 + 49 = 98 10 x 10 = 100 closer Then there are hexes. :-|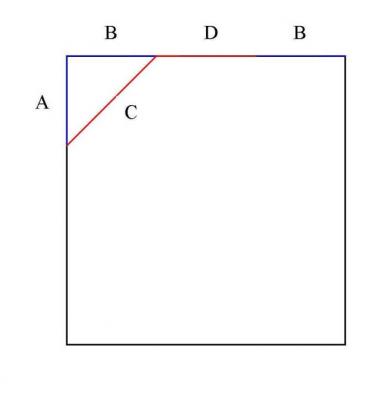
-
Birch plywood is used by model airplane (R/C) builders. It is light and strong. I can get the really thin stuff (less than 1/16th") at the local hobby shop. For bulkheads I prefer 1/8"...which I can get at Michael's.
-
I thought about using a very thin piece of Evergreen plastic (same as the width you used, square) as the under friese molding...but I got the evil eye from Mike Lonnecker and chickened out.
-
I am not sure if price/cost is an issue. I can get either modeling plywood (1/8") or basswood for reasonable price at Michael's. The warping and strength, however are my major issues. I use (usually 1/8") modeling birch plywood for my bulkheads (frames versus walls) and have had no problems with delaminating. Strength is a particular issue when dealing with the thin upright stantions for the bulwarks, such as on SYREN, I never sand my stantions down to the desired width until the outer planking is in place, but even still there are breakage issues with basswood (see '18th Centrury Longboat breakaway stem piece').
-
John, It's a small step from kit building to kit bashing and just a little stroll from there to scratch building. You may not be ready to scratch build another VICTORY in a few years, but perhaps a schooner. Some day the scratch bug will get ya. I couldn't do it without my trusty Byrnes Saw, but other than that, my exotic equipment include a dremel and an exacto knife. I look forward to your build log. Chuck
-
John, If I understand you correctly, you want to get strip wood 24", 30", whatever, and then cut them into individual smaller planks around 5" or so. Is that right? Obviously the final length of the plank will be dictated by the bulkhead or frame location, but at least 1 plank per strake will probably be shorter than your ideal plank length. This will be due to: 1. Not every strake will be an even multiple of your ideal plank length. 2. Staggering of butt joints will result in a short plank in the bow, or stern, or both. Chuck
-
Its that last plank that is a bear...or the well fed boa constrictor, in my case.
-
John, I am having trouble seeing why you would need any piece of wood over 24 inches when dealing with 1/90 scale. If my calculations are correct, that is 180 scale feet.
-
...sez Leonardo diVinci.
-
Bob, Very impressive. Back to the Longboat?
-
Robbyn, I had the same issues with the painted waterline as you did. I disagree that it is a horizontal line. Due to the fact that it is on a surface that is a compound curve, it is ONLY a straight line when you look at it with your eyes at the waterline level. Otherwise, it appears non-straight. I was able to mark my waterline with a super high-tech waterline marker (see my build log). Once it was marked, but before painted, I sank the model up to the waterline in a tin of sugar. The waterline was correct. I did the same after it was painted. Waterline correct. Sure didn't LOOK correct. I think this is why I like the SULTANA where the whites tuff is not painted below the waterline, rather it is below the wale. It is visually pleasing. The other option is to NOT paint below the waterline. I would think that this would unbalance the visual of the model, with a lot of plain on the bottom and a lot of fancy on top. However, one of the San Diego fleet was not painted below the waterline...and it looked fine.
- 234 replies
-
- 1
-

-
- 18th century longboat
- model shipways
- (and 1 more)
-
Toni You better get Dan in gear. The San Diego fleet has at least 3 complete on the west coast and 1 on the east coast, with 2 more complete by August or September. By then we can arm up the fleet, sail in your general direction and overwhelm you. Dan, Welcome to the group. Toni and Bob have great build logs and great examples for you to follow.
-
Mike, Looks great. I am leaning towards my standard oak wood/golden oak stain base and moulding but I worry that the color is wrong. I will look closer at out next community build meeting.
-
Maury, What changes did you make?
-
I think the Longboat would look GREAT coppered.
- 100 replies
-
- 1
-
-
- model shipways
- 18th century longboat
- (and 1 more)
-
Are there any issues with the MOROPE stretching out of shape over time?
-
Robbyn, One option for planking to consider is the "garboard to sheer" option. BobF and Toni Levine did this with great success. Starting at the garboard and working your way to the sheer strake as opposed to doing 2 at the top, 2 at the bottom and working your way to the middle, as Chuck has it in the instructions. I say this because I had all sorts of trouble with the final plank. (Of course if I had measured better, I may not have had the trouble.) Using a bit of wood filler and keeping it below the waterline so I could paint over it was my salvation in that regard. By doing this, however, you have to come up with some method to support the upper bulkheads until the planking is complete. Easy peasy.