HOLIDAY DONATION DRIVE - SUPPORT MSW - DO YOUR PART TO KEEP THIS GREAT FORUM GOING! (Only 13 donations so far - C'mon guys!)
×


Martin W
-
Posts
1,412 -
Joined
-
Last visited
Content Type
Profiles
Forums
Gallery
Events
Everything posted by Martin W
-
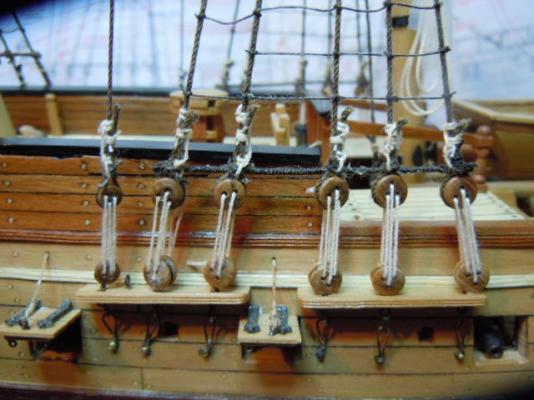
 Those billboards look really good -- the contrast between the black & yellow helps to show off the neatness of the curved lines that you nailed just about perfectly. I'm not sure if your sheave there is too big or not. I do like the double hole though. I'm even halfway thinking of going back and replacing my single-hole versions, since these doubles look far more realistic. So are you going to leave the gun port lids down or up? They look tidy in their place. And if they're going to be in the up position, will they also be red on the insides? That paint scheme makes for a striking build. Well done! Martin
 -
Hi Jon -- That's good progress on those spars. These make for pretty good practice runs, since any mistakes you make here will be covered up by the boat. I think you'll find that sanding -- especially with the finer grits -- and 2 or 3 coats of polyurethane will make good spars and masts look outstanding. Cheers, Martin
-
That octagon gave me fits too. Every one of the instructions I've read make it sound easy, but I found that when I smoothed out one of the 8 sides, it made 2 of the others too narrow. If I recall, though, Blue Ensign -- that repository of skills and information -- has an account of cutting the octagon. My guess is that it just takes lots of practice and care. After using the electric drill method for trimming down the spars (which does work well), I switched to using hand tools -- cutting the basic shape with an exacto, and then clamping the wood so I could run a narrow band of sand paper over the spar. That worked just as well or better, and I had fewer broken pieces. Good luck! Martin
-
I have to repeat Keith's comments. It's nice to hear that you can find the joy of your work by simply touching and looking at it. There's no competition here, just mutual admiration. Terrific work. Martin
-
Right. Certainly plat is a typo. Bob is not overly fastidious in his proof reading. Cheers, Martin
-
More on the Boomkin: Here's an interesting detail that Jon and anyone else following Bob Hunt's practicum might find useful. While working on the Bunt lines last night, I began wondering about the thickness of the line I was using. I thought I would look to see what size Bob used, and found that in the discussion of rigging the foremast, he describes the placement of the boomkin! Jon, take a look at the volume on Rigging the Rattlesnake, chapter 5, pages 14 & 15 -- you'll see that he refers to Sheet 9 of the Mamoli plans, and they should help you work out the placement and angle. This should have gone in an earlier part of the practicum, of course. But I hope any future modellers following this useful but quirky guide will be helped by this alert. Cheers, Martin
-
Ten hours is nothing if it produces something that wonderful! Cheers, Martin
-
If you read the parts of the MS plans in read, you can work out which lines belay to bolts. Your idea of waiting to install the bolts with the blocks is probably good. 6 or half a dozen, I'd say. Cheers, Martin
-
That's simply beautiful work, Ron. You're already making the new year sparkle. Cheers, Martin
-
That's a good looking build, there, Jon. You've done the Practicum more than justice. I like your solution with the boarding steps. I used my Byrnes saw to cut the bottom rabbets -- it was a bit tricky, and not nearly as safe as your solution, but it worked. It's also good that you reinforced them with those pins -- I've knocked mine off several times. That iron horse gave me trouble as well, and it's something that other Rattlesnake builders should keep in mind. First I had to make several adjustments to the rudder and the way the post passes through the Captain's Cabin. And then because, as you say, Bob doesn't address the issue (and I really think something is off in his explanation of how to align the rudder post), I couldn't figure out what the MS plans were showing. You might want to go over the MS plans before getting too far along with the rigging to check on all the eyebolts and ringbolts you'll need to install. There are a couple at the base of the main mast that require some fine maneuvering -- I broke my pumps about 5 different times. Congratulations on a great looking build! Martin
-
Thanks guys, I appreciate having you all check in, and your kind words. Affixing the bumkins really follows the same principle as stepping in the masts: you drill holes where you want them to go and try your best to get the angle close to what the plans show, and then you put them in (of course that overly simplistic description leaves out all the swear words that go along with the countless tries that look close then prove to be way off). The difference here, really, is that the bumkins are pretty tiny -- after I cut and shaped them, I had to put them away someplace where they wouldn't get lost or broken. As for placement, there is a suggestion that it could vary somewhat. Here's what Lees says: "The boomkins tapered towards the outboard end, being about one quarter narrower there than at the heel. Their length varied with the individual ship, but they had to be long enough so that when the fore yard was braced sharply, the yard arm and the boomkin were in a straight line. Usually the boomkins butted against the beakhead though sometimes they butted against knightheads on either side of the bowsprit, this latter method being used mainly after 1800" (my emphasis). All the plans I've seen show the block on the bumkin un-rigged. Lees is a great source for the history of each part of the masting and rigging. The Antscherl books are indeed pricey. It's taken me more than a few years to accumulate the 4 volumes, and each purchase usually meant that I had to cut back my beer consumption for a month. But the sacrifice has proven worthwhile, since his explanations are very clear, and easily transferable to builds like the Ratt. Cheers to all, Martin
-
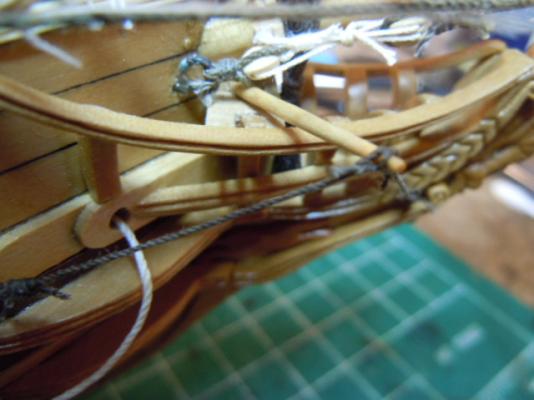
Hi Jon -- Here are some references for you on the bumkins (or boomkins, or bumpkins): Antscherl has a photo on Vol 4, p 29 that shows the port side bumkin passing just in front of the seat of ease. He describes the shrouds on p. 46 of the same volume. Petersson shows the bumpkin on p. 61 and p 48. Lees describes the evolutionary stages of the boomkins on p 36, and he marks 1780 as the beginning of the drooping version; but, again, it seems that the Rattlesnake had straight ones, as appears in Chapelle's lines of the Ratt, on p 136 of The History of American Sailing Ships. (I've looked in Steel as well, but I can't seem to get a grip on the organization of his work.) And here's a photo (not terribly clear) of my starboard bumkin that shows pretty much how I fit it in to the keel by drilling an angled hole. It took several tries to get everything to fit. Hope that helps. And Happy New Year! Martin
- 104 replies
-
- 2
-

-
- rattlesnake
- mamoli
- (and 1 more)
-
Jon -- You have my sympathy. On my first model, I tried doing a mock-up of the masts set in the deck, then running lines from the tops to try establishing the angles for the chainplates. I got just about every angle consistently wrong. For the Ratt, I just waited until I was belaying the shrouds. Ok, I got the angle right, but the lengths of the chainplates (which I custom made, using a jig to make them all the same) ended up at different heights up and down the hull. Next time?? Dunno -- maybe I'll have to work on my understanding of basic geometry. Enjoy your New Year! Martin
- 974 replies
-
- 1
-
-
- rattlesnake
- mamoli
- (and 1 more)
-
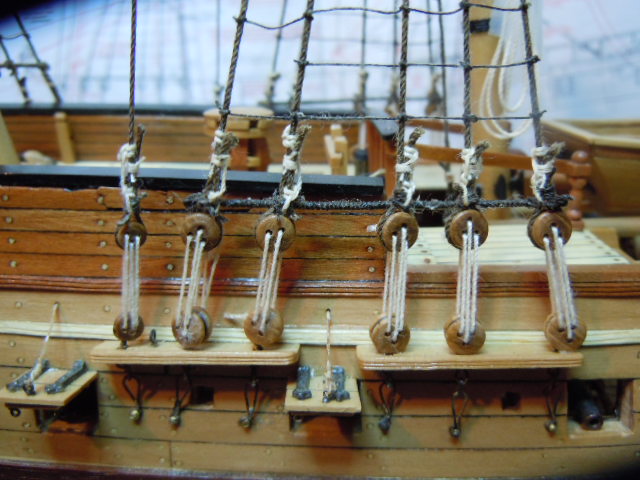
Bumkins: These 2 little spars fascinate me for several reasons -- their size, I'm sure is part of it, but also the fact that they curve on many of the ships of the period. Blue Ensign's Pegasus shows the curved version. But as far as I've been able to make out from Hahn's plans and the MS plans (by Ben Lankford), the bumkins on the Rattlesnake do not have that little droop. They do have shrouds, however, and a single block seized to the end. I wanted to post this just because I've followed both Flyer and BE in their work on the bumkins. I made my bumkins from boxwood, just cutting down a 1/8 inch square piece to a rounded piece with notches at each end. I had to customize the fit for each one so it would come out of the bow at the correct angle. Since they're pretty tiny, I didn't attach them until all the other bowsprit rigging was done. In this photo, you can see that I've affixed the bumkin shrouds, using a basic seizing to the eyebolts, and a false eye-splice at the bumkin. The eyebolts might not adhere exactly to the MS plans (Hahn's are bit confused here, with numerous lines converging in a small space), but I set them up where they seemed to make most sense. Unfortunately, this photo also shows up the rather rough serving I did on the bobstay. Really, I thought it looked much tidier when I put it on.

- 104 replies
-
- 5
-
-
- rattlesnake
- mamoli
- (and 1 more)
-
That's stunning work, Ron. The shot from the bow really shows how nicely you've done the work. Martin
-
Right, Eric, I got it now. And, in fact, I noticed last night when looking at my own Ratt, that I'd put in the eyebolt for the pull-rope as well. For one such rope, I think it's the aft-most, I had to drill a hole to run it through the channel before passing into the bulwarks. That's how it seemed to look on the plans. Overall, I think the gunports are one detail that make a modeller grit his teeth -- they have lots of little detail (and you can always add more), and they come off very easily. Looking forward to more. Martin
-
Thanks for dropping by, BE and Jon. BE -- as always your knowledge of Steel is extremely valuable. I guess I would take his ambivalence to mean that it's Captain's choice. Since I'd already rigged the hearts onto the jibboom before setting it in place, I went that way, but could see how deadeyes might work as well or better, since finishing off the lanyard for deadeyes seems more commonsensical than with hearts; I've tried out several possibilities (sacrificing consistency in hopes of a final determination of which looks better), and haven't settled on any one yet. On a side note, I might mention as well, that -- even as one pretty familiar with the turns of eighteenth-century English prose, I have often found Steel just a bit obscure in places. That might be simply because I have not yet mastered the organization of the books. And it seems that some of the key details are presented as though they were ancillary. Maybe it's time to fluff up my easy chair and put in a few hours in serious study. Jon -- It was the rigging that first led me to Bob Hunt's practicum. I got the rigging portion of the Rattlesnake work first, just to figure out how to proceed. The instructions in my previous kit (my first), basically said, "To rig the ship, start aft and move forward." For this build, I have found the MS plans invaluable -- though the information on the running rigging seems a touch less informative. I have also relied heavily on Petersson's book, as well as Lees, and this web site. My best advice: get a hold of several pairs of tweezers -- they can fit where fingers can't. And as for the knots, well, David Antscherl is absolutely right when he says you'll get lots of practice. Cheers, Martin
-
I also like those scrapers. And I'll be very interested to see how your hinges work out. In my view, the hinges supplied by the kit are too big and thick, and they end up looking clunky. There are eyebolts that go on the inside bottoms of each lid -- is that where you're going to use the wire? Cheers, Martin
-
Those are nice kevels there, Jon. The "pulley" makes a significant improvement on Bob's very simple slot. I'll have to remember this strategy in the future. Cheers, Martin
-
Rigging the Bowsprit With a day or two at my disposal, I thought I'd bring my Rigging Log somewhat up to date. Moving from the Mizzen Mast forward, I've completed all the shrouds & stays of the standing rigging, and have wrapped it up with the Bowsprit, where I'm also starting the running rigging. One of the primary tasks on the Bowsprit was to rig the Traveller. I'm sure the kit has included one, but I've lost it in the detritus that surrounds my build. So I decided to fashion one out of wire. It couldn't be soldered, however, since I'd already connected some of the rigging to the Bowsprit. So a made a small loop out of wire, which I could solder together; this is where the jibstay will pass. Then I made a larger loop at the bottom that will go around the jibboom. This bottom loop looked ugly with an unpleasantly obvious gap where there should have been soldering. To make the contraption a bit more eye-appealing, I served the bottom loop after setting it on the jibboom. And here is the jib stay as it passes through the traveller on its way to the Bowsprit cap. You can also see a line coming from either side of the traveller -- these are inner guys, not to be confused with the inner guy pendants (if I have worked these details out correctly!), which are part of the running rigging. This photo also shows the Fore topgallant stay, which I simply seized onto the end of the jibbom and belayed with deadeyes on the starboard bow. Right around this point, I began to have loads of unexpected fun as I noticed that several of my lines were wrapped around each other. I had to undo almost everything and straighten everything out. And of course that's also when seizings started slipping, knots came undone, and numerous nights went by when I would only be repeating what I had already done two or three times. I suspected that the diluted glue I was using had become too diluted. So I made a fresh batch and went at it again. In this next picture, you can see the lanyards for the inner & outer guy pendants, and the bowsprit shrouds (one of them anyway). These shrouds run from an eyebolt that I fashioned out of a thick wire (and soldered) to the heart connected to the small hearts that I fashioned from some boxwood bullseyes. Here I thought the line for the shrouds was already pretty thick, and to use a simple seizing would be even thicker. Having just that day admired Blue Ensign's strategy for making a false eye splice, I tried it here. I'd read David Antscherl's account, but BE's photos suddenly made the process click for me. So thanks as always, BE: the process is very simple, and makes for a neat splice. You can also see just aft of the large heart from the forestay 2 thin ropes hanging down. These are the stirrups supporting the man ropes, which run from eyebolts in the rail to eyebolts in the cap. For these supports I also used the BE false eyesplice. You can also see part of the bobstay, which I served its entire length, and is belayed to a heart at below the forestay. One page of the MS plans shows the bobstay with deadeyes, while the other shows the heart. Mamoli shows deadeyes, and Petersson has hearts. I flipped a coin on this one. This final photo shows the running rigging: the lifts for the spritsail & topsails yards, the inner & outer guy pendants, and (not as clearly as I'd like) the braces. For the braces I encountered another divergence of opinions. Mamoli shows both braces (spritsail & topsail) passing up to a double block seized to the forestay and then passing down to the jeer bitts. MS has them passing through separate single blocks hanging from the crosstrees and then to the bitts. Petersson has the topsail braces set up in the same fashion as MS, and the spritsail braces beginning from the forestay, where it's tied with a clove hitch, then down to a single block seized to a line from the end of the spritsail yard, and then up to its own block under the crosstrees and down to the bitts. Petersson's layout makes for an attractive W shape, so I went with it. But then I realized I had used the block that are meant for the bunt lines on the fore sail yard, and so down they come. Next up: Jeers. Martin


- 104 replies
-
- 2
-
-
- rattlesnake
- mamoli
- (and 1 more)
-
Hi Eric -- I'll weigh in here by going along with the others. JPett makes exactly the suggestion I would about that nibbing -- you will have to experiment lots, and trim the inside edge to get a decent fit. One point to keep in mind is that you'll want something approaching symmetry as you do the other side; you'll be surprised at how easy it is to get out of whack, or maybe how hard it is to stay in whack. You might even want to catch up on the other half of the decking just so you'll be able to gauge how much of an allowance you need to make. As for the bill boards -- go look at Jon's build. I did much the same, only without the treenails. I just drew the lines on the hull in pencil -- not as parallel as your plans show, since from looking at other models I gathered the board weren't necessarily parallel, and they would have been replaced somewhat frequently -- and then I cut short pieces and stacked 'em up. It was necessary to cut a chunk out of the molding, though -- that part didn't make me happy, since I was kind of proud of the molding, but what the hey. I hope you have a happy holiday (with lots of modelling time). Cheers, Martin
-
Thanks for the kind word, BE. Cheers, Martin
-
Thank you, Robert. May you and yours have a happy holiday as well! Martin
-
Those are great shots from above, showing all the fabulous detail of the woodcraft. Bravo! Martin
- 1,215 replies
-
- 1
-
-
- sloop
- kingfisher
- (and 1 more)
-
Hi Robert -- Thanks for checking in. And thanks especially for the compliment! i started this build back in January 2010, and on 16 December 2013 I began cutting the masts and spars. Whew! I am slow indeed! The rigging itself seems to go the slowest, since I've had to spend lots of time simply studying the plans. And the day to day progress just doesn't seem as noticeable, since a couple of hours can easily get spent on one or two lines. But I like the rigging line I got, so it's a pleasure to work with -- at least when the knots hold and the masts & spars stay in their proper alignment! I've been remiss in keeping up with the log -- I'm hoping to do some updating over the holidays. Cheers, Martin