HOLIDAY DONATION DRIVE - SUPPORT MSW - DO YOUR PART TO KEEP THIS GREAT FORUM GOING!
×


Martin W
-
Posts
1,412 -
Joined
-
Last visited
Content Type
Profiles
Forums
Gallery
Events
Everything posted by Martin W
-
 I hear what you're saying, Alistair. At first -- in the mind's eye stage -- I thought curved lines would look good. Last night, as I got down to working on the ladder way, the image of curved head rails began to seem out of place, at least for that particular opening & frame (if nothing else, a heightened frame to accommodate a curve would give something for busy sailors to trip over). Your critique of the grating is also appreciated. I got them to line up as a frame on the athwartships sides, but since I was thinking about curved lines and sanding utterly neglect to think about the for & aft lines (ie along the sides). You're right that they look awkward, and I think that in a redo it will be an easy detail to correct. Right now it's still just sitting there without glued permanence, so another version won't hurt me, especially while I still have the muscle memory of making this one. But here's a question that came to me as I was beginning the ladderway. First off, I notice that neither you nor BE has a ladder way on the main deck -- and I really only noticed that last night. Next, I looked at the NMM plans, and they do show a ladder going down from the main deck to the lower deck. BUT the entire series of ladders -- from the QD to the Main Deck and then to the Lower Deck -- is AFT of the Capstan, not fore as in this kit. Probably all of you have already noticed that, but it surprised and puzzled me. Hmmm. Martin
 -
Nils -- That gun rigging is impressive not only for its detail but for the sheer complexity. YIKES! I don't know how you can find your way, even with a list! Cheers, Martin
-
Well, I didn't manage to work on Prototype #2 as planned (someone brought home a bushel of basel from the farmer's market, so I made pesto instead). I did manage to put in some trenails. This time the gods smiled on me (it must have been the pesto), and I got the Swiss pear down to #21 on the drawplate, which enabled me to use a 79 drillbit. Here's how it looks: I also want to say thanks for the link, BE. I haven't looked at the early pages of your log on this site for a while. These seem to have a few different details, which make me think I should spend some time looking them over. Cheers, Martin
- 467 replies
-
- 1
-

-
- fly
- victory models
- (and 1 more)
-
Jon -- It's nice to see all 3 masts there together. Well done. Martin
-
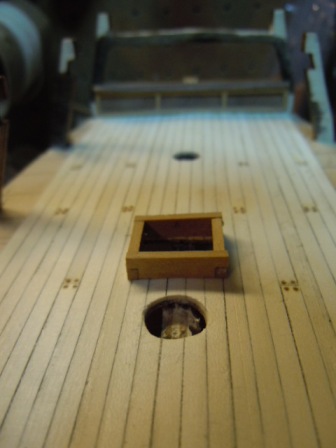
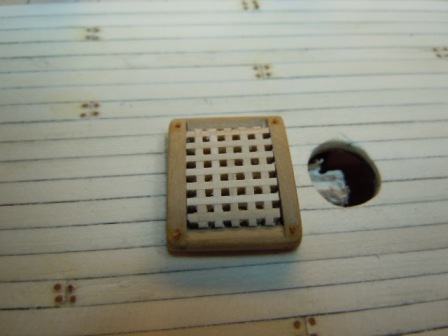
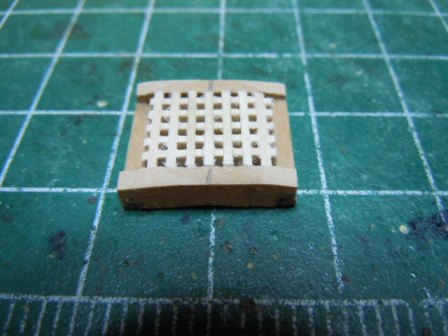
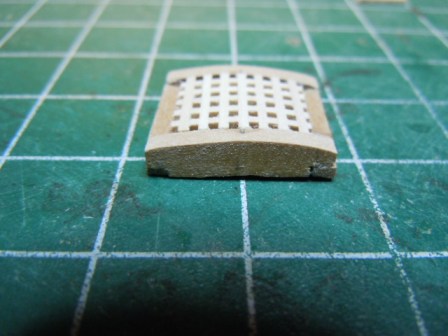
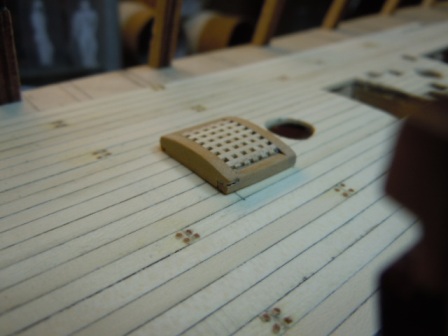
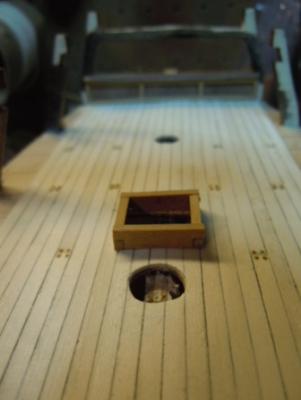
Thanks again for the tips, everyone, they're helping me enormously. The kit's gratings looked better that I had expected, so I decided to use them -- and they look good in everyone else's build as well. They go together very easily, and they hold up under sanding much better than I'd expected. Here's what I did. First I just roughed out the frame of the coamings at about 3mm & head frames at about 5 mm. I wanted to try to do the rounding -- and at this stage I am still thinking very much in terms of prototypes, seeing which procedure works best and looks best on my main deck. I started sanding, and here you can see where I've gotten about a third of the way. I began with 180 grit paper, laying it flat on the table and moving the head frames over it in a slight rocking motion. I soon decided 180 was too, too aggressive, so switched to 220, and then 320. Here's pretty much where I ended up (I still have to round off the corners, and sand the sides). The sides (coamings) presented a bit of a problem here, since geometrically I couldn't get the grating to round down to the coaming, or the head rails to round down without also rounding off the edges of the coamings. I got a tiny piece of 400 grit paper and lightly sanding the gratings to get them just about where I wanted. Here's the piece in place: this prototype is the "Lying atop the Planks" version; others will follow. To get this one to fit the curve of the deck, I laid a piece of 320 grit paper on the deck, then slid the hatch back and forth to conform to the shape I wanted. Tonight, I'll start on Prototype #2: the "Fitting within the Planks" version. Cheers, Martin
- 467 replies
-
- 3
-
-
- fly
- victory models
- (and 1 more)
-
Beautiful, tight joints, Toni. Simply stunning. Martin
-
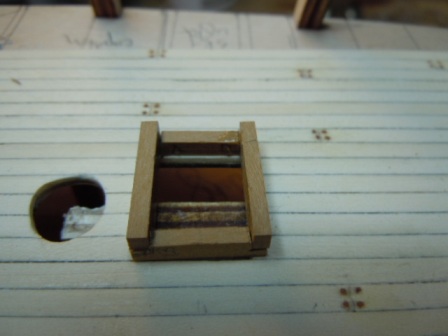
Thanks for the comments, guys, these are all very helpful. I spent about 3 hours last night just trying to think of how to measure a rabbet and still get the right dimensions for the joints etc. I decided -- after butchering some nice boxwood -- that the aft hatch will probably sit atop the planking. Now I've started the ladder way, which be without grating, of course. My notion is to do all the coaming/ledges, and then do the gratings. Alistair -- the sanding process you describe sounds absolutely obvious; I'm shaking my head, saying, of course, why didn't I think of that? Duh! Did you sand that much before or after putting the grating in? My little square keeps threatening to collapse whenever I work on it, so I would imagine that the grating would stiffen it. BE -- I've checked out your hatches from the "Early Years" over on the other site. They're simply gorgeous. Hearing that you put that 1mm ledge around the inside answers a question I've been meaning to ask you. Did you make your own grating, or use the kit's? -- It would seem that the gratings would need to be sort of thick to get the curve you have, eh? Spy -- I hadn't thought at all about actually bending the grating. Hmm, that's something to consider. Meanwhile -- the Missus mentioned that she couldn't see the lake any more, and I pointed out that it was because the brush had grown up. After 3 minutes of silence, I slowly understood that she was describing the view but making a hint. So my afternoon will be spent with a machete. Cheers, Martin
-
Har Spy!! That would be the longest thread on the site! Nils, you have my sympathy. Everytime I'm down on my elbows and knees looking for that d*** little piece, my dog decides to join me and put her wet nose in my face while sitting on the very spot where I'm sure the piece went. If I ever do find it, though, it's usually way off on the other side of the room. Cheers, Martin
-
Thanks for checking in, folks, and I appreciate both the likes and the advice. Alistair, I have studied your procedure at almost every step, since your log is nicely detailed. And I've actually gone back and forth about whether to set the coamings in or lay them on top of the planking. If I recall, on my previouis build I did the former. I had originally planned on doing that again for thd Fly. Then I started thinking about how I would probably need to cut a rabbet along the outside of the coaming frame so it would fit snuggly inside the planking with a bit of overlay. No big deal, I suppose, since it wouldn't have to be terribly neat and I could do it with an x-acto. But since I think there also needs to be a rabbet along the inside top to accommodate the grating, I felt a major spell of the lazies come over me. More study is in order here, which is fine, since I'm still at the prototype stage. There's also this personal detail: I bought a micro mill that is now sitting in my workshop. I should be able to knock out rabbets with it in a heartbeat. But it's tool that requires practice and understanding. So far, I've practiced, and have NO understanding. I have to admit to being a touch intimidated. Spy -- Thanks for that photo. I like the nice smooth lines you got on that coaming along with matching the curvature of the deck. Do I see a slight chamfering along the outer edge as well? I also have to say I like your deck. But the issue of the height is still a bit foggy for me: the athwartship pieces are supposed to have a curve, right? at the peak of the curve they would be what, something like 2.5 mm? then the sides would be a bit under 2 mm? I'm now going to work out a second prototype, with the rabbet. Till then, Cheers, Martin
-
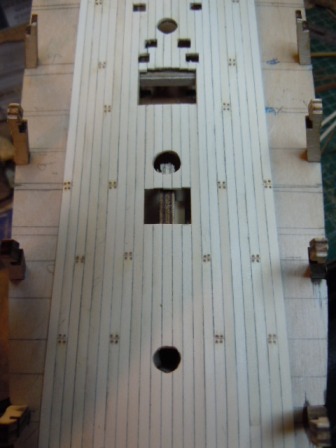
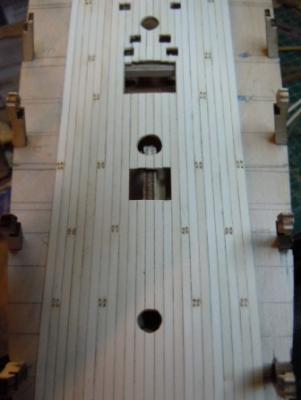
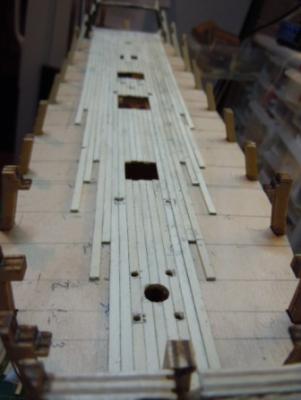
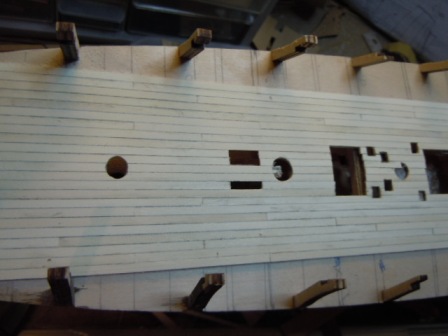
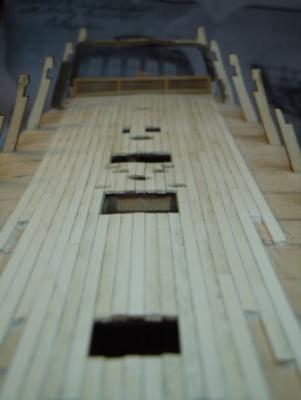
Here's a brief update. With the deck mostly in place, I thought I'd put in the trenails. I have to say that I do like the contrast between a holly deck and some darker wood for the trenails. In the past I used walnut, but it tends to split too easily. The standard bamboo skewers that I can get tend to have a greenish tint that I can't get rid of. And, well, I've simply never tried the strategy of wood filler. Long & short: I cut up a strip of Swiss pear that I had on hand, and gave it a shot. I drilled holes at the joints only, since I agree with the general view that with dark trenails this small model of a deck can get too spotted pretty easily. I used a #75 bit, and then found I just couldn't get the wood down that small. So I opened the holes with a #70 bit, which then accepted the wood that I had gotten down to hole #29 on the drawplate. With the dark wood, I think these are still too big -- another reason to do only the butt joints. Here you can see the result: You can see that I allowed a spacing of 4 planks between a repetition of trenails on a particular line of planking. The butts fall on "beams" that I marked following the NMM deck plans; and I also used Antscherl's plan. I've seen people refer to specific patterns numerically as "13245" or something like that, but I don't know what those numbers designate, so can't tell you what exactly my pattern is. But the two sides do mirror one another. Next, I made up a list of all the details I need to take care of before returning to the dreaded gunport strips. It's a pretty formidable list -- ladders, bulkheads, window seat in the cabin, and hatches. There's been a good discussion about whether the coamings should go on before or after the decking -- and I read that after I had already done the decking. My decision was made for me. Here's coaming prototype #1, which I only set up to judge for size and dimensions: This is made from boxwood, about 2x5 mm. This picture doesn't do justice to the gargantuan size of the coaming. I think I'll try cutting down the boxwood to 2x3, which should look more in scale (I'm using the eyeball measure). --Now, if I can go more than 2 weeks without my computer crashing, I might manage some regular updating. Cheers, Martin
- 467 replies
-
- 2
-
-
- fly
- victory models
- (and 1 more)
-
Nils -- the shots of your forecastle are fascinating, and these violin (or "fiddle"?) blocks are absolutely ingenious!! I'm sure your technique here will be copied widely -- certainly by me. Cheers, Martin
-
Hello Mihai -- It seems that just as I found your log, you've had to take a break from it. Believe me, I understand how work can interrupt modelling. I'll be looking forward to your progress. And I also want to say that your planking looks nice and neat. Martin
-
Nice work, Nils. Those close-up photos show off the neat details of your craftsmanship! Cheers, Martin
-
Thanks Mark. I thought the problem might have come from that issue, but wasn't sure. Another Rattlesnake builder has told me that he saved many of my photos, so it might just work out. Cheers (from an old, displaced Oregonian), Martin
-
Hi Guys, thanks for checking in, and for the nice words. Alistair -- whether I can pull off the carving remains a real question. I'm game, though, and enjoy it, even though at times it seems like a waste of wood. BE -- That's excellent advice; I got some cannon from Chuck and the place Alistair has mentioned (and I've forgotten, but they're nice). I'll be working on a sample gun to do just as you say. The unplanked deck was again a reason not to put the strips on yet. For caulking, I just blackened one side of each plank with a #2 pencil lead; I'd used a Sharpie black pen on parts of the Rattlesnake, and found that it tended to run, and couldn't be sanded out. The pencil might be a touch too subtle, so I'm going to look around for something in between for the hull planking. Spy -- Thanks for the compliment, but let's see if I can keep the figures heads on their necks. Those little putti flying between the King & Queen have already made me nervous. At this scale, everything is tiny. Onward! Martin
-
Here's a problem that I hope someone can solve for me. On several occasions -- both in my own build log and in postings I've made in other people's logs -- photos have disappeared. Previously, I just uploaded them again, but my hard drive recently crashed and I've lost all my old pictures. But for future reference, I'd like to know if I'm doing something wrong when I upload them, or is this just a glitch in the site? Cheers, Martin
-
Right, Jon, if you rig crowsfeet, the buntlines get to be something of a problem, just because of the crowding. You'll probably be better off putting them further back under the platform so they don't have to bend around the outer crowsfeet. The only problem then, however, is that you'll find things getting crowed under there, so you'll want to try to rig the bunt lines before installing the mast in the hull. Then you can leave the lines slack and tie them off below the blocks (I marked each line with a piece of scotch tape that I wrote on). Cheers, Martin
-
Jon -- The Model Shipways plans are much clearer than the Mamoli plans. If you study the diagram in the MS plans of the tops, you'll get all the blocks you'll need. As for the crowsfeet: one difference between the tops you & I built and those in any rigging plan is that we put a ridge around the edge of the platform. So, if you locate the center of the front of the platform, you can drill the first hole in the front of the ridge, then drill either 5 or seven equally spaced holes on both sides of that. For now, that's about all you'll need to do, since the crowsfeet go in well after much of the rigging (it fastens on the forestays). You might also just look at the way I rigged them. http://modelshipworld.com/index.php?/topic/1048-rattlesnake-by-martin-w-mamoli-kit-bashed-164/page-5 I like your solution for the stanchions. And you really oughtta try soldering -- it's not at all difficulty if you get the pieces cleaned well. You'll find it helps with making eyebolts. Cheers, Martin Martin
-
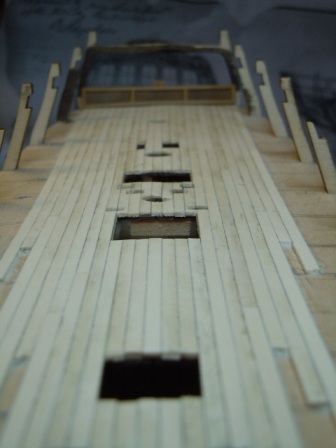
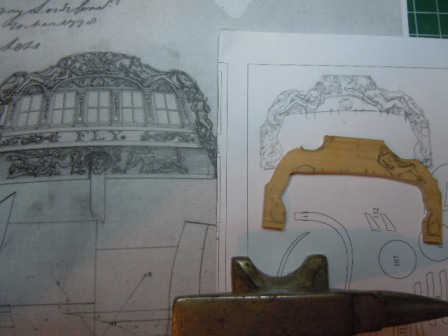
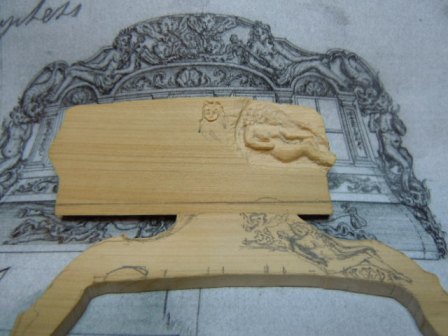
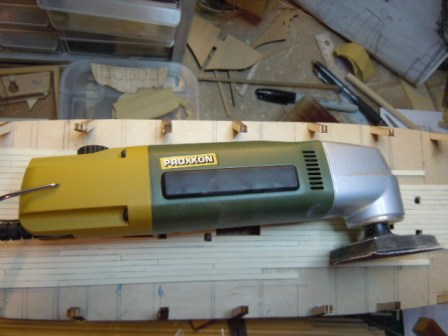
Hello everybody -- It's been quite a while since I've updated this log. I ordered some wood, and have been waiting on it, and have held off on just about every thing till it came in. I did start a few details -- such as the bulkhead to the Captain's cabin, the window seat in the cabin, and some ladders. But in each case, once I got just a small way in, I decided that my measurements were relying on too much guess work of how the planking would affect the dimensions, and so I held off. The result is that each of these projects is sort of started and tucked away for now. One detail I did work on though, was the stern carving. This is pretty ambitious, beyond my capacity; BUT I find carving to be a real hoot, even if I can't do it terribly well. I began by reducing the drawing of the Stern Carving in the NMM plans to 74% to make them pretty close to 1:64 scale. Then, to get myself to understand how the lines of the figures related to the space in which they appear, I drew a copy of the Carving onto an outline of the boxwood I'd cut out on the scroll saw: Once I'd worked out the spatial relations, I copied the copy onto the wood itself. But before I could get the nerve actually to carve the actual stern piece, I thought I might do a trial run, which would (theoretically) help me to understand how to turn the 2-dimensional lines into a 3-D bas-relief. This is the Queen of the Seas, and, well, in my version she's pretty blocky. But the aim wasn't perfection yet, just understanding. I next took a deep breath, and started carving the Queen on the boxwood piece that would (I hoped) become the actual carving. I don't have a picture of the result, but can tell you that this version came to an abrupt halt when I saw that I had effectively decapitated Her Highness, making her royal head float somewhere over her royal port shoulder instead of her royal neck. I've begun Attempt #2, but have only begun. I'll post photos as I proceed. Meanwhile, my wood order arrived, my obligations at work lightened a wee bit, and I started planking the main deck. I was happy to get back into making progress in a real way. Here's the holly planking, unsanded: I've left room for the waterway, and haven't cut out the holes for the masts, etc. Here's a slightly more finished version: The variation in coloring is due to differences in the levels of individual planks -- I really thought I'd kept them all absolutely level, but, hey, I guess I was wrong. Looks like I'll be doing more sanding. I'll point out that in this 2nd photo, you can just see the front of the window seat that I set up just to check on the fit. Finally, here's my one Proxxon tool: It makes sanding go a lot faster than ye olde sanding stick. Comments, suggestions are always welcome! Cheers, Martin
- 467 replies
-
- 5
-
-
- fly
- victory models
- (and 1 more)
-
Those platforms are very, Jon. You're wise to drill the holes now. And as for the stanchions, well, you could perhaps cut some out of boxwood that would match the tops. Eh? Cheers, Martin
-
Peter -- your photos are great at showing the successive steps in getting those sails looking right. And that sailmaker is probably going to need even bigger muscles to pick up those scissors!!! But wait a minute -- Jack Sparrow? What about Lucky Jack Aubry? Cheers, Martin
- 431 replies
-
- 1
-
-
- pegasus
- victory models
- (and 1 more)
-
Hi Nils -- At long last I've come across your log, and have to say that you're building a beautiful ship. The detail is lovely. Martin
-
Peter -- I like your idea of the shroud cleats -- it solves a problem of where to belay those cluelines, and is a lot neater than tying them off on the block. Cheers, Martin
-
Russ -- I just have to add my song of praise to all the other voices: beautiful lines, and a sweet build. I admire your skills. Cheers, Martin
-
Hi Jon -- good to have you back! I sympathize with your anxiety over rigging, especially at the start, since there are just so many lines to tie, blocks to seize, holes to drill, eye-bolts, and on and on and on. I got the chapter on rigging in Bob Hunt's Rattlesnake practicum before I got the rest of the practicum. I was where you are on my first build (Prince de Neufchatel), and the kit instructions said something like, start from the masts and work outward. That was about it. Bob's instructions were methodical and clear enough for me to get through that rigging project. But when I returned to it for the Rattlesnake itself, I found -- just as you're doing -- that it had so many mistakes, and actually wasn't so methodical after all, that I only consulted it occasionally. If you have Antscherl's vol 4 of TFFM, and Petersen's book, you should be able to find your way with the Model Shipways plans. Just start at one end and work toward the other. I began with the mizzen, did the shrouds and jackstay, then moved to the mainmast and fore, focusing mostly on the lower rigging. By the time I got to the foremast and jib, I found a logic to the process so that I knew pretty much how to proceed -- or maybe it would be more accurate to say I saw what I should have done earlier on. The Model Shipways plans really seemed the most detailed and helpful, but I still looked to the Mamoli plans for certain steps. As for drilling holes in the tops, I'd say do as much as you can think of before putting the mast in place. Drill those holes and seize all the blocks that go under the top -- and set them with diluted glue so they won't fail. Crowsfeet aren't that hard, and they really do look nice. The MS plans for the tops have all the details you'll need. Study it closely. One other bit of advice: buy lots and lots of blocks of every size -- you'll run out faster than you think. Slow and steady! Cheers, Martin