HOLIDAY DONATION DRIVE - SUPPORT MSW - DO YOUR PART TO KEEP THIS GREAT FORUM GOING!
×


Martin W
-
Posts
1,412 -
Joined
-
Last visited
Content Type
Profiles
Forums
Gallery
Events
Everything posted by Martin W
-
 Toni -- I love the detail on the hatch battens. That's fine work. Cheers, Martin
 -
Hi Scott -- Those gratings are pretty nice looking. If you've run out of the pre-cut grating, why not try making some of your own? It's not that hard, if you devise a jig, which plenty of people on MSW have discussions on how to do. You're making great progress, Martin
-
Nice planking there, Vitus. I'm with Alistair: the tapering looks really good, giving the deck a tidy appearance. Cheers, Martin
-
So it's not just my imagination that the years have sped up?
-
Hi Peter -- Your comments about the sails completing the ship and giving the rigging meaning has struck a chord. My guess is that most of us have only ever thought that the sails would have to be unfurled, and would then obscure the view of all the details. But with them furled, as you're doing, another intriguing element is added. I'm going to have to keep this in mind . . . though it will be about 4 years before I get to that point. Cheers, Martin
- 431 replies
-
- 1
-

-
- pegasus
- victory models
- (and 1 more)
-
Go for it!
-
It's interesting to see the ship with that uniform color -- it brings out the shape nicely. Everything looks smooth and right. Congratulations on those tools. I'll be interested to see how you like that chopper -- I've thought of getting one, but haven't been sure. That hull holder, though, is VERY useful, since you can rotate and tilt the model to accommodate your needs. Cheers, Martin
-
That's a busy crew, and Cap'n Jack drives them hard! But the work is paying off as the rigging all looks neat and tidy. I especially like the look of the parrels -- my crew has a history of not getting those taut enough. Well done, Martin
- 431 replies
-
- 1
-
-
- pegasus
- victory models
- (and 1 more)
-
Thanks for those pointers, Spy. As a matter of fact, I have been worrying and fiddling with the fairing of the stern bulkheads -- I've set the extensions up to check the angle, and have more or less decided (for now) that everything goes the way I want. I did end up taking more off the bow bulkheads, because I set the fo'csle deck on and it served as a good guide. It's good to hear that the standing rigging checks out -- that suggests that even though the gunport strip is a pain, it works. Cheers, Martin
-
Hi Brian -- Planking is a challenge, always. And if you decide to skip the second planking, then you're over one of the hardest parts of the build. Cheers, Martin
-
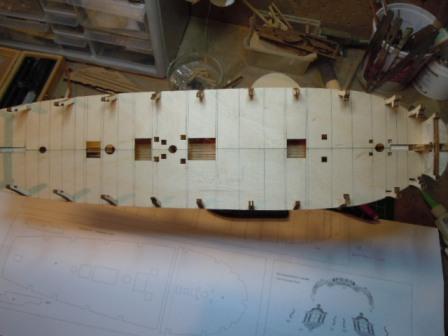
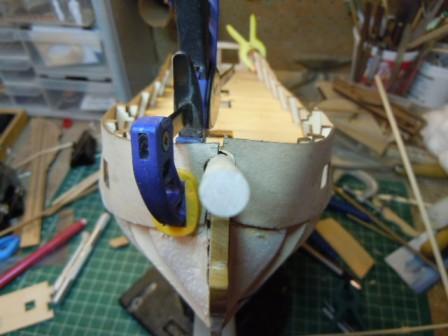
Thanks for checking in guys. I think the real issue was where the gunports ended up in relation to the deck. When the strip was too high, the gun ports toward the bow were about 2mm higher than those amidship. By lowering the strip at the stem, the gun ports came more in line. Spyglass, you're absolutely right about the length of the strip. So far I've only been dryfitting the back halves of the strip to check on how to fair the bulkheads as you suggested previously. But I don't like the fact that the strip extends well beyond the stern counter extensions. And that jigsaw joint on my strips is really loose. But now that I've taken the strips off, I think I'll keep them off for a while and work on the Captain's cabin. Cheers, Martin
- 467 replies
-
- 1
-
-
- fly
- victory models
- (and 1 more)
-
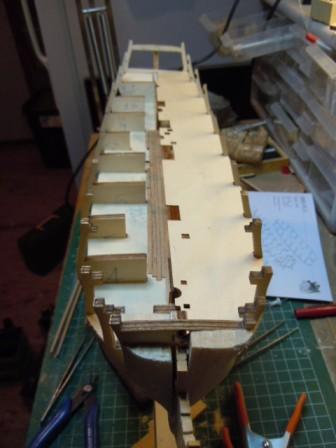
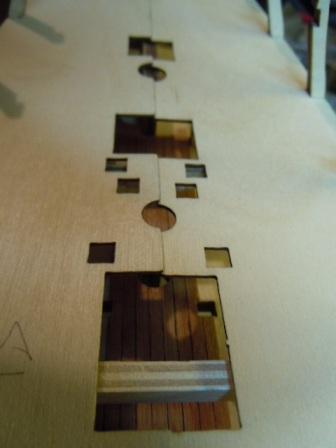
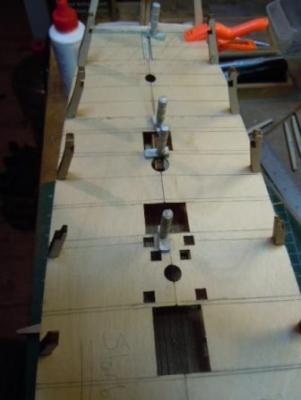
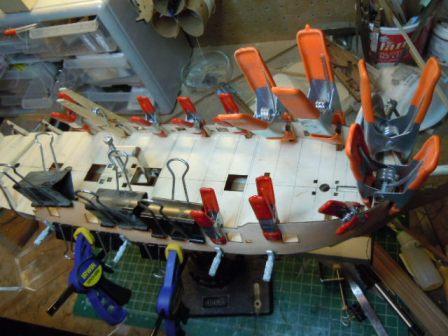
After a few weeks spent largely on getting the new operating system installed on my home computer, and then laboriously un-installing numerous spyware programs that seemed to spring like hydra's heads from the new Microsoft program, I can now post with at least some regularity. First I laid down some planking along the middle of the lower false deck, as I've seen from a few other builds. Here you can see half of the thin ply deck and the planking on the thicker false deck below. Next I laid out a planking plan on the thin plywood deck, largely by working out the theoretical placement of the frames. This strategy worked about 80% well, since the frames on the NMM plans don't always quite correspond to what shows up on the kit deck. But with these "frames" drawn, I'll be able to plot out the Captain's cabin and the Day Room. And, suprise, suprise, I ran into the problem than other Fly/Pegasus builders have met, and that is that silly little bulge down the middle where the 2 halves of the thin plywood meet. I smoothed that out largely with gobs of glue and some smallish blocks of scrap underneath the joints. I clamped the blocks and joints into a flat condition till the glue dried. And that's where I should have paused. Instead, I got antsy. The kit's instructions say, with all the breeziness in the world, that the next step is attaching the thin plywood gun strips. Now, I know that other builders have worked on the deck, adding plenty of furniture while everything up there is open. But I didn't have access to MSW to remind myself, AND I'm waiting on my wood order for the deck planking. So I worked on those problematic plywood gunport strips. Following the general procedure, I soaked the strips for 2 or 3 hours, then dry-fit them onto the bulkeads to get the basic form. I also took considerably care to ensure that they were level relative to one another by setting a small level across the tops. I mustered the courage – or fool’s courage, I should say – and glued the strips on. After showing the results to a few modellers more perceptive than I am, I got the response that the strips were noticeably too high, that the gunports would be too far off the deck. So, out came the alcohol, and off came the strips. After removing the starboard strip, I did in fact pause (just this once) long enough to decide how far I needed to lower the strips. The answer is almost exactly 1/16 inch. And that’s where I am for now. Trying to determine the best way to re-attach the gunport strips at the optimal height, while keeping all the gunports at the appropriate distance from the deck. Maybe it's time for a beer. Cheers, Martin


- 467 replies
-
- 5
-
-
- fly
- victory models
- (and 1 more)
-
Nicely place guns always accentuate the neatness of a build. Yours look terrific, Bob. I also have to admire your photographic skills. Cheers, Martin
-
Hi Jon -- Your solution to the lashing question seems to have worked out quite well. Those are lovely photos of a nice build. Cheers, Martin
-
Hi Scott -- Your planking looks nice. If you can look at your hull straight on from the bow and and enjoy the lines of the strakes, then you've met the standard. Sorry I haven't been able to keep up for a while -- I had to get that new Microsoft operating system installed (10 days), and then uninstall two dozen or so spy ware programs that came with the new OS. Ai yi yi what a tiresome process to go through just so I can read my email and visit MSW!! Cheres, Martin
-
Hi Ron -- Glad to hear you're getting geared up. Like plenty of others, I enjoy seeing your fine work. And I can appreciate how lulls happen (which I think amounts to saying, how no-happenings happen). Cheers, Martin
-
Slang it is, Peter. I think it comes from the weird world of seances, where a medium either takes laudanum (though brandy might do) or puts herself in a trance state by splicing and knotting, then "channels" spirits from other space-time continua. My German isn't good enough to come up with anything terrbily close, but tragen could carry or channel the meaning in a way. Cheers, Martin
- 431 replies
-
- 1
-
-
- pegasus
- victory models
- (and 1 more)
-
That's a nice boat there, Jon. The oars make a good detailed addition. I can't wait to see this on the R herself. Cheers, Martin
-
Nice work, Peter, really nice. And you're right about rigging -- it has a kind of hypnotic quality from the intricate problems that it continually poses. But if you're going to start channeling Maturin, I do hope you'll stay off the laudanum. Cheers, Martin
- 431 replies
-
- 1
-
-
- pegasus
- victory models
- (and 1 more)
-
Thanks for that, it explains the works clearly. Cheers, Martin
-
Hi Jon -- The photos are back in place! Cheers, Martin
-
Right, BE. I cut a second number 13 as well, largely following what you did. I put filler blocks under 13 last night, and they will help considerably in the placing of the new open bulkhead there. That extension of the hull that holds 13 at an angle from 12 will also need to come out, but I'm going to use it as a space when gluing 13 in. Cheers, Martin
-
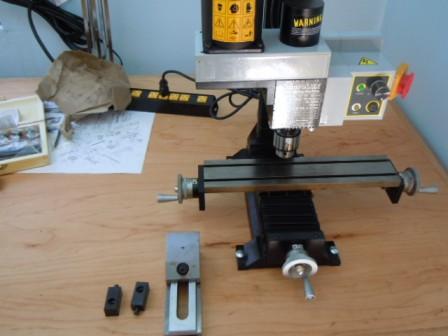
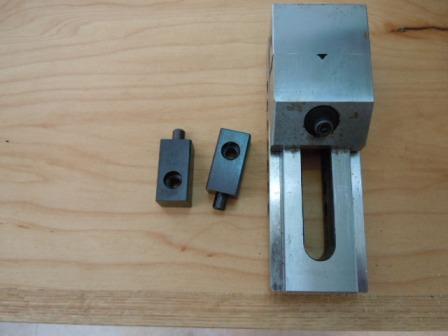
Thanks Jay, the photo tells me quite a lot. I have the nuts -- 4 of them, which seems like double what I need, since the clamps each have only one hole. What I'm missing are the bolts that would pass through the clamps to the nuts in the t-slots. Your clamps are bigger than mine. And I don't know what I would use the allen wrench for on mine either. One other question: how do you move the jaws of the vise? There's a heavy pin holding it in one of the holes. So how do you move it to another hole? Stupid question, to be sure, but I am an utter novice with this. Cheers, Martin
-
Nice guns, Bob. Getting those block in just right, and at a consistent distance is one of the many aspects of that repetitive job that can drive a shipwright cross-eyed. Looks like you nailed it. Cheers, Martin
-
Thanks a lot you guys. Revenge, I might just have what you show. Here's a photo of my mill and the vise & clamps. First my mill: And here are the clamps: These don't have the double prongs like the ones you recommend, but they seem to follow the same principle. Jay, that User's Guide is exactly what I've been looking for. Thanks loads. But the down side to your generous help is that I wish I'd heard of The Little Machine Shop last summer, since the price on their Mini Mill isn't much more than I paid for my Micro. Ouch! It's good to know there's another place for accessories, though. Cheers, Martin