
HOLIDAY DONATION DRIVE - SUPPORT MSW - DO YOUR PART TO KEEP THIS GREAT FORUM GOING!
×


Martin W
-
Posts
1,412 -
Joined
-
Last visited
Content Type
Profiles
Forums
Gallery
Events
Everything posted by Martin W
-
 Very impressive, BE! Opening up to the ladderway is a delightful touch. Martin
- 574 replies
-
- 1
-

-
- cheerful
- Syren Ship Model Company
- (and 1 more)
-
Ahoy Nils -- So, you've completed another masterpiece -- Bravo! I seriously think you should consider following Blue Ensign's strategy for dealing with a crowded display area: build a new wing to your house! Seriously, if you stopped building MSW would lose one of its major contributors! New project! New project!!! Cheers, Martin
- 692 replies
-
- 3
-
-
- eagle of algier
- chebec
- (and 2 more)
-
Sooo, is the galley flue part of the kit, or did you solder it together?
- 574 replies
-
- 1
-
-
- cheerful
- Syren Ship Model Company
- (and 1 more)
-
Thanks Bob. Now that I have an actual brand name to search for, I should be able to find it. Mike -- thanks for the nice words, though I 'm not convinced yet that jealousy is appropriate. As for the carvings, those Medusas on Pegasus do look intimidating (ahem!), though their size might make carving the facial features more of a possibility than the smaller figures. FFM's advice of starting out with a model in clay would really help to determine what's feasible. And I'm not sure yet about the angle of the quarter pieces. On NMM's Fly plans, they look to be facing fully aft. I had sort of envisioned notching them onto the planking to give them stability. Though that would violate the need to have a space between them and the bulwark. I actually haven't started on anything yet (beyond tracing the figures from the plans and gluing them onto some stock), because I'm fiddling with the mullions of the windows. But once I get a pair of clay models (very rough) done, I hope to be able to figure out the placement. And, natch, I'll follow the usual best practice of going back to several Swan build logs. I recall that BE resolved the issue with some Knight figures. Thanks for checking in. And thanks to everyone who clicked the like button! Martin
- 467 replies
-
- 1
-
-
- fly
- victory models
- (and 1 more)
-
Thanks for the lead, Bob. Where did you get that Micro Kristal Klear?
-
I agree with you, BE, the unglazed windows have as much life as unglazed windows in a house. I looked online and in Model Expo for any kind of product, and ran into a dead end. Probably I was using the wrong search term. Simply recognizing that this will be the final year has already made it go slower, my colleagues less charming, and my stomach acid more plentiful. Cheers, Martin
- 467 replies
-
- 1
-
-
- fly
- victory models
- (and 1 more)
-
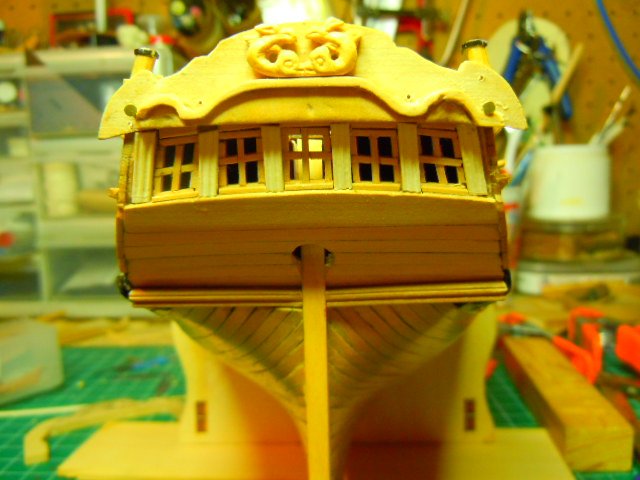
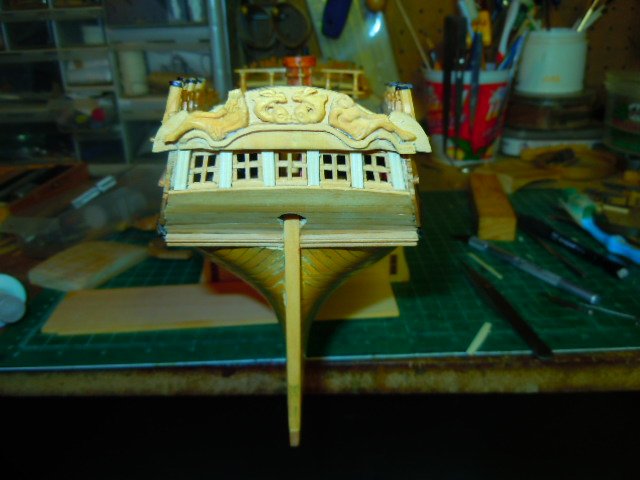
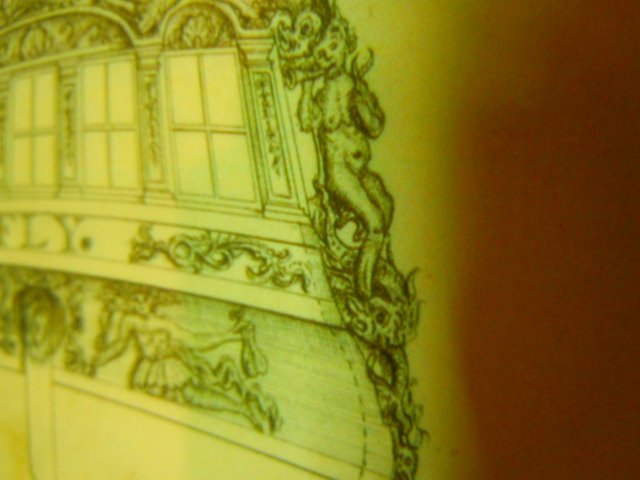
Work on the stern continues. I carved the King, and a pair of Dogfish to go in between the royal couple: The King's face came out a bit better, while the Queen's royal visage is still a bit of a blur. I tried numerous versions of a Kraken to go between, but they all failed disastrously. From reading the section on the carvings in FFM more closely, I learned that what I had been calling Putti are actually The Four Winds -- so their puffy cheeks are not cherubic but inflated. At any rate, they would have been just as difficult as the Kraken. After these three figures, I decided to take a break and work on the pilasters around the windows. I have a small amount of holly, and wanted to get some more, but the one supplier (not Syren) charges a flat shipping rate of $10, so that even a modest order becomes more expensive that this modeller would like. So I made do. I fashioned a scraper to cut the grooves. I then tried several techniques for fashioning capitols & pediments, but they all ended up looking too thick. Out of necessity, then, I've decided to forego those details. One problem here is that the 2 outermost pilasters on either side can't cover up the edge of the planking. I'm considering two options for this: either use a thin piece of boxwood, or hope that the quarter piece offers enough covering. My guess is that I'll do both (cover with boxwood and hope). In order to begin figuring out how the quarter piece will fit, I've had to attach the tafferal. I put it back into its curved mold for a few days, and then before it had a chance to spring back, I pinned and glued it into place: And then I added the Royal Couple: The port cove needs to be extended under the King's foot, and the part under the Queen's foot needs a bit of trim. But this essentially it. -- I could never find anything to simulate glass for the windows. The quarter pieces pose a new challenge, as they're round carvings rather than relief. The NMM plans show a lad with a dogfish going between his legs and another sitting atop his curly head: The upper dogfish extends up to the Queen's knee (or the King's over on the port side). The lower quarter piece appears to have a stylized Kraken (much better than anything I designed or carved) eating some polyps: And there's another really good Kraken on the side decoration: For now, my plan of action is to set up the trumpeting lad & dogfish as a relief carving that I'll round off in the back after completing all the frontal detail. On a side note, I'll mention that after talking with Mrs W at great length, I've decided this will be my last year in pre-retirement. None of my colleagues knows yet, but they still seem to have conspired to give me more work than ever. Between now and May, my shoulders will be bowed and the bags under my eyes like pineapples. Cheers, Martin
- 467 replies
-
- 6
-
-
- fly
- victory models
- (and 1 more)
-
My word BE, I look away for just a short while and you're leaping ahead. The capping rails really do seem to polish her off nicely. And there are lots of nice details to look at throughout. And it's great to see the man and dog behind the build. Cheers, Martin
- 574 replies
-
- 2
-
-
- cheerful
- Syren Ship Model Company
- (and 1 more)
-
One of those weights looks like a small shoulder plane. Have you been cutting tenons? Nice work as always, BE. Martin
- 574 replies
-
- 1
-
-
- cheerful
- Syren Ship Model Company
- (and 1 more)
-
Trains and ye old ruined pile -- can't go wrong there!
- 574 replies
-
- 1
-
-
- cheerful
- Syren Ship Model Company
- (and 1 more)
-
Hi John -- I have just now discovered your build log, and am very impressed with your progress and skill. Those guns look fantastic -- the iron work is meticulous for such a small scale. And getting the quoins to fit proved to be too much of a challenge for me, so I'm envious of your success. Can't wait to see more! Cheers, Martin
-
Nice indeed, Bob. I also have to say that I enjoy seeing a man's tools spread out on his workbench within easy reach. 😉 Cheers, Martin
- 359 replies
-
- 4
-
-
- prince de neufchatel
- model shipways
- (and 1 more)
-
William show what all that work leads to. Great work, BE. That's a (characteristically) nice addition of putting in the ladderway & the lower deck. Having a way for the eye to continue as though into a greater space is always compelling, and very much in keeping with Georgian designs. Cheers, Martin
- 574 replies
-
- 3
-
-
- cheerful
- Syren Ship Model Company
- (and 1 more)
-
A lovely addition to a lovely fleet, Toni. There's much to admire and to learn from. Martin
-
Ahoy BE! Great looking hull -- the treenails accentuate the nice lines. And I'll bet those ears (which I believe correspond to the cheeks on Swan builds) truly were delicate. When I put the Fly versions in, I found I pretty much either had to laminate to avoid the weak grain or to scarph in some short pieces. Laminating made scratching a moulding pattern tricky (and sort of sloppy looking in the end). Your hands are obviously steadier than mine. Cheers, Martin (El Tremblor)
- 574 replies
-
- 1
-
-
- cheerful
- Syren Ship Model Company
- (and 1 more)
-
That is a lot of copper to be sure! And I'm certain that you enjoyed every hour of putting it on. Cheers, Martin
- 366 replies
-
- 1
-
-
- bellerophon
- victory models
- (and 2 more)
-
Thanks for that, Peter. The needles don't come with much of a story, beyond that of my horse getting regular vaccinations. But usually after the second beer I can make up huge tales. 😉 Cheers, Martin
- 467 replies
-
- 1
-
-
- fly
- victory models
- (and 1 more)
-
Thanks for the hints, BE. I'll try to get a hold of some Clearfix and see how it works. I'd like something that isn't terribly shiny or transparent. On my Rattlesnake, I just used some clear plastic cut from egg cartons, and found it less attractive than having nothing there, so I'm hoping for the old fashioned look you refer to. As for the carvings: last night I pulled out a hypodermic needle (I have a pile from horse vaccinations), and was able to scratch out some details. But every time I got close to what I wanted, the flex of the needles would lead to a cut too deep or broad, and I'd have to start over. It's the challenges and the learning that keep this hobby compelling. Cheers, Martin
- 467 replies
-
- 1
-
-
- fly
- victory models
- (and 1 more)
-
Hi BE -- Thanks for the nice words, they mean a lot. I've never had much success getting any kind of glazing to work. I've never tried clearfill, so maybe I should give it a go. What have you used, and what's been your experience? Any blotching or smears? As for the decoration, last night I sat and stared at both the Queen & not-yet-formed King, and tried to work out a better strategy for their faces. At this scale, an actual face is impossible -- or at least very difficult -- so the aim is to create some shadows that give the impression of eyes, nose, and mouth. The problem is that all my tools, even that 1mm gouge I have, are too big. So we'll see how it goes. Thanks to everyone who clicked the like or react button. It's great to have folks checking in! Cheers, Martin
-
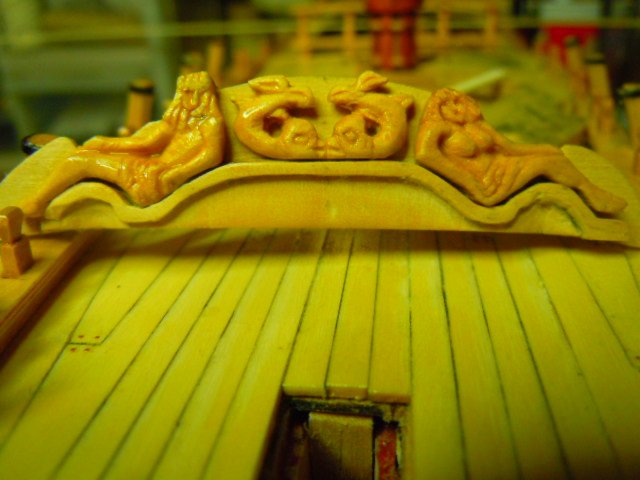
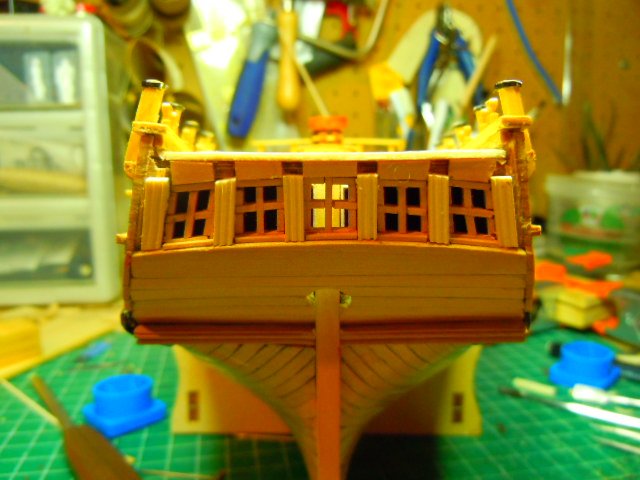
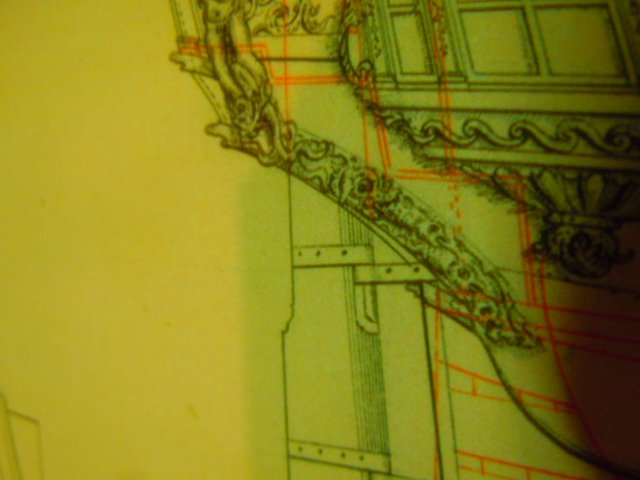
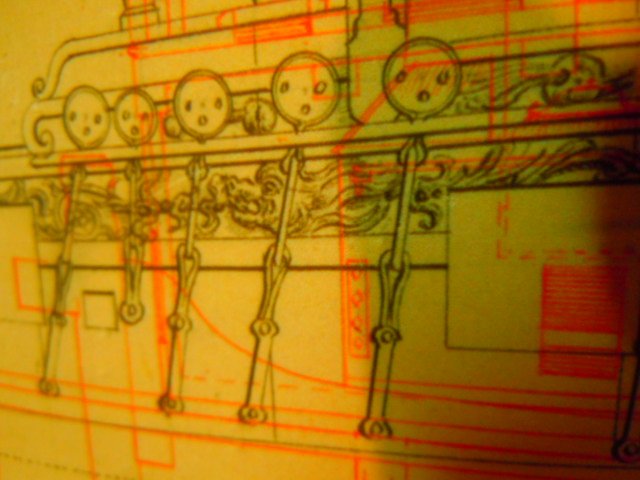
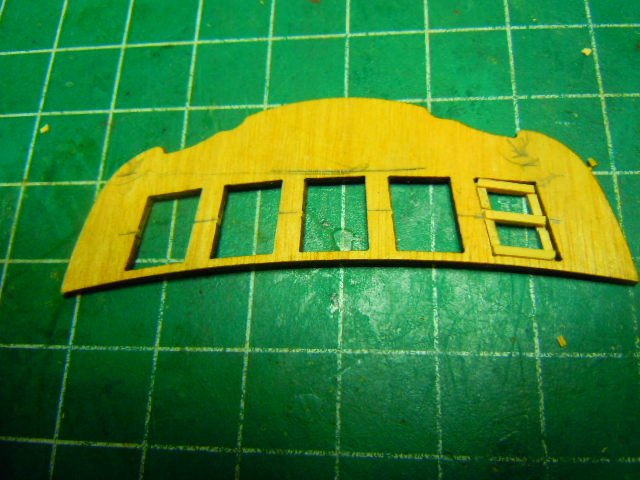
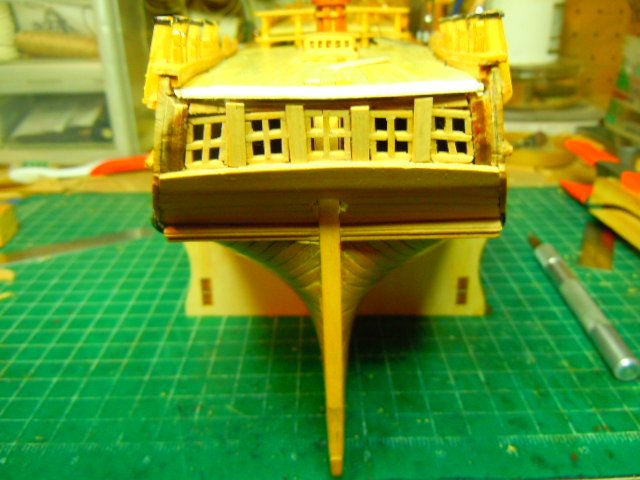
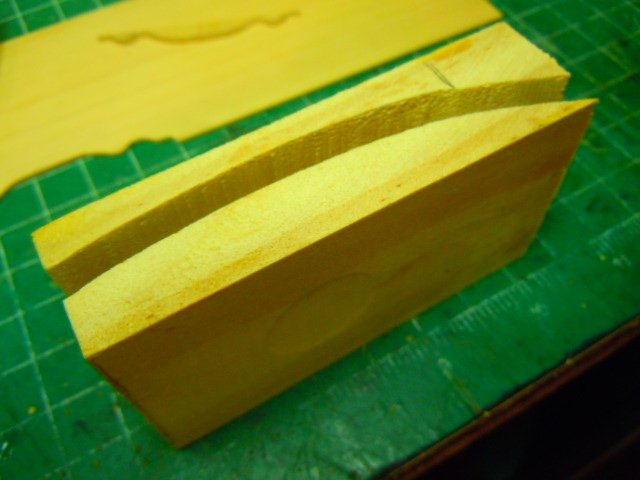
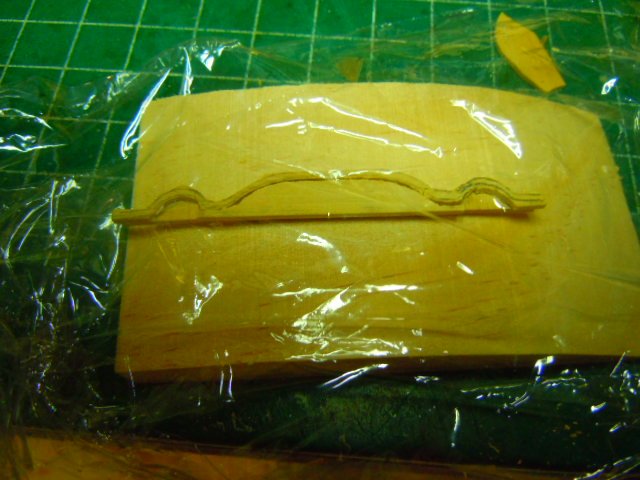
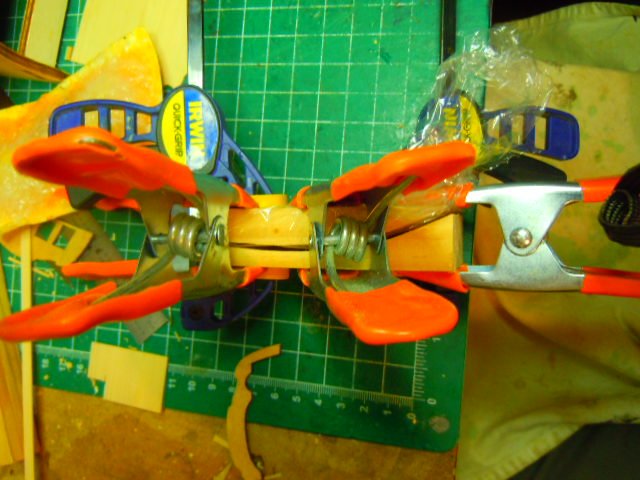
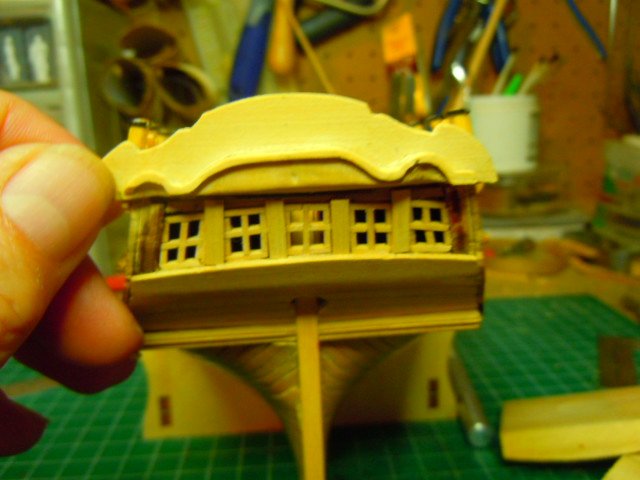
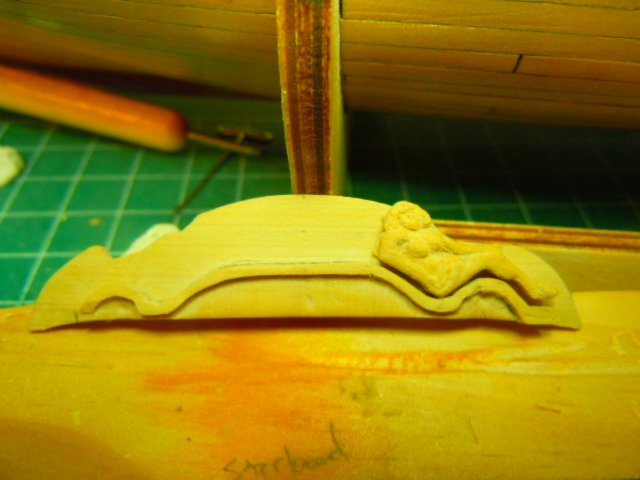
From the pointy end to the square end: For the past few weeks, I've turned my attention to the stern. First up are the windows. The kit's stern piece is thin ply, and it would work fine, but it's not boxwood. So I decided to continue with my bashing and try to scratch out everything. For the frames, I glued in some fairly thick stock (1/8 inch): They required a little bit of trimming, just to ensure that the actual windows would follow the curvature of the counter (which seems to be a bit less pronounced on NMM's plan). To get the windows into the proper angle, I used the kit's stern piece as a framing jig: That worked pretty well. You can see that I marked out the alignment of each of the center frames, and that helped a lot. I used 3/64" stock for the frames, and cut lap joints for the corners and to set in the horizontal cross piece. For the vertical cross piece, I cut only one lap in the horizontal piece, and then set the vertical piece up as close to the top and bottom as I could. That helped with the alignment. Here they are all in place, with the munions. In this photo the munions look out of alignment, but I just went back and checked, and in real life they don't look as bad. Plus they'll be covered with pilasters. My one gripe is that the 3/64 inch stock makes for some pretty thick looking windows. I don't think I could have gotten anything thinner to work, since these are pretty delicate as is. (I might also mention that as I was dry fitting one window in place, it shot out of my tweezers, and flew into the Captain's Cabin. It took my strongest flashlight, a long bent wire, and 90 minutes of patience to fish it out of there. That's also when I saw LOTS of shavings and dust lying in there that I also extracted.) Next is the taffarel. FFM details a lamination process that took me a while to understand, but I think I have worked it out. It consists of 3 layers. The bottom, with the grain running horizontally, is the main outline of the taffarel. I simply traced the kit's piece onto some 1/16" stock, and cut it out. The middle layer constitutes the three coves along the bottom of the taffarel, and its grain runs vertically. Then the top layer forms the "arch of the cove" or the border, and it is very thin and fragile, even with the grain running horizontally. I cut a mold on my bandsaw out of some pine scrap: In this I first glued up the top two layers, covering them with plastic wrap so they wouldn't stick to the mold: And then I clamped the mold together overnight. Out of the mold, I hollowed the coves a little bit, and here we are: For the carvings, I'm pretty much planning to follow the layout on the NMM plans, of the King & Queen of the Seas, with various sea monsters around them. I thought of trying to make the King & Queen a merman & mermaid, but I couldn't get the fishy lower part to look right, since it needs to curve over the cove. But I do think that instead of the putti flying in the middle section I'll try to carve a Kraken. A few years back I started carving the figures into the taffarel itself. I gave that up when I saw other builders glue figures onto the taffarel. And so that's the procedure that I'm following. And this time as well, instead of using a power carver, I'm using a high number of #11 exacto blades (it's the sharp point that has proven most useful, and it breaks easily). So far I've mostly finished Her Highness: I was pretty disappointed when I saw this photo, because she looks like nothing more than a blob. I did cut the folds of her skirt, some curls in her flowing locks, and something of a "face." But obviously I'm going to have to do some more refining, to get the details to stand out more -- and of course with poly wiped on, they will show up a bit more, but so will all the flaws. And that's where I am. Cheers, Martin

- 467 replies
-
- 6
-
-
- fly
- victory models
- (and 1 more)
-
Five strakes a day is about 4 1/2 more than my patience could handle. Those guiding marks you made adhere to your usual high standard -- and that's not a superfluous compliment, because following that curve at the stern is tricky. Cheers, Martin
- 574 replies
-
- 1
-
-
- cheerful
- Syren Ship Model Company
- (and 1 more)
-
I don't think they're at all fussy. Quite the contrary, I think they add to the overall tidiness of your work. After studying these last photos, I'm hard pressed to see how you can exclude yourself from the category of "ultra-crisp" planking. Cheers, Martin
- 574 replies
-
- 3
-
-
- cheerful
- Syren Ship Model Company
- (and 1 more)
-
2400 indeed! That's an interesting point about the colors. It's definitely worth keeping in mind. Cheers, Martin
- 366 replies
-
- 2
-
-
- bellerophon
- victory models
- (and 2 more)
-
That's an impressive array of armament, Bob. As I recall, the two carronades right up at the bow were a really tight fit. Yours look just right to me. Cheers, Martin
- 359 replies
-
- 4
-
-
- prince de neufchatel
- model shipways
- (and 1 more)
-
Have you ever tried setting out the lines with blue tape? You could decide where the frames would lie, and lay out the treenails there. Theoretically, anyway.
- 574 replies
-
- 1
-
-
- cheerful
- Syren Ship Model Company
- (and 1 more)