
HOLIDAY DONATION DRIVE - SUPPORT MSW - DO YOUR PART TO KEEP THIS GREAT FORUM GOING!
×


Martin W
-
Posts
1,412 -
Joined
-
Last visited
Content Type
Profiles
Forums
Gallery
Events
Everything posted by Martin W
-
 Wow! that's some impressive progress, Doug. I'm envious that you're on the rigging now -- I'm stalled at the tangle of bits and pieces in the head structure. Cheers, Martin
 -
Very neat work, BE. The strategy of painting the wale before setting it in place clearly paid off. Cheers, Martin
- 574 replies
-
- 3
-

-
- cheerful
- Syren Ship Model Company
- (and 1 more)
-
Toni -- Your carving skills are growing by leaps and bounds!! The impressionistic munions will look fine, casting leafy shadows -- wow! cheers, Martin
-
Hi Bob -- That's tidy planking. Every time I check in on your progress, I hear myself saying, ah, so that's how the Prince is supposed to look! -- And I think a lot of us are eagerly awaiting the re-opening of Crown. Cheers, Martin
- 359 replies
-
- 2
-
-
- prince de neufchatel
- model shipways
- (and 1 more)
-
Teeth always make lady look better. She's going to be a beauty.
- 366 replies
-
- 2
-
-
- bellerophon
- victory models
- (and 2 more)
-
Hi Jason -- Your observation is very timely. Last night I graphed 2 versions of the head rail on some card stock, and couldn't quite figure out why neither of them worked. Then, after looking back and forth at the kit plans & the NMM plans, I noticed that nicely graceful curve you're talking about. The aesthetic aspect is what I find delightful -- the scientific part continues to elude me as I need to figure out how and where to elongate the rail without distorting it. Thanks for your advice! Martin
-
Thanks for the encouraging words, you guys, and for the astute observations. Peter -- I left that excess wood at the forward end of the rail to allow myself to slide the rail back and forth to see how it might fit. I have since trimmed it off, and probably should have left it, since I still haven't worked out the fit. My first effort was to set up the timbers first and then align the rails, but since I departed from the kit long ago, numerous "variations" (ahem) have arisen that don't make a simple alignment that easy. So I decided to follow the procedure in FFM of figuring out the rail first and the timbers second. BE -- I did indeed use the the kit's rail, and the plans to lay out my own. I had to elongate it just a tad, however, and that's where I think I slung it too low. When I get in the boatyard this evening (as soon as my feet can carry me) I'm going to try pulling off the swivel mounts, to see if I can just set the rails up higher without creating new problems. Too often, though, trial runs, or theoretical set-ups, look good until they become reality. Maybe I should mention that I have no background in engineering, draughting, or much else that's practical in something like this. I do recall struggling in Geometry class as a lad, but my troubles mostly came from the girl sitting next to me who almost certainly had no idea of my agony, or even my existence. But I do love trying to work out these sorts of problems, even with my stunted design skills. Nils -- this is a VERY fun hobby, and it's seeing what craftsmen like you can accomplish that keep making me want to try again and again. Retirement is maybe (I'm hoping) a year away, or two at most. There are a few matters I'd like to finish up, and then Mrs W. and I will be heading to cooler climes, and -- she's promised me! -- a much larger boatyard. I'll let you guys know how my next efforts pan out. Cheers, Martin
- 467 replies
-
- 3
-
-
- fly
- victory models
- (and 1 more)
-
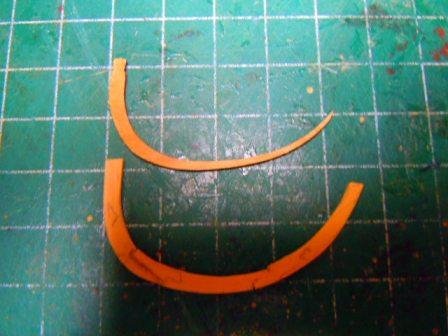
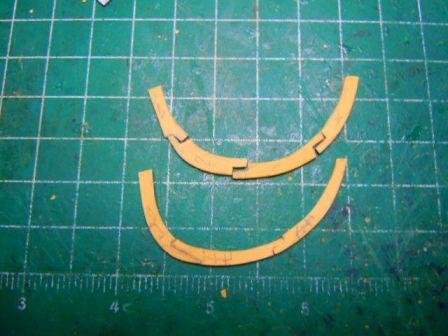
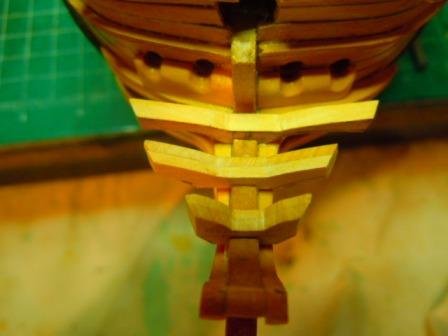
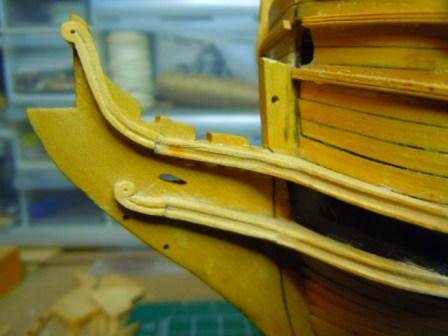
Hello Everybody -- This is just about the first chance I've had to look away from work (retirement is calling me, and I'm beginning to listen), and since the weather outside has been cool, I've spent the rare weekends out there -- except for the days that were eight degrees. I've been trudging along with the head works, and have mostly been finding my skills seriously challenged in just about every way. So far I've re-made the rails twice, and am seriously thinking about redoing them yet again -- the problems have been keeping them even in their downward sweep, and in getting that sweep at the proper elevation. I've also found that little decisions I made long ago were ill-informed and are revealing their consequences now. In short, I've mostly been frustrated. But I thought I'd show what I've done (without the repeats). I made the rail out of two layers laminated. At the top is the kit's rail, made of walnut. The bottom is the first layer of mine from boxwood, and if you can penetrate the poor photography, you can see the 2 scarphs. The second layer will also be jointed with scarphs offset from these: And then the two layers are glued up: Here's the view from port of the rails pinned in place: These look too low to my eye. Simply to slide them upward makes them overlap the swivel mounts, however. I'm thinking I might just get away with raising the mounts a smidge or two. If that doesn't work, then I'll start over on the rails. In fact, I've graphed them out again, trying to get the forward sweep to start just below the swivel mount, but haven't set the drawing against the build itself yet. And finally here are the timbers: Or I should say, here are the timbers in their first manifestation. In re-reading FFM on the timbers, I finally came to the understanding that the rails will need to sit on top of notches at the outer ends, so I've already begun to do them over. That's where I am. Progress is slow to say the least (and sometimes backwards). I'll update again when I get the lower rails done. Meanwhile all comments and suggestions are welcome! Cheers, Martin

- 467 replies
-
- 5
-
-
- fly
- victory models
- (and 1 more)
-
Ahoy Peter! I can sympathize with your irritation over mistakes made too long ago to correct -- that's pretty much been my experience so far with The Fly, and I didn't even realize I was doing things the 'navy way'. I also have to say though that your workbench is far tidier than mine -- sometimes it seems that the storage drawers must be all empty because everything (and more) is on the surface. Ai yi yi! Martin
- 366 replies
-
- 5
-
-
- bellerophon
- victory models
- (and 2 more)
-
Neat work, there, BE. I always like seeing the hull shape that emerges as the planking goes on. And Cheerful is a lovely little thing, isn't she? Cheers, Martin
-
Terrific work, Mihai, and congratulations. I also have to say that I love the look of your walls -- very handsome! Cheers, Martin
-
Hi Bob -- Great to see you at another build. The Prince is dear to my heart, since it was my first build. So I'll be zeroed in to see a Right Master giving her the attention she deserves! And I recall that Howard Chapelle has a good discussion of the Prince and other Baltimore style ships. Cheers, Martin
- 359 replies
-
- 6
-
-
- prince de neufchatel
- model shipways
- (and 1 more)
-
Hi Bob -- If "bad" language helps, then it's not bad in my opinion. And if your hands aren't as steady as they used to be, well, you're still getting things done at an impressive skill level. Fabulous to see! Martin
- 682 replies
-
- 4
-
-
- halifax
- lumberyard
- (and 1 more)
-
Very interesting, BE. I wouldn't have thought the balsa filler blocks would extend above the ports. Is this common in your experience? Cheers, Martin
- 574 replies
-
- 2
-
-
- cheerful
- Syren Ship Model Company
- (and 1 more)
-
Very nice carving, Toni -- you clearly know how to wield a knife. It looks like you worked in some interesting motifs along with the acanthus leaves -- maybe some wings (port) and a trumpet (starboard)? Bravo! Martin
-
Nice work, BE, and good save on that gap. Surely, if there is a warp, it won't be enough to lead to other problems. (?) Looking over your tool setup again, I noticed you had a vacuum hose hooked up. (And I've often wondered how you took care of the dust in a carpeted work room.) Does that lead to a shop-vac, or do you have a fully-blown dust-collection system (one of the many, many upgrades I've been craving)? Cheers, Martin
- 574 replies
-
- 2
-
-
- cheerful
- Syren Ship Model Company
- (and 1 more)
-
No progress to report -- I'm trying out some decorative carvings for the head, and going even more slowly than usual. Mrs W (of the Prairie) and I are heading off to upstate NY for the holiday, so I would like to take this chance to thank everyone who's checked in, andoffered advice and encouragement, over the past year. Happy Holiday to all, and Happy Modelling! Martin
- 467 replies
-
- 4
-
-
- fly
- victory models
- (and 1 more)
-
Gotta love Proxxon! Their tools work seriously, and they fit in a small space. Nice progress on the bulkheads -- they look good and square. And Hooray for William! There's nothing like having a dog to help out with the technical details. Happy holidays to you, BE, and to Mrs W of the Shires, and to WW himself. Cheers, Martin
- 574 replies
-
- 4
-
-
- cheerful
- Syren Ship Model Company
- (and 1 more)
-
Thanks BE. And the same to you and yours. Always a treat to see William -- I heard about the snow hitting England -- a bit of a rarity? Cheers, Martin
- 574 replies
-
- 4
-
-
- cheerful
- Syren Ship Model Company
- (and 1 more)
-
Nice work, BE, and the kit really looks to be made of top-grade material. What a concept -- producing a kit that doesn't require the builder to replace virtually everything. I do admire your habit of framing the NMM plans. I have the plans of Fly merely (and profanely) taped to the wall next to my workbench. They are very handsome prints, and definitely deserve framing. By the way, did the draughtsman of the Cheerful plans sign his name? Cheers, Martin
- 574 replies
-
- 6
-
-
- cheerful
- Syren Ship Model Company
- (and 1 more)
-
Thanks for checking in, guys, and thanks to everyone who clicked on the "like" button. Mike -- I'm always up for practice, so sure, set up a cot in your boatyard. Oh, wait, I forgot -- I still have a job. Your question about the lining is a bit of a teaser. I don't recall FFM clarifying the matter, but I would guess the measurement is for the hole itself, which then becomes narrowed by the lining which extends over the bottom of the bolster. When you give that explanation, Bob, it seems obvious. But when I was doing the lamination, it just didn't dawn on me. Funny how the mind works (or doesn't). Somehow I think I'll have a few opportunities ahead to try the process again. Thanks, BE, those dimensions are very helpful. I looked at your log and noted your discussion of the kit's placement of the hawse holes too close to the stem. Frustratingly, I had already drilled the (too small) holes. BUT, I think that with a clever placement of the bolster I can conceal them and drill some new and larger ones further out. Plenty to consider. Martin
- 467 replies
-
- 2
-
-
- fly
- victory models
- (and 1 more)
-
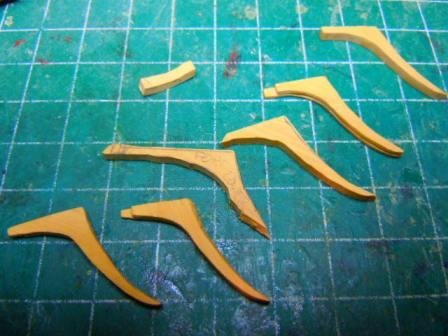
Hello everybody -- It's been a long, long time since I updated this log. Work, work, and more work has put serious limits on my time (and energy), but I have gotten in the boatyard for at least a brief spell almost every evening. One other reason for my tardiness is that I have taken on the Head. I spent a good bit of time going through other logs' accounts of this intricate and demanding structure; and I've spent plenty of time thinking of how best to fabricate and fit the pieces that work in complex ways. Another reason is my, ahem, lack of ability (except in the destruction of wood ). Numerous attempts at the cheeks resulted in filling up the reject pile: These are only the ones that didn't fit against the hull & stem properly. Many others looked good and then broke because I tried extending one of the arms too far against the grain. I tried Bob Fine's strategy of laminating, but then ran into difficulties scraping the molding into 2 different grain patterns. But perseverance and full use of the Sailor's Profanasaurus got me to a rough version: Last night I sanded this a bit, and filed down the uneven joints, so it does look better. My dastardly camera wouldn't turn on, so this is the latest. I also drilled the hawse holes on each side. According to the kit's plans, these should be 3/8" in diameter. But those on the NMM plans, and on a lovely model of Fly I drooled over at the NRG conference a few years back are much larger, even accounting for scale. Advice on this would be welcome. Cheers, Martin
- 467 replies
-
- 5
-
-
- fly
- victory models
- (and 1 more)
-
Hi BE -- Great to see you at it again. Congratulations on your new Proxxons (see me GREEN). I've never used a planing machine, though have yearned for one at both the modelling level (we have Jim Byrnes over on this side o' the pond) and at the full scale. My guess about the lateral movement of the strip is that it's due to the narrowness of the stock, ie as a strip, since the expectation for planers generally is that you'd start off with wide stock, plane it to thickness, then rip it to width. Just a guess, though. And congratulations on winning the support of Mrs W -- always a boon. Cheers, Martin
- 574 replies
-
- 3
-
-
- cheerful
- Syren Ship Model Company
- (and 1 more)
-
Neat work, Bob. Those pumps display your customary ingenuity. Cheers, Martin
- 682 replies
-
- 5
-
-
- halifax
- lumberyard
- (and 1 more)
-
Oh, yes, BE, that's a lovely duo! Well done, and ONWARD! Cheers, Martin
- 91 replies
-
- 4
-
-
- 18th century longboat
- model shipways
- (and 1 more)