
HOLIDAY DONATION DRIVE - SUPPORT MSW - DO YOUR PART TO KEEP THIS GREAT FORUM GOING!
×


Martin W
-
Posts
1,412 -
Joined
-
Last visited
Content Type
Profiles
Forums
Gallery
Events
Everything posted by Martin W
-
 Hi BE -- I didn't know about using de-ionized water. Does that take the place of flux? Cheers, Martin
 -
Hi Bob -- As a builder of the Prince, I concur with your assessment of the kit. It's old, has not been updated, and so falls far short of what many people have come to expect from a kit -- especially now that Syren is producing some very interesting projects. But, and this a a major but, as every one else attests, you've taken a poor kit and have done more than most of us could do! I'm a bit behind you in years, but blurred vision has begun to make those details at 1:64 almost impossible to gauge. Still these builds provide a quiet means of slow and steady attention. You're one of the real craftspeople on this site, Bob. Three cheers for another fine accomplishment. Martin
- 359 replies
-
- 3
-

-
- prince de neufchatel
- model shipways
- (and 1 more)
-
That is a fascinating construction of a cathead -- lacking the outboard support, and resting on that vertical beam. Hmm, I have to wonder just how much weight it was able to handle. Cheers, Martin
- 574 replies
-
- 1
-
-
- cheerful
- Syren Ship Model Company
- (and 1 more)
-
How very intriguing -- not only the flushing toilet, but the simple idea of collecting fresh water. Nice work as always, Peter. The quarter galleries make a bold addition, and the steps & bolster make everything start looking like a Man of War! Cheers, Martin
- 366 replies
-
- 2
-
-
- bellerophon
- victory models
- (and 2 more)
-
I remember trying to match the work you did on Pegasus' guns, and never being able to get those details. Now, at 1:48, the details really look good. I want to ask about your decision to fit the carronades with wheeled carriages rather than trunions. Have you already discussed this? Cheers, Martin
-
That's a really nice looking Fly, Doug. Terrific work. Cheers, Martin
-
Thanks, Ron, glad to have you check in. Seeing the attention to detail you put into your Oneida has always inspired me. Cheers, Martin
- 467 replies
-
- 1
-
-
- fly
- victory models
- (and 1 more)
-
Ha ha! Thanks, Doug. The difficulties might also be thought of as intriguing questions, like, hmm, can I do this? Thanks for checking in. Martin
- 467 replies
-
- 1
-
-
- fly
- victory models
- (and 1 more)
-
Thanks for checking you guys. Peter -- Those are very nice comments that I'll carry with me to the boatyard for many nights. I recently heard a famous woodworker say that the difference between an amateur and professional is that when someone compliments the amateur he begins to list all the faults of the piece, and when someone compliments the professional he just says, thanks. Mike -- I like your idea of pinning these figures from the back. That would prevent having to drill a hole all the way through. Last night I spent my whole modelling time sketching possibilities for the lower pieces, and working out the connection between them and the upper quarter pieces. My plan is to make a sort of L joint (technically, a lap joint I suppose) that the dogfish head would fit into and that would give gluing surfaces at the bottom and the back. So the two points of support would be the pinned head of the Triton, and the pinned & glued head of the dogfish. We'll see how it goes. Cheers, Martin
- 467 replies
-
- 1
-
-
- fly
- victory models
- (and 1 more)
-
Nice work. Did you cut them out with the scroll saw then file them to their final shape?
- 574 replies
-
- 1
-
-
- cheerful
- Syren Ship Model Company
- (and 1 more)
-
Thanks BE, those are encouraging words. I'm not sure these little carvings will ever match the meticulous skill you bring to the craft, but I did enjoy making them. Thanks to everyone who checked in -- it's always nice to know you folks are still interested in my desultory work. Cheers, Martin
-
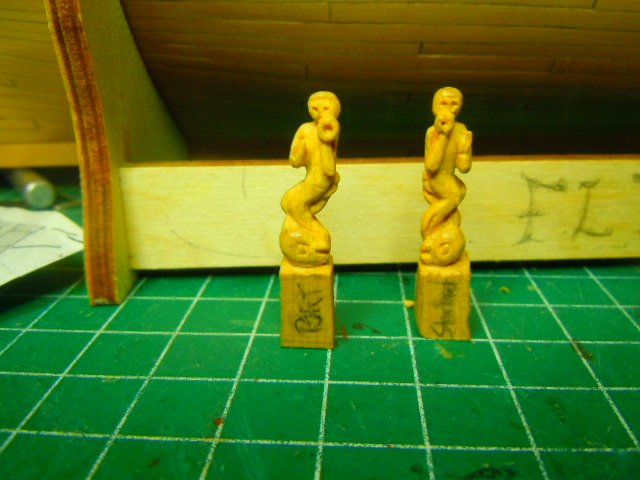
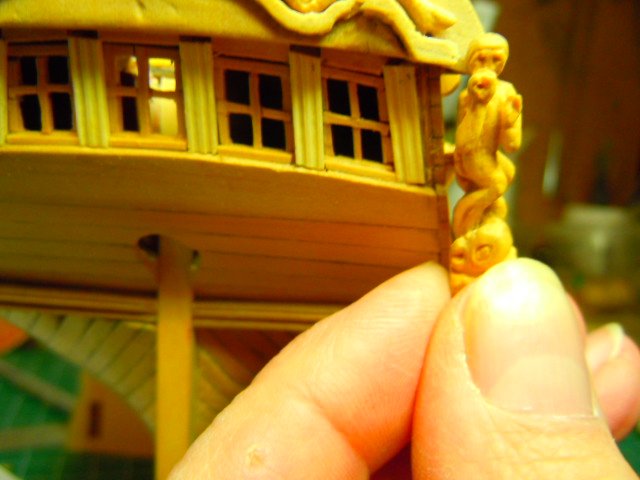
I've effectively completed the two quarter piece carvings. I feel that I've been working on them continually, but looking at the date of my last posting, I have to wonder. Ok, I threw out three versions for three different reasons, so maybe starting over and over took some time. Here are some views: Each of them has its own strengths and weaknesses. I tried to follow the advice in FFM of doing the two together, but each one took its own route. Looking at the pictures, I wonder where all the detail that I spent so long has disappeared to. Hmm, I was sure it was there. Uh oh, and now I've begun to notice other issues that I don't recall having ever seen before. Time to look away! As I've mentioned before, I have no idea how to attach them. The lower pieces (yet to exist) will provide a kind of basis, and the dogfish coming down from above might also, but they still seem to be pretty much just in the air. A basic gluing seems insufficient, but do I really want to drive a pin through Triton's head? Cheers, Martino lento


- 467 replies
-
- 12
-
-
- fly
- victory models
- (and 1 more)
-
I love the "crew perspective" shot! And I can see why you chose that canary wood for the base -- handsome! Overall, a build to be proud of. Cheers Martin
- 136 replies
-
- 1
-
-
- caldercraft
- Cruiser
- (and 2 more)
-
Terrific work, Ron. I can only admire your nerves of steel in getting those oar shafts down so thinly. I also have to envy the quality of your photographs -- their clarity really does bring out the fine details of your work. Cheers, Martin
-
As Alfred Hitchcock said, "Any posting on MSW with a dog picture makes jolly Christmas cheer!" Happy Holidays to you, Mrs W (of the Shires), and William (himself). Cheers, Martin PS -- I love that beautiful little plane . . . I'm beginning to suspect you're a collector!?
- 574 replies
-
- 1
-
-
- cheerful
- Syren Ship Model Company
- (and 1 more)
-
Ah, BE -- It seems that your easeful speculation has induced a bit of a strain.
- 574 replies
-
- 1
-
-
- cheerful
- Syren Ship Model Company
- (and 1 more)
-
That planking is utterly fascinating, BE. And your anniversary photos show a handsome build -- so if it's all fun stuff here on out, as Chuck says, I hope it has results as compelling as what you've done so far. Cheers, Martin
- 574 replies
-
- 1
-
-
- cheerful
- Syren Ship Model Company
- (and 1 more)
-
Yes it is fun! The Prince was my first build, and the rigging is what eventually led me to MSW, because I just could not figure out what the kit's instructions were about! Seeing you getting the standing rigging started makes me want to go back and look at my own work . . . but I dread finding out how much I did wrong. Your Prince really shows how it's all supposed to work. Cheers, Martin
- 359 replies
-
- 4
-
-
- prince de neufchatel
- model shipways
- (and 1 more)
-
Very nice, indeed. Everything looks to fit nice and tightly. Good to hear from you again. Cheers, Martin
-
Scarphs can be tricky and often require multiple tries. But in the end, they look awfully good. Very tidy work (and we ALL understand the obsession!). Cheers, Martin
- 574 replies
-
- 1
-
-
- cheerful
- Syren Ship Model Company
- (and 1 more)
-
Nice work, BE. On the skylight, I think that the red goes along with the painted bulwarks quite nicely. My first thought was, oh no, unpainted wood is always better! But once I saw the picture, I changed my bigoted discord to a harmonious paean to parts uniting into a whole. 😊 And I do remember your jig for the Pegasus guns -- in fact, I plagiarized it! Cheers, Martin
-
I hope the eggs will stay! Nice work on the base, Nils. cutting that molding can be tricky, even with the miter saw. Cheers, Martin
- 692 replies
-
- 2
-
-
- eagle of algier
- chebec
- (and 2 more)
-
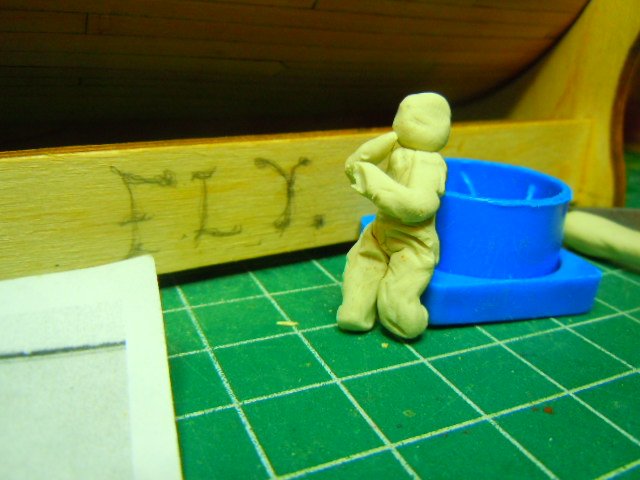
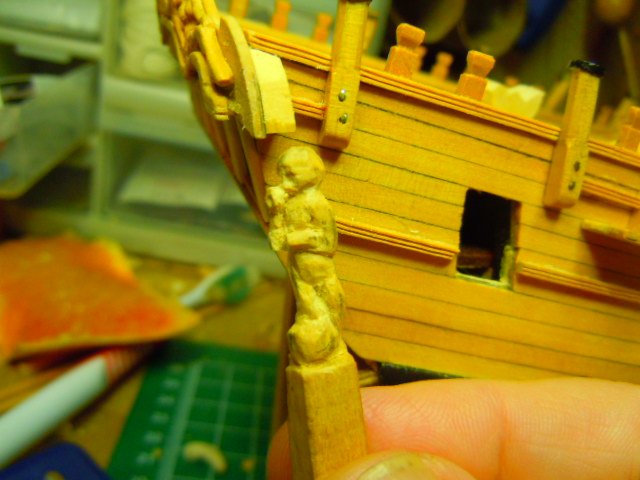
A brief update. Starting on the lower quarter pieces, I've mostly been making adjustments to my approach. As always, I started with a clay model that served to answer just a few questions, like how the angle of the legs should align with the angle of the shoulders. It's pretty much in the range of the Pillsbury Doughboy, but it served its purpose. At least up to a point. As I began to think about actually putting knife to wood, other questions arose, like how to fix the different heights of the various lines formed by arms & legs, not to mention the dogfish curving through the legs. Since I'm one of those guys who ruin lots of wood, I have plenty of scraps lying around. I grabbed the one closest to hand and tried working out some of the issues by way of prototype. This is unfinished, so lots of the details are mere blurs, but this gives you a blurry idea of where I'm headed: There's a dogfish that will extend from Her Royal Knee down to Triton's curly head. And of course, the real teaser remains that dogfish weaving its way through Triton's legs. Oh, and as far as I can make out from the NMM plans, he's holding a small polyp in his hand. And I can say up front that I can't imagine even dreaming of hoping to carve something that intricate that would be about 1/16 of an inch. Cheers, Martin

- 467 replies
-
- 6
-
-
- fly
- victory models
- (and 1 more)
-
Bravo! Your log will continue to serve as a tutorial for many of us. It's always useful to see how the skilled folks answer the questions raised by a build. Cheers, Martin