
HOLIDAY DONATION DRIVE - SUPPORT MSW - DO YOUR PART TO KEEP THIS GREAT FORUM GOING!
×


Martin W
-
Posts
1,412 -
Joined
-
Last visited
Content Type
Profiles
Forums
Gallery
Events
Everything posted by Martin W
-
 Hi BE -- Your thinking about the black line sounds logical to me. And this is a tidy little build that I assume is serving as an intermezzo for a larger project, eh . . . . ? Cheers, Martin
 -
Glad to see you're at it, Peter. Bellerophon really is an impressive ship. I think you might have mentioned this early on, but I can't remember: is she similar to the Bellona? I ask because I the Anatomy of the Ship book on Bellona, and thought I might look through it to get a sense of where you're headed. Cheers, Martin
- 366 replies
-
- 3
-

-
- bellerophon
- victory models
- (and 2 more)
-
Basswood / limewood -- harumph! I just finished a carving project with an 8x10" piece of lime/bass/whatever, and have grown to dislike the "wood" thoroughly. You're absolutely right about its unevenness in coloring, though in itself it's supposed to be neutral. But any cutting opens the grain so that it takes on a different shade. It's also hard to keep it from developing fuzzies (and sanding is a no-no). I recall that your previous build had lime planking and that they presented certain annoyances. I am impressed, again, at your skills in overcoming these problems in order to come up with a lovely build. Cheers, Martin
- 91 replies
-
- 2
-
-
- 18th century longboat
- model shipways
- (and 1 more)
-
Hi BE -- Nice work as always, especially with the iron fittings. Curious about the difficulties with the spar coloring. I take it that the dowel is pine or fir? Cheers, Martin
-
Hi Bob -- I'm just starting the head on my Fly, and seeing your work here has solved one of the first problems: I never thought of laminating! And I have just been baffled over cutting the big curves of the cheeks that cross the grain no matter how they're lined up. Plus, your nice sanding of the outer edge takes care of the task of decorative molding. Wonderful. Now if I can only get a few days off from work, maybe I'll get it done. And maybe if I do it a dozen times, I can get something almost as nice as your work. Cheers, Martin
- 682 replies
-
- 2
-
-
- halifax
- lumberyard
- (and 1 more)
-
Hi BE -- That ivory really looks good; once I saw it with the decoration along the sheer, I understood why you went with that tone instead of plain white. And your use of the ochre varnish also complements the colors & tones of the decoration/ivory combo. And so, I agree with Steve that the stern decoration might be a touch bright. And I also think your decision not to add white along the margin of the caprail is right, since that would have brightened the red interior (and I like that shade of red). It's a nice little build for a man of your talents & skill. (I say that coming off a weekend of blunders and basic mistakes of reading a ruler). Cheers, Martin
- 91 replies
-
- 3
-
-
- 18th century longboat
- model shipways
- (and 1 more)
-
Congratulations, Ken. The Rattlesnake is a lovely ship, and you have done her full justice. Display your build proudly! Cheers, Martin
-
Delicate work, indeed, BE. Very nice, and I'm glad you're doing it instead of me! Cheers, Martin
- 91 replies
-
- 1
-
-
- 18th century longboat
- model shipways
- (and 1 more)
-
Lovely work, Bob. It's a real treat to scroll through the pictures and watch the progress. Fabulous! Martin
- 682 replies
-
- 2
-
-
- halifax
- lumberyard
- (and 1 more)
-
Aha! So that's how you get those nicely rounded sheaves!!!! Very realistic looking. Glad you made it through the storm, Bob. Let's hope that's last of them for a while. Cheers, Martin
- 682 replies
-
- 4
-
-
- halifax
- lumberyard
- (and 1 more)
-
Nice work, BE. It's actually seeing the clamps in place that make me realize the diminutive size of the "Long"boat. Cheers, Martin
- 91 replies
-
- 3
-
-
- 18th century longboat
- model shipways
- (and 1 more)
-
Thank you very much, Nils. Coming from a craftsman like you, that's a compliment I value. Cheers, Martin
- 467 replies
-
- 1
-
-
- fly
- victory models
- (and 1 more)
-
Thanks for checking in everybody. Mike, yes those sheaves are supposed to work, but I won't know how until I start on the rigging. The kit plans show eye bolts along the breast beam, but FFM replaces those with the sheaves. In the end I suppose they were what made my breastwork overly tall. Cheers, Martin
- 467 replies
-
- 1
-
-
- fly
- victory models
- (and 1 more)
-
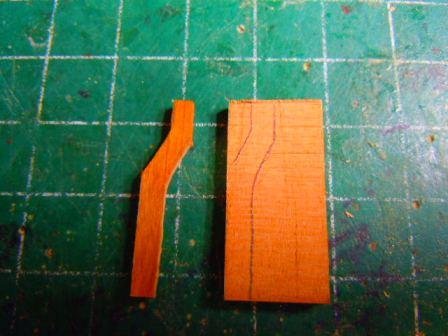
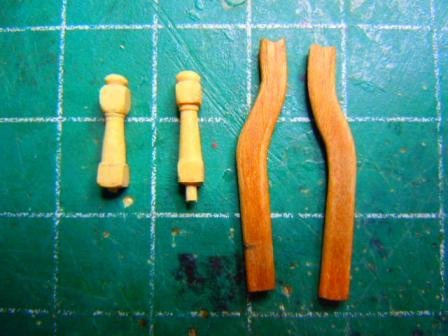
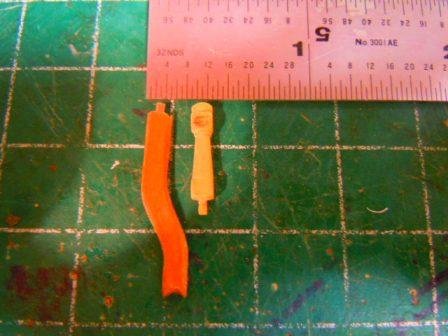
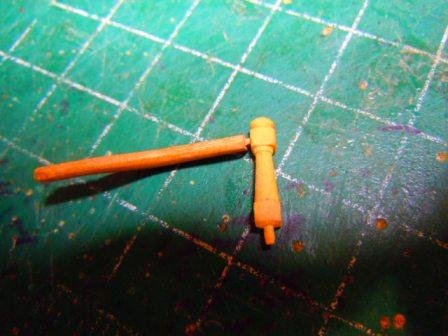
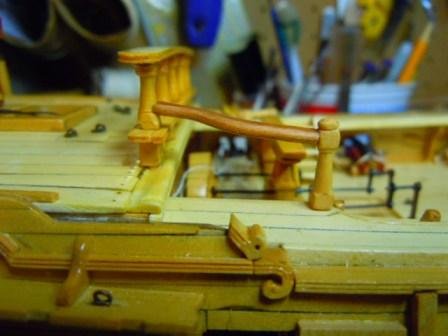
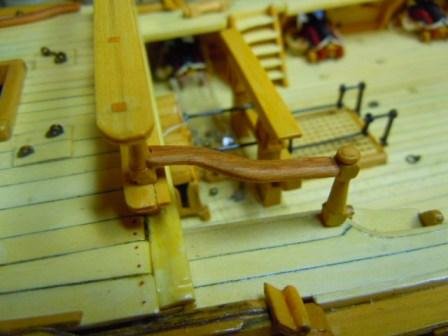
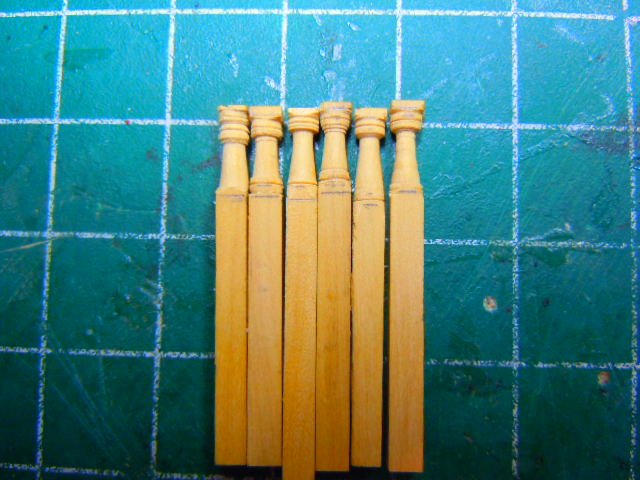
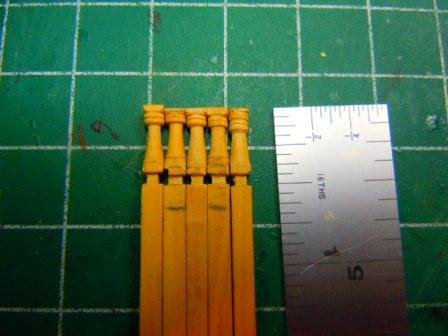
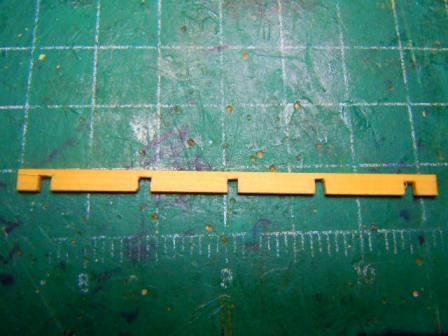
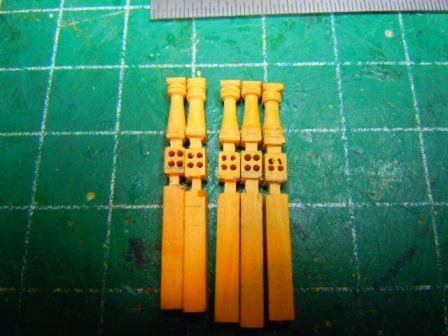
I've decided to keep my oversized breastwork. I can't find any figures at 27mm -- and the larger ones I have found would cost so much I'd have to give up my dream of buying a new handplane before the end of the year. But the happiness of ignorance is that without any truth-telling measure, I have managed to convince myself that the breastwork looks ok. To make my "decision" irreversible, I've gone on with the bannisters and the newel posts. I started with the posts, since they would allow me to fix the length of the bannisters. I turned them in much the same fashion as I did for the stanchions, except that I tried to make a ball at the top (as shown on the NMM plans). My skills at the lathe are not the keenest (it still holds much of the mystery of a new tool), and so I only managed a smashed ball. I also wanted something of a tenon down on the bottom to hold it solidly in the gangway. Since I already had a photographic record of the stanchions, I forgot to do one for the posts. But when I had the second one in the vise to do some fine tuning, I managed to snap off the tenon. You'll see the wound in a bit. For the bannisters I thought it might be nice to add a touch of color by going with cherry. FFM 2 shows that the bannisters have a gooseneck to cover the distance from the stanchion to the inboard edge of the gangway. On my Fly this distance measures 3/16"; I cut a piece of cherry stock down to 1/8" thickness, then freehanded the shape of the bannister with the gooseneck and the 1 1/8" length I measured from the stanchion to the placement of the newel post. And here you can see the wounded newel post. As a fix, I simply drilled a hole in the bottom and stuck in a pin. You can also see that at the top ends of the bannisters, I've filed a round notch to fit against the stanchion. This notch is also angled slightly, since the bannisters will have to drop down a bit. And at the bottom of the starboard bannister, you can see where I've marked the length. Now, I asked myself if I could possibly join the bannisters to the posts with a mortise and tenon. They would have to be pretty tiny at this scale, and after snapping off the tenon from that one post, I felt a few butterflies. But I have had the experience of falling off a horse (too many times), and know the importance of climbing back on (and of having a good chiropractor). So I said, why not -- if I mess it up, I'll simply start over. So here you can see my work: I cut the tenon with my beloved 1/16" chisel from Lee Valley. Then I drilled out the mortise and squared the corners a bit with the same chisel. It took a few tries, and I worried non-stop about snapping off the tenon. But with some luck . . . Whaddya know, it fit. So here is how it looks in place: And here is how they both look: What follows is the iron strap that extends from the top railing of the breast work down onto the bannister. I'm not sure how I'll get that done, since every time I fire up the soldering torch I remember that I don't really care for metal work (isn't that why we pay farriers?). And I keep thinking that in some of the pictures of older models in FFM the strap is made from wood (though somehow I couldn't find them last night, so maybe they're wishful thinking). Since the strap has a gooseneck as well as the downward curve, I fear metal is probably the better option. But I feel my feet getting heavy, and my imagination turning to the planksheers and other wooden details. Martin
- 467 replies
-
- 9
-
-
- fly
- victory models
- (and 1 more)
-
Non-stop BE!!! Way to go, and we're all here eagerly watching. Cheers, Martin
- 91 replies
-
- 3
-
-
- 18th century longboat
- model shipways
- (and 1 more)
-
Finished! So soon that I've barely gotten used to the project. Congratulations !!! What's up next? Martin
-
Wow, BE! You just keep doing it, and better and better! And I'm always impressed at your ability to find materials ready to hand. (Does Mrs W know you nicked one of her hairpins? Did William forgive you for pulling out the bristle on his brush?) Cheers, Martin PS -- As for those figures, I looked at various places and couldn't find any that would fit 1/64 scale -- are they still available somewhere?
- 156 replies
-
- 1
-
-
- pinnace
- model shipways
- (and 1 more)
-
Hi Doug -- You are moving along well, and your Fly is filling up with plenty of nice details. I'm well behind you, but a few days ago wondered if I were nearing the halfway mark. So I made a list, and realised I'm not even close -- but then again, I'm well behind you (I haven't even started the head work). And the rigging will take a solid three or four months -- if you put in long hours. Really, though, there are plenty of nice details in your build to look at and admire. Cheers, Martin
-
My hearty congratulations, Nils. Seeing your fabulous museum again, I have to say that you are not intimidated by large builds!!! I'm looking forward to the Chebec! Martin
- 2,625 replies
-
- 3
-
-
- kaiser wilhelm der grosse
- passenger steamer
- (and 1 more)
-
Nice work, Mike. I especially like the strategy you used for counter -- very ingenious! As for the ebony, I think that if you're using power tools, you avoid many of the issues caused by oily wood. And I definitely, whole-heartedly agree that natural wood beats out painted or stained wood any day! Cheers, Martin
-
Hi BE -- Just to add a thought to Mark's suggestion: judging from the photo you have underneath the first one introducing George, I'd say that the rowers are leaning farther forward than he is. That might explain why your oar comes a wee bit more inboard??? Ahoy William, you ol' Sea Dog (or River Dog) -- there's nothing like feeling the breeze your long floppy ears! Cheers, Martin
- 156 replies
-
- 1
-
-
- pinnace
- model shipways
- (and 1 more)
-
Thanks guys, your support makes my day. Mike -- I'll be looking forward to seeing what you do on Pegasus as well the Charles Morgan -- your skills consistently show up in the fine details you add. Doug -- Thanks for checking in, and glad you like the belfry. That was one of the many enjoyable mini-projects on this build. Nils -- Compared with the countless details you provide in wood and metal on your builds, my efforts pale. I can't wait to see what you start up next! BE -- 5' 6" might not have been uncommonly short for a 1776 sea Captain, or the under-fed crew. I spent a good hour last night justifying the overly high railing, and it mostly comes down to choosing to leave well enough alone. Really, though, I should commission a Captain Silver and enlist a one-handed Jack or two, just to size up the various structures as I'm working on them, and then I won't have to make such justifications! Thanks again for checking in everyone. And thanks to all who clicked the Like Button. Cheers, Martin
- 467 replies
-
- 2
-
-
- fly
- victory models
- (and 1 more)
-
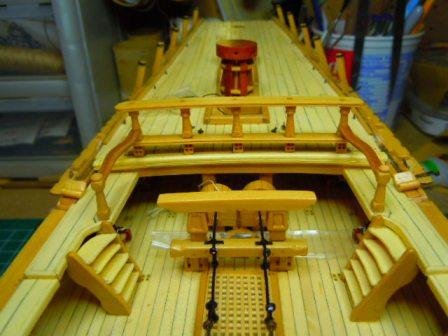
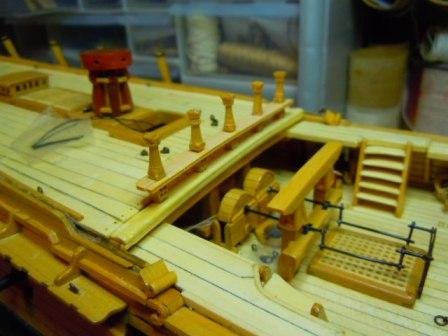
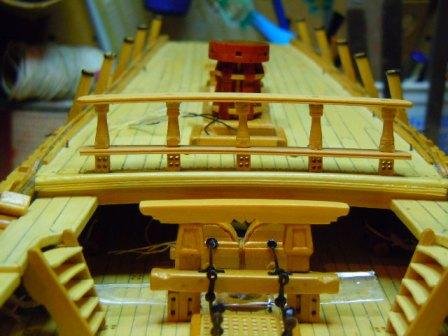
The Breast Work for the QuarterDeck This structure complements the Breast Work on the Fo'c'sle, but entails a bit more decoration on the stanchions, along with some sheaves. As FFM states, It's worth taking a bit of time on this, because it really does add to the architectural beauty of the Swans. The kit's plans show that the Breast work is 5/8" high. I chose to start with 1/8" square boxwood for the stanchions. I worked out a diagram that divided the length to allow for the curved part, the mortise for the lower rail, and the double sheaves at the bottom. Then I turned the curved section on the lathe (FFM warns that it is virtually impossible to replicate the design exactly over five stanchions -- and that is very true, but at 1:64 I'm not terribly sure the differences are glaring). Next I cut the slots on all four sides to create the tenons on which the bottom rail will fit. Using the mill, I cut 1/32" on each side. Using the kit's plans to determine the spacing of the stanchions, I marked a strip of 3/16" boxwood, and cut out the mortises, first using the jeweller's saw to make the cross cut, and then a 1/16" chisel to snip out the waste along the grain. Back to the mill, I next drilled the sheaves. Because these are double sheaves, they take up quite a bit of room. I used my smallest cutter, and still the holes are pretty sizeable, leaving very little wood. I cut a vertical groove in one pair of holes (not visible in the picture), and it removed so much wood that I worried about everything collapsing. Along all the bottoms, I also cut a tenon to fit into the deck, but forgot to take a picture. Fitting required paring out some space in the upward curve of the breast beam, then drilling a good sized hole to accommodate the tenon. Since this structure could be holding some rigging, I wanted it set solidly into the deck. Then, using the same strategy I followed on the Fo'c'sle to get the rail together (a strategy from FFM -- of course!), I put the back part of the rail on, let the glue dry over night, then put the thin front part in place. All the edges of the rail have moulding scraped into them. And finally the top rail. Again I used 3/16" boxwood, the same width as the lower rail. And to simulate the through tenons, I drilled holes that I squared with a small chisel, then glued in 1/16" square boxwood. Here are a few views: My one concern is that this comes in a bit high -- it's a bit under 7/8", and with my own metallic Captain off in the ship-yard taverns, I can't use any figure to judge whether the difference is damning or not. I'll stare at it a few days, and hope that some of you will weigh in. Cbeers, Martin
- 467 replies
-
- 7
-
-
- fly
- victory models
- (and 1 more)
-
Well done, Peter. How was it getting that plywood in place? With the hull as it is, I'd imagine the ply would present even more of a challenge than the infamous ply gunport strip on the Swan kits. Cheers, Martin
- 366 replies
-
- 2
-
-
- bellerophon
- victory models
- (and 2 more)
-
Fabulous, BE, thanks. Would that handsome vessel serve as someone's habitation, or does it work for a living?
- 156 replies
-
- 1
-
-
- pinnace
- model shipways
- (and 1 more)