
HOLIDAY DONATION DRIVE - SUPPORT MSW - DO YOUR PART TO KEEP THIS GREAT FORUM GOING!
×


Jack12477
-
Posts
5,661 -
Joined
-
Last visited
Content Type
Profiles
Forums
Gallery
Events
Everything posted by Jack12477
-
 They used colored panes of glass to change the color, usually hung as removable panels in front of the light, which was always white, due to the glass used to make the Fresnel prisms. So painting a pane red is acceptable.
 -
Denis, FYI, the light characteristic from Thomas Point Shoals is "flashing white with two red sectors" See Reference Looking great so far.
-
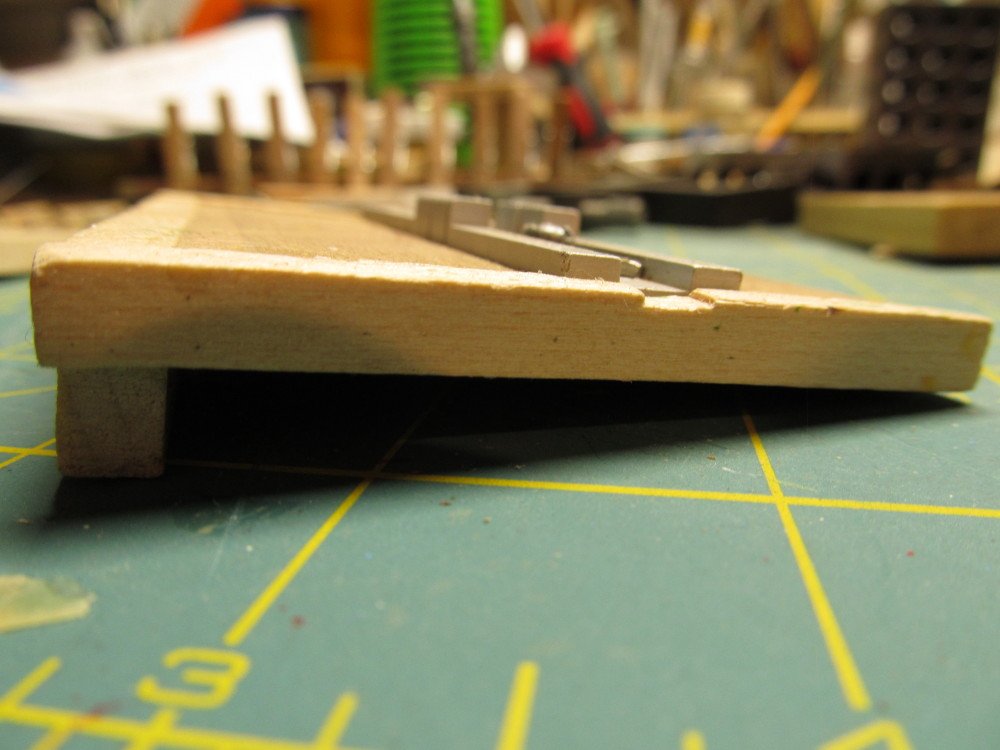
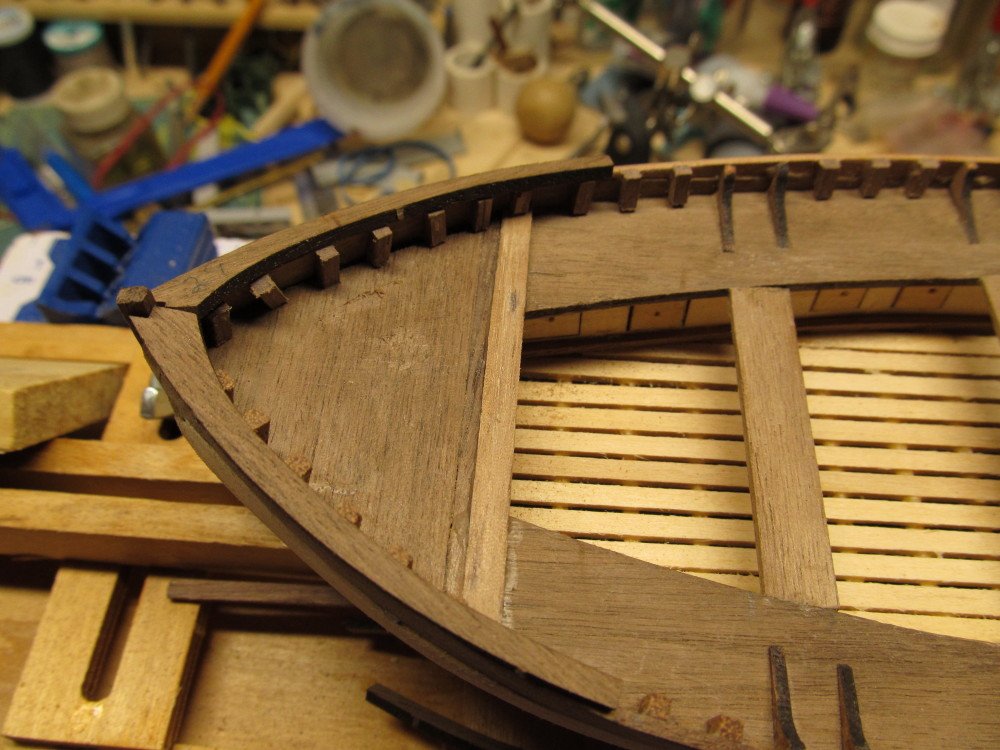
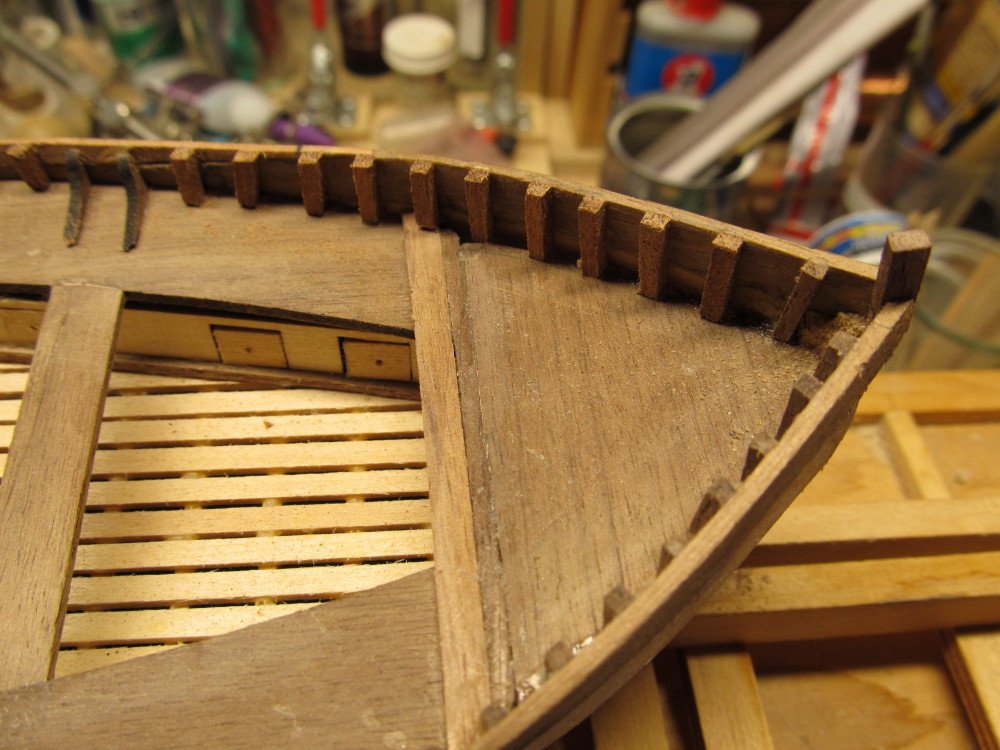
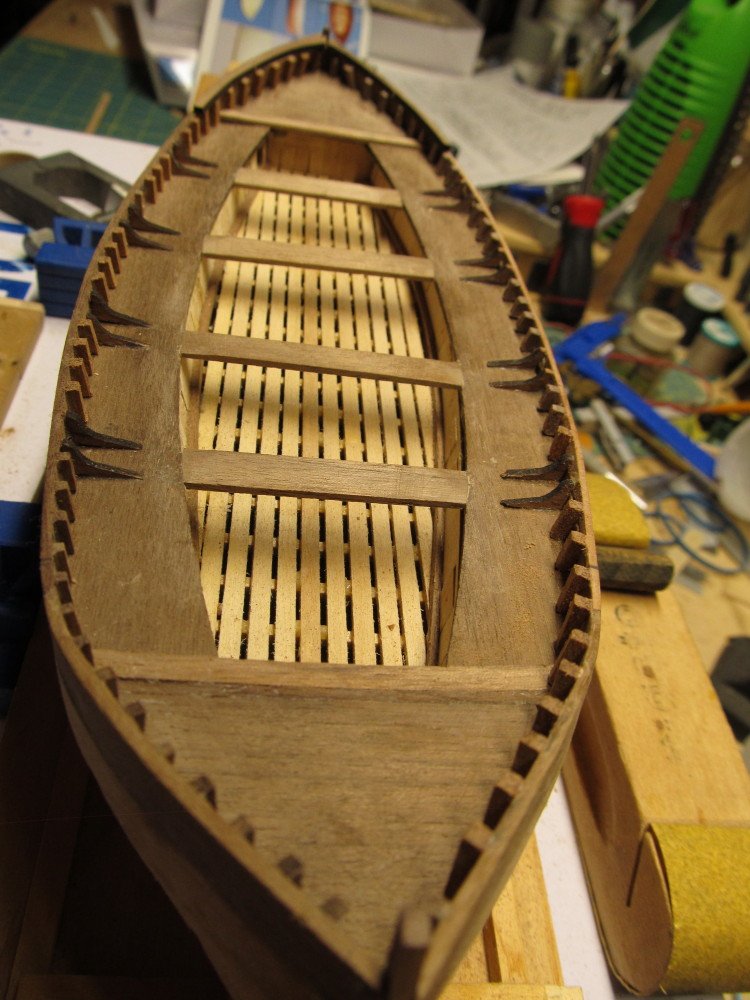
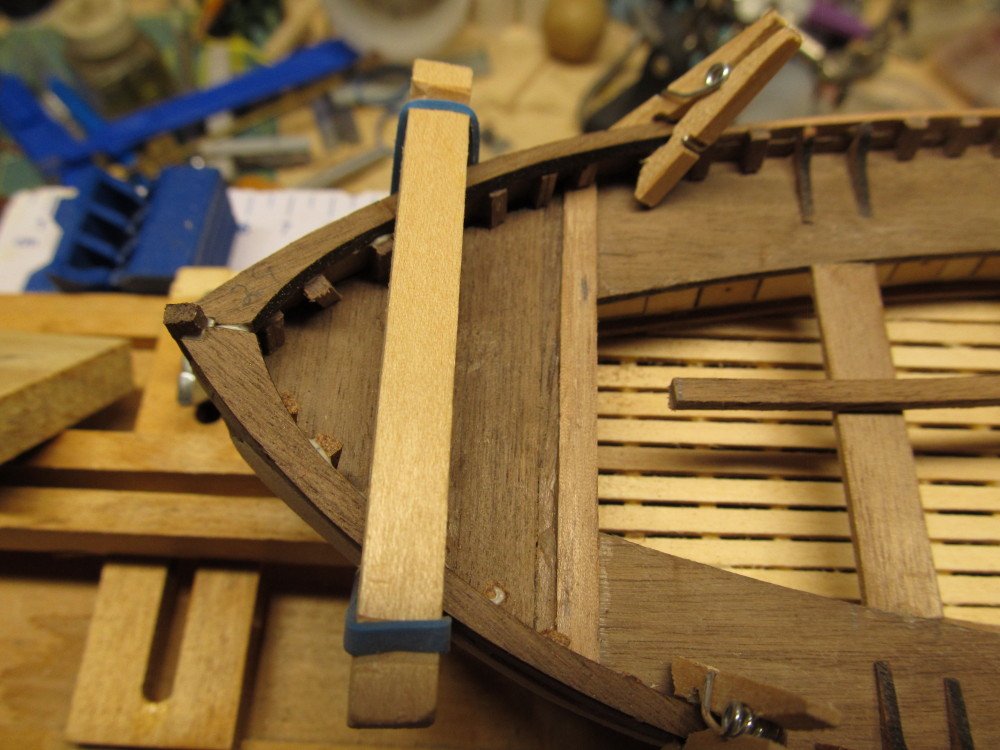
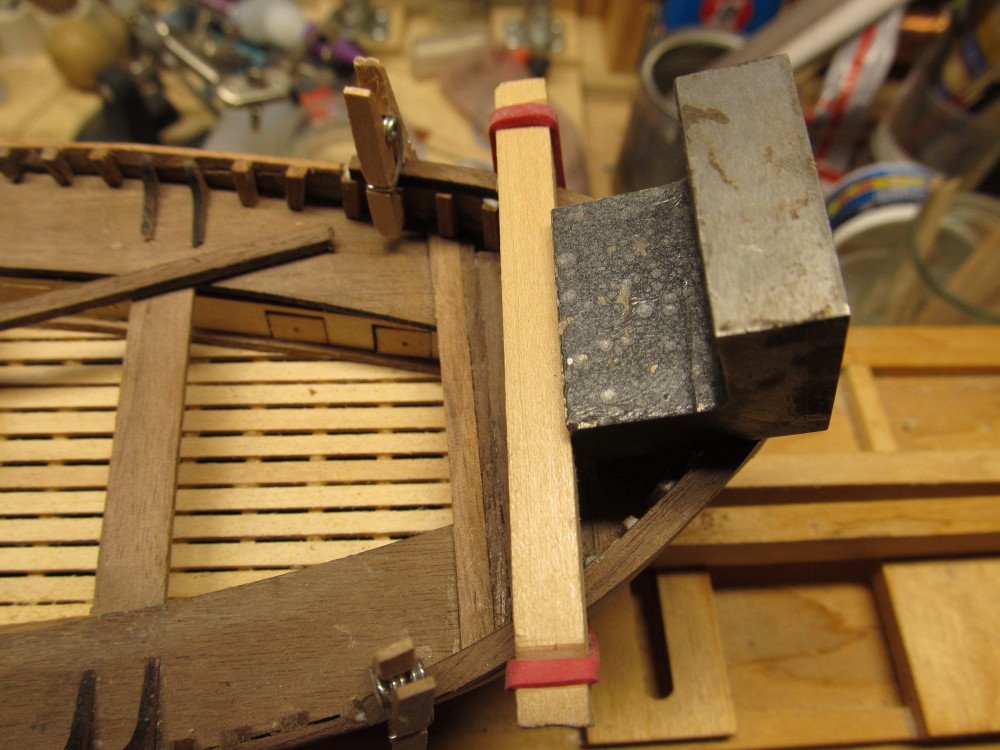
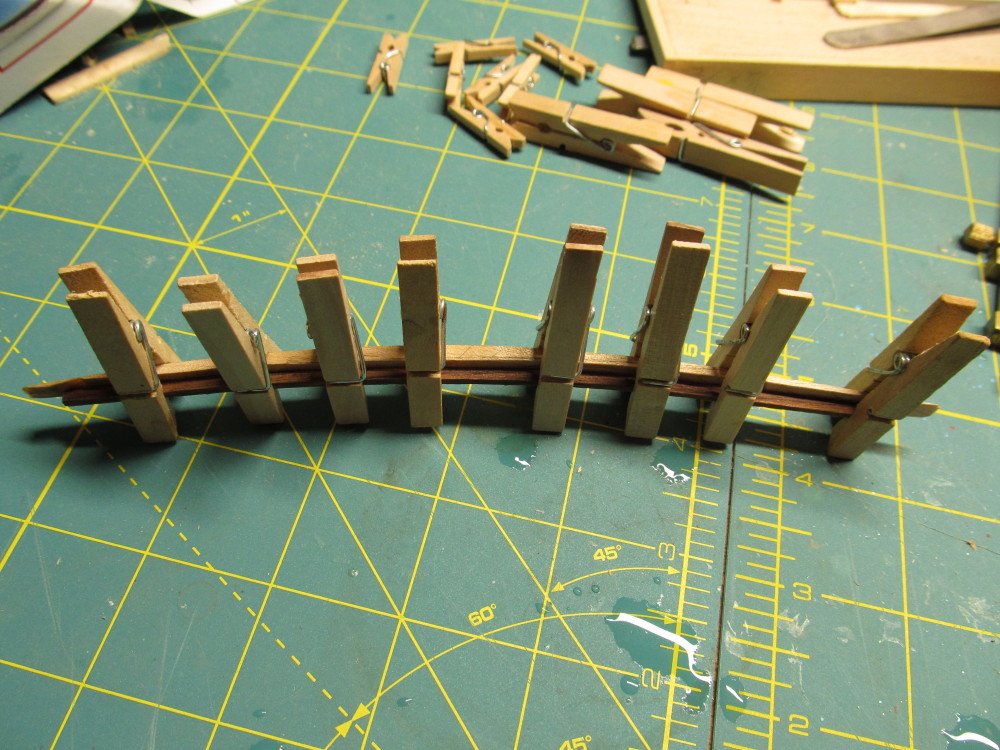
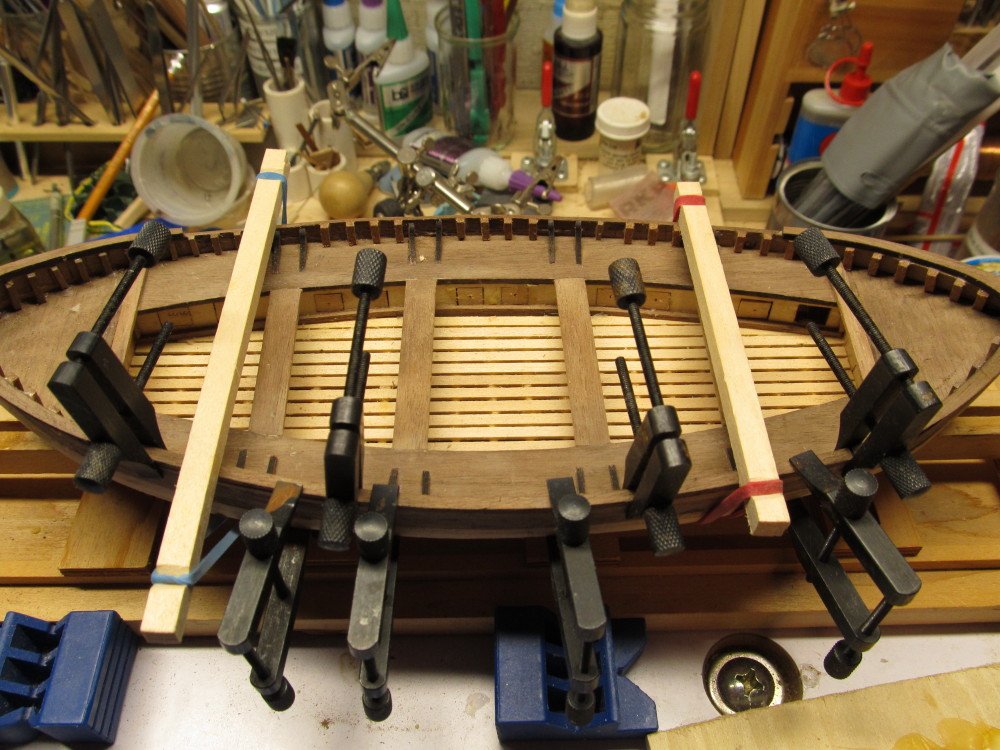
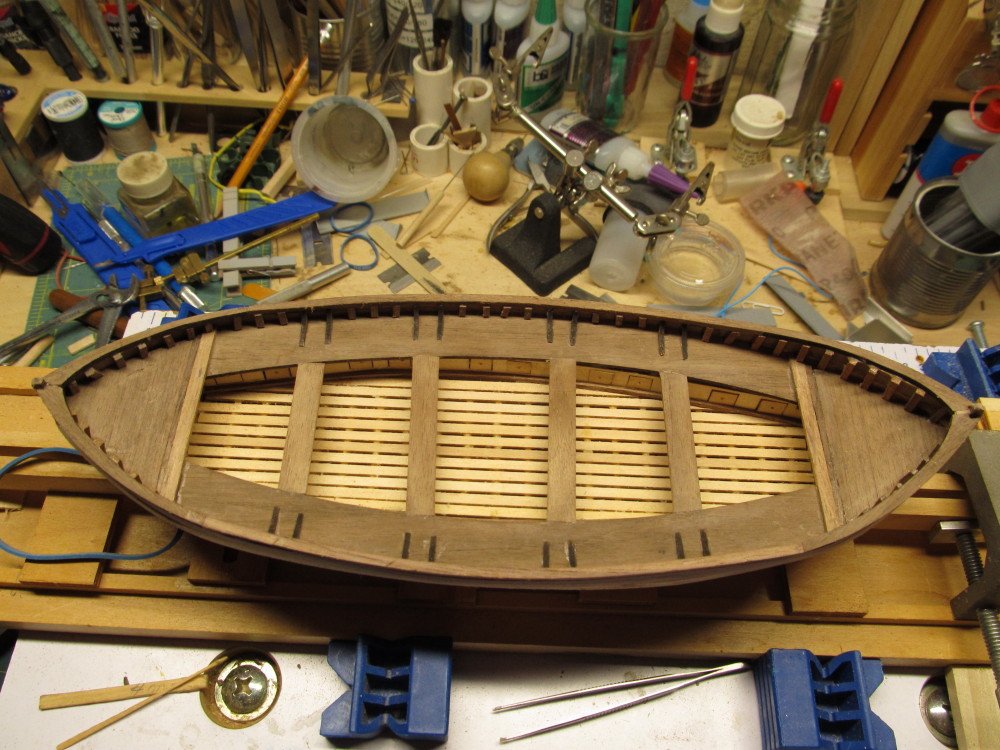
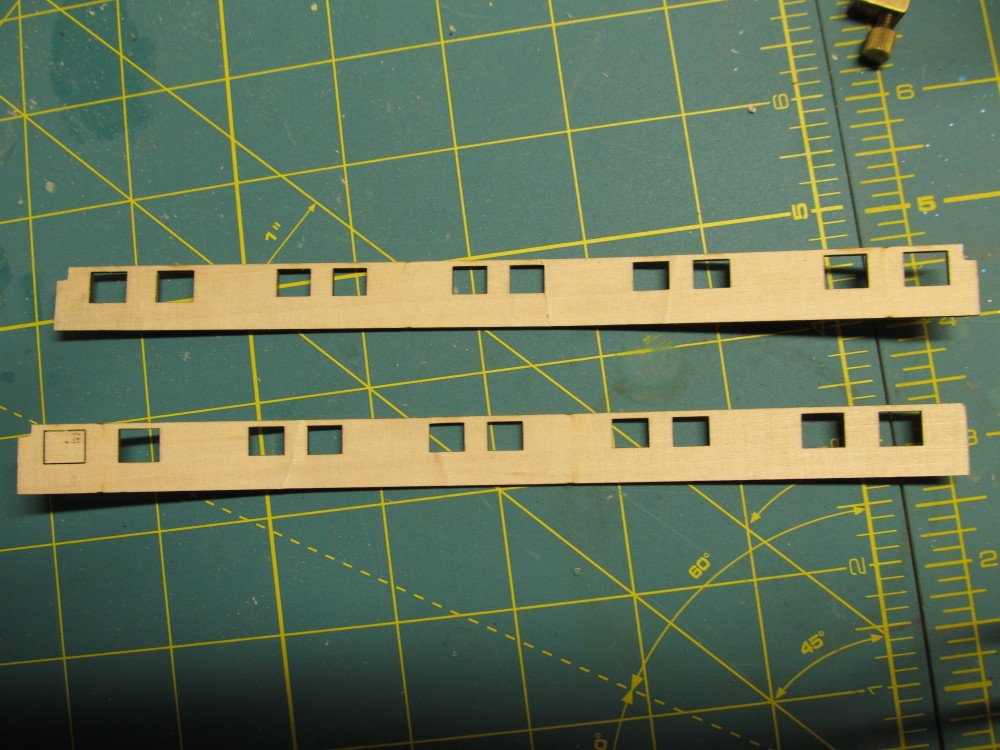
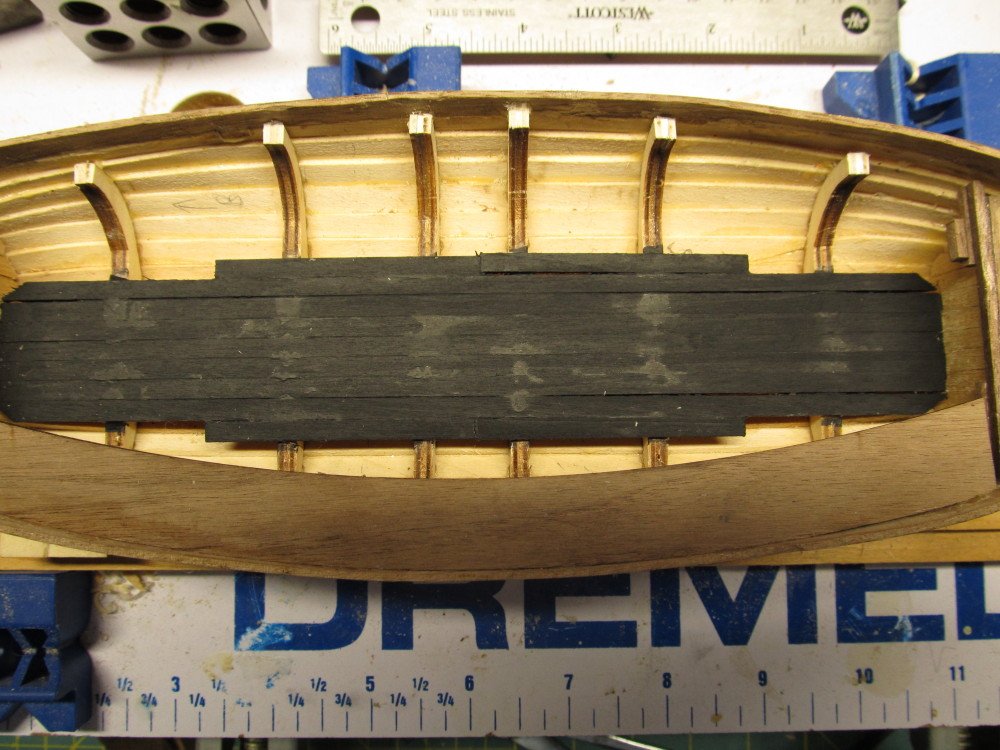
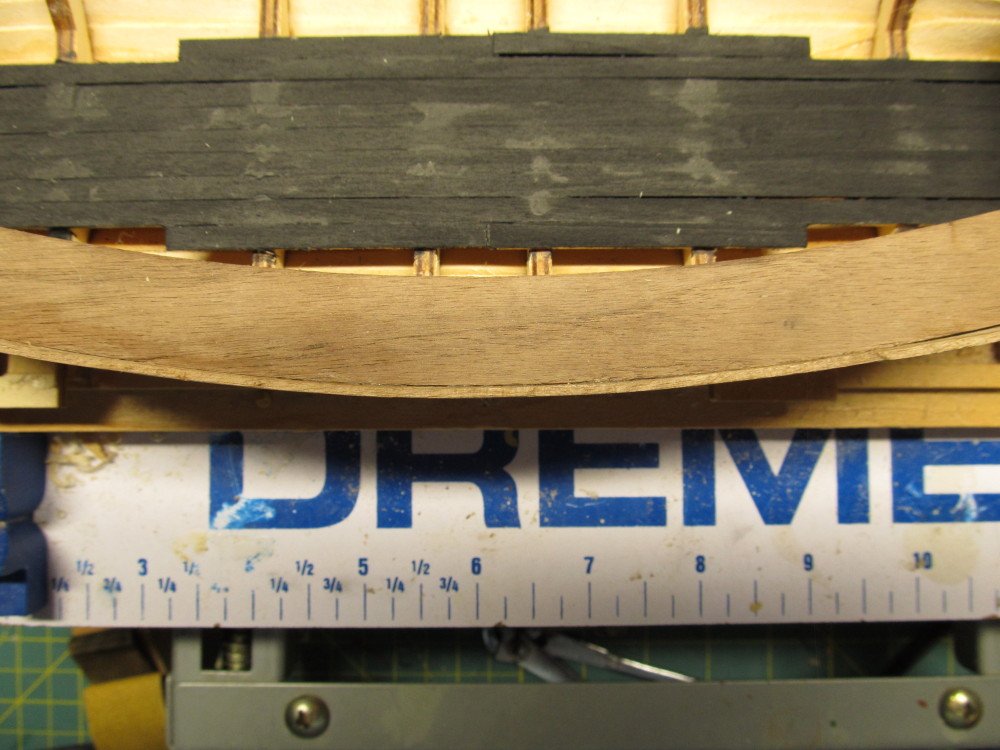
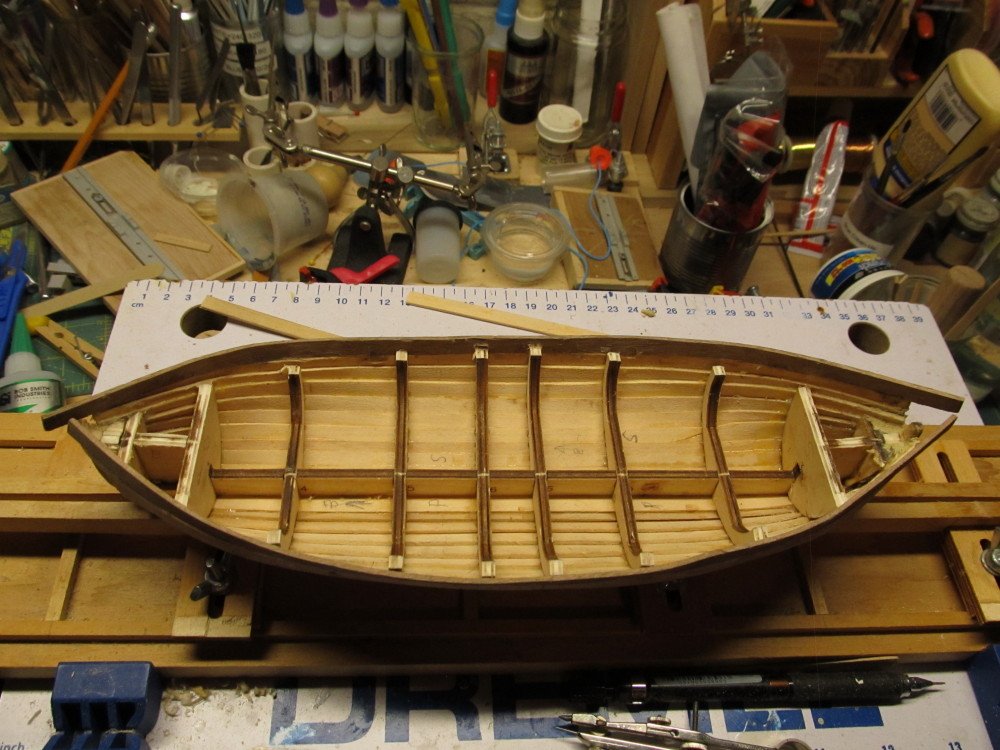
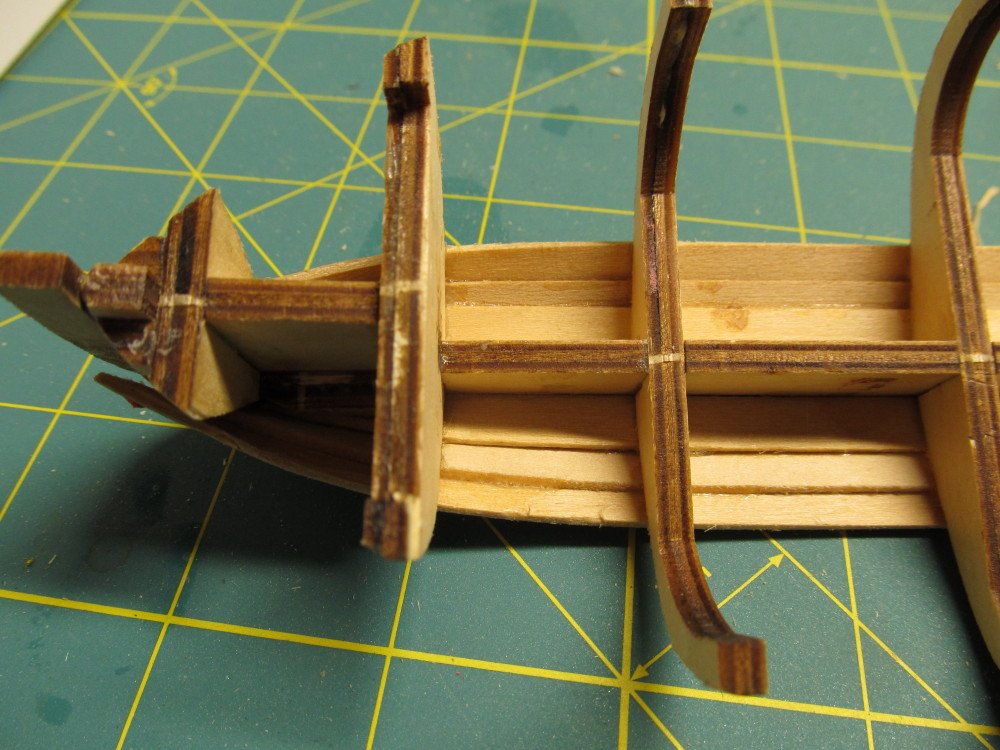
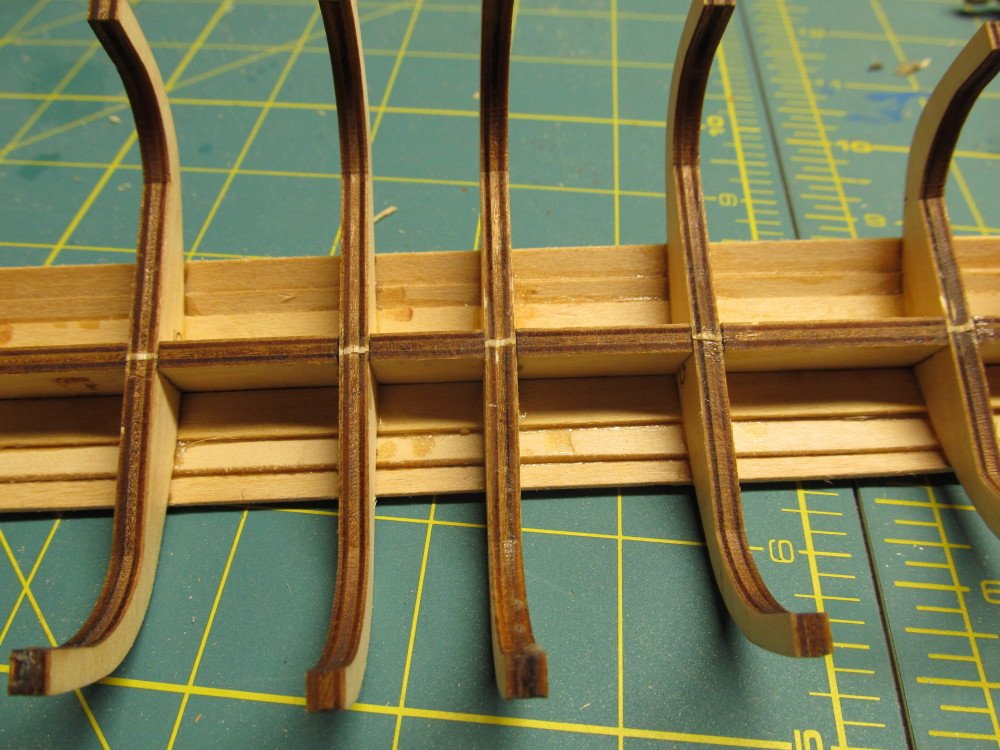
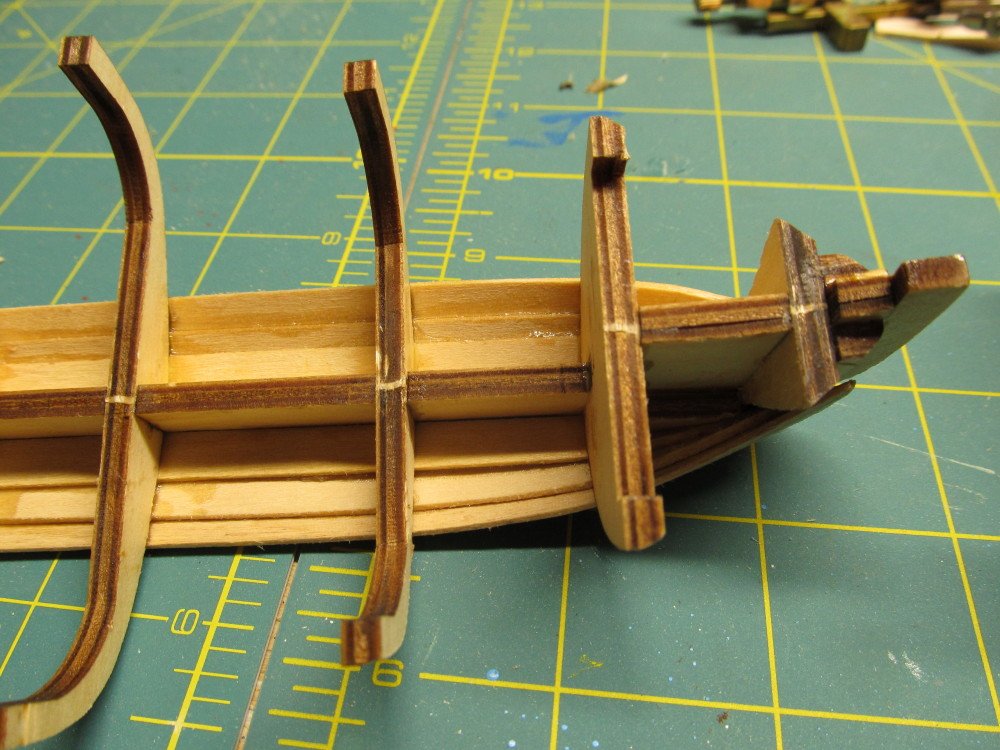
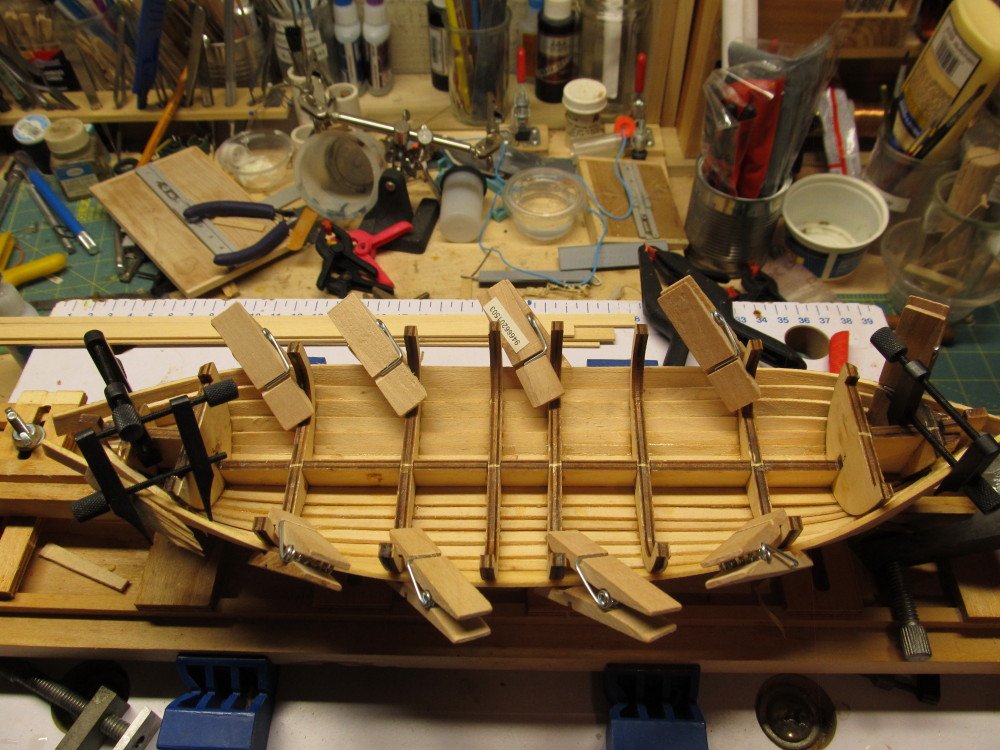
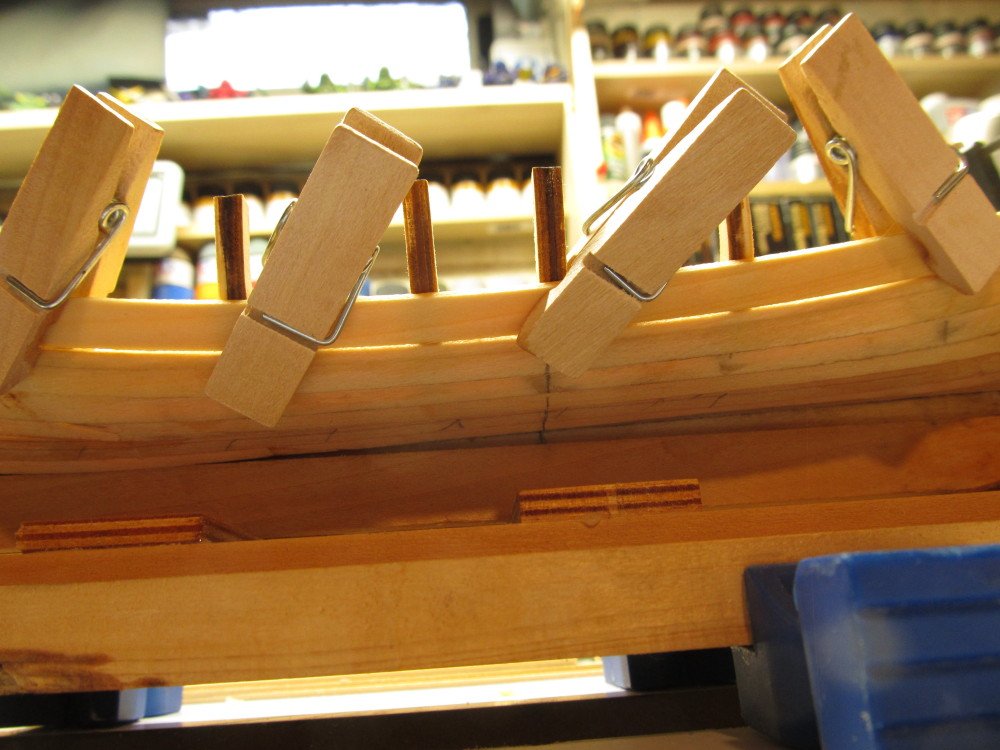
Moving right along at Glacial speed, I finally completed the basic structure of the lifeboat. Next step is sanding and painting. To cut all the 2 mm x 2 mm stanchions that fit along the gunwales to the same length I used my miniature miter gauge and razor blade saw. I added a bench hook to the jig to allow me to keep it in place while I cut Stanchions installed (all 49 million of them ) Next came the cap rails. 4 of the pieces are laser cut to be installed at the bow and stern. The center piece is 2 mm x 3mm piece which has to be pieced into the center, to edge bend it I cut a curved piece on the band saw to match the curvature of the hull, soaked the piece in water for a few minutes, then clamped it to the jig to dry. I also plugged up the gaping hole in the bow and stern

- 52 replies
-
- 7
-

-
- artesania latina
- titanic
- (and 1 more)
-
I'm here also, just been hiding in back row.
-
I am familiar with the canal path, just never had time to walk/ride along it. I still have family in Rochester and Pittsford. We had a family reunion a few years back and chartered one of the canal boats (filled the boat) to take us from Fairport to the river and back thru the locks. Our cousins from Canada, England, and Ireland were impressed with the canal and its history. We turned around just shy of the river. My brother traced our Grandfather's family back to Ireland in the 1600s and along the way discovered cousins we didn't know existed both here and across the pond.
- 599 replies
-
- 3
-
-
- sidewheeler
- arabia
- (and 4 more)
-
Eric, I see we hail from the same area of NY. I grew up in the Town of Brighton, just over the Rochester City line. As a toddler our house abutted one of the original Erie Canal locks (I490 and I590 merge there now) before we moved into Brighton. Locks 32 and 33 on the Barge Canal were an easy bike ride from home. Love your model. It is coming along nicely.
- 599 replies
-
- 4
-
-
- sidewheeler
- arabia
- (and 4 more)
-
That is a very nice kit. I built in several years ago.
-
Roger, thanks ! No, the instructions don't mention that at all. In fact they don't even mention a rabbet in the stem/stern posts either.
- 52 replies
-
- 4
-
-
- artesania latina
- titanic
- (and 1 more)
-
Yes, the catch is a refill set of 5 bands will cost about $32 USD for all 4 grits . But then I am still working with the set of bands that came with set, the refills are sitting in the drawer.
- 52 replies
-
- 4
-
-
- artesania latina
- titanic
- (and 1 more)
-
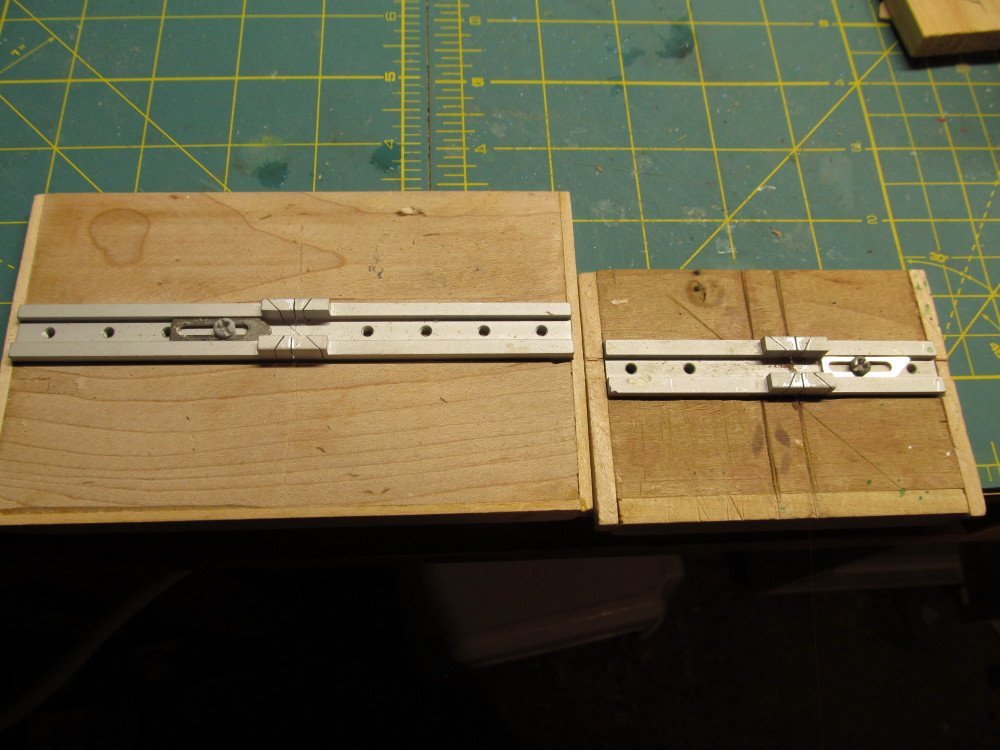
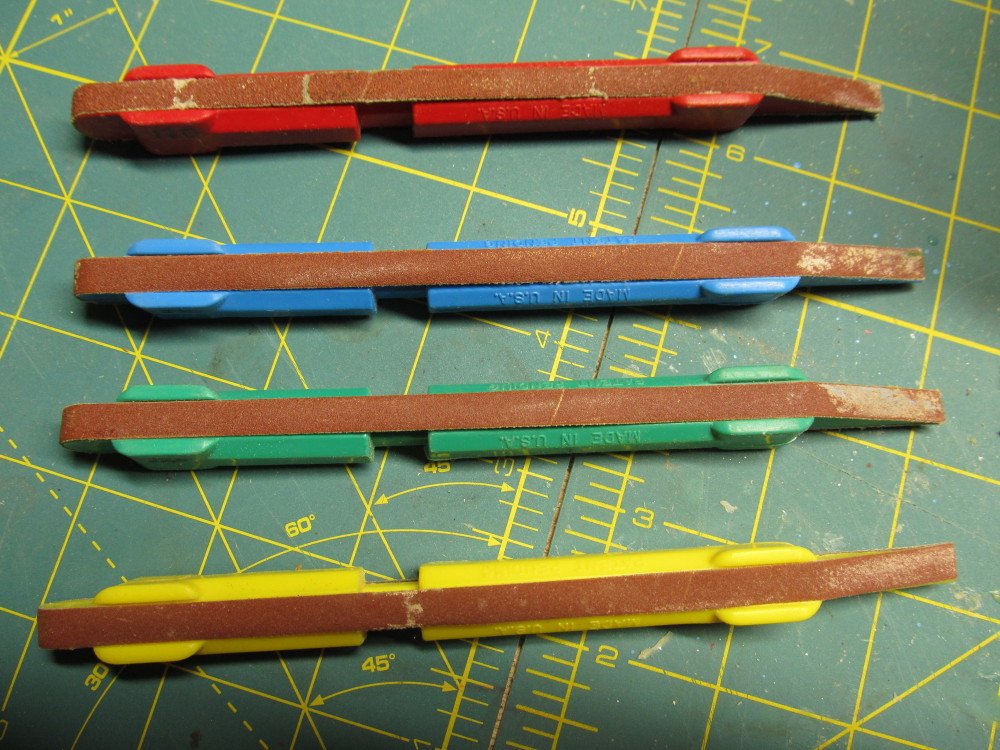
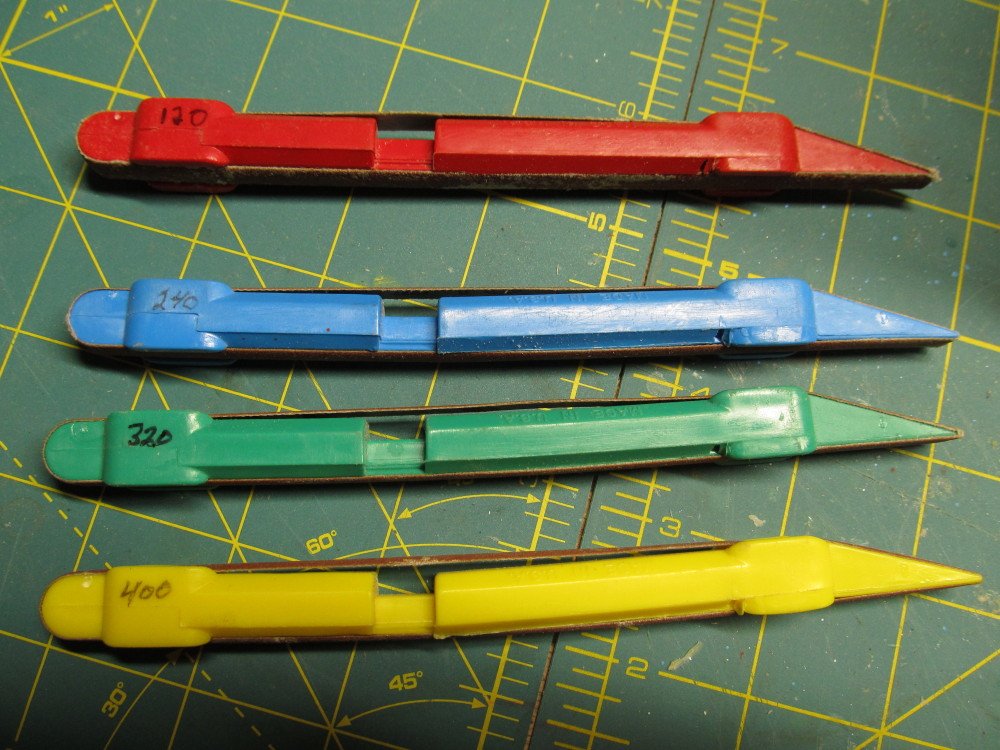
Thanks, Lou I assume you mean sanding the completed hull. For that I am using the sanding sticks shown in the photos below; Each is color coded and the belts come in 120, 240, 320 and 400 grits. They are just right width to do each plank individually. To change belts you just push the two ends toward the center to release the tension and the belts comes right off. I think I got them from MicroMark but not sure since I have had them for a long time. I bought a bunch of extra belts at the time. If one part of the belt starts to wear out, I just push the ends together, release the tension, slide the belt along, release and continue with a new area of the belt.
- 52 replies
-
- 4
-
-
- artesania latina
- titanic
- (and 1 more)
-
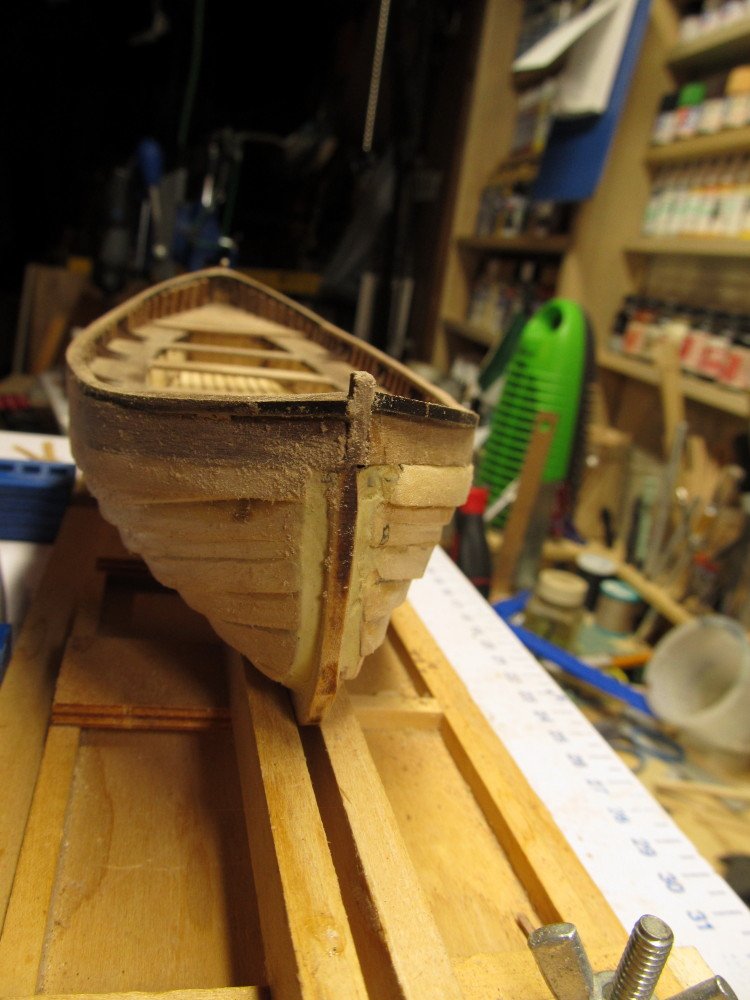
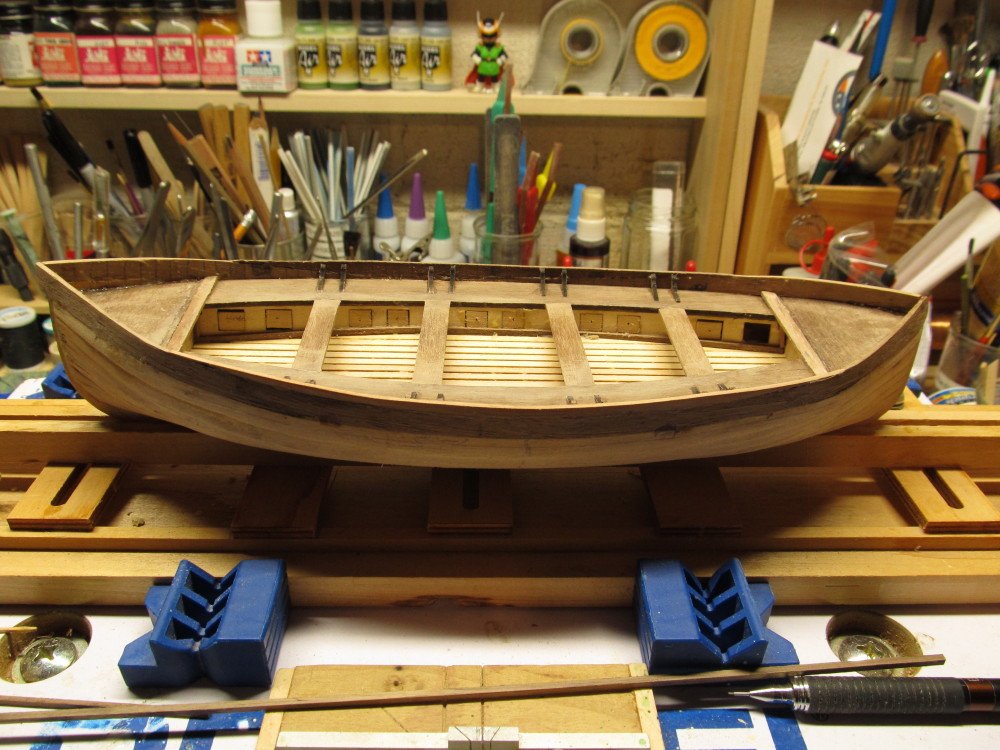
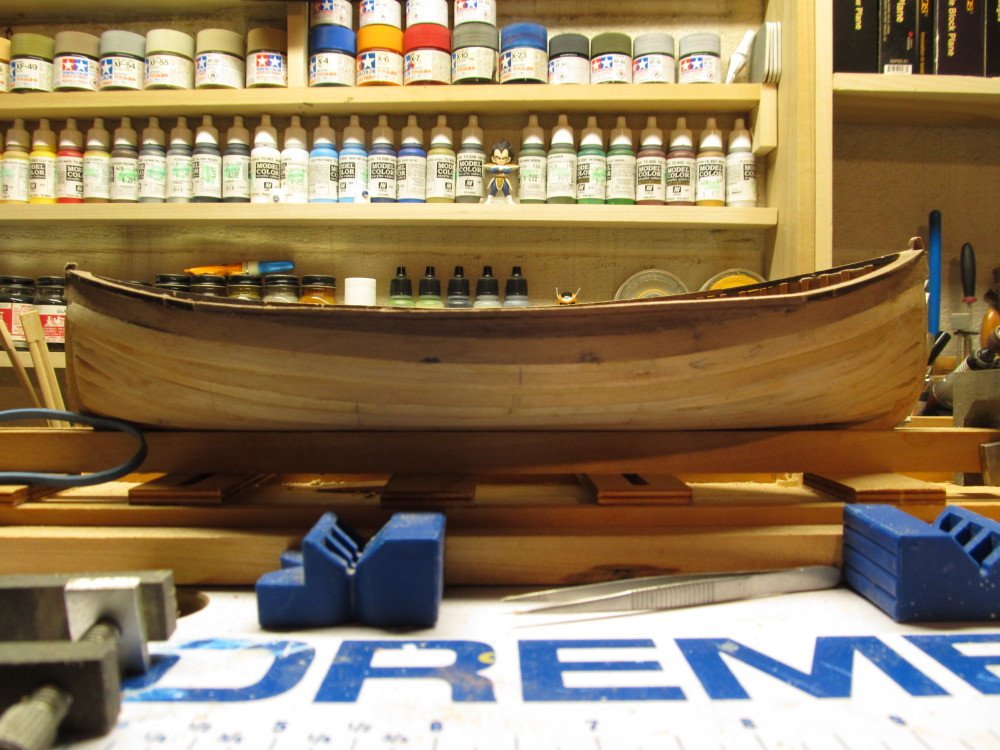
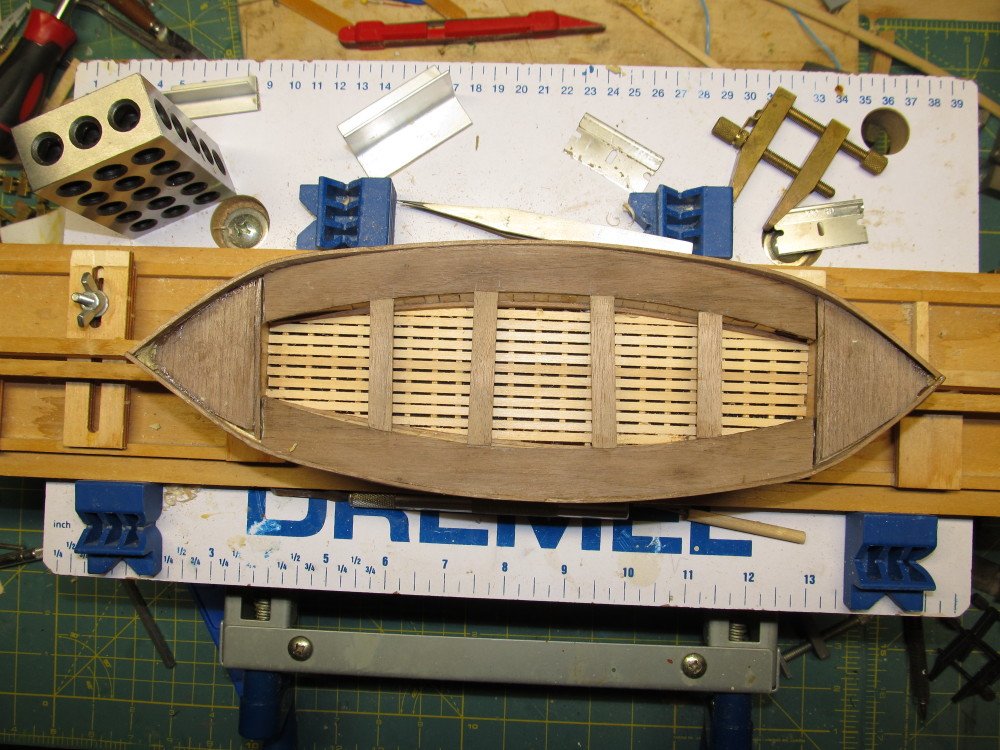
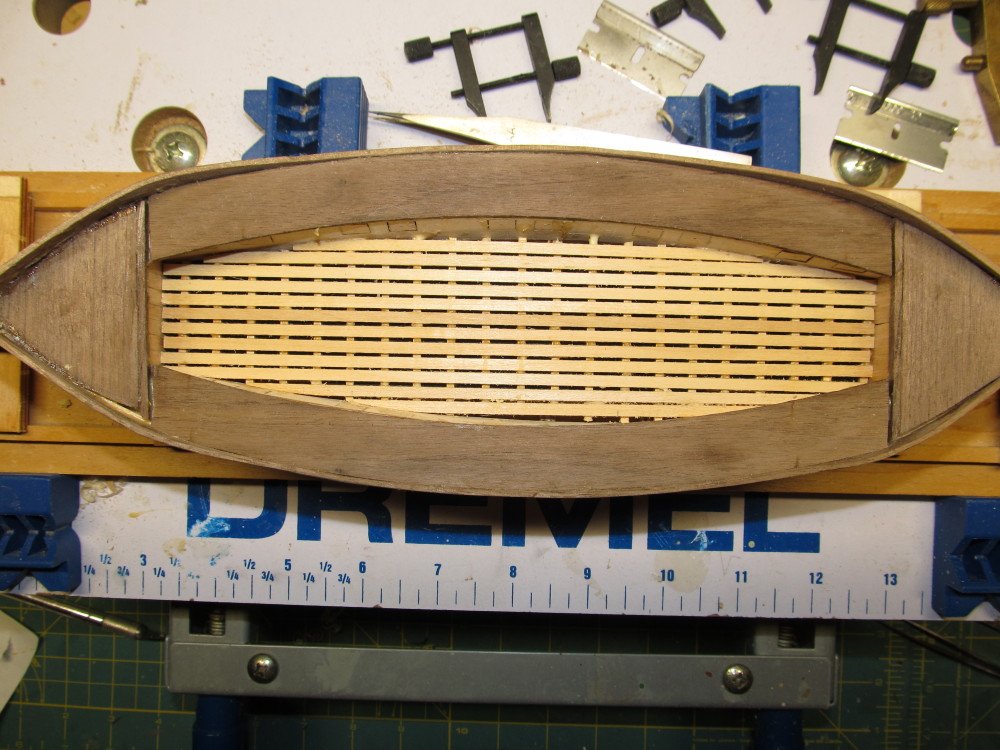
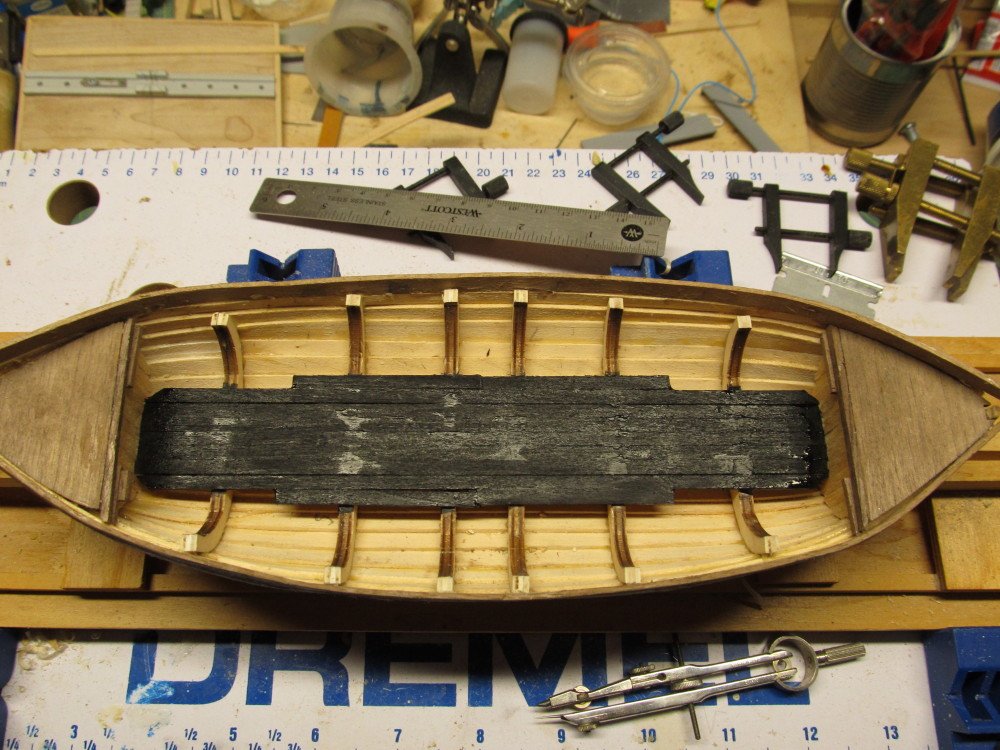
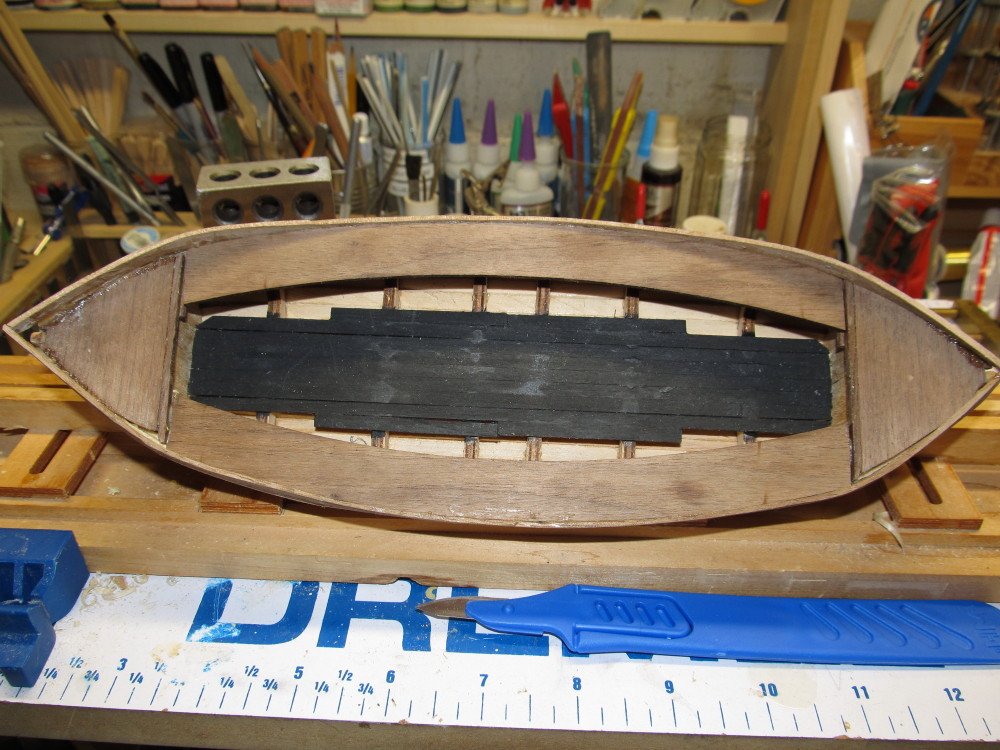
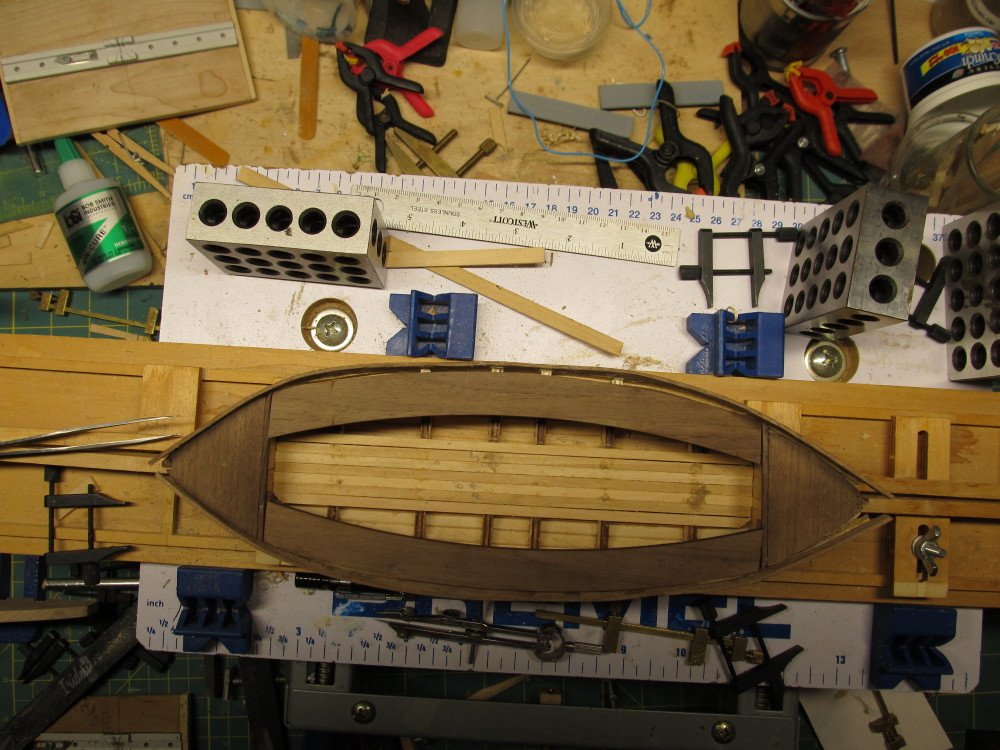
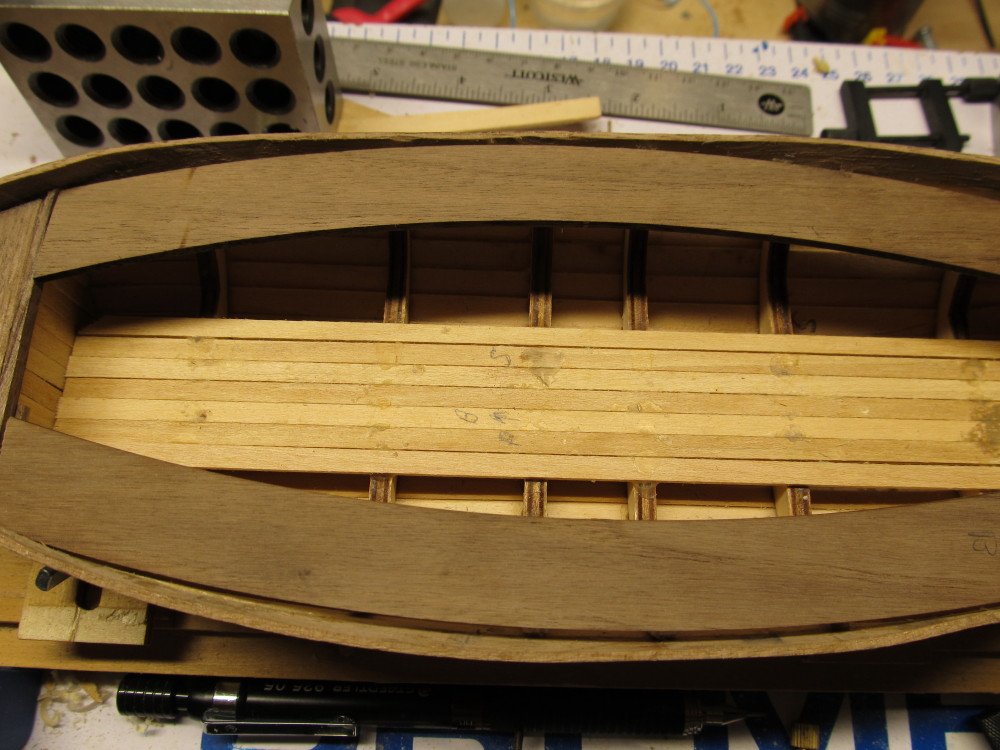
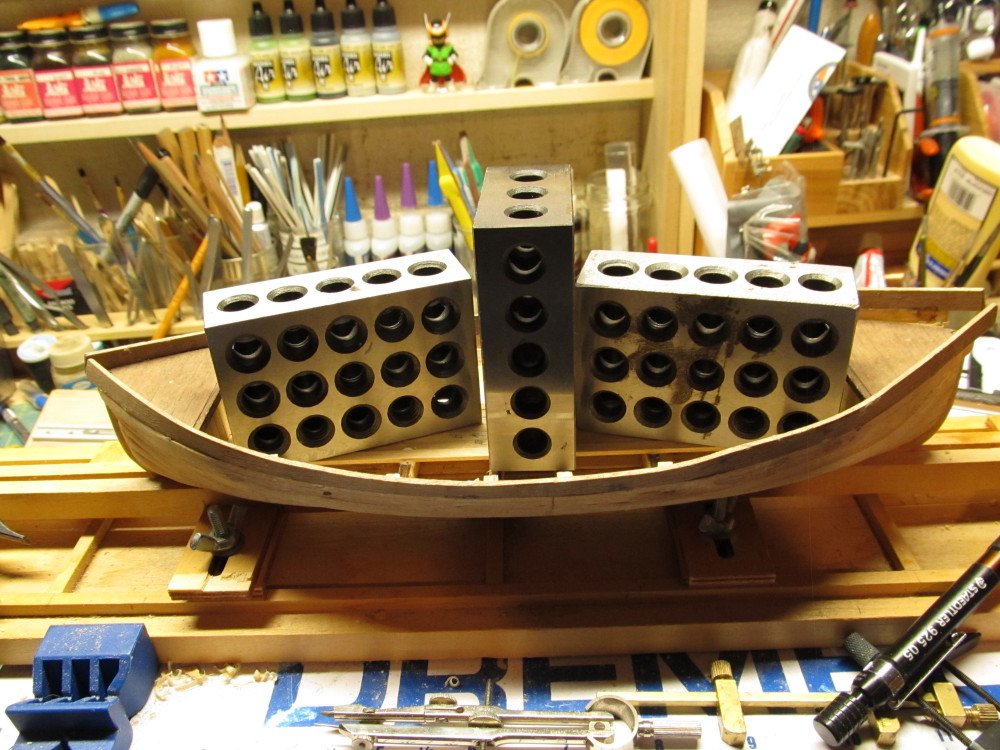
Moving right along with the build and repair: I used some wood putty to fill in the gaps at the bow and stern. Installed the side drawers - these are 3 ply plywood, laser cut, and a bear to bend without breaking, even with a hot iron they did not bend easily Then I installed the cross slates over the first floor decking before installing the final floor decking. I used a 5 mm shim to get the spacing even for the cross slates and then a 1 mm shim for the final floor planking spacing. Then installed the seats and some miscellaneous trim pieces that don't show up very well in the photos.

- 52 replies
-
- 6
-
-
- artesania latina
- titanic
- (and 1 more)
-
See this Link He is the CEO.
-
It is not the plane but the pilot who flew it, Robert Goebel, a Double Ace. See the very first post for the history .
-
Nice workbench ! Nice roomy workshop too. Love the plane stand jig.
-
Kevin, did you make that stand for the plane ? Nice work on the plane !
-
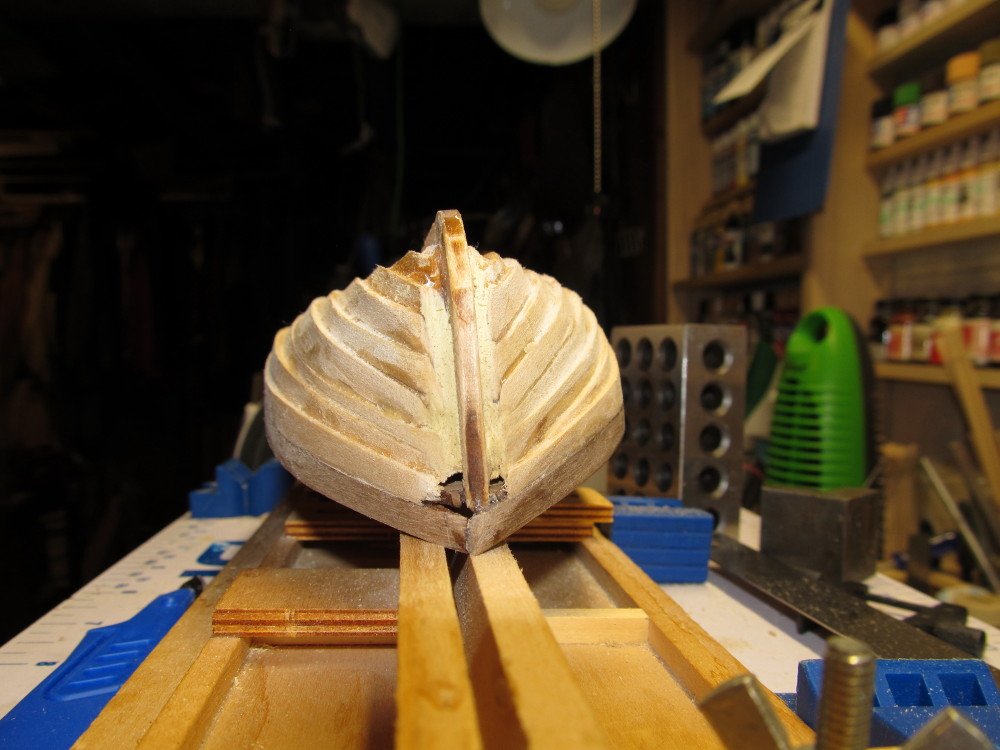
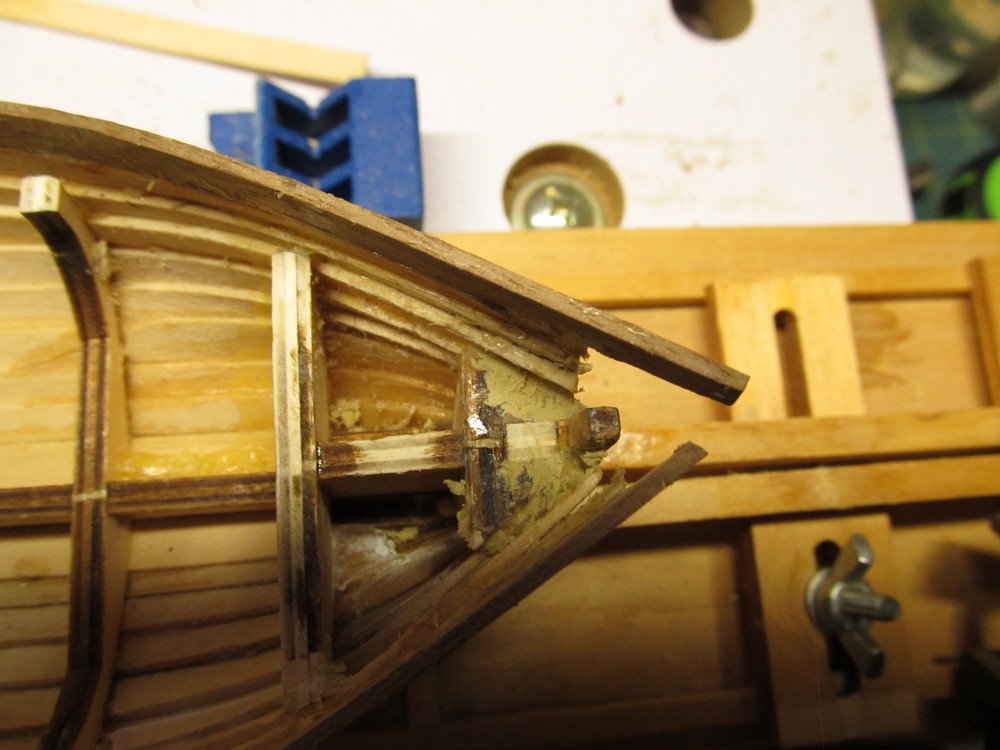
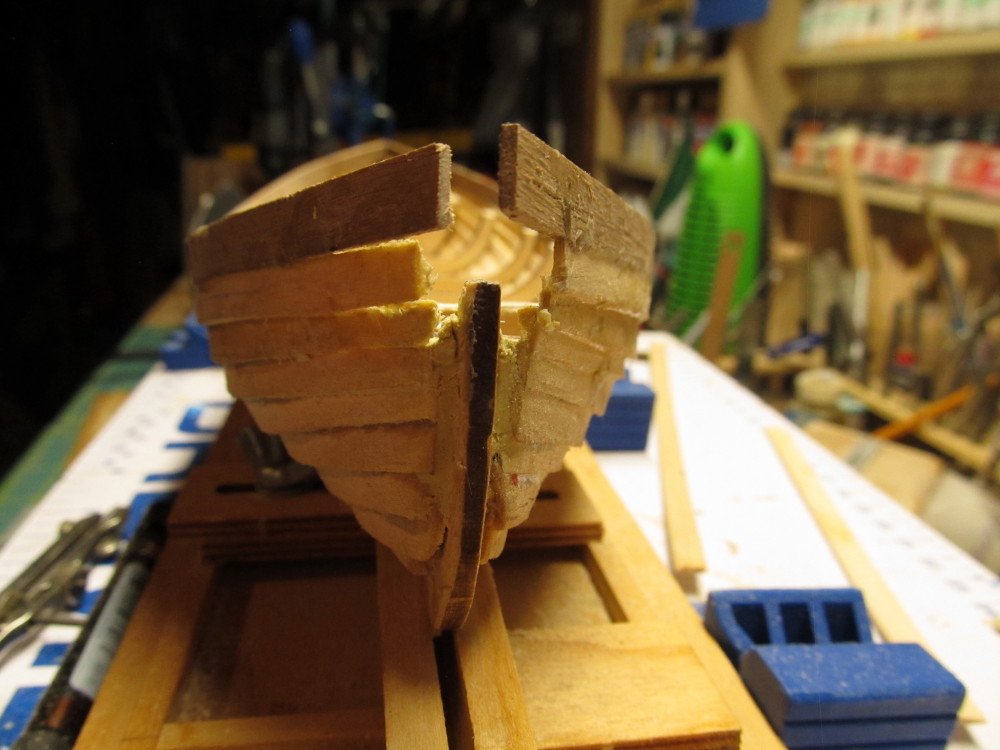
I think I fixed part of the debacle. With the help of a lot of clamps and the pursuader I managed to brute force the sides into taking the shape of the center decking and close the huge gap. First, "the pursuader" Then we went from this To this While I was waiting I also added the first flooring planks and painted them flat black (there is another floor planking that covers this one. (why ??????) Got part of the bow/stern gap closed - now to fill in the remaining gap So this is the present side view & top view

- 52 replies
-
- 7
-
-
- artesania latina
- titanic
- (and 1 more)
-
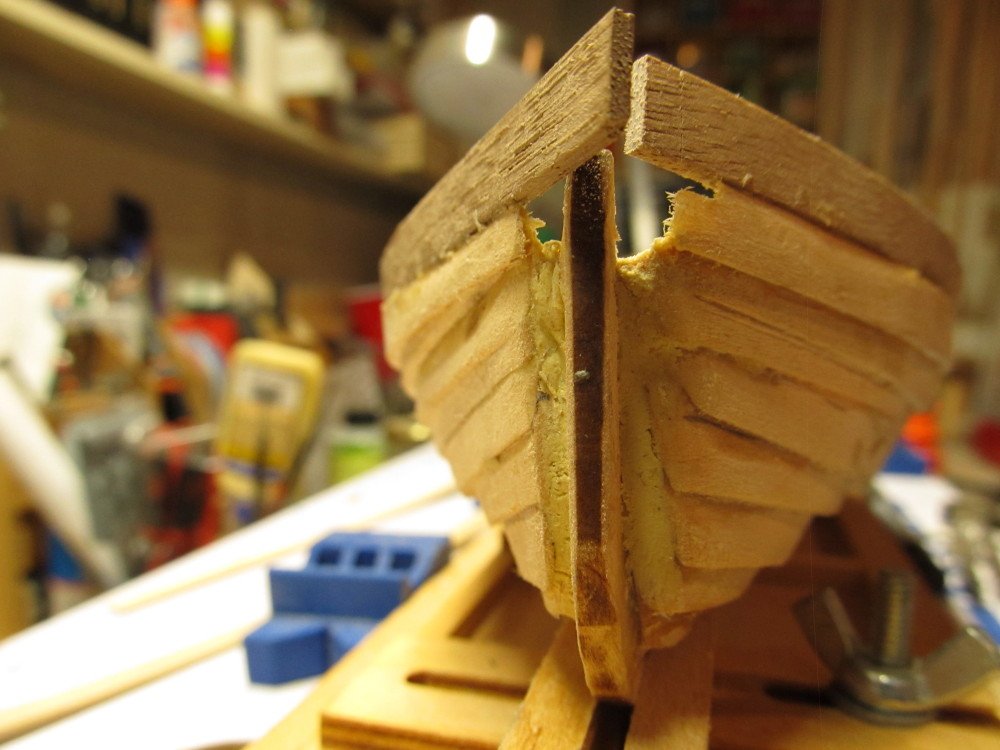
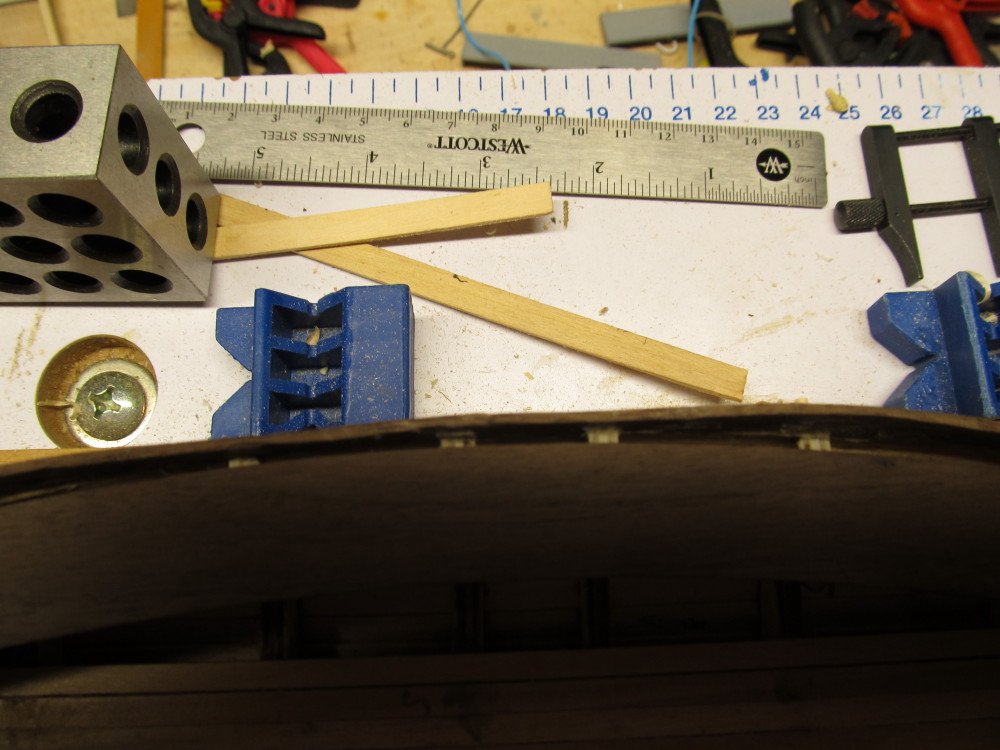
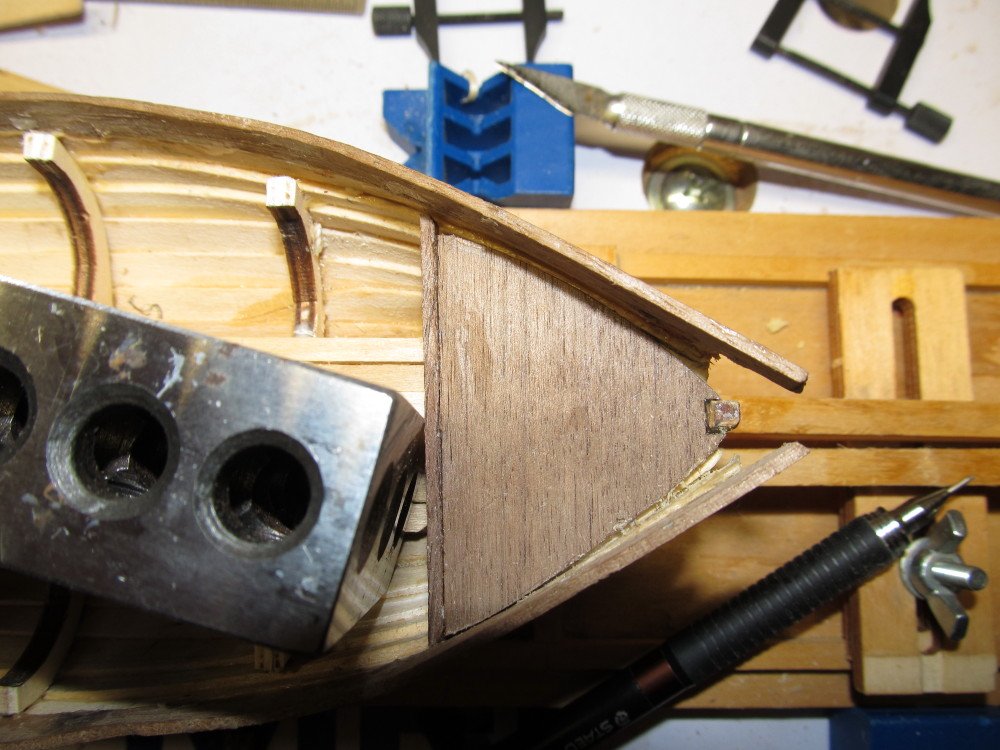
Those pieces are the fore and aft keel pieces. The instructions called for them to be installed before planking which in hindsight was a mistake. I think without them in place I could have cut the planks to fit better. I am getting the center deck pieces to fit more snuggley against the hull with some extra clamping and heat from the travel iron. Once I get the interior deck pieces glued down I will go back and address the holes in the bow/stern. Fingers are feeling better this morning. Quite a big blister on my index finger, thumb not so bad. Pain is gone.
- 52 replies
-
- 3
-
-
- artesania latina
- titanic
- (and 1 more)
-
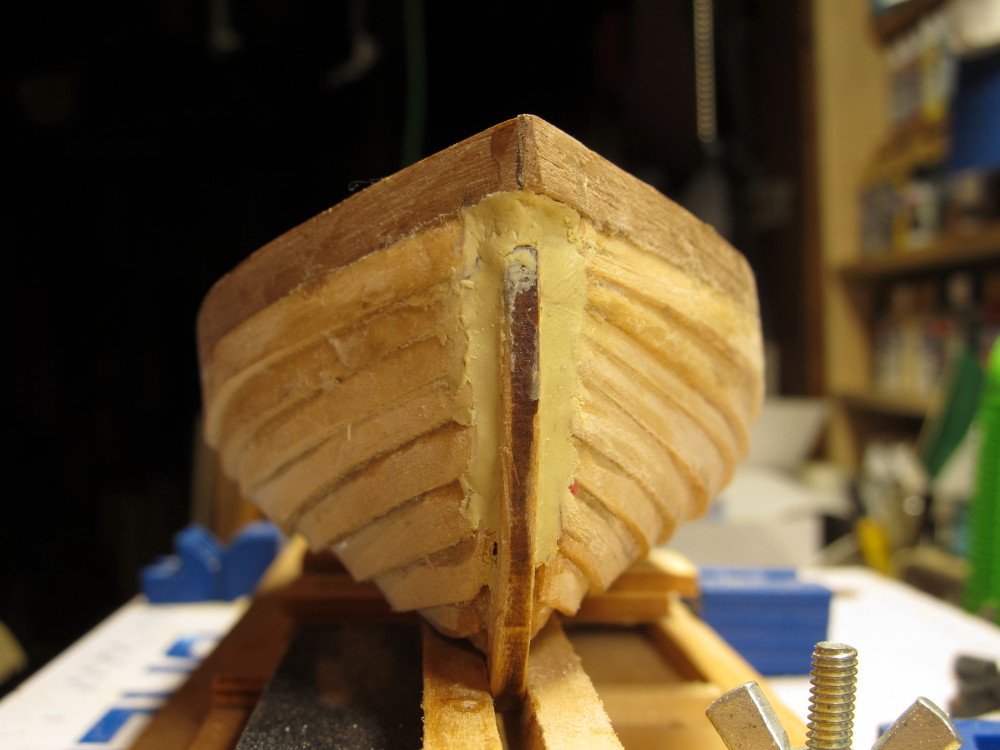
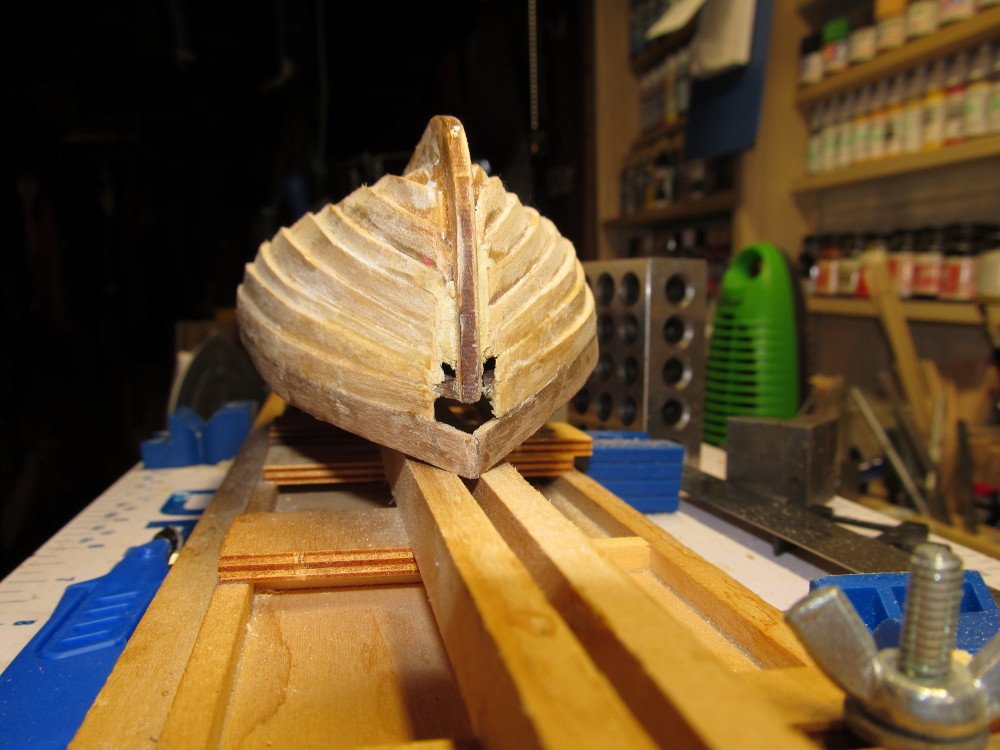
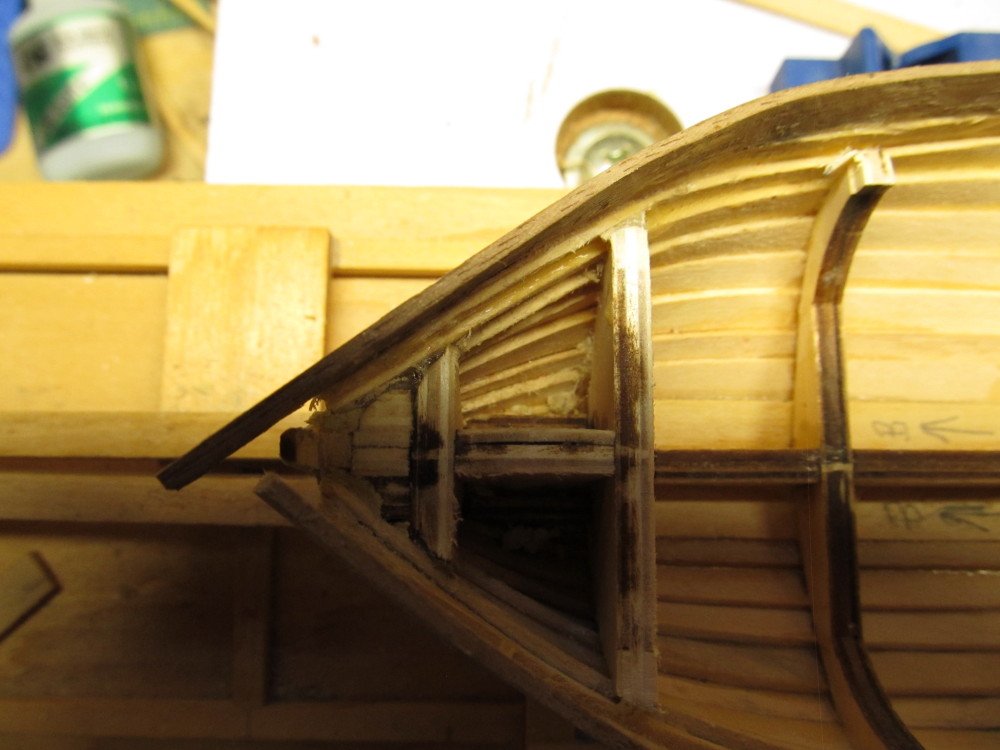
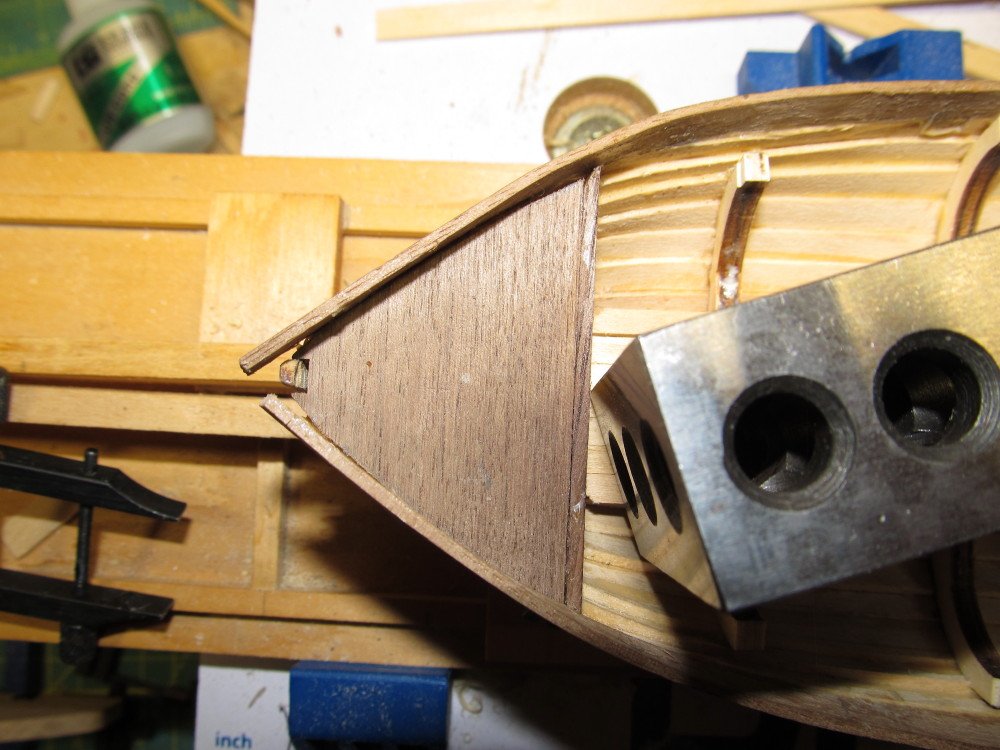
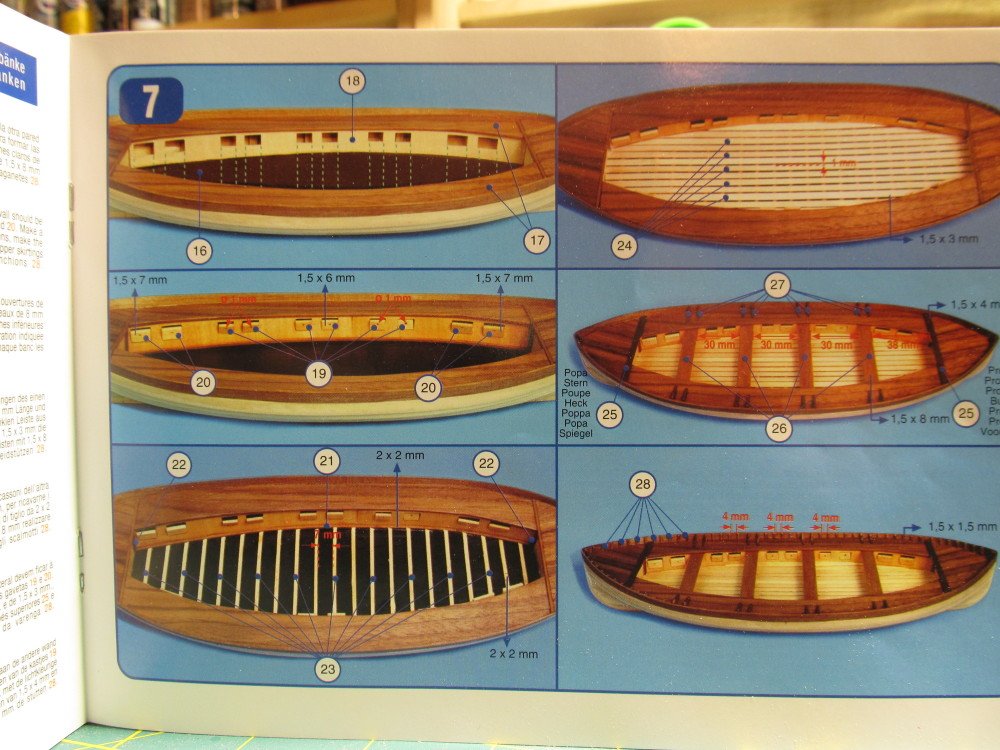
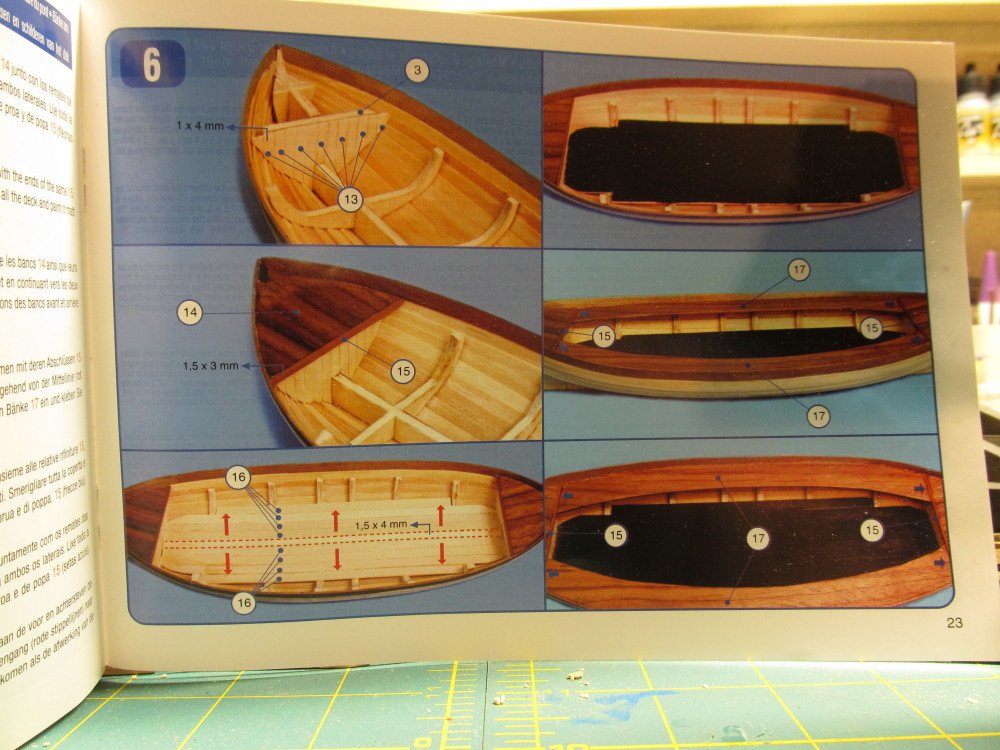
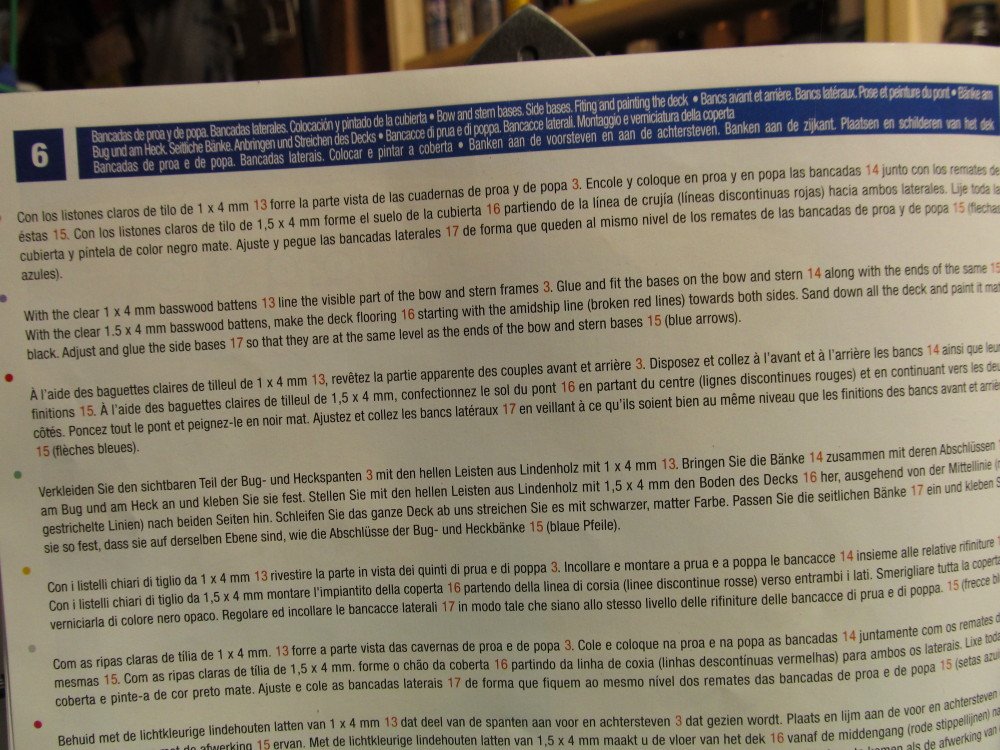
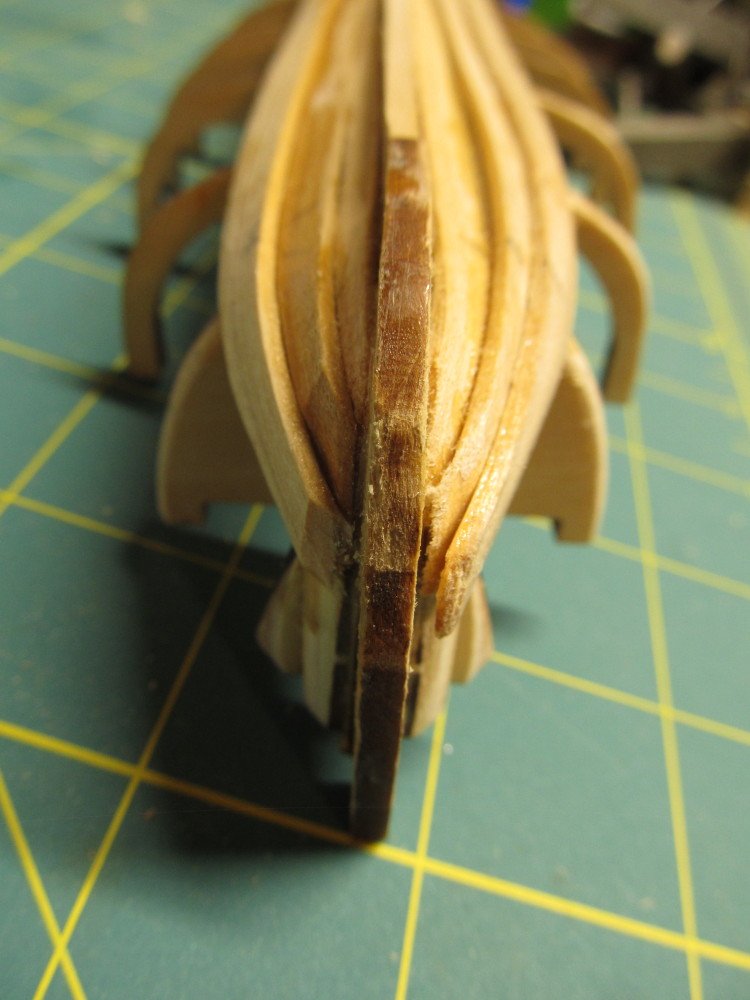
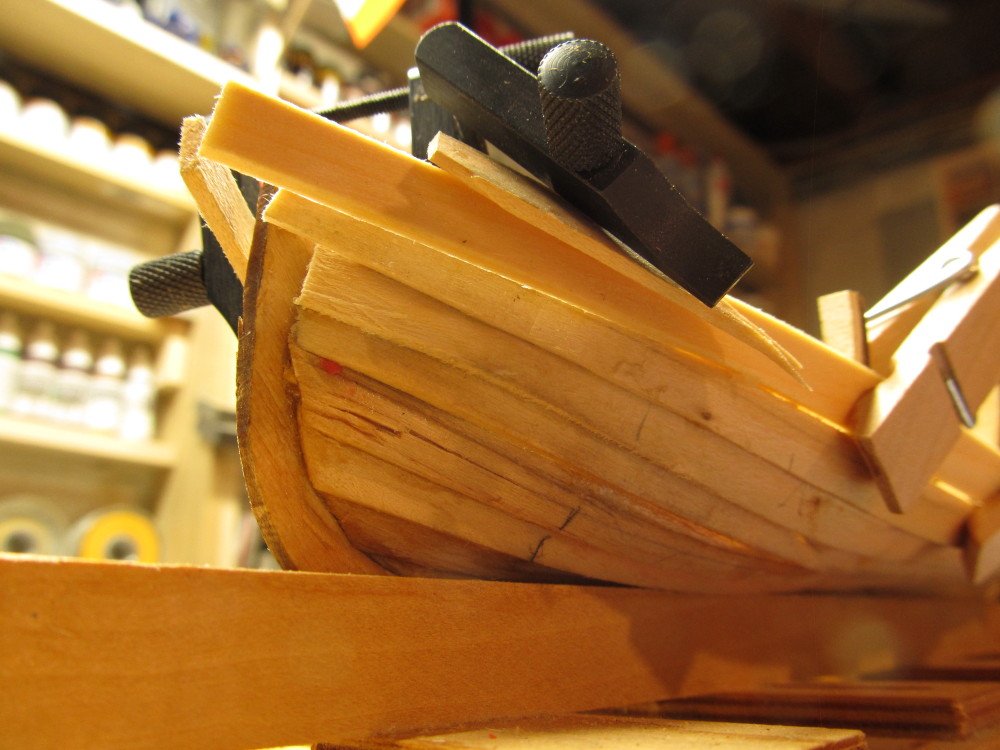
Well the Butcher of Seville has struck again. The planking at the bow and stern has a gaping hole which I need to somehow close. The curvature of the hull doesn't match the curvature of the pieces I need to add to the interior, even tho the planks all aligned to the bulkheads. And while I was using the plank bending tool (soldering iron will bulb nose) this morning, Murphy struck. Somehow while holding the iron in my right hand my left hand reached up and grabbed the shank with my thumb and index finger resulting in a nice burn, which now affects my typing as well as model work. I spent several hours yesterday with my WeCheer micro tool (accepts all Dremel attachments) grinding the two walnut bow/stern deck inserts until their curvature matched the bow/stern curvature. Those are now glued in place. Pictures follow: First the bow/stern disaster. I think I can scarf a fix for this later. Next comes the bow/stern decking and the center decking pieces. Not the gap between the center deck and the planking. I was trying to heat this area and using clamps pull the planks and center piece together when I accidentally burned my fingers, putting that fix attempt on hold for now. And the decking for the floor Part of my problem is the lack of clear written instructions. A paragraph with 3-4 sentences doesn't convey what you need to do and what pitfalls to avoid. AL has really skimped on their instructions in recent kits from those of a decade or more ago. I wonder if the fact that they are now printed in 6-7 languages with the associated translation costs is a key factor for the terse instructions - a couple of photos of the instructions follow: Notice the 2nd paragraph in the first photo below, the 2nd photo accompanies these instructions. The last photo shows the next sequence of steps. Adding the "drawers" and additional floor planking. Time to go rest the hand for awhile before tackling the fix. A re-do is not feasible because there is not enough spare wood to start over.
- 52 replies
-
- 4
-
-
- artesania latina
- titanic
- (and 1 more)
-
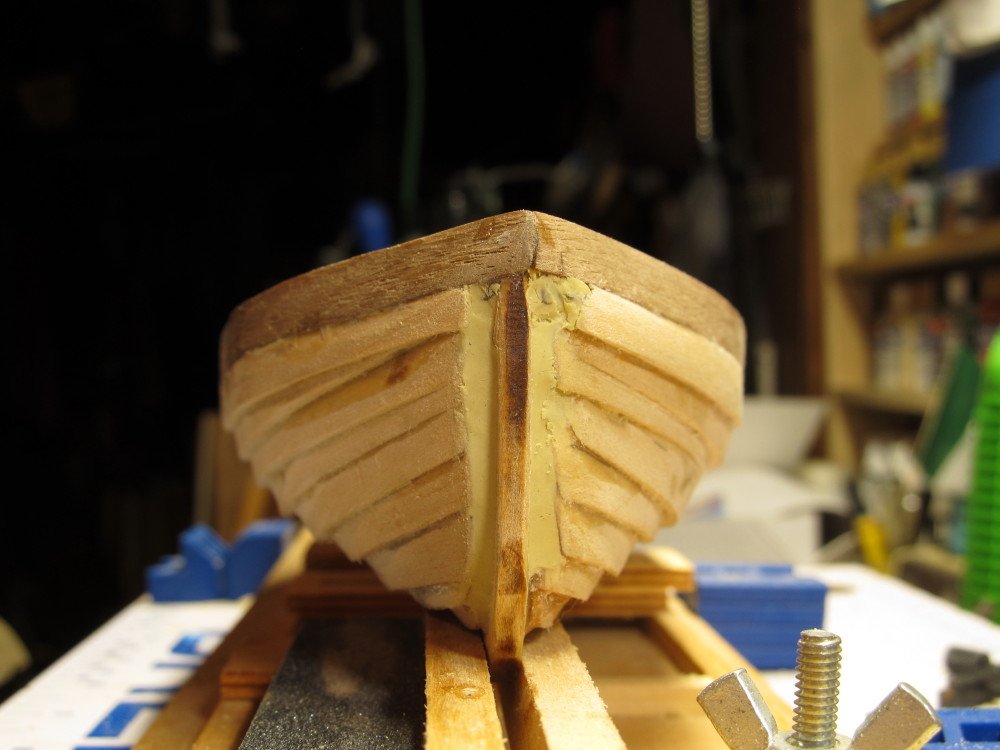
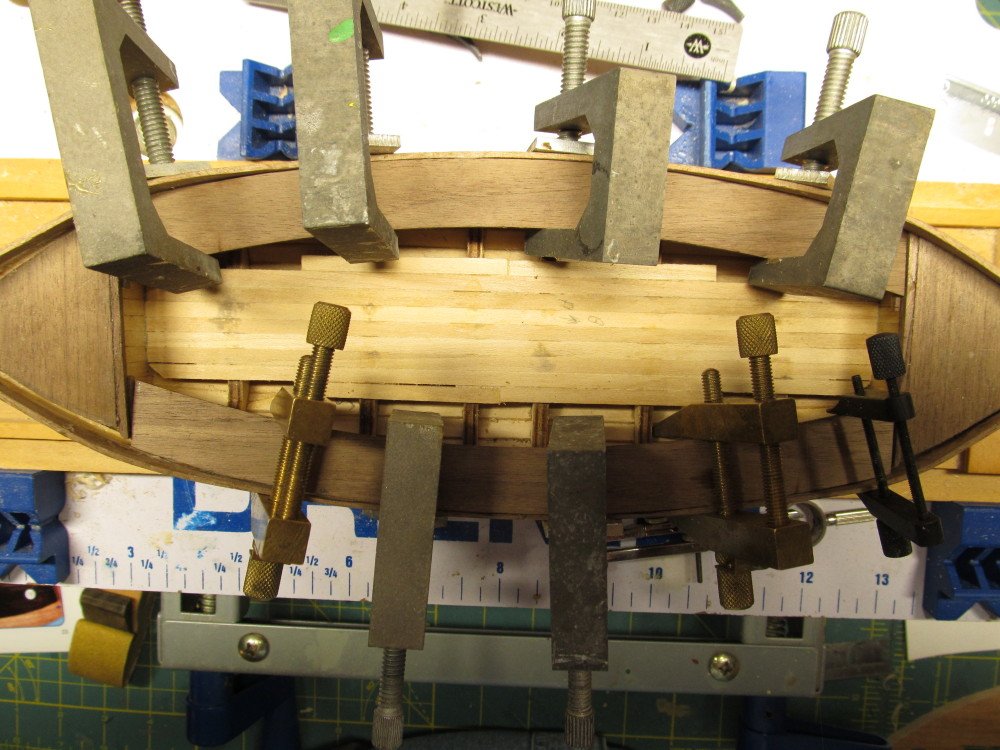
Hello David, I'm not the best hull planker either as you can see, but thanks for the compliment and looking in. Yes, this clinker planking is a real challenge, but not impossible. I've found that if you scribe a line 5 mm from one edge of each plank before you try to bend it, it makes aligning the planks 2 mm overlap easier to visualize and check. The hull planks in AL kits all seem to be of this same basswood thickness, 1.5 mm, at least from my experiences with prior AL kits. It is not too hard to bend lengthwise, both the hot hair dryer and hot travel iron work well for this. However, edge bending is a bit more challenging. For me, I've found that soaking the plank in water for 10-15 minutes first, then using Chuck's travel iron technique with a jig to set the curvature, works, but go slow and don't exert a lot of sideways pressure, keep the hot iron moving across the area of the bend. At least in my prior AL kits with this thick hull planks, I had a second planking of ultra thin walnut/mahogany veneer to cover up the flaws in the first planking, that and my Veritas miniature block plane to smooth out the hull's first planking, and plenty of sanding. For this model, I have been soaking the planks in water for 10-15, maybe 20, minutes, then clamping them to the hull with clothespins at bulkhead 6, I slowly bend the plank fore and aft around the curve using the travel iron as a "hot persuader" , the heat and surface area of the iron help to bend the plank. Once I have it roughly in place, I clamp it and let it dry overnight. then come back and maybe repeat the process if needed or glue it in place using PVA glue. And yes I have already broken two planks in the process. Oh, to ensure I get the planks aligned I put a witness mark across the lower plank and plank I'm installing at roughly the mid-point between the two bulkheads #6, before I even try soaking it. This way when I remove the plank for soaking, bending, trimming, I can always align it with the witness mark on the lower (installed) plank. Looking at the photos of the AL model in the instructions, I counted 9 planks on each side and then a 10th walnut plank as the last plank. Like the Doctors who have been "practicing Medicine" for some 2,000 years; I'm still practicing hull planking after some 20 plus years of model ship building [no offense intended to the Medical community by that old pun] Hope you come back to your Titanic build, David.
- 52 replies
-
- 8
-
-
- artesania latina
- titanic
- (and 1 more)
-
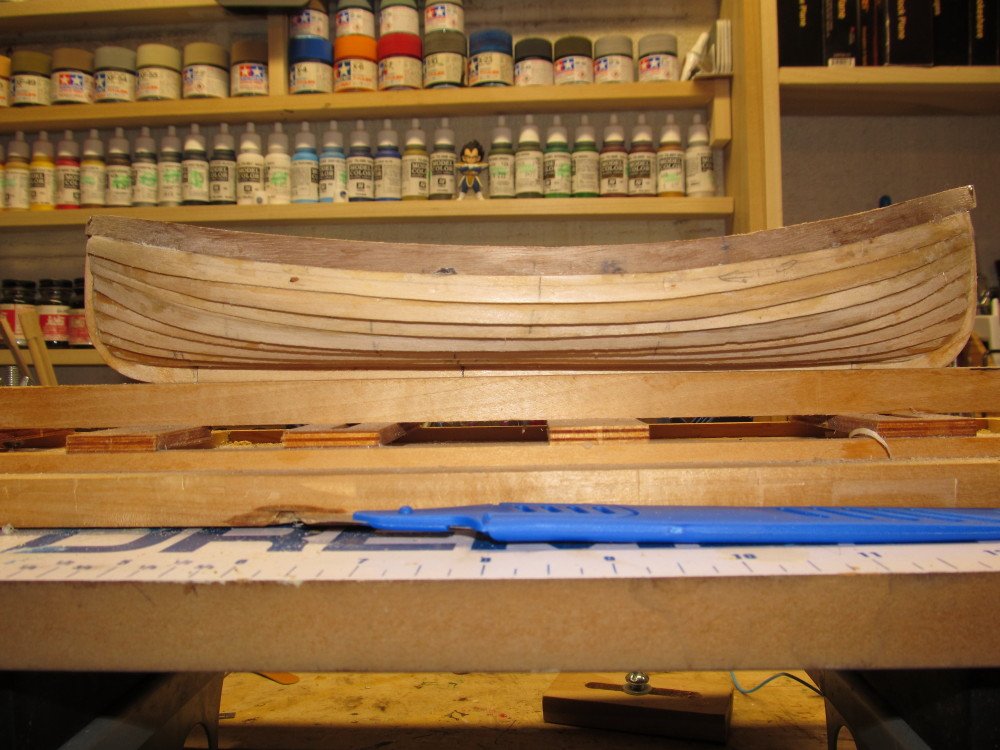
Well, muddling right along on this build. We are making some progress altho this bending is proving to be a bit of a challenge. After trying the hair dryer, travel iron, plank bender (glorified soldering iron with a melt golf ball on the end ), each of which gave varying results, I settled on soaking the planks for about 10 minutes first then slowly bending them applying heat from the travel iron. The wood is listed in the kit inventory as basswood/Tilo/Tileul/Lindenholz/Tiglio/Tilia/Lindenhout quantity 24 size 1.5 mm x 7 mm x 310 mm. Nowhere in the instructions does it explain how many of these are needed for the hull planking. So looking at the photos of the finished model and counting the planks I deduced the number is 9 per side. (18 in total) which is good since I have already broken 2. The instructions recommend planking alternating side to prevent warping. Photos follow: I am still having trouble getting planks to land flush against the bow stem or stern post. But I'll get there someday. I bend them wet then attach them to the hull, clamp and let dry (heating them to assist in the bending). After drying, I remove the clamps, test fit the plank and re-wet/re-heat/re-bend as needed. Then I apply the glue and clamp till the glue sets. I've alternated between thin and medium CA and Elmers yellow Titebond glue (PVA); I've decided to stick with the PVA for this build. So far I have 8 of the 9 planks(per side) installed. The last 2 planks are left to install, then we install a top plank that is walnut/Nogal/Noyer/Nussbaum/Noce/Nogueira/Notenhout (everything is in 6 or 7 languages, including the instructions). Each instruction is rather terse and leaves a lot to misinterpretation. I've built a lot of Artesania Latina kits over the last 20 years or so and these instructions are not up to the quality of those in the first kits I built.
- 52 replies
-
- 10
-
-
- artesania latina
- titanic
- (and 1 more)
-
Messis, if you used PayPal or your Credit Card, contact them for a refund.
-
Lee Valley Veritas Hand Joinery
Jack12477 replied to Jack12477's topic in Modeling tools and Workshop Equipment
Yes, I have the new Jack Plane on my list for Christmas. -
Lee Valley Veritas Hand Joinery
Jack12477 replied to Jack12477's topic in Modeling tools and Workshop Equipment
Yes In US and Canada the A2 blade is 3/32 inch or roughly 2.381 mm, if my conversion is correct . That seems to be the only offering size -
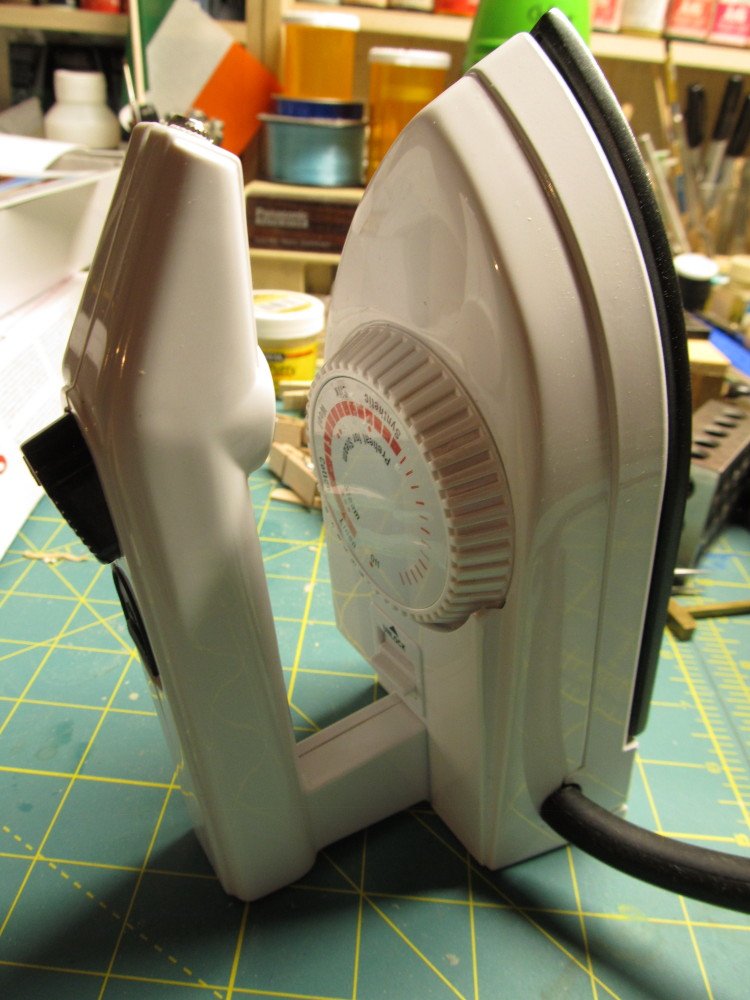
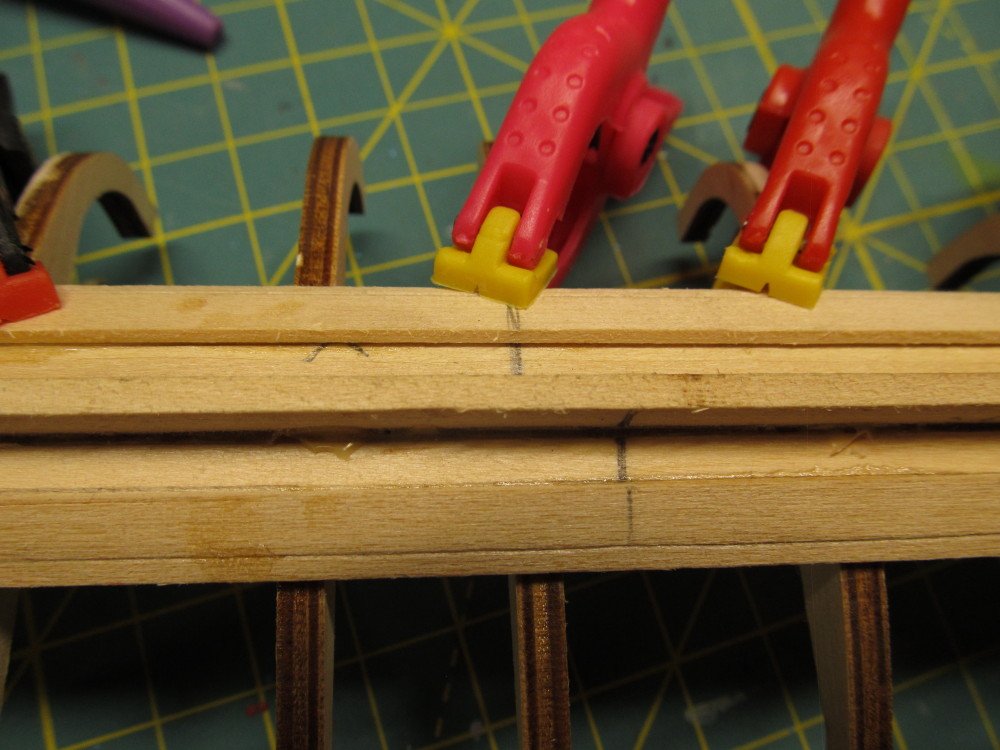
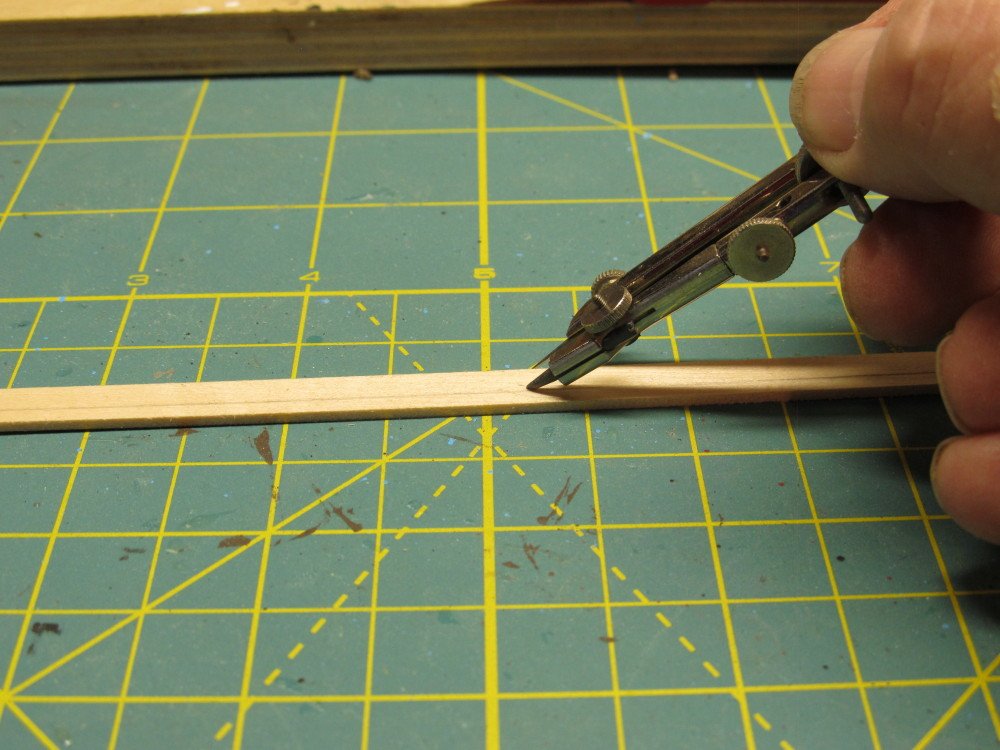
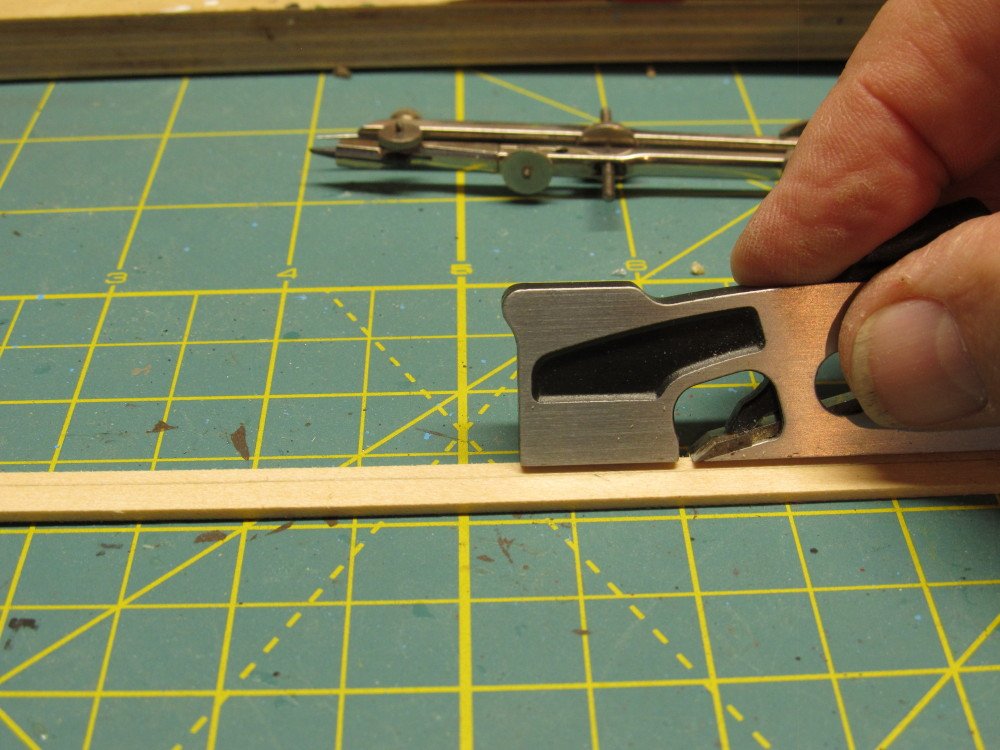
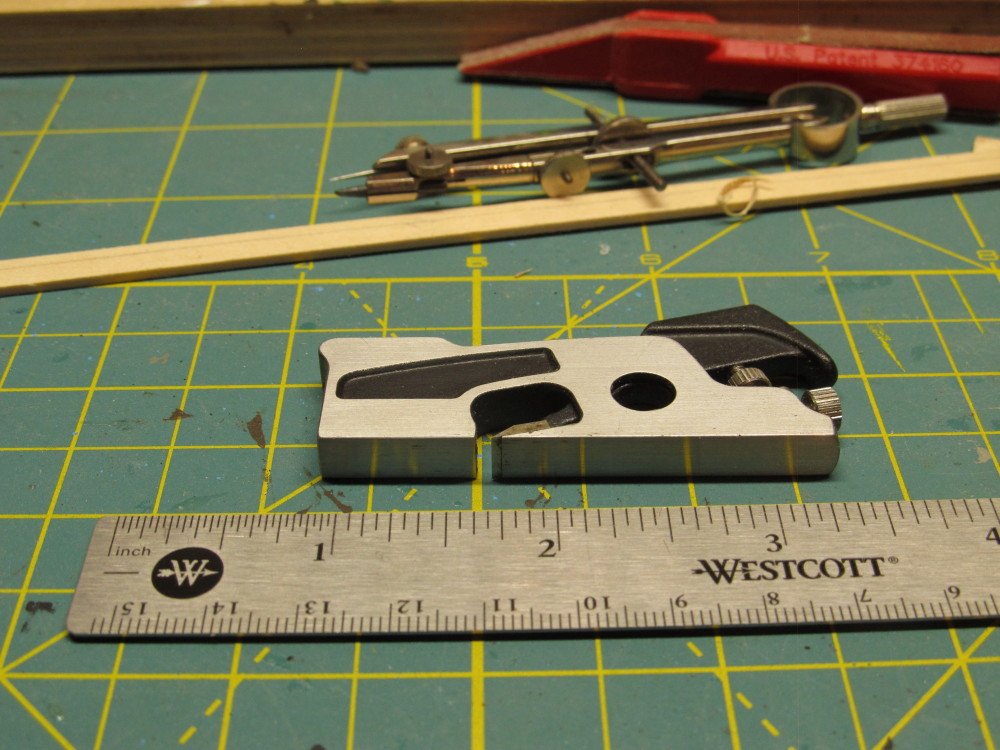
Now that the hull frame is completed and faired, I will start the daunting (for me at least) task of clinker planking the hull. The instructions call for planking with 1.5 mm x 7 mm strips, with a 5 mm reveal and 2 mm overlap with the next plank. To keep the reveal constant I am marking a line 5 mm from the edge using a drafting compass I've had since my college years. To allow the next plank to sit snugly I am using my Veritas miniature Shoulder plane to put a slight bevel on along the 2 mm overlap. Drawing the 5 mm reveal line. Using the Veritas shoulder plane to create the bevel The gar planks and 1st overlap planks installed. The instructions advise to alternate sides. Bending is a challenge. I was using @Chuck hot air hair dryer method but that is a little slow, so I switched to his small travel iron method, which is working much better. I'm using medium CA to glue the planks down. I used yellow carpenter's glue for everything else. You will notice some "witness marks" on the planks to mark the center and the start of the curved bow/stern area. I offset the center marks on the port and starboard sides a little to help me remember which side the plank goes on I use these marks to roughly align the planks when I glue them down. Since the planks have to be trimmed at both ends exact matching is not a problem.
- 52 replies
-
- 6
-
-
- artesania latina
- titanic
- (and 1 more)