


hof00
-
Posts
1,656 -
Joined
-
Last visited
Content Type
Profiles
Forums
Gallery
Events
Everything posted by hof00
-
 Hi Chap, Thanks for that!! I could paint these but I don't want to tempt fate, I'd rather have something that I can just "Place" to achieve the desired result. Just had a look at the site, this might just be the ticket!!🙂 (Australia is not too far away so shipping shouldn't be too costly.) Could you please detail exactly the item you ordered? Good to see you back, I was wondering where you had got to.... 🙂 Cheers and Regards, Harry.
 -
Hi Chap, Looking very good indeed!! Awesome detail at this scale.... (I'm having enough of a "Challenge" at 1/200) Cheers....HOF.
-
Hi Chap, Thanks for the advice, Unfortunately no.... 🙂 The Deck is absolutely flat. The Superstructure is in contact with the Deck, but, the Port side of the Hanger is not. (As per the photos.) The only thing that I can think of is that the connection between Hanger and Superstructure is out of plumb somehow.... To try and remove the Hanger part of this Superstructure would be courting certain disaster!! Your advice is very much appreciated and also a trigger to get me thinking about this again. Pretty sure I'm going to use Vallejo Acrylic Putty for the "Gap." Cheers and Regards, Harry.
-
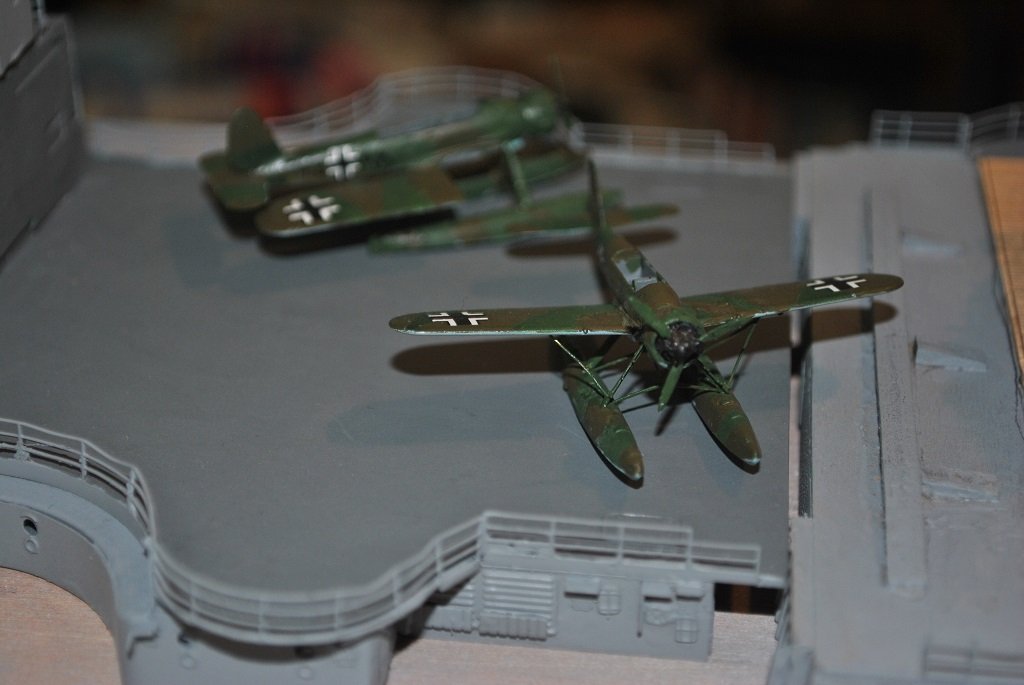
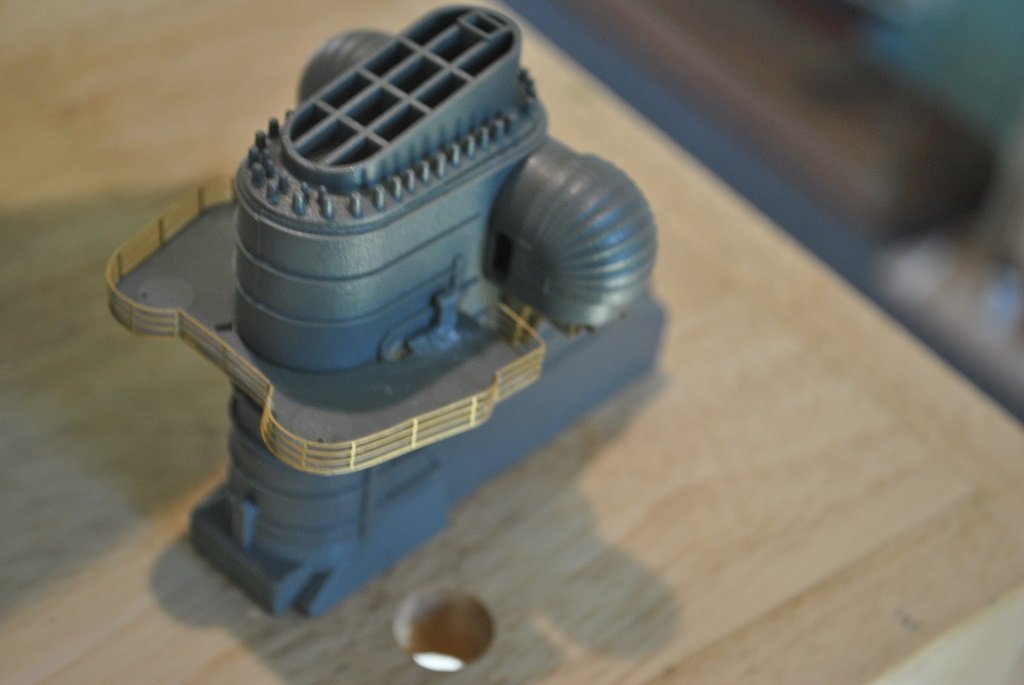
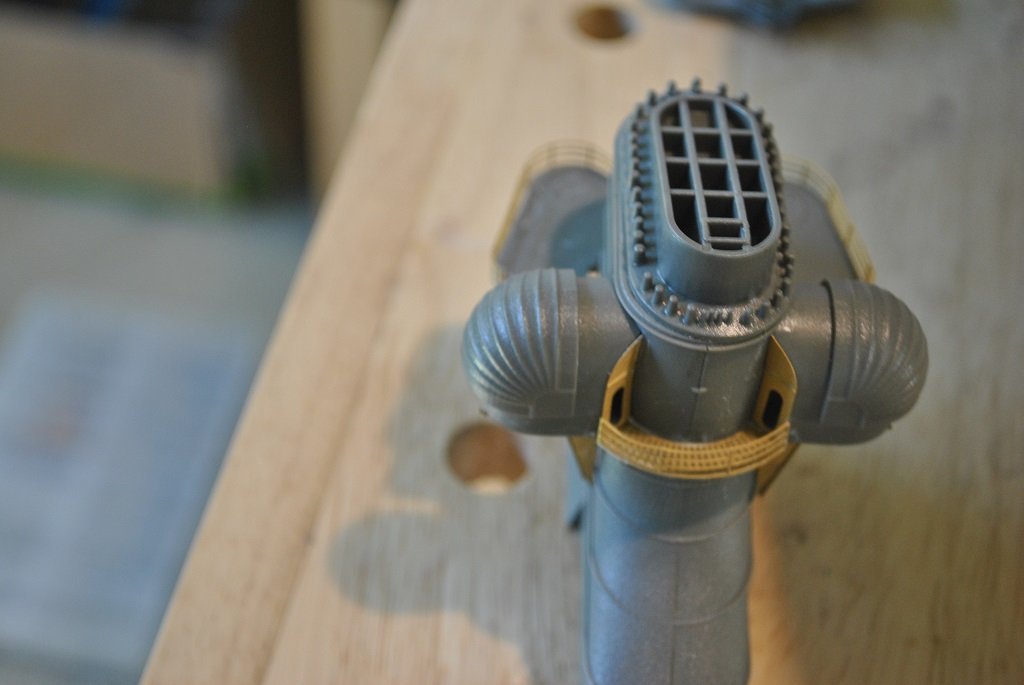
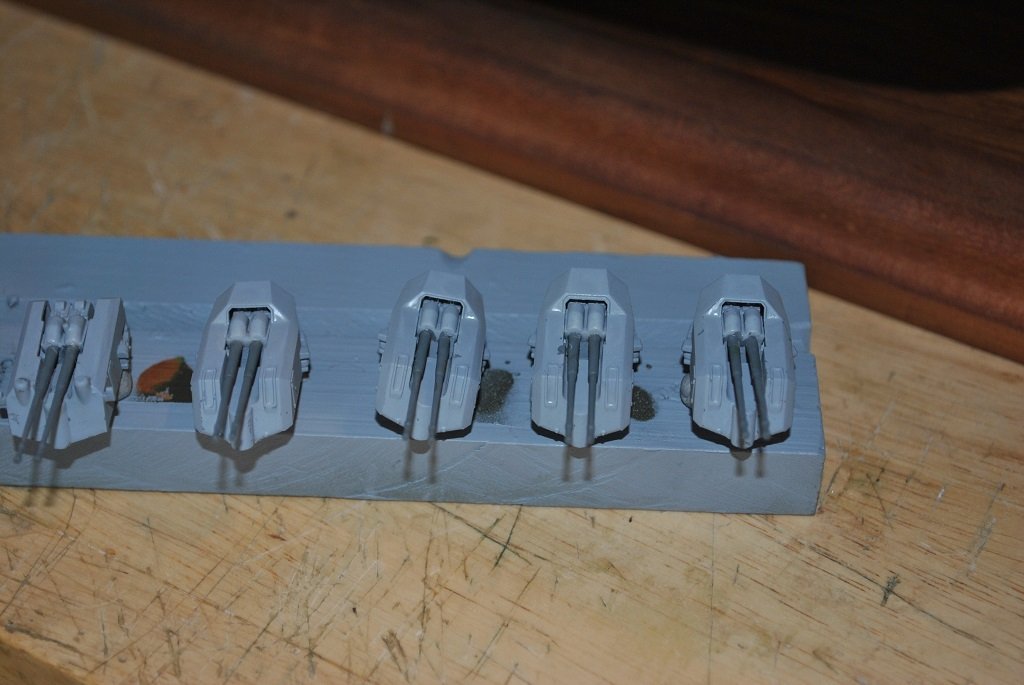
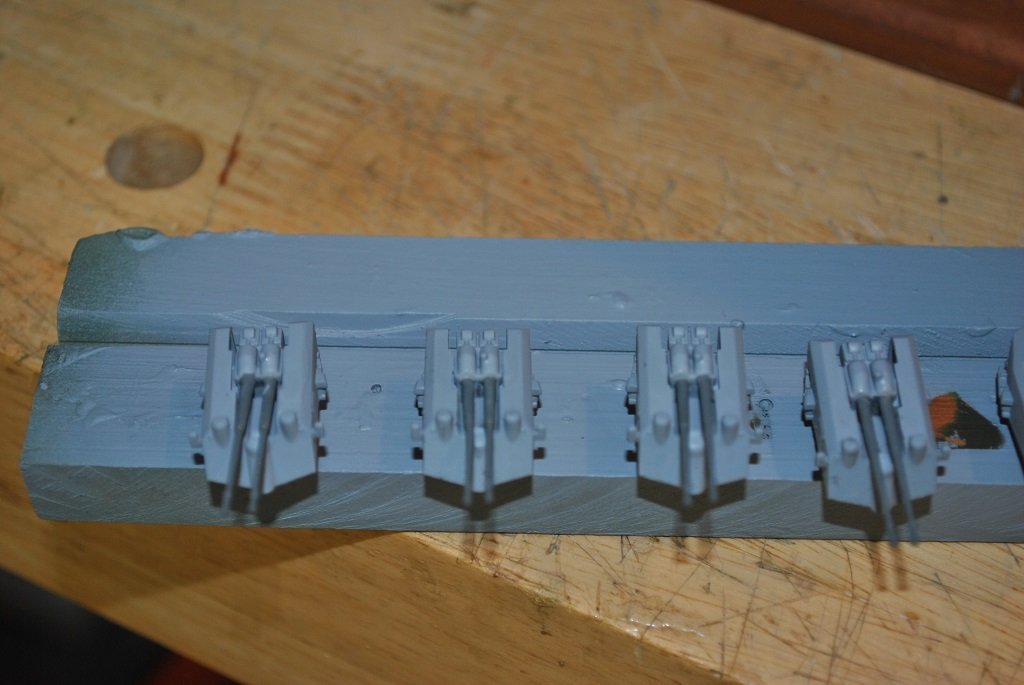
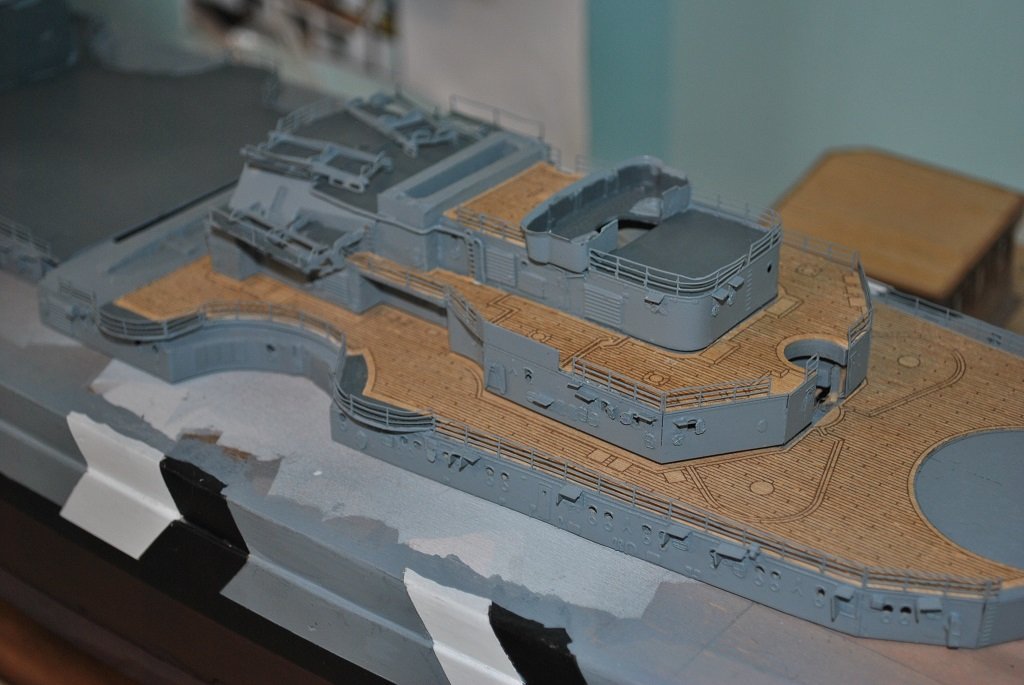
Hi All, It's been a while since I posted so here is a small update: Arados complete apart from Canopies, I'll get to defining the Frames when I find something suitable to highlight them. Conning Tower has had additional PE attached, (Not shown here), and Upper Tower Gallery and Fire Control structures assembled. Funnel PE attached but not yet complete. 10.5cm Anti Aircraft Guns, (X8), complete. Bow Cleat attached. I think that I really need to get the Main Deck Stanchions marked and the Decking sized and affixed as there are many sub-assemblies almost ready to attach. Cheers....HOF. Photos:
-
Hi Rod, Just thought I'd have a look at your "Amati" U-Boat build. An interesting kit but as you pointed out in your log, a little light on detail. (There don't seem to be many U-Boat builds on the forum....) I'm thinking that I might have a go of the Revell 1/72 Type VII "Wolfpack" that I have in storage, I have the Pontos Detail-Up stuff for this as well. Anyway, that's in the near future.... 🙂 Cheers and Regards, Harry.
-
Hi Chap, Looking good!! (The detail is way too fine for the likes of myself.... 🙂) Cheers....HOF.
-
Hi Rod, Your "To Do" list looks a little busy, good to see you will not be idle!! 🙂 Looking forward to your upcoming builds. By Deck Transfers, I am alluding to the Swasticker markings, or, more correctly, Air Recognition" markings. Were these supplied or did you paint these? (I guess I'm looking for a source to order from.) Cheers and Regards, Harry.
-
Hi Rod, That looks really, really Awesome!! I rake my hat off to you, knowing first hand how, in your words, "Insane" this model is.... 🙂 I guess you are almost at the point where you can say "Finished." (Wot's next? 🙂) Anyway, it has been, and is, an absolute privilege to see your Ship come together and also replies to my many questions (I do have another question for you at this time: Where did you procure the Deck Transfers?) Cheers and Regards, Harry.
-
Thanks Rod, I'll soldier on with the Canopy Frames, I found some "Lettraset" tape about 1.5mm, something to trim down.... 🙂 I also found some Vallejo filler that you advised me about. I'll have a "Play" Off-Ship when I get my hands on it. Cheers and Regards, Harry.
-
Hi All, The above reply from Canute referred to a post that I inadvertently deleted the content of this was: .Yesterday, or today depending on where you are in the world, the Bismarck sank taking 2,000 lives with her.... 27/05/1941 at 1030 Whether or not this was due to Royal Navy action, or, as some recent research suggests, the crew scuttled thier own ship. Cheers....HOF.
-
Hi Rod, Thanks for the advice regarding my "Gap" issue. I'll order some Vallejo filler next week, (As well as some more Acrylic Polyurethane), it sounds good and I hope it's available here. I have "Squadron" Plastic Putty at hand but it takes ages to go off and gets over things, (Messy), without masking first.) I did consider "Attacking" the underside of the structure but shelved the idea, just one errant brush with something and I'll bend stuff. (I already some the Boat Skid Rails to straighten a tiny bit, I guess I don't wish to push my luck.... 🙂) Do you think that I am at a safe stage to attach this structure? I was concerned that if I did this now, it would make things difficult adding additional components to this structure. (My instructions advise against attaching permanently at this stage. I did have an idea of setting this up, "Off-Ship" to do the fill and touch up thing.) Thanks also for the "Heads-Up" reading what is described in my Bismarck instructions as the "Aft Signal Station. 🙂" I have taken note of this, much appreciated!! Yup, as you know, I was considering EZLine, or at least mentioned, I'll certainly give the kit supplied nylon a go first!! (I have never used EZLine before but got some from the States about a year ago.) I'm currently working on finishing the Arados, one with folded wings. These are a little problematic in some respects, probably just the builder.... A question here for you,: Did you use the painted Masking Tape method for the Canopy framework? My instructions refer to placing strips 1.0mm wide but this just looks too wide.... Anyway, thank you once again for the information, very, very much appreciated. Cheers and Regards, Harry.
-
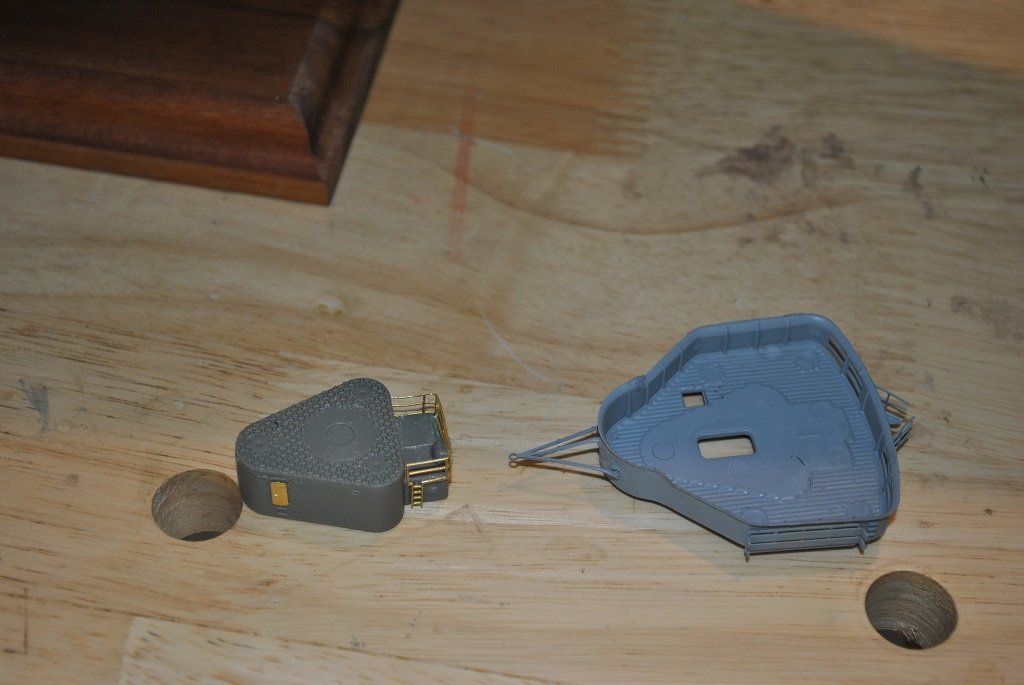
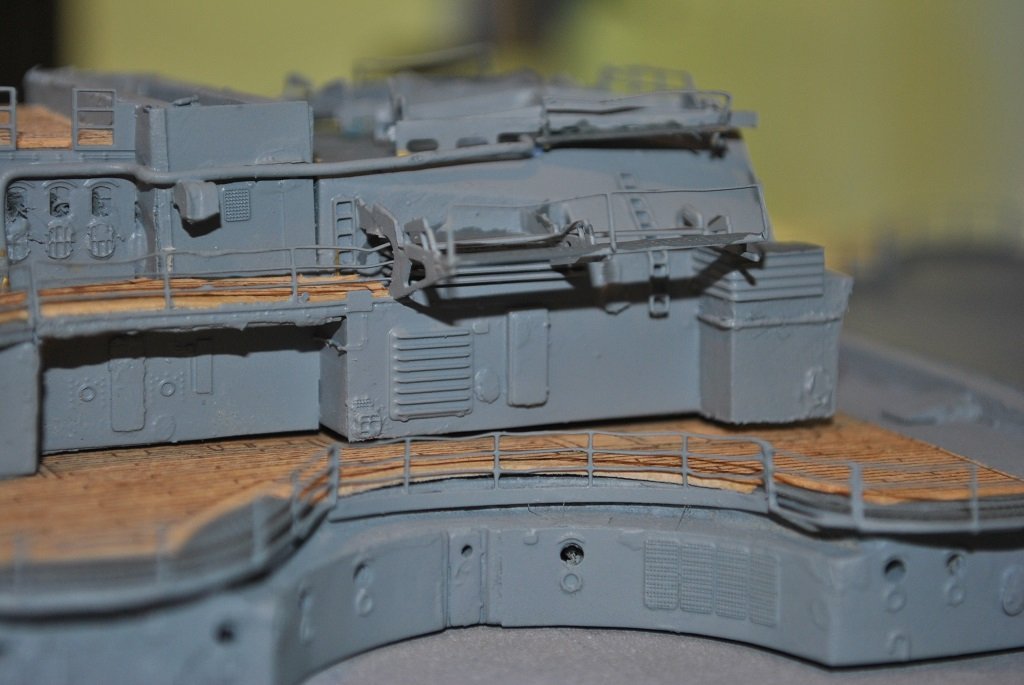
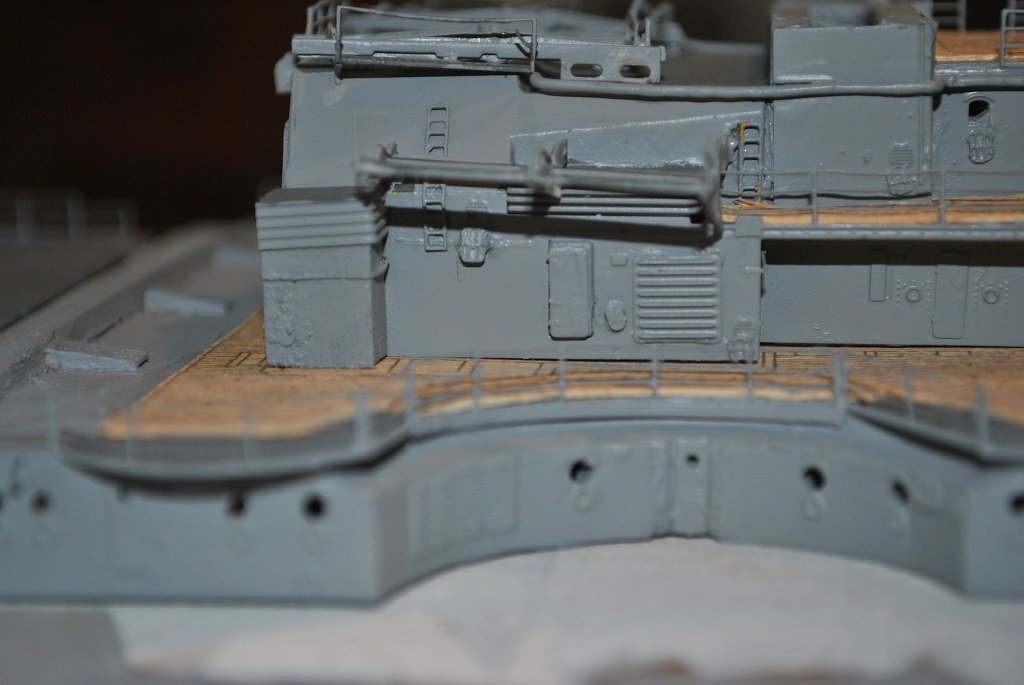
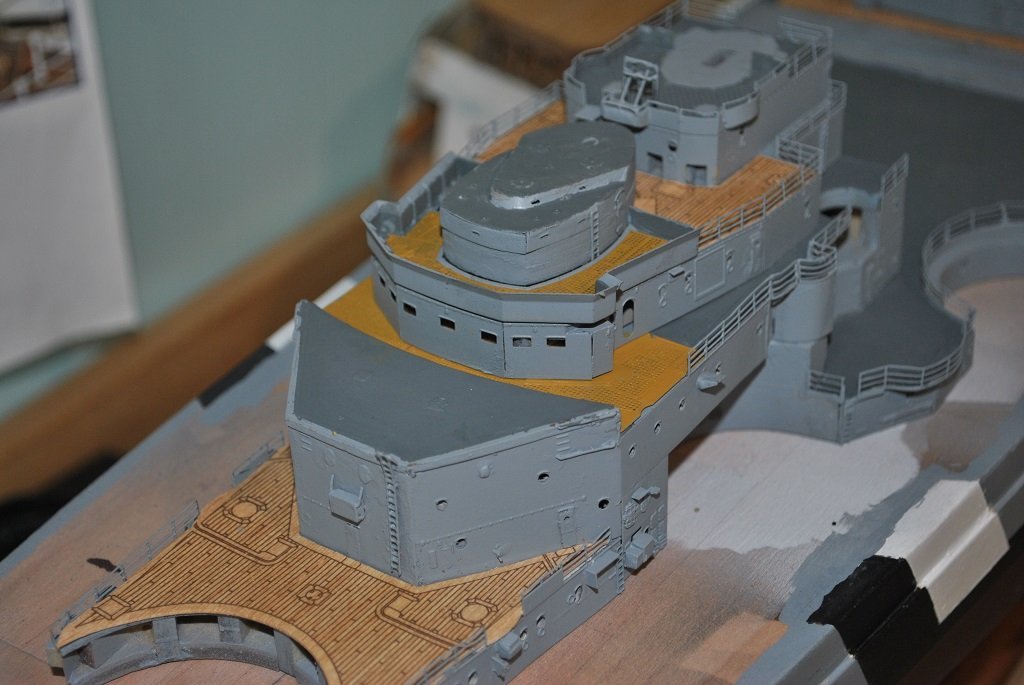
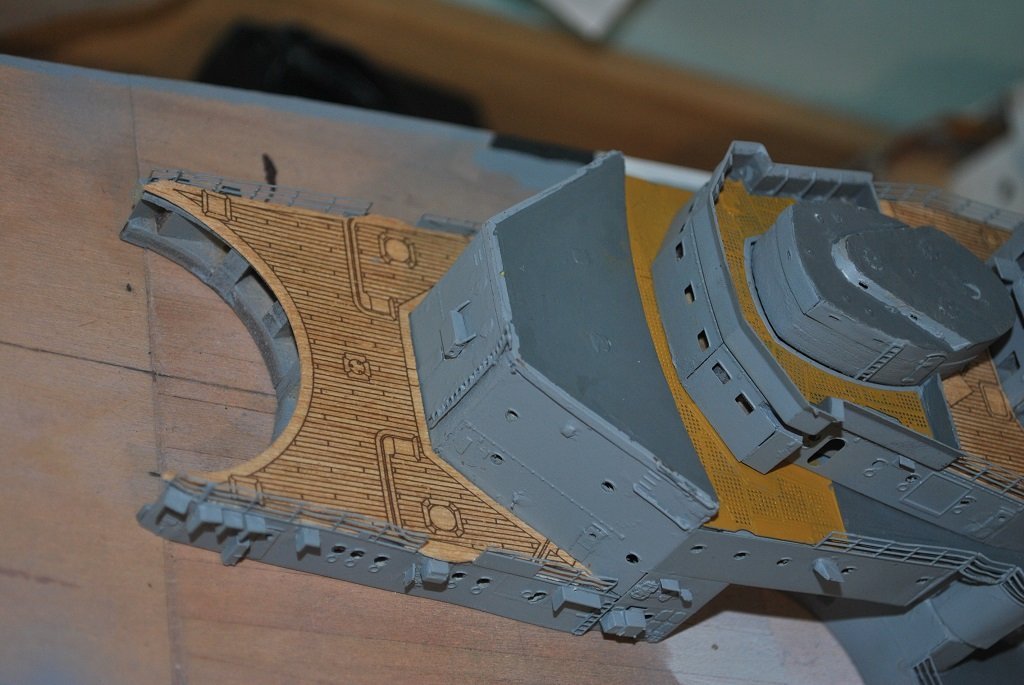
Hi Mark and Piet, Thanks for coming in to the "Fray" for me.... I initially thought that this was a "Fit" issue ,When I initially constructed this, it was super tight.... But no, I paired down the mounting lugs, so, not that.... Inspected the Underside of Tier two, nothing looks out of place. There don't appear to be "High" spots on the Deck of Tier one. (I'll double check though. If there is, there's sod all I can do about it as the Wooden Deck is very firmly attached) I'll do the Level Test as best I can, there are protruding ply "Locator" Lugs that protrude from the bottom of the structure. about 2/3 down the length of Tier two. My conclusion is that the Hanger wall is not quite square, (Plumb) on one corner but square with the rest of the Superstructure as all the PE fits correctly, no gaps,.... 🙂 "How did this happen in the first place?" I'm really unsure.... (If I had the luxury, I'd do it again. 🙂 Hindsight is a wonderful thing.... (Pardon the cliché!!)) Starboard side, as per photos is fine.... If I use any filler, I think it has to be a Plastic Putty as the Hanger is mainly Plastic and PE. Thoughts? Cheers and Regards, Harry. Edit: I have just placed a Steel Rule on the Deck of Tier one, no high spots whatsoever. Placed Tier two on a sheet of Glass, as per the photos, I have a gap, Starboard side as per photos.... (Well, good to have confirmation I guess....🙂) Photos:

-
Hi Chap, Thanks for that. The 2nd Tier of the Superstructure is not yet affixed to Tier one, just placed. The Hanger and the rest of Tier two are very firmly attached together. The gap around the Port side of the Hanger remains.... I was thinking of trying to remove and I'd like to rectify this prior to permanently attaching Tier two .the Hanger from Tier 2 but that would have been a huge mistake in terms of breakage/re-work. (There are more components to fit prior to mating Tier one and easier to do this if I can remove Tier two to work on it, another reason why I'd like to rectify the gap.) 🙂 My apologies for not clarifying the above. Cheers and Regards, Harry.
-
Very nice!! I do like the result, looks great and a great environment for display. Cheers....HOF.
-
Ditto!! The Lfe Boat covers make for very nice detail. Cheers....HOF.
-
Thanks Ken and OC. I thought about White Glue.... I think that whatever method is used, I am of the opinion that I should remove this tier of the Superstructure, (It's not affixed yet), and fill/paint before it is permanently placed. I guess set it up on maybe some Glass to prevent filler bonding, or, maybe Masking Tape? One of my concerns with White Glue is that maybe it could "Slump?" The Hanger structure underneath is Plastic/PE, would White Glue bond sufficiently? (That's why I thought about Plastic Putty as a possible solution. Thoughts? Cheers....HOF.
-
Hi All, Any ideas regarding my post above? (Gap issue) I have a few ideas,,,, Plastic Putty Plastic Card (Under and flush with Hanger edges) Thin wood strip Under and flush with Hanger edges) A combination of Plastic Putty/Plastic Card A combination of Wood strip/Plastic Putty Any sage advice or opinions very much appreciated. Cheers....HOF.
-
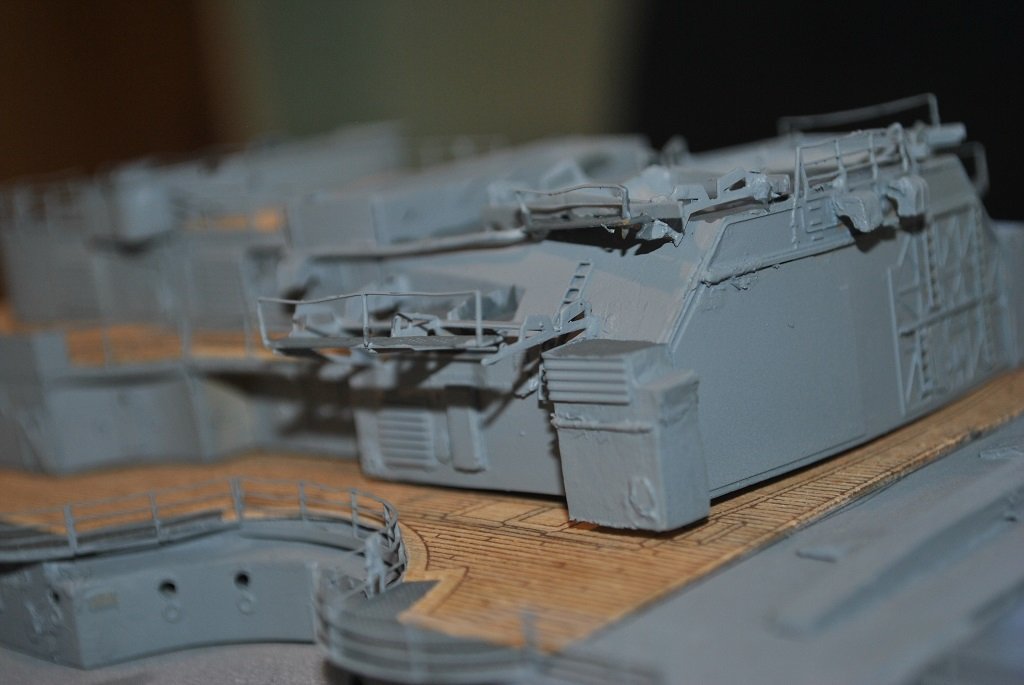
Hi All, No update today but rather an issue that I discovered yesterday.... The problem is that I have a "Gap" between the Main Hanger and Deck, Port side. (Starboard is fine unless I place finger pressure on top of the Hanger, the whole thig rocks slightly and I get a real bad gap all around. ()Except for the Hager....) I have been giving this allot of thought..... I initially thought that this was a "Fit" issue ,When I initially constructed this, it was super tight.... But no, I paired down the mounting lugs, so, not that.... Inspected the Underside of this, but nothing looks out of place, so, My conclusion is that the Hanger wall is not quite square but square with the rest of the Superstructure. I thought about removing the Hanger but this would be an absolute "Nightmare" with all the PE, Decking, Etc. attached. My only other thought was to carefully fill the gap once it is comes time to fix it down. The Gap is only about 1.0mm and not noticeable just viewing but it really annoys and it would be good to fix as best I can. I don't want to "Rush" the fix either and thought that I'd put my issue to the Forum to see if anyone has some "Sage" advice.... 🙂 (I took some photos to show the problem.) Cheers....HOF. Photos:


-
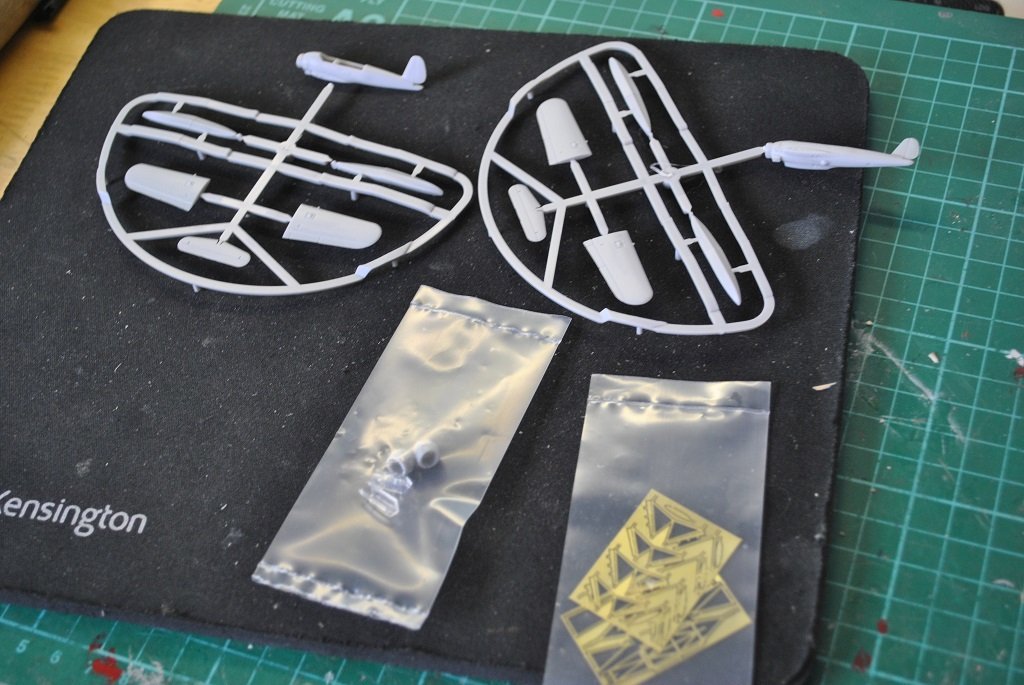
Hi Rod, Thank you. The Arados come with the Wing Struts, I guess I'll have a couple spare if the folded Wing version works out o.k. Have just finished the PE Catapult "Sleds" and have almost completed painting the Aircraft. (I'm performing this "Unassembled." Thanks for the "Heads-Up" regarding the Float alignment, however, I've already opened up the locating holes to 0.5mm I guess I'll have to work on it.... 🙂 I have a reasonably big issue that I'll past about shortly.... Cheers and Regards, Harry.
-
Thanks Chap! I am pleased that I only had to re-spay the "Vallejo" Polyurethane.... I simply could not do a re-paint of the Superstructure. (I did consider this for a few panicked seconds....🙂) I need to listen to myself and my mantra, "Slow things up and consider carefully....") Anyway, onwards.... Cheers....HOF.
-
Thanks Chap, I agree, walk away!! Live and learn I guess. 🙂 The situation would not have occurred in the first place if I had thought about things a little longer.... I had an idea that the reflective/refractive properties of different coatings was at play. (I had done some reading about this sometime in the past.) the only other thing that's bugging me, (At the moment), is the "Dazzle" Stripes encroaching onto the False Deck.... I'll rectify this soonish, it should be a strip of Light Grey around the Deck perimeter.... Cheers and Regards, Harry..
-
Hi All, Another small update: Yesterday, I thought that I had ruined the Superstructure.... Problem: Sprayed the incorrect Polyurethane over my work. The result was that it darkened the Grey and was a little too gloss, I was absolutely gutted. I slept on it and decided to re-spray with Vallejo Acrylic, Semi-Gloss Clear. This "Picked Up" they different Grey's. I now have Superstructure colors that match the Hull. (I am much relieved!! 🙂) I am of the opinion that the original Polyurethane absorbed the light rather than reflecting. So, the "Crystal Clear" Acrylic is fantastic for Wooden Ship models but no good for the Bismarck where I have already been using "Vallejo...." .... (The Decking areas got a dose of Vallejo also.) I thought I'd have a change of pace for the next couple of days and have a go at the Arados. (These are tiny.... The plan is to have one with folded wings and the other, wings extended. (These are the next two "Issues" anyway.) Cheers....HOF. Photos:

- 544 replies
-
- 10
-


