


JSGerson
-
Posts
2,482 -
Joined
-
Last visited
Content Type
Profiles
Forums
Gallery
Events
Posts posted by JSGerson
-
-
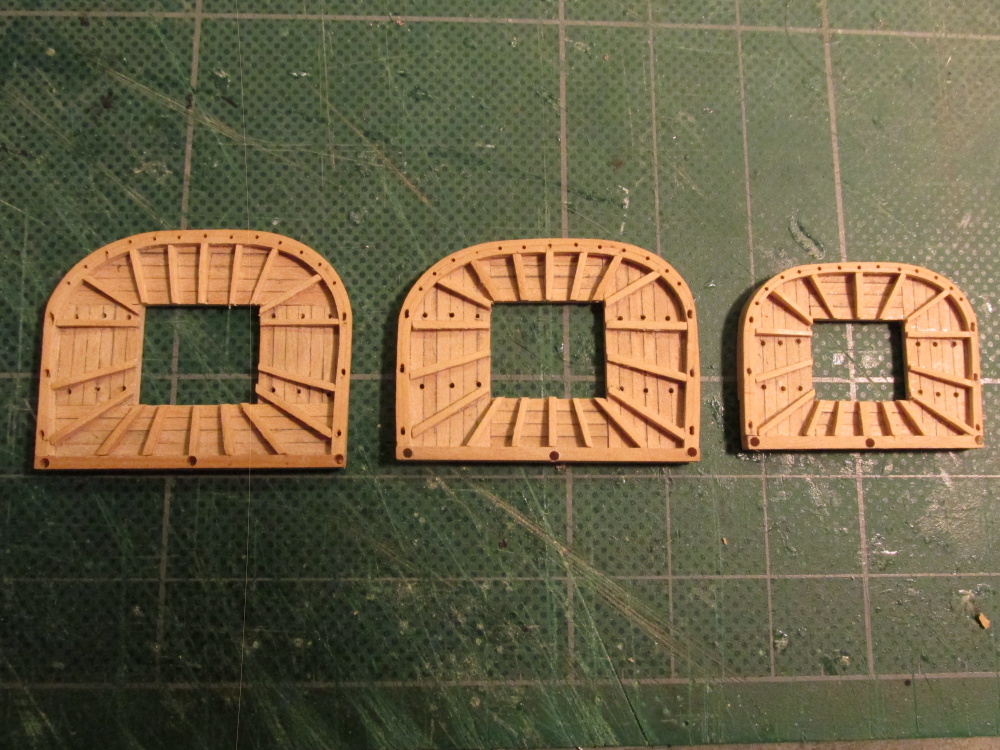
Finally, I've drilled what seemed like a billion holes into the fighting tops.
-
Steve - When I started this build soooo long ago I knew nothing except how to follow directions. I had no books and few ship building skills. Now I have so many directions it gets confusing, as I have noted above numerous times. Actually I have all of the books you mentioned plus another 20 or so. I have spent a fortune in books alone. My latest one is The Fully Framed Model, Rigging a Sixth Rate Sloop of 1767 - 1780 Vol. IV by David Antscherl which excellent. I wish I had known about and read his first three volumes when building the Rattlesnake hull. That's one of the reasons I go so slow, I'm always pouring through my reference library.
I can't stress enough the importance of a build log. I was afraid, like you, to write a log knowing there were craftsmen out there who had skills way beyond mine. I was pushed and reluctantly started to write. It was the best thing I could have done. Just organizing my thoughts to tap them out on the keyboard helped me understand what I was doing, plus the feedback was invaluable.
Jon
-
-
Thanks, you verified my thinking
-
Martin - The holes for the Crowsfeet I've already drilled without a problem. What I'm confused about is how and where the buntline blocks are attached to the platform. Mamoli shows them tied with a line that goes over over the rim right where the Crowsfeet is rigged and hanging below the platform. The MS plans show the same thing in a more simplified manner. If there were no Crowsfeet, I wouldn't of seen a problem. In the books which do show the Crowsfeet, the buntline blocks are hung further inside the platform with the jeer strop. I guess I don't understand what you were trying to say as to where you placed them.
-
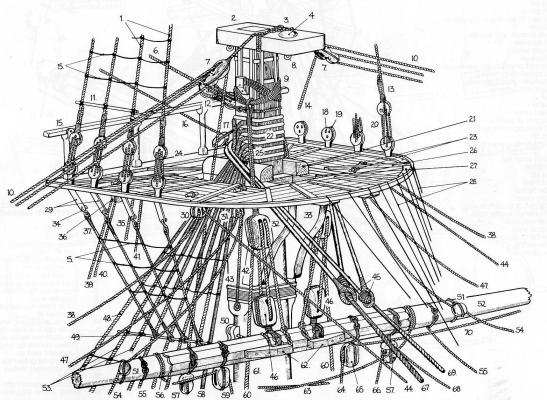
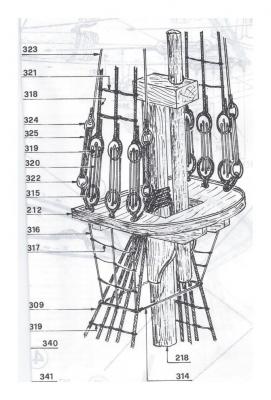
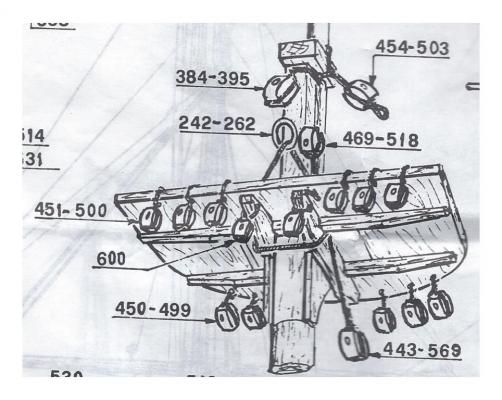
1. Main topmast shrouds
2. Mainmast cap
3. Main yard lift block strop
4. Hole for main topmast
5. Ratlines
6. Mizzen topmast stay
7. Main yard lift long tackle block
8. Eye for top ropes
9. Strops for jeer pendants
10. Main yard lifts
11. Topmast shroud stave
12. Mizzen topmast stay deadeye
13. Topmast shroud lashing and deadeye
14. Main yard lift fall
15. Main top rail
16. Mizzen topmast staysail stay
17. Mizzen topmast staysail block
18. Topmast shroud lower deadeye
19. Deadeye plate
20. Deadeye lanyards
21. Bolster
22. Lower mast shroud eyes
23. Jeer strop
24. Main top gunwale
25. Jeer strop
26. Batten
27. Iron plate for topmast heel fid
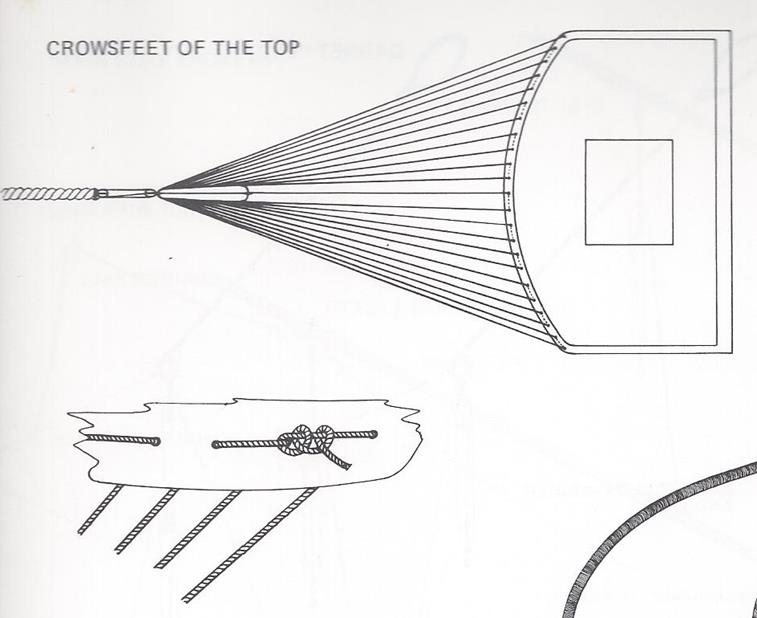
28. Crowsfeet
29. Topmast deadeye and futtock shroud plates
30. Spritsail brace and main course buntline block
31. Studding sail boom topping lift and inner buntline fall block
32. Standing jeer block
33. Bibs
-
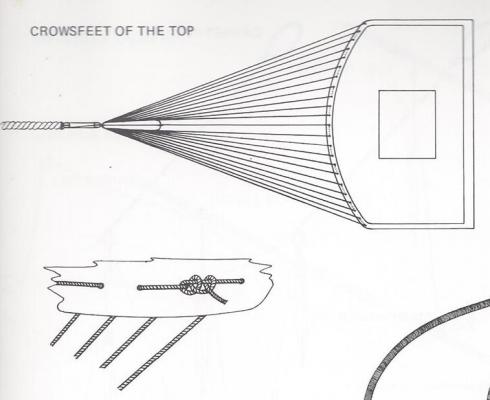
What is taking me so long to drill the holes in the tops is among other things trying to figure out where the rigging is going. As I stated, I plan to rig Crows feet as shown in Harold Hahn’s plans but neither the Mamoli nor the Model Shipways show this. When I look at the books from Petersson, Lee, and Antsherl they show in excruciating detail how the Crowsfeet is supposed to look. All fine and good except that both Mamoli and MS show rigging and blocks that the book authors don’t, specifically the buntline blocks. (see comment 520 of the log).
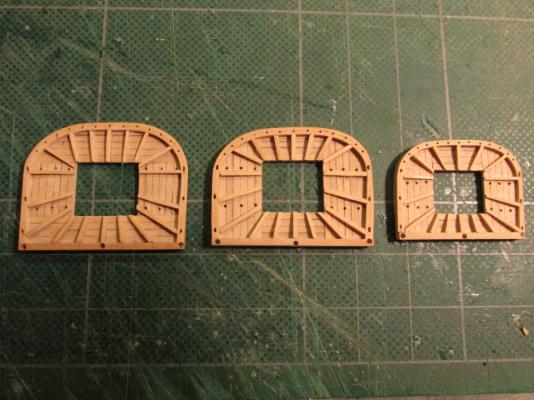
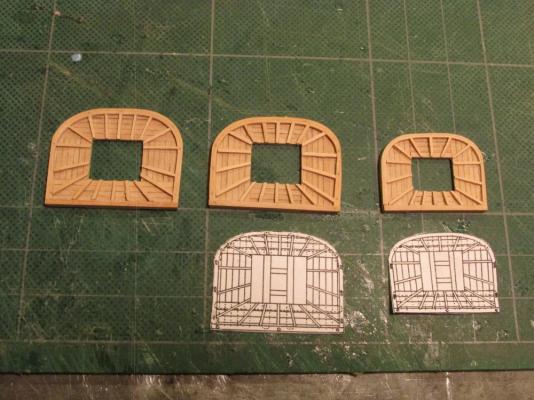
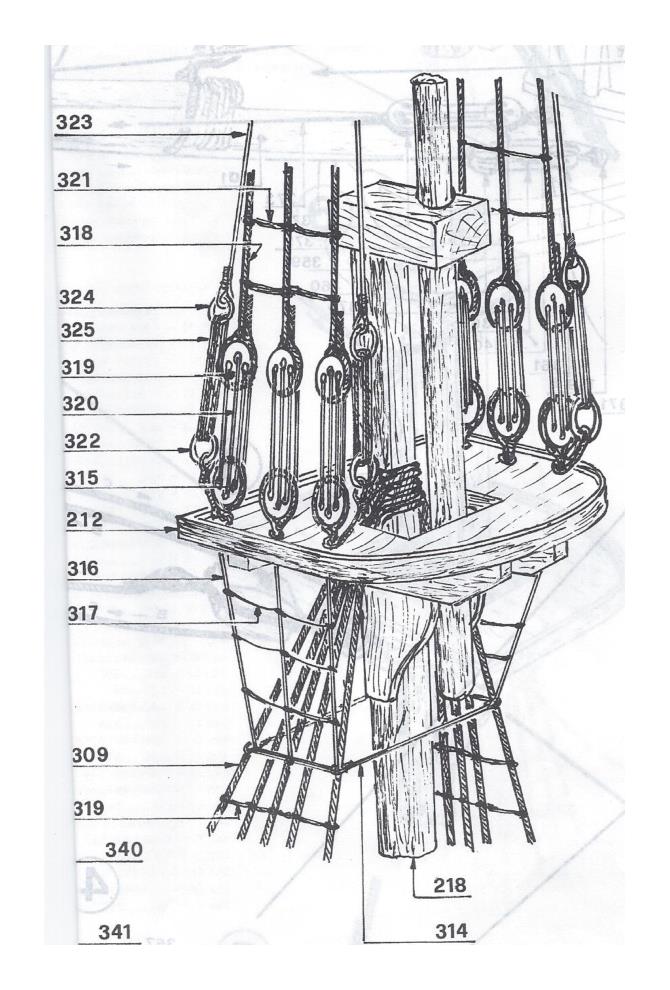
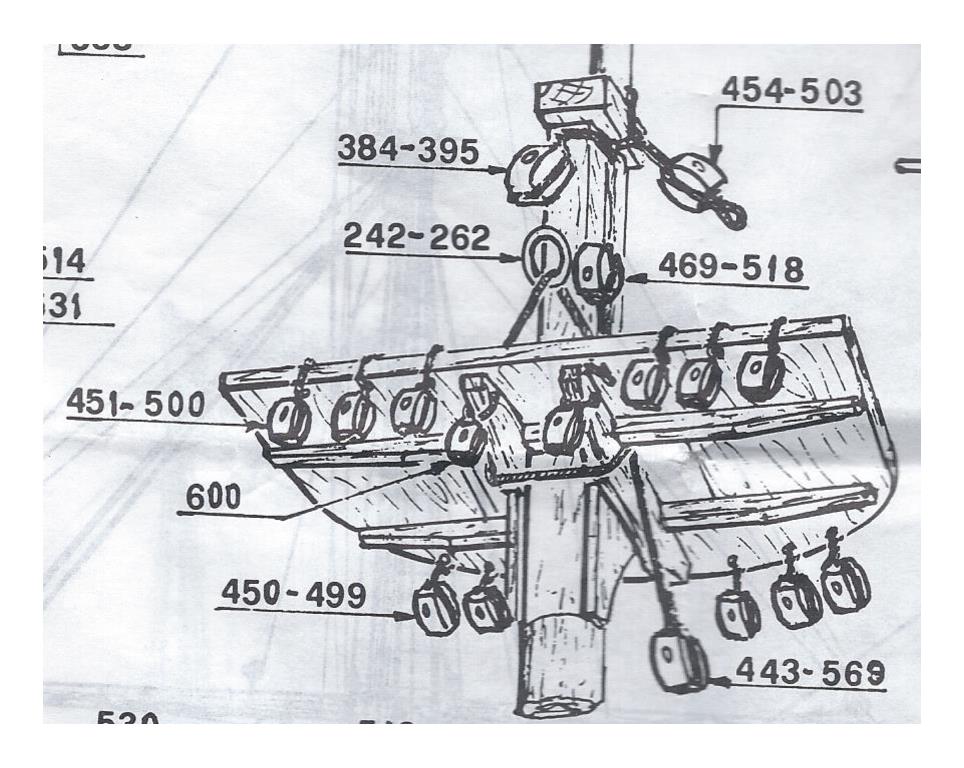
The Mamoli plan (third image) shows 12 blocks (Nos 450 – 499 and 451 – 499) and the MS plans (first image) shows 6 blocks. Both plans show them attached to the rim of the platform. Because my model will have the Crowsfeet, it would appear that the blocks attached to the fore rim would interfere with it. The books on the other hand show either 6 or 12 blocks suspended underneath the platform using something called a Jeer Strop (No. 23 in the diagram below).
Now I know no two rigging plans are the same so I’ve chosen the Hahn’s plan as the Master guide but I still have to refer to anything I can lay my hands on for the details. For instance the diagram shows deadeye and futtock shroud plates (No 29) as well as the MS plans (not shown). The Mamoli plans appear to just use rigging line (2nd image comment 520). What will I use? I have no idea at this stage. If I go with the plates, I’ll have to make them somehow.
-
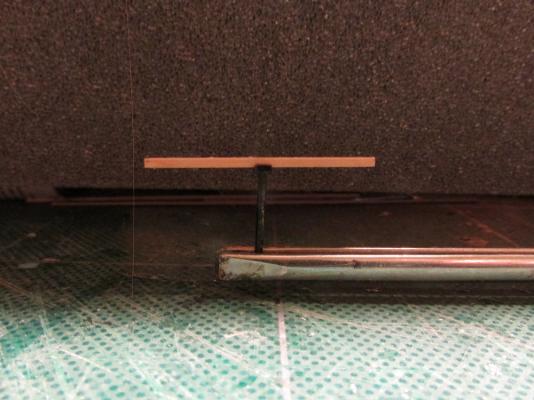
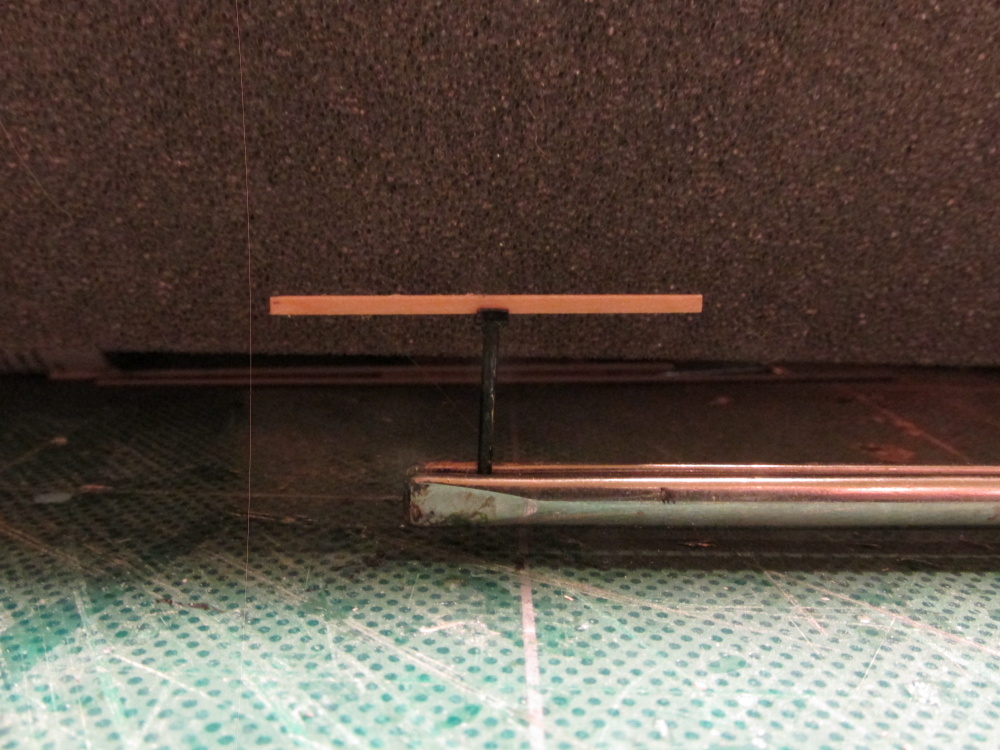
Since this appears to work I now know what size hole to drill for the stanchions. Next I need to figure out how the futtocks work. The last item to the stanchion to be made is the little base plate which is not needed at this time so it will be created later.
- Martin W, CaptainSteve and Littlebob
-
 3
3
-
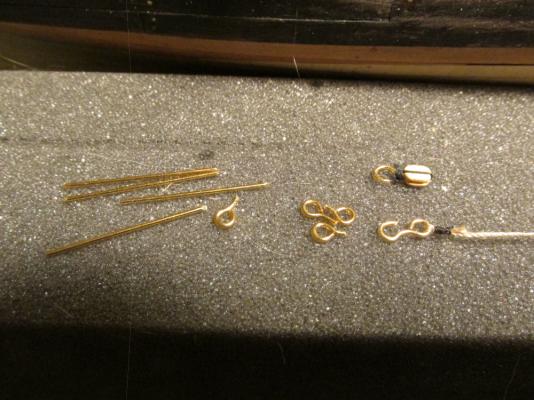
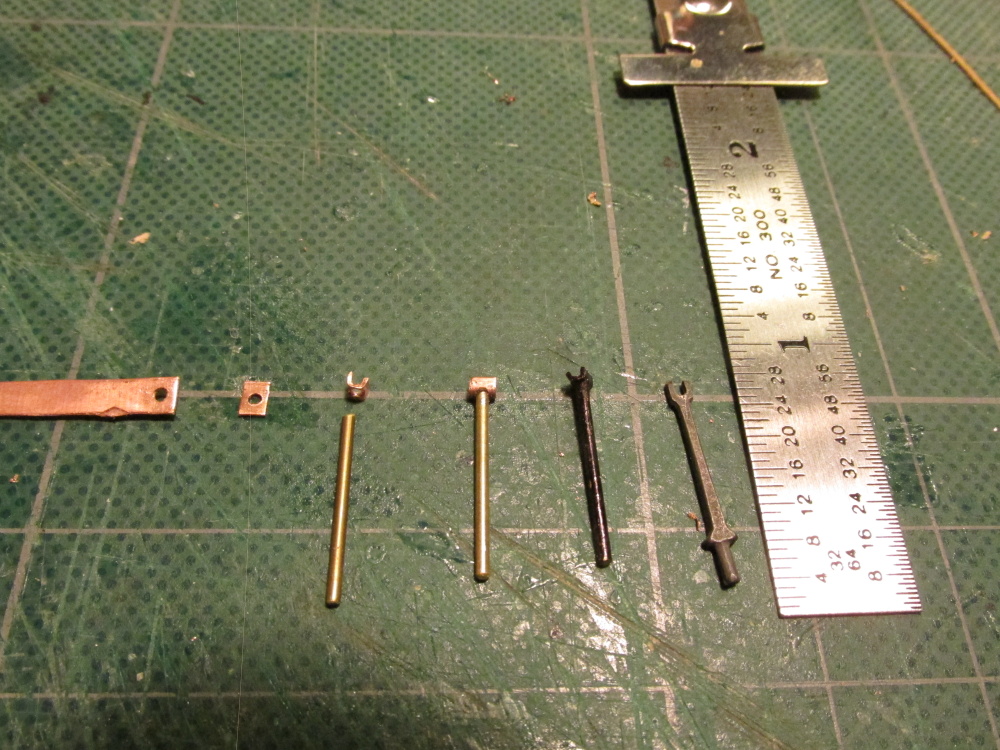
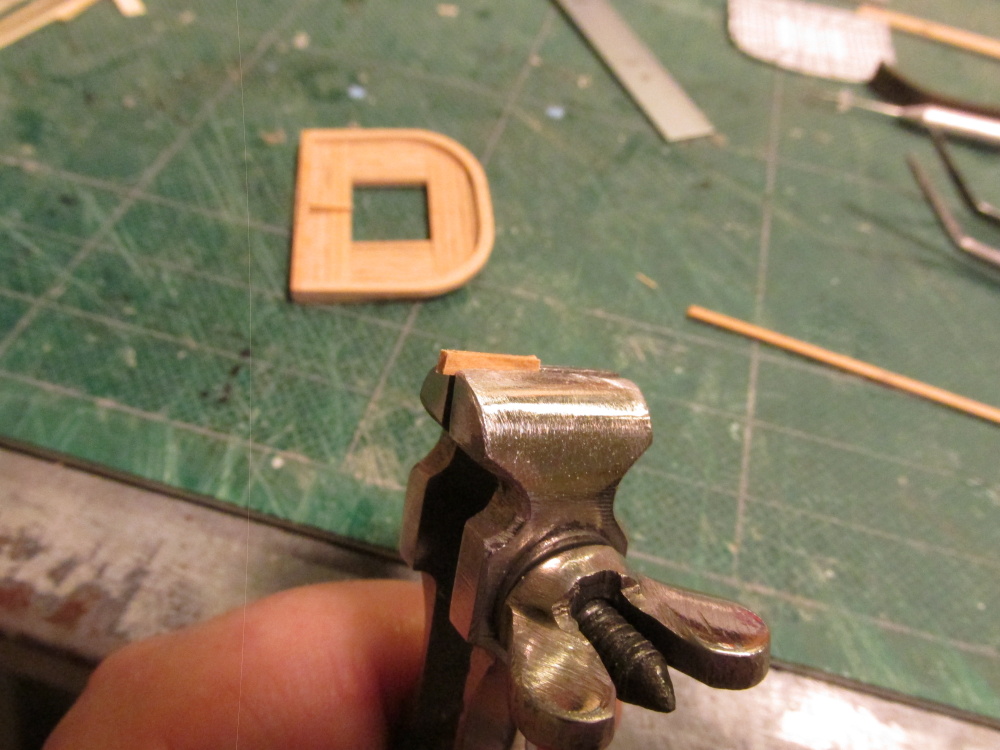
Matching the thickness of the music wire, a 3/64” bit was used to drill a hole on the center axis of the strip as close to end as I could. This was cut off at an equal distance on the other side of the hole. Drilling the hole first was much easier than trying to drill it after the piece was cut off. Using a pair of flat nose pliers, the two sides were bent up to a 90° angle forming the U-shaped saddle. The hole was then filed with a round needle file to ensure proper fit, allowing a piece of 17mm long music wire to be epoxied on. Once the glue had set and the excess trimmed, it was “painted” black with a Sharpie pen.

-
I thought about how I would make the rail stanchions especially the U-shaped saddle that fits on top. My first thought was to solder the saddle on. Sounded easy except I don’t have any solder equipment and my only experience is a very limited knowledge of how to connect a couple of electric wires as my Father showed me when I was a child. I read articles and viewed YouTube videos about silver soldering but reading and watching is one thing, doing is another. So before I committed money to getting soldering equipment and supplies, I decided to at least try using epoxy glue.
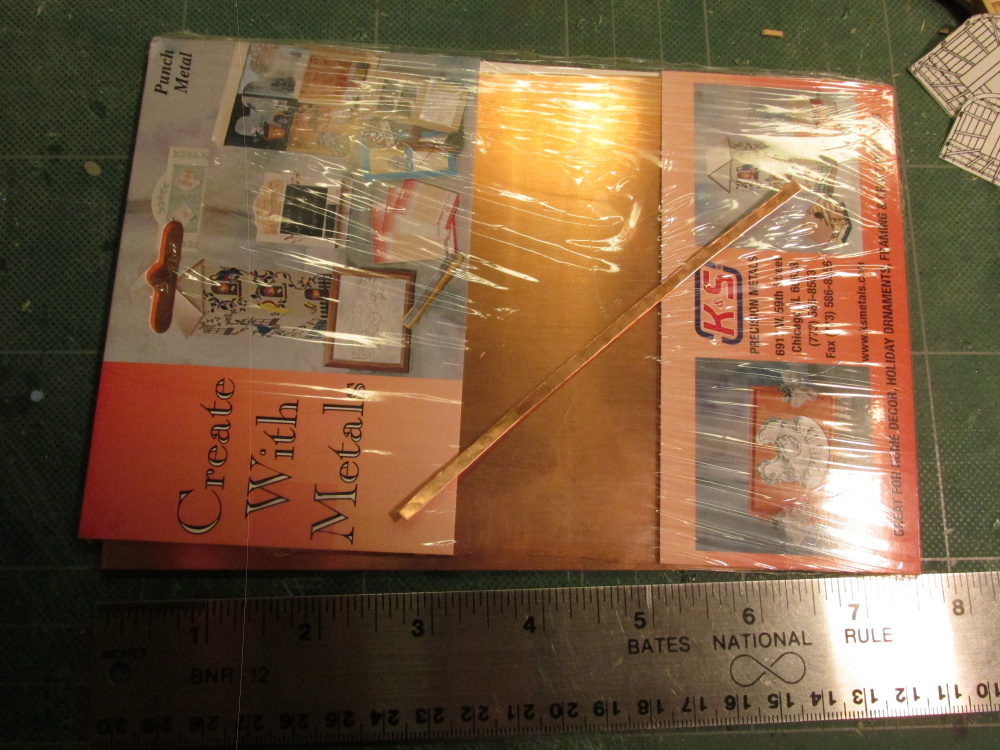
I went to Hobby Lobby which is the nearest hobby type store near me within 25 miles. It’s more of a crafts store than a hobby shop. There, I purchased the smallest amount of copper they sold, a 5 x 7” 0.16” copper plate. Using a strip of paper to create a template for the saddle, I determined that I needed a strip of copper about 1/8” wide. Using a pair of hand shears, a strip was cut off.

-
-
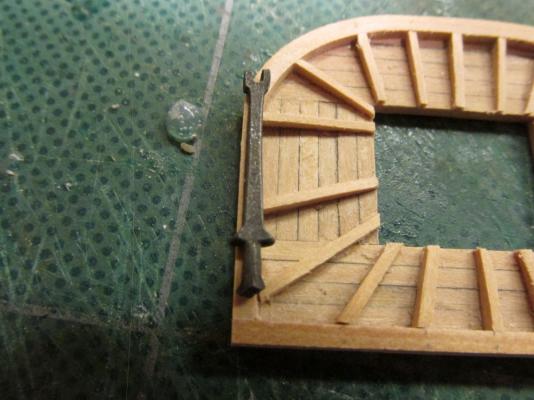
The stanchions that came with the Mamoli kit I feel are too thick and clumsy. They just don’t seem to be to scale. I would be a lot of work to file them down and I’m not sure the results would be worth the effort. If I am to drill the stanchion openings now, I need to know what I putting in there to determine the size and shape. So, I’m going to take a stab at making them with 3/64” “music wire” for stiffness of the posts and connected to copper plate (to be determined) bent to cradle the railing; more on that effort later. At this point I haven’t determined the size of the futtock plates.
-
Actually they are more complicated than that but at 1/64 scale, I’m no Master Builder…yet. Once all the battens were installed I wanted to drill all the holes and slots for the rail stanchions, futtock plates that hold the deadeyes, and the crowsfeet. Based on Blue Ensign’s log for his build of the 1/64 scale HMS Pegasus, I will drill the crossfeet holes 0.5mm for 0.1mm line. As near as I can determine from Hahn’s plans, 13 holes in the Foremast top will be required.
-
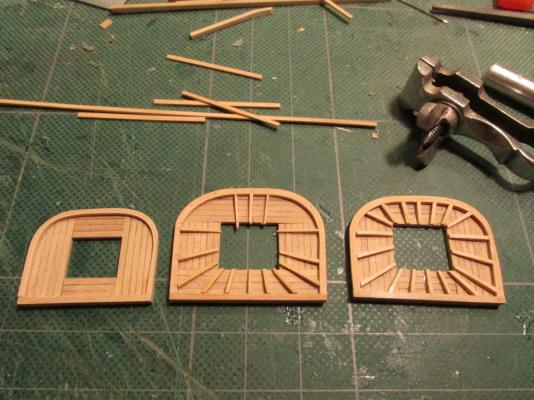
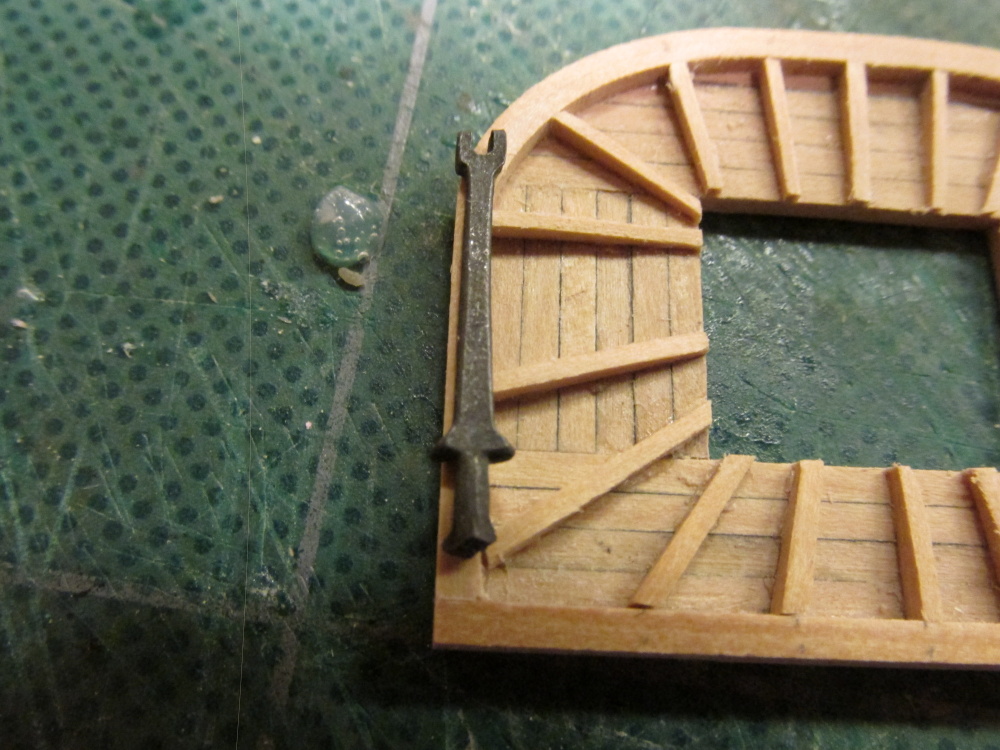
OK, where to begin? I started with creating the ribs or battens, those radial reinforcing members. These seemingly simple elements really aren’t. They actually taper down thinner in height towards the center square hole in the top and (although you can’t see it in the pictures below) they also have a very slight narrowing taper when looked at in the plan view. The battens were made from 1/16” x 1/32” boxwood stock. Because the Practicum did not address these, the wood supplement package from HobbyMills did not supply this size stock which required that I mill them from scrap wood on the Byrnes Saw. The taper was made using a hand-held vise and a file.

-
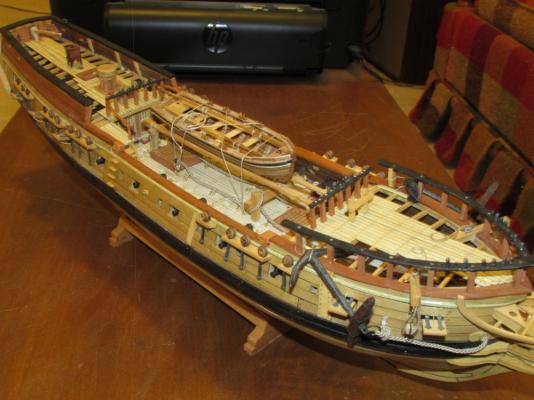
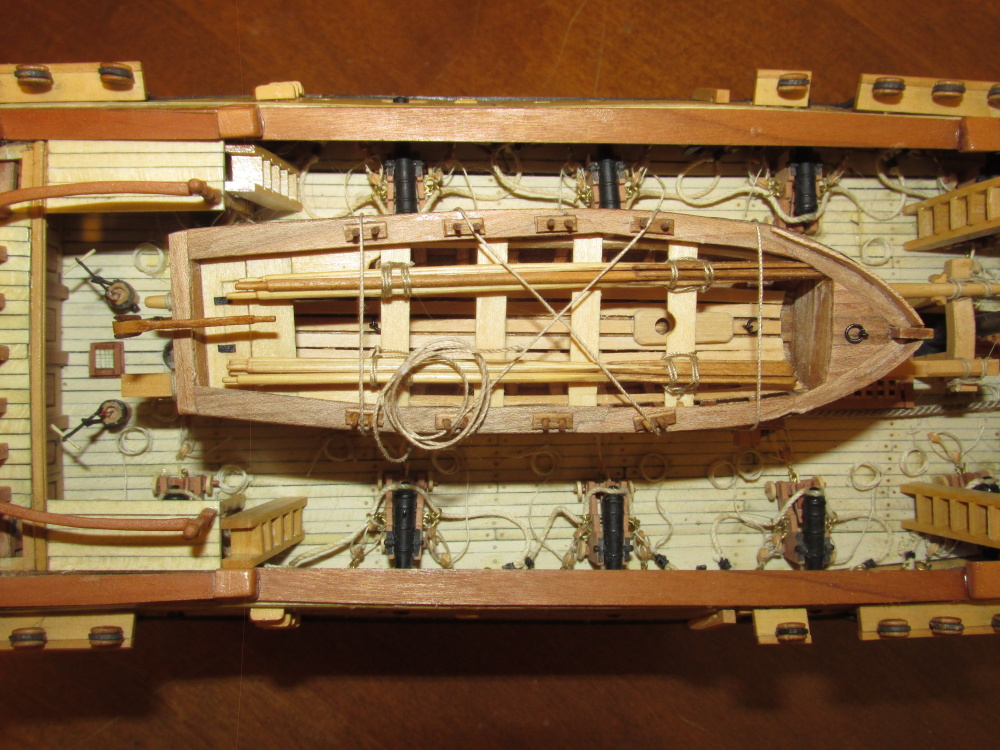
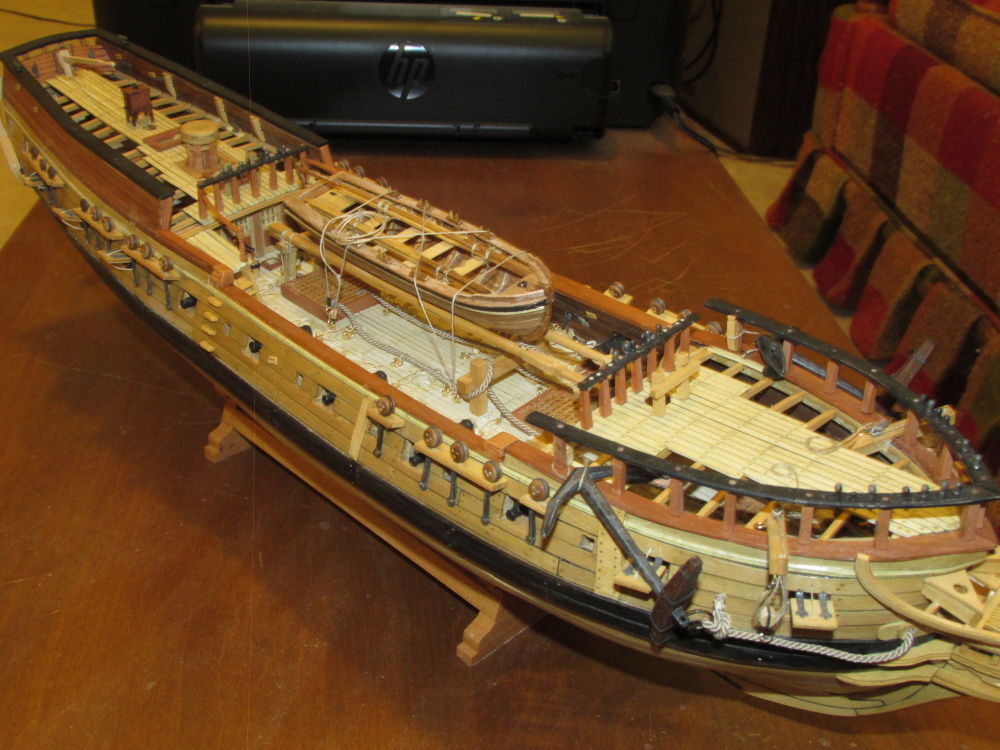
I made my Rattlesnake Long Boat from a separate POF kit because Mamoli provided a semi-completed shell. I felt like that was cheating so I took the different route. A least the Model Shipways method forces you to construct the boat. I am waiting with anticipation to see how it all comes together. This is the same method that their USF Constitution's boats are made, which in the next decade or so I hope to start. I learn from example.
-
Jud - Thanks for your insight, I wish I had read it earlier before I secured the boat to the model. As I originally stated, I did what I did because I knew no better. All of the models pictures I looked at that I could see that level of detail were very few and I did not see any blocks attached to the rings nor did I see any protection placed on the boat for the rope wrapping around the edges. That’s not to say it wasn’t done by a number of different crew; I was just not aware of it. As for the hitch, I knew there had to be some kind of knot that would be easy to release. The problem was the hitch I used just cannot be seen at this scale. If your method of securing the boat gets under my skin, I just might change it, but for now I’ll let it go.
Blue Pilot – I agree that I should follow one set of plans, I will try to. The problem is that I am clueless as to how to rig a ship. The Hahn plans provide the overall rigging plan but don’t have the details I need to attach the lines. It’s written for a rigging knowledgeable person. The Practicum has been my bible but at this point I find that a lot of detail has been skipped over, over simplified, or not addressed so I must consult other sources. Model Shipways gives a nice over view of the rigging with specific details. Mamoli provides nice perspective images in their details. Then there are the reference books which I consult when I need a better understanding of what it is I’m making. So yes, I am trying to follow one leader, the Practicum, but it must be supplemented to fill in the deficiencies. Thanks for your concern.
-
Continuing the Mast Tops
Yeah, I know it’s been a while since my last post. I’ve been on sort of a holiday for the last month or so since I completed the Ship’s Boat. That, and visiting my 96 old Mother in Florida (where else?) for a couple of weeks with my Sister took me away from model making. Because she still lives by herself (with daily visits by a Nurse’s Aid, we had a long To-Do List and it took both of us to complete it. It was a nice break.
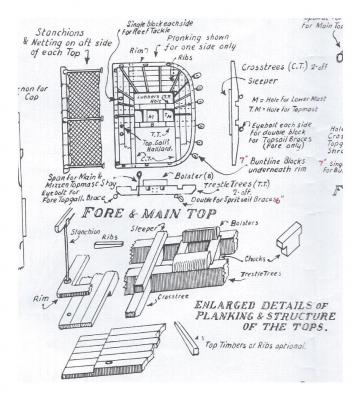
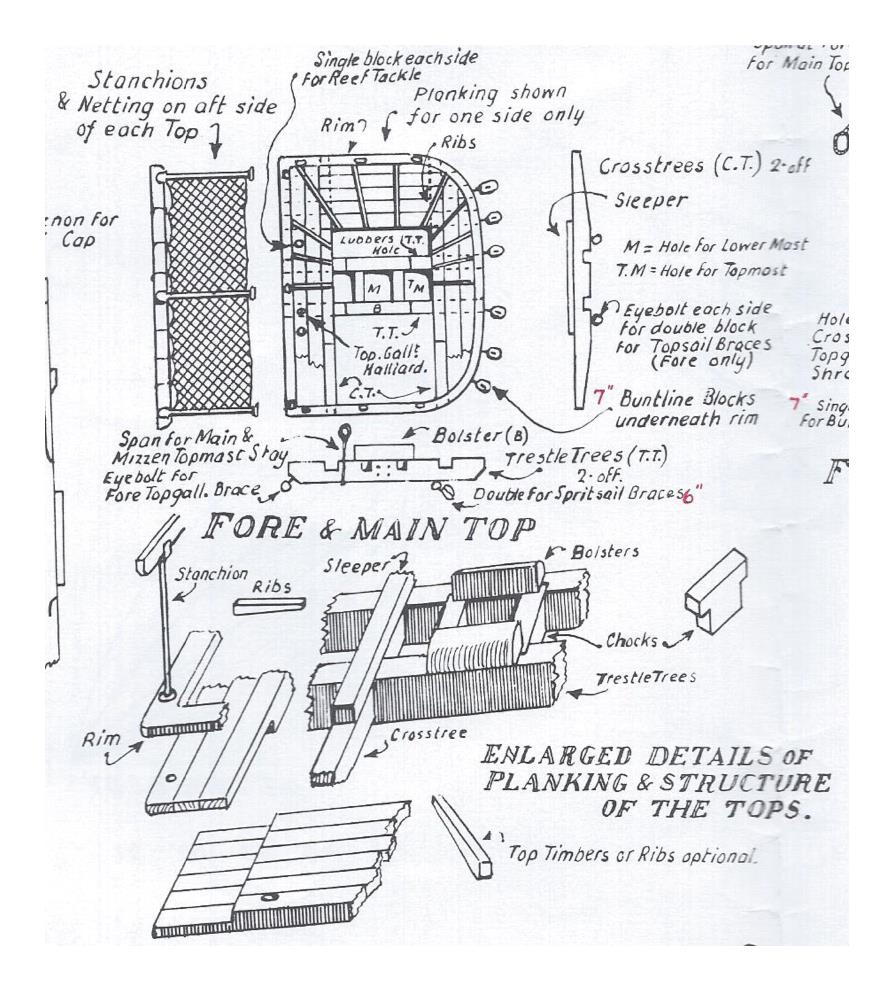
At this point in the Practicum I should be starting Page 14 of Rigging Chapter 1. Here the Practicum directs the builder to construct the trestletrees and the crosstrees and attach them to the top platforms. It states: “I made the trestletrees and the crosstrees from 3/32” x 1/16” boxwood.” Looking at the plans I realized this had to be wrong. The trestletrees were obviously thicker in height than the crosstrees. I determined that the trestle trees had to made from 3/32” x 1/8” stock and the crosstrees from 3/32” x 1/16”. Also looking at all the different plans and reference books, they were consistent in showing the ends of the trees were rounded, something the Practicum did not address.
Then because I was studying the mast tops it occurred to me that the Practicum did not address the ribs on top of the platform, bolsters, sleepers, and adding all the holes necessary that had to be made for the stanchions, deadeyes, and blocks. If I follow Harold Hahn’s rigging plan, which shows “crowsfeet” rigging (which Mamoli and Model Shipways plans do not) then even more holes would be required. Wouldn’t it be simpler to drill them now before the trees were added let alone attaching it to the mast per the Practicum? It obvious Mr. Hunt had no intension to rig his model. He was running out of time to meet some deadline with this and three other models he was constructing at the same time. Now as I have stated before, I could not have gotten this far if it weren’t for the detailed instruction provided in his Practicum. However, now I must proceed with caution reading the kit plans with a lot more intensity and using the Practicum only as a guide instead of an absolute how-to set of instructions. I’m treading on thin ice as I have never rigged a ship before.
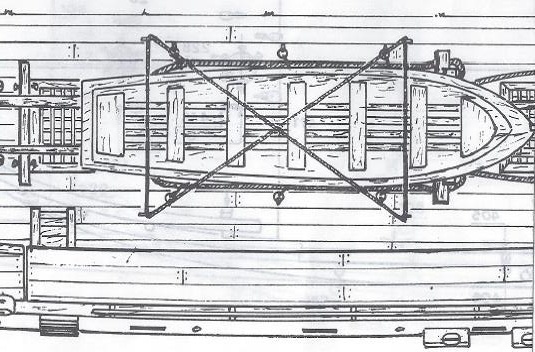
The first diagram below is from Model Shipways
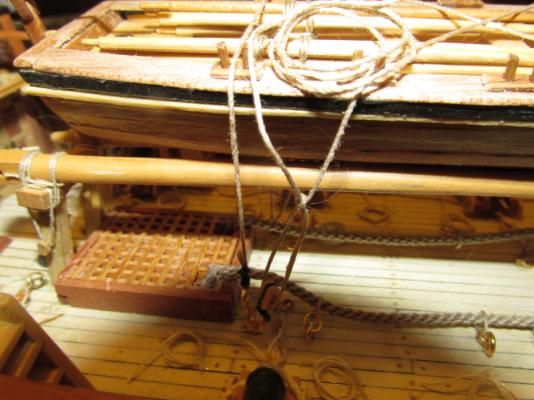
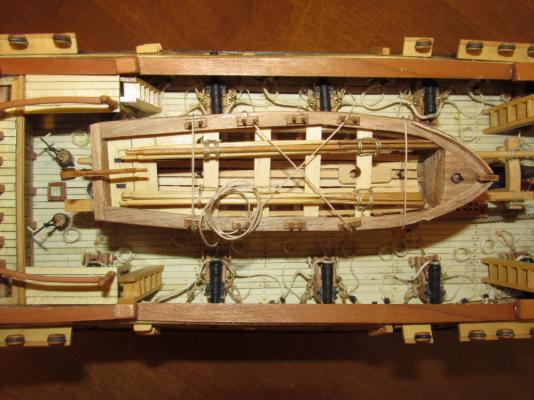
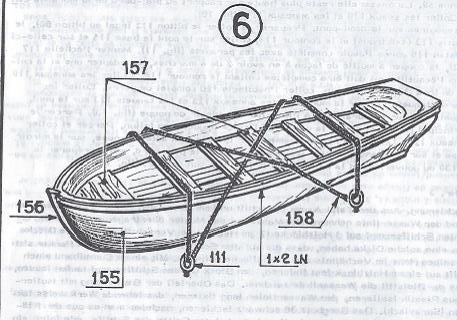
The second and third are from Mamoli
And the last is a diagram of the Crowsfeet from James Lee’s The Masting and Rigging of English Ships of War 1625 - 1860
-
It's been 16 months since your last post, but who's counting! It's good to see you back at it. I'm just about at the same place in construction as you are on my Mamoli kit bashed build and at last I have your guidance to show me the way. Welcome back!
-
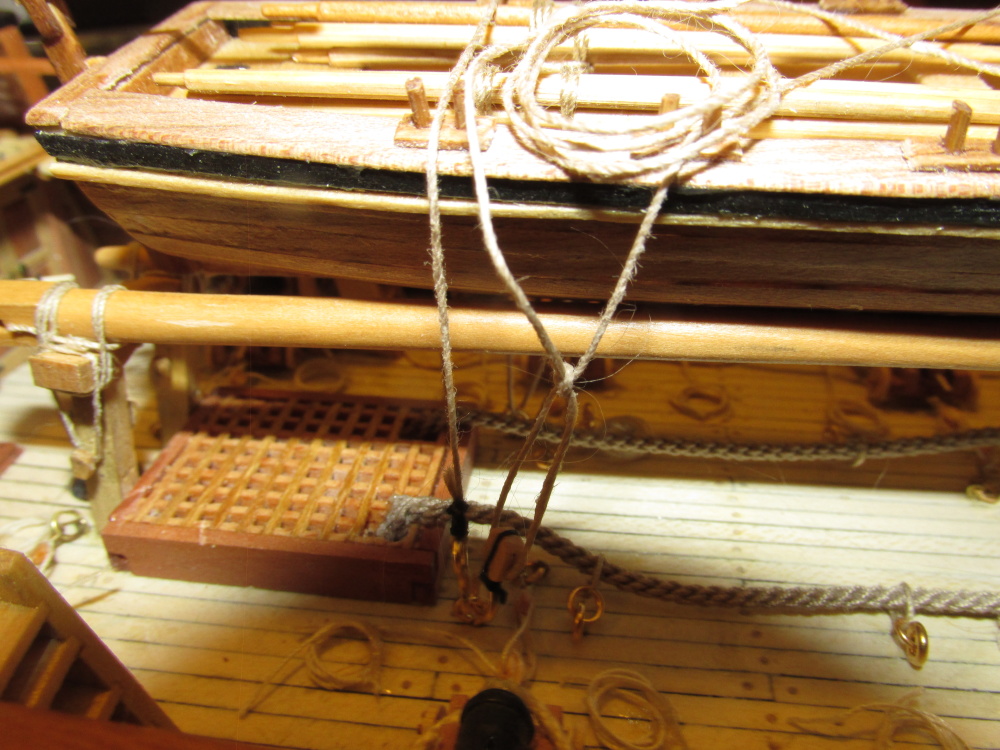
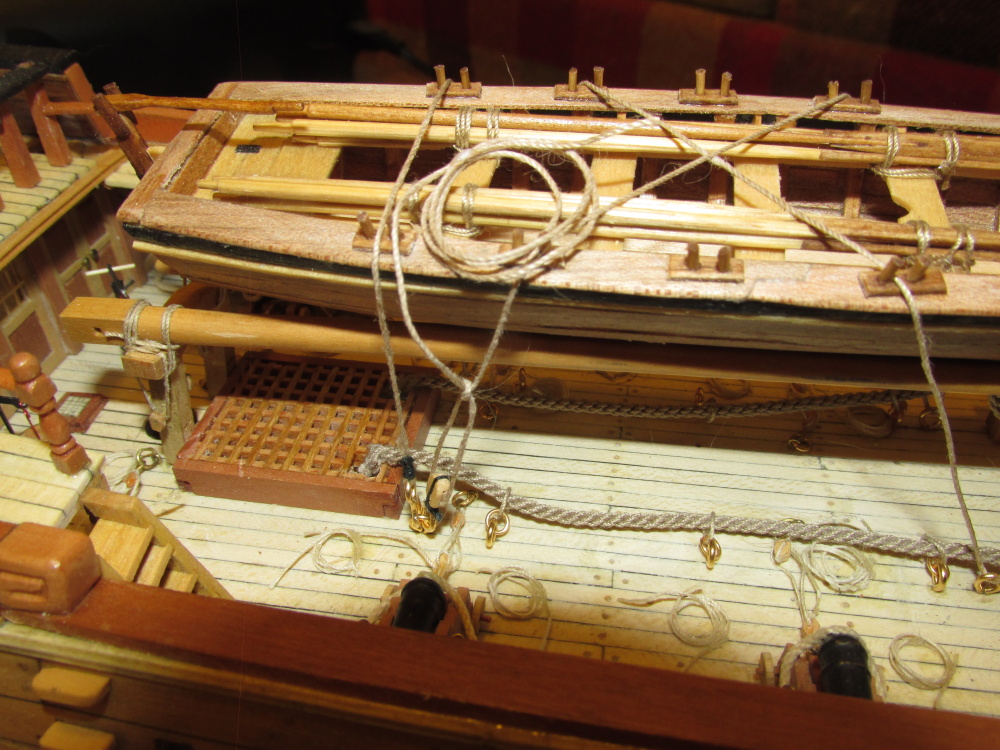
First the hooked end is hooked to a deck eyelet and then crisscrossed over the boat through the other eyelets as show in the diagram where it comes back to the starting point. Here I added the hooked block, but what to do with the bitter end? I tied it back onto itself and laid the remainder of the rope on the boat. Not being a sailor I’m clueless to the accuracy of this arrangement.

-
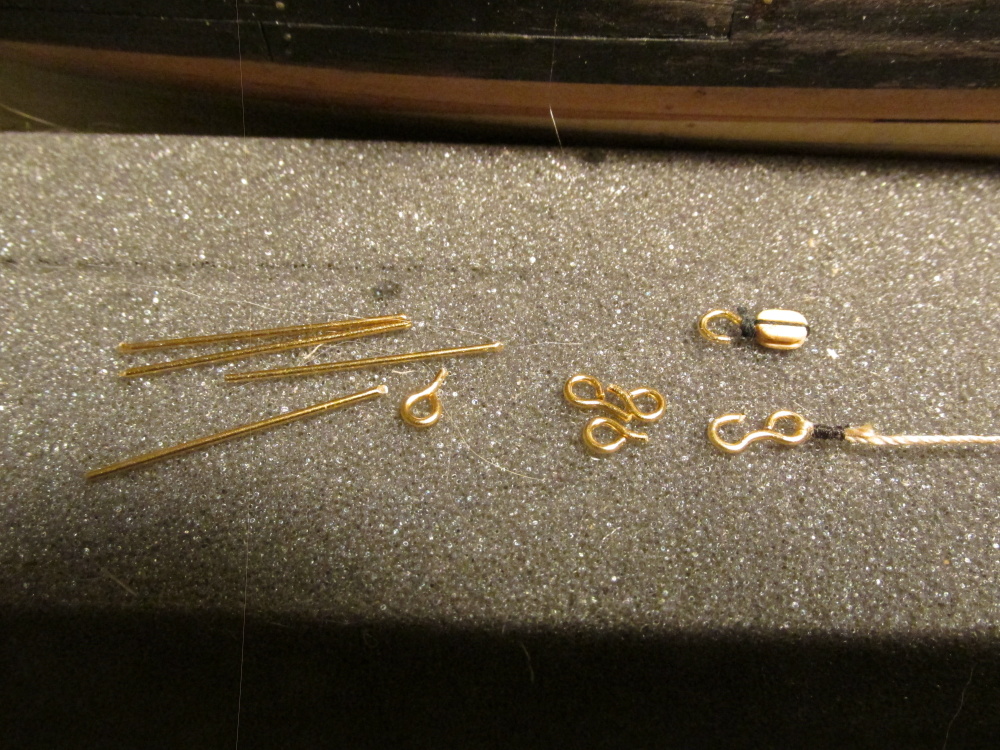
Well I knew the rope had to have a beginning and an end however I could not find either a clear detailed image or description as to how this was configured. The Practicum just show the boat sitting on the spare masts without any ropes, the MS plans show the boat in position but didn’t explain or show the lashing at all, and the Hahn plans were totally silent about the boat altogether. So I took my best shot. I decided to start the lashing with a hook at the end of a rope line at one end and a hook block at the other.
As an aside, the shafts of the eyelets that were cut off are not thrown away. I save them because they are useful for making construction pins and other odds and ends. I also use broken drill bits, but they are harder to trim.
-
Meanwhile…Back at the Ship’s Boat
If you may remember, I decided to forgo the boat shell that came with the Mamoli kit and elected to build a Plank-On-Frame boat from Model Shipways and document that build on a separate log.
http://modelshipworld.com/index.php?/topic/5430-ship%E2%80%99s-boat-by-jsgerson-model-shipways/
The ship’s boat has now been completed. All that was left was to lash it onto the ship. According to the Mamoli plans, a continuous rope loop crisscrosses over the boat while sitting on the spare masts through eyelets in the deck.
-
I ran across this little interesting article about the Constitution's head:
-
Thanks Robnbill, that is the first image I have seen of any portion of the seats. I guess they frown upon tourist leaning and climbing over the rails to get to portions of the ship not open to the public.
-
I appreciate the scan effort. You might want to let the scanner default to what ever format it wants (usually pdf) and attach the file(s) in an email to me. I'll see if I can convert it to jpg and share it with the rest of the readers.
I too have the Karl Marquardt's "Anatomy of the Ship" as well as the plans that came from my Model Shipways (unopened) model. It's always helpful to have actual photos of the real thing as the final judge as to what really exists on the ship. Right now I'm gathering up my resources for the Conny build once I complete my Rattlesnake.
Thanks
Jon


Rattlesnake by JSGerson - FINISHED - Mamoli - 1:64 - Using Robert Hunt’s practicum
in - Kit build logs for subjects built from 1751 - 1800
Posted
I finally got to cut the boxwood pieces for the trestletrees (1/8” x 1/16”) and its crosstrees (3/16” x 1/16”).