HOLIDAY DONATION DRIVE - SUPPORT MSW - DO YOUR PART TO KEEP THIS GREAT FORUM GOING! (Only 13 donations so far - C'mon guys!)
×


Justin P.
-
Posts
1,008 -
Joined
Content Type
Profiles
Forums
Gallery
Events
Everything posted by Justin P.
-
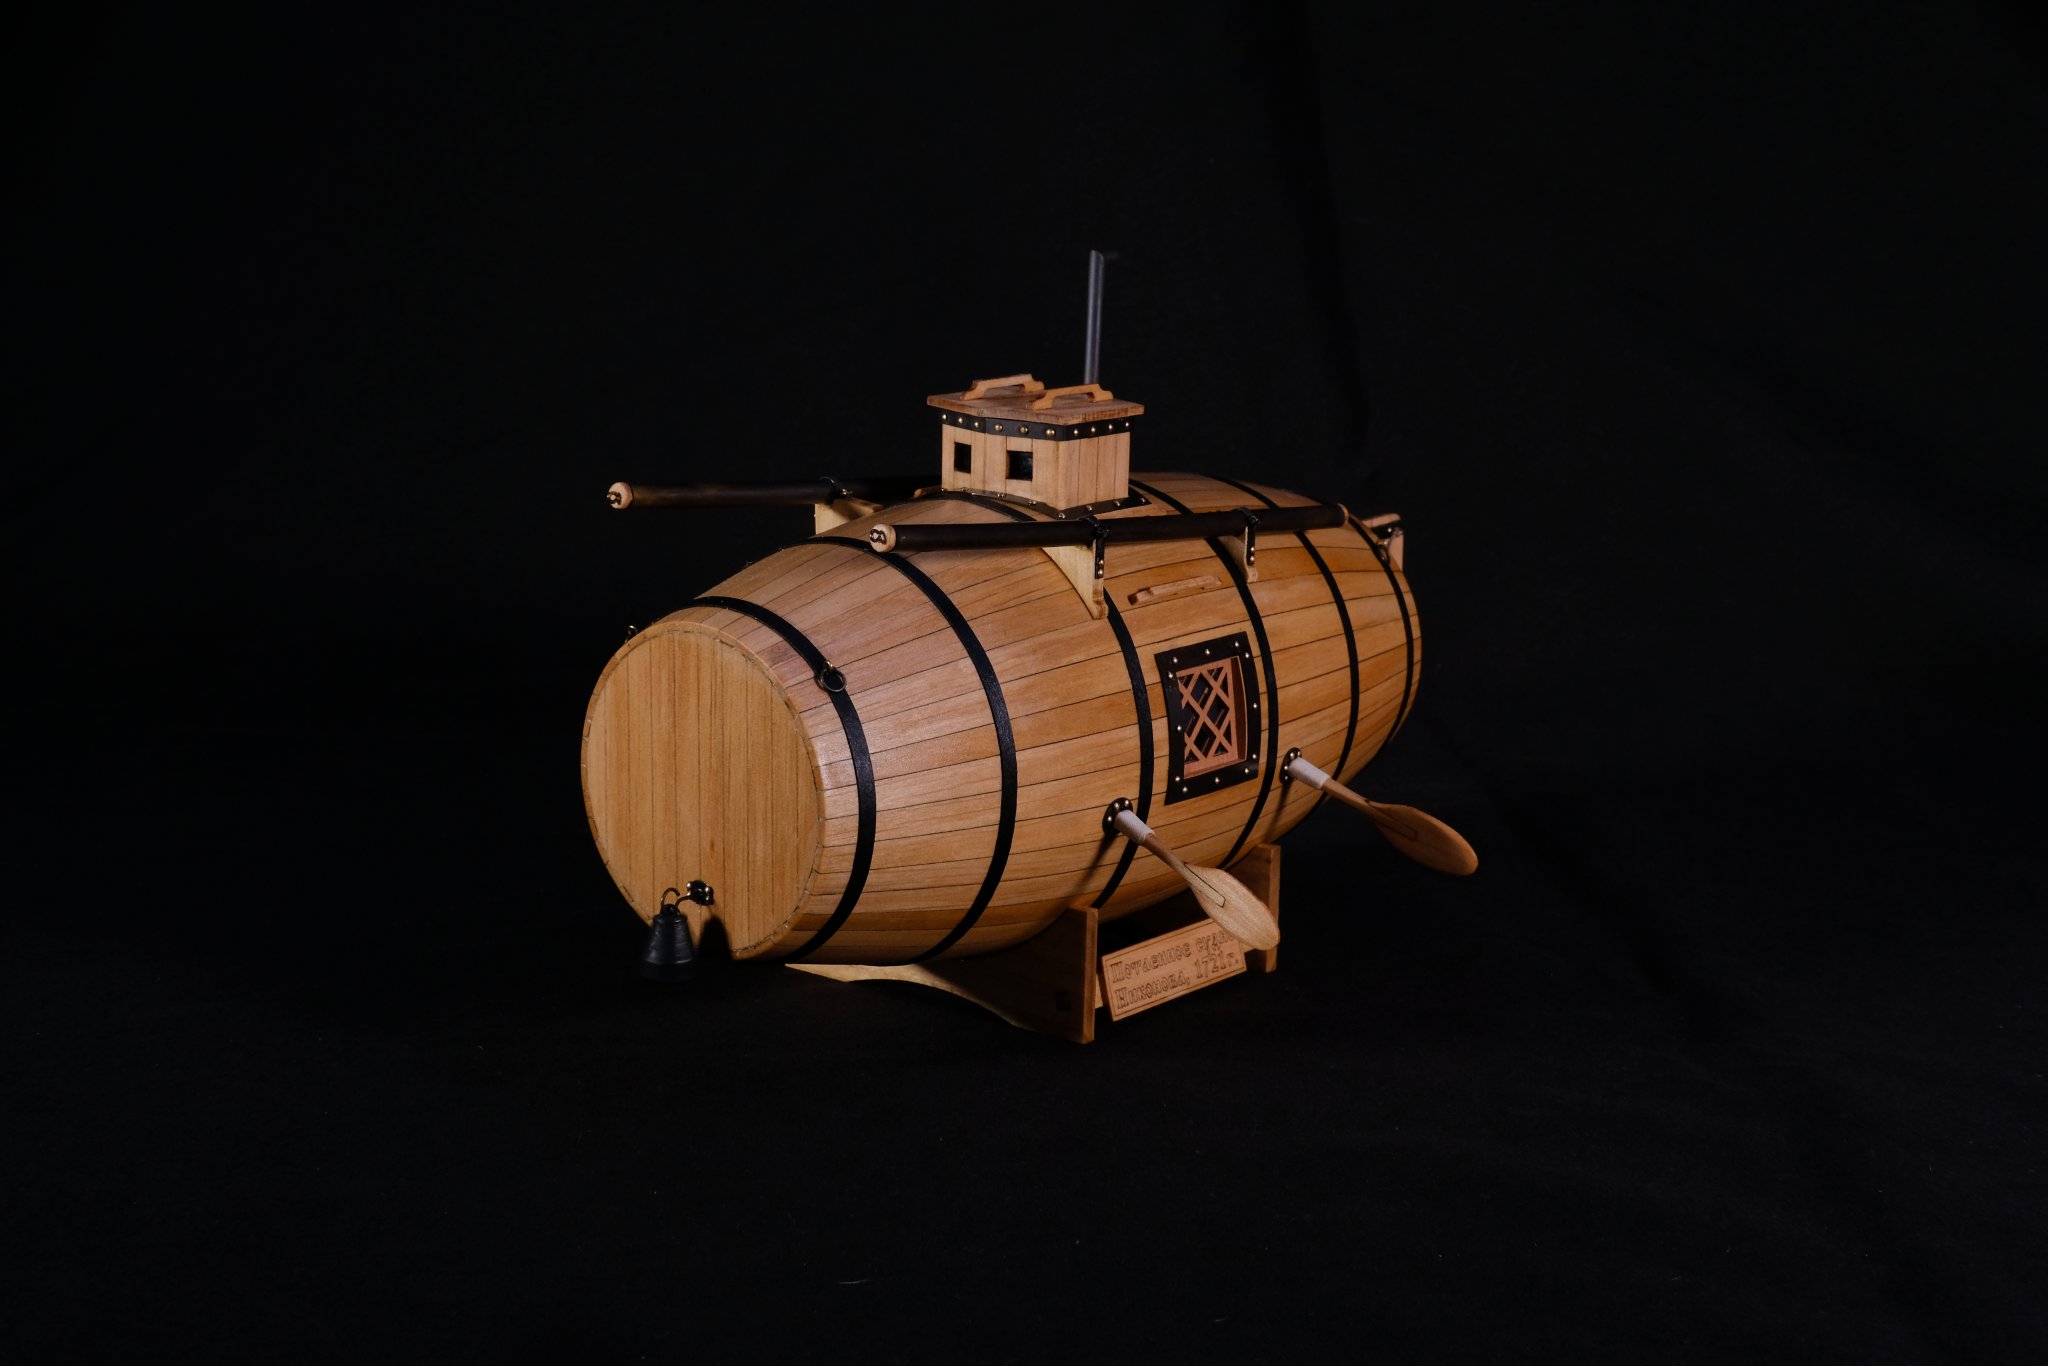
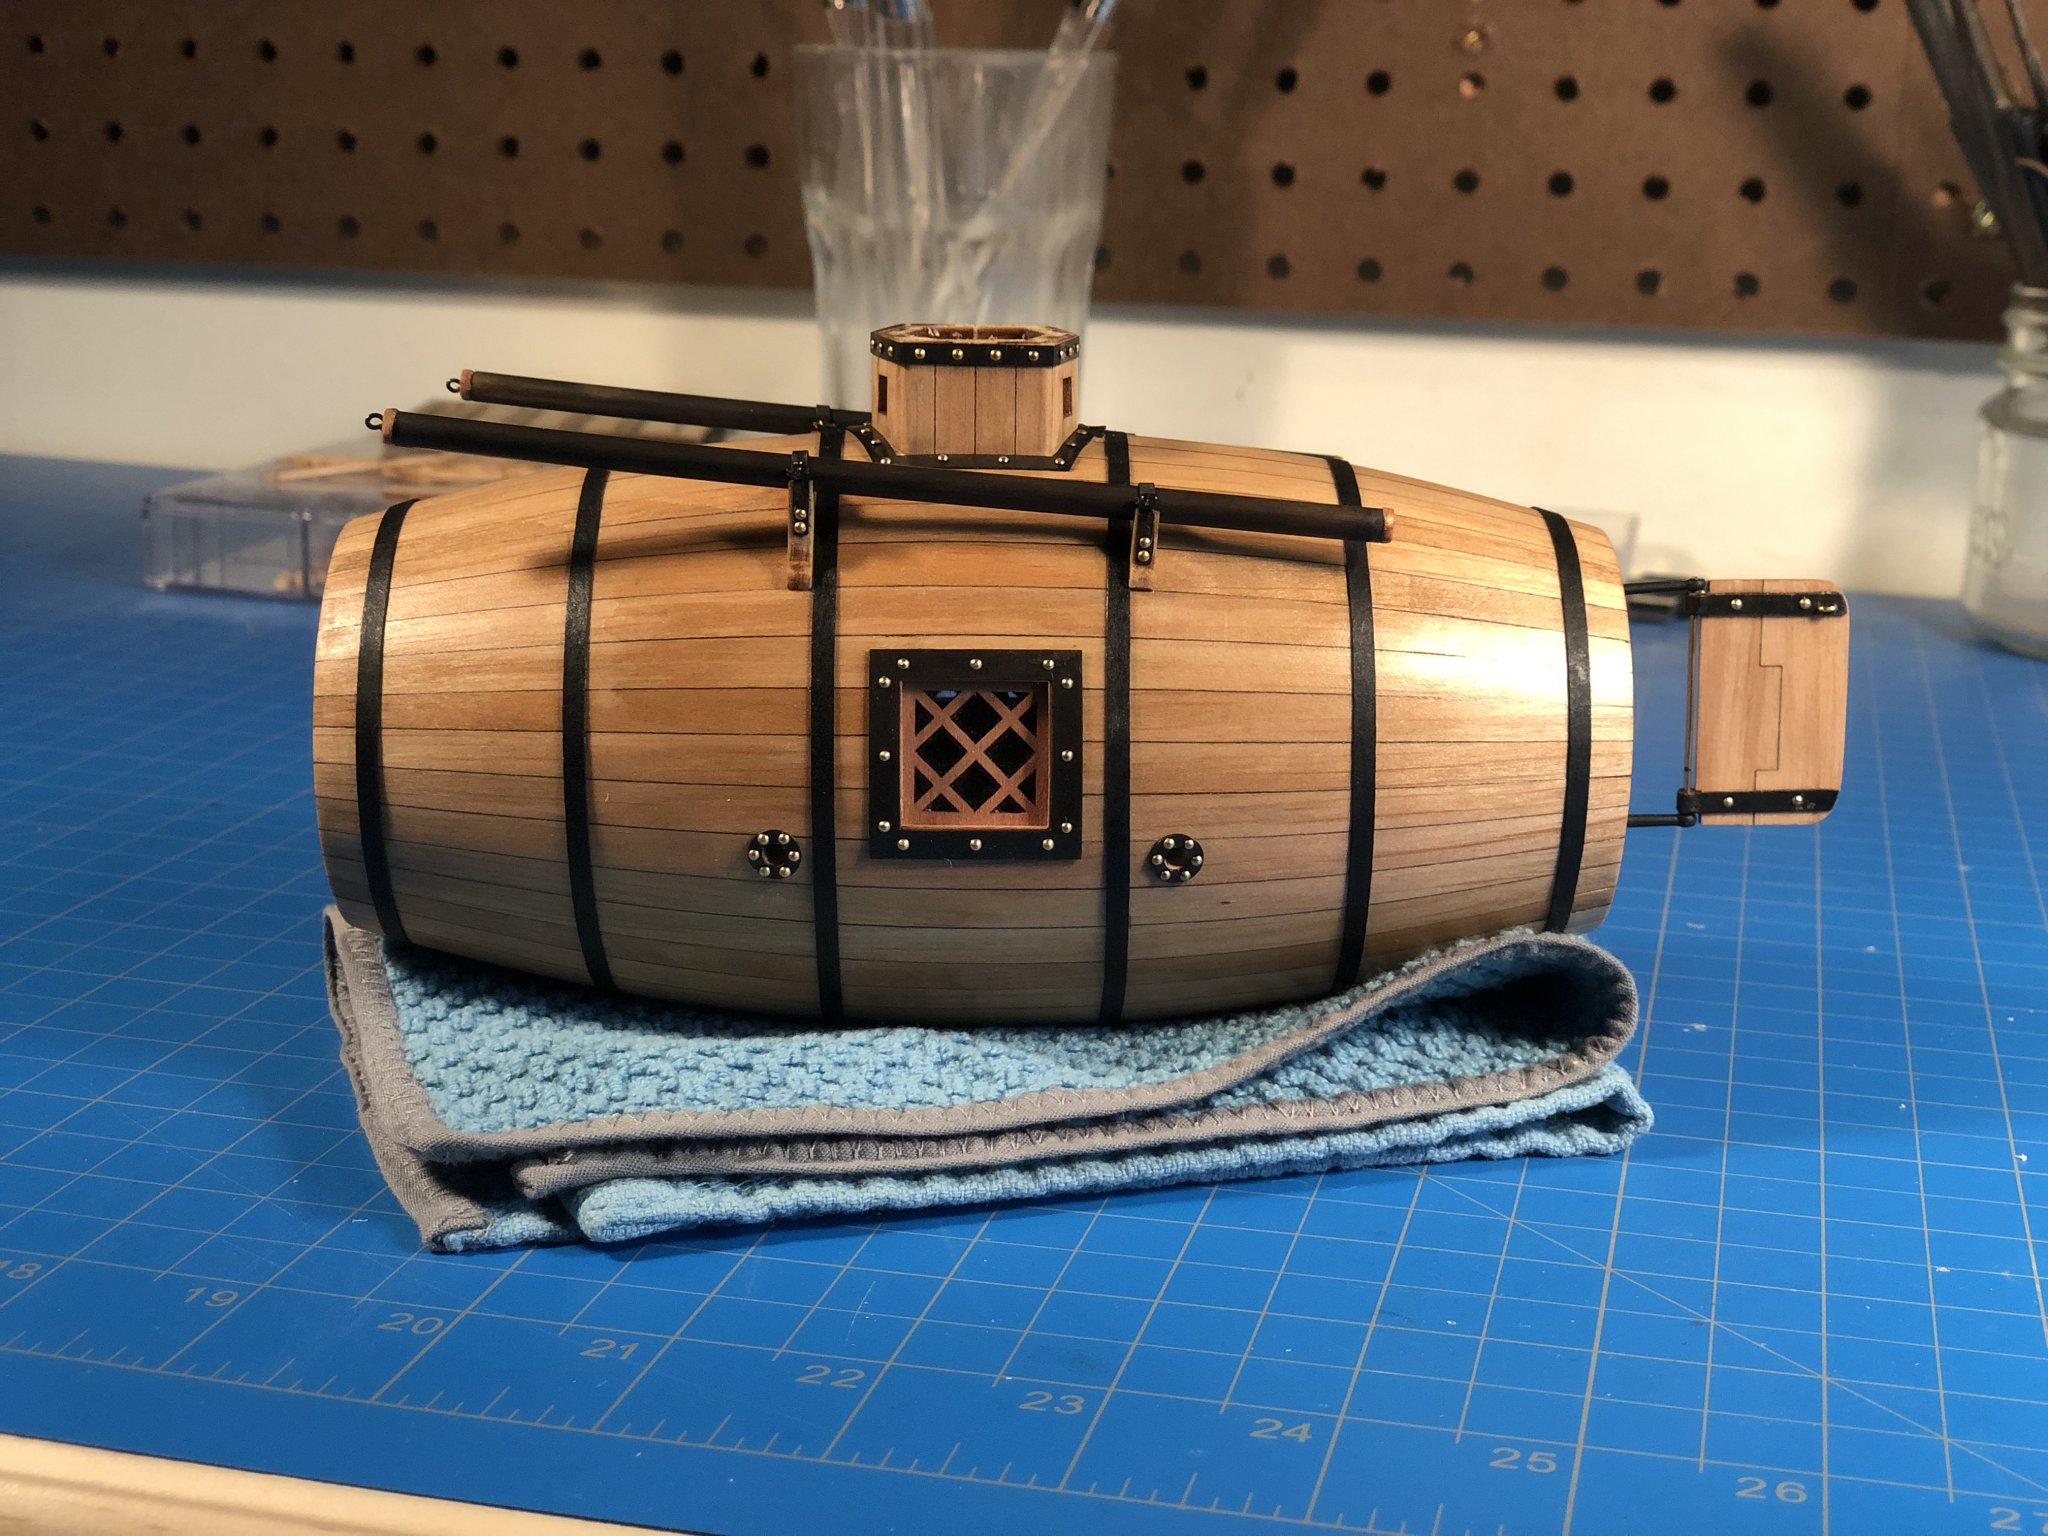
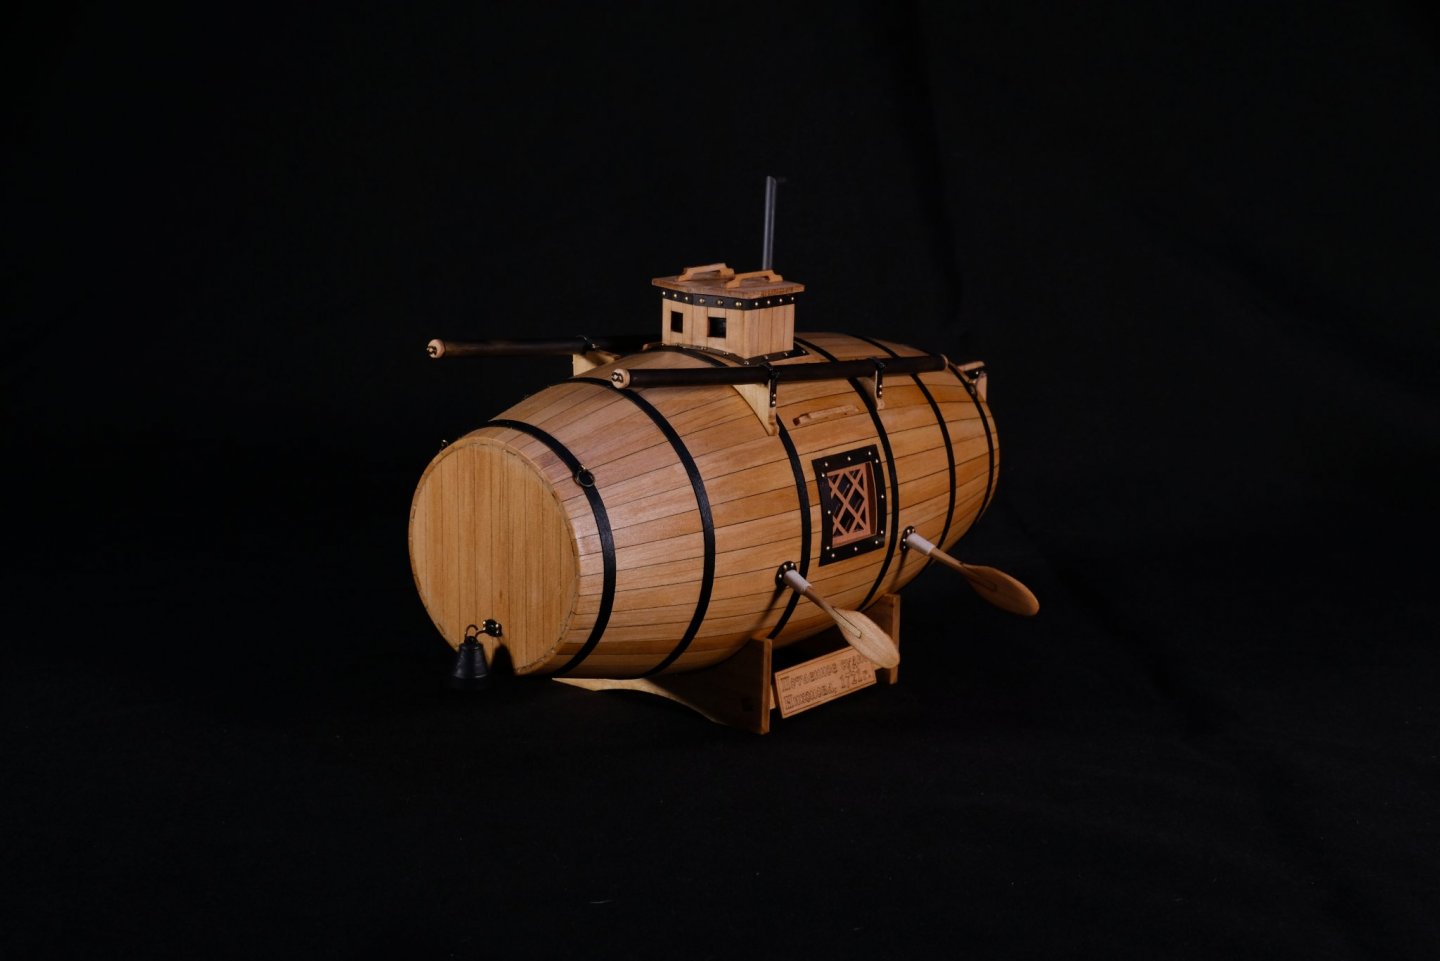
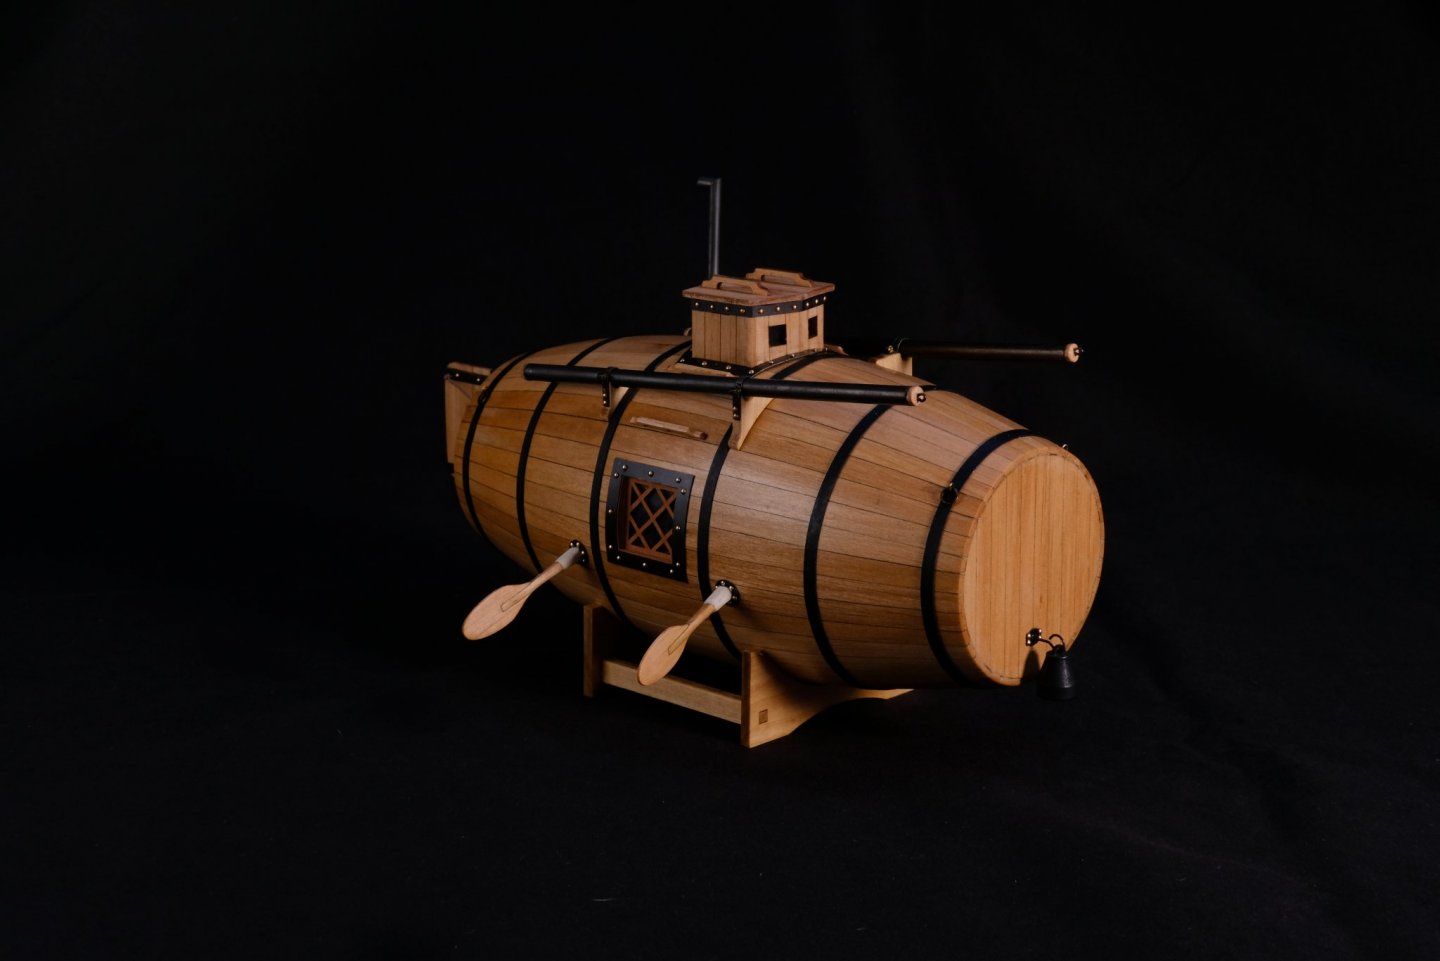
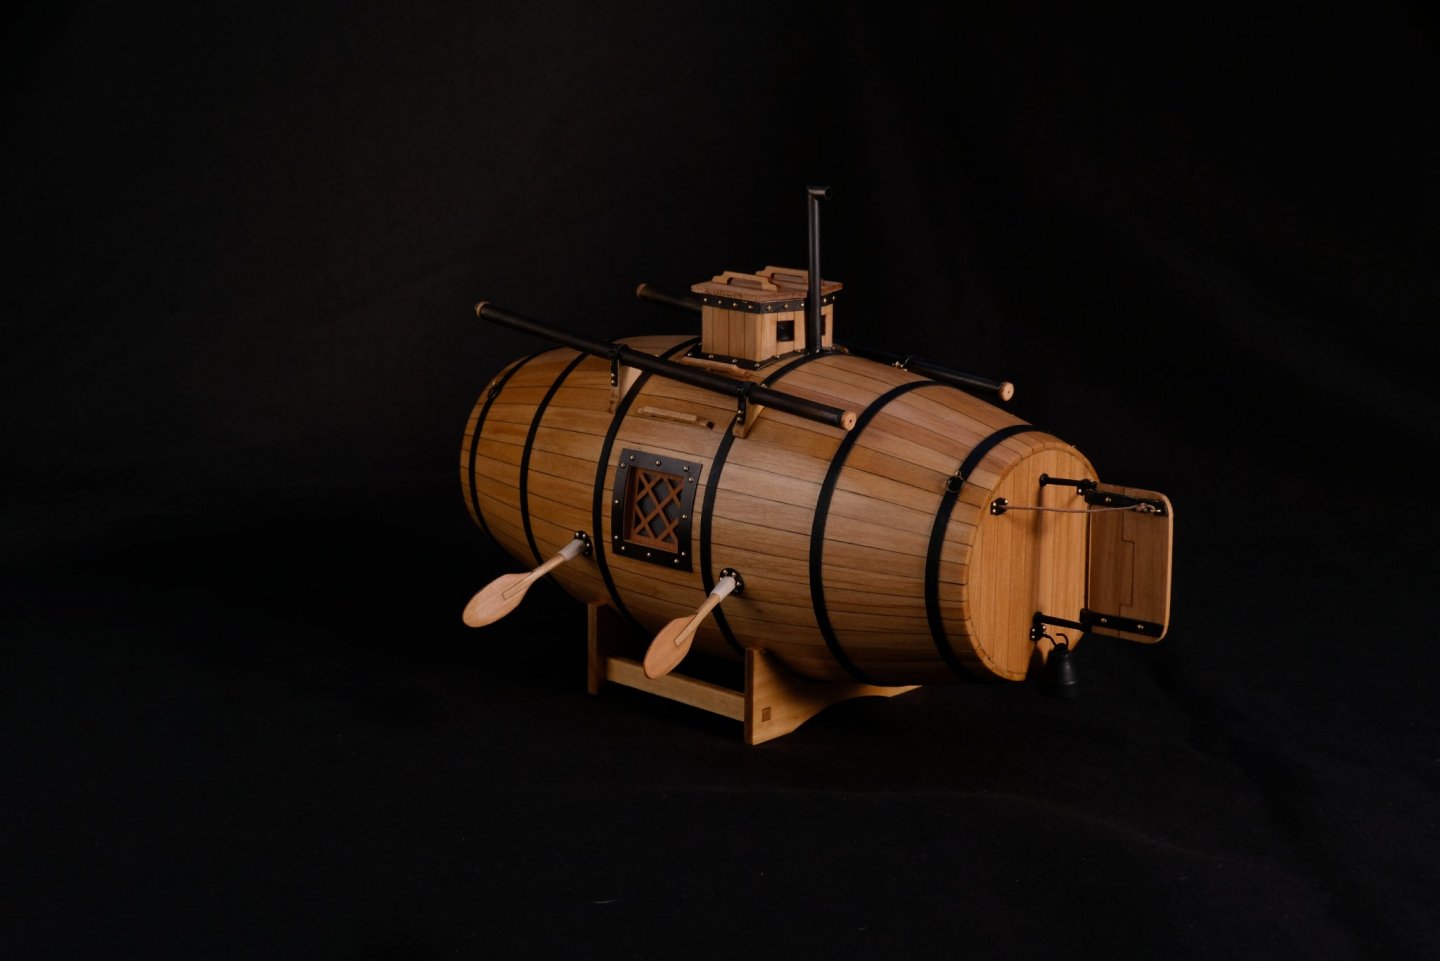
 Its done. Wrapped up the last bits today, including a few more anchors, a few handholds and the provided stand. I used some Syren scale rope I had laying around from another project in lieu of the provided nylon rope for the steerage cables. I also added the air pipe. All in all it was a pleasure to build and a fun little deviation from the much longer, much more arduous building projects. I think I need to reward myself with more of these little quick builds in order to break up what can sometimes feel like an endless build somewhere else. Forgive the black backdrop on these final images, its what I had laying around. I wished to take better photos, but without my studio at work Im a bit hampered. I can usually bring a few bits home for these sorts of things. I must invest in my own neutral grey sometime soon... or perhaps a good Lightbox. Thanks all for following along and all the kind words.
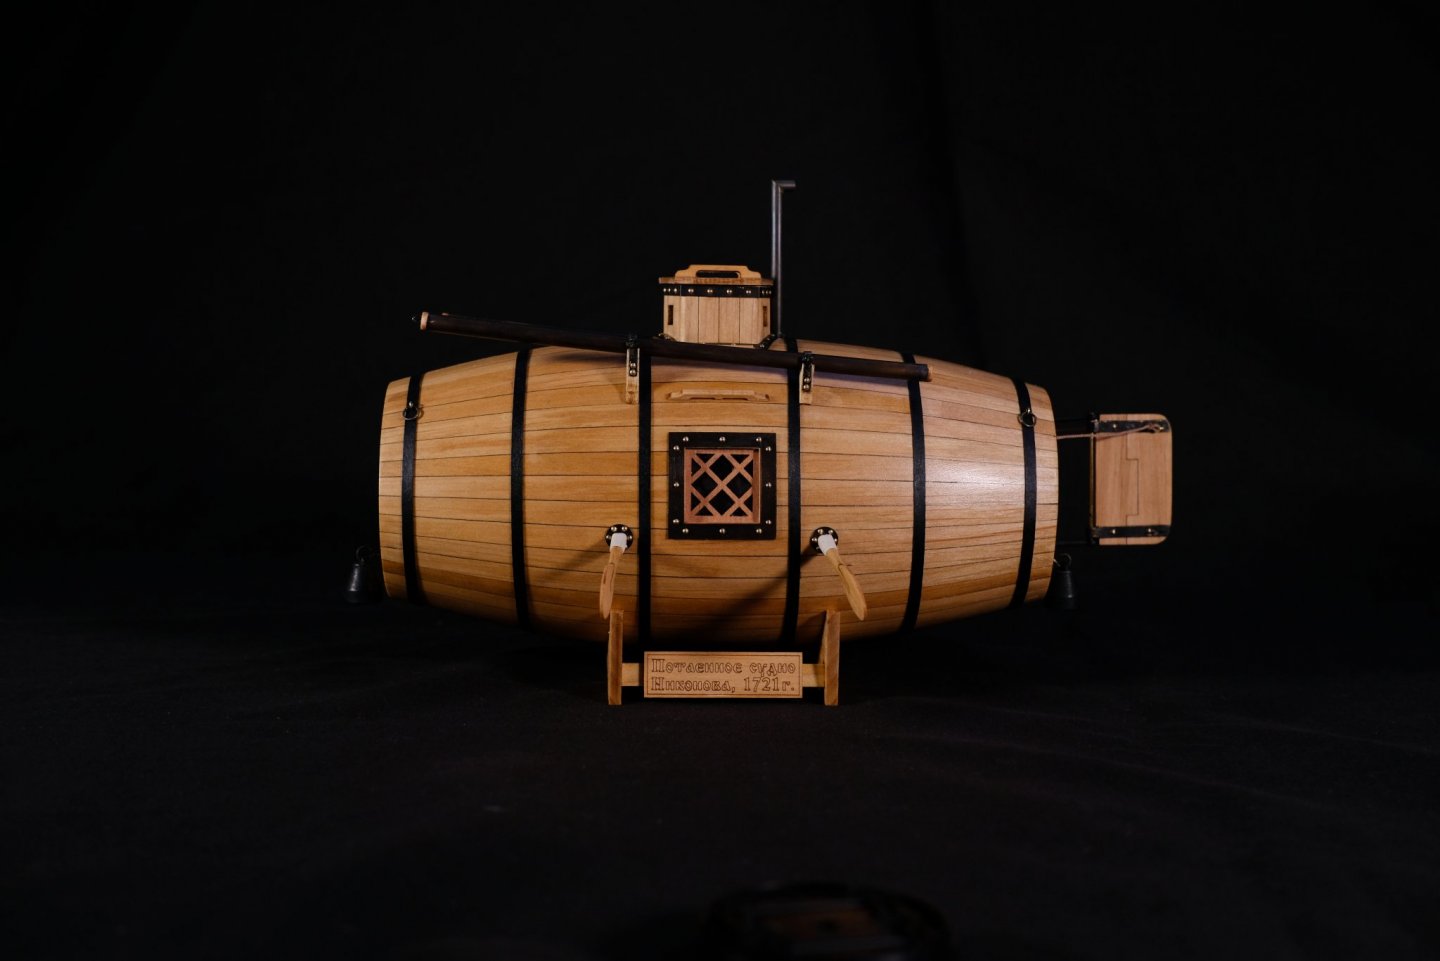
- 77 replies
-
- 25
-

-
- morel
- master korabel
- (and 1 more)
-
I have none really. My plan was just to finish, and as always, that can be ambitious enough
- 77 replies
-
- 3
-
-
- morel
- master korabel
- (and 1 more)
-
Not entirely. They are provided as laser cut pieces which one must bend and shape into hinges. They certainly werent my best work, but they'll do.
- 77 replies
-
- 3
-
-
- morel
- master korabel
- (and 1 more)
-
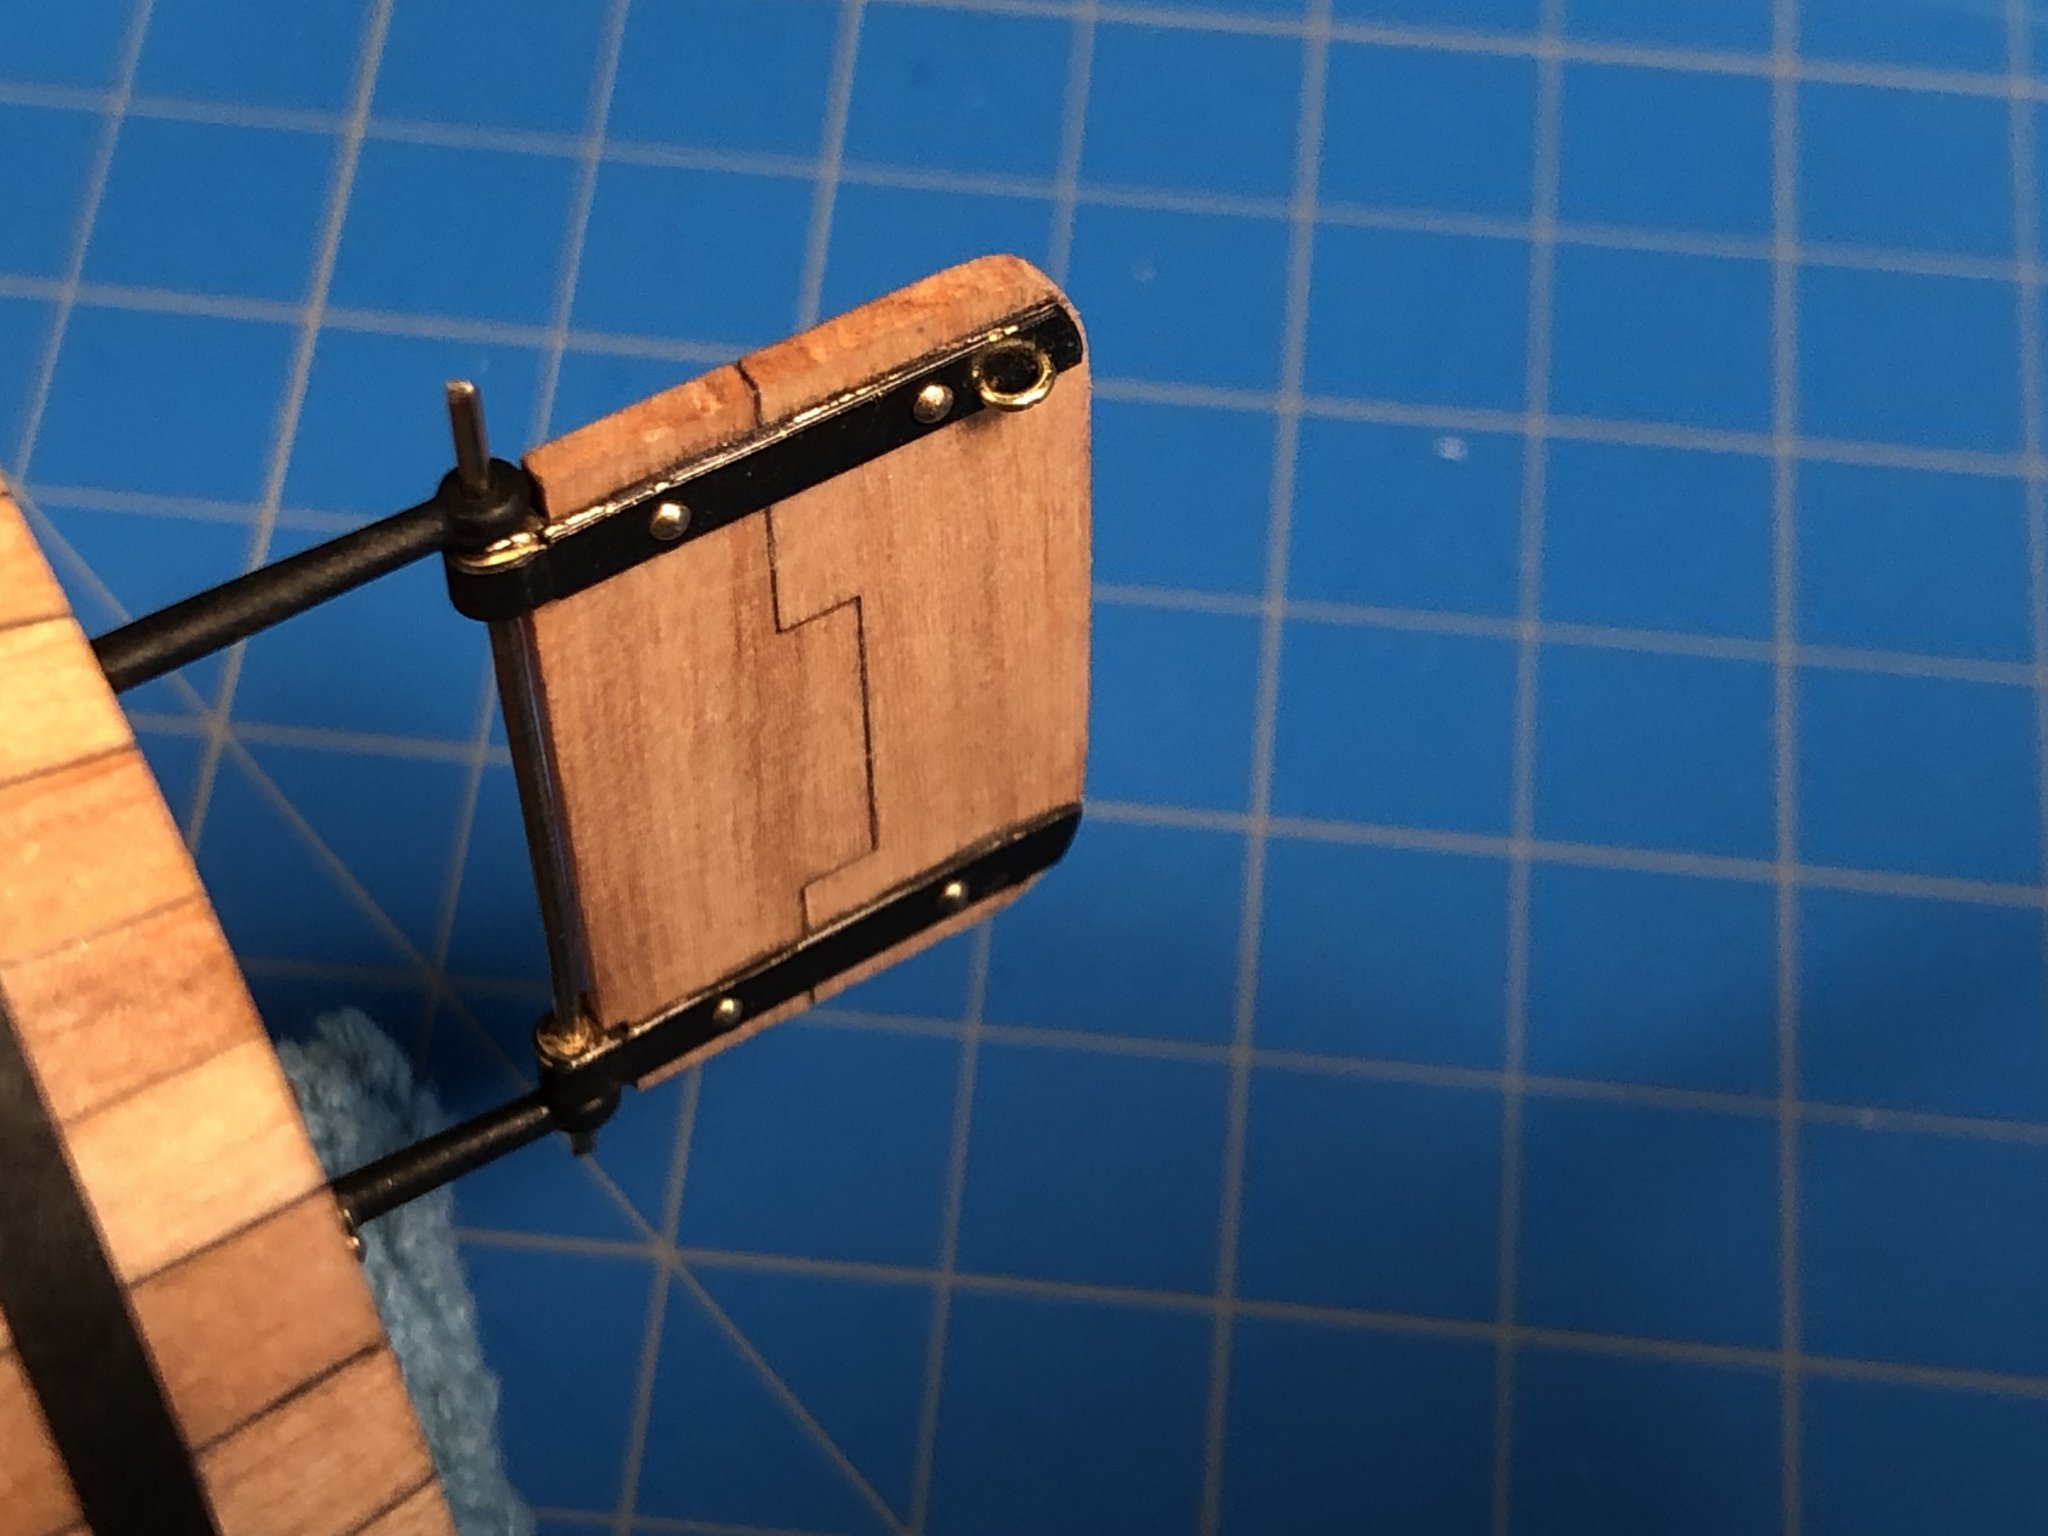
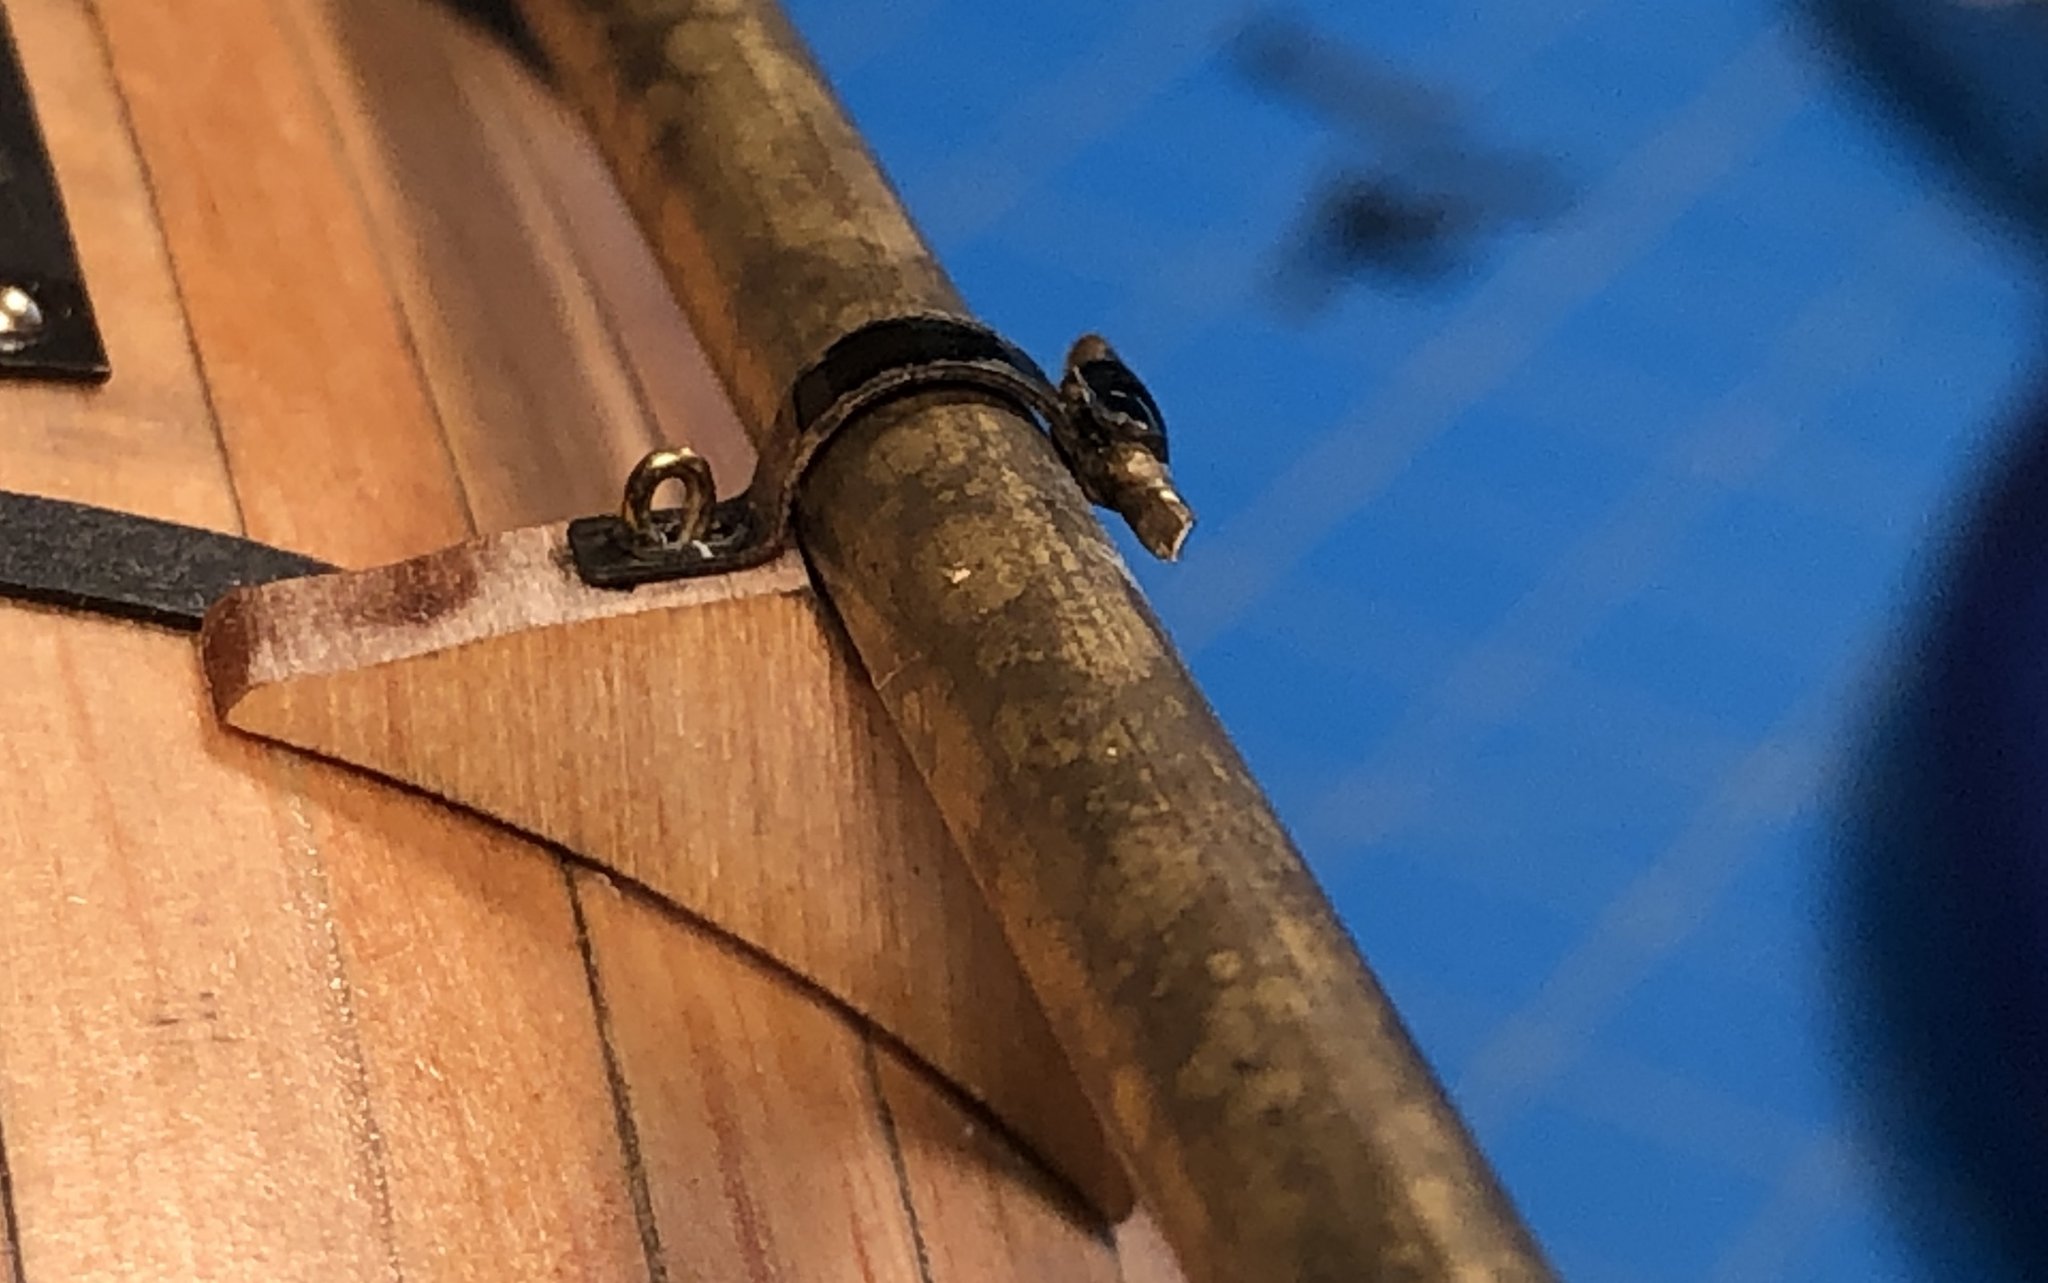
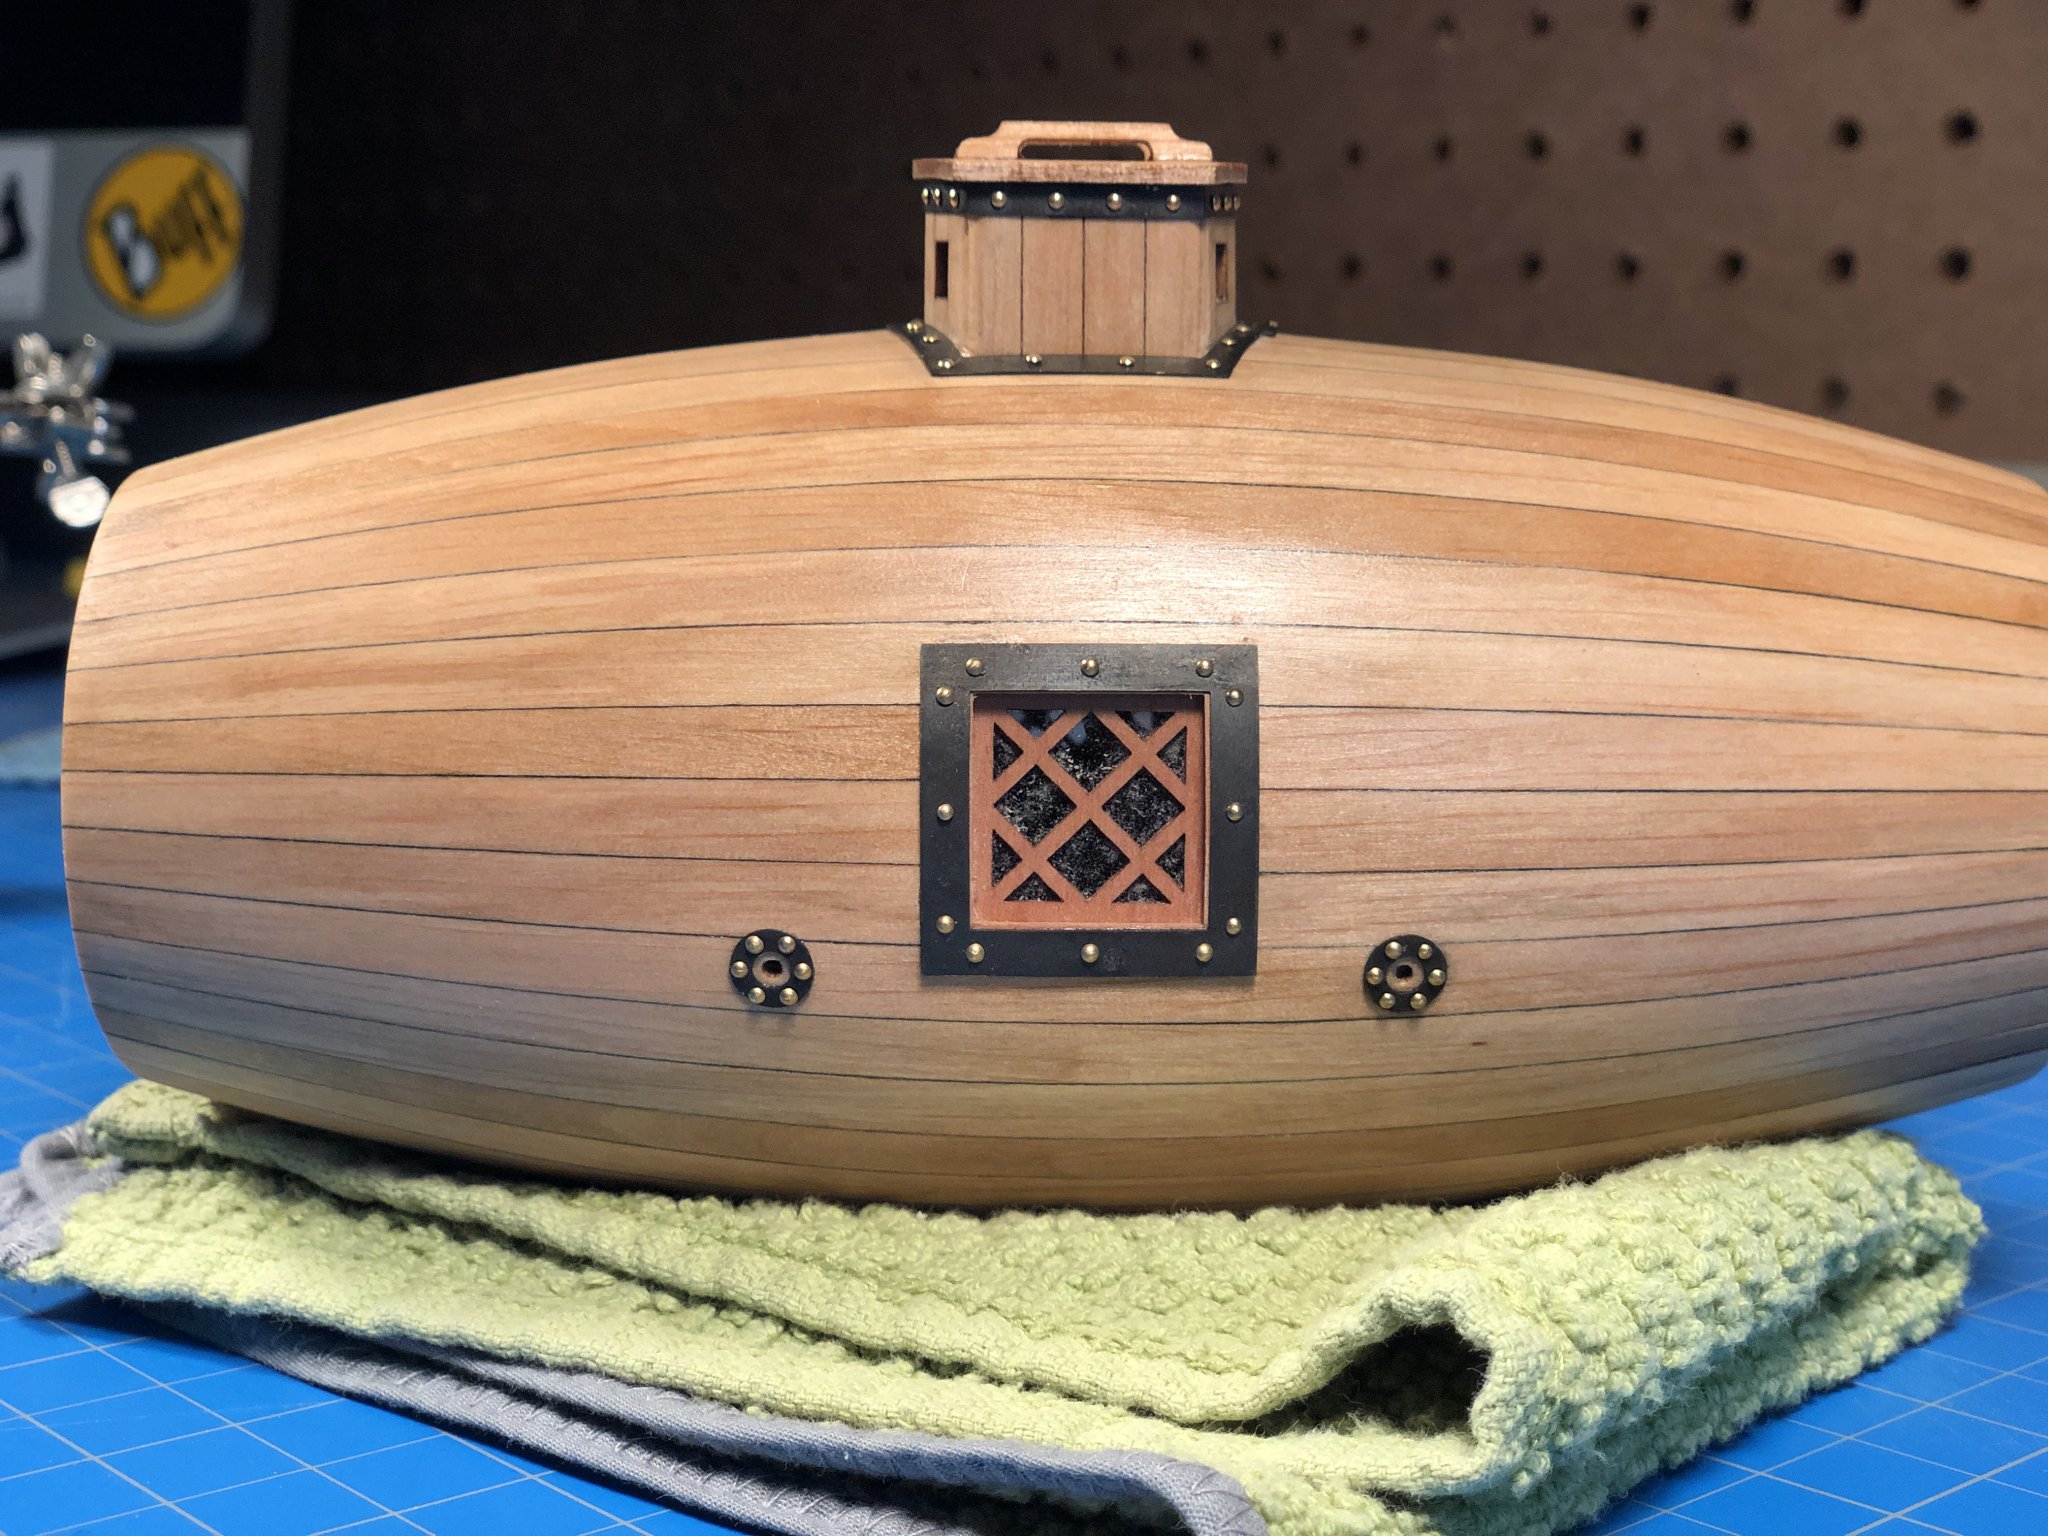
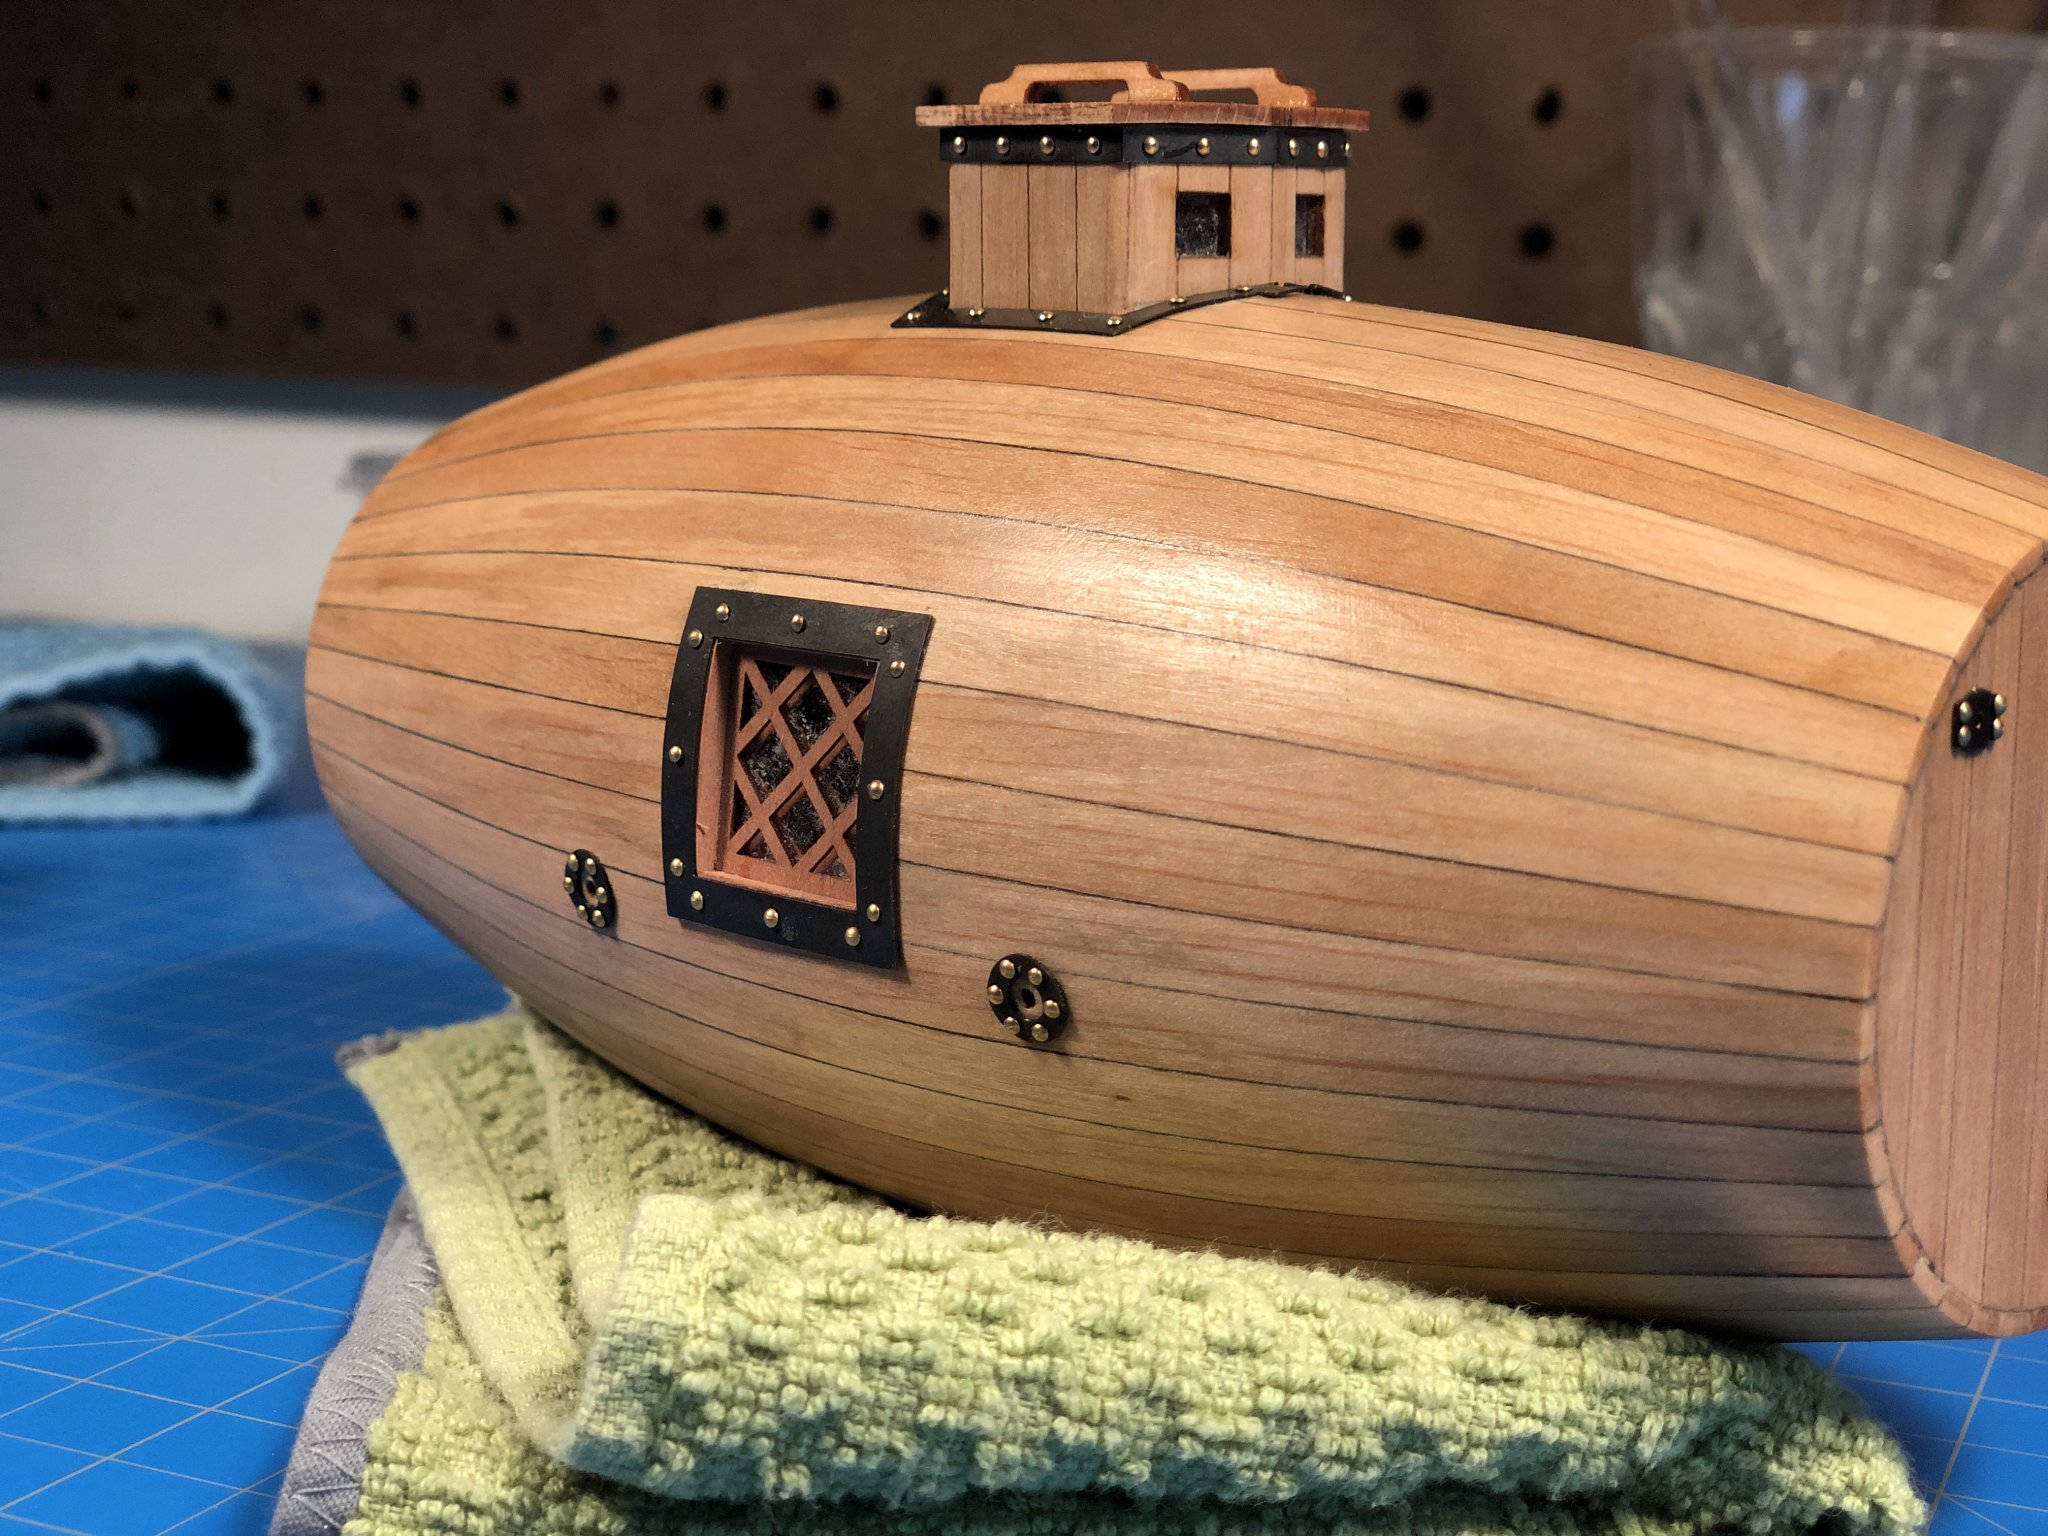
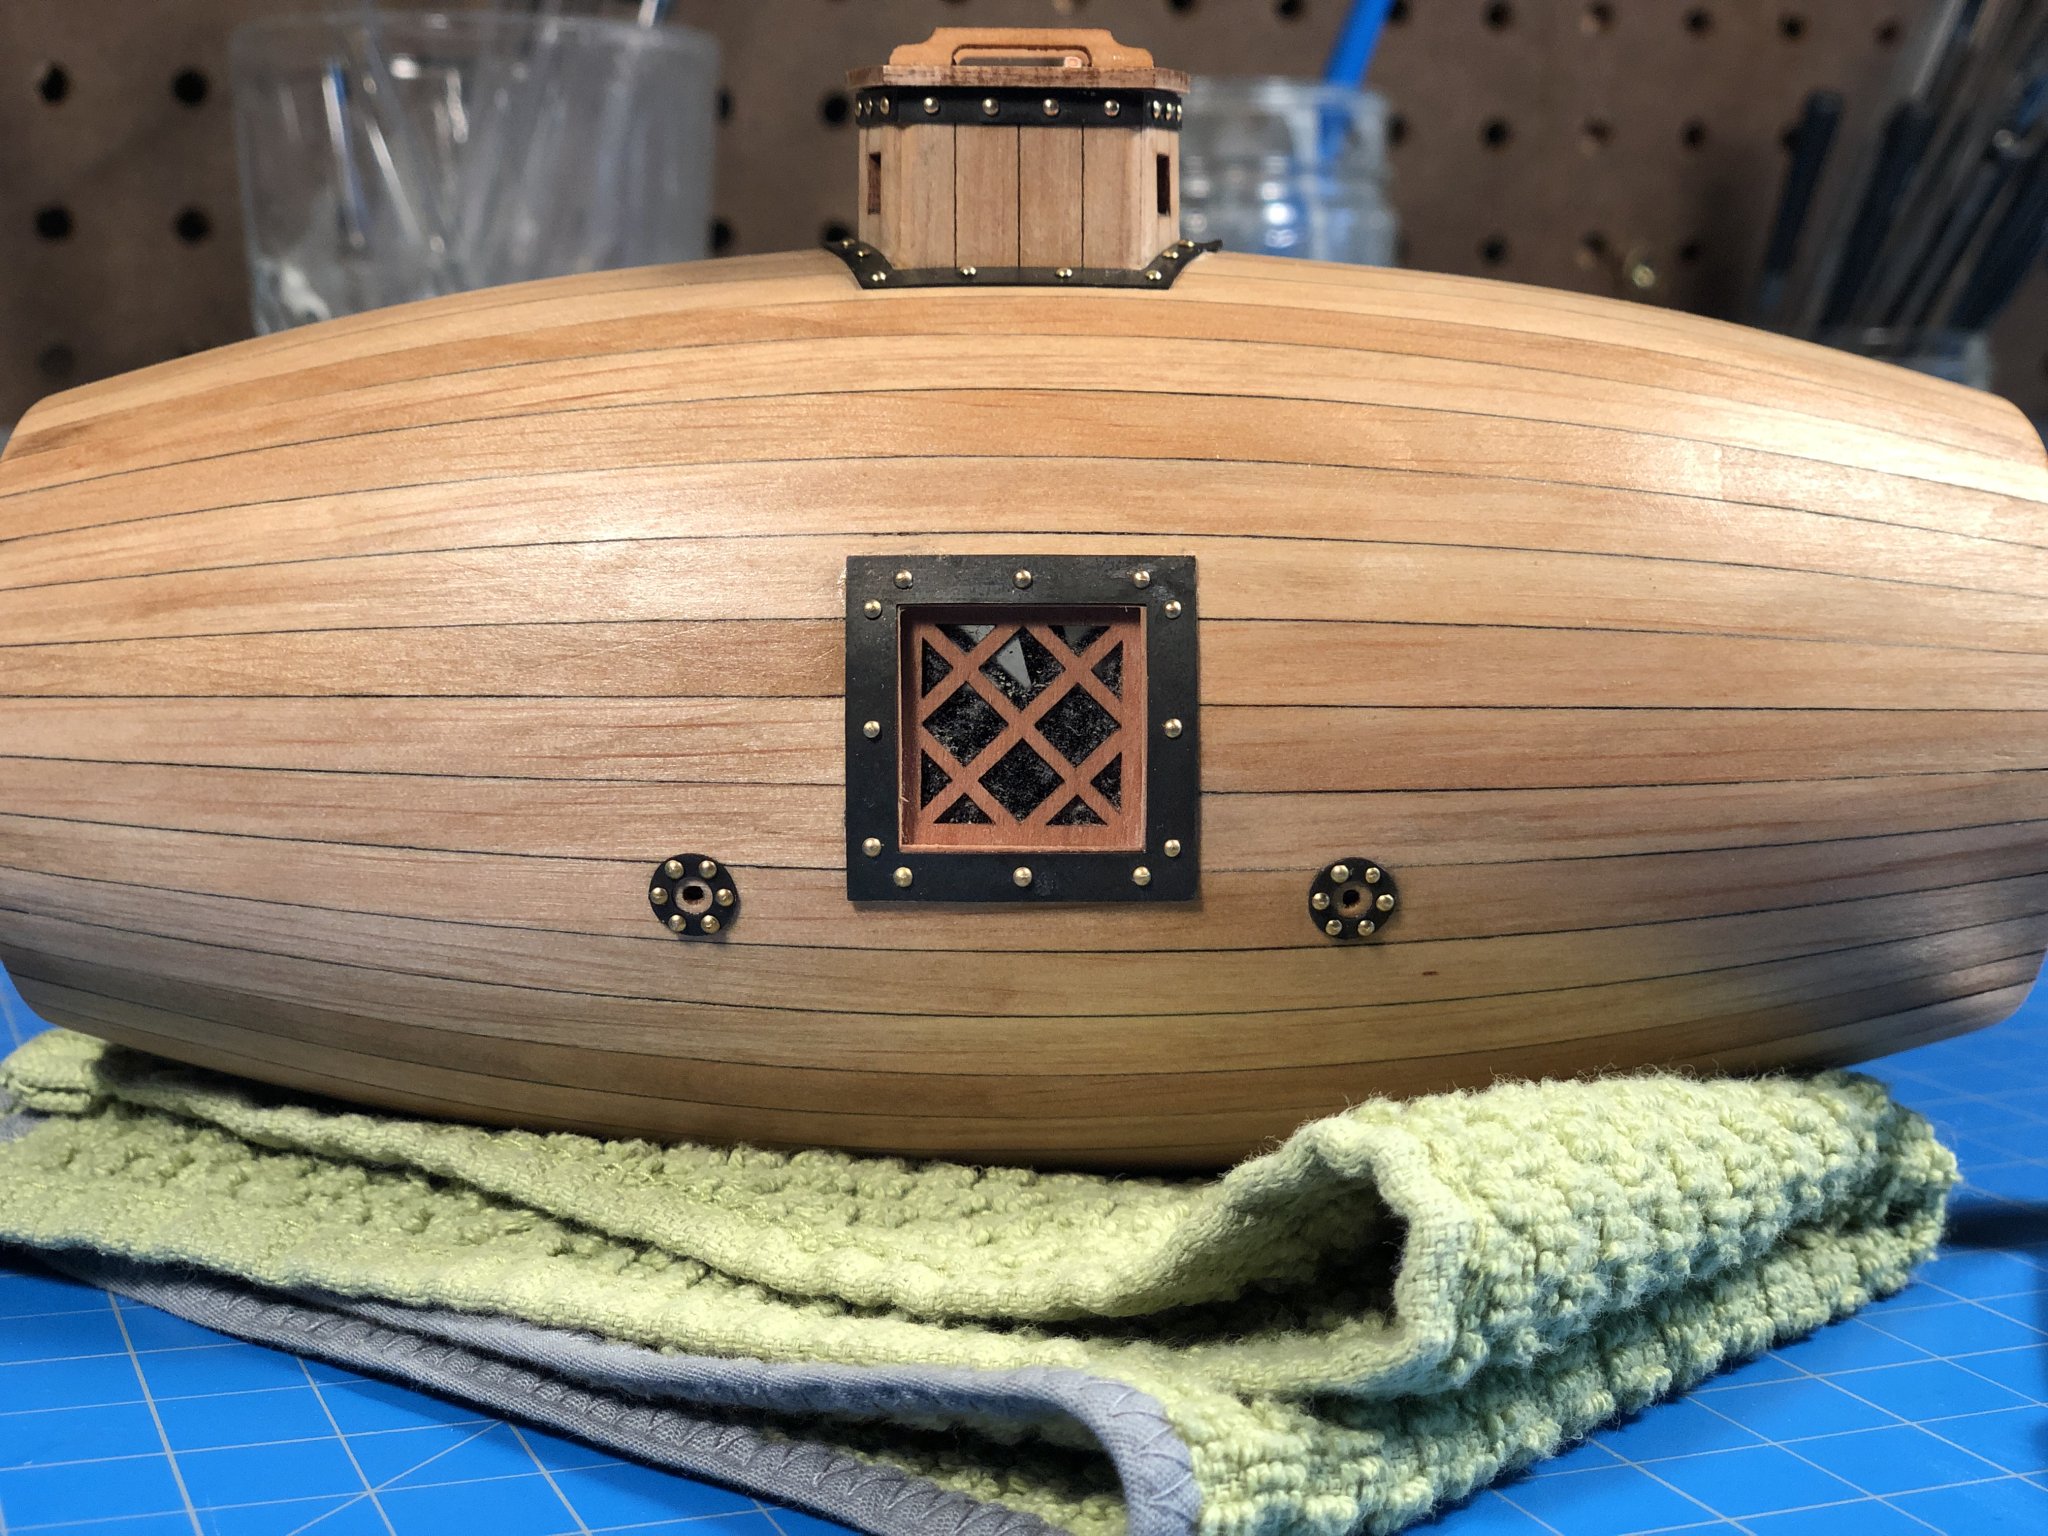
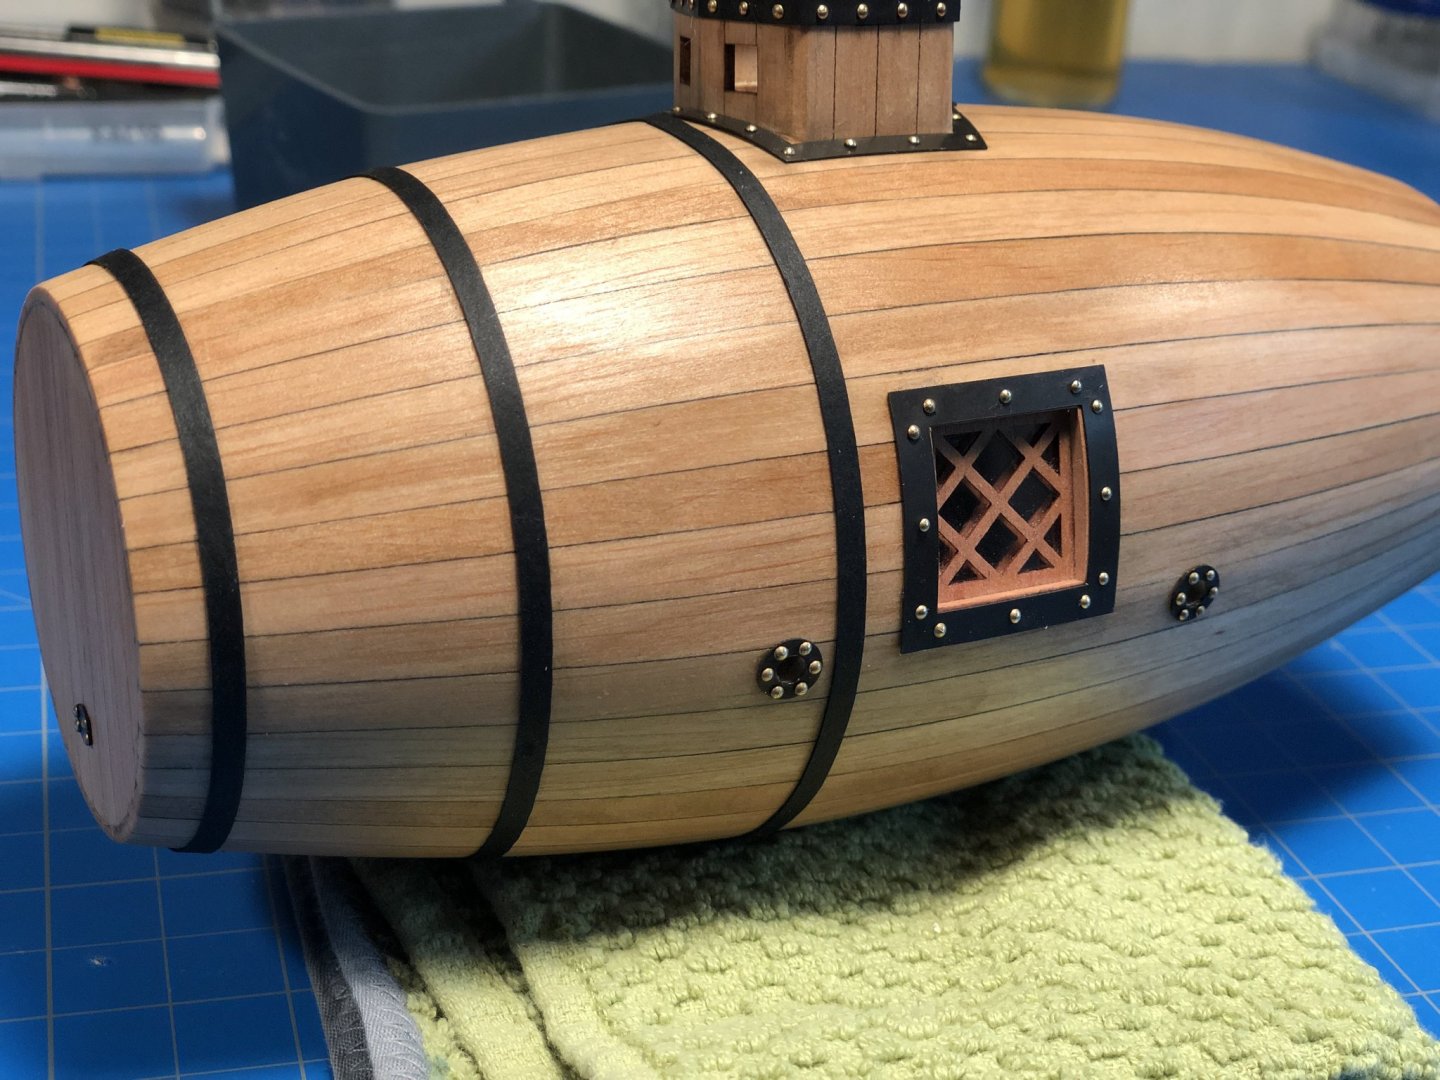
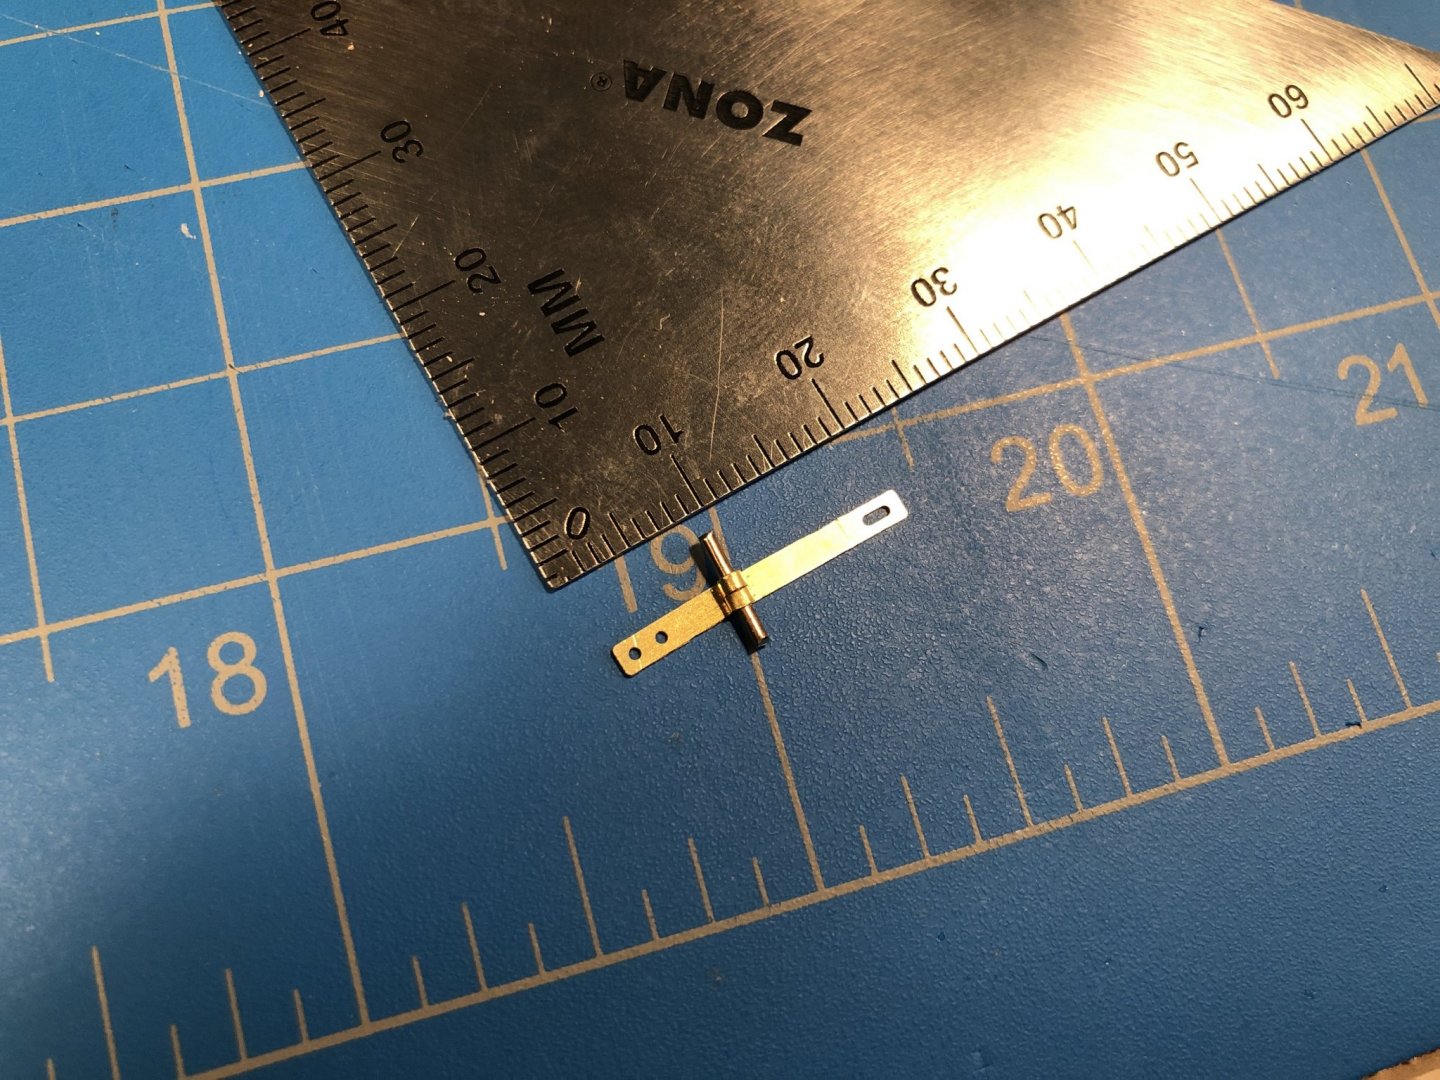
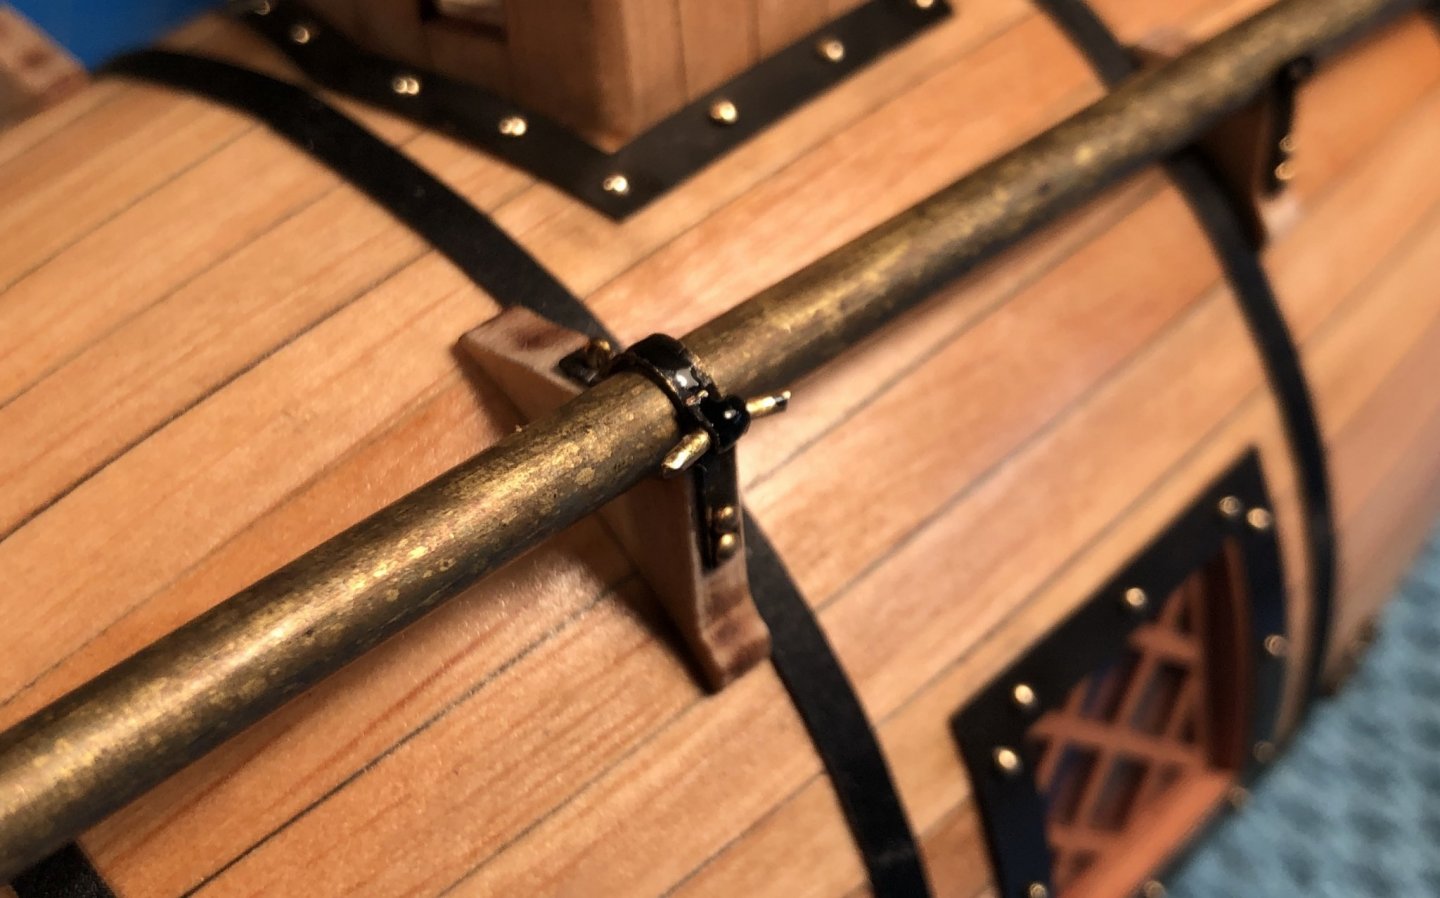
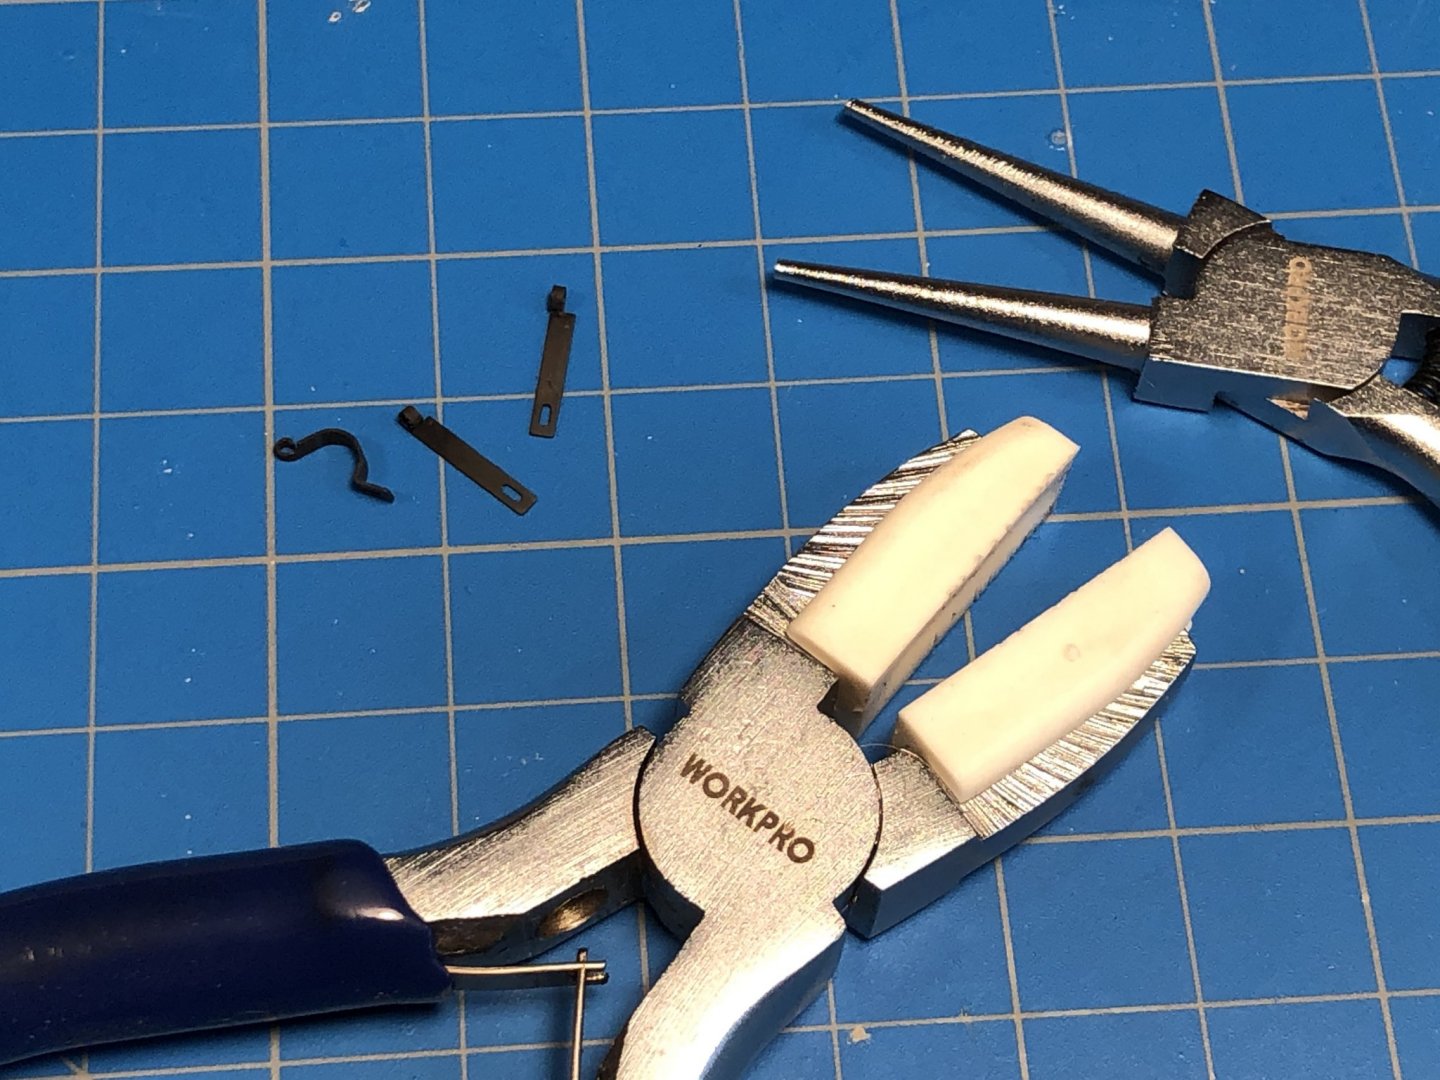
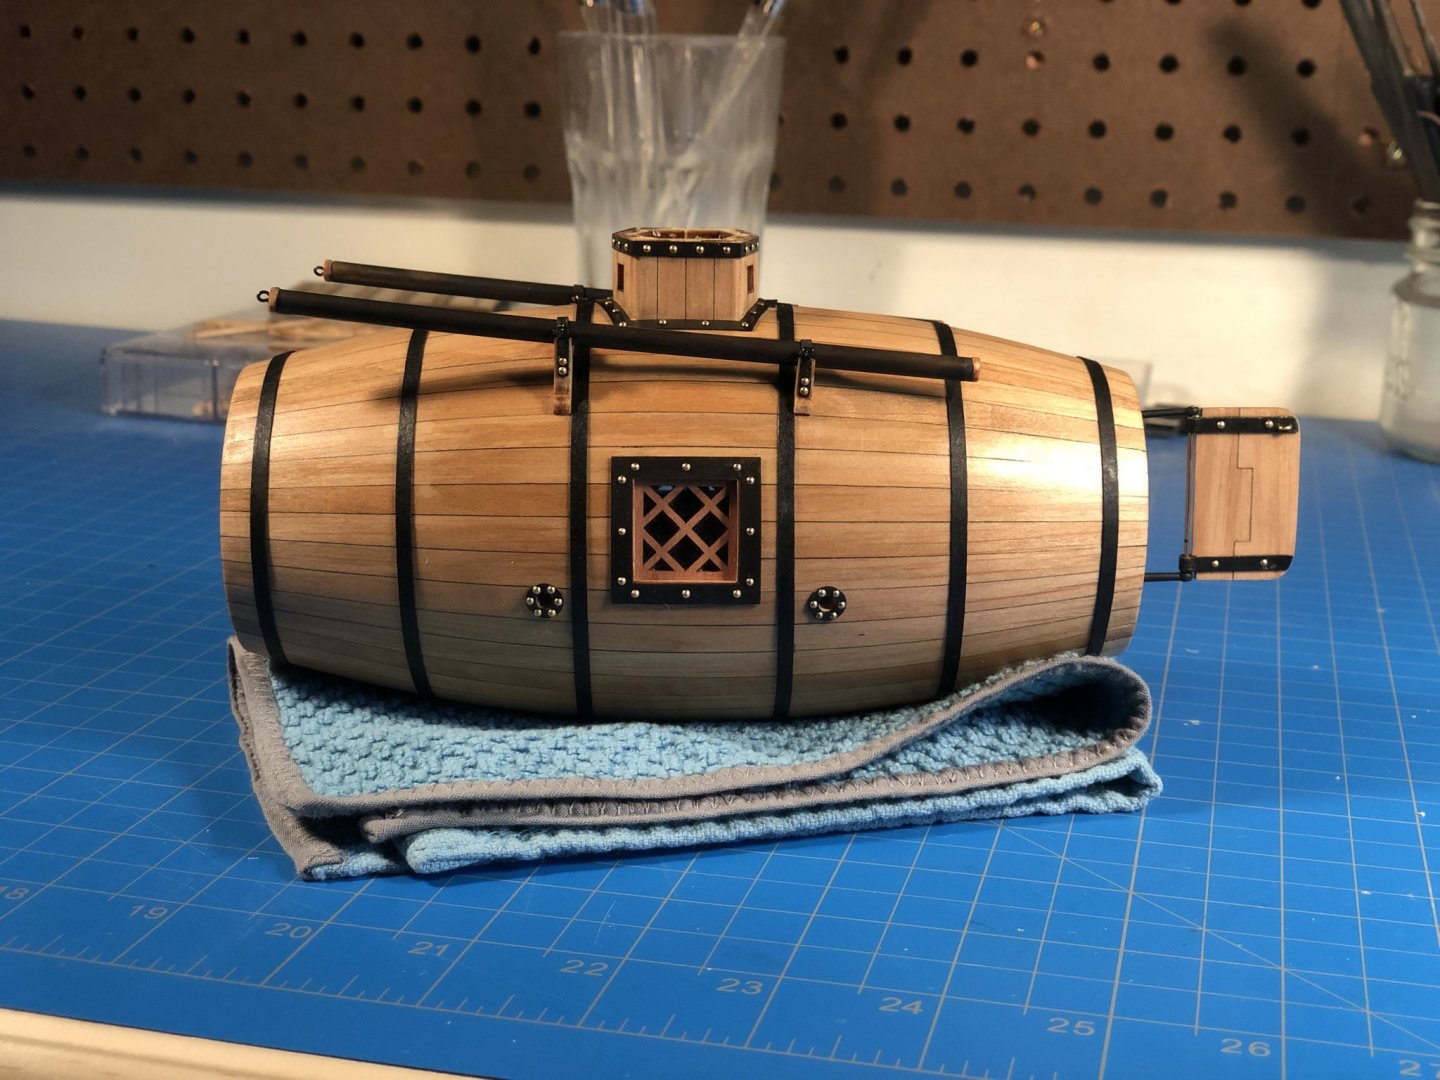
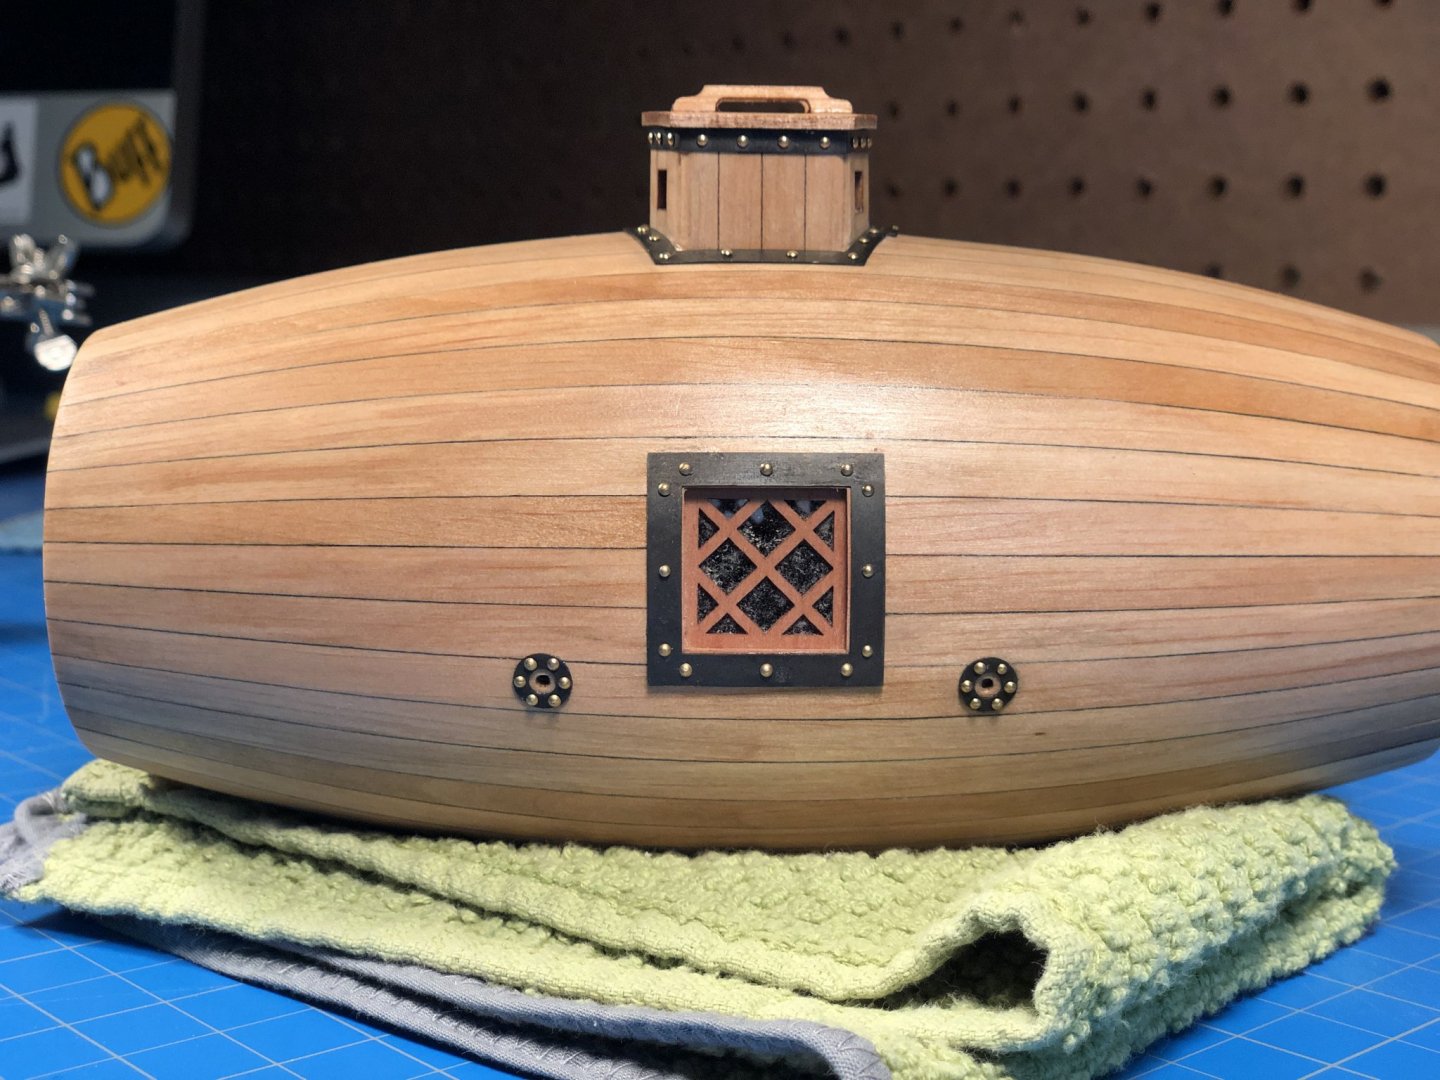
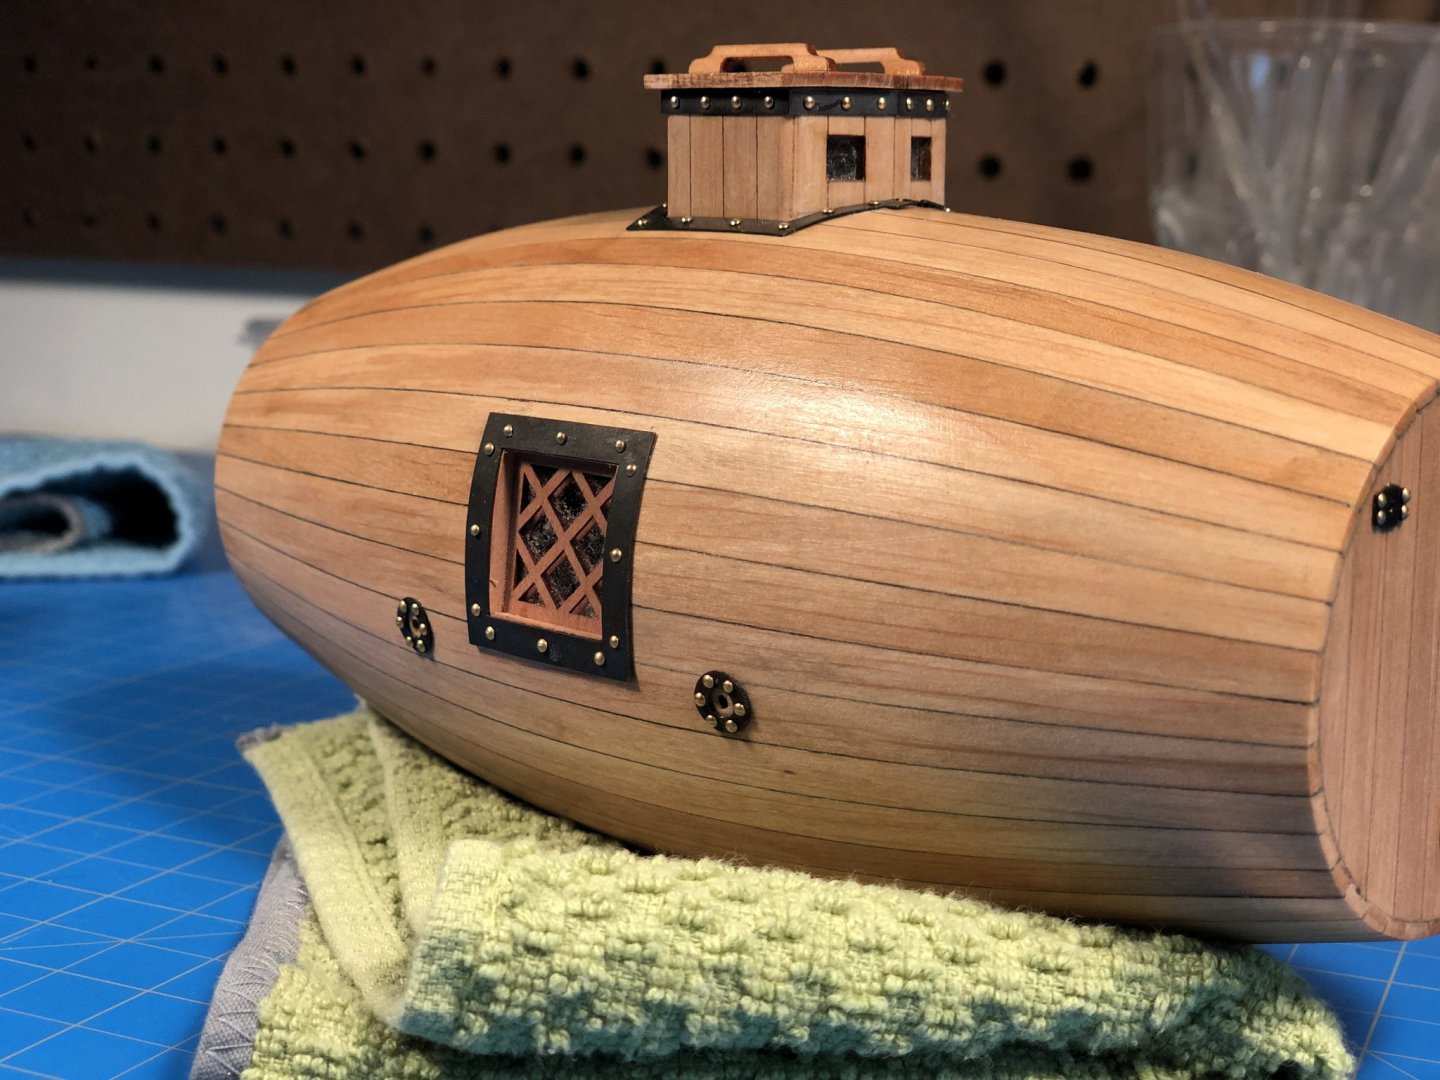
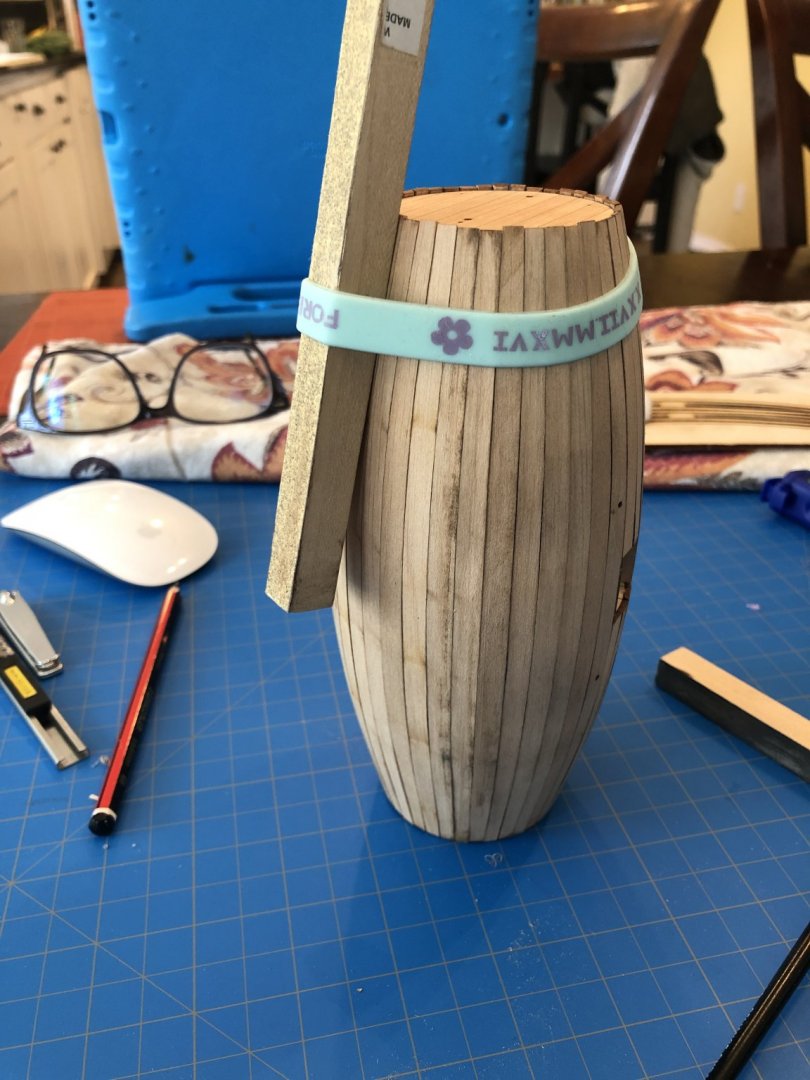
It was another productive weekend, although with the shelter-in-place order in effect, there really isn't a whole lot more I could really do anyway! Or so I told myself It was time to start in on the "iron" banding, which is made from a black 10 pt card. As someone whose professional life revolves around the intricacies of paper, I appreciate that Master Korabel got this bit right. I was at first resistant to using paper, and I may yet regret going with it. In new condition however, the look and workability of the chosen material was spot on. I especially appreciate that they got the grain direction of the chosen paper sheet correct for wrapping around the hull. I also started in on more of the metal work. I have to say this was not my favorite part of the project. I know next to nothing about making hinges, which becomes exponentially more problematic when making them at a minuscule size. Fitting them to the fire-pipes, getting them blackened and having to make probably 4x the needed parts took about the whole day. For whatever reason, if I dropped one piece it completely and utterly disappeared. I mean gone. No matter how neat and tidy I kept my bench, if it slipped from my tweezers/hands/pliers it was gone. Hence, making each piece so many times... The above shots show the installed hinges with the pin left long as I fitted and adjusted the piece. Ive also had to brush on a bit of blackener to occasionally refinish the brass as my fumbling scratched it. You can see the glean of the liquid blackener on the surface of the hinge here. I also had to add a few brass loops and eyes here and there which Ive left unblackened for the same reasons as previously stated, I just like the contrast. You can see the post and eyes in the below photo unblackened, and also left long until completely finished. Finally, here she is as she currently sits. Still a few details away from finished, but getting there.


- 77 replies
-
- 16
-
-
- morel
- master korabel
- (and 1 more)
-
tool review Perma-Grit tools
Justin P. replied to James H's topic in REVIEWS: Model Shipwrighting Tools, Parts and fittings
I certainly appreciate the in-depth review, thanks for taking the time. Im also encouraged to see that my initial reaction to these tools is supported by actual use by wefalck and Tony. When I first saw these on the Micro-Mark website I was curious but from the pictures could tell they would likely be much too coarse for anything Ive ever done in ship modeling.- 17 replies
-
- 3
-
-
- permagrit
- perma-grit
- (and 3 more)
-
I think I got enough off the windows to be satisfied. I thought about the vacuum too, I have a micro-vacuum at work with variable speed. Or maybe a can compressed air with a tube. In the end, what was laying around proved just as useful.
- 77 replies
-
- 5
-
-
- morel
- master korabel
- (and 1 more)
-
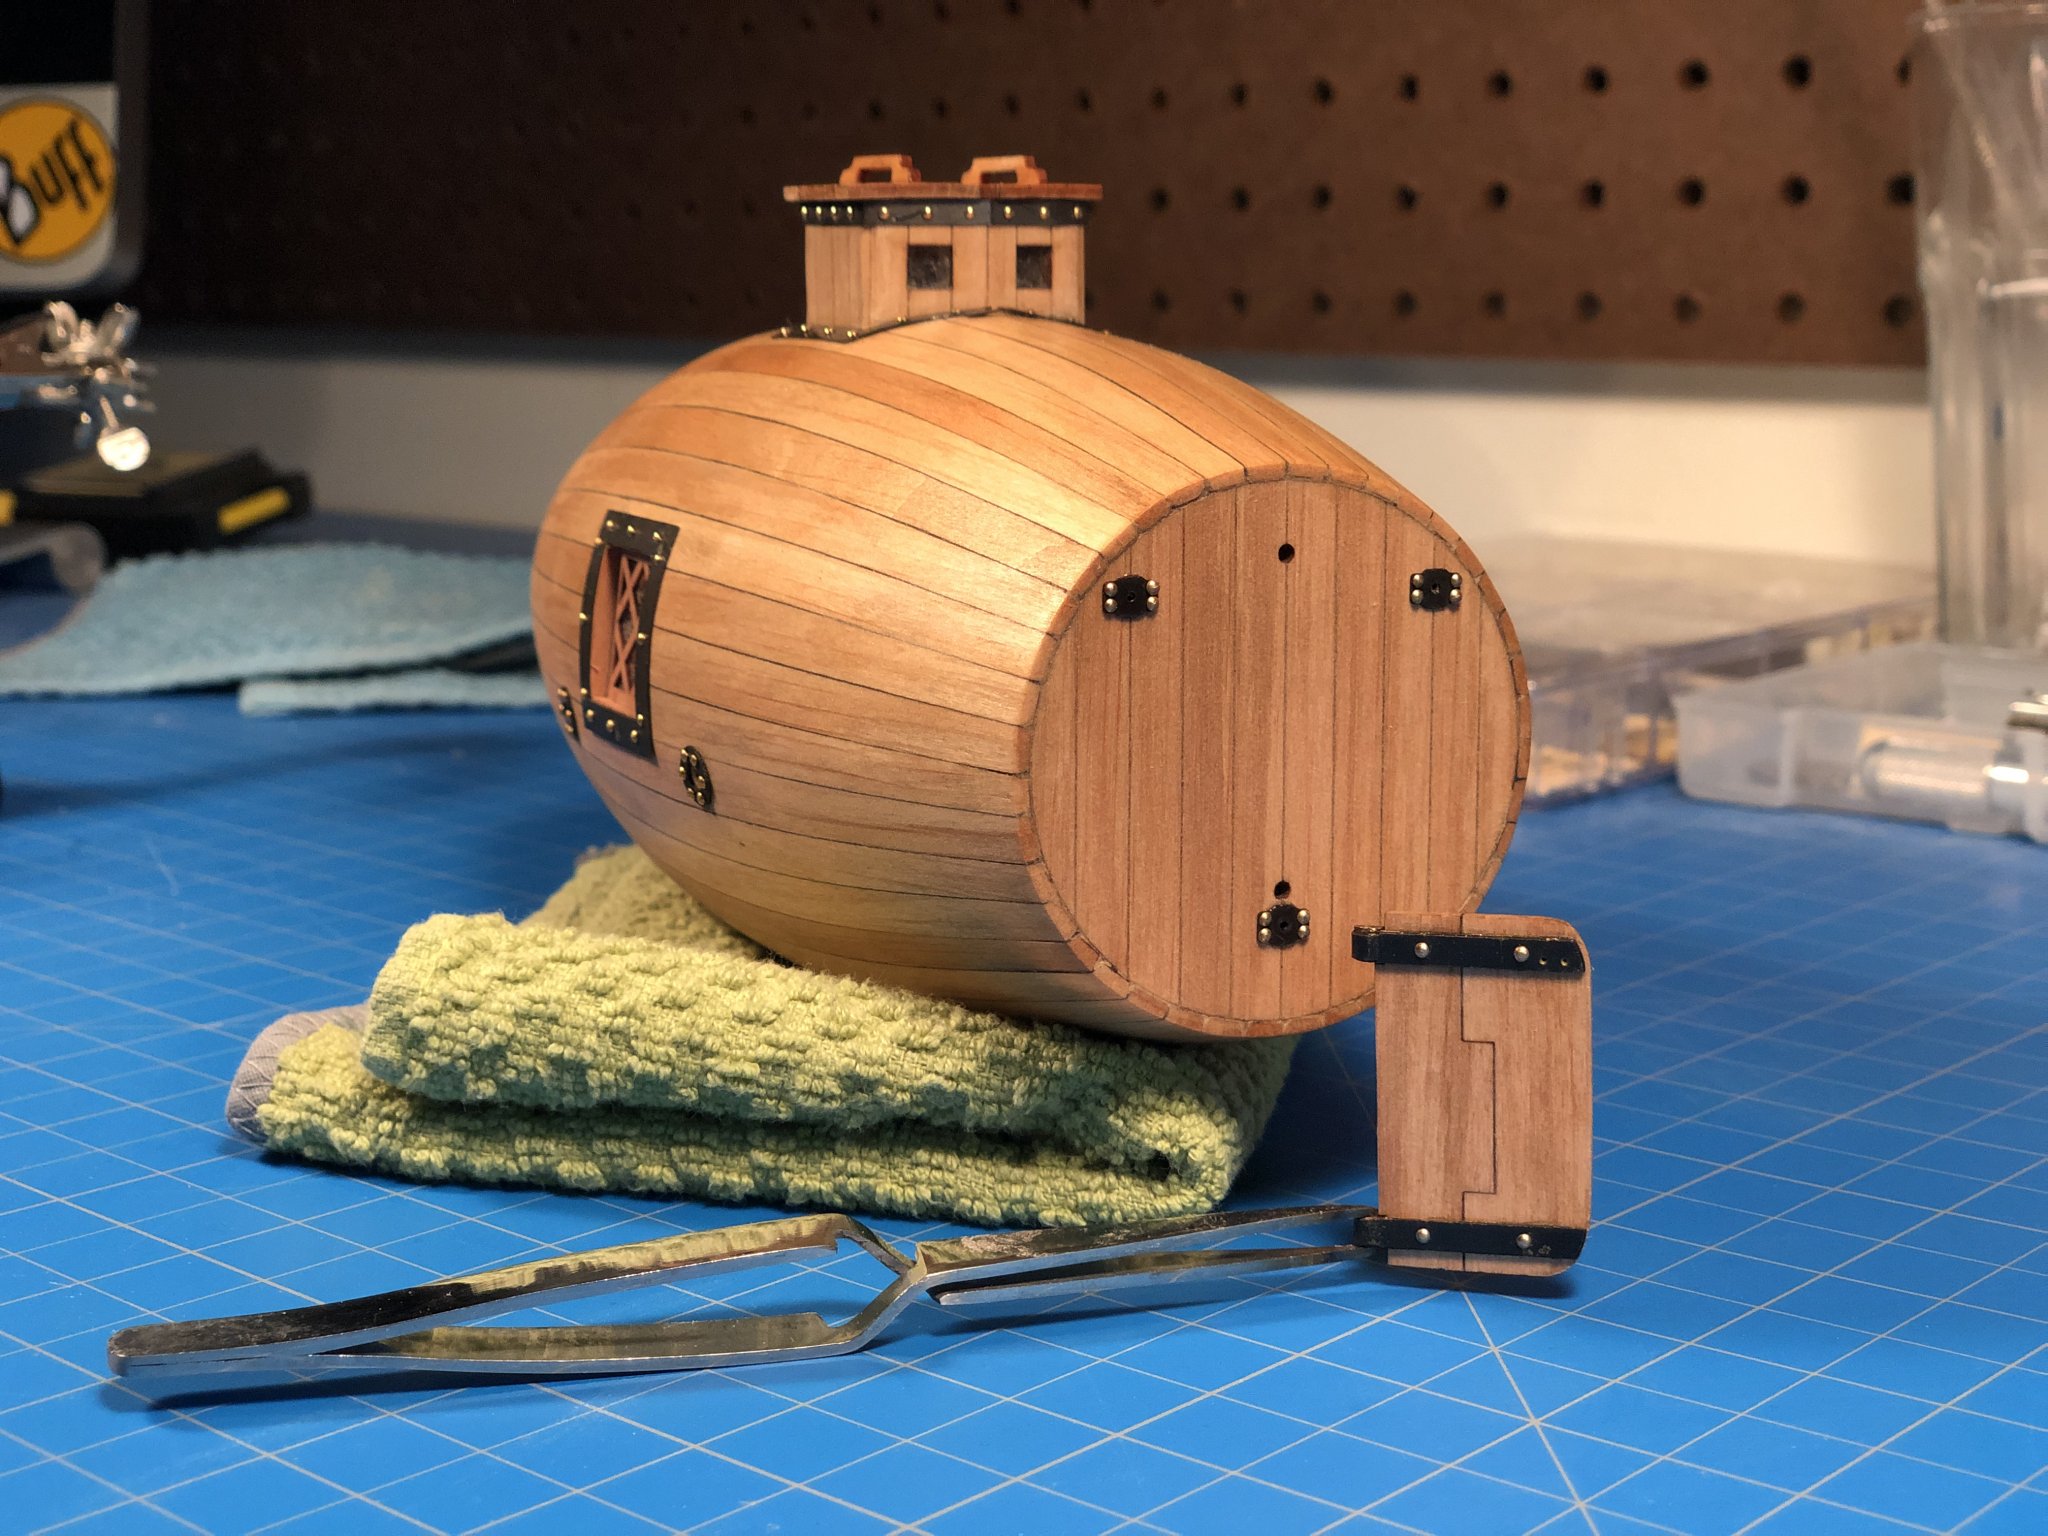
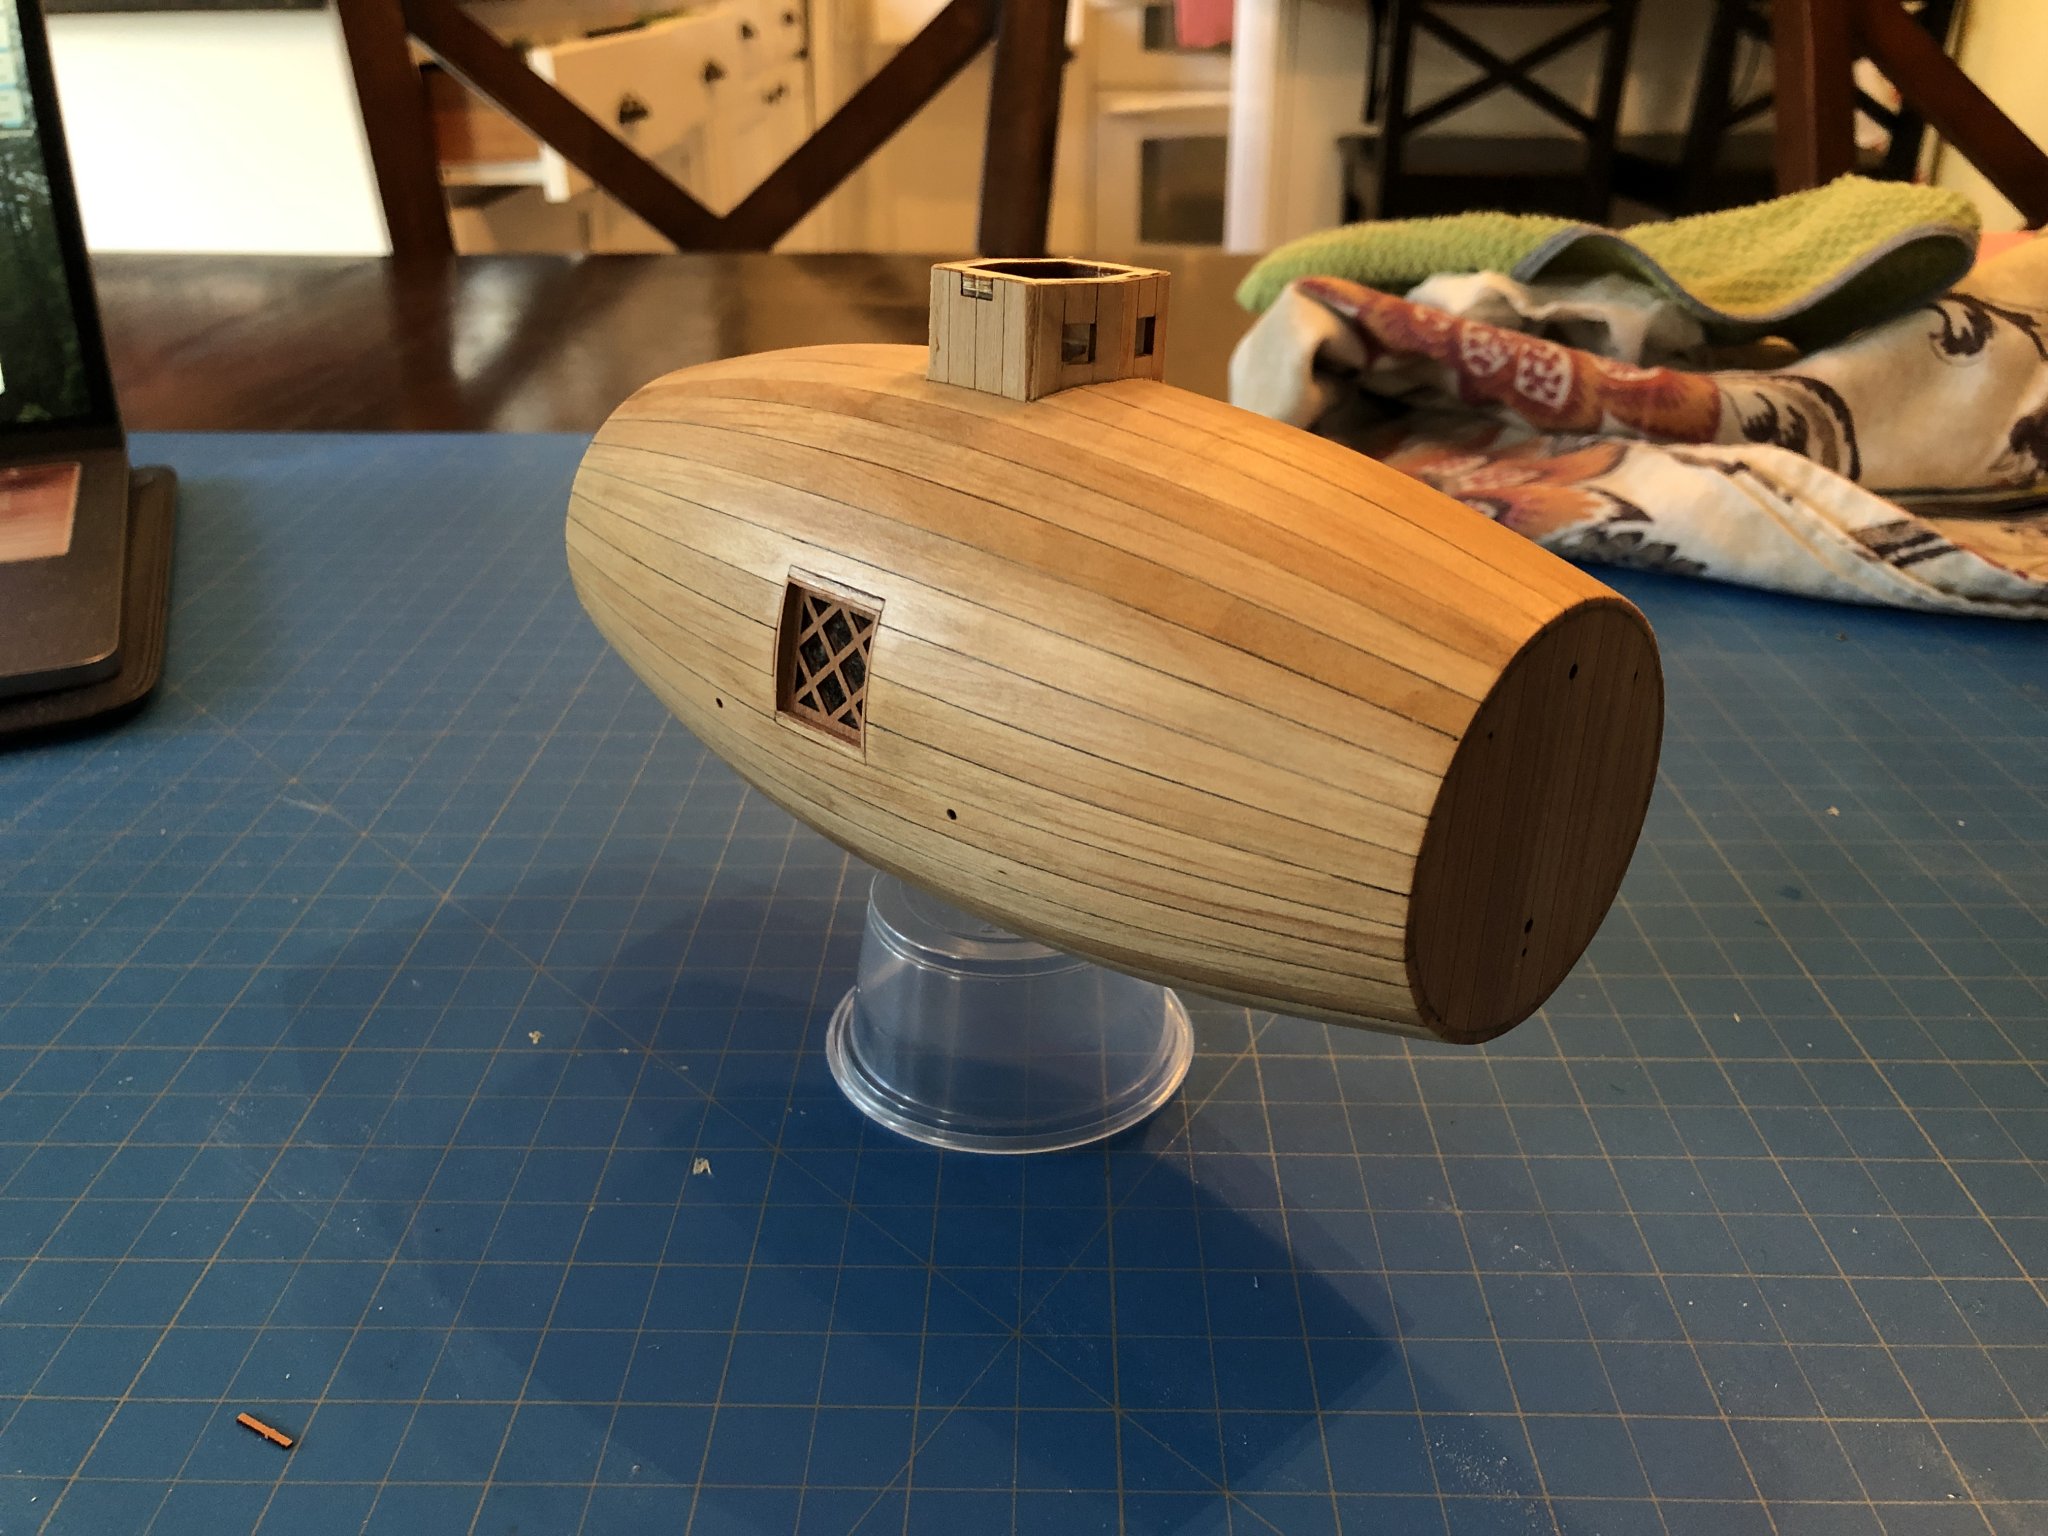
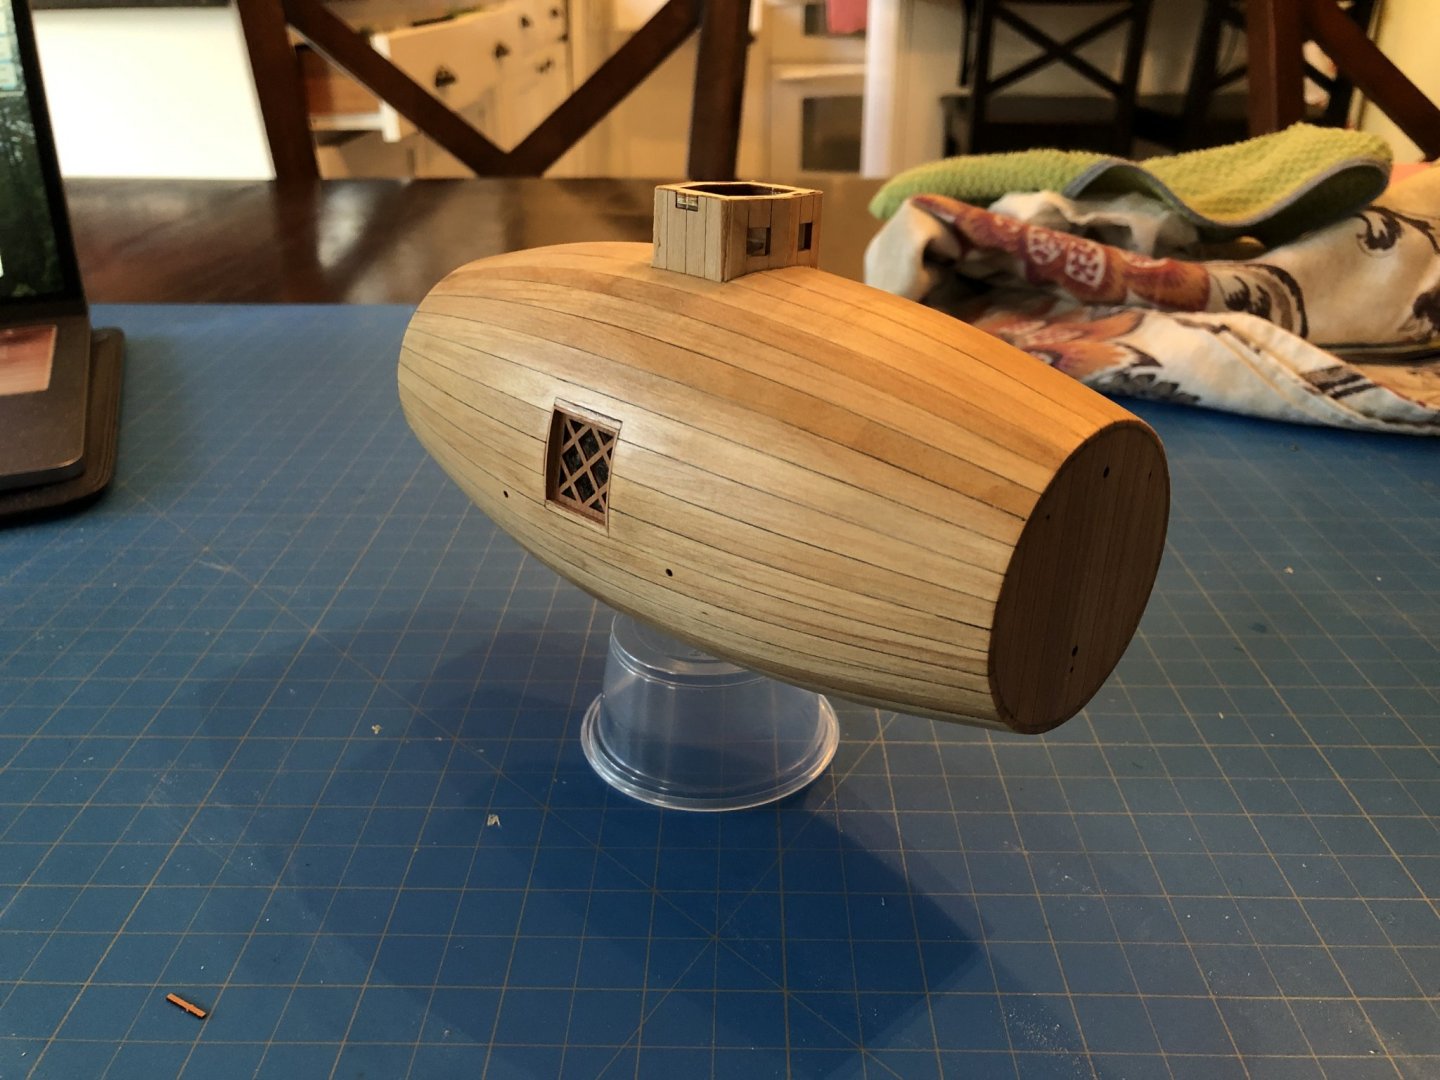
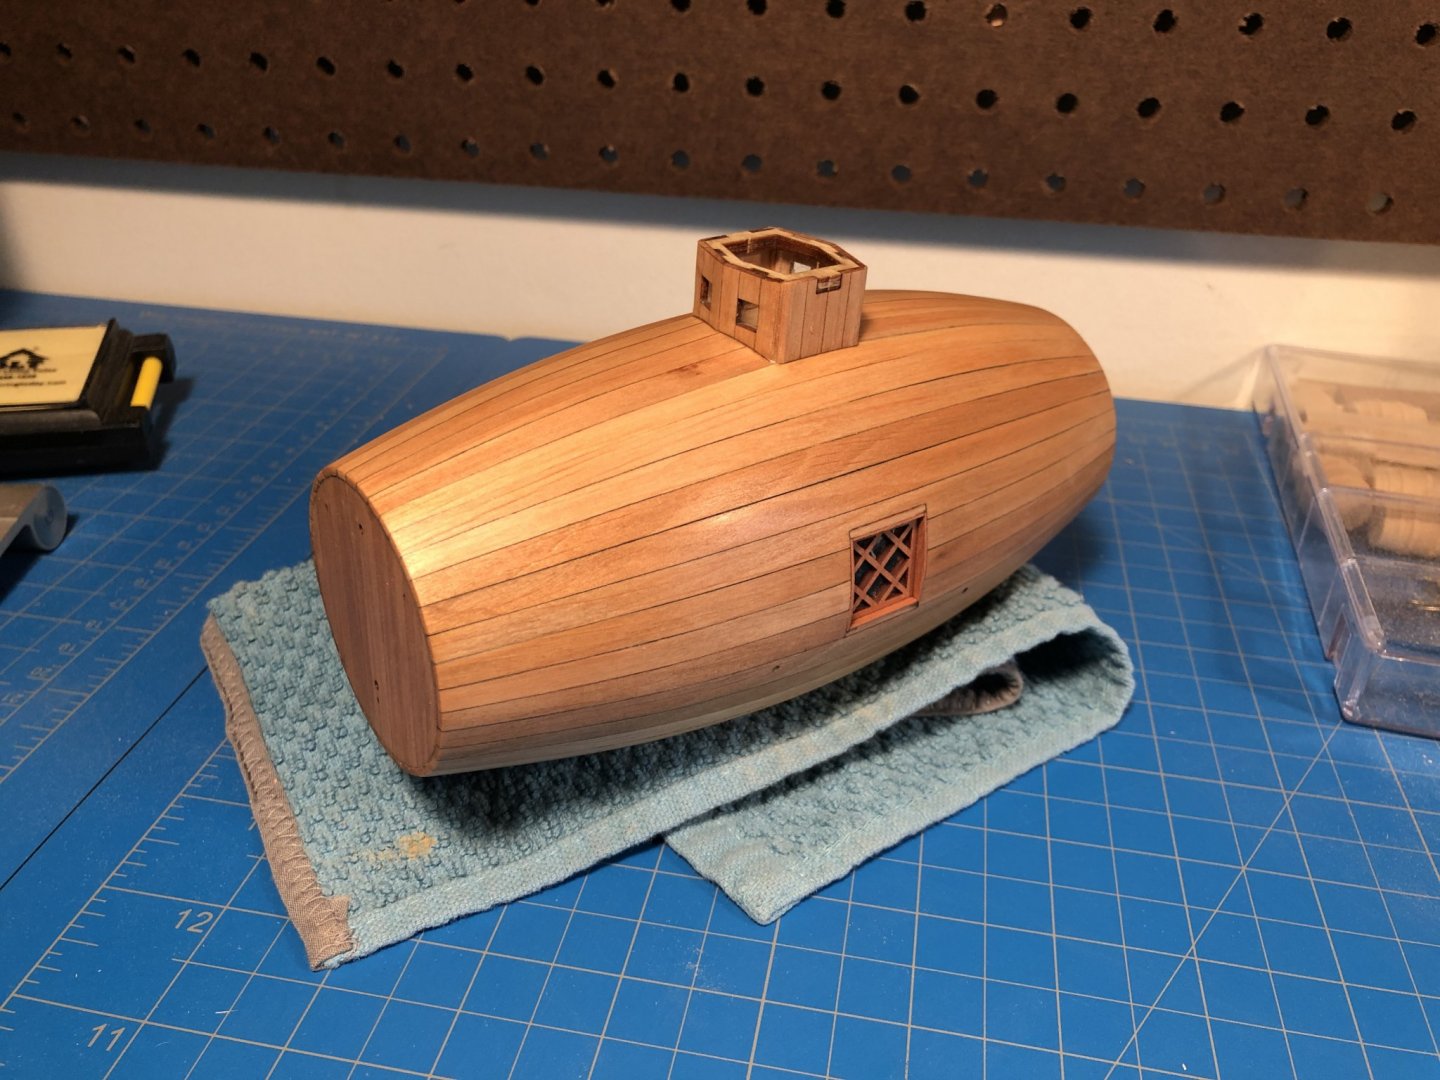
Not much today as I spent most of the day tending to kids and trying to put together a form of homeschooling that isn't concerned with ships and small bits of wood. Apparently reading and math are important pre-requisites. I did manage to tackle my annoying dust problem. After poking around in my assorted bits-and-bobs container, and after trying a few prototypes that were WAY over designed I ended up just bending a micro-brush into a 45° and found that to be a perfect solution. Luckily this model is designed to be able to lift the hatch off to see the interior details, so... Before After It took four in total... of course the little brush tips won't load up on very much sawdust, so two a piece per window isn't bad. Especially when 400 brushes cost something like $10. Glad to have finally found a use for them


- 77 replies
-
- 16
-
-
- morel
- master korabel
- (and 1 more)
-
That makes sense now that you mention it...
-
Why is the bungie holding up the motor? Or can you explain what's happening there, maybe its not holding it up? Just looks that way. I haven't seen this modification before.
-
Key word here is "almost," I may have a trick or two up my sleeve ;). I may also be delusional...
- 77 replies
-
- 4
-
-
- morel
- master korabel
- (and 1 more)
-
Oh man... I haven't even tried yet, waiting until ALL the sanding I could possibly have to do is done. Just knowing it is there is making me feel nuts enough! I can't imagine how Ill actually get it out. Im thinking Ill start with a blast of compressed air, but worried that might make it worse! Was also up in the middle of the night going back through the process wondering what I could do (next time) to prevent it. Such is life in quarantine.
- 77 replies
-
- 4
-
-
- morel
- master korabel
- (and 1 more)
-
Love the ingenuity of the copper plating jig. You are moving right along, I fear I must move at the speed of molasses compared to this!
-
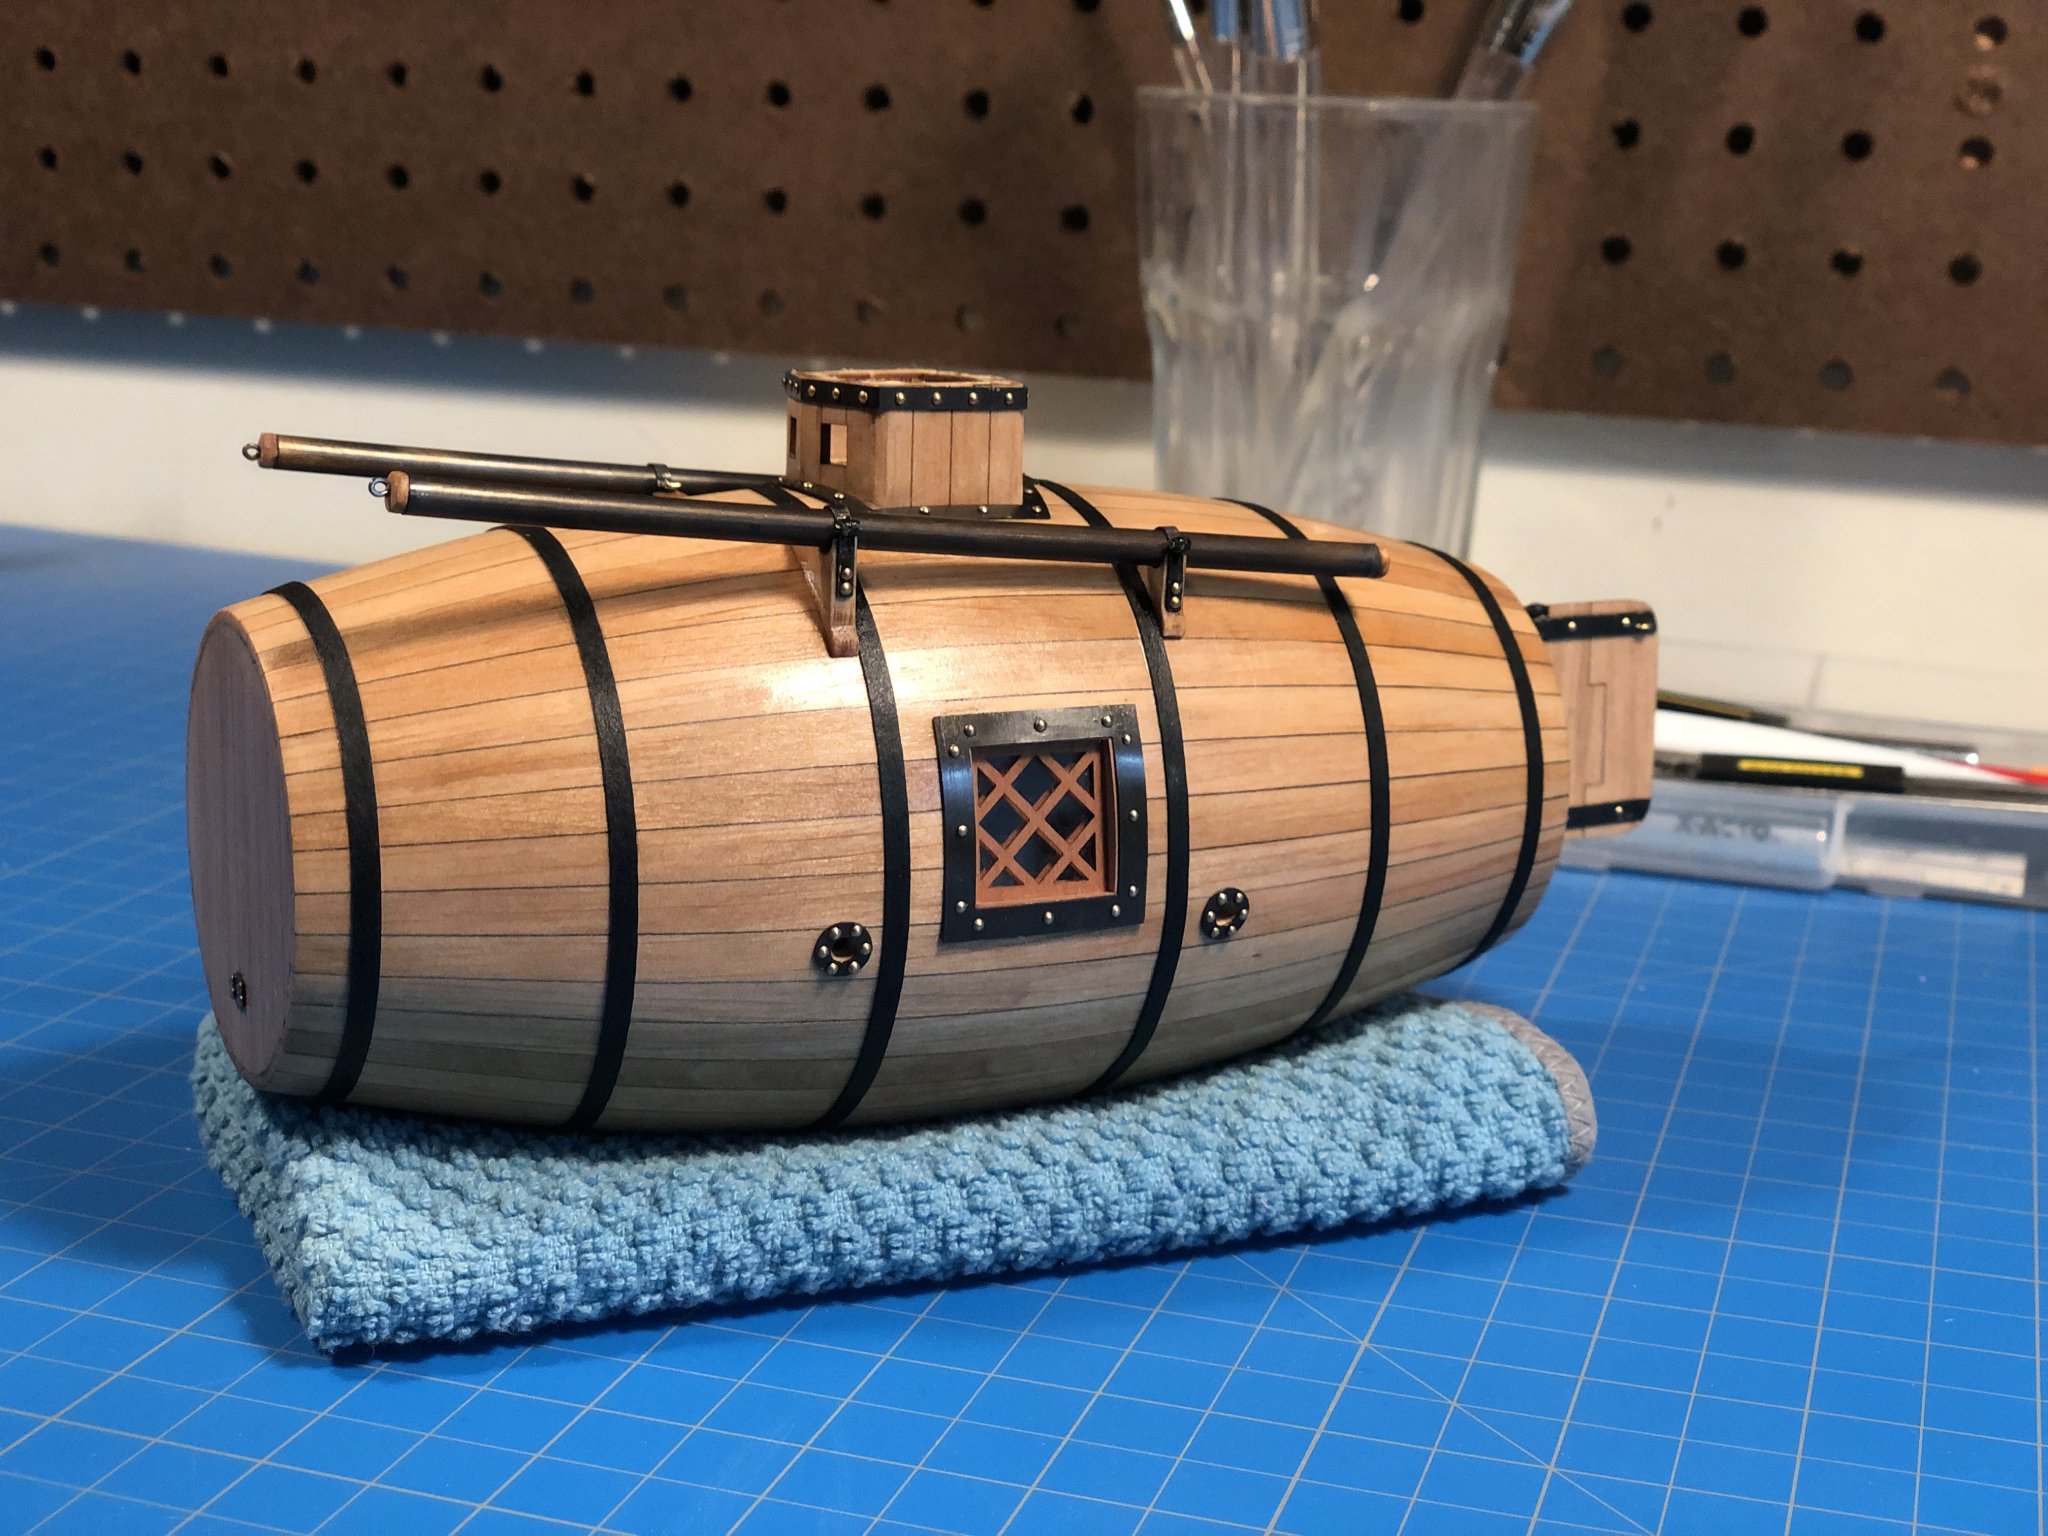
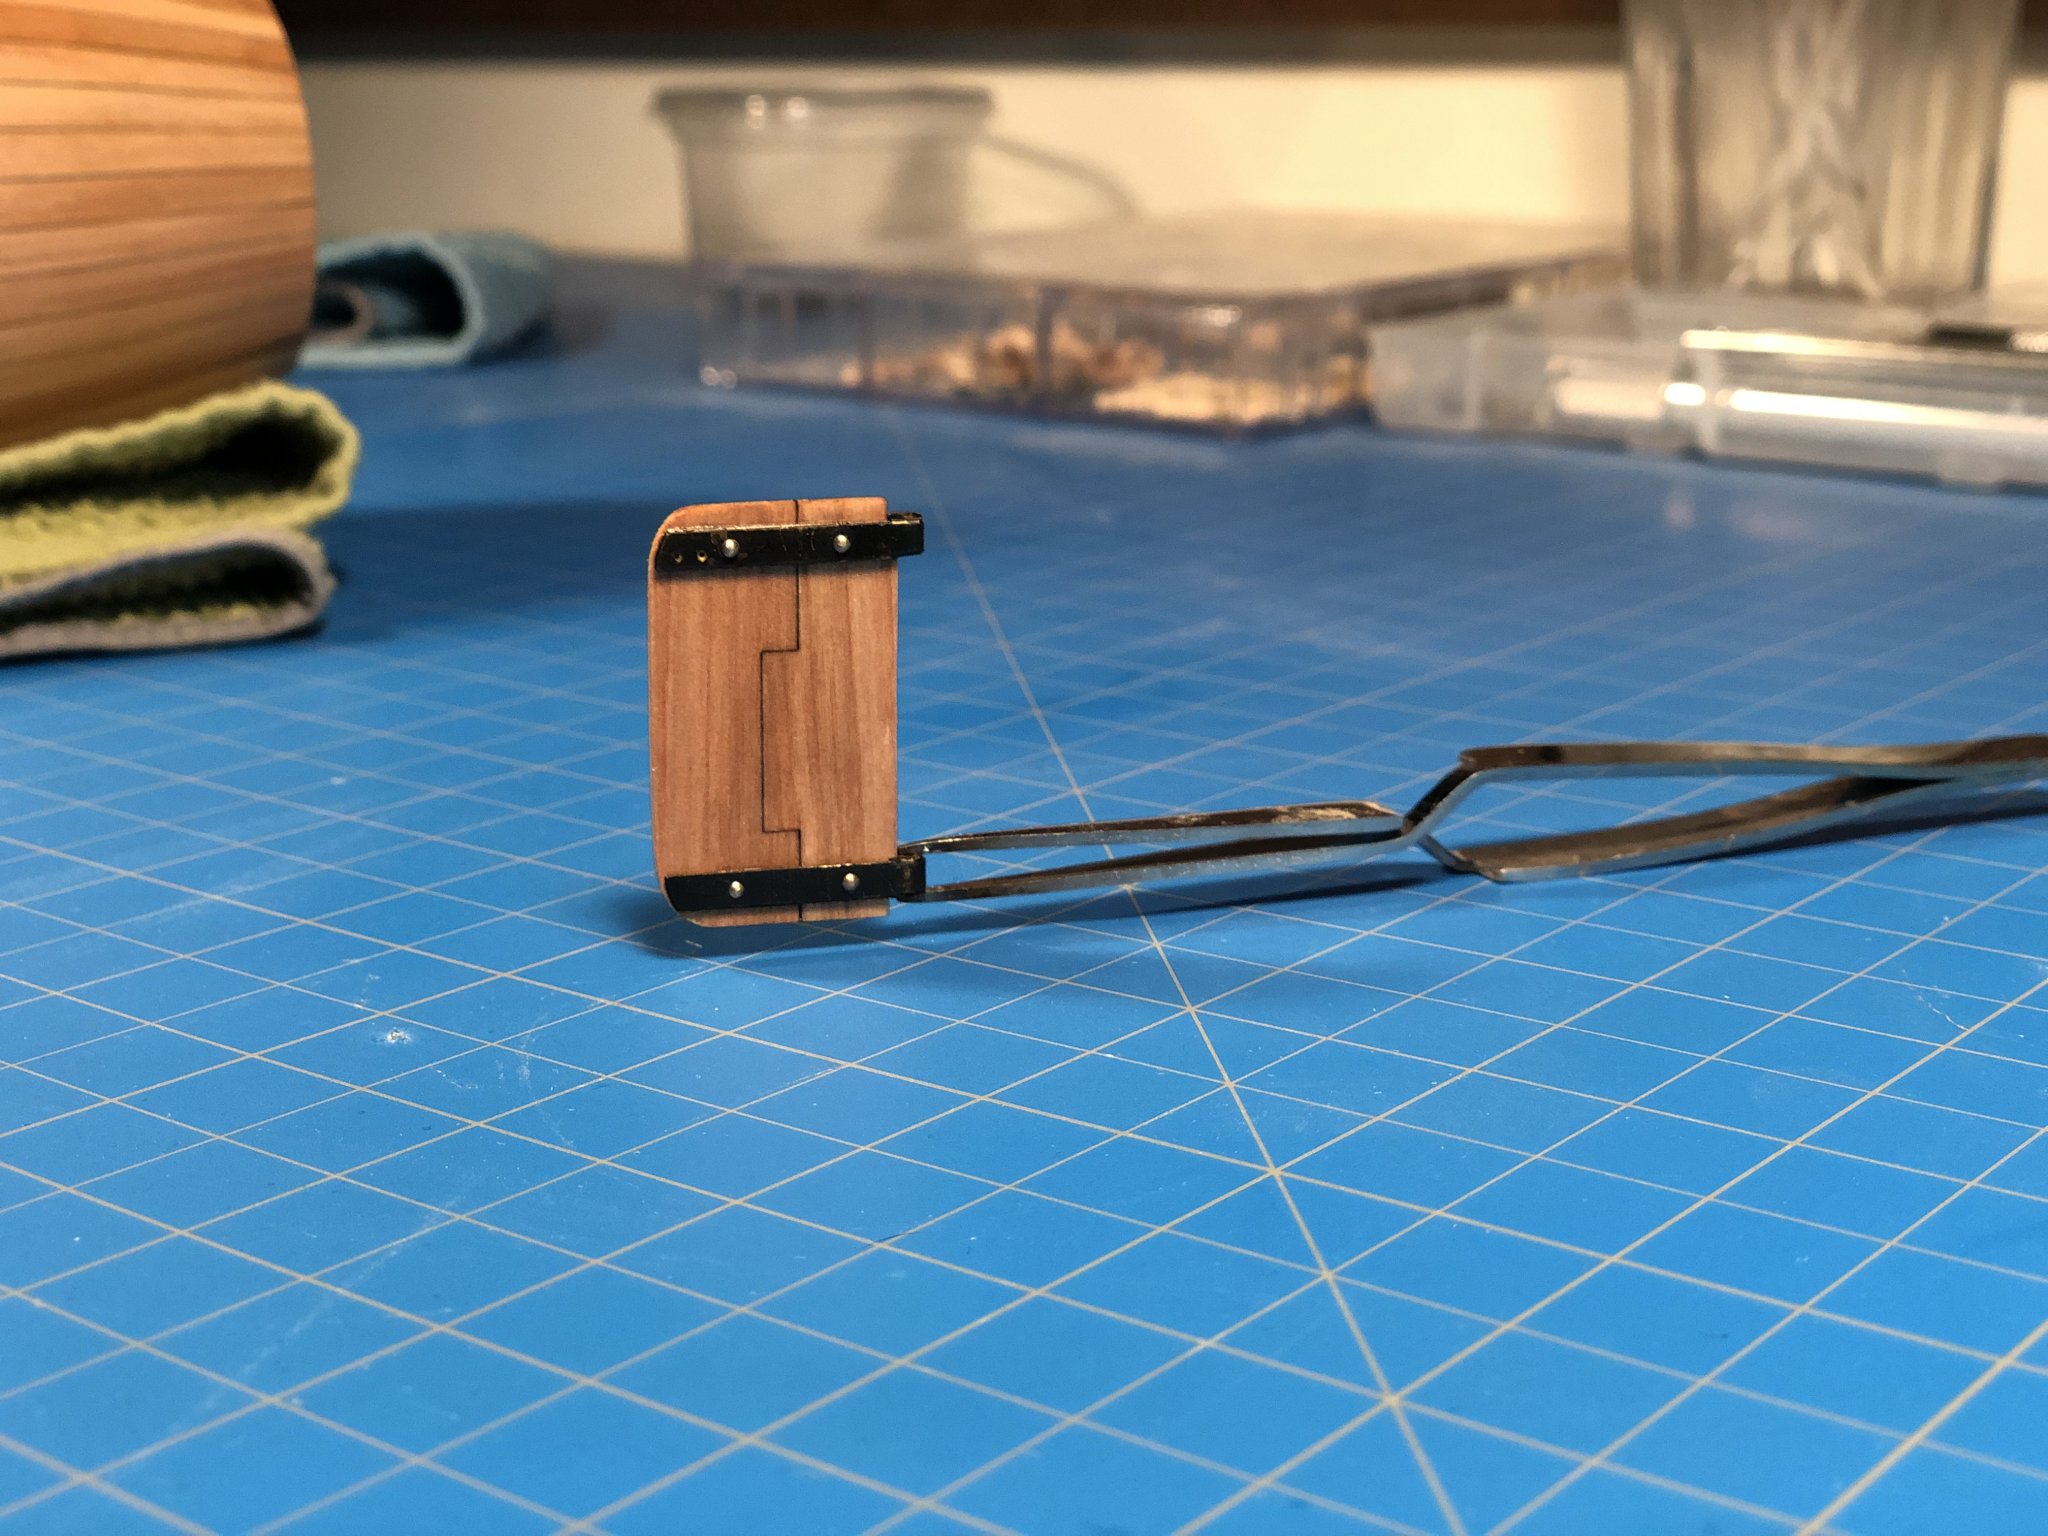
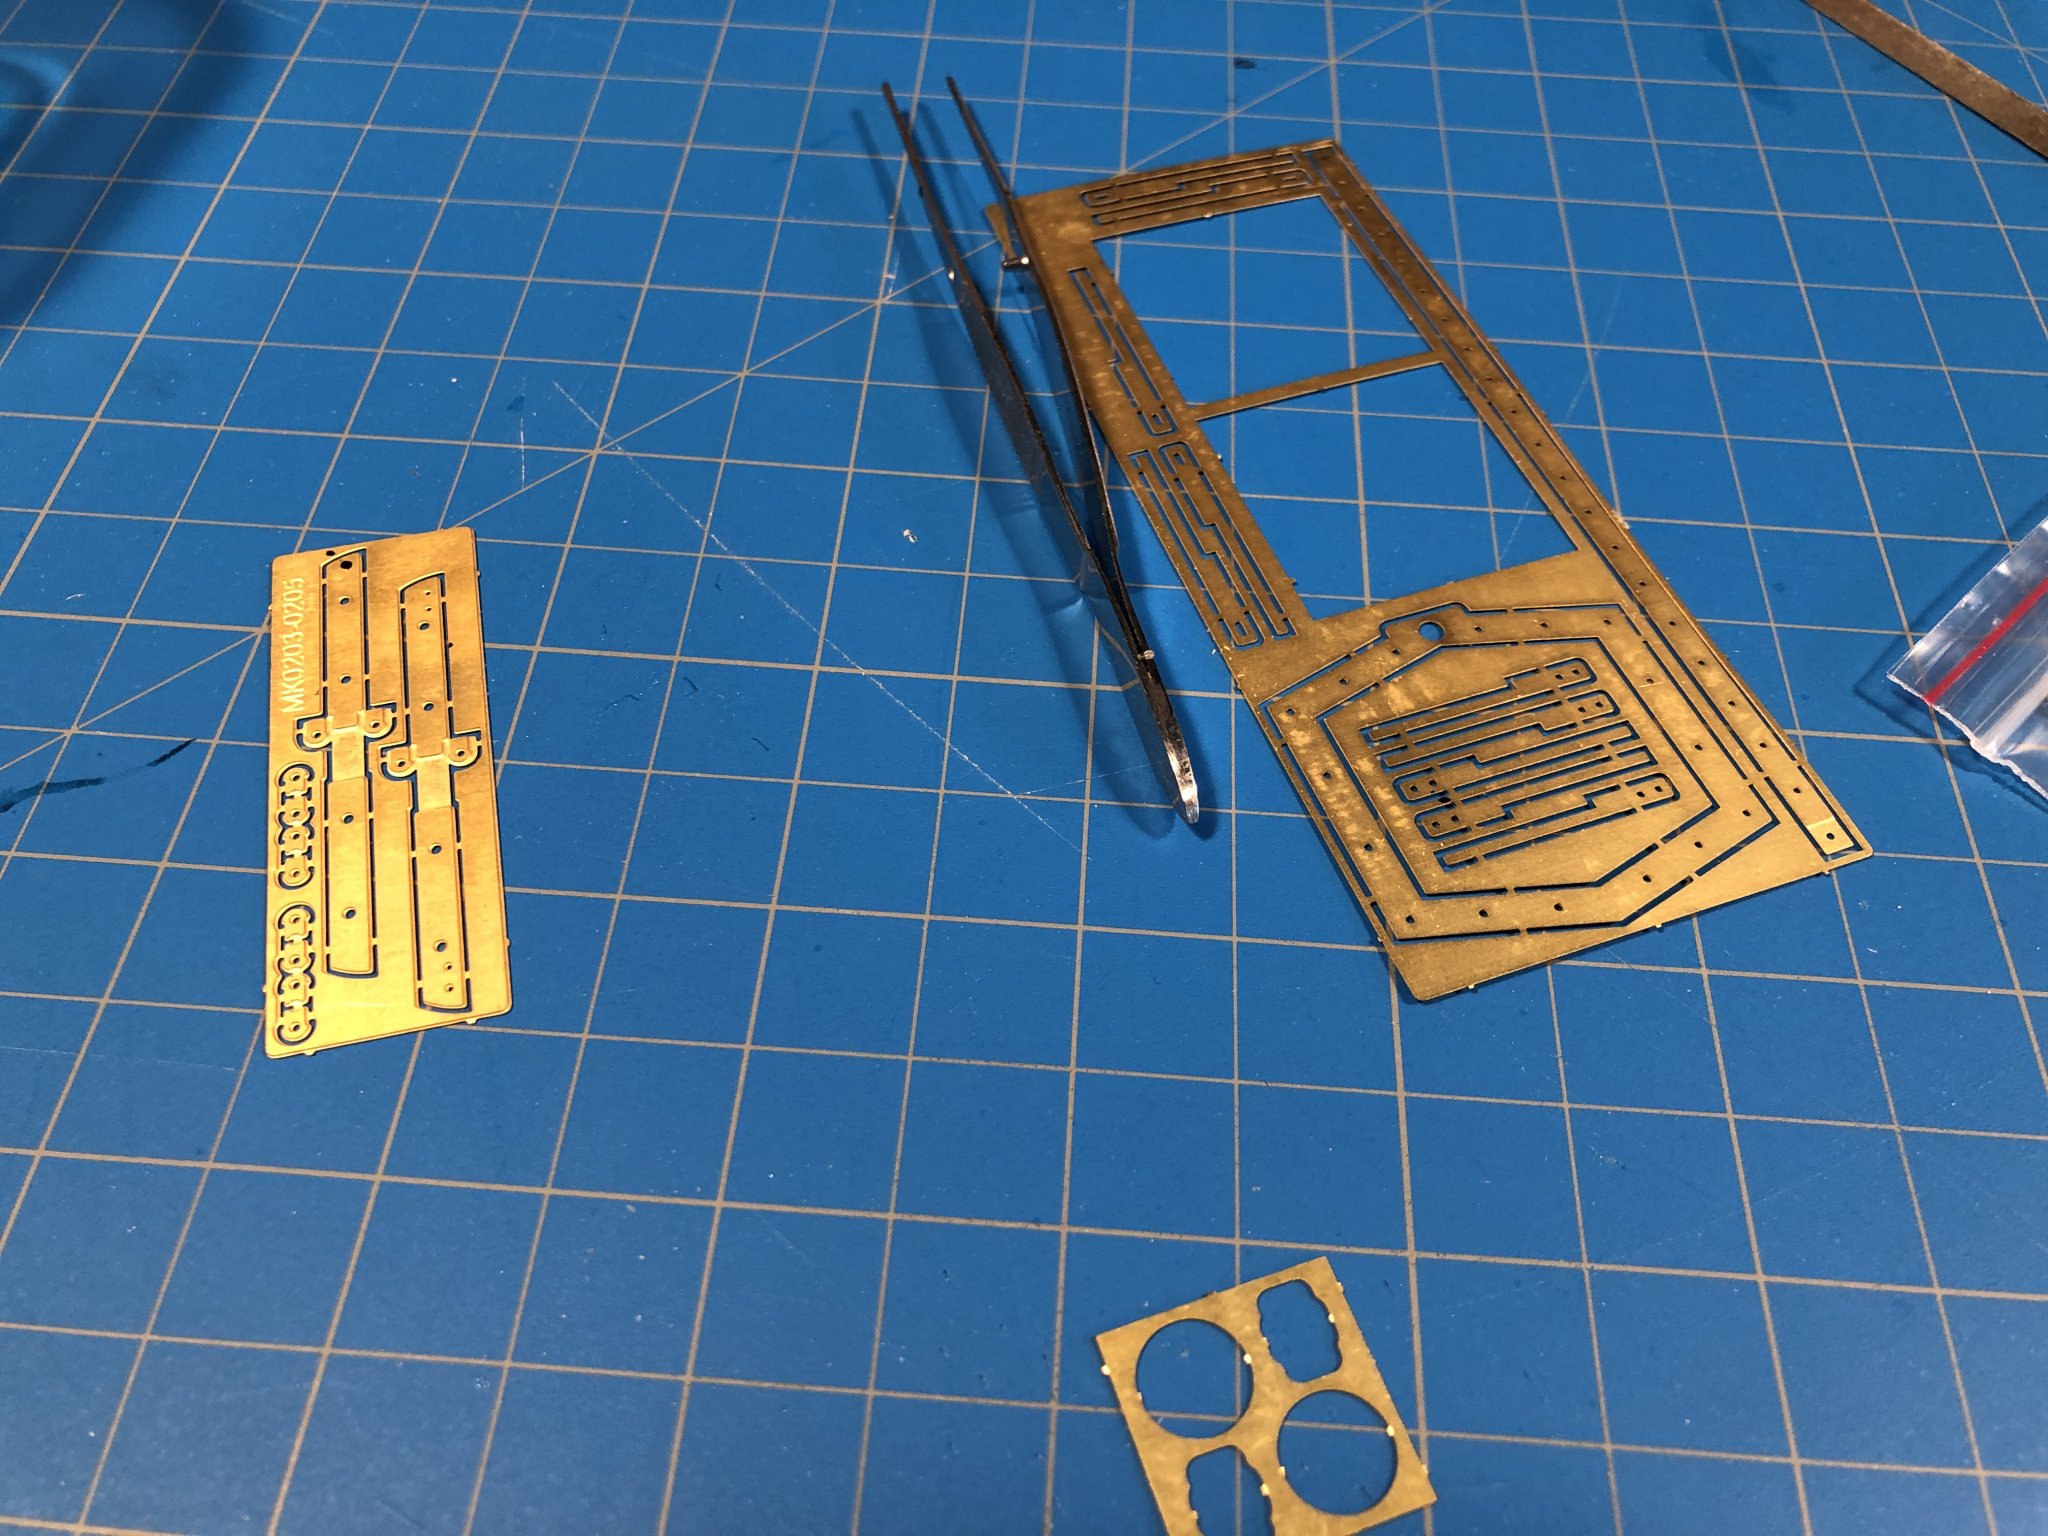
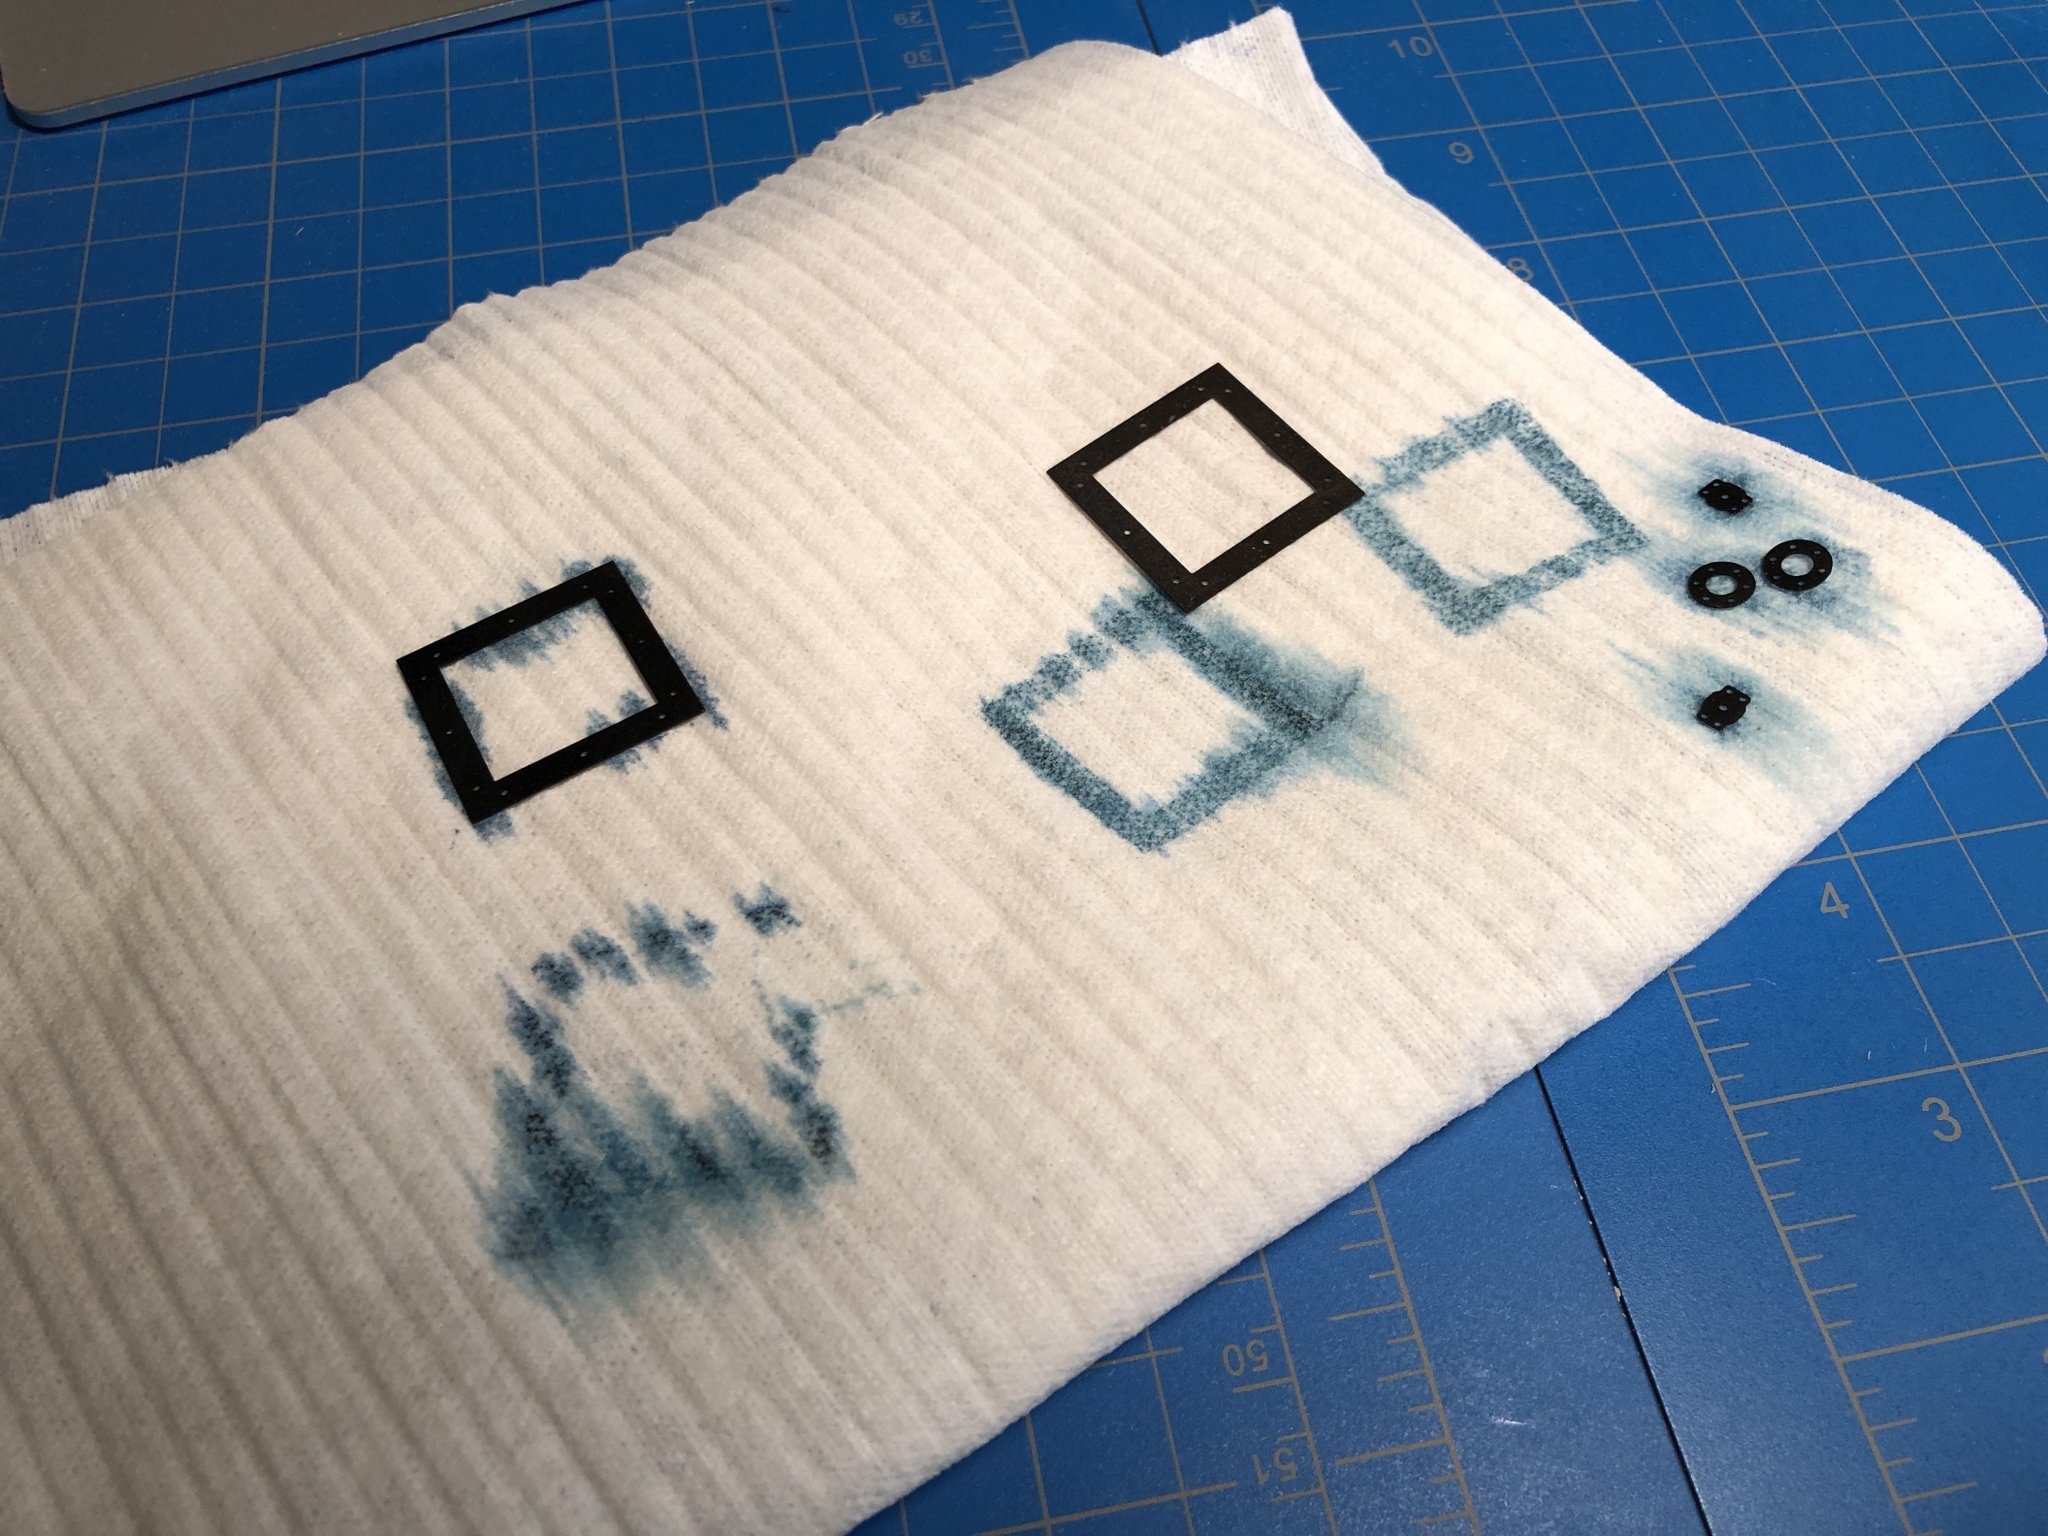
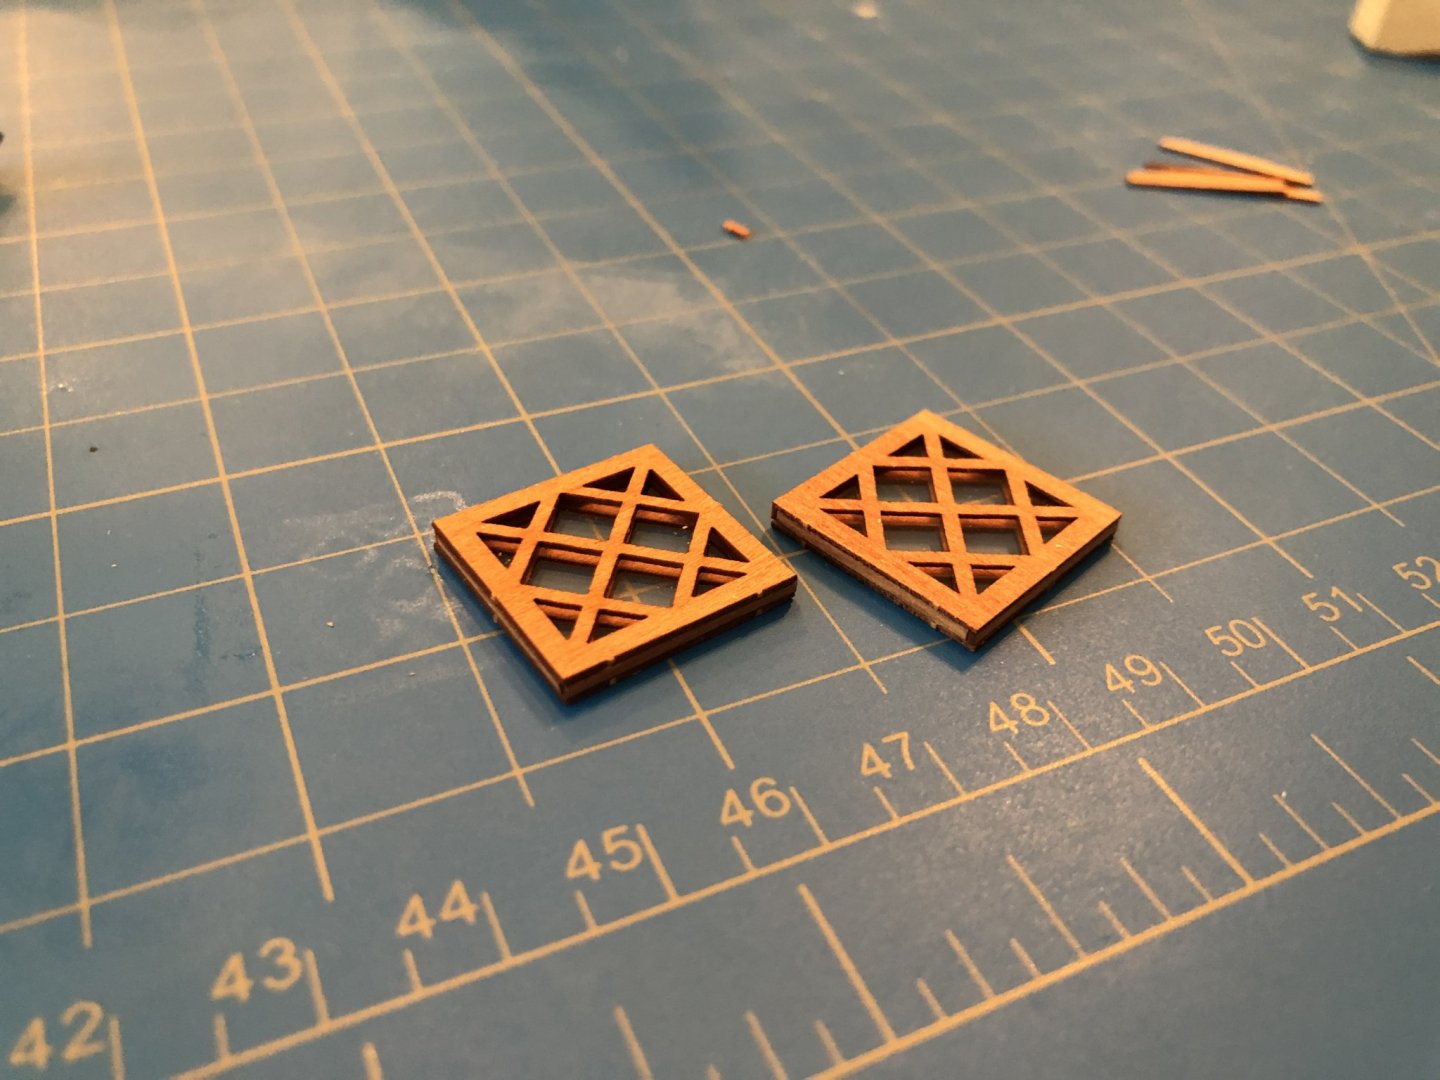
Today I started the detail work. After clipping out the brass bits, filling them down a touch and blackening I started the "riveting" work. I also assembled the hatch door and rudder. Ive skipped a few steps in the instructions as it seemed like it would be a hugely problematic to try and finish this thing with those delicate oars sticking out the sides. I feel similar about the rudder, so Ill likely leave it until the end to attach. I chose to leave the brass nail heads unblackened for no real reason other than that I just liked it better. The contrast is pleasing to me. Similarly, I also chose not to paint the window work black as is shown in the photos. One supremely annoying problem I have though is the fine sawdust accumulation on the glazing of the windows. If I had taken a bit more care I probably could have avoided this problem, of course now its looking pretty impossible to get it totally off the interior of the glazing. I will be creating some kind of armature window wiping thing... ugh. Its fear this is one mishap that will drive me nuts. Its already making me crazy... I find Im incessantly blowing on it, knowing full well the dust is on the inside.


- 77 replies
-
- 15
-
-
- morel
- master korabel
- (and 1 more)
-
Oops. Thanks. Wasn't trying to promote it, just direct some eyes at yet another bizarre depiction of this mystery vessel.
- 77 replies
-
- 3
-
-
- morel
- master korabel
- (and 1 more)
-
Indeed he does say its Pear or Alder. So there you have it. As for the Chinese kit, I mean "curious" as in its interesting to see, not interesting to buy ;). Even if I hadn't already gotten the MK kit, I HATE buying things from overseas on Ebay. In fact, Ebay is one of the lat places on the internet that Ill buy something. It used to be a wonderland, but Ive lost my taste for it ever since it became a low-grade amazon.
- 77 replies
-
- 4
-
-
- morel
- master korabel
- (and 1 more)
-
Right. Thats where the kit I have is from. I mention that in Post #1.
- 77 replies
-
- 3
-
-
- morel
- master korabel
- (and 1 more)
-
Im a bit curious about this other kit I recently found out of China/Hong Kong/Taiwan on Ebay and wonder if it is a pirated version. I only found this today and as I had been pretty aggressively trying to get my hands on the Master Korabel kit in the last few months am surprised I haven't come across it yet. Its design has many additional details, but as this vessel is relatively light on primary sources I wonder where they came up with their vision for it. **Link removed by moderator**
- 77 replies
-
- 2
-
-
- morel
- master korabel
- (and 1 more)
-
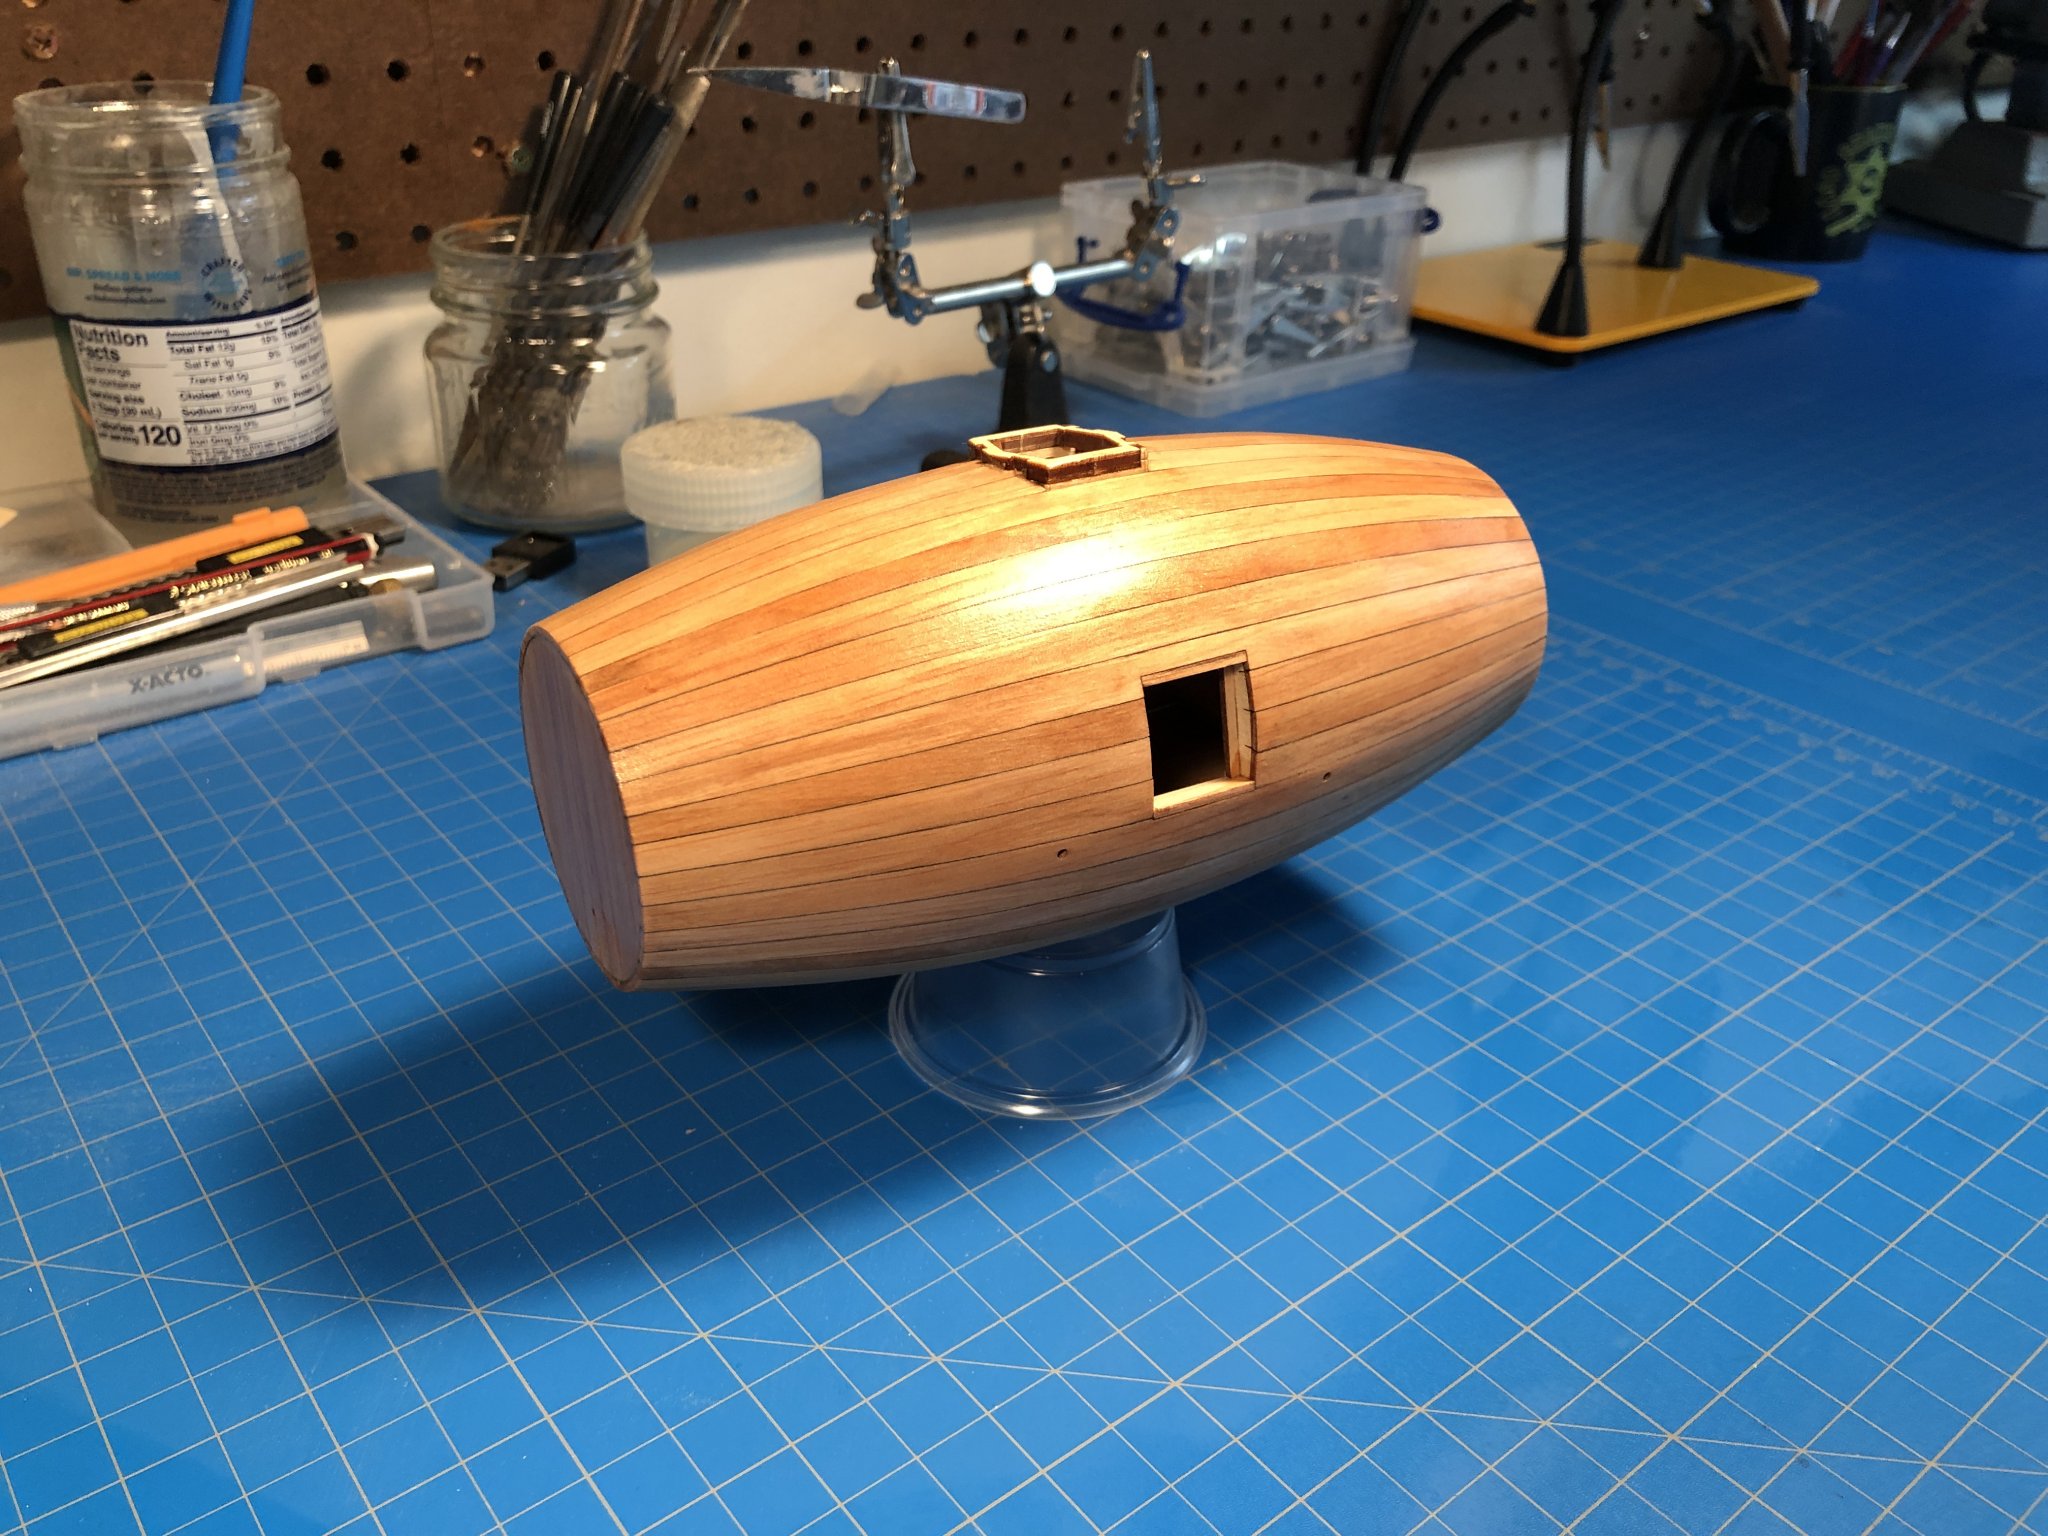
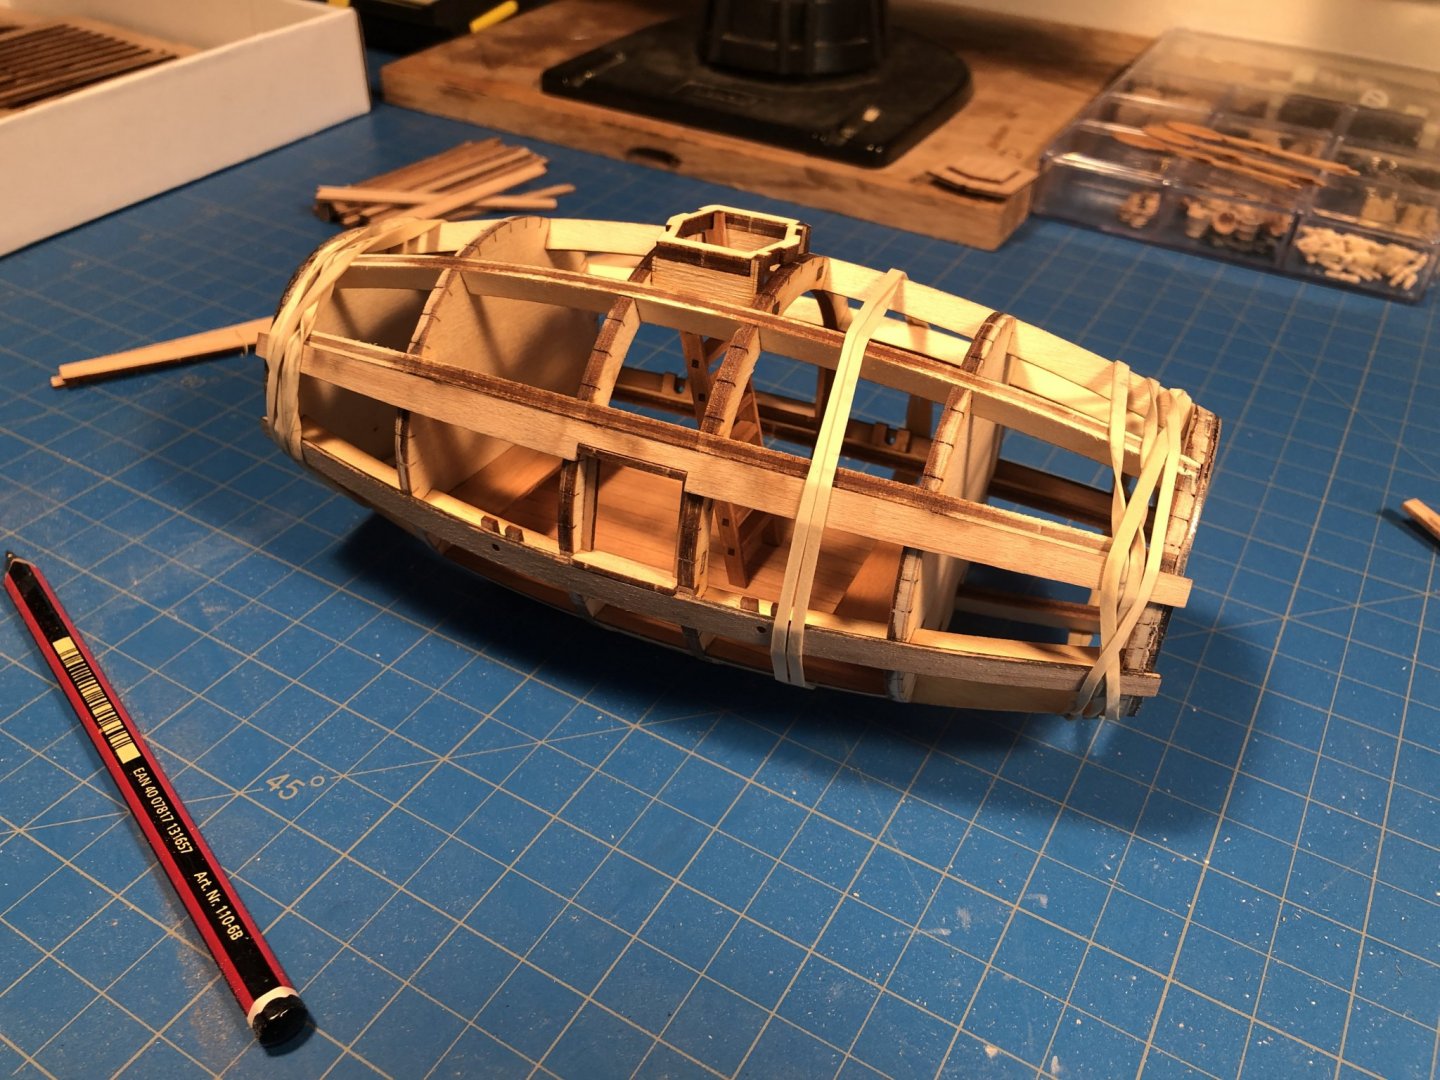
Thanks all for the kind words... I've been pleased with how its turning out thus far too. Today I was able to get the top hatch framed in and more or less finished. All the while participating in quarantine conference calls at the dinner table with my audio mostly on mute :). This section was much more finicky than the rest of the steps combined and at first I wasn't sure it was going to work out. It requires many bevels, with compound curves all needing to come together with nice seems around an unusual hexagonal shape. I basically mucked this up pretty good by over sanding. But after just sitting with it awhile, I decided to commit and deal with the gaps the usual way - filler. Overall it turned out much better than I was expecting. In the above photos the unfinished top hatch sits waiting for recovery inspiration to strike, as well as the little window assemblies that we equally finicky. Made up of 7 pieces of veneer thin material and acrylic glazing they were a challenge to work out. Once the glue dried however, they sanded up nicely and fit perfectly. The frames are finished with an exterior layer of the same material. I then finished up the top hatch assembly with some sanding and a coat of wipe-on poly. It actually looks far better than I had anticipated so Im glad to see how the filler really can help recover some otherwise tragic situations. Sawdust and Elmers is the best recipe. I completed all this over the course of a day, with probably a good 4 hours of work. This evening I began blackening the brass components which Ill be working with tomorrow.


- 77 replies
-
- 10
-
-
- morel
- master korabel
- (and 1 more)
-
I wish I knew. Im not good with my wood identification beyond the obvious species and Ive not been able to find the info in my kit. They are described either as wood, plywood or veneer. My guess is Cherry based on a little round-about googling, but I can't say for sure. If I had to make a second guess it might be Pear?
- 77 replies
-
- 4
-
-
- morel
- master korabel
- (and 1 more)
-
Man, great work. You and Duanelaker are really making me want to take another crack at this wonderful little kit!
-
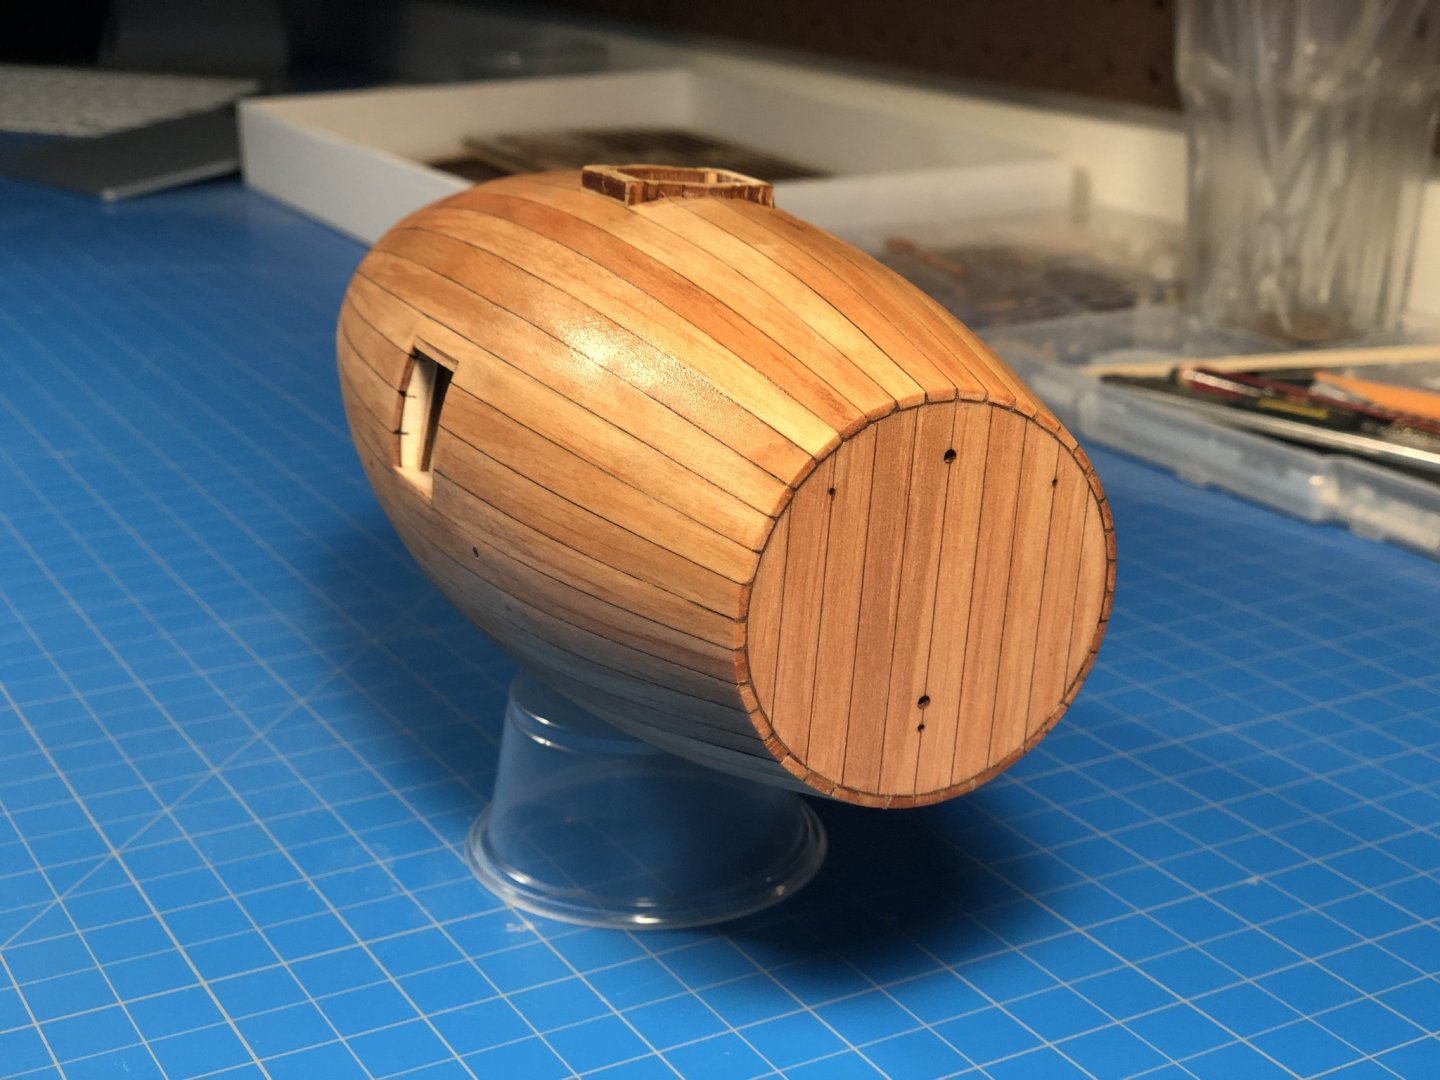
Planking is complete. Probably the one the most pleasurable experiences Ive had planking, of course there was not much one could screw up with this. No complicated curves or spiling. Beveling was required and after I gave it a go on a couple planks with a file and sanding stick, I gave that up completely and just used a small luthiers plane (or thumb plane). Here is the shot of the final plank going in: After a solid hour of sanding, checking, sanding some more and then sanding a whole lot more it got nice and smooth. Unfortunately the gaps became much more pronounced. So I swept up all the new dust I created, whipped up a nice paste with some Elmers glue (my favorite for this task), and used a small putty knife to fill. That was another hour of fill and wipe, fill and wipe. Let dry, fill and wipe some more. All in all, it turned out pretty well Im happy with the result. As always, Im tempted to give it another go and build this kit again sometime just to see if I can do better, but Ill finish it before I go there. A quick layer of wipe-on poly just to reward myself and below is the semi-complete product. I think I may take a day away from it, and come back with fresh eyes to see if it needs any more sanding/filling before moving on. For what's it worth, the total planking period probably has about 8+ hours time into it.

- 77 replies
-
- 19
-
-
- morel
- master korabel
- (and 1 more)
-
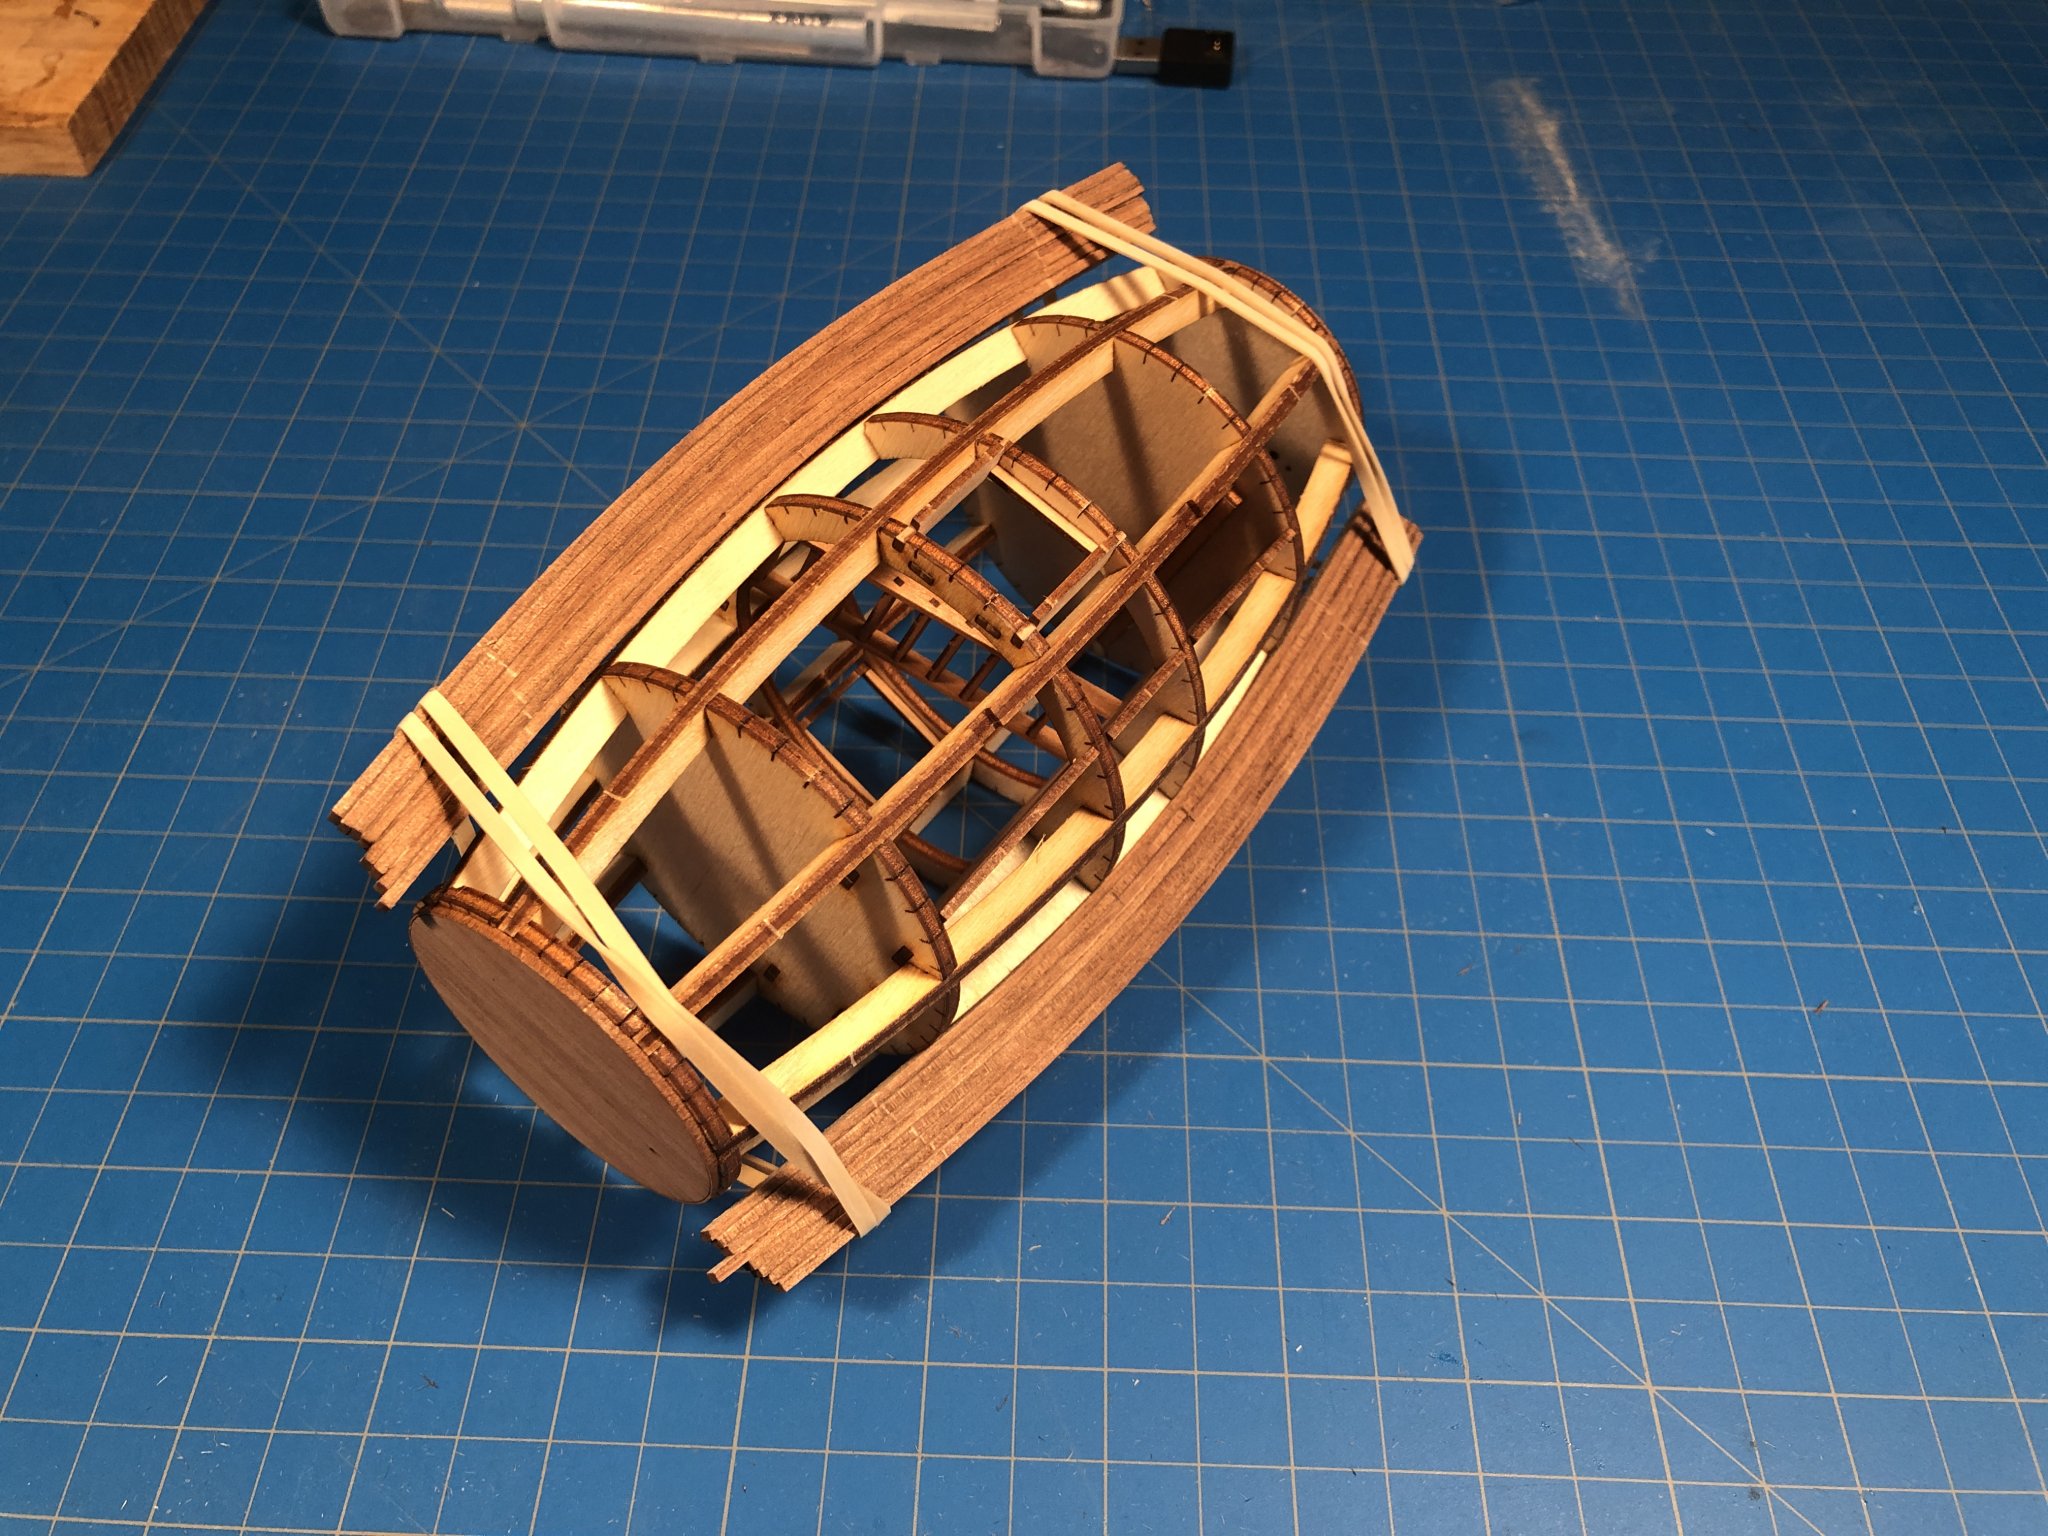
Today I set to work on a few of the details. Throughout the day I continued to soak and bend planks, which I stored as can be seen in the photo to preserve the bend while working with the others. The plank former has surprisingly lasted through multiple sessions, though does need to be babied a bit to keep from wearing out. Careful is the word here. I never did bother opening the last slot in the former as I just didn't feel it necessary in the end. Preparing and setting planks takes enough time that Im not in any desperate hurry to get many ready at a time. And any time I rush, I always fail, break or screw something up. During drying sessions, I turned my attention to fairing the hull and building out the oars and interior oarlocks. The oars were a bit of a pain, but I can't say Im a huge fan of lots of detail work on tiny things anyway. I might have have appreciated attaching laser cut flat pieces to dowels, as opposed to flat pieces to larger, thicker flat pieces and then spending an hour sanding it round without breaking the damn thing! All in all though, I think they turned out well. There are some final details to add later, but glad to have the bulk of this work done. Fairing went really smoothly and took almost no time owing to the excellent design and fit of the pieces. It basically only needed a bit of work at the bow and stern and a little around the portholes and hatchway. I then began adding a few planks in the prescribed sequence. Having pre-bent them, this is also going quite well. Time will tell how well they begin to fit together. The instructions only detail minor beveling of the plank edges, and do not mention any blackening (caulking) to the plank edges. I added it in the customary fashion, however, with a soft pencil. I just can't imagine the vessel wouldn't have been caulked in some fashion. Today cost me about 4 hours time, the bulk of which was spent on oars. Im sure there is a faster way, but I don't know what it is. Files, chisels, sandpaper and elbow grease is how I know how to do it without something going sideways.


- 77 replies
-
- 13
-
-
- morel
- master korabel
- (and 1 more)
-
I agree. Such a clever thing if your dealing with simple curves like this. Perhaps not so easy to design if you're planning for complex hull shapes and curves.
- 77 replies
-
- 4
-
-
- morel
- master korabel
- (and 1 more)
-
Making Rope Coils with a Jig by Peta_V
Justin P. replied to ccoyle's topic in Masting, rigging and sails
This is a great little diagram. I assume you are fixing the actual rigging to the belay pin area in some other way. Ive seen some folks simply tie it down with an overhand knot and hit it with a dab of CA, then hang the coil over that. I wonder if in some form, that this is basically what everyone does? Or if some nut out there is actually belaying and coiling the same line that runs into their rigging! An admirable thing to do for sure.