
HOLIDAY DONATION DRIVE - SUPPORT MSW - DO YOUR PART TO KEEP THIS GREAT FORUM GOING! (Only 27 donations so far out of 49,000 members - C'mon guys!)
×


Justin P.
-
Posts
1,008 -
Joined
Content Type
Profiles
Forums
Gallery
Events
Everything posted by Justin P.
-
I would recommend anyone who is concerned get in the practice of monitoring the temp and RH of their cases. A tiny obscure one can be found at https://www.universityproducts.com/mini-digital-humidity-and-temperature-meter.html Maintaining somewhere between 50-55% RH and 70F would be a good target.
-
Ill just add one more thought about the use of Shellac. I would tend to want to reserve Shellac for the wood finishes and rely on something else for the rigging. The wholesale "spraying" of a completed model with a single concentration of Shellac just trips an alarm for me. Shellac is not a barrier, and really is more a finish then a protectant. IN fact its tendency to wick moisture (a main catalyst in acid degradation) is greater then that of wood itself. Similarly, best practice would be to tailor the finish/protectant to the materials. As a complex structure of mixed materials, I would probably take a different course of action. That said, I am in no way saying that the practice as described above is wrong, just that my training gives me anxiety when I think about it. This is where the advice and training of a real artifact/ship model conservator is more appropriate.
-
The needles I use will do what you describe and are the same width from one end to the other, and that width is very, very small. This is the needle I found one day wandering around behind my wife in a Jo-Ann Fabric store: https://www.joann.com/beading-needle/7701063.html?utm_source=google&utm_medium=cpc&source=TIS-S&WT.srch=1&gclid=CjwKCAiA44LzBRB-EiwA-jJipJJFZG4jigSkz3qbSi2nywOavKfnG1xPpQmfVxXf8UcECm1lLQ0skBoCnnkQAvD_BwE They are very thin, and are more like two extremely thin wires soldered at each end. They are flexible, so you pull the two apart, slip in your thread and it pinches down and holds it. They work wonderfully, and Ive only needed the one size for all applications. To look at them, you would think it is a single piece of wire with no eye. As for the Klucel-G, yes it is a solution. So 2% would be 2 grams of powder to 100ml of Ethanol, etc.
-
I don't think we need to return to hide glue. PVA for use in model construction is fine in most cases. I was referring to it within the context of its use consolidating rigging, or when folks take a diluted concentration of PVA and coat entire lengths of their rigging to "strengthen" or provide a "protective" layer. In the short term is does both of these things, it is the long term where there is concern. In terms of what conservators use for ship modeling applications, it wouldn't be for me to say. My specialty is with books and paper, and as such much of my expertise does overlap with only elements of ship modeling practice (i.e rigging, sails), basically elements that are derived from cellulosic materials (cotton, linen). Object conservator, wooden artifact conservators and even furniture restorers would have more applicable knowledge when considering the wood aspect of the ship model. There are a couple boniifed ship model conservators in the forum who might weigh in.
-
I think for the purposes of feeding rigging through tiny holes, nothing beats a good large eye needle. I found these amazing beading needles that are unlike any I've ever seen before. More like elongated hoops made from very fine wire. At first glance, they appear to have no hole at all but with closer inspection they are actually one giant hole collapsed onto themselves with a point at each end. Extremely versatile, and useful with the smallest of diameter holes. For consolidation of lines, truthfully nothing beats wax. As a conservator, we take surface coatings and consolidating materials quite seriously. PVA in whatever dilution would and is absolutely avoided in every occasion. Accelerated aging tests have proven that it will become intolerably acidic over time and almost always discolors. For the purposes of coating lines (consolidating) where wax is otherwise difficult to pull off or is unseemly I have been experimenting with a 2-5% solution of Hydroxypropyl Cellulose in Ethanol. This material is sold under the name "Klucel-G," and is pretty widely used in cultural heritage conservation for similar purposes to that in ship model construction. Most cellulose derivatives will provide similar characteristics to PVA without the shine or the aging problems, and when mixed in a solvent-base form will dry rapidly without a tacky feel. EDITED: I wanted to add too that CA glue would be at the very bottom of the list (actually not even on the list at all), particularly when used as an adhesive for organic cellulosic materials like cotton, wood, linen etc. Its use in ship modeling (though highly convenient in the short term) is not the greatest choice for the longevity of your models. For some interesting reading, check out this Wiki on adhesives. This list comprises most if not all adhesives used on objects/artifacts derived from cellulosic materials (paper/wood). Ship models are very similar in make when considering sails and rigging.
-
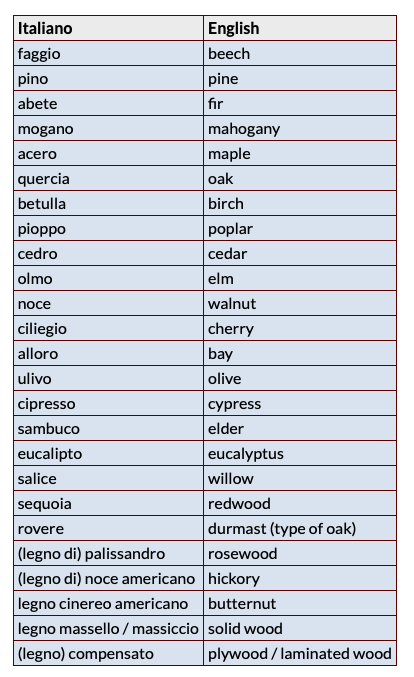
You could try to type in some of suspect Italian phrases into google translate. Here are a few:
-
The splicing technique described by EdT is also commonly used in bookbinding and tapestry. A very clever adoption, so funny that this is something I probably do 15-20 times a week and never once thought of its application in ship modeling.
-
 Inspiring. Thanks for sharing this project with us. Congrats.
- 452 replies
-
- 3
-

-
- cheerful
- Syren Ship Model Company
- (and 1 more)
-
Nice work, looking forward to watching along. I love the mysterious and notorious vessels of the Franklin Expedition.
-
This is extremely good advice. One of the most common scams has to do with PayPal and the Gift transaction. In order to protect yourself completely (in the eyes of PayPal) you must send and require a signature for delivery AND pay the fee.
-
Yes, the site says back order. Call them. They wrote me yesterday saying they had more in stock that literally arrived yesterday.
-
Mine has been on backorder from Hobbyworld USA for my upcoming Syren build, and last week was told it would only be a week or so before they received their new shipment from Poland and mine would be sent out. Perhaps look to them? They have been responsive and seem on top of it. http://www.hobbyworld-usa.com/Store/index.php UPDATE: As of today they have these in stock.
-
Ill weigh-in as someone who uses airbrush techniques in my work all the time. During a recent studio renovation we had our university Environmental Health and Safety come do a instrument based analysis of our use of hobby-grade airbrush using solvent based, water based and lacquer based materials. We DO NOT use a spray booth. Our EH&S people found that the level of airborne particulates and fume exposure were below the minimum threshold to require any more PPE (personal protective equipment) than Goggles and an N-95 rated respirator (with a good seal; i.e no beard). This was important as anything more than that would have required a higher degree of PPE and thus medical clearance to wear. To be clear they tested us during a typical use scenario of up to 30 minutes of continual spraying in a confined space (approximately 14 x 20' room) using hobby-grade equipment. Most of the advice here meets the recommendation that you have good airflow (at least a fan) and lung protection (essential). The spray both really only protects your working areas from over-spray. For you bearded guys... the straight forward opinion we received was that your beard basically ruins the effectiveness of the N-95 mask, and you should consider something more substantial.
-
Looking great. I’m enjoying this build, makes me want to pull my documents out from when I built it and give it a go as a small scratch build.
- 114 replies
-
- 1
-
-
- small
- Peterboro Canoe
- (and 2 more)
-
I’ve never used Syren billets or sheets, but generally use the Byrnes thickness sander as a step prior to ripping sheets on my Byrnes saw, not after. Based on Syrens own description of their products, I assume they will come ready to rip without needing an additional thinning unless you need a specific dimension not offered.
-
Rare complete ship's curves set on eBay
Justin P. replied to Bob Cleek's topic in Modeling tools and Workshop Equipment
Are they made of crystal? -
Great Job so far. Now the fun begins, as you can go in any direction. There a lot of traditional design elements to play with on these Peterboroughs. Wefalck, The museum may have been there but maybe not in its new building. It was a really fantastic museum though, highly recommend.
- 114 replies
-
- 2
-
-
- small
- Peterboro Canoe
- (and 2 more)
-
Using a server with dead eyes, standing rigging
Justin P. replied to achuck49's topic in Masting, rigging and sails
Great explanation here, thank you (many years later). If this were done inappropriately would one observe twisting in the alignment of both deadeyes? I’m trying to isolate the cause of twisting in my own current shrouds, it seems I may have a few details out of sync. -
Ive found that with some sanding, and then some wipe-on poly the effect of the "stain" is reduced quite a bit.
-
The Castaway: The extraordinary survival story of Narcisse Pelletier by Robert Macklin Hatchet Australia, 336 Pages Review: For anyone looking to take a break from the monotony of field manuals and reference materials, this lovely story traces the life and experiences of a truly extraordinary young man during the late 1850's, who through the rather normal circumstances of life at sea, becomes stranded on the Australian coast. I don't want to share too many details of the story, other than to say that it is an extremely well written and an engaging story. Its not particularly long, so a great weekender. There are two stories being told, one of Narcisse and the other of the Aboriginal experience as British colonists move ever slowly across the island continent. The culture clash and abhorrent treatment of the Aboriginal people is a stark contrast to the treatment and care that Narcisse receives as an adoptive member of the Night Island People. The story overall is light on sailing, exploring or other details of life at sea but is heavy on the mindset and realities of the young sailor and vastness of the world at that time. I highly recommend this book.


-
- 2
-
-
Just stunning. Another one of those "God I hope to get there one day..." builds. Really, really nice.
-
I consume them between audiobooks. My work, long commute and hobbys all allow plenty of listening time. I’m not sure how I’d pass a day otherwise.
-
Another I came across after it was originally shared by someone on a Facebook group for wood ship models. This is a great episode of Preble Hall, and this episode is entirely on Model Ships. https://www.usna.edu/Museum/PrebleHall/index.php#panel6. Episode 13. Also, a bit more on the volunteers who work in the Ship Model Shop... I suspect some members of MSW might be working there. https://allhands.navy.mil/Stories/Display-Story/Article/1839521/ships-built-to-scale
