Justin P.
-
Posts
1,008 -
Joined
Content Type
Profiles
Forums
Gallery
Events
Everything posted by Justin P.
-

Straightening aftermarket rigging line
Justin P. replied to DonInAZ's topic in Masting, rigging and sails
You can still get linen thread.... https://www.colophonbookarts.com/binding -
Oh dear! Yes, those frames are delicate, but thankfully, easily mended! I actually didn't fair this one too much, partly for this reason but also it just really didn't seem necessary.
-
Wiser words are rarely spoken.
-
A lot of great tweaks on this build. I also note you had the foresight to build in the interior details on the lower deck as you go. I'll never understand why the AL instructions for this kit have you install details later. It makes it sooo much harder!
-
Gun ports
Justin P. replied to Sheerline's topic in Building, Framing, Planking and plating a ships hull and deck
It was not as obvious to me, but still is good advice for the next build. At the very least Ive found it a very helpful approach after going through the process of cutting holes in a planked hull. -
The worst too is that by the time you finish one, you likely bought three others to make deciding even harder!
- 114 replies
-
- 3
-

-
- small
- Peterboro Canoe
- (and 2 more)
-
Model Expo has a tempting sale like every week. They got me too with their 40 year anniversary sale.
- 114 replies
-
- 2
-
-
- small
- Peterboro Canoe
- (and 2 more)
-
Gun ports
Justin P. replied to Sheerline's topic in Building, Framing, Planking and plating a ships hull and deck
This may be a more technically difficult approach for a newbie, but I’ve found it easier to add scratch built gun port framing according to where they should be, and then plank around that. Otherwise it gets finicky to drill/file and cutout holes in a nicely planked hull. -
Straightening aftermarket rigging line
Justin P. replied to DonInAZ's topic in Masting, rigging and sails
Yes that's correct, I think Im getting my cyano-acrylate and my poly-vinyl acetates mixed up -
2nd on the Titebond, do not use CA. I love this kit, it was one of my firsts. I recommend also making a visit up to the Canadian Canoe Museum sometime, its not far from you (5 - 6 hrs drive). Great place, and they stock all the great canoe kits in their gift shop. Also check out https://www.amazon.com/Peterborough-canoes-Canoe-Company/dp/096982422X You can make some great water-slip decals to add a bit of realism too. There are a couple really easy mods you can implement later in the build that would really make it shine.
- 114 replies
-
- 1
-
-
- small
- Peterboro Canoe
- (and 2 more)
-
Straightening aftermarket rigging line
Justin P. replied to DonInAZ's topic in Masting, rigging and sails
Bookbinders glue is a poly-vinyl acrylate, so not much different than wood glue. Wood glue and/or PVA is will be your most inert adhesive over the long-term. There are other more stable adhesives out there that we rare book conservators use as alternatives to PVA for longevity, but those are impractical for use in ship-modeling. -
Workshop Essentials - Favorite Features
Justin P. replied to Justin P.'s topic in Modeling tools and Workshop Equipment
Indeed! I use a stool actually, and it should fit nicely under the bench when not in use. While seated, yes it might get tight, but one of the reasons I use a stool is that it is easily moved here and there to get out of the way. -
Workshop Essentials - Favorite Features
Justin P. replied to Justin P.'s topic in Modeling tools and Workshop Equipment
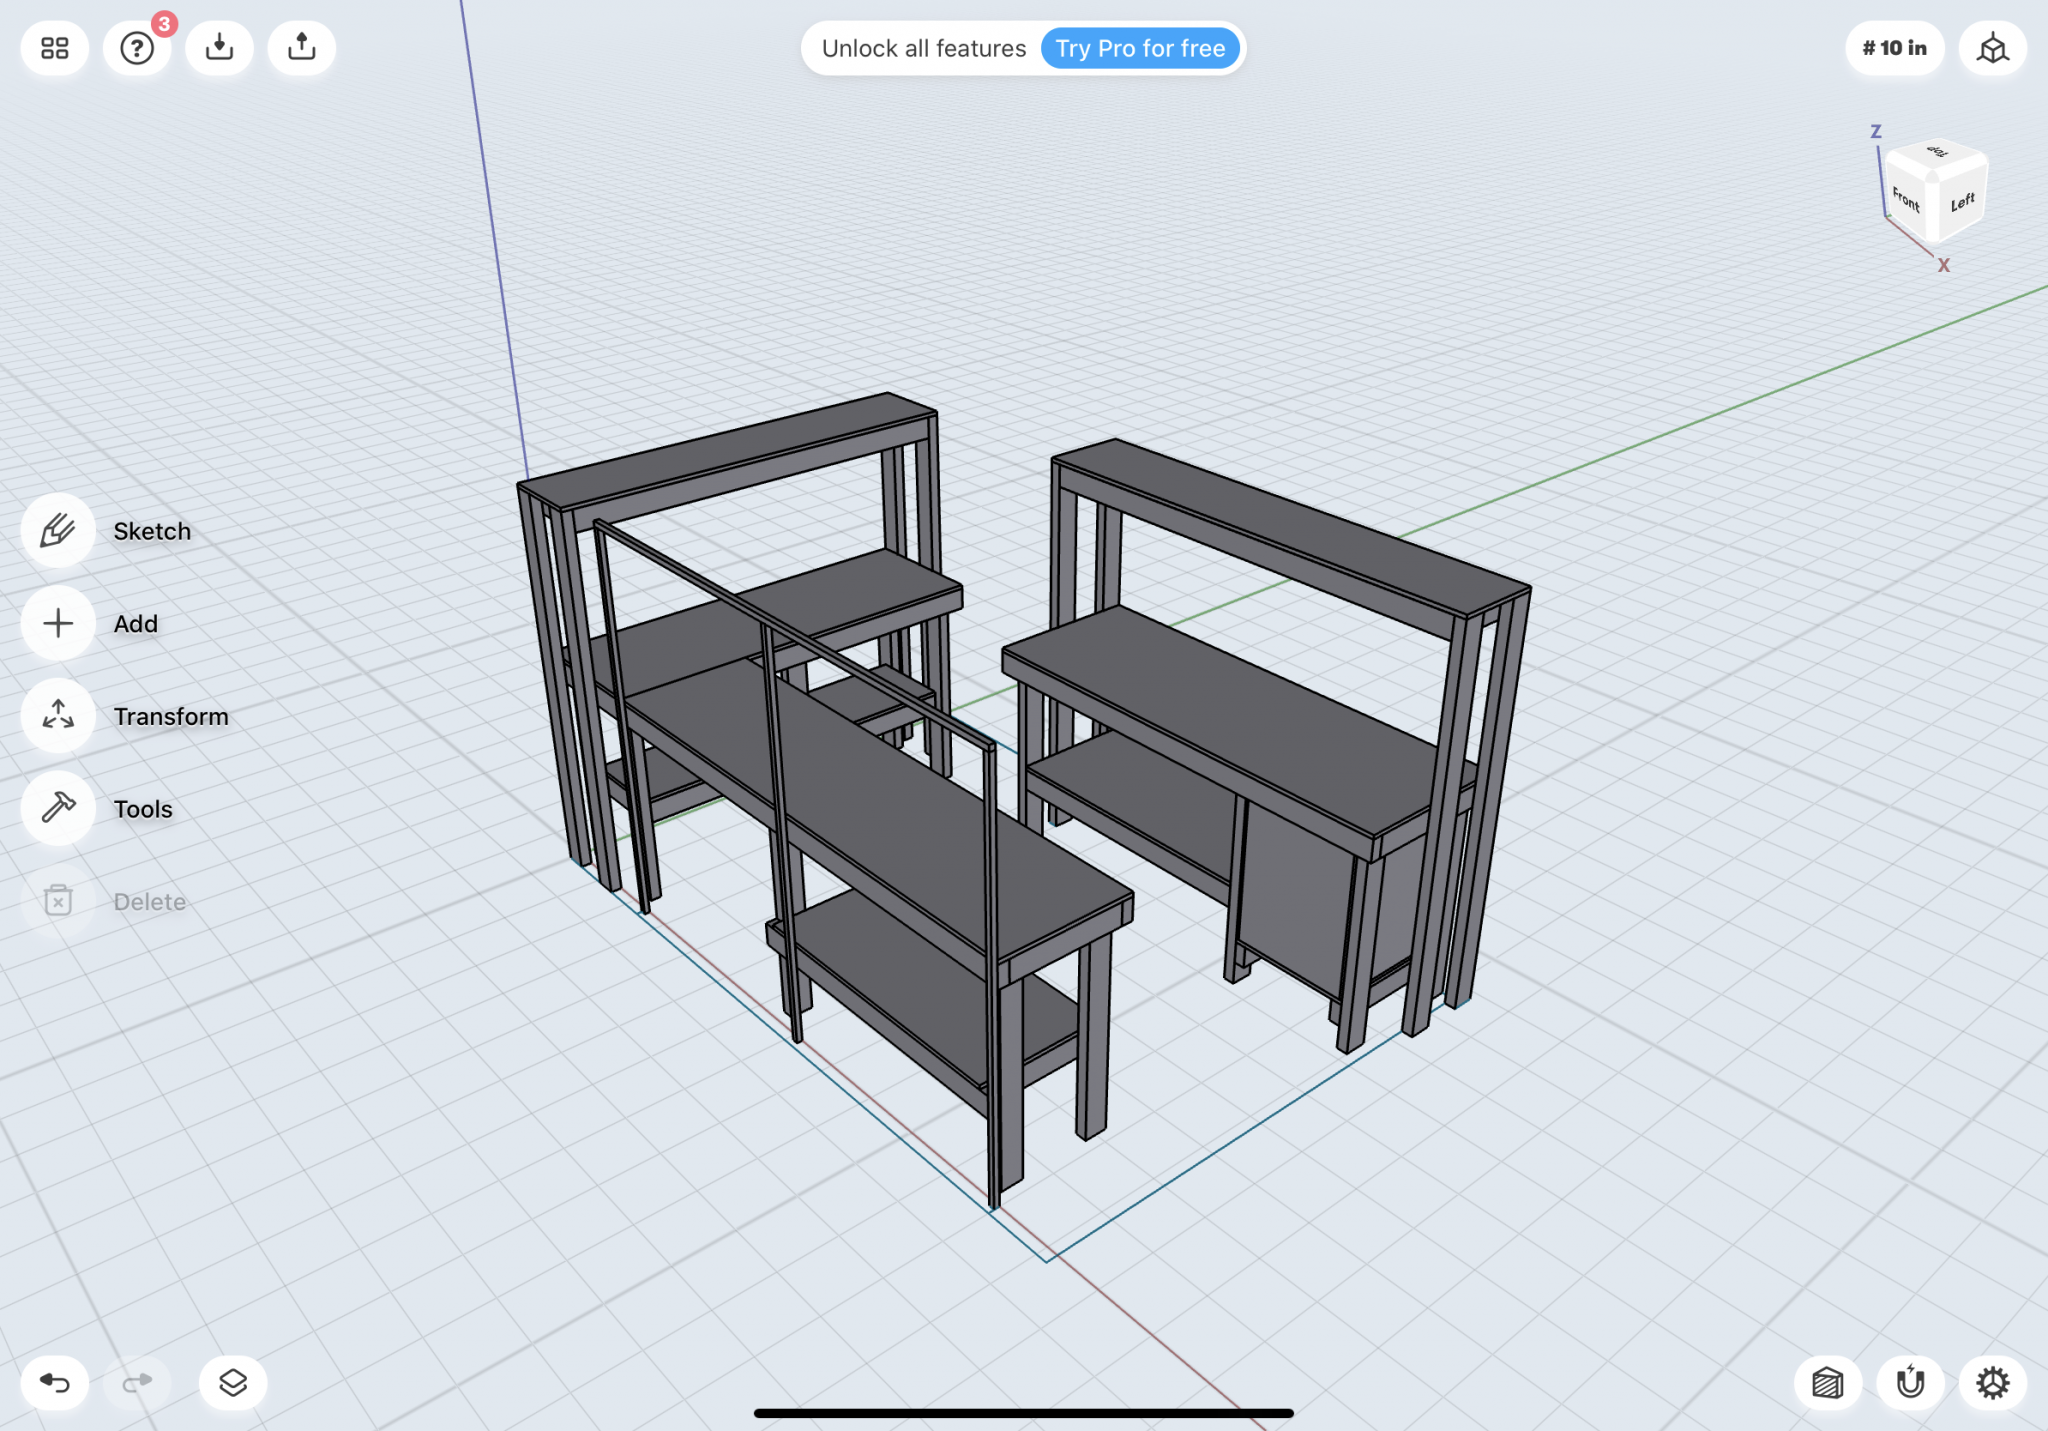
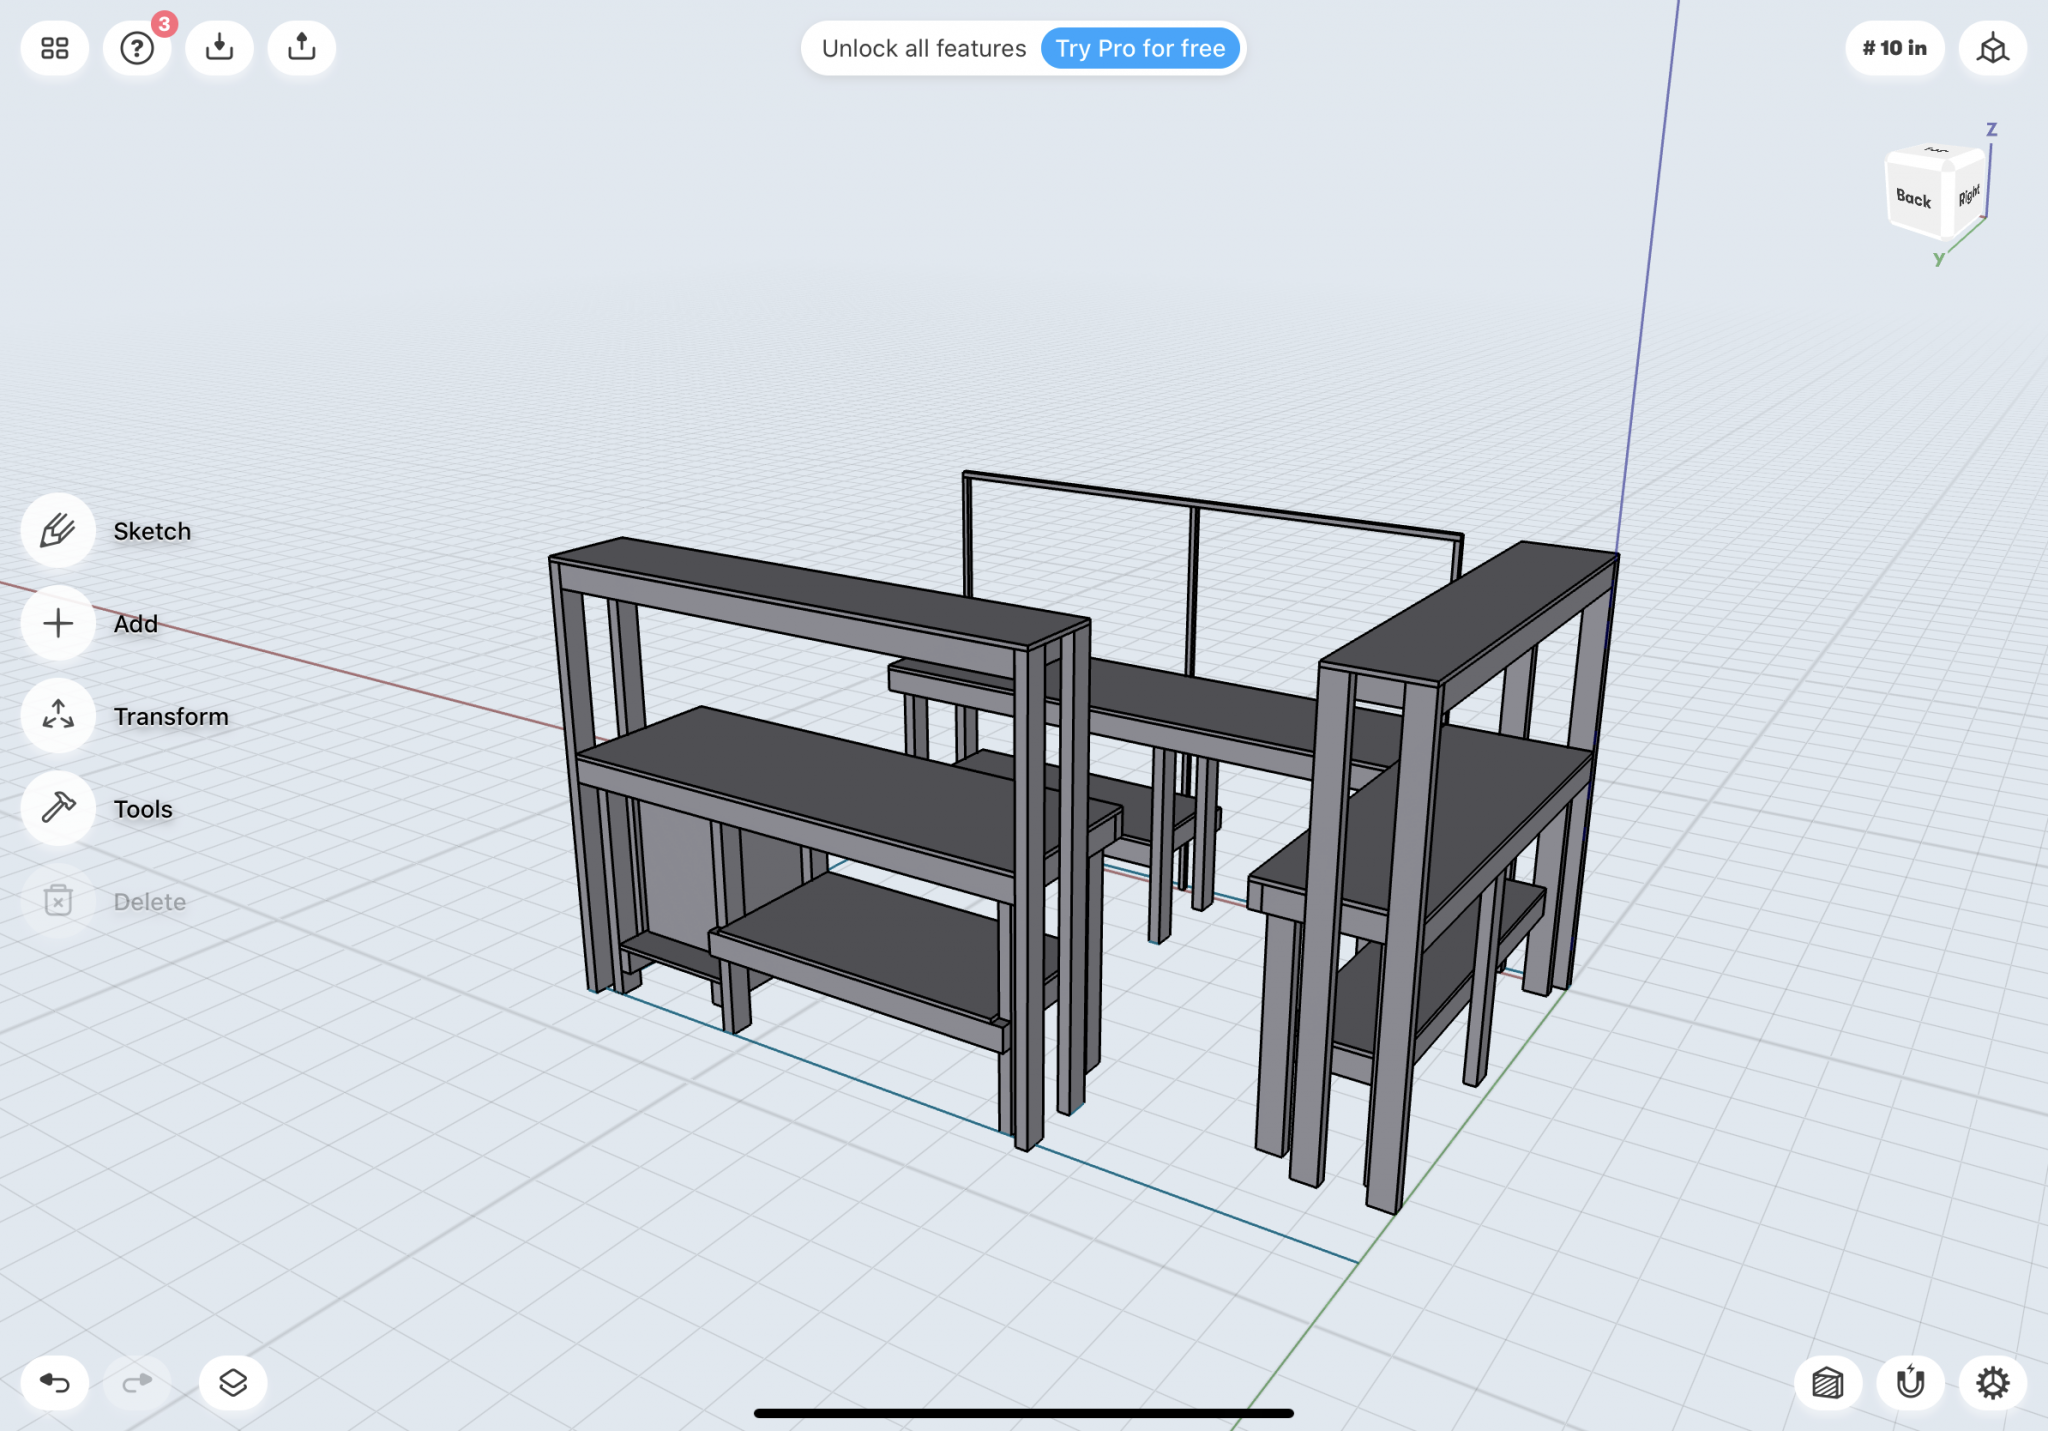
Thanks for all the great ideas. Ive been working on a draft design for new benches and plan to price that out once I work up a lumber list. For now, Ive got to translate the blueprints to a cultist, then to a lumber list. As Ive said previously Ive got very limited space, roughly 11' x 7' 4" (in the garage). What I want is a LOT of surface, place for plans (out of the way) and plenty of peg board, shelving. In these plans there are two built in overhanging shelves mainly to mount shop lights to. On the far wall, framed in 2x2 will be half custom cork board for plans measuring under 30 x 40" (I've yet to see plans at 40 x 60" but I may have to cross that bridge when I get there. This may already accommodate that. All surfaces are 24" deep, stand at 41.5" high (I mainly work standing at 6') with one sitting area (kneehole). I used Shapr3d (Free Version) on an iPad to work this up. I found it amazingly versatile, powerful with a very quick learning curve. Ive never used CAD anything before, granted this is all building with blocks so how hard could it be. Also, the entire thing is 2x4 and 3/4" plywood.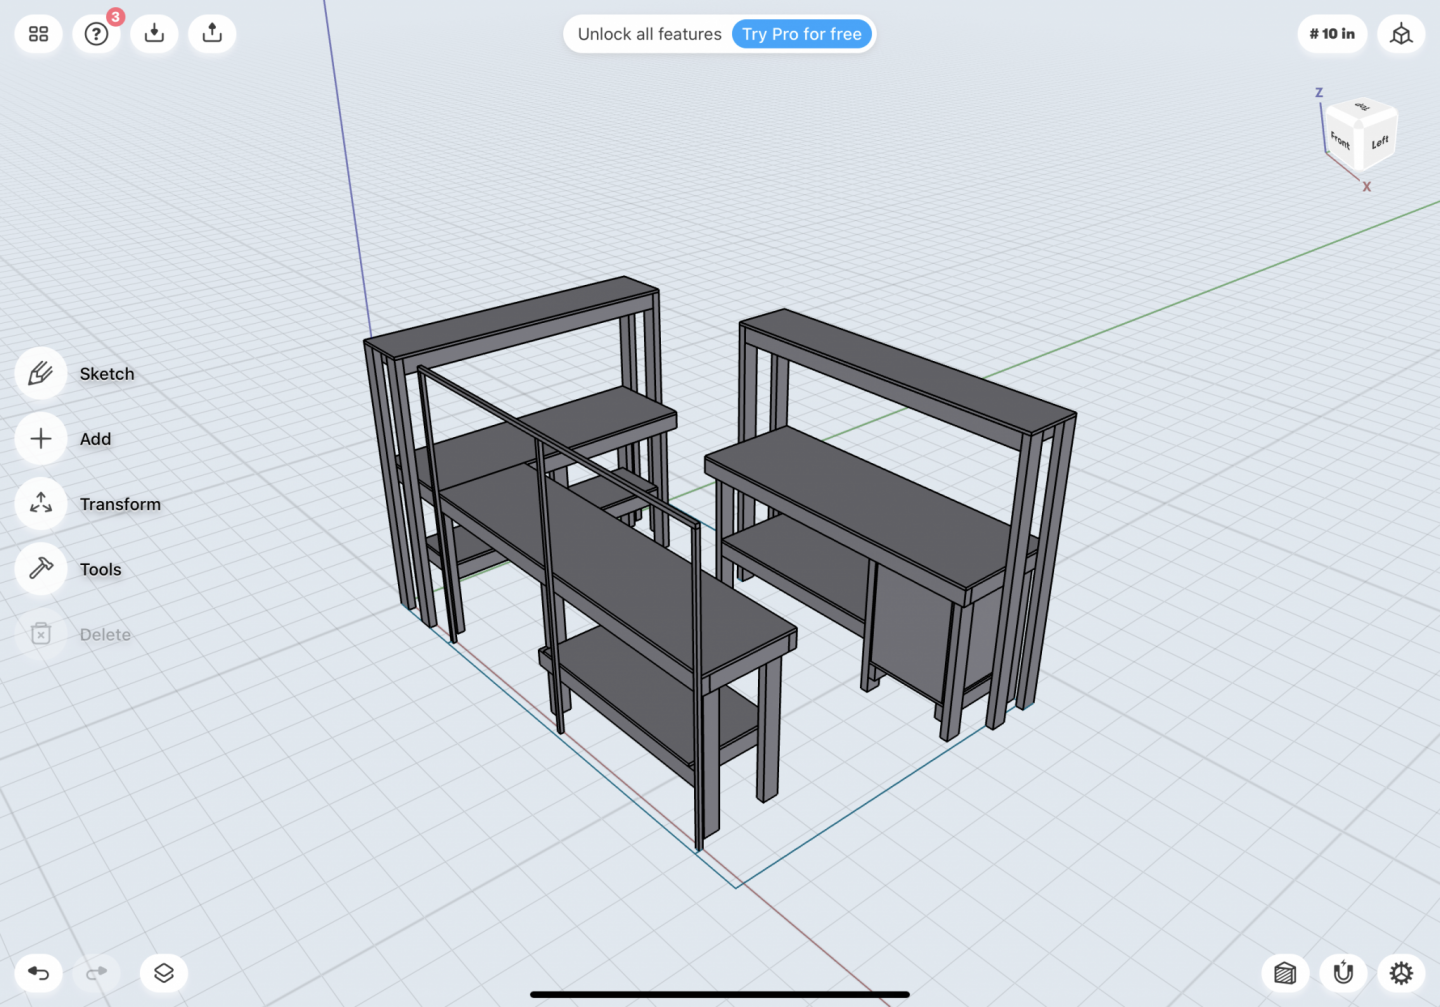

-
I was surprised by this as well. I have some experience with AL kits and while I wasn't overly impressed, I wasn't so disappointed that I haven't seriously considered buying another. I also thought it a bit sad that they are no more. I thought they had a good place in the spectrum of kits. As someone else pointed out, it may be about individual kits too rather than the company as a whole. It may be that Ive been lucky and the AL kits Ive experienced just weren't all that bad. Some, Im sure, are not that great. Ive also noted that their instructions can tend to be great in the beginning and then just sort of dissolve as if the writer lost interest - this observation has been made by others and is not my original thought, but one that did resonate with me. Their instructions have nice photography, which I appreciated, but their format was confusing and accuracy was a wash. Otherwise though, if you just want to get on with building something they weren't so bad. I really like the Model Shipways kits, but often find they come with overly wordy instructions and/or poor or repetitive visual aides. This I find difficult for quick referencing as the main steps can be lost in the minutia of explanation. I think your experience viewing really nice completed builds from AL kits may have more to do with the builders and how those kits more easily lend themselves to refinement.
-
Thanks for the heads up on this, so far still on sale for $29.99, but at least that much for shipping. BUT if I spent another $20 I got free shipping so... Half-price! Cant beat that. I had just reached out to HobbyZone USA about when the back-ordered item might come in and they ignored me. So... good for me. Thanks again! UPDATE: Free Time Hobbies cancelled my order :(. I guess they ran out. Not surprised, at the price they were selling, it was a steal.
-
Hello and yet another Syren in progress
Justin P. replied to Kevin53's topic in New member Introductions
Wow... that plan rack is genius! Got any plans or information on that you could share? EDIT: Nevermind, I just found your post on this elsewhere : Great piece Ill be adding to my shop renovation plans. -
Workshop Essentials - Favorite Features
Justin P. replied to Justin P.'s topic in Modeling tools and Workshop Equipment
This is so weird. I cannot get to it. I tried to go back in that thread group archive, to page 58 where the very last post that I can see was made Feb 21, 2013. I must be daft, I had to go back through Wintergreens history to the date of the post you provided to find it... Thank you so Much! -
Workshop Essentials - Favorite Features
Justin P. replied to Justin P.'s topic in Modeling tools and Workshop Equipment
These are great ideas. Im very interested in cable management so perhaps some clever usage of surge protectors would do the trick. The dust collection is essential, especially given my heat source in the winter and my proximity to our furnace. To this point Ive been using a small shop vac attached to the tools directly which isn't so bad except for all the setup just to do a single thing here or there... I often then skip something like hooking up the dust collection. I need to make it easier or permanent. Part of the point of doing this is to create enough space so that tools are in place where they are used and ready to go. No moving them or setup. I had though of a single like hose suspended that I would just switch from tool to tool as I use them... but daisy-chaining them as pictured in your post could work too, though looks like it could get elaborate. -
Workshop Essentials - Favorite Features
Justin P. replied to Justin P.'s topic in Modeling tools and Workshop Equipment
This is one of my top priorities. I have kids, all my neighbors have kids... all aged 4-8 and on the weekends they just move like a herd from garage to garage playing bikes, scooters and just generally running the neighborhood. My kids are pretty well trusting when it comes to tools and areas to avoid, but I don't want to worry about my neighbors kids nor do I want to worry about breaking down equipment every time Im out of the room. My time in the yard gets interrupted often for tasks inside the house so I might walk away from it for an hour or so and not want to shut down everything and pack up. A master switch is a great idea... I wonder if there is someway to do this without significant electrical changes. Perhaps if I run everything (outlet strips, power tools, lights from the same 2x2 outlet and try to find a similar outlet with a switch or key. IM not sure how much I can run off one single outlet so Im imagining Ill need multiple plugs and would like to avoid having to unplugging a bunch of stuff every time. Unfortunately only my disc sander has a safety switch built in... Cant for the life of me figure out why they wouldn't put one on a Lathe. -
Workshop Essentials - Favorite Features
Justin P. replied to Justin P.'s topic in Modeling tools and Workshop Equipment
That is great stuff right there. Im not sure I have the electrical know how to put something like that together safely, but its a great idea. Curious about the durability of the MDF top... for some reason I feel like MDF is not that durable but Im guessing there are different grades I should explore. Mainly Im thinking of adding an overhang to the front of the bench which can be used for clamping and wonder if the MDF will be OK without a support directly underneath. I currently have construction grade plywood topped with self-healing cut mats which Ive like so far and was thinking about repeating in the new benches, though changing out the 1/2" I currently have and bumping up to 3/4" with an endcap. -
Oh man, I almost fell of my seat laughing.
-
I am more curious how they determine the appropriate age to be using a stick, square or not.
-
Workshop Essentials - Favorite Features
Justin P. replied to Justin P.'s topic in Modeling tools and Workshop Equipment
Indeed! Thanks for the heads up. In all honesty I thought I did a pretty good initial search of back threads to make sure I wasn't stirring up old discussion! This I think is where really good topic titles come into play...in none of my search terms did I use: "So where do you do yours then (mode making that is)". Im a little embarrassed now that I somehow missed the well worn thread! Though... I can't seem to find it even now. Searching "workshop" or "shipyard" or "building a workshop" doesn't bring up that thread at all. Maybe Im not doing something right. I even tried the title of the thread and it still didn't come up, I got an "ACCESS DENIED - Securi Website Firewall". How bizarre is that? Cant explain that at all. Never happened before. -
Hi All, As Im closing in on the end of my current build and looking forward to my next, Im thinking of undertaking a major redesign/rebuild of my current workshop "area." (read: Admiral designated corner of garage). I have come to realization that I will not likely be moving, or convincing my family to let me move into the guest bedroom...LOL...so I must resign myself to my permanent location. I have about 7.5' x 9' to work with and currently have one bench and misc assortment of odd furniture that does an ok job accommodating a lathe, disc and thickness sander, scroll saw, small tools etc. Im thinking of completely overhauling this space, up to and including rebuilding space specific benches and storage. What I find is that Im not only cold, but also constantly having to move things around to accommodate whatever task I need to undertake. This eats up time and has lead to accidents as my spatial awareness is always challenged to remember where my model is and that I should not knock it off the bench! What Im asking the collective group is: What are the best features of your own workshops/shipyards? What hacks, bench details, surfaces etc do you find to be the best? What strange things have you adopted/adapted that have really worked for you? What are the most important things NOT to overlook? Do you have kids, any particular measure you have taken to ensure the safety of kids in the garage who might poke around? What would you do if you could? What heating solutions, if any, are those of you in uninsulated areas using for winter work? I don't have an unlimited budget but I am willing to invest a bit more than a passive hobbyist might. My list of must haves are: Plan Board (Ideas? I hate to commit too much space to this. Looking at Plan station type of solutions: https://www.amazon.com/Plan-Station-Portable-Workbench-WS3800/dp/B075V3LX1H) Safety/Securing Heavy Equipment. Overhead Lighting (shop lighting) Dust Mitigation (vacuum line for tools, perhaps overhead or acquiring extra long vacuum line to dedicated small shop vac) Plenty of Power (I am currently overburdening a single 4 outlet circuit that is also running a garage refrigerator. I need to share this burden out a bit.) Small Tool Wall storage Misc Wood storage (off floor) Thanks all for your input!