HOLIDAY DONATION DRIVE - SUPPORT MSW - DO YOUR PART TO KEEP THIS GREAT FORUM GOING! (89 donations so far out of 49,000 members - C'mon guys!)
×


Piet
-
Posts
3,568 -
Joined
-
Last visited
Content Type
Profiles
Forums
Gallery
Events
Everything posted by Piet
-
 Fantastic work bro. That's the way the shipwright meant for the planking to run, so don't fret about it, looks great. Cheers,
 -
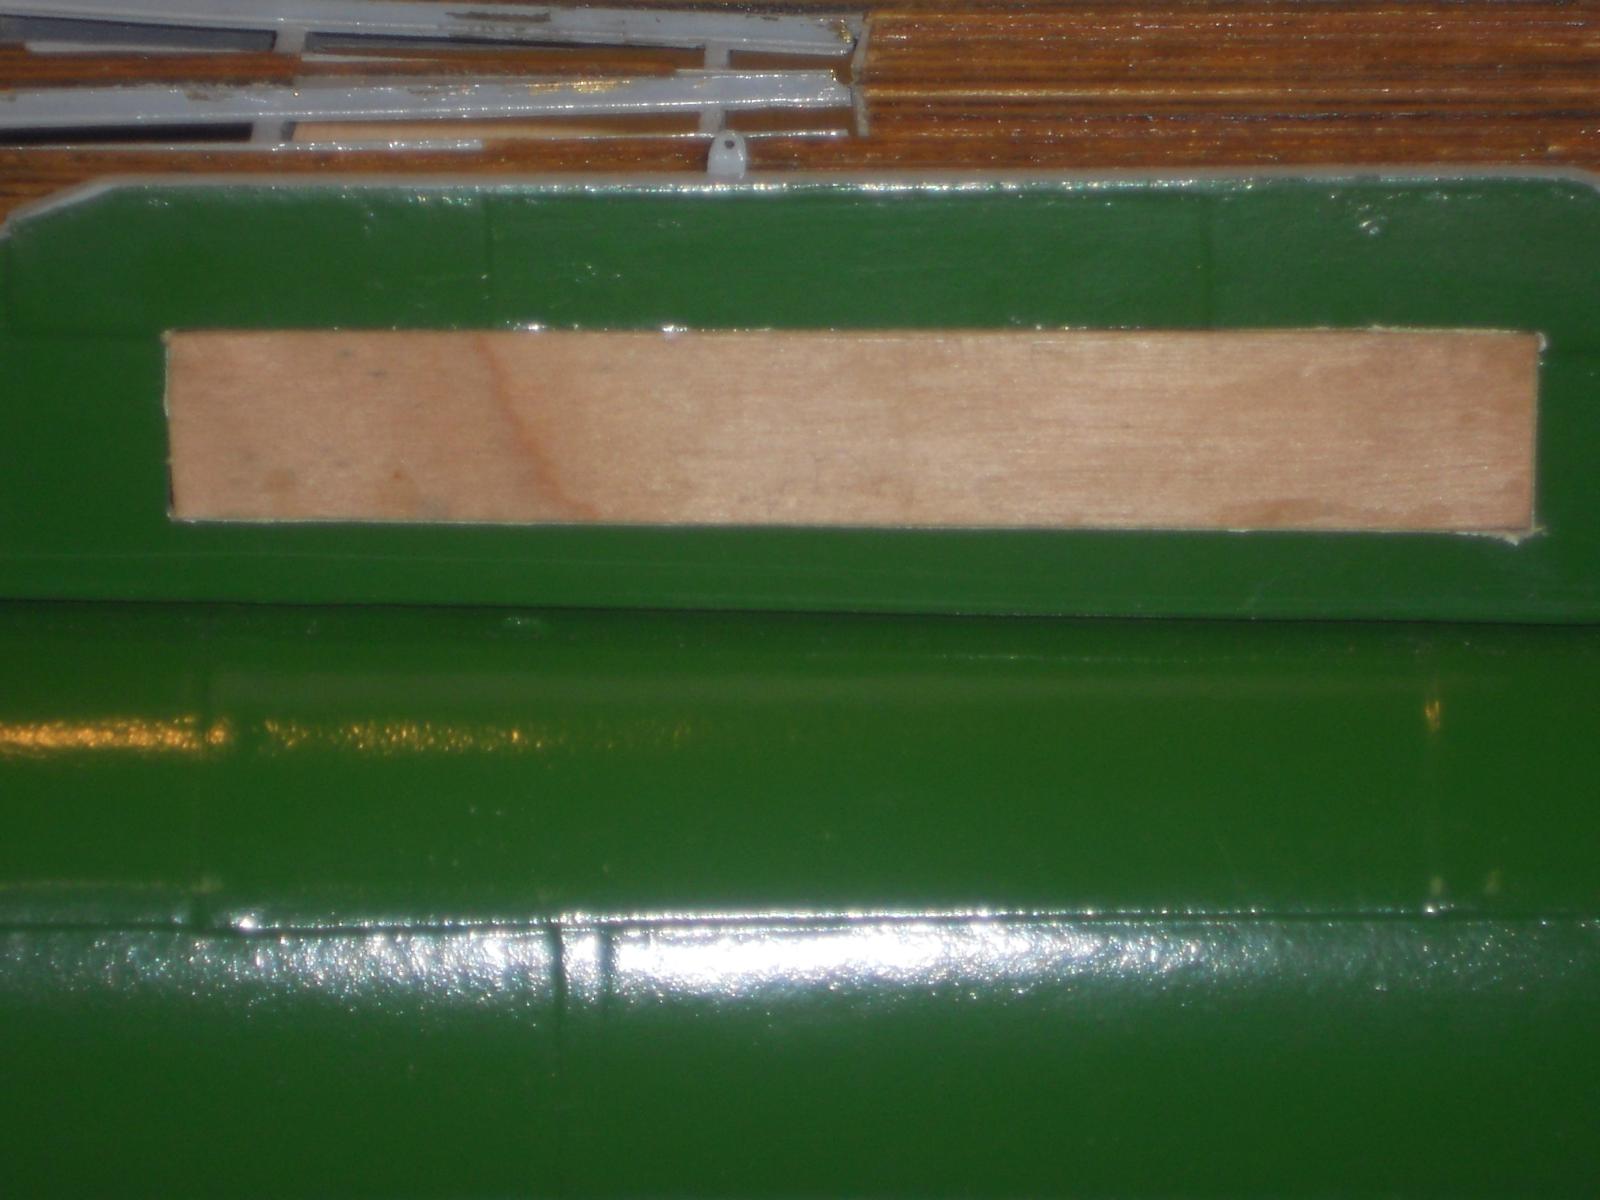
First of all I want to thank everyone who visited my shipyard and your likes, it's REALLY very much appreciated. And not to forget all your kind remarks. After the great fiasco I encountered this morning on my way to the clinic for my BCGI cancer treatment I didn't feel up to going into a hot garage to work on the O19. You can read all about it in "What Have You Done Today." Well, after a late lunch and reading my mail I felt a little guilty and mozied on into the garage anyway. Yeah, it was hot but I turned the fan on and opened the doors. Nice breeze and I was a happy camper. So, I removed the two pieces of plywood from the clamping rig and started to clean the residu glue off and trimmed the pieces. Didn't look bad at all. So, now what - - - okay I put the build dock back on the workbench and started with fitting one piece to the port side. Being careful not to remove too much all at once, trying to remember that I'm now working with wood - - right Sjors? After carefully and slowly filing and sanding away smidgin by smidgin of the wood It finally fit like a glove. By that time it was past 17:00 hrs and it was time to quit. My home made plywood turned out to be 1.4 mm thick - - a little thinner then I really was shooting for but there is still a "steel" plate (file folder card) to be glued to the outside, which'll make it to the 2 mm. Next I'll have to make the reinforcing strips on the backside and also make the slight curve and twist of the deck structure. Then the hinges and assorted hardware. So far - so good. I took one flash pic of the deck-door-to-be inside the opening. Not much to look at but there was quite a bit of work involved getting it to this stage. Here you see my home made piece of plywood fitted in the deck side, to become the door to close it off when the torpedo launcher is in the stowed position. Still a lot of detail work to be added. Cheers,

-
Hi Sjors, no wonder that stuff cuts so easy - - - wood eh? Hmmm, is that the stuff that comes from trees?? and not from ore out of mother earth?? I'll have to shift mental gears now and not grab for the soldering iron or torch Hoi Remco, yeah, it's a little different then just running to the store and buy stuff. For me it's a matter of 'can I make that' ? Popeye is another one who's as crazy as I am As it turns out my plywood is 1.4 mm thick, which is okay but would have liked 2 mm though. Hello Doris, so good to see you visit my shipyard, I'm honored. Thank you for your very kind words and I'll try to do do honor to my father in who's memory i am building this model, his boat. Cheers,
-
ROYAL CAROLINE 1749 by Doris - 1:40 - CARD
Piet replied to DORIS's topic in - Build logs for subjects built 1501 - 1750
Thanks for the tutorial Doris and here I thought these pins were made in one piece. Hmmm, something to think about for when I have to make belaying pins for my VOC ship. I'll have to try both ways and see which one works bet for me. Cheers,- 883 replies
-
- 2
-

-
- royal caroline
- ship of the line
- (and 1 more)
-
Looking pretty good Sjors. I agree with Popeye but in case you make your rivet impressions just omit the sides that'll be covered with the next plate. Oh, I understand that this getting nit-picky but it's just a thought. In the overall scheme of things your coppering job will look just marvelous. Cheers,
- 1,616 replies
-
- 1
-
-
- caldercraft
- agamemnon
- (and 1 more)
-
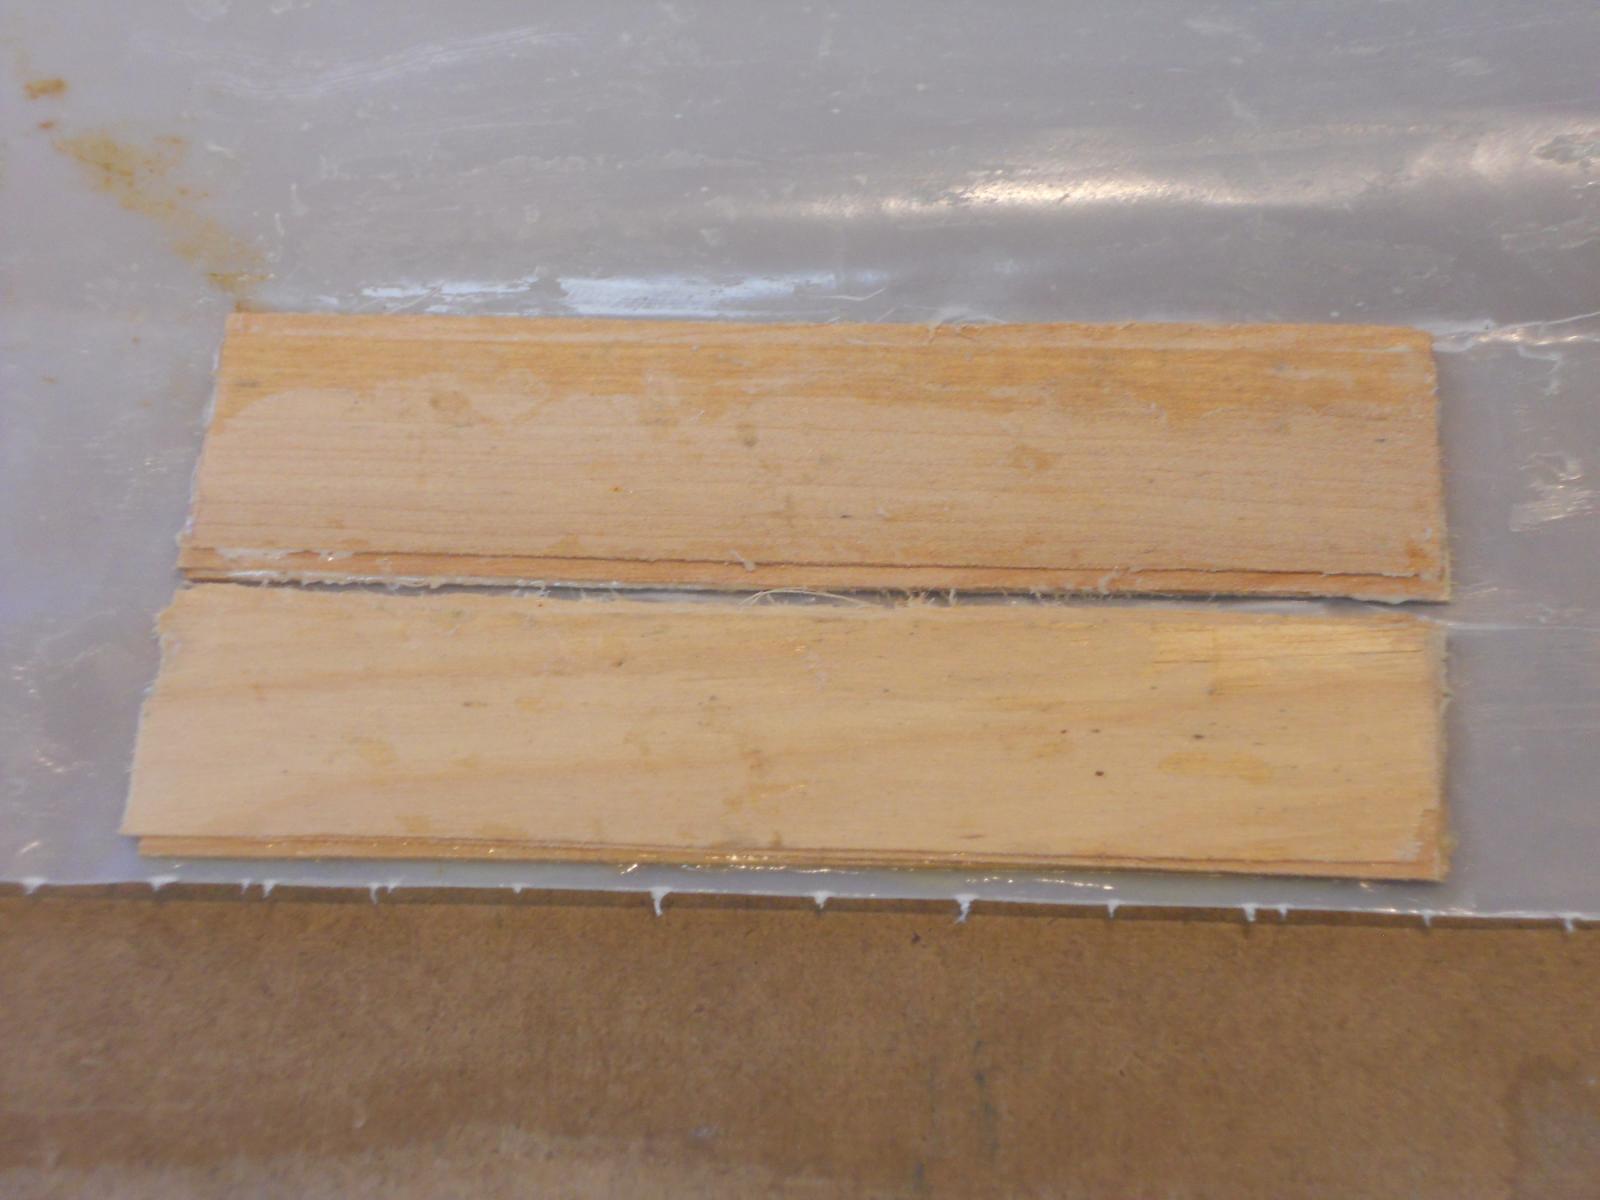
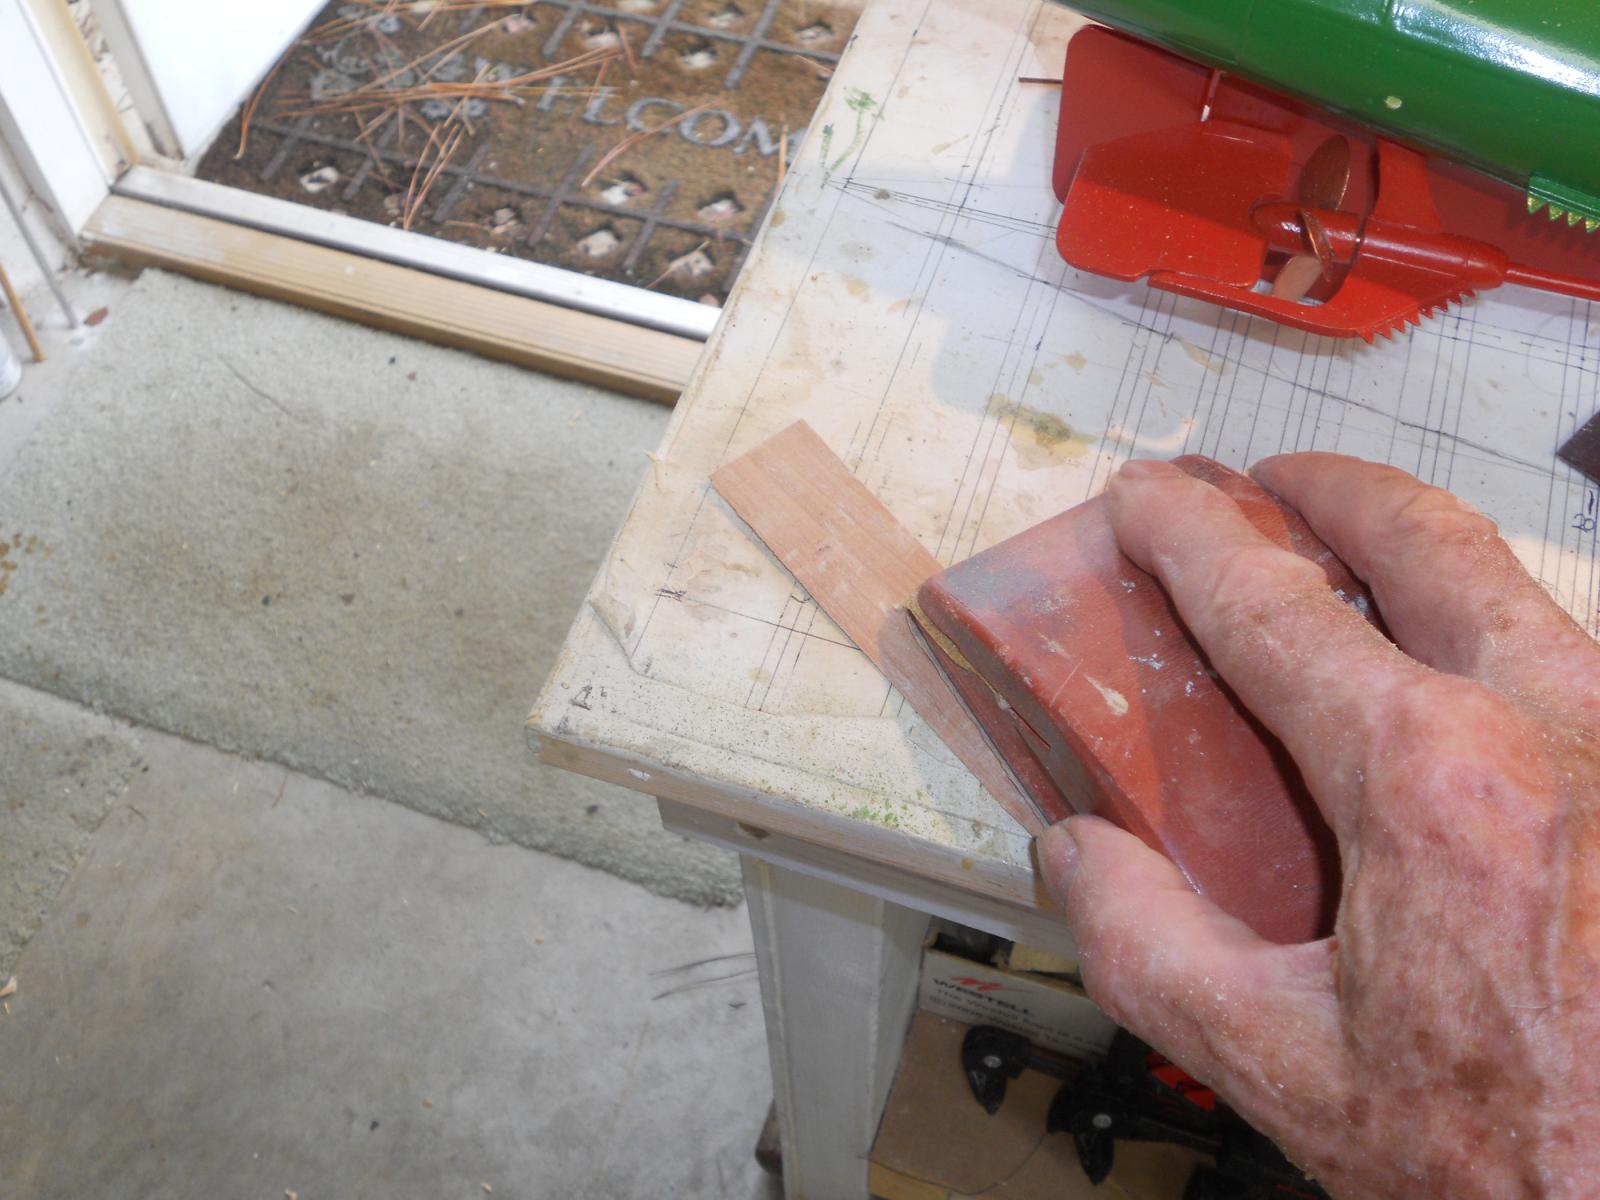
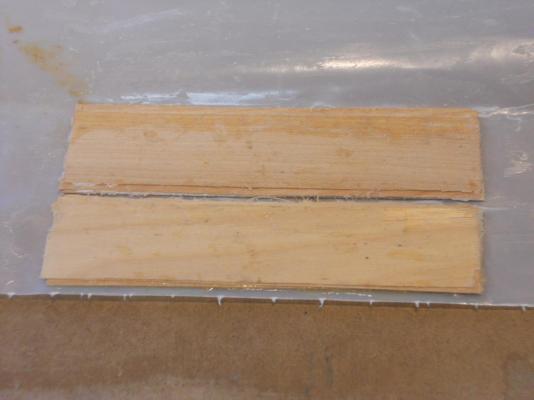
Hello folks and welcome to my shipyard, coffee is up. Today I continued with removing the inner core pieces from the veneer strips. Instead of using a wood chisel and a sanding block I changed over to a small sanding disk in my Poxxon hand tool. That way I could also remove most of the cement they used to make the original plywood. I had some plastic sheeting I used for gluing-up the strips of veneer. Glue won't stick to it, not even CA. No need to show all yuns the sequence of events in gluing three pieces of veneer together so I didn't take any pics of that. To keep the stacks nice and flat I folded the plastic sheet over them and then clamped this sandwich between two small flat boards. After about 3 hours I was curious to see how they came out and so far it's okay but te glue was not set yet so I re-clamped it again and wait till tomorrow. I know, this is not very exiting work but it's progress and is mainly ment for my own archive but like to share some of the rather mundane things too Here are two pics from my archive - - - ho - hum - yawn This shows my clamping rig as described above. These are the two pieces of my own plywood, in a sneak preview. Cheers,

-
Thanks everyone for joining me with this build, I'm having a ball. Hello Pete, thank you and yes, the launcher did turn out okay, it's amazing what a coat of paint can do Cheers,
-
ROYAL CAROLINE 1749 by Doris - 1:40 - CARD
Piet replied to DORIS's topic in - Build logs for subjects built 1501 - 1750
Glad to see you again Doris! Beautiful work dear friend, outstanding! Cheers,- 883 replies
-
- 1
-
-
- royal caroline
- ship of the line
- (and 1 more)
-
Thanks to everyone who visited my shipyard and hitting the like button! @ Dave - Sawdust: Thank you Dave and I'm glad to brighten your day with visiting my build. The "whatever's next" will be the two deck side doors for the launcher. That'll be a real challenge because there is hardly any space below the launcher and I need to make them workable as well - - - fold down so the launcher can rotate out. @ John - texxn5: So good hearing from you and seeing that you and Diane are enjoying your trip. Gwen and I are doing okay, I'm right now in the second try to eradicate the bladder cancer. Thank you for your compliments and stay safe and in good health. @ Remco: Thank you, yes it really brought it all together, it makes me happy. Well, yes, - - - once the outer doors are installed and closed you can't see the launcher, but that's why I am trying to make the doors so they can fold down and I can rotate the launcher out. At least we can see some of it, but I can also remove the entire launcher from the boat if need be for a show and tell I did not do anything today on the boat. I had to mow the back yard and really attend to many weeds that are taking over with all the rain we have had. There is a lot more that needs attention but if the weather is okay (no rain) I need to attend to the draining ditch next our front yard. Sunday seems the right time Tomorrow is another day I'll spend cleaning off the plywood cores from the veneer strips I cut to make thin plywood for the deck side doors. That in itself will be very challenging, to say the least. Cheers to all,
-
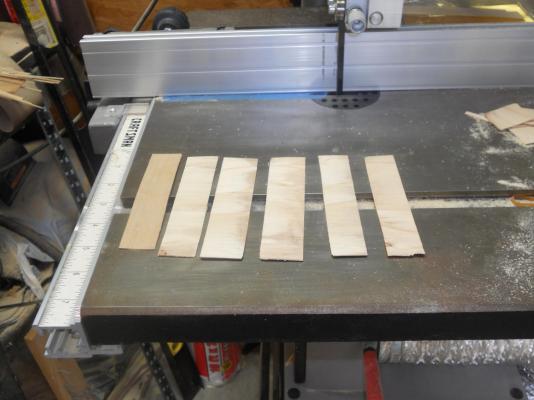
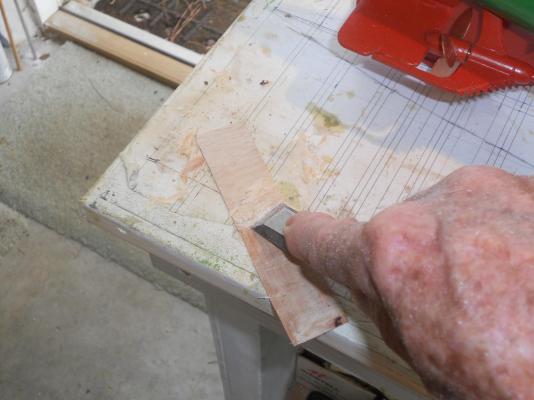
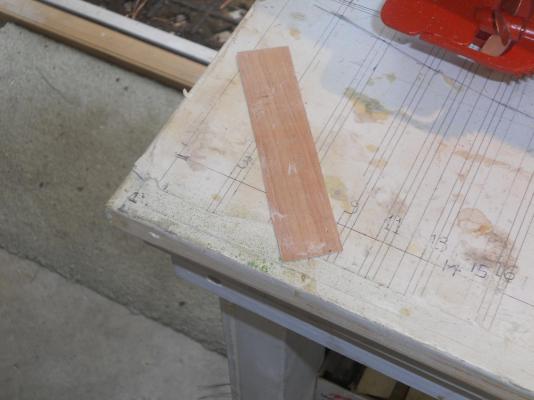
Okay, this is my plywood making project as part of the deck rework for the torpedo launcher. I have already explained how I went about doing this in my previous post thus will only show the pictures with comments. This shows my set-up and how I am carefully cutting just inside the outer veneer. That way I didn't have to remove a lot of the core. The glue they used is very tough and hard. This shows all six pieces I need for the two doors. Here I am actually chiseling the core away from the wood. the rest will be done with sandpaper. Here I am using a sanding block with some 150 grit sandpaper. Most all the core is now removed and started the application with acetone. More needs to be done. When all pieces are free from the core material and old glue then I'll have apply TiteBond, mak a three layer sandwich with TiteBond glue and clamp it all together. Cheers,


-
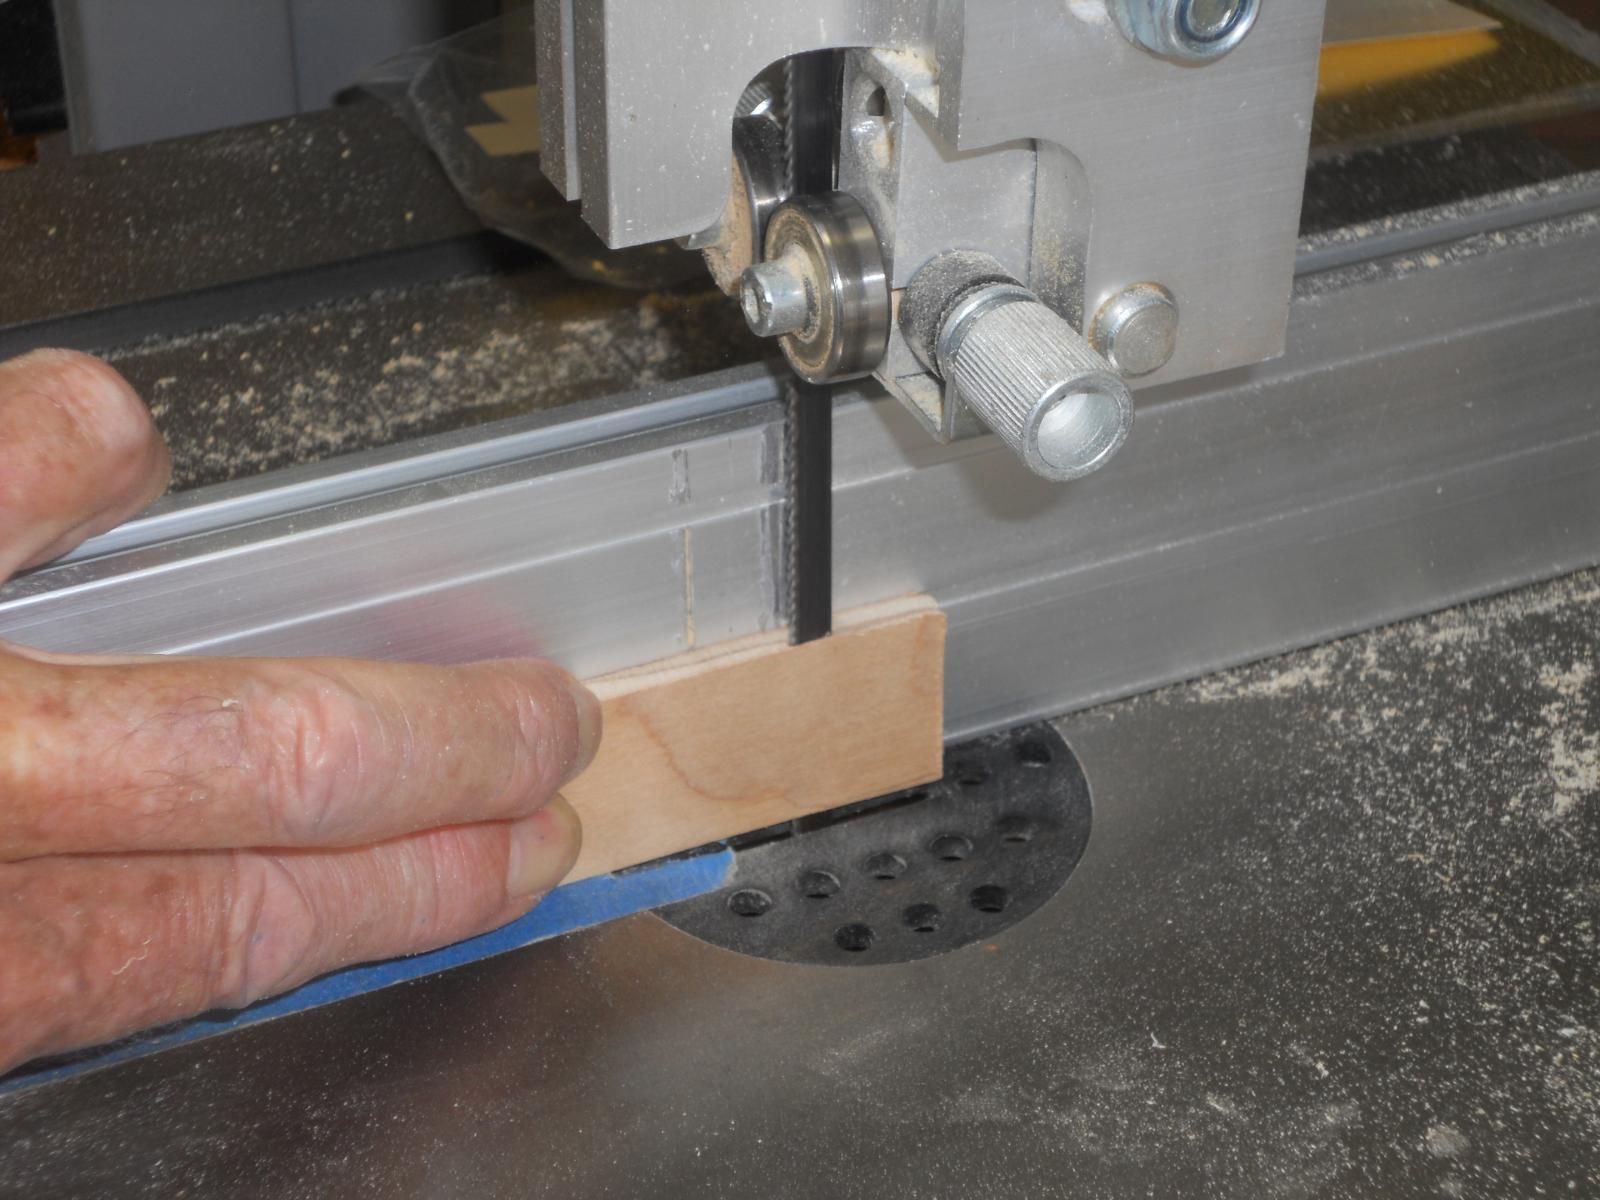
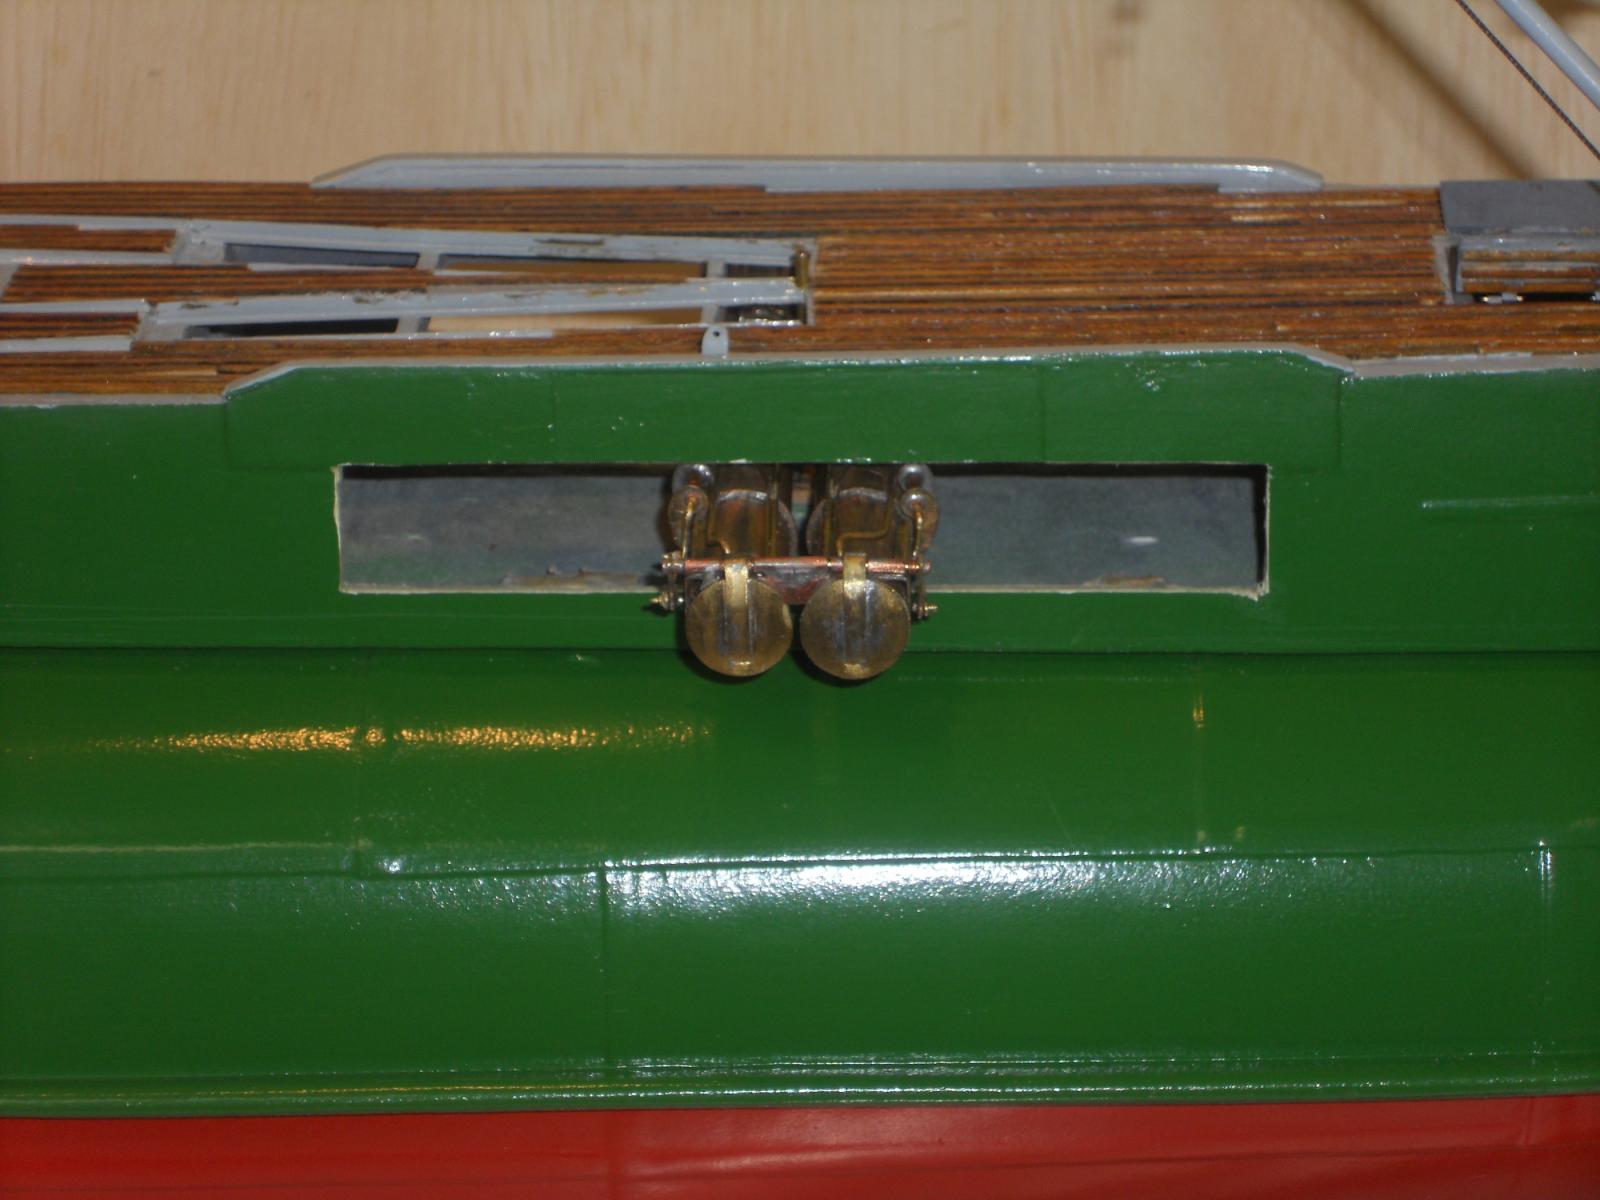
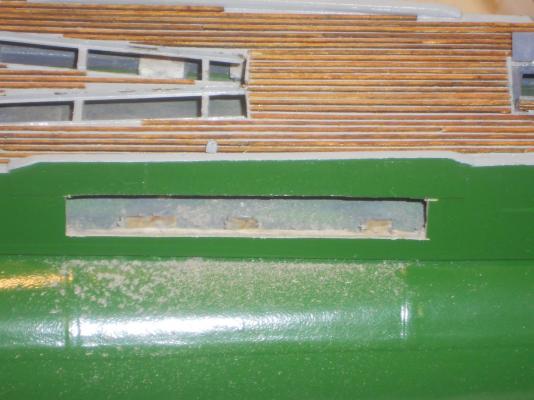
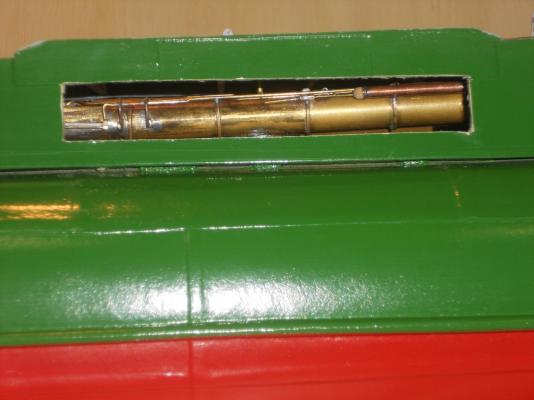
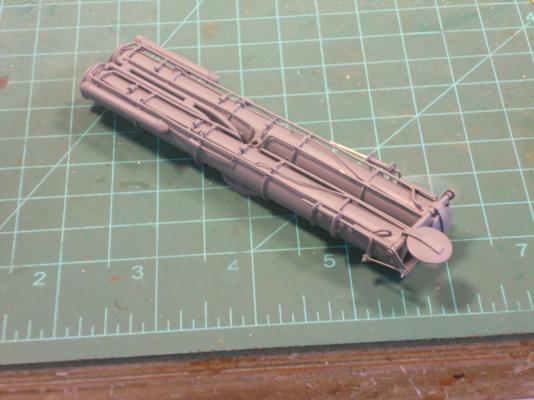
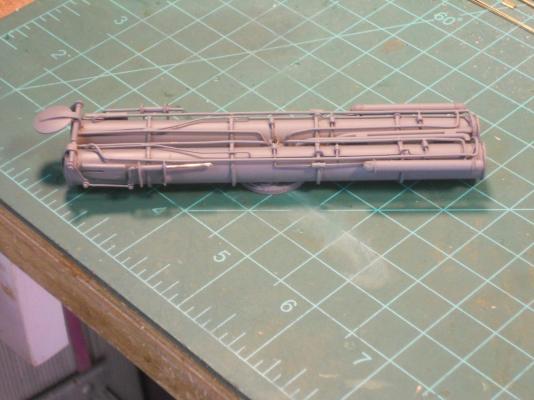
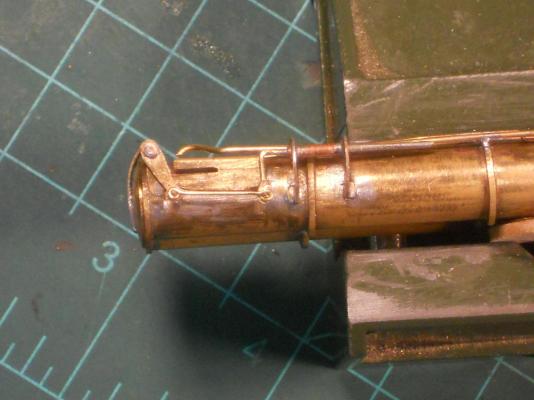
Hello everyone and welcome to my shipyard. My dear bride Gwen left this morning 0545 for Coraopolis, PA to visit with our daughter Marianne and grandson Troy Nelson. Yep, he was also named after the great Admiral Lord Nelson. In any case, my plan of mowing the front lawn had to be postponed because the grass was way too wet, we had an early rain this morning. Well, that didn't really break my heart so I did some very productive work on the O19. Instead of etching and painting the torpedo launcher I decided to start with the surgery on the torpedo launcher deck openings. I needed to place the launcher inside several times for fitting purposes and that way the paint would be damaged. I already knew that I had to remove some slivers of the bottom and top of side plating and the fore and aft parts of the opening so I just had to cut that away, VERY carefully, sliver at a time. Checking with the launcher, marking where more of the plating needed to be removed. Obviously I had to do this on both sides and also try to make it even out. Not only the side plating was involved but also the framing materia insidel had to be cut back to allow room for the doors and the hinges. For this I used a rotary file in my Poxxon had tool. This was slow going because the rotary file is for metal and cuts wood very slooooowly. This is good though because I didn't want to remove a lot of wood at the same time and not damage the inside of the side plating. After many, many times installing and removing the launcher for trying the fit I was satisfied with it. I can now rotate the launcher into any direction and remove it for a show and tell Now it was time to prep the launcher and paint it. I had some acid and brushed a diluted mix over the poor thing and let it sit for a while. Then washed it all of in hot running water and carefully hand toweled it semi dry, then put it outside in the sun. Yeah, the sun came out and the grass was drying real nice so I planned on mowing right after lunch. But before lunch I finally paint the launcher! What a difference that made! It looks really very nice all dolled up in a fresh coat of medium dark grey. Now that the launcher is finished and the torpedo door openings are cut to size I started to make some plywood I need two pieces for the door openings and don't want to spend an extra $15 dollars for a sheet, just for two small pieces??? Yeah, yeah, yeah, cheap Dutchman No, just frugal and practical I had some nice ⅜ thick maple finished plywood and cut three pieces of 1 X 4 ½ inches from it. Now I had to remove the nice maple veneer from the junk cores. I placed each piece on it's side against the fence of my bandsaw that was adjusted to just inside the veneer and turned the saw on. I very slowly and carefully pushed the pieces through. And yes, I had an extra block of wood on the outside as a guid. I managed all three pieces without losing any fingers, lucked out again Now I had to remove the rests of the core and used a sharp wood chisel and sandpaper. The glue will be removed with acetone and a scraper. I managed doing only one of the six pieces but hey, I'm having fun and again, it's a challenge to me, seeing if I can do it. I don't recommend anybody doing this crazy stunt, it's better to spend the 15 bucks and safe a trip to the hospital emergency room - - - says he with a straight face after taking a chance of loosing life and limb Well, crazy or not but I do know my tools and have confidence in my ability. As noted already, I did have a block of wood on the outside of the piece as an extra guide though. I'll show the pics in a follow-up post. Okay, enough of my banter and it's time for a few pics. I also took a few on the plywood project. This shows the start of reworking the port side. The biggest problem was grinding wood away from the lower side support structure inside without damaging the remaining side deck plating. I really didn't want to replace all that too. After many fit checks with the launcher inside I was finally satisfied with the way the launcher fit and rotated. The following three pics show the different positions. The painted torpedo launcher (uh oh, small divot in the paint, needs a touch-up) Cheers,


-
Thank you all for visiting and your compliments and comments. I truly appreciate it. @ Remco: Yeah, I guess I'm nuts going into all this detail but guess who's the instigator ???? Yep, after a few rejects and redo's it all came together okay. @ Dave (Sawdust): Thank you but you are too kind and make me blush I am happy with the fact that all y'all enjoy my efforts and hopefully are challenged at trying your hand at some out of the ordinary modeling. btw, you are not a slouch yourself my friend, I have seen your work! @ Pete: Thank you my friend, it's a great feeling when a plan comes successfully together. @ Dave B: Hmmmm - - - working torpedoes ???? There are limits my friend but ask Freek about his launcher that fires torpedoes - - - albeit with rubber bands but he's not done yet and his mind is working overtime developing a better system - - - are you Freek??? Did you see his videos Dave? @ Freek: Wow, thank you for those kind words. Mine, being a static model, I could concentrate on making it also a stand alone model in addition to also being able to mount it inside the boat. Your aim may have been more on the practical side. Either way, both of us are happy with the results and that's what counts. I'm happy having you visit my shipyard any day my friend. Cheers to all,
-
Beautiful detail work Danny. I always enjoy my visits at your shipyard. Cheers,
-
WOW, just lovely Pete. Ref the paint, final coat a little thinner and check the air pressure at the nozzle of the spray gun. Test it on a pice of scrap metal for flow. Cheers,
-
Beautiful detail work Freek. Yep, that's what's what's called a turn buckle in aircraft jargon. That'll be a challenge finding a smaller one. Could check with some of the places that sell very small hardware. She's looking really very nice and hope that she'll perform as good as she looks. Cheers,
-
When Gwen, my dear bride, was a little girl she had a cat like that and called her "lappiedot." Hmmm, my Dutch - English dictionary doesn't show a translation but "Patches" or "quilt" comes close, I think. Brilliant work Remco - - - 5 mm?? WOW! Cheers
- 1,215 replies
-
- 2
-
-
- sloop
- kingfisher
- (and 1 more)
-
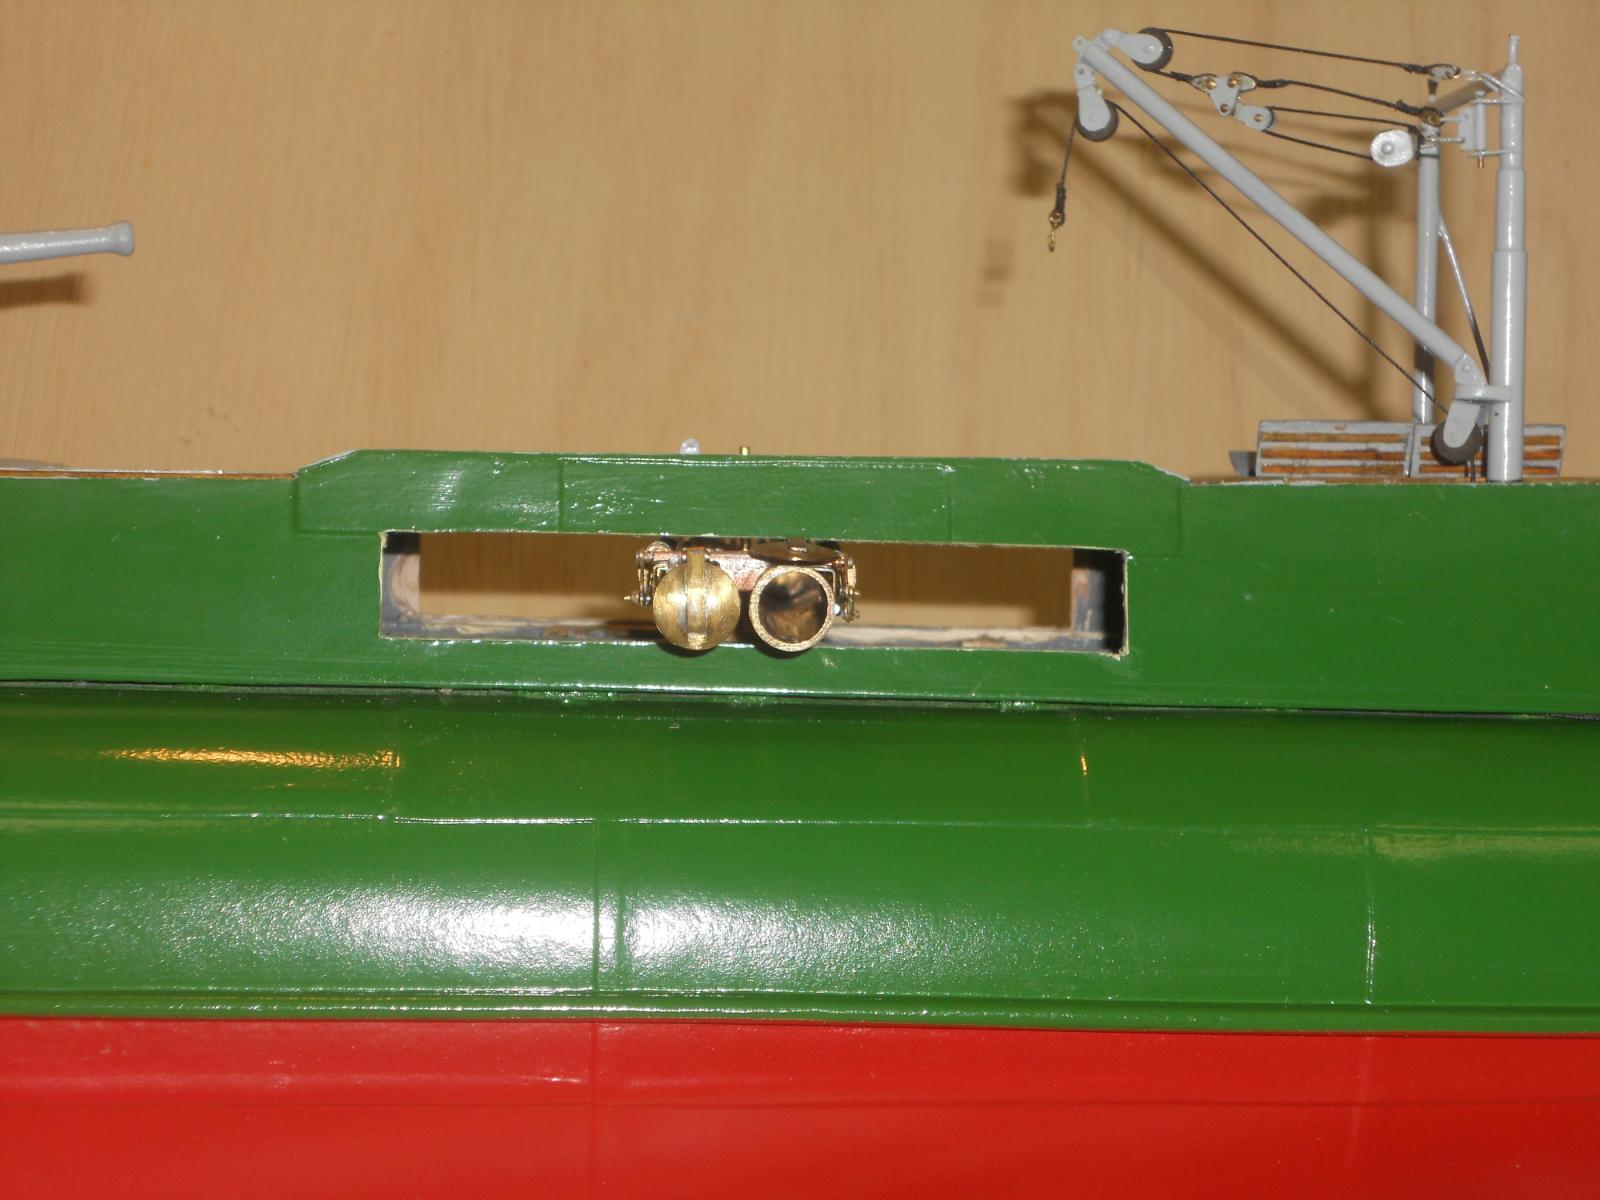
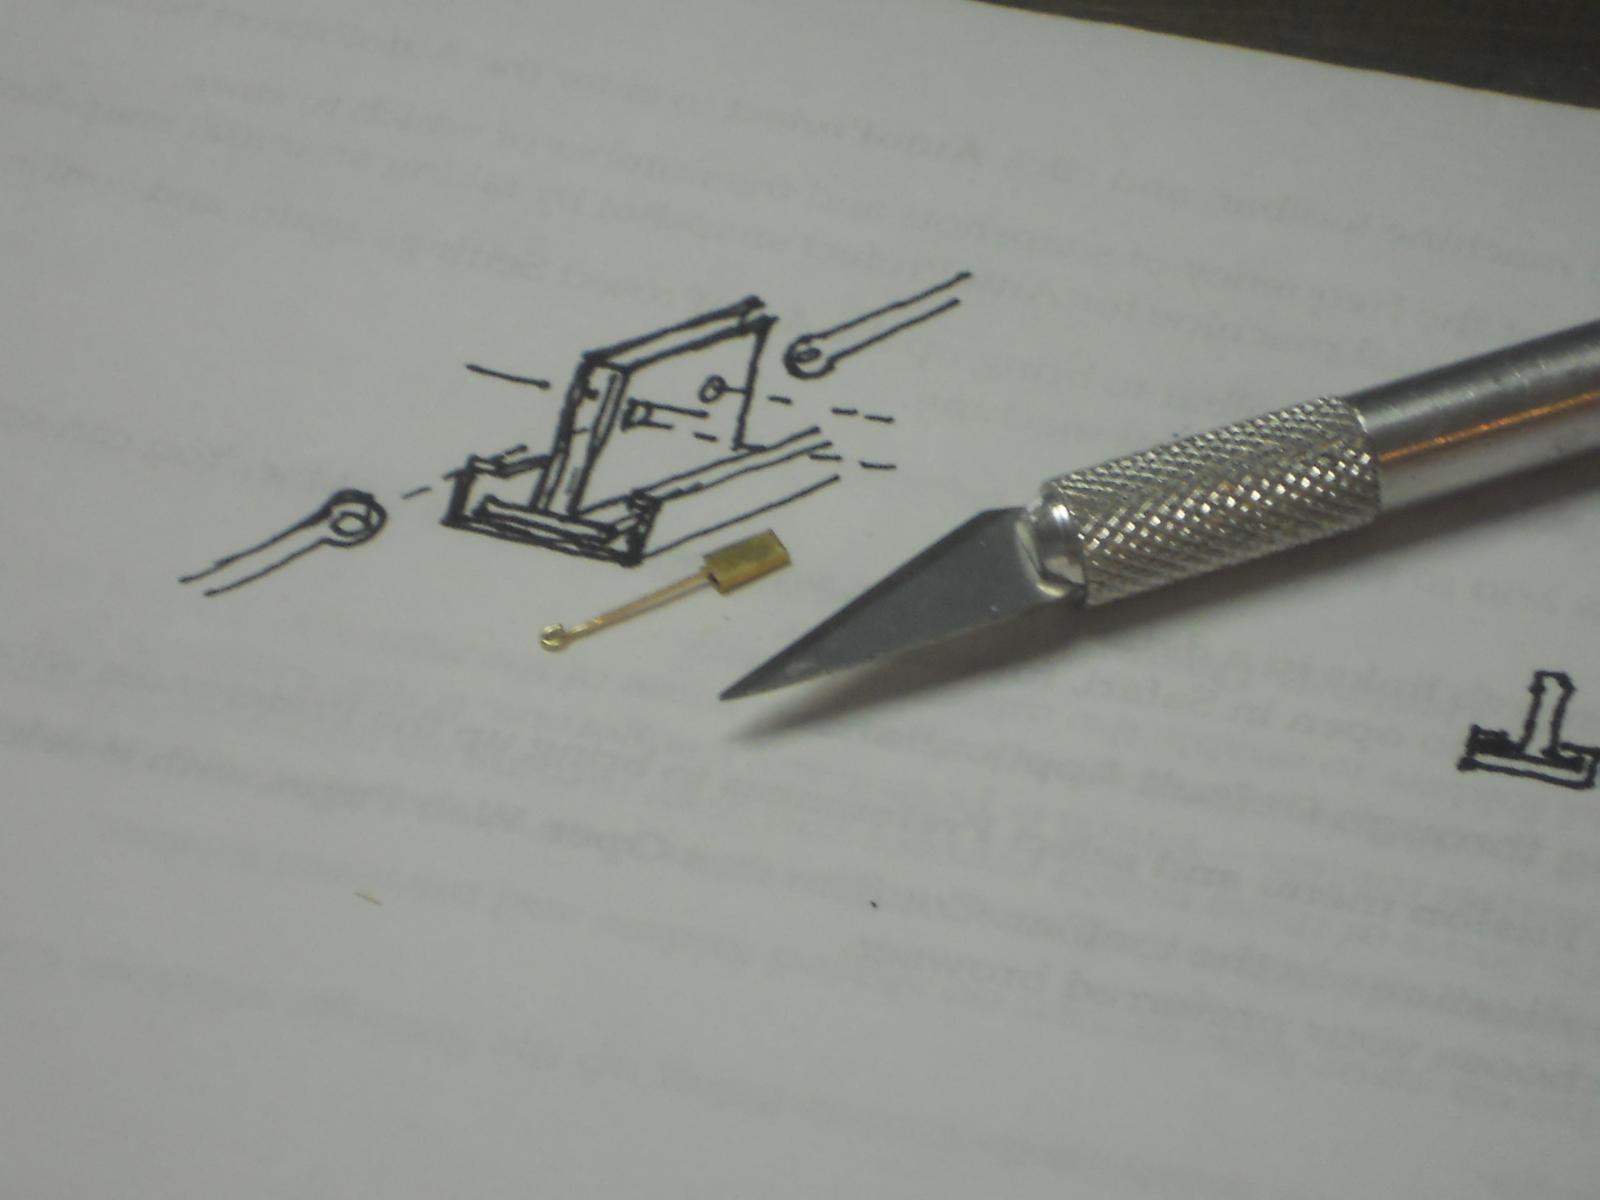
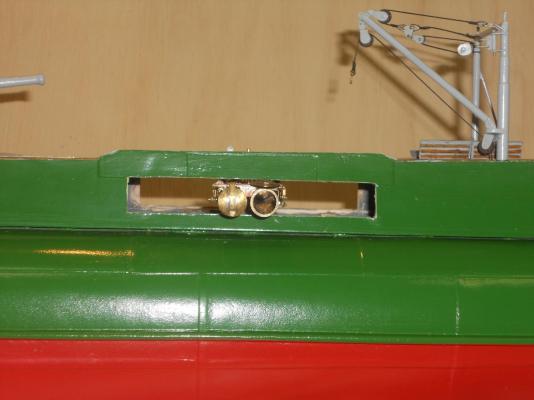
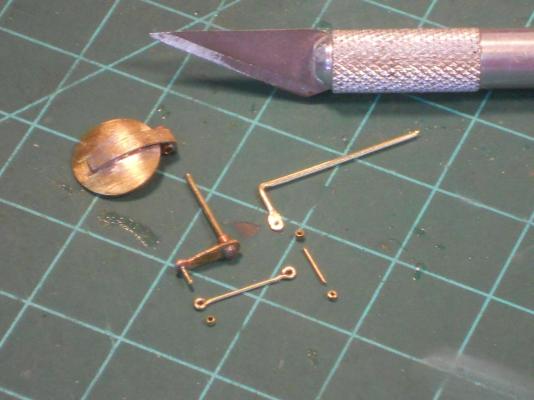
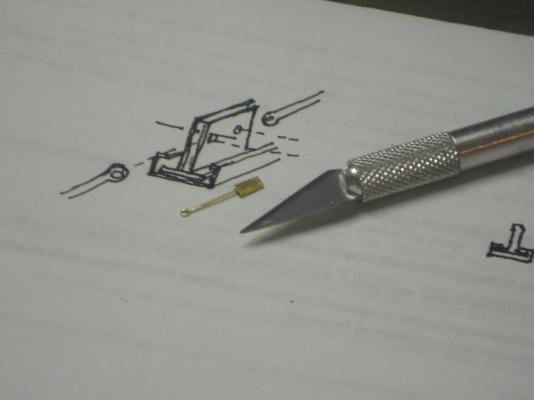
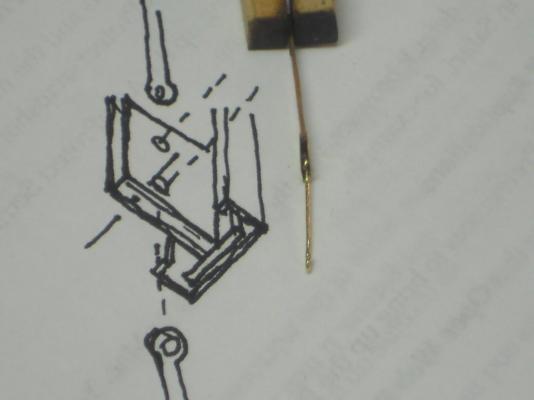
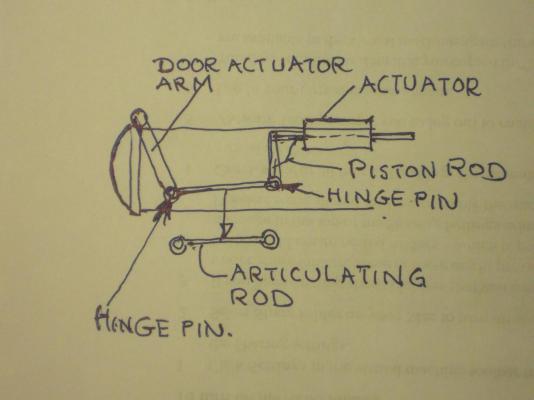
Hello everyone and thanks to all for visiting and enjoying my build. This is my second attempt to write this post. I completed my story on todays work and started adding e few pics when MSW froze I couldn't do anything to unfreeze it so I had to reboot my @*%^#$^ confuser and lost everything Okay, I'll start over. Today I fabricated all the parts for the torpedo tube doors. The first pic below shows all of them for one side. The other side looks the same - - duh I was thinking about how to connect the articulating rod to the heavier piston rod of 0.8 mm. Drill a 0.5 mm hole in it for a hinge pin? Hmmm, perhaps but no - - - so I figured that if I pounded the end flat and then drill a 0.5 mm hole in it would work better and look better. I took a ¼ inch drift pin and a gebanger (hammer) and put the rod end on a steel block of steel and gebanged the end flat. I shaped it nicely and attempted to drill a 0.5 mm hole in it. Hmmm, problem. I have no more small drill bits around that size, just the leftover shanks. Soooooh, I filed a triangular tip to ane end and proceeded to drill the holes. It works, believe me. Now, I mention this so that yuns can do the same thing with your broken drills. It only works for wood, plastic and soft metals though. I could now solder the hinge pins to the piston rod and the door actuator arm. Next I made two articulating rods with eyes on both ends but had to add solder to the piston rod that goes through the actuator to make it a little thicker in diameter. It was a bit too loos and I needed it stiff enough to hold the doors open. When I had all the hardware completed I put everything together and did a dry run to see if it worked. Eureka, it did - lucked out again! The only thing I'm a little concerned about is whether the CA will hold up in cementing the door to the hinge shaft. I made a test piece and so far it seems to work okay, keep our fingers crossed. I hope to have everything completed by tomorrow afternoon but I need to mow the front lawn first though. Then I need to give it an acid bath to etch the metal for the primer. It'll be painted a darker grey then the rest of the upper works. In one of my last posts I mentioned that I was not going to make the actual sliding shoe with it's guides. Well, this morning I thought to show you with a sketch and one actual piece I started on what I had in mind. I'm glad I abandoned it because it would have entailed a lot of work and rework. When you see the photos of today's accomplishment you should agree that my simple way looks acceptable, not as authentic but just okay. I'll be bacheloring it for the next ten days. Gwen is driving up north to Coraopolis, PA tomorrow morning at oh dark hundred (0600) to help our daughter Marianne with some stuff. Brave gall she is - - 900 miles in one day, 13 hours! Well, here are the pics. Here we see all the parts for one of the two doors. I kinda laid them out in the way they should be mounted. On the left is the door with its hinge shaft and arm. It also has the hinge pin already soldered to it for the articulating rod. This rod is positioned below that. To the right is the piston rod with its articulating arm hinge pin and the small 0.5 mm tube pieces, one to help soldering it to the piston rod and the other will act as the locking nut. You can see the locking nut (tube) below the articulating rod on the left. The hinge pins will be dressed down of course after the nuts are soldered to them. Here is the start of fabricating the slider shoe. I made a sketch to show what I was talking about. That small brass gismo is a U channel from 0.1 mm brass shim with the articulating rod end stuck inside it. I was ready to solder the shoe-plate to the bottom of the U channel at which time I put a stop to it. The sliding channel would be made in two parts. Both to look like U channels and then solder the long parts together. This would have to be soldered to the forward part of the torpedo tubes as shown in the original photo. Would it have worked? Most likely but - - - well, enough said. Perhaps at some later date, who knows - - I may just be crazy enough to try it anyhow. This shows that sliding shoe arrangement seen from the top down. You can clearly see the articulating rod inside the shoe. Here we have all the door actuating parts loosely installed for the trial. Looks okay to me and works as advertised. Here we see it with the door open. I'm a happy camper Cheers,

-
Hello Ian, yes fore sure, it's great seeing this thing close to being finished. Just the door actuating mechanism and paint. Then we have to tackle the deck structure where this thing will be located. Hoi Sjors, yep, I sure know what I'm doing, it helps I had to put my engineering heat on though There's a bunch of stuff I couldn't add, too small and it wouldn't add anything to the launcher model. Thank you for your compliment, it's beginning to look a little like the original photo. Hi Pete, thank you. That's just a very quick sketch made to help clarify my attempt to describe what I'm trying to do. Yesterday I mentioned abandoning the thought of making the sliding shoe, well, I figured I make another quicky sketch and the fabrication of the shoe. Pic below. Hi Mark, thank you, thank you! :im Not Worthy: Hello Kevin, right now, no, the deck structure still needs to me modified some. I started with removing some plating from the bottom and sides of the opening on the port side but the starboard side still needs some surgery. This'll be another tedious operation with little space to work in and have to improvise / make some tooling for that. Hmmm, torpedo tubes on the Victory eh - - - - . You better have a few good minesweepers but they won't do you any good My sub has 40 mines and many are of a very secret design, unique I might add. I discovered that very rare smelling enzyme of the giant of the famous encounter with Jack and the Beanstalk. That "sniffer" enzyme is 1000 times more powerful than a dog's. Sooooh - - - I installed little sniffers with that enzyme in floaters on the mines and they will float up to the surface and start sniffing. As everyone knows it's highly sensitive to smelling Englishmen - - - fee - fi - fo - fum - - I smell an Englishman. As soon as your ships sail near and over my mines - - - kaBOOM and it's good buy all y'all - - - buwahahahaha hahaha haha Cheers,
-
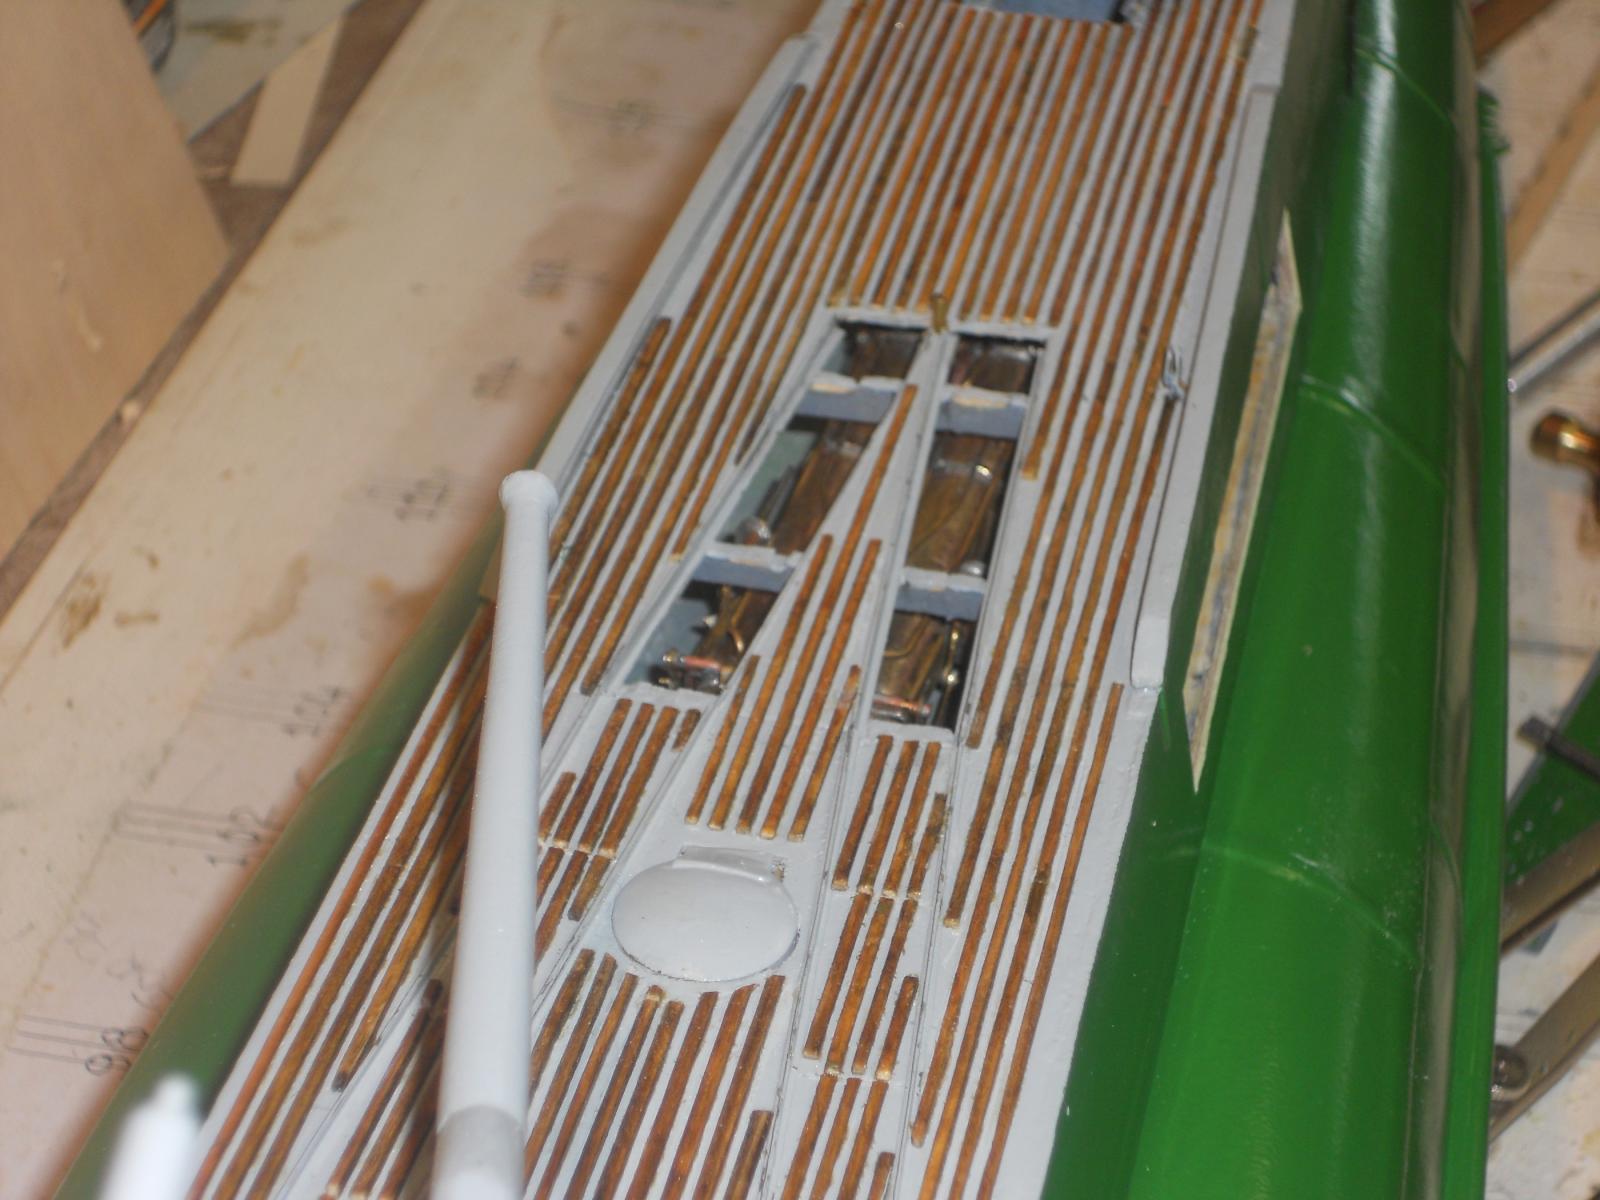
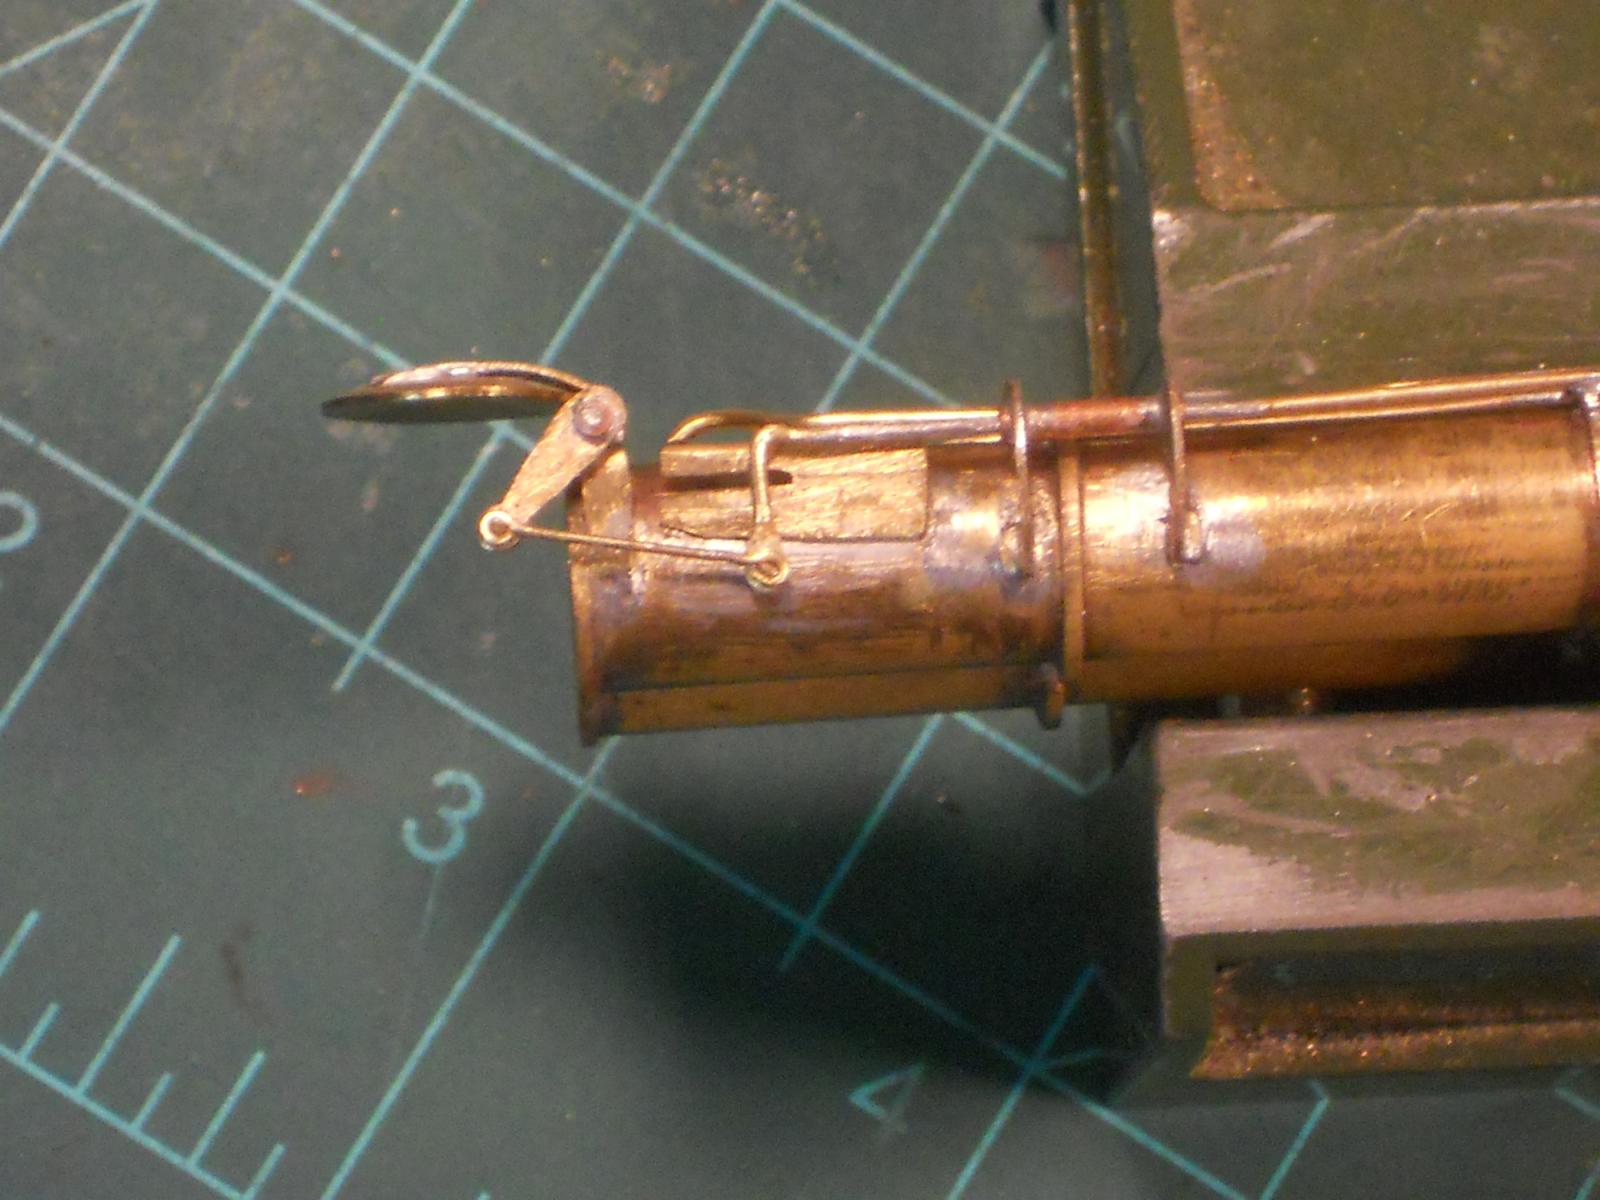
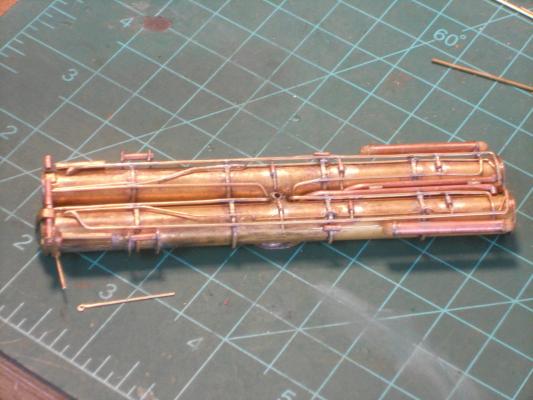
Hello all, today I completed the piping on the torpedo launcher unit, I think At least I'm calling that part done. I started with fabricating the door hinging mechanism and have to simplify it. In order for me to make the slide shoe movement I would have to fabricate a flanged U channel for the shoe to slide in and also keep the shoe locked inside. It's like a square tube with a slid cut in the top. Oh I guess I could probably make something like it with the shoe having a foot that keeps it inside. Even at this scale of 1:50 it's just too small to make it look authentic and is not worth my efforts with the great probability that I would have to discard many trial pieces and damaging the other stings close to the front end of the launcher. Sooooh, I'm making a hinged arm on both ends that are pinned to the door actuator arm and the piston rod. I can't CAD a picture of it - - - but wait, let me make a quick sketch so yuns see what I plan to do. First I though of making a fake shoe just to make it look close to what the original photo shows but thought better of it to just forego the fake stuff. It'll be enough of a challenge to make the pivot arm pivot on the pins without soldering it all locked up tight. I already started the pin for the doorarm, which is temporarily kept long till I have made the articulating rod. I used a very small piece of 0.8 brass tube on the end of a brass rod and soldered them together. This'll act as a head and had to file it down to about a fraction of a mm so it can clear the forward flange of the torpedo tube. I have bend one eye on one end of the articulating rod, waiting to see how long to make it before I can bend the other eye. Then the actuator piston rod, that'll just be a brass rod bend 90 degrees with an eye on the lower leg as my sketch shows. You can see the door hinge arm with pivot pin and the start of the articulating rod. Right now I'm just experimenting with this and let yuns know and see how it came out. Keep your fingers crossed and wish me luck Well, here are the pics, the top one is with all the piping completed with the hinge pin and articulating arm next to it. The other one is my sketch of the planned door actuating mechanism. All piping is now installed to the best of my ability including the cross-way pipes with their little gizmos and the two side gizmos that may be check valves. You should be able to see the hinge pin on the door arm and the unfinished articulating rod laying in front of the launcher. With my explanatory dialog above this should be easy to follow. Watch out, the ink is still wet so don't smudge it I hope all y'all agree with my plan. Cheers,
-
Thanks to everyone visiting and your likes and for those who commented, it's much appreciated. @ Dave B, thanks you and yes, I also hope my physical condition will turn out okay. @ omega, thanks for the compliment my friend. Yep, that was another way to skin the cat making it possible to do some work while having these frequent urges to pee right after the BCGI treatment. It only lasts for the one day and that's a good thing. Yes, obviously each and everyone making models try to do the best they can with the tools and skills they have. Starting out the skills need to develop and over time we can produce some very good results for our efforts. We must always keep tying to improve and learn from our previous mishaps. Always ask, why did this happen? What can I do to make it look better. Read about other people's mistakes and fixes. Then there are handbooks and journals. More tools don't necessarily guarantee great models. Know what the tools can do, how to handle the wood or metal is perhaps one of the keys to a successful model. All I can add is - keep at it, keep at it and be proud of what you have done. The next one will be better. @ Dave Sawdust, thanks for your comments of encouragement. We model because we enjoy creating something from a pile of wood or plastic to a 3D image of something we enjoy looking at. We do it for our own pleasure not someone else's. @ Pete, thank you and yes, I'm feeling rather chipper. Fortunately it's only uncomfortable for that one day after the procedure. Three more to go, yippee @ Remco, thanks my friend, yep, the internal plumbing is important and I'll know after all the treatments are done and then an internal look-see. I'll ask the doc to put the scope images on the monitor so I can also admire the insides of my bladder. Unfortunately they don't have video hook-up otherwise I would get a DVD of it @ Ian, thank you very much, we try Cheers,
-
Hi Freek, great Scot man, your parents were totoks too ??? Wow, small world, I was born in Soerabaja (Dutch spelling) way back in 1934 and left in 1947. I learned to speak Indo from our live in maid / nanny. My dear bride Gwen was born in Batavia in 1941. Yep, my father and thousands with him did a valiant try to stop the Jap onslaught. Cheers,
-
Beautiful job on the companionway stairs Kevin. What's the function of the stun boom? Oh, I guess I could Google it but like to hear it from you Hey, I'm an airplane guy and airplanes don't have booms sticking out the fussilage Cheers,
- 1,319 replies
-
- 2
-
-
- caldercraft
- Victory
- (and 1 more)
-
Beautiful job Freek! Yeah, a shame about the tape glitch but you'll fix that I'm sure. Yeah, "tjetten" is the Dutch way of writing the Indonesian word for to paint or painting. Paint is spelt "cat" in Bahasa Indonesia, where the c is pronounced as tj. Looking forward to your videos with the O-1 in action. Cheers,
-
Always ready with an answer, eh Remco Brilliant! Cheers,
-
Sheer poetry Pete, gorgeous. Cheers,