Keith_W
-
Posts
1,145 -
Joined
-
Last visited
Content Type
Profiles
Forums
Gallery
Events
Everything posted by Keith_W
-
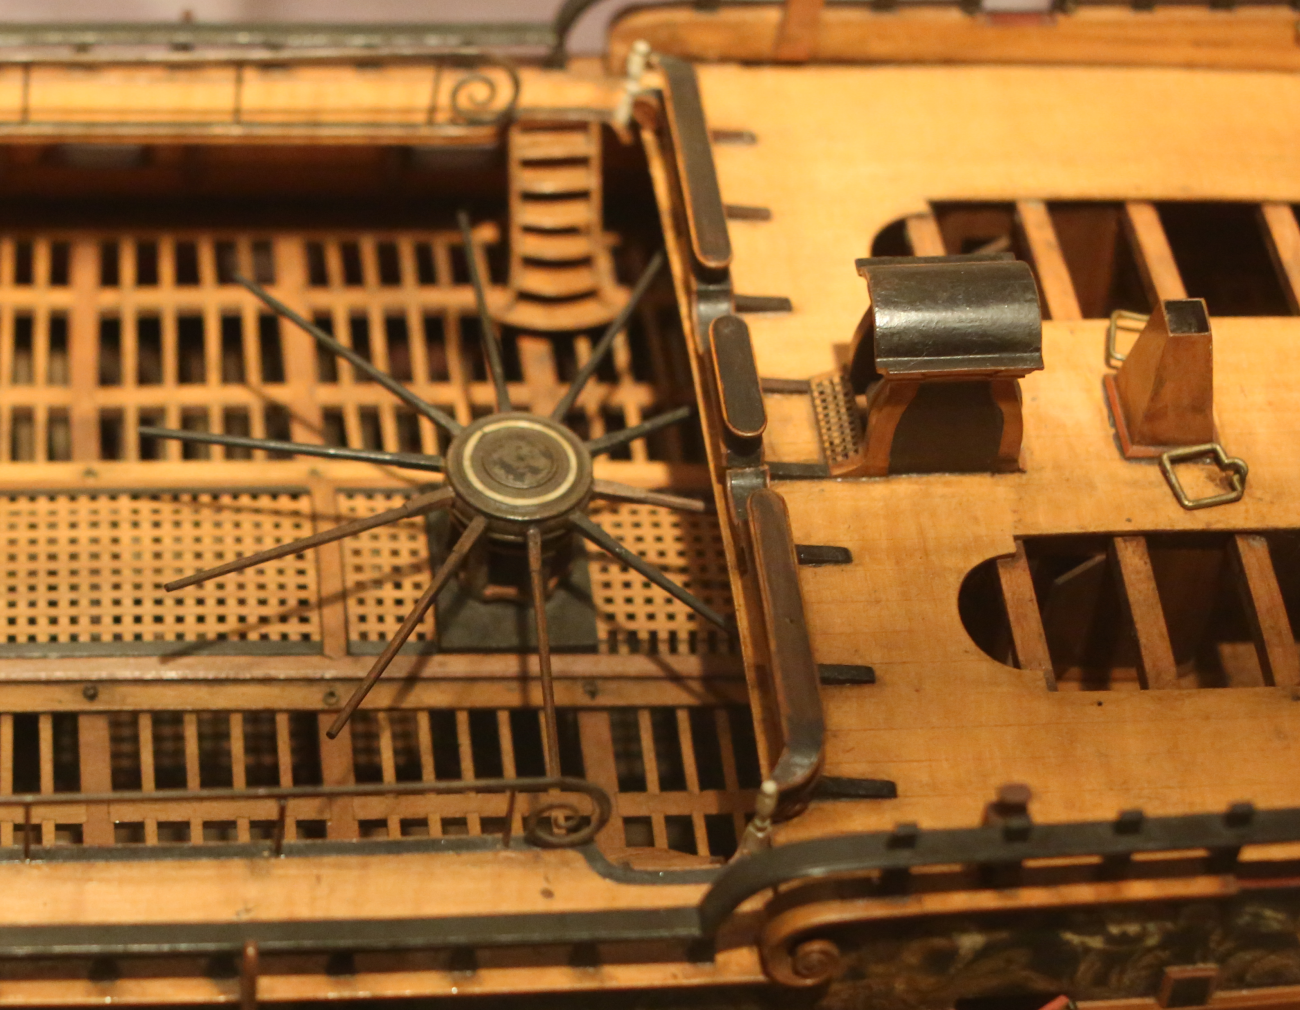
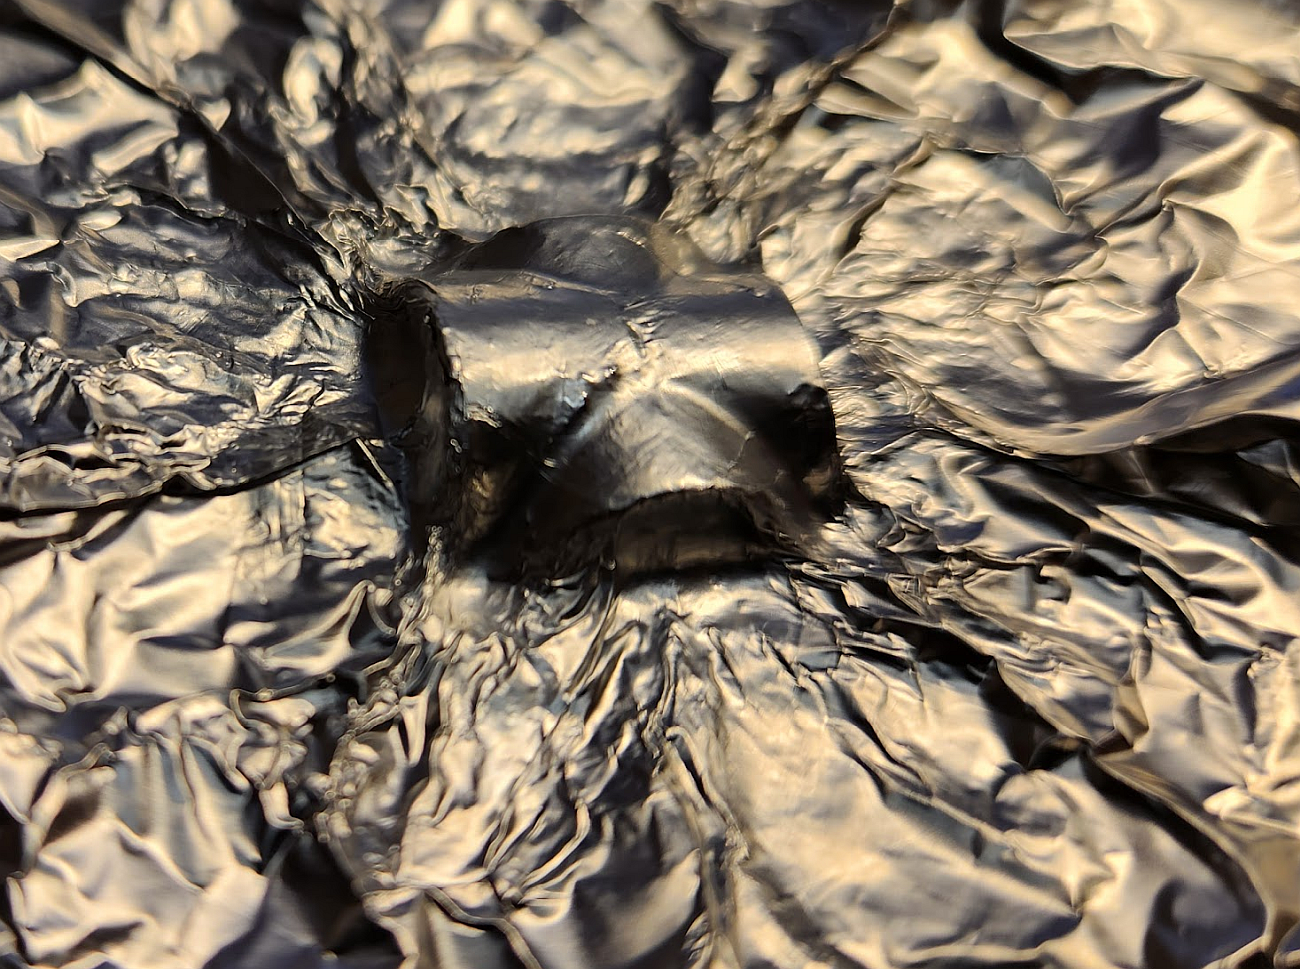
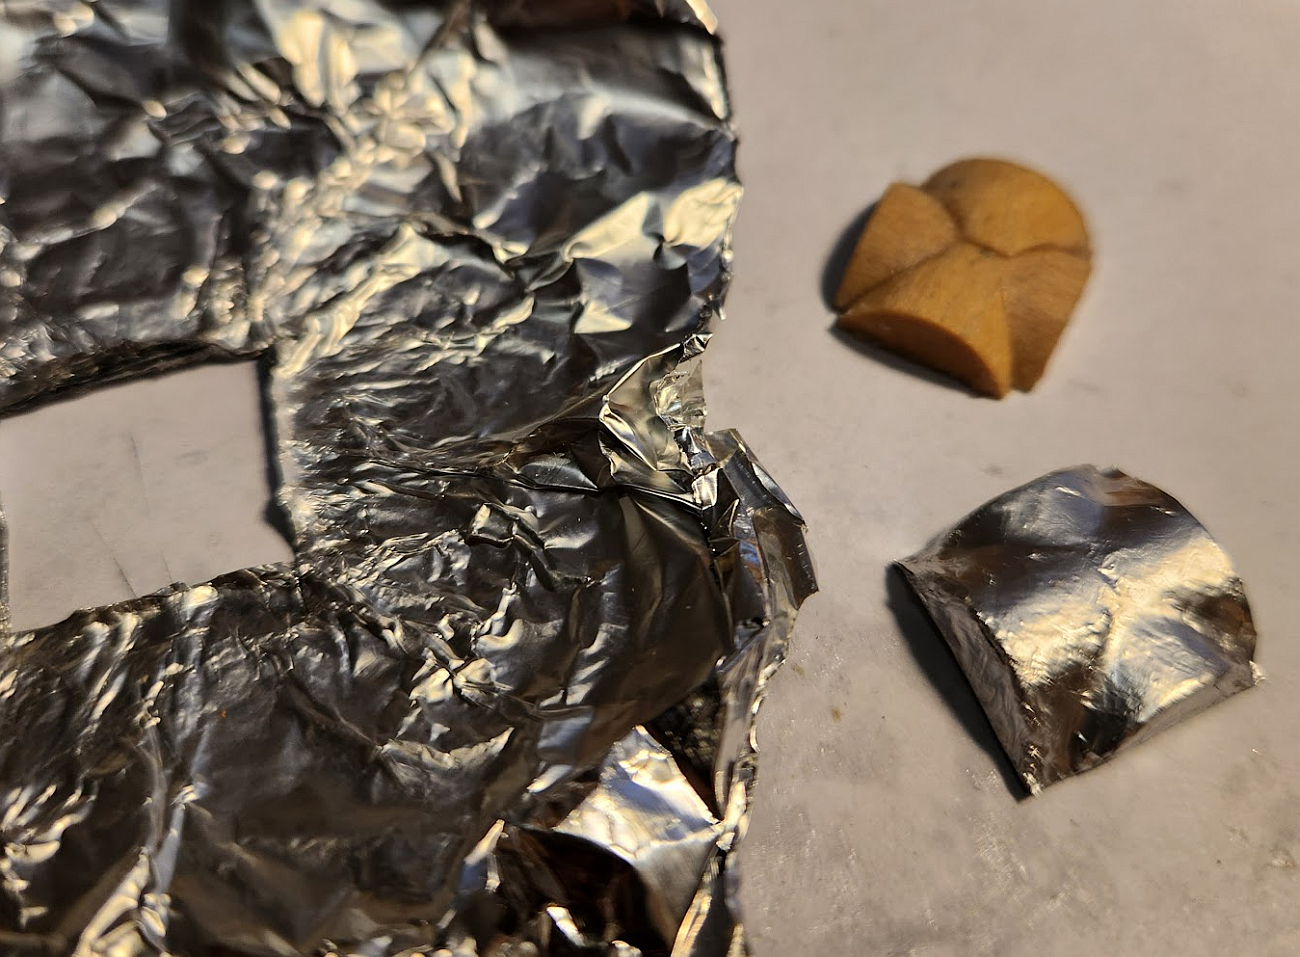
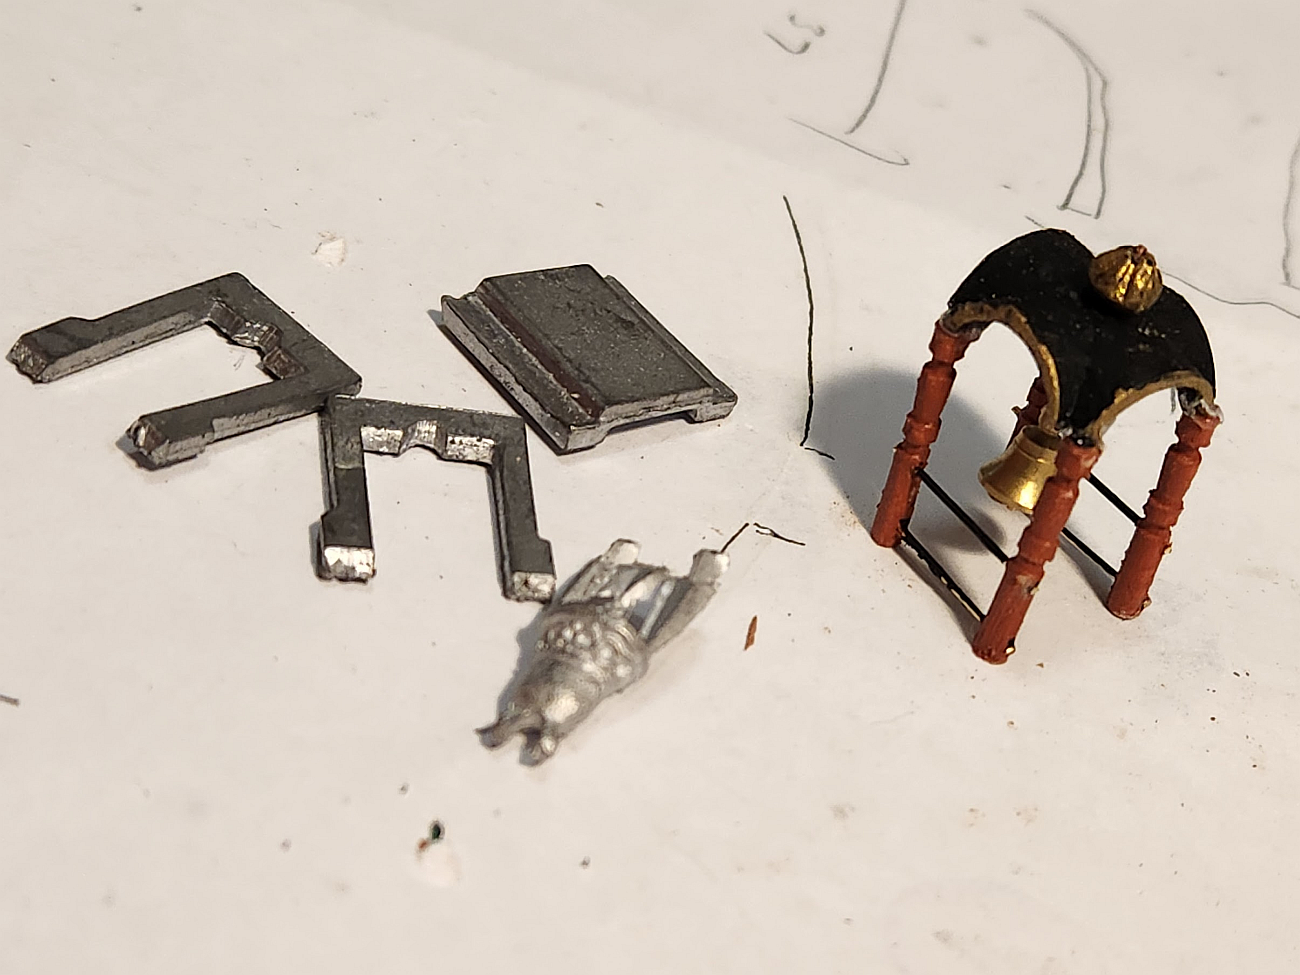
 I was not happy with the appearance of the belfry as supplied with the RW kit. It appears to be taken from the model of the RW at the National Maritime Museum in Greenwich, UK. This is a photo of the belfry that I took when I visited Greenwich a few years ago: However, the model at the USNA museum is much more ornate: So, I pondered how I am going to replicate that, given that carving it is beyond my skill level. I came up with this solution ... I don't know if I have invented a new modelling technique. What you need is some tinfoil, CA glue, and a mold to form the shape around. My idea was to laminate multiple sheets of foil with CA glue around the mold. The mold was made by taking a dowel, splitting it in half, and then carving out the underside of one of the dowels so that the other half could fit. A Dremel with a drum sander makes easy work of it. Rub the mold liberally with vaseline (in case the foil tears and CA sticks the foil to the mold!). Then lay the first layer of foil on top and gently work around the curves with a Q-tip cotton bud. Once nicely pressed, apply a liberal layer of CA glue. It needs to be slow curing! I did 7 layers of tinfoil, then left it alone for a couple of hours to make sure the CA glue really sets. Cut it out and Dremel it into shape. At this point, it is what you expect 7 layers of laminated alfoil to be - it is really light, but stiff enough to handle. But it is not super tough and it WILL deform if you do not handle it delicately. But ... it's a belfry. It is not a structural component (where strength is important), and I do not anticipate anybody is going to touch it. So it will do. After I sprayed it with metal primer, I painted it. This is the result, compared to the Euromodel supplied belfry. I purchased the bell from a model shop. It is turned brass and much nicer than the cast white metal bell supplied with the kit. I am not happy with the wonky legs of the belfry or the rather scruffy appearance after glue-up. I will revise it.
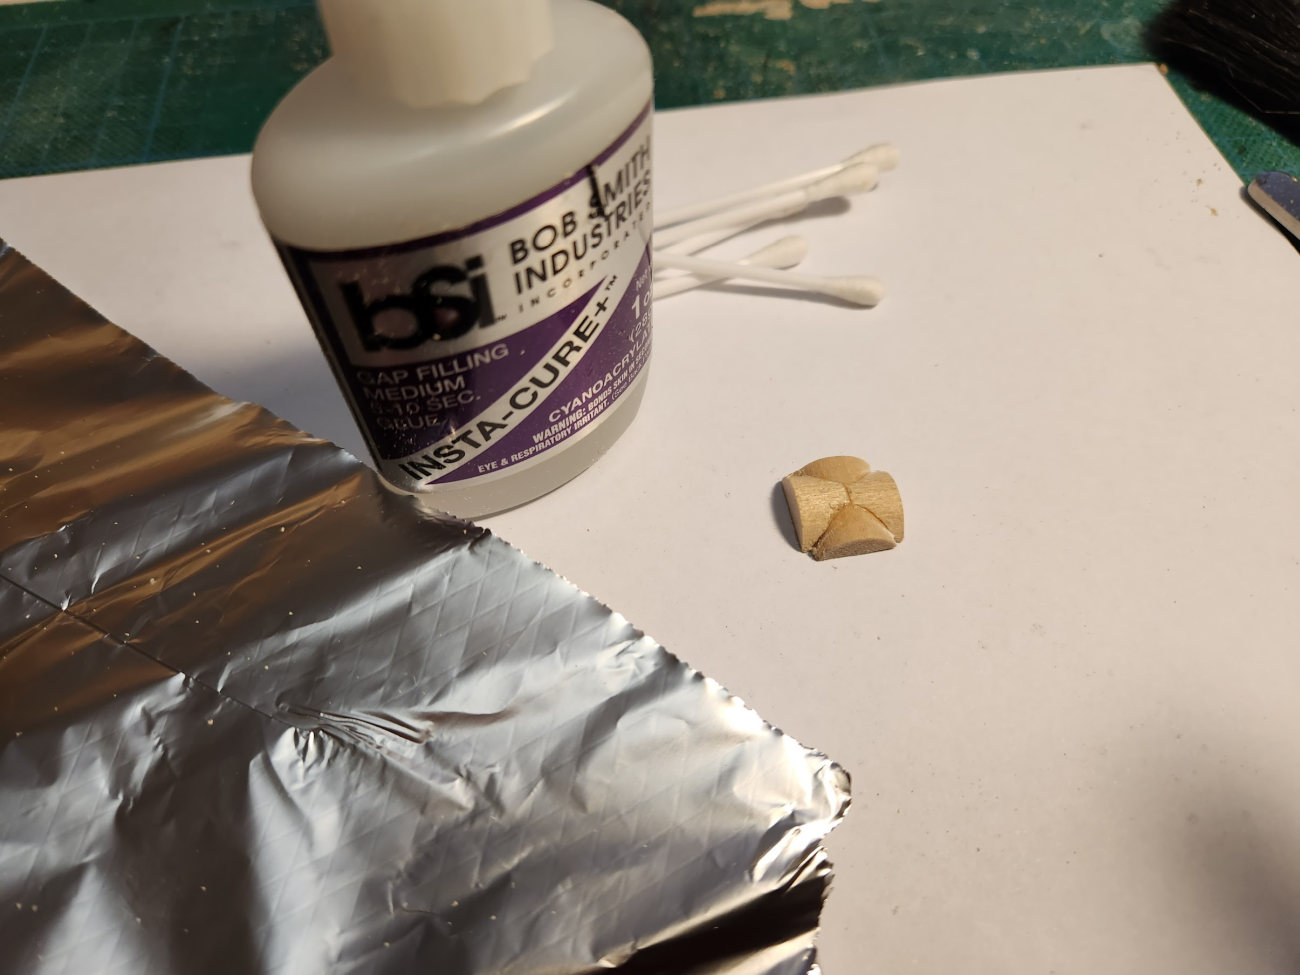
-
That is awesome! Thank you for doing this. I'll probably thank you in a way that really matters by buying a kit 😁
-
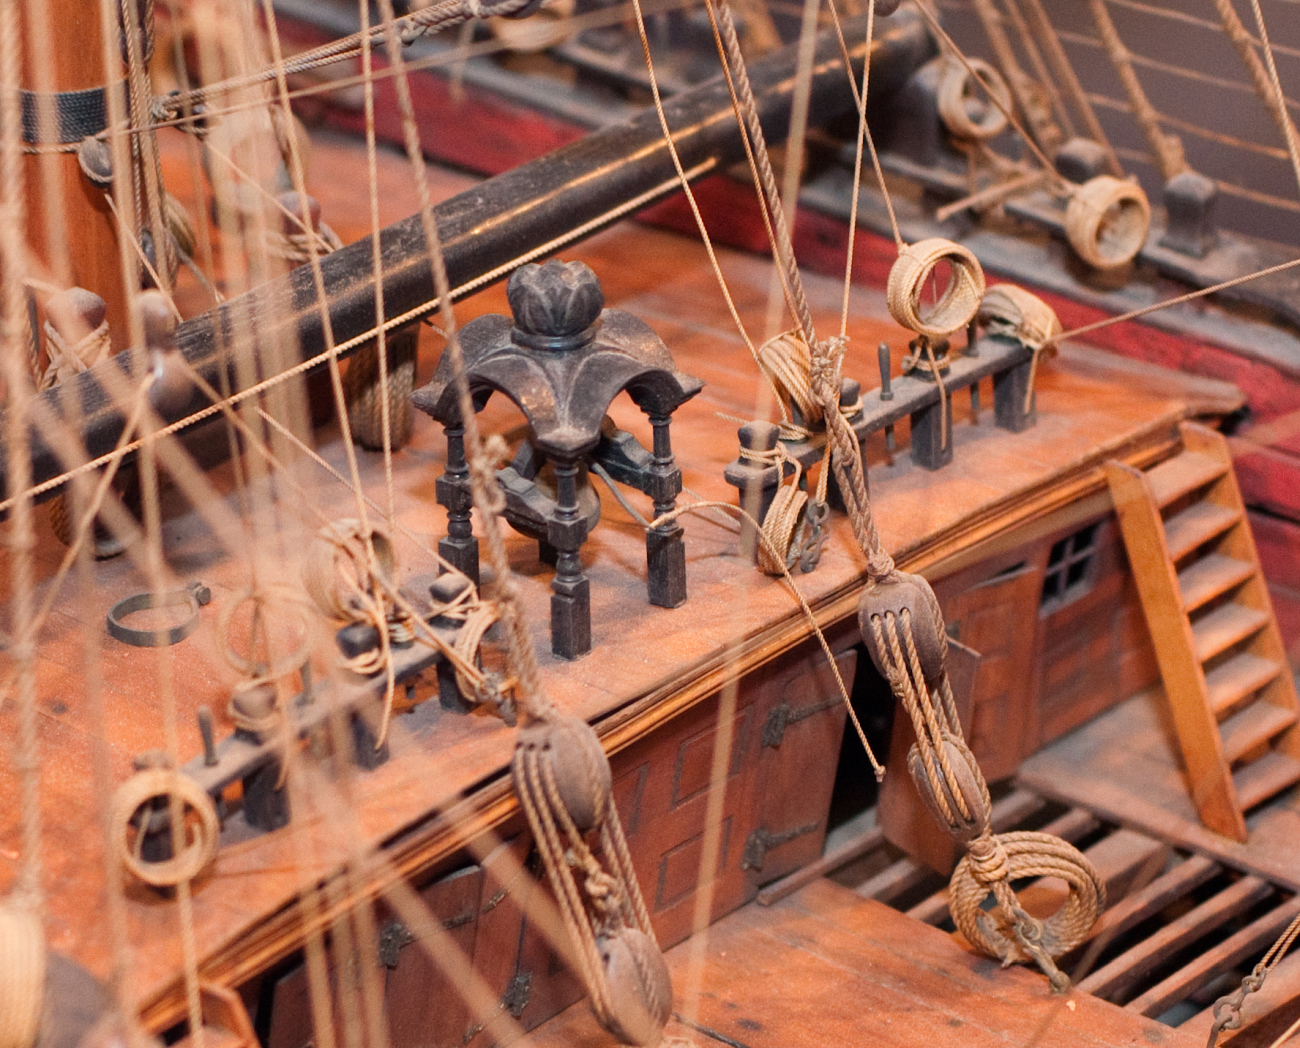
You are correct, the image I consulted was this one I found from a Google search: However, I did not have enough double blocks to do all of them. I had plenty of singles, so I came up with a solution that works provided you don't look too closely 😀
-
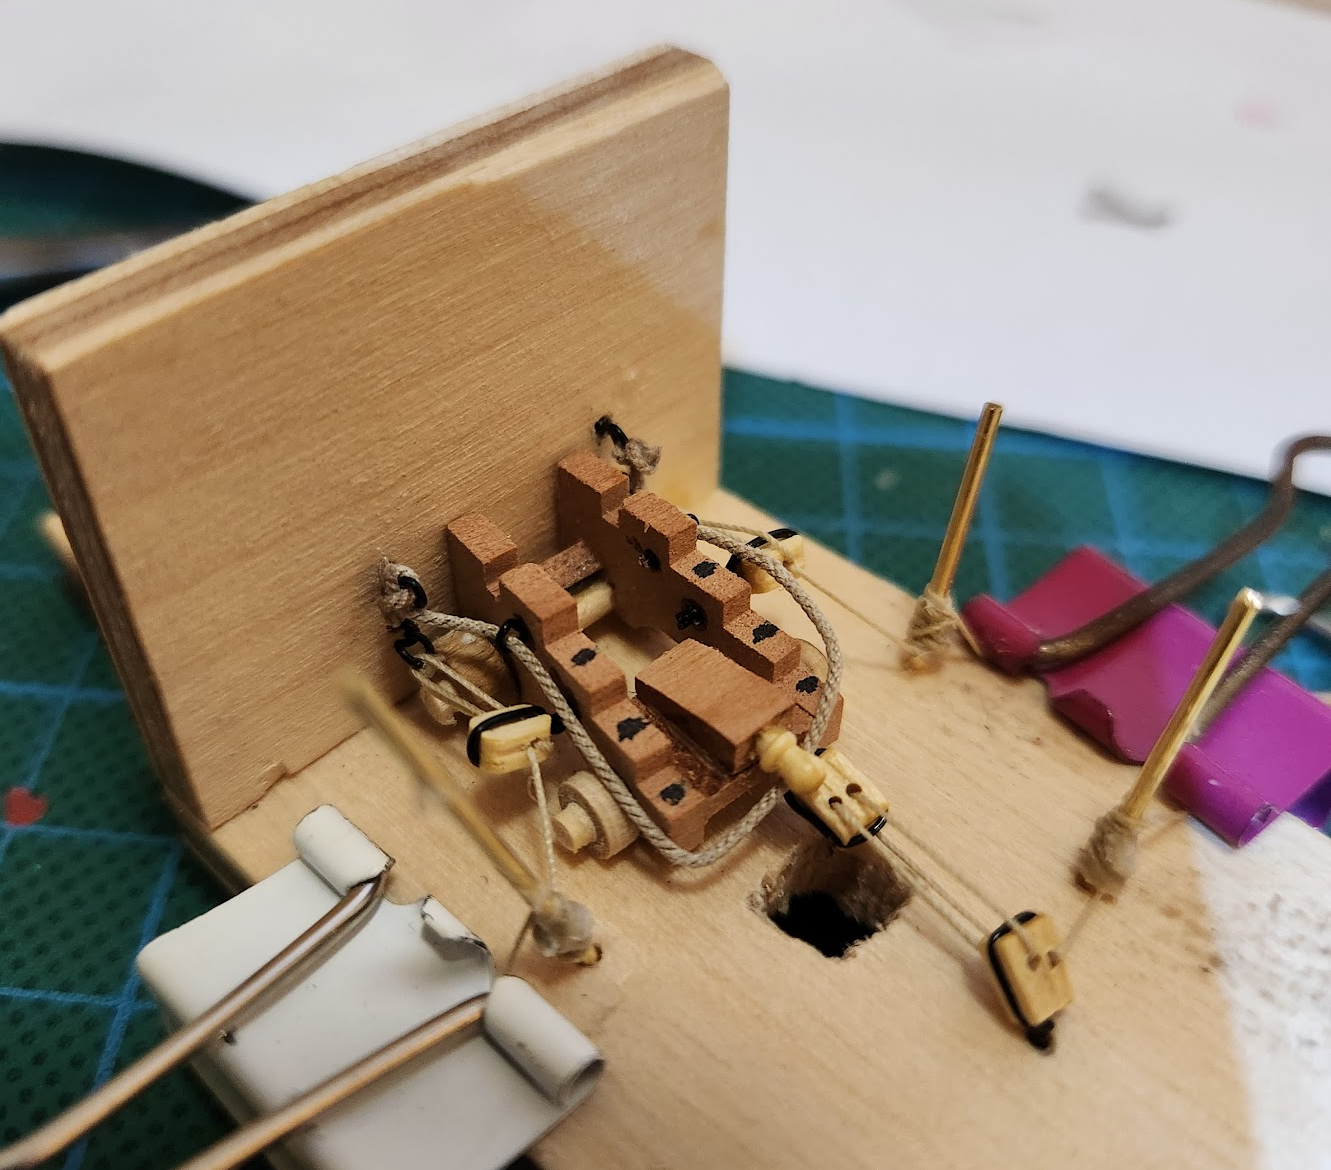
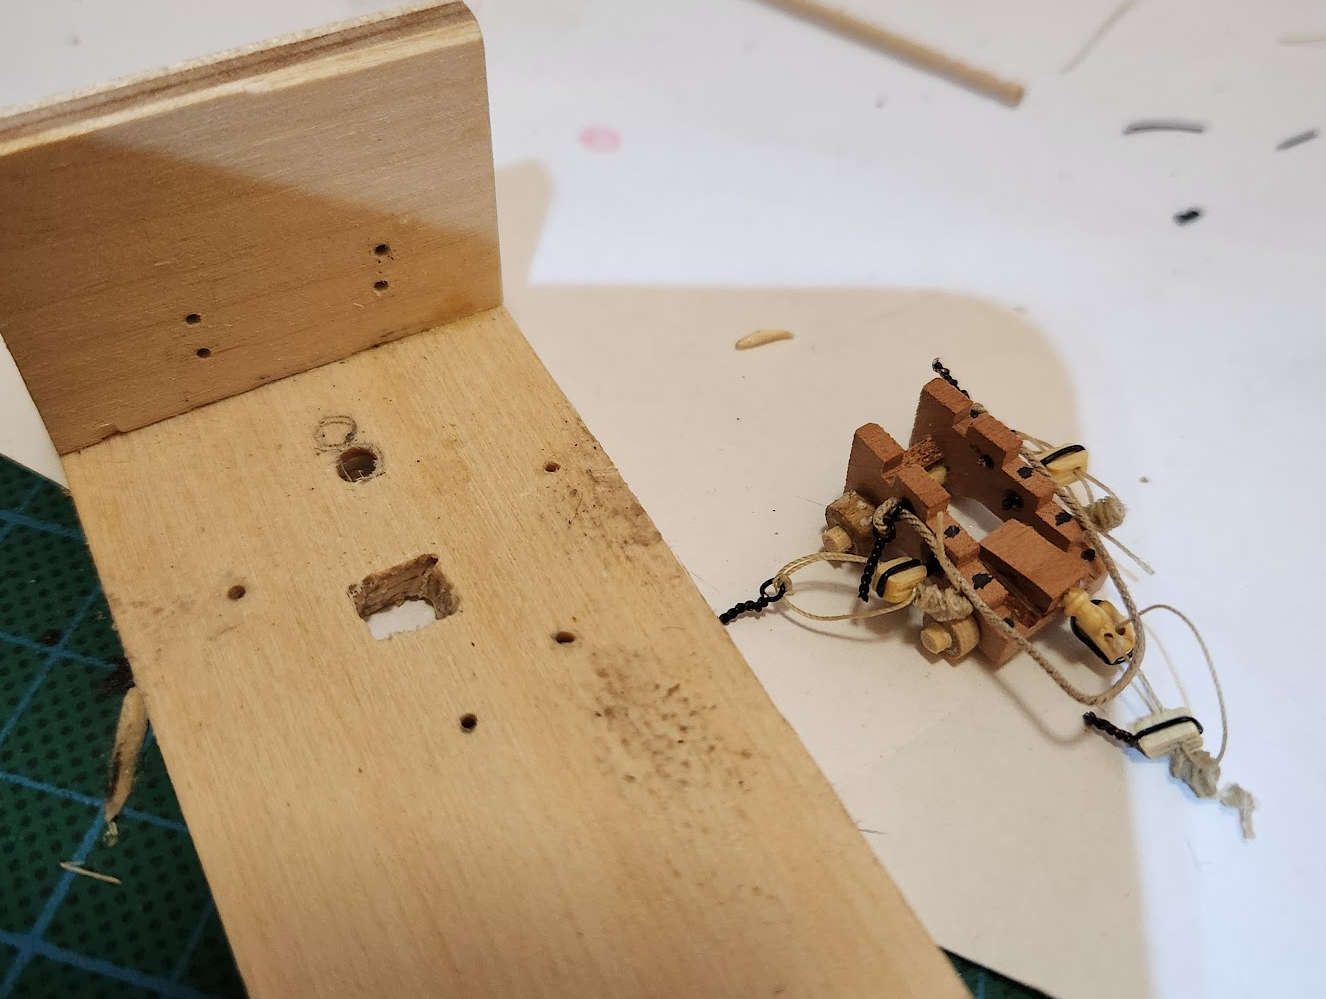
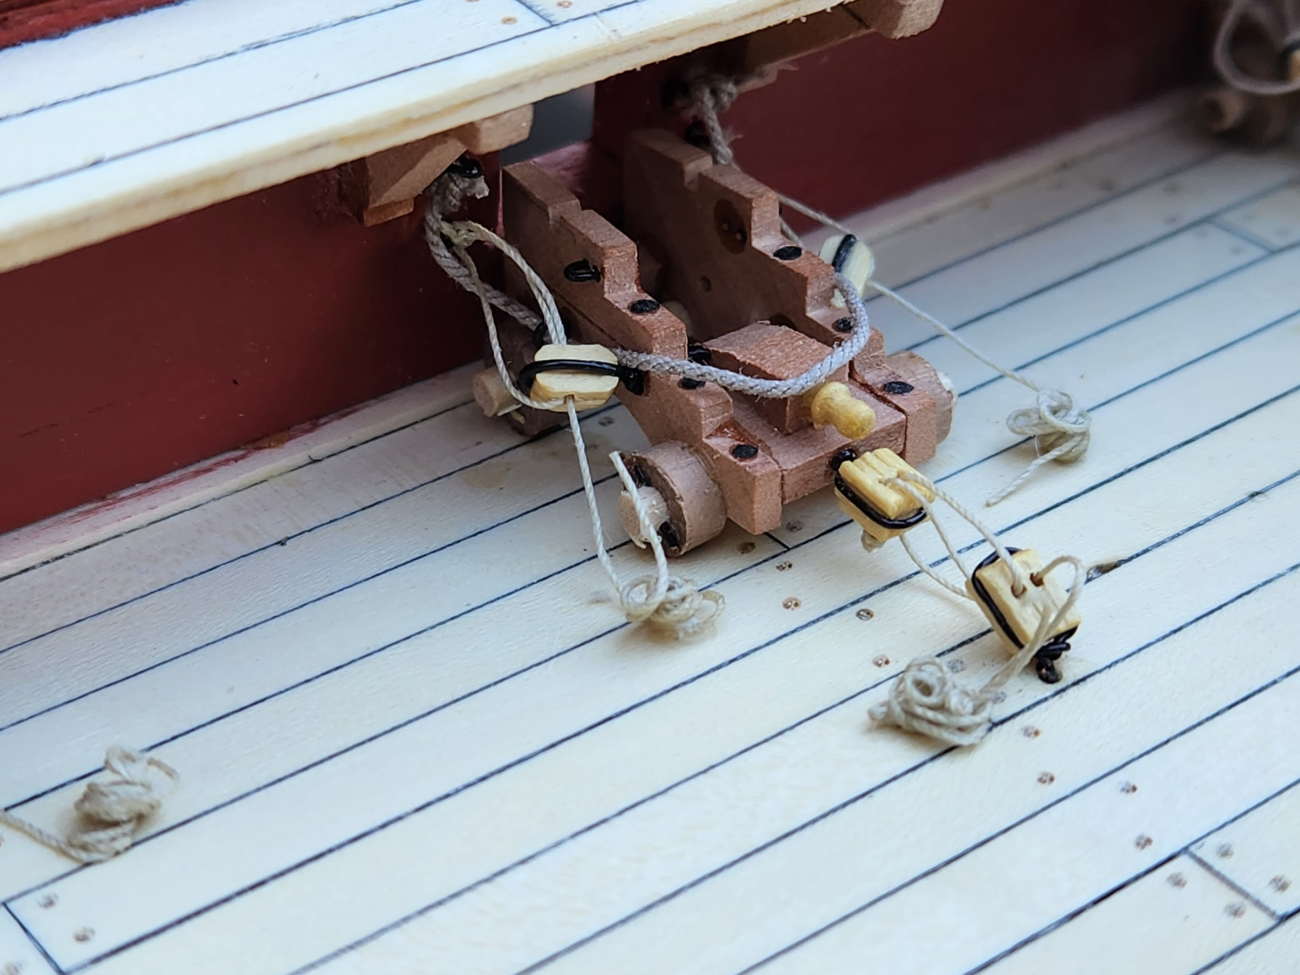
Thank you for your likes and comments everyone! @piratepete007 I think many of us belong to both categories (modellers who have finished and abandoned projects). I have only completed 4 models, but I have abandoned two of them. I made too many mistakes with my first two models so I never completed them. With the first one, I completed the hull and gave it away. The second model was thrown out. This is my 5th model and my most ambitious one. I have made many mistakes with this build, some which can be rectified, some which I left. In hindsight, I should have tackled an easier build where most things have been done for you before attempting a kit like this. I would highlight some areas of great difficulty that Euromodel could improve - the main one providing a template for cutting gunports and several parts (e.g. transom supports 56 and 57) , because mistakes here can have catastrophic knock-on effects that can not be fixed! Anyway, I am on to the "easy" part of the build, where I am adding details and not structural elements. Anything I do from here can be rectified if I make a mistake. In a sense, this is much more relaxing than having to measure and triple measure parts which have not been created yet or attempt to visualize how something that can not be supported is going to fit. I have made everything fit through my own solution - by scratchbuilding parts so I can guarantee that they fit. I have completed all the gun carriages now. What started off as fun when I did the first one quickly became tedious after having to do so many. Fortunately, I made a gun carriage rigging jig that made my life easier: It is just a simple jig I threw together from spare kit plywood with holes drilled in it. You can see the features of the jig: there is a square hole that allows me to work on that block from the bottom. I made all the ring bolts oversized so I just push the bolt through the hole, bend the wire at the back, and it holds it secure while I pull on the ropes. There are also brass rods which allow me to make rope coils. You can see that I am using my own scratch built gun carriages instead of the supplied kit carriages which are too square and do not have the tapering angles found on real gun carriages. Once rigging is finished, simply pull all the ringbolts out of the holes and it is ready for mounting on the ship. Here is one of them, mounted on the ship. I had 30 of these to make, I estimate it took me 2 hours per gun carriage. 3-4 hours to mill all the parts, another 4-5 hours to make all the ringbolts and tackle, 30 min per carriage to assemble, 45 min per carriage to rig, and 10 min per carriage to mount. Then there are the guns which took me a few hours to clean and blacken. I will wait until more of the hull is completed before I mount the guns. It took a lot longer than 10 minutes for tricky carriages like this one which are under the gangway. I rehearsed talking like a sailor when attempting to push pins into holes that I could barely see. I don't know what I was thinking when I installed the gangway before making the carriages - so other RW builders, don't do this! For historic accuracy I should have painted the carriages red. But I do like the look of pear, so I left them in natural wood.

-
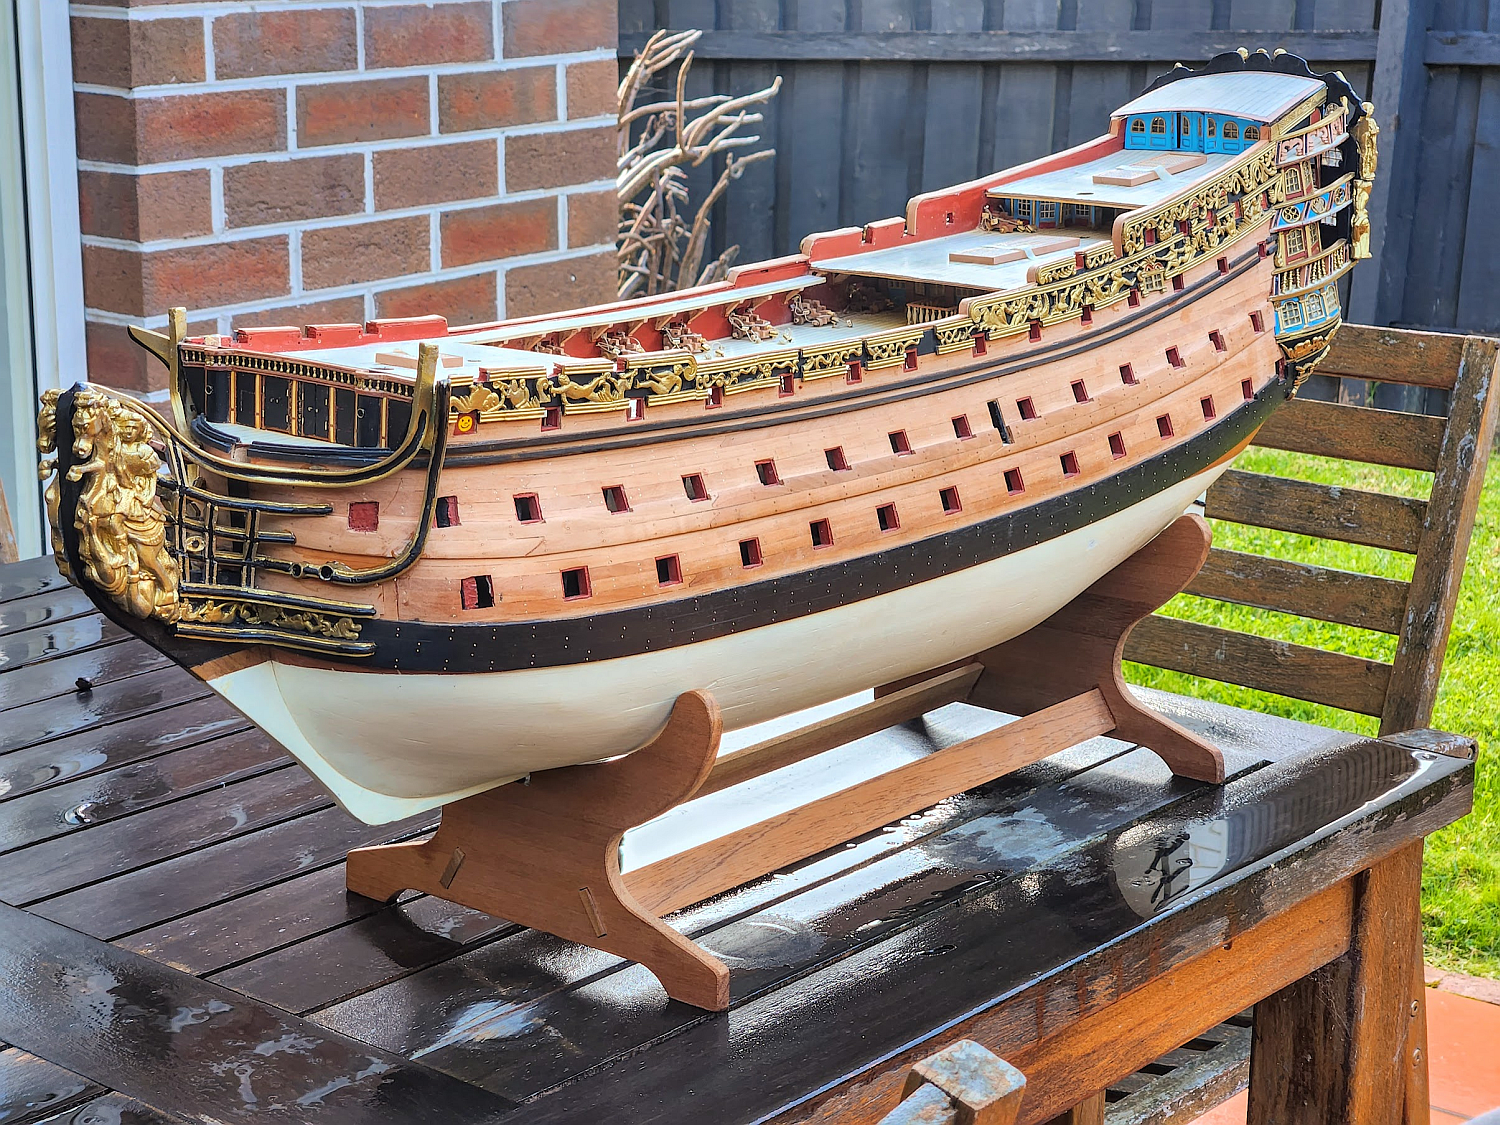
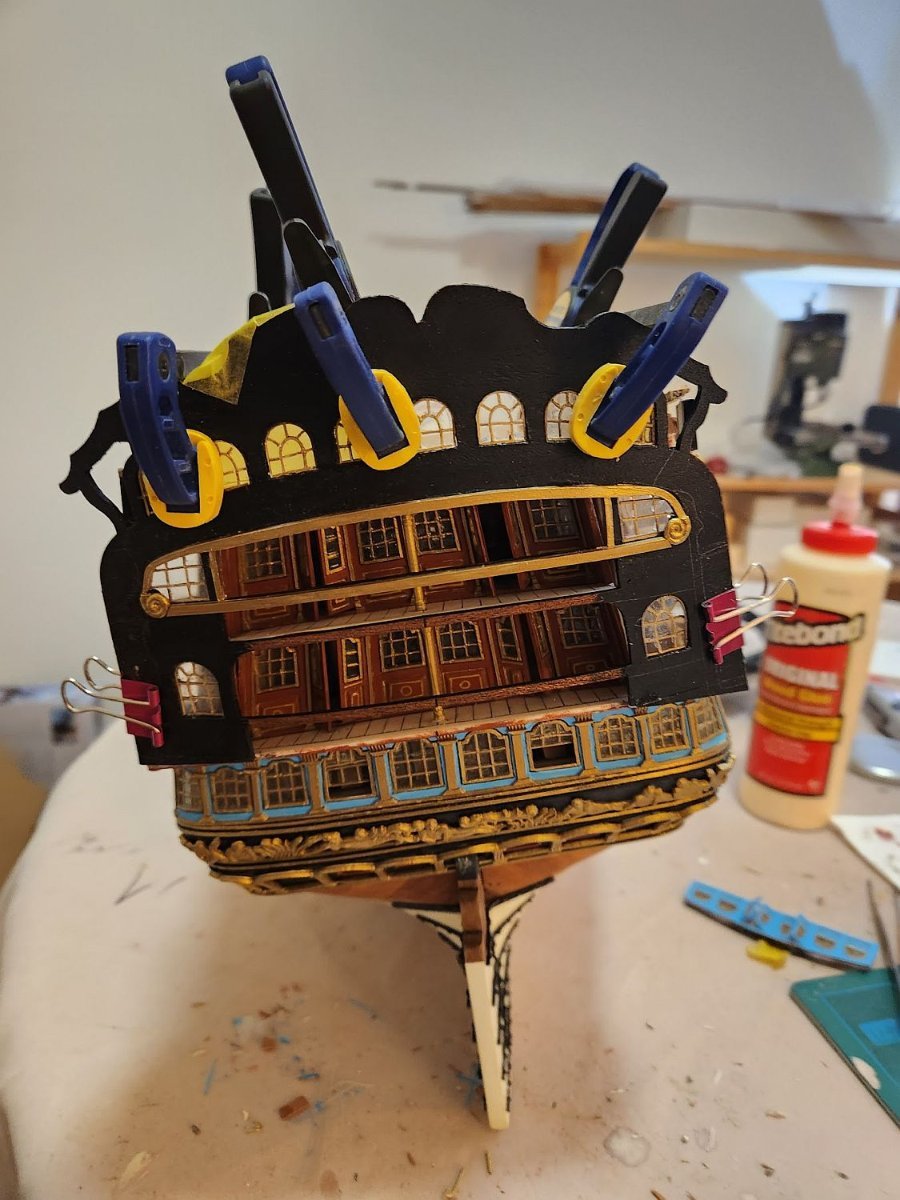
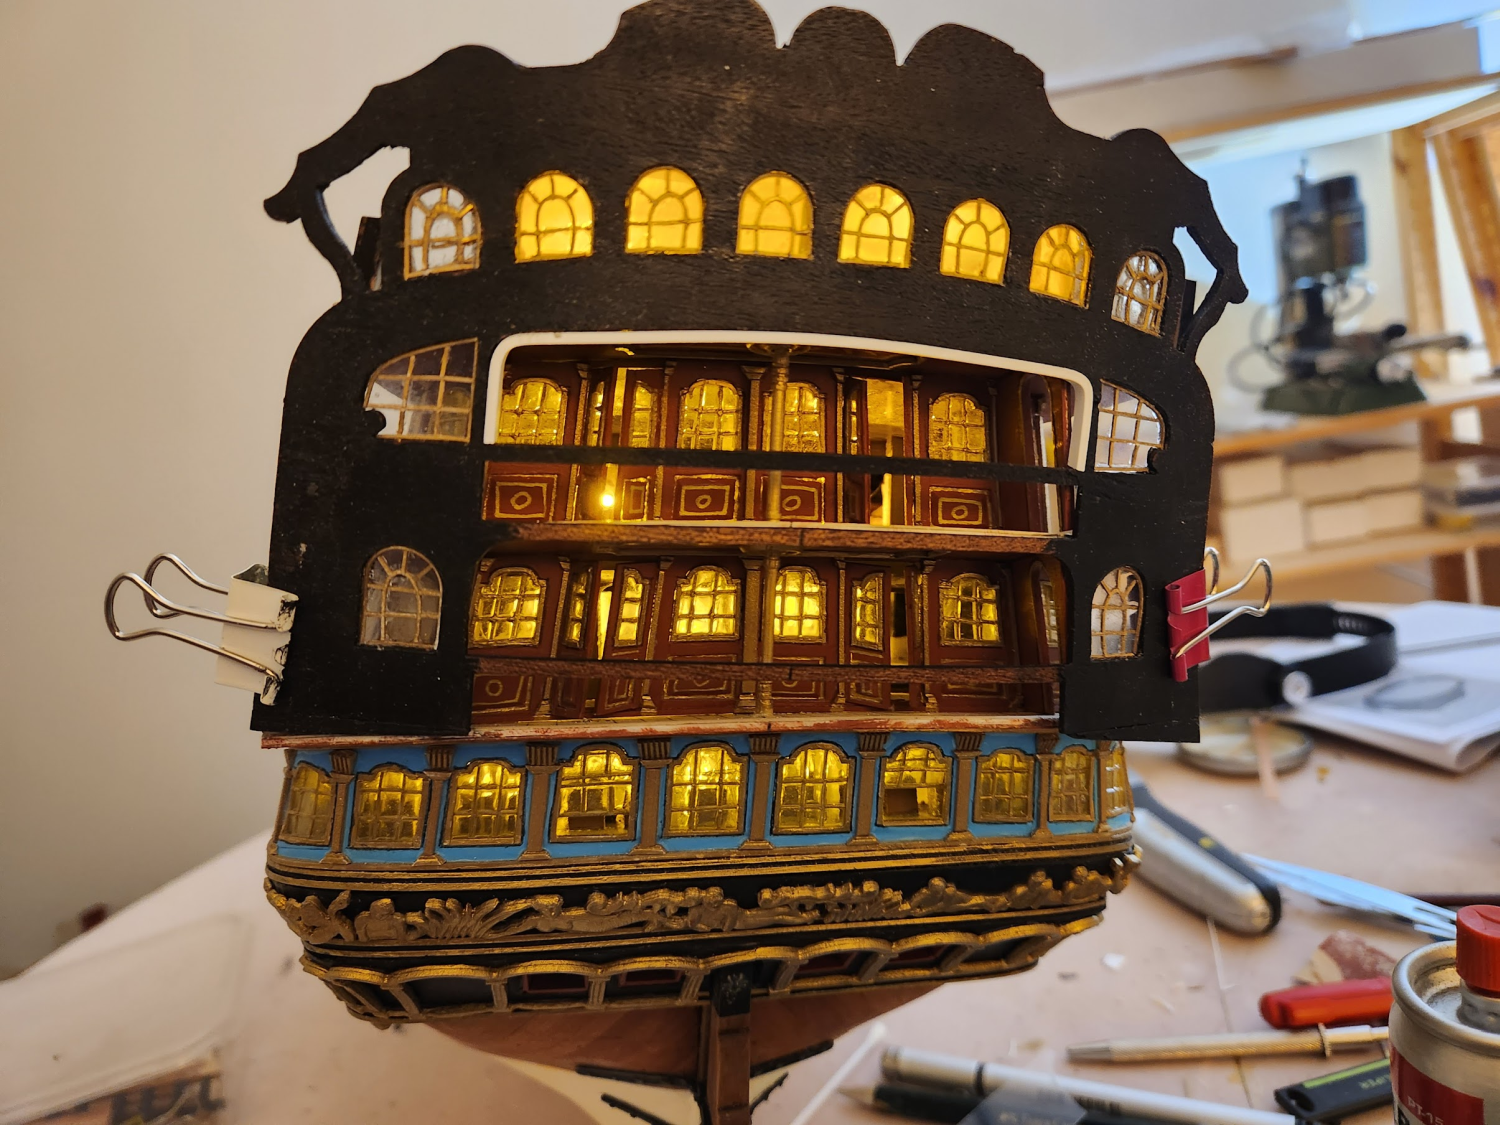
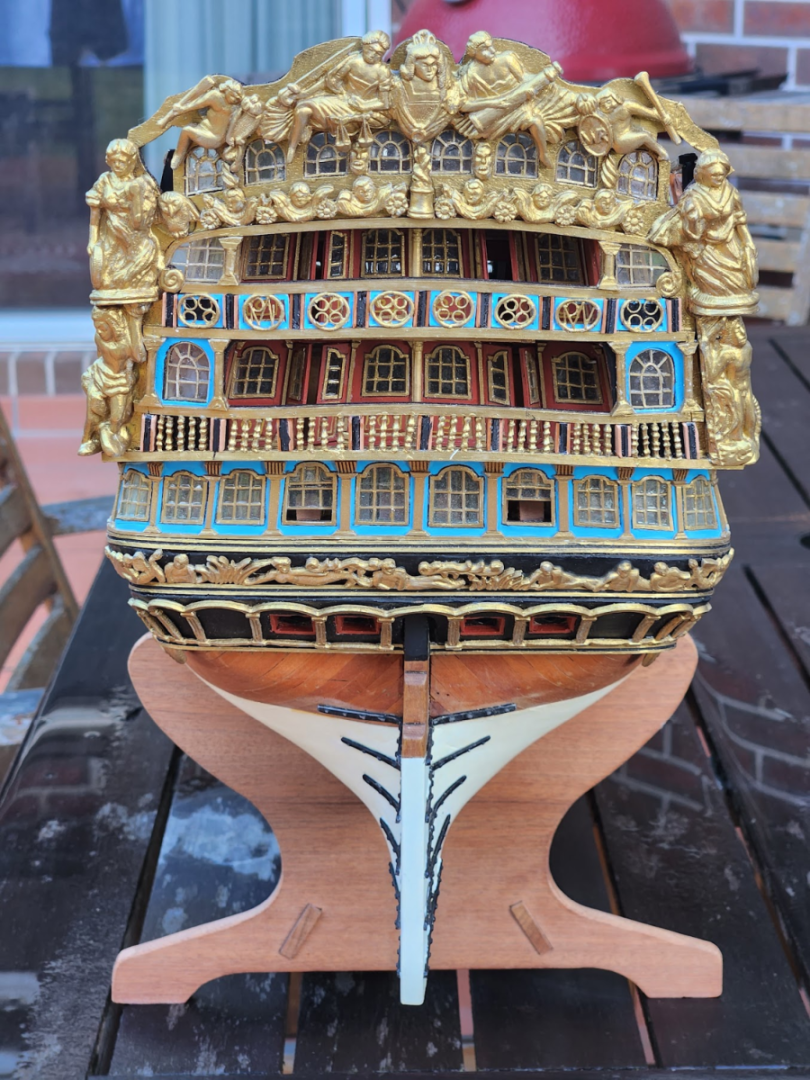
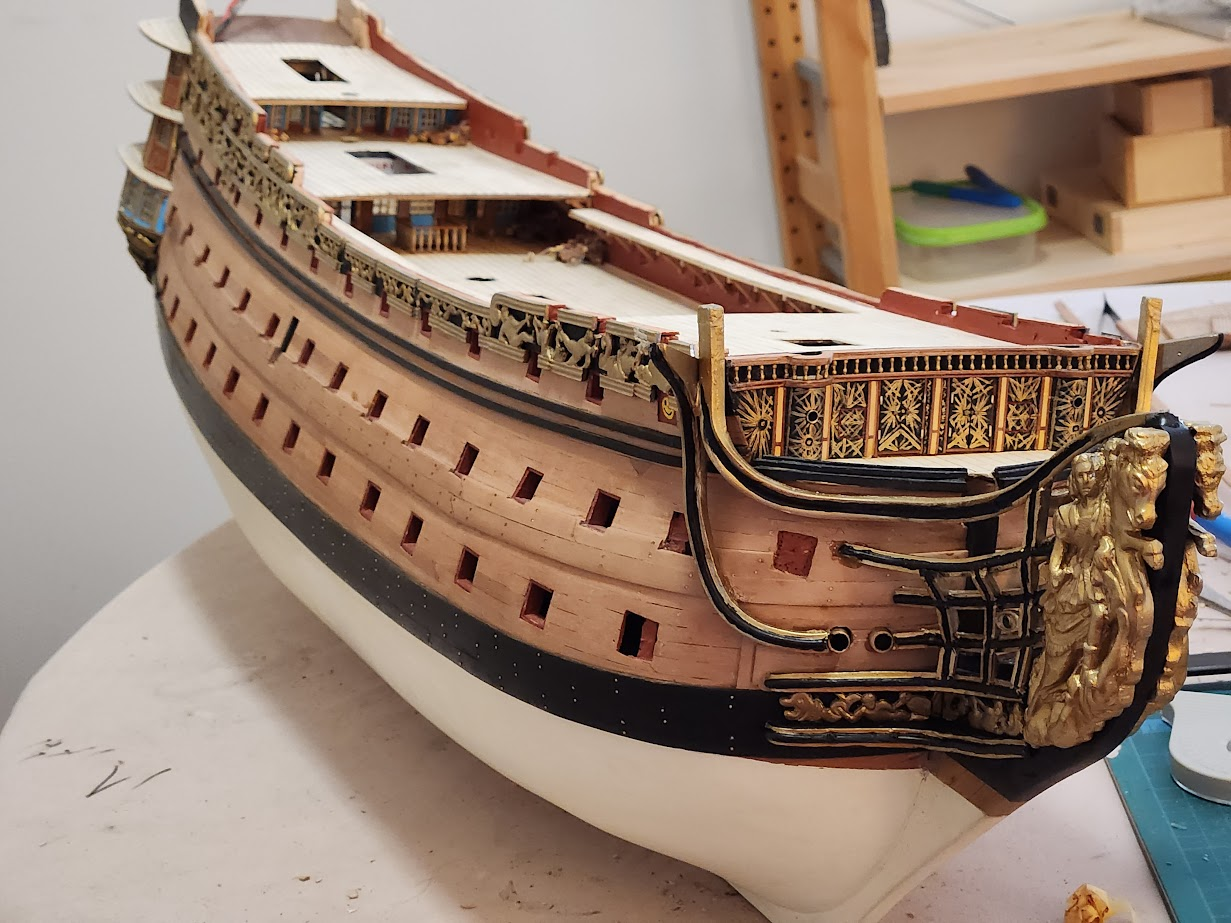
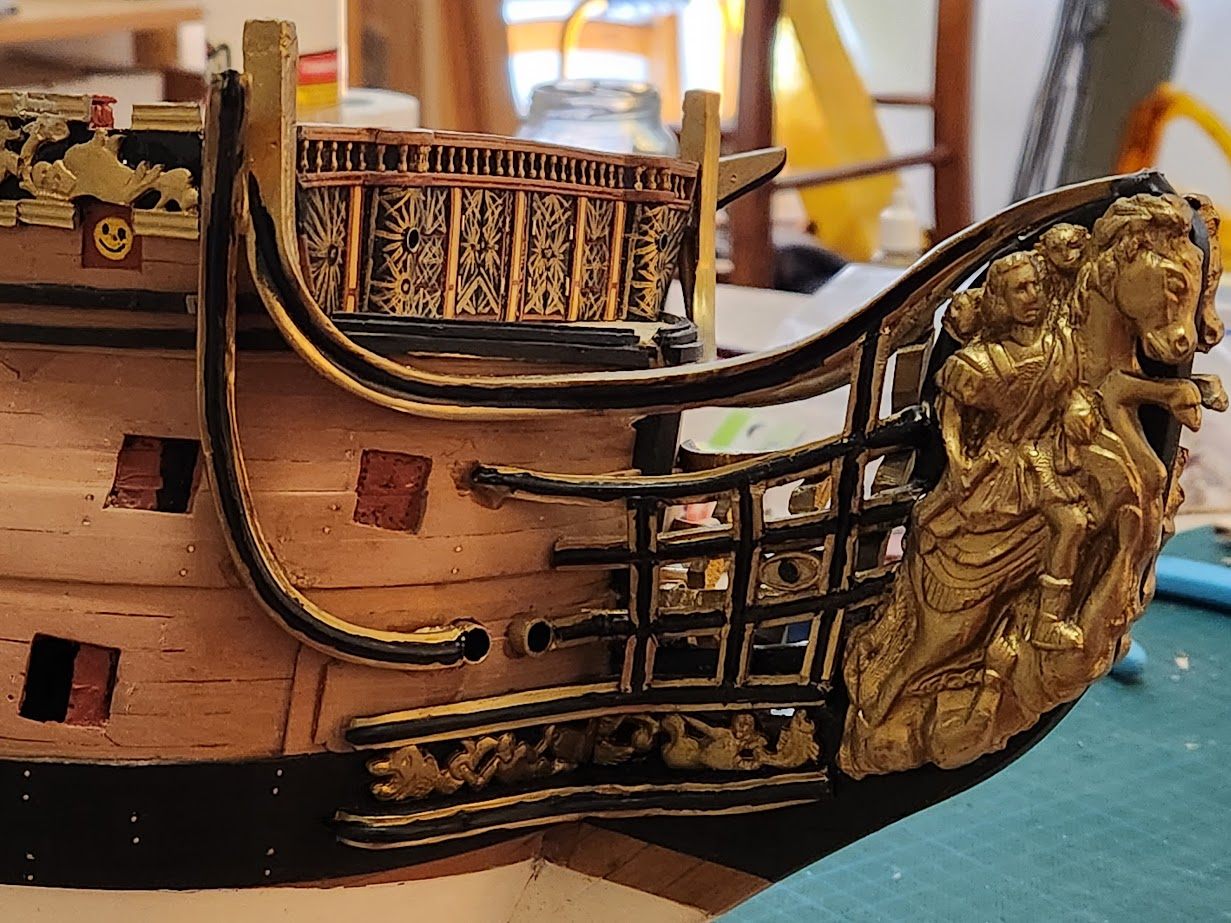
Thank you Allan, and thanks everyone for the likes and comments. A milestone has been reached ... I have completed the transom. In case you are wondering why my colour scheme deviates from other RW's in MSW, I was guided by John Clevely's painting of HMS Royal George from 1756: I did consider painting the entire fascia blue as per that painting, and went as far as creating a mock-up. But I decided that the supplied castings would not provide enough coverage, and there would be large areas of flat colour. Other RW's on MSW have the transoms painted black, or left natural wood - I studied those images closely. Black made the most sense, because it matched the strip going down the side. Going all gold might be a bit excessive, but all gold camouflages flat areas pretty well. In the end: ... this is a photo of the stern of Victor Yankovich's Royal William, which looks to be better than museum quality. I know it is foolish to post this picture so that you can directly compare his sheer modelling perfection to my hack job, but this colour scheme looked right to me. He went all gold. So that's what I chose. Before I purchased the ship, I had already inspected a friend's RW kit and decided that I would scratch-build the transom. Everything that you see except for the cast metal decorations and pre-cut transom fascia has been scratch built ... which is why it looks so wonky. I was not convinced that you could get a good result using the kit supplied parts until I saw marktieden's build, surely the most perfect "out of the box" RW there is. I am not happy with how I applied the stanchions, they are uneven and look like they need a visit to a good dentist. I will tear out some of them and replace them so that they are more straight. It was a typical Melbourne day (raining one moment, sunny the next). So once the rain stopped, I took the ship outside for some photos.

-
Oh boy. That is a really sad looking ship. To think that someone lavished so much time and love on it, and then it languished in storage until it looks like that. A lot of building mistakes also. Good luck restoring it!
-
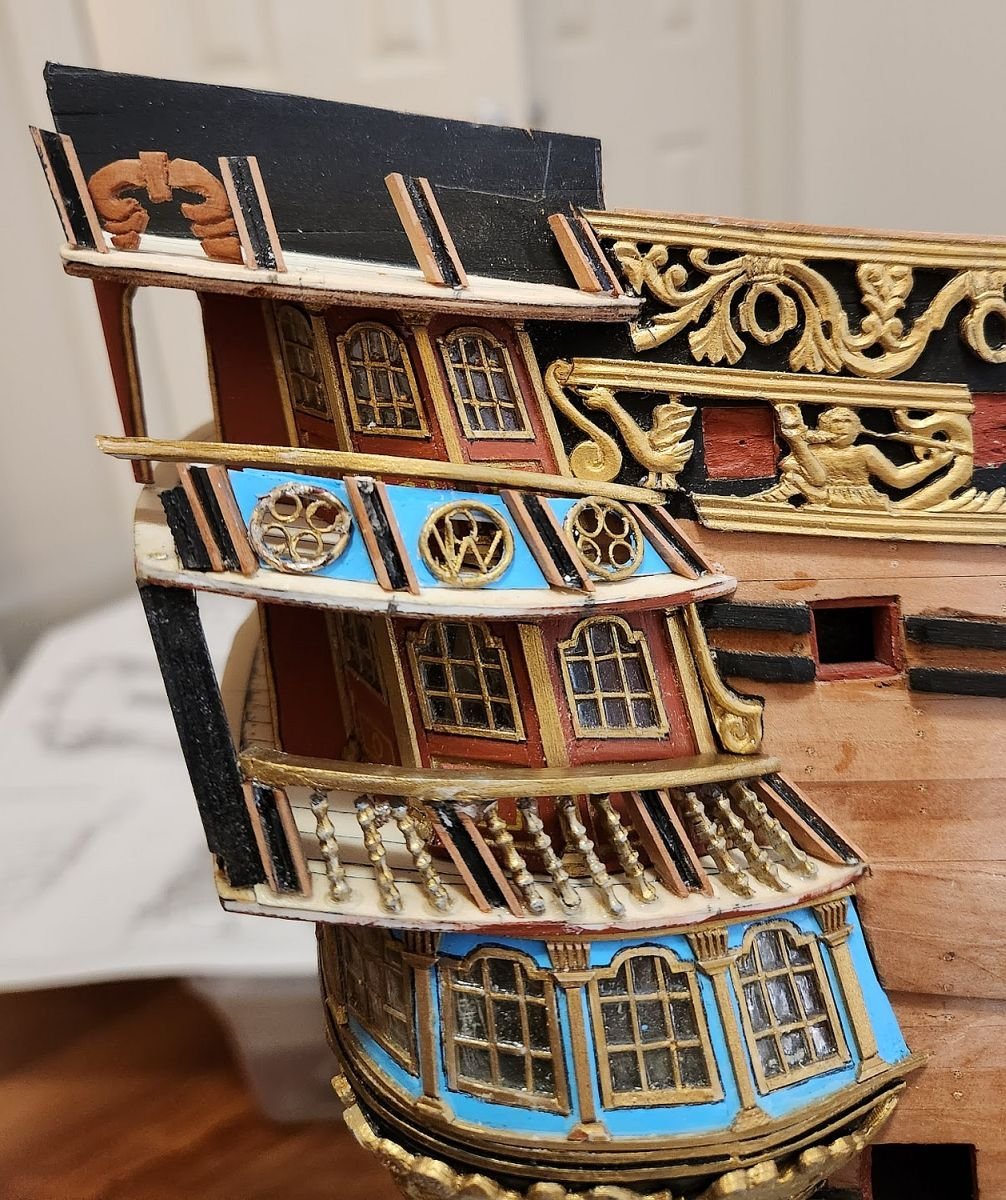
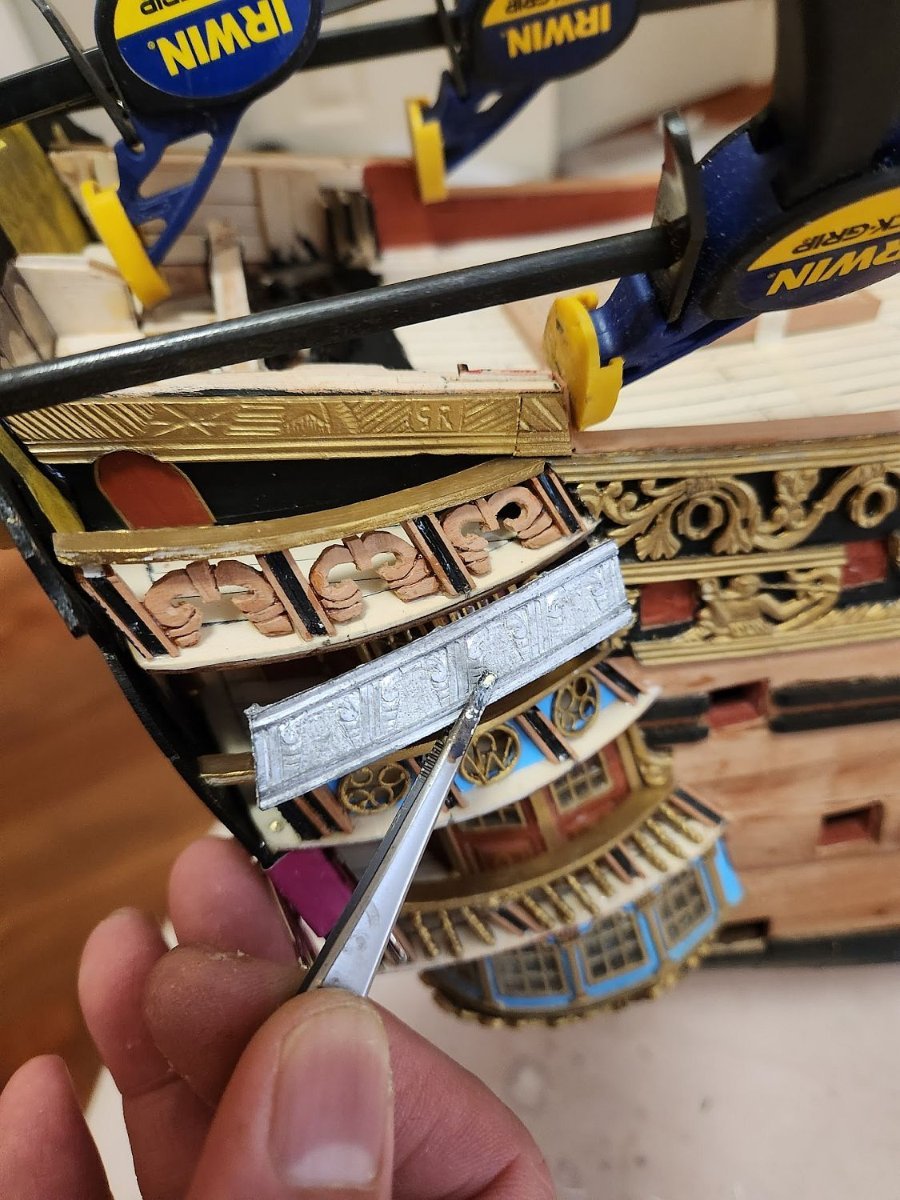
Once those decorations have been made, I mounted it on the ship. As you can see, I decided to use the stanchions provided by the kit. This was after I bought some stanchions from RK Hobby (too wide), considered using toothpicks (also too wide), tried turning my own stanchions on a Dremel (takes too long, and too many breakages). Then I decided that Euromodel's stanchions don't look so bad after all. Another comparison of scratch-built vs. what was supplied in the kit. Other builders of this kit have drilled out the decorations so they don't look so coin-like, but then you lose the flexibility of sizing the decoration to the exact dimensions of your galleries. For my model, these were much too wide. They fit the railings provided by Euromodel, but those railings don't fit my galleries. And this is a comparison of the upper galleries - carved vs. kit. You can see that the casting was quite poor with my kit and if I wanted to use it, I would have to re-scribe all the lines. You can also see that they are much too short for my galleries. The size of my galleries follows the plans, but as we have seen time and time again in this build log, the supplied metal pieces do not follow the plans. Of course I had checked whether these would fit before cutting my galleries, and I knew that I would have to scratchbuild my own if I decided not to use the kit part. You can also see that I added a little hatch to access the top gallery. This is not indicated in the plans, but it seemed strange to have a beautifully built open air verandah with no way to access it. Placing a little hatch there makes it seem a little less abandoned. With all the galleries done, time to attach the transom fascia. I forgot to take a picture of all the reinforcements and gluing points I had added to make sure it stays on and doesn't fall off from the weight of all the metal parts. As I write this, I am waiting for the glue to dry. I used three types of glue - Titebond, epoxy, and CA. The purpose of the CA was to instantly secure the fascia once I had correctly positioned it (you can see my guide marks in the middle of the fascia). Masking tape protects some windows from the glue. You can also see that I have drawn the outlines of the decorations in pencil when I was debating whether to paint the transom fascia before or after mounting - I decided to paint after mounting. I will go back and secure the transom with pins for additional insurance.


-
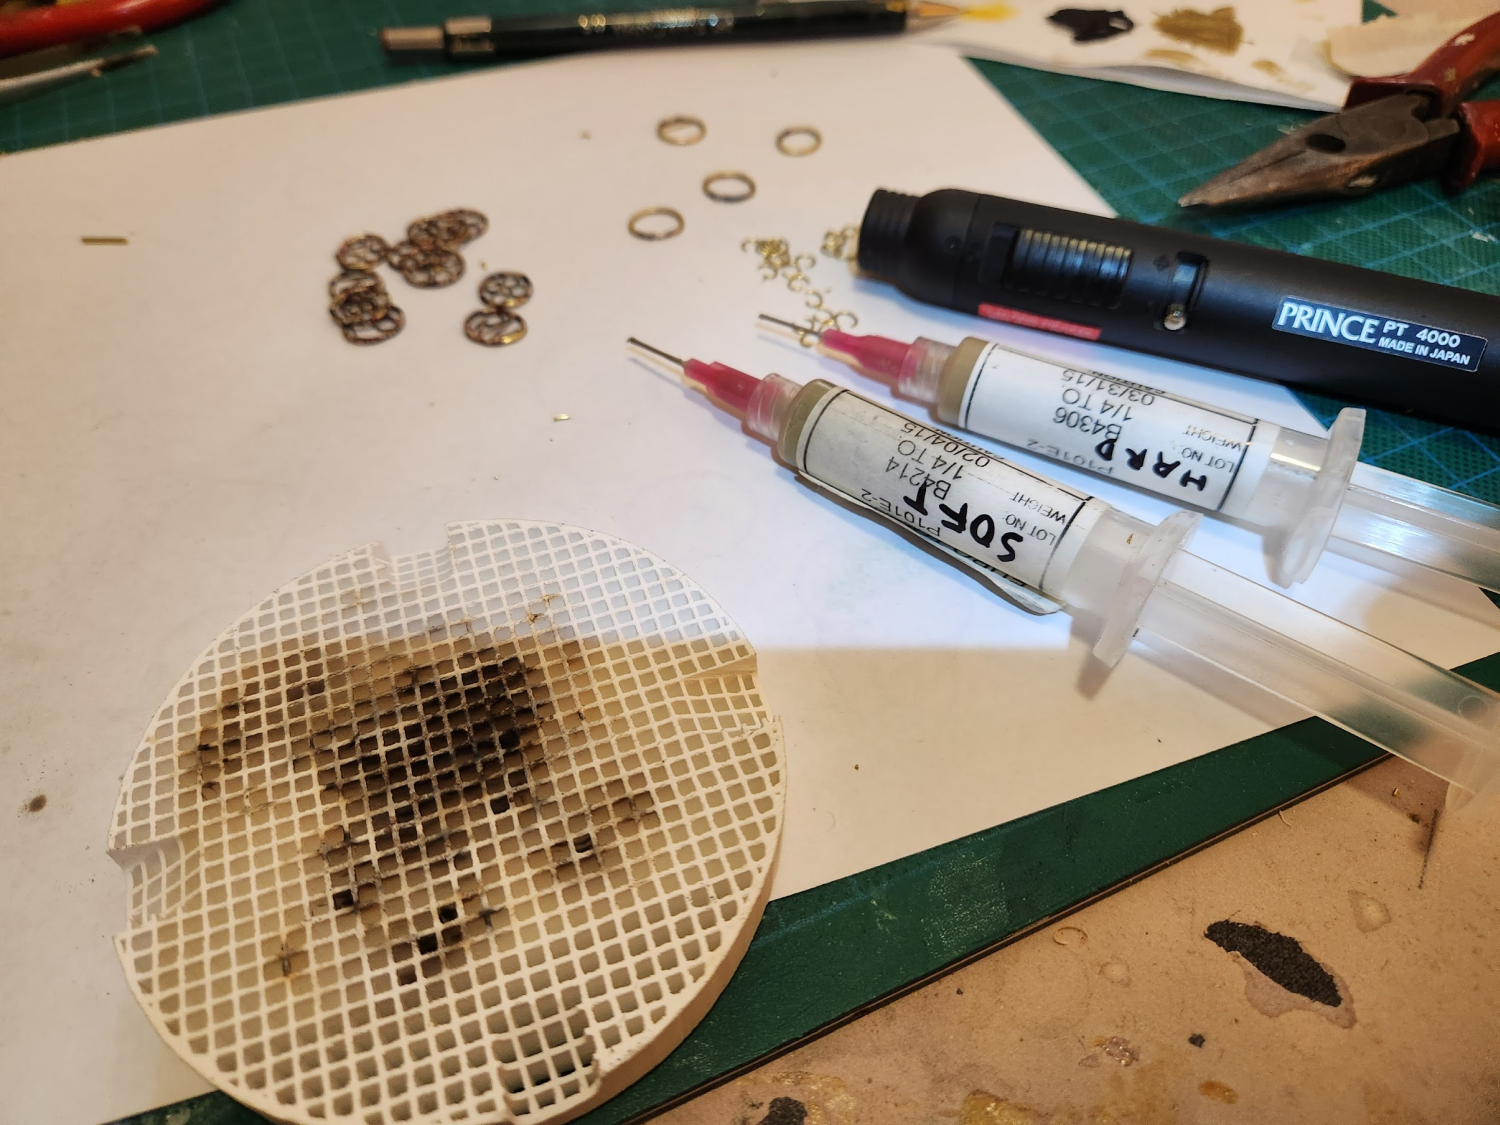
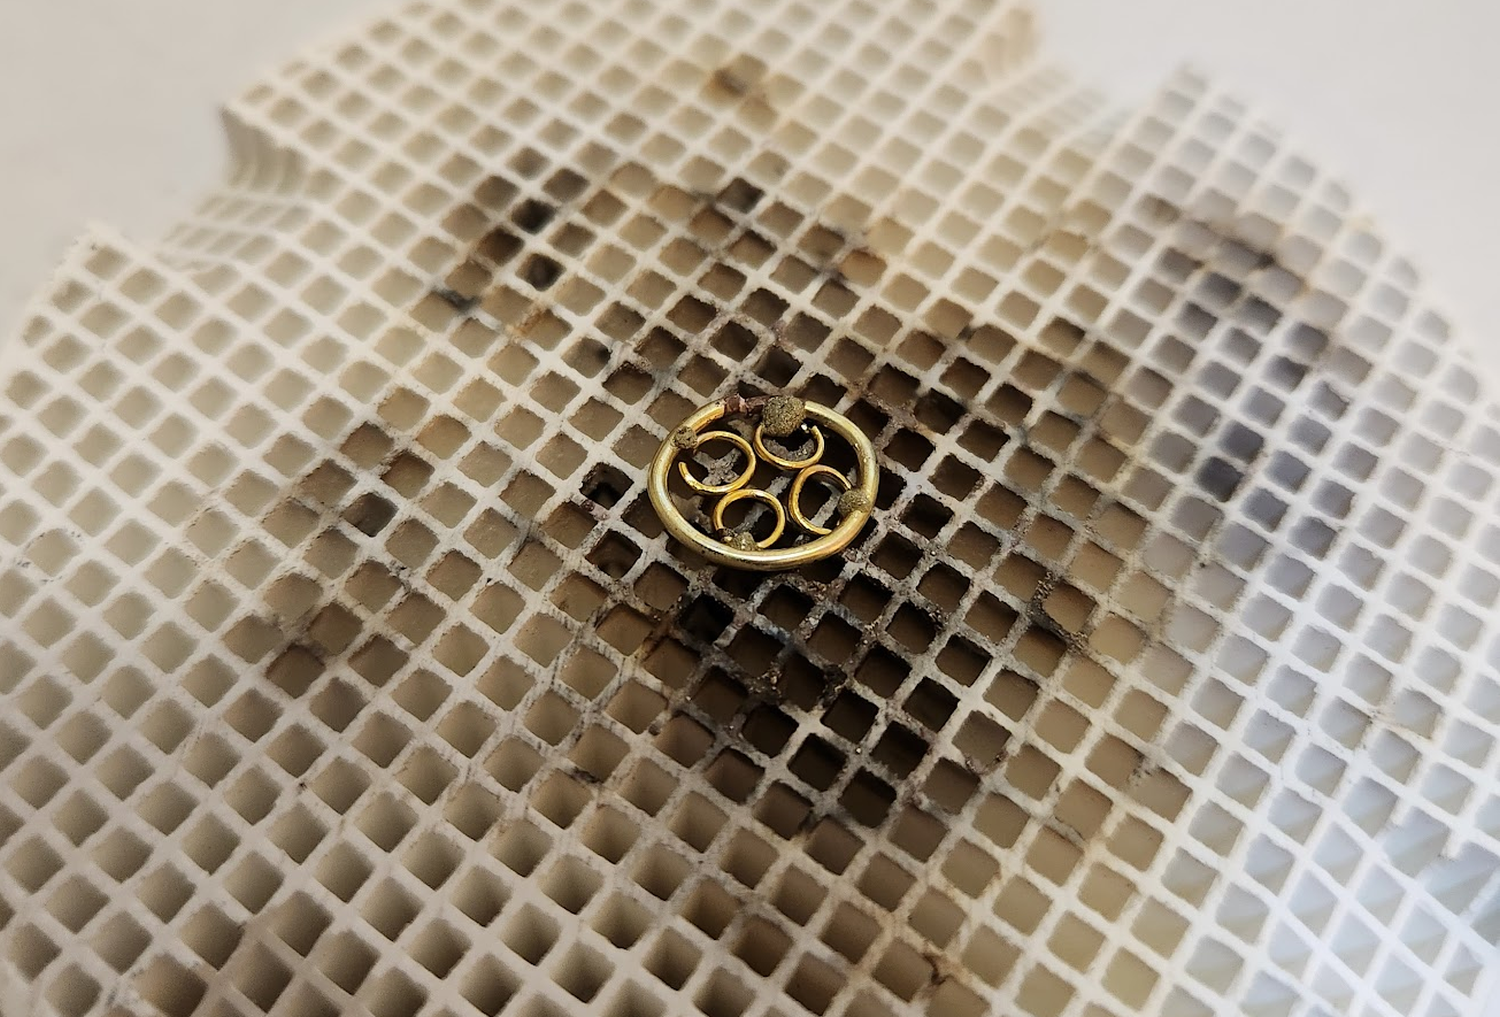
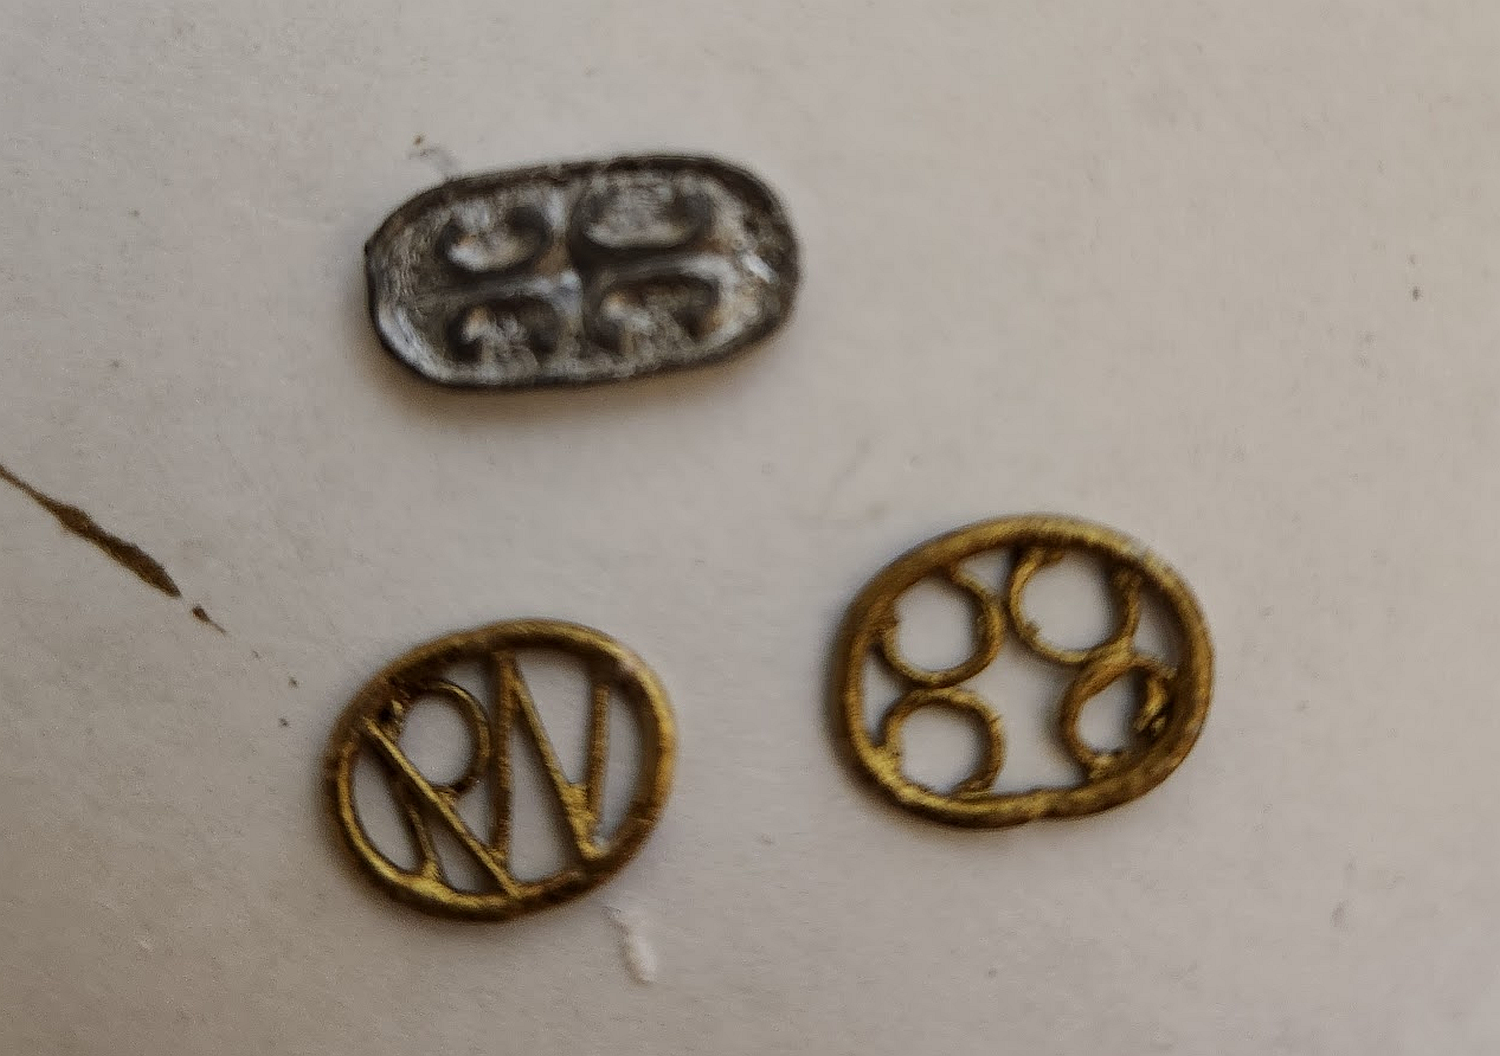
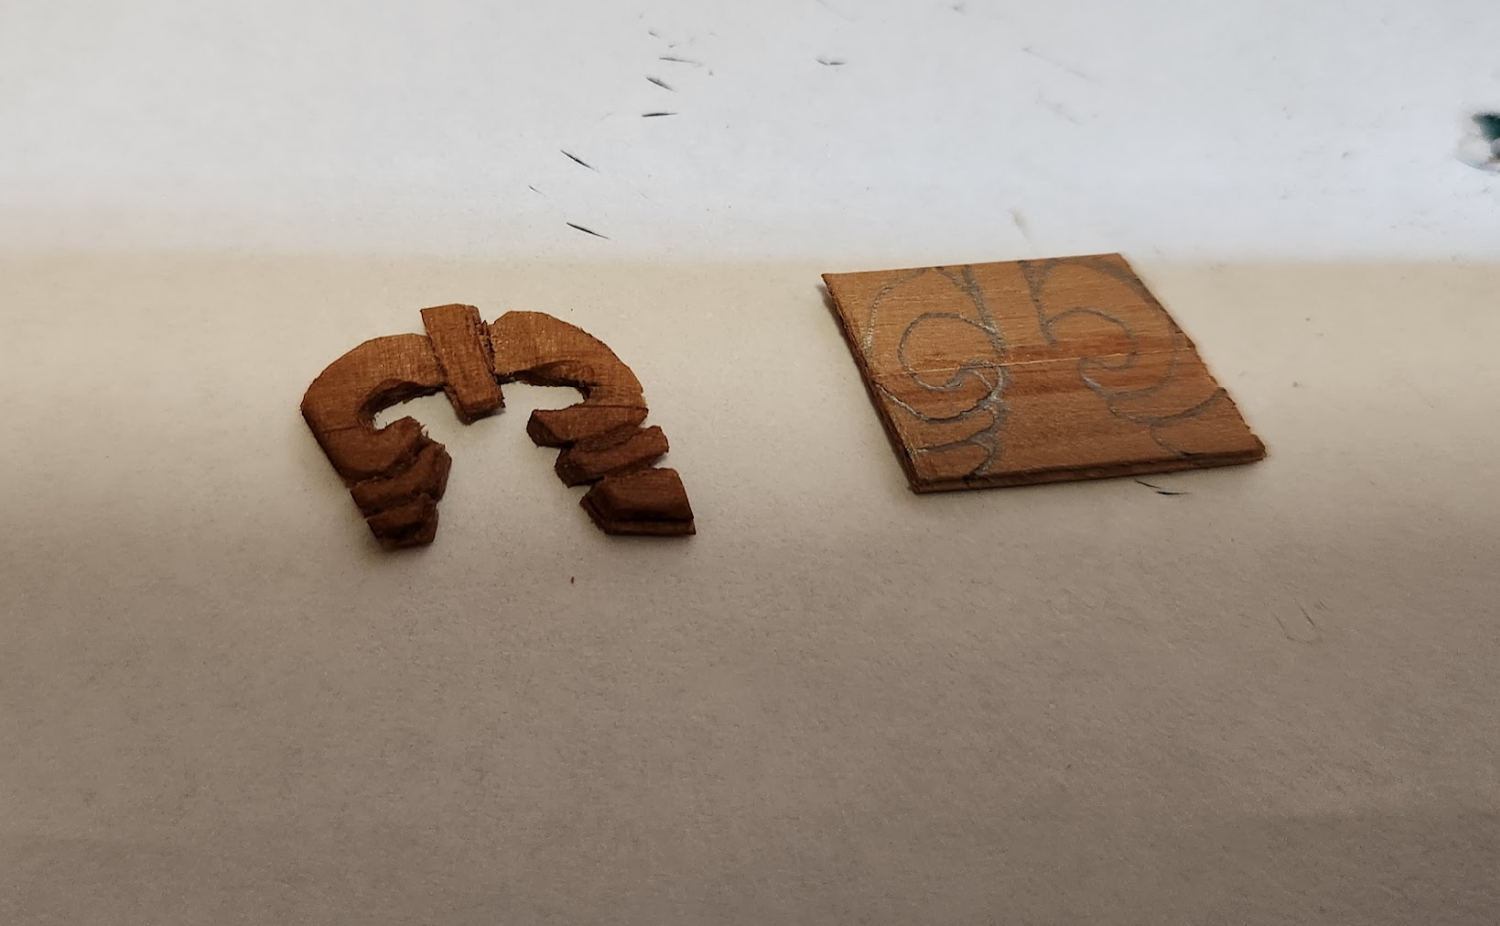
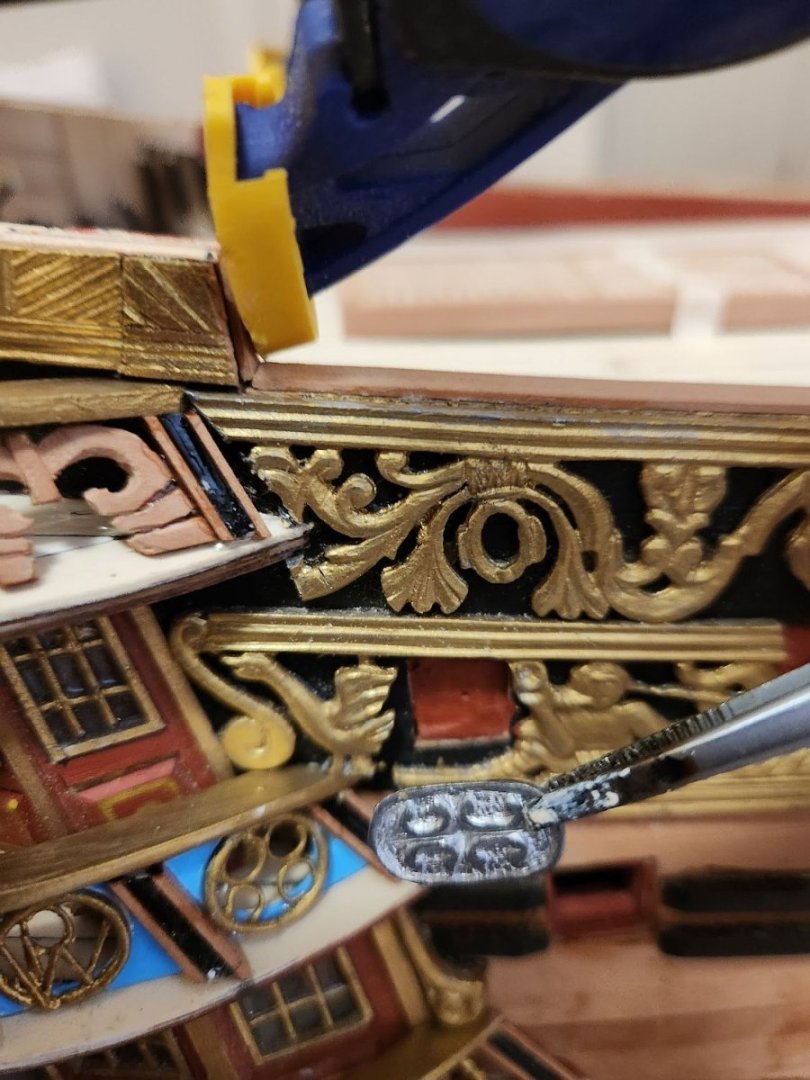
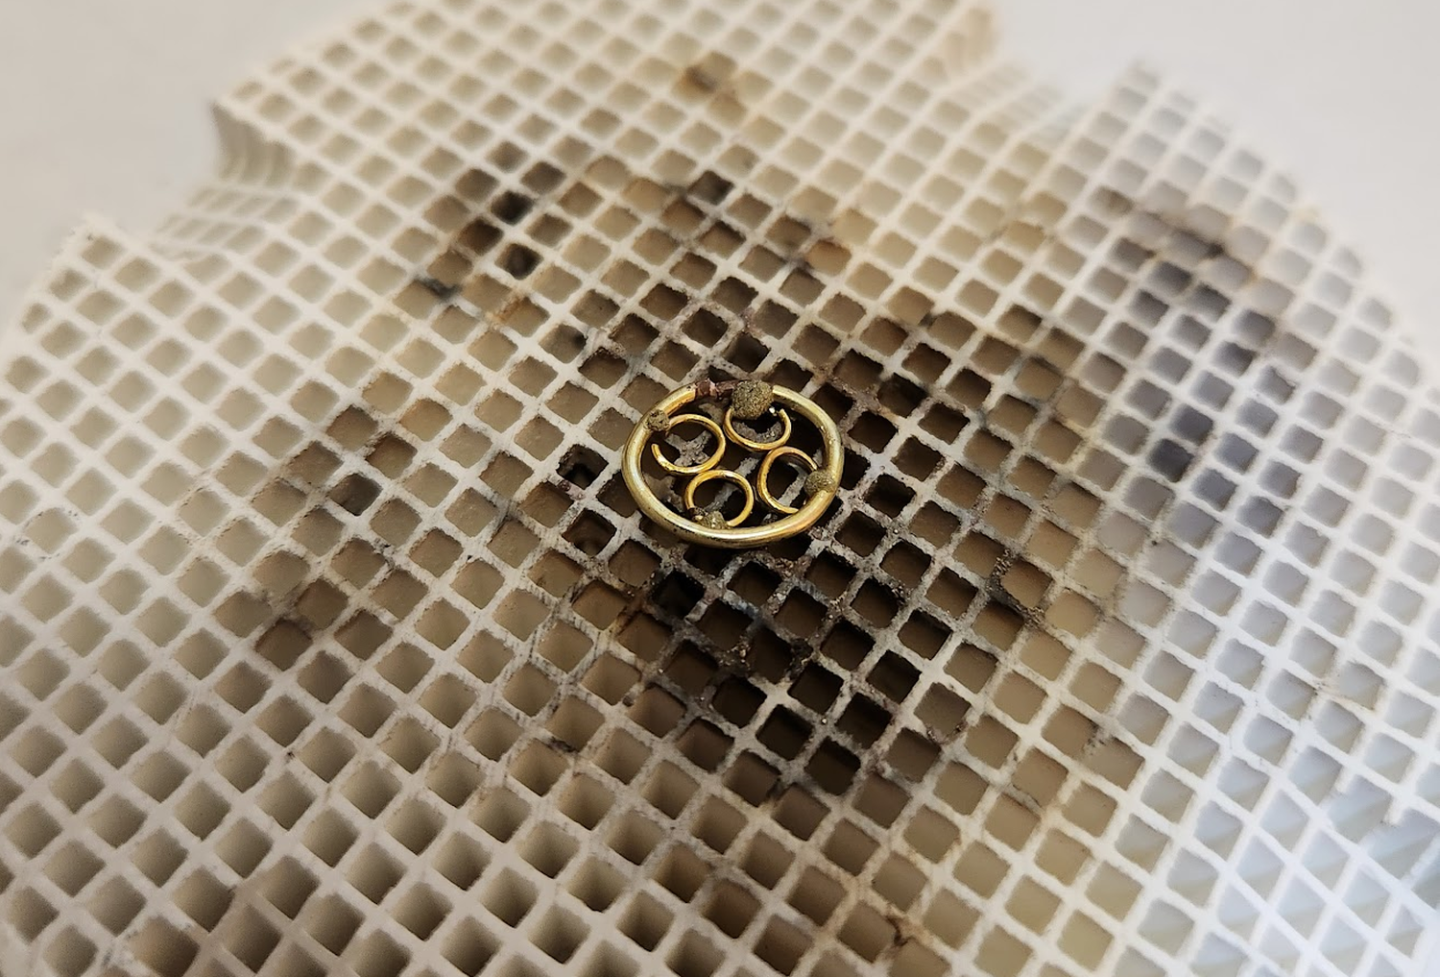
I have completed making my own decorations for the stern. From the very beginning, I had decided to make my own decorations because I did not like what was supplied in the kit. So I bought a book on jewellery making and watched a lot of Youtube videos. It still involved a lot of trial and error, and my skill improved as I refined my technique after making at least a dozen which I discarded. This was wasteful of K&N Brass Rods which fortunately aren't too expensive! These are the tools you need: a ceramic soldering base, a pencil torch, and two types of silver solder - "hard" and "soft". The idea of two types of solder is that one melts at a much higher temperature, which allows you to make joints next to each other without the first one melting. You have to be strategic about which type of solder you are going to use. Ideally, the pieces should be clamped down because they have a tendency to suddenly shift when the solder melts, which will result in a discarded piece because once it is soldered on, there is no getting it off. Silver solder is STRONG! I will describe what worked for me in case it helps other modellers who wish to do the same. The rings were made by winding brass rod around a suitably shaped cylinder to create a spiral (I used wooden dowel that came with the kit). Then cut the spiral to make rings. Shape each ring with pliers, making sure that the two cut ends meet and will hold together by the springiness of the metal alone. Lay your workpiece on the ceramic base. Here, the large ring has already been soldered, and I am soldering on the small rings. The silver solder comes as a paste, and it is very stiff when ejected from the syringe. It has a tendency to move the small rings when you try to apply it. I have found that it dissolves in Acetone and flows with heat. So after I lay out the workpiece with all the pieces I want to solder, I gently apply some heat and extrude some paste and gently touch the metal. This causes the flux to melt and flow into the gap without moving the piece. After all the paste has been extruded, apply aggressive heat with the pencil torch - you will see the flux start to bubble, the metal will glow red, then suddenly you get a flash of silver as the solder melts and cements the piece together. Immediately stop applying heat and move on to the next joint. Once all the decorations have been made, you will note that the heating process discolours the metal. I lightly sand it and then give it an Acetone bath to remove any finger oil or excess flux. Then spray it with primer (I used Tamiya metal primer), then paint it to your liking. This is a comparison of the decoration supplied by Euromodel, and my scratchbuilt effort. These decorations are like my windows - they are inconsistent! Once those were done, I moved on to carving the decorations for the topmost rail. This was done with a Dremel with and engraving tool, and a sharp hobby knife. To ensure that the pieces wouldn't break apart, I glued two planks at right angles to each other to make my own "plywood".


-
Thank you Pete! I was starting to wonder if I am talking to myself here. I have re-downloaded your Interpretive Info. I see that you have modified them since I started the build. Currently I am doing some research as to what colours I should paint the transom. I am not sure whether I want to keep the black background or go with all gold. I think I will make my decision after I attach the metal pieces. If there is insufficient coverage, I will go with all gold to hide the bare bits. I have seen some funny looking RW transoms on Google image search and I am hoping that mine does not look like that ... given that the transom is what most people gaze at when they look at a model (or maybe that's just me!).
-
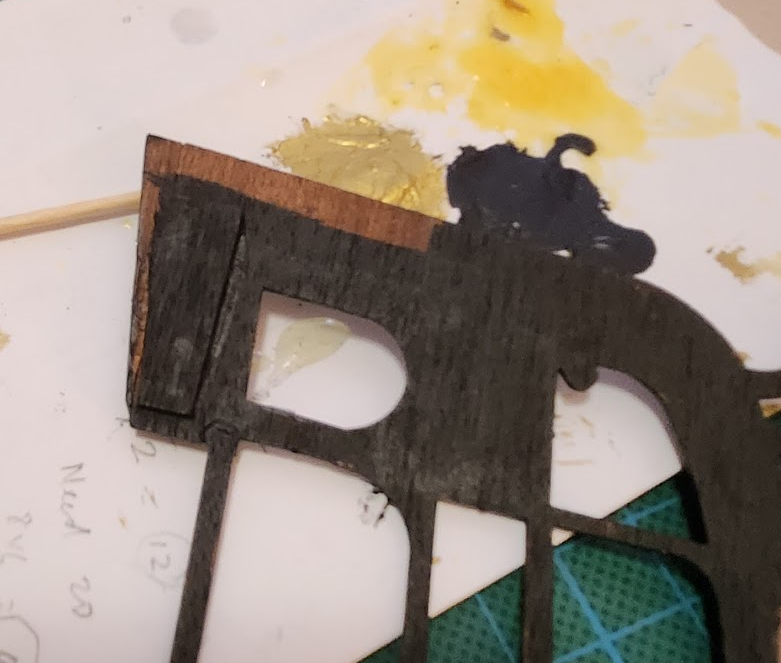
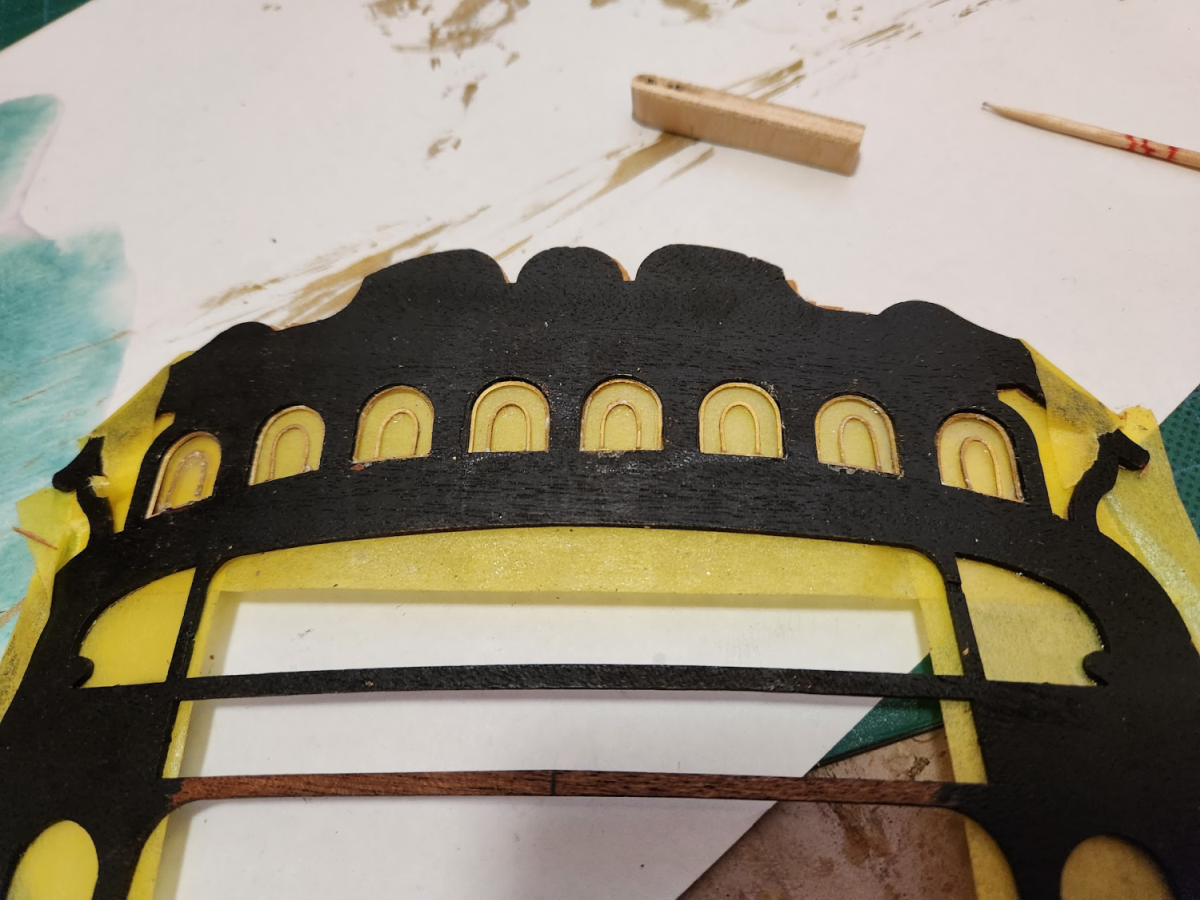
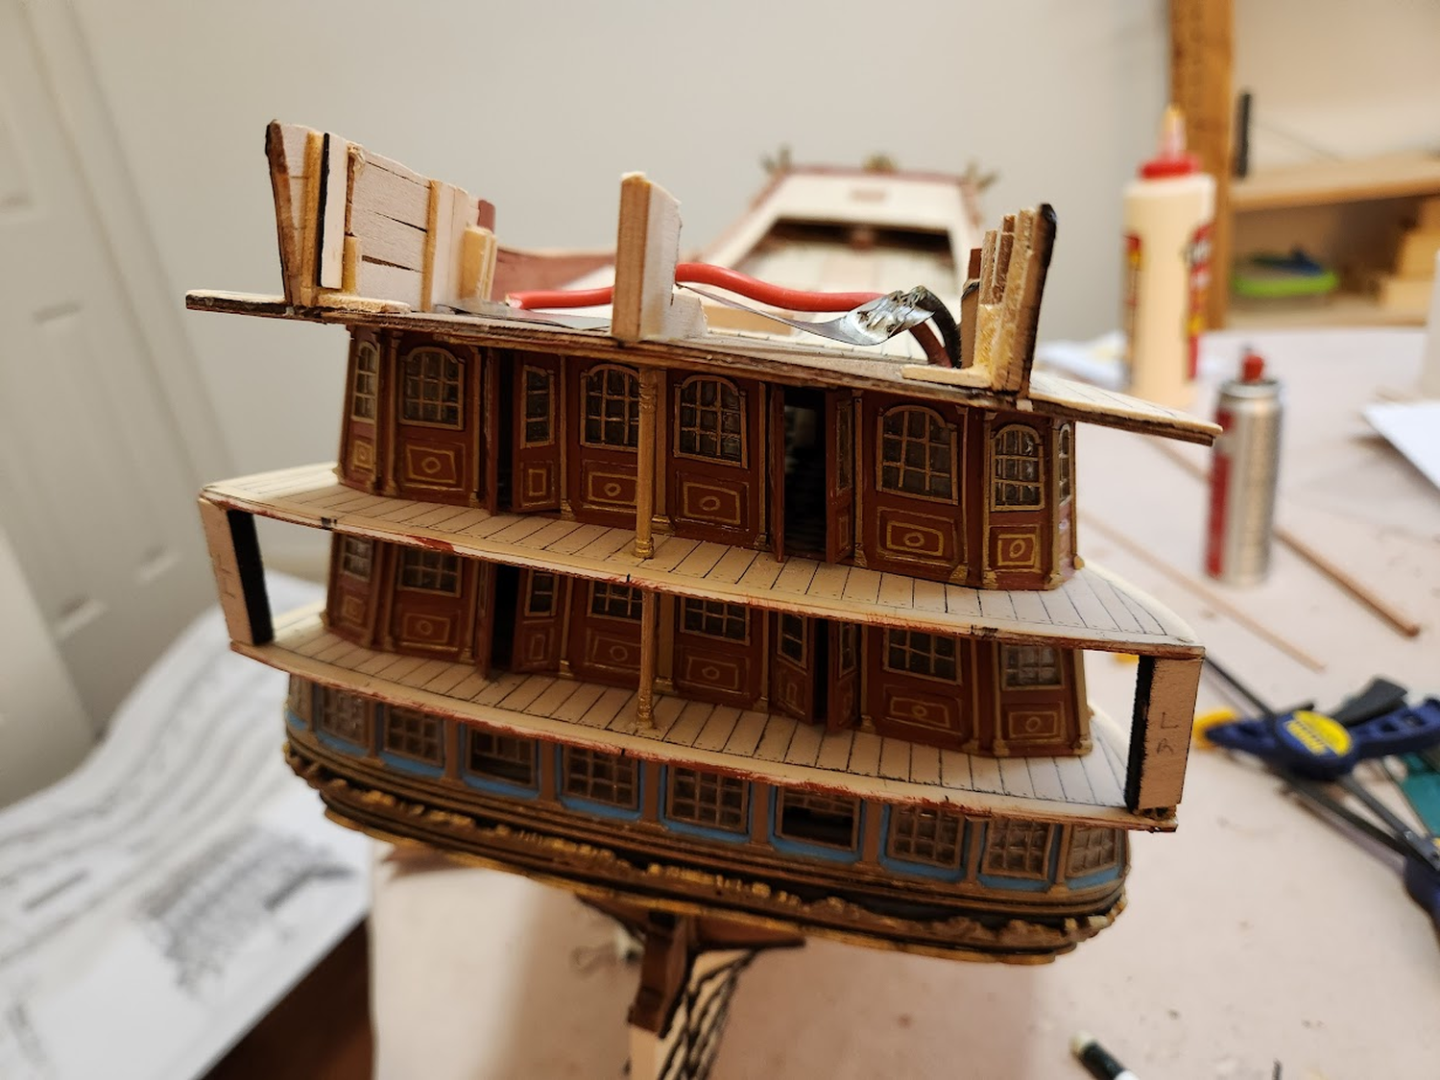
I have spent the past week working on the transom. In a previous post, I showed that the pre-cut plywood fascia does not fit my model. So I had to graft an extension on to it. You can see a faint line from the front, but it won't matter because it will be covered by decorations. With that complete, I made a start with the windows. Euromodel supplies cast metal windows. Other modellers on MSW have drilled out the window panes and filled it with clear glue to imitate glass. Given that the rest of the windows and panels are scratch built in my model, I had to continue the same approach. After I completed all the windows, a quick test to show if the lights are still working after leaving the ship untouched for a few years. All good! They have a wonderful "scratch built" look to them. By that I mean, they are inconsistent from one window to another. If it's too perfect then it looks like it came from the kit 😄 Having said that, I think these look better than the kit supplied windows. There is more glass area, the windows are bigger, and the details are ever so slightly finer.

-
I was not happy with the way I installed the beakhead supports / vertical risers. So I pulled them out and reinstalled them: I will need to sand off all the glue marks and repaint it. I am not happy with how lumpy the final appearance looks. The problem is that the metal is so soft, and when I shape them on my disc sander the only way to get a proper grip on the piece is to hold it with pliers. This then leaves a mark on the piece. I should have used good old hand sanding instead to shape the piece but that takes forever!
-
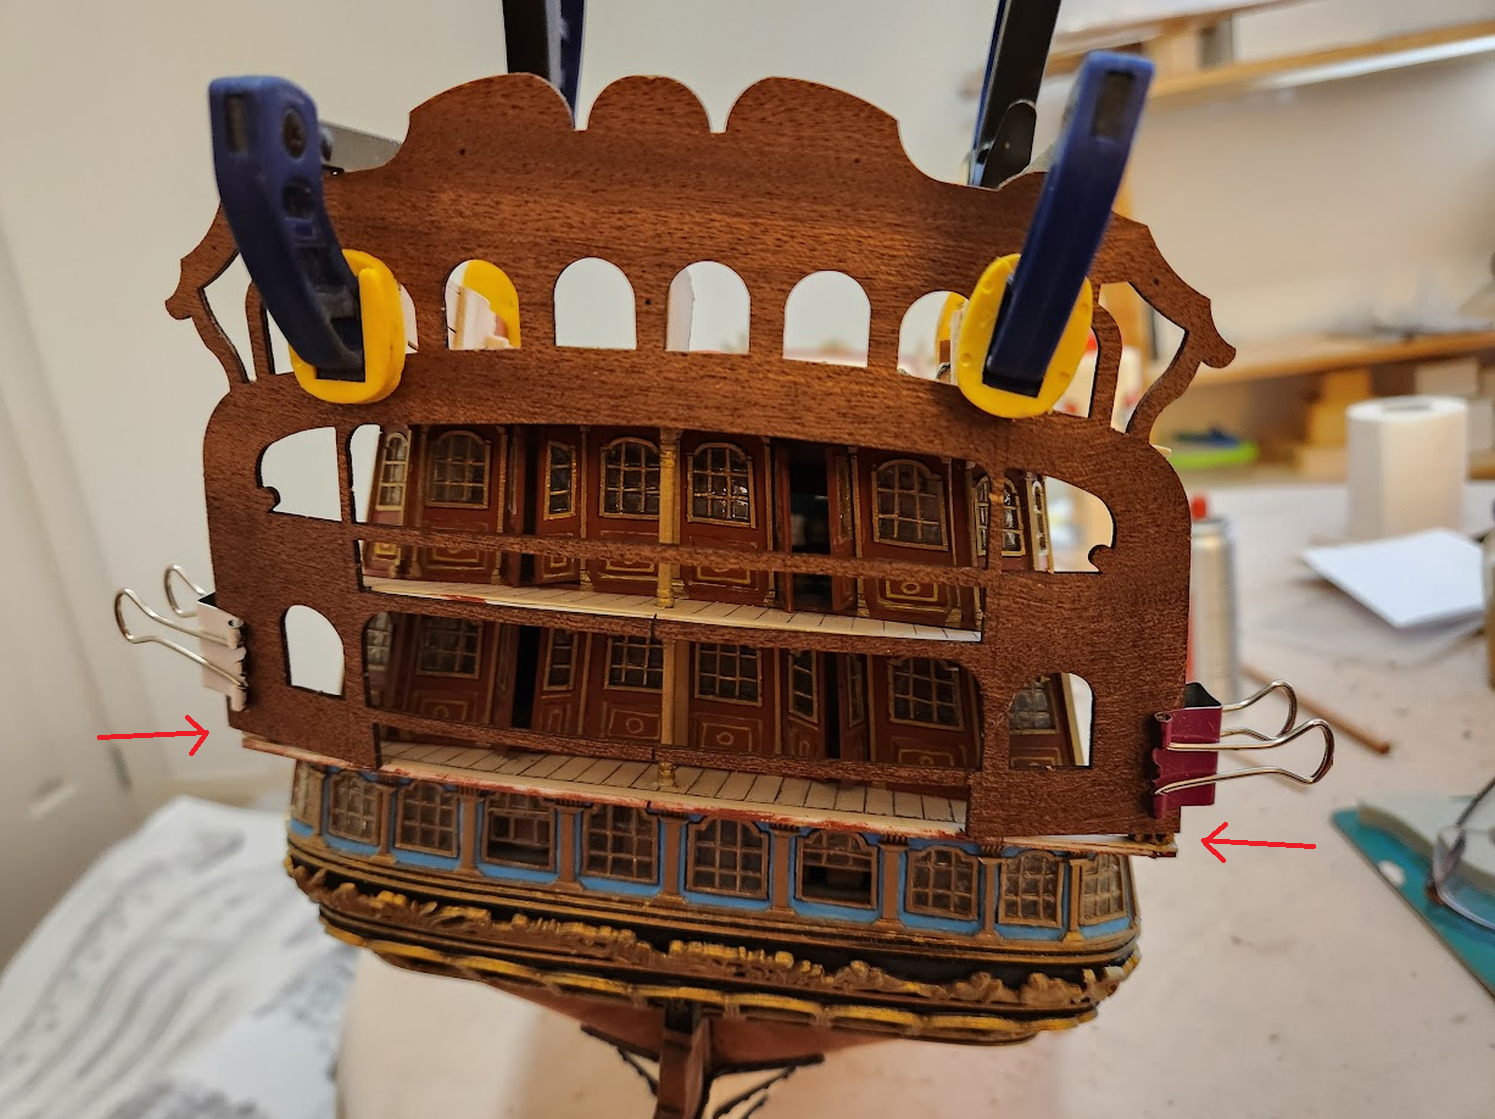
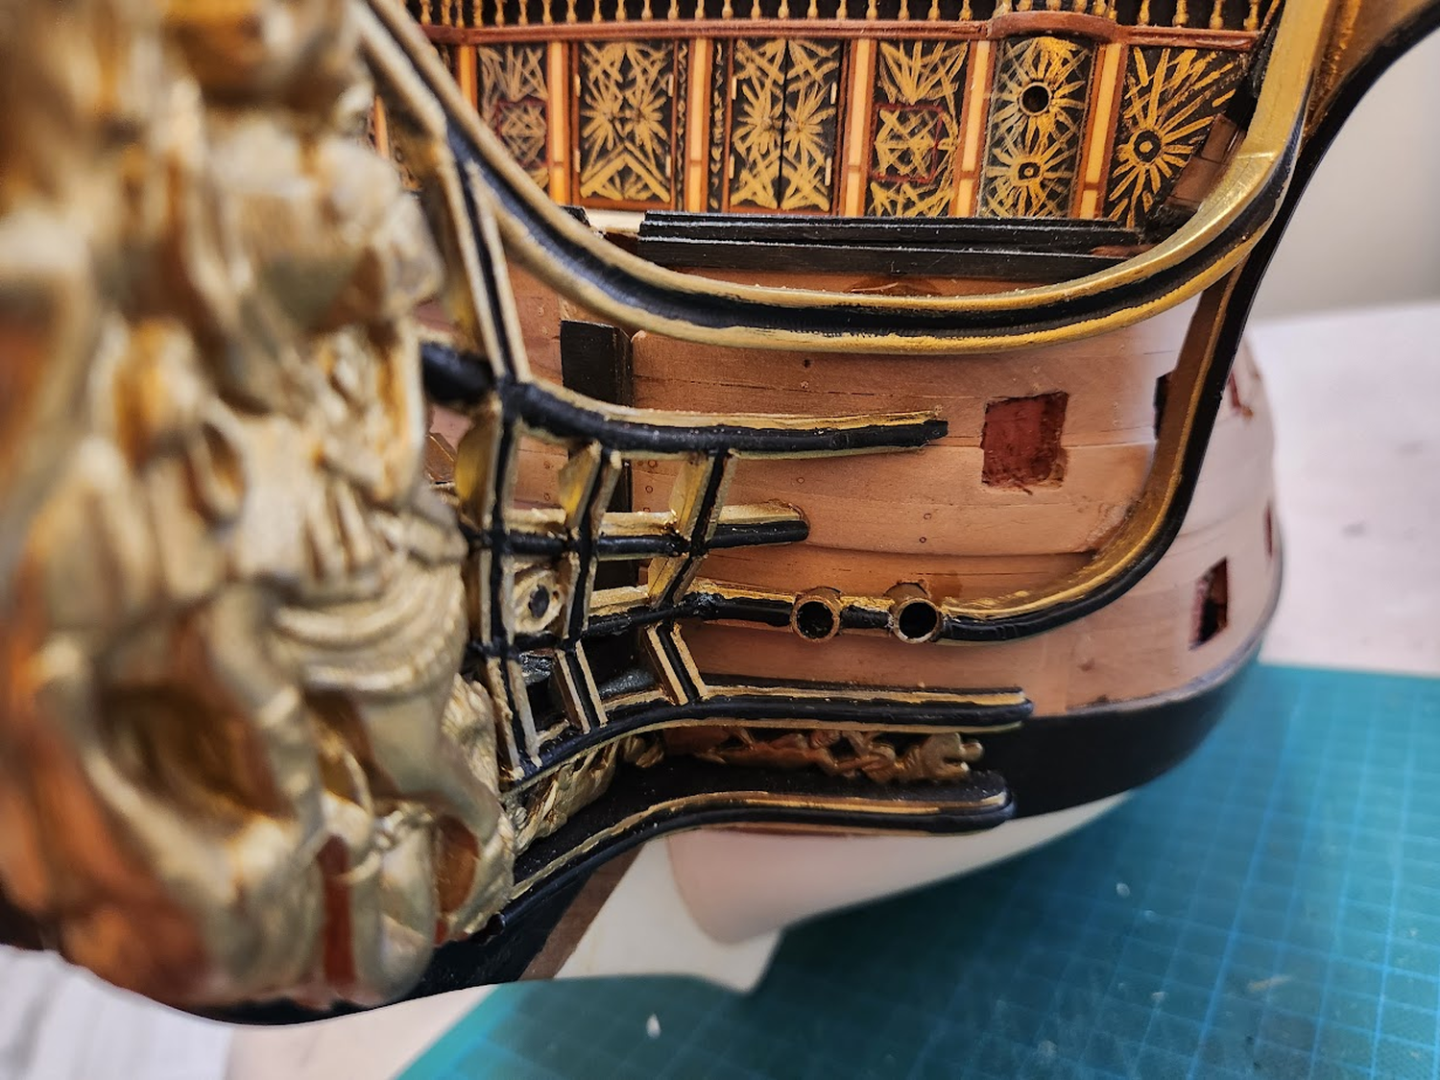
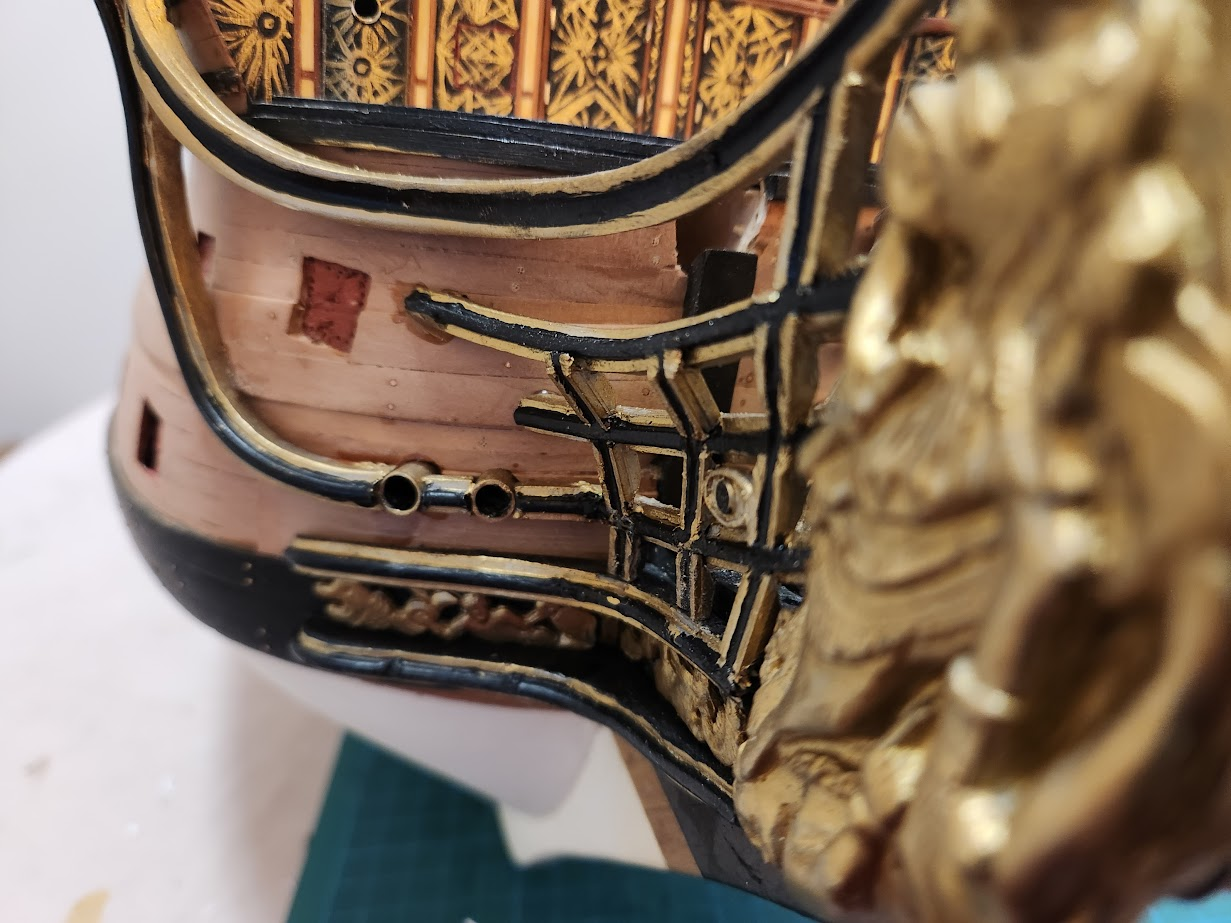
Hello all, a number of years have passed since I last worked on this ship. A few things have happened in life, took up other hobbies, etc. The RW was still looking magnificent and sitting in an unfinished state in my living room. Guests would come to my house, look at the ship model, and tell me I should go back to work on it. So here we are. My previous progress was stalled because I had cut the beakhead supports (I don't know what you call them, those vertical riser things?) wrongly. Euromodel only supplies 6 - which is just enough if you don't make any mistakes. I had to source a set of spares from a friend who had abandoned his RW build and this time I carefully cut them out and installed them. I am not entirely pleased with the result but it looks OK. Hand painting the beakhead was very difficult since my eyesight is not as good as it was a few years ago. I went back and fixed some of the jaggies so it looks better. I am now working on the transom. It is difficult to support the fascia piece and I was concerned about the lack of gluing points for the heavy decorations that would hang off it, so I installed some columns on either edge of the lower deck. These are pinned to the decks above and below and are absolutely solid. These will be hidden by the metal castings and the fascia piece, and when the fascia is installed I will drill a hole through it and pin it. With the support columns in place, it allows me to clamp the fascia piece onto the transom and allows me to work on the position with much greater precision and repeatability than before. I had already pre-curved the fascia a few years ago and marked the center line alignment. Once installed, all the horizontal bars will be cut out and replacements will be fabricated. I indicated with arrows some gaps where the rear fascia is not quuuuite long enough to meet the decks. I will need to add some material to this. There is not much gluing area, fortunately I was planning to add some reinforcement behind it to help support the weight of the transom anyway. This is the most exciting part of the kit - the major reason I bought the Royal William was because of the open stern galleries which lends a lot of visual excitement. I am taking reference off other RW kit builders (most of whom have finished their models) and photos I have found online. My stern will have a different colour scheme because I do not think that painting it all black is correct. I will post again when I have completed more work.

-
I am very late to this thread. I had a pleasurable few hours looking at the thread from the very beginning. Please allow me to add to the chorus of approval from the MSW community. I can barely believe that a modeller of my very modest skill is sharing a forum with a master artist like yourself. Everything you do is excellent, or beyond excellent. It is almost a shame to see you cover up your beautiful metalwork with paint. Please do continue posting, and I would love to see your other projects.
-
I am a rather old doctor and going to retire soon. Yes we do use instruments to tie knots, especially if we want precision knots. But we do tie knots by hand. The end of that video has some links to more surgical knot tying videos.
-
That is simply gorgeous. Another option you could consider is home-made photo-etch. It looks simple enough: youtube link. I haven't tried it, but I am considering buying a kit and making my own parts when I come to the stern of my Royal William. Same ship as yours, only it's been rebuilt
-
I have never built a card model before. What are the planks made of? Did they come in that colour, or did you stain them? How do you get them to run so smoothly? Did you sand everything? Also, the blue and red look quite a lot more saturated than the replica that is in berthed in Australia. Did you choose that colour, or did the kit come like that? If it is cardboard, can it be repainted? Sorry for all the questions, I am curious to try a cardboard model and I want to know how many of these decisions have been made for you by the kit maker.
-
I'm pulling up a chair for this one. Care to show us your other 1/100 models?
- 9 replies
-
- 3
-

-
- German
- Battleship
- (and 1 more)
-
Paul, what web browser are you using on your phone. Try using Chrome, it should let you upload photos. I do it all the time on my Android phone, although mine is a Samsung Fold 4.
-
As I mentioned, all laptops and tablets are able to upload pictures. For me I have unique computing requirements - powerful PC at home for video rendering, home audio, media server, etc, a laptop for travel, and an Android tablet because it's light and expandable with an SD card. I do all my reading on my Android tablet. I did consider getting a Microsoft surface but I do not like the keyboard and it is too heavy to read in bed, so when I travel I take my laptop and tablet with me.
-
I don't know about PS4's or Xboxes so I can't tell you if you can upload photos from that. I would imagine that you should be able to, given that I had a PS3 many years ago and I was able to transfer photos from my SD card to the PS3, and the PS3 had a web browser. It was really annoying to use with a game controller though. All laptops, tablets, and smartphones should be able to upload photos to MSW. Since you appear not to know much about computers (forgive me if i'm wrong, I am trying to be helpful and not insulting), I will give you a quick rundown of the different types that you can consider: - Desktop PC. Probably the cheapest option, particularly if you get a friend/family member to build one for you from secondhand parts. You can also recycle parts from your old PC into the new one if it's still in working order (my PC is essentially the same computer that I built in 1991 which has been incrementally upgraded until all the parts are not the same any more!). IMO it gives you the best keyboard / screen experience and can be built to be the most powerful computer possible in a domestic setting. Downside is that it's not transportable and it occupies space. - Laptop: advantage is that it can be easily stored and put away, and you can travel with it. Comes in many form factors and many sizes. Disadvantages: you pay more for the computing power you get, is upgradeable to a limited extent (or if you get Apple, not upgradeable at all), and parts can not be recycled for your next computer. You can choose between Windows, Apple MacOS, or Google Chrome. Apple is the most expensive and gives you the most limited choice and has less app support, so I would avoid Apple unless there is something specific you need to do on MacOS or if you like the design. Windows laptops are by far the most common and come in all shapes and sizes. Chrome has the lowest computing requirements and probably the best bang for your buck, but all its applications are web-based meaning you need a permanent internet connection or it won't work. Selection of apps is somewhat limited. - Tablet: three choices here: Windows, Apple iPad, or Android. Tablets are great for reading in bed (my entire Kindle library is stored on my tablet), watching videos and movies, taking on airplanes, and so on. They are extremely portable. Microsoft Surface (Windows) runs the full desktop operating system and can run any Windows program on the tablet. There are third party options from Lenovo and Acer. Despite Apple's attempts to make the iPad more "professional", it is still a toy for professionals but might suit light web browsing and low demand computing so it may be ideal. Android tablets have the same disadvantages as Apple but with the added disadvantage of less app support. Your first step is to decide how much you want to spend, then choose which form factor you want (desktop, laptop, or tablet) and then choose which operating system you want. Happy to guide you more but you must make these decisions first.
-
Nice work! I built the same ship. I painted black then dry brushed some copper on it. See my link.
-
I don't know how I missed this build. I will pull up a chair and follow along. Great progress there!
-
The trick is to dilute your PVA glue. For about 1 tablespoon of sawdust, I add 1-2 drops of PVA. Then I dilute it with water to form a paste. There is juuuust enough glue to hold the sawdust in place, and enough sawdust to take a stain if you want to.
-
FYI, when I did the ratlines on my HMS Bounty (link in my sig) I used CA glue. At the time I was worried that the acid in the glue might corrode the rope. It is now 14 years since the model was completed and the ratlines still look great. Also, I did the rigging on another model using PVA glue because of the above concern. I did not like PVA glue as much because it would not set as quickly as CA and the knots could migrate if I am not careful to leave them undisturbed whilst waiting for it to dry. I am obviously not as skilled as you guys who tie your ratlines without any glue. It is now 8 years since that model was completed, and the rigging still looks great. Bottom line: for me it's CA glue or PVA. But I prefer CA because it sets much faster. Just be careful to dab a tiny bit of it with a toothpick, and at the back of the ratline where it won't be conspicuous.
-
Sorry guys for the grave dig. I was wondering whether anyone has tried making rope from silk? It's supposed to be strong, does not stretch, is very light, has no fuzz, and flexible. Yes I know it is a bit expensive, but the cost of this is nowhere near the cost of my time invested in the model so it is of no issue to me.