


russ
-
Posts
3,086 -
Joined
-
Last visited
Reputation Activity
-
 russ reacted to hof00 in Bluenose II by Osmosis - Artesania Latina - 1:75 - First POB
Good Evening Mr Osmosis,
I have built this version, it worked out o.k.
Have a look at Mr J Earl's website, helped me heaps!! (Google)
Heaps of photos if you require.
(got mine on E-Bay also after a short bidding war many years ago.)
Enjoy!!
Cheers....HOF.
-
russ reacted to Beef Wellington in HMS Jason by Beef Wellington - Caldercraft - 1:64 - Artois-class frigate modified from HMS Diana 1794
Thanks everyone for interest and kind words
Frolick - thanks for posting the history of that action, always very interesting to read.
Final comments on the stern, brief notes, and pictures thrown in just for spice:
The roof of the quarter galleries was really the last major hurdle to getting the 'look' of the stern as I wanted it. This did pose a conundrum, as options abounded. Other frigates of the period typically seemed to have the more classical fluted columns between lights and shingled 'roof' to the quarter galleries, and the contemporary models of Diana have a highly decorative roof and columns which Christian (Barbossa) has replicated so beautifully on his Diana. In the end, just decided to follow the AOTS book and its distinctly Georgian look which I like and use some of the kit supplied mouldings.
The roof itself was made from some spare stock and shaped to dimensions less that that suggested by the instructions using the plans. The kit provides some soft metal decorations, although how they are supposed to be applied is a mystery as the roof has a quite fine, but pronounced convex-concave shape. I very carefully attacked this with a dremel and removed the thickness of the metal backing to leave the decorative elements which felt a little more in keeping with the scale. This was less challenging that at first thought, though care is certainly required and fine tuning with a sanding stick. The only problem was that the these did have a tendency to break, although these can be reassembled without too much difficulty in situ.
With the roof in place the stern seems to have acquired its (almost) final form, some decorations between the lights need to be applied still as appear on the stern, and a molding will ultimately the placed on top. Overall, I am very happy with the way this turned out, and proved to be more challenging than I had initially thought. I've talked at length at some faults with the dimensions and shapes of the provided PE parts but I think these can be used to provide reasonable results with some planning. These do look much better to the human eye, the camera seems to highlight the slightest misalignment
The sheer rail could now be placed, and fortuitously this landed almost exactly where it should lining up with the top of the quarter gallery roof. Gaps have been left for the channels which will be positioned later. Steps, fenders and chesstrees have also been attached after reducing slightly to the expected level of the deck. Not much else to say so I'll leave with some pictures...
-
 russ got a reaction from Johnnyreg in T78 Norden by popeye the Sailor - FINISHED - Billing Boats - 1:30
Nice work. This model is coming together very well. The extra deck details really a lot of character to the model.
Russ
-
 russ got a reaction from popeye the sailor in T78 Norden by popeye the Sailor - FINISHED - Billing Boats - 1:30
Nice work. This model is coming together very well. The extra deck details really a lot of character to the model.
Russ
-
russ reacted to Jerry in H.M.S. BOUNTY by Jerry's Admiral - FINISHED - Amati - Scale 1:60
Hello again everyone..
It took a long time but we finally received the display case from our manufacturer and our Bounty is happily on display in our living room. She proudly sits on the other side of the narrows from HMS Victory vying for the most attention. This will close out our joint effort in the building oh the HMS Bounty.
Best to everyone..
Charlene and Jerry
-
russ reacted to Richvee in Kate Cory by Richvee - FINISHED - Model Shipways - 1:64 - solid hull
A little background before I start this log. I played around with models of all kinds when I was young, but this was my first effort at a "quality" model as a result. (The term "quality" is up for debate )I am in the middle of this build. I started it back in the late 80's. The hull was shaped, sanded and topsides painted. Plankshseer, rails and decking added and painted.....And there it sat as life went on. Bought a house, raised 2 kids, and late summer of '17 I dusted it off, and started adding rivets to the strip copper for the hull. Little did I know these strips should have been cut into plates. I simply simulated the plates by using the ponce wheel to run vertical rivets every 15mm.
After the copper, I started on the deck work. Hatches and companionways, wheel, skylight, galley.
Next up was the tryworks.
-
russ reacted to Richvee in Kate Cory by Richvee - FINISHED - Model Shipways - 1:64 - solid hull
While doing research on tryworks and trying to figure out how I was going to make this, I ran across this site, namely, jablackwell's Kate Cory build log. His log, along with Thomas Lauria's great site, and texxn's C.W. Morgan added a wealth of information for me. it was after discovering all these places on line that I truly realized how much I had to learn, and how much better I needed to get.
So the tryworks were built. I used the metal pots that I still had from the original kit. The brick was a thin plastic sheet of model railroad "S" scale brick wall, that I painted. The rest is wood sheet and strip wood I had from various kits, and steel wire for the slide rod for the oven doors.
-
russ reacted to Richvee in Kate Cory by Richvee - FINISHED - Model Shipways - 1:64 - solid hull
After the tryworks I moved to the bowsprit, and a few details on the deck, deadeyes and chainplates, windlass details and anchor chain
-
russ reacted to Richvee in Kate Cory by Richvee - FINISHED - Model Shipways - 1:64 - solid hull
I don't have a lot of time over the summer for modeling, but I managed to make the masts this past summer.
Decided at this point to start the standing rigging of the foremast and bowsprit. (in an attempt to put off carving the whaleboats even longer )
Added the davit and bearing post on the port side for the waist boat. This davit goes on the outside of the hull. details are sketchy so it was a a best guess as to how to portray it.
Which brings me up to date on this build. I guess uit's time to dive into the whaleboats. I don't want to add the iron davits other than the one above until I have the whaleboats done at least to the point where I know the davits will line up over the hoisting eyes on the whaleboats.
These whaleboats are the old machine carved that came with the original kit way back when. There's a lot of sanding, filing, and chiseling to do to get the walls to 1/32". The process has begun.
I guess I can always take a break and start stepping the main mast.
-
russ reacted to jablackwell in US Brig Syren by jablackwell - Model Shipways - first POB build
Made more headway this afternoon given the lousy NH weather we are having today.... expecting some 12-18 inches (30 to 45cm) of snow.... So... what better that work on the model?!
- Sanded down the sills and lintels, and everything held together. Nothing broke, so I am happy.
- Trimmed the gun port template and taped that into place.
- Marked all the little bits that make up the vertical walls of the gun ports.
- Set the mini chop saw fence to cut the gun port walls and chopped slew of those then started to glue them in.
- By the way: I am LOVING my new Dewalt finishing sander. It has saved me a ton of time, and is delicate enough to get it done safely.
- Some images follow....
-
russ reacted to Baker in Golden Hind (ex-Pelican) by Baker - FINISHED - scale 1/45 - Galleon late 16th century
Painting is done.
On this part of the hull the colors have become white and red.
After painting a light dry brushing with white and reddish brown was applied.
Sometimes it did not go according to plan...
The pelican is also further painted.
Now we can start with the floor of the balcony. And make windows and a door.
Thanks for following, index see post 1.
-
russ reacted to yamsterman in WASHINGTON GALLEY by yamsterman - 1/48 scale - POF
HI ALL
DECK HAS NOW BEEN PLANKED
UNFORTUNATELY I DRILLED THE HOLES IN ONE PLANK IN THE WRONG PLACE!!!!! DOH!!!
OUT CAME THE ISO....THANKFULLY IT CAME OUT QUITE EASILY....PHEW!
I CAN NOW MOVE FORWARD AND START MAKING THE DECK FITTINGS.....ONCE IVE SANDED THE DECK SMOOTH
THE CLAMPS I MADE EARLIER PROVED TO HAVE A FEW ISSUES WITH THEM.......SO THE BOXWOOD WAS REPLACED WITH ALUMINIUM....PROBABLY DOWN TO ME USING 3MM THREAD RATHER THAN THE UNF THREAD.
THATS ALL FOR NOW FOLKS
CHEERS...MICK
-
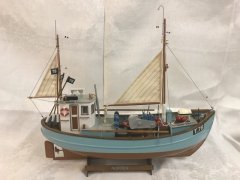
russ reacted to popeye the sailor in T78 Norden by popeye the Sailor - FINISHED - Billing Boats - 1:30
thanks John.......yea, got a few more ideas to throw at her
as mentioned, I finally added the break water fenders to the bow. a bit out of character for Billing's....usually they supply these as laser cut parts......these you make from scratch. I had a pair from another model.......likely from the Mary Ann, since I used the pair that they showed in the diagrams. how this other pair got into the kit, I'll never know, but have a good idea of it. I've built other models before that supplied parts that were intended for another version of the model.
then I worked on rigging up the main mast boom. I added a stay for the boom......actually, I should have rigged it to be a haul line, but the gooseneck of the boom is a stationary fixture, and only allows the boom to swing port or starboard. the stay will aide in making the down haul pulleys taught.
I also worked on the winch, adding what would be considered the power wires. once done, I can add it to the model. more on her soon. sad thing to note, that my work schedule has changed.......I've gone from the 3 / 12 hour work week, to a 4 / 10 hour work week...so I will be losing a day at play. might be good...... ..might be bad.....I really don't know how all this will play out. I have one more week of my old schedule, and then I'm on the new one. this might be short lived though......on Thursday, I have to go take a test.......if I pass, I'll be well on the road to a new job.
-
russ reacted to stripehunter in Enterprise 1799 by stripehunter - Constructo - 1:51
Life has kept me from doing much work for some time. Ive been working on my deck planking. I have some more log photos to post as time permits. In the meantime though im looking for opinions on my simulated trenails. Im thinking i dont like the results so much. Not as subtle as id hoped. Im seriously contemplating sanding them out and trying something else. Thoughts please?
-
russ reacted to yancovitch in USF Confederacy by yancovitch - Model Shipways
ok............back on board................is now at the spaghetti stage................next...the belaying.......fraid it will be a ''close enough for jazz'' rig.......hopefully it will look ok.............
-
russ reacted to JesseLee in Syren by JesseLee - FINISHED - Model Shipways - scale: 1:64
Rigged the lanyards through the deadeyes. Got all the lower shrouds completed.
Jesse
-
russ reacted to mtaylor in Revolutionary warship uncovered in Maine by storm
Here's the links via Google for this: https://news.google.com/news/search/section/q/revolutionary war ship/revolutionary war ship?hl=en&gl=US&ned=us
-
russ reacted to mtaylor in Licorne 1755 by mtaylor - 3/16" scale - French Frigate - from Hahn plans - Version 2.0 - TERMINATED
Been a busy week in the shipyard. Figuring out how the heck I'm going to do the cannons and I think I'm on target. I've looked over the details from Boudriot's The Seventy-fFur Gun Ship (see picture) and after going "Holy cow!!! How in the h*** am I going to do that?" I took a deep breath and began analyzing things. I think I can pull this off but there's a few bits I'm going to cheat on... like the hooks on the single block at the rear of the gun. I'll use Dafi's etched brass hooks for those.. the 2.2mm size. The singles I have are tiny and in scale to my eye as are the doubles on the front (they're actually maybe a tinge to large. I've dug out the eyebolts and rings and found I can make the forward hook that's in the bulkhead from an eyebolt. I went through assorted stock and found some of Chuck's line that will work perfectly. My apologies, I didn't toss a dime into the parts for size but if you go back up a few posts, you can see the carriages with a dime for size. Oh... I do have more parts than what's shown in the box as those will get me started.
Well, the road to hell is paved with good intentions and I've got a few good intentions. Hopefully my sanity will stay where it is. I'll update when I get a few guns done and installed providing my eyes aren't crossed by then. Time to gather the yard dogs up and set up a production line.
-
russ reacted to jablackwell in US Brig Syren by jablackwell - Model Shipways - first POB build
The gun port lintels are complete. Now to sanding.... stand by!
~john
-
-
russ reacted to ccoyle in USS Lexington wreck found
Amazing preservation down there at two miles deep. I remember reading a book about Lexington when I was a kid. I don't think many kids today have any inkling of how important the Battle of the Coral Sea was in thwarting Japanese advances into the Southwest Pacific. Heck, most kids today probably don't even know there is a Southwest Pacific!
-
russ reacted to Canute in USS Lexington wreck found
Paul Allen's crew has found the wreckage of Lady Lex in 3,000 meters of water in the Coral Sea. See here for details: https://www.paulallen.com/uss-lexington-wreck-located-rv-petrel/
-
russ reacted to RichieG in Mayflower by RichieG - Model Shipways MS2020
I glued on the bulwarks (or what I'd call the 'side pieces') uneventfully (I thought). I think they were meant to line up with the tops of the forward bulkhead and the transom, but I found that I was over an eighth of an inch low in the front, and over an eighth of an inch high in the back. I was left with the option of raising the side piece in front and lowering it in back, or raising the transom and lowering the forward bulkhead. I opted in both cases to leave the side pieces as they were, and to alter the front and back to match.
(the pictures show the forward bulkhead well above the bulwark before alteration, and then the forward bulkhead sanded down to match. In the picture of the back of the boat, you can hopefully see where the transom originally ended, and where it was built up. The new top pieces don't have treenails in them.)
-
russ reacted to EdT in Young America 1853 by EdT - FINISHED - extreme clipper
Young America - extreme clipper 1853
Part 272 – Fore Upper Topsail Yard Rigging 1
The last picture in Part 271 picture showed the yard set up for rigging, but first the topgallant sheet blocks had to be fitted to the yard. The first picture shows a trial fit with one of these before both were blackened.
This picture also shows the studding sail boom irons on this end of the yard and the two jewel blocks at the end of the boom. Studding sail blocks that would likely have been "permanently" rigged will be shown on the model, but other studding sail rigging will not be modeled.
In the next picture the yard has been returned to the fixture and rigging of the footropes has begun.
The stirrup eyes and the ends of the footropes are secured with lashings – to jackstay stanchions in the case of stirrups and the inner ends of the footropes, and to the outer boom irons in the case of the footrope outer ends. The next picture shows a lashing being tied.
Guterman® quilting cotton is being used for all small lashings – black for permanent connections and ecru for temporary – like reef tackle blocks and inner boom lashings. To make this type of lashing, I have been double looping the line through the eye and around the boom iron (or stanchion, etc.) A clove hitch is then made around the turns as shown. Before this is tightened the other end is pulled to shorten the lashing to its final length. The hitch is then tightened and the lashing touch with diluted glue.
There are several blocks lashed to the yard for buntlines, reef tackle, downhauls, etc. On this yard most are 9" (1/8") single blocks, strapped with a single thimble. For these small blocks I usually form an eye around a pin, tie it with a double hitch to simulate the seizings, then tie an overhand knot under the block to simulate the strap splice. Some of these may be seen lying about in the second picture. For blocks with thimbles at each end, this method is not practical. So something more like the actual strapping is made. A strap loop is first made as shown in the next picture.
The rope is wrapped around two pins set at a distance that will allow the two eyes to be seized. The strap splice is made by passing the rope through itself then gluing. When the glue dries the block is inserted as shown in the next picture.
The excess strap rope is cut off and a seizing tied to form the eye at each end of the block. This method was used for the reef tackle blocks lashed to the outer boom irons.
The next picture shows the method used to simulate a shackle between the halyard tie and the iron gin block with the finished shackle shown in the inset.
The picture shows a test of the method. The actual connection will need to be made on the model after the tye chain is attached to the yard band and threaded through the mast sheave. To make this shackle, wire is passed through the chain link then through the eye on the block from both directions with an overhand knot set within the block eye. The ends are then pulled tight and clipped off as shown in the inset. The final configuration of the halyard will be shown in the next part.
The next picture shows the bench work finished and the yard ready to be hung.
The topgallant sheet chains may be seen hanging from the center sheet block and from the cheek blocks at the ends. Securing the two chains inside so the yard may be pulled down by the sheet tackles was discussed in an earlier post. The picture also shows the chain halyard tye suspended from the sling band. All the chain ends are threaded with wire to assist in getting then through the various sheaves. Pushing on a rope has its difficulties but pushing on chain is impossible.
In the last picture the yard has been hung and is ready for the next steps – securing the sheets and halyard.
Ed
-
russ reacted to Navis Factorem in HMS Surprise by Navis Factorem - FINISHED - 1:75
Deck fittings.
The deck fittings are now pretty much complete and stepping of the masts and commencement of the rig is getting closer.
Before this major step I need to do a deck rig layout to ensure that I fit any rings, blocks etc that are required where lines run down to the deck before belaying. On my Bounty build I omitted this step and had to drill holes and fit blocks and rings once the masts were in place, not easy.
Cheers, David.