MORE HANDBOOKS ARE ON THEIR WAY! We will let you know when they get here.
×


NMBROOK
-
Posts
2,305 -
Joined
-
Last visited
Content Type
Profiles
Forums
Gallery
Events
Everything posted by NMBROOK
-
 Beautiful work Siggi I am glad you have started a log and look forward to following along. Kind Regards Nigel
 -
Thanks Ferit ,I have actually found cobalt drill bits down to 0.15mm diameter now.These have a 1mm shank and would fit in the MF70 collet.Only downside is they aren't cheap Kind Regards Nigel
-
Thank you very much Jason and Grant Still can't believe I went through all the trial and tribulations without one swear word Just got several more to make now Kind Regards Nigel
-
Thank you Mark Btw,I checked EdTs Naiad log,no nails in the gratings,Frolich does say at 1/48 they should be no bigger than 0.2mm.I wouldn't even know where to buy a drill that small,never mind drill more than two holes without it snapping,so that idea has gone in the scrap bin with the other gratings Kind Regards Nigel
-
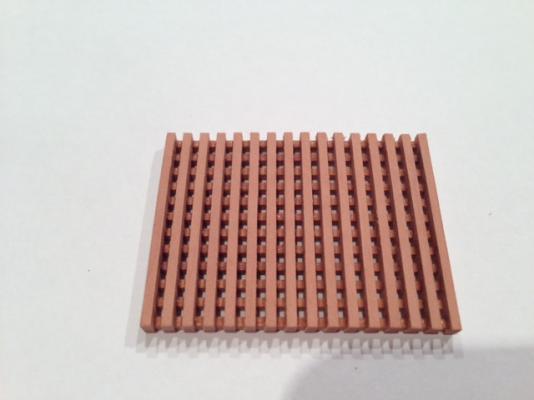
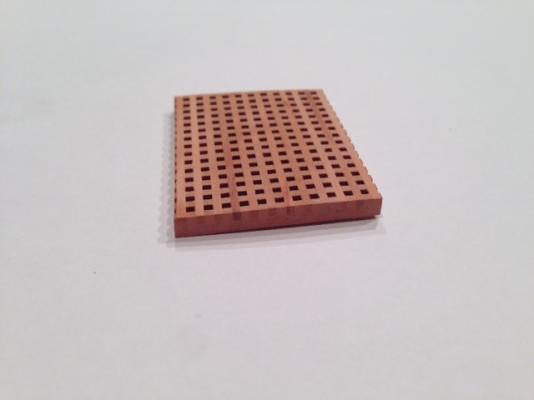
Gratings Mk 4 part 2 1.5mm wide battens were glued into the grouves and allowed to dry.I used alaphatic applied with a cocktail stick and excess was vigilently removed with a wet brush.When dry,the back was sanded off and the battens flushed off.I used a small disc in the Proxxon IBE to do this.Before final trimming and profiling I am going to apply two coats of heavily thinned matt poly to prevent any splintering.Mr Frolich does mention this in his book and seems like a good insurance policy. Kind Regards Nigel
-
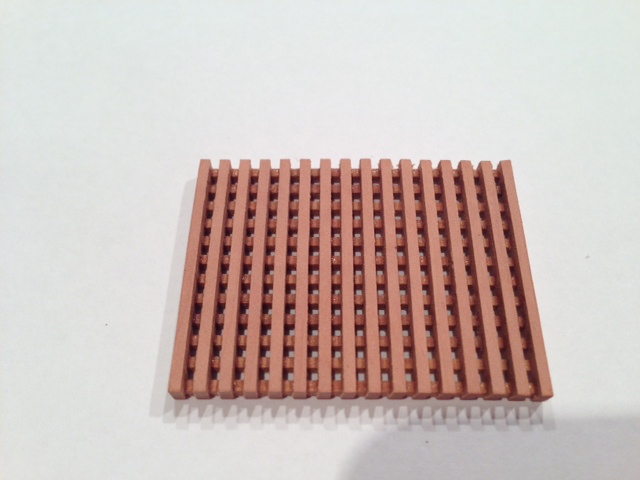
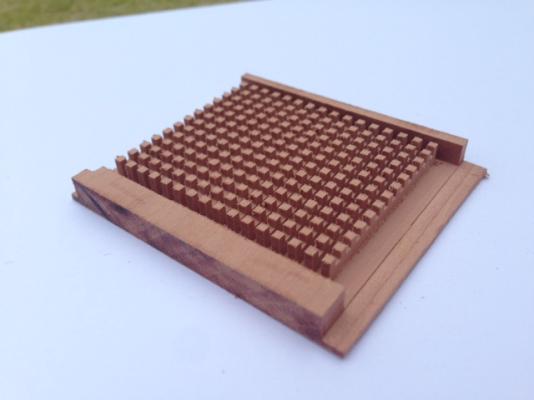
Ok then,hopefully a more positive post.After trying the table saw route and more failures(the little nibs kept breaking of)I think I have it sussed.When in doubt,consult a book.After studying Frolich's method,it made a lot of sense when working with the problematic pear.Just a couple of tweaks to use the mill instead of a tablesaw. So here we have Gratings mark 4?Part one. A solid block 6mm thick was machined to follow the same pattern as what Frolich does.Basically the ledges are machined in the top face leaving some material acting as a backer holding them the correct distance apart.When the battens are glued and set,the rear face is sanded away leaving a complete grating.The important factor was the order of doing things to prevent the 'nibs' from being chipped.The block was placed in the mill so that the grain followed the ledges i.e.athwartships.1.5mm wide by 1.5mm deep grouves were then cut the right distance apart for the run of the battens.4mm deep by 1.5mm grouves were then machined perpendicular to these.These are the gaps between ledges.I have changed the gap despite what I said earlier to 1.5mm.This then matches the contemporary model,so should not look out of place.This process leaves the ledges attached to a backer which holds everything true while the battens are fitted.The fact that the final cut runs inline with the grain results in crisp 'nibs' with not chipping.I will take photos of the machining process for the next post,I didn't bother while making this until I was sure it would work Kind Regards Nigel


-
Thank you Kevin I think the biggest lesson and reason I don't mind posting the bits that go wrong,is that no matter how long you have been doing this,things don't always go as planned Kind Regards Nigel
-
Thank you John and Mark I will check out EdT's log Mark.The only issue with doing it in situ is the fact the upper grating will be visible underneath,this would mean ideally drilling blind holes.I have already thought of moving up to the next size of copper.This would enable me to use a 0.4mm drill.Which inturn would mean I could use the mill (with micromot chuck)and table to position the holes.Having studied tonight the pics of the builders model,I could actually go to a slightly wider(2mm v 1.5mm)ledge and batten as I have too many holes in my version.I still want to maintain 1mm square holes as this is about bang on scalewise,any bigger and it is a foottrap.Incidentally,the kit gratings have 2mm square holes!!!!!! Kind Regards Nigel
-
HMS Victory by JPett - Corel - 1:98
NMBROOK replied to JPett's topic in - Kit build logs for subjects built from 1751 - 1800
Your planking is coming on well JP,you are quite correct,as long as the planking is in full contact with the stern fillers,no worries about how thin you have to take the planking at the sternpost.I think that the fact you are getting clinkering at the bow is a good pointer that you may have to spill some of these planks from sheet when it comes to the second layer to maintain the same line. Kind Regards Nigel -
Thank you for your support everyone If it was all plain sailing(no pun intended) then there would be no more challenges I am more determined than ever to find a solution,but a break from gratings and some pause for thought is on the cards I shall resume work on the main hull instead and apply coat nine of poly to the deck. Keith I sourced the pear for this and Royal William from Dennis Nixon in the UK,AKA Twigfolly.com Kind Regards Nigel
-
Well I am not a happy bunny writing this Unfortunately whilst milling the grating face,some of the copper was 'dragged' out and resulted in grating destruction. Progress on mark 2 gratings was dogged with further issues of timber splintering,mainly due to the small size of the 'tongues' I am trying to produce.This is not helped by the fact of using pear.I know I wouldn't have these issues with boxwood but then again,boxwood would not look right when everything else is pear. I have avoided the common route of cutting grooves in a sheet and sawing strips off,because I know I will get charring on the pear from the saw cut. Taking a break from this task and will continue elsewhere whilst I think of a better plan.Also as the copper fixings in the grating was a no go,this inturn means I am abandoning the use of copper fixings elsewhere.It really was an all or nothing decision for me. Kind Regards Nigel
-
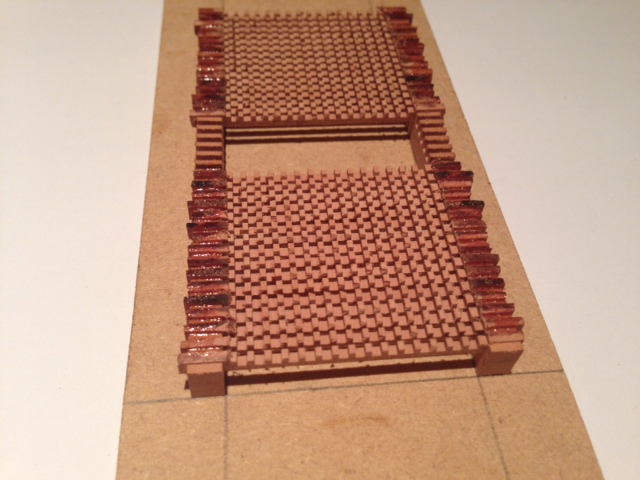
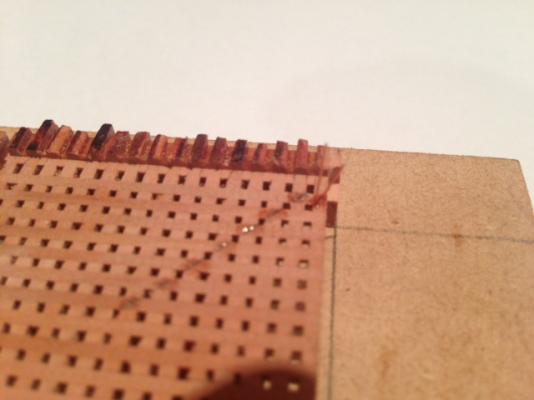
In an attempt to address the poor picture quality above,I post a better quality example .Half of the nails fitted in one grating and trimmed flush(although the keen eyed will note I have one to redo as the copper was not inserted properly and dislodged whilst trimming).I have ordered some liver of sulphur gel,but I am sat on the fence as to whether to use it on these fixings. Kind Regards Nigel

-
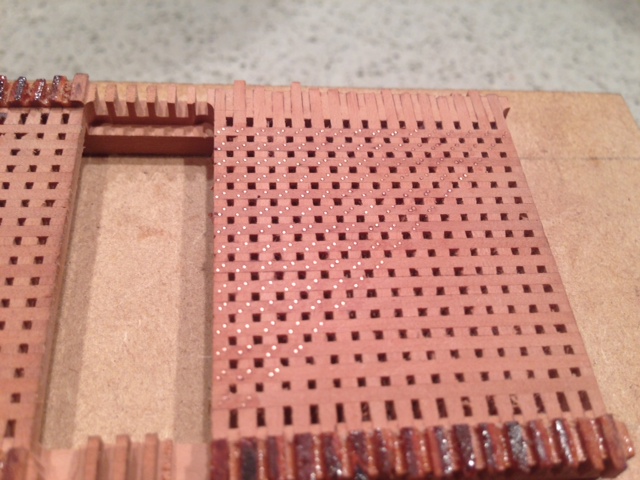
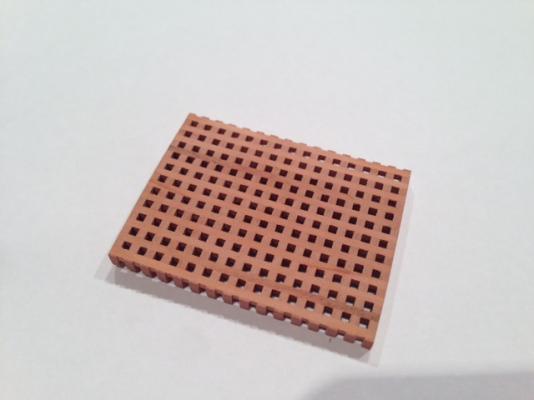
Thank you Matti and Ferit and Ferit a valid question.The holes at the sides are not part of the grating,this section will be cut through.The holes in the middle appear a little out of square because the 'burrs' from milling have not been cleaned off.The direction of feed forms the rough edges on two sides of the hole only . Kind Regards Nigel
-
Thanks Gaetan I have heard of at least one model that used apple for the carvings.I will have to get hold of some apple and experiment a little. Kind Regards Nigel
-
Wonderful model Gaetan,did you produce the carvings in apple as well? Kind Regards Nigel
-
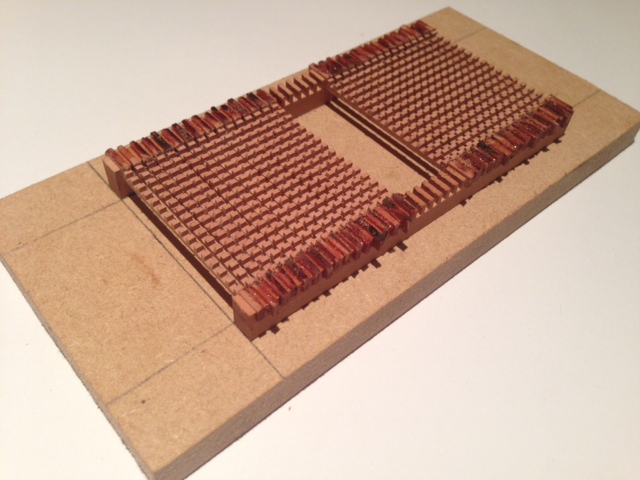
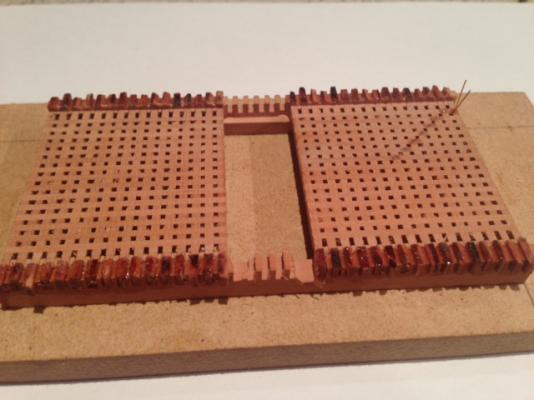
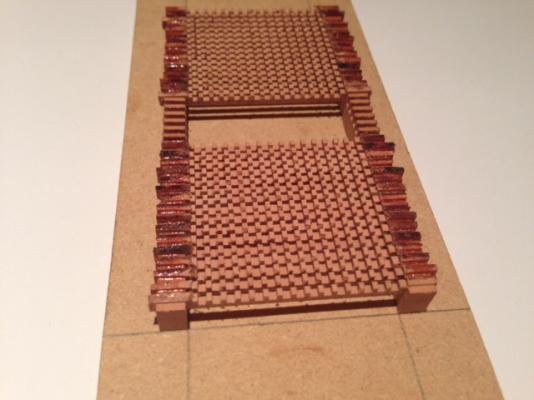
Grating construction pt2 I next glued battens into the notches in the ledges.The height of the battens was oversize as the tops would be milled off.I used aliphatic,with a drop in each joint rather than using dilute PVA, When set,the top face of the gratings was faced of again with the miller,but still above finished level.Whilst on the mill bench,I trimmed the ends of the battens flush with the end ledges. I have made the decision to carry out representation of all fastenings with copper.This was my original intention at the start and I have decided to stick to it.So now to the grating nailing.I have started drilling two holes at each intersection 0.3mm diameter.Unfortunately this must be done manually with a pin vise.Due to the drill diameter,I was unable to find anything adequately concentric and small enough to hold the drill in the mill or rotary tool.Into the holes I am bonding with CA 0.27mm copper wire.I have made a start in the pics,but you can appreciate it may be a little while before part 3 .The top face still has around 0.4mm of material to be removed so this should eradicate the glue residue. Kind Regards Nigel
-
Thanks Mick,I have bookmarked their website A nice variety of timbers available,the applewood is inexpensive compared to box and pear I normally buy.Their prices for Ebony are also cheaper than workshop heaven Definitely be using them in the future. Kind Regards Nigel
-
Thank you,I did have a suspicion that apple was a premium timber for modelling purposes,best see if I can get the next lot of 'trimmings'. Kind Regards Nigel
-
Sitting in the pub tonight with my friend,he revealed he had been pruning his apple tree.He had taken 8 loads to the local tip!! I was rather distressed and mentioned I may have taken it off his hands (some of the branches were over three inches in diameter and almost arrow straight.) I know apple has been used in the construction of various contemporary models,my question is what is it like to work with?To my knowledge you cannot buy it in the UK.He does mention there may be some more branches to come. Kind Regards Nigel
-
Your ratlines look great mate I always knew you wouldn't have any difficulties Congrats on reaching 100 pages,it is a great pleasure to follow your journey from the start Kind Regards Nigel
-
Thank you very much indeed Matti and Brian Unfortunately not Brian Trying to juggle over fifty hours work,twelve hours commuting and some modelbuilding into my typical week Kind Regards Nigel
-
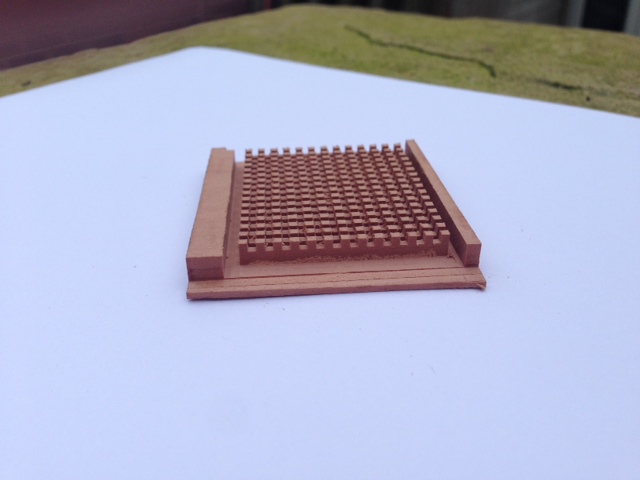
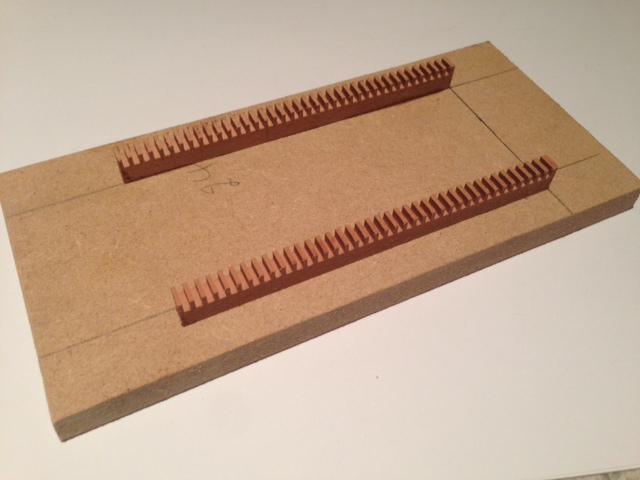
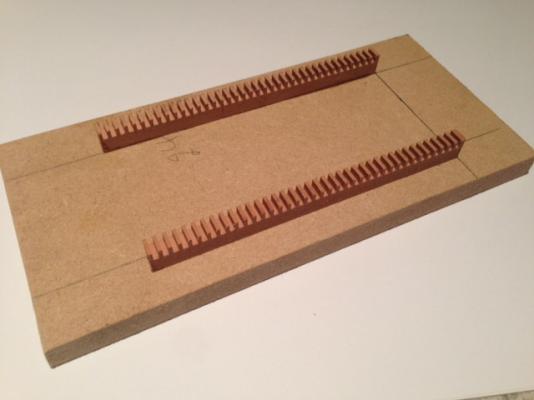
Grating construction Part one. Not only do I want to produce more historically accurate gratings,I wanted to produce them in Pear to match the rest of the model.As far as I am aware A.Banarov is the only producer of grating kits in Pear but ordering some gratings from Odessa would be a bit extreme,even for me I decided that the ledges and battens would be 1.5mm wide with holes 1mm square.This gave a scale hole size of 60mm by 60mm.The way I have decided to produce these should enable scale holes for Royal William by adjusting the centres I work to on the miller. The first step was to make some sacrificial jigs.These comprise of some mdf cut to a suitable size to allow easy clamping on the miller table.On to this I bonded some pear strip machined with 1.5mm wide slots at 2.5mm centres. The next stage was to bond some 1.5mm by 2.5mm pear ledges into the slots.When dry the top was faced off in the miller and then perpendicular slots machined 1.2mm deep into the ledges.The gratings will be thinned in depth further when the battens are glued in place.Keeping everything oversize to start with,eliminates any deflection of the ledges whilst machining.It is my intention to curve the assembled piece after assembly and removal from the jig as everything will be far too thin to allow the curved face to be sanded on. To be continued Kind Regards Nigel

-
Wonderfully clean and crisp work Jack Kind regards Nigel
-
Hi Kevin Your build is coming along great I wouldn't worry overly about the dust,I keep dusting mine off with an airline and blow gun,but the PCB/computer cleaning aerosols from Maplins work just as well if you don't have a blowgun for the compressor. Regarding the hammock netting,have you thought of using thin brass wire through the cranes and tying the netting to that.Just a suggestion,but I would of thought it would have made things much easier to keep straight and uniform. Kind Regards Nigel
-
Hi mate The 'ladders' are invariably tied in with the next set of lower deadeyes,so these would need fitting first. When fitting the ratlines it is best to try and not create any twisting in the thread,this causes the 'worm' appearance and makes it harder to get the thread to sag.As Mark says dilute PVA painted on helps you to control the thread.My suggestion would be to cut some strips of Plasticard a couple of mm narrower than the distance between the shrouds.Place a fold in the middle and hang these on the ratlines after applying dilute PVA.The weight of these strips should induce the desired sag and hold it whilst the glue dries off.The dilute PVA should not stick to the plasticard. Kind Regards Nigel