NMBROOK
-
Posts
2,305 -
Joined
-
Last visited
Content Type
Profiles
Forums
Gallery
Events
Everything posted by NMBROOK
-
 Fabulous work mate At least now you get a little break doing something else,from the monotony of knots Kind Regards Nigel
 -
Excellent work Marsalv!! Kind Regards Nigel
-
Hi PG I knew you liked this ship and when I saw the title,I immediately thought of you I think you will enjoy starting with a clean sheet of paper,I know I am,it can sometimes be frustrating 'kitbashing' and you end up doing more work than starting from scratch Excellent choice of timbers,they are both expensive in the UK,but are much more enjoyable to work with than the stuff that normally comes with kits.Be prepared to go through a lot of blades with Boxwood though,it is extremely hard. I would recommend you buy Frolich's book if you haven't already,it is expensive,but does have a section on his build of this model and worth every penny IMHO. I look forward to following along with your 'journey' Kind Regards Nigel
-
Great work Tom What are the two ports towards the stern that are obviously different levels to the guns? Kind Regards Nigel
-
Excellent work Michael and a good bit of 'matchmarking' as we call it in my day job Kind Regards Nigel
-
The quality and attention to detail with all your metal work is simply outstanding Johann!! Kind Regards Nigel
-
Hi Gaetan I have followed along in the shadows for a while,but now must say I am admirer of your work,it is fantastic Two things historically you may find of interest,but you may know already. It is officially documented that a builders model was produced for Sovereign of the Seas.This is regarded as possibly the first builders model in England.This dates to around 1637. In 1698,Peter the Great visited the Royal dockyards and was given a model of the Royal Sovereign,this started the ship model building phenomenon in Russia that many of us are aware of today. Kind Regards Nigel
- 728 replies
-
- 2
-

-
- le fleuron
- 64 gun
- (and 1 more)
-
Hi Michael Yes,I fully appreciate now why this wouldn't produce the desired effect.Having the lid match the port it fits is far more important than consistency throughout,especially on Vasa,where consistency is perhaps a little less than the norm. Kind Regards Nigel
-
Eamonn,you ask the million dollar question.I have not seen substantiated information about RN vessels of my chosen periods that say either way.The model I mentioned shows to me there is a good possibility they followed the same practice.Interestingly,Michael (md1400s) has just posted some excellent pics of Vasa's gunports featuring the same details. Basically,aesthetically they add a great deal and my using the NMM model argument as my justification should keep the judges happy Kind Regards Nigel
-
The link was Dr Mike's work.His Rivoli ones are even nicer,actual rounded nail heads and made in silver against boxwood.I would have had to delve deep into his build log to find that one. Kind Regards Nigel
-
If my wife suggested that,I wouldn't argue .I have googled them and can't believe you can spend up to £1800 on one .Seriously though,the dust blower is a useful inclusion,mine has a manual version Kind Regards Nigel
-
Oh dear,now you do really face the dilemma,cheap and cheerful,or proper money Only advise I would offer is go for one that takes plain ended blades,not just pinned.There is a vast selection of blades available plain ended,unlike the pinned which my saw uses Kind Regards Nigel
-
Hi Keith Thank you very much and yes it is Roma's model I am referring.I will try both single and double fixings on a scrap 'mock up'.I think many may realise I am borderline certifiable . I have two options with shaping.One is to sand the curved profile,but I would much rather be able to thin the grating enough to enable me to shape the piece by water application.This is the reason for the thinned varnish,to reinforce around the holes to allow removal of further material by sanding. The nailed gunport lids is something I will touch on later in this build as I intend to open a 'can of worms' regarding history.It has generally been accepted this was a French practice,however there is a sectional model of a gun position from Royal William that was in the NMM.This dates to the time of the vessel and the 'sea of nails' can be made out beneath the paint .I shall be adopting this on both Mordaunt and Royal William.This is what I am hoping to achieve with copper http://www.shipmodels.com.ua/images/models/le_ambiteux/22_b.jpg Kind Regards Nigel
-
Hi Bill Yes,you got it.I found that sanding with the rotary tool to be the safest option.I tried it on the mill but it is touch and go as the grating can start to move when the amount of material holding it is drastically reduced.Mr Frolich actually cut his off using the tablesaw,I haven't the nerve to try that on something I have spent several hours on Kind Regards Nigel
-
Some wonderfully clean and crisp wood work Juergen!!! Kind Regards Nigel
-
They are going to look great Michael As ever,I am thinking if you could laminate the two sections together,then mill to size and mill the rebate on the MF70.This would mean perfect squareness and an exact lip on all lids.Just a suggestion my friend,thinking of how this mass production job could be made a little easier.Hardest thing would be holding them.Possibly spot gluing to a sheet of ply and clamping that down. Kind Regards Nigel
-
Kevin My scroll is a cheap and cheerful one.I don't know how much better things would be with a more expensive one.At the moment I am not willing to part with 300 quid to find out.If yours is like mine,the recessed section where the blade goes through is the cause for the timber trying to 'jump'.There is an added issue if you are cutting pear,there are hard and soft spots throughout this timber that can send the blade wandering.When I cut ply and boxwood things are much,much easier. Kind Regards Nigel
-
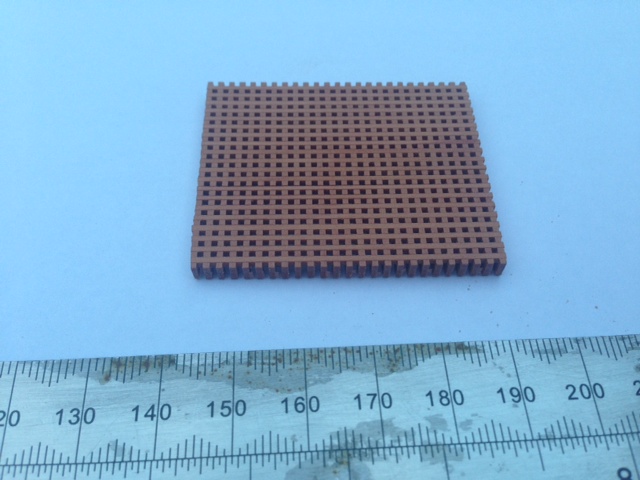
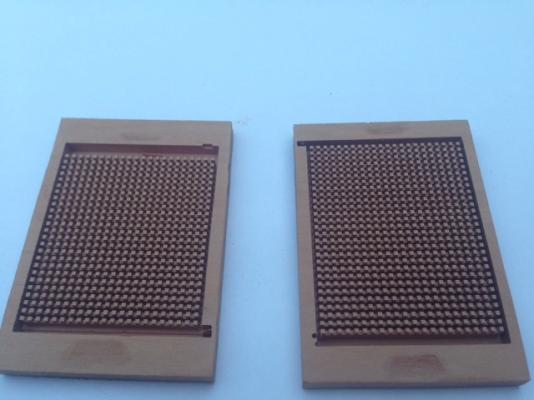
A small update,besides cutting and shaping up some more deck beams(not taken any pics as they are well,beams ) I have milled two more grating 'bases' but have also built up the first one.This has to be cut to size and the top shaped.I have given it a thin coat of polyurethane to stiffen it up a little and hopefully stop me loosing the crisp edges through chipping. Kind Regards Nigel

-
Thank you very much indeed Michael for your kind words Knowing my log has been your breakfast companion makes me smile even more The nail detail is not written off just yet Just need to up my game tool wise.As I now have to fit the fastenings inside a 1mm square box,I am going to opt for one fixing per joint(I know of one Russian master who went for just the one on his model of Le Requin).The cobalt PCB drill has the issue of only having 1mm of drilling section.I am going for a 0.2mm hole with 0.18mm copper wire.Two fixings are theoretically possible,but we are bordering brain surgery .Either way,this will have to be drilled on the mill table for accuracy and the curved profile of the top face added beforehand due to the limited drill depth.At present,I am giving this much further thought as to whether the grating should be fitted into it's combing first or later. Kind Regards Nigel
-
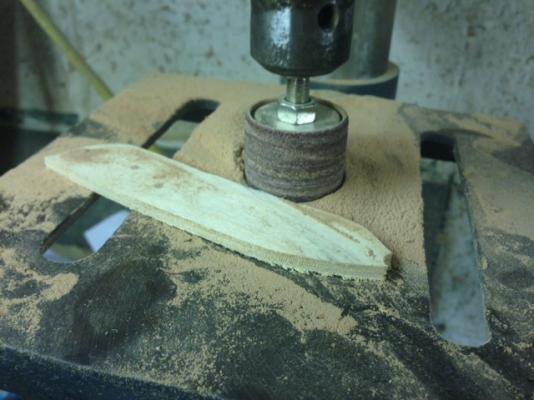
To be honest Kevin,my scroll saw work looks the same.I cut well away from the line and sand back to shape.I feel I have more control and this method I find twenty times quicker than trying to get perfection from the machine.I enclose a pic of my 'secret weapon' cheap sanding drum in the bench top pillar drill.For mass sanding sessions I have a piece of wood slightly larger than the drum that I clamp to the table.A disc sander is useful for the outside profile,but I have yet to purchase one of those.I use this set up for rough sanding of everything I cut out on the scroll saw Kind Regards Nigel
-
You are very wise Kevin doing some experimentation with your tools before starting 'proper'.One thing to keep in mind is that I doubt there is a builder in existence that makes every piece perfect first time.Don't be discouraged if you find yourself 'feeding' the scrap bin.Making mistakes helps you learn more than doing everything right first time.The beauty of scratchbuilding is it is only another piece of wood,as opposed to a kit part which isn't so easy to replace. I find using homemade sanding sticks to produce bevels on planks gives you far more control than using a normal sanding block.After trying nearly all the varnishes available in the UK(yes we cannot get half the products mentioned on this forum),I have settled on what Chris Watton uses,Ronseal Ultra tough matt coat.It is very versatile and can also be thinned and sprayed for exceptional results(however you would need something with a decent nozzle size for this,rather than a small airbrush nozzle). Kind Regards Nigel
-
Thank you very much indeed Bob,Bill and Joe I have used the laminating technique on other builds Bill.The issue in this instance is that the lower section has a deep chamfer feathering into the ceiling planks.This would make the glue joints highly visible.Had this not been the case,I may well of adopted that approach.I have made a fair few spiral staircases,but in steel,not wood . Kind Regards Nigel
-
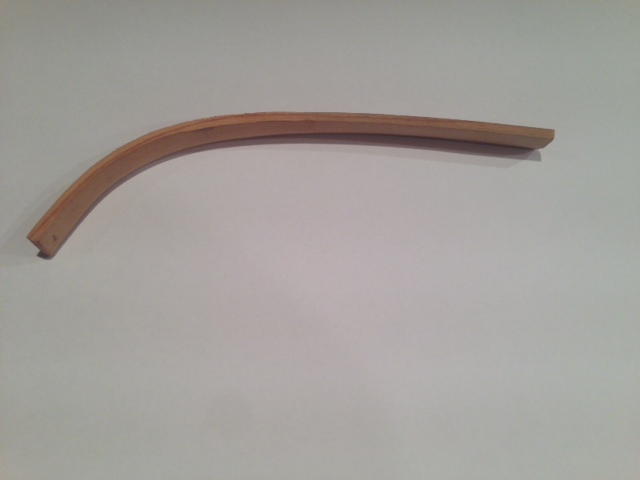
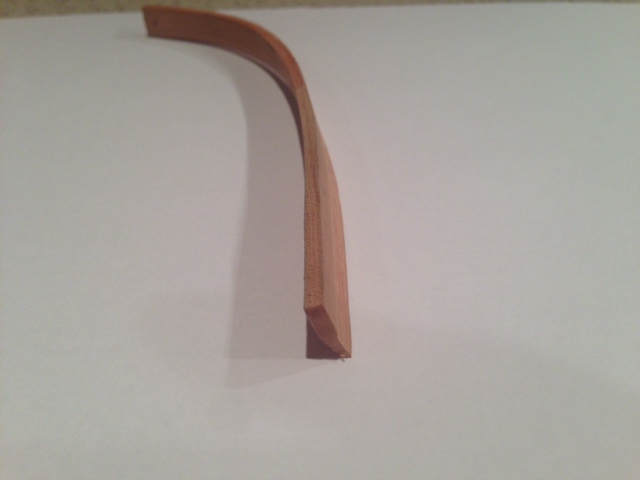
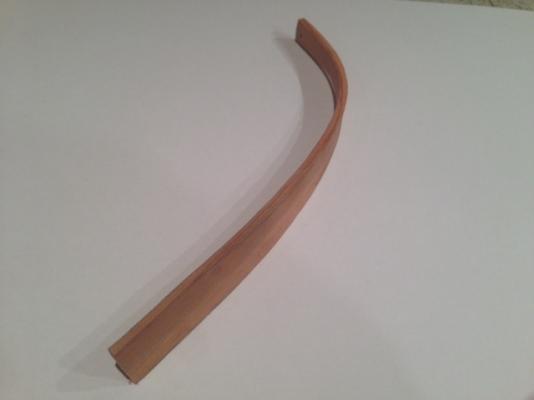
Thank you very much indeed Brian,Matti and Alistair The packer behind the g clamp is a failed attempt I have learned to expect this with Pear now and again,the grain structure is very unpredictable.The first one,shown shaped in the pics was as tough as old boots to get around that bend,the last one,that is shown clamped up went real easy.All three were soaked and boiled exactly the same.With some timbers you can second guess which way they will bend best and indeed if they won't take the bend.With pear the grain is almost invisible so it is a little hit and miss until you produce satisfactory pieces. Kind Regards Nigel
-
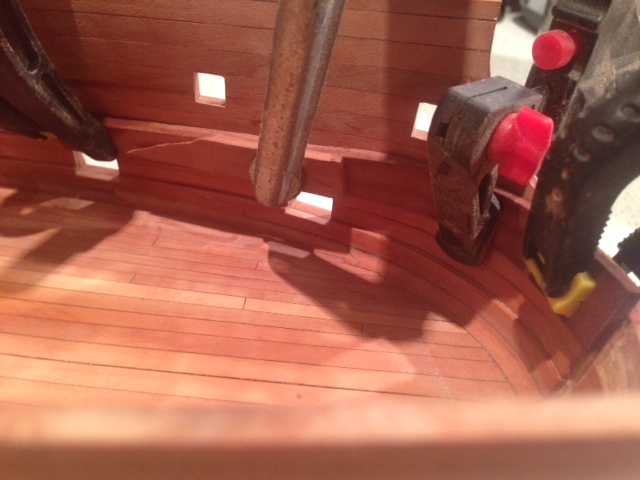
A small,but possibly useful update Work has stopped on my deck 'treenailing' as I have now been waiting a week for some more drillbits to arrive I have decided to start producing the deck clamps 'in the rough'.These are made from 3mm thick pear sheet and spiled,profiled and prebent where necessary to conform to the inside of the hull.This is not helped by the fact that the tumblehome changes direction right in the middle of these pieces.My plan is to make and bend the sections overlength and add the hooked scarph joints to the ends a little later. I have started at the bow,a paper template was made for the shape and pieces cut to suit oversize in height and length.The top edge cannot be accurately established until the deck beams are dry fitted and the hull cutouts used as a reference.The angle of cut of the top edge also changes massively at the bow as the profile is in effect twisted. I soaked the piece to be bent for three hours in water,then this was placed in the kettle and boiled up.The strip was first worked in my fingers to ease the bending process.The strip was then clamped to the inside of the hull and left for 3 days!!!!.Upon removal absolutely no spring back was experienced.The final job for now was to dish the matting face to suit the tumblehome. The second one is now clamped in place and is resting for it's 3 days I will continue with something else for the rest of the weekend Kind Regards Nigel


-
She is looking wonderful Boyd,great work!!I love the different woodtones and think that your decorations look good in brass,the only other alternative IMHO would have been carved wood,painting these in the historically correct colours wouldn't look right on your model. Kind Regards Nigel