DONATION DRIVE - SUPPORT MSW - DO YOUR PART TO KEEP THIS GREAT FORUM GOING!
×


NMBROOK
-
Posts
2,305 -
Joined
-
Last visited
Content Type
Profiles
Forums
Gallery
Events
Everything posted by NMBROOK
-
 Great work Bob,she is looking fantastic!!!! To be frank,I am using the like button more often as I am struggling to find alternative superlatives Kind Regards Nigel
- 1,477 replies
-
- 1
-

-
- essex
- model shipways
- (and 1 more)
-
Mary Rose 1545 by tarbrush - Scale 1:72
NMBROOK replied to tarbrush's topic in - Build logs for subjects built 1501 - 1750
This is a truly fascinating build John and I am keenly following along I actually found the link for the UK news article covering the forecastle find.Alas,this was a dead link,the Daily Mail newspaper must have removed it Having visited the vessel prior to getting her new home,the one thing that surprised me was how small she actually was,maybe this is due to seeing Warrior and Victory at the same time.Conditions must have been incredibly cramped on board. I look forward to seeing more of your great work and following the model's progress. Kind Regards Nigel -
Thank you Keith Yes,I feel the costs are well worth it.I am prepared to have to order 'as and when required' to help me overcome this hurdle.That is another reason why Royal William is a slow long term build.No way could I afford to invest in a bundle of timber for the whole project as this will run into a substantial three figure sum. I think we are both of the same mindset with Ebony,overcoming the challenges of working with this wood is as rewarding as the final result. All the best with your grating production and your new toys,I had many years in this hobby with no power tools,but the toys just speed things up so much and help no end with consistency Kind Regards Nigel
-
Wow Kevin,this went well under my Radar As for gluing your patterns to the timber,you can't beat good old fashioned Pritt-stik in the UK Apply to the wood,carefully lay the paper template on and smooth from the centre outwards with a bank card,plastic offcut etc.I find it is best to leave a couple of hours before commiting to the saw,then you don't end up with the paper lifting.Removal is easy with a wet cloth and the adhesive residue is easily cleaned off and leaves no discoloration . Anyway,I wish you all the best with your build mate and will be following along Kind Regards Nigel
-
Thank you very much indeed Richard and Tom I am glad you find my logs helpful Richard as this is the main reason I post.I feel I have to 'pay back' for all the tips and tricks I have learned from others I still have a fair few to learn myself Pear is expensive Tom,not helped that I buy mine already milled and thickness sanded.Yes I could save money buying from the merchant and milling my own,but at present I have no facilities to do this.As an example,a one metre board 9mm by 75mm works out about 30 euros in your money.With the ever increasing use of Ebony in my models,this sends the timber budget skyward,but I am hooked on incorporating it for more and more details.Unlike most,I really enjoy working with it,after 25 years working in the structural steel industry the associated mess from this wood is minimal compared to what I am used to Kind Regards Nigel
-
Great to see an update of sorts mate Glad you enjoyed Venice,never been myself,but my mother had and always used to rave about it You should just about have the finishing touches on the rigging in place before bedtime Kind Regards Nigel
- 1,039 replies
-
- 1
-
-
- ballahoo
- caldercraft
- (and 2 more)
-
Clear Shellac Sanding Sealer
NMBROOK replied to grsjax's topic in Painting, finishing and weathering products and techniques
Although I haven't tried it myself YET,shellac was used on original contemporary models and still is used by many French and Russian master modellers. Kind Regards Nigel -
Thank you very much indeed Janos,Brian and Sjors Sjors,you will have to come and give me a lift with the hull onto the scales Kind Regards Nigel
-
A valid point Brian,the main advantage to this method,aside from being authentic to the original is that you are only in effect producing half the number of necessary 'combs'.Trying to make crisp combs individually in Pearwood is virtually impossible,I did try,but the wood just chips away. Kind Regards Nigel
-
Thanks Matti Kind Regards Nigel
-
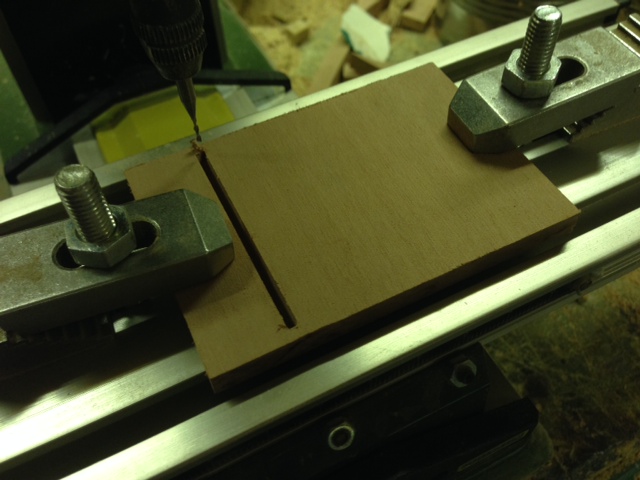
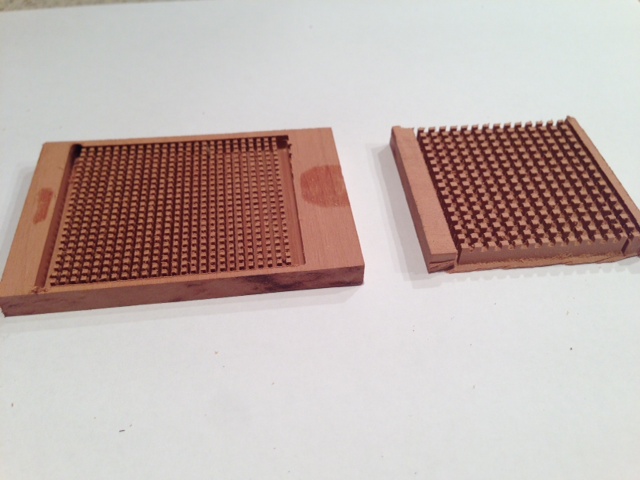
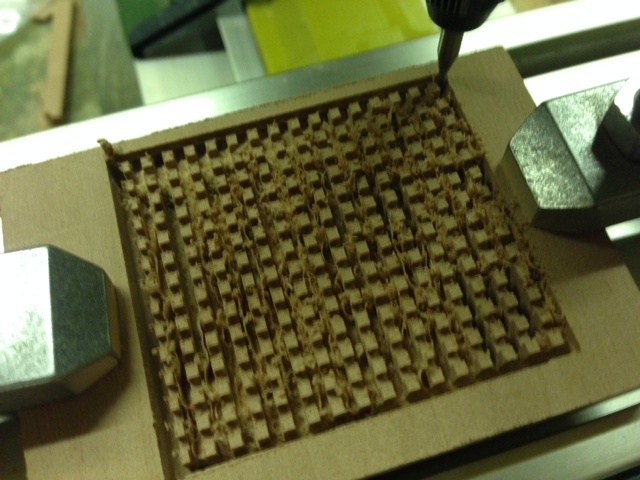
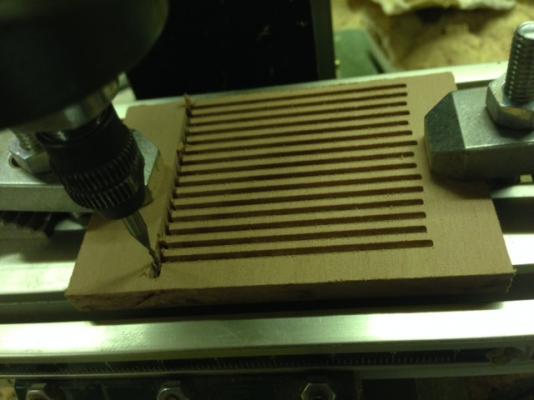
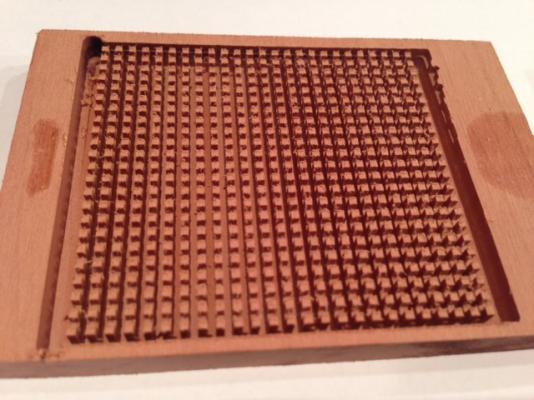
Now as promised,a picture walkthrough of the steps involved milling the 'grating' with backing spacer. First a safepark position was created with the mill,a slot around 2mm to 3mm wide 5mm deep(the sheet is 6mm thick)All work is done with a 1mm milling cutter Step two was to machine 1.5mm slots 1.5mm deep that will form the grouves for the battens to lay in. Step three was to mill 1.5mm slots 5mm deep perpendicular to the batten slots.These are the gaps between the ledges.All slots had 1.5mm of material inbetween them i.e. the centre to centre distance is 3mm. Finally the sections at each end were cut off to enable easy fitting of the overlength battens.Now also in this pic,because I was determined to have a go with this method to produce a finer pattern grating,is one with 1mm holes and 1mm ledges and battens.This was a complete success,not one chip to any of the nibs,although removing the sawdust was a very careful job with a soft brush.I think this is the way forward for Mordaunt's gratings although 1mm pear sheet for the battens will have to wait as my supplier of this is currently on their holidays Kind Regards Nigel


-
Thank you very much indeed Joe and Sjors for your kind words Due to the solid timber below decks she is almost self righting Sjors Infact she is very heavy considering there is no metalwork on board yet I will put her on the scales when I get chance,just out of curiosity . Kind Regards Nigel
-
Hi Michael I would share if I still had any of the military stuff I used to make.I am going back 25 years and a messy divorce,plus many house moves.I did,may still have a Stug 4 somewhere in the loft but I am afraid that is about it If I still had it all now there would be no room for ships Kind Regards Nigel
-
Thank you very much indeed John and Alistair for your kind works Damn,I knew that peg basket would spoil the perspective Alistair Kind Regards Nigel
-
Leaving them in place makes a lot of sense Mark.The only thing worth considering is running the saw through three or four evenly spaced along the length of the hull immediately prior to planking.It would be insurance against any timber movement in the future which could result in the odd crack appearing.This can always be a problem when you have a long continuous 'stack' of timbers with the grain running vertically Kind Regards Nigel
-
Excellent work Mark Not my favourite of jobs,trouble is most of my favourite subjects have 3 decks and lots of cannons Do you plan on leaving the fillers either side of the ports or are you removing them with the rest?I just wondered as they will be covered by planking I presume and things will become a little fragile without them. Kind Regards Nigel
-
Can't agree more mate.His 74 won a gold at Sandown Park this year.I am gutted I didn't go,I was doing other things. Definately be there next year in the hope of seeing it in person.I will keep my ear to the ground to see who is going to be in attendance as I think this will become an annual roadtrip for some of the Russian masters. Kind regards Nigel
-
Rather you than me Michael I do agree the mass production factory method is possibly the only route for a task like this one and maintain sanity at the same time I do think they will add a great deal of visual interest with that degree of detail painting.Your new order of things is the correct way,that was the way I used to do it with armour figures many years ago and was,although I say it myself,quite good at it.Only thing that may make things easier to 'see' is to paint the whole head with a white base coat that also forms the whites of the eyes.This may make it easier to see the shape of the eyes when cutting back in with the yellow.Just a thought. Kind Regards Nigel
-
Can't take the credit for the beam idea mate,that is down to Mr Shevelev,I just thought it made so much sense.Cross checking dimensions and levels is soo much easier than trying to work inside a hull with loads of tumblehome Kind Regards Nigel
-
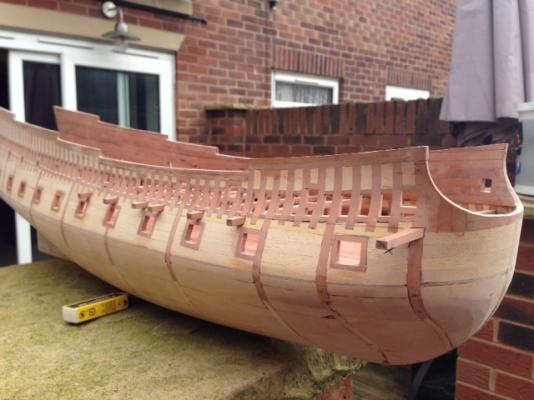
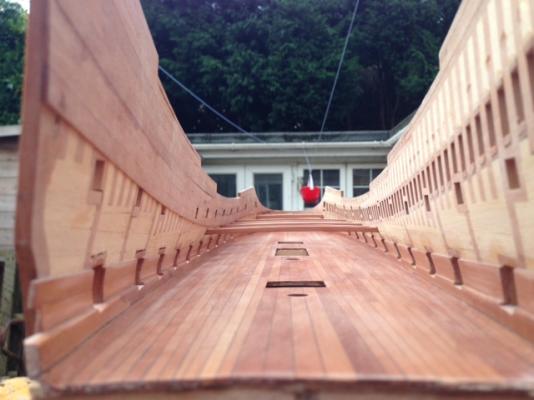
Thank you Nils,Bill and Matti I was just thinking a similar thing yesterday Nils It kind of reminds me of tudor buildings,although the colour is wrong. I am enjoying to able to spend some decent time in the shipyard Matti I agree the lines are fantastic,although there is still some refinement to do on the model,predominantly the stern which is still a plain block.I am deliberately leaving this until the counter timbers are in place which can only go in once this main gundeck is about complete.I could fit them earlier,but would make everything so much harder to access. I have succumb to temptation and done a little treenailing.I have decided to stick to the original plan and go for unblackened copper.This decision is based on the 'Russian Palace' influence I have going on with this model and is a direction I have been moving toward.I have not ruled out doing the decorations in black As I have got further on in this pastime,my taste has changed somewhat and I prefer the darker muted aesthetics of this style to the gilded or carved boxwood ornamentation that is commonplace. I have posted this link before,but for me personally this is THE model ship and one that has had the biggest influence on my future style of modelling,but I shall post it again for anyone unfamiliar with it; http://www.shipmodels.com.ua/eng/models/elite/le_ambiteux/index.htm Kind Regards Nigel
-
Hi tulok Yes the maple from CMB is identical in colour to lime.Make sure you keep the two seperate in the work area to avoid potential mishaps Kind Regards Nigel
-
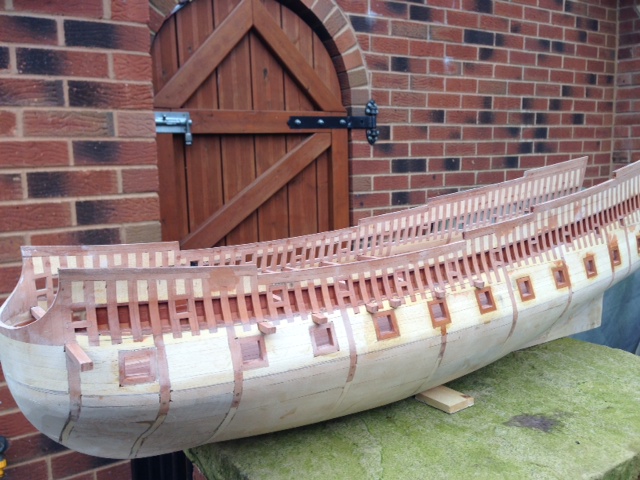
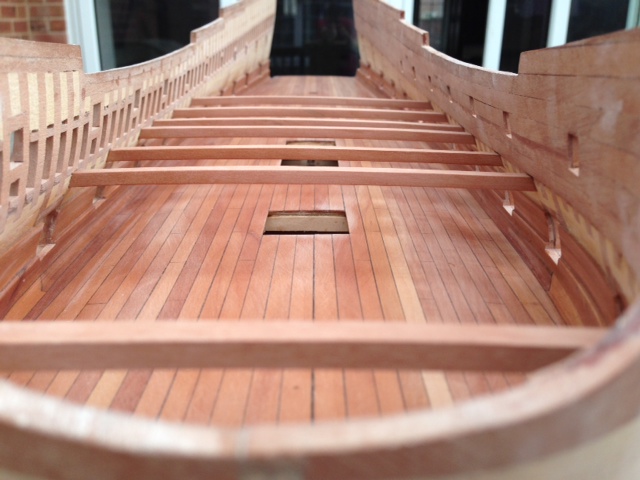
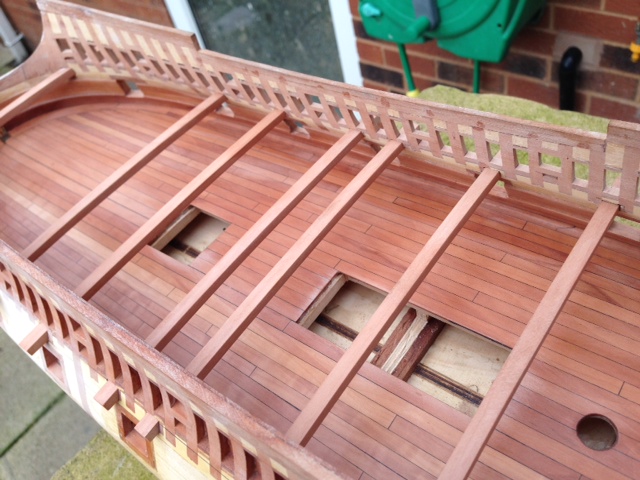
As I am not working this weekend for a change,I have decided to concentrate on big structural stuff and leave the gratings for the limited time I have on weeknights. After a thorough rub down of the poly on deck spirketing and gunports I have made a start on the deck beams.Incidentally,the varnished areas have now had nine coats of poly,'knocked back' every three coats.There will be another coat applied before using whichever treenailing method I employ,if any,flatted again and then the final coat. For the deck beams,I have borrowed a method from Russian master Dimitry Shevelev.The beams slot through the sides of the hull.This allows the beams to be adjusted by shimming to ensure perfect deck alignment in relation to the gunports.Any adjustments become invisible when the final covering is applied inside and out.In addition to this,the deck structure can be built inside the hull and fine adjustment can be carried out to the hull sides before the beams are glued to the hull sides. The plan is that all the plain beams are dry fitted,then removed to allow the deck clamps to be fitted inside the hull.The beam slots are then extended through the deck clamps to allow refitting of the beams.I know this joint will be historically incorrect,but would look identical from the outside although this area will be nigh on invisible on the assembled model. I do anticipate that these beams will be fitted dry and removed several times,to allow the joints to be cut in them and to allow varnishing of the undersides before finally gluing in place. Kind Regards Nigel


-
I planked the underside of my SOTS in 4mm by 2mm maple from CMB.Yes it is hard and does like to dull cutting edges,however it is durable,especially compared to lime.I ordered more than necessary because you do get some strips with a wacky grain pattern that would not look right on a model. Kind Regards Nigel
-
Great job with the garboard Nick You have got a nice even band left to fill in which should make life a little easier(as easy as it can be cutting all the planks out of sheet). Kind Regards Nigel