


NMBROOK
-
Posts
2,305 -
Joined
-
Last visited
Reputation Activity
-

 NMBROOK reacted to Mirabell61 in MORDAUNT 1681 by NMBROOK - Euromodel - 1:60 - Beyond Bashed
the treenailed deck looks great Nigel,
seems to be never ending drilling session....
Nils
-
 NMBROOK got a reaction from avsjerome2003 in MORDAUNT 1681 by NMBROOK - Euromodel - 1:60 - Beyond Bashed
I am currently decorating and between coats As the sun is shining,I thought I would take some pics of where the build is up to at the moment.No pics of the gratings yet as I will photograph these when I start building them up with their combings which will be in Ebony.
I have fitted the deck clamps back to roughly amidships.They extend right up to the deck underside.This isn't historically correct,however it is my intention to cut a 3mm deep rebate to take the lodging knees.This creates a flat surface for the knees to abut to,rather than contending with the severe tumblehome at this point.When assembled,the finished appearance will be the same as if I had built it historically correct.The hooked scarph joints are clearly visible.Both these clamps and the scarphed spirketting will be fitted with copper fastenings 0.8mm diameter extending completely through the hull as it stands now.I am undecided as to whether to represent bolt heads on the deck clamp fixings to illustrate proud bolt heads.
Work is progressing at a slow but steady pace on the deck plank fastenings.I have fitted two staggered fixings per main beam and one central for each ledge.The hatch openings have been roughly cut to size.Final finishing will be done when the hatches are made up.The area in front of the main hatch has further planking to be added for the flat capstan base.I got carried away drilling holes,I could have left this section
Kind Regards
Nigel
-
 NMBROOK got a reaction from themadchemist in MORDAUNT 1681 by NMBROOK - Euromodel - 1:60 - Beyond Bashed
Thanks mate Just for you,proof of nail existance Wire is slightly larger than the hairs on my Jack Russell
Kind Regards
Nigel
-
NMBROOK reacted to CaptainSteve in MORDAUNT 1681 by NMBROOK - Euromodel - 1:60 - Beyond Bashed
That is some fine work, Nigel !!
-
 NMBROOK got a reaction from rtropp in MORDAUNT 1681 by NMBROOK - Euromodel - 1:60 - Beyond Bashed
Thanks mate Just for you,proof of nail existance Wire is slightly larger than the hairs on my Jack Russell
Kind Regards
Nigel
-
 NMBROOK got a reaction from Ferit in MORDAUNT 1681 by NMBROOK - Euromodel - 1:60 - Beyond Bashed
A very small update,but probably a major milestone achieved for me
The picture shows the forward grating section sized,however the rebates for the anchor ropes need cleaning up after installing all the fastenings.The eagle eyed(enlarging pic essential) will notice I have installed one line of the double nailing.I have found it necessary to install a pair at the same time due to the limit of how small a droplet of cyano I can apply.The holes are 0.3mm apart.I have decided to sand the radius profile to the top rather than risk damaging what amounts to about twenty hours work so far!!This will be done when the grating has been fitted with the combing.The nailing should become more visible then as there are cyano deposits on the surface at the moment.
Kind Regards
Nigel
-
NMBROOK got a reaction from rtropp in MORDAUNT 1681 by NMBROOK - Euromodel - 1:60 - Beyond Bashed
A very small update,but probably a major milestone achieved for me
The picture shows the forward grating section sized,however the rebates for the anchor ropes need cleaning up after installing all the fastenings.The eagle eyed(enlarging pic essential) will notice I have installed one line of the double nailing.I have found it necessary to install a pair at the same time due to the limit of how small a droplet of cyano I can apply.The holes are 0.3mm apart.I have decided to sand the radius profile to the top rather than risk damaging what amounts to about twenty hours work so far!!This will be done when the grating has been fitted with the combing.The nailing should become more visible then as there are cyano deposits on the surface at the moment.
Kind Regards
Nigel
-
 NMBROOK got a reaction from janet bode in MORDAUNT 1681 by NMBROOK - Euromodel - 1:60 - Beyond Bashed
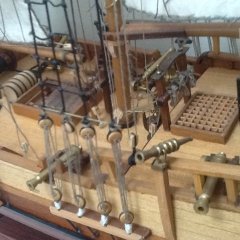
As work is moving well on the construction of my Caroline build,preliminary work is now starting on my next'bill paying' project.This is based on the Euromodel kit,but it is my intention to push the boundaries of what can be achieved with a kit.I shall be using construction techniques for the hull that have been developed by myself,specifically for this build.The completed model shall include the following details;
1/hull planking in boxwood and ebony
2/hull planking omitted between the upper wales with false boxwood frames,this is a feature on quite a few Navy board models which I am quite fond of and an alternative from a fully framed build.
3/Full hull interior,lower gun deck upwards,with planking sections omitted on the upper decks for viewing the interior.
4/Remodelling of the stern to replicate the drawing by Van de Velde the Elder.
This project will be a 'slow burn' until Caroline is finished,but I am starting this log now to avoid missing anything as work progresses.I am trying to avoid starting another log with a planked hull
Some photos to wet your appetite
The box,rather heavy,given it's size
Mordaunt by Van de Velde the elder
Kind Regards Nigel
-
NMBROOK reacted to egkb in MORDAUNT 1681 by NMBROOK - Euromodel - 1:60 - Beyond Bashed
Classy Stuff Nigel ! So when are you going to put the little wee nails in?
All The Beat
Eamonn
Just Kiddin.. I can see them.. Honest
-
 NMBROOK got a reaction from AntiSpiral in MORDAUNT 1681 by NMBROOK - Euromodel - 1:60 - Beyond Bashed
A very small update,but probably a major milestone achieved for me
The picture shows the forward grating section sized,however the rebates for the anchor ropes need cleaning up after installing all the fastenings.The eagle eyed(enlarging pic essential) will notice I have installed one line of the double nailing.I have found it necessary to install a pair at the same time due to the limit of how small a droplet of cyano I can apply.The holes are 0.3mm apart.I have decided to sand the radius profile to the top rather than risk damaging what amounts to about twenty hours work so far!!This will be done when the grating has been fitted with the combing.The nailing should become more visible then as there are cyano deposits on the surface at the moment.
Kind Regards
Nigel
-
NMBROOK reacted to marktiedens in Wasa by marktiedens - FINISHED - Corel - scale 1:75 (Vasa)
Update-
Finished the bulwark stanchions& railings - approx.390 individual pieces & a coat of poly applied.Also made the pulley block which goes between the railing at the center of the ship.Also got the gratings made. I will paint the deck flat black under the gratings.If I had paid a little more attention I would have cut the openings in the deck before fastening it down .
/Mark
-
 NMBROOK got a reaction from mtaylor in MORDAUNT 1681 by NMBROOK - Euromodel - 1:60 - Beyond Bashed
A very small update,but probably a major milestone achieved for me
The picture shows the forward grating section sized,however the rebates for the anchor ropes need cleaning up after installing all the fastenings.The eagle eyed(enlarging pic essential) will notice I have installed one line of the double nailing.I have found it necessary to install a pair at the same time due to the limit of how small a droplet of cyano I can apply.The holes are 0.3mm apart.I have decided to sand the radius profile to the top rather than risk damaging what amounts to about twenty hours work so far!!This will be done when the grating has been fitted with the combing.The nailing should become more visible then as there are cyano deposits on the surface at the moment.
Kind Regards
Nigel
-
 NMBROOK got a reaction from rafine in MORDAUNT 1681 by NMBROOK - Euromodel - 1:60 - Beyond Bashed
A very small update,but probably a major milestone achieved for me
The picture shows the forward grating section sized,however the rebates for the anchor ropes need cleaning up after installing all the fastenings.The eagle eyed(enlarging pic essential) will notice I have installed one line of the double nailing.I have found it necessary to install a pair at the same time due to the limit of how small a droplet of cyano I can apply.The holes are 0.3mm apart.I have decided to sand the radius profile to the top rather than risk damaging what amounts to about twenty hours work so far!!This will be done when the grating has been fitted with the combing.The nailing should become more visible then as there are cyano deposits on the surface at the moment.
Kind Regards
Nigel
-
NMBROOK reacted to tkay11 in HM Cutter Cheerful 1806 by Chuck - FINISHED - 1:48 scale - kit prototype
Thanks, Christian. Sorry to have pushed this off topic. 0.1mm is what I can do as well with my Proxxon saw, and I'd expect that from a supplier. My feeler gauges are in 0.1mm increments. That's why I put the column for expected cutting tolerance on the right in my post #232 above to one decimal place, or 0.1mm.
The differences from the conversion appear small, but I was worried that over a long distance between bulkheads or for the planking or, as Chuck says, between bulkheads and former, those small differences might make a problem.
I have become used to seeing differences of less than 0.1mm on my own model, but that is at 1/64 scale, and it might be less problematic at 1/48. As a complete novice and having no experience at all of how it might play out I thought I'd still ask.
However, Chuck has given me the solid advice: "Following the plans will do the trick...when you adjust any wood sizes...think about what you will need to adjust on the plans....but it may not even be needed". And as Nigel has said, in the UK, at least, there is still stuff off the shelves in inches.
Apologies to Chuck for posting on his log -- I just thought this discussion might be useful for Europeans and others who work in metric as well and who are intensely interested in this great project.
Tony
-
NMBROOK reacted to mtaylor in Licorne 1755 by mtaylor - 3/16" scale - French Frigate - from Hahn plans - Version 2.0 - TERMINATED
Deadlights.
After staring and thinking... I decided deadlights next. Not the frames yet but the black background part. Being a glutton for punishment, I decided to use ebony since I love the look of this wood. Which begat more contemplation because that stuff is a bit hard to work with. I think I found an adequate solution.
Being fond of quick prototyping in many areas, I made up some deadlights from basswood. Gave it some thought and decided to make some ebony veneer. I tried to rip some down to 1/64" (.35mm)....by 1" (25mm) with the thin side coming off the 1" thick billet. Don't try it. I got it down to 1/32" (.7mm) before things starting exploding across the shop. Might have something to do with the blade but I wasn't going to kill a new Thurston blade on an experiment. Anyway... now I have to clean up fragments everywhere. I was using the table saw for this.
I took the 1/32" inch thick piece that survived and ran it through the thickness sander to get it where I wanted it, glued the prototype deadlights to it and cut them out with the scroll saw. A bit of sanding and they fit about right. The pics show a gap but that will be covered by the window framing. Did I mention I hate macros... To the naked eye (or even with glasses on) it looks pretty good. I don't feel anything out of place running my fingers around everything, so that's good also.
I'll re-fillet the glue joints on the framing and cut them down to shape. Also need to get the middle area of the counter fixed up with some wood for the landing of the counter plank ends at the rudder and stern post.
First pic of the basswood and veneer laminated together for the deadlights. Second one is the installation and..hmm... wet glue. What the hey.. I'm having fun it's turning out well in my opinion. I past the point where Version 1.0 met it's end (the stern area) so I'll be carrying on.
-
-
NMBROOK got a reaction from mtaylor in La Belle Poule 1765 by AntiSpiral - 1/48 - An Adventure in POB
Wow PG,those LED's are SMALL.One method I have seen many times on RC builds,is to cast the lights in clear resin with the LED inside.This could work well with lanterns and you could make many identical pieces with little hassle.
I am certain that you will appreciate the joy of working with Pear compared to some of the other timbers.Yes it is expensive,but is so much nicer to work with and the grain size is much more suitable for modelling scales.
Kind Regards
Nigel
-
NMBROOK reacted to jaerschen in HMS Triton 1773 by jaerschen - 1/48 - POF
I do not understand why, but one side of the hawseholes were not similar to the other. I had wrong measured, that's absolutely certain for me because I have made one side some day's earlier than the other. Here's a pic there you can see the variety of height.
The level of the holes at the starboard side is correct. So I closed the holes at the portside and drilled new ones as the same level as of the starboard side.
-
 NMBROOK got a reaction from GLakie in HM Cutter Cheerful 1806 by Chuck - FINISHED - 1:48 scale - kit prototype
Exceptionally neat planking work Chuck Not to deviate off topic too much,but Tony the good quality Birch ply desireable for bulkheads sold in the UK is still made in imperial sizes,I have some 1/4 inch in the workshop.The metric stuff is either liteply for RC aeroplanes or rubbish stuff made in China that is full of voids
Kind Regards
Nigel
-
 NMBROOK got a reaction from Shipyard sid in Royal Caroline 1749 by Shipyard sid - Panart - 1/47 scale
You are off to a great start David I would wait until later to decide on the keel planking,there is a 'knockon' effect if you choose this route which can lead to taking things further than anticipated.If you stick to Panarts colours,none of the ply will remain visible.
Kind Regards
Nigel
-
 NMBROOK got a reaction from Chuck in HM Cutter Cheerful 1806 by Chuck - FINISHED - 1:48 scale - kit prototype
Exceptionally neat planking work Chuck Not to deviate off topic too much,but Tony the good quality Birch ply desireable for bulkheads sold in the UK is still made in imperial sizes,I have some 1/4 inch in the workshop.The metric stuff is either liteply for RC aeroplanes or rubbish stuff made in China that is full of voids
Kind Regards
Nigel
-
 NMBROOK got a reaction from tkay11 in HM Cutter Cheerful 1806 by Chuck - FINISHED - 1:48 scale - kit prototype
Exceptionally neat planking work Chuck Not to deviate off topic too much,but Tony the good quality Birch ply desireable for bulkheads sold in the UK is still made in imperial sizes,I have some 1/4 inch in the workshop.The metric stuff is either liteply for RC aeroplanes or rubbish stuff made in China that is full of voids
Kind Regards
Nigel
-
NMBROOK reacted to canoe21 in Sovereign Of The Seas by NMBROOK - Scale 1/84 - based on the works of Van De Velde the elder
Hi Nigel
Just catching up on your great build, she sure is a very special build with so very much detail that I love so very much, ENJOY
Regards Lawrence
-
NMBROOK reacted to kay in HMS Royal William by kay
Good evening in the MSW world,
thanks for the compliments, I am very happy that you like it.
As already seen the hull has been built into the shell construction. Robert Volk had described it in his book, and I tried it on the trunk of the ROYAL WILLIAM and am very satisfied. Between the frames have been glued pine wood strips of 5x10 mm. The strips I have had 1 mm above the frames protrude, and then I sanded the shape of the frames. So I got a very solid hull. The hull is also a little heavier, but that does not matter. The second planking pear wood used was 0.5 x 5 mm.
@ Nils: All carvings are made by myself. It takes a long time till I've finished, since I work with knives. For a ornamental pillar at the rear I have 20 minutes needed. Then there are some 80 pieces for many hours.
Here are some photos from the ROYAL WILLIAM arise. Tomorrow I will make again in the shipyard and take some photos of the carvings.
Regards Kay
-