HOLIDAY DONATION DRIVE - SUPPORT MSW - DO YOUR PART TO KEEP THIS GREAT FORUM GOING! (Only 13 donations so far - C'mon guys!)
×


dafi
-
Posts
2,426 -
Joined
-
Last visited
Content Type
Profiles
Forums
Gallery
Events
Everything posted by dafi
-
 @Siggi Thank you, I know this drawing very well, but never realised the partitions of the cabins ... ... blind fox I am ... In todays Vic, the partition of the gunroom starts aft the mizzen mast, most drawings I see make me believe it was in front of it, as seen in the you drawing you showed. @bart430 One deck up, it really was done like this. But not sure about the gunroom. XXXDAn
 -
Thank you Siggi, you placed the cabins over the guns, whereas the plans show them inbetween. Perhaps this placement was just a mere symbol on the plan and the actual cabin might have been something completely different. Also the plans suggest the guns in a vertical position towards the hull, but one could also imagine a position alongside fore/aft lashing like in the wardroom. XXXDAn
-
My thinking, too big to be removed on sea. Druxey, thank you for the link, it fitted for some research we are doing in our german forum! XXXDAn
-
We once had a discussion about this cage in our german forum. Achilles gave the hint there that in the thesis from Steere 2004 (The Evolution of Decorative Work on Englisch Men of War) it is guessed, that it was probably only a trial. http://repository.tamu.edu/bitstream/han....pdf?sequence=1 pages 67/68 Cheers, Daniel
-
Thank you very much Druxey, Pat and jud. Actually NMM shows several plans indicating the positioning there. http://collections.rmg.co.uk/collections/objects/87585.html http://collections.rmg.co.uk/collections/objects/79874.html The tiller does not go to the outer extends of the sweep as the max angle was 30° (?) to each side. Cheers, Daniel
-
And again one of my small oupsys ... #902 Building the gunroom I placed first the canvas bulkheads as partition against the main gun deck aft the mizzen mast. In this area was thought to hold 3 cabins each side, starboard aft the gunner´s one. But once build I was happy that I had the rudder working ... ... as it showed like the bulkheads collided nicely with the tiller. First try with integrated guns was not successful either, just worked for the gunner´s cabin. Should the guns be placed in an fore-aft direction like in the ward room? All drawings found in NMM showing this detail displayed cabins that were not including the guns, thus leaving this area free. Also the AOTS Bellona - even though only a two decker showed clearly that my first cabins were too big and should leave the guns free. Ok another trial - do not ask of how many - managed to place three tiny cabins in this area without obstructing the tiller. On the deck beam a warrant officer´s sleeping cod to show the dimensions needed. And now my usual questions: - could this be plausible? - were at this special day in 1805 at 17:35 o´clock AM only loose hanging canvas bulkheads used or was this a light construction using wooden frames with canvas? Cheers, Daniel
-
Always a pleasure to catch up here! Thank you for showing, Daniel
-
And another version found in DSC01116 Mark´s great pictures of the HMS Endymion 44 guns of 1779 http://modelshipworld.com/index.php/gallery/image/9076-dsc01116/ The chain goes up beside the rudder
-
A even more detailed description adding to the link Evan gave was given by Chapman in our german Forum: http://usscm.blogspot.de/2013/03/in-bag-sailors-and-their-sea-bags.html Thank you Jörg! Daniel
-
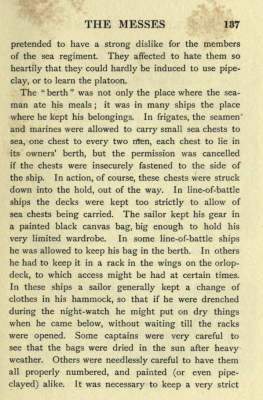
Thank you tons Evan, it is always fun to see more pieces of the puzzle pop up :-) "The clothing bags issued to the seamen were painted black to waterproof them, and stand in contrast to the unpainted personal bags so often richly decorated by the owners." 1812 to 1829 This gives me - as usual - some more questions: - from when on were they painted? - something special for special countries? - my understanding for the Royal Navy around 1800 was that the sailors had to provide their own equipment. This would suggest to me a very diverse appearence in the kits. Cheers, Daniel
-
Thank you all, you confirm some my thoughts :-) The plans from the decks in NMM show quite clearly that there are no two tubes and threre is no offset for the second level - both levels look to be perfectly in line. My personal guess is that the cistern from the two storeys pump has a watertight "passing through" cistern that could be opened if necessairy. if the cranc of the "normal" pump that leads through this cistern is just passing through or if it also drives a coq wheelis pure guess from my side. But interesting, that no further technical evidence so far is to be found ... XXXDan
-
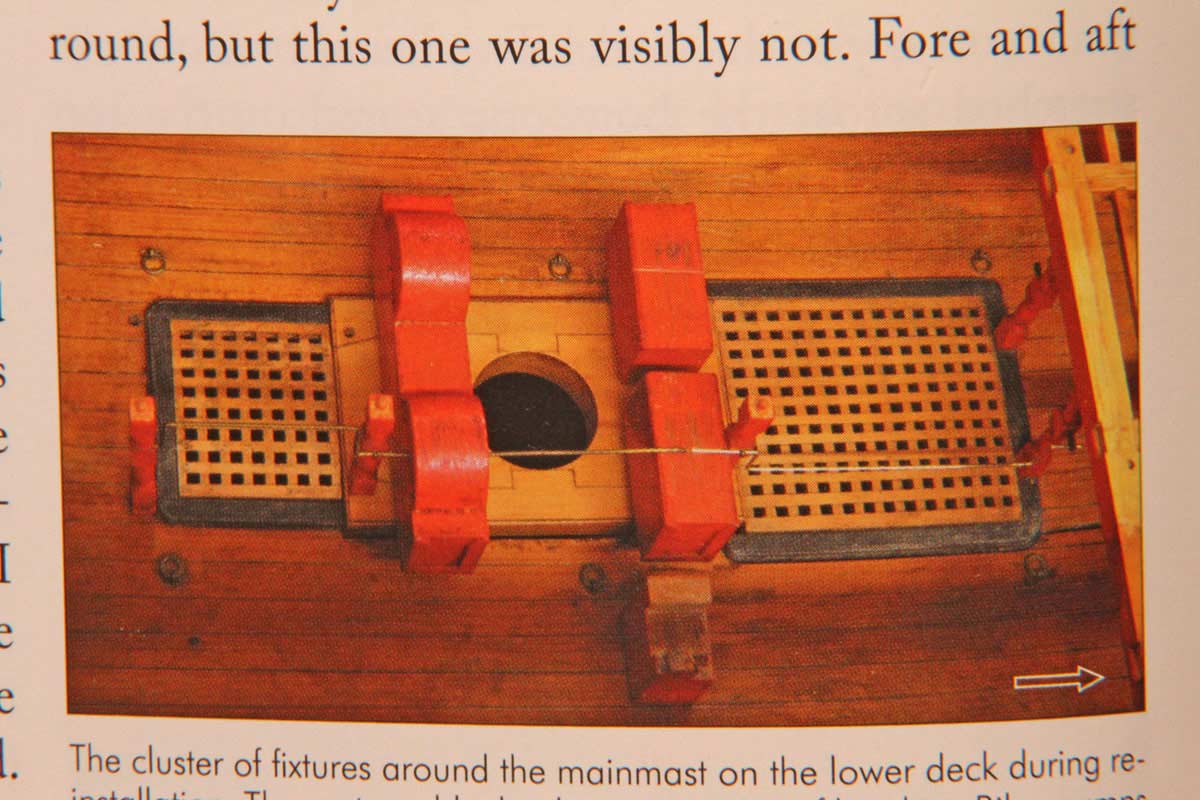
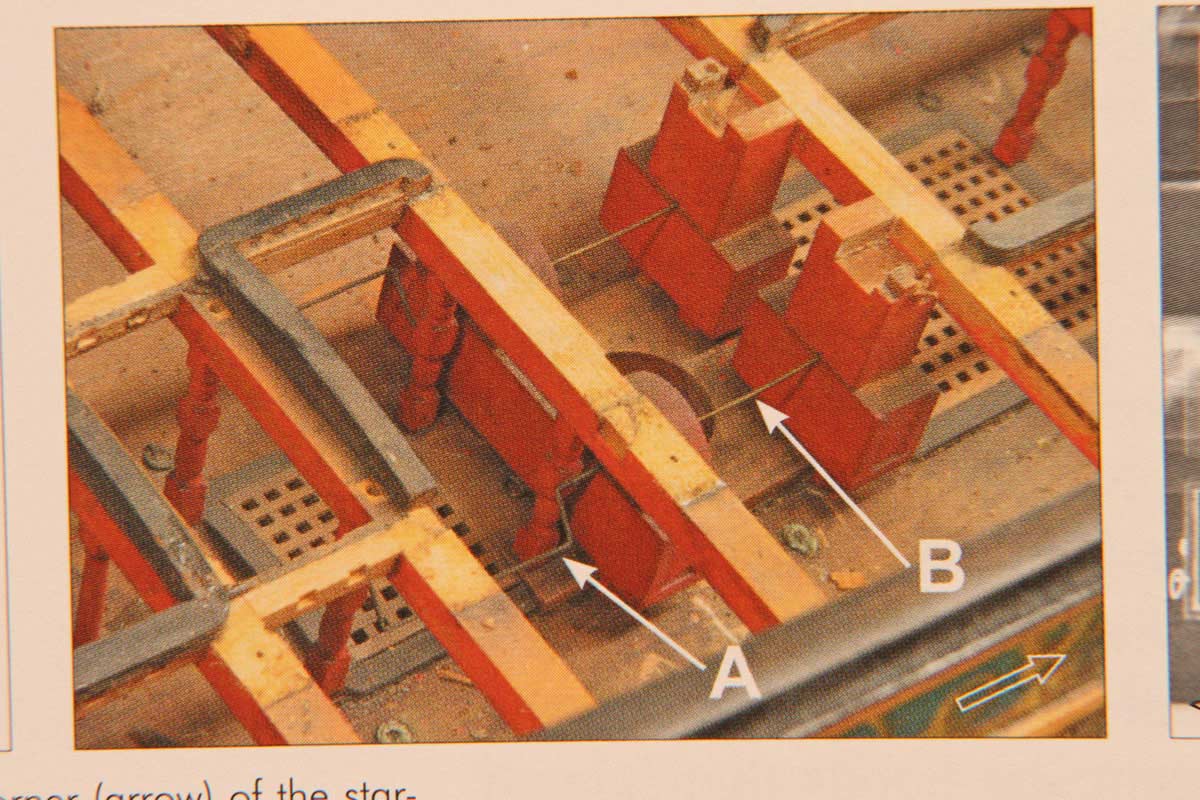
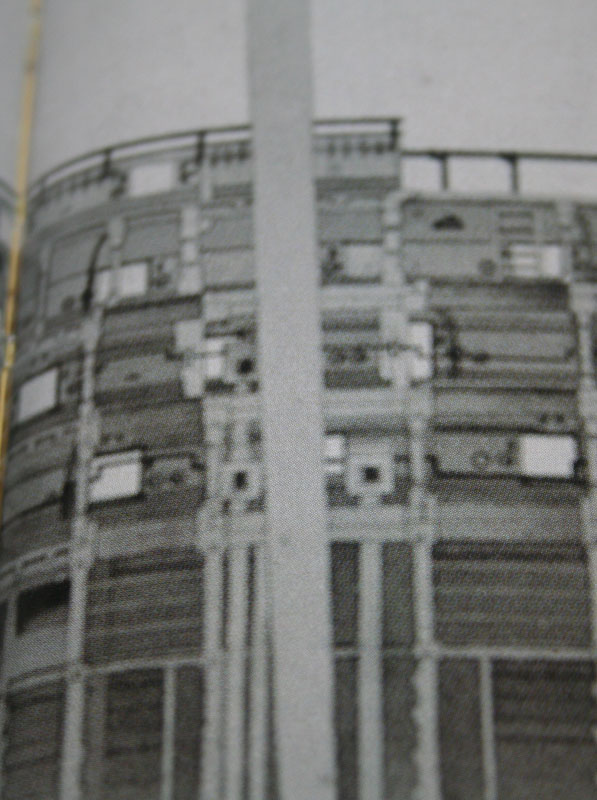
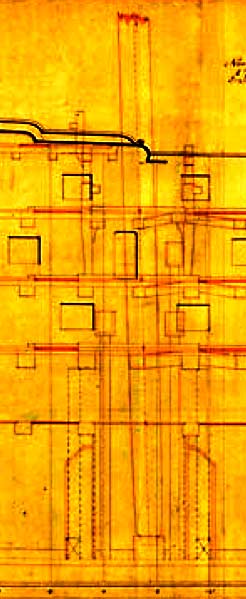
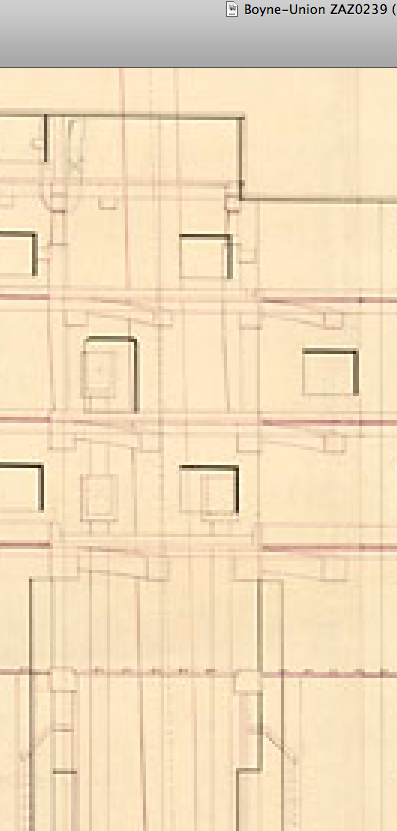
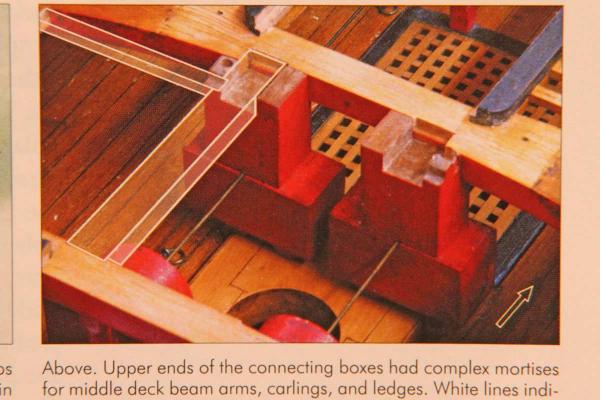
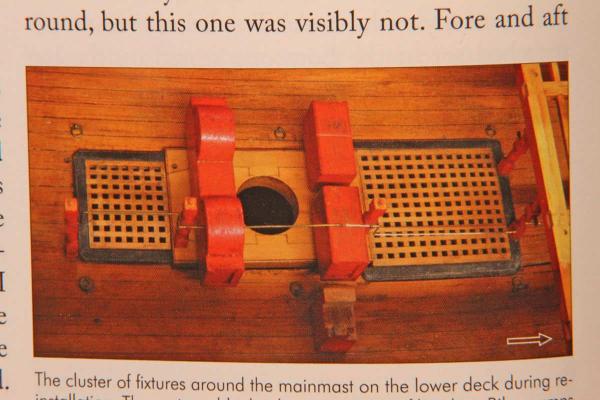
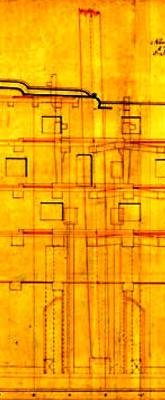
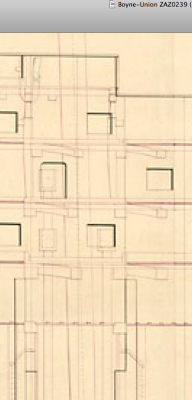
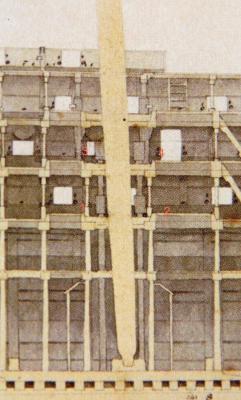
A long time ago on the research for the pumps of my Vic I realised that all drawings of first and second rates at NMM from a certain date on show at least two of the four chain pumps reaching the middle deck. This started about 1760 to 1780. All the drawing showing details have a cistern on the lower deck even for the pumps reaching the middle deck, mostly showing something that appears like an exhaust for a dale or hose. From about 1810 both pairs of pumps reached the middle deck, both having a cistern and an "exhaust" on both decks. Searching for quite a while already I just found one source apart from the drawings - the model of the Princes Royal. Here one pair of pump is reaching the upper deck, also showing the cistern, but no details of the mechanism is revealed. The only reason so far I can see is that the double amount of man could man the handles. But no idea whatsoever how the technical side worked. Where these one chain running though the lower deck (as it seems to me) or were those two different chains for each pump? Was the cistern on the lower deck a water tight "passing through" cistern? As usual - question over question ... I just add some pictures of what I mean, some drawings out of NMM and of the Princess Royal. XXXDAn


-
Spanish flag flown at the Battle of Trafalgar
dafi replied to JerseyCity Frankie's topic in Nautical/Naval History
Here are more infos http://collections.rmg.co.uk/collections/objects/567.html Enjoy, Daniel -
What a beauty :-) Cheers, DAniel
-
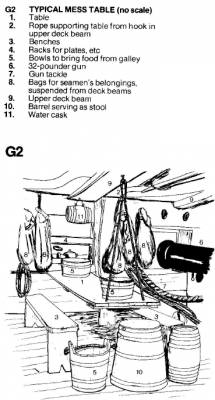
And on we go with some trifles :-) I was wondering how to create furniture without it looking like dollhouse toys. Ok, off I went to find out. Luckily I was successful, only have to stick to the true dimensions :-) Here the substructure, fast done and quite stable. Contemporary drawings always show the tables direction fore aft, so I displayed them over the massive partner of the sternpost. Like this canvas cabins could be erected on the ship´s sides. The openings on the deck are no litter bins but aft there are the two scuttles of the ventilation trunks of the hold and in the front the scuttle for the bread room and in the middle the one for the Lady´s hole, means the stuff of the gunner. The gratings are flipped open for better ventilation. Here we already have the name of the area, the gun room. The gunner had his quarters here and was then highest warrent officer in this area.He had a canvas cabin on starboard and larboard was the one from the chaplin. The area also was the mess for the warrent officers, junior lieutenants, marine officers and first class volunteers. Here also the chaplin taught the junior midshipmen. The Area was separeted from the rest of the deck by means of canvas covers. Still have to redo the canvas blinds, but they work well as layout separations. I hope, I got the details right, cheers Daniel PS: Could not resist to show the Tic Tac in place :-)
-
At the moment I am busy to breed some true to scale weevils for the biscuits served. Could be successful :-) XXXDAn
-
Thank you Lawrence and Popeye :-) @Popeye: Have a closer look at the last two pictures: As "exercising the great guns" is in progress, the cupboards are taken down :-) Just the marks are seen on the wall. XXXDAn
-
As we are on a martial and brute man o war, it is time to make home cosy and cute ... ... means building the cupboards, plates for the square meals and tinplates ... ... hanginá them high and arrange the stuff inside ... ... and taking them down again where it sounds like "Exercising the great Guns" .... ... just a fade shade of grey remains. I am thinking about putting some Hello-Kitty-stickers to personalize the shelf ...? XXXDAn
-
But where wre they stowed? In AOTS Bellona they are shown beside the guns. Mansfield also discribes them sometimes being kept in the orlop (first published 1905). Any other ideas? Cheers, DAniel
-
I love the title, so I borrowed from Robin :-) Looking for references upon kit bags, not too much to find out there http://collections.rmg.co.uk/collections/objects/147296.htmlPAH7349; 1 May 1802, light canvas http://collections.rmg.co.uk/collections/objects/17771.htmlEQA0171; Kit bag. Brown canvas http://collections.rmg.co.uk/collections/objects/17769.htmlEQA0169; RNVR kit bag 1915 http://collections.rmg.co.uk/collections/objects/205925.htmlREL0799; Fragment of kitbag http://collections.rmg.co.uk/collections/objects/17771.htmlEQA0171; Kit bag. Brown canvas http://collections.rmg.co.uk/collections/objects/17770.htmlEQA0170; Kit bag. A brown canvas WWII http://collections.rmg.co.uk/mediaLib/660/media-660880/preview.jpg http://collections.rmg.co.uk/collections/objects/206682.htmlEQA0594: Yellow canvas kit bag WWII http://collections.rmg.co.uk/collections/objects/556365.htmlZBA4956; Kit bag WWII http://collections.rmg.co.uk/collections/objects/17770.htmlEQA0170; Kit bag. A brown canvas kitbag WWII http://collections.rmg.co.uk/collections/objects/17780.htmlEQA0180; Canvas hammock But one can find plenty of sail bags ;-) http://collections.rmg.co.uk/collections/objects/558261.htmlSLR1817.2; Sail bag
-
02. November 2013 finishing the run out and secured guns 25. November 2013 finishing the run out guns and placing the first gun crew 02. October 2013 retrofitting the eyebolts on the inner hull for the still lingering around tackles 02. November 2014 I solemnly declare: All guns on the lower gun deck fully rigged *** ... and as always the mandatory Tic-Tac :-) ....hihihihihihi... XXXDAn PS: *** seen by the quality standards of today, 03.11.2014 ... ... PPS: But who knows ...
-
- Grandfather, tell me a story ! - Alright, go and get your storybook - No, no, not one of those, a real story ! - A real story ? - Yes, tell me about when you were a boy. - Well, then I shall have to take you back with me, a long way in time... ... end of 2009 first tests November 2011 until February 2012 start of mass production November 2011 first mood pictures August 2012 trials and tests for functions November 2012 more tests, this time anchor cables ... 11.February 2013 first guns glued in ... 22.02.2013 ... to already retrofit with gun monograms only 11 days later August 2013 retrofitting the eyebolts on the carriages and the side tackles October 2013 upgrading the breeching lines for the run out guns
-
Cannon Alignment
dafi replied to JohnB40's topic in Discussion for a Ship's Deck Furniture, Guns, boats and other Fittings
A bit earlier than the Unicorn: Van der Velde and others show plenty of diversity in elevation and how much run out on the single ships in their sketches and even paintings. Also sometimes they show a random pattern of tompions being in place and taken out ... Cheers, DAniel