HOLIDAY DONATION DRIVE - SUPPORT MSW - DO YOUR PART TO KEEP THIS GREAT FORUM GOING!
×


dafi
-
Posts
2,426 -
Joined
-
Last visited
Content Type
Profiles
Forums
Gallery
Events
Everything posted by dafi
-
 Hello Martin, parts are on the way since this morning :-) And very enjoyable build, looking forward to keep up with it! Cheers and thanks, Daniel
- 467 replies
-
- 1
-

-
- fly
- victory models
- (and 1 more)
-
Getting closer to the way it possibly might have been ... #757 ... any corrections welcome :-) XXXDAn
-
The best results I usually got if was as near to the original as posible. So I went to try out the real serving. But as the real thin ropes proved to be to be to thin for the serving mashine I used copper wire. Took one of my two colored ropes ... ... enjoyed the fancy effects ;-) So another try with two single untwisted threads - black and brown - to get the wanted color effect, the wire was first blackened with Edding ... ... and bingo - here we go :-) Another comparison in between the fake white glue version and the real served one. Used V4 and the fancy colored rope to try the fixing of the slings and it proves to work far better than the rubber version seen of the bottom :-) Made my now famous bacteriophage ... ... looks already creepy ... ... but this full-sucked tick, that will be V5 ;-) Placed in its place ... And what will remain? Only the memory remains ... of V1 up to V4 ... XXXDAn
-
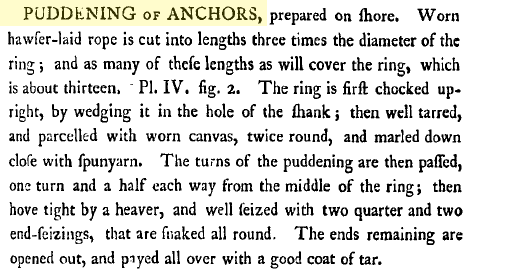
So after a couple of weeks I found time for the shipyard ... *blowingawaythedust* ... what did I find ??? And everything started in such a nice and easy mood ... *gettingwetmouthbyrememberingallthedeliciousthings* ... but dark clouds started to gather on the horizon! A certain Monsieur R. V. from A.*** already started to moan about the buoy before the meeting *lookingforthedevilsmily* (For legal reasons we blended out his face with a red square.) Buoy ropes should be tarred and not à la natüre and the buoy slings be smarted ... ... also the lenght of the buoy rope was questioned ... ... and-and-and ... ... Back at home same procedure as usual ... ... first the buoy rope tarred - not to dark - and about 20 fathoms long and thickness a third of the anchor cable - a heavy tool needed to break free the bower from the ground. http://modelshipworld.com/index.php/topic/7685-anchor-buoys-looking-for-details-of-ones-used-in-1700s/page-2#entry230141 Then tarred the slings with white glue and black paint to make disappear the gaps to look like the right one ... ... but at least the fingers looked spectacular ... ... and then my misinterpretation - the buoy itself à la natüre and not tarred ... ... and V2 goes down the drains :-) Then the discussion goes on about the thickness of the slings: Usually the slings and lanyards have half or a third of the superior rope´s diameter. So new slings done, 1/3 of the anchor cable and 1/3 of the buoy rope ... ... looks ridiculous :-( Got it, the slings are not to transmit force its just to hold the buoy. Ok, discard V3. By then Bernd showed a nice version in our german forum http://www.segelschiffsmodellbau.com/t717f368-HMS-Pandora-scratch-11.html#msg44816 ... that brought me back to the testing grounds :-) V4 was another try with slings of white glue, thick black paint and brown casein paint ... ... but realised half way that they represnt much more a rubber duck than a buoy slings ... ... that is why I stopped and ... ... to be continued :-)
-
Nice project, I like the approach :-) If you wish to be historical correct, do not forget that the masts and rigging was usually purely english, best seen on the tops , mastheads and caps etc. and so on. Means masts could become scratch. Cheers, Daniel
-
Nice build! And sorry about your small companion! Cheers, Daniel
-
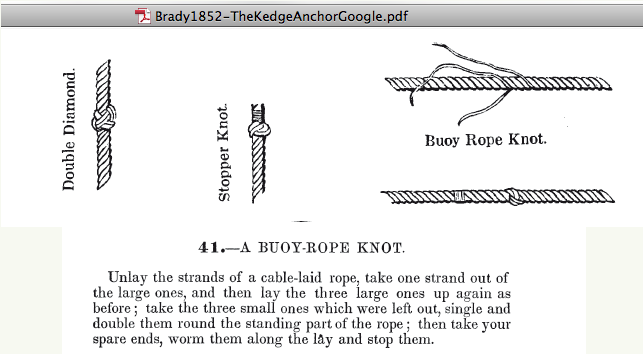
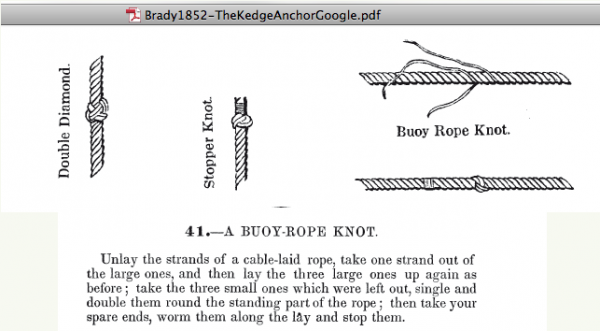
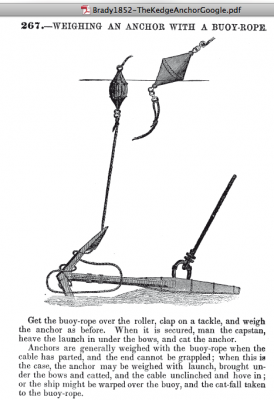
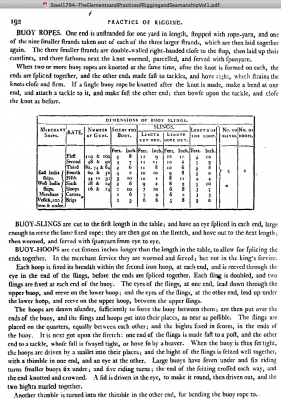
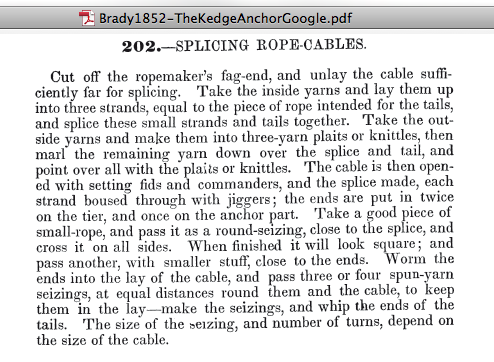
Thank you Ian :-) There was a simple reason - to many flaws still in my one ... ... we had some major discussions in our german forum about the details ... ... and this interesting discussion did not finished yet ... ... but Bernd was already having a far better result! About my humble effords ... - First the bouy slings should be served. I fixed that. - then it looks like the buoy rope should be tarred. But what color does that mean? That lead to another lengthy but fruitful discussion about the colors of tarred rope over there. So I was appreciating very much the parallel discussion here: http://modelshipworld.com/index.php/topic/7561-ratlinestarred-or-not/ ... and I opted for a dark brown ... - then I misinterpreted a text and left the cork natural: Version 3 to be skipped ... - Next was about the thickness of the buoy slings. Usually lanyards and tackles are half or a third of the following rope: With the buoy rope being a third of the anchor cable (Harland Seamanship) and then another third ... ouch much too thick ... understood, those slings were simply to hold the buoy and were not for big pulling. - In the moment I am doing Version 5 with tarred cork, buoy slings served ropes in a diameter corresponding to the contemporary models in a dark brown and a buoy rope tarred in a medium brown. quote from Luce, thanks to Chapman: Source: http://hnsa.org/doc/luce/index.htm Buoys and Buoy-Ropes. Buoys attached by their buoy-ropes to the crown, point out at all times the situation of the anchor. The can buoy is in the form of a cone, it floats base uppermost, and the rope is attached to the apex. The nun buoy is largest at the centre, tapering at the ends. The latter is in general use. Fig. 434, Plate 92. The size of buoy-ropes is one-third of the cable. The length varies, for it is shortened or lengthened according to the depth of the water in which you will drop the anchor. It is bent to the crown of the anchor, by taking a half-hitch around one arm, and putting the running eye in its end over the other arm; or a clove-hitch is formed over the crown, and the end stopped along the shank, or to its own part. Or, Attach a large thimble to the crown of the anchor, by a stout strap of the size of the buoy-rope (one-third the cable). Through this thimble is rove the buoy-rope, both parts leading up to the buoy. The advantage of this is, that the buoy-rope may be smaller, and when necessary, a stout rope of the required size, may be, by it, rove through this thimble in the crown of the anchor, thereby affording a greater purchase than that of a single rope, for weighing. The only objection to this plan is, that the two parts of the small buoy-rope will become hawser-laid, and will not unreeve. But this may be, in a great measure, remedied by having one part plain-laid and the other back-handed rope. 253 Sometimes a buoy will not watch, from its having filled with water, or from the buoy-rope being too short, particularly in a tide-way. By this is meant, that it does not float on the surface of the water. In the former case it will be necessary to bleed it, that is, to let the water out. In the latter, to lengthen the buoy-rope. Buoys are generally kept, one in each of the fore channels for common use. Spare ones are kept in the hold. It was a very good rule, that an anchor should never be let go without a buoy attached. But since the screw propeller has been introduced, they have been less used, through fear of fouling the screw, though the end of a chain is always buoyed in slipping. Harland Seamanship page 231 to 279 The biggest collection of informations - Buoy a quarter of the anchor shaft´s length - Buoy rope a third diameter of the anchor cable - fits to the dimensions Steels gives for a first rate Marquardt Schoner in Nord und Süd page 177ff + Bemastung und Takelung ... page 380ff - Buoy made of cork of slices thickness 1 inch - served slings - Buoy rope 18 to 25 fathoms (about. 30 to 45 meter) Nares Seamanship page 120ff - plenty details - first throw the buoy, then let go the anchor Brady Ketch Anchor page 150ff - to break loose the anchor with a small boat: stretch the rope with all men on this side, belay the rope tight and then everybody jumping to the other side of the boat :-) - page 197: Adapt the buoy to the depth of the water with a bouy rope knot. Lever Sheet Anchor page 68ff - buoy slings served - Length of the buoy rope 17 to 18 fathoms Lavery Nelson´s Ships page 170 - buoy rope fixed on the arms side and not on the ring to facilitate breaking free the anchor McGowan/McKay HMS Victory page 194ff - fishing the anchor McKay AOTS HMS Victory - nodding ;-) Lavery AOTS Bellona page 66ff - very weak way of stowing - stream anchor fixed arm on arm as seen with Brady http://collections.rmg.co.uk/collections/objects/200881.html (no canvas around the cork) Marquardt AOTS Costitution page 82 - some of the most stable lashings shown in literature Lee Masting and Rigging page 129ff - length of the buoy rope depending on the expected depth of the water - the rope for the slings is about 9 times the length of the buoy - nice pictures of anchors from contemporary models Schrage Rundhölzer - nothing Steel sayz: http://hnsa.org/doc/steel/part2.htm#pg61 page 61 Buoy-ropes are commonly laid shorter than cables. page 66 For Stays, Tacks, Sheets, and Buoy-Ropes, which are Cable-laid, allow the same Length as is shewn for Yarn in the Tables for Cables, which shew how many Fathoms and Feet of Yarn will make a Fathom of Cable, from 1 to 120 Fathoms XXXDAn And some more Steel, Brady, Nares und Biddlecombe :-)


-
I think that is a 74 by the rigging from this source: http://www.shipmodels.com.ua/eng/models/elite/74_gun_ship/ Yes the buoy were layers of cork, about 1 inch thick :-) Here is a different version out of NMM http://collections.rmg.co.uk/collections/objects/266589.html Did those buoys have a central axis from wood or rope? XXXDAn
-
Here the link again: http://nautarch.tamu.edu/pdf-files/Jobling-MA1993.pdf Thank you! DAniel
-
Marquardt shows some different forms and buoy sling patterns for various countries. Cheers, Daniel
-
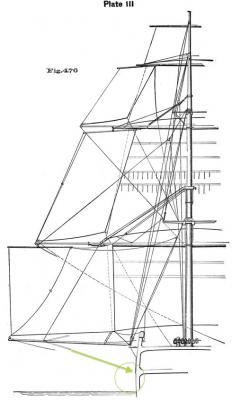
Here Sir dafi again :-) Lee mentions plenty details pages 115-119 but does not mention the martingales ... (... or I did not get it as it is in english ...) Nares shows the setting from page 106 on and plates 159 and 160. Lever shows it on pages 81 and 82. The martingale has a block and is led up to the fore castle - but this is a version 50 years after my time slot :-) XXXDAn
-
All the lifts and guys are mentioned somewhere but the martingale ... McKay shows the following: Fore boom on an eye bolt in the middle in between cathead and fore channel and a bit higher than the channel. All lifts and guys are in fixed in the middle of the boom with loops held by a clamp. Underneath the hook on the hull there was a down holder to prevent unhooking (McGowan page 190) The topping lift: In AOTS it goes to a block underneath the fighting top and then possibly to the fore bits (front or aft the mast?). Circumference is 3,5" In McGowan the block is on a long pendant from the lower mast cap and possibly going to the timber heads of the fore castle. In AOTS the after guy comes from the aft fore channel deadeye and goes to the middle of the boom and the front guy goes from there to a block on the outer edge of the spritsail yard back to the timberhead beakhead bulkhead (?). Circumference 3" in McGowan not really to be seen. The martingale is the downward counter part of the topping lift. In AOTS it goes down to the level of the upper edge of the whales, means lower edge of the gunports. Also 3,5" suggested? In McGowan page 190 it shows an eyebolt and a hook. Height is difficult to recognize. Petterson shows the main boom martingale with a block on the height of the whales, free end pointing direction of the channels XXXDAn PS: Ian, Sir will do it ;-)
-
That too is my understanding. As far as my knowlegde is, that with the Victory, the main stunsail booms were hinged to the main channels and the fore ones were stowed in the waist with the other spars. Possibly for not obstructing anchor work. The USS Constellation possibly had another arrangement. xxxCAPTAINdafi Thanks Ian!!!
-
I vaguely remember some scenes in MaC where the booms where used also for the handling of the boats, when "parked" beside the ship. Was this a common use? Like the main one on Victory that is in a almost ready to use position? The other question concerns the downward lanyard. Where and how was this one fastened? Hooked into a bolt beside a gunport? Some sheeve going into the hull? XXXDAn
-
If Victory kits are mentioned, I still miss the classic Heller one :-) By the form of the hull still the best one imho, best details for the scale, well to be done oob and if one wants to bash, there is plenty of opportunities. http://modelshipworld.com/index.php/topic/76-hms-victory-by-dafi-to-victory-and-beyond/page-35 Cheers, DAniel PS: OK, forget the instructions ...
-
A nice version from Bernd to be found here :-) RE: HMS Pandora, scratch, 1:85 Cheers, Daniel
-
I think AOTS and McGowan/McKay give a nice overview about all the sails. I did not check if the details are fitting 100% but it looks like a great base to start with. I would not say that it is impossible to do the sails at this scale, as Blue Ensign nicely proved with his Praetorian. http://modelshipworld.com/index.php/topic/152-le-superbe-by-blue-ensign-heller-plastic-built-as-le-praetorian-after-boudriot/ If more details needed, contact me PM. Cheers, Daniel
-
Do not apologize Geoff, that is the interesting bit. We model makers are very traditional - means stubborn - and once a thought is set, it is difficult to get it out. But it is worth rattling*** on those believes, or we would still use shrouds with differnt twists for starbord and port as mentioned in Mondfeldt´s "bible". Funnily we have a similar discussion about the color of the ropes in our german forum triggered by the brown ratlines of my build and also there the discussion goes away from the black and white thinking to a renewed written book: 50 Shades of Brown :-) It does not solve the initial question yet about the color of the ratlines. Even if tarred - what color does that mean, most probably not black ... XXXDAn PS: *** no pun intended ;-)
-
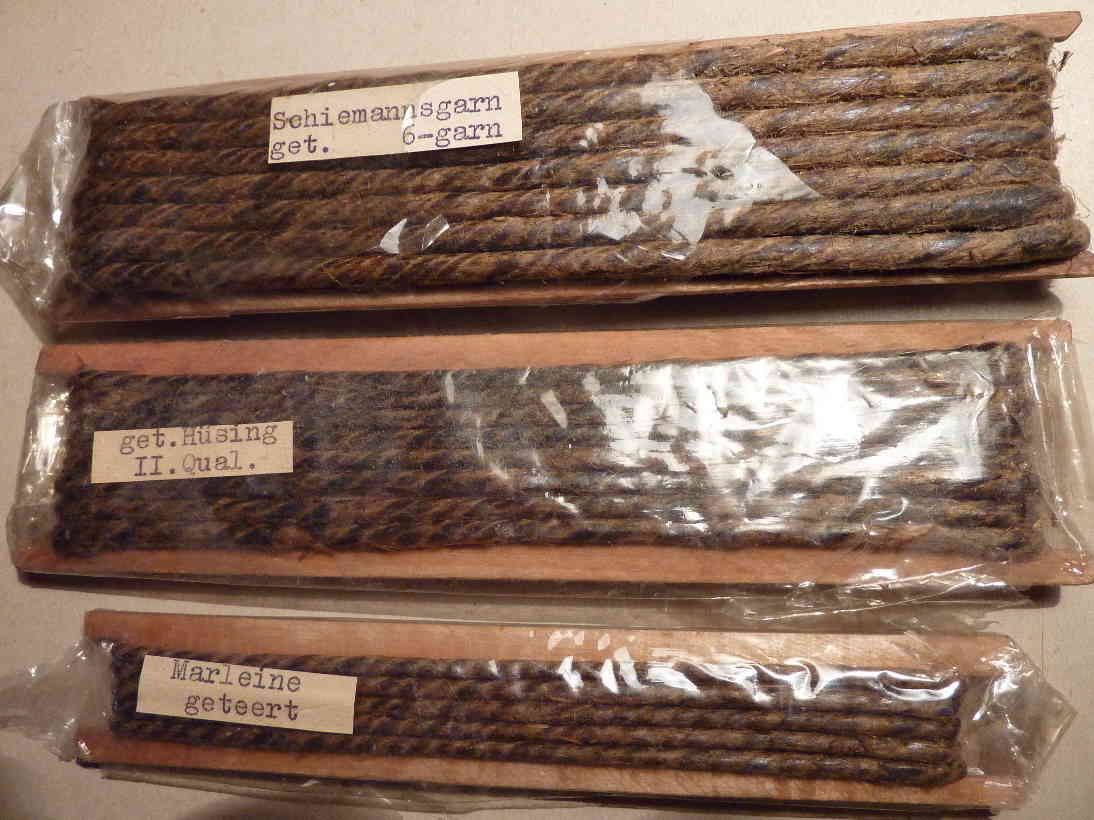
On top of it the Vic has synthetic fibres. All references should show natural fibers to give a comparison. The colour of the synthetics is a pure design-thing, I do not think that they are tarred or any other substances applied. Perhaps they are still served to avoid chafing, but no reason to protect them against rot ;-) I think the biggest challenge for us is to come away from the thought that tarred means greasy-sticky-thick-black stuff around the rope. Look at the second picture of my entry #38 and you know what I mean. I think that there should be still lighter tarred versions available. Cheers, Daniel
-
That´s what I started in the lower deck :-) It is nice, to look through but not having the guns run out like most of the builds. It also gives nice look-throughs with the open ports on the other side. I like the idea that in the upper deck three different ways of lashing the guns has to be shown one beside the other :-) Cheers, Daniel
-
Hello Kevin, the guns that do not have a gun port lid are lashed in a run-out position as far as I know, as seen today on the V. in P. The guns in the cabins are usually secured alongside the bords fwd/aft, the other ones most possibly the usual way pointing upwards. Does this help? Cheers, Daniel
-
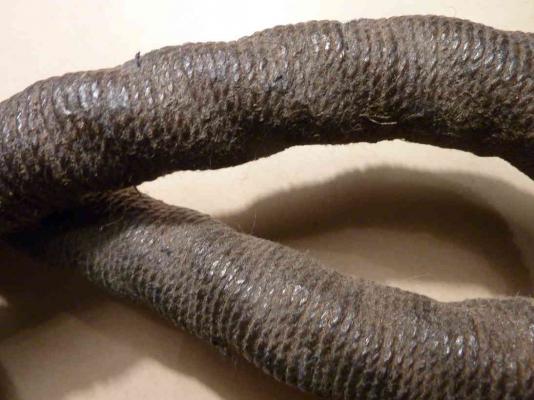
Some picture I found years ago on the net, if I remeber well from the "original" rig of the Batavia replica. Unfortunately no idea who to give the credits for ... From a stay Tarred twine XXXDAn

-
Thank you Popeye, that was the part I had in mind and could not find any more. I think there are even contemporary sources that mention the tarring, I believe there was another mentioning in a log entry while the time of Glorious 1st of June or on the road to Trafalgar. Now come the second interesting question: What colour did a tarred ratline show? My personal guess is that it was a light brownish drab darker than the running rigging but much lighter than the shrouds. Is there anybody who has knowledge upon the old craftsmanship of rope making? Any experimental archeologist? Cheers, Daniel
-
Very much to be seen: The higher use of brown rigging line in the french modeling à l´arsenal :-) Thanks for showing! XXXXXXDAn