rafine
-
Posts
2,932 -
Joined
-
Last visited
Content Type
Profiles
Forums
Gallery
Events
Everything posted by rafine
-
 Welcome to the Cheerful club Erik. Great to have you aboard. Bob
 -
I don't recall the width of the wale planks I used, but I did do the wales slightly thicker than the other hull planking. Bob
-
Nice work on the planking Engineer. Bob
-
Cutter Cheerful 1806 by rafine - FINISHED
rafine replied to rafine's topic in - Build logs for subjects built 1801 - 1850
Thanks Sjors. I think that I do. Bob- 525 replies
-
- 5
-

-
- cheerful
- Syren Ship Model Company
- (and 1 more)
-
I knew those guns would look fantastic in place, and they do. Beautiful, Grant. Bob
- 456 replies
-
- 5
-
-
- finished
- bomb ketch
- (and 2 more)
-
Cutter Cheerful 1806 by rafine - FINISHED
rafine replied to rafine's topic in - Build logs for subjects built 1801 - 1850
Thanks so much Tom. I'm an Advil man myself. Bob- 525 replies
-
- 4
-
-
- cheerful
- Syren Ship Model Company
- (and 1 more)
-
Cutter Cheerful 1806 by rafine - FINISHED
rafine replied to rafine's topic in - Build logs for subjects built 1801 - 1850
Thanks so much Mike, Erik, druxey, Nils and Grant for the kind words and comments and thanks also to the "likes". Mike, I put a small drill bit in a vise, butt end up, and wrap wire around it, then snip it off and pinch with a tweezer. I must fess up that I have been known to resort to ready mades from Model Expo when I tire of making them, particularly the very small ones. Erik, I am using the .035 line for the breeching ropes. Druxey, I'm not familiar with watchmaker's tweezers, but I'll look into them. Bob- 525 replies
-
- 7
-
-
- cheerful
- Syren Ship Model Company
- (and 1 more)
-
Cutter Cheerful 1806 by rafine - FINISHED
rafine replied to rafine's topic in - Build logs for subjects built 1801 - 1850
Thanks so much Erik, Dirk, Martin and the "likes". I had asked Chuck about the sizes of the blocks and line to use (I am using his blocks and rigging line). He said either the 2.5 or 3mm blocks and the .012 line. I went with the 3mm blocks because the 2.5mm were just beyond my physical capabilities at this point. Frankly, the 3mm are right at the edge. I tried the .012 line, but even with drilling out the holes in the blocks, I was having trouble, so I went with his .008 line, which worked well. Truthfully, I chalk up my experience to the ever increasing effects of age and arthritis. Bob- 525 replies
-
- 8
-
-
- cheerful
- Syren Ship Model Company
- (and 1 more)
-
Cutter Cheerful 1806 by rafine - FINISHED
rafine replied to rafine's topic in - Build logs for subjects built 1801 - 1850
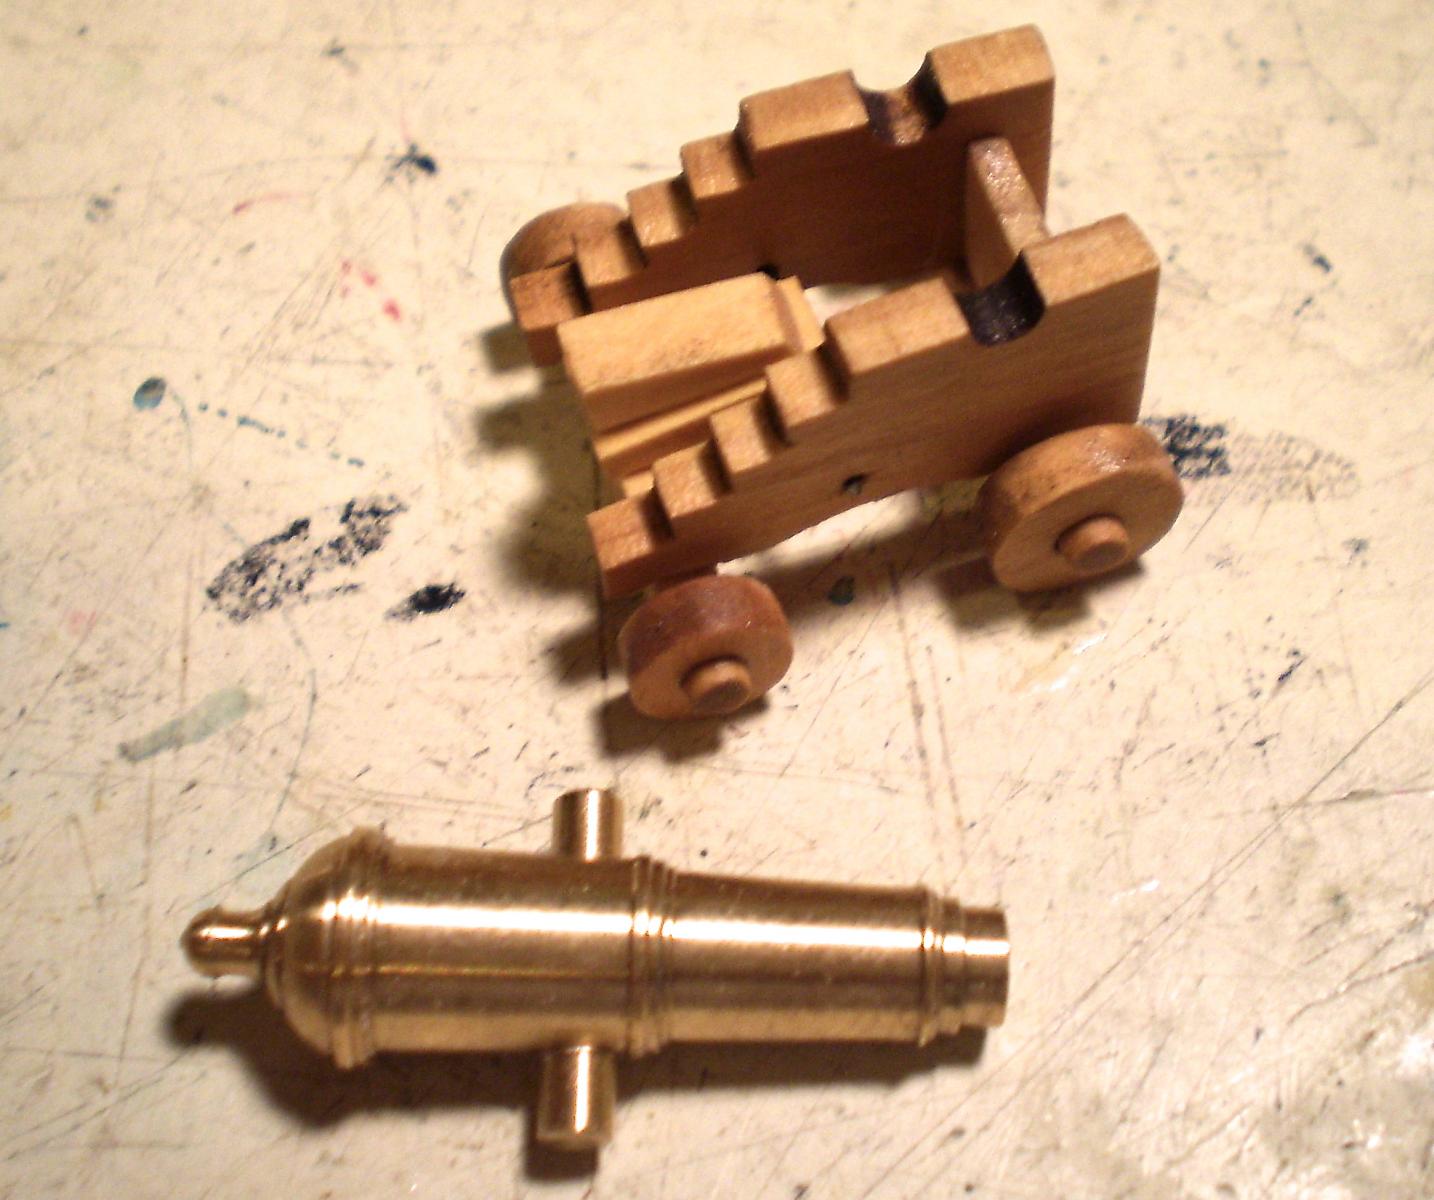
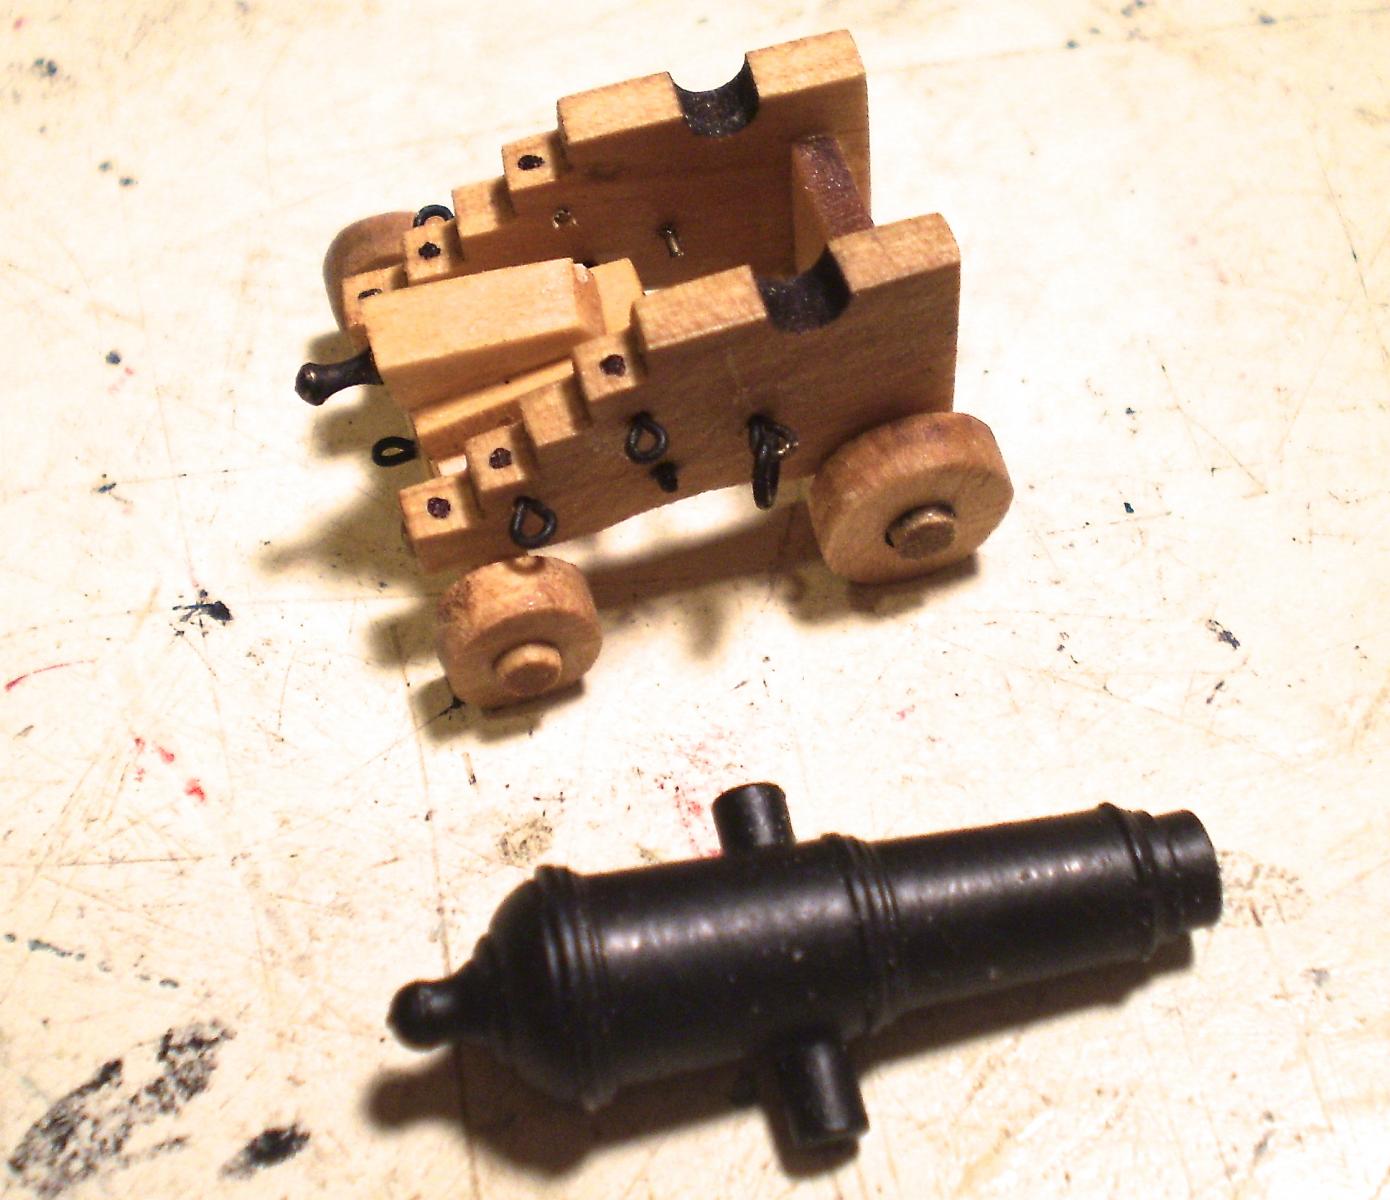
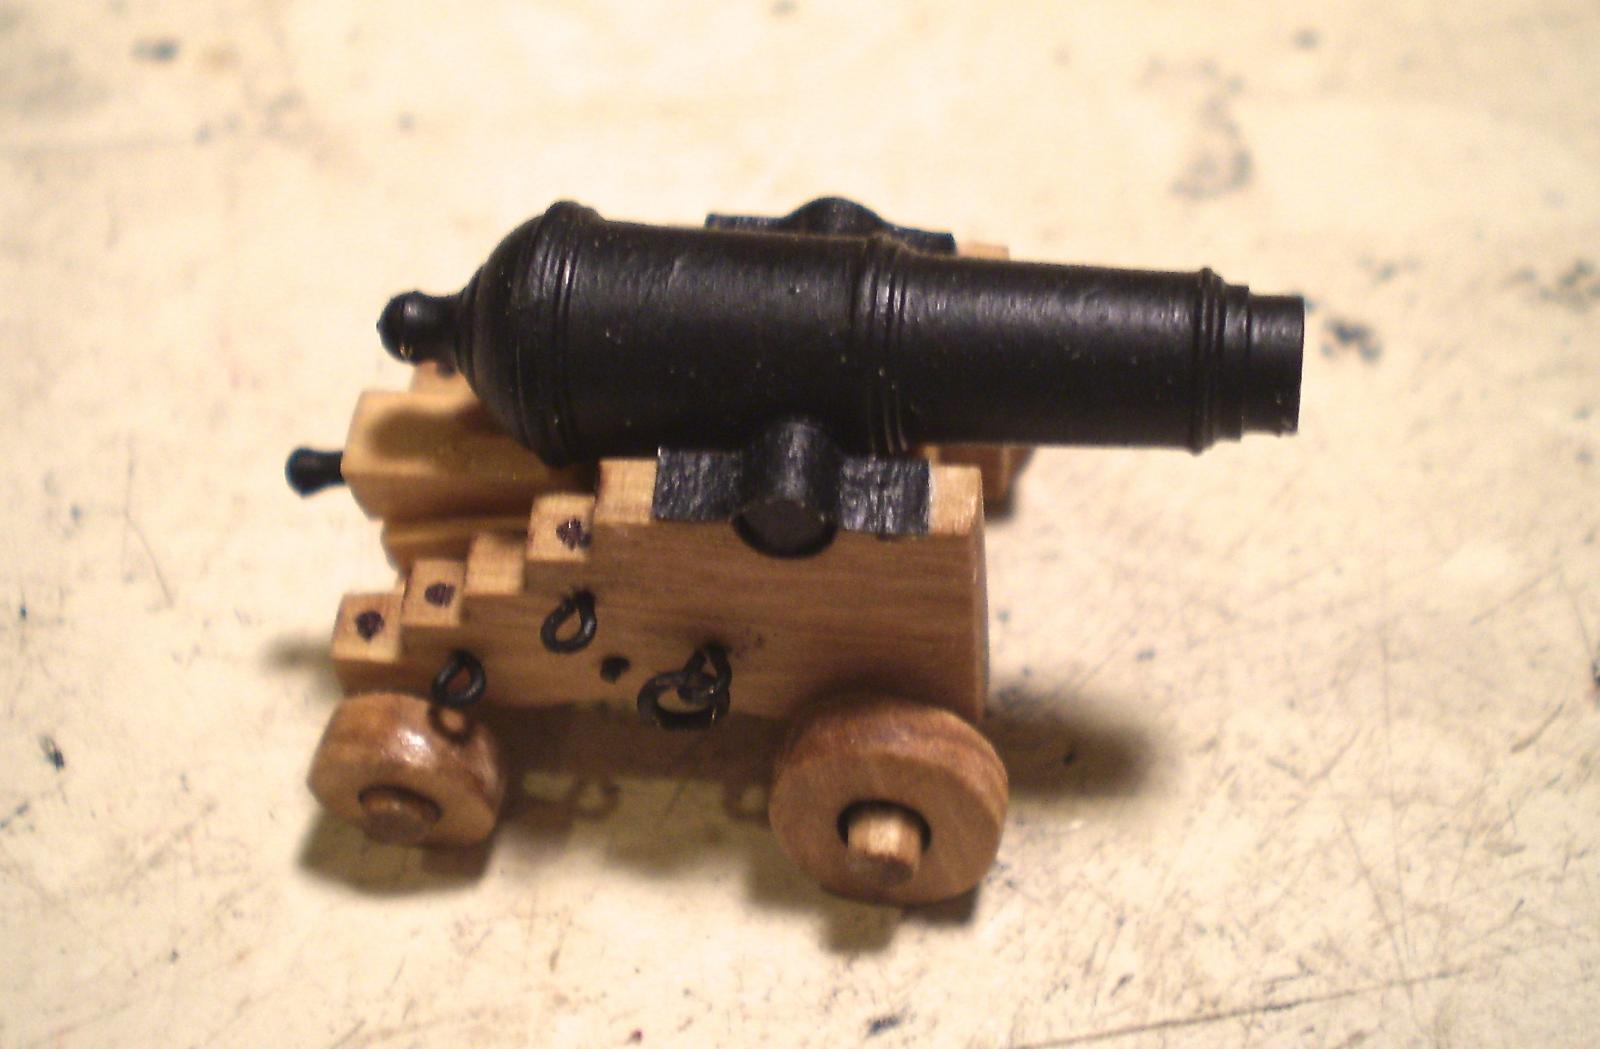
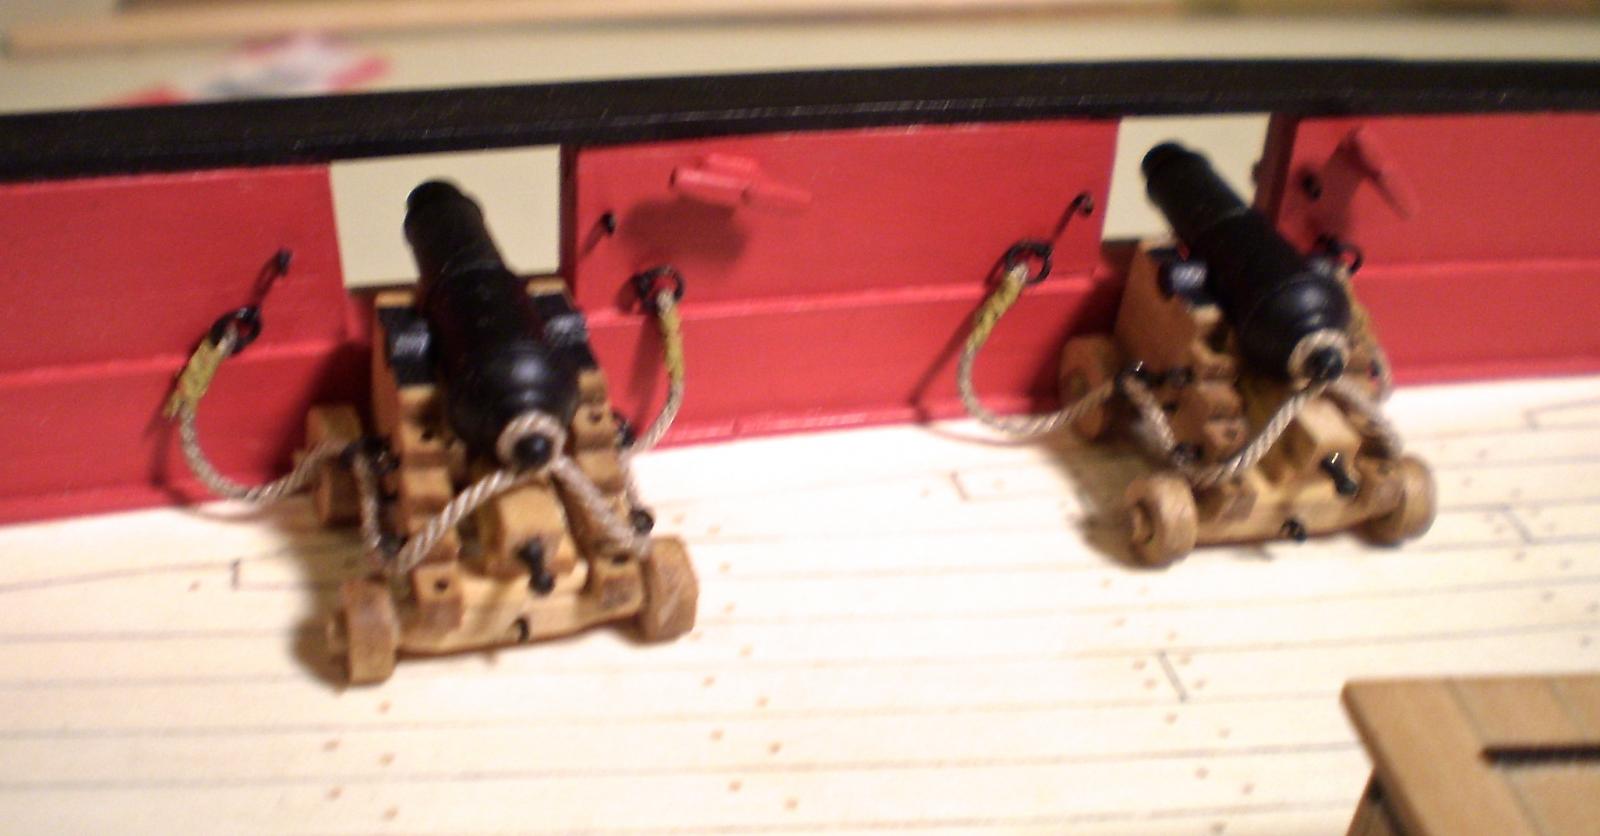
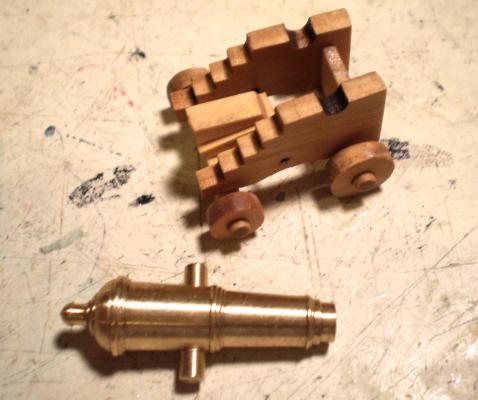
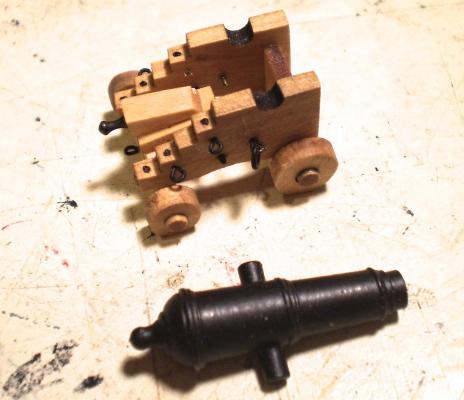
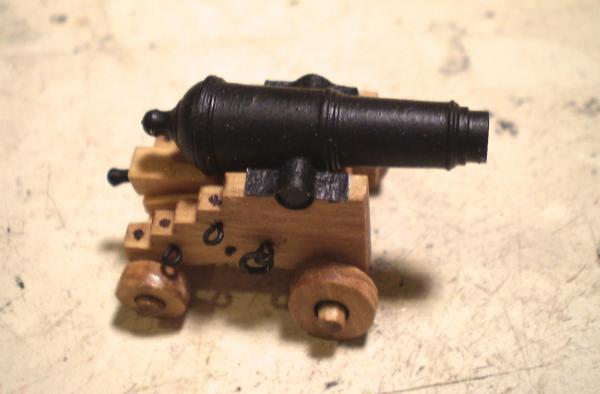
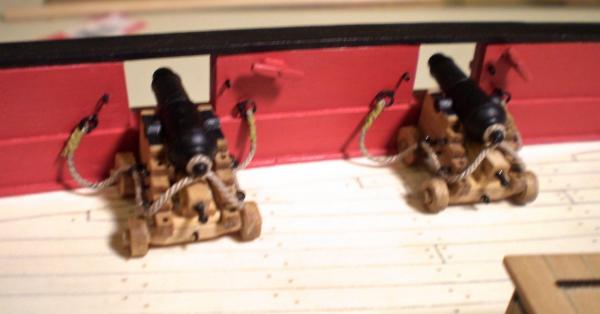
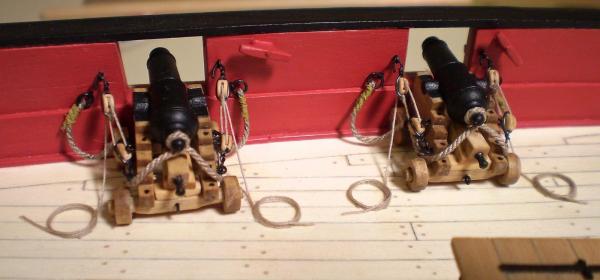
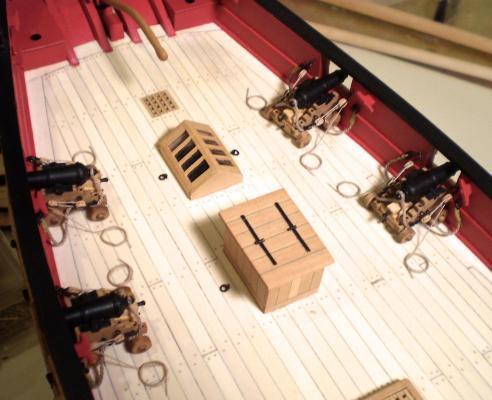
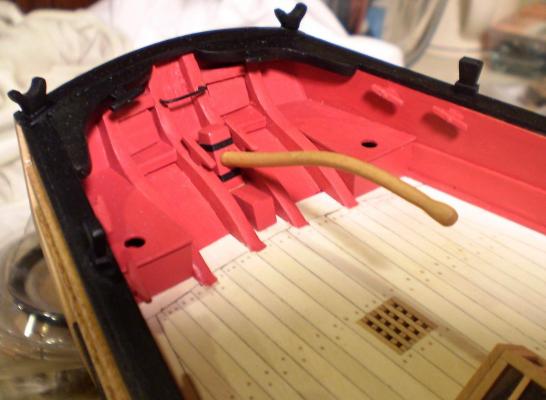
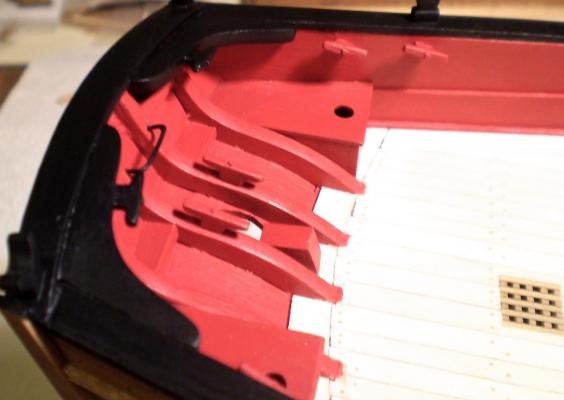
Since I hate doing repetitive tasks, I tend to break them down into segments. Thus, rather than doing all of the guns at once, I'm moving along the deck doing the detailing for each segment. Starting at the stern my first segment involved the first four guns, some bulwark cleats and some deck ringbolts. The guns were made up using Chuck's carriage kits and brass barrels, to which I added the necessary eyebolts and ringbolts, made from brass wire and blackened. The quoins were made from blackened brass belaying pins. The cap squares are paper. I chose to leave the carriages natural wood with a poly finish. After assembly, the guns were installed and rigged with breeching lines and tackles (those blocks are very small and hard to handle for arthritic fingers ) . Lastly, I made up rope coils and glued them in place. The next segment will include the next four guns, the pumps and the entry ladders. Bob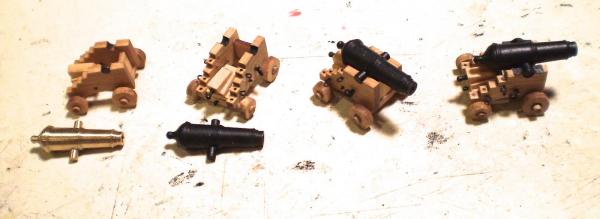
- 525 replies
-
- 38
-
-
- cheerful
- Syren Ship Model Company
- (and 1 more)
-
Cutter Cheerful 1806 by rafine - FINISHED
rafine replied to rafine's topic in - Build logs for subjects built 1801 - 1850
Thanks so much Captain Hook and the "likes". Bob- 525 replies
-
- 2
-
-
- cheerful
- Syren Ship Model Company
- (and 1 more)
-
Cutter Cheerful 1806 by rafine - FINISHED
rafine replied to rafine's topic in - Build logs for subjects built 1801 - 1850
Thanks so much Thomas and the"likes". Bob- 525 replies
-
- 4
-
-
- cheerful
- Syren Ship Model Company
- (and 1 more)
-
Really nice work on the masts Sal. Enjoy your time in Florida. It's a great time of year here. Bob
- 659 replies
-
- 5
-
-
- syren
- model shipways
- (and 1 more)
-
Very nice work on the collars and those hounds look great. I would leave them be. Bob
- 481 replies
-
- 1
-
-
- rattlesnake
- model shipways
- (and 1 more)
-
Cutter Cheerful 1806 by rafine - FINISHED
rafine replied to rafine's topic in - Build logs for subjects built 1801 - 1850
Thanks so much Wes, Ken, David, Grant and Mark for the nice comments and also the "likes". Greatly appreciated. David, I would have been inclined to do so, but Chuck's plans do not show a built up rudder. Bob- 525 replies
-
- 5
-
-
- cheerful
- Syren Ship Model Company
- (and 1 more)
-
Cutter Cheerful 1806 by rafine - FINISHED
rafine replied to rafine's topic in - Build logs for subjects built 1801 - 1850
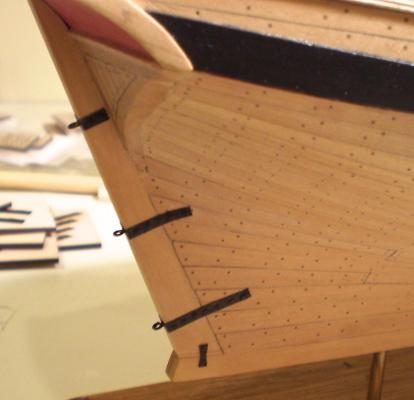
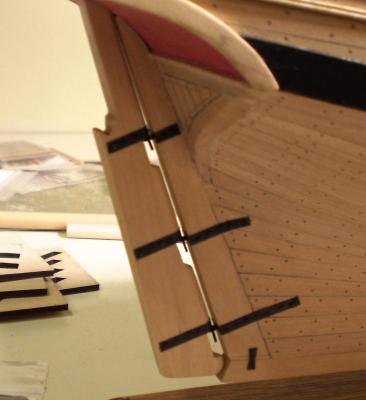
Thanks so much Nils, Tim, George and the "likes". Tim, the pintles and gudgeons are made from Manila file folder card. The bands on the rudder head are from masking tape, which I secure with a dab of glue at the ends. Bob- 525 replies
-
- 5
-
-
- cheerful
- Syren Ship Model Company
- (and 1 more)
-
Cutter Cheerful 1806 by rafine - FINISHED
rafine replied to rafine's topic in - Build logs for subjects built 1801 - 1850
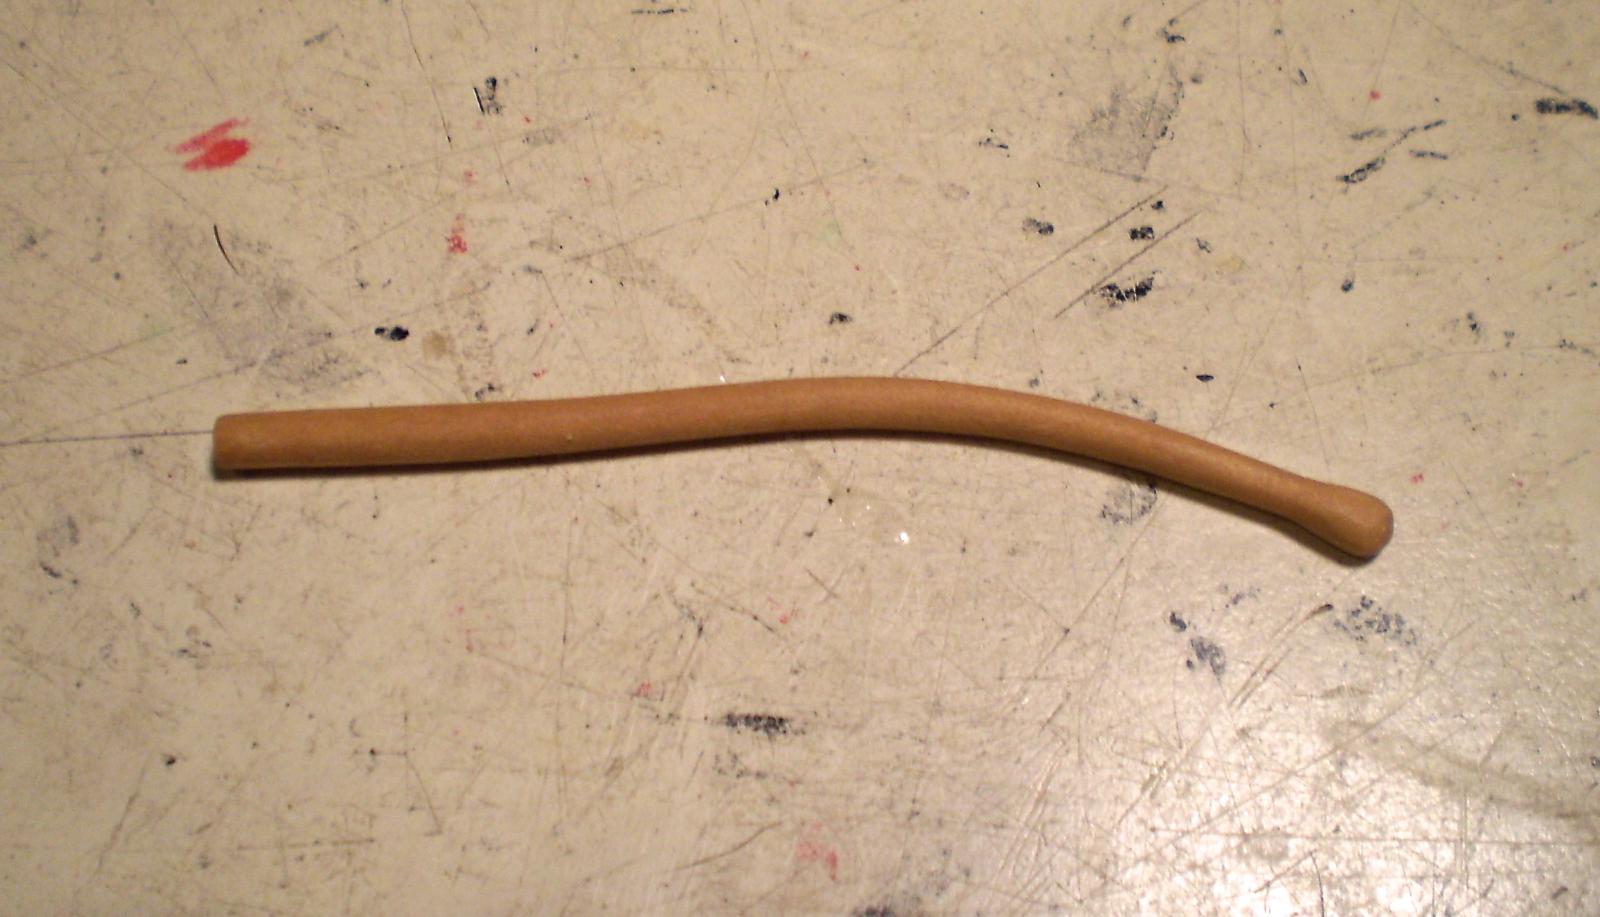
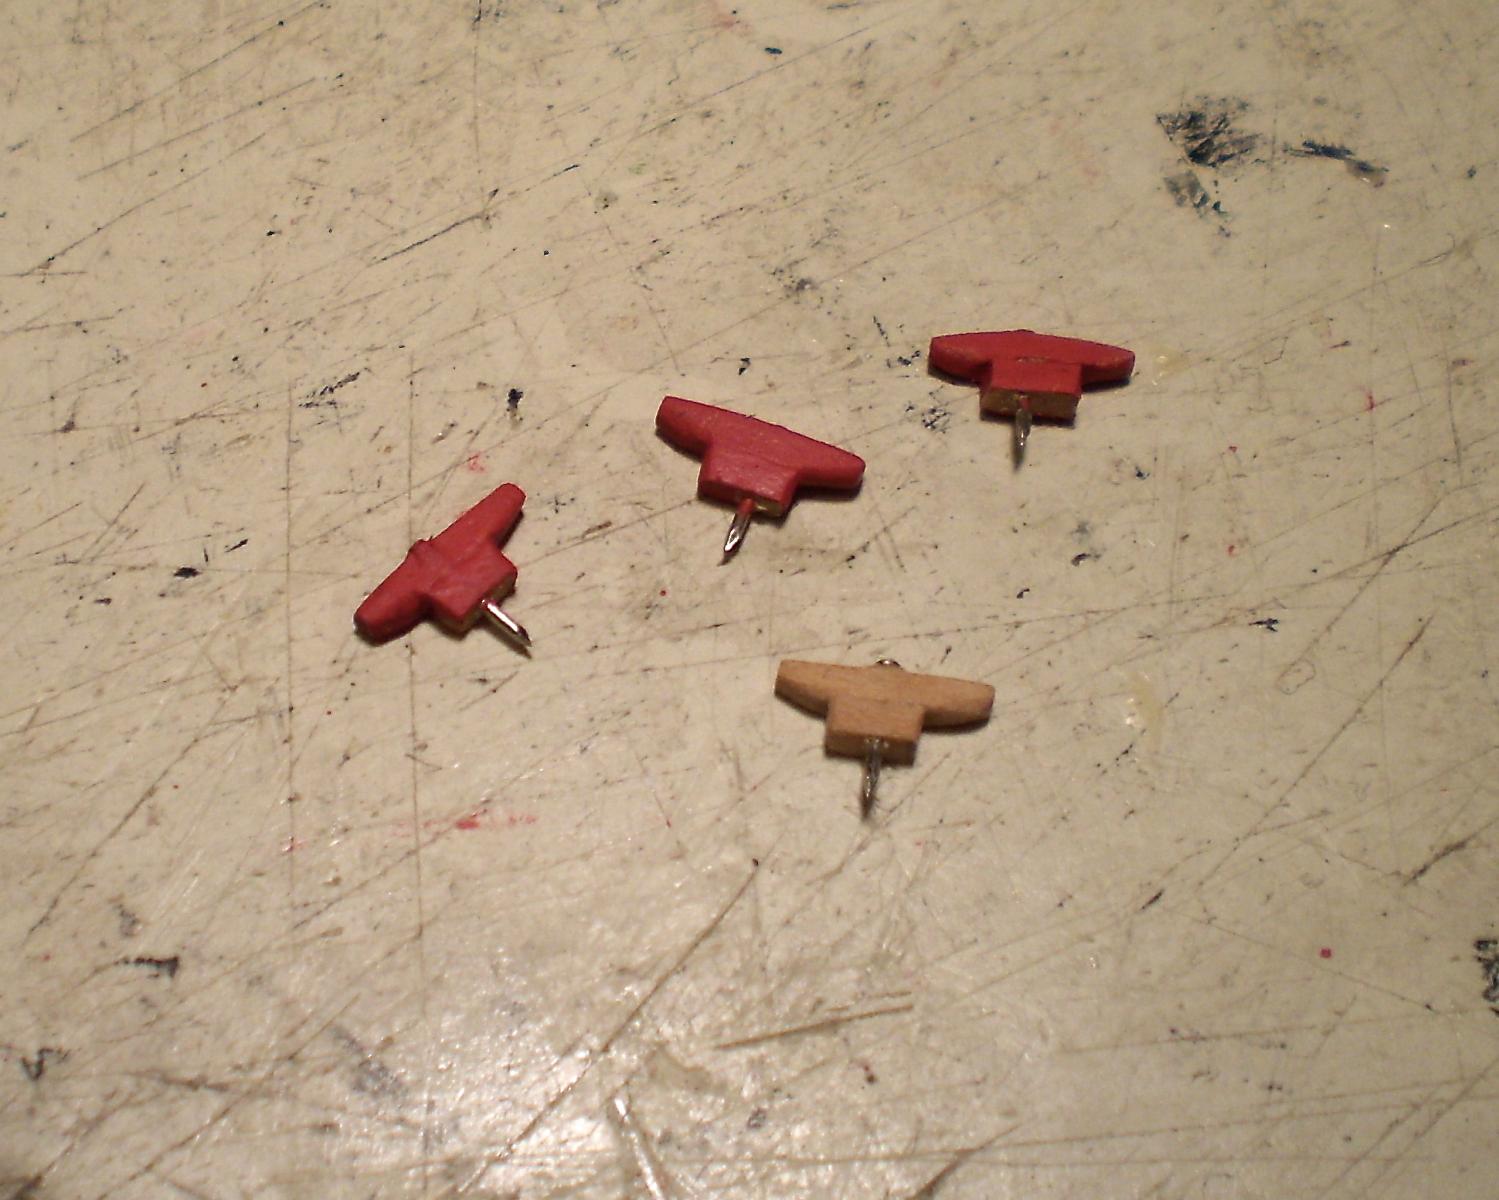
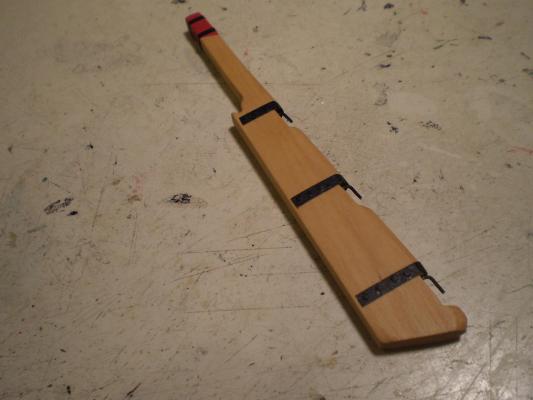
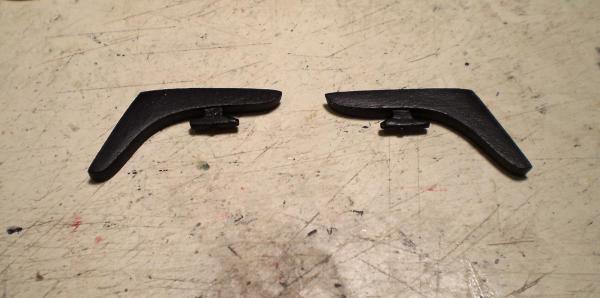
First, a very happy and healthy New Year to all, and one filled with modelling pleasure. Now, for my first update of the New Year. I have made and mounted the rudder. The rudder itself is from Chuck's laser cut framing set, shaped with sanding sticks. After some indecision, I chose to paint the top portion of the rudder red to match the previously done stern post extension piece. I did , however decide to leave the tiller natural wood. The tiller was cut from boxwood sheet using a glued on copy of the plan as a template. The cutout wood blank was shaped with files and sanding sticks. Since I don't like working with metal, I chose to do the iron work in black painted paper, with wire used for the actual mounting. This included the pintels and gudgeons and the bands at the rudder head. It doesn't show well (if at all) in my photos, but there are bolt heads, made from tiny pin heads drilled and inserted in the pintels and gudgeons. With this work completed, it is my intention to work from the stern forward on the interior detailing. The first task will be to make, install and rig the first four guns at the aft end. Bob

- 525 replies
-
- 40
-
-
- cheerful
- Syren Ship Model Company
- (and 1 more)
-
Beautifully done guns Grant. They will look fantastic in place. Bob
- 456 replies
-
- 6
-
-
- finished
- bomb ketch
- (and 2 more)
-
Cutter Cheerful 1806 by rafine - FINISHED
rafine replied to rafine's topic in - Build logs for subjects built 1801 - 1850
Thanks so much druxey, Rusty and Tim for the nice comments and thanks also to the "likes". Always appreciated. Druxey, I don't know the answer, other than to say that I followed Chuck's drawing. Bob- 525 replies
-
- 5
-
-
- cheerful
- Syren Ship Model Company
- (and 1 more)
-
Cutter Cheerful 1806 by rafine - FINISHED
rafine replied to rafine's topic in - Build logs for subjects built 1801 - 1850
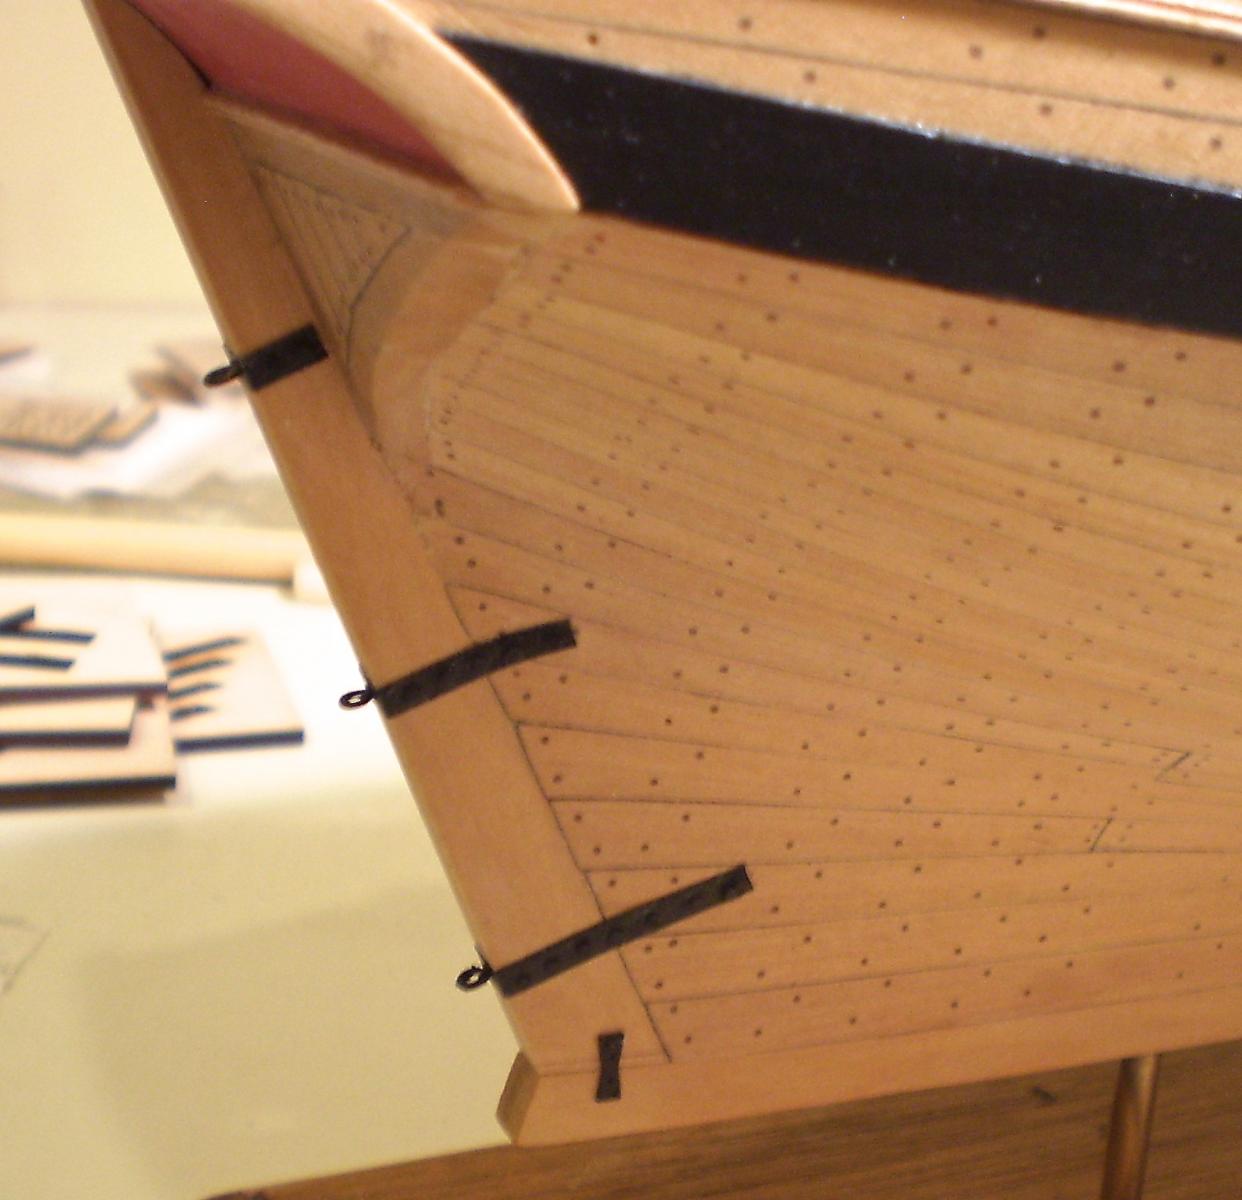
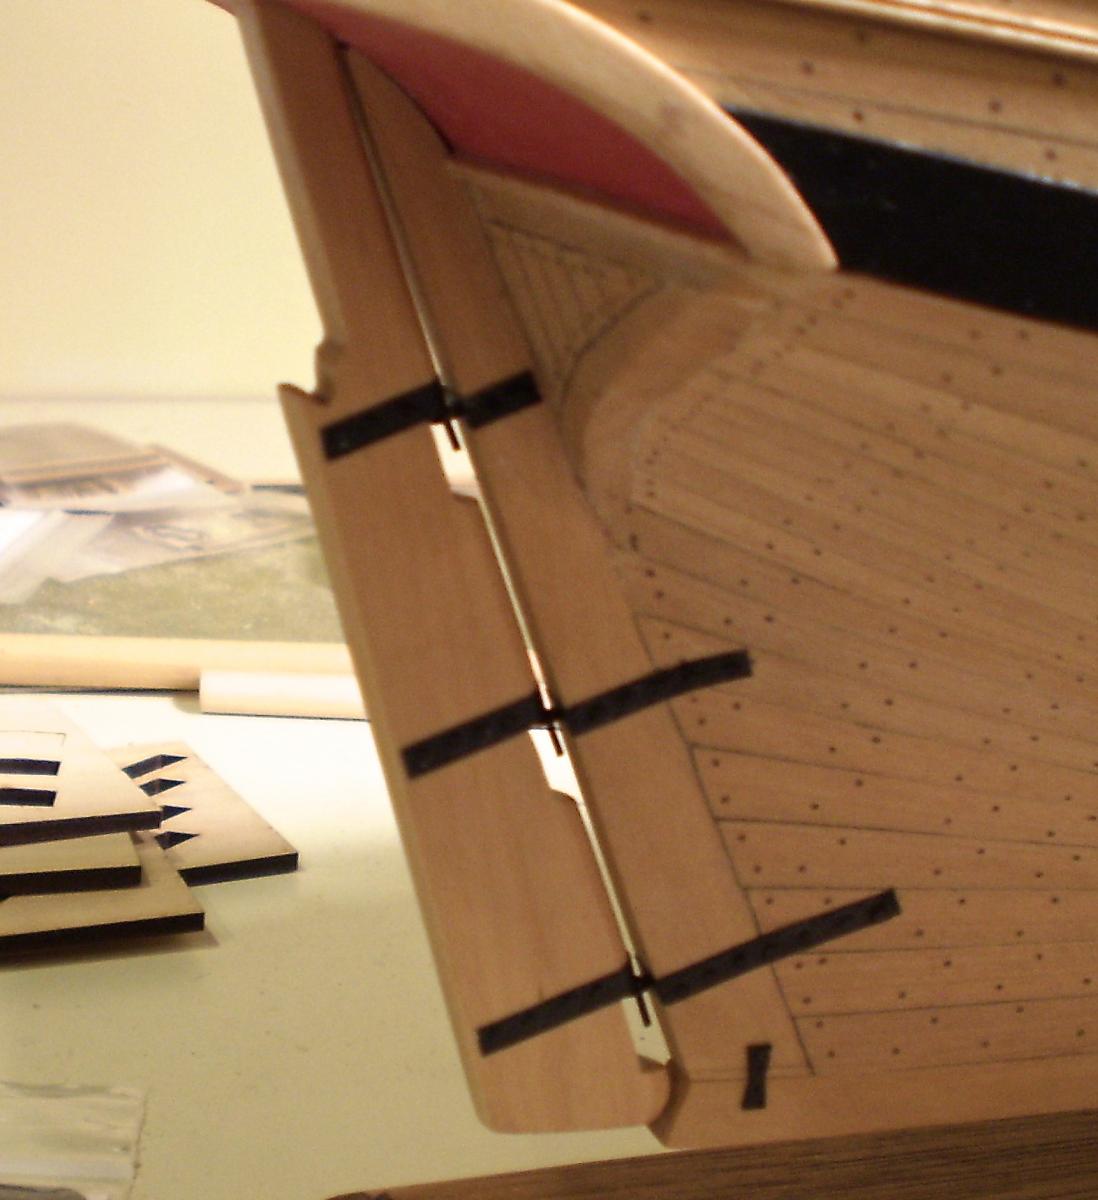
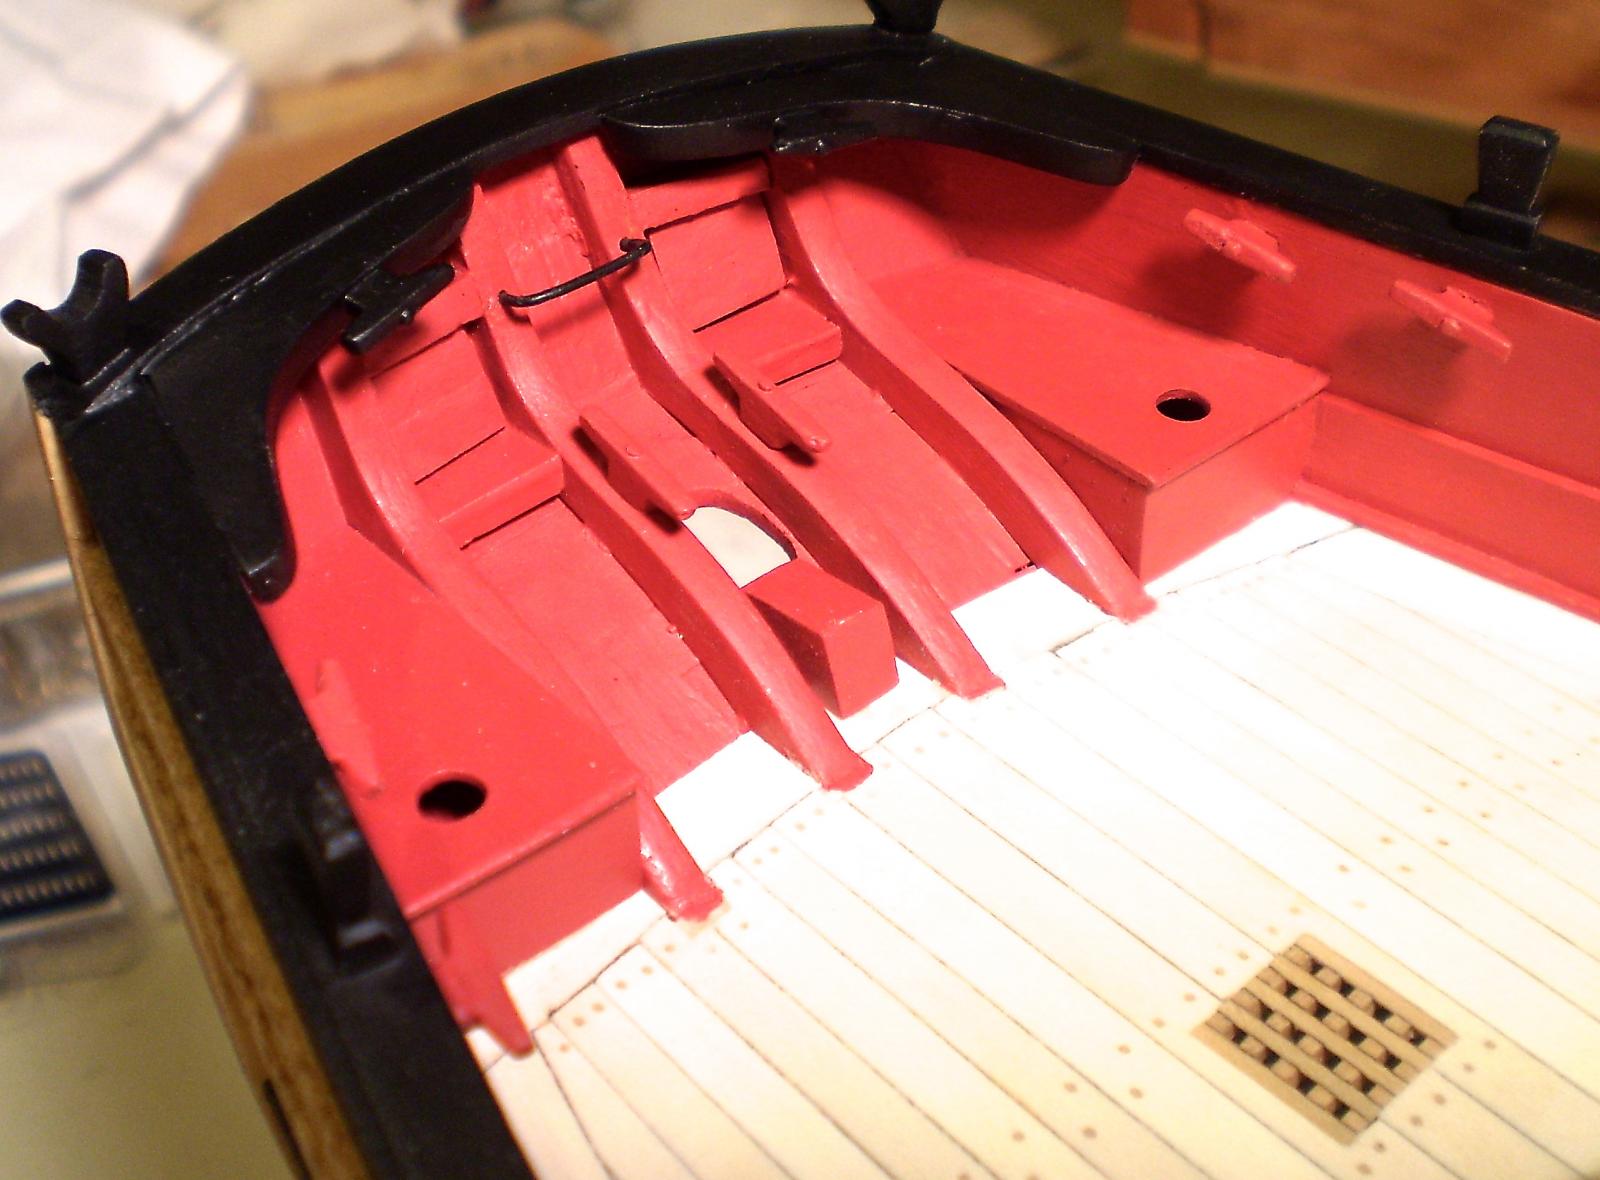
I've got a houseful of family company for the holidays, but have been able to sneak in a little modeling time. The result is that I've made and added the knees at the stern, and some cleats to the bulwarks, the stern frames and the knees. I also added the horse for the boom sheets The knees were cut from 1/8" boxwood sheet using card templates and were then beveled to fit. I chose to paint them black, because they just looked better that way than in natural wood or red (at least to my eye). I don't know what is "correct". The cleats were made from boxwood strip and shaped with files. I painted them to match the surfaces to which they are attached. They are pinned and glued. Next up will be the rudder. Bob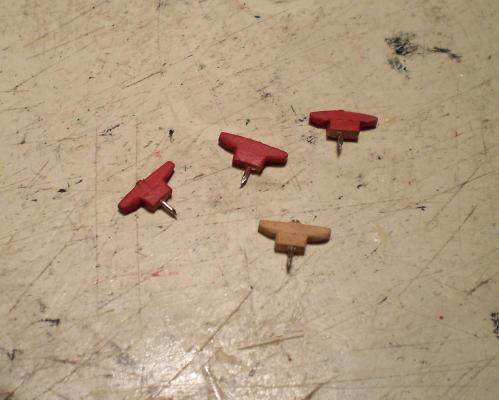

- 525 replies
-
- 30
-
-
- cheerful
- Syren Ship Model Company
- (and 1 more)
-
No, actually I use carpenters glue for virtually all of my wood to wood joints. With scale length planks, it doesn't seem that difficult to hold them in place until the glue grabs. Messy fingers sometimes. Bob
-
Cutter Cheerful 1806 by rafine - FINISHED
rafine replied to rafine's topic in - Build logs for subjects built 1801 - 1850
Thanks so much David, Mobbsie and the "likes". You've got that just right Mobbsie. Bob- 525 replies
-
- 4
-
-
- cheerful
- Syren Ship Model Company
- (and 1 more)
-
Cutter Cheerful 1806 by rafine - FINISHED
rafine replied to rafine's topic in - Build logs for subjects built 1801 - 1850
Thanks so much Tom. Bob- 525 replies
-
- 3
-
-
- cheerful
- Syren Ship Model Company
- (and 1 more)