Chuck
-
Posts
9,701 -
Joined
-
Last visited
Content Type
Profiles
Forums
Gallery
Events
Everything posted by Chuck
-
 Looking great Rusty....but dont ask me....I had a hard enough time deciding when I did them.
- 310 replies
-
- 5
-

-
- cheerful
- Syren Ship Model Company
- (and 1 more)
-
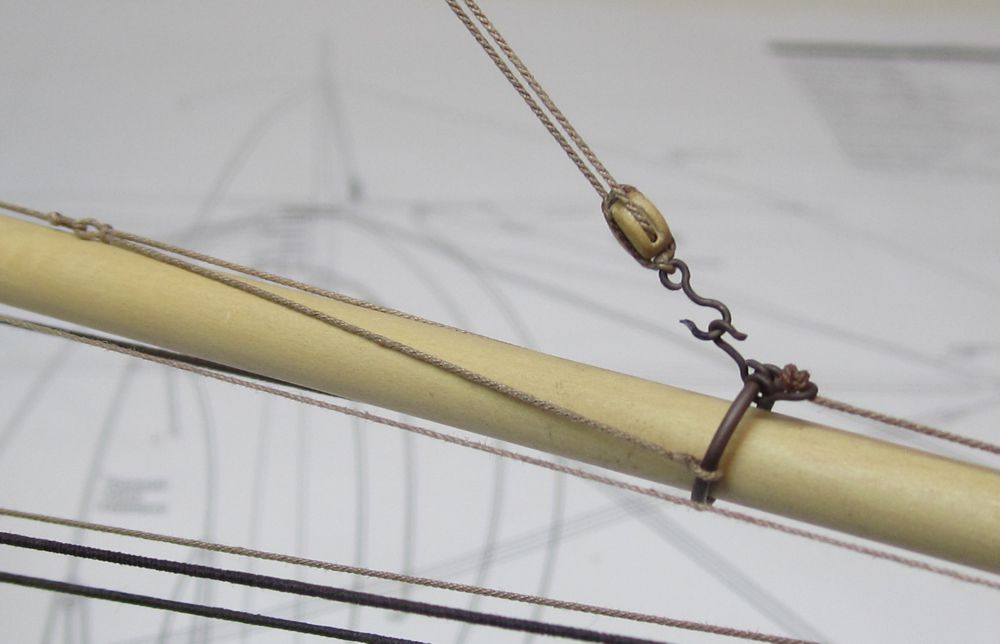
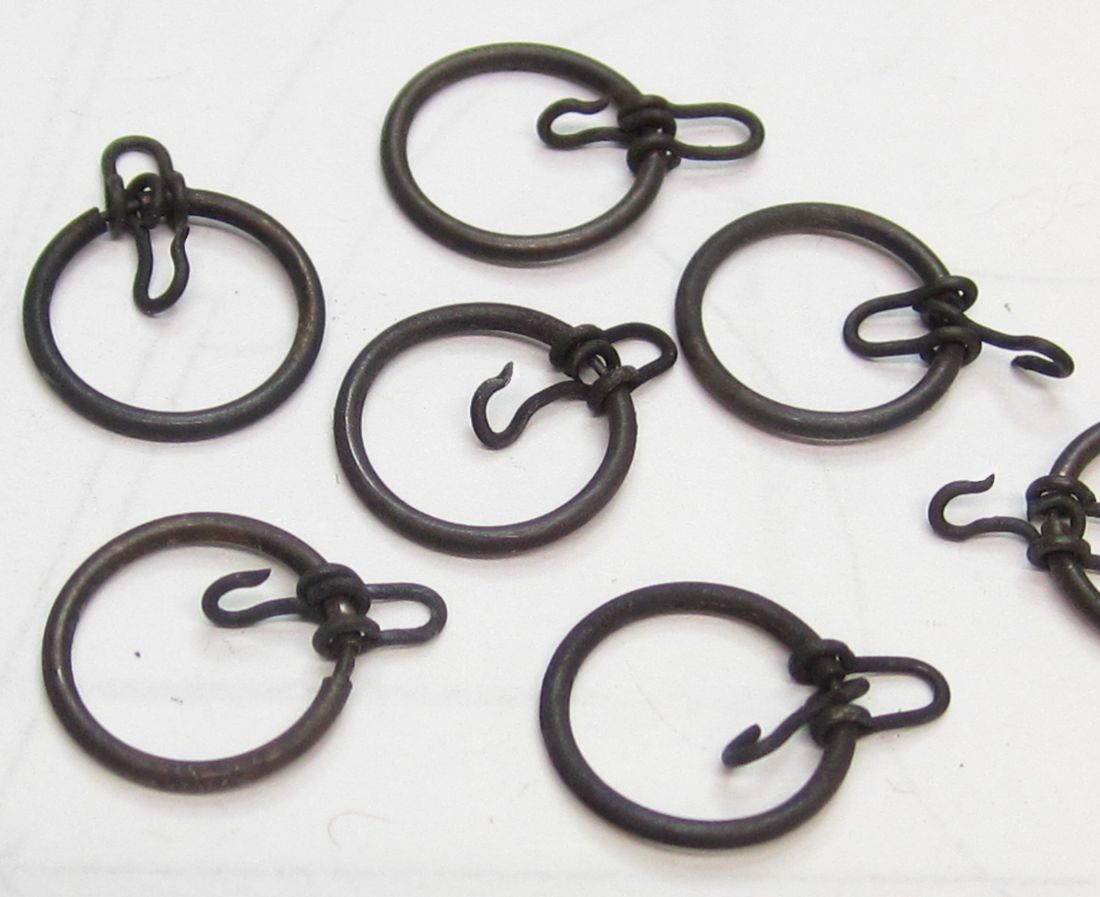
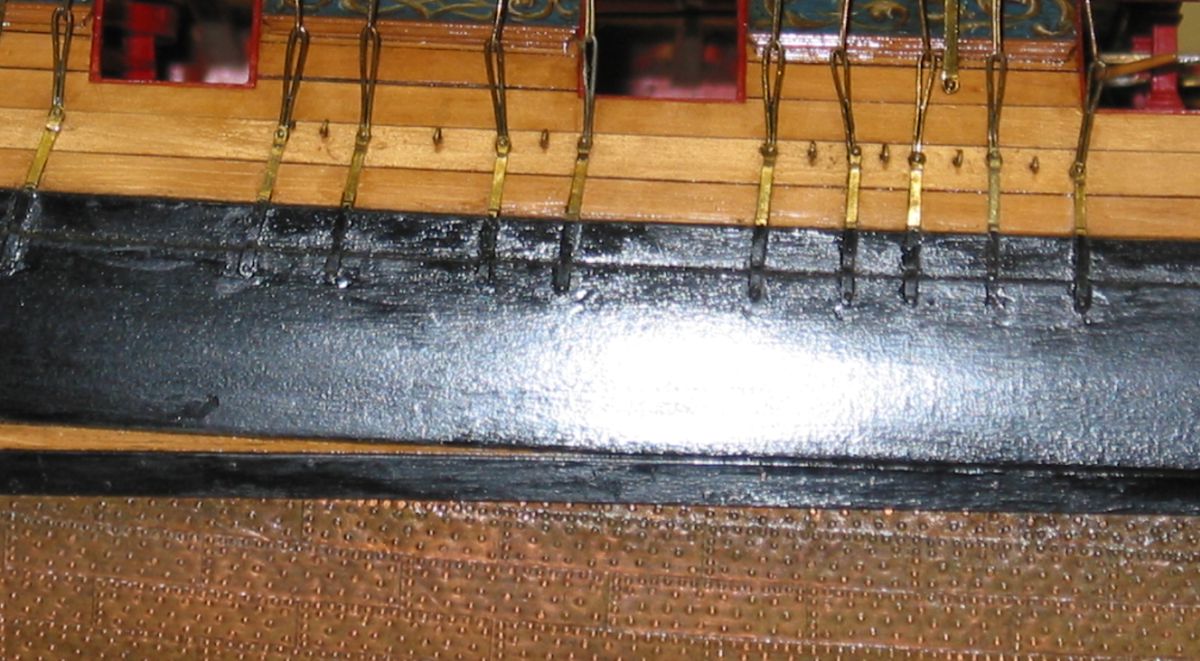
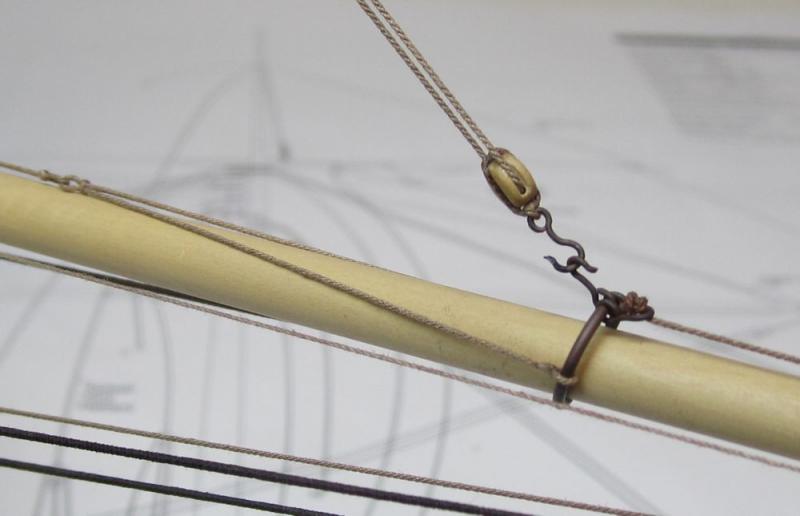
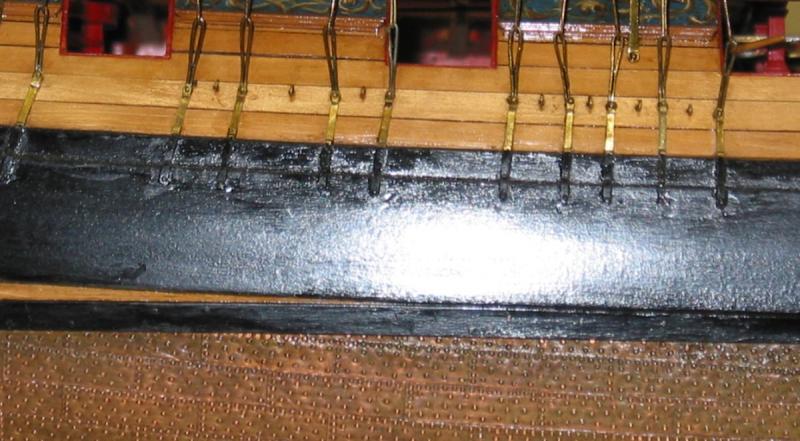
Thanks Allan Yes the traveler ring is not made from wire that is usually the case. It is made from 1mm brass tube. Its easier to use and looks better. You cut the rings like you would if you were using wire. Just wrap around a dowel and then cut with a saw. Then a small length of 24 gauge wire is inserted into the tube to close it up...you can push it pretty far into the tube so no solder is even required. But first you should slide your shackle and hook onto it and then close it up....those are also made from 24 gauge wire.
- 1,051 replies
-
- 16
-
-
- cheerful
- Syren Ship Model Company
- (and 1 more)
-
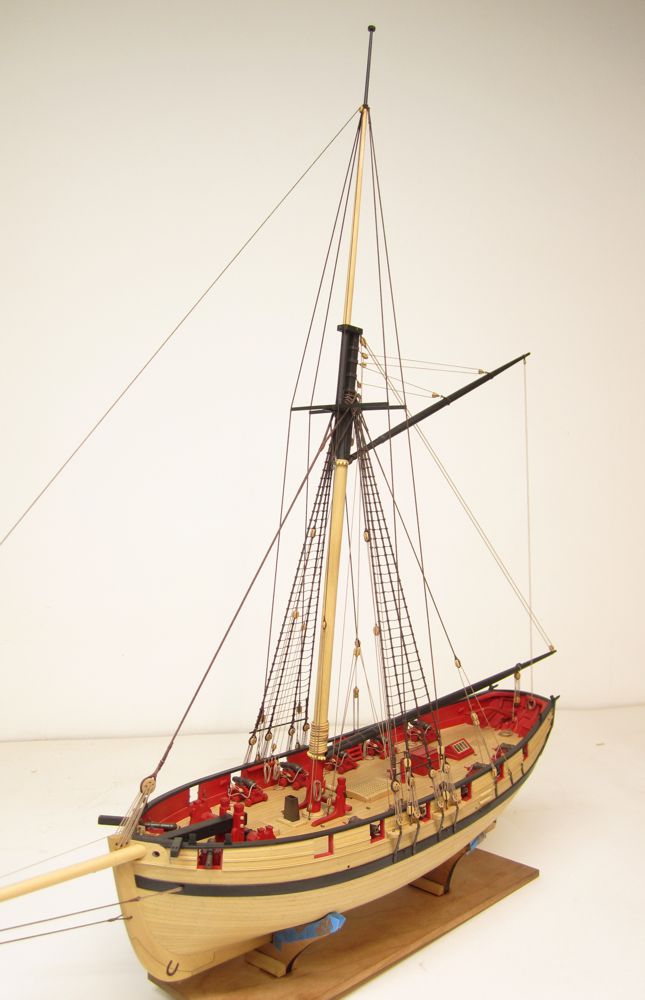
Al Unfortunately I cant add to an order already submitted. Its protection for you and your CC's are deleted immediately after the order is finalized. This is how the traveler ring looks after rigging it. The jibsail and foresail rigging is now completed. All that remains to rig are the two yards....once I make them. That will complete the rigging and then its the final stretch with a few additional details....anchors....flag....boarding ropes......and she is officially done.
- 1,051 replies
-
- 48
-
-
- cheerful
- Syren Ship Model Company
- (and 1 more)
-
HM Cutter Cheerful 1806 by Erik W - 1:48 scale
Chuck replied to Erik W's topic in - Build logs for subjects built 1801 - 1850
That can be corrected easily....I wouldnt worry too much about it. Just start cutting planks slightly wider over the next few strakes. But dont correct it all in the next strake. Spread the correction over the next two or so and it wont be noticeable. Before you know it.....you will be back on your tick marks. Chuck -
The club is meeting on the 14th at my place but anytime will work...we can work on those shrouds while I do some rigging on my Cheerful too!!! I set aside a traveler ring for you.
- 1,051 replies
-
- 4
-
-
- cheerful
- Syren Ship Model Company
- (and 1 more)
-
Mike You will have to show me when you drop by the shop. Today I am preparing to start the running rigging. The first thing I did was make all of the hooks and also prepare the traveler ring for the jib rigging. The traveler ring has both a shackle and a hook. A simple version is shown on the plans but I will be using the traveler ring available "ready made" at Syren Ship Model Company. It is ready to use right out of the package. It has a 3/8" inside diameter. They can be finicky things to make. Now if I only remembered to slip one of these on the bowsprit before I finished the standing rigging!!!! No worry though. I will be able to assemble one in place. Chuck

- 1,051 replies
-
- 28
-
-
- cheerful
- Syren Ship Model Company
- (and 1 more)
-
His site is no longer active and we never created a downloadable document. I do have all of the info however and its one of those things still on the "to-do" list. Chuck
-
Just a suggestion....sand off the laser char entirely from the keel pieces. Before you ad anymore frames. It will be much more difficult as you move forward. I know it will b epainted but it will be a muddy color if you dont.
-
Much better and yes it will be easier to rig the shrouds now...
- 452 replies
-
- 4
-
-
- cheerful
- Syren Ship Model Company
- (and 1 more)
-
I will have to look into that......I am now using Corel Photo now and I imagine they have the same features. Thanks
- 1,051 replies
-
- 2
-
-
- cheerful
- Syren Ship Model Company
- (and 1 more)
-
This was my feeble attempt on Syren. these are individual stamped and overlapped plates.
-
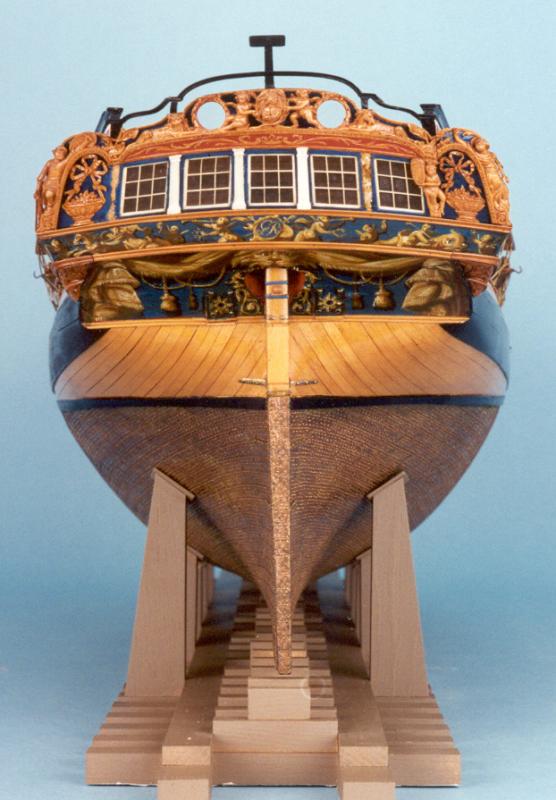
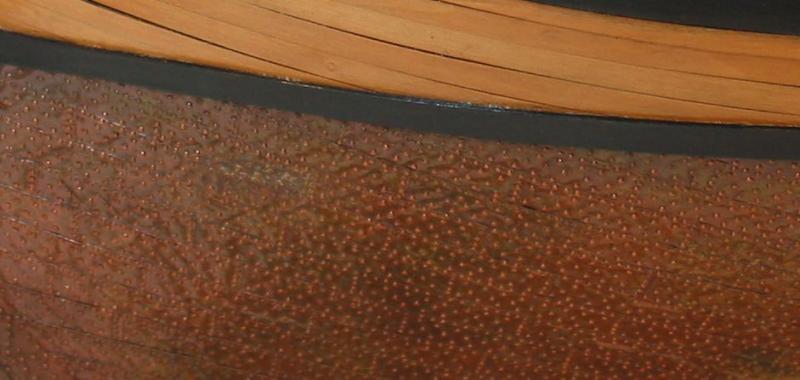
The hull is also NOT broken into two or three bands like some do.....this is also true of the Bellona model that shows contemporary plates on a model. I believe that is a much later application and if you are building a 1770-1790ish model one belt like this is more appropriate. The plates more or less follow the run of planking.......beautiful....insnt it? I plan to plate Winchelsea. I had a flood a few years ago that wrecked the planking. After fixing it I am not real happy with it so the plating of the hull should fix that. The alert was the first ship plated and it would be great to show this sister ship with plates.......I will be replicating the plates on this contemporary model as best I can.
-
Thanks but when you stay f-stop....these cameras are dumbed down now and they dont call it that in the settings. What would it be?
- 1,051 replies
-
- 2
-
-
- cheerful
- Syren Ship Model Company
- (and 1 more)
-
Thanks guys... Yes Erik it is tough to photograph. My simple point and shoot digital really distorts the images. It gives that slight "fish bowl" effect around the perimeter and bends the image. I am going to see if one of the guys in my club has a better camera. I will take some photos with it to see if it improves. I do like Mikes pictures and will ask him to bring his camera to the next workshop session at my shop. We meet every month at my place to work on models together. Its really great fun.
- 1,051 replies
-
- 5
-
-
- cheerful
- Syren Ship Model Company
- (and 1 more)
-
What you are looking at here are photos of a contemporary model (Minerva). A rare example of copper plates made for a model and its contemporary. If I remember correctly these plates were put on the hull with actual small nails....thousands of them. Wish I had better pictures but these are the best I have close up of the plates.

- 20 replies
-
- 12
-
-
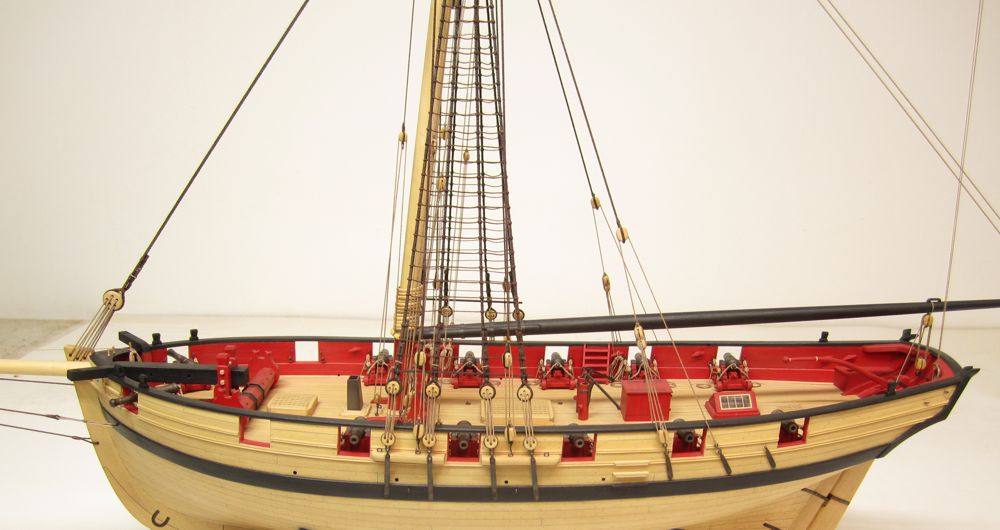
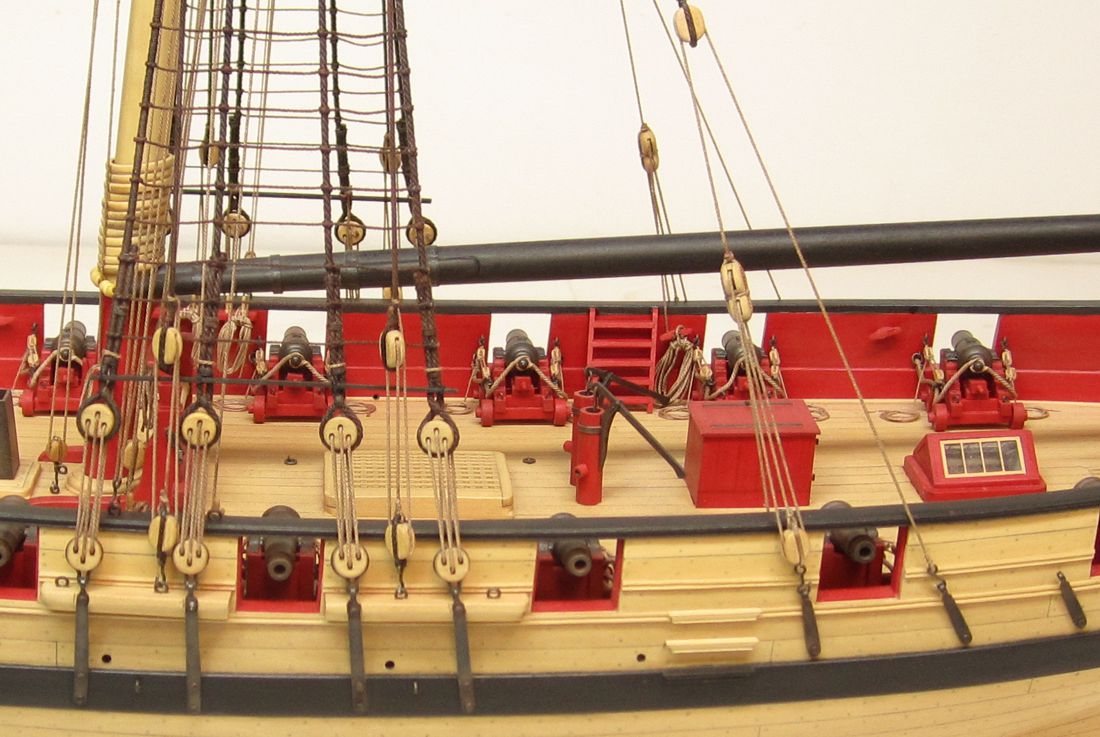
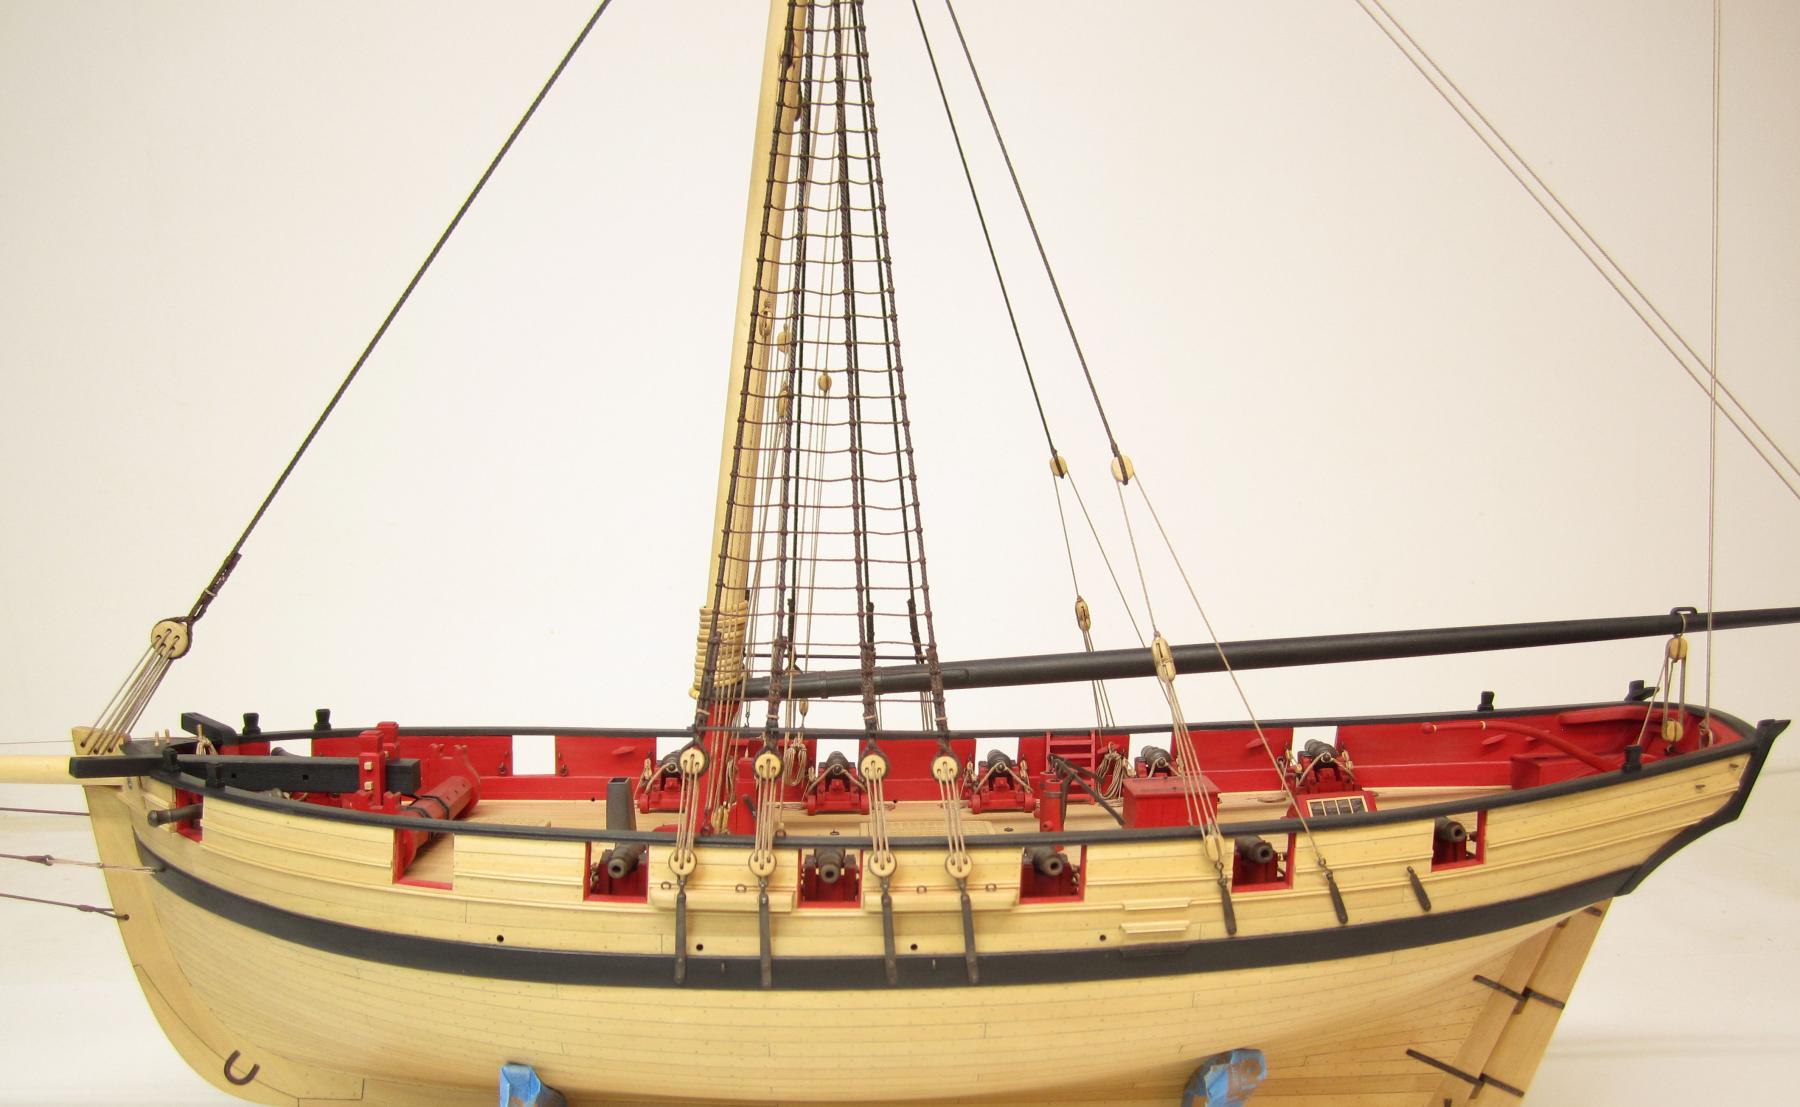
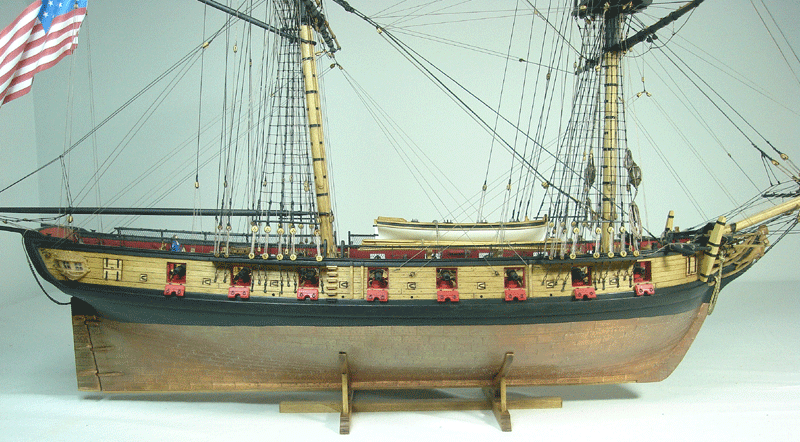
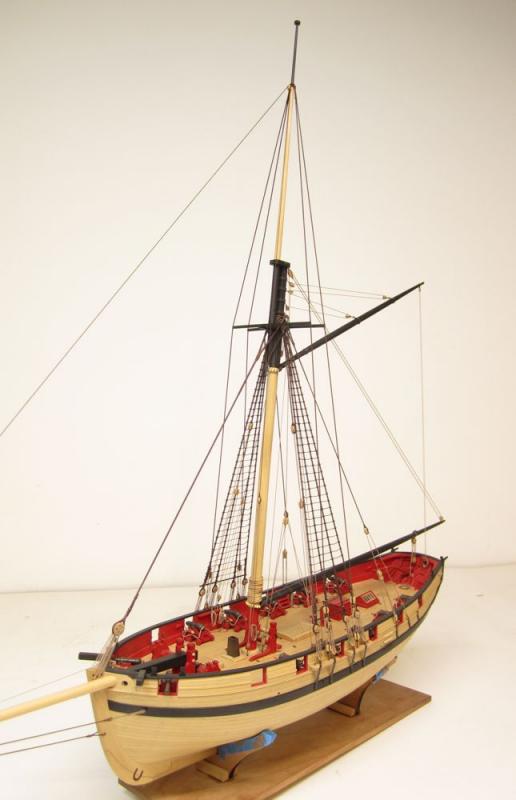
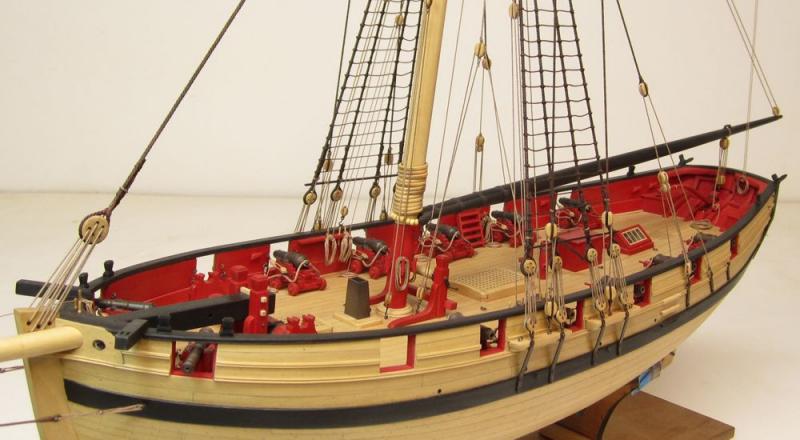
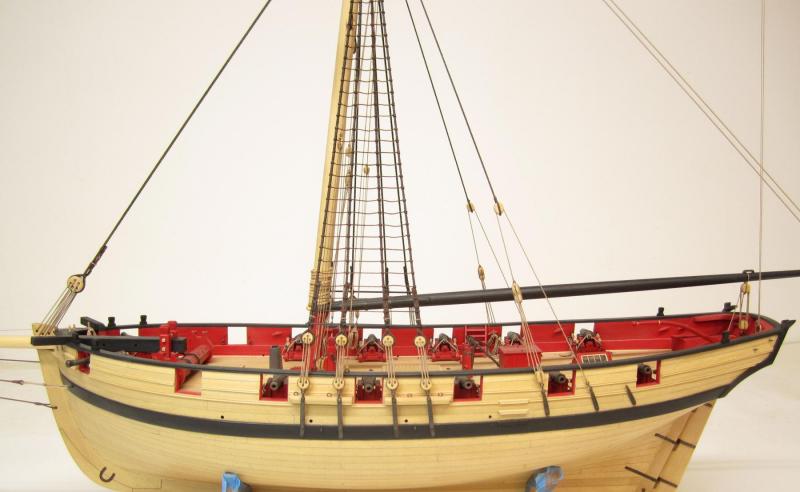
Today I finished the standing rigging. Once the ratlines were done I only had to rig the topmast shrouds and the topmast stay. Even though I have shown the topmast backstay on the plans, I did not rig them. I just wanted to show what they would look like. Only under rare conditions were they used. I have never seen a contemporary model with them rigged and the straps on the side of the hull are always left empty. So I decided to follow suit. I think it ruins the look of the model a bit as well and this is more in keeping with what everyone is used to seeing. Next up I will start the running rigging. Its getting close!!!!


- 1,051 replies
-
- 45
-
-
- cheerful
- Syren Ship Model Company
- (and 1 more)
-
Those are just extra pieces.....just in case. The glue choice is up to you...whatever is more comfortable for your pace and work habits. Yes glueing those pieces across the bulkheads is a great idea.
-
HM Cutter Cheerful 1806 by Erik W - 1:48 scale
Chuck replied to Erik W's topic in - Build logs for subjects built 1801 - 1850
That looks very good. -
Thats a great method Druxey...thank You for that. And thank you all for the nice comments and likes.
- 1,051 replies
-
- 6
-
-
- cheerful
- Syren Ship Model Company
- (and 1 more)
-
Thank You guys. Right you are Greg....Yes the outside shrouds are indeed square knots. My bad for that omission I will go back .and add that to the post to avoid confusion.
- 1,051 replies
-
- 5
-
-
- cheerful
- Syren Ship Model Company
- (and 1 more)
-
I am still thinking about it....it will hit me sooner or later.
- 1,051 replies
-
- 3
-
-
- cheerful
- Syren Ship Model Company
- (and 1 more)
-
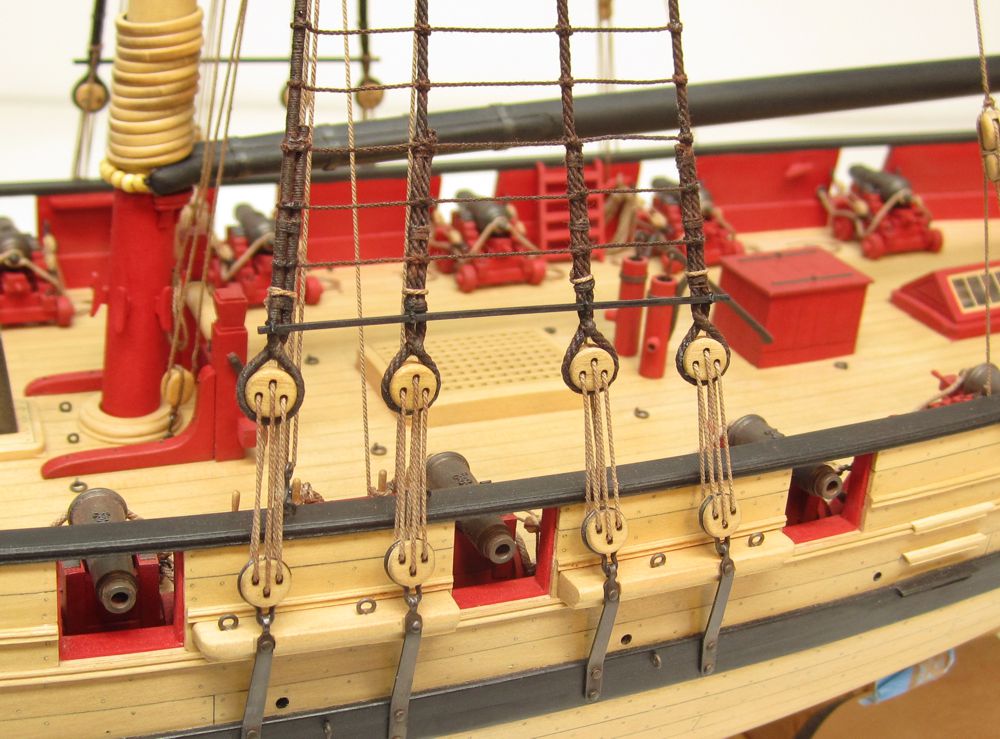
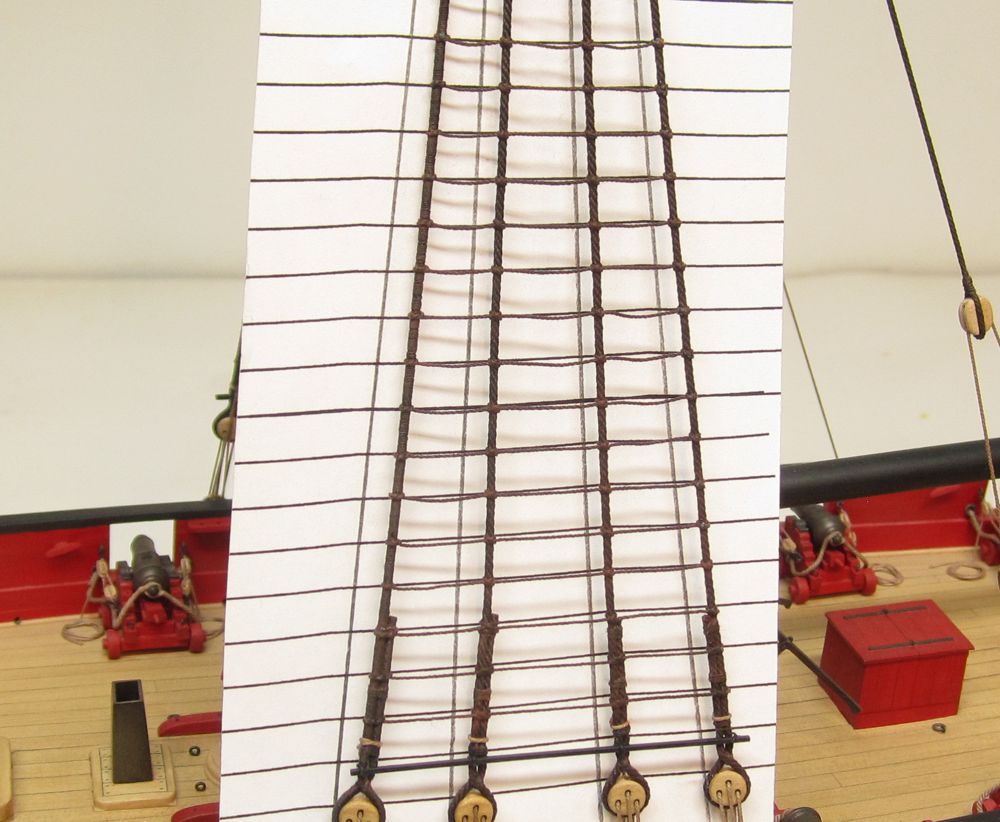
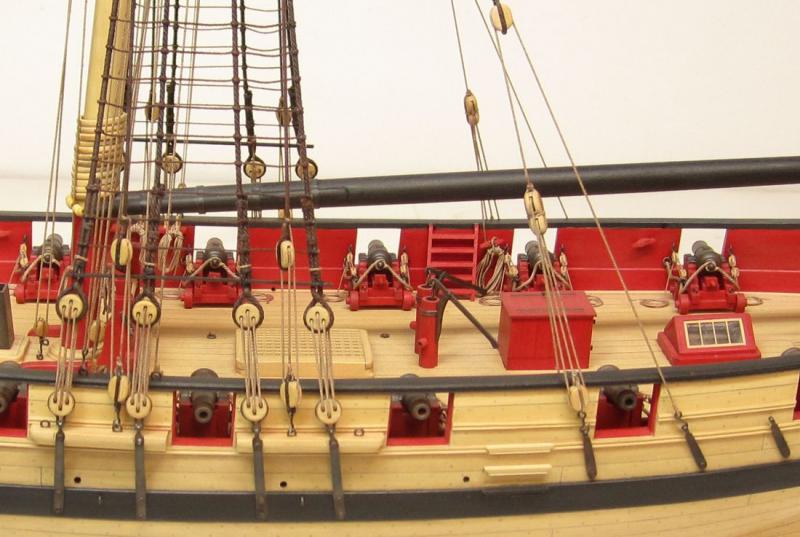
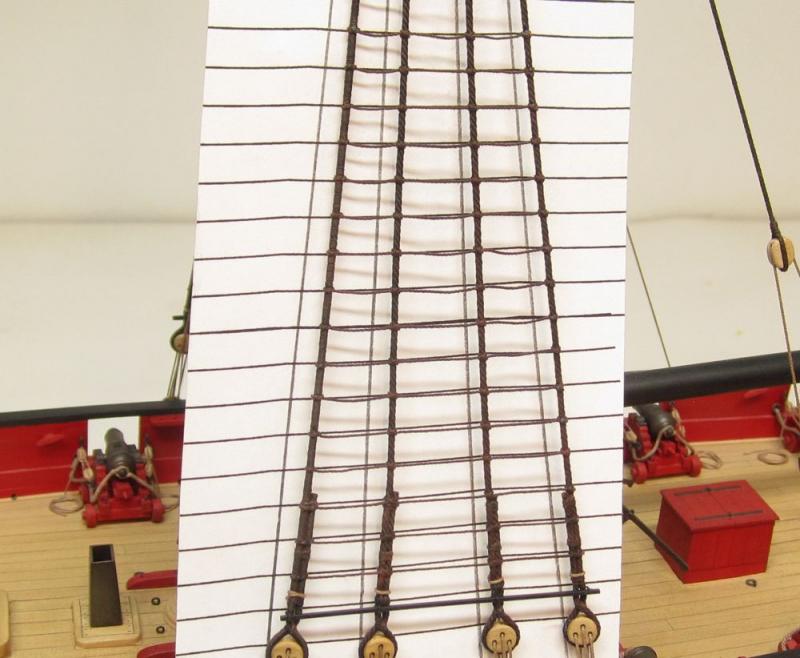
I added the sheer pole. It is lashed to the outside of the shrouds above the deadeyes. I painted it black but it could have been left natural also. It is just a 1/32" x 1/32" strip with the edges rounded off a bit. Then I started the ratlines with .012 rope. You dont want to go heavy with these. The outside shrouds are simple square knots. But I used clove hitches on each inside shrouds. I urge folks to use them rather than simply tie a knot on all four shrouds. The lines hang much better. Its easy to do. I used a card with both horizontal lines and lines to show the shrouds. Its not enough to just use horizontal lines. Having the shrouds drawn on the card will make it easier to watch your progress. You dont want to gradually pull the shrouds in. That hourglass shape for shrouds on a model is the kiss of death. This helps you keep them straight and not pull them in as you progress. I found it better to leave the ratlines a little loose rather than pull them tight and I try to shape them after its done. Only some watered down white glue was applied on the knots of the outer shrouds only. The two inner shrouds have no glue at all. I waited until a series of rows were complete so I could adjust them before adding the glue. You can also see that I finally cut off all the loose ends at the belaying points after re-tensioning the lines and I added rope coils to the belaying points. Now its time to start the ratlines on the starboard side. Yay for me. Merry Christmas everyone!!! Chuck

- 1,051 replies
-
- 37
-
-
- cheerful
- Syren Ship Model Company
- (and 1 more)
-
The longboat is not a beginner kit. Keep that in mind. Its rated as intermediate but I would consider no good for beginners. Dont let the price fool you. Less expensive doesnt equate to easy. Just smaller. I would say that planking the smaller vessels like the lonboat is in fact advanced rather than intermediate. Chuck