Chuck
-
Posts
9,719 -
Joined
-
Last visited
Content Type
Profiles
Forums
Gallery
Events
Everything posted by Chuck
-
 They are in central New Jersey. They dont have a physical store. He is a member of the a tree commission or conservany or something and gets a lot of his wood from those operations. For example, after Hurricane Sandy he collected a ton of Dogwood, Cherry, and Pear and apple...from fallen trees. Also has dealings with the local tree farmers and orchards. Chuck
 -
Pat That looks fantastic. It must be bitter sweet after working on her for so long. That is a fine looking model.
- 517 replies
-
- 3
-

-
- Endeavour
- Artesania Latina
- (and 1 more)
-
Please welcome and thank Wood Project Source for becoming a sponsor of Model Ship World. WPS supplies milled wood sheets and strips along with carving blocks for many hobbies. Their specialty is Alaskan Yellow Cedar Sheets and Carving Blocks. Other species like Yellow Heart, Purple heart, Butternut, Applewood, Dogwood and Mahogany are soon to follow. They also carry the staples for our hobby like Boxwood, Swiss Pear and others. They are just finishing up their new website so please have some patience with them as they continue adding more wood species and products to their online store. They have many more than I listed. I have personally bought from them many times as they are close by and I gotten to know the owner. I have bought some Yellow Cedar and Boxwood from them and will say that I am very happy with the quality of the wood. They have fantastic prices and they are the lowest I have seen for some wood sheets. Please join me in welcoming them as a sponsor of MSW. Visit their site and check them out. I am grateful they decided to become a sponsor and didnt hesitate after I asked them about it. www.woodprojectsource.com

- 31 replies
-
- 28
-
-
That looks great Ryland. well done!!
-
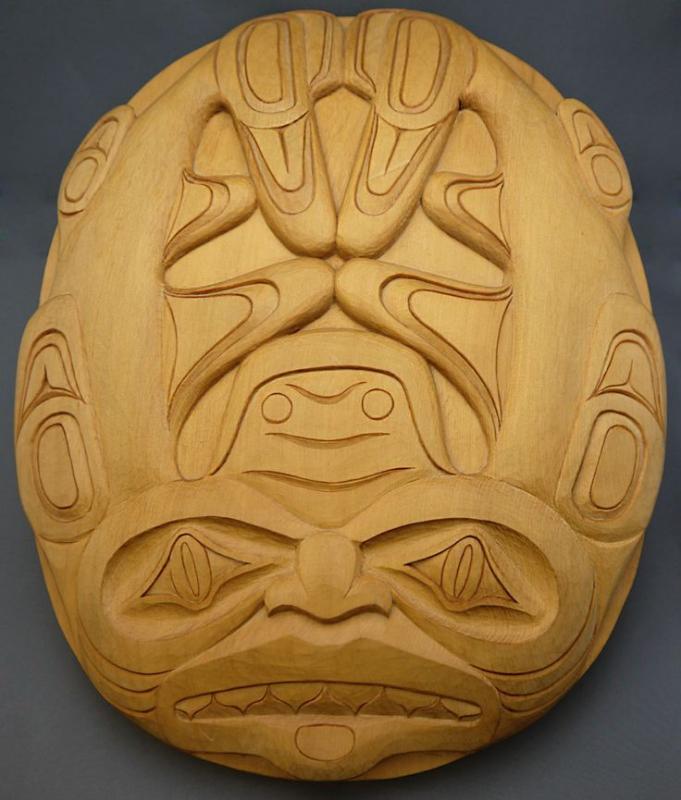
That is wonderful....but please lets keep the topic at hand focused on relief carving and decorative works. Thanks
-
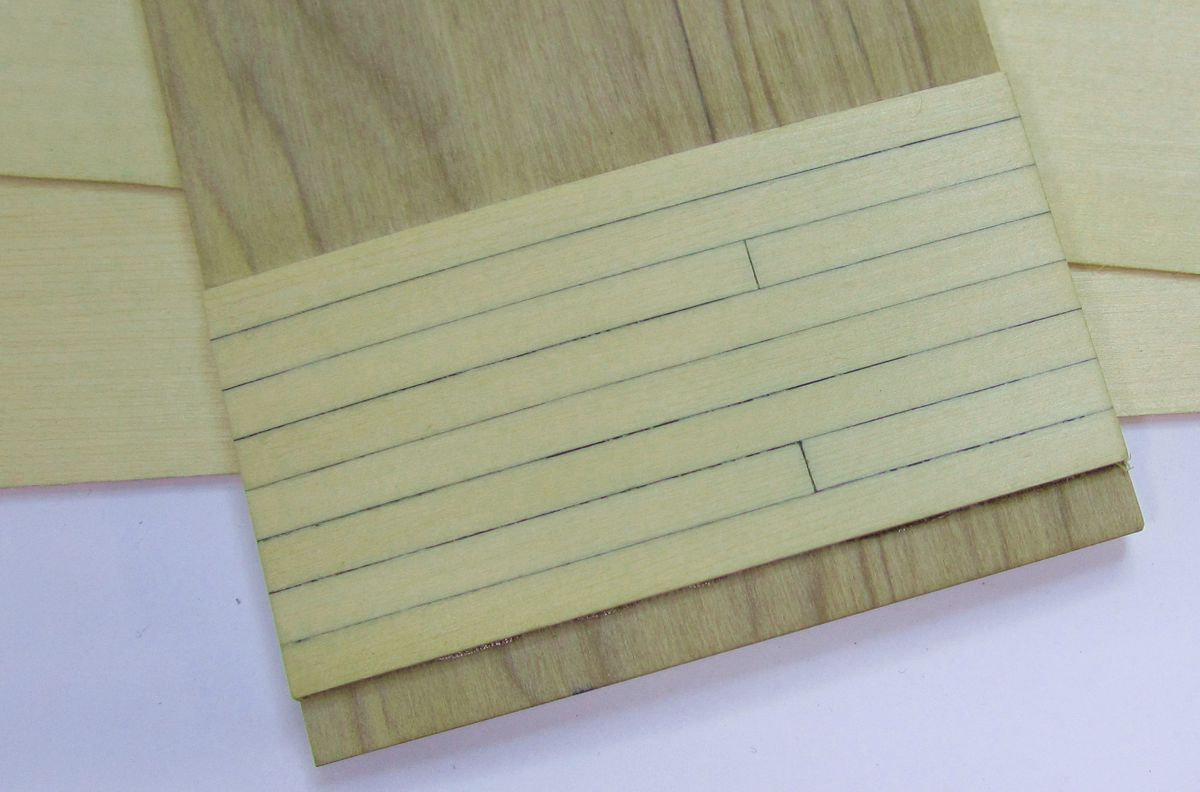
Heres a close up of my planking experiment with Yellow cedar. Very tight almost inconceivable grain. holds a sharp edge and no need to stain it. There are two 1/32" sheets below it that I will cut a few carving blanks from and give it a try. I just have to find some time to do so. I applied one coat of WOP. The seams were simulated with a #2 pencil. I like it. I havent tried making frames but it is certainly a great replacement for planking....either for boxwood or even holly. It will darken over time. ALSO....its about half the price of Boxwood and Holly (give or take). A bit more than Cherry or Maple but I think its a much better wood. It really does cut like butter with a #11 blade. Hopefully the same will be true when I carve it. Chuck

- 71 replies
-
- 15
-
-
So far so good. The wood is extremely flexible...I would compare it to holly but softer. I made a test piece of planking...let me take a photo of it. Back in a few minutes.
-
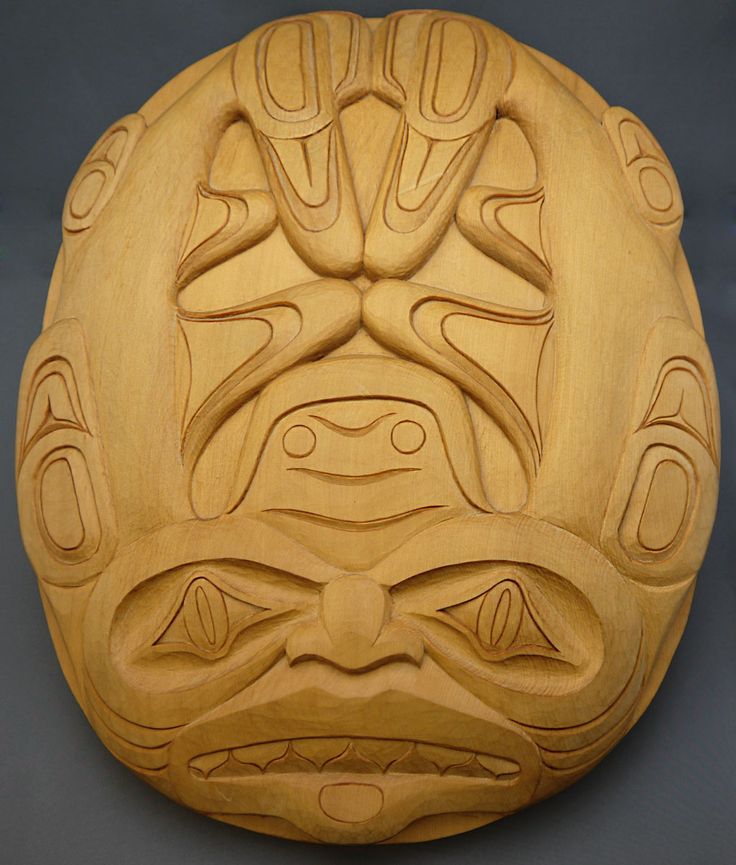
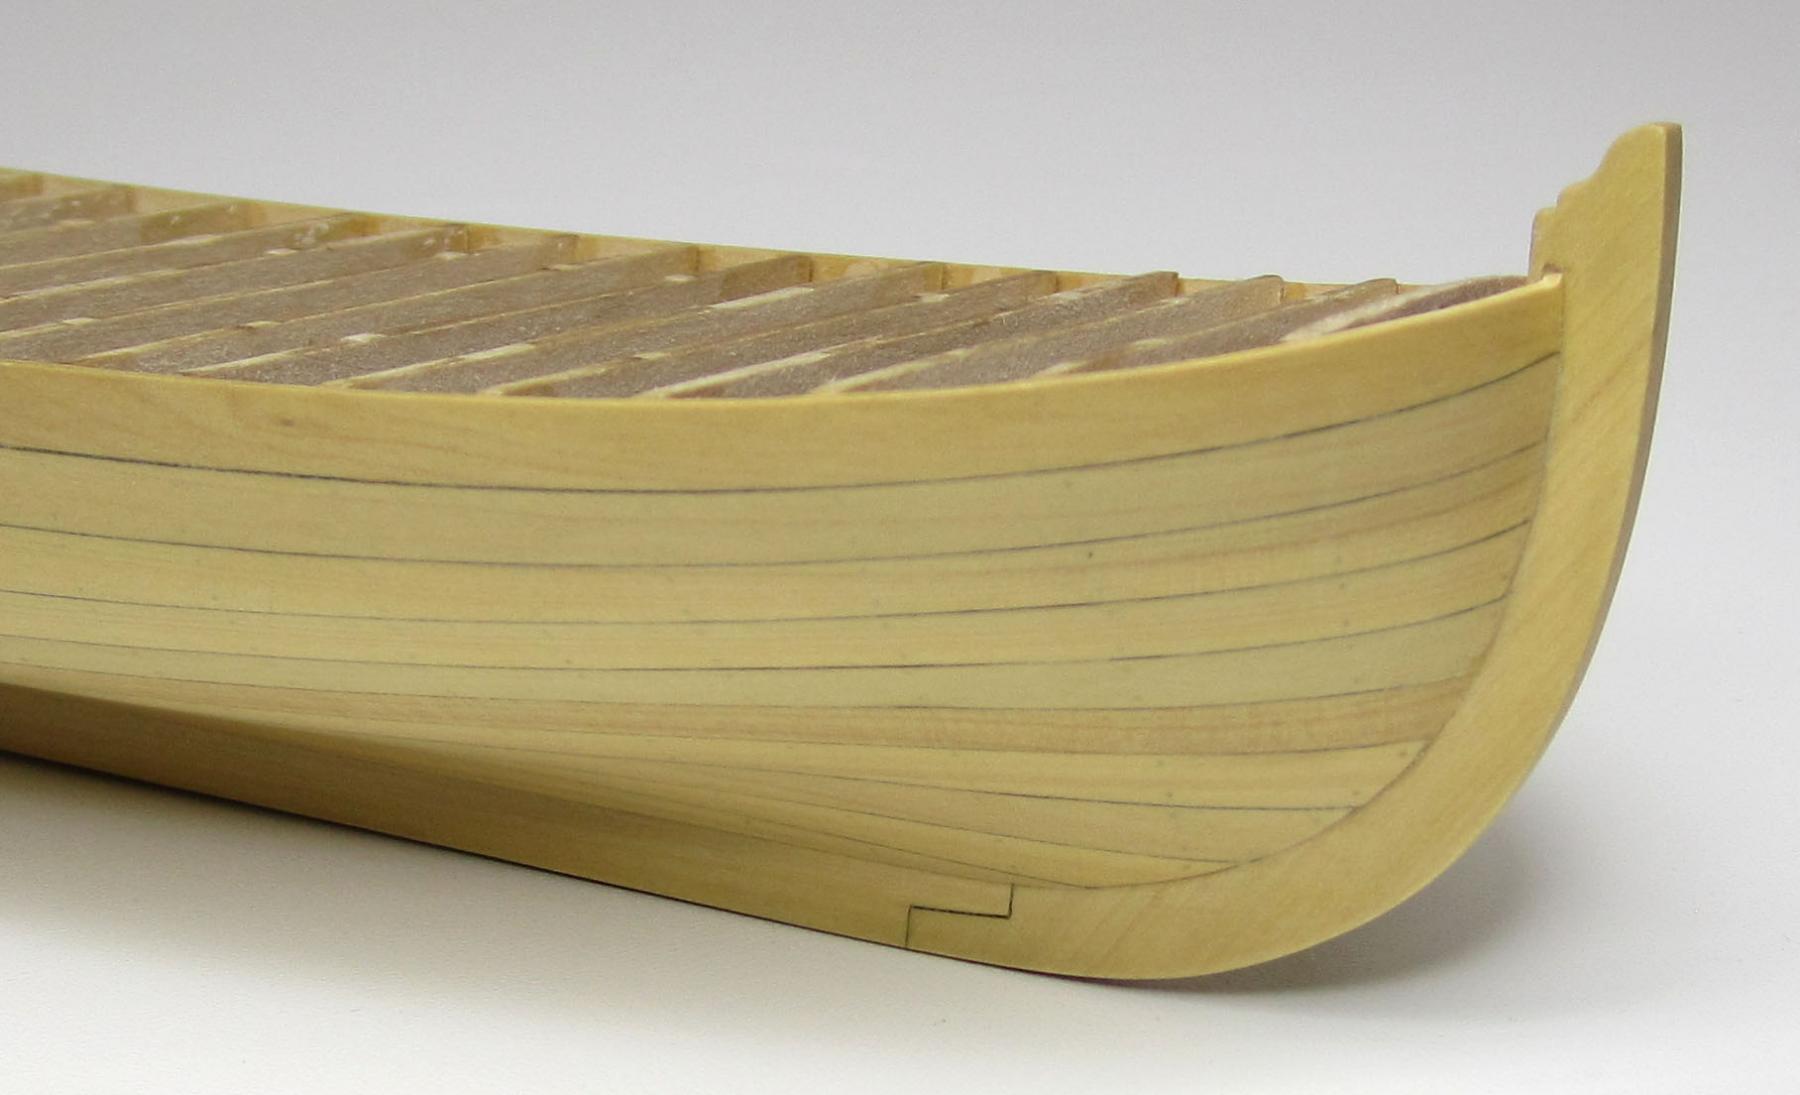
I am going to try and carve one of the blanks from Yellow Cedar. Its beautiful stuff and I just got some from my supplier. In case you want to try it check out his site. He also mills boxwood and a whhole bunch of other stuff. His prices are fantastic. So far I am more than happy with the quality and respoinsiveness of this guy. Hopefully once he gets his site up and running it will be even easier to place an order.n As far as I know, he is the only supplier of milled yellow cedar on the web. http://www.woodprojectsource.com/ Right now he doesnt have any items listed on his site as in stock because he is just finishing it up. It should be real soon because he never had a website before and I convinced him to build one. But you can contact him at any time because he is open for business. But thanks to some prodding from me he is starting off by adding the woods we prefer. But he mostly caters to local wood carvers which apparantly there are a lot of. Here is an example in Yellow Cedar of a carving and my test build of the barge. Compare with teh cherry version behind it. I really like it for what we do. Its softer than box but harder than basswood yet the color is beautiful and since I took this photo the color has deepened and it looks almost identical to boxwood although a bit more yellowish....but not an obnoxious yellow at all. Chuck

- 71 replies
-
- 16
-
-
I prefer a mounting board to prevent the small thin sections from breaking while carving. Everyone works differently. But sometimes it achieves the same result. Whatever is most comfortable I guess.
- 45 replies
-
- 18
-
-
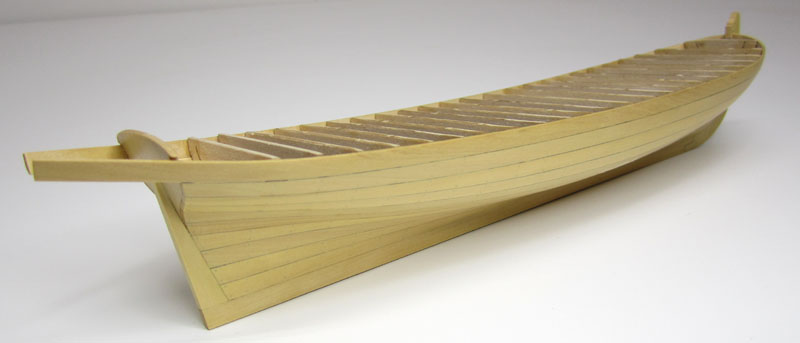
It looks pretty good. But dont forget to bevel the edges of each strake so they fit really snug up against the strakes already on the hull. You can just knock of the corner of the back edge for the most part.
- 129 replies
-
- 6
-
-
- finished
- model shipways
- (and 1 more)
-
In this instance its Windsor and Newton Galleria acrylic paint. Yes it is thinned down quite a bit and put on in many layers like watercolor. The color is Crimson straight out of the tube. I have used dozens of coats of very thin washes until it becomes opaque. That helps me keep the paint very flat and without paint brush stokes using a round brush. Chuck
- 1,051 replies
-
- 13
-
-
- cheerful
- Syren Ship Model Company
- (and 1 more)
-
What is a stanley blade??? Pictures maybe
-
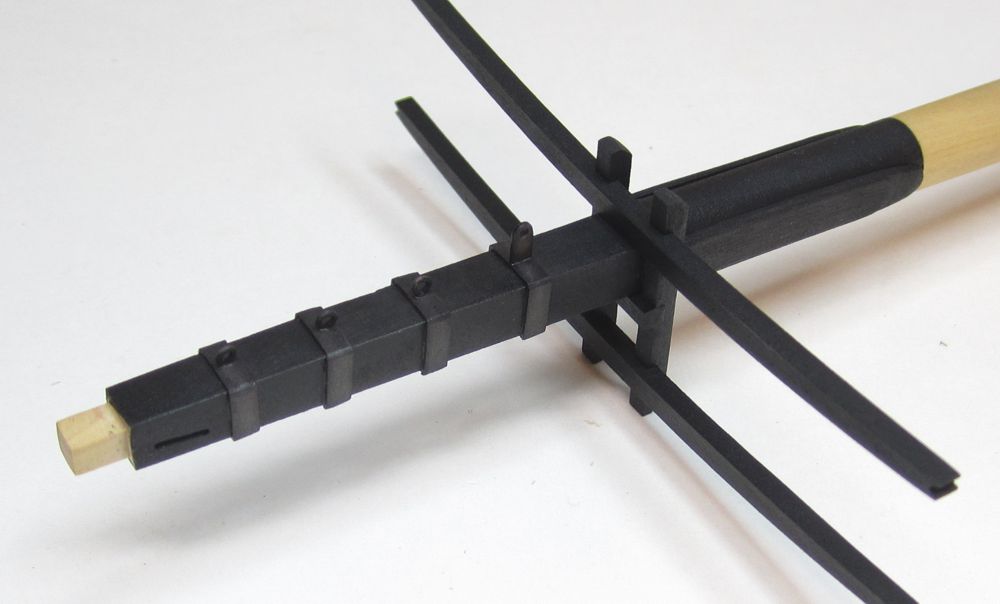
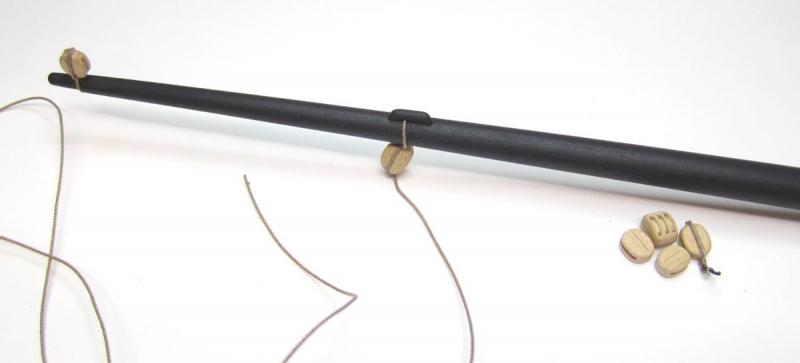
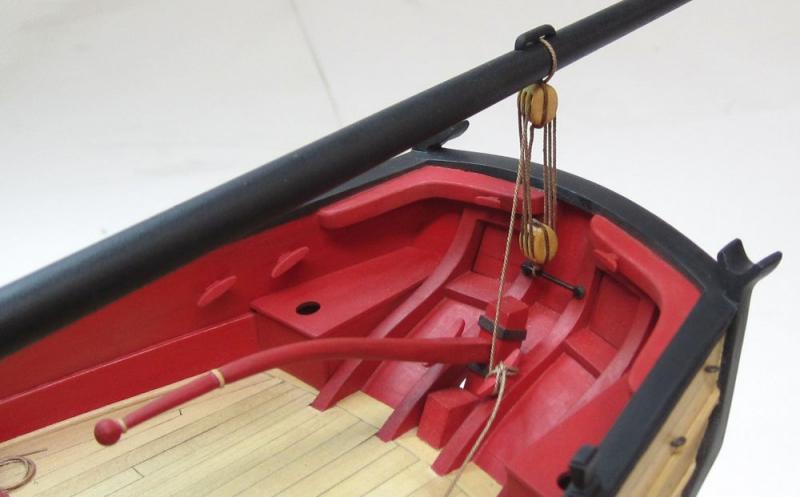
Michael, I am using Grumbacher acrylic paints in a tube. Specifically Mars Black. I finished the boom today and its all rigged. It was shaped the same way as the mast. I started with square stock and used the 7/10/7 ratio to convert to an octagon. Then I used my drill to round it off and put the taper on it. The jaws were added after I flattened the sides to accept them. The blocks were prepared in advance, meaning some were added to the boom ahead of time. Other blocks were secured to the mast and horse for sheets. Then it was just a matter of rigging it in place. I have only tightened the ropes around the cleats without any glue. I will leave it this way until after the standing rigging is completed in case I have to re-tension the lines. But from the way it looks I think it will be OK. For the trucks on the jaws to secure the boom to the mast, I used what I found in the shop. I had some boxwood beads laying around that were the perfect size....I might even have enough left over to give the remainder to Mike for his model. Here are some pics. Next up will be the gaff.
- 1,051 replies
-
- 46
-
-
- cheerful
- Syren Ship Model Company
- (and 1 more)
-
I have a couple of those...just havent tried them yet. I am still hoping we will get some folks that will try shaping these pieces with a rotaary tool....it would be nice to have a comparison. Also You guys are free to carve any design and start a log here as long as it is for ship model related items. Carving with any tool is very different when you are working at these scales and it is a very different experience than carving full size or even double the size of these blanks. I know we have a lot of traditional wood carvers out there and once you try carving something as small as these you will see how differently you must approach it. So feel free to carve anything you like....just no folk art old men with a cane....that stuff is not relevant to carving items meant for a ship model at 3/16" or even a 1/4" scale. But if you have a trailboard or another design you want to carve for your ship model...feel free to start a log and get some input from the others. I am very happy to see more logs being started...thanks for the interest. I am also thinking about starting another area on sculpting using polymer clay for those who wish to try that medium to make more complex designs or even the same ones we are doing here. Just have to find the time to start that one up. And I will do so if you guys think there is sufficient interest in it. I am trying to develop this area more so it covers many aspects for creating the decorative elements for a ship model.....whether they are carved or sculpted. Chuck
-
I plan to...hopefully the gaff and boom will be rigged by then.
- 452 replies
-
- 4
-
-
- cheerful
- Syren Ship Model Company
- (and 1 more)
-
Mike That is looking very nice. Cant wait to see it in person. Chuck
- 452 replies
-
- 4
-
-
- cheerful
- Syren Ship Model Company
- (and 1 more)
-
Make a card template or paper version first. Then after it fits....trace it onto a strip or sheet and cut it out.
- 129 replies
-
- 8
-
-
- finished
- model shipways
- (and 1 more)
-
Thats looking great....the garboard ends just a hair past the scarf joint. I hope this picture helps.


- 129 replies
-
- 8
-
-
- finished
- model shipways
- (and 1 more)
-
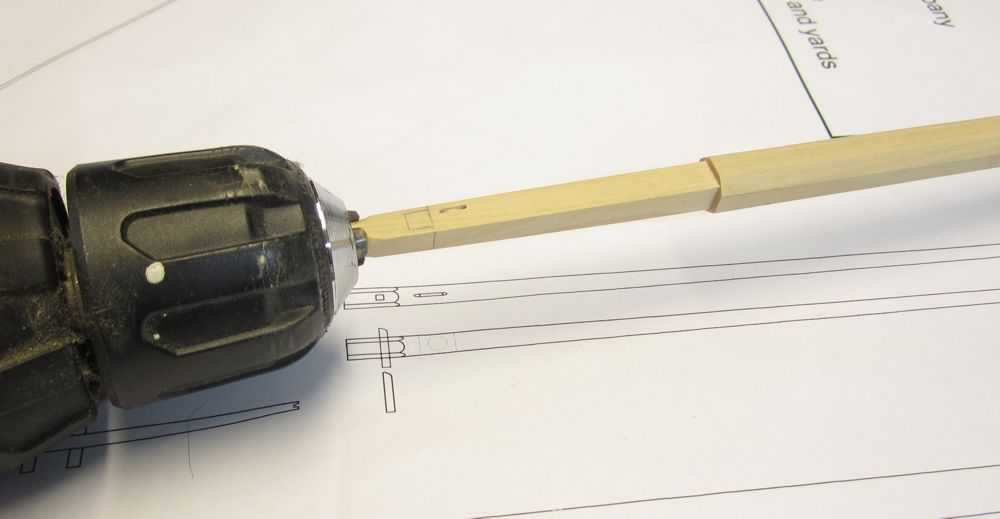
One hand holding the drill.....the other has sand paper curled up and thats the hand you use to stabilize it. As you are running the folded paper back and forth you are keeping the stick from vibrating. Its much easier to do than it is to visualize.
- 1,051 replies
-
- 5
-
-
- cheerful
- Syren Ship Model Company
- (and 1 more)
-
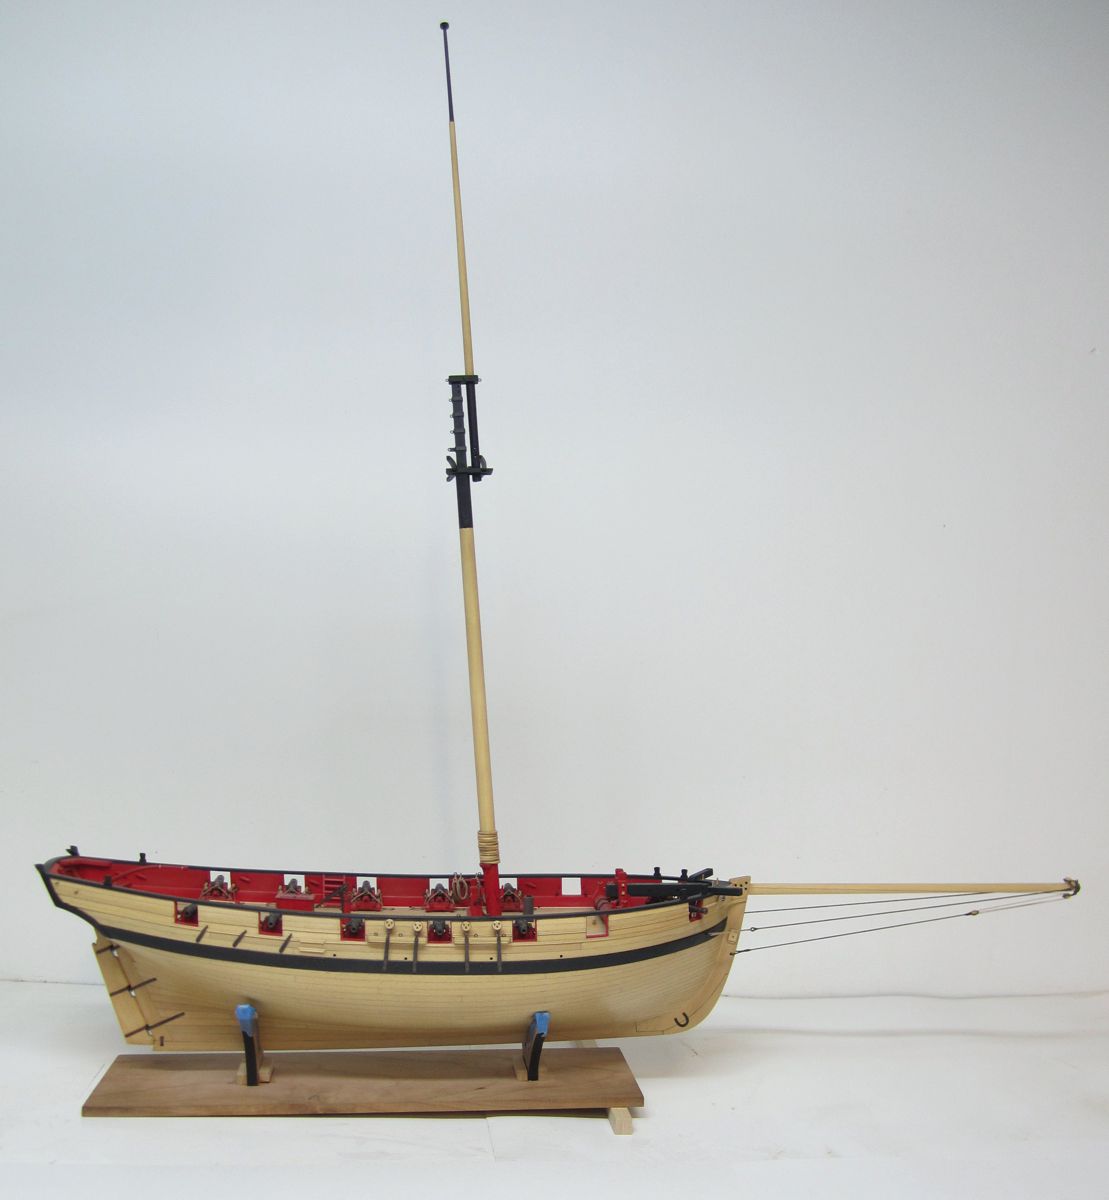
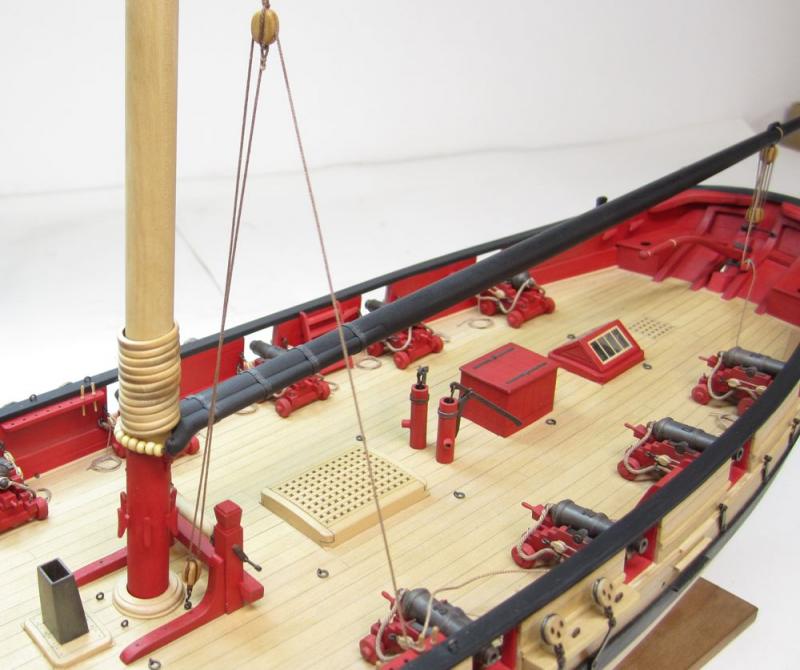
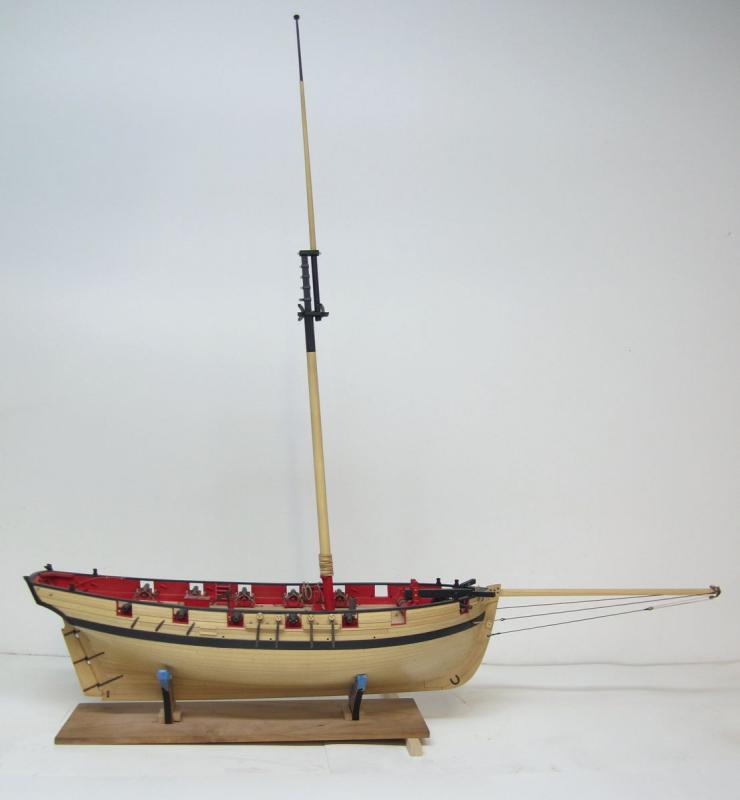
Thank You so much guys. Today I finished the topmast. Its all painted and the entire mast is now completed. Rather than start on the standing rigging with the pendants, shrouds and stays....I will be building the boom and gaff first. On this model it will be much easier to rig the finished gaff and boom first before tackling the shrouds and stays. This way I wont have to reach behind the standing rigging to rig them. Especially the where the rigging is close to the lower mast at deck level.

- 1,051 replies
-
- 36
-
-
- cheerful
- Syren Ship Model Company
- (and 1 more)
-
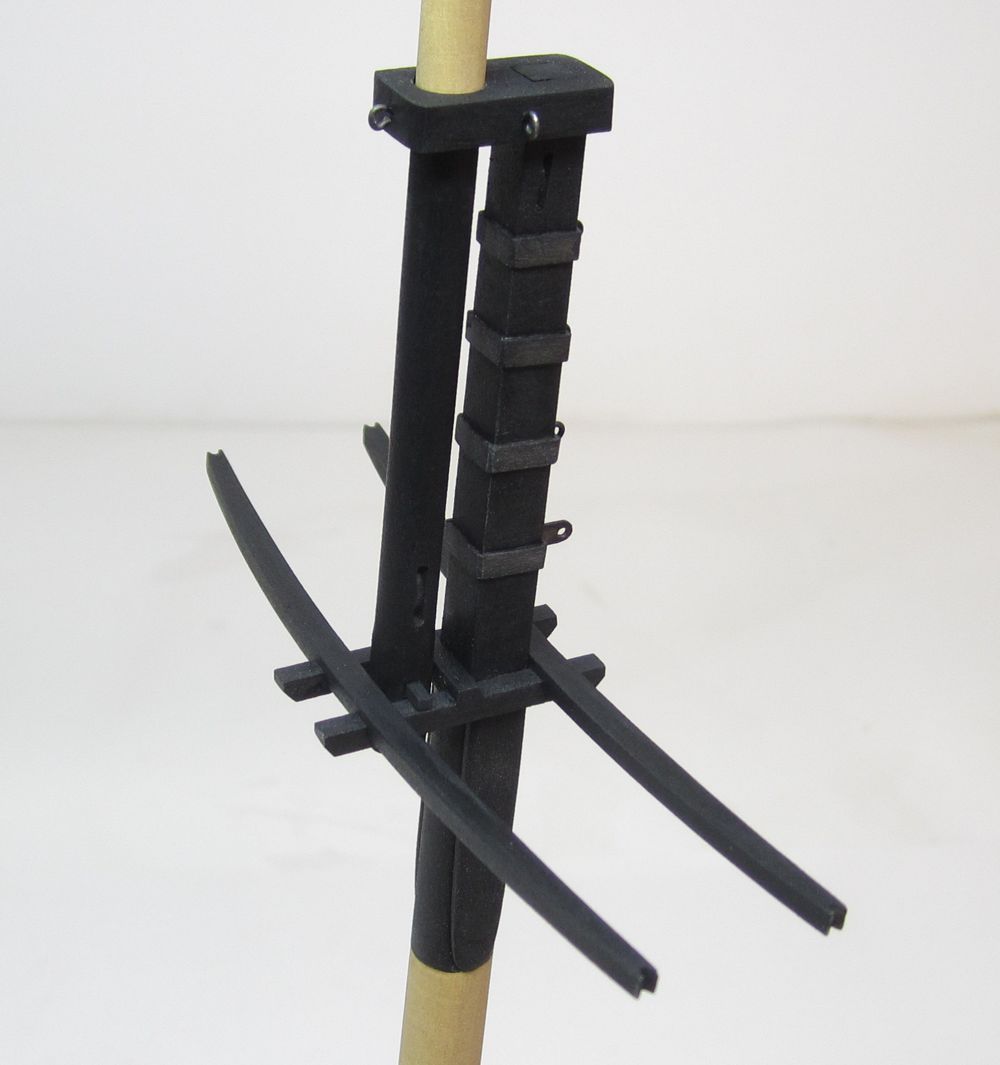
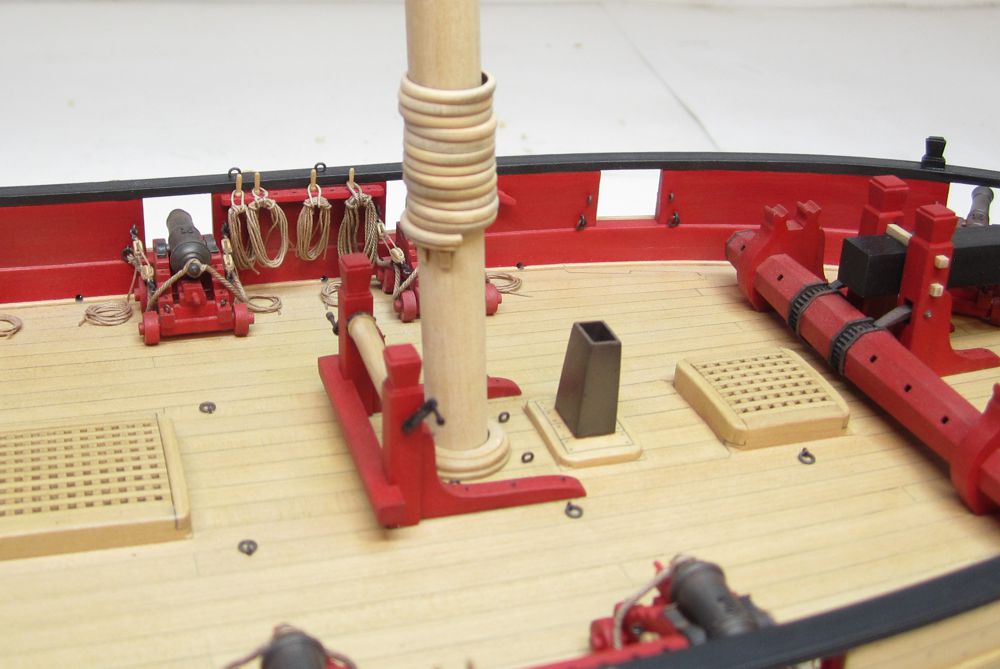
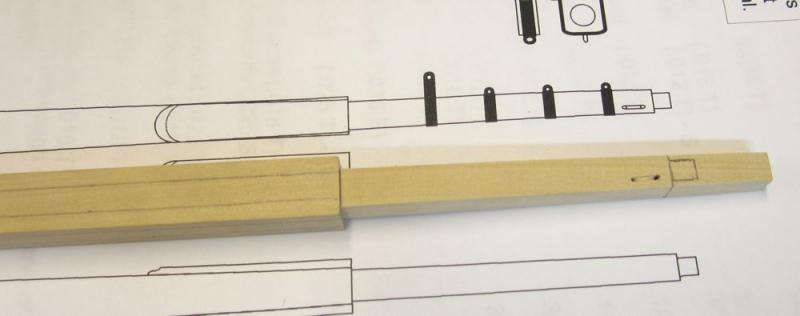
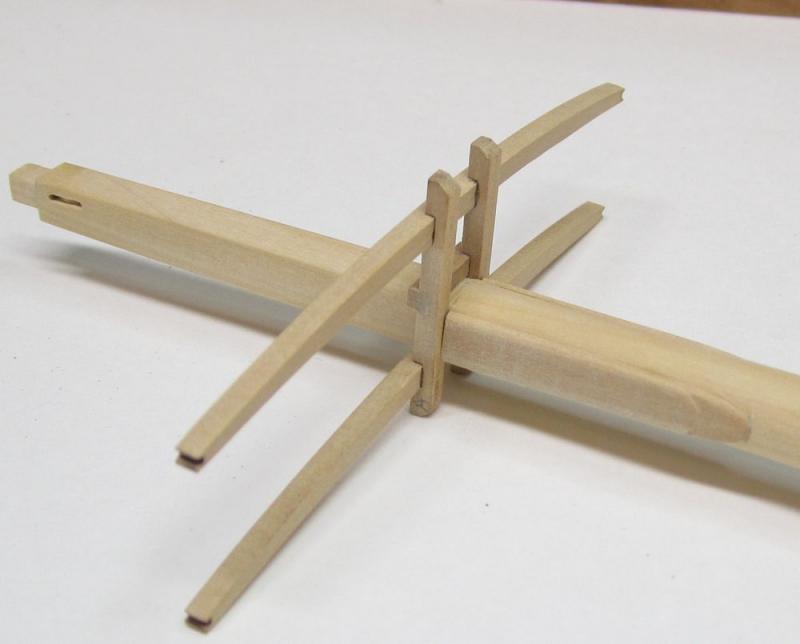
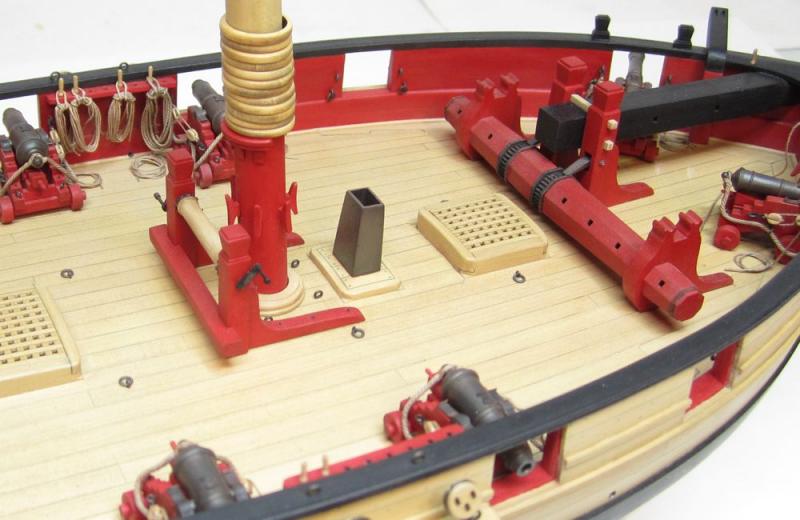
I figured the same Dan. The lower mast has been completed and I am now working on the topmast. To begin, I started with square boxwood stock. Then I squared up and tapered the top according to the plans using some chisels and sanding sticks. But before doing that I drilled the holes for the sheave as you can see. Once the top portion was squared off and tapered I finished up the sheave by rounding it off and cleaning it up. You can also see the 7/10/7 ratio applied to the lower mast. I am about to chisel it to an octagon in preparation for rounding it off. The entire mast was left a bit long so I have some extra to chock it in my hand drill. It was chocked and rounded off with some sandpaper. I also carefull added the taper to the rounded portion while sanding it. Then the boom rest was fabricated from a washer of boxwood 3/32" thick. Just like the mast coat it was shaped with its profile using needle files and sanding sticks. It was cut in half and then the small chocks were added around the perimeter after it was glued into position. I still have to add the cleats around the base of the lower mast as well. I made sure to make the mast hoops using the mini-kits from Syren and slip those on the mast before adding the trestle tree permanently. I was afraid that I would forget but I didnt. The trees were crafted from boxwood using the plans as a guide. It was pretty straight forward except for the fact that it must be angled properly on the mast. Once the cheeks were shaped and glued to the mast the proper angle for the trees was filed into the mast. The mast is angled or raked aft and the trees must remain parallel to the deck. So considerable time was used to establish the correct angle. Finally the cleats were added and the lower portion painted red. Then the masthead area from the bottom of the cheeks upwards was painted black. That was done after adding the mast bands and eyebolts. These will be used for the boom and gaff rigging later.


- 1,051 replies
-
- 37
-
-
- cheerful
- Syren Ship Model Company
- (and 1 more)
-
Great to see you in the shop Ryland....hope you are doing well. Enjoy the carving. One thing I did was draw in on the blank where all of my stop cuts were going to go before I started carving.