


Chuck
-
Posts
9,703 -
Joined
-
Last visited
Content Type
Profiles
Forums
Gallery
Events
Everything posted by Chuck
-

2015 NRG Conference Update - MYSTIC
Chuck replied to Chuck's topic in NAUTICAL RESEARCH GUILD - News & Information
Those are the speakers on Saturday,,,,,,Friday we have worktable tech sessions. Speakers for symposium are Melbourne Smith – Naval Architect Paul O’Pecko – Mystic Seaport Archivist Douglas Brooks – Shipwright & Expert on Japanese Small Boats Grant Walker - Curator of Rogers collection Annapolis -
2015 NRG Conference Update - MYSTIC
Chuck replied to Chuck's topic in NAUTICAL RESEARCH GUILD - News & Information
The registration form is now online. Sign up soon and I look forward to seeing all of you there... CLICK HERE!!! -
Cutter Cheerful 1806 by Maury S - 1:48 - POB
Chuck replied to Maury S's topic in - Build logs for subjects built 1801 - 1850
Nicely done so far. -
Thats what I use...I use Crimson right from the tube usually but sometimes I will add some raw sienna to tone it down on the brown side a bit. Chuck
- 452 replies
-
- 2
-

-
- cheerful
- Syren Ship Model Company
- (and 1 more)
-
Cutter Cheerful 1806 by Maury S - 1:48 - POB
Chuck replied to Maury S's topic in - Build logs for subjects built 1801 - 1850
Looking good Maury -
Even though I am painting the inboard of the stern. They will show. So you might want to use another material other than ply....BUT as I said, they will painted red. Chuck
- 39 replies
-
- 1
-
-
- cheerful
- Syren Ship Model Company
- (and 1 more)
-
Cutter Cheerful 1806 by Maury S - 1:48 - POB
Chuck replied to Maury S's topic in - Build logs for subjects built 1801 - 1850
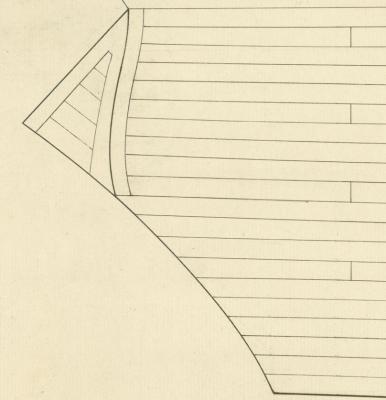
That looks very good..... The square tuck planks are 100% vertical. See how they follow the stern post.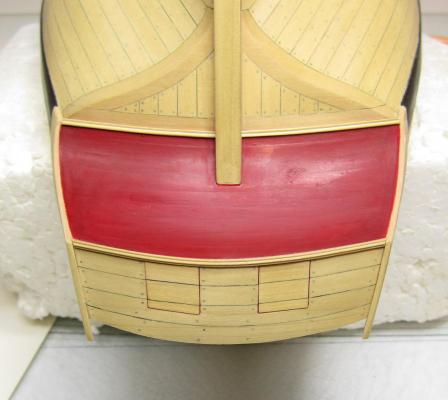
-
Most Chinese machines may of course say that they are 40 watt machines. In reality they cut with much less power (folks say around 25 - 30 watt who have tested them). You might be able to cut basswood up to 3/16" thick. But 1/4" will be a real stretch and tax the machine. Forget about hardwoods. The lenses they use are also sub par and dont focus the laser enough. The beam will not be using the power to its fullest. The lens on a good machine will cost you $80 plus dollars alone. It can focus the cone of the laser so its a thin pinpoint. The chinese machines use cheap lenses from cheap material and they pit and warp. This means a huge and wide kerf for the cut even on thin pieces of wood with a very angular cut. Enough about the laser power....what about mechanics. The laser travels on tracks in the x and y axis. These are belt driven/ I have seen some poorly made Chinese unites that dont travel with a smooth motion. They jerk around and therefore dont produce smooth cut lines. So also think about the mechanics. On almost every laser cutting forum like Sawmillcreek...people who buy these machines regret they ever did. They are not very good at all. And you cant return them.... Check out the forums for laser cutters and do searches for entry level machines...just read the comments. Its very telling. Best to buy an American machine made from the bones of a Chinese unit where everything has been upgraded. These are good places and companies to research. All have their pros and cons...stay away from fullspectrum lasers just as I would recommend stayng away from the MM laser. Boss Laser Rabbit Laser USA Lightobject Automation Technology Inc. If you have money to burn...Epilog is the absolute best and three times as costly.
-
It might be harder to line it up properly with the bulkheads on. The keel has to be centered with equal space on both sides to form the rabbet. But other than that it doesnt really matter.
-
Looks good. At this stage a lot of builders glued little pieces across the top of the bulheads to make the whole thing more rigid for planking. Little pieces of 1/8" 1 1/32" strips would do the trick spanning across from one bulkhead to another. Take a look at some of the other buuild logs to see how they did that. Chuck
- 100 replies
-
- 3
-
-
- model shipways
- 18th century longboat
- (and 1 more)
-
Thats looking very good. And yes. I made all of the needed adjustments so the bulkheads would fit together nicely. Its looking just as it should at this stage. Chuck
- 452 replies
-
- 1
-
-
- cheerful
- Syren Ship Model Company
- (and 1 more)
-
Thats the right attitude....just remember to have fun!!!
- 100 replies
-
- 2
-
-
- model shipways
- 18th century longboat
- (and 1 more)
-
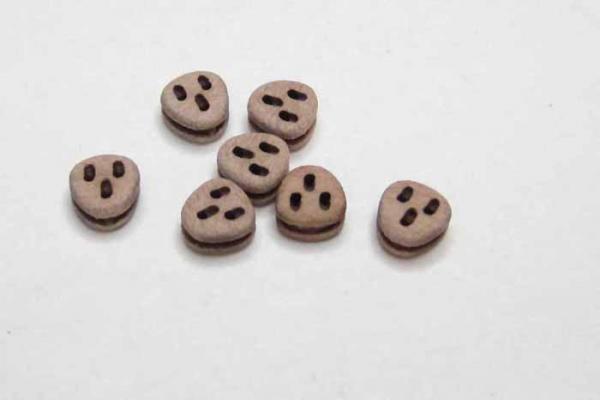
I just laser cut some for a customer..... I can make as small as 3mm. Let me know if you need them. These are 4mm. They will be kits in three layers and you will need to assemble them and sand them. Chuck
-
That looks quite good I would keep some blue painters tape on the bottom of the keel to protect it from getting nicked and scratched once the bulkheads are in position.
- 452 replies
-
- 7
-
-
- cheerful
- Syren Ship Model Company
- (and 1 more)
-
Great space Chris....Set up a card table and break out the tools!!!!
- 290 replies
-
- 1
-
-
- confederacy
- frigate
- (and 1 more)
-
2015 NRG Conference Update - MYSTIC
Chuck replied to Chuck's topic in NAUTICAL RESEARCH GUILD - News & Information
Registration is coming soon.....just dotting a few eyes and crossing a few tees........... -
* 2015 Nautical Research Conference * Fellow Guild Members, CONFERENCE 2015 - SAVE THE DATES The 2015 Conference will be in Mystic, Ct. on Thursday October 22 thru Saturday October 24. We are preparing special tours on Thursday not offered to the general public at the Mystic Seaport. The tours will be: 1) Inside the Archives/Library 2) Model Collection - models not on public display 3) Small Craft Collection 4) Inside the Shipyard Each tour will be approximately one hour and will be conducted through out the day in a round-robin format such that about 100-120 members can take part in groups of 25-30. Tour times starting at 9am and ending around 4:30pm with an allowance for lunch on your own. As the tour space is limited, we urge that spouses who are not interested in the special tours not to sign up so that those interested are not closed out. There is plenty to do elsewhere in the Seaport. The special tour arrangements will pretty much fill the day Thursday, so if you wish to tour the rest of the Mystic Seaport attractions available to the public you will want to plan this for the Wednesday before the conference or on Sunday following the conference. All who register for the conference will receive free admission to the Mystic Seaport Wednesday through Sunday. There are plenty of things to do and see in Mystic including the Aquarium and Mystic Villages located right across the street from the Hilton. Even though these attractions are within walking distance, others such as the Seaport will require a car. It's just a mile down the road and the Hotel does have a shuttle but renting a car for your stay would allow you to visit so much more. You will need to get yourself to the Seaport for the tours on Thursday. Many will have cars but you can take the shuttle. Its best to rent a car however. There are two Casinos within 30 minutes drive of the hotel along with the New London submarine base. Not to mention many area restaurants including the Famous Mystic Pizza. Click here to download a list of Mystic area attractions. The Mystic Hilton will be the conference hotel and the location for the Modeler's Tech Sessions on Friday and the General Sessions on Saturday as well as the Model Display and Vendor Room. Registration information and details on the speakers, topics and tech sessions will be posted very soon. Below is a partial list of speakers - several are yet to provide final confirmation: Melbourne Smith - Naval Architect Paul O'Pecko - Mystic Seaport Archivist Douglas Brooks - Expert on Japanese Small Boats David Antscherl Grant Walker - Curator / Rogers Collection Steve Wheeler Chuck Passaro Kurt Van Dahm Nic Damuck A list of the Vendors that will be attending the show: Syren Ship Model Co. - Ship model Blocks, Rope and fittings Sea Fever Books - Nautical books - new and used Crown Timberyard - Milling services and wood for Ship Models Bluejacket Shipcrafters -Ship model kits and supplies Byrnes Model Machines - Ship Model Power Tools SeaWatch Books - Nautical history and Ship model books Ship Ahoy Models and Miniatures - Models, canons and tools Don't Forget to bring your Ship Models to the Conference. Displaying your ship models is a very important and enjoyable part of the conference. Everyone looks forward to it. If you intend to bring some please fill out the section of the registration form with all of the details. Room will be limited so please register your models early. Once the tables fill up we can't accept any more for display. Mystic Hilton Hotel Information 20 Coogan Boulevard, Mystic Connecticut 06355 Call hotel direct to make reservations: 1-860-572-0731 (This skips all the prerecorded Hilton choices on the national reservation line). You must use the GROUP CODE - NRG14 to get the special $145.00 room rate if you reserve rooms on the Hilton Web site. http://www3.hilton.com/en/hotels/connecticut/hilton-mystic-MYSMHHF/index.html AIRPORTS Hartford, CT and Providence, RI are the major airports serving Mystic with each being 50 - 60 miles away. Neither airport has shuttle service to Mystic. A cab/car service or rental car will be needed to get to Mystic from either airport. Thank You and Happy Modeling!!! The NRG Board of Directors info@thenauticalreserachguild.org
-
Almost all cutters of the period I have seen or even the the primary source documentation have two pair of braces. They use forward and aft braces as can be clearly seen on this model.
- 42 replies
-
- 6
-
-
- Cutter
- 18th Century
- (and 4 more)
-
wonderful stuff. can you add these to our gallery of contemporary models please? each model should have its own album. thank you for sharing them
- 42 replies
-
- 5
-
-
- Cutter
- 18th Century
- (and 4 more)
-
No update but I did want to let folks know I completed the last chapter of the monograph. It is uploaded on my website here for folks building it along with me. http://www.syrenshipmodelcompany.com/revenue-cutter-cheerful-1806.php This has been a busy few weeks but I am now up to date with all my writing and have fully stocked my parts inventory. After this weekend's joint clubs show and conference (new london CT) I will have plenty of time to work on the model. I am so looking forward to next week and will begin working on the inside bulwarks as soon I get back. I can't believe I am caught up with everything!!! Now its time for some fun
- 1,051 replies
-
- 13
-
-
- cheerful
- Syren Ship Model Company
- (and 1 more)
-
You are so welcome!!! Thank you for the kind words.
-
Nope....Basically measure from the top of the cap rail of the bulwarks down to the wales.....Then transfer that measurement to you model. Chuck
- 1,051 replies
-
- 2
-
-
- cheerful
- Syren Ship Model Company
- (and 1 more)
-
Thanks Measure from the top of sheer down. Then using a similar device you would mark a waterline with......transfer that measurement to the model. Chuck
- 1,051 replies
-
- 4
-
-
- cheerful
- Syren Ship Model Company
- (and 1 more)
-
I wouldnt have expected anything different....from Hobbymill. Its lovely to have as good a resource available now that he is no longer around.
-
I dont own a drum sander. Many folks dont. I dont have a bandsaw either. Many folks dont. I also find my most precious item these days is time. Like with other items and kit products available, the last thing I want to do is buy something only to have to fix it so it meets my standards. As a guy who would rather spend his limited time on the fun stuff, I am just happy there is one wood supplier I can count on that supplies me with a product I dont have spend hours making usable. OR spend extra money buying the tools to do so. I see nothing wrong with being extra happy about one thing that is actually supplied as advertised. So few things are these days. There arent many places like this and I am very fortunate to have the resource. Literally....Syren Ship Model Company would be out of business if I had to spend the time needed to re-thickness the amount of wood I use. I am sure everyone can mill their own if they wanted to and if they had the tools. I just dont want to. Thank you Jason for making my life a whole lot easier. And the same goes for countless other model builders. I ve got nothing but love for ya baby!!! It made the difference between me being in business and out of business.
- 35 replies
-
- 18
-


