Chuck
-
Posts
9,703 -
Joined
-
Last visited
Content Type
Profiles
Forums
Gallery
Events
Everything posted by Chuck
-
 I would like to think so...by leaps and bounds. But you should get an impartial opinion from the many customers who use my blocks and rope.
- 162 replies
-
- 3
-

-
- 18th century longboat
- model shipways
- (and 1 more)
-
Of course you can...Just take the parts list and see how many you will need. I cant break down a package for so few blocks...so you will have to buy a complete package of each size. Otherwise I would only be selling 15 blocks of various sizes. I am sure you will find use for the extras on future models. Chuck
- 162 replies
-
- 2
-
-
- 18th century longboat
- model shipways
- (and 1 more)
-
That looks very good. You will be moving ahead to the fun stuff very soon. Almost done with the planking.
- 222 replies
-
- 6
-
-
- 18th century longboat
- model shipways
- (and 2 more)
-
Dont overthink it......it looks perfect. I think the planking will go just fine. Its about what I had too more or less. That little bit wont matter and it could be so many factors. Press on with the planking. Chuck
- 452 replies
-
- 9
-
-
- cheerful
- Syren Ship Model Company
- (and 1 more)
-
Thanks guys...its nice to be back working on her. The deck planking is the last major project on the model. I have to start with making the coamings and gratings first. Chuck
- 1,051 replies
-
- 10
-
-
- cheerful
- Syren Ship Model Company
- (and 1 more)
-
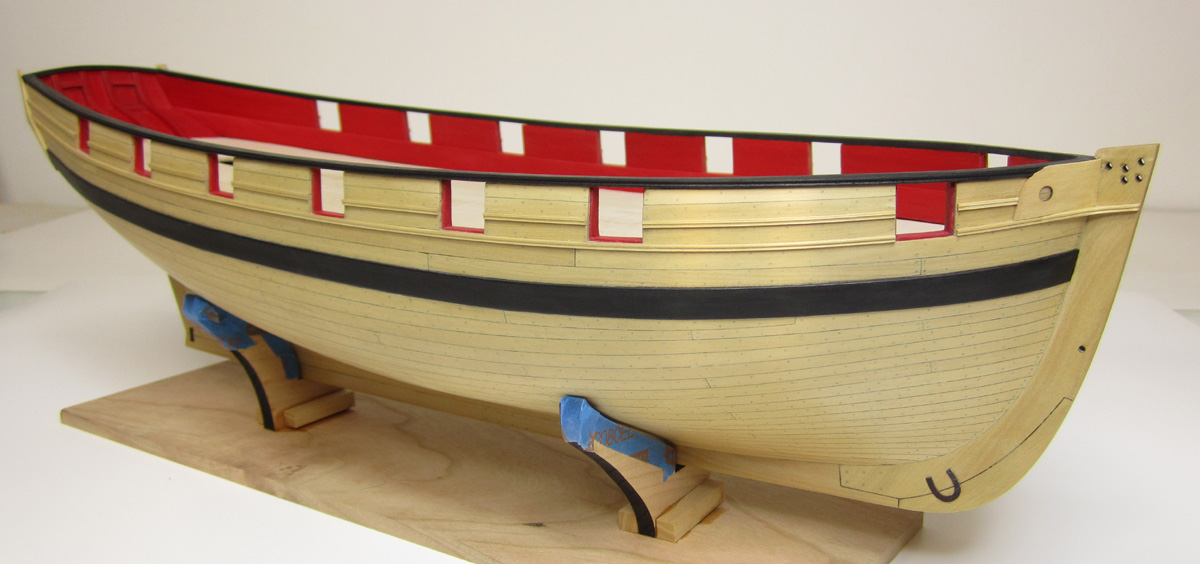
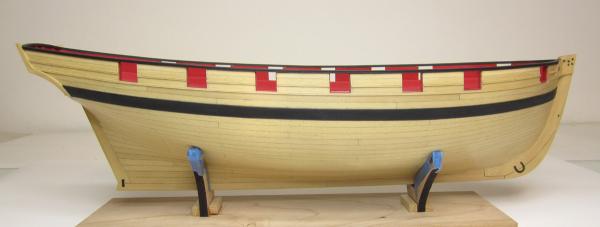
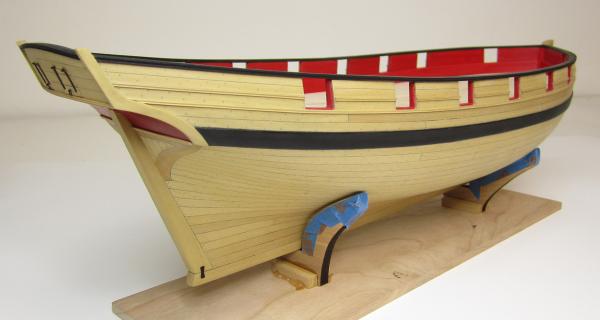
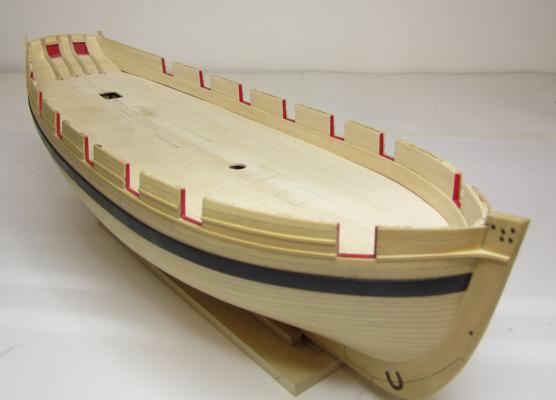
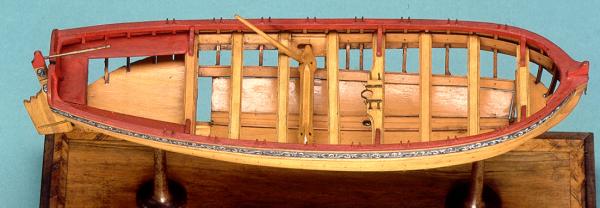
After planking the bulwarks I painted it red. The finished bulwarks were 5/32" thick. Maybe slightly thinner. Then it was time to add the caprail. It will be added in two pieces. First the main rail which is 1/16" thick. This was sanded flush both inboard and outboard. Another strip will eventually be placed outboard as a fancy molding. It is scraped like the others and is 1/6" x 1/32". But it wasnt added yet. First I had to create the hawse hole plates....which are essentially 1/32" thick pieces with the holes ut for the hawse holes and the bowsprit. This sits flush with the top of the caprail so I had to add it first before I could add the fancy molding strip along the caprail outboard. I didnt drill the hawse holes yet. This will be done next. But the hawse plates in position makes it easy to find their locations. So that will be done in a day or two. Lastly I added that fancy molding strip outboard for the cap rail which stands proud of the hull planking and finishes it off. This is where I am to date and after drilling the hawse holes and hole for the bowsprit I will make preparations to start planking the deck. Its getting there... I am contemplating painting the hawse plates and the stem above the ear molding black.....along with the fashion pieces at the stern. But I have time to decide that. So I will live with it as it is shown for a while before I commit to it. Maybe after I drill and file the holes for the bowsprit and such...we shall see.


- 1,051 replies
-
- 43
-
-
- cheerful
- Syren Ship Model Company
- (and 1 more)
-
Model Shipways didnt have the fractional size strip available and so it was decided to go with the 1/8" wide strips. I mentioned this a few times in other logs. BUT yes the plans are correct in every respect...always follow the plans... When I designed the kit I actually used 5/32" wide strips for thwarts. It matched the plans. But just as MS swapped out the hull planking for a different size recently they did the same with the the thwart material because they dont have 5/32" wide strips anymore. This was done a while ago but they actually had the thought to change my dimensions in the instructions. Something they forgot to do with the recent change for the hull planking. My guess is that as time goes by more changes will be made on the MFG side without addressing the model ramifications.....yes it can get confusing..but always follow the plans. It is something that they cant change too easily. Chuck

- 335 replies
-
- 4
-
-
- 18th century longboat
- Finished
- (and 1 more)
-
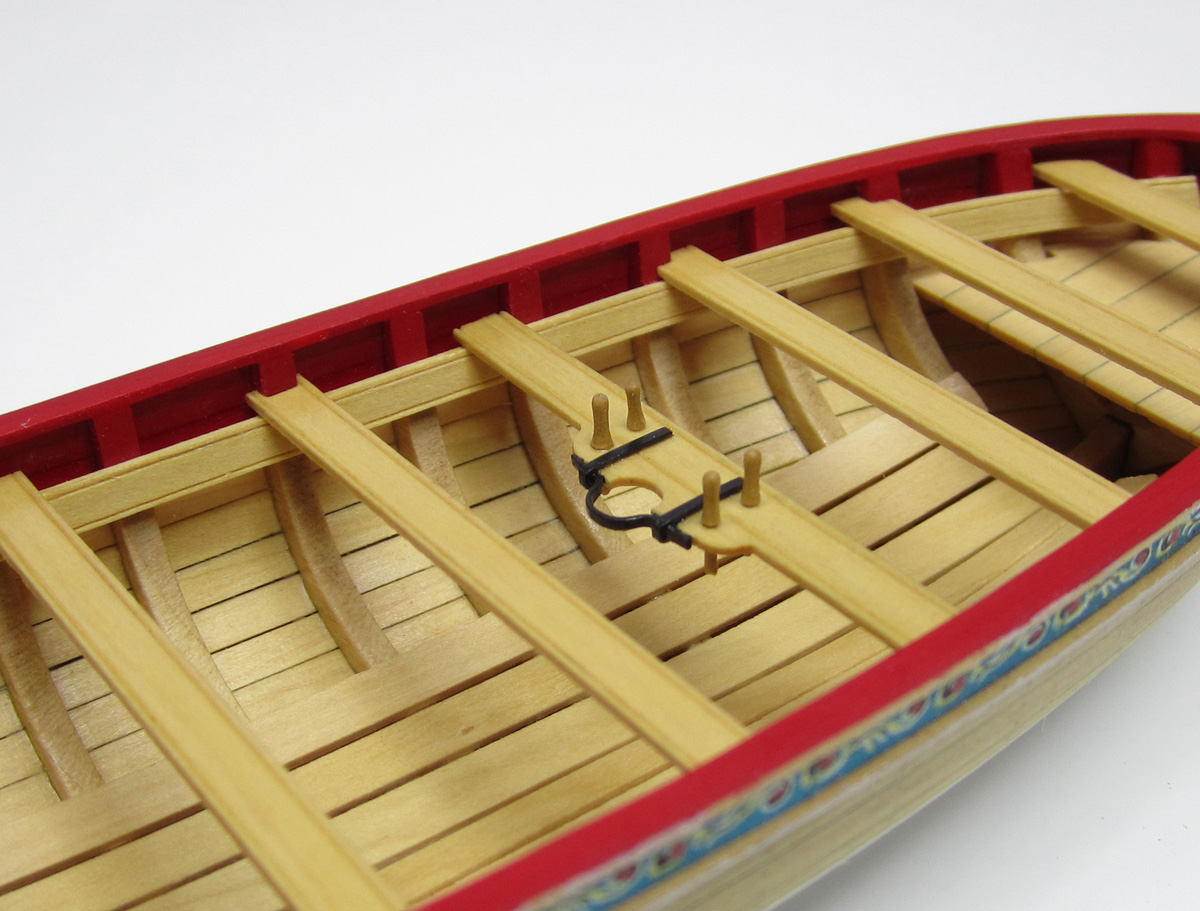
Remember this is an advanced kit... The shape and size of this thwart is clearly shown on the plans. It can be made in several ways...whether you use a one piece strip and shape it or build it up with two doesnt matter. I am not sure how this detail could paralyze your progress. Not a great deal of aptitude and reasoning is needed.....I did in fact make it from two pieces...I used a 5/32" wide strip for the main thwart and then glued another 3/32" strip to it along the center for the area thats even wider. Then it was shaped to match the plans by sanding and filing the circular shape to accept the mast. If you can see the final shape on the plans and were given the thickness of the part along with photos....it really shouldnt be that hard to figure out how to cut it out....whether in one piece or with two. But for folks who need a little hand-holding...consider the text in bold an addendum to the page of instructions...always follow the plans. Model Shipways didnt have the fractional size strip available and so it was decided to go with the 1/8" wide strips at some point. I mentioned this a few times in other logs. BUT yes the plans are correct in every respect...always follow the plans... When I designed the kit I actually used 5/32" wide strips for thwarts. It matched the plans. But just as MS swapped out the hull planking for a different size recently they did the same with the the thwart material because they dont have 5/32" wide strips anymore. This was done a while ago but they actually had the thought to change my dimensions in the instructions wherever I mentioned 5/32" wide strips. Something they forgot to do with the recent change for the hull planking material. My guess is that as time goes by more changes will be made on the MFG side without addressing the model ramifications.....yes it can get confusing..but always follow the plans. It is something that they cant change too easily. If this step is what tripped you up then then I am certain there will be more that do. Its not real difficult. ....yes maybe the dimensions were reversed...but will someone tell me how someone could get paralysis analysis..because they couldnt figure out that 1/32" x 1/8" is the same as 1/8" x 1/32". If thats all you found to be stuck on so far I think things are going pretty good. I think too many people want every last detail and step written about which is a far cry from other instructions. I am not trying to be a smart *** but really am having trouble with the level of detail needed for some folks. For any model with so many complexities and parts, the designer and writer needs to assume that advanced model builders would know how to do some aspects without writing 300 pages of instructions. This is why this kit was labeled as an advanced kit. Also...the reason for this group build area is so that if anyone gets stuck, they can just pose the question in their log...or send me a PM and I would explain as it is sometimes difficult for me to check and read every post on this site. I could miss the question.. I am sure you would have received many way to achieve the same results. Please remember that for the future. When in doubt...send me a PM. If anyone finds additional weirdness, please let me know so I can set the record straight.........SEND ME A PM PLEASE. Chuck

- 162 replies
-
- 2
-
-
- 18th century longboat
- model shipways
- (and 1 more)
-
For whatever reason, Model Expo decided to change it. It was not something I designed for. That would be the appropriate final thickness however. But because the kit has really soft basswood it isnt a good idea to use it. I recommend going with 1/32" thick basswood wood having a bit of meat to then sand down to the proper .025 thickness. OR if you decide to upgrade to a harder wood like boxwood then it would be ok to start with a thinner wood. But as designed for basswood I recommend the 1/32" thick stuff. Cleaner edges and more room to sand out rough planking jobs if needed. Chuck
- 162 replies
-
- 1
-
-
- 18th century longboat
- model shipways
- (and 1 more)
-
Cutter Cheerful 1806 by rafine - FINISHED
Chuck replied to rafine's topic in - Build logs for subjects built 1801 - 1850
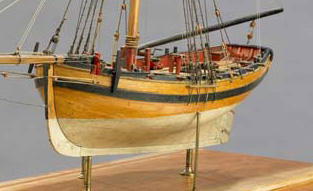
Nils, Cheerful was NOT clinker planked. I know that its a simple thing to just think that all cutters were planked that way (like Alert). But its simply not true. This class of cutters was carvel planked. Just as the contemporary model of Surly shows. I suppose that folks could clinker plank the cutter but it would be historically incorrect. Chuck- 525 replies
-
- 7
-
-
- cheerful
- Syren Ship Model Company
- (and 1 more)
-
Really nice work on this tough little model. Its a tricky build and you are doing great.
- 100 replies
-
- 1
-
-
- model shipways
- 18th century longboat
- (and 1 more)
-
Micro-Mark MicroLux LaserKnife 2525 – A Review
Chuck replied to mtaylor's topic in Modeling tools and Workshop Equipment
Just a quick note from admin... What Mr Frisoli did was grounds for being banned from this site. You cant pretend to be someone else and play games like that on this forum. So a quick warning to Tom....dont get cute. He knew what he was doing. I personally think the laser cutter is well overpriced for what it is. You can alter it and work for days adding new parts like Mark did on any Chinese machine bought on Ebay for $750. When you spend $2000 for one that performs the same way and needs just as much attention there is definitely an issue. But I will give you the benefit of the doubt so you can try and help these good folks who read on your site that they just needed to "plug it in and start cutting". That is clearly not the case....and it still says this on your site. I find that very misleading since you just admitted as much and so did old Mama bear "But, as with using any delicate instrument, and as Mr. Taylor pointed out, a bit of technical savvy goes a long way toward achieving early success. Now . . . I'll kid you not. To develop use of the machine to its full potential, you're going to have to spend some time with it, and learn the various techniques and tips and tricks" Tom, if you are serious about being fair and straight with your customers, I would expect you state the same on your website and in your catalog. But I am not holding my breath. So please be respectful to our members unlike Mr Frisoli. I own a much better machine which actually did work straight out of the box with no replacement parts and in one hour I was cutting parts.....and I will recommend to all folks that they should consider another machine. It might cost you more but they are proven machines....also wait for more reviews of this MicroMark Laser knife machine and tales of success or hardship before you dive in. The research is key here. Chuck MSW Papa bear- 82 replies
-
- 10
-
-
Micro-Mark MicroLux LaserKnife 2525 – A Review
Chuck replied to mtaylor's topic in Modeling tools and Workshop Equipment
George you are kind of correct... The Frisoli's actually own MicroMark. John is the president and owner. So he isnt exactly being fair and truthful....Yes he does own a MicroMark Laser Cutter .....or you might say he owns them all , until they sell one of those inferior machines to someone else. He just left that part out of the post..... Link below. https://www.linkedin.com/pub/john-frisoli/35/a7/8a1 Chuck- 82 replies
-
- 14
-
-
That is looking very good. Well done. I am glad you are having fun with it. Chuck
- 33 replies
-
- 3
-
-
- model shipways
- 18th century longboat
- (and 1 more)
-
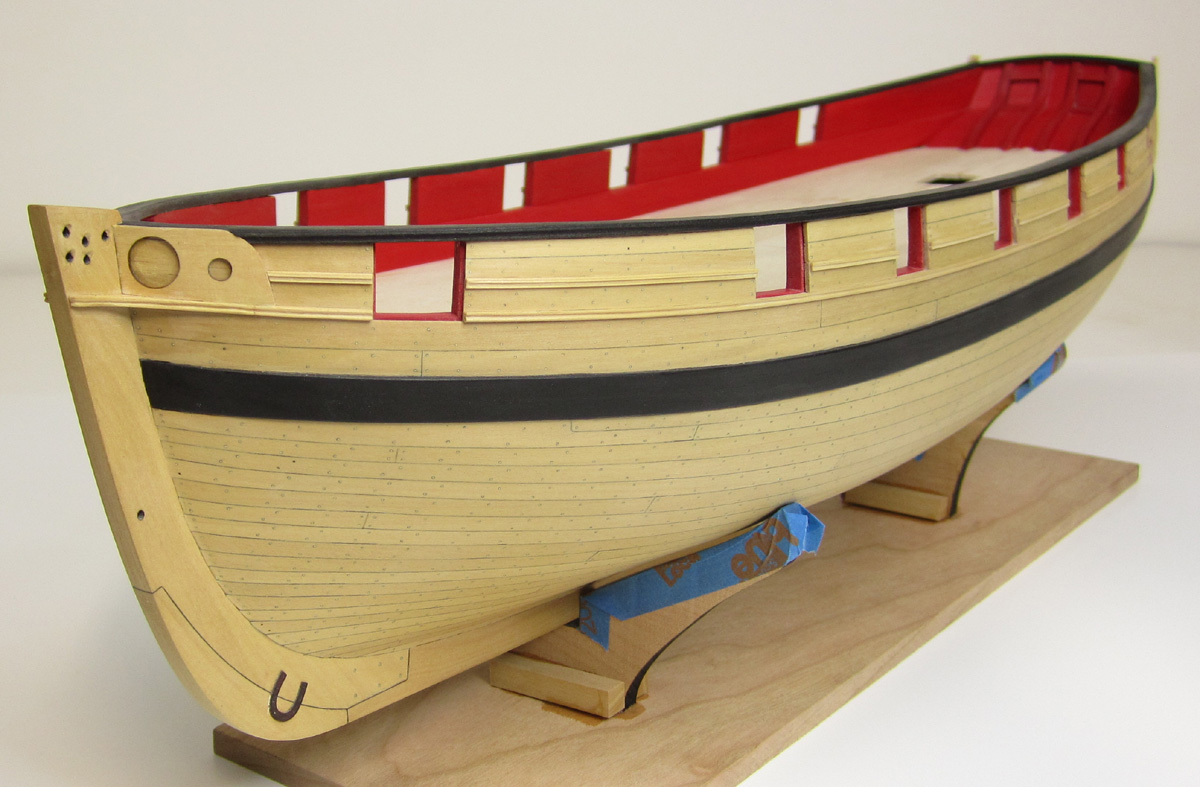
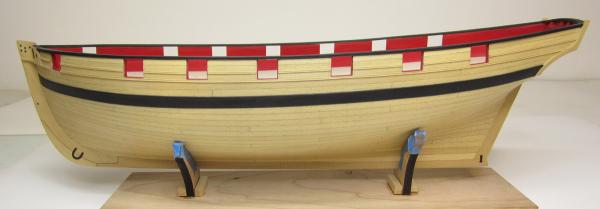
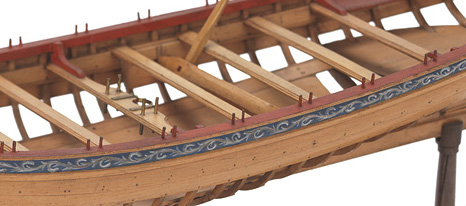
Finished planking the bulwarks on the port side after installing the false deck. The false deck was 1/16" thick. Then I added some filler strips at the bow and stern where I thought I needed it. At the bow to beef up where the hawse holes will be. You can see these strips below which I used 1/16" thick scrap strips for these filler pieces. The first plank (3/16" wide and 3/64" thick) was placed right below the gun ports. The planking below the ports inboard is thick and stands proud of the planking between the ports. This will be accomplished in two layers much like the wales. Placing the plank directly below the ports first allows me to get the run of the planking correct as it must follow the bottom of the ports. Then the remaining planks were added below that and above. Once completed the second layer of thicker planking was added. This is the spirketing. It runs from the deck to the port sills and is thicker....but not by very much. The original planking draft has the spirketing just 1/2" thicker. I used 1/32" thick planks for the second layer and actually thinned them down a bit more. Then I softened the edge where it stands proud along the sills. I try to soften all of the hard edges like this. The thickness of the hull where the caprail will be is 5/32" thick after planking. The cap rail will be 3/16' wide hanging over a bit outboard. Once I get the planking done on the other side I will install the cap rail.

- 1,051 replies
-
- 33
-
-
- cheerful
- Syren Ship Model Company
- (and 1 more)
-
Cutter Cheerful 1806 by rafine - FINISHED
Chuck replied to rafine's topic in - Build logs for subjects built 1801 - 1850
Great start...as always dont hesitate to ask me any questions. Knowing how fast you work you should be catching up to me in no time at all. Chuck- 525 replies
-
- 1
-
-
- cheerful
- Syren Ship Model Company
- (and 1 more)
-
2015 NRG Conference Update - MYSTIC
Chuck replied to Chuck's topic in NAUTICAL RESEARCH GUILD - News & Information
Speakers and Tech Sessions........more to come so check this topic often Friday Morning Steve Wheeler – Modeling Clinker-built Boats Michel Mantin – Modeling 20th Century “Grey (Steel) Navy” Vessels Fuso & Dunkerque Douglas Brooks – Japanese Boat Building & Models Friday Afternoon Roundtables David Antscherl – Rigging Tips & Tricks Kurt Van Dahm – Airbrushing Basics for the Modeler Chuck Passaro – Serving Rope Steve Wheeler – A Jig for Making Oars Nic Damuck – Making Scale Silkspan Sails Saturday Paul O’Pecko – Library Director, Mystic Seaport – Conducting Primary Research Melbourne Smith – Modeling 1:1: Building Seagoing Replicas Grant Program – Short Updates – Future Releases Grant Walker – The Rogers Collection: In Print at Last! -
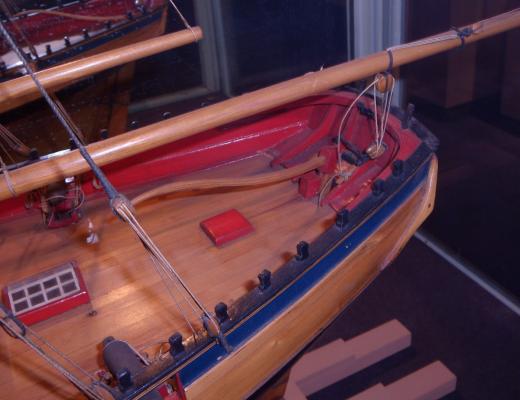
They are thinned down....thats their finished thickness. Check the plans. See this example of a cutter stern from inboard...see how the frames are exposed? The top is the Cheerful from rogers collection and the bottom is Surly from the museum in Ontario. Chuck

- 1,051 replies
-
- 22
-
-
- cheerful
- Syren Ship Model Company
- (and 1 more)
-
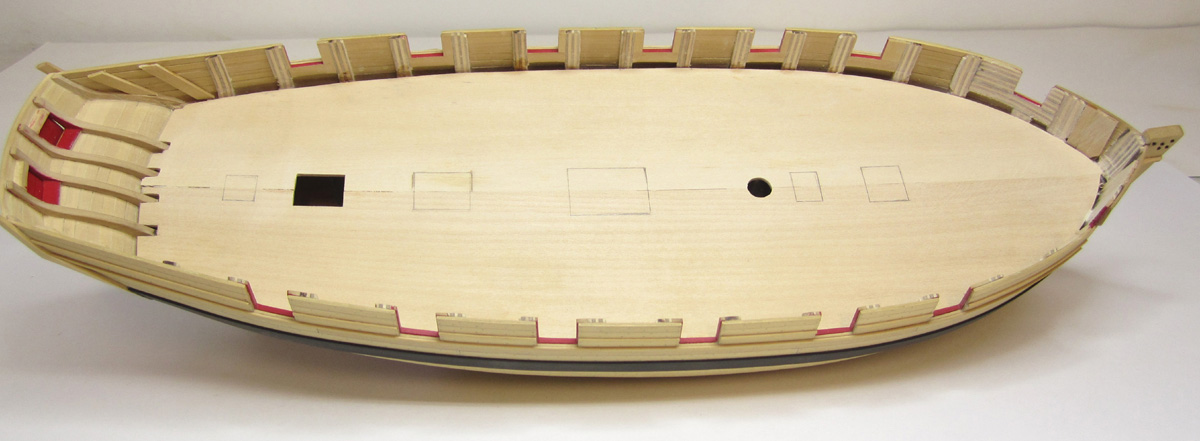
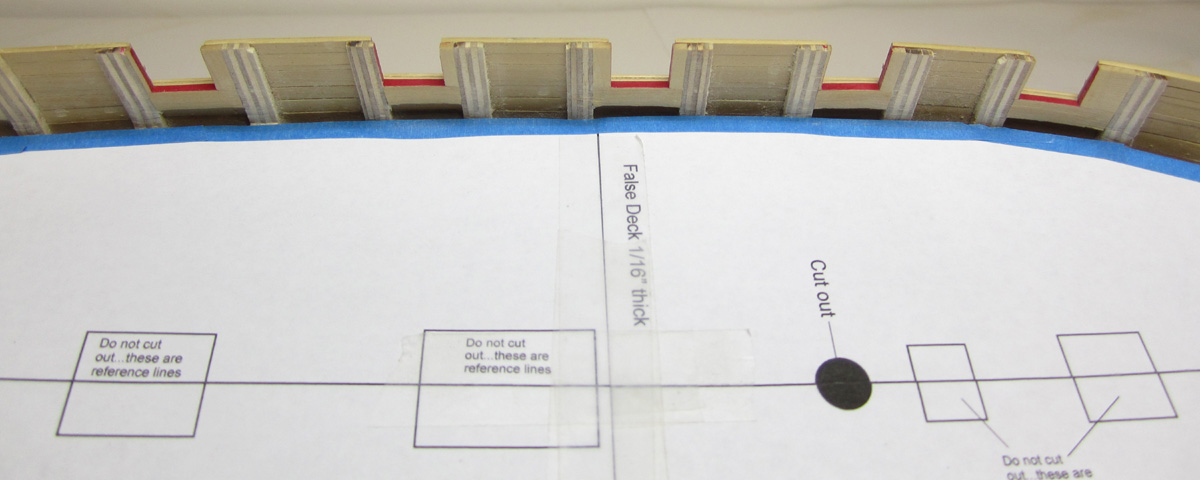
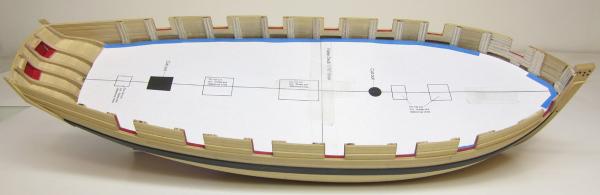
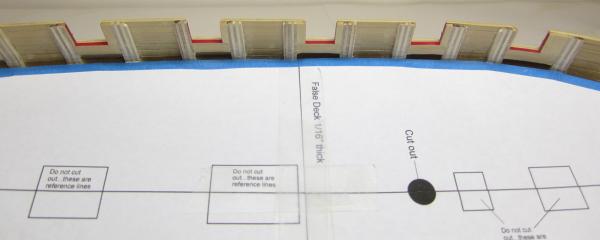
Some progress was made today. I wanted to get this crappy part of the project over with. The bulwarks inboard were faired and thinned down. I use the sanding drum on my dremel. What a mess. Then I touched it up with some sandpaper after chiseling some areas away where the bulkhead extensions met the deck. The bulkhead extensions were thinned down to about 1/16" thick. I may take them down thinner still. Maybe 3/64" thick. You can see them in the close up image below. Then I took the template for the false deck from the plans. I cut it down the middle so I had two halves port and starboard. You could also make four pieces but I made two and it was fine. The important thing is to use the center line on the template to line it up with the center of the bulkhead former. I wanted to try something new with this project. I intentionally made the template drawing about 1/8" smaller than need on the sides of the hull. Trying to get a perfect match for folks is tough. It all depends on how much someone thins down the bulwarks etc....how they fair the hull inboard and its tough to get a perfect match for everyone's model. So basically I took each half one at a time...lined it up with the center line and the mast hole. I taped it along the bulkhead former. Then I used thin strips of blue painters tape to find the perfect size and shape for my false deck template. I just rand lengths of tape along the bulwarks as shown in the photos. When I peel it up I will have a template that is the perfect match for making my false deck. It will be cut from 1/16" basswood. I will get that done tomorrow and post some new pics. Once the false deck is in position I can plank the inboard bulwarks. Chuck
- 1,051 replies
-
- 27
-
-
- cheerful
- Syren Ship Model Company
- (and 1 more)
-
I would agree with you on most of those points... But yes they were brought down to a small cone shape but as you can see by these photos it wouldnt stay in place unless there was a peg or iron pin as an axis. The sides were made into a cone I suspect because the sides of the hull inboard curve drastically below the windlass and unless they thinned it down it wouldnt turn unless it was much shorter. But I suppose they could have worked without a pin.....but wouldnt it be too lo ose? They dont look very secure this way for and aft. I wonder how much of it is a model convention rather than an actual representation. I do know that I simplified this for my kit design.... one could follow these images if they wanted to.
- 162 replies
-
- 5
-
-
- 18th century longboat
- model shipways
- (and 1 more)
-
It doent look that bad at all. I would take a bit more off so the bend isnt as sharp where the plank tuck up into the lower counter.. See these pics if it helps. Couldnt find any of the stern unpainted. Chuck
- 1,306 replies
-
- 13
-
-
- syren
- model shipways
- (and 1 more)