Chuck
-
Posts
9,703 -
Joined
-
Last visited
Content Type
Profiles
Forums
Gallery
Events
Everything posted by Chuck
-
 I believe those tolerances and quality are better than any other supplier for pear and box.....so it is lucky for us that he is around. If you were to try that exercise with any other supplier of boxwood. Let me know what the measurements are. That is fantastic. I agree with Druxey however in that it is over analysis. I havent heard of anyone doing that with any other wood supplier. So in fairness and a way to show just how incredible Crown is. I would love to see what the results would be for other vendors. You would be an even bigger fan of his milling if you did.
 -
Go with 3/64" thick if you are milling them yourself. That is plenty thick.
-
You did a great job on the kit. Congratulations!!!
-
Call or email the office......The info is on the website. Telephone: 585-968-8111 info@thenauticalresearchguild.org Ask for Mary
-
You know I am not sure. I would imagine they might have multiple plank lengths but this particular size is such that probably they had only one. Its a small boat. At most I think they would have two lengths. But yes...I made a decision to just use one piece for simplicity sake and didnt really even entertain the though of using scale lengths.
-
Sternpost...two of them because I gave one extra. Chuck
-
Cutter Cheerful 1806 by Maury S - 1:48 - POB
Chuck replied to Maury S's topic in - Build logs for subjects built 1801 - 1850
I didnt bend it. I just cut it into small sections. -
Cutter Cheerful 1806 by Maury S - 1:48 - POB
Chuck replied to Maury S's topic in - Build logs for subjects built 1801 - 1850
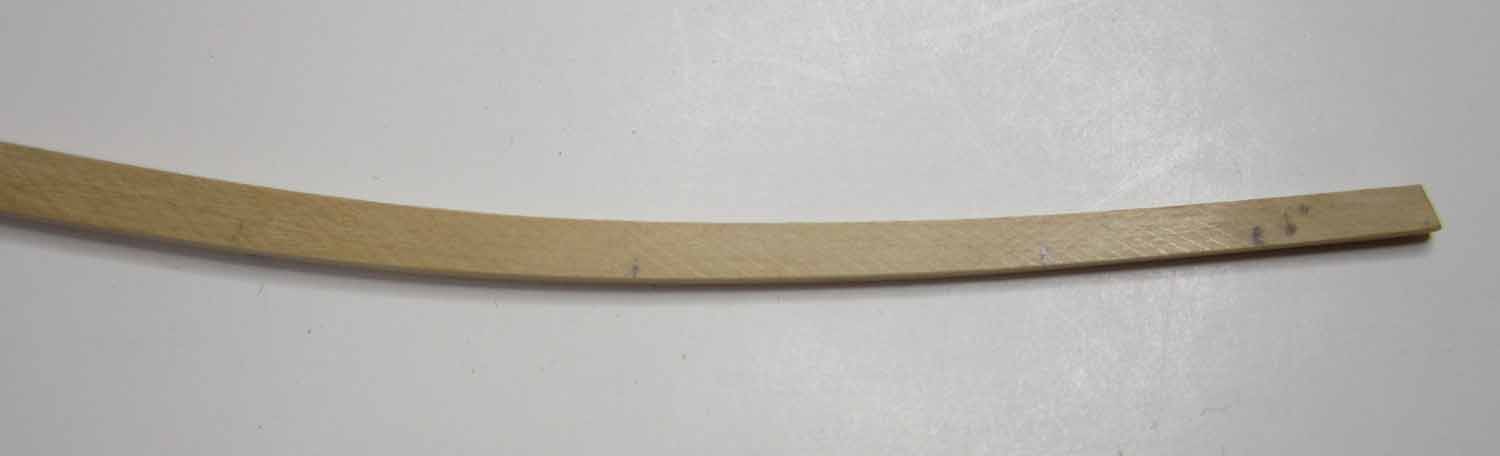
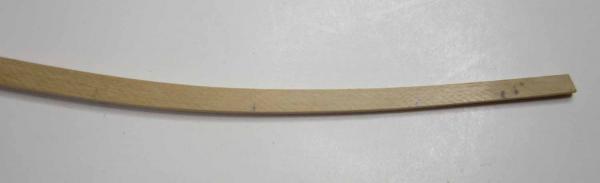
You need to bend it much more than that. Keep the heat on it for at least 4 or 5 minutes. Get it really hot. Get close to the wood. You will get accustomed to the amount of spring-back. Just try it on a piece....really bend it. Also I would have flipped it over and bent it the other way. Its easier to create the bend in my opinion. Note how much bend this strip has while clamped......then note how much the strip sprung back in the photo below it. After a little while you get accustomed to how much you need to bend it initially. You didnt do it nearly enough. Try it again on a scrap length. Dont be afraid to bend it almost to its breaking point. It could also be that your hair dryer doesnt get hot enough. Chuck
-
For those that are building the model or even just following along....I just added another chapter of the monograph to my site. Its covers the planking and lining off process and I describe it in more detail than in my log. I have had a lot of questions about how to line off the hull and to plank by bending edgewise etc. Unlike the tutorial i posted on this site that talks about cutting the curved planks from wider stock, or using tape to find the curve.... this chapter shows how I pre-bent the planks edgewise to achieve the same thing. Neither technique is better than the other. They are just different. I hope it helps along with those videos posted as nobody could actually see how I was marking each plank etc in the videos. Let me know if you have any questions. I have posted all of the chapters through chapter four.....I am almost caughtup with writing. Yippee http://www.syrenshipmodelcompany.com/revenue-cutter-cheerful-1806.php Chuck
- 1,051 replies
-
- 12
-

-
- cheerful
- Syren Ship Model Company
- (and 1 more)
-
Cutter Cheerful 1806 by Maury S - 1:48 - POB
Chuck replied to Maury S's topic in - Build logs for subjects built 1801 - 1850
Thats looking very good. You will be catching up with me in no time. I better start writing the next chapter!!! -
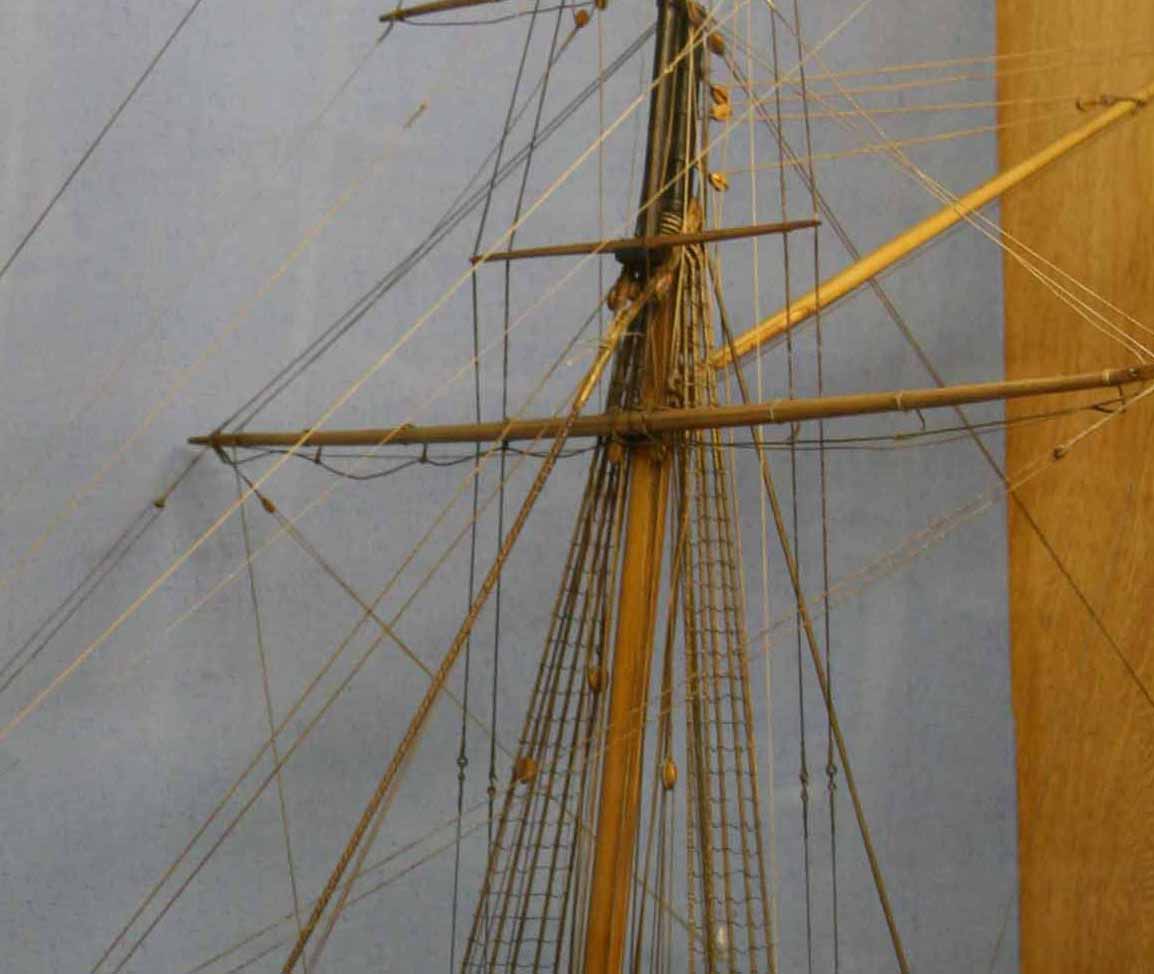
As an absolute...one can not say that the foremost shrouds were definitively served. There are too many contradictions out there. But I am going to do it anyway. I try not to sweat the small stuff. I have seen contemporary sources with served shrouds and those without them. This isnt the only time when you read about contradictions in the rigging plan for a cutter of this period. Another is the use of a mouse on the main stay. I have only seen one instance where there was a mouse. ALL of the others including those cutter models with contemporary period rigging show a simple splice. So I will NOT be using a mouse. Its one of those things where it wont have a huge impact on the model visually and the the decision is supported by more evidence than just "going with accepted model assumptions". I see a lot of people using a mouse on there cutter models although there is scant primary info that they were used and mostly examples where they werent. But folks feel compelled to go ahead and add it because its something that modelers "always seem to do" . See below, No mouse in the house. Chuck


- 1,051 replies
-
- 9
-
-
- cheerful
- Syren Ship Model Company
- (and 1 more)
-
Yes they will be served on the model. They are not served on the 3d model. That 3d model is not yet complete either. It has many discrepencies and issues but I wanted to post it because it looks interesting. Its just a cool looking graphic. But the model will absolutely have served lines. Chuck
- 1,051 replies
-
- 2
-
-
- cheerful
- Syren Ship Model Company
- (and 1 more)
-
No no....I didnt do this one. But its very interesting. This is all Greek to me. I am fascinated by teh textures that are possible though. Chuck
- 1,051 replies
-
- 4
-
-
- cheerful
- Syren Ship Model Company
- (and 1 more)
-
And dont forget...if they say no. I am also here for your custom laser cutting needs. I have boxwood and pear on the shelf but other materials are fine too. Just contact me with your cutting needs. Chuck
-
Ian Great to see you starting. Contact me if you have any questions at all. I would love to follow your progress. I changed the title because yes I thought you had actually posted in my log.....LOL Have fun with it!!! Chuck
- 39 replies
-
- 1
-
-
- cheerful
- Syren Ship Model Company
- (and 1 more)
-
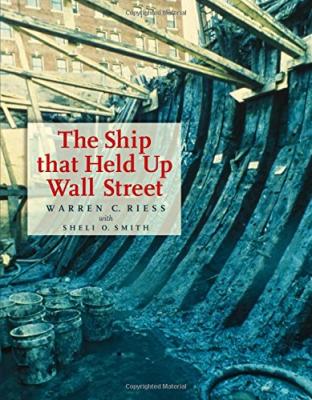
The Ship that Held Up Wall Street By Warren C. Riess with Sheli O. Smith College Station: Texas A&M University Press, 2014 8-3/4” x 11-1/4”, hardcover, 112 pages Illustrations, diagrams, sketch maps, notes, glossary, index. $29.00 ISBN: 9781623491888 In January 1982 a backhoe digging a trench at a New York City construction site uncovered the remains of a buried ship—an old one. The trench, one of four, was part of an archeological survey prior to clearing the site for the foundations of a thirty-story office building in Manhattan’s financial district. It was soon apparent the ship likely dated from the early eighteenth century. It offered insights on a little-understood period of naval architecture. Construction could be delayed for only a short time. Any study or recovery of the ship in situ had to be completed by March 1. The Ship that Held Up Wall Street, by Warren C. Riess with Sheli O. Smith, tells what happened next. It reveals the story of a month-long sprint to unearth the ship and the decades-long marathon to unlock the secrets of the find. The book opens describing the 28-day site dig. Riess relates an urban adventure worthy of an Indiana Jones movie. The excavation took place in February in pre-Giuliani New York City. The archeologists not only had to fight time and February weather, they had to contend with picket lines and gang violence. (Local community activists protested the lack of minority workers at the dig site until they learned the diggers were low-paid archeologists, not high-paid construction workers. A street gang attempted to fire-bomb the ship for reasons still unknown.) This is followed by a section describing preservation of artifacts and explains what was chosen for preservation and why. It provides a clear, understandable introduction to the science behind stabilizing fragile timber and artifacts. Riess next unravels the identity of the ship uncovered by construction. The chapter reads like a first-rate mystery novel, as Reiss pieces clues together. Evidence as diverse as the design of the ship, the timber used in construction, and even the species of shipworm which attacked the hull provided critical data. Combined with archival research, it allowed a tentative identification of the ship. For those most interested in sailing era naval architecture, this is likely the most fascinating chapter. The ship is revealed as a transitional design, a cross between the Dutch fluyte (or flyboat) and British merchant frigate. It was significant find. After developing the probable career of the ship, Riess explains how and why this ship ended up buried one-tenth of a mile from Manhattan’s present coast. To do this he examines the history of early eighteenth-century New York City. He takes readers into the commercial life of the city, and introduces them to the individuals who developed the lot in the 1740s and 1750s. The Ship that Held Up Wall Street is a delightful book on several levels. In addition to adventure, mystery, and history, Riess introduces touches of comedy and tragedy describing missteps, near-catastrophe, and dropped opportunities occurring in every effort with tight deadlines and many participants. The only real disappointment—for model-makers—is a lack of technical detail about the ship’s design and construction. Riess promises that in a second book about the ship, one he is currently preparing. The Ship that Held Up Wall Street will hold model-makers until then. Mark Lardas League City, Texas
- 4 replies
-
- 12
-
-
Voyage of The Slave Ship: J.M.W. Turner’s Masterpiece in Historical Context By Stephen J. May Jefferson, North Carolina: McFarland & Co., 2014 6” x 9”, softcover, vii + 206 pages Illustrations, notes, bibliography, index. $45.00 ISBN: 9780786479894 In the preface and introduction of The Voyage of The Slave Ship: J.M.W. Turner’s Masterpiece in Historical Context, Stephen J. May declares his intent to evaluate the background, history, previous reviews and his own opinion of Turner’s painting The Slave Ship. In the following chapters, he does just that, exceeding expectations with a copious amount of detail. He immediately catches the reader in the preface and deftly guides them through the first few chapters with a colorful historical background, setting the scene for the introduction of the painting, Turner, and the major players involved in the fate of the painting. May goes on to chronical the life of Turner and the painting. In the evaluation of the creation of the painting, he makes strong, declared postulations based on historical connections between those involved in the abolition movement and Turner. This gives a district life to the painting that would otherwise be missing. However, at times, May makes certain declarative statements without clear evidence or a disclaimer, such as his belief that The Slave Ship portrayed the savage acts aboard the slaver Zong, due to the extensive news coverage of the trail and, therefore, Turner’s enviable knowledge of the tale. Yet, May did not provide any hard evidence that Turner was absolutely aware of the incident or that he was directly influenced by it. While this is a fair conclusion given the facts, it is not certain. The discussion of the composition of the painting is sprinkled throughout the book, there is no one chapter dedicated to the content, brushwork or technique. Nor is there any discussion of the painting from a technical standpoint. This does not detract from the book, as May’s intent is not a simple discussion of the artistic qualities of the painting. Rather than throwing around confusing artistic terms, May choses to focus on the painting as a whole, such as how a laymen would see it, making the painting a more accessible experience for the reader. May does an exceedingly thorough job of explaining and examining everyone who had any influence on the fate of the paining; some might argue too thorough of an examination in some cases. Occasionally, he provides such an intense level of information about an individual other than Turner it begins to pass from supporting dialog into unneeded information, leaving the reader slightly confused about how the additional biographical facts connect to Turner or the painting. Some trimming of this excess may help streamline the points and connections May is trying to make. However, in many of the examples, the author’s digressions, as lengthy as they are, circle back around to make a point about the painting or Turner, such as in the case of his discussion of the sublime; which at first seems like an over explained idea, but then consistently reemerges throughout the examination of the life and players of the painting. Although at times May can delve a little too in-depth for the average reader, overall, he provides an accessible evaluation of the history and life of J.M.W. Turner’s The Slave Ship and those men directly connected to it, that even the most historically or artistically challenged reader can relate to, enjoy, and understand. Michele Panico East Carolina University

- 1 reply
-
- 2
-
-
Cutter Cheerful 1806 by Maury S - 1:48 - POB
Chuck replied to Maury S's topic in - Build logs for subjects built 1801 - 1850
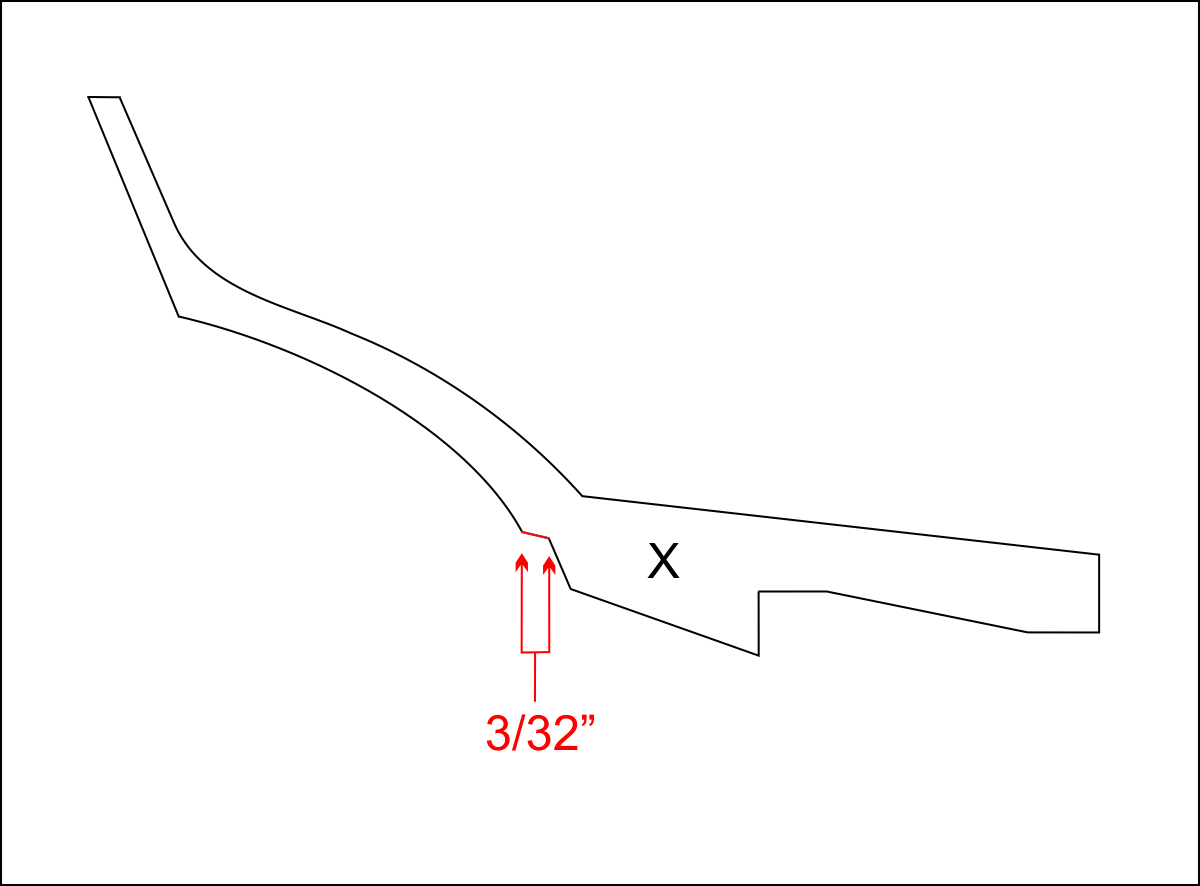
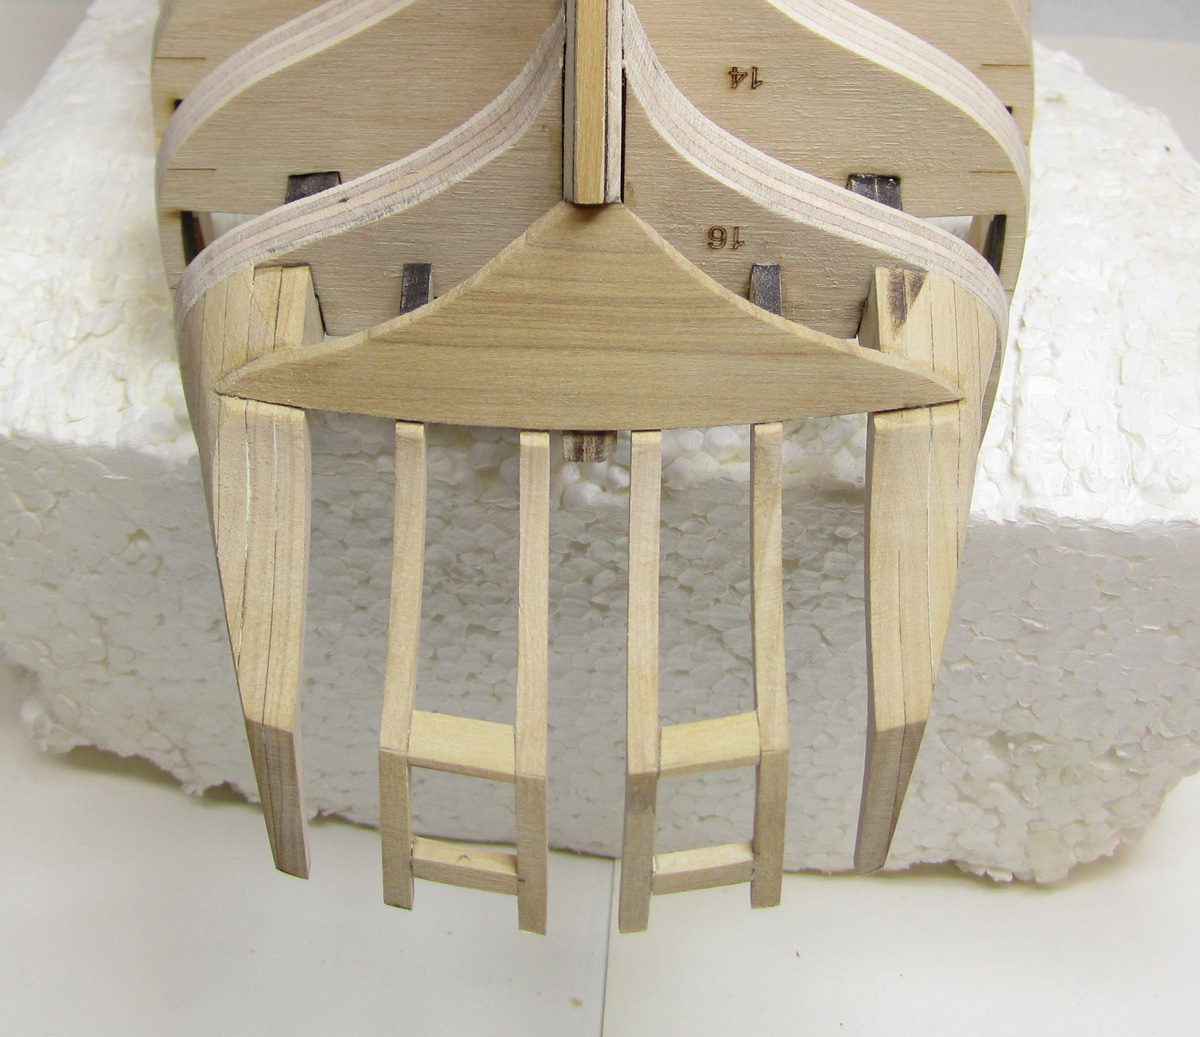
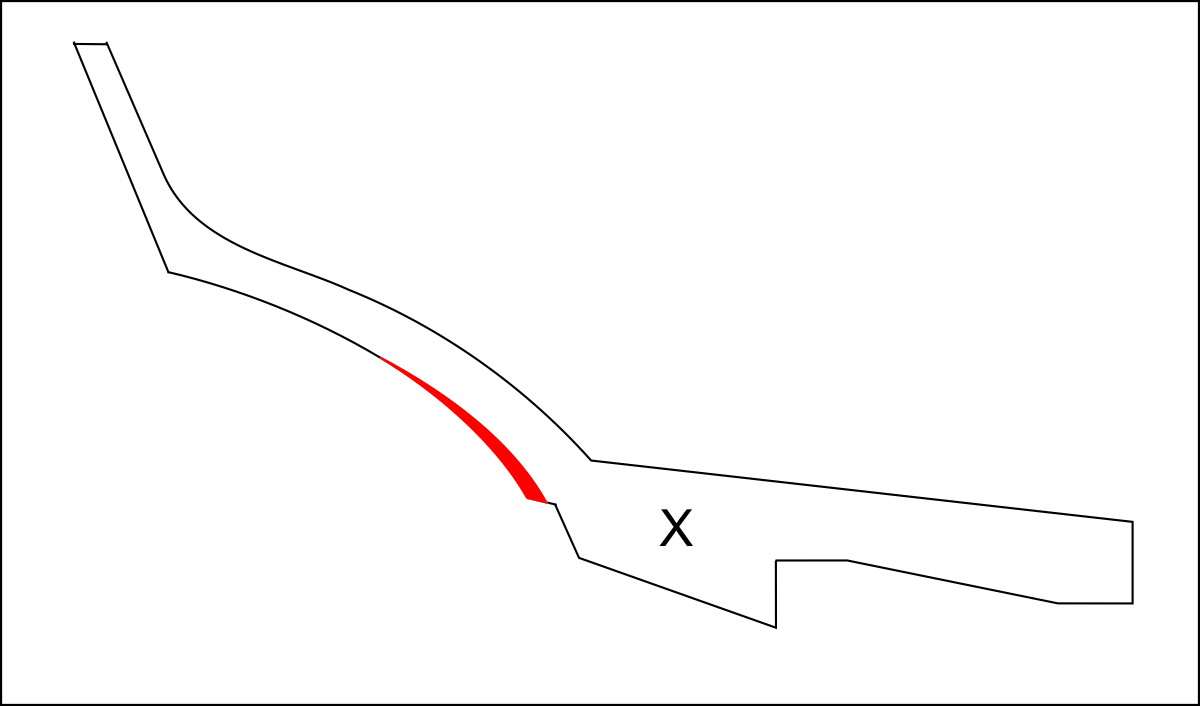
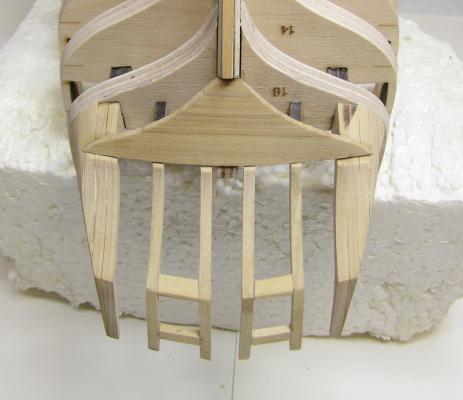
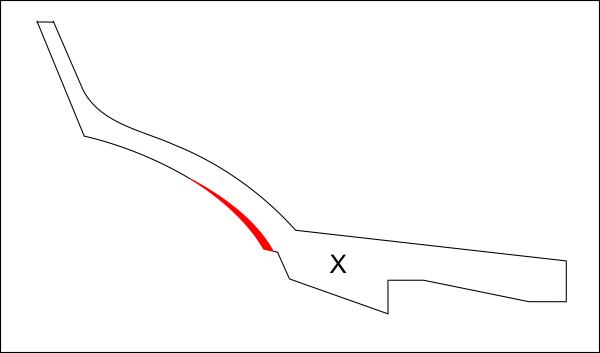
Maury....look at how much of a lip/ledge remains at each stern frame after installing the 1/32' thick square tuck piece. You can see how much more of a lip on each stern frame there is in comparison to yours below. It looks as though the notches in your stern frames weren't deep enough. That notch should have been 3/32' long. See the line in red below. After putting a 1/32" thick sheet for the square tuck you should have a ledge remaining of about 1/16". A little less is ok. Its hard to tell in your photos but if this is not the case you need to remove that square tuck 1/32" sheet and make your notches deeper. OR build up your frames if they were just sanded down too much on the bottom of the counter. Other than that it looks great. I would recommend just building it up as it looks like over sanding. See below in red.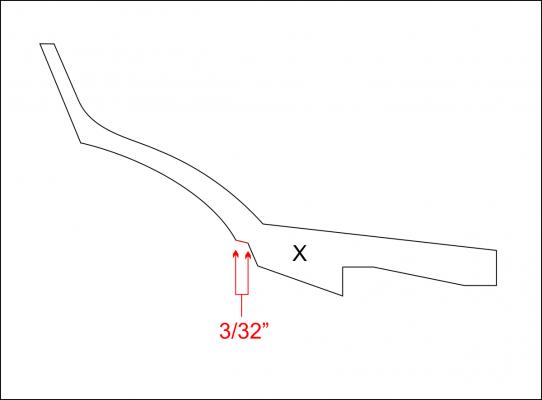
-
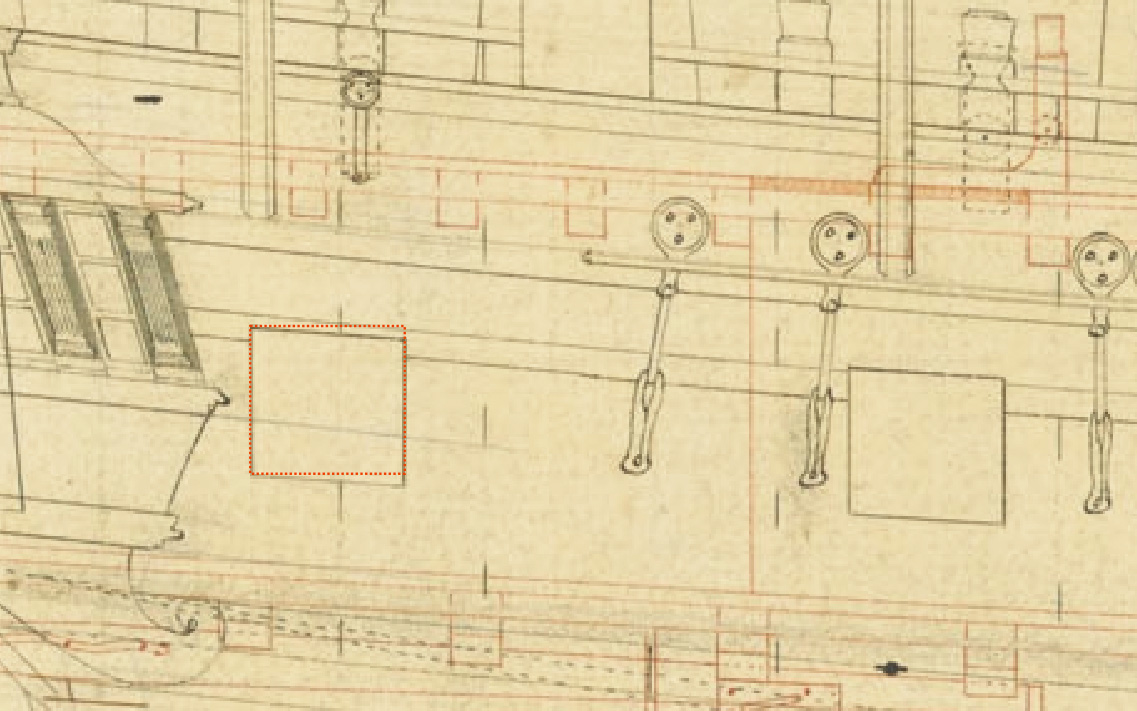
Correct!!! Bottom of ports follow the run of the deck. Sides are vertical and straight with teh frames. Port lids will be the same. Typical mistake seen on kits. Not all ports are completely square at all. Take a look at this original draft. The red dashed square is at right angles. Note how the port is not. It follows the deck.

- 1,051 replies
-
- 21
-
-
- cheerful
- Syren Ship Model Company
- (and 1 more)
-
Yes....Just name and post your log. Then hit reply to post a new update. Anyone working on the model can post these updates in the same log. But it will be seen as a reply. But because its in the same one log it should be fine. The way its working now is the way it is supposed to work. Unfortunately you will have multiple people or members contributing. Unless of course you give everyone the username and password of one individual member and all of you use it when posting updates.
-
Therte was a ring bolt inside and a line was tied to it. This line was secured around a cleat inboard.
- 1,051 replies
-
- 3
-
-
- cheerful
- Syren Ship Model Company
- (and 1 more)
-
Please everyone send me a PM rather than use my log for sales stuff please. Or the traders and dealers section. I can certainly make them but this is probably the correct size as this is a small cutter. Scale is relative to the ship so you will need to give me measurements to be sure. Hiegth and width. Chuck
- 1,051 replies
-
- 2
-
-
- cheerful
- Syren Ship Model Company
- (and 1 more)
-
I would love to offer these hinges to folks but my issue is I wouldnt know how wide to make the straps and how long to make the straps for each individual model. I would have no problem cutting these for anyone as a custom order but first we must talk via PM so I am sure that I have created them the correct size and shape. For example, depending on the type of vessel and the period they could be drawn with many differnt contours. Some narrow towards the bottom and then have a fancy diamond shape. Some have a circular bottom. Others are plain and straight like on cheerful. I will make a post in the traders and dealers section with the criteria I would need to laser cut them correctly for folks rather than just making a bunch of generic hinges and guessing at the lengths and shape and widths. See this link.... http://modelshipworld.com/index.php/topic/10138-custom-laser-cut-gunport-hinges-from-syren-ship-model-company/ Chuck
- 1,051 replies
-
- 3
-
-
- cheerful
- Syren Ship Model Company
- (and 1 more)
-
Cutter Cheerful 1806 by Maury S - 1:48 - POB
Chuck replied to Maury S's topic in - Build logs for subjects built 1801 - 1850
Inboard wont be planked so I wouldnt permanently add any blocks between the stern frames. You only want to see the frames when its all done. You can see that the stern is lightly planked and framed on this contemporary model of Surly. Also note that it is not plated but instead painted white with tallow. Hence the confusion about whether these small cutters were ever copper plated. Chuck